<?xml version="1.0" encoding="UTF-8"?>
<feed xml:lang="en" xmlns="http://www.w3.org/2005/Atom" xmlns:opensearch="http://a9.com/-/spec/opensearch/1.1/" xmlns:s="http://jadedpixel.com/-/spec/shopify">
  <id>https://www.waterdamagedefense.com/blogs/home-maintenance-blog.atom</id>
  <link rel="alternate" type="text/html" href="https://www.waterdamagedefense.com/blogs/home-maintenance-blog"/>
  <link rel="self" type="application/atom+xml" href="https://www.waterdamagedefense.com/blogs/home-maintenance-blog.atom"/>
  <title>Water Damage Defense - Home Maintenance Blog</title>
  <updated>2014-02-19T13:19:00-05:00</updated>
  <author>
    <name>Water Damage Defense</name>
  </author>
  <entry>
    <id>https://www.waterdamagedefense.com/blogs/home-maintenance-blog/identify-money-pit-house</id>
    <published>2014-02-19T13:19:00-05:00</published>
    <updated>2016-10-09T19:20:37-04:00</updated>
    <link rel="alternate" type="text/html" href="https://www.waterdamagedefense.com/blogs/home-maintenance-blog/identify-money-pit-house"/>
    <title>How to Identify a Money Pit of a House</title>
    <author>
      <name>Nick Domino</name>
    </author>
    <summary type="html">
      <![CDATA[<p style="text-align: left;"><a href="https://www.waterdamagedefense.com/blogs/home-maintenance-blog/identify-money-pit-house"><img alt="" src="//cdn.shopify.com/s/files/1/0387/9521/files/Money_Pit_big415.png?17728472423092730165" style="float: none;"></a></p>
<p>If you’re shopping for a new home (or thinking of putting your own on the market) you need to know what marks the difference between a fixer-upper and a complete disaster.</p><p><a class="read-more" href="https://www.waterdamagedefense.com/blogs/home-maintenance-blog/identify-money-pit-house">More</a></p>]]>
    </summary>
    <content type="html">
      <![CDATA[<div itemprop="image" itemscope="" itemtype="https://schema.org/ImageObject">
<img class="floatright" alt="inspecting home" src="//cdn.shopify.com/s/files/1/0387/9521/files/inspecting_home.png?2631745651851920830"><meta itemprop="width" content="325">
<meta itemprop="url" content="https://cdn.shopify.com/s/files/1/0387/9521/files/inspecting_home.png?2631745651851920830">
<meta itemprop="height" content="538">
</div>
<p>If you’re shopping for a new home (or thinking of putting your own on the market) you need to know what marks the difference between a fixer-upper and a complete disaster. There are countless changes you can make to a home to improve it aesthetically or practically, but there are also major potential dealbreakers that you need to be on the lookout for. These problems are signs that it’s not just a fixer-upper – it’s a money pit.</p>
<p>When you’re looking at homes, bring along your home-checking kit: a flashlight, a carpenter’s level, a marble (yes, like one from a Chinese checkers set), and binoculars. You’ll also want to wear comfortable clothes and shoes that you don’t mind getting dirty, because you may need to crawl around a bit under the house to find the most extreme problems. Ready to take a look? Let’s start from the outside.</p>
<p><strong> Is Anything Obviously Wrong Outside?</strong></p>
<p>
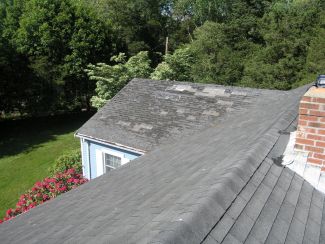
Surprisingly, many home-seekers miss this step entirely, even though it’s as easy as checking the house out from a distance. You want to check out the roof for any signs that it’s sagging or damaged (if you think the roofline might be sagging but can’t tell, compare it to the neighbor’s roof), and the exterior features, including doors, windows, foundation, walls, and porch for any crookedness.</p>
<p><img class="floatright" alt="foundation crack" src="//cdn.shopify.com/s/files/1/0387/9521/files/foundation_crack_crop.png?17894388542506642023" height="228" width="325">If you see a sagging roof, it means that it’s been damaged by bearing too much weight over time, either because there are too many layers of shingles, or because the owner hasn’t handled heavy snowfall properly. When a roof sags, snow isn’t able to melt as quickly, which can cause ice dams and more damage to the roof materials.</p>
<p>
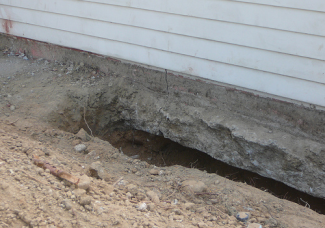
If you see any other obvious problems with crookedness outside the house, you’re probably looking at a problem with the foundation. Foundation problems are among the most severe and expensive issues a house can throw at you, and they’re more common in older houses. They’re also a problem that’s easily missed by inexperienced home buyers.</p>
<p><strong> Are the Floors and Doors Straight?</strong></p>
<p>Once inside the house, check for sloping floors. The slope may be immediately obvious to you as you follow the real estate agent through the house; you may notice that the floor feels elevated in one section but not another, or that you keep scuffing your feet against a slight rise you don’t expect.</p>
<p><img class="floatright" alt="Level doorway" src="//cdn.shopify.com/s/files/1/0387/9521/files/Level_doorway.png?5009975069041865092" height="433" width="325">
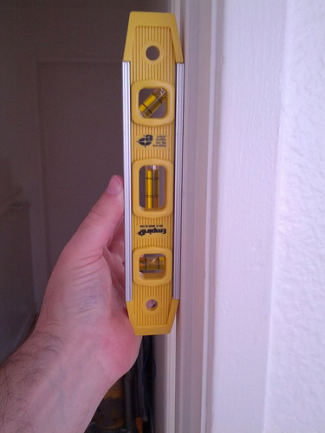
Notice how the floor feels beneath doorways and other arched areas; humps in those areas can mean a support has failed somewhere beneath. Your marble and your carpenter’s level are your friends here. Set the marble down on a hardwood floor to see if it rolls, indicating a slanted floor, and use the carpenter’s level on carpeted areas.</p>
<p>Check all the doors and windows to see if they stick, and look to see if the doors fit squarely. If there are big gaps between the top and bottom of the door, or you can see that the door has been altered to fit a crooked space, that’s an indicator that the foundation or the structural support of the house is damaged.</p>
<p><strong> Has Water Invaded?</strong></p>
<p>
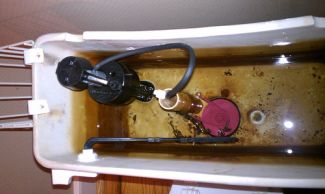
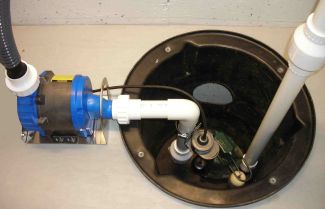
As you tour the house, be aware of any unusual smells that might indicate mold or dampness. Check under bathroom and kitchen fixtures for any sign of water stains, mold, or other water damage. You’ll also want to take a hard look (and a deep smell) around the basement and attic, two very common places for water damage to occur unnoticed. In the basement, take a look at the primary sump pump or <a href="https://www.waterdamagedefense.com/collections/battery-backup-sump-pumps">battery backup sump pump</a>, if there is one installed; check for a sticker or information card from the plumbing company who installed or serviced them. They might have valuable knowledge about the property’s basement water damage history.</p>
<p>
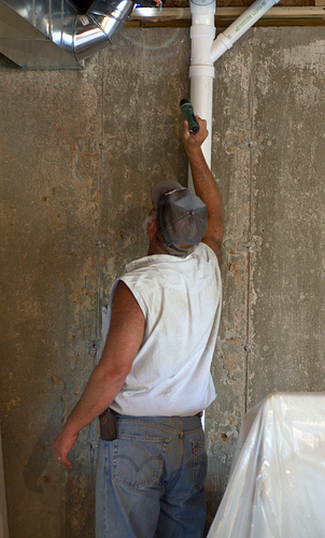
Many homeowners are completely unaware of water damage and rot in their homes, or they may not realize how serious these problems can get. For this reason, many simply cover up water damage with a fresh paint job or a fast remodel and forget about it – but the damage is still there underneath. Check for these types of repairs with your flashlight. By holding it parallel to the wall, you can often spot irregularities and repair jobs. Ask about them and get information about who made the repair so you can double-check that all is well.</p>
<p><strong> The Fixes</strong></p>
<p>If you find any of these problems, none of them is automatically a dealbreaker. They are, however, problems that you need to follow up on before making an offer on the house.</p>
<p>If you noticed a problem with the roof, you’ll want to find out if it’s a <a href="https://www.waterdamagedefense.com/blogs/home-maintenance-blog/foundation-cracks">foundation issue</a> or simply roof damage. Either way will cost a pretty penny to repair: a new roof can run $8,000 or more, and a fallen foundation starts at $20,000 - $30,000 if you need to jack up the house in order to repair it.</p>
<p>Issues with sloping floors and ill-fitting doors and windows indicate that there’s either a foundation problem or that one or more of the house’s supports is damaged. If it’s a foundation issue, the cost can run from a full foundation replacement, as above, or a few thousand dollars to repair a slipped foundation.</p>
<p>If a support has been damaged, you’ll want to get an estimate on repairs, because they can vary massively, depending on the type of support and the scope of the damage: anywhere from a few hundred to tens of thousands of dollars.</p>
<p>If nothing is wrong with the foundation or the supports structurally, it may be that one of the supports has slipped or that the house wasn’t built on level supports originally. Repairing this kind of problem starts at about $3,000, and involves jacking up the house.
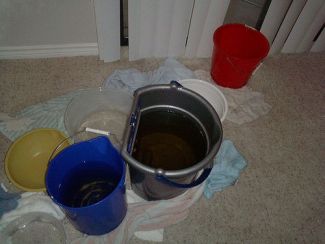
</p>
<p><img class="floatright" alt="water damage roof" src="//cdn.shopify.com/s/files/1/0387/9521/files/water_damage_roof.png?6757381807286353866" height="433" width="325"><a href="https://www.waterdamagedefense.com/blogs/home-maintenance-blog/water-damage">Water damage</a> anywhere in the house is the biggest wild card in the bunch. The water damage may be mild and easily fixed if it’s recent damage; if you’re lucky, it’s a quick $50 for materials to fix the leak. If you have long-term water damage, however, there may be rot and mold issues that compromise the integrity of the entire house – which could cost you $100,000 or more to repair. If you find water damage, seek an expert to find out exactly what you’re dealing with.</p>
<p>If you’re in love with the house and willing to repair big problems like these, be sure to negotiate the price accordingly. Get an inspector’s report and ask a real estate agent (not the seller’s) what a reasonable price knock-down would be. If you have the time and energy to lay a new foundation on a lovable old home, you can tackle that job – but at least you’ll know exactly what you’re getting into from the start.</p>
<p>Image Sources: <a href="https://www.flickr.com/photos/84335369@N00/7624026268/">trenttsd/Brittany Lynne</a>, <a href="https://www.flickr.com/photos/91173606@N00/2868992592/">CAHairyBear</a>, <a href="https://www.flickr.com/photos/waterdamagedefense/9455618718/">wdd</a>, <a href="https://www.flickr.com/photos/gramody/2617467878">Gramody</a></p>]]>
    </content>
  </entry>
  <entry>
    <id>https://www.waterdamagedefense.com/blogs/home-maintenance-blog/read-house-plans-blueprints</id>
    <published>2013-12-19T16:38:00-05:00</published>
    <updated>2016-10-09T19:20:59-04:00</updated>
    <link rel="alternate" type="text/html" href="https://www.waterdamagedefense.com/blogs/home-maintenance-blog/read-house-plans-blueprints"/>
    <title>How to Read House Plans and Blueprints</title>
    <author>
      <name>Nick Domino</name>
    </author>
    <summary type="html">
      <![CDATA[<p><a href="https://www.waterdamagedefense.com/blogs/home-maintenance-blog/read-house-plans-blueprints"><img src="//cdn.shopify.com/s/files/1/0387/9521/files/House_Blueprint_Cross_Section_big415.png?8230662381181096635" alt=""></a></p>
<p>If you’re undergoing major home remodeling or building a new home, you’re going to need to be able to understand the blueprints presented to you by your architect or contractor.</p><p><a class="read-more" href="https://www.waterdamagedefense.com/blogs/home-maintenance-blog/read-house-plans-blueprints">More</a></p>]]>
    </summary>
    <content type="html">
      <![CDATA[<div itemprop="image" itemscope="" itemtype="https://schema.org/ImageObject">
<img class="blogcenter" src="//cdn.shopify.com/s/files/1/0387/9521/files/House_Plans.jpg?9601269751775392317" alt="House Plans"><meta itemprop="width" content="602">
<meta itemprop="url" content="https://cdn.shopify.com/s/files/1/0387/9521/files/House_Plans.jpg?9601269751775392317">
<meta itemprop="height" content="380">
</div>
<p>If you’re undergoing major home remodeling or building a new home, you’re going to need to be able to understand the blueprints presented to you by your architect or contractor. Properly understanding your blueprints gives you the ability to notice potential problems and solve them before work is underway – but if you can’t read the blueprints, you may not notice what’s out of place until it’s too late.</p>
<p>One common misconception about blueprints is that they’re all the same – that every contractor uses the same symbols and the same conversions as every other. This is far from the case.</p>
<p>This guide should help you identify the basic elements that go into a blueprint. Keep in mind, though, when you’re evaluating a set of plans if there’s something you don’t understand, you need to follow up with your architect immediately, before the project moves forward.</p>
<p><strong>Conversion Scale</strong> The most important thing to understand when attempting to read a blueprint is the <a href="http://www.cactus2000.de/uk/unit/masssca.shtml">conversion scale</a>. It's usually located at the bottom of the plan, and it tells you the scale to which the blueprints were made.</p>
<p>Often, plans are made to one-quarter scale, which means that for every foot in real measurement, the plans allocate one-quarter of an inch. So, for example, if a wall is four feet long in real life, the plan will show that wall as one inch long. It's important to check, though, because while one-quarter scale is common, it's not universal.</p>
<p><strong> Architectural Features</strong> Doors, windows, and stairs all have specific symbols. Doors are depicted with a strong perpendicular line on one side and a quarter-circle showing which direction the door will open - helping determine where objects in the room can be placed. Stairs are usually marked with what looks like a series of stacked boxes, all the same size, and window symbols can vary based on the plan - or not be included at all.</p>
<p><strong> Interior Features</strong> Your appliances and any unmovable features should be plainly marked on the blueprints with shapes that approximate those features. For example, your stove should have the four stovetop burners evident from above. Often the interior features will also be labeled appropriately.</p>
<p><img class="floatcenter" alt="House Plans Exterior Elevation 730" src="//cdn.shopify.com/s/files/1/0387/9521/files/House_Plans_Exterior_Elevation_730.png?13323812538628642404" height="486" width="730"></p>
<p><strong>Exterior Elevation Sheets</strong> Beyond the top sheet, you'll have four exterior elevation sheets that show you what your property looks like from each side. You'll be able to see the pitch of the roof, where the windows are located and their dimensions, and other external elements from a straight-on view, rather than from above.</p>
<p><strong> Foundation Page</strong> The foundation page will show where the primary foundation points and support walls are. If you've excavated any areas of your property for the building, the foundation page will also show this. Of course, be cautious any time you plan to excavate. Avoid building on fresh, un-compacted fill. Ask questions any time excavation is involved.</p>
<p>Look for water drainage specifics in your foundation plans. Make sure you understand things like: how your underground footing drainage pipes will be laid out, how your landscaping grading will work to lead ground water away from your foundation, whether there are plans for a sump pump and battery backup or <a href="https://www.waterdamagedefense.com/collections/water-powered-sump-pumps">water powered sump pump</a>, and finally where roof rain water will drain towards.</p>
<p><strong> Layout Pages</strong> Every individual room in the house should be drawn in detail, usually to 1/4 scale, and the layout pages will show the dimensions of these rooms. Often these blueprints are used to show the layout of furniture within the rooms as well, and they should detail where the electrical outlets, fixtures, and water sources will be located.</p>
<p><img class="floatcenter" alt="House Blueprint Cross Section 730" src="//cdn.shopify.com/s/files/1/0387/9521/files/House_Blueprint_Cross_Section_730.png?17466120935508416907" height="468" width="730"></p>
<p><strong> Cross Section Pages</strong> These are detailed depictions of how the different parts of the structure fit together, including the walls, angles of the ceiling, or other detailed architectural elements. These schematic drawings also dictate structural choices and the procedures used to support your building through stresses like wind, rain, floods, or snow loads.</p>
<p>Cross-Section plans should be approved by your engineers and building inspectors and adhered to during construction. Ask the contractor every question you have in order to fully understand the cross-section plans before and during construction. No compromises here!</p>
<p><strong> Electric and Plumbing</strong> Both the electric and plumbing blueprints should come with a legend - a key to symbols that make them easier to understand. Simply match the legend to the corresponding places on the blueprints. Plumbing symbols often vary from place to place, so you’ll probably spend a good amount of time referring to the plumbing legend. If you have any questions, ask the electrician or plumber; you want to have a good understanding of both of these systems before your project gets underway.</p>
<p><strong> How to Ask About the Blueprints</strong> Don’t be afraid of looking foolish or pestering the contractor with questions – it’s your job to sign off on his plans, which makes it his job to be sure you understand them. If you can’t see where the electrical outlets are located on his blueprints, ask him about it. If you’re unclear on where the plumbing hook-ups are, ask him to show you.</p>
<p>You can also ask to hold onto the blueprints for a while to double-check that you’re okay with the dimensions as laid out. If, for example, your master bedroom has a door that opens inward, but you won’t be able to fit your wife’s huge armoire in there if the door opens that way, you can ask for changes. That’s the kind of problem that only shows up if you really spend some time with the blueprints and imagine how they’d look drawn to scale, with your possessions properly put away, so take your time and use the plans to your benefit.</p>
<p>You can’t have everything you want, of course – but by truly understanding your blueprints, you can get more than you would have if you hadn’t known to ask!</p>
<p><iframe src="//www.youtube.com/embed/56L_7QJZyRQ" allowfullscreen="" align="middle" frameborder="0" height="315" width="420"></iframe></p>
<p>Image sources: <a href="http://www.countryplans.com/20wide2s.html">Country Plans</a>, <a href="http://www.shanestructures.com/sample.html">Shane Structures</a>, and <a href="http://www.whitby.ca/en/residents/buildingguides.asp?hdnContent=">whitby.ca</a></p>]]>
    </content>
  </entry>
  <entry>
    <id>https://www.waterdamagedefense.com/blogs/home-maintenance-blog/infographic-the-anatomy-of-refridgerator-repair</id>
    <published>2013-12-15T10:42:00-05:00</published>
    <updated>2016-10-15T18:27:41-04:00</updated>
    <link rel="alternate" type="text/html" href="https://www.waterdamagedefense.com/blogs/home-maintenance-blog/infographic-the-anatomy-of-refridgerator-repair"/>
    <title>Infographic: The Anatomy of Refridgerator Repair</title>
    <author>
      <name>Nick Domino</name>
    </author>
    <summary type="html">
      <![CDATA[<p><a href="https://www.waterdamagedefense.com/blogs/home-maintenance-blog/infographic-the-anatomy-of-refridgerator-repair"><img src="//cdn.shopify.com/s/files/1/0387/9521/files/anatomy-refrigerator-repair_big415.png?11127585758782915442" alt=""></a></p>
<p>Your refrigerator is one of the few items in your home that is running non-stop, day or night. When you think about the constant work your refrigerator is doing...</p><p><a class="read-more" href="https://www.waterdamagedefense.com/blogs/home-maintenance-blog/infographic-the-anatomy-of-refridgerator-repair">More</a></p>]]>
    </summary>
    <content type="html">
      <![CDATA[<a href="http://www.partselect.com/JustForFun/Anatomy-Refrigerator-Repair.aspx" rel="nofollow">
<div itemprop="image" itemscope="" itemtype="https://schema.org/ImageObject">
<img title="Infographic: The Anatomy of Refridgerator Repair" src="//cdn.shopify.com/s/files/1/0387/9521/files/anatomy-refrigerator-repair.jpg?16914362354723667740" alt="Infographic: The Anatomy of Refridgerator Repair"><meta itemprop="width" content="619">
<meta itemprop="url" content="https://cdn.shopify.com/s/files/1/0387/9521/files/anatomy-refrigerator-repair.jpg?16914362354723667740">
<meta itemprop="height" content="1324">
</div>
</a>]]>
    </content>
  </entry>
  <entry>
    <id>https://www.waterdamagedefense.com/blogs/home-maintenance-blog/infographic-plumbing-problems-repair-vs-replacement</id>
    <published>2013-12-01T14:24:00-05:00</published>
    <updated>2016-10-15T18:27:52-04:00</updated>
    <link rel="alternate" type="text/html" href="https://www.waterdamagedefense.com/blogs/home-maintenance-blog/infographic-plumbing-problems-repair-vs-replacement"/>
    <title>Infographic: Plumbing Problems? Repair vs. Replacement</title>
    <author>
      <name>Nick Domino</name>
    </author>
    <summary type="html">
      <![CDATA[<p><a href="https://www.waterdamagedefense.com/blogs/home-maintenance-blog/infographic-plumbing-problems-repair-vs-replacement"><img src="//cdn.shopify.com/s/files/1/0387/9521/files/Plumbing_Problems_Repair_vs._Replacement_640_big415.png?2537786223083971646" alt=""></a></p>
<p>If you're facing plumbing problems, consider these 5 factors to help you decide whether to repair or replace...</p><p><a class="read-more" href="https://www.waterdamagedefense.com/blogs/home-maintenance-blog/infographic-plumbing-problems-repair-vs-replacement">More</a></p>]]>
    </summary>
    <content type="html">
      <![CDATA[<a href="http://www.oneillplumbingofseattle.com/703328/2013/05/24/plumbing-problems-repair-vs-replacement-infographic.html" rel="nofollow">
<div itemprop="image" itemscope="" itemtype="https://schema.org/ImageObject">
<img title="Plumbing-Problems-Repair-Replace-Infographic" src="//cdn.shopify.com/s/files/1/0387/9521/files/Plumbing_Problems_Repair_vs._Replacement_640.png?16610339528815908639" alt="Plumbing-Problems-Repair-Replace-Infographic"><meta itemprop="width" content="640">
<meta itemprop="url" content="https://cdn.shopify.com/s/files/1/0387/9521/files/Plumbing_Problems_Repair_vs._Replacement_640.png?16610339528815908639">
<meta itemprop="height" content="3551">
</div>
</a>]]>
    </content>
  </entry>
  <entry>
    <id>https://www.waterdamagedefense.com/blogs/home-maintenance-blog/rotten-wood</id>
    <published>2013-08-14T18:58:00-04:00</published>
    <updated>2016-10-09T19:21:28-04:00</updated>
    <link rel="alternate" type="text/html" href="https://www.waterdamagedefense.com/blogs/home-maintenance-blog/rotten-wood"/>
    <title>Rotten Wood - Find it Before it Destroys Your House</title>
    <author>
      <name>Nick Domino</name>
    </author>
    <summary type="html">
      <![CDATA[<p><a href="https://www.waterdamagedefense.com/blogs/home-maintenance-blog/rotten-wood"><img src="//cdn.shopify.com/s/files/1/0387/9521/files/rotten_wood_big.jpg?16630734287433786965" alt=""></a></p>
<p>Given enough time and the right conditions, rot can completely destroy wooden building materials. Because of its tendency to spread, you should repair rotten wood ASAP when you discover it, and make sure you fix it completely.</p><p><a class="read-more" href="https://www.waterdamagedefense.com/blogs/home-maintenance-blog/rotten-wood">More</a></p>]]>
    </summary>
    <content type="html">
      <![CDATA[<h3>Is Rotten Wood Hiding in Your Home?</h3>
<div itemprop="image" itemscope="" itemtype="https://schema.org/ImageObject">
<img class="floatright" src="//cdn.shopify.com/s/files/1/0387/9521/files/rotten_wood.jpg?1855127253477947511" alt="rotten wood"><meta itemprop="width" content="325">
<meta itemprop="url" content="https://cdn.shopify.com/s/files/1/0387/9521/files/rotten_wood.jpg?1855127253477947511">
<meta itemprop="height" content="217">
</div>
<p>Given enough time and the right conditions, rot can completely destroy wooden building materials.</p>
<p>Occasionally, our houses scream for attention when they need repairs. For instance, it is pretty obvious that you need to spring into action if a water leak begins to gush through your ceiling or if a baseball crashes through your living room window.</p>
<p>However, unlike major water leaks or broken windows, rotting wood can easily escape notice, unless you specifically look for it. And unfortunately, like kudzu or a spot of rust on a car, wood rot can spread far and wide, making it especially dangerous to your home’s wooden building materials.</p>
<p>Because of its tendency to spread, you should repair rotten wood ASAP when you discover it, and make sure you fix it completely. Otherwise, you will only face more serious and extensive repairs down the road. Ultimately, serious enough wood rot can even compromise your home’s structural integrity (look around your home – you see a lot of wood, right?). So, what should homeowners know about rotten wood?</p>
<h3>Causes of Rotten Wood</h3>
<p>Understanding wood rot is the first step towards fighting it, so take a minute to think about what causes wood to rot. It is actually fairly simple – lingering moisture in wood creates an environment conducive to fungi growth, which in turn causes the wood’s fibers to deteriorate. So, <strong>when water contacts an unprotected wood surface for a long enough period of time, the wood begins to rot</strong>.</p>
<p><img class="floatright" src="//cdn.shopify.com/s/files/1/0387/9521/files/wooden_deck.jpg?10624087201111418279" alt="wooden deck" height="244" width="325"> 
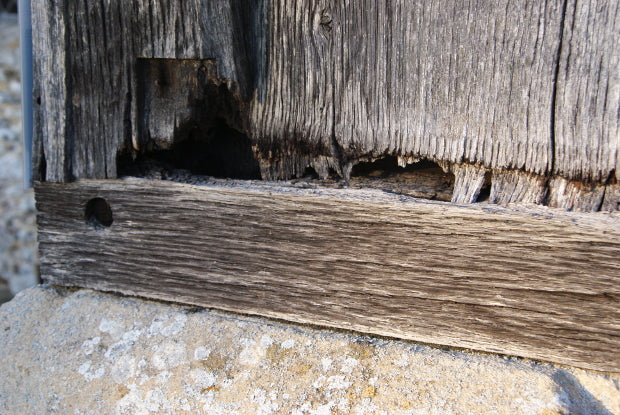
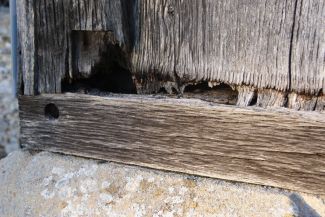
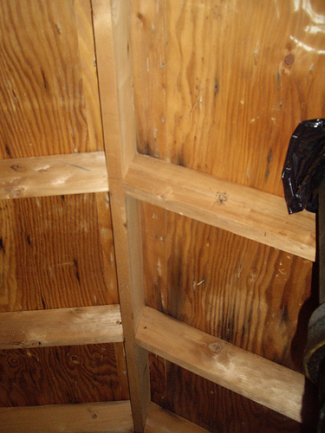
Lingering moisture on unprotected wood allows fungi to grow, eventually causing rot.</p>
<p>Regardless of whether this process begins by rain collecting gently on your window sill or a major leak pouring through your ceiling, wood rot can be astonishingly destructive. Think about the places in your home where moisture could collect – on window sills, near outside doors, or under sinks, for example. These areas are susceptible to wood rot, so keep your eye on them.</p>
<h3>Finding Rotten Wood</h3>
<p>So, how do you actually go about finding wood rot? <strong>You’ll need both your senses of sight and touch for this task, as well as a screwdriver, flashlight, and binoculars</strong>. Keep in mind that, although sometimes the rot you are looking for may be easily visible, in plain sight, quite often it will be hidden, for instance behind cracked paint or underneath siding.</p>
<p>One key (and hopefully obvious) principle to bear in mind during your search: <strong>wood should not be soft when you press on it</strong>.</p>
<p><img class="floatright" src="//cdn.shopify.com/s/files/1/0387/9521/files/screwdriver_to_find_rotten_wood.jpg?3974785273573499159" alt="screwdriver to find rotten wood" height="325" width="325"> 
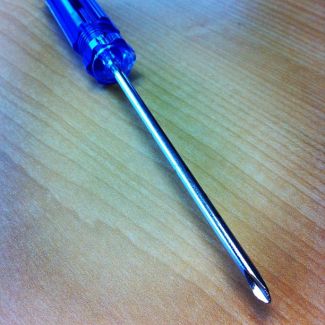
Use a screwdriver to probe for rot in your home’s wooden components.</p>
<p>I know – that is probably obvious to most of us. However, to evaluate the health of the wooden components of your home, you do need to give them a good poke and see how they feel. <strong>Be on the lookout for any sign of soft, brittle, or crumbly wood</strong>. In extreme cases rotten wood may even disintegrate as you touch it.</p>
<p>As you poke around, keep your eyes peeled for discoloration, which is a sign of fungi and rot. Also, if you find a surface with peeling paint that feels damp, you may have just uncovered a water leak behind that spot. Investigate further and fix any leaks you find.</p>
<p>On the subject of damaged paint, <strong>check any painted or sealed wooden surfaces on your home’s exterior for cracks in the paint or sealant</strong>. Any crack you find, even small ones, can allow water to work its way into the wooden material, resulting in rot.</p>
<p>What if your house’s surface is vinyl or aluminum? Could it still succumb to rotten wood? The answer is yes, since <strong>even vinyl or aluminum sided homes likely still have wooden framing, plywood, and trim</strong>. Take a look at these wooden components, to the extent possible, and get a sense of their health. Look for damage to the siding, which might let water through, and arm yourself with binoculars and a flashlight to spot wear or discoloration in places you cannot see close up. In areas where you can get close to a wood surface, press it with a screw driver to test its integrity.</p>
<p>You should inspect your home for rotting wood at least annually - or twice per year if you live in a damp climate. Ideally, make this inspection a regular part of your spring and fall maintenance routine.</p>
<h3>Specific Areas to Check for Rotting Wood</h3>
<p><img class="floatright" src="//cdn.shopify.com/s/files/1/0387/9521/files/window_frame_water_damage.jpg?13068064475366051569" alt="window frame water damage" height="216" width="325"> 
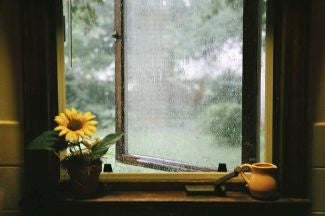
Over time, rain can repeatedly soak window frames and sills, causing damage and, eventually, rot.</p>
<p>Here are some particularly vulnerable areas that you should keep a close eye on:</p>
<p><strong>Wooden Window Frames</strong>: Water tends to remain on window sills longer than on the rest of the window frame, so the <strong>sills are usually the first to suffer from rot</strong>. Rain is persistent and can have a powerful cumulative effect. Over time, as rainwater collects on a window sill, it can slowly wear away the paint, allowing water to seep into the wood, and eventually leading to rot. As you inspect your window sills, carefully press the wood to detect any soft, deteriorated areas. Use a screw driver in hard-to-reach places. If the wood punctures easily, replace it ASAP. Finally, inspect the rest of the window frame, as wood rot often spreads up from the sill to the vertical framing pieces and trim.</p>
<p><img class="floatright" src="//cdn.shopify.com/s/files/1/0387/9521/files/wooden_exterior_door.jpg?10099592847955835963" alt="wooden exterior door" height="474" width="325"> 
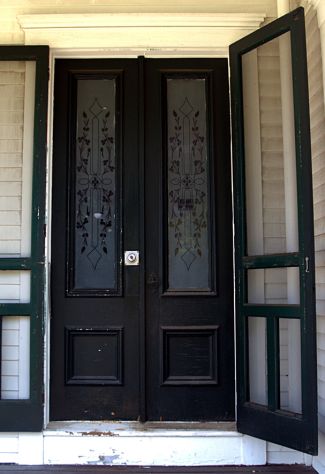
Exterior doors can get damaged over time through normal wear and tear. Add moisture to the mix and rot could eventually result.</p>
<p><strong>Exterior Doors</strong>: There is a good chance that your exterior doorways contain a lot of wood, which gets damaged over time from normal wear and tear, making it vulnerable to rainwater. <strong>Check all wooden parts of the door and door frame, including the threshold, door jamb, and trim</strong>. Make sure there are no soft, spongy areas. The lower sections of the door tend to be prime areas for fungi to form – especially if your home does not have a roof overhang to help protect the entrance from the weather. Poke around with your screw driver to make sure the wood is sound. Inspect the kick plate at the bottom of the door – is there any sign of rot underneath it?</p>
<p><strong>Interior Spaces</strong>: Grab your flashlight and pay a down-and-dirty visit to the places in your home where moisture might have a chance to collect. <strong>Check the floor areas around your water heater, washer, dishwasher, toilet, tub, and the bottom of your sink cabinets</strong>. Unfortunately, this involves some grunt work. Prepare to get down on your hands and knees to peer underneath appliances and clean out those cluttered sink cabinets.</p>
<p>Do a thorough visual inspection with your flashlight, and also run your hand over the wooden surfaces as you look at them. <strong>If you come across areas that seem to be consistently moist or find swelling in the floor or sub-floor, you have probably discovered a leak</strong>. Investigate further ASAP. Also, check ceilings for any telltale water damage discoloration created by leaks from above.</p>
<p><img class="floatright" src="//cdn.shopify.com/s/files/1/0387/9521/files/wood_deck.jpg?10624087201111418279" alt="wood deck" height="435" width="325"> 
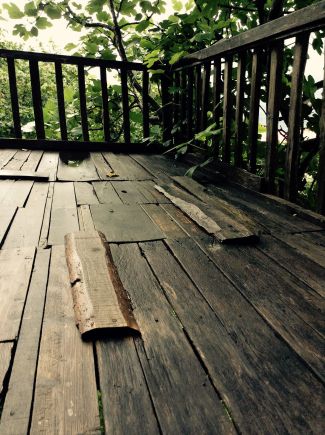
Most decks contain a lot of wood and will require a thorough inspection for rot. Check it from above, from below, and assess the health of the ledger board.</p>
<p><strong>Decks</strong>: First, <strong>inspect the wooden components that make up your deck</strong> and deck stairs for signs of rot – looking from both above (easy!) and below (potentially dirty work!). <strong>After that, direct your attention to the piece of wood that attaches your deck to the house</strong>. This is called a ledger board, and it is a prime spot for wood rot if it was not connected properly. It should be flashed in aluminum, and when that is not the case, water can get behind it, eventually causing rot. This is a crucial item to check, since rot here can spread to the house’s structure underneath your siding.</p>
<p><strong>Roof</strong>: Go out to your yard with binoculars and train them on your roof. Make a close inspection of both the roof itself, as well as the area directly below the roof line, for any wear and tear. This inspection could take a little while. It might feel a bit strange to be standing in the yard or out by the road scanning your roof with binoculars, and you might get a few looks from the neighbors, but take the time to be thorough. Catching a problem early could save you lots of money and hassle.</p>
<p><img class="floatright" src="//cdn.shopify.com/s/files/1/0387/9521/files/damaged_shingles.jpg?23535346328739615" alt="damaged shingles" height="244" width="325"> 
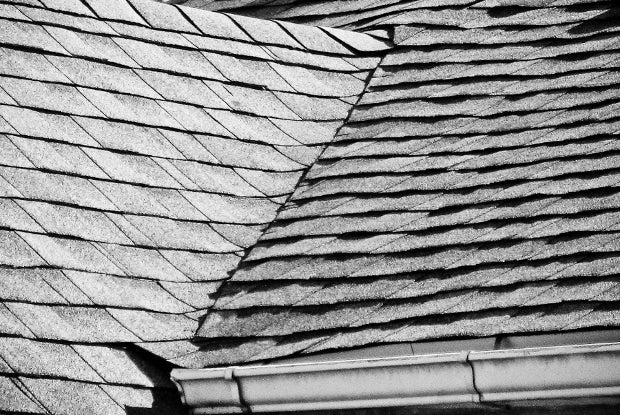
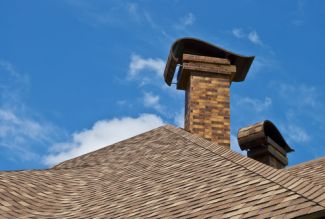
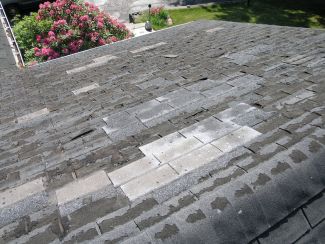
On your roof, look for damaged or missing shingles, raised nail heads, cracked seals around chimneys and vent pipes, and discoloration on the fascia below the roof line.</p>
<p><strong>Look for any missing or curled shingles, raised nail heads, cracked seals around chimneys and vent pipes, and also for discoloration on the fascia below your roof line</strong>. You may choose to get up on your roof if the pitch is not too steep, which will allow you to feel for any sponginess in the plywood as you walk across it. If you think the roof may be weak, or do not want to take the risk of going up on your roof, have a professional examine it instead. Roofs and ladders can be very tricky to navigate, so if you do go up there, exercise the utmost caution.</p>
<h3>Preventing Wood Rot</h3>
<p>Now that you know where to look to find rotting wood in your home, here are some tips to prevent it in the first place.</p>
<p><img class="floatright" src="//cdn.shopify.com/s/files/1/0387/9521/files/roof_gutters.jpg?6367508967980780062" alt="roof gutters" height="179" width="325"> 
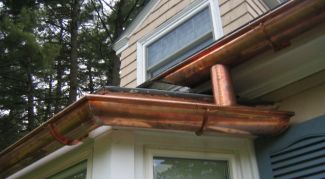
Clean and maintain your gutter system regularly so that water is drawn away from your house.</p>
<p><strong>Maintain your gutters</strong>: Well functioning gutters make for a healthy house. <a href="https://www.waterdamagedefense.com/blogs/home-maintenance-blog/gutter-cleaning">Clean your gutters</a> regularly, and <strong>keep them in good condition so that rainwater will be drawn away from your house</strong>. Water should flow down your spouts, and away from the structure, instead of overflowing out of the gutters and spilling right next to your foundation.</p>
<p><strong>Building materials</strong>: Instead of using wood in areas of your house where rot is common, consider using <strong>composite building materials with no wood fibers</strong>. For example, when replacing windows use vinyl or vinyl clad designs. Similarly, consider aluminum or vinyl siding, which are popular for this reason. Preventative measures like this will help reduce your maintenance costs over time.</p>
<p><img class="floatright" src="//cdn.shopify.com/s/files/1/0387/9521/files/covered_entryway.jpg?8550393086938947486" alt="covered entryway" height="425" width="325"> 
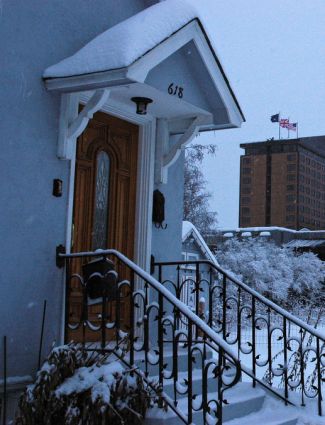
Add covered entryways and overhangs to your roof, to protect your windows and doors from precipitation.</p>
<p><strong>Entryways</strong>: Next time you re-do your roof, <strong>add <a href="http://www.finehomebuilding.com/how-to/qa/adding-roof-overhangs.aspx" target="_blank">overhangs</a> and covered entryways</strong> if you do not have them already. This added shelter helps to protect your windows and doors from moisture.</p>
<p><strong>Condensation</strong>: Keep <a href="https://www.waterdamagedefense.com/blogs/home-maintenance-blog/what-causes-condensation">condensation</a> at bay inside your home. Although it sounds counter-intuitive, an air-tight, well-insulated house can tend to trap moisture indoors. To prevent this, <strong>ensure that your bathrooms, kitchens, and laundry rooms are well-ventilated</strong>. Proper ventilation is amazingly effective at dissipating humidity through natural airflow (<strong>hot, moist air rises and is replaced by fresh air</strong>). If necessary, use a dehumidifier to keep persistent moisture problems under control.</p>
<p><strong>Maintain your caulk and paint</strong>: Keep any <a href="http://www.oldhouseweb.com/how-to-advice/choosing-the-right-caulk.shtml" target="_blank">caulking</a> on your home’s exterior in good condition – this is fairly self explanatory, since caulk <strong>seals moisture out of your house</strong>. Paint is also a vital seal against the elements. In fact, it is often the sole barrier keeping solid wood from rotting, so it is imperative to keep your home wrapped in a good coat of paint.</p>
<p><img class="floatright" src="//cdn.shopify.com/s/files/1/0387/9521/files/water_leaks_rotten_wood.jpg?9989607579332229235" alt="water leaks rotten wood" height="216" width="325"> 
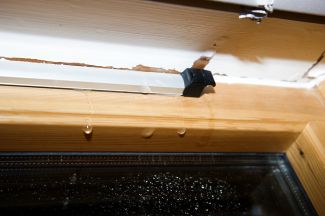
Keep your eye out for water leaks in your home. When you find them, fix them immediately, so they don’t turn into larger problems.</p>
<p><strong>Water leaks and basement flooding</strong>: Stay alert for water leaks in your home and repair them quickly, regardless of how small they seem. Even a small amount of water can ruin wood, and small leaks often develop into larger problems. <strong>Take preventative action, where possible, to prevent or minimize water damage in your home</strong>. Use an <a href="https://www.waterdamagedefense.com/collections/flow-rate-based-water-leak-detectors-shut-off-valve/products/ydrostop-automatic-water-shut-off-valve-whole-house" target="_blank">automatic water shut off valve</a> to turn off your water when a leak occurs. To protect your basement, consider installing a <a href="https://www.waterdamagedefense.com/collections/battery-backup-sump-pumps" target="_blank">battery backup sump pump</a> or <a href="https://www.waterdamagedefense.com/collections/water-powered-sump-pumps" target="_blank">water powered sump pump</a> to take over for your primary sump pump if your power goes out during a storm, or if the primary pump fails.</p>
<p>To keep your home in good shape, you will need to play the role of detective from time to time, watching for potential problems and investigating those that arise. This is certainly true if you want to avoid rotten wood. Even though rot may not be discernible at first glance, by searching for the right clues, you can spot problems before they become unmanageable.</p>
<p><strong>When you do find rotting wood on your property, get if fixed right away so it does not turn into a larger problem</strong>. Finally, take all the preventative measures you can to prevent rot in the first place.</p>
<p>Image Sources: <a href="https://www.flickr.com/photos/chelmsfordblue/3131199563/">fourthandfifteen/chelmsfordblue</a>, <a href="https://www.flickr.com/photos/wetsun/51914962/">wetsun</a>, <a href="https://www.flickr.com/photos/sixteenmilesofstring/6750707275/">Timothy Vollmer/sixteenmilesofstring</a>, <a href="https://www.flickr.com/photos/aerosolhalos/1364599710/in/photostream/">Nico Paix/aerosolhalos</a>, <a href="https://www.flickr.com/photos/takomabibelot/2757622889/">takomabibelot</a> (cropped), <a href="https://www.flickr.com/photos/134896745@N05/20054629042/">Nilgün Gül Özer</a>, <a href="https://www.flickr.com/photos/dolfindans/3724819525/">Brian Robinson/dolfindans</a>, <a href="https://www.flickr.com/photos/kikisdad/18866444/">Ctd 2005/kikisdad</a>, <a href="https://www.flickr.com/photos/wonderlane/3146291909/">wonderlane</a> (cropped), <a href="https://www.flickr.com/photos/22179048@N05/6636608589/in/photostream/">Bob Peters</a>.</p>
<p class="cc-block"><a href="https://creativecommons.org/licenses/by-sa/3.0/" rel="license"><img class="cc-button" src="https://licensebuttons.net/l/by-sa/3.0/88x31.png" alt="Creative Commons License"></a>The <em><a href="https://www.waterdamagedefense.com/blogs/home-maintenance-blog/rotten-wood">Rotten Wood - Find it Before it Destroys Your House</a></em> by <em><a href="https://www.waterdamagedefense.com/blogs/home-maintenance-blog">Water Damage Defense</a></em>, is licensed under a <a href="https://creativecommons.org/licenses/by-sa/3.0/" rel="license">Creative Commons Attribution-ShareAlike 3.0 Unported License</a>.</p>]]>
    </content>
  </entry>
  <entry>
    <id>https://www.waterdamagedefense.com/blogs/home-maintenance-blog/infographic-the-real-cost-of-home-repairs</id>
    <published>2013-02-12T20:15:00-05:00</published>
    <updated>2016-10-09T19:21:15-04:00</updated>
    <link rel="alternate" type="text/html" href="https://www.waterdamagedefense.com/blogs/home-maintenance-blog/infographic-the-real-cost-of-home-repairs"/>
    <title>Infographic: The Real Cost of Home Repairs</title>
    <author>
      <name>Nick Domino</name>
    </author>
    <summary type="html">
      <![CDATA[<p><a href="https://www.waterdamagedefense.com/blogs/home-maintenance-blog/infographic-the-real-cost-of-home-repairs"><img src="//cdn.shopify.com/s/files/1/0387/9521/files/cost_of_home_repairs_big415.jpg?1807311625213250923" alt=""></a></p>
<p>A Smart Home Owneres Guide - Heating &amp; AC, gutters, carpets, refridgerators, plumbing, pests, and more...</p><p><a class="read-more" href="https://www.waterdamagedefense.com/blogs/home-maintenance-blog/infographic-the-real-cost-of-home-repairs">More</a></p>]]>
    </summary>
    <content type="html">
      <![CDATA[<a href="https://www.clublocal.com?utm_source=press&amp;utm_medium=site&amp;utm_campaign=infographic1" rel="nofollow">
<div itemprop="image" itemscope="" itemtype="https://schema.org/ImageObject">
<img title="ClubLocal: The real cost of homeownership" src="//cdn.shopify.com/s/files/1/0387/9521/files/clublocal_inforgraphic.jpg?9922206467884890590" alt="ClubLocal: The real cost of homeownership"><meta itemprop="width" content="640">
<meta itemprop="url" content="https://cdn.shopify.com/s/files/1/0387/9521/files/clublocal_inforgraphic.jpg?9922206467884890590">
<meta itemprop="height" content="2105">
</div>
</a>]]>
    </content>
  </entry>
  <entry>
    <id>https://www.waterdamagedefense.com/blogs/home-maintenance-blog/roof-replacement-cost</id>
    <published>2012-11-14T16:26:00-05:00</published>
    <updated>2016-10-09T19:21:33-04:00</updated>
    <link rel="alternate" type="text/html" href="https://www.waterdamagedefense.com/blogs/home-maintenance-blog/roof-replacement-cost"/>
    <title>Roof Replacement - How Much Does a New Roof Cost?</title>
    <author>
      <name>Nick Domino</name>
    </author>
    <summary type="html">
      <![CDATA[<p><a href="https://www.waterdamagedefense.com/blogs/home-maintenance-blog/roof-replacement-cost"><img src="//cdn.shopify.com/s/files/1/0387/9521/files/roof_replacement_cost_big415.jpg?13143326591120732527" alt=""></a></p>
<p>A solid roof over our heads is something we may take for granted, but when that roof needs to be fixed or replaced, the costs can add up. Fortunately, you can control that cost, to an extent, by the decisions you make on materials and labor.</p><p><a class="read-more" href="https://www.waterdamagedefense.com/blogs/home-maintenance-blog/roof-replacement-cost">More</a></p>]]>
    </summary>
    <content type="html">
      <![CDATA[<div itemprop="image" itemscope="" itemtype="https://schema.org/ImageObject">
<img class="centerblog" src="//cdn.shopify.com/s/files/1/0387/9521/files/asphalt-shingles-roof.jpg?15673066514604803627" alt="asphalt shingles roof"><meta itemprop="width" content="900">
<meta itemprop="url" content="https://cdn.shopify.com/s/files/1/0387/9521/files/asphalt-shingles-roof.jpg?15673066514604803627">
<meta itemprop="height" content="675">
</div>
<p>A solid roof over our heads is something we may take for granted, but when that roof needs to be fixed or replaced, the costs can add up. Fortunately, you can control that cost, to an extent, by the decisions you make on materials and labor.</p>
<p>As a homeowner or landlord, when you discover that your roof needs to be replaced, brace yourself. You are probably in for a significant expense, and unfortunately, there is no avoiding it. So, just how much could it cost? Well, a number of factors drive this amount, including some items that may not necessarily be obvious at first.</p>
<p>The good news is that <strong>you can control the overall cost to a certain extent</strong>, since you have a number of choices to make – on things like material type and labor quality.</p>
<p>The bad news, though, is you may not have much flexibility on timing: <strong>when a roof needs to be replaced it cannot be put off</strong>! <a href="https://www.waterdamagedefense.com/blogs/home-maintenance-blog/avoiding-roof-problems">Roof damage</a> can lead to serious water damage in your home, potentially causing structural issues.</p>
<p><img class="floatright" src="//cdn.shopify.com/s/files/1/0387/9521/files/damaged_roof.jpg?2002692754014614191" alt="damaged roof" height="244" width="325"> A damaged roof can suffer from leaks, potentially leading to serious water damage. When you discover that your roof needs attention, do not put it off.</p>
<p>So, if you find yourself at the point where you are considering roof replacement, how do you estimate its impact on your wallet?</p>
<p>The most direct way to approach this is to reach out to roofing professionals and get their opinions on your roof. They can tell you whether the damage to your roof requires replacement, or if simple repairs could suffice instead. Later on, if you decide to use a contractor, check out the best practices we highlighted in our article on <a href="https://www.waterdamagedefense.com/blogs/home-maintenance-blog/hiring-a-contractor">hiring a contractor</a>.</p>
<p>In the meantime, read on to learn about the basics of roofing costs.</p>
 
<h3>The Basics of Roofing Costs</h3>
<p>Costs for shingles, labor, and other roofing materials will generally be quoted in terms of “squares,” each comprising 100 square feet. In other words, a <strong>10 foot by 10 foot patch of your roof makes 1 square</strong>. Although roofs come in many different shapes and sizes, an “average” roof in the U.S. often totals between 22 and 26 squares, or 2200 to 2600 square feet.</p>
<p>To keep costs low, do-it-yourself homeowners can usually install a roof on an average American ranch house for between $1,000 and $4,000, depending on the material quality used. In contrast, a professional roofer would probably cost between $2,000 and $8,500 for the same roof. Keep in mind, though, most homeowners do not have the ability to replace their own roof properly, and unless you know exactly what you are doing, it makes sense to pay a professional to ensure quality work.</p>
<h3>Removing the Old Roof</h3>
<p><img class="floatright" src="//cdn.shopify.com/s/files/1/0387/9521/files/stripping_shingles_roof.jpg?2002692754014614191" alt="stripping shingles roof" height="217" width="325"> 
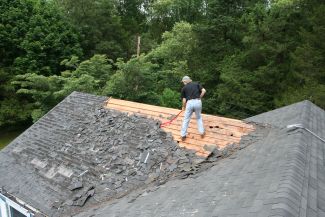
The cost to remove your old roof will depend on its size, height from the ground, steepness, material type, and number of layers.</p>
<p>The first major cost you will encounter when replacing your roof is the removal of the current roofing material. The magnitude of <strong>this expense varies, depending on several factors: the size of your roof, its height from the ground, its steepness, the material type, and finally the number of layers in it</strong>. A one-story, single-layer roof of minimal steepness will cost between $100 and $150 per square to remove. A double-layer roof at the same height would cost more like $115 to $165 to remove, while a triple-layer roof would reach $125 to $175 per square.</p>
<p>A steeper roof will increase these estimates, of course, as will a roof that is high off the ground. The materials being removed also play a role. Asphalt shingles are the cheapest to remove, while metal, wood, or slate will all cost more. Additionally, there is a cost for hauling away the debris, which may or may not be included in a roofer’s price, depending on the contractor.</p>
<p><img class="floatright" src="//cdn.shopify.com/s/files/1/0387/9521/files/asphalt_shingle_layers.jpg?2002692754014614191" alt="asphalt shingle layers" height="244" width="325"> 
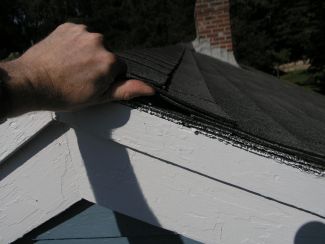
Layering new roofing materials on top of your old roof is easier, but it brings disadvantages: reduced lifespan of the new roof, potential violation of the roof’s warranty, and possible building code violations.</p>
<p>Removal costs can be entirely avoided if you overlay a new layer of roofing onto the existing one, instead of fully replacing the roof. However, this practice comes with a significant downside. <strong>An overlay is estimated to cut as much as 20% from the lifespan of your new roof and might actually violate the warranty of the new roof’s materials</strong>. Also, many municipalities’ building codes specify how many layers a roof can have before it needs to be completely replaced. Your local roofer will know these codes and can check to see whether your roof has too many layers already.</p>
<h3>Roofing Materials</h3>
<p><img class="floatleft" src="//cdn.shopify.com/s/files/1/0387/9521/files/new_shingles_roof.jpg?2002692754014614191" alt="new shingles roof" height="217" width="325"> 
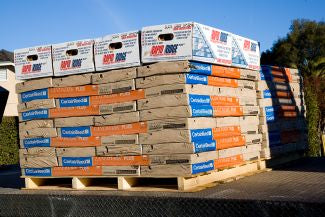
Asphalt shingles are the most common, and least expensive, roof covering, although slate, wood, clay, and metal roofing materials are available as well.</p>
<p>When you are ready to replace your roof, you will be faced with a variety of materials from which to choose. The <strong>most common materials are: asphalt shingles</strong>, which generally cost between $120 – $140 per square, <strong>slate tiles</strong> at $125 – $145 per square, <strong>wooden shakes</strong> at $150 – $230 per square, <strong>clay tiles</strong> at $170 – $260 per square, and <strong>metal roofing</strong> at $350 – $1,100 per square.</p>
<p>Obviously, a roof’s cost increases along with the quality of its materials and the labor required to install it. However, keep in mind that higher quality materials can both last longer and look much better than lower grade materials. If your roof’s appearance is highly important to you, your final decision on roofing material may hinge on its aesthetic appeal.</p>
<p><strong>Beyond the roofing type, there are other costs to bear in mind as well</strong>. For example, if you uncovered any evidence of water damage while removing your previous roof, you may need to replace the wooden decking underneath it. Also, roofs in northern areas with cold winters and frequent snowfall will usually need an additional layer of ice protection.</p>
<p><img class="floatright" src="//cdn.shopify.com/s/files/1/0387/9521/files/new_roof_flashing.jpg?2002692754014614191" alt="new roof flashing" height="244" width="325"> Properly installed metal flashing is crucial to ensure watertight seals on your roof.</p>
<p><strong>To ensure watertight seals, you should also make sure that your roof has sufficient flashing</strong> in vulnerable places, for example where chimneys or vent pipes penetrate the roof. In spots where the roof’s surface meets a vertical wall, specific “step flashing” will be required. Proper flashing installation will require a roofing expert, so unfortunately this step will not be eligible for DIY savings on your part.</p>
<p>One final cost to plug into your estimate is the construction permit that your municipality will likely require for the project.</p>
<h3>Putting It All Together</h3>
<p><img class="floatleft" src="//cdn.shopify.com/s/files/1/0387/9521/files/replacing_roof.jpg?2002692754014614191" alt="replacing roof" height="217" width="325"> 
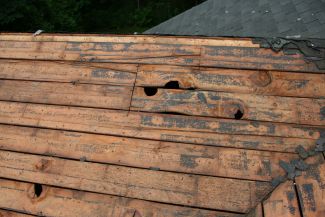
If you uncover damage underneath your roof covering, don’t miss this opportunity to fix it properly.</p>
<p>Combining all these expenses, you can estimate the total cost of your roof replacement. <strong>The absolute cheapest way to do the job would be to use asphalt shingles, overlay the new layer on top of your current roof, and perform the work yourself</strong>.</p>
<p>However, <strong>there are hidden costs associated with that approach</strong>. First, consider the chunk of time you will need to invest in the project. <strong>Roof replacement has to be done quickly, since leaving your roof half-finished and exposed to the weather is dangerous</strong>. So, you will need to devote a continual block of time to it and finish it fast, rather than simply working on it gradually for a couple of hours per day in your spare time. Additionally, you need to be skilled enough to perform the work safely. You would need to rent or own the tools necessary and be able to dispose of the debris yourself. Finally, although the DIY method seems cheaper upfront, you may experience higher costs down the road because of the overlaid roof’s reduced lifespan and any workmanship quality issues stemming from your DIY labor.</p>
<p><img class="floatright" src="//cdn.shopify.com/s/files/1/0387/9521/files/roof_replacement.jpg?2002692754014614191" alt="roof replacement" height="217" width="325"> 
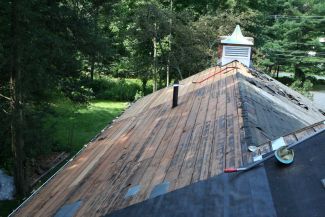
Roof replacement must be completed quickly, since it’s dangerous to leave a half-finished roof exposed to the elements. If you’re considering the DIY approach, make sure you’ll be able to finish the job fast.</p>
<p>A professional roofer will be much more efficient and knowledgeable than the average DIY homeowner and will be able to complete the job much faster and with higher quality work. Ideally, they should remove the current roof layer(s) to ensure a longer lifespan for your roof. The downside, of course, is that they will cost significantly more than a DIY job. Ultimately, the time saved and the assurance of a job well done are often worth the extra cost.</p>
<p><img class="floatleft" src="//cdn.shopify.com/s/files/1/0387/9521/files/roof_with_weathervane.jpg?2002692754014614191" alt="roof with weathervane" height="244" width="325">
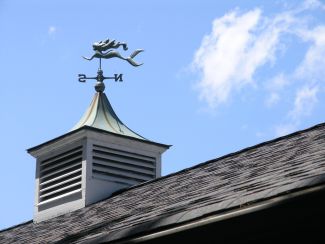
Having a solid roof over our heads is something we easily take for granted, but when that roof needs to be fixed or replaced, the costs can add up. By considering your available options and priorities ahead of time, you will avoid mistakes and keep your roof replacement costs from spiraling out of control.</p>
<p>Image sources: <a href="https://www.flickr.com/photos/artbystevejohnson/5462067310/">Steve Johnson</a>, <a href="https://www.flickr.com/photos/kikisdad/17110129/in/photostream/">Ctd 2005</a>, <a href="https://www.flickr.com/photos/pointnshoot/361779335/in/photostream/">pointnshoot</a>, and Brian Robinson <a href="https://www.flickr.com/photos/dolfindans/3725622228/in/album-72157621421080629/">1</a>, <a href="https://www.flickr.com/photos/dolfindans/3725417562/in/album-72157621421080629/">2</a>, <a href="https://www.flickr.com/photos/dolfindans/3724821093/in/album-72157621421080629/">3</a>, <a href="https://www.flickr.com/photos/dolfindans/3724611347/in/album-72157621421080629/">4</a>, <a href="https://www.flickr.com/photos/dolfindans/3724760353/in/album-72157621421080629/">5</a>, <a href="https://www.flickr.com/photos/dolfindans/3725618000/in/album-72157621421080629/">6</a>.</p>
<p class="cc-block"><a href="https://creativecommons.org/licenses/by-sa/3.0/" rel="license"><img class="cc-button" src="https://licensebuttons.net/l/by-sa/3.0/88x31.png" alt="Creative Commons License"></a> The <em><a href="https://www.waterdamagedefense.com/blogs/home-maintenance-blog/roof-replacement-cost">Roof Replacement - How Much Does a New Roof Cost?</a></em> by <em><a href="https://www.waterdamagedefense.com/blogs/home-maintenance-blog">Water Damage Defense</a></em>, is licensed under a <a href="https://creativecommons.org/licenses/by-sa/3.0/" rel="license">Creative Commons Attribution-ShareAlike 3.0 Unported License</a>.</p>]]>
    </content>
  </entry>
  <entry>
    <id>https://www.waterdamagedefense.com/blogs/home-maintenance-blog/driveway-sealing</id>
    <published>2012-08-28T17:12:00-04:00</published>
    <updated>2016-10-09T19:22:20-04:00</updated>
    <link rel="alternate" type="text/html" href="https://www.waterdamagedefense.com/blogs/home-maintenance-blog/driveway-sealing"/>
    <title>Driveway Sealing Tips</title>
    <author>
      <name>Nick Domino</name>
    </author>
    <summary type="html">
      <![CDATA[<p><a href="https://www.waterdamagedefense.com/blogs/home-maintenance-blog/driveway-sealing"><img src="//cdn.shopify.com/s/files/1/0387/9521/files/driveway_sealing_big415.jpg?18255278117260177429" alt=""></a></p>
<p>A good looking, well maintained driveway adds a lot of curb appeal to your home, while a neglected driveway can be an obvious eyesore. Fortunately it is reasonably easy to keep your driveway in good condition by repairing cracks and sealing it periodically.</p><p><a class="read-more" href="https://www.waterdamagedefense.com/blogs/home-maintenance-blog/driveway-sealing">More</a></p>]]>
    </summary>
    <content type="html">
      <![CDATA[<div itemprop="image" itemscope="" itemtype="https://schema.org/ImageObject">
<img class="floatright" src="//cdn.shopify.com/s/files/1/0387/9521/files/seal_driveway.jpg?13740296577253504187" alt="seal driveway"><meta itemprop="width" content="325">
<meta itemprop="url" content="https://cdn.shopify.com/s/files/1/0387/9521/files/seal_driveway.jpg?13740296577253504187">
<meta itemprop="height" content="244">
</div>
<p>We all spend a good amount of time and energy maintaining our houses and yards. Amid all the household repair tasks, one item that is easy to overlook is the driveway. However, a good looking, well maintained driveway adds a lot of curb appeal to your home, while a neglected driveway can be an obvious eyesore. Fortunately it is reasonably easy to keep your driveway in good condition by repairing cracks and sealing it periodically. Read on for some helpful driveway sealing tips.</p>
<p>First, a few words on some common causes of driveway cracks…</p>
<p>The initial paving job is actually often responsible for cracks that develop later. The paving may have taken place on a cold day, causing the asphalt to not set properly, for example. Also, the area under the driveway may have not been packed down sufficiently before the paving took place, allowing some areas below the driveway to shift or settle later. In the case of re-paving, the surface of the old driveway may have not been cleaned well enough before the new asphalt was laid down, preventing the new surface from bonding properly.</p>
<p><img class="floatleft" title="how to seal driveway" src="//cdn.shopify.com/s/files/1/0387/9521/files/how_to_seal_driveway.jpg?15742685588198171450" alt="how to seal driveway" height="244" width="325">
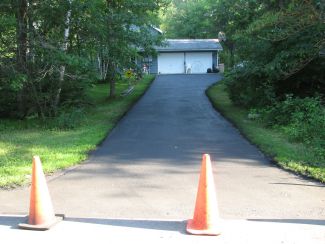
Aside from the original paving job, weather and temperature also cause cracks. In areas with cold winters, the continual freezing and thawing, combined with moisture that has seeped into the driveway surface can cause asphalt to expand and contract, eventually resulting in cracks. Additionally, asphalt can be damaged from contact with oil, gasoline, or ice-melting compounds.</p>
<h3>Driveway Sealing Tips</h3>
<p>You should seal your asphalt driveway regularly, every 2 to 4 years. One way to gauge whether your driveway is in need of a fresh coat of sealant, is to pour water onto the driveway and watch to see if it forms into beads on the surface or seeps into the asphalt. If it does make its way into the asphalt, then you should go ahead and seal the driveway.</p>
<p><img class="floatright" title="driveway sealing" src="//cdn.shopify.com/s/files/1/0387/9521/files/driveway_sealing_1.jpg?2789154814643151214" alt="driveway sealing" height="207" width="325">Here are some basic driveway sealing steps to follow. Since every situation is different, consult a driveway or asphalt professional for specific advice for your particular driveway, and be sure to follow the instructions of the driveway sealant products that you buy. Also, follow common sense safety measures, such as wearing gloves, avoiding skin contact with the sealant, and keeping from breathing in the smell of the sealant, as well as any safety precautions listed on the driveway products you buy.</p>
<ul>
<li>First, clean the driveway thoroughly. This is imperative, since the sealer needs to be able to adhere to a clean surface. Ideally, pressure wash your driveway to clean it completely. If you do not own a pressure washer, they are easy to rent from an equipment rental company. Also, completely remove all weeds (including roots), debris, dirt, and other loose items from the cracks in the driveway. Use weed killer if necessary to ensure that weeds are completely gone from the cracks.</li>
<li>
<img class="floatright" title="driveway sealing" src="//cdn.shopify.com/s/files/1/0387/9521/files/driveway_sealing.jpg?2789154814643151214" alt="driveway sealing" height="487" width="325">Fill any small, narrow driveway cracks with asphalt patching compound. Press the compound into the crack with a trowel, and smooth its surface. Wider cracks, where the ground below the driveway is visible, present a larger challenge since they could prevent the driveway sealer from working properly. For these wide cracks, fill the crack partially with sand, before filling the remaining space with crack sealer. Repairing cracks immediately as you notice them, while they are still small, is one of the most beneficial things you can do for your driveway.</li>
<li>Apply asphalt sealer to the driveway, in a side-to-side motion, instead of applying it up and down (the long way). Be sure to do this on a reasonably hot day, with low humidity, so that the sealer sets properly. Of course, keep off the driveway while the sealer is drying. Products vary, but they often require around 24 hours to set.</li>
</ul>
<p>Although you may not feel like spending a summer day laboring over hot pavement, sealing your driveway really is not that arduous of a process, for most driveways. If you regularly maintain your driveway, not only will you keep it in good condition, but you will also be rewarded with a smooth, clean looking driveway, which adds a surprising amount of visual appeal to your property.</p>
<p>Image sources <a href="https://www.flickr.com/photos/40404999@N00/874217084/">conjake6</a>, <a href="https://www.flickr.com/photos/rdowens/7227683734/lightbox/">rdowens</a>, and <a href="https://www.flickr.com/photos/positionmktg/6813652356/">positionmktg</a></p>
<p class="cc-block"><a href="https://creativecommons.org/licenses/by-sa/3.0/" rel="license"><img class="cc-button" src="https://licensebuttons.net/l/by-sa/3.0/88x31.png" alt="Creative Commons License"></a> The <em><a href="https://www.waterdamagedefense.com/blogs/home-maintenance-blog/driveway-sealing">Driveway Sealing Tips</a></em> by <em><a href="https://www.waterdamagedefense.com/blogs/home-maintenance-blog">Water Damage Defense</a></em>, is licensed under a <a href="https://creativecommons.org/licenses/by-sa/3.0/" rel="license">Creative Commons Attribution-ShareAlike 3.0 Unported License</a>.</p>]]>
    </content>
  </entry>
  <entry>
    <id>https://www.waterdamagedefense.com/blogs/home-maintenance-blog/new-roof</id>
    <published>2012-05-30T05:02:00-04:00</published>
    <updated>2016-10-09T19:22:25-04:00</updated>
    <link rel="alternate" type="text/html" href="https://www.waterdamagedefense.com/blogs/home-maintenance-blog/new-roof"/>
    <title>How to Tell if You Need a New Roof</title>
    <author>
      <name>Nick Domino</name>
    </author>
    <summary type="html">
      <![CDATA[<p><a href="https://www.waterdamagedefense.com/blogs/home-maintenance-blog/new-roof%20"><img src="//cdn.shopify.com/s/files/1/0387/9521/files/new_roof_big415.jpg?16093224180226251868" alt=""></a></p>
<p>Your home's roof protects you, your family, and your entire house from nature's elements. Like anything else, a roof requires regular care and maintenance in order to function properly and last as long as possible.</p><p><a class="read-more" href="https://www.waterdamagedefense.com/blogs/home-maintenance-blog/new-roof">More</a></p>]]>
    </summary>
    <content type="html">
      <![CDATA[<div itemprop="image" itemscope="" itemtype="https://schema.org/ImageObject">
<img class="floatright" src="//cdn.shopify.com/s/files/1/0387/9521/files/new_roof.jpg?15436382035739553461" alt="new roof"><meta itemprop="width" content="325">
<meta itemprop="url" content="https://cdn.shopify.com/s/files/1/0387/9521/files/new_roof.jpg?15436382035739553461">
<meta itemprop="height" content="219">
</div>
<p>Your home's roof protects you, your family, and your entire house from nature's elements. Like anything else, a roof requires regular care and maintenance in order to function properly and last as long as possible. Of course, wear and tear is inevitable. Even the best constructed roof will wear out eventually.</p>
<p>Some signs that you need to replace your roof are obvious, like water leaking through multiple places in your ceiling! Other signs are not as apparent and require a more thorough inspection to diagnose. Here are some telltale warning signs that you may need a new roof.</p>
<p><strong>Curling or Cupping Shingles</strong></p>
<p><img class="floatleft" title="replace roof" src="//cdn.shopify.com/s/files/1/0387/9521/files/replace_roof.jpg?3816608203804288879" alt="replace roof" height="325" width="325">
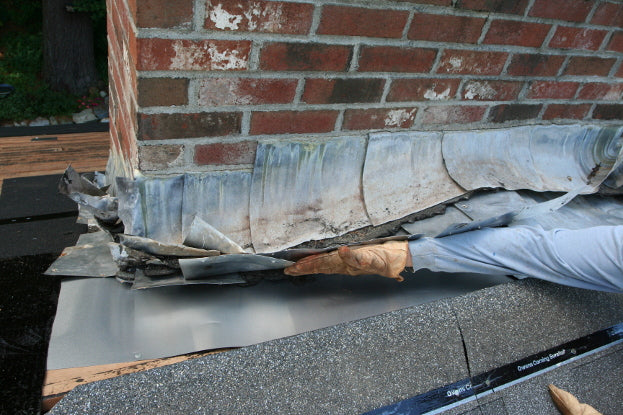
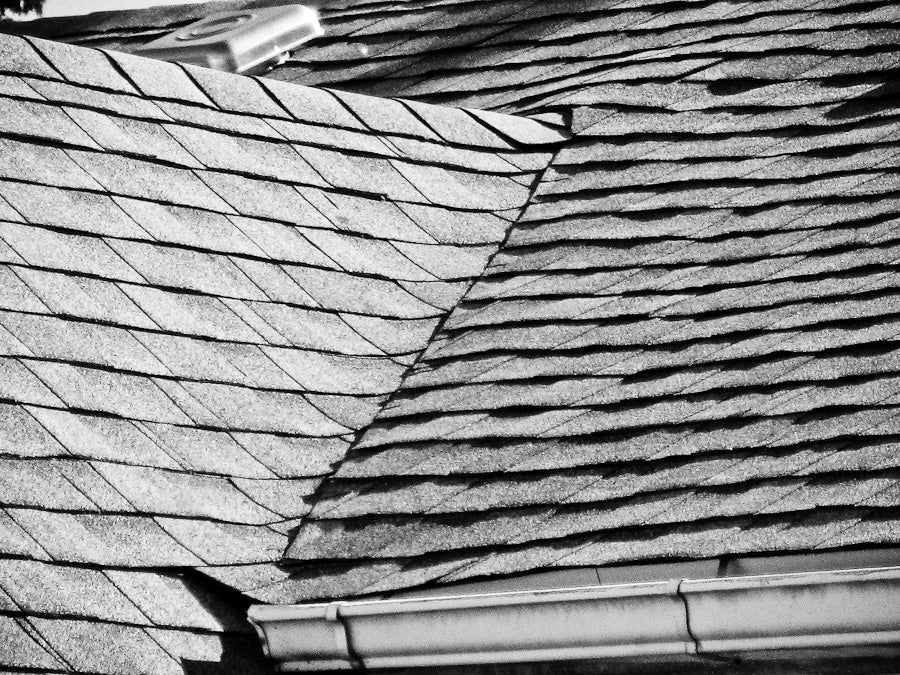
Curling is a common problem on roof shingles and typical causes include: improper shingle storage prior to installation, incorrect installation, excessively dry asphalt shingle bases, poor quality materials, or just natural wear. When shingles curl, they are no longer able to keep water from seeping through your roof, which could potentially cause serious structural damage.</p>
<p>If your roof's shingles are curled, do not attempt to walk on them, as this will only cause them to break off. Once shingles have gotten to this point, there is no way to halt or reverse the process, unfortunately. It is best to just replace them all. After you install new shingles on your roof, diligent care will help them last. Make sure you inspect them at least once per year for signs of damage or wear and replace them as necessary. It is also a good idea to check shingles for damage after strong wind storms or extreme temperature shifts.</p>
<p><strong>Shoddy Workmanship</strong></p>
<p>Unfortunately, some roof problems simply result from poor craftsmanship. If the roof was installed by an unscrupulous contractor or an inexperienced homeowner, it will often show. Ultimately, an incorrectly installed roof will dramatically shorten its useful life and could even invite serious water damage to your home.</p>
<p>Telltale signs of poor-quality workmanship include obvious and excessive patching on the roof or shingles that fit together awkwardly. Multiple layers of shingles also signal that corners were cut in a previous roof job. Years ago, it was common practice to install new shingles directly on top of the old ones to save money and time. However, this actually damages the top layer of new shingles, which essentially end up getting baked by heat from the layer(s) below. This practice is no longer considered acceptable and will probably void the warranty on your new shingles.</p>
<p><strong>Missing Shingles</strong></p>
<p><img class="floatright" title="new roof" src="//cdn.shopify.com/s/files/1/0387/9521/files/new_roof_1.jpg?4548204346175799823" alt="new roof" height="217" width="325">Shingles only protect your roof if they are all intact. Missing shingles create convenient openings, through which water can enter your home. Shingles can be pulled off your roof by strong winds or falling tree branches and can also be broken by repeated freezing and thawing. However, take special note if your shingles come off without any real provocation – if this happens they are definitely worn out.</p>
<p>Missing shingles must be replaced as soon as possible, whereas loose shingles should be sealed with flashing cement. Make sure this cement conforms to the ASTM D4586 asbestos-free standards. If you plan to handle this cement yourself, you should know that some types still contain hazardous substances. Make sure that you thoroughly read and understand the manufacturer's instructions and wear the appropriate safety gear before using flashing cement on your roof.</p>
<p><strong>Decaying Shingles</strong></p>
<p><img class="floatleft" title="replace roof" src="//cdn.shopify.com/s/files/1/0387/9521/files/replace_roof_1.jpg?960006723083465055" alt="replace roof" height="244" width="325">All roofing materials will eventually deteriorate. Often, shingles on a roof will not all go bad at once. Deteriorating shingles are actually fairly easy to notice. Look for any splitting, cracking, chipping, peeling, curling, or blistering and replace the affected shingles as necessary.</p>
<p><strong>Blistering </strong> When moisture or gas builds up inside of a shingle, it can cause the surface to bubble outward in places. This is known as blistering. Conditions that cause blistering can include a poorly ventilated attic, leaf or debris buildup, or just natural roof aging. Additionally, intense sunlight exposure can cause or exacerbate a blistering problem.</p>
<p>Blistered shingles are not necessarily a death sentence for your roof. As long as the blisters stay smaller than one-quarter of an inch and do not break open, they should not affect the useful lifespan of your roof. It is a good idea to check your roof regularly for signs of blistering and to make sure that any existing blisters have remained closed.</p>
<p><strong>Damaged Flashing</strong></p>
<p><img class="floatright" title="new roof" src="//cdn.shopify.com/s/files/1/0387/9521/files/new_roof_2.jpg?10972076824836156719" alt="new roof" height="216" width="325">Flashing is a layer of metal sheeting, usually made from copper, tin, or aluminum, installed at an angle or joint in your roof, which prevents water from breaching the roof. The most common place to find flashing is around your chimney or sewer vent pipe.</p>
<p>Asphalt roof shingles require “step flashing,” which are individual pieces of flashing covering each shingle and overlapping onto the shingle down slope. This application is usually needed where a sloping roof passes a vertical surface like a chimney. By using an individual piece of flashing for each shingle or row of shingles, a water tight seal can be maintained over time, despite daily shingle expansion and contraction from temperature swings. A larger, single piece of metal would crack apart from this expansion and contraction, letting water into the structure.</p>
<p>Flashing can also be damaged by forces like wind, snow, ice, hail, or falling tree branches. Of course, improper installation is also a common culprit. Many people prefer to caulk their flashing back into place to make it look better, but this is not always a reliable repair method. To ensure optimal protection for your roof, it is important to properly repair any damaged flashing. If you are unsure whether your flashing is in proper condition, consult a roofing expert to make sure it is not a weak point on your roof.</p>
<p><strong>Rotting</strong></p>
<p><img class="floatleft" title="replace roof" src="//cdn.shopify.com/s/files/1/0387/9521/files/replace_roof_2.jpg?1337245053065122130" alt="replace roof" height="488" width="325">If your roof is rotting, the problem should be fairly obvious and must be remedied immediately. Rot is most common in wooden shingles, but can also occur in the asphalt variety. If the shingle absorbs excessive moisture over time, rot can result. Of course, rotten shingles tend to occur most often in geographic areas with significant humidity or rainfall.</p>
<p>If some shingles are rotting, the rest could follow soon. Rather than wasting time and energy replacing many individual shingles and prolonging the inevitable, you should bite the bullet and replace them all.</p>
<p><strong>Algae Buildup</strong></p>
<p>Algae growth is worth mentioning here as well. Fortunately, however, it is NOT a sign that something is wrong with your roof or that you need to replace shingles. Although algae does discolor shingles, causing an eyesore, the algae buildup itself is not harmful to your roof. This problem is typical in humid geographic regions, especially for homeowners with shake roofs.</p>
<p>Algae is fairly simple to control. If you spray it forcefully with a garden hose, you should be able to remove a good amount of it. If the buildup is extremely thick, you may want to consider replacing your existing shingles with algae-resistant ones. You can also use a weak solution of hydrogen peroxide, mixed with water to deal with persistent algae.</p>
<p>A healthy roof on your home is important. It keeps you and the structure safe. Stay vigilant and monitor your roof for signs of wear or damage, and take early action to correct problems before they get worse. Finally, it is always a good idea to consult a roof expert before embarking on a maintenance project, or if you are unsure of your roof’s condition. To help your roof last a long time, see our article on avoiding <a title="Avoiding Roof Problems" href="https://www.waterdamagedefense.com/blogs/home-maintenance-blog/avoiding-roof-problems">roof problems</a>. Or if it's time to replace, here is our article on how much a <a title="Roof Replacement – How Much Does a New Roof Cost?" href="https://www.waterdamagedefense.com/blogs/home-maintenance-blog/roof-replacement-cost">new roof costs</a>.</p>
<p>Image sources: <a href="https://www.flickr.com/photos/architecturegeek/8030545633/">architecturegeek</a>, <a href="https://www.flickr.com/photos/daleus/2232209561/sizes/m/in/photostream/">daleus</a>, <a href="https://www.flickr.com/photos/dolfindans/3724703883/">dolfindans</a>, and <a href="https://www.flickr.com/photos/dbjorn/1440315671/">dbjorn</a></p>
<p class="cc-block"><a href="https://creativecommons.org/licenses/by-sa/3.0/" rel="license"><img class="cc-button" src="https://licensebuttons.net/l/by-sa/3.0/88x31.png" alt="Creative Commons License"></a> The <em><a href="https://www.waterdamagedefense.com/blogs/home-maintenance-blog/new-roof">How to Tell if You Need a New Roof</a></em> by <em><a href="https://www.waterdamagedefense.com/blogs/home-maintenance-blog">Water Damage Defense</a></em>, is licensed under a <a href="https://creativecommons.org/licenses/by-sa/3.0/" rel="license">Creative Commons Attribution-ShareAlike 3.0 Unported License</a>.</p>]]>
    </content>
  </entry>
  <entry>
    <id>https://www.waterdamagedefense.com/blogs/home-maintenance-blog/painting-tips</id>
    <published>2012-04-27T09:43:00-04:00</published>
    <updated>2016-10-09T19:22:30-04:00</updated>
    <link rel="alternate" type="text/html" href="https://www.waterdamagedefense.com/blogs/home-maintenance-blog/painting-tips"/>
    <title>Common DIY Painting Mistakes and Professional Tips on Avoiding Them, Part 3</title>
    <author>
      <name>Nick Domino</name>
    </author>
    <summary type="html">
      <![CDATA[<p><a href="https://www.waterdamagedefense.com/blogs/home-maintenance-blog/painting-tips%20"><img src="//cdn.shopify.com/s/files/1/0387/9521/files/painting_tips_and_tricks_big415.jpg?6010113651083423089" alt=""></a></p>
<p>Mistake #9: Using the wrong paint finish or the wrong roller cover.<br><br>Why it’s bad: You will end up with a compromised finished product or spend extra time and money painting an additional coat.</p><p><a class="read-more" href="https://www.waterdamagedefense.com/blogs/home-maintenance-blog/painting-tips">More</a></p>]]>
    </summary>
    <content type="html">
      <![CDATA[<div itemprop="image" itemscope="" itemtype="https://schema.org/ImageObject">
<img class="floatright" src="//cdn.shopify.com/s/files/1/0387/9521/files/house_painting_tips.jpg?18251785658966055127" alt="house painting tips"><meta itemprop="width" content="325">
<meta itemprop="url" content="https://cdn.shopify.com/s/files/1/0387/9521/files/house_painting_tips.jpg?18251785658966055127">
<meta itemprop="height" content="217">
</div>
<p>This is a 3-article series, containing a total of 11 important house painting tips and tricks from professional painter Bruce Scofield. See the first 2 installments here: <a title="Common DIY Painting Mistakes and Professional Tips on Avoiding Them, Part 1" href="https://www.waterdamagedefense.com/blogs/home-maintenance-blog/wall-painting-techniques">painting techniques</a>, part 1, and <a title="Common DIY Painting Mistakes and Professional Tips on Avoiding Them, Part 2" href="https://www.waterdamagedefense.com/blogs/home-maintenance-blog/diy-painting">DIY painting</a> tips part 2. Continuing on in our final article, we come to mistake #9…</p>
<p><strong>Mistake #9: Using the wrong paint finish or the wrong roller cover.</strong></p>
<p><strong>Why it’s bad</strong>: You will end up with a compromised finished product or spend extra time and money painting an additional coat.</p>
<p><strong>Do this instead</strong>: Choose the finish of your paint according to the surface being covered. There are six paint finishes, covering a spectrum from most shiny to least: gloss, semi-gloss, satin, eggshell, matte, and flat. Generally speaking when painting interior spaces, Bruce recommends eggshell finish for walls (it can be cleaned easier than flat, yet is not too shiny) and semi-gloss for trim. Using semi-gloss on the walls of your home will give it an industrial feel. Of course, there is a lot of leeway for specific situations, and your local paint supplier is usually a wealth of information on what type of paint to use. Remember, shinier paint will cause more surface imperfections will show. However, a glossy finish can be perfect for a nice book shelf or piece of furniture.</p>
<p>The length of the nap on a roller has to fit the surface being painted, as well as the paint finish. Use a ½ inch roller cover for flat paint and 3/8 inch for semi-gloss and small foam rollers are great for a smooth glossy paint finish. Also keep in mind you will need a longer nap to paint a rougher surface texture, for instance a textured ceiling.</p>
<p><strong> Mistake #10: Incorrect use of primer.</strong></p>
<p><strong><img class="floatright" title="painting tips and tricks" src="//cdn.shopify.com/s/files/1/0387/9521/files/painting_tips_and_tricks.jpg?15124481573073828899" alt="painting tips and tricks" height="244" width="325">Why it’s bad</strong>: Your expensive finish paint will soak in too much, not adhere well, or absorb unevenly.</p>
<p><strong>Do this instead</strong>: The purpose of primer is to seal porous surfaces and create a uniform layer, to which your finish paint will evenly absorb and readily adhere. Always use primer when painting over the following surfaces: raw or unfinished material, latex paint with a sheen finish (only latex flat finish doesn’t need primer), oil-based paint, and joint compound. You may need to sand wood very lightly with fine grit sandpaper (#150 or finer) if the wood grain lifts up from the surface after the first coat of primer is applied. Patches of joint compound will show through a finished coat by displaying a different sheen if you don’t prime them. Bruce recommends dabbing two coats of primer on patches, allowing drying time in between while working on other tasks. When appropriate, use a small roller for this job and have the roller texture match the rest of the wall.</p>
<p>If you are covering a surface permeated with smoke, oil primer is necessary; be sure to use a quality respirator when applying any oil based product. Also, take advantage of specialty primers made to accommodate various surface applications, for instance to block stains or resist mildew potentially found in damp areas such as basements or bathrooms.</p>
<p><strong> Mistake #11: Expecting more color coverage than is realistic for bold colors.</strong></p>
<p><strong><img class="floatright" title="house painting tips" src="//cdn.shopify.com/s/files/1/0387/9521/files/house_painting_tips_1.jpg?17969204112465948270" alt="house painting tips" height="459" width="325">Why it’s bad</strong>: You may underestimate the amount of paint and time required to complete the job.
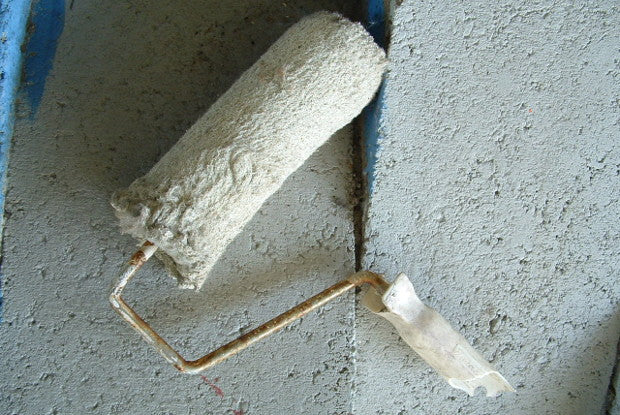
</p>
<p><strong>Do this instead</strong>: If painting a pastel color over a dark color, paint at least one, or if necessary, two coats of white first. This is the only way to get your true color. If painting an intense color such as red or orange, first paint a base coat of neutral gray. Many bright colors have little covering power so you may need to experiment a little to get the effect you want.</p>
<p>That’s the last of our 11 tips from painter Bruce Scofield. He has a lot of tricks in his painter’s cap; pull some out and put them to good use on your next DIY project. They are tried and true methods that will improve your painting proficiency.</p>
<p>Bruce: Please accept our sincere appreciation for sharing this excellent painting advice from the wealth of experience you have accumulated over your long professional career. We have seen your work firsthand and attest to the fine finished surfaces that are the result of your knowledge and capability!</p>
<p>Image source <a href="https://www.flickr.com/photos/quirky/218134337/">quirky</a></p>
<p class="cc-block"><a href="https://creativecommons.org/licenses/by-sa/3.0/" rel="license"><img class="cc-button" src="https://licensebuttons.net/l/by-sa/3.0/88x31.png" alt="Creative Commons License"></a> The <em><a href="https://www.waterdamagedefense.com/blogs/home-maintenance-blog/painting-tips">Common DIY Painting Mistakes and Professional Tips on Avoiding Them, Part 3</a></em> by <em><a href="https://www.waterdamagedefense.com/blogs/home-maintenance-blog">Water Damage Defense</a></em>, is licensed under a <a href="https://creativecommons.org/licenses/by-sa/3.0/" rel="license">Creative Commons Attribution-ShareAlike 3.0 Unported License</a>.</p>]]>
    </content>
  </entry>
  <entry>
    <id>https://www.waterdamagedefense.com/blogs/home-maintenance-blog/diy-painting</id>
    <published>2012-03-13T11:06:00-04:00</published>
    <updated>2016-10-09T19:22:35-04:00</updated>
    <link rel="alternate" type="text/html" href="https://www.waterdamagedefense.com/blogs/home-maintenance-blog/diy-painting"/>
    <title>Common DIY Painting Mistakes and Professional Tips on Avoiding Them, Part 2</title>
    <author>
      <name>Nick Domino</name>
    </author>
    <summary type="html">
      <![CDATA[<p><a href="https://www.waterdamagedefense.com/blogs/home-maintenance-blog/diy-painting%20"><img style="display: block; margin-left: auto; margin-right: auto;" src="//cdn.shopify.com/s/files/1/0387/9521/files/diy_painting_big415.jpg?13666874683766442305" alt=""></a></p>
<p>Mistake #5: Using the wrong amount of paint for the situation.<br><br>Why it’s bad: Whether evidenced in blotches, streaks, drips, or ridges - unevenness in paint application is noticeable and never looks good.</p><p><a class="read-more" href="https://www.waterdamagedefense.com/blogs/home-maintenance-blog/diy-painting">More</a></p>]]>
    </summary>
    <content type="html">
      <![CDATA[<div itemprop="image" itemscope="" itemtype="https://schema.org/ImageObject">
<img class="floatright" src="//cdn.shopify.com/s/files/1/0387/9521/files/how_to_paint_a_room.jpg?17377438856839002194" alt="how to paint a room"><meta itemprop="width" content="325">
<meta itemprop="url" content="https://cdn.shopify.com/s/files/1/0387/9521/files/how_to_paint_a_room.jpg?17377438856839002194">
<meta itemprop="height" content="218">
</div>
<p>This is a 3-article series, containing a total of 11 DIY painting tips from professional painter Bruce Scofield. Read the whole series to learn how to paint a room like a pro! See the first installment here, <a title="Common DIY Painting Mistakes and Professional Tips on Avoiding Them, Part 1" href="https://www.waterdamagedefense.com/blogs/home-maintenance-blog/wall-painting-techniques">painting techniques</a>, part 1. Continuing on, we come to mistake #5…</p>
<p><strong>Mistake #5: Using the wrong amount of paint for the situation.</strong></p>
<p><strong>Why it’s bad</strong>: Whether evidenced in blotches, streaks, drips, or ridges - unevenness in paint application is noticeable and never looks good.</p>
<p><strong>Do this instead</strong>: Plan on using two coats of finish paint to reach an attractive, even effect. When doing touch-up, it’s always better to paint multiple thin coats than one heavy one, which will leave a ridge. A raw, unfinished surface will absorb more paint than a finished one, so adjust the amount you use accordingly. It takes experience to load your roller or brush with the right amount of paint; too much will cause drips, too little is difficult to spread evenly. Keep your roller wet with paint; do not let it run dry, stretching the paint too far. Add to your efficiency and neatness by keeping your paint supply close by. Never use a larger than quart size container to brush from; it is easy to overload your brush when using a large paint bucket. When masking, make sure you achieve a very good seal with quality painter’s tape and then apply paint sparingly to the tape; otherwise paint is apt to seep under your masking job.</p>
<p><strong>Mistake #6: Not preparing your brush or roller cover for use.</strong></p>
<p><strong><img class="floatright" title="diy painting" src="//cdn.shopify.com/s/files/1/0387/9521/files/diy_painting.jpg?15365822556782673882" alt="diy painting" height="239" width="325">Why it’s bad</strong>: The brush or roller will not accept the proper amount of paint. Paint will tend to wick upward toward the top of your brush where it you do not want it, making the brush hard to clean. New rollers fresh from the package may leave a trail of fuzz on the painted surface.</p>
<p><strong>Do this instead</strong>: Dampen your brush then shake out the excess. Wet your roller cover in a sink, run the edge of a putty knife over it to squeeze out the majority of excess water, and then spin the roller, leaving it damp.</p>
<p><strong>Mistake #7: Careless ladder use</strong></p>
<p><img class="floatleft" title="how to paint a room" src="//cdn.shopify.com/s/files/1/0387/9521/files/how_to_paint_a_room_1.jpg?13703180402356959732" alt="how to paint a room" height="244" width="325"></p>
<p><strong>Why it’s bad</strong>: Misuse of a ladder is a frequent cause of DIY accidents.</p>
<p><strong>Do this instead</strong>: Climb a ladder only as far as you are comfortable. Don’t reach out too far. Take the time to make sure the ladder is stable and move it as often as necessary.</p>
<p><strong>Mistake #8: Believing all the advertising in the paint industry.</strong></p>
<p><strong>Why it’s bad</strong>: You can needlessly spend extra money for a designer name or the promise of one-coat product.</p>
<p><strong>Do this instead</strong>: Keep in mind that the number of coats necessary for the job completely depends on the surface you are painting. Most paints on the market are very similar and any good paint store can mix whatever color you want.</p>
<p>Continue reading in the third and final installment of DIY <a title="Common DIY Painting Mistakes and Professional Tips on Avoiding Them, Part 3" href="https://www.waterdamagedefense.com/blogs/home-maintenance-blog/painting-tips">painting tips</a> from Bruce.</p>
<p>Image source: <a href="https://www.flickr.com/photos/perspicacious/4733905951/">perspicacious</a></p>
<p class="cc-block"><a href="https://creativecommons.org/licenses/by-sa/3.0/" rel="license"><img class="cc-button" src="https://licensebuttons.net/l/by-sa/3.0/88x31.png" alt="Creative Commons License"></a> The <em><a href="https://www.waterdamagedefense.com/blogs/home-maintenance-blog/diy-painting">Common DIY Painting Mistakes and Professional Tips on Avoiding Them, Part 2</a></em> by <em><a href="https://www.waterdamagedefense.com/blogs/home-maintenance-blog">Water Damage Defense</a></em>, is licensed under a <a href="https://creativecommons.org/licenses/by-sa/3.0/" rel="license">Creative Commons Attribution-ShareAlike 3.0 Unported License</a>.</p>]]>
    </content>
  </entry>
  <entry>
    <id>https://www.waterdamagedefense.com/blogs/home-maintenance-blog/wall-painting-techniques</id>
    <published>2012-02-27T07:15:00-05:00</published>
    <updated>2016-10-15T18:29:24-04:00</updated>
    <link rel="alternate" type="text/html" href="https://www.waterdamagedefense.com/blogs/home-maintenance-blog/wall-painting-techniques"/>
    <title>Common DIY Painting Mistakes and Professional Tips on Avoiding Them, Part 1</title>
    <author>
      <name>Nick Domino</name>
    </author>
    <summary type="html">
      <![CDATA[<p><a href="https://www.waterdamagedefense.com/blogs/home-maintenance-blog/wall-painting-techniques%20"><img src="//cdn.shopify.com/s/files/1/0387/9521/files/wall_painting_techniques_big415.jpg?10246311914082613872" alt=""></a></p>
<p>Mistake #1: Skimping on surface prep.<br><br>Why it’s bad: Paint is just a thin covering; there is a limit to what it will hide. In order to achieve the full visual benefit of a fresh coat of paint,</p><p><a class="read-more" href="https://www.waterdamagedefense.com/blogs/home-maintenance-blog/wall-painting-techniques">More</a></p>]]>
    </summary>
    <content type="html">
      <![CDATA[<p>This is a 3-article series, containing a total of 11 important painting tips from a professional painter.</p>
<div itemprop="image" itemscope="" itemtype="https://schema.org/ImageObject">
<img class="floatright" src="//cdn.shopify.com/s/files/1/0387/9521/files/how_to_paint_a_wall.jpg?5654774043627665397" alt="how to paint a wall"><meta itemprop="width" content="325">
<meta itemprop="url" content="https://cdn.shopify.com/s/files/1/0387/9521/files/how_to_paint_a_wall.jpg?5654774043627665397">
<meta itemprop="height" content="217">
</div>
<p>Bruce Scofield has over 50 years of experience as a professional painter. Name any type of surface and he has most likely painted it! We recently asked him to share his tips for those of us who lack his expertise. In this series of articles, we highlight some common mistakes he has observed over the years, along with his advice on what to do instead. Want to find out how to paint a wall before you embark on your first painting project? Read on...</p>
<p><strong>Mistake #1: Skimping on surface prep.</strong></p>
<p><strong>Why it’s bad</strong>: Paint is just a thin covering; there is a limit to what it will hide. In order to achieve the full visual benefit of a fresh coat of paint, the imperfections of a surface must be corrected as much as possible before you ever touch the paint bucket. Some surfaces will need special treatment.</p>
<p><strong>Do this instead</strong>: Replace any sheetrock or wood that is damaged. Wood may need sanding if it is not smooth. If there is mold on the surface to be painted, wash it off with a 2 to 1 solution of water to bleach, or the new paint will peel. Always wash a dirty surface or any outside surface before painting. Otherwise the paint will not adhere properly. Lightly sanding previously painted surfaces will also help with surface adhesion. Scrape off any old globs or peeling paint with a stiff putty knife. Apply joint compound over small holes or depressions with a flexible putty knife. Use one stroke to apply it, then another stroke at a 90 degree angle to the first stroke to wipe away any excess. Do not overwork the joint compound. If you are inexperienced, you may need to very gently sand this area first, before painting, using fine grit sandpaper (refer to upcoming tip # 10 on the use of primer).</p>
<p>Another professional tip is to neatly apply paintable caulk to fill any gaps between trim and your wall surface. Gently smooth the bead of caulk with your finger, removing any excess; you may want to dampen your finger. If you are not experienced with caulking, Bruce recommends these steps to avoid a messy trim surface: mask the trim, apply the caulk, smooth the caulk into the gap, then pull off the masking tape, leaving a neat edge along the caulking.</p>
<p><strong>Mistake #2: Buying poor quality brushes and roller covers.</strong></p>
<p><strong><img class="floatright" title="wall painting techniques" src="//cdn.shopify.com/s/files/1/0387/9521/files/wall_painting_techniques.jpg?15124085655983697478" alt="wall painting techniques" height="244" width="325">Why it’s bad</strong>: Inferior painting tools make painting more difficult than it needs to be. It is hard to produce a good result when your brushes and rollers do not perform well. Inexpensive brushes may be stiff, shed bristles, and make it difficult to paint a crisp line. Poor quality roller covers will leave ragged edges.</p>
<p><strong>Do this instead</strong>: Buy good quality brushes and rollers. As with most trades, good tools can make the difference between a well-executed painting project or one that is aggravating to accomplish and has a poor result. Good brushes hold paint well, which makes it easier to paint with smooth strokes and as few brush marks as possible. A good quality roller cover will apply paint consistently, helping you avoid roller marks. Thoroughly clean these tools immediately after use, and you will be able to use them many times.</p>
<p><strong>Mistake #3: Leaving hardware in place.</strong></p>
<p><strong><img class="floatright" title="painting techniques for walls" src="//cdn.shopify.com/s/files/1/0387/9521/files/painting_techniques_for_walls.jpg?16733585681265510486" alt="painting techniques for walls" height="216" width="325">Why it’s bad</strong>: Carefully painting around hardware is difficult and time consuming. Anything that detracts from the uniform painted surface is noticeable and should be avoided. A small gap or ridge in the new paint or, even worse, a dab of misplaced paint does look surprisingly unsightly.
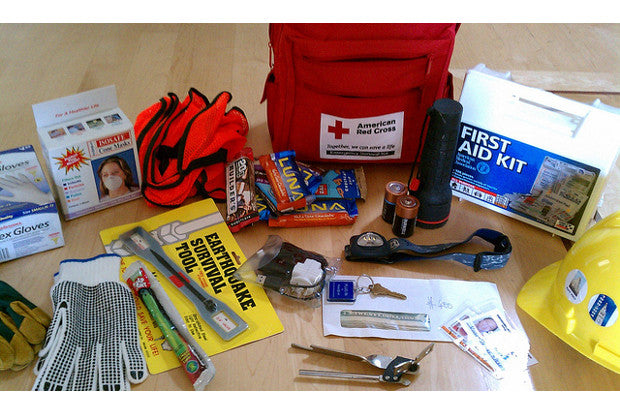
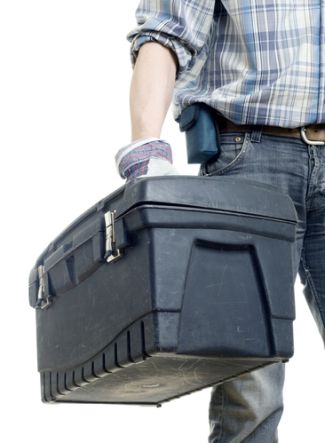
</p>
<p><strong>Do this instead</strong>: Remove switch plates, curtain hardware, cabinet handles and anything you do not want to paint that is reasonably easy to remove. You can mask around door knobs and light fixtures. This will be worth your time in the long run and will give you a superior, uniformly finished look.</p>
<p><strong>Mistake #4: Being ill-prepared for accidents. </strong></p>
<p><strong>Why it’s bad</strong>: Paint can easily end up where it’s not supposed to be – for example, tracked across your floor!</p>
<p><strong>Do this instead</strong>: Cover all floors with drop cloths, card board, craft paper, or even old sheets. Keep a damp cloth handy to quickly wipe any stray strokes or splatters. Avoid spills by never setting your paint container on a ladder. Make your job easier by using these tools: a hook to hang a paint bucket on a ladder, a handy paint cup to hold a small amount of paint (some even have a magnet to hold your brush), and a long handle attachment for rolling on high spaces.</p>
<p>We’ll continue this series in our next installment, with 4 more <a title="Common DIY Painting Mistakes and Professional Tips on Avoiding Them, Part 2" href="https://www.waterdamagedefense.com/blogs/home-maintenance-blog/painting-tips">DIY painting</a> tips from Bruce.</p>
<p>Image sources: <a href="https://www.flickr.com/photos/mediadeo/2163657440/">mediadeo</a> and <a href="https://www.flickr.com/photos/juniorvelo/3571890574/">juniorvelo</a></p>
<p class="cc-block"><a href="https://creativecommons.org/licenses/by-sa/3.0/" rel="license"><img class="cc-button" src="https://licensebuttons.net/l/by-sa/3.0/88x31.png" alt="Creative Commons License"></a> The <em><a href="https://www.waterdamagedefense.com/blogs/home-maintenance-blog/wall-painting-techniques">Common DIY Painting Mistakes and Professional Tips on Avoiding Them, Part 1</a></em> by <em><a href="https://www.waterdamagedefense.com/blogs/home-maintenance-blog">Water Damage Defense</a></em>, is licensed under a <a href="https://creativecommons.org/licenses/by-sa/3.0/" rel="license">Creative Commons Attribution-ShareAlike 3.0 Unported License</a>.</p>]]>
    </content>
  </entry>
  <entry>
    <id>https://www.waterdamagedefense.com/blogs/home-maintenance-blog/home-emergency-kit</id>
    <published>2012-01-29T12:15:00-05:00</published>
    <updated>2016-10-09T19:23:14-04:00</updated>
    <link rel="alternate" type="text/html" href="https://www.waterdamagedefense.com/blogs/home-maintenance-blog/home-emergency-kit"/>
    <title>How to Make a Home Emergency Kit</title>
    <author>
      <name>Nick Domino</name>
    </author>
    <summary type="html">
      <![CDATA[<p><a href="https://www.waterdamagedefense.com/blogs/home-maintenance-blog/home-emergency-kit%20"><img src="//cdn.shopify.com/s/files/1/0387/9521/files/home_survival_kit_big415.jpg?6862948822730453839" alt=""></a></p>
<p>Although we hope you never need it, it is important to spend the time to make a home emergency kit. If a sudden disaster, like a hurricane, flood, or long term power outage, strikes, your everyday lifestyle could be turned upside down.</p><p><a class="read-more" href="https://www.waterdamagedefense.com/blogs/home-maintenance-blog/home-emergency-kit">More</a></p>]]>
    </summary>
    <content type="html">
      <![CDATA[<p>Although we hope you never need it, it is important to spend the time to make a home emergency kit. If a sudden disaster, like a hurricane, flood, or long term power outage, strikes, your everyday lifestyle could be turned upside down. It does not take long to craft a plan for emergency situations, and gathering necessary supplies is actually fairly easy to do (it becomes hard, though, once the crisis hits!).</p>
<p>In general, FEMA (Federal Emergency Management Agency) recommends being ready for emergencies in these basic areas: water, food, first aid supplies, sanitation / clothing / bedding, tools, and special items.</p>
<p><strong>Water</strong> – Have a 3 to 7 day supply on hand. Estimate your needs at approximately a gallon per person per day, with half of the water being used for drinking and half for hygiene. You may need water purification tablets as well.</p>
<div itemprop="image" itemscope="" itemtype="https://schema.org/ImageObject">
<img class="floatright" src="//cdn.shopify.com/s/files/1/0387/9521/files/home_emergency_kit.jpg?3591233310361875883" alt="home emergency kit"><meta itemprop="width" content="325">
<meta itemprop="url" content="https://cdn.shopify.com/s/files/1/0387/9521/files/home_emergency_kit.jpg?3591233310361875883">
<meta itemprop="height" content="215">
</div>
<p><strong>Food</strong> – Have at least a 3 day supply of non-perishable, easy to prepare foods. Try avoiding salty foods in order to limit thirst. Freeze-dried food like dried fruits, granola bars, beef jerky, or non-perishable high energy foods work well. Canned items like condensed meats and soups, canned fruits and vegetables, and fruit juices are also good choices. Make sure you have a hand can opener to access them. Also, items like peanut butter and jelly, hard candy, canned nuts, and vitamins are good to have on hand, and can be comforting during disasters. Of course, periodically check to make sure that your supply's expiration dates have not passed.</p>
<p>Regarding food choices, <a href="http://www.fema.gov/pdf/library/f&amp;web.pdf" target="_blank">FEMA suggests (PDF)</a>, “As you stock food, take into account your family’s unique needs and tastes. Familiar foods are important. They lift morale and give a feeling of security in times of stress. Try to include foods they will enjoy and that are also high in calories and nutrition. Foods that do not require refrigeration, water, special preparation or cooking are best.”</p>
<p><a href="http://www.redcross.org/prepare/location/home-family/get-kit" target="_blank">Red Cross advises</a>, that individuals with special diets will need particular attention, as will babies, toddlers, and the elderly. (Baby supplies could include bottles, formula, baby food and diapers.) Canned dietetic foods may be helpful for ill or elderly people.</p>
<p>Kitchen supplies to have on hand, besides a manual can opener, include: aluminum foil, utensils for eating and cooking, disposable plates and bowls, re-sealable plastic bags, household bleach, paper towels, and garbage bags for trash storage.</p>
<p><strong><img class="floatright" title="home survival kit" src="//cdn.shopify.com/s/files/1/0387/9521/files/home_survival_kit.jpg?3591233310361875883" alt="home survival kit" height="244" width="325">First Aid Kit</strong> – To treat cuts and prevent infections, have peroxide or antibiotic cream available. Also, include bandages of various sizes and gauze, with medical tape for fastening. Other necessities include tweezers, gloves, burn ointment, scissors, a first aid manual, and pain relievers. Dust masks are a good idea as well, since you may have to protect yourself from dust or debris in the air. Finally, moistened towelettes are always helpful to have on hand to make it easier to stay clean.
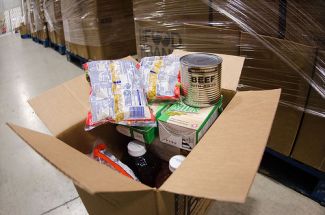
</p>
<p><strong>Medications</strong> - Have a 7 day supply of essential medicine that your family needs, along with backups of necessities like eye glasses, contact lenses with cleaning solution, or hearing aids with extra batteries.</p>
<p><strong>Sanitation / Clothing / Bedding</strong> – Basics to have on hand include: toilet paper, paper towels, hand sanitizer, moist towelettes (also mentioned above), feminine supplies, and any other personal hygiene items you regularly need.</p>
<p>Anticipate your climate requirements, and have the following for each person: blankets or sleeping bags, a complete change of extra clothing, a hat, and sturdy shoes. Rain gear, insect repellant, and sun screen are also beneficial to pack.</p>
<p><strong><img class="floatright" title="home emergency kit" src="//cdn.shopify.com/s/files/1/0387/9521/files/home_emergency_kit_1.jpg?3591233310361875883" alt="home emergency kit" height="244" width="325">Tools and Equipment</strong> – It is a good idea to have a battery powered or hand crank radio in your kit. You should also have a <a href="http://www.nws.noaa.gov/nwr/" target="_blank">NOAA Weather Radio</a> with a tone alert. Of course, keep a supply of extra batteries for both. Actually, it is best to have a model that has both battery and solar power supply options. Some models can even be used to charge cell phones when the power is off.</p>
<p>Flashlights and extra batteries are a fundamental requirement for your supply kit. Lights are comforting as well as vital for safety. It is best to avoid candles or open flames, which could prove dangerous if unknown flammable leaks are present on your property. A wrench or pliers are also helpful, since you may have to turn off your utilities. Always useful in everyday life, duct tape is a must during an emergency. Also, have a roll of plastic sheeting, which can be used to construct an instant temporary shelter or seal window openings.</p>
<p>Matches in a water-proof container are worth having on hand, especially if you have a fireplace or wood stove that you can operate safely. Make sure you have a supply of firewood as well.</p>
<p><a href="http://www.survivorgeek.com/pages/Emergency-uses-for-Paracord.html" target="_blank">Paracord </a>and <a href="http://blackdiamondequipment.com/en/climbing-carabiners-quickdraws" target="_blank">carabiners </a>have a huge variety of uses in survival situations, including making tourniquets, splints, and temporary shelters, as well as hoisting and securing objects on the fly. Keep well-made versions of both in your survival kit, along with a book on survival techniques, like the <a href="http://www.amazon.com/gp/product/0061733199/?tag=d0c922-20" target="_blank">SAS Survival Handbook</a>.</p>
<p><strong>Specialty Items</strong> –Keep copies of personal documents (medication lists, medical information, deed or lease to home, birth certificates, insurance policies), photocopies of identification and credit cards, bank and investment account information, family photos, passports, and contact information for friends, relatives, doctors, and emergency numbers. All of this information should be in a water-proof, portable container.</p>
<p>You may need the following miscellaneous items:</p>
<ul>
<li>Cell phone and chargers. Have a solar power source if possible.</li>
<li>Whistle to signal for help.</li>
<li>Extra car and house keys.</li>
<li>Extra cash.</li>
<li>Pet needs - food, medicine, and extra water.</li>
<li>Entertainment items like books, games, puzzles, paper, and pens.</li>
<li>Camera so you can document damage to your property.</li>
<li>Map of your area.</li>
<li>Full tank of gas in your vehicle.</li>
</ul>
<p><strong><img class="floatright" title="home survival kit" src="//cdn.shopify.com/s/files/1/0387/9521/files/home_survival_kit_1.jpg?3591233310361875883" alt="home survival kit" height="193" width="325">Resource Websites</strong>: Many of these suggestions came from the sources below, which contain a wealth of advice on specific emergency situations and items to include in your home survival kit.
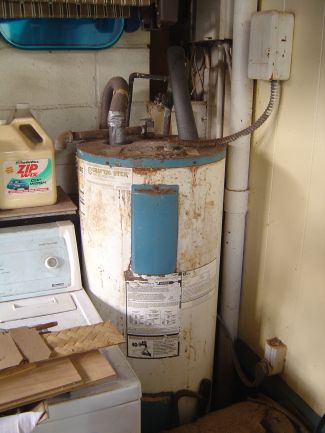
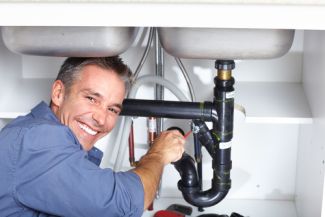
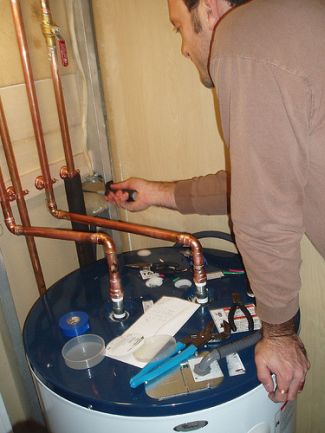
</p>
<p><a href="http://www.redcross.org/prepare" target="_blank">Red Cross</a></p>
<p>Tel: 1-866-GET-INFO will also access the American Red Cross’ “Be Red Cross Ready” checklists. They are very helpful and free.</p>
<p><a href="http://www.ready.gov/index.html" target="_blank">FEMA</a> – The Federal Emergency Management Agency, offers a helpful list on its website, called “Recommended Items to Include in a Basic Emergency Kit.”</p>
<p>Individual states and local communities often have their own dedicated websites on this topic, with specifics on local climates, challenges, and needs.</p>
<p>Whether you have experienced serious emergencies in the past or have been fortunate enough to avoid this type of situation, it is important to be prepared for such an event in the future. These situations can be exceedingly stressful and can change people’s lives, long after the event. It is absolutely worth taking an hour or two during your free time to put together an emergency supply kit.</p>
<p>Image sources: <a href="http://www.flickr.com/photos/usdagov/6763024389/sizes/m/in/photostream/">US Department of Agriculture</a>, <a href="https://www.flickr.com/photos/honan/3779689068/sizes/m/in/photostream/">honan</a>, <a href="https://www.flickr.com/photos/santiagonicolau/6346741321/sizes/m/in/photostream/">santiagonicolau</a>, and <a href="https://www.flickr.com/photos/globalx/5532445369/sizes/m/in/photostream/">globalx</a></p>
<p class="cc-block"><a href="https://creativecommons.org/licenses/by-sa/3.0/" rel="license"><img class="cc-button" src="https://licensebuttons.net/l/by-sa/3.0/88x31.png" alt="Creative Commons License"></a> The <em><a href="https://www.waterdamagedefense.com/blogs/home-maintenance-blog/home-emergency-kit">How to Make a Home Emergency Kit</a></em> by <em><a href="https://www.waterdamagedefense.com/blogs/home-maintenance-blog">Water Damage Defense</a></em>, is licensed under a <a href="https://creativecommons.org/licenses/by-sa/3.0/" rel="license">Creative Commons Attribution-ShareAlike 3.0 Unported License</a>.</p>]]>
    </content>
  </entry>
  <entry>
    <id>https://www.waterdamagedefense.com/blogs/home-maintenance-blog/plumbing-maintenance</id>
    <published>2011-11-14T18:35:00-05:00</published>
    <updated>2016-10-09T19:23:20-04:00</updated>
    <link rel="alternate" type="text/html" href="https://www.waterdamagedefense.com/blogs/home-maintenance-blog/plumbing-maintenance"/>
    <title>10 Tips for Avoiding Plumbing Emergencies</title>
    <author>
      <name>Nick Domino</name>
    </author>
    <summary type="html">
      <![CDATA[<p><a href="https://www.waterdamagedefense.com/blogs/home-maintenance-blog/plumbing-maintenance%20"><img src="//cdn.shopify.com/s/files/1/0387/9521/files/plumbing_maintenance_big.jpg?14955403959054909691" alt=""></a></p>
<p>By regularly examining your plumbing system, and performing preventative maintenance, you can save yourself from both costly repair bills and the slow, steady expense caused by drips and leaks.</p><p><a class="read-more" href="https://www.waterdamagedefense.com/blogs/home-maintenance-blog/plumbing-maintenance">More</a></p>]]>
    </summary>
    <content type="html">
      <![CDATA[<p>Plumbing maintenance may not be the most exciting topic to read about, but it is well worth your attention! By regularly examining your plumbing system, and performing preventative maintenance, you can save yourself from both costly repair bills and the slow, steady expense caused by drips and leaks. Read on for a maintenance checklist to help you stay ahead of common plumbing problems.</p>
<div itemprop="image" itemscope="" itemtype="https://schema.org/ImageObject">
<img class="floatright" src="//cdn.shopify.com/s/files/1/0387/9521/files/plumbing_maintenance.jpg?4111044568279757924" alt="Plumbing Maintenance"><meta itemprop="width" content="325">
<meta itemprop="url" content="https://cdn.shopify.com/s/files/1/0387/9521/files/plumbing_maintenance.jpg?4111044568279757924">
<meta itemprop="height" content="433">
</div>
<p>1.<strong> Boiler and water heater</strong>: Inspect and clean your boiler each year before the heating season. In addition, many plumbers recommend draining and cleaning your water heater annually. Most people hire a professional to handle these tasks, due to their technical nature, and often they are even included in your plumbing fixture’s service contract.</p>
<p>2. <strong>Valves</strong>: Locate all your shut-off valves and turn them off, then back to their original position, to make sure they would not be stuck open in the event that you need to shut the water off. While you are at it, look them over for any sign of corrosion, which could lead to an undetected leak. Replace any valves that are not working properly. Finally, make sure that your entire family knows where your shutoff valves are located, especially the main one, since this is very valuable information in case a leak occurs.</p>
<p>3. <strong>Leaks</strong>: Leaks can develop in many different places in your plumbing system and should be addressed immediately to curtail waste and water damage. Periodically check for any of the following signs of trouble: soft flooring near toilets, bathtubs, dishwashers, water heaters or washing machines; dampness inside sink cabinets; soft walls or loose tiles that could signal a leak inside a wall; pipes with rust or mineral deposits; constant dampness around faucets or toilets; and finally toilets that keep running after being flushed. Use <a href="https://www.waterdamagedefense.com/collections/flow-rate-based-water-leak-detectors-shut-off-valve">water shut off valve</a> or <a href="https://www.waterdamagedefense.com/collections/aqualeak-commercial-water-and-oil-leak-detectors/products/waterbug-water-leak-detection">water leak detection</a> systems to alert you when water leaks occur.</p>
<p><img class="floatright" title="Plumbing Maintenance" src="//cdn.shopify.com/s/files/1/0387/9521/files/plumbing_maintenance_1.jpg?6353143919848150837" alt="Plumbing Maintenance" height="217" width="325">4. <strong>Old or malfunctioning fixtures</strong>: Generally, toilets, dishwashers, washing machines, water heaters, and boilers that are more than 12 years old are good candidates for replacement. New appliances will be more energy and water efficient. Check the item’s serial number, since this often indicates the year it was manufactured. Companies use a variety of coding methods, so perform a quick internet search to find out what to look for. Additionally, replace old faucets with new, washer-less models to save on maintenance costs, and replace any hardened or cracked hoses on washers and dishwashers to reduce the risk of a rupture. The old adage “If it isn’t broken, don’t fix it,” does not always make sense when it comes to plumbing! Keep in mind that by swapping the old plumbing fixtures for new, more efficient models you could save money every month on your energy and water bills in addition to avoiding costly water damage repair bills.</p>
<p><img class="floatright" title="Plumbing Maintenance" src="//cdn.shopify.com/s/files/1/0387/9521/files/plumbing_maintenance_2.jpg?16785970097611588249" alt="Plumbing Maintenance" height="244" width="325">5. <strong>Caulking</strong>: Check and re-do any aging caulking around bathtubs, showers, toilets, and sinks that might be allowing water to penetrate the surrounding structure.</p>
<p>6. <strong>Basement Flooding</strong>: If you live in an area prone to flooding, or on a lot with poor site drainage, consider installing a basement sump pump if you do not have one already. Additionally, you can install a <a href="https://www.waterdamagedefense.com/collections/battery-backup-sump-pumps">battery backup sump pump</a> or <a href="https://www.waterdamagedefense.com/collections/water-powered-sump-pumps">water powered sump pump</a> as a preventative measure to take over the pumping duties in the event that a storm knocks out your power.</p>
<p>7. <strong>Septic</strong>: If you have a septic system, any persistently marshy areas in your drainage field may signal a leak in your septic line. Although pumping a septic tank is an essential element of plumbing maintenance, there is no hard and fast rule governing how frequently you should pump the tank. It depends on several factors, like the number of people in your household, whether there is a garbage disposal, the size of your tank, its system design, and even the temperature in your region. Consult a septic expert to find out how often you should pump your septic tank.</p>
<p>8. <strong>Low water pressure</strong>: Test for low water pressure by running water from your tub faucet and then opening the kitchen faucet. If the pressure decreases when you open the second faucet, you should get a plumber to analyze the problem. Low water pressure is often caused by a leaks or sediment build-up in pipes.</p>
<p><img class="floatright" title="Plumbing Maintenance" src="//cdn.shopify.com/s/files/1/0387/9521/files/plumbing_maintenance_4.jpg?14398489846522632057" alt="Plumbing Maintenance" height="244" width="325">9. <strong>Drains</strong>: Clogged drainpipes can often be avoided by regularly cleaning your drains with an eco-friendly drain cleaner. One easy way to clean your kitchen garbage disposal is to send some ice through it to clean out any grease that may have accumulated inside. Also, look for bubbles escaping up from a drain while water is trying to go down, as this could indicate a drain vent problem.</p>
<p>10. <strong>Frozen pipes</strong>: If you live in an area that experiences cold winters, like northern U.S. states or Canada, it is well worth your time to install and maintain insulation around your cold water supply pipes. Take extra care with any length of pipe that has been previously frozen or is exposed to wind or cold outside temperatures.</p>
<p>Whether you perform these maintenance checks yourself or hire a professional to handle them, it is a worthwhile investment of your time or money. By taking preventative measures, you greatly reduce the risk that you encounter costly surprises down the road.</p>
<p>Image sources <a href="https://www.flickr.com/photos/plus0ne/3221325388/">plus0ne</a> <a href="https://www.flickr.com/photos/71023733@N00/3377709684/">opiebreath</a> and <a href="https://www.flickr.com/photos/aerophish/424319740/">aerophish</a></p>
<p class="cc-block"><a href="https://creativecommons.org/licenses/by-sa/3.0/" rel="license"><img class="cc-button" src="https://licensebuttons.net/l/by-sa/3.0/88x31.png" alt="Creative Commons License"></a> The <em><a href="https://www.waterdamagedefense.com/blogs/home-maintenance-blog/plumbing-maintenance">10 Tips for Avoiding Plumbing Emergencies</a></em> by <em><a href="https://www.waterdamagedefense.com/blogs/home-maintenance-blog">Water Damage Defense</a></em>, is licensed under a <a href="https://creativecommons.org/licenses/by-sa/3.0/" rel="license">Creative Commons Attribution-ShareAlike 3.0 Unported License</a>.</p>]]>
    </content>
  </entry>
  <entry>
    <id>https://www.waterdamagedefense.com/blogs/home-maintenance-blog/how-to-find-a-plumber</id>
    <published>2011-09-26T18:09:00-04:00</published>
    <updated>2016-10-09T19:23:27-04:00</updated>
    <link rel="alternate" type="text/html" href="https://www.waterdamagedefense.com/blogs/home-maintenance-blog/how-to-find-a-plumber"/>
    <title>Tips on Hiring a Plumber</title>
    <author>
      <name>Nick Domino</name>
    </author>
    <summary type="html">
      <![CDATA[<p><a href="https://www.waterdamagedefense.com/blogs/home-maintenance-blog/how-to-find-a-plumber%20"><img style="display: block; margin-left: auto; margin-right: auto;" src="//cdn.shopify.com/s/files/1/0387/9521/files/how_to_find_a_plumber_big415.jpg?177451854587566092" alt=""></a></p>
<p>Hiring a good plumber is an important decision because plumbing repairs and renovations can be expensive, and incompetent workmanship can quickly lead to further cost and aggravation.</p><p><a class="read-more" href="https://www.waterdamagedefense.com/blogs/home-maintenance-blog/how-to-find-a-plumber">More</a></p>]]>
    </summary>
    <content type="html">
      <![CDATA[<p>Hiring a good plumber is an important decision because plumbing repairs and renovations can be expensive, and incompetent workmanship can quickly lead to further cost and aggravation. Whether you need a plumber for a complex job or to simply install a <a href="https://www.waterdamagedefense.com/collections/sump-pumps">sump pump</a>, there are many aspects to consider. In addition to hiring someone for a fair price, you also want your plumber to be trustworthy, knowledgeable, experienced, and efficient.</p>
<div itemprop="image" itemscope="" itemtype="https://schema.org/ImageObject">
<img class="floatright" src="//cdn.shopify.com/s/files/1/0387/9521/files/how_to_find_a_plumber.jpg?12554954536119444622" alt="How to find a Plumber"><meta itemprop="width" content="325">
<meta itemprop="url" content="https://cdn.shopify.com/s/files/1/0387/9521/files/how_to_find_a_plumber.jpg?12554954536119444622">
<meta itemprop="height" content="217">
</div>
<p>Of course, these matters are best contemplated when there is no water gushing onto your floor and you have time to compare plumbers. However, if you do find yourself in an emergency situation, it is generally a good idea to select the most established local company you can find.</p>
<h3>Use a variety of resources to get started in your selection process.</h3>
<p>Ask your friends, building contractors you know, or your real estate agent for their recommendations. They will likely be glad to share their experiences about plumbers they have hired. Be sure to find out what kind of work they had done, whether they were happy with the quality, and if the job was completed in a timely and cost-effective manner. Tales of satisfaction or woe, from someone you trust, carry a lot of weight when looking for a reliable tradesman.</p>
<p>An additional method of finding a good plumber is to check online for a local directory of plumbing contractors and then examine the customer reviews and ratings. You may be able to get a feel for the size and scope of a company’s work from their website. Review sites, like Angie’s List, can assist you in comparing several local plumbers, and some can even offer recommendations for specific types of work. Finally, you can also check with the Better Business Bureau.</p>
<h3>Call Recommended Plumbers</h3>
<p><img class="floatright" title="how to find a plumber" src="//cdn.shopify.com/s/files/1/0387/9521/files/how_to_find_a_plumber_1.jpg?12554954536119444622" alt="How to find a Plumber" height="488" width="325">
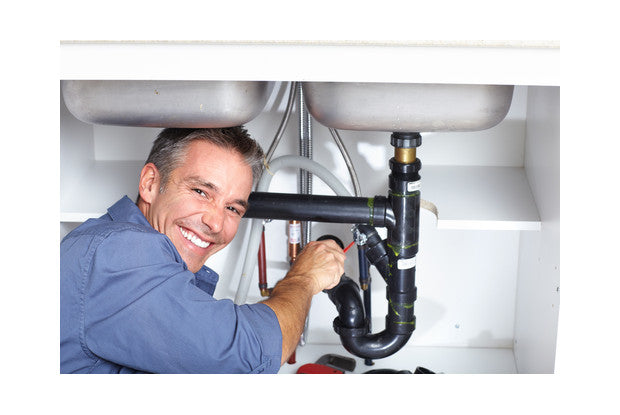
Whether speaking directly to an independent plumber or the salesperson at a large company, you will get an impression of their business from a telephone interview. Have a list of questions ready and organize your findings with a chart or spreadsheet. Here are some topics to cover:</p>
<ul>
<li>Labor Costs: Is labor charged by the hour or is a flat rate applied to each specific task? There is no right or wrong here, but be aware that higher rates are usually charged after normal business hours. A plumber will most likely give you a rough estimate of time and cost over the telephone but will not work up a true quote without seeing the work to be done. Ask if they charge for the estimate itself or the travel time to get to your location.</li>
<li>Credentials: A plumber’s license for your locale and current contractor insurance are both vital requirements. Ask for a copy of his insurance certificate and plumber’s license.</li>
<li>Estimate and Contract: Will these documents be available in writing?</li>
<li>Experience: Find out how long the contractor has been in the plumbing business and if he has experience with the type of work you need to have done. If the business has a number of plumbers and helpers, ask if you can request a journeyman.</li>
<li>Service Warranty: What type of warranty is offered? The coverage can range from 30 days to 5 years.</li>
<li>Additional Questions: Is a 24 hour service offered? If you do not already have referrals, can he supply a list of references?</li>
<li>Your impression: Rate your impression of the telephone conversation. Were you treated with professionalism? It is important to feel comfortable, and to be able to communicate easily, with workers coming into your home.</li>
</ul>
<h3>Final Steps</h3>
<p>Using the information you gleaned from your telephone calls, select at least three plumbers and have them come to your home to look at the project. Be sure to get an itemized, written estimate and a time frame for when the work could be completed. Ask how any cost overruns would be handled, or if there would be any extra fees. Also find out how and when they expect to be paid, and keep in mind that some plumbers require a percentage of the cost upfront.</p>
<p>Base your final hiring decision chiefly on the plumber’s reputation for reliability and quality. Sign a contract that specifies exactly what the work is, when it will be done, and how much it will cost. When considering the cost, a good rule of thumb is to select an estimate that is near the average price. Keep in mind that a very low estimate may signal an inexperienced plumber, while a very high estimate could mean they are too busy and cannot really devote sufficient time to your work.</p>
<h3>
<img class="floatright" title="how to find a plumber" src="//cdn.shopify.com/s/files/1/0387/9521/files/how_to_find_a_plumber_2.jpg?12554954536119444622" alt="How to find a Plumber" height="487" width="325">Cost Considerations to Keep in Mind</h3>
<ul>
<li>An experienced plumber may charge a higher rate but may also be a more efficient worker.</li>
<li>If a plumber has a well-stocked van he may not need to run for parts as often while “on the clock.”</li>
<li>Is your project likely to have surprises? If your pipes are very old, or if a leak is hidden behind a wall, for instance, then your plumber may actually be unable to give a hard and fast estimate. Ask instead for an upper limit of the cost.</li>
<li>An experienced plumber will be able to recommend fixtures and appliances for your situation. However, you should try to have an idea of what you want beforehand, since this will save him time, which in turn could save you money. Have a concise list ready. Remember, most plumbers will want to buy all the supplies for the job themselves.</li>
<li>Clarify working hours and arrangements.</li>
<li>Be wary of plumbers who only accept cash, do not charge required tax, do not have bills or receipts printed with their company name, or ask for the majority of the payment upfront. This could be a warning sign of an unreliable or inexperienced tradesperson.</li>
</ul>
<p>Following these guidelines will take some effort, but it could save you a considerable amount of time and money in the long run when hiring a plumber. Finally, remember that as eager as you are to hire a professional who performs his job well, your plumber is also hoping to be treated with respect and to be paid in a timely manner. You never know when you may need him again. If he does a commendable job, offer to give him a good recommendation, since someone is always looking for a good plumber.</p>
<p class="cc-block"><a href="https://creativecommons.org/licenses/by-sa/3.0/" rel="license"><img class="cc-button" src="https://licensebuttons.net/l/by-sa/3.0/88x31.png" alt="Creative Commons License"></a> The <em><a href="https://www.waterdamagedefense.com/blogs/home-maintenance-blog/how-to-find-a-plumber">Tips on Hiring a Plumber</a></em> by <em><a href="https://www.waterdamagedefense.com/blogs/home-maintenance-blog">Water Damage Defense</a></em>, is licensed under a <a href="https://creativecommons.org/licenses/by-sa/3.0/" rel="license">Creative Commons Attribution-ShareAlike 3.0 Unported License</a>.</p>]]>
    </content>
  </entry>
  <entry>
    <id>https://www.waterdamagedefense.com/blogs/home-maintenance-blog/home-humidity</id>
    <published>2011-07-03T07:21:00-04:00</published>
    <updated>2016-10-09T19:23:32-04:00</updated>
    <link rel="alternate" type="text/html" href="https://www.waterdamagedefense.com/blogs/home-maintenance-blog/home-humidity"/>
    <title>Preventing Home Moisture Problems</title>
    <author>
      <name>Nick Domino</name>
    </author>
    <summary type="html">
      <![CDATA[<p><a href="https://www.waterdamagedefense.com/blogs/home-maintenance-blog/home-humidity%20"><img src="//cdn.shopify.com/s/files/1/0387/9521/files/home_humidity_big415.jpg?14745135122698659046" alt=""></a></p>
<p>There are a variety of actions you can take to get home humidity and moisture problems under control. They vary in complexity and cost - while some are relatively involved, other steps are actually quite simple.</p><p><a class="read-more" href="https://www.waterdamagedefense.com/blogs/home-maintenance-blog/home-humidity">More</a></p>]]>
    </summary>
    <content type="html">
      <![CDATA[<p>There are a variety of actions you can take to get home humidity and moisture problems under control. They vary in complexity and cost - while some are relatively involved, other steps are actually quite simple.</p>
<h3>Easy ways to control moisture</h3>
<div itemprop="image" itemscope="" itemtype="https://schema.org/ImageObject">
<img class="floatright" src="//cdn.shopify.com/s/files/1/0387/9521/files/home_humidity.jpg?8823217953347116944" alt="Home Humidity"><meta itemprop="width" content="325">
<meta itemprop="url" content="https://cdn.shopify.com/s/files/1/0387/9521/files/home_humidity.jpg?8823217953347116944">
<meta itemprop="height" content="244">
</div>
<p>Installing good quality storm windows is an easy, yet effective way to curtail condensation problems caused by warm indoor air colliding with your cold window panes. Not only will they will help to keep your windows from getting fogged up or icy, but they will also help you control your heating costs.</p>
<p>Using a dehumidifier is another easy way to reduce your home's humidity level. Make sure to get one that is powerful enough to handle the size and humidity of your space. Generally, when the weather is cold outside, you should keep your home's humidity level low, in order to keep condensation at bay. During periods of high humidity in the summer, both air conditioners and dehumidifiers can help to lower the humidity inside your home.</p>
<p>Proper ventilation is essential to avoiding moisture problems. It is important to make sure that hot air can exit your home through natural air flow, while also keeping your home free of cracks or openings around doors, windows, or electrical outlets, where new humid air could enter. Besides reducing indoor moisture, ventilation also helps to keep indoor pollutants and odors under control.</p>
<h3>Vapor barriers</h3>
<p><img class="floatright" title="house humidity" src="//cdn.shopify.com/s/files/1/0387/9521/files/house_humidity.jpg?15391796603222933697" alt="House Humidity" height="475" width="325">
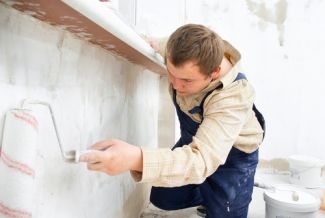
Vapor barriers play an important role in controlling moisture in homes. They block or slow the movement of water vapor through surfaces like walls or floors, thereby helping to keep moisture from spreading. During construction, vapor barriers are usually attached to a house's framing beneath the sheetrock on the exterior wall. Typical barriers are heavy, clear plastic sheets stapled onto the wood studs before sheetrock covers the walls. Coatings, like paint, can also act as water vapor barriers.</p>
<p>The extent to which your vapor barrier is airtight will determine its effectiveness. If you have a plastic membrane barrier, it is important that any holes in it, like where wires pass through, are sealed up. Keep an eye out for potential signs of vapor barrier failure, like mold or peeling paint on the inside of exterior walls, along with an obviously high humidity level. Consult a construction professional to assess whether your home's vapor barriers are damaged or if your walls need additional treatment.</p>
<h3>Outside your home</h3>
<p><img class="floatright" title="home humidity" src="//cdn.shopify.com/s/files/1/0387/9521/files/home_humidity_1.jpg?16004385260425312006" alt="Home Humidity" height="217" width="325">Finally, there are steps you can take outside your home to keep moisture from getting inside the structure. Make sure your roof gutter drainage system functions well (see our <a title="Maintaining and Cleaning Gutters" href="https://www.waterdamagedefense.com/blogs/home-maintenance-blog/gutter-cleaning">how to clean gutters</a>). Also, if possible, ensure that your yard is sloped away from your house on all sides.</p>
<p>Take steps to dampness-proof the portion of your foundation wall that is below grade, along with your footings if possible, to keep both from absorbing ground water. One way to do this is to coat the exterior of your foundation walls and footings with a moisture proof, tar-based membrane. Also, try to verify that your buried footing drainage is diverting ground water away from your foundation. If the soil outside your foundation becomes saturated, water will try to penetrate into your basement, potentially causing expensive trouble (see our articles on <a title="Ground Water Control and Roof Drainage" href="https://www.waterdamagedefense.com/blogs/home-maintenance-blog/what-is-a-french-drain">roof drainage</a> and <a title="Foundation Cracks" href="https://www.waterdamagedefense.com/blogs/home-maintenance-blog/foundation-cracks">foundation cracks</a>).</p>
<p>If you get in the habit of checking for signs of excess moisture and humidity in your home, you will be able to prevent a lot of costly damage. Of course, fix any problems you see immediately, and consult construction or mold professionals to help you assess and deal with any serious issues.</p>
<p>Image source: <a href="http://www.flickr.com/photos/lorakutty/6099916942/">lorakutty</a></p>
<p class="cc-block"><a href="https://creativecommons.org/licenses/by-sa/3.0/" rel="license"><img class="cc-button" src="https://licensebuttons.net/l/by-sa/3.0/88x31.png" alt="Creative Commons License"></a> The <em><a href="https://www.waterdamagedefense.com/blogs/home-maintenance-blog/home-humidity">Preventing Home Moisture Problems</a></em> by <em><a href="https://www.waterdamagedefense.com/blogs/home-maintenance-blog">Water Damage Defense</a></em>, is licensed under a <a href="https://creativecommons.org/licenses/by-sa/3.0/" rel="license">Creative Commons Attribution-ShareAlike 3.0 Unported License</a>.</p>]]>
    </content>
  </entry>
  <entry>
    <id>https://www.waterdamagedefense.com/blogs/home-maintenance-blog/what-causes-condensation</id>
    <published>2011-05-22T19:11:00-04:00</published>
    <updated>2016-10-09T19:23:37-04:00</updated>
    <link rel="alternate" type="text/html" href="https://www.waterdamagedefense.com/blogs/home-maintenance-blog/what-causes-condensation"/>
    <title>Causes of Home Moisture &amp; Condensation Problems</title>
    <author>
      <name>Nick Domino</name>
    </author>
    <summary type="html">
      <![CDATA[<p><a href="https://www.waterdamagedefense.com/blogs/home-maintenance-blog/what-causes-condensation%20"><img src="//cdn.shopify.com/s/files/1/0387/9521/files/what_causes_condensation_big415.jpg?16332031289994184735" alt=""></a></p>
<p>Moisture problems have a variety of causes and can result in major damage to your home. It is a good idea to inspect your house regularly for any damage caused by moisture, while also keeping an eye out for warning signs of potential trouble ahead.</p><p><a class="read-more" href="https://www.waterdamagedefense.com/blogs/home-maintenance-blog/what-causes-condensation">More</a></p>]]>
    </summary>
    <content type="html">
      <![CDATA[<h3>Causes of Home Moisture &amp; Condensation Problems</h3>
<div itemprop="image" itemscope="" itemtype="https://schema.org/ImageObject">
<img class="floatright" src="//cdn.shopify.com/s/files/1/0387/9521/files/what_causes_condensation.jpg?7892313177247892816" alt="What Causes Condensation"><meta itemprop="width" content="325">
<meta itemprop="url" content="https://cdn.shopify.com/s/files/1/0387/9521/files/what_causes_condensation.jpg?7892313177247892816">
<meta itemprop="height" content="487">
</div>
<p>Moisture problems have a variety of causes and can result in major damage to your home. It is a good idea to inspect your house regularly for any damage caused by moisture, while also keeping an eye out for warning signs of potential trouble ahead. If you notice any problems, take immediate action to fix them before they cause further damage or balloon into larger, more complicated issues.</p>
<p>Uncontrolled humidity can actually make your home more expensive to heat and cool, because when insulation gets damp enough, it loses its R value and its ability to insulate. This is a common problem in basements, crawl spaces, and attics (see our article on common <a href="https://www.waterdamagedefense.com/blogs/home-maintenance-blog/avoiding-roof-problems">Roof Problems</a> for more info on attics).</p>
<h3>Mold</h3>
<p>Damp conditions in these areas also promote mold growth, which can have many nasty effects. It can actually damage the structure of your home by weakening building materials, as well as cause health problems. Additionally, damage from mold is often not covered by homeowner's insurance, making prevention all the more important.</p>
<p><img class="floatright" title="what causes condensation" src="//cdn.shopify.com/s/files/1/0387/9521/files/what_causes_condensation_1.jpg?7892313177247892816" alt="what causes condensation" height="216" width="325">
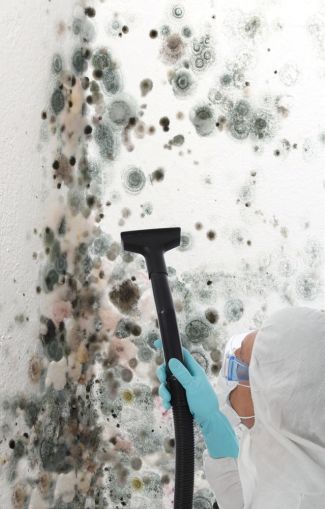
If you can see evidence of mold in your home's living areas, then there is a good chance it has already affected structural components of your house. Investigate the extent of your mold problem as soon as possible. In fact, even if you do not see evidence of mold, if your home has high moisture or humidity levels, then it is a good idea to have a professional mold inspector assess whether you have an existing mold problem.</p>
<p>Damp conditions in houses are often caused by insufficient ventilation or water leaks that have not been completely cleaned up. Anytime you notice a leaky pipe or dripping faucet in your home, investigate and fix it immediately! Additionally, rain can leak into houses as the result of worn siding, flashing, or weather-stripping material. Check these materials to make sure they are watertight. Finally, protect vulnerable areas in your home by using <a href="https://www.waterdamagedefense.com/collections/aqualeak-commercial-water-and-oil-leak-detectors/products/water-leak-detector">water leak detectors</a> to alert you to plumbing leaks, and install either a <a href="https://www.waterdamagedefense.com/collections/water-powered-sump-pumps">water powered backup sump pump</a> or <a href="https://www.waterdamagedefense.com/collections/battery-backup-sump-pumps">battery backup sump pump</a> in your basement to prevent flooding during power outages or heavy storms.</p>
<h3>Condensation</h3>
<p><img class="floatright" title="what causes condensation" src="//cdn.shopify.com/s/files/1/0387/9521/files/what_causes_condensation_2.jpg?7892313177247892816" alt="what causes condensation" height="217" width="325">Condensation is another common cause of excess moisture. So, what causes condensation? In general, warmer air can hold more moisture than colder air. So, when warm air cools, the moisture in it has to go somewhere. This creates condensation - moisture is deposited on the first cold surface that the air contacts. Condensation problems can occur in the winter as well as the summer, and could have several causes. A high air humidity level could be the culprit. Keep an eye on your windows. Do you see moisture on the inside of the panes? If so, then the humidity level inside your house is too high. Take steps to reduce it.</p>
<p>Trapped hot air inside the home also tends to cause condensation. This could even result from a house being extremely well-insulated and properly sealed from cold air. If pockets of hot air get trapped in the house and come in contact with cold surfaces, condensation takes place. These cold surfaces could be things like exterior walls, windows, pipes, or a toilet. To guard against this, make sure your ventilation system is functioning well, and install kitchen and bathroom exhaust fans if you do not already have them.</p>
<h3>Fix and prevent moisture problems</h3>
<p>It is important to continuously monitor your home for signs of moisture damage. Be sure to fix problems quickly, before they develop into larger, more complex issues. Read our article on preventing <a title="Preventing Home Moisture Problems" href="https://www.waterdamagedefense.com/blogs/home-maintenance-blog/home-humidity">home humidity</a>, to learn more about preventative steps you can take in your home.</p>
<p>Image source: <a href="https://www.flickr.com/photos/senoranderson/4156168701/lightbox/">senoranderson</a></p>
<p class="cc-block"><a href="https://creativecommons.org/licenses/by-sa/3.0/" rel="license"><img class="cc-button" src="https://licensebuttons.net/l/by-sa/3.0/88x31.png" alt="Creative Commons License"></a> The <em><a href="https://www.waterdamagedefense.com/blogs/home-maintenance-blog/what-causes-condensation">Causes of Home Moisture &amp; Condensation Problems</a></em> by <em><a href="https://www.waterdamagedefense.com/blogs/home-maintenance-blog">Water Damage Defense</a></em>, is licensed under a <a href="https://creativecommons.org/licenses/by-sa/3.0/" rel="license">Creative Commons Attribution-ShareAlike 3.0 Unported License</a>.</p>]]>
    </content>
  </entry>
  <entry>
    <id>https://www.waterdamagedefense.com/blogs/home-maintenance-blog/avoiding-roof-problems</id>
    <published>2011-03-12T14:33:00-05:00</published>
    <updated>2016-10-09T19:24:07-04:00</updated>
    <link rel="alternate" type="text/html" href="https://www.waterdamagedefense.com/blogs/home-maintenance-blog/avoiding-roof-problems"/>
    <title>Avoiding Roof Problems</title>
    <author>
      <name>Nick Domino</name>
    </author>
    <summary type="html">
      <![CDATA[<p><a href="https://www.waterdamagedefense.com/blogs/home-maintenance-blog/avoiding-roof-problems%20"><img src="//cdn.shopify.com/s/files/1/0387/9521/files/roof_problems_big415.jpg?12337389891927245785" alt=""></a></p>
<p>It is important to monitor the physical condition of your home's roof regularly, so that you spot problems early, before they compound into serious issues.</p><p><a class="read-more" href="https://www.waterdamagedefense.com/blogs/home-maintenance-blog/avoiding-roof-problems">More</a></p>]]>
    </summary>
    <content type="html">
      <![CDATA[<h3>Keep Your Roof In Good Condition</h3>
<div itemprop="image" itemscope="" itemtype="https://schema.org/ImageObject">
<img class="floatright" src="//cdn.shopify.com/s/files/1/0387/9521/files/roof_damage.jpg?17888206617426276180" alt="Roof Damage"><meta itemprop="width" content="325">
<meta itemprop="url" content="https://cdn.shopify.com/s/files/1/0387/9521/files/roof_damage.jpg?17888206617426276180">
<meta itemprop="height" content="227">
</div>
<p>It is important to monitor the physical condition of your home's roof regularly, so that you spot problems early, before they compound into serious issues. Do not wait until a leak occurs. Instead, be proactive – inspect your roof at least twice per year and also after heavy storms. When you see signs of roof damage, have a professional repair them immediately.</p>
<p>You can probably accomplish a portion of your visual roof inspection from the ground, using binoculars. However, it is necessary to go up on the roof for a close-up view from time to time as well. Be sure to exercise caution when on your roof or climbing on ladders to avoid injury, and stay off your roof during slippery conditions. Alternatively, you can have a roofing professional help you inspect your roof.</p>
<p>In general, to maintain a healthy roof, ensure that your roofing material and flashing are water tight and in good shape. Also make sure your attic has good ventilation and insulation. If one of these basic elements of your roofing system is deficient, your roof's integrity is compromised, which will lead to problems.</p>
<p>Keep in mind that the climate conditions in your area will have a dramatic effect on your roof's longevity. Harsh precipitation, such as hail, will cause significant wear to your roof over time, as will air that has a high salt or pollutant content. Wind is another important factor. High winds push and tug at the edges and top of your roof. Over time this can cause your shingles, and the roof frame itself, to loosen.</p>
<h3>Inspecting Your Roof</h3>
<p><img class="floatright" title="roof problems" src="//cdn.shopify.com/s/files/1/0387/9521/files/roof_problems.jpg?9217902295723016425" alt="Roof Problems" height="216" width="325">Check your roof for damaged or missing shingles. When shingles deteriorate or are missing, the roofing material below is exposed to the elements, causing water damage. Watch for pieces of shingles in your gutters or in the yard around your house.</p>
<p>Look at the metal flashing that is attached to your chimneys, vent pipes, and roof joints. Leaks can occur when this flashing is damaged. On large, complex roofs, look at the valleys connecting your roof's different surfaces. These valleys serve as primary pathways for water, funneling it to a particular spot as it exits the roof. Because of their importance, these valleys are often reinforced by an extra "snow and ice shield" protective layer underneath the roofing. Make sure that all of the roofing materials in these valleys are in good shape, since a puncture here could quickly lead to serious water damage.</p>
<p>Hail can be especially damaging to a roof. After a big hail storm, once your roof is no longer slippery, look for signs of damage to your roof. On your shingles, check for a repeating pattern of dents or broken edges and corners. If you have asphalt shingles, look for eroded asphalt particles in your gutters. Also, be on the lookout for leaks after a hailstorm, as the hail could have actually punctured your roof.</p>
<h3>Inside Your House</h3>
<p>Walk through your house, and look for any signs of water leaking through your roof, including water-stained ceilings or walls, as well as peeling wallpaper.</p>
<h3>Ice Dams</h3>
<p><img class="floatright" title="roof damage" src="//cdn.shopify.com/s/files/1/0387/9521/files/roof_damage_1.jpg?6684026692612259164" alt="Roof Damage" height="217" width="325">One common problem in areas with cold winters is "ice damming." This takes place when snow or ice melts and then freezes again as temperatures drop, creating a dam of ice. As some of the ice then melts, water gets trapped by the dam, resulting in standing water on your roof. If there happens to be faulty roofing material where that water collects, water can end up entering your house, causing a serious problem. Additionally, the ice itself can damage your roofing material by freezing and thawing while attached to your shingles. Because of this, try to verify whether the lowest sections of your roof are protected by a "snow and ice shield" layer.</p>
<h3>Ventilation and Insulation</h3>
<p>The root cause of ice damming is usually insufficient attic ventilation or insulation, which allows the attic, and subsequently the roof, to get too warm. Generally, winter attic temperatures should only be a few degrees warmer than the outside temperature. People often do not realize this and allow their attics to get too warm. Heat then passes through the attic to the roof, causing ice dams and standing water problems.</p>
<p><img class="floatright" title="roof problems" src="//cdn.shopify.com/s/files/1/0387/9521/files/roof_problems_1.jpg?4566347953146399161" alt="Roof Problems" height="467" width="325">Attic condensation and moisture also affect your roof. Condensation is the unavoidable byproduct of "hot meeting cold." Similar to the way a cold drink in a hot room produces moisture on the outside of the glass, condensation is continuously occurring inside your attic insulation layer, since the insulation is the barrier between hot and cold temperatures. This moisture needs to be carried away from your attic by a well-functioning air circulation system. If it is not removed, then during warm months, heat and moisture will break down your roofing material, causing it to wear out prematurely. Additionally, in the wintertime, condensation will saturate your insulation, reducing its ability to insulate and leading to high attic temperature problems.</p>
<p>To protect your attic and roof from heat and condensation, check to make sure your soffit intake vents and ridge vents are not blocked. A soffit is the underside of your roof's overhang. Vents are usually located there, because it is a natural place from which to draw cool air into your attic. It is essential to your roof's health that these vents are open, because if they do not vent properly, heat and condensation problems will likely occur. Since warm air rises naturally, it will seek to exit out of your roof's ridge vent, located at the highest point in your roof. This subsequently causes fresh, cooler air to be drawn into your attic through the soffit vents. This basic air circulation pattern should operate continuously to keep your attic and roof from getting too hot, while also carrying away excess moisture and keeping your insulation dry, so it insulates properly.</p>
<p>Remove anything that might be blocking your soffit and ridge vents, such as insulation stuffed against them or possibly wood that was installed in front of them, in a misguided attempt to keep the attic warm. Additionally, consider adding an attic fan to dispel excess heat from your attic in the summer. An attic fan is minimal expense, but it can greatly increase the effectiveness of your soffit and ridge vent system. Also, consider adding insulation baffles between each rafter or roof truss, if they are not already installed, as this is another inexpensive way to promote air flow through your soffit vents.</p>
<p>Proper attic insulation is another important component of a healthy roof. As mentioned above, you actually want the unused attic portion of your house to be cold during the winter, like the outside air. Many people try to keep their attics warm as a way to keep heating costs down, but this is actually counterproductive.</p>
<p>A simple way to tell if your attic floor has enough insulation, and if your attic vents are working properly, is to look at your roof during cold weather when snow covers it. Monitor the amount of snow on the roof for a few days. If the snow stays on your roof, it is likely that your ventilation and insulation are sufficient, but if the snow melts quickly on certain parts of your roof, you can tell that either your insulation or venting is lacking in those spots. Also, it is important to make sure your attic insulation is of an appropriate thickness, or "R value" for your geographic location. Consult your local building codes or a home construction professional to make this determination.</p>
<h3>Perform Regular Maintenance and Fix Problems Quickly</h3>
<p><img class="floatright" title="roof damage" src="//cdn.shopify.com/s/files/1/0387/9521/files/roof_damage_2.jpg?14370135138283345112" alt="Roof Damage" height="244" width="325">Finally, make sure you continually monitor your roof's condition and perform regular maintenance. One simple step you can take is to just keep your roof clean. This is especially important for homes with minimally sloped roofs. Sweep debris off your roof, while taking care not to damage your shingles in the process. Also, keep your gutters well maintained. Properly functioning gutter drainage is very important to your roof's health and also helps to prevent basement water damage by leading rain water away from your foundation (read <a href="https://www.waterdamagedefense.com/blogs/home-maintenance-blog/gutter-cleaning">gutter cleaning</a>). Most importantly, when you do spot roof damage, get it fixed as soon as you can, so it does not turn into a more serious issue in the future.</p>
<p>At some point every roof does reach the end of its life span. For further reading, check out our articles on how to tell if you need a <a title="new roof" href="https://www.waterdamagedefense.com/blogs/home-maintenance-blog/new-roof">new roof</a> and how to estimate <a title="Roof Replacement – How Much Does a New Roof Cost?" href="https://www.waterdamagedefense.com/blogs/home-maintenance-blog/roof-replacement-cost">roof costs</a>.</p>
<p>Image source: <a href="http://www.flickr.com/photos/aidanmorgan/2646734885/">aidanmorgan</a></p>
<p class="cc-block"><a href="https://creativecommons.org/licenses/by-sa/3.0/" rel="license"><img class="cc-button" src="https://licensebuttons.net/l/by-sa/3.0/88x31.png" alt="Creative Commons License"></a> The <em><a href="https://www.waterdamagedefense.com/blogs/home-maintenance-blog/avoiding-roof-problems">Avoiding Roof Problems</a></em> by <em><a href="https://www.waterdamagedefense.com/blogs/home-maintenance-blog">Water Damage Defense</a></em>, is licensed under a <a href="https://creativecommons.org/licenses/by-sa/3.0/" rel="license">Creative Commons Attribution-ShareAlike 3.0 Unported License</a>.</p>]]>
    </content>
  </entry>
  <entry>
    <id>https://www.waterdamagedefense.com/blogs/home-maintenance-blog/hiring-a-contractor</id>
    <published>2011-01-06T08:43:00-05:00</published>
    <updated>2016-10-09T19:24:13-04:00</updated>
    <link rel="alternate" type="text/html" href="https://www.waterdamagedefense.com/blogs/home-maintenance-blog/hiring-a-contractor"/>
    <title>Tips on Hiring a Contractor</title>
    <author>
      <name>Nick Domino</name>
    </author>
    <summary type="html">
      <![CDATA[<p><a href="https://www.waterdamagedefense.com/blogs/home-maintenance-blog/hiring-a-contractor%20"><img src="//cdn.shopify.com/s/files/1/0387/9521/files/hiring_a_contractor_big415.jpg?2211892931991859101" alt=""></a></p>
<p>Hiring the right contractor for a construction project can be surprisingly difficult. Since your choice of contractor will directly impact your satisfaction with the completed project, it is important to be as thorough as possible in your search process.</p><p><a class="read-more" href="https://www.waterdamagedefense.com/blogs/home-maintenance-blog/hiring-a-contractor">More</a></p>]]>
    </summary>
    <content type="html">
      <![CDATA[<p>Hiring the right contractor for a construction project can be surprisingly difficult. Since your choice of contractor will directly impact your satisfaction with the completed project, it is important to be as thorough as possible in your search process.</p>
<h3>Figure Out What You Want</h3>
<div itemprop="image" itemscope="" itemtype="https://schema.org/ImageObject">
<img class="floatright" src="//cdn.shopify.com/s/files/1/0387/9521/files/hiring_a_contractor.jpg?6035202087044583091" alt="Hiring a Contractor"><meta itemprop="width" content="325">
<meta itemprop="url" content="https://cdn.shopify.com/s/files/1/0387/9521/files/hiring_a_contractor.jpg?6035202087044583091">
<meta itemprop="height" content="443">
</div>
<p>While your project is still in the planning stage, before speaking to contractors, take the time to map out what you want to accomplish, in as much detail as you can. This will make your discussions with contractors much easier and help avoid misunderstandings down the road.</p>
<p>Figure out things like: your budget for the project, the material type and quality you want to use, and the completion time you need. As you do your research, consult designers, architects, and material suppliers, as needed, so that you understand your options and preferences.</p>
<h3>Due Diligence</h3>
<p>After your planning is done and you begin your search for a contractor, take the time to conduct thorough due diligence. This becomes especially important for larger jobs.</p>
<p>Compile a large list of possible contractors, and then work to narrow it down to at least 3 candidates to request bids from. During your research, be sure to use your friends and acquaintances as resources, since word of mouth is often a good way to find candidates.</p>
<p><img class="floatleft" title="how to find a contractor" src="//cdn.shopify.com/s/files/1/0387/9521/files/how_to_find_a_contractor.jpg?2042767466001690120" alt="How to Find a Contractor" height="217" width="325">As you research the contractors on your list, try to get a feel for how reputable and established they are. Do an online search. Read reviews that are available, and also look for any complaints (search contractor names along with words like "review" or "complaint").</p>
<p>Check with the Better Business Bureau. Find out what information they have on the contractors. Have any complaints been lodged? If so, what was done to address them?</p>
<p>Find out whether the contractors are licensed in your location, and do not hesitate to confirm this by calling the licensing organization.</p>
<p>Additionally, check to make sure they have the proper liability insurance. Get written proof of insurance, as this is often required to obtain a building permit. Take the extra step of calling their insurance agent, to make sure the policy is current and in force. While you are on the phone, ask the agent whether the policy has consistently been in place or if it has frequently lapsed or been cancelled.</p>
<p>Finally, get multiple references from those contractors that you seriously consider. Call each one and find out if the project was completed to their satisfaction. Did the contractor stay within budget and finish on time? If problems came up, how were they handled? Was there any damage done to the property? If possible, go take a look at the contractor's work for yourself.</p>
<h3>Discussions with Contractors</h3>
<p><img class="floatright" title="how to choose a contractor" src="//cdn.shopify.com/s/files/1/0387/9521/files/how_to_choose_a_contractor.jpg?11380248684992310724" alt="How to Choose a Contractor" height="487" width="325">Sit down and talk at length with the contractors on your short list. Ask a lot of questions. Find out about their experience. How long have they been in business? What type and scale of project do they typically take on? What do they consider to be their specialty?</p>
<p>As you discuss your project, keep in mind that a good contractor will have a wealth of experience and can provide you with a lot of helpful advice. It is unlikely that they will simply agree with all your ideas about the best way to handle the project. Actually, if they do, it could be a warning sign - that they are simply trying to sign you up as a customer without helping you consider the best, most feasible ways to accomplish your project.</p>
<p>Finally, find out how busy they are, and whether they have the capacity for additional work. If it sounds like they already have too much on their plate, be careful. On the other hand, if they seem to have no work at all, that could be a warning sign too.</p>
<h3>Bids</h3>
<p>In order to gain negotiating power and the ability to compare, solicit bids from at least 3 contractors. Get the bids in writing, and make sure they address specific detail. You will want to be able to make "apples to apples" comparisons across the bids you receive. To accomplish this, be as specific as possible about the scope of the project when requesting bids, so that all the contractors bid on similar work, time-frame, and material quality.</p>
<p>Keep in mind that simply choosing the lowest bidder is not necessarily the best course of action. There could be a good reason that they seem so cheap. Find the reasons for any major price differences in the quotes you receive. Be cautious if a particular bidder uses extremely low estimates for materials or labor. Find out why.</p>
<p>Be sure to take intangible factors into account as well. Interpersonal interaction, for example, can be extremely important. You will need to get along with the contractor and work with them to make decisions and handle problems that come up. If your personalities conflict badly, the project will suffer.</p>
<h3>Get Everything in Writing</h3>
<p><img class="floatright" title="hiring a contractor" src="//cdn.shopify.com/s/files/1/0387/9521/files/hiring_a_contractor_1.jpg?11380248684992310724" alt="Hiring a Contractor" height="268" width="325">Before the contractor starts work, sign a written contract that clearly lays out all important details. Of course, the contract should include major elements like: the exact scope of the work to be performed, expected time line, types of materials to be used, contractor's responsibilities, budget, and schedule of payment.</p>
<p>Beyond these basics, however, there are many additional details that should be agreed upon. The contract should also include things like: who is responsible for trash and materials removal (including proper removal of hazardous materials), how to handle bathroom facilities, what happens if the project goes over budget, how to resolve disputes, who will handle permits and inspections, what responsibilities the homeowner has, and the names of any subcontractors. Also, make sure the contract is clear on what happens if an outside event, like a storm or material shortage, disturbs the project's completion.</p>
<p>There likely will be many additional details that you will want to include in your contract as well. Make sure that there are no grey areas. In fact, if it seems like a contractor is trying to be vague, you probably do not want to work with them anyway.</p>
<p>It is a good idea to have a lawyer review the contract before you sign. Read it thoroughly yourself as well, since you need to fully understand what the contract contains before you finalize anything.</p>
<h3>Worth the Effort</h3>
<p>Although the contractor search process can require some work on your end, it is worth the effort. By taking the time to hire a contractor you are comfortable with and confident in, you greatly reduce the likelihood of ending up dissatisfied once your project is complete.</p>
<p>Image source: <a href="http://www.flickr.com/photos/62264028@N03/5666123017/">nicgep114</a></p>
<p class="cc-block"><a href="https://creativecommons.org/licenses/by-sa/3.0/" rel="license"><img class="cc-button" src="https://licensebuttons.net/l/by-sa/3.0/88x31.png" alt="Creative Commons License"></a> The <em><a href="https://www.waterdamagedefense.com/blogs/home-maintenance-blog/hiring-a-contractor">Tips on Hiring a Contractor</a></em> by <em><a href="https://www.waterdamagedefense.com/blogs/home-maintenance-blog">Water Damage Defense</a></em>, is licensed under a <a href="https://creativecommons.org/licenses/by-sa/3.0/" rel="license">Creative Commons Attribution-ShareAlike 3.0 Unported License</a>.</p>
<p><small>This Water Damage Defense article is intended to provide information of general interest to the public and is not intended to offer legal advice about specific situations or problems. You should consult a lawyer if you have a legal matter requiring attention.</small></p>]]>
    </content>
  </entry>
  <entry>
    <id>https://www.waterdamagedefense.com/blogs/home-maintenance-blog/causes-of-water-damage</id>
    <published>2010-11-13T17:33:00-05:00</published>
    <updated>2016-10-09T19:24:17-04:00</updated>
    <link rel="alternate" type="text/html" href="https://www.waterdamagedefense.com/blogs/home-maintenance-blog/causes-of-water-damage"/>
    <title>Causes of Water Damage</title>
    <author>
      <name>Nick Domino</name>
    </author>
    <summary type="html">
      <![CDATA[<p><a href="https://www.waterdamagedefense.com/blogs/home-maintenance-blog/causes-of-water-damage%20"><img src="//cdn.shopify.com/s/files/1/0387/9521/files/water_damage_causes_big415.jpg?11965126590413955069" alt=""></a></p>
<p>More than 1 million homes in the United States experience extensive water damage every year. In fact, water damage actually exceeds fire as the largest type of loss paid out in homeowner's insurance claims.</p><p><a class="read-more" href="https://www.waterdamagedefense.com/blogs/home-maintenance-blog/causes-of-water-damage">More</a></p>]]>
    </summary>
    <content type="html">
      <![CDATA[<div itemprop="image" itemscope="" itemtype="https://schema.org/ImageObject">
<img class="floatright" src="//cdn.shopify.com/s/files/1/0387/9521/files/water_damage_causes.jpg?7232807938695425885" alt="water damage causes"><meta itemprop="width" content="325">
<meta itemprop="url" content="https://cdn.shopify.com/s/files/1/0387/9521/files/water_damage_causes.jpg?7232807938695425885">
<meta itemprop="height" content="509">
</div>
<p>More than 1 million homes in the United States experience extensive water damage every year. In fact, water damage actually exceeds fire as the largest type of loss paid out in homeowner's insurance claims.</p>
<p>Water damage causes building materials to deteriorate and creates an environment in which termites and mold flourish. Besides being a nuisance, termites and mold can both cause major structural damage to a home very quickly.</p>
<p>In addition to major catastrophes like floods, many of the incidents that cause water damage occur right at home. Fortunately, they are often preventable.</p>
<br class="clear">
<h3>Typical Causes of Water Damage</h3>
<p><strong>Pipe failures</strong> are the leading cause of water damage, costing an average of $5,000 per incident to fix, according to insurance industry data. Frozen pipes are a typical culprit in cold weather areas, as pipes rupture from the pressure that builds in them as they freeze.</p>
<p><strong>Toilet overflows</strong> and leaks are the second leading source of residential water damage. Common causes include: faulty supply lines, overfilling, and overflows from clogs.</p>
<p><strong><img class="floatright" title="water damage causes" src="//cdn.shopify.com/s/files/1/0387/9521/files/water_damage_causes_1.jpg?7232807938695425885" alt="water damage causes" height="244" width="325">Sinks</strong>: Deteriorating caulk and pipe leaks can cause drips that eventually turn into steady leaks. Overflows are typically caused by clogged pipes.</p>
<p><strong>Bathtubs and showers</strong>: Similar to sinks, incidents are typically caused by overflows or deteriorated caulking.</p>
<p><strong>Refrigerator Icemakers</strong>: Hoses can develop leaks as they age.</p>
<p><strong>Dishwashers</strong>: Again, hoses wear out and crack, developing leaks.</p>
<p><strong>Water Heaters</strong>: Leaks and failures are common as water heaters age. Approximately 1 out of 10 failures occur when the occupant is not at home, resulting in significant damage.</p>
<p><strong>Washing Machines</strong>: Leaks tend to be caused by supply hoses and water connections failing. As would be expected, the worst damage takes place if no one is at home, resulting in an average cleanup cost of $12,300, according to insurance industry data.</p>
<p><strong>Basement Flooding</strong> typically occurs when sump pumps fail. Common causes include: power failure, the pump motor burning out from overuse, a broken impeller or drive shaft, the float switch getting stuck, a tripped circuit breaker, or high water volume simply exceeding the pump's capacity.</p>
<p>Unfortunately, the water damage causes described above are quite common and occur all too frequently. Fortunately, you can take steps to prevent them. Read our <a href="https://www.waterdamagedefense.com/blogs/home-maintenance-blog/flooded-basement">Tips on Preventing Water Damage</a>, and protect your home by installing <a href="https://www.waterdamagedefense.com/collections/waterblock-excess-water-flow-shut-off-valve/products/waterblock-wb-13-excess-water-flow-shut-off-valve">automatic water flow shut off valves</a> near important plumbing fixtures, along with a <a href="https://www.waterdamagedefense.com/pages/water-driven-sump-pumps">water driven sump pump</a> or <a href="https://www.waterdamagedefense.com/collections/battery-backup-sump-pumps">battery backup sump pump</a> in your basement.</p>
<p>Image source: <a href="http://www.flickr.com/photos/bfhoyt/4221019735/sizes/m/in/photostream/">bfhoyt</a></p>
<p class="cc-block"><a href="https://creativecommons.org/licenses/by-sa/3.0/" rel="license"><img class="cc-button" src="https://licensebuttons.net/l/by-sa/3.0/88x31.png" alt="Creative Commons License"></a> The <em><a href="https://www.waterdamagedefense.com/blogs/home-maintenance-blog/causes-of-water-damage">Causes of Water Damage</a></em> by <em><a href="https://www.waterdamagedefense.com/blogs/home-maintenance-blog">Water Damage Defense</a></em>, is licensed under a <a href="https://creativecommons.org/licenses/by-sa/3.0/" rel="license">Creative Commons Attribution-ShareAlike 3.0 Unported License</a>.</p>]]>
    </content>
  </entry>
  <entry>
    <id>https://www.waterdamagedefense.com/blogs/home-maintenance-blog/flooded-basement</id>
    <published>2010-08-05T11:53:00-04:00</published>
    <updated>2016-10-09T19:24:21-04:00</updated>
    <link rel="alternate" type="text/html" href="https://www.waterdamagedefense.com/blogs/home-maintenance-blog/flooded-basement"/>
    <title>Tips on Preventing Water Damage</title>
    <author>
      <name>Nick Domino</name>
    </author>
    <summary type="html">
      <![CDATA[<p><a href="https://www.waterdamagedefense.com/blogs/home-maintenance-blog/flooded-basement%20"><img src="//cdn.shopify.com/s/files/1/0387/9521/files/flooded_basement_big415.jpg?14807836037023813790" alt=""></a></p>
<p>From warped flooring and mildew to flooded basements and serious structural damage, water damage can devastate a house. Homeowners should invest some time and effort in periodic maintenance to safeguard their homes from this destructive force.</p><p><a class="read-more" href="https://www.waterdamagedefense.com/blogs/home-maintenance-blog/flooded-basement">More</a></p>]]>
    </summary>
    <content type="html">
      <![CDATA[<p>From warped flooring and mildew to flooded basements and serious structural damage, water damage can devastate a house. Homeowners should invest some time and effort in periodic maintenance to safeguard their homes from this destructive force. Continue reading for our tips on preventing water damage in your house.</p>
<h3>Water Heaters</h3>
<div itemprop="image" itemscope="" itemtype="https://schema.org/ImageObject">
<img class="floatright" alt="Flooded Basement" src="//cdn.shopify.com/s/files/1/0387/9521/files/flooded_basement.jpg?11366712103199533654"><meta itemprop="width" content="325">
<meta itemprop="url" content="https://cdn.shopify.com/s/files/1/0387/9521/files/flooded_basement.jpg?11366712103199533654">
<meta itemprop="height" content="433">
</div>
<p>To maximize the life expectancy of your water heater, periodically have a plumber do the following:</p>
<ul>
<li>Inspect the anode rod in the water heater and replace if necessary. The anode rod is typically made from zinc, aluminum, or magnesium, and it protects the tank from corrosion. However, once the rod itself becomes corroded, it can no longer protect the tank. By replacing a worn-out anode rod, you can significantly increase your tank's life expectancy.</li>
<li>Examine the glass lining inside the tank for spots where water has penetrated the lining, which could cause corrosion of the tank itself and ultimately lead to the tank rupturing.</li>
<li>Inspect valves and pipes. Make sure valves work properly, and replace rusty or worn out components.</li>
<li>Remove sediment from the tank every 6 months by flushing the water heater. Sediment can prevent the anode rod from functioning and makes it harder for the heater to heat water.</li>
</ul>
<h3>Washing Machines</h3>
<p>If possible, install your washing machine in the basement, away from valuable home furnishings. Periodically inspect your machine to look for the following:</p>
<ul>
<li>Valves: Replace any valves that are not working properly. Ideally, install a dual ball lever-operated valve, which will make it easier to turn off the water when you are not home.</li>
<li>Hoses: Look for signs of worn-out supply hoses, such as stress cracks, especially in places where the hoses bend sharply. Replace worn hoses or any that are over 5 years old with reinforced steel braided hoses. Tighten any loose hose connections - this is important, as leaks are most common at connection points.</li>
</ul>
<h3>Toilets</h3>
<img class="floatright" alt="Basement Flooding" src="//cdn.shopify.com/s/files/1/0387/9521/files/basement_flooding.jpg?13343752842301643351">
<ul>
<li style="float: right;">Stay in the room: It sounds overly simplistic, but one of the best ways to prevent water damage near your toilet is to simply stay in the bathroom until the toilet has finished refilling.</li>
<li>When the toilet overflows, turn off the supply valve as quickly as possible.</li>
<li>Inspect toilets a couple times per year. Look inside the tank to make sure that the fill and flush valves are working correctly. Make sure the supply line is securely connected and that the supply valve operates smoothly and contains no rust. Take note if the toilet is running between uses, as this can signal that toilet components are beginning to fail. One part that is particularly prone to failure is the flush valve, which can develop leaks. Replace any components that no longer work properly.</li>
</ul>
<h3>Plumbing System</h3>
<p>Pay attention to your plumbing system, and stay on the lookout for indicators of potential leaks, including:</p>
<ul>
<li>Water bills that are higher than they should be</li>
<li>Signs of moisture in the walls or floors</li>
<li>Rust stains in sinks or water that is rust-tinted</li>
<li>Pipes that make a "bang" noise, when faucets are turned off</li>
<li>Wet soil erosion close to your home's foundation</li>
</ul>
<p>Additionally, test your water shutoff valve regularly and make sure that everyone in your home knows how to shut off the house's water supply.</p>
<h3>Frozen Pipes</h3>
<p>If you live in a region that gets cold in the winter, you should take steps to prevent frozen pipes, including:</p>
<ul>
<li>When the temperature is extremely cold, open your faucets slightly to allow them to drip. This reduces pressure inside your pipes. Open cabinet doors under sinks to allow warm air to circulate around the pipes. Warm pipes in your basement, if necessary, with space heaters. Make sure any exposed plumbing, like that in basement ceilings, is well insulated.</li>
<li>Keep your thermostat set to 60 degrees or higher, even if no one is home.</li>
<li>Remove garden hoses and install a frost-free sillcock.</li>
</ul>
<h3>Water Leaks</h3>
<p><img class="floatright" alt="Basement Flood" src="//cdn.shopify.com/s/files/1/0387/9521/files/basement_flood.jpg?11387011006749057661"> Use a <a href="https://www.waterdamagedefense.com/collections/flow-rate-based-water-leak-detectors-shut-off-valve">water shut off valve</a> to protect your home from water leaks. Early detection is the key to preventing extensive water damage, and it will often mean the difference between cleaning up a small drip or having a large leak destroy your home and belongings.</p>
<h3>Basement Flooding</h3>
<p>Make sure you have a reliable, well maintained primary <a href="https://www.waterdamagedefense.com/collections/sump-pumps">sump pump</a> in your sump pit. Additionally, ensure that its pumping capacity is sufficient to handle the water that could potentially enter your basement. Read our tips on determining <a href="https://www.waterdamagedefense.com/pages/sump-pump-size">sump pump capacity</a> If your basement is subject to high water volumes, you could install a standby pump as well, to assist your main pump by engaging when the water level rises to a certain point.</p>
<p>Additionally, take steps to avoid a flooded basement in case you lose power during a heavy storm. If your house loses power, your A/C powered primary pump will not be able to remove the water rising in your basement. However, if you have a <a href="https://www.waterdamagedefense.com/collections/battery-backup-sump-pumps">battery backup sump pump</a> or <a href="https://www.waterdamagedefense.com/collections/water-powered-sump-pumps">water powered sump pump</a> in place, it would automatically switch on to handle the workload in place of your primary pump.</p>
<p>Image sources: <a href="https://www.flickr.com/photos/johncarljohnson/320144325/">johncarljohnson </a>and <a href="https://www.flickr.com/photos/chrisandbabs/5405749624/">chrisandbabs</a></p>
<p class="cc-block"><a href="https://creativecommons.org/licenses/by-sa/3.0/" rel="license"><img class="cc-button" src="https://licensebuttons.net/l/by-sa/3.0/88x31.png" alt="Creative Commons License"></a> The <em><a href="https://www.waterdamagedefense.com/blogs/home-maintenance-blog/flooded-basement">Tips on Preventing Water Damage</a></em> by <em><a href="https://www.waterdamagedefense.com/blogs/home-maintenance-blog">Water Damage Defense</a></em>, is licensed under a <a href="https://creativecommons.org/licenses/by-sa/3.0/" rel="license">Creative Commons Attribution-ShareAlike 3.0 Unported License</a>.</p>]]>
    </content>
  </entry>
  <entry>
    <id>https://www.waterdamagedefense.com/blogs/home-maintenance-blog/water-damage-repair</id>
    <published>2010-07-23T14:42:00-04:00</published>
    <updated>2016-10-09T19:24:26-04:00</updated>
    <link rel="alternate" type="text/html" href="https://www.waterdamagedefense.com/blogs/home-maintenance-blog/water-damage-repair"/>
    <title>Water Damage Cleanup, Part 2 - Fixing the Problem</title>
    <author>
      <name>Nick Domino</name>
    </author>
    <summary type="html">
      <![CDATA[<p><a href="https://www.waterdamagedefense.com/blogs/home-maintenance-blog/water-damage-repair%20"><img src="//cdn.shopify.com/s/files/1/0387/9521/files/water_damage_repair_big415.jpg?15230288885040654507" alt=""></a></p>
<p>Before beginning the water damage cleanup and repair process, make sure that it is safe for you to be in your home.</p><p><a class="read-more" href="https://www.waterdamagedefense.com/blogs/home-maintenance-blog/water-damage-repair">More</a></p>]]>
    </summary>
    <content type="html">
      <![CDATA[<p>Before beginning the water damage cleanup and repair process, make sure that it is safe for you to be in your home. Read about safety issues to consider when dealing with <a href="https://www.waterdamagedefense.com/blogs/home-maintenance-blog/water-damage">water damage</a> in part 1 of this article.</p>
<div itemprop="image" itemscope="" itemtype="https://schema.org/ImageObject">
<img class="floatright" src="//cdn.shopify.com/s/files/1/0387/9521/files/water_damage_repair.jpg?7162035643835018360" alt="Water Damage Repair"><meta itemprop="width" content="325">
<meta itemprop="url" content="https://cdn.shopify.com/s/files/1/0387/9521/files/water_damage_repair.jpg?7162035643835018360">
<meta itemprop="height" content="244">
</div>
<h3>Stop Incoming Water</h3>
<p>Once you have determined that it is safe to begin cleanup, start by preventing additional water from entering your house. If pipes are leaking, turn your house's water supply off immediately. Have a plumber address the pipe leak. Similarly, if your roof is leaking, do your best to stop the leak and collect the water, and have a roofing professional fix your roof as soon as possible.</p>
<h3>Take Pictures</h3>
<p>While the damage is still evident, take pictures of all the water damaged areas in your home. These could prove important later on, as you deal with insurance companies or other parties. Be as complete as possible, but also do this quickly. It is important to begin cleanup as fast as you can.</p>
<h3>Dry the Area, Circulate Fresh Air</h3>
<p><img class="floatright" title="water damage clean up" src="//cdn.shopify.com/s/files/1/0387/9521/files/water_damage_clean_up.jpg?10065939089913031963" alt="Water Damage Clean Up" height="217" width="325">
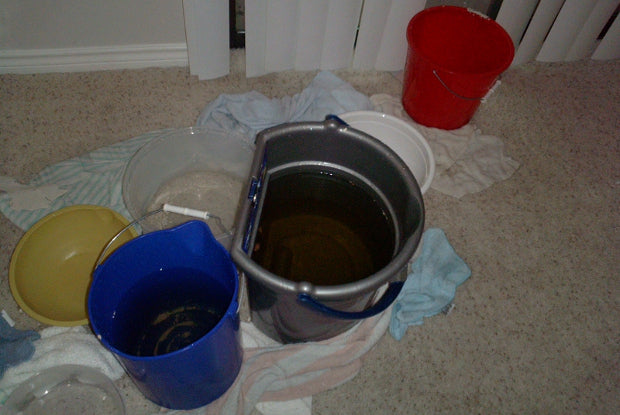
Speed and fresh air are important. You want to dry out your home as quickly as possible to reduce the chance of serious mold problems. Use a wet/dry vacuum to remove water from floors and furniture. Open your windows and use fans to circulate as much fresh air as you can through the water damaged area. Additionally, use dehumidifiers to remove moisture. Run the fans and dehumidifiers until the drying process has completely finished.</p>
<h3>Carpet and Furniture</h3>
<p>Remove wet carpet, as well as furniture and valuable items from water damaged rooms. Be careful not to bring waterlogged items into dry, undamaged rooms, in order to avoid spreading moisture or mildew.</p>
<p>If your carpet has only been wet for a day or two, you might be able to keep it, although the padding should be thrown away. First, remove water from the carpet with a wet/dry vacuum, and then clean it with a professional carpet cleaning machine. However, if the carpet has been waterlogged for more than a couple of days, you will probably need to discard it.</p>
<h3>Walls, Ceilings, Floors</h3>
<p><img class="floatleft" title="water damage repair" src="//cdn.shopify.com/s/files/1/0387/9521/files/water_damage_repair_1.jpg?11658630142236206968" alt="Water Damage Repair" height="487" width="325">Check your walls for signs of damage to the drywall. If your drywall is swollen or obviously waterlogged, it will have to be replaced. If your interior walls have undergone extreme water damage, cutting holes in them could help to speed the drying process. However, check with a water damage expert and your insurance company before you begin slicing away at your walls.</p>
<p>If water leaked through ceilings or floors, you may need to replace items like ceiling tiles and flooring material. If your insulation has been soaked, it will lose its ability to insulate, so it will need to be replaced as well.</p>
<br class="clear">
<h3>Standing Water</h3>
<p><img class="floatright" title="water damage clean up" src="//cdn.shopify.com/s/files/1/0387/9521/files/water_damage_clean_up_1.jpg?8025289437466836380" alt="Water Damage Clean Up" height="488" width="325">Standing water can be especially tricky to deal with. If you have a lot of standing water in your basement, it is probably best to get an expert involved, because of counter-intuitive side effects that could result. For example, if a flood caused the standing water in your basement, the water-saturated soil outside could be exerting a lot of pressure on your basement walls. The standing water in your flooded basement, in this case, might actually be providing structural support to the walls. In extreme situations, pumping it out too quickly could cause your basement walls to crack or buckle.</p>
<p>After getting the standing water out of your basement, remove the remaining debris or mud before they dry. Finally, wash and sanitize the floor and walls.</p>
<h3>Safety</h3>
<p>Water damaged areas can be extremely dangerous, so error on the side of caution during the clean up process. Wear watertight gloves, clothing, and boots to protect yourself from bacteria, and only wade into standing water once you are absolutely sure that your electricity has been turned off. Finally, have someone else with you while you are working, in case of emergency. See our previous article for more on safety issues to consider when dealing with water damage.</p>
<h3>Consider Using Professionals</h3>
<p>Unfortunately, you may find that the scope of the damage is worse than you initially thought. If you discover signs of structural damage at any point, vacate the house immediately and contact professionals. Even if you are capable of handling the water damage clean up yourself, if you think it will take you a long time, consider using professional help, since fast and complete cleanup is the best way to reduce your chances of mold and mildew problems down the road. Finally, in your discussions with water damage professionals, ask for their opinions on preventative measures you can take, like a <a href="https://www.waterdamagedefense.com/collections/water-powered-sump-pumps">water powered sump pump</a> or automatic <a href="https://www.waterdamagedefense.com/collections/flow-rate-based-water-leak-detectors-shut-off-valve">water shut off valve</a>, to help you avoid water damage in the future.</p>
<p>Image sources: <a href="http://www.flickr.com/photos/globalreset/26817322/">globalreset </a>and <a href="http://www.flickr.com/photos/70237334@N04/6379729531/">carlpenergy</a></p>
<p class="cc-block"><a href="https://creativecommons.org/licenses/by-sa/3.0/" rel="license"><img class="cc-button" src="https://licensebuttons.net/l/by-sa/3.0/88x31.png" alt="Creative Commons License"></a> The <em><a href="http://blog.waterdamagedefense.com/water-damage-repair/">Water Damage Cleanup, Part 2 - Fixing the Problem </a></em> by <em><a href="http://blog.waterdamagedefense.com">Water Damage Defense</a></em>, is licensed under a <a href="https://creativecommons.org/licenses/by-sa/3.0/" rel="license">Creative Commons Attribution-ShareAlike 3.0 Unported License</a>.</p>]]>
    </content>
  </entry>
  <entry>
    <id>https://www.waterdamagedefense.com/blogs/home-maintenance-blog/water-damage</id>
    <published>2010-06-08T14:22:00-04:00</published>
    <updated>2016-10-09T19:24:49-04:00</updated>
    <link rel="alternate" type="text/html" href="https://www.waterdamagedefense.com/blogs/home-maintenance-blog/water-damage"/>
    <title>Water Damage Cleanup, Part 1 - Safety Issues</title>
    <author>
      <name>Nick Domino</name>
    </author>
    <summary type="html">
      <![CDATA[<p><a href="https://www.waterdamagedefense.com/blogs/home-maintenance-blog/water-damage%20"><img src="//cdn.shopify.com/s/files/1/0387/9521/files/water_damage_big415.jpg?15230288885040654507" alt=""></a></p>
<p>Water damage can range from small, easy-to-fix problems to disasters that ruin entire homes. So, what should you do if water damage strikes your house?</p><p><a class="read-more" href="https://www.waterdamagedefense.com/blogs/home-maintenance-blog/water-damage">More</a></p>]]>
    </summary>
    <content type="html">
      <![CDATA[<div itemprop="image" itemscope="" itemtype="https://schema.org/ImageObject">
<img class="floatright" src="//cdn.shopify.com/s/files/1/0387/9521/files/water_damage.jpg?11316032884102613191" alt="Water Damage"><meta itemprop="width" content="325">
<meta itemprop="url" content="https://cdn.shopify.com/s/files/1/0387/9521/files/water_damage.jpg?11316032884102613191">
<meta itemprop="height" content="487">
</div>
<p>Water damage can range from small, easy-to-fix problems to disasters that ruin entire homes. So, what should you do if water damage strikes your house? Read our tips below.</p>
<p>As soon as you find out about water damage in your home, do two things immediately: contact your insurance company to notify them of the damage, and also assess whether it is safe to be inside your home.</p>
<h3>Call Your Insurance Company</h3>
<p>Get in touch with your homeowner's insurance company to find out what is covered by your policy and determine if they can help in the clean up process. Keep in mind, water and mold damage are not always covered by homeowner's policies, so of course, it is always a good idea to verify the exact coverage of these events each time you start or renew a policy.</p>
<h3>Electric, Oil, and Gas Risks</h3>
<p>Water damage often creates a risk of electrical shock inside a home. If you have any standing water, then there is a chance that circuit breaker boxes, electric outlets, or live wires are submerged, posing serious risks. If there is any chance that electrical components are submerged, do not enter the house.</p>
<p>Have your utility company turn off power to your home. Then, shut off power locally in your house as well, in case the utility company mistakenly turns the power back on while you are still working. It is a good idea to have an electrician assess whether it is safe to be in your home, since you do not want to wade into standing water until you are absolutely sure there is no risk of electric shock.</p>
<p>Similarly, turn off your fuel oil, natural gas, or propane lines, and shut off any individual lines to each of the corresponding appliances as well. This is important, because if you had a large amount of standing water in your home, it could have shifted your appliances or loosened connection lines, potentially creating leaks. Once you have determined that it is safe to be in your house, check these items for damage, along with your water heater and similar appliances.</p>
<h3>
<img class="floatright" title="water damage" src="//cdn.shopify.com/s/files/1/0387/9521/files/water_damage_1.jpg?11316032884102613191" alt="Water Damage" height="217" width="325">Structural Damage</h3>
<p>Take note of what caused the water damage. Did a fallen tree tear a hole in your roof, did a pipe burst inside the house, or is a toilet or sink overflowing? Look for signs of danger in the water damaged area and at the source of the damage.</p>
<p>In particular, look for any structural damage to your home. Signs of structural damage could include buckling floors, bulging ceilings, or any evidence of weakness in weight bearing components of your home. Make sure your foundation walls are not damaged, especially if a lot of water is standing in your basement.</p>
<p>If there is the slightest sign of structural damage or a large amount of standing water in your home, have a professional water damage expert help you assess whether it is safe to be in your house.</p>
<h3>Water Contamination</h3>
<p>Additionally, consider whether the source of the water damage is dangerous. A clean water source, like a sink overflow, is unlikely to pose a health risk. However the source might be grey water, like a toilet bowl overfilling, or even black water containing sewage.</p>
<p><img class="floatright" title="water damage" src="//cdn.shopify.com/s/files/1/0387/9521/files/water_damage_2.jpg?11316032884102613191" alt="Water Damage" height="244" width="325">Grey water could contain contaminants, and black water certainly does. If contaminated water caused the damage, vacate the premises and have a professional water damage expert clean it up.</p>
<h3>Protect Yourself</h3>
<p>As you assess the extent of your water damage and work on cleaning it up, protect yourself from bacteria and infection by wearing watertight gloves, clothing, and boots. Also, in case of emergency, be sure to have another person with you while you are working.</p>
<h3>Clean Up</h3>
<p>Read part 2 of this article, to learn about <a href="https://www.waterdamagedefense.com/blogs/home-maintenance-blog/water-damage-repair">water damage repair</a>.</p>
<p>Image source: <a href="http://www.flickr.com/photos/thirteenofclubs/3105615966/">thirteenofclubs</a></p>
<p class="cc-block"><a href="https://creativecommons.org/licenses/by-sa/3.0/" rel="license"><img class="cc-button" src="https://licensebuttons.net/l/by-sa/3.0/88x31.png" alt="Creative Commons License"></a> The <em><a href="https://www.waterdamagedefense.com/blogs/home-maintenance-blog/water-damage">Water Damage Cleanup, Part 1 - Safety Issues</a></em> by <em><a href="https://www.waterdamagedefense.com/blogs/home-maintenance-blog">Water Damage Defense</a></em>, is licensed under a <a href="https://creativecommons.org/licenses/by-sa/3.0/" rel="license">Creative Commons Attribution-ShareAlike 3.0 Unported License</a>.</p>]]>
    </content>
  </entry>
  <entry>
    <id>https://www.waterdamagedefense.com/blogs/home-maintenance-blog/what-is-a-french-drain</id>
    <published>2010-04-06T09:03:00-04:00</published>
    <updated>2016-10-09T19:24:55-04:00</updated>
    <link rel="alternate" type="text/html" href="https://www.waterdamagedefense.com/blogs/home-maintenance-blog/what-is-a-french-drain"/>
    <title>Ground Water Control and Roof Drainage</title>
    <author>
      <name>Nick Domino</name>
    </author>
    <summary type="html">
      <![CDATA[<p><a href="https://www.waterdamagedefense.com/blogs/home-maintenance-blog/what-is-a-french-drain%20"><img style="display: block; margin-left: auto; margin-right: auto;" src="//cdn.shopify.com/s/files/1/0387/9521/files/What_is_a_french_drain_big415.jpg?3983913946729856055" alt=""></a></p>
<p>Consider the volume of water that pours off your roof from rain during a typical year - it can be a huge amount! For example, when a 2,400 square foot roof receives a 1 inch rainfall, approximately 1,500 gallons of water will pour from this roof. If this property receives 35 inches of rain in a given year, 52,500 gallons of water will enter the soil near its foundation.</p><p><a class="read-more" href="https://www.waterdamagedefense.com/blogs/home-maintenance-blog/what-is-a-french-drain">More</a></p>]]>
    </summary>
    <content type="html">
      <![CDATA[<div itemprop="image" itemscope="" itemtype="https://schema.org/ImageObject">
<img class="floatright" src="//cdn.shopify.com/s/files/1/0387/9521/files/roof_drainage.jpg?6115747722458663554" alt="roof drainage"><meta itemprop="width" content="325">
<meta itemprop="url" content="https://cdn.shopify.com/s/files/1/0387/9521/files/roof_drainage.jpg?6115747722458663554">
<meta itemprop="height" content="434">
</div>
<p>Consider the volume of water that pours off your roof from rain during a typical year - it can be a huge amount! For example, when a 2,400 square foot roof receives a 1 inch rainfall, approximately 1,500 gallons of water will pour from this roof. If this property receives 35 inches of rain in a given year, 52,500 gallons of water will enter the soil near its foundation.</p>
<p>Assuming your basement has no leaks, the bulk of the rain water that enters the soil near your foundation will be pumped away by your <a href="https://www.waterdamagedefense.com/collections/sump-pumps">sump pump</a>. It is important to make sure that your sump pump discharges this water as far as possible from your house, so that it does not simply re-enter the soil near your foundation and get recycled back into your basement, overworking your pump.</p>
<p>Given the huge volume of rainfall that can drop on your home and the surrounding soil, well-functioning gutters and drainage systems are essential to prevent water from entering your home or damaging your foundation. Drain water and sump water should be piped away from your home, either into the public storm sewer system, if available, or to the lowest part of your property. Be sure to verify and comply with your local runoff codes for discharging this water responsibly.</p>
<h3>Roof Gutters are Important</h3>
<p><img class="floatleft" title="what is a french drain" src="//cdn.shopify.com/s/files/1/0387/9521/files/what_is_a_french_drain_1.jpg?1819795398711679768" alt="roof drainage" height="228" width="325">
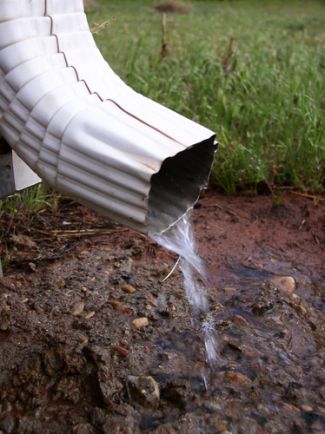
Gutters are used to keep rain water from dripping down and accumulating around your home's foundation. If the soil around your home becomes saturated with water, extra pressure is placed on your basement walls. This can eventually cause your house to settle and can actually cause your basement walls to shift or bend inward, leading to structural damage. Additionally, water can begin to seep into your basement.</p>
<p>Excess water draining into the soil around your home is an especially serious problem if you happen to live in an area with poor draining soil, such as soil with a high clay content.</p>
<p>Review our tips on <a href="https://www.waterdamagedefense.com/blogs/home-maintenance-blog/gutter-cleaning">how to clean gutters</a> in order to protect your foundation.</p>
<h3>French Drains and Footing Drains</h3>
<p><img class="floatright" title="what is a french drain" src="//cdn.shopify.com/s/files/1/0387/9521/files/what_is_a_french_drain.jpg?17343442581440279210" alt="what is a french drain" height="488" width="325">Use a French drain in your yard to act as a "gutter for ground water", to direct water away from your foundation during heavy rains when the ground gets saturated.</p>
<p>So, what is a French drain? A French drain is a tunnel containing stone and a perforated pipe, dug in a downward sloping grade. It is especially useful for keeping water from traveling toward your house from a high point in your yard. The trench diverts water that would otherwise be moving toward your foundation.</p>
<p>Most foundations have footing drains installed during initial construction. These systems of pipes, gravel, and a filtering material collect water near your foundation and redirect it, to prevent it from gathering at the exterior base of the foundation wall. If you find that water levels near your foundation seem high, find the outlets from your footing drainage and for any existing French drain systems you may have. Be sure these drain lines still function well. Clear the pipes if you detect that the water flow is restricted. Try checking these pipes during, or immediately after, heavy rainfall to confirm that water is flowing properly.</p>
<p>The topography of your lot is an important aspect of effective ground water control. Where possible, you want the grade of your property to slope away from your house so that water is naturally diverted away from it.</p>
<p>Given the enormous amount of water that falls on your roof and yard over time, it is important to make sure that the water-diverting systems on your property are functioning well. When you notice any deficiencies in your roof drainage or other drain systems, always fix them right away. By investing a little bit of time and money in periodic maintenance, you can save yourself from a tremendous amount of hassle.</p>
 
<p>Image source: <a href="https://www.flickr.com/photos/toddneville/6103788972/in/photostream/">toddneville</a></p>
<p class="cc-block"><a href="https://creativecommons.org/licenses/by-sa/3.0/" rel="license"><img class="cc-button" src="https://licensebuttons.net/l/by-sa/3.0/88x31.png" alt="Creative Commons License"></a> The <em><a href="https://www.waterdamagedefense.com/blogs/home-maintenance-blog/what-is-a-french-drain">Ground Water Control and Roof Drainage</a></em> by <em><a href="https://www.waterdamagedefense.com/blogs/home-maintenance-blog">Water Damage Defense</a></em>, is licensed under a <a href="https://creativecommons.org/licenses/by-sa/3.0/" rel="license">Creative Commons Attribution-ShareAlike 3.0 Unported License</a>.</p>]]>
    </content>
  </entry>
  <entry>
    <id>https://www.waterdamagedefense.com/blogs/home-maintenance-blog/gutter-cleaning</id>
    <published>2010-02-21T21:01:00-05:00</published>
    <updated>2016-10-09T19:25:01-04:00</updated>
    <link rel="alternate" type="text/html" href="https://www.waterdamagedefense.com/blogs/home-maintenance-blog/gutter-cleaning"/>
    <title>How to Clean and Maintain Your Gutters</title>
    <author>
      <name>Nick Domino</name>
    </author>
    <summary type="html">
      <![CDATA[<p><a href="https://www.waterdamagedefense.com/blogs/home-maintenance-blog/gutter-cleaning%20"><img style="display: block; margin-left: auto; margin-right: auto;" src="//cdn.shopify.com/s/files/1/0387/9521/files/How_to_clean_gutters_big415.jpg?195232834483990021" alt=""></a></p>
<p>Check your gutters and clean them twice per year - in the late fall, after leaves have come down, and again towards the end of spring, after new growth has accumulated in the gutters again.</p><p><a class="read-more" href="https://www.waterdamagedefense.com/blogs/home-maintenance-blog/gutter-cleaning">More</a></p>]]>
    </summary>
    <content type="html">
      <![CDATA[<p> </p>
<div itemprop="image" itemscope="" itemtype="https://schema.org/ImageObject">
<img class="floatright" src="//cdn.shopify.com/s/files/1/0387/9521/files/how_to_clean_gutters.jpg?5340919169594540704" alt="How to Clean Gutters"><meta itemprop="width" content="325">
<meta itemprop="url" content="https://cdn.shopify.com/s/files/1/0387/9521/files/how_to_clean_gutters.jpg?5340919169594540704">
<meta itemprop="height" content="217">
</div>
Check your gutters and clean them twice per year - in the late fall, after leaves have come down, and again towards the end of spring, after new growth has accumulated in the gutters again.
<h3>Gutter Cleaning</h3>
<p>First, clean out the leaves, dirt, and other junk that has accumulated in the gutters. Do this by hand, as opposed to spraying them with a hose, because you do not want to push stuff into your downspouts, causing a clog.</p>
<p>Next, once all the debris has been removed, use your hose to rinse out the gutters. Also, clean your downspouts by inserting your hose into them and running the water at high pressure.</p>
<h3>Inspect Your Gutters</h3>
<p><img class="floatright" title="clean gutters" src="//cdn.shopify.com/s/files/1/0387/9521/files/clean_gutters.jpg?17484048889408054611" alt="Clean Gutters" height="485" width="325">After rinsing and cleaning your gutters, it is time to inspect – do this while some water is still dripping through the gutters. Inspect the entire gutter assembly for leaks, paying particular attention to any rusty spots. Use patching or silicon sealer products to fix leaks. Look at your gutter hangers. If any are damaged, replace them.</p>
<p>Inspect the angle of your gutters to make sure water flows downward. If water collects in a spot inside the gutter, you can tell it does not have a steep enough slope. You want to avoid standing water in your roof gutter, as it provides a potential breeding ground for mosquitoes around your home. A good rule of thumb is to drop your gutter vertically by 1 inch for every 15 feet that it extends horizontally. You can change the slope of the gutter by adjusting the hangers.</p>
<h3>Splash Pans</h3>
<p>Adjust your splash pans, located at the bottom of the downspouts. Make sure they are positioned so water hits them directly and so they divert water at least 3 feet away from your foundation. Splash pans help to prevent soil erosion under your downspouts; they are a good way to direct water so it drains where you want it to.</p>
<h3>Debris in Gutters</h3>
<p><img class="floatleft" src="//cdn.shopify.com/s/files/1/0387/9521/files/how_to_clean_gutters_1.jpg?14429123722213960971" alt="How to Clean Gutters" height="216" width="325">
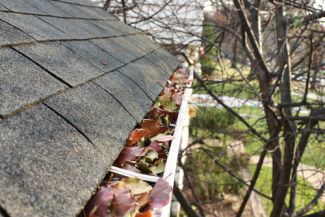
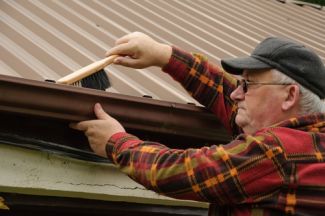
If gutter debris presents a significant problem for you, consider installing a gutter guard system to help prevent clogging. These are screens or gratings that you can attach to the top of your open gutters to keep leaves and debris out. Gutter guards are especially helpful if your home is surrounded by trees that shed leaves or needles onto your roof, or if high winds tend to blow twigs, branches, or other debris into your gutters. Keep in mind that, although gutter guards maker it easier to maintain your gutters, you will still need to perform basic maintenance and cleaning periodically. There are also gutter foam products that can be placed in gutters, allowing water to flow, while keeping leaves and debris out of the gutter.</p>
<p>Note: To avoid bending or denting the gutter while working, be careful not to lean your ladder up against it. If you find that you must lean your ladder against the gutter, try placing a short piece of 2x4 lumber inside the gutter to help support the ladder's weight and keep the gutter from being crushed.</p>
<p>Regular gutter maintenance is essential, in order to manage the large volume of water that pours off your roof over time. By keeping your gutter and drainage systems in good condition, you will greatly improve your chances of keeping water out of your basement and avoid an overworked <a href="https://www.waterdamagedefense.com/collections/sump-pumps">sump pump</a>.</p>
<p>Image source: <a href="http://www.sxc.hu/photo/1088179">Mattox</a></p>
<p class="cc-block"><a href="https://creativecommons.org/licenses/by-sa/3.0/" rel="license"><img class="cc-button" src="https://licensebuttons.net/l/by-sa/3.0/88x31.png" alt="Creative Commons License"></a> The <em><a href="https://www.waterdamagedefense.com/blogs/home-maintenance-blog/gutter-cleaning">How to Clean and Maintain Your Gutters</a></em> by <em><a href="https://www.waterdamagedefense.com/blogs/home-maintenance-blog">Water Damage Defense</a></em>, is licensed under a <a href="https://creativecommons.org/licenses/by-sa/3.0/" rel="license">Creative Commons Attribution-ShareAlike 3.0 Unported License</a>.</p>]]>
    </content>
  </entry>
  <entry>
    <id>https://www.waterdamagedefense.com/blogs/home-maintenance-blog/foundation-cracks</id>
    <published>2009-12-04T04:35:00-05:00</published>
    <updated>2016-10-09T19:25:11-04:00</updated>
    <link rel="alternate" type="text/html" href="https://www.waterdamagedefense.com/blogs/home-maintenance-blog/foundation-cracks"/>
    <title>Foundation Damage</title>
    <author>
      <name>Nick Domino</name>
    </author>
    <summary type="html">
      <![CDATA[<p><a href="https://www.waterdamagedefense.com/blogs/home-maintenance-blog/foundation-cracks%20"><img src="//cdn.shopify.com/s/files/1/0387/9521/files/foundation_crack_big415.jpg?3702265438803144576" alt=""></a></p>
<p>It is a good idea to check your house for foundation damage at least once per year. Foundation problems can be difficult to fix and can be signs of major structural damage to your home, so early detection is key.</p><p><a class="read-more" href="https://www.waterdamagedefense.com/blogs/home-maintenance-blog/foundation-cracks">More</a></p>]]>
    </summary>
    <content type="html">
      <![CDATA[<h3>How to spot problems in your foundation</h3>
<p>It is a good idea to check your house for foundation damage at least once per year. Foundation problems can be difficult to fix and can be signs of major structural damage to your home, so early detection is key.</p>
<h3>Signs of Foundation Movement</h3>
<div itemprop="image" itemscope="" itemtype="https://schema.org/ImageObject" class="floatright">
<img src="//cdn.shopify.com/s/files/1/0387/9521/files/foundation_cracks.jpg?1212494674977454196" alt="Foundation Cracks"><meta itemprop="width" content="325">
<meta itemprop="url" content="https://cdn.shopify.com/s/files/1/0387/9521/files/foundation_cracks.jpg?1212494674977454196">
<meta itemprop="height" content="244">
</div>
<ul>
<li>Are your door and window frames no longer at right angles, making them difficult to open and close?</li>
<li>Are your floors sloping?</li>
<li>Do you see nails working their way out of your sheetrock walls, or are there new wall cracks appearing?</li>
<li>Do you have a leaking roof, even though your roofing material is new?</li>
</ul>
<h3>Foundation Cracks</h3>
<p>Additionally, examine your interior and exterior foundation walls, looking for cracks. Take note of what the cracks look like. This can tell you a lot about the source of the problem. Pay particular attention to foundation cracks that look like they have been repaired several times, which could signal persistent problems in your foundation.</p>
<p>Vertical foundation cracks are often caused by your basement settling unevenly. If a crack in a wall continues along the floor, it could be related to the footing below your basement. This could signal a serious issue, since the foundation wall and all of the structure above is supported by that section of footing.</p>
<p>Additionally, look for places where your foundation may have shifted downward, leaving a gap between the foundation and your house's frame. This is another sign that one of the concrete footers below your foundation has sunk or become damaged.</p>
<p>These days, most foundations are built with poured concrete or with cement blocks, also known as concrete masonry units (CMUs). In poured concrete, small shrinkage cracks can take place naturally, since concrete shrinks when it initially sets. They can be vertical or random in shape; tiny ones are often less serious in nature.</p>
<p>Horizontal cracks in any type of foundation indicate the presence of serious issues. They can be signs of pressure from the outside being exerted on your wall, possibly from saturated soil near your foundation or from freezing and thawing soil (see our article on <a href="https://www.waterdamagedefense.com/blogs/home-maintenance-blog/what-is-a-french-drain">roof and soil drainage tips</a>). Look for clues that may explain these horizontal cracks. For example, if there is a driveway near your foundation, has pressure from a car placed significant pressure on your exterior basement wall? <img class="floatright" title="foundation crack" src="//cdn.shopify.com/s/files/1/0387/9521/files/foundation_crack.jpg?5414293330620140183" alt="Foundation Crack" height="244" width="325"></p>
<p>If you have a cement block foundation, look for any sign of damage to the bond courses in your exterior foundation walls. A bond course is a solid mortar filled cavity with rebar inside, and several of them typically run throughout cement block foundation walls. They act as a series of structural bands to support the wall. The top of the foundation wall is typically a solid 'bond beam', made of mortar with rebar inside, holding embedded anchor bolts for attaching the wood structure to the foundation. If either the bond courses or the bond beam are cracked, your walls are seriously damaged and may be at risk of collapse. You should have a professional inspect them immediately.</p>
<p>In a stone foundation, damage does not typically occur from the stones themselves cracking. Rather, the wall can become cracked or bulge inward from outside pressure on the wall and from freezing and thawing soil. Additionally, damage can result from a stone wall being weakened when individual stones are removed to create openings for windows, doors, or pipes.</p>
<p>Brick foundations are relatively uncommon, but if you have one, or have brick walls, check them for loose or damaged bricks. Also, check the strength of the mortar. Poke at it - is it still holding well? Keep in mind that gaps or cracks in brick walls provide space for water to get into your wall, further weakening it, especially when the water freezes and expands. Cracks in brick walls are often due to building movement or insufficient support. Treat cracks in brick walls as very serious, and have an expert inspect them right away, especially if the wall has become bulged.</p>
<h3>Check Other Foundations on Your Property</h3>
<p><img class="floatright" title="foundation damage" src="//cdn.shopify.com/s/files/1/0387/9521/files/foundation_damage.jpg?16477927557529898173" alt="foundation damage" height="267" width="325">
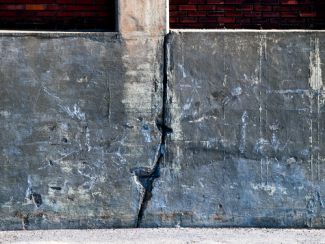
Inspect the foundations of other structures on your property, such as a detached garage. In stand-alone garages, the horizontal cement slab will often settle from the combination of its own weight, along with that of the vehicles on top of it. This places downward pressure on the dirt below the slab, which then pushes outward on the garage foundation walls. Look for horizontal cracks in the foundation walls as a sign of damage caused by settling.</p>
<p>If you find signs of damage to your foundation, contact a foundation expert immediately to help you diagnose the extent of the damage and to help you repair it. In addition to addressing any potential structural problems, it is important to repair any cracks that could allow water into your house.</p>
<br>
<p>Image source: <a href="http://www.flickr.com/photos/waytru/1348265363/lightbox/">waytru</a></p>
<p class="cc-block"><a href="https://creativecommons.org/licenses/by-sa/3.0/" rel="license"><img class="cc-button" src="https://licensebuttons.net/l/by-sa/3.0/88x31.png" alt="Creative Commons License"></a> The <em><a href="https://www.waterdamagedefense.com/blogs/home-maintenance-blog/foundation-cracks/">Foundation Damage</a></em> by <em><a href="https://www.waterdamagedefense.com/blogs/home-maintenance-blog">Water Damage Defense</a></em>, is licensed under a <a href="https://creativecommons.org/licenses/by-sa/3.0/" rel="license">Creative Commons Attribution-ShareAlike 3.0 Unported License</a>.</p>]]>
    </content>
  </entry>
</feed>
