<?xml version="1.0" encoding="UTF-8"?>
<feed xml:lang="en" xmlns="http://www.w3.org/2005/Atom" xmlns:opensearch="http://a9.com/-/spec/opensearch/1.1/" xmlns:s="http://jadedpixel.com/-/spec/shopify">
  <id>https://graphicsmesh.com/blogs/news.atom</id>
  <link rel="alternate" type="text/html" href="https://graphicsmesh.com/blogs/news"/>
  <link rel="self" type="application/atom+xml" href="https://graphicsmesh.com/blogs/news.atom"/>
  <title>GraphicsMesh - News</title>
  <updated>2019-02-18T10:22:00-06:00</updated>
  <author>
    <name>GraphicsMesh</name>
  </author>
  <entry>
    <id>https://graphicsmesh.com/blogs/news/installation-tutorial-mickey-mouse-inspired-ears-wall-decals</id>
    <published>2019-02-18T10:22:00-06:00</published>
    <updated>2019-02-18T10:40:05-06:00</updated>
    <link rel="alternate" type="text/html" href="https://graphicsmesh.com/blogs/news/installation-tutorial-mickey-mouse-inspired-ears-wall-decals"/>
    <title>Installation Tutorial: Mickey Mouse inspired ears wall decals</title>
    <author>
      <name>Marta Suchodolski</name>
    </author>
    <summary type="html">
      <![CDATA[Tutorial on Mickey Mouse inspired ears wall decals installation using a tracer.<br>Mickey ears and personalized name look great in any nursery or kids room.<p><a class="read-more" href="https://graphicsmesh.com/blogs/news/installation-tutorial-mickey-mouse-inspired-ears-wall-decals">More</a></p>]]>
    </summary>
    <content type="html">
      <![CDATA[<h2>HOW TO INSTALL MICKEY MOUSE EARS WALL DECALS <em><span style="color: #666666;">WITH A TRACER</span><br></em>
</h2>
<p>Installing vinyl wall decals is super easy although it might look intimidating when you first open up your package.  All the instructions are always included in your order so make sure to read through those first on how to prep walls etc.</p>
<p>This tutorial is specifically showing you how to install this set:<br> <a href="https://graphicsmesh.com/products/mickey-mouse-ears-with-personalized-baby-name-disney-inspired-wall-decals" target="_blank" title="Mickey Mouse ears wall decals with personalized name" rel="noopener noreferrer">https://graphicsmesh.com/products/mickey-mouse-ears-with-personalized-baby-name-disney-inspired-wall-decals</a> MEDIUM SIZE.  It is being installed on a wall that is only 79 inches tall, so the graphic looks pretty big here. Always start with clean walls and these sort of decals work best on smooth surface.  <br><br>When you take all the decals out of the package you will first need to separate all of them using scissors or a utility knife on a cutting mat. There is always a few extra ears included in your order as well as a random sample that you can use to practice installation.<br><br><img src="//cdn.shopify.com/s/files/1/0456/6085/files/IMG_6491_large.jpg?v=1550503968" alt="" width="451" height="338"></p>
<p>
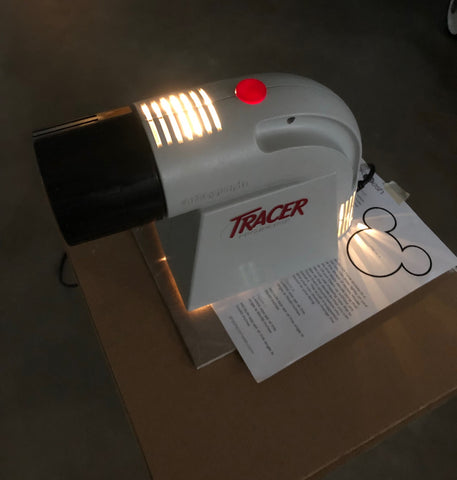
Easiest way to install these is with a tracer. I borrowed mine from my sister :)<br>
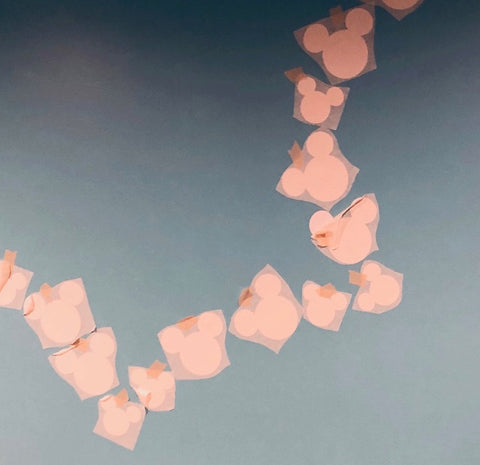
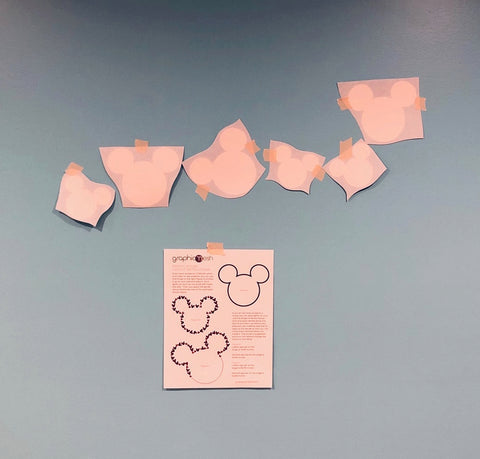
I took a tall plant stand I had in the house and placed a card board on it and then the image of the layout that comes with your order. To see the image on your wall you will need to turn down the lights.</p>
<p>PS. Sorry for the fuzzy pictures but in order for the tracer to work the lights need to be dimmed or off.</p>
<p><br><img src="//cdn.shopify.com/s/files/1/0456/6085/files/IMG_6495_large.jpg?v=1550503949" alt="Tracer, projector" width="451" height="474"></p>
<p>
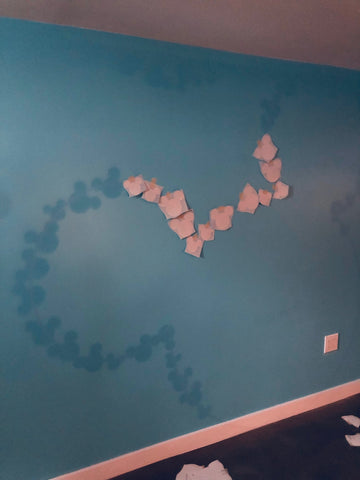
In the instructions provided I suggest you trace the main line of the shape of ears (Figure A on your installation sheet) and you can just install along that line as you please, or install exactly the same as I suggest which is Figure C on the layout instruction sheet. I followed the layout that is provided (Figure C on layout instructions sheet)</p>
<p>I taped up one of each of the ears first, then I moved the tracer back so that I can get the image to match the size of the ears.  I used masking tape (or painters tape) so that I can still move the decals if i need to before final installation.</p>
<p><img src="//cdn.shopify.com/s/files/1/0456/6085/files/IMG_6496_large.jpg?v=1550504722" alt="" width="451" height="601"></p>
<p>
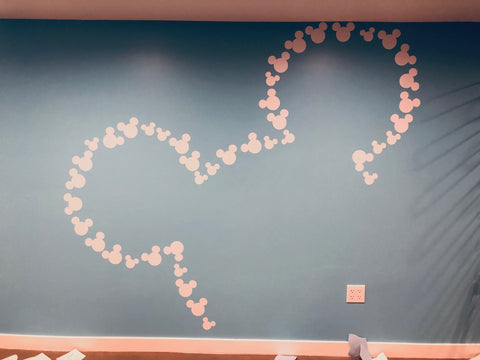
Once I had the size I needed in the right spot on the wall I just followed the projected image and taped up all the mickey ears.</p>
<p><img src="//cdn.shopify.com/s/files/1/0456/6085/files/IMG_6498_large.jpg?v=1550505021" alt="Mickey mouse wall decals" width="451" height="601"></p>
<p><img src="//cdn.shopify.com/s/files/1/0456/6085/files/IMG_6499_large.jpg?v=1550505096" alt="" width="451" height="331"></p>
<p><img src="//cdn.shopify.com/s/files/1/0456/6085/files/IMG_6501_large.jpg?v=1550505173" alt="Mickey mouse ears wall decal installation" width="451" height="338"></p>
<p>
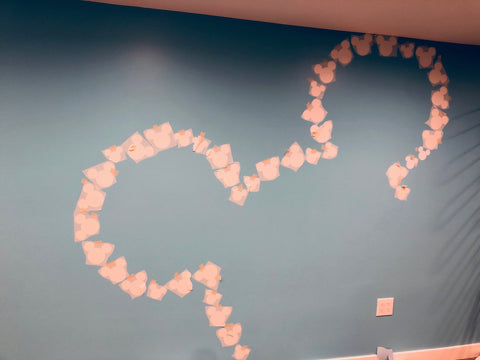
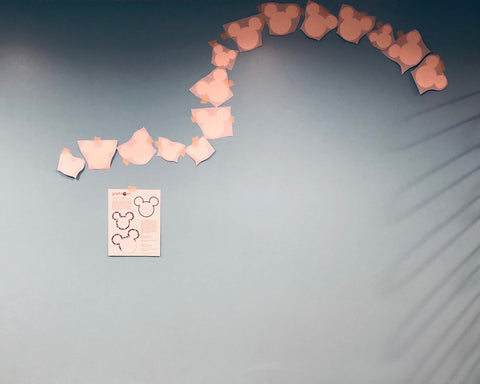
Once all the ears were taped up, I turned the lights back on and stepped back to see if I like the placement of all of them or if I need to shift any of them.  If you have a crib or any other furniture that you want to place in front you can move it back now to see if that's how you like the decals.<br><br><img src="//cdn.shopify.com/s/files/1/0456/6085/files/IMG_6502_large.jpg?v=1550505241" alt="Mickey mouse ears wall decals" width="451" height="338"></p>
<p>
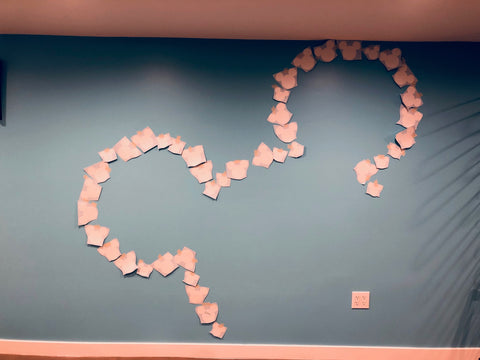
Next, is time to install the ears on to the wall.  You install them one by one by removing the backing paper first and press down on the ears with squeegee.</p>
<p><img src="//cdn.shopify.com/s/files/1/0456/6085/files/IMG_6505_large.jpg?v=1550505544" alt="Mickey mouse wall decal installation" width="450" height="338"></p>
<p>I had to peel off some of the transfer tape on some of the ears if it was in the way of installing the next piece.</p>
<p><img src="//cdn.shopify.com/s/files/1/0456/6085/files/IMG_6504_large.jpg?v=1550505652" alt="Mickey mouse installation close up" width="451" height="437"></p>
<p>
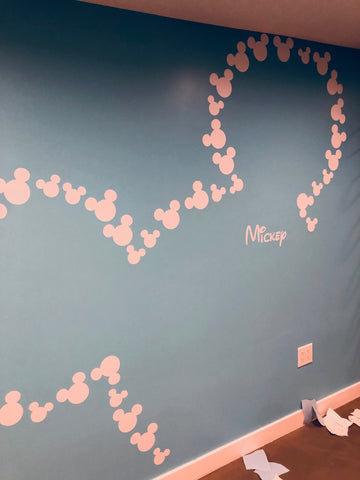
Once all are installed you need to remove the transfer tape from each, carefully peel back the transfer tape close to the wall so that you don't remove the ears itself.</p>
<p><img src="//cdn.shopify.com/s/files/1/0456/6085/files/IMG_6506_large.jpg?v=1550505801" alt="Mickey mouse ears installed" width="451" height="338"></p>
<p>
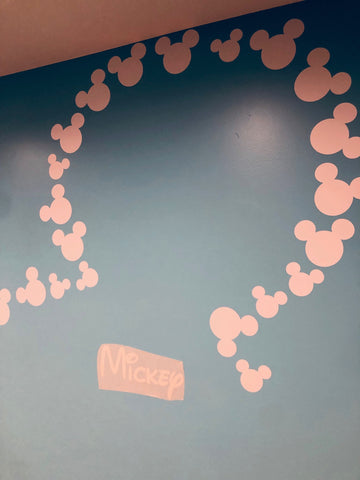
Then install the name the same way you installed the ears and you are done!</p>
<p><img src="//cdn.shopify.com/s/files/1/0456/6085/files/IMG_6507_large.jpg?v=1550505874" alt="Mickey mouse personalized name installation"></p>
<p><img src="//cdn.shopify.com/s/files/1/0456/6085/files/IMG_6508_large.jpg?v=1550505912" alt="Mickey mouse personalized name installation"></p>
<p> </p>
<h2>WHAT TO DO IF YOU DO NOT HAVE A TRACER?</h2>
<p>You can tape up the mickey ears free-handed!  I first taped up the image on the wall as a guide and then I started to tape up the ears trying to get similar placement.  I started in the center between the ears, somehow that seemed as the best spot to start with.</p>
<p><img src="//cdn.shopify.com/s/files/1/0456/6085/files/IMG_6492_732fdf10-7283-48bb-ae10-3643df098b18_large.jpg?v=1550507635" alt="Mickey ears freehanded installation" width="451" height="431"></p>
<p>Continue to tape up all the ears...</p>
<p><img src="//cdn.shopify.com/s/files/1/0456/6085/files/IMG_6494_large.jpg?v=1550507708" alt="Mickey ears freehanded installation" width="451" height="361"></p>
<p>Once you have all the ears taped up (it will look a bit off I am sure) you need to step back and asses what needs to be moved and shifted.  It will take a few tries and just keep shifting the ears a bit until you are satisfied with the layout. Then you can start to install the ears.</p>
<p>How did you do?!<br>Was it is easy or difficult?! Please share your thoughts and pictures with us!</p>]]>
    </content>
  </entry>
  <entry>
    <id>https://graphicsmesh.com/blogs/news/16409995-kaizen-and-the-10-commendments</id>
    <published>2014-12-15T11:28:00-06:00</published>
    <updated>2018-04-24T20:11:07-05:00</updated>
    <link rel="alternate" type="text/html" href="https://graphicsmesh.com/blogs/news/16409995-kaizen-and-the-10-commendments"/>
    <title>Kaizen and the 10 commendments</title>
    <author>
      <name>Marta Suchodolski</name>
    </author>
    <content type="html">
      <![CDATA[<p><img src="https://cdn.shopify.com/s/files/1/0456/6085/files/KaizenWallDecals_Blog_grande.jpeg?1087"></p>
<p>What do Ford, Intel, Toyota and Maytag company have in common?! These large companies have announced publicly that they use the Kaizen concept that have focused on eliminating waste in working process and focus on continual improvement. I was first introduced to it by a client that wanted something that reminded her of this concept in her office space. She wanted this as Kaizen in working environment stands for uninterrupted, ongoing incremental change. Not knowing what this was, out of pure curiosity I looked into it. So here is a little history lesson and key points of this concept and maybe it can help you in your everyday working environment.</p>
<p>Kaizen direct translation from Japanese is "good change", often translated in the west as ongoing, continuous improvement and becoming better. The history of Kaizen begins right after WWII and its stated that Japan's competitive success in the world market place is the result of implementing the Kaizen concept in their corporations. Toyota was one of the first large companies that employed a special activity called "Quality Circles" in its production process that was part of the Kaizen method.  This concept used looks for uninterrupted, ongoing incremental change. <span id="article_font">These continual small improvements (Kaizen) add up to major benefits. They result, for example, in: faster delivery, lower costs, and greater customer satisfaction. </span></p>
<p><span>Another side of Kaizen is Kaikaku that is also know as breakthrough Kaizen and is the revolutionary, focused on radical improvements. </span>Even if you are not a large corporation there are many great principles that you can implement to be more productive and to produce greater results and I especially loved the 10 Kaikaku commandments. </p>
<h4>Here are the 10 Kaikaku Commandments</h4>
<div>1. Abandon fixed ideas</div>
<div>2. Think of ways to make it possible</div>
<div>3. No excuses needed</div>
<div>4. Go for the simple solution, not the perfect one</div>
<div>5. Correct mistakes right away</div>
<div>6. Use your wits, not your wallet</div>
<div>7. Problems are opportunities</div>
<div>8. Repeat “why?” five times</div>
<div>9. Seek ideas from many people</div>
<div>10. There is no end to improvement</div>
<div></div>
<div>
<p><br>Have you used any of these commandments and how?</p>
<p>How can you improve your productivity today?</p>
</div>
<p> </p>
<h4>Here is the wall decals that we came up with for our client.  <br>It can be purchased here: <a title="Kaizen wall decal" target="_blank" href="http://bit.ly/1AdvSBC" rel="noopener noreferrer">http://bit.ly/1AdvSBC</a>
</h4>
<a href="//www.pinterest.com/pin/create/extension/" style="height: 20px; width: 40px; position: absolute; opacity: 0.85; z-index: 8675309; display: none; cursor: pointer; background-color: transparent; background-image: url('data:image/png;base64,iVBORw0KGgoAAAANSUhEUgAAACgAAAAUCAYAAAD/Rn+7AAADU0lEQVR42s2WXUhTYRjHz0VEVPRFUGmtVEaFUZFhHxBhsotCU5JwBWEf1EWEEVHQx4UfFWYkFa2biPJiXbUta33OXFtuUXMzJ4bK3Nqay7m5NeZq6h/tPQ+xU20zugjOxR/+7/O8539+5znnwMtNTExwJtMb3L/fiLv3botCSmUjeCaejTOb39AiFothfHxcFIrHY8RksZjBsckJcOIRMfFsHD/SsbExUYpnI8DR0dGUGjSb0byhEJp5Uqg5CTSzc2CQleJbMEj9/ywBcGRkJEk9DQqouEVQT1sK444yWI9UonmTjGqauVLEIlHa9x8lAMbj8SSpp0rwKGMVvg8P46vbg0C7na8z8JsMcgHe7jlEa+edRhiLy8n/TUMfu6EvLElk+U0WtGwrTrdfAGQf5J8iiK4LVzDU28t8JtMSocf8E+l68myaNFXm/6rXslLK7ay5TOunuRvZWpJuvwAYjUaTpOIWoquuAZ219RTaxKYp9BbjycoN5FvL9qH9TBX5rvoGdJythvXYSTxdtRnWylO/ZdqrLsGwszzhWQ593z2KlAwCYCQSSZJ6ehZ0W7bD9VBLgN0NCqr3qR7R2rBrL3pu3Sb/7nDlz2uy6cG0OXk0GTbZXzNp8trsPAQdTj6frlWzN2DcXZGKQQAMh8NJ6rpyHe+PnkCr/CAFdZyvpfpjuvkifLF9wIt1Wwlo0OHie1RvWrKa93RjzfzliTzPKz3ltB0/Tevmwp14wGUgHAzSOoUEwFAolFaaBSuhnslPRkJexUJtZ6v5HtUeLswl33n1BgEY5fvhs9sJ3FAiT+QYyyvoAQJuD0KBAFRTJNAuz5/s3gJgMBhMJwrVFRThM5tY5zUF/A4X1f2fvQTRLCuBreoim0YmAbqNJryvPEXeeq46kaNdkQ/1HCncbJKPs9ZSv2VHGfWsZ2hfkhKAfr8/pdxWKx4wwD69PmVfNSOL+lr2w+gYqHpWDtXt1xQ8AMlWU0e1lqLd/APRHoP8AJqWrQG9gYxcPMsvSJUvAA4MDKTUJ7MZLaVy8v+qT21tcDx/OemePr0RTkNrur4A6PP5xCgBsL+/X4wiQDpuuVxOeL1eMYmYeDY6sOp0z+B0OuHxeEQhxkJMFosJiSO/UinOI/8Pc+l7KKArAT8AAAAASUVORK5CYII=');"></a>]]>
    </content>
  </entry>
</feed>
