<?xml version="1.0" encoding="UTF-8"?>
<feed xml:lang="en" xmlns="http://www.w3.org/2005/Atom" xmlns:opensearch="http://a9.com/-/spec/opensearch/1.1/" xmlns:s="http://jadedpixel.com/-/spec/shopify">
  <id>https://groovemonkee.com/blogs/blog.atom</id>
  <link rel="alternate" type="text/html" href="https://groovemonkee.com/blogs/blog"/>
  <link rel="self" type="application/atom+xml" href="https://groovemonkee.com/blogs/blog.atom"/>
  <title>Groove Monkee - Blog</title>
  <updated>2026-02-05T07:25:47-06:00</updated>
  <author>
    <name>Groove Monkee</name>
  </author>
  <entry>
    <id>https://groovemonkee.com/blogs/blog/ableton-live-midi-preview</id>
    <published>2026-02-05T07:25:47-06:00</published>
    <updated>2026-02-07T18:00:57-06:00</updated>
    <link rel="alternate" type="text/html" href="https://groovemonkee.com/blogs/blog/ableton-live-midi-preview"/>
    <title>Ableton Live MIDI Preview</title>
    <author>
      <name>Groove Monkee</name>
    </author>
    <summary type="html">
      <![CDATA[<p>Learn how to audition MIDI clips in Ableton Live using any instrument.</p><p><a class="read-more" href="https://groovemonkee.com/blogs/blog/ableton-live-midi-preview">More</a></p>]]>
    </summary>
    <content type="html">
      <![CDATA[<p>Ableton Live is a great app but it's missing one key feature: the ability to preview MIDI loops using any instrument you choose.  Finally, there's an inexpensive solution to the problem: <a href="https://killihu.vstskins.com/midi-explorer/" title="MIDI Explorer by Killihu" rel="noopener" target="_blank">MIDI Explorer</a></p>
<p><strong>Tip</strong>: If you use Logic or Garage Band, please see this post for information about an inexpensive solution: <a href="https://groovemonkee.com/blogs/blog/free-mac-midi-app" title="Free Mac MIDI Player">Free Mac MIDI Player</a></p>
<h2>MIDI Explorer</h2>
<p><a href="https://killihu.vstskins.com/midi-explorer/" title="MIDI Explorer by Killihu" rel="noopener" target="_blank">MIDI explorer</a> is a device that allows you to preview MIDI files directly on an instrument track, and load them as a clip into the project directly from the device using drag and drop.</p>
<p>It's reliable and it currently costs only $8. Considering the time it can save you, it's a good deal!</p>
<h3>System Requirements</h3>
<ul>
<li>Live Version: 10 / 11 / 12 with Max for Live</li>
<li>Operating System: Windows and Mac</li>
</ul>
<h2>MIDI Explorer Interface</h2>
<p>Here's an overview of the MIDI explorer interface.</p>
<p>To open a folder, click the folder icon (number 6 in the image below) and navigate to the folder of your choice.</p>
<p>To play a MIDI clip, simply click on the file (right side of the image below)</p>
<p>To load a clip, select the file and drag it to a slot using icon 2 in the image below.</p>
<p>To stop playing the file, click on the square icon (number 3)</p>
<p>To loop a file so it plays continuously, click on the circle icon (number 4)</p>
<p>The icon labeled number 5 in the image below is the MIDI controller lock. See the product manual for additional information.</p>
<p><img src="https://cdn.shopify.com/s/files/1/0267/7825/files/MIDI_Explorer_interface_numbered.png?v=1770219989" alt=""></p>
<h2>MIDI Loops for Live</h2>
<p>The second problem many users face is finding drum kits to match their drum loops. To address this issue, we have mapped our <a href="https://groovemonkee.com/collections/midi-loops" title="MIDI Drum Loop Collection">MIDI drum loops</a> to work with the <a href="https://www.ableton.com/en/packs/session-drums-studio/" title="Ableton Session Drums" rel="noopener" target="_blank">Session Drums pack</a> from Ableton. All of our MIDI drum packs have files mapped for Session Drums. Our <a href="https://groovemonkee.com/collections/percussion-packs" title="Groove Monkee Percussion Packs">Percussion Packs</a> include files mapped for the <a href="https://www.ableton.com/en/packs/latin-percussion/" title="Ableton Latin Percussion Pack" rel="noopener" target="_blank">Ableton Latin Percussion Pack</a>.</p>
<h2>Questions?</h2>
<p>If you have additional questions about our products, please ask! You'll find our contact info on the <a href="https://groovemonkee.com/pages/contact-us" title="Groove Monkee contact info">Contact Us</a> page.</p>]]>
    </content>
  </entry>
  <entry>
    <id>https://groovemonkee.com/blogs/blog/midi-loops-for-maschine</id>
    <published>2026-01-07T10:17:23-06:00</published>
    <updated>2026-01-07T11:28:05-06:00</updated>
    <link rel="alternate" type="text/html" href="https://groovemonkee.com/blogs/blog/midi-loops-for-maschine"/>
    <title>MIDI Loops for Maschine</title>
    <author>
      <name>Groove Monkee</name>
    </author>
    <summary type="html">
      <![CDATA[<p>How to configure Maschine drum kits for use with our MIDI Drum loops.</p><p><a class="read-more" href="https://groovemonkee.com/blogs/blog/midi-loops-for-maschine">More</a></p>]]>
    </summary>
    <content type="html">
      <![CDATA[<div>
<p>Native Instruments Maschine drum kits don't follow a consistent MIDI mapping scheme. This means most kits won't trigger the correct sounds making it difficult and time consuming to use commercial MIDI files. But we have a solution for you!</p>
</div>
<div>
<p>To use our files, simply create a new drum kit or rearrange an existing one to match the custom Maschine mapping we've developed. Our kit mapping not only solves this problem but it has 3 open slots allowing you to use additional sounds, if necessary.</p>
</div>
<div>
<p>This guide will walk you through obtaining the MIDI files, configuring your kit according to our mapping, and adjusting key settings to ensure everything works as intended.</p>
</div>
<h3>Getting the MIDI Files</h3>
<div>
<p>The MIDI files for Maschine are available upon request. After making a purchase, email us to request the files for your order. </p>
</div>
<h3>Configuring Your Drum Kit</h3>
<div>
<p>To use the MIDI files with Maschine, you'll need to rearrange your drum kit sounds to match our custom Maschine mapping.</p>
<p>Download our <a rel="noopener" title="Groove Monkee Maschine Kit mapping" href="https://bonzo.groovemonkee.com/resources/docs/Groove_Monkee_Maschine_Kit_Mapping.pdf" target="_blank">Maschine Kit Mapping PDF</a> for the complete layout.</p>
</div>
<div>
<p><strong>Note</strong>: Pad number 1 is in the lower left corner. Pad numbers increase as you move left to right.</p>
</div>
<h3>Moving Kit Sounds</h3>
<div>
<p>Section 4.2.7 'Moving Sounds' of the Maschine Mk3 Manual describes how to move sounds in your drum kit via drag and drop. Note that 'pre-listen' (speaker button) must be turned off during this process.</p>
</div>
<p><strong>Setting Up a Hi-Hat Choke Group</strong></p>
<div>
<p>For realistic hi-hat behavior, configure a choke group between your open and closed hi-hats. Section 5.1.4 'Using Choke Groups' of the Maschine Mk3 Manual describes how to add choke groups if your kit doesn't already have one configured.</p>
</div>
<div>
<p><strong>Enabling MIDI Triggering</strong></p>
</div>
<div>
<p>Finally, set the Key Mode to 'Drumkit' in your Group settings to ensure MIDI patterns trigger the correct drum sounds. Section 11.2.1 'Triggering Sounds via MIDI Notes' of the Maschine Mk3 Manual covers this setting in detail.</p>
</div>
<h3>Kit Mapping</h3>
<div>
<p>In case you missed it, here's the link to our Maschine Kit Mapping:</p>
</div>
<p><a rel="noopener" title="Groove Monkee Maschine Kit Mapping" href="https://bonzo.groovemonkee.com/resources/docs/Groove_Monkee_Maschine_Kit_Mapping.pdf" target="_blank">Maschine Kit Mapping PDF file</a></p>
<p><strong>Note</strong>: Pad number 1 is in the lower left corner. Pad numbers increase as you move left to right.</p>
<h3>Contact Us</h3>
<p>If you have additional questions or to request the Maschine files for your purchases, you'll find our contact info on the <a title="Groove Monkee Contact information" href="https://groovemonkee.com/pages/contact-us">Contact Us</a> page. </p>]]>
    </content>
  </entry>
  <entry>
    <id>https://groovemonkee.com/blogs/blog/14194641-the-best-daws-auditioning-midi-drum-loops</id>
    <published>2025-12-11T05:14:55-06:00</published>
    <updated>2026-02-05T07:35:05-06:00</updated>
    <link rel="alternate" type="text/html" href="https://groovemonkee.com/blogs/blog/14194641-the-best-daws-auditioning-midi-drum-loops"/>
    <title>Auditioning MIDI Loops</title>
    <author>
      <name>Groove Monkee</name>
    </author>
    <summary type="html">
      <![CDATA[<p>The best DAWs for working with MIDI drum loops. Learn which ones have the ability to audition midi loops without importing them.</p><p><a class="read-more" href="https://groovemonkee.com/blogs/blog/14194641-the-best-daws-auditioning-midi-drum-loops">More</a></p>]]>
    </summary>
    <content type="html">
      <![CDATA[<p>Do you need a way to audition MIDI files BEFORE importing them into your DAW (recording software)? Here's a list of great alternatives, including a free app for Mac users! </p>
<p>ALL of the following allow you to audition MIDI files easily and that saves you time!</p>
<h2><a href="https://groovemonkee.com/blogs/blog/free-mac-midi-app" title="Free Mac MIDI Player">Free Mac MIDI Player</a></h2>
<p>If you're a Mac user and don't want to use a different DAW, check out this really nice, FREE app: <a href="https://groovemonkee.com/blogs/blog/free-mac-midi-app" title="Free Mac MIDI Player">NS MIDI Player</a></p>
<h2>
<a title="Cockos Reaper DAW" href="http://reaper.fm" rel="noopener noreferrer" target="_blank">Reaper</a> </h2>
<p align="JUSTIFY"><strong>Pros</strong>: Inexpensive. Windows, Mac and Linux versions available. <strong>Free 60-day trial</strong>. License fee: $60 for non-business use.</p>
<p align="JUSTIFY"><strong>Cons</strong>: No drum sounds included</p>
<p><strong>Summary</strong>: A very popular choice that's inexpensive and easy to use. Mac and Linux versions available. </p>
<ul></ul>
<ul></ul>
<h2><a title="Presonus Studio One" href="http://www.presonus.com/products/studio-one" rel="noopener noreferrer" target="_blank">Presonus Studio One</a></h2>
<ul></ul>
<p align="JUSTIFY"><strong>Note</strong>: Studio One is now <a href="https://www.fender.com/pages/fender-studio-pro" target="_blank" title="Fender Studio Pro" rel="noopener">Fender Studio</a>. We have not reviewed the Fender version yet but it's very similar. <strong></strong></p>
<p align="JUSTIFY"><strong>Pros</strong>: Fender Studio has Mac and Linux versions available. Free kits, instruments and effects. Easy drum maps. Excellent ready-made effect chains.</p>
<p align="JUSTIFY"><strong>Cons</strong>: None</p>
<p align="JUSTIFY"><strong>Summary</strong>: It is easy to use and includes a bunch of good effects, instruments and drum kits. Currently, there are several versions so the features and price vary considerably.</p>
<h2><a title="Steinberg Cubase" href="http://www.steinberg.net" rel="noopener noreferrer" target="_blank">Cubase</a></h2>
<ul></ul>
<p align="JUSTIFY"><strong> Pros</strong>: Mac version available. GrooveAgent drum app. Powerful, full-featured DAW.</p>
<p align="JUSTIFY"><strong> Cons</strong>: None</p>
<p align="JUSTIFY"><strong> Summary</strong>: Groove Agent is good but the kits are mapped inconsistently. Free 30-day trial.</p>
<h2 align="JUSTIFY"><a href="https://store.harrisonaudio.com/all-products" title="Harrison Mixbus">Mixbus</a></h2>
<p align="JUSTIFY"><strong>Pros</strong>: Windows, Mac and Linux versions available. Mixbus 11 is currently only $49. </p>
<p align="JUSTIFY"><strong>Cons</strong>: Very good overall but not always the most intuitive experience.</p>
<p align="JUSTIFY"><strong>Summary</strong>: Great value for the money. S<span>mart editing tools, intuitive arrangement features, and high-quality virtual instruments.</span></p>
<p> </p>]]>
    </content>
  </entry>
  <entry>
    <id>https://groovemonkee.com/blogs/blog/free-mac-midi-app</id>
    <published>2025-10-25T06:00:00-05:00</published>
    <updated>2025-11-01T06:29:27-05:00</updated>
    <link rel="alternate" type="text/html" href="https://groovemonkee.com/blogs/blog/free-mac-midi-app"/>
    <title>Free Mac MIDI Player</title>
    <author>
      <name>Groove Monkee</name>
    </author>
    <summary type="html">
      <![CDATA[<p><span>This app makes it easy to audition MIDI files on your Mac. It's FREE and it sounds good!</span></p><p><a class="read-more" href="https://groovemonkee.com/blogs/blog/free-mac-midi-app">More</a></p>]]>
    </summary>
    <content type="html">
      <![CDATA[<div>
<p><a rel="noopener" title="NS MIDI Player" href="https://apps.apple.com/us/app/ns-midi-player/id1514225088" target="_blank"><strong>NS MIDI Player</strong> </a>is a free Mac app that makes auditioning MIDI files fast and easy. It allows you to browse and play files directly from the Mac finder window without adding them to your DAW first. It's packed with features like tempo control, adjustable reverb, and more. And maybe best of all, it actually sounds good!</p>
<h3>Key features<strong>:</strong>
</h3>
<ul>
<li>Free version</li>
<li>Play MIDI files inside Mac Finder</li>
<li>Tempo control</li>
<li>Adjustable reverb and level and type</li>
<li>Additional SoundFonts can be added</li>
</ul>
</div>
<div>
<p><img alt="" src="https://cdn.shopify.com/s/files/1/0267/7825/files/app_interface_640x480_e1d229df-5f8d-4a4c-add5-586a685396e5.png?v=1761247988"></p>
</div>
<div>
<h2>General MIDI (GM) Files</h2>
<p>For best results with drum loops, you should use files that follow the General MIDI (GM) drum map.</p>
<p>If your drum loop sounds off — like the wrong drums are playing — the MIDI file probably doesn't adhere to the GM standard.</p>
</div>
<div>
<strong>🎹 Tip:</strong> If you've purchased one of our <a title="MIDI Drum packs" href="https://groovemonkee.com/collections/midi-loops">MIDI drum packs</a>, The GM files are in the folder that ends with "GM".</div>
<div><br></div>
<div>
<h2 id="playing-midi-files" class="atx">Playing MIDI Files</h2>
</div>
<div><iframe title="YouTube video player" src="https://www.youtube-nocookie.com/embed/AU2LxzPBkBU?si=rCbR5giLFsaHpGxF" height="315" width="560"></iframe></div>
<div>
<p>Getting started with NS MIDI Player is easy, and the app offers several methods to open and play your MIDI files.</p>
</div>
<div>
<p><strong>Playing within Finder</strong></p>
</div>
<div>
<p>To play files using Finder, right-click on a file, select "Open with" and choose "MIDI Player.app".</p>
<p>Selecting a file also displays a PLAY button on the right side of the Finder window. For this to work, NS MIDI app has to install an extension and that will probably require your permission.</p>
<hr>
<h4>🎹 Tip: Set NS MIDI Player as the Default</h4>
<p>To permanently open MIDI files with <strong>NS MIDI Player</strong>, right click on any MIDI file:</p>
<p><strong>Get Info → Open With → NS MIDI Player → Change All</strong></p>
<p>Watch a quick demo here: 
  <a href="https://youtu.be/gOpTpKWC4lI?si=Hlb3iN5HD-5_PYvy" target="_blank" rel="noopener noreferrer" title="Video demonstration of setting Mac file associations">
     https://youtu.be/gOpTpKWC4lI?si=Hlb3iN5HD-5_PYvy
  </a>
</p>
<hr>
</div>
<div>
<p><strong>Playing within the app</strong></p>
</div>
<div>
<p>You can also load a MIDI file into the app and click the play button.</p>
<p>The "open MIDI" button is located on the top left side. Overall, the interface is clean and intuitive, making it easy to navigate your music library and start playback with a single tap.</p>
</div>
<div>
<p><strong>A Quick Note on File Selection</strong></p>
</div>
<div>
<p>There's one quirk worth mentioning: clicking on a file may or may not start playback. This is the only real flaw I found while using the app. </p>
</div>
<div>
<h2 id="app-controls" class="atx">App Controls</h2>
<p>NS MIDI Player is more than a simple MIDI player. It offers several highly useful playback options.</p>
</div>
<div>
<p><strong>Tempo Control</strong></p>
<p>In the upper right corner, you'll find the app's tempo controls. Clicking here displays several discrete settings like 1.25x speed. For more precise control, select the "tempo" option to display a widget that includes a handy "tap tempo" feature—just tap the tempo you want and the app will adjust accordingly.</p>
</div>
<div>
<p><strong>Reverb Settings</strong></p>
<p>The settings menu is located on the bottom left and this is where you can adjust the reverb type and amount. The default is a "Hall" reverb but there other choices as well. Adjust the reverb amount to suit your taste.</p>
</div>
<div>
<p><strong>Additional Options Menu</strong></p>
<p>Tap the three dots in the lower right corner to access some additional options:</p>
<ul>
<li>
<strong>Show file in Finder</strong> - Quickly locate the currently playing file in your file system</li>
<li>
<strong>Get Info</strong> - View technical details including time signature and the full file name</li>
<li>
<strong>Export as Audio</strong> - Convert your MIDI file to an audio format (requires upgrading to the full version)</li>
</ul>
</div>
<div>
<h2 id="adding-custom-soundfonts" class="atx">Adding Custom SoundFonts</h2>
</div>
<div>
<p>While the default SoundFont covers most needs, NS MIDI Player allows you to customize your sound palette by adding additional SoundFonts. I tried a few but could only get files with a .dls extendion to work. </p>
</div>
<div>
<h3>Get the app</h3>
</div>
<div>NS MIDI Player is available for free using the link below.</div>
<div id="link-https-apps-apple-com-us-app-ns-midi-player-id1514225088">NS MIDI Player: <a href="https://apps.apple.com/us/app/ns-midi-player/id1514225088">https://apps.apple.com/us/app/ns-midi-player/id1514225088</a>
</div>]]>
    </content>
  </entry>
  <entry>
    <id>https://groovemonkee.com/blogs/blog/installation-and-support</id>
    <published>2025-10-25T04:30:00-05:00</published>
    <updated>2026-01-07T10:24:00-06:00</updated>
    <link rel="alternate" type="text/html" href="https://groovemonkee.com/blogs/blog/installation-and-support"/>
    <title>Installation and Support</title>
    <author>
      <name>Groove Monkee</name>
    </author>
    <summary type="html">
      <![CDATA[<p>Installation instructions and links to helpful documents. </p><p><a class="read-more" href="https://groovemonkee.com/blogs/blog/installation-and-support">More</a></p>]]>
    </summary>
    <content type="html">
      <![CDATA[<p>This post aims to help you understand the files included in your purchase and provides links to installation instructions for most popular drum apps.</p>
<h2>Important Info</h2>
<p>ALL of the MIDI files are stored in the “Other MIDI Mappings” folder of your download. You do <strong>NOT </strong>need an installer. See below for additional information.</p>
<h2>Compatibility</h2>
<p>You can use our MIDI files on Mac, PC and Linux.</p>
<h2>General MIDI Files</h2>
<p>Unless you're using a drum app we support (see below), you only need the General MIDI files. To find them, look inside the “Other MIDI Mappings” for the folder that ends with "GM".</p>
<p><a href="https://bonzo.groovemonkee.com/resources/docs/General_MIDI_Drum_Map.pdf" title="General MIDI Drum map" rel="noopener noreferrer" target="_blank">Download General MIDI Drum Reference</a></p>
<p><strong>Note</strong>: These are type 1 files mapped to channel 10 per the MIDI standard.</p>
<p><strong>All of the other files are for specific drum apps.</strong></p>
<h2><strong>File Tempo and Time Signature Info</strong></h2>
<p><strong>Tempo</strong>: The first three numbers of the file name represent the recorded tempo. </p>
<p><strong>Time Signature</strong>: If there is no time signature, the beat is in 4/4 time. Otherwise, the time signature follows the tempo. </p>
<p><strong>Example:</strong> "080 6-8 Verse 1" means the tempo is 80 BPM in 6/8 time.</p>
<h2>Finding Files for Specific Apps</h2>
<p>1. Use this to find the files you need for a specific app:</p>
<p><a href="https://bonzo.groovemonkee.com/resources/docs/Apps_to_Folder_Table.pdf" title="Groove Apps to Folders Table" target="_blank">Apps to Folders Table</a></p>
<p>2. This file links folder names to apps. Example: "AD" is for Addictive Drums.</p>
<p><a href="https://bonzo.groovemonkee.com/resources/docs/Folder_to_Apps_Table.pdf" title="Groove Monkee folder names to specific apps" target="_blank">Folder Names to Apps</a></p>
<h2>Installers</h2>
<p>Running the PC installer is not usually necessary. The installer only supports a limited number of apps and most users do NOT need it. The apps supported will be listed when the installer starts.</p>
<p><strong>Important</strong>: Toontrack now recommends different installation methods for EZdrummer and Superior Drummer (please see the relevant links below).</p>
<p><strong>Note</strong>: We no longer support Mac installers, sorry. </p>
<h2>Installation Instructions</h2>
<p><a href="https://groovemonkee.com/blogs/blog/afro-cuban-percussion-installation-and-support" title="Afro-Cuban Support Page">Afro-Cuban Percussion Pack Support Page</a></p>
<p><a href="https://groovemonkee.com/blogs/blog/conga-toolbox-support-page" title="Conga Toolbox Support Page">Conga Toolbox Support Page</a></p>
<p>Here are links to our installation instructions for the most popular drum apps:</p>
<p><a title="MIDI files for Abbey Road Drums and Studio Drummer" href="https://groovemonkee.com/blogs/blog/14182533-midi-loops-for-abbey-road-and-studio-drummer" target="_blank">Abbey Road Drums and Studio Drummer</a></p>
<p><a href="https://groovemonkee.com/blogs/blog/how-to-install-midi-files-into-addictive-drums-2" title="Addictive Drums 2 installation instructions" target="_blank">Addictive Drums 2 Installation Instructions</a></p>
<p><a href="https://groovemonkee.com/blogs/blog/how-to-import-a-beat-buddy-project" title="How to set up a Beat Buddy Project">Beat Buddy Project Setup</a></p>
<p><a href="https://groovemonkee.com/blogs/blog/importing-a-pbf-file-into-beatbuddy" title="Beat Buddy installation using the desktop Beat Buddy Manager" target="_blank">Beat Buddy Installation with the Desktop App</a></p>
<p><a href="https://groovemonkee.com/blogs/blog/import-a-pbf-file-using-the-bbmo" title="Beat Buddy installation using the Online Beat Buddy Manager" target="_blank">Beat Buddy Installation with the Online App</a></p>
<p><a href="https://groovemonkee.com/blogs/blog/14182425-bfd3-installation" title="BFD3 installation instructions" target="_blank">BFD 3 Installation Instructions</a></p>
<p><a href="https://groovemonkee.com/blogs/blog/installing-groove-monkee-files-into-bfd-3-5" title="Installing new files into BFD 3.5">BFD 3.5 Installation Instructions</a></p>
<p><a href="https://groovemonkee.com/blogs/blog/ezdrummer-2-midi-installation" title="EZdrummer 2 installation instructions" target="_blank">EZdrummer 2 Installation Instructions</a></p>
<p><a href="https://groovemonkee.com/blogs/blog/how-to-install-midi-files-into-ezdrummer3-with-a-linked-folder" title="EZdrummer 3 installation instructions" target="_blank">EZdrummer 3 Installation Instructions</a></p>
<p><a href="https://groovemonkee.com/blogs/blog/midi-loops-for-maschine" title="Using MIDI loops with Maschine">Native Instruments Maschine</a></p>
<p><a href="https://groovemonkee.com/blogs/blog/steven-slate-drums-5-midi-installation" title="Steven Slate 5 Installation Instructions" target="_blank">Steven Slate 5 Installation Instructions</a></p>
<p><a href="https://groovemonkee.com/blogs/blog/how-to-install-midi-files-into-superior-drummer-3-with-a-linked-folder" title="Superior Drummer 3 Installation Instructions" target="_blank">Superior Drummer 3 Installation Instructions</a></p>
<h2>Windows Problems</h2>
<p>If you are using Windows, please put the zip file on your Desktop and extract it there. Then move the files to a another folder of your choice. </p>
<p><strong>Windows OneDrive</strong> can also interfere with both downloading and extracting. Please don't download or extract zip files into a folder backed up by OneDrive.</p>
<h2>Product Guide</h2>
<p>Our product guide has additional installation instructions, our license agreement, a glossary and more: <a title="Groove Monkee Product Guide" href="https://bonzo.groovemonkee.com/resources/docs/Read_Me.pdf" target="_blank">Groove Monkee Product Guide</a></p>
<h2 class="_9EpbS">Downloading Your Purchases</h2>
<p class="XvacU">Please see this link for more information: <a title="Groove Monkee download page" href="https://groovemonkee.com/blogs/news/downloading-previous-purchases">https://groovemonkee.com/blogs/news/downloading-previous-purchases</a></p>
<h2>Support</h2>
<p>Please contact us if you need help. You'll find our contact information on our <a title="Groove Monkee Contact Information" href="https://groovemonkee.com/pages/contact-us">Contact Us Page</a></p>]]>
    </content>
  </entry>
  <entry>
    <id>https://groovemonkee.com/blogs/blog/conga-toolbox-support-page</id>
    <published>2025-10-02T05:37:33-05:00</published>
    <updated>2025-10-09T12:10:12-05:00</updated>
    <link rel="alternate" type="text/html" href="https://groovemonkee.com/blogs/blog/conga-toolbox-support-page"/>
    <title>Conga Toolbox Support Page</title>
    <author>
      <name>Groove Monkee</name>
    </author>
    <summary type="html">
      <![CDATA[<p>Documentation for our <a href="https://groovemonkee.com/products/conga-toolbox" title="Conga Toolbox page">Conga Toolbox</a> MIDI pack.</p><p><a class="read-more" href="https://groovemonkee.com/blogs/blog/conga-toolbox-support-page">More</a></p>]]>
    </summary>
    <content type="html">
      <![CDATA[<div>This is documentation for our <a title="Conga Toolbox page" href="https://groovemonkee.com/products/conga-toolbox">Conga Toolbox</a> MIDI pack.</div>
<p><strong>IMPORTANT</strong>: To use our Conga Toolbox pack you need<em> </em>at least <strong>ONE </strong>of the following:</p>
<ul>
<li>Ableton Live Latin Percussion pack</li>
<li>Logic Pro 10+</li>
<li>Toontrack Latin Cuban Percussion EZX</li>
<li>Toontrack Latin Percussion EZX</li>
<li>Battery 3 Afro-Cuban Percussion samples</li>
</ul>
<div>
<strong>Note</strong>: the Battery 3 samples can be played using Battery 4. We provide kits for both Battery 3 and Battery 4. <strong>Our kits do NOT include the drum samples.</strong>
</div>
<div>The following sections provide additional information for each supported format.</div>
<h3><b>Ableton Live Documentation</b></h3>
<div>To use this this product with Live, you'll need the Ableton 'Latin Percussion' pack.</div>
<div><strong>Installation</strong></div>
<div>To find the files for Live, open the 'Ableton Live' folder of your download. Inside, you'll find the files stored in a folder named 'Conga Toolbox'.</div>
<div>For convenience, you can store the MIDI files in the 'Clips' folder of your Live 'User Library'. To find this folder, right click on the 'Clips' folder and select either 'Show in Finder' or 'Show in Explorer'.</div>
<div><strong>Live Drum Racks</strong></div>
<div>You can use any of the three Latin Percussion Conga Instrument Kits. </div>
<div>
<h3>Logic Pro Documentation</h3>
</div>
<div>To use this this product with Logic Pro, you'll need the Conga 'Performance' instruments. Please see the section named 'How to load an instrument' if you're not sure if you have the required instruments.</div>
<div><strong>Logic Pro Conga Instruments</strong></div>
<div>The files are mapped for <span>Logic's</span> 'Conga Performance' instruments:<br>1. Conga Performance<br>2. Conga Bright Performance</div>
<div>
<strong>Note</strong>: the 'bright' performance congas are generally higher in pitch.</div>
<div><strong>How to load an instrument</strong></div>
<ol>
<li>Open the sounds Library (press 'Y')</li>
<li>Select 'Drums and Percussion'</li>
<li>Next, select 'Percussion' then 'Performance instruments'</li>
<li>Choose either Conga Performance or Conga Bright Performance</li>
</ol>
<div><strong>Importing MIDI files</strong></div>
<div>You can import MIDI files into Logic in one of two ways:</div>
<div>1. Drag and drop the files onto an instrument track<br>2. Use the menu: File &gt; Import &gt; MIDI file</div>
<div><strong>Installation</strong></div>
<div>MIDI files cannot be installed into Logic. You can save the files in any convenient location such as your 'Documents' folder.</div>
<div>
<h3>Battery Documentation</h3>
</div>
<div>To use this product, you'll need the Afro-Cuban samples from Battery 3. We provide kits (NOT the samples) for both Battery 3 and Battery 4.</div>
<div><strong>Installation</strong></div>
<div>Copy our 'Expanded Afro-Cuban Kit' into the folder named '03 - Percussion Kits' inside your Battery 3 Library.</div>
<div>After copying our kit as described above, start Battery and click on the 'Files' tab</div>
<div>Navigate to the 'Battery 3 Library' folder on your hard drive and double click to enter it.</div>
<div>Next, double click on the folder '03 - Percussion Kits' and you should see the new kit.</div>
<div><strong>Loading the kit</strong></div>
<div>When you first load the kit, Battery probably won't find the samples. If you get a "Missing Samples" error, select “Search Library” and check “Apply to other Battery instances” so you won't have to search every time you load the kit.</div>
<div>
<h3>Toontrack Documentation</h3>
</div>
<div>We provide two sets of MIDI files for Toontrack. One for the Latin Cuban Percussion EZX and one for the Latin Percussion EZX. You'll find the files inside the 'Toontrack' folder of your download. The percussion expansion kits can be used with either EZdrummer or Superior Drummer.</div>
<div>
<h3>Toontrack Installation</h3>
</div>
<div>We have MIDI installation instructions for EZdrummer and Superior Drummer on our "Installation and Support" page:</div>
<div><a href="https://groovemonkee.com/blogs/blog/installation-and-support" title="Groove Monkee Installation and Support">https://groovemonkee.com/blogs/blog/installation-and-support</a></div>
<div>
<h3>Questions? Need help?</h3>
</div>
<div>If you have questions or need additional help, please contact us. You'll find our contact info on the <a title="Groove Monkee Contact Info" href="https://groovemonkee.com/pages/contact-us">Contact Us</a> page.</div>]]>
    </content>
  </entry>
  <entry>
    <id>https://groovemonkee.com/blogs/blog/groove-agent-5-support</id>
    <published>2025-08-20T09:00:00-05:00</published>
    <updated>2025-08-21T08:50:23-05:00</updated>
    <link rel="alternate" type="text/html" href="https://groovemonkee.com/blogs/blog/groove-agent-5-support"/>
    <title>Groove Agent 5 Support</title>
    <author>
      <name>Groove Monkee</name>
    </author>
    <summary type="html">
      <![CDATA[<p>Our MIDI drum loops are now fully mapped for Groove Agent 5.</p><p><a class="read-more" href="https://groovemonkee.com/blogs/blog/groove-agent-5-support">More</a></p>]]>
    </summary>
    <content type="html">
      <![CDATA[<p>We’re excited to announce that our MIDI drum loops are now fully mapped for Groove Agent 5 by Steinberg. These new files have been added to all existing products. </p>
<h2>Finding the Files</h2>
<p><strong>Single packs</strong>: Look for the folder ending in "GA5" in the "Other MIDI Mappings" folder of your download.</p>
<p><strong>Mega Pack</strong>: Look for the zip file named "Mega Pack GA5" in the "Other MIDI Mappings" folder of your download.</p>
<h2>Download Area</h2>
<p>Customers can re-download their purchases anytime from our download area: <a title="Groove Monkee Download area" href="https://edl.groovemonkee.com/login" target="_blank">https://edl.groovemonkee.com/login</a></p>
<p><strong>IMPORTANT</strong>: <span>You must create your own Download Area password. See instructions at the site.</span></p>
<h2>Compatibility</h2>
<p>The loops are compatible with the following Groove Agent kits:</p>
<ul>
<li>SE Studio Kits (21 kits)</li>
<li>The Kit SE (11 kits)</li>
</ul>
<p>For other add-on kits, we recommend trying our General MIDI loops. This specifically includes:</p>
<ul>
<li>Allen Morgan kits</li>
<li>SE Kits (“Beat Agent”)</li>
<li>Production Grooves</li>
<li>Laser Beams</li>
<li>Rock Pop Toolkit</li>
</ul>
<p>Please note, compatibility with every Groove Agent kit cannot be guaranteed because Steinberg does not follow a consistent kit mapping scheme.</p>]]>
    </content>
  </entry>
  <entry>
    <id>https://groovemonkee.com/blogs/blog/afro-cuban-percussion-installation-and-support</id>
    <published>2025-07-01T10:24:00-05:00</published>
    <updated>2025-10-31T09:06:43-05:00</updated>
    <link rel="alternate" type="text/html" href="https://groovemonkee.com/blogs/blog/afro-cuban-percussion-installation-and-support"/>
    <title>Afro-Cuban Percussion Installation and Support</title>
    <author>
      <name>Groove Monkee</name>
    </author>
    <summary type="html">
      <![CDATA[<p>Detailed information about our Afro-Cuban Percussion MIDI pack.</p><p><a class="read-more" href="https://groovemonkee.com/blogs/blog/afro-cuban-percussion-installation-and-support">More</a></p>]]>
    </summary>
    <content type="html">
      <![CDATA[<p><a href="https://groovemonkee.com/products/afro-cuban-percussion-battery-3" title="Afro-Cuban Percussion MIDI pack" rel="noopener" target="_blank">Afro-Cuban Percussion</a> contains over 800 MIDI Percussion loops for Salsa and Afro-Cuban music. It includes authentic parts for Bongo, Conga, Timbale, Cowbell, Clave, Guiro, Shekere, Surdo &amp; Maracas. The following styles are covered in this pack: Cha Cha, Mambo, Songo, Mozambique, Timba, Pilon, Bembe.</p>
<h3>Formats Supported</h3>
<p>This product <em>requires </em>at least one of the following:</p>
<ul>
<li>Ableton Live Latin Percussion pack</li>
<li>Logic Pro<span> </span><a rel="noopener" title="Logic Performance Patches" href="https://support.apple.com/guide/logicpro/map-performance-patches-lgcp40722281/11.2/mac/14.4" target="_blank">Performance<span> </span></a><a href="https://support.apple.com/guide/logicpro/patches-overview-lgcp2bc4b02f/11.2/mac/14.4" title="Logic Performance Patches" rel="noopener" target="_blank">percussion<span> </span></a><a rel="noopener" title="Logic Performance Patches" href="https://support.apple.com/guide/logicpro/map-performance-patches-lgcp40722281/11.2/mac/14.4" target="_blank">patches</a>
</li>
<li>Toontrack Latin Cuban Percussion EZX</li>
<li>Toontrack Latin Percussion EZX</li>
<li>Battery 3 Afro-Cuban Percussion samples</li>
</ul>
<p><strong>Note</strong>: the Battery 3 samples can be played using Battery 4. We provide kits (not the samples) for both Battery 3 and Battery 4.</p>
<div>
<p>The following sections provide additional information for each of the supported formats.</p>
</div>
<h3><b>Ableton Live Documentation</b></h3>
<div>To use this this product in Live, you'll need the Ableton 'Latin Percussion' pack. </div>
<div><strong>Installation</strong></div>
<div>To find the files for Live, open the 'Ableton Live' folder of your download. Inside, you'll find the files stored a folder named 'AfroCuban Percussion'.</div>
<div>For convenience, you can store the MIDI files in the 'Clips' folder of your Live 'User Library'. To find this folder, right click on the 'Clips' folder and select 'Show in Finder' or 'Show in Explorer'.</div>
<h4>Drum Racks</h4>
<div>You can use the existing 'Latin Percussion' Instrument Kits 'as is' for all instruments except timbales. Please see the Timbale section below for additional information.</div>
<div>For Bongos and Congas, you can use any of the matching instrument kits.</div>
<div>
<strong>Clave: </strong>use the 'Wood A' instrument kit</div>
<div>
<strong>Cowbell: </strong>use the 'Bells and Triangle' instrument kit</div>
<div>
<strong>Guiro</strong>: use the 'Wood B' instrument kit</div>
<div>
<strong>Maracas</strong>: use the 'Shaker and Maracas' instrument kit</div>
<div>
<strong>Shekere</strong>: use the Caxixi instrument kit</div>
<div>
<strong>Timbales</strong>: For best results, you should add a cymbal bell and a cowbell to the Timbales instrument kits as follows:</div>
<ul>
<li>A cymbal bell sample mapped to MIDI note E2 (#52)</li>
<li>A cowbell 'open' sample to MIDI note F2 (#53)</li>
<li>A cowbell 'rim' sample to MIDI note F#2 (#54)</li>
</ul>
<h4>Notes<strong></strong>
</h4>
<p>The cowbell 'open' tone is lower in pitch and often designated as 'mouth'</p>
<p>The cowbell 'rim' tone is higher in pitch and often sounds muted</p>
<p>While the Caxixi is not a perfect match for Shekere, it can serve as a substitute in some situations</p>
<h3>Battery Documentation</h3>
<p>To use this product with Battery, you'll need the Afro-Cuban samples from Battery 3. We provide kits (not the samples) for both Battery 3 and Battery 4.</p>
<h4>Installation<strong></strong><strong></strong>
</h4>
<div>
<p>Copy our 'Expanded Afro-Cuban Kit' into the folder named '03 - Percussion Kits' inside your Battery 3 Library. With Battery 4, you can use either kit.</p>
<p>After copying our kit as described above, start Battery and click on the 'Files' tab.</p>
<p>Navigate to the 'Battery 3 Library' folder on your hard drive and double click to enter it.</p>
<p>Next, double click on the folder '03 - Percussion Kits' and you should see the new kit.</p>
<p><strong>Loading the kit</strong></p>
<p>When you first load the kit, Battery probably won't find the samples. <strong>If you get a "Missing Samples" error, select “Search Library” and check “Apply to other Battery instances”</strong><span>.</span></p>
<h3>Logic Pro Documentation</h3>
<div>
<strong>Requirements</strong>: Logic Pro 10.7+</div>
<h4>Finding Performance Patches</h4>
<ol>
<li>Press 'Y' to open the Logic Library</li>
<li>Click 'Percussion'</li>
<li>Click 'Performance Patches'</li>
<li>Select the patch required for the MIDI file</li>
</ol>
<h4>Performance Patch Usage</h4>
<p>Bongos: use the Bongos patch<br>Clave: use the 'Bells and Blocks' patch<br>Congas: use either Congas or 'Congas Bright' patch<br>Cowbell: use the 'Bells and Blocks' patch<br>Maracas: use the 'Shakers 1' patch<br>Timbale: use the Timbales and 'Bells and Blocks' (please see below)</p>
<h4>A Note on Timbales</h4>
<p>Some timbale grooves have separate files for woodblock and/or cowbell. Those files are labeled with either 'Bell' or 'Woodblock'.</p>
<h4>IMPORTANT</h4>
<p>Logic does not have Performance patches for the following instruments:</p>
<ol>
<li>Shekere</li>
<li>Surdo</li>
<li>Guiro</li>
</ol>
<p>As a result, the files for these instruments are not included in the Logic version.</p>
</div>
<h3>Toontrack Documentation</h3>
<p>We provide two sets of MIDI files for Toontrack. One for the Latin Cuban Percussion EZX and one for the Latin Percussion EZX. You'll find the files inside the 'Toontrack' folder of your download. These expansions can be used with both EZdrummer and Superior Drummer.</p>
<p><strong>Note</strong>: the Toontrack expansion packs do not include a Surdo drum so the Surdo files are not included in the Toontrack versions.</p>
<h3>Toontrack Installation</h3>
<p>We have installation instructions for EZdrummer and Superior Drummer on our "Installation and Support" page:</p>
<p><a href="https://groovemonkee.com/blogs/blog/installation-and-support" title="Groove Monkee Installation and Support">https://groovemonkee.com/blogs/blog/installation-and-support</a></p>
<h3>Style Guide</h3>
<p>For information about the various styles included plus advice on grouping the rhythms together effectively, please see our <a href="https://groovemonkee.com/blogs/blog/afro-cuban-percussion-style-guide" title="Afro-Cuban Style Guide">Afro-Cuban Style Guide</a>.</p>
<h3>Questions? Need help?</h3>
<p>If you have questions or need additional help, please contact us. You'll find our contact info on the <a title="Groove Monkee Contact Info" href="https://groovemonkee.com/pages/contact-us">Contact Us</a> page.</p>]]>
    </content>
  </entry>
  <entry>
    <id>https://groovemonkee.com/blogs/blog/afro-cuban-percussion-style-guide</id>
    <published>2025-07-01T09:48:00-05:00</published>
    <updated>2025-07-03T13:43:20-05:00</updated>
    <link rel="alternate" type="text/html" href="https://groovemonkee.com/blogs/blog/afro-cuban-percussion-style-guide"/>
    <title>Afro-Cuban Percussion - Style Guide</title>
    <author>
      <name>Groove Monkee</name>
    </author>
    <summary type="html">
      <![CDATA[<p>Style and usage info for our Afro-Cuban Percussion MIDI pack.</p><p><a class="read-more" href="https://groovemonkee.com/blogs/blog/afro-cuban-percussion-style-guide">More</a></p>]]>
    </summary>
    <content type="html">
      <![CDATA[<p>Here's some general style and usage information passed on to us from the drummer who recorded our <a href="https://groovemonkee.com/products/afro-cuban-percussion-battery-3" target="_blank" title="Afro-Cuban Percussion MIDI pack" rel="noopener">Afro-Cuban Percussion</a> pack. Feel free to break all of the rules and have fun!</p>
<h4>Style Notes</h4>
<p><strong>Pilon</strong>: Pilon starts with congas, timbales, claves and guiro. Maracas and cowbells may be added for extra color.</p>
<p><strong>Songo</strong>: Songo is a modern style that starts with congas, drum set and clave. Timbales (used as a drum set substitute), guiro, maracas and shekeres may be added for extra color. Timbale loops 1 &amp; 2 are 3-2, loops 3 &amp; 4 are 2-3.</p>
<p><strong>Timba</strong>: Timba is a very modern style that is very open in terms of interpretation. Timbales (or drum set), congas, and claves are the basic instruments. The conga and timbale patterns from the Mambo, Cha Cha and Songo styles could also be used. Bongos, guiro, maracas, shekeres and cowbell patterns may also be added for extra color. Drum set is also now a regular instrument in Timba. Conga loops 1&amp; 3 are 3-2, loops 2 &amp; 4 are 2-3.</p>
<p><strong>Bembe</strong>: 'Bembe' (originally meaning a Santeria ceremony) is often used as a catchall term incorporating many of salsas 6/8 rhythms. For a generic salsa 6/8 groove, combine a conga, clave and either a timbale or 6/8 cowbell pattern. Shekeres may also be added for color.</p>
<p><strong>Mozambique</strong>: The Mozambique is a descendant of Cuban carnival rhythms. The Cuban version of Mozambique may be created by layering several Surdo (known as Bombos in Cuba) patterns, several cowbells and several conga patterns numbered 1-3.</p>
<p>The New York Salsa style Mozambique is created by combining one of the timbale patterns, one of the conga patterns numbered 4-6 and a clave. Guiro and maracas may be added if desired, but it is not common.</p>
<p><strong>Note</strong>: In many of the styles you'll see “riff” loops. These loops are timekeeping variations that include slight changes in the patterns. These may be used whenever a basic pattern just isn't exciting enough!</p>
<h4>Instrument Notes</h4>
<p><strong>Guiro</strong>: While the guiro is primarily used in the Cha Cha and Mambo styles, it may be added to the Songo, Timba and Pilon. It is not traditional to the Cuban Mozambique. The guiro rhythms are not clave specific.</p>
<p><strong>Bongo</strong>: The basic bongo rhythms are not clave specific. They may be used in Mambo or Cha Cha.</p>
<p><strong>Maracas</strong>: The Mambo maracas loops may be added to most salsa styles for extra color. The Cha Cha maracas loops are to be used for slower tempos. They are not appropriate for faster styles. The maraca rhythms are not clave specific.</p>
<p><strong>Congas</strong>: The conga parts are very style-specific. They are, along with the timbales, what give each rhythm their identity. However, the conga patterns for the Cha Cha and Mambo are interchangeable. The fills in the Cha Cha style do NOT work at the faster Mambo tempos. The fills in the Mambo style will work at slower Cha Cha tempos, however.</p>
<p><strong>Timbales</strong>: The typical Mambo arrangement has the timbales playing any one of the 'cascara' variations (either the single or double handed) during the verses. The cascara loops are labeled as either “2-3” or “3-2”. The Mambo bell patterns are to be used during a chorus or montuno section.</p>
<p><strong>Mambo Cowbell</strong>: These patterns are typically what a bongo player would play during a chorus or montuno section. In a typical Mambo arrangement, the bongo player plays the bongos during the verses, then switches to a hand-held cowbell when the timbale player switches to the Mambo bell. These patterns may also be added to the Songo and Timba styles for extra color.</p>
<p><strong>Claves</strong>: The clave rhythm makes up the rhythmic D.N.A. of salsa music. The choice of which side (3-2 or 2-3) to use depends on the melody of the music. Most of the timbale rhythms are clave specific. Some of the conga rhythms are also clave specific. Please refer to the style notes above for specifics.</p>
<p>As a general rule, if a tumba (lowest conga drum) note lands on the 'and' of 2, then that measure should line up with the “3” side of the clave (the bar with 3 clave hits). The maracas and guiro rhythms are not clave specific.</p>]]>
    </content>
  </entry>
  <entry>
    <id>https://groovemonkee.com/blogs/blog/mega-pack-for-beat-buddy</id>
    <published>2025-05-29T05:12:50-05:00</published>
    <updated>2025-05-29T05:12:53-05:00</updated>
    <link rel="alternate" type="text/html" href="https://groovemonkee.com/blogs/blog/mega-pack-for-beat-buddy"/>
    <title>Mega Pack for Beat Buddy</title>
    <author>
      <name>Groove Monkee</name>
    </author>
    <summary type="html">
      <![CDATA[Details about our Mega Pack for Beat Buddy.<p><a class="read-more" href="https://groovemonkee.com/blogs/blog/mega-pack-for-beat-buddy">More</a></p>]]>
    </summary>
    <content type="html">
      <![CDATA[<p><a href="https://groovemonkee.com/products/mega-pack" title="Groove Monkee Mega Pack">Groove Monkee Mega Pack</a></p>
<!-- Bootstrap 5 CSS -->
<p> </p>
<div class="container mt-4">
<!-- Page Header -->
<h1>Mega Pack for Beat Buddy</h1>
<!-- Song Count Section -->
<h3>Song Count: 769</h3>
<table class="table table-striped">
<thead>
<tr>
<th>Product</th>
<th>PBF name</th>
<th>Song Count</th>
</tr>
</thead>
<tbody>
<tr>
<td><a href="#product-ballads-1">Ballads</a></td>
<td>GM_Ballads</td>
<td>32</td>
</tr>
<tr>
<td><a href="#product-big-easy-1">Big Easy</a></td>
<td>GM_Big_Easy</td>
<td>15</td>
</tr>
<tr>
<td><a href="#product-blues-classics-1">Blues Classics</a></td>
<td>GM_Blues_Classics</td>
<td>21</td>
</tr>
<tr>
<td><a href="#product-blues-1">Blues</a></td>
<td>GM_Blues_OPP</td>
<td>11</td>
</tr>
<tr>
<td><a href="#product-blues-rock-1">Blues Rock</a></td>
<td>GM_Blues_Rock</td>
<td>10</td>
</tr>
<tr>
<td><a href="#product-breakbeats-1">Breakbeats</a></td>
<td>GM_Breakbeats</td>
<td>25</td>
</tr>
<tr>
<td><a href="#product-chill-1">Chill</a></td>
<td>GM_Chilled_Beats</td>
<td>30</td>
</tr>
<tr>
<td><a href="#product-classic-rock-1">Classic Rock</a></td>
<td>GM_Classic_Rock</td>
<td>16</td>
</tr>
<tr>
<td><a href="#product-classic-rock-1">Classic Rock</a></td>
<td>GM_Classic_Rock_OPP</td>
<td>16</td>
</tr>
<tr>
<td><a href="#product-contemporary-rock-1">Contemporary Rock</a></td>
<td>GM_Contemporary_Rock</td>
<td>10</td>
</tr>
<tr>
<td><a href="#product-country-1">Country</a></td>
<td>GM_Country</td>
<td>19</td>
</tr>
<tr>
<td><a href="#product-country-outlaws-1">Country Outlaws</a></td>
<td>GM_Country_Outlaws</td>
<td>16</td>
</tr>
<tr>
<td><a href="#product-country-outlaws-1">Country Outlaws</a></td>
<td>GM_Country_Outlaws_OPP</td>
<td>14</td>
</tr>
<tr>
<td><a href="#product-doom-1">Doom</a></td>
<td>GM_Doom</td>
<td>18</td>
</tr>
<tr>
<td><a href="#product-electronic-1">Electronic</a></td>
<td>GM_Electronic</td>
<td>20</td>
</tr>
<tr>
<td><a href="#product-funk-hh-rb-1">Funk HH RB</a></td>
<td>GM_Funk_HH_RB</td>
<td>28</td>
</tr>
<tr>
<td><a href="#product-fusion-1">Fusion</a></td>
<td>GM_Fusion</td>
<td>21</td>
</tr>
<tr>
<td><a href="#product-garage-rock-1">Garage Rock</a></td>
<td>GM_Garage_Rock</td>
<td>15</td>
</tr>
<tr>
<td><a href="#product-garage-rock-1">Garage Rock</a></td>
<td>GM_Garage_Rock_OPP</td>
<td>14</td>
</tr>
<tr>
<td><a href="#product-hard-rock-1">Hard Rock</a></td>
<td>GM_Hard_Rock</td>
<td>18</td>
</tr>
<tr>
<td><a href="#product-hi-octane-1">Hi-Octane</a></td>
<td>GM_Hi-Octane</td>
<td>21</td>
</tr>
<tr>
<td><a href="#product-jazz-buddy-1">Jazz Buddy</a></td>
<td>GM_Jazz_Buddy</td>
<td>20</td>
</tr>
<tr>
<td><a href="#product-led-head-1-1">Led Head 1</a></td>
<td>GM_Led_Head_1</td>
<td>10</td>
</tr>
<tr>
<td><a href="#product-led-head-2-1">Led Head 2</a></td>
<td>GM_Led_Head_2</td>
<td>8</td>
</tr>
<tr>
<td><a href="#product-metal-1">Metal</a></td>
<td>GM_Metal</td>
<td>23</td>
</tr>
<tr>
<td><a href="#product-odd-metal-1">Odd Metal</a></td>
<td>GM_Odd_Metal</td>
<td>39</td>
</tr>
<tr>
<td><a href="#product-police-beats-1">Police Beats</a></td>
<td>GM_Police_Beats</td>
<td>21</td>
</tr>
<tr>
<td><a href="#product-police-beats-1">Police Beats</a></td>
<td>GM_Police_OPP</td>
<td>15</td>
</tr>
<tr>
<td><a href="#product-punk-1">Punk</a></td>
<td>GM_Punk</td>
<td>11</td>
</tr>
<tr>
<td><a href="#product-retro-funk-1">Retro Funk</a></td>
<td>GM_Retro_Funk</td>
<td>12</td>
</tr>
<tr>
<td><a href="#product-rock-2-1">Rock 2</a></td>
<td>GM_Rock_2</td>
<td>13</td>
</tr>
<tr>
<td><a href="#product-rock-essentials-1-1">Rock Essentials 1</a></td>
<td>GM_Rock_Essentials_1</td>
<td>24</td>
</tr>
<tr>
<td><a href="#product-rock-essentials-2-1">Rock Essentials 2</a></td>
<td>GM_Rock_Essentials_2</td>
<td>99</td>
</tr>
<tr>
<td><a href="#product-rush-beats-1">Rush Beats</a></td>
<td>GM_Rush_Beats</td>
<td>21</td>
</tr>
<tr>
<td><a href="#product-southern-rock-1">Southern Rock</a></td>
<td>GM_Southern_Rock</td>
<td>14</td>
</tr>
<tr>
<td><a href="#product-southern-rock-1">Southern Rock</a></td>
<td>GM_Southern_Rock_OPP</td>
<td>14</td>
</tr>
<tr>
<td><a href="#product-world-beats-1">World Beats</a></td>
<td>GM_World_Beats</td>
<td>35</td>
</tr>
</tbody>
</table>
<!-- Product Details Section -->
<h2>Product Details</h2>
<!-- Product Name -->
<h3 id="product-ballads-1">Ballads</h3>
<!-- Product Table -->
<table class="table table-striped">
<thead>
<tr>
<th>PBF Name</th>
<th>Song Name</th>
</tr>
</thead>
<tbody>
<tr>
<td>GM_Ballads</td>
<td>068 Money Stick Brushes</td>
</tr>
<tr>
<td>GM_Ballads</td>
<td>Money Beat Stick</td>
</tr>
<tr>
<td>GM_Ballads</td>
<td>Money Beat</td>
</tr>
<tr>
<td>GM_Ballads</td>
<td>060 Half Man Stick</td>
</tr>
<tr>
<td>GM_Ballads</td>
<td>060 Half Man</td>
</tr>
<tr>
<td>GM_Ballads</td>
<td>072 Be There Stick</td>
</tr>
<tr>
<td>GM_Ballads</td>
<td>072 Be There</td>
</tr>
<tr>
<td>GM_Ballads</td>
<td>073 Cry Stick</td>
</tr>
<tr>
<td>GM_Ballads</td>
<td>073 Cry</td>
</tr>
<tr>
<td>GM_Ballads</td>
<td>075 Bayou Stick</td>
</tr>
<tr>
<td>GM_Ballads</td>
<td>075 Bayou</td>
</tr>
<tr>
<td>GM_Ballads</td>
<td>076 6-8 Ballad Stick</td>
</tr>
<tr>
<td>GM_Ballads</td>
<td>076 6-8 Ballad</td>
</tr>
<tr>
<td>GM_Ballads</td>
<td>077 Reason Stick</td>
</tr>
<tr>
<td>GM_Ballads</td>
<td>077 Reason</td>
</tr>
<tr>
<td>GM_Ballads</td>
<td>072 Stars Stick</td>
</tr>
<tr>
<td>GM_Ballads</td>
<td>072 Stars</td>
</tr>
<tr>
<td>GM_Ballads</td>
<td>082 Not Only One Stick</td>
</tr>
<tr>
<td>GM_Ballads</td>
<td>082 Not Only One</td>
</tr>
<tr>
<td>GM_Ballads</td>
<td>058 Wings Stick</td>
</tr>
<tr>
<td>GM_Ballads</td>
<td>058 Wings</td>
</tr>
<tr>
<td>GM_Ballads</td>
<td>072 March</td>
</tr>
<tr>
<td>GM_Ballads</td>
<td>070 Straight Blues</td>
</tr>
<tr>
<td>GM_Ballads</td>
<td>072 Weight Stick</td>
</tr>
<tr>
<td>GM_Ballads</td>
<td>072 Weight</td>
</tr>
<tr>
<td>GM_Ballads</td>
<td>088 Ophelia</td>
</tr>
<tr>
<td>GM_Ballads</td>
<td>095 Wonderful Stick</td>
</tr>
<tr>
<td>GM_Ballads</td>
<td>095 Wonderful</td>
</tr>
<tr>
<td>GM_Ballads</td>
<td>100 Waltz Stick</td>
</tr>
<tr>
<td>GM_Ballads</td>
<td>100 Waltz</td>
</tr>
<tr>
<td>GM_Ballads</td>
<td>082 Melissa Stick</td>
</tr>
<tr>
<td>GM_Ballads</td>
<td>082 Melissa</td>
</tr>
</tbody>
</table>
<!-- Product Name -->
<h3 id="product-big-easy-1">Big Easy</h3>
<!-- Product Table -->
<table class="table table-striped">
<thead>
<tr>
<th>PBF Name</th>
<th>Song Name</th>
</tr>
</thead>
<tbody>
<tr>
<td>GM_Big_Easy</td>
<td>090 S1 Funk</td>
</tr>
<tr>
<td>GM_Big_Easy</td>
<td>085 S2 Brothers</td>
</tr>
<tr>
<td>GM_Big_Easy</td>
<td>130 S3 12-Bar Fess-like</td>
</tr>
<tr>
<td>GM_Big_Easy</td>
<td>180 S4 Zydeco</td>
</tr>
<tr>
<td>GM_Big_Easy</td>
<td>155 S5 Cajun Waltz</td>
</tr>
<tr>
<td>GM_Big_Easy</td>
<td>190 S6 Cajun</td>
</tr>
<tr>
<td>GM_Big_Easy</td>
<td>135 S7 MG Mambo</td>
</tr>
<tr>
<td>GM_Big_Easy</td>
<td>145 S8 Shuffle</td>
</tr>
<tr>
<td>GM_Big_Easy</td>
<td>090 S9 Funk Rock</td>
</tr>
<tr>
<td>GM_Big_Easy</td>
<td>195 S10 Crack</td>
</tr>
<tr>
<td>GM_Big_Easy</td>
<td>125 Jump Bonus</td>
</tr>
<tr>
<td>GM_Big_Easy</td>
<td>160 Secondline 1 Bonus</td>
</tr>
<tr>
<td>GM_Big_Easy</td>
<td>095 Secondline 2 Bonus</td>
</tr>
<tr>
<td>GM_Big_Easy</td>
<td>110 Streetbeat Bonus</td>
</tr>
<tr>
<td>GM_Big_Easy</td>
<td>118 Zydeco Waltz Bonus</td>
</tr>
</tbody>
</table>
<!-- Product Name -->
<h3 id="product-blues-1">Blues</h3>
<!-- Product Table -->
<table class="table table-striped">
<thead>
<tr>
<th>PBF Name</th>
<th>Song Name</th>
</tr>
</thead>
<tbody>
<tr>
<td>GM_Blues_OPP</td>
<td>3 AM Blues</td>
</tr>
<tr>
<td>GM_Blues_OPP</td>
<td>12-8 Slow Blues</td>
</tr>
<tr>
<td>GM_Blues_OPP</td>
<td>Thrill</td>
</tr>
<tr>
<td>GM_Blues_OPP</td>
<td>Play The Blues</td>
</tr>
<tr>
<td>GM_Blues_OPP</td>
<td>Medium Shuffle</td>
</tr>
<tr>
<td>GM_Blues_OPP</td>
<td>Cold</td>
</tr>
<tr>
<td>GM_Blues_OPP</td>
<td>Torn</td>
</tr>
<tr>
<td>GM_Blues_OPP</td>
<td>Pride</td>
</tr>
<tr>
<td>GM_Blues_OPP</td>
<td>Uptempo Shuffle</td>
</tr>
<tr>
<td>GM_Blues_OPP</td>
<td>Hide</td>
</tr>
<tr>
<td>GM_Blues_OPP</td>
<td>Testifying</td>
</tr>
</tbody>
</table>
<!-- Product Name -->
<h3 id="product-blues-classics-1">Blues Classics</h3>
<!-- Product Table -->
<table class="table table-striped">
<thead>
<tr>
<th>PBF Name</th>
<th>Song Name</th>
</tr>
</thead>
<tbody>
<tr>
<td>GM_Blues_Classics</td>
<td>12-8 Slow Blues 1</td>
</tr>
<tr>
<td>GM_Blues_Classics</td>
<td>12-8 Slow Blues 2</td>
</tr>
<tr>
<td>GM_Blues_Classics</td>
<td>12-8 Slow Blues Stick</td>
</tr>
<tr>
<td>GM_Blues_Classics</td>
<td>Cross Cut</td>
</tr>
<tr>
<td>GM_Blues_Classics</td>
<td>Big Leg</td>
</tr>
<tr>
<td>GM_Blues_Classics</td>
<td>Blues Boogie</td>
</tr>
<tr>
<td>GM_Blues_Classics</td>
<td>Cold Shock</td>
</tr>
<tr>
<td>GM_Blues_Classics</td>
<td>Flat Tire</td>
</tr>
<tr>
<td>GM_Blues_Classics</td>
<td>Mojo</td>
</tr>
<tr>
<td>GM_Blues_Classics</td>
<td>Moderate Shuffle</td>
</tr>
<tr>
<td>GM_Blues_Classics</td>
<td>Pride</td>
</tr>
<tr>
<td>GM_Blues_Classics</td>
<td>UpTempo Blues</td>
</tr>
<tr>
<td>GM_Blues_Classics</td>
<td>UpTempo Blues Var</td>
</tr>
<tr>
<td>GM_Blues_Classics</td>
<td>Swampy</td>
</tr>
<tr>
<td>GM_Blues_Classics</td>
<td>Crossroads</td>
</tr>
<tr>
<td>GM_Blues_Classics</td>
<td>Shook Me</td>
</tr>
<tr>
<td>GM_Blues_Classics</td>
<td>Reed Shuffle</td>
</tr>
<tr>
<td>GM_Blues_Classics</td>
<td>Thrill</td>
</tr>
<tr>
<td>GM_Blues_Classics</td>
<td>Thrill Var</td>
</tr>
<tr>
<td>GM_Blues_Classics</td>
<td>Simple Shuffle 1</td>
</tr>
<tr>
<td>GM_Blues_Classics</td>
<td>Simple Shuffle 2</td>
</tr>
</tbody>
</table>
<!-- Product Name -->
<h3 id="product-blues-rock-1">Blues Rock</h3>
<!-- Product Table -->
<table class="table table-striped">
<thead>
<tr>
<th>PBF Name</th>
<th>Song Name</th>
</tr>
</thead>
<tbody>
<tr>
<td>GM_Blues_Rock</td>
<td>130 S1 Shuffle</td>
</tr>
<tr>
<td>GM_Blues_Rock</td>
<td>094 S2 2-Feel</td>
</tr>
<tr>
<td>GM_Blues_Rock</td>
<td>080 S3 12-8 Feel</td>
</tr>
<tr>
<td>GM_Blues_Rock</td>
<td>080 S4 12-8 Slow Blues</td>
</tr>
<tr>
<td>GM_Blues_Rock</td>
<td>130 S5 12-Bar Blues</td>
</tr>
<tr>
<td>GM_Blues_Rock</td>
<td>145 S6 Half-Time Shuffle</td>
</tr>
<tr>
<td>GM_Blues_Rock</td>
<td>155 S7 Fast Rock Shuffle</td>
</tr>
<tr>
<td>GM_Blues_Rock</td>
<td>110 S8 Simple</td>
</tr>
<tr>
<td>GM_Blues_Rock</td>
<td>108 S9 Swung 16th</td>
</tr>
<tr>
<td>GM_Blues_Rock</td>
<td>075 S10 12-8 Blues Rock</td>
</tr>
</tbody>
</table>
<!-- Product Name -->
<h3 id="product-breakbeats-1">Breakbeats</h3>
<!-- Product Table -->
<table class="table table-striped">
<thead>
<tr>
<th>PBF Name</th>
<th>Song Name</th>
</tr>
</thead>
<tbody>
<tr>
<td>GM_Breakbeats</td>
<td>Breakthru</td>
</tr>
<tr>
<td>GM_Breakbeats</td>
<td>Clouds</td>
</tr>
<tr>
<td>GM_Breakbeats</td>
<td>Get Out</td>
</tr>
<tr>
<td>GM_Breakbeats</td>
<td>Wrong</td>
</tr>
<tr>
<td>GM_Breakbeats</td>
<td>Deceive</td>
</tr>
<tr>
<td>GM_Breakbeats</td>
<td>New York</td>
</tr>
<tr>
<td>GM_Breakbeats</td>
<td>Radio</td>
</tr>
<tr>
<td>GM_Breakbeats</td>
<td>Pretender</td>
</tr>
<tr>
<td>GM_Breakbeats</td>
<td>Right Won</td>
</tr>
<tr>
<td>GM_Breakbeats</td>
<td>Run</td>
</tr>
<tr>
<td>GM_Breakbeats</td>
<td>Workin</td>
</tr>
<tr>
<td>GM_Breakbeats</td>
<td>Dont Stop</td>
</tr>
<tr>
<td>GM_Breakbeats</td>
<td>Good</td>
</tr>
<tr>
<td>GM_Breakbeats</td>
<td>Lost</td>
</tr>
<tr>
<td>GM_Breakbeats</td>
<td>New Day</td>
</tr>
<tr>
<td>GM_Breakbeats</td>
<td>Out</td>
</tr>
<tr>
<td>GM_Breakbeats</td>
<td>Breathe</td>
</tr>
<tr>
<td>GM_Breakbeats</td>
<td>Diggable</td>
</tr>
<tr>
<td>GM_Breakbeats</td>
<td>Clone</td>
</tr>
<tr>
<td>GM_Breakbeats</td>
<td>President</td>
</tr>
<tr>
<td>GM_Breakbeats</td>
<td>Movement</td>
</tr>
<tr>
<td>GM_Breakbeats</td>
<td>Spot</td>
</tr>
<tr>
<td>GM_Breakbeats</td>
<td>In Love</td>
</tr>
<tr>
<td>GM_Breakbeats</td>
<td>Air</td>
</tr>
<tr>
<td>GM_Breakbeats</td>
<td>A Patch</td>
</tr>
</tbody>
</table>
<!-- Product Name -->
<h3 id="product-chill-1">Chill</h3>
<!-- Product Table -->
<table class="table table-striped">
<thead>
<tr>
<th>PBF Name</th>
<th>Song Name</th>
</tr>
</thead>
<tbody>
<tr>
<td>GM_Chilled_Beats</td>
<td>084 S01 Mist</td>
</tr>
<tr>
<td>GM_Chilled_Beats</td>
<td>084 S01 Mist ALT</td>
</tr>
<tr>
<td>GM_Chilled_Beats</td>
<td>081 S02 Simple 1</td>
</tr>
<tr>
<td>GM_Chilled_Beats</td>
<td>081 S02 Simple 1 ALT</td>
</tr>
<tr>
<td>GM_Chilled_Beats</td>
<td>088 S03 Space</td>
</tr>
<tr>
<td>GM_Chilled_Beats</td>
<td>088 S03 Space ALT</td>
</tr>
<tr>
<td>GM_Chilled_Beats</td>
<td>098 S04 HT 1</td>
</tr>
<tr>
<td>GM_Chilled_Beats</td>
<td>098 S04 HT 1 ALT</td>
</tr>
<tr>
<td>GM_Chilled_Beats</td>
<td>110 S05 HT 2</td>
</tr>
<tr>
<td>GM_Chilled_Beats</td>
<td>110 S05 HT 2 ALT</td>
</tr>
<tr>
<td>GM_Chilled_Beats</td>
<td>074 S06 Baked</td>
</tr>
<tr>
<td>GM_Chilled_Beats</td>
<td>074 S06 Baked ALT</td>
</tr>
<tr>
<td>GM_Chilled_Beats</td>
<td>076 S07 Simple 2</td>
</tr>
<tr>
<td>GM_Chilled_Beats</td>
<td>076 S07 Simple 2 ALT</td>
</tr>
<tr>
<td>GM_Chilled_Beats</td>
<td>078 S08 Bird</td>
</tr>
<tr>
<td>GM_Chilled_Beats</td>
<td>078 S08 Bird ALT</td>
</tr>
<tr>
<td>GM_Chilled_Beats</td>
<td>092 S09 XXX</td>
</tr>
<tr>
<td>GM_Chilled_Beats</td>
<td>092 S09 XXX ALT</td>
</tr>
<tr>
<td>GM_Chilled_Beats</td>
<td>082 S10 Quest</td>
</tr>
<tr>
<td>GM_Chilled_Beats</td>
<td>082 S10 Quest ALT</td>
</tr>
<tr>
<td>GM_Chilled_Beats</td>
<td>079 S11 Hope</td>
</tr>
<tr>
<td>GM_Chilled_Beats</td>
<td>079 S11 Hope ALT</td>
</tr>
<tr>
<td>GM_Chilled_Beats</td>
<td>075 S12 Gold</td>
</tr>
<tr>
<td>GM_Chilled_Beats</td>
<td>075 S12 Gold ALT</td>
</tr>
<tr>
<td>GM_Chilled_Beats</td>
<td>091 S13 Liquid</td>
</tr>
<tr>
<td>GM_Chilled_Beats</td>
<td>091 S13 Liquid ALT</td>
</tr>
<tr>
<td>GM_Chilled_Beats</td>
<td>076 S14 Displaced</td>
</tr>
<tr>
<td>GM_Chilled_Beats</td>
<td>076 S14 Displaced ALT</td>
</tr>
<tr>
<td>GM_Chilled_Beats</td>
<td>082 S15 Lucky</td>
</tr>
<tr>
<td>GM_Chilled_Beats</td>
<td>088 S16 Fly</td>
</tr>
</tbody>
</table>
<!-- Product Name -->
<h3 id="product-classic-rock-1">Classic Rock</h3>
<!-- Product Table -->
<table class="table table-striped">
<thead>
<tr>
<th>PBF Name</th>
<th>Song Name</th>
</tr>
</thead>
<tbody>
<tr>
<td>GM_Classic_Rock</td>
<td>Cant Get</td>
</tr>
<tr>
<td>GM_Classic_Rock</td>
<td>Rockin Candy</td>
</tr>
<tr>
<td>GM_Classic_Rock</td>
<td>Jail Breakin</td>
</tr>
<tr>
<td>GM_Classic_Rock</td>
<td>The Grange</td>
</tr>
<tr>
<td>GM_Classic_Rock</td>
<td>Sweet Devotion</td>
</tr>
<tr>
<td>GM_Classic_Rock</td>
<td>Alright</td>
</tr>
<tr>
<td>GM_Classic_Rock</td>
<td>Love My Car 6-8</td>
</tr>
<tr>
<td>GM_Classic_Rock</td>
<td>Feel Like Makin</td>
</tr>
<tr>
<td>GM_Classic_Rock</td>
<td>Ur All Ive Got</td>
</tr>
<tr>
<td>GM_Classic_Rock</td>
<td>Space Truck</td>
</tr>
<tr>
<td>GM_Classic_Rock</td>
<td>Doctor</td>
</tr>
<tr>
<td>GM_Classic_Rock</td>
<td>Rocky Mountain 12-8</td>
</tr>
<tr>
<td>GM_Classic_Rock</td>
<td>Huntin</td>
</tr>
<tr>
<td>GM_Classic_Rock</td>
<td>Irony Man</td>
</tr>
<tr>
<td>GM_Classic_Rock</td>
<td>Walkin Away</td>
</tr>
<tr>
<td>GM_Classic_Rock</td>
<td>Betty</td>
</tr>
<tr>
<td>GM_Classic_Rock_OPP</td>
<td>Cant Get OPP</td>
</tr>
<tr>
<td>GM_Classic_Rock_OPP</td>
<td>Rockin Candy OPP</td>
</tr>
<tr>
<td>GM_Classic_Rock_OPP</td>
<td>Jail Breakin OPP</td>
</tr>
<tr>
<td>GM_Classic_Rock_OPP</td>
<td>The Grange OPP</td>
</tr>
<tr>
<td>GM_Classic_Rock_OPP</td>
<td>Sweet Devotion OPP</td>
</tr>
<tr>
<td>GM_Classic_Rock_OPP</td>
<td>Alright OPP</td>
</tr>
<tr>
<td>GM_Classic_Rock_OPP</td>
<td>Love My Car 6-8 OPP</td>
</tr>
<tr>
<td>GM_Classic_Rock_OPP</td>
<td>Feel Like Makin OPP</td>
</tr>
<tr>
<td>GM_Classic_Rock_OPP</td>
<td>Ur All Ive Got OPP</td>
</tr>
<tr>
<td>GM_Classic_Rock_OPP</td>
<td>Space Truck OPP</td>
</tr>
<tr>
<td>GM_Classic_Rock_OPP</td>
<td>Doctor OPP</td>
</tr>
<tr>
<td>GM_Classic_Rock_OPP</td>
<td>Rocky Mountain 12-8 OPP</td>
</tr>
<tr>
<td>GM_Classic_Rock_OPP</td>
<td>Huntin OPP</td>
</tr>
<tr>
<td>GM_Classic_Rock_OPP</td>
<td>Irony Man OPP</td>
</tr>
<tr>
<td>GM_Classic_Rock_OPP</td>
<td>Walkin Away OPP</td>
</tr>
<tr>
<td>GM_Classic_Rock_OPP</td>
<td>Betty OPP</td>
</tr>
</tbody>
</table>
<!-- Product Name -->
<h3 id="product-contemporary-rock-1">Contemporary Rock</h3>
<!-- Product Table -->
<table class="table table-striped">
<thead>
<tr>
<th>PBF Name</th>
<th>Song Name</th>
</tr>
</thead>
<tbody>
<tr>
<td>GM_Contemporary_Rock</td>
<td>090 S1 6-8 Rock</td>
</tr>
<tr>
<td>GM_Contemporary_Rock</td>
<td>090 S2 Slow 8ths</td>
</tr>
<tr>
<td>GM_Contemporary_Rock</td>
<td>095 S3 Funky 8</td>
</tr>
<tr>
<td>GM_Contemporary_Rock</td>
<td>110 S4 Mod 8ths</td>
</tr>
<tr>
<td>GM_Contemporary_Rock</td>
<td>116 S5 16th Rock</td>
</tr>
<tr>
<td>GM_Contemporary_Rock</td>
<td>120 S6 Heavy</td>
</tr>
<tr>
<td>GM_Contemporary_Rock</td>
<td>130 S7 Proggy</td>
</tr>
<tr>
<td>GM_Contemporary_Rock</td>
<td>134 S8 4x4</td>
</tr>
<tr>
<td>GM_Contemporary_Rock</td>
<td>134 S9 Half-Time</td>
</tr>
<tr>
<td>GM_Contemporary_Rock</td>
<td>140 S10 Floor Tom Rock</td>
</tr>
</tbody>
</table>
<!-- Product Name -->
<h3 id="product-country-1">Country</h3>
<!-- Product Table -->
<table class="table table-striped">
<thead>
<tr>
<th>PBF Name</th>
<th>Song Name</th>
</tr>
</thead>
<tbody>
<tr>
<td>GM_Country</td>
<td>120 S1 Heartbeat-Light</td>
</tr>
<tr>
<td>GM_Country</td>
<td>120 S1 Heartbeat</td>
</tr>
<tr>
<td>GM_Country</td>
<td>120 S1 Heartbeat ALT</td>
</tr>
<tr>
<td>GM_Country</td>
<td>120 S2 Basic-Light</td>
</tr>
<tr>
<td>GM_Country</td>
<td>120 S2 Basic</td>
</tr>
<tr>
<td>GM_Country</td>
<td>108 S3 Push-Light</td>
</tr>
<tr>
<td>GM_Country</td>
<td>108 S3 Push</td>
</tr>
<tr>
<td>GM_Country</td>
<td>130 S4 Shuffle-Light</td>
</tr>
<tr>
<td>GM_Country</td>
<td>130 S4 Shuffle</td>
</tr>
<tr>
<td>GM_Country</td>
<td>122 S5 2-Feel-Light</td>
</tr>
<tr>
<td>GM_Country</td>
<td>130 S5 2-Feel</td>
</tr>
<tr>
<td>GM_Country</td>
<td>072 S6 Ballad</td>
</tr>
<tr>
<td>GM_Country</td>
<td>070 S7 6-8 Country-Light</td>
</tr>
<tr>
<td>GM_Country</td>
<td>070 S7 6-8 Country</td>
</tr>
<tr>
<td>GM_Country</td>
<td>080 S8 Swung-Light</td>
</tr>
<tr>
<td>GM_Country</td>
<td>080 S8 Swung</td>
</tr>
<tr>
<td>GM_Country</td>
<td>140 S9 Rock-Light</td>
</tr>
<tr>
<td>GM_Country</td>
<td>140 S9 Rock</td>
</tr>
<tr>
<td>GM_Country</td>
<td>138 S10 Train</td>
</tr>
</tbody>
</table>
<!-- Product Name -->
<h3 id="product-country-outlaws-1">Country Outlaws</h3>
<!-- Product Table -->
<table class="table table-striped">
<thead>
<tr>
<th>PBF Name</th>
<th>Song Name</th>
</tr>
</thead>
<tbody>
<tr>
<td>GM_Country_Outlaws</td>
<td>Are You Sure Hank</td>
</tr>
<tr>
<td>GM_Country_Outlaws</td>
<td>Country Boy</td>
</tr>
<tr>
<td>GM_Country_Outlaws</td>
<td>Good Hearted</td>
</tr>
<tr>
<td>GM_Country_Outlaws</td>
<td>Mamas 6-8 Snare</td>
</tr>
<tr>
<td>GM_Country_Outlaws</td>
<td>Mamas 6-8 Side Stick</td>
</tr>
<tr>
<td>GM_Country_Outlaws</td>
<td>Mama Tries</td>
</tr>
<tr>
<td>GM_Country_Outlaws</td>
<td>On the Road</td>
</tr>
<tr>
<td>GM_Country_Outlaws</td>
<td>Onrey and Mean</td>
</tr>
<tr>
<td>GM_Country_Outlaws</td>
<td>Ring Fire</td>
</tr>
<tr>
<td>GM_Country_Outlaws</td>
<td>The Ride Ballad</td>
</tr>
<tr>
<td>GM_Country_Outlaws</td>
<td>Waltz</td>
</tr>
<tr>
<td>GM_Country_Outlaws</td>
<td>Waylon Beat</td>
</tr>
<tr>
<td>GM_Country_Outlaws</td>
<td>Wings</td>
</tr>
<tr>
<td>GM_Country_Outlaws</td>
<td>Wings Groove (Stick)</td>
</tr>
<tr>
<td>GM_Country_Outlaws</td>
<td>Workin Blues</td>
</tr>
<tr>
<td>GM_Country_Outlaws</td>
<td>You Never Called</td>
</tr>
<tr>
<td>GM_Country_Outlaws_OPP</td>
<td>Are You Sure Hank</td>
</tr>
<tr>
<td>GM_Country_Outlaws_OPP</td>
<td>Country Boy</td>
</tr>
<tr>
<td>GM_Country_Outlaws_OPP</td>
<td>Good Hearted</td>
</tr>
<tr>
<td>GM_Country_Outlaws_OPP</td>
<td>Mamas Dont Let 6-8</td>
</tr>
<tr>
<td>GM_Country_Outlaws_OPP</td>
<td>Mama Tries</td>
</tr>
<tr>
<td>GM_Country_Outlaws_OPP</td>
<td>On the Road</td>
</tr>
<tr>
<td>GM_Country_Outlaws_OPP</td>
<td>Onrey and Mean</td>
</tr>
<tr>
<td>GM_Country_Outlaws_OPP</td>
<td>Ring Fire</td>
</tr>
<tr>
<td>GM_Country_Outlaws_OPP</td>
<td>The Ride Ballad</td>
</tr>
<tr>
<td>GM_Country_Outlaws_OPP</td>
<td>Waltz Heaven</td>
</tr>
<tr>
<td>GM_Country_Outlaws_OPP</td>
<td>Wings - Studio</td>
</tr>
<tr>
<td>GM_Country_Outlaws_OPP</td>
<td>Wings - Live</td>
</tr>
<tr>
<td>GM_Country_Outlaws_OPP</td>
<td>Workin Blues</td>
</tr>
<tr>
<td>GM_Country_Outlaws_OPP</td>
<td>You Never Called</td>
</tr>
</tbody>
</table>
<!-- Product Name -->
<h3 id="product-doom-1">Doom</h3>
<!-- Product Table -->
<table class="table table-striped">
<thead>
<tr>
<th>PBF Name</th>
<th>Song Name</th>
</tr>
</thead>
<tbody>
<tr>
<td>GM_Doom</td>
<td>112 Bonus 1</td>
</tr>
<tr>
<td>GM_Doom</td>
<td>105 Bonus 2</td>
</tr>
<tr>
<td>GM_Doom</td>
<td>080 Bonus 3</td>
</tr>
<tr>
<td>GM_Doom</td>
<td>135 Bonus 4</td>
</tr>
<tr>
<td>GM_Doom</td>
<td>095 Bonus 5 6-8</td>
</tr>
<tr>
<td>GM_Doom</td>
<td>075 Bonus 6</td>
</tr>
<tr>
<td>GM_Doom</td>
<td>105 Song 1</td>
</tr>
<tr>
<td>GM_Doom</td>
<td>070 Song 2</td>
</tr>
<tr>
<td>GM_Doom</td>
<td>140 Song 3</td>
</tr>
<tr>
<td>GM_Doom</td>
<td>065 Song 4</td>
</tr>
<tr>
<td>GM_Doom</td>
<td>135 Song 5</td>
</tr>
<tr>
<td>GM_Doom</td>
<td>055 Song 6</td>
</tr>
<tr>
<td>GM_Doom</td>
<td>070 Song 7</td>
</tr>
<tr>
<td>GM_Doom</td>
<td>170 Song 8</td>
</tr>
<tr>
<td>GM_Doom</td>
<td>090 Song 9</td>
</tr>
<tr>
<td>GM_Doom</td>
<td>050 Song 10 6-8</td>
</tr>
<tr>
<td>GM_Doom</td>
<td>180 Song 11</td>
</tr>
<tr>
<td>GM_Doom</td>
<td>150 Song 12</td>
</tr>
</tbody>
</table>
<!-- Product Name -->
<h3 id="product-electronic-1">Electronic</h3>
<!-- Product Table -->
<table class="table table-striped">
<thead>
<tr>
<th>PBF Name</th>
<th>Song Name</th>
</tr>
</thead>
<tbody>
<tr>
<td>GM_Electronic</td>
<td>132 2-Step</td>
</tr>
<tr>
<td>GM_Electronic</td>
<td>135 2-Step</td>
</tr>
<tr>
<td>GM_Electronic</td>
<td>135 Breakbeat</td>
</tr>
<tr>
<td>GM_Electronic</td>
<td>074 Displaced</td>
</tr>
<tr>
<td>GM_Electronic</td>
<td>150 DnB</td>
</tr>
<tr>
<td>GM_Electronic</td>
<td>170 DnB</td>
</tr>
<tr>
<td>GM_Electronic</td>
<td>142 Dubstep</td>
</tr>
<tr>
<td>GM_Electronic</td>
<td>136 Electro</td>
</tr>
<tr>
<td>GM_Electronic</td>
<td>070 Ethereal</td>
</tr>
<tr>
<td>GM_Electronic</td>
<td>132 House</td>
</tr>
<tr>
<td>GM_Electronic</td>
<td>134 House</td>
</tr>
<tr>
<td>GM_Electronic</td>
<td>135 House</td>
</tr>
<tr>
<td>GM_Electronic</td>
<td>134 Garage</td>
</tr>
<tr>
<td>GM_Electronic</td>
<td>132 Grime</td>
</tr>
<tr>
<td>GM_Electronic</td>
<td>140 Grime</td>
</tr>
<tr>
<td>GM_Electronic</td>
<td>118 Mid-Tempo</td>
</tr>
<tr>
<td>GM_Electronic</td>
<td>128 Mid-Tempo</td>
</tr>
<tr>
<td>GM_Electronic</td>
<td>140 Trance</td>
</tr>
<tr>
<td>GM_Electronic</td>
<td>077 Urban</td>
</tr>
<tr>
<td>GM_Electronic</td>
<td>110 Urban</td>
</tr>
</tbody>
</table>
<!-- Product Name -->
<h3 id="product-funk-hh-rb-1">Funk HH RB</h3>
<!-- Product Table -->
<table class="table table-striped">
<thead>
<tr>
<th>PBF Name</th>
<th>Song Name</th>
</tr>
</thead>
<tbody>
<tr>
<td>GM_Funk_HH_RB</td>
<td>072 6-8 Ballad</td>
</tr>
<tr>
<td>GM_Funk_HH_RB</td>
<td>072 16th Displaced</td>
</tr>
<tr>
<td>GM_Funk_HH_RB</td>
<td>076 Chilled Beat 1</td>
</tr>
<tr>
<td>GM_Funk_HH_RB</td>
<td>079 Chilled Beat 2</td>
</tr>
<tr>
<td>GM_Funk_HH_RB</td>
<td>083 Sparse Ballad</td>
</tr>
<tr>
<td>GM_Funk_HH_RB</td>
<td>085 Bitcrusher</td>
</tr>
<tr>
<td>GM_Funk_HH_RB</td>
<td>088 6-8 Busy</td>
</tr>
<tr>
<td>GM_Funk_HH_RB</td>
<td>088 Dirty South</td>
</tr>
<tr>
<td>GM_Funk_HH_RB</td>
<td>089 Monkee Drummer</td>
</tr>
<tr>
<td>GM_Funk_HH_RB</td>
<td>089 West Coast</td>
</tr>
<tr>
<td>GM_Funk_HH_RB</td>
<td>090 East Coast</td>
</tr>
<tr>
<td>GM_Funk_HH_RB</td>
<td>092 East Coast</td>
</tr>
<tr>
<td>GM_Funk_HH_RB</td>
<td>093 16th Feel</td>
</tr>
<tr>
<td>GM_Funk_HH_RB</td>
<td>095 Simple Hop</td>
</tr>
<tr>
<td>GM_Funk_HH_RB</td>
<td>098 Bouncy</td>
</tr>
<tr>
<td>GM_Funk_HH_RB</td>
<td>100 Light R&amp;B</td>
</tr>
<tr>
<td>GM_Funk_HH_RB</td>
<td>103 Funk</td>
</tr>
<tr>
<td>GM_Funk_HH_RB</td>
<td>105 8th Feel</td>
</tr>
<tr>
<td>GM_Funk_HH_RB</td>
<td>106 Lazy 8ths</td>
</tr>
<tr>
<td>GM_Funk_HH_RB</td>
<td>107 Swampy</td>
</tr>
<tr>
<td>GM_Funk_HH_RB</td>
<td>112 Moderate</td>
</tr>
<tr>
<td>GM_Funk_HH_RB</td>
<td>114 Stick to Toms</td>
</tr>
<tr>
<td>GM_Funk_HH_RB</td>
<td>122 Funk</td>
</tr>
<tr>
<td>GM_Funk_HH_RB</td>
<td>124 Motown</td>
</tr>
<tr>
<td>GM_Funk_HH_RB</td>
<td>132 Funk</td>
</tr>
<tr>
<td>GM_Funk_HH_RB</td>
<td>135 Amen</td>
</tr>
<tr>
<td>GM_Funk_HH_RB</td>
<td>135 Disco</td>
</tr>
<tr>
<td>GM_Funk_HH_RB</td>
<td>140 Trapped</td>
</tr>
</tbody>
</table>
<!-- Product Name -->
<h3 id="product-fusion-1">Fusion</h3>
<!-- Product Table -->
<table class="table table-striped">
<thead>
<tr>
<th>PBF Name</th>
<th>Song Name</th>
</tr>
</thead>
<tbody>
<tr>
<td>GM_Fusion</td>
<td>079 Acidic</td>
</tr>
<tr>
<td>GM_Fusion</td>
<td>098 6-8 Afro Groove</td>
</tr>
<tr>
<td>GM_Fusion</td>
<td>102 6-8 Afro Groove</td>
</tr>
<tr>
<td>GM_Fusion</td>
<td>062 Ballad</td>
</tr>
<tr>
<td>GM_Fusion</td>
<td>076 Ballad</td>
</tr>
<tr>
<td>GM_Fusion</td>
<td>075 Chilled</td>
</tr>
<tr>
<td>GM_Fusion</td>
<td>105 ECM Breaks</td>
</tr>
<tr>
<td>GM_Fusion</td>
<td>101 Funk</td>
</tr>
<tr>
<td>GM_Fusion</td>
<td>122 Funk</td>
</tr>
<tr>
<td>GM_Fusion</td>
<td>135 Funk Congas</td>
</tr>
<tr>
<td>GM_Fusion</td>
<td>110 Funky Songo</td>
</tr>
<tr>
<td>GM_Fusion</td>
<td>132 Jazzy</td>
</tr>
<tr>
<td>GM_Fusion</td>
<td>148 Half-Time Shuffle</td>
</tr>
<tr>
<td>GM_Fusion</td>
<td>102 Nawlins Breaks</td>
</tr>
<tr>
<td>GM_Fusion</td>
<td>072 RB 16th Feel</td>
</tr>
<tr>
<td>GM_Fusion</td>
<td>098 RB Congas</td>
</tr>
<tr>
<td>GM_Fusion</td>
<td>108 Samba</td>
</tr>
<tr>
<td>GM_Fusion</td>
<td>138 Samba</td>
</tr>
<tr>
<td>GM_Fusion</td>
<td>110 3-4 Samba</td>
</tr>
<tr>
<td>GM_Fusion</td>
<td>162 7-4 Samba</td>
</tr>
<tr>
<td>GM_Fusion</td>
<td>108 7-8 Songo</td>
</tr>
</tbody>
</table>
<!-- Product Name -->
<h3 id="product-garage-rock-1">Garage Rock</h3>
<!-- Product Table -->
<table class="table table-striped">
<thead>
<tr>
<th>PBF Name</th>
<th>Song Name</th>
</tr>
</thead>
<tbody>
<tr>
<td>GM_Garage_Rock</td>
<td>128 S01 Something To Say</td>
</tr>
<tr>
<td>GM_Garage_Rock</td>
<td>101 S02 Oh Yeah</td>
</tr>
<tr>
<td>GM_Garage_Rock</td>
<td>104 S03 6-8 Pawn Shoppe Heart</td>
</tr>
<tr>
<td>GM_Garage_Rock</td>
<td>192 S04 Fell In Love</td>
</tr>
<tr>
<td>GM_Garage_Rock</td>
<td>167 S05 Broken Man</td>
</tr>
<tr>
<td>GM_Garage_Rock</td>
<td>129 S06 Evil</td>
</tr>
<tr>
<td>GM_Garage_Rock</td>
<td>153 S07 Girls and Boys</td>
</tr>
<tr>
<td>GM_Garage_Rock</td>
<td>137 S08 Taken For A Fool</td>
</tr>
<tr>
<td>GM_Garage_Rock</td>
<td>142 S09 Shake Shake</td>
</tr>
<tr>
<td>GM_Garage_Rock</td>
<td>065 S10 Evil Town</td>
</tr>
<tr>
<td>GM_Garage_Rock</td>
<td>139 S11 Get Free</td>
</tr>
<tr>
<td>GM_Garage_Rock</td>
<td>148 S12 Tell Me What You See</td>
</tr>
<tr>
<td>GM_Garage_Rock</td>
<td>135 S13 Tick Tick Boom</td>
</tr>
<tr>
<td>GM_Garage_Rock</td>
<td>138 S14 Main Offender</td>
</tr>
<tr>
<td>GM_Garage_Rock</td>
<td>187 Bonus Come On</td>
</tr>
<tr>
<td>GM_Garage_Rock_OPP</td>
<td>128 S01 Something To Say</td>
</tr>
<tr>
<td>GM_Garage_Rock_OPP</td>
<td>101 S02 Oh Yeah</td>
</tr>
<tr>
<td>GM_Garage_Rock_OPP</td>
<td>104 S03 Pawn Shoppe Heart</td>
</tr>
<tr>
<td>GM_Garage_Rock_OPP</td>
<td>192 S04 Fell In Love</td>
</tr>
<tr>
<td>GM_Garage_Rock_OPP</td>
<td>167 S05 Broken Man</td>
</tr>
<tr>
<td>GM_Garage_Rock_OPP</td>
<td>129 S06 Evil</td>
</tr>
<tr>
<td>GM_Garage_Rock_OPP</td>
<td>153 S07 Boys and Girls</td>
</tr>
<tr>
<td>GM_Garage_Rock_OPP</td>
<td>137 S08 Taken For a Fool</td>
</tr>
<tr>
<td>GM_Garage_Rock_OPP</td>
<td>142 S09 Shake Shake</td>
</tr>
<tr>
<td>GM_Garage_Rock_OPP</td>
<td>065 S10 Evil Town</td>
</tr>
<tr>
<td>GM_Garage_Rock_OPP</td>
<td>139 S11 Get Free</td>
</tr>
<tr>
<td>GM_Garage_Rock_OPP</td>
<td>148 S12 Tell Me What You See</td>
</tr>
<tr>
<td>GM_Garage_Rock_OPP</td>
<td>135 S13 Tick Tick Boom</td>
</tr>
<tr>
<td>GM_Garage_Rock_OPP</td>
<td>138 S14 Main Offender</td>
</tr>
</tbody>
</table>
<!-- Product Name -->
<h3 id="product-hard-rock-1">Hard Rock</h3>
<!-- Product Table -->
<table class="table table-striped">
<thead>
<tr>
<th>PBF Name</th>
<th>Song Name</th>
</tr>
</thead>
<tbody>
<tr>
<td>GM_Hard_Rock</td>
<td>Tribal Toms</td>
</tr>
<tr>
<td>GM_Hard_Rock</td>
<td>Half-Time</td>
</tr>
<tr>
<td>GM_Hard_Rock</td>
<td>Mid-Tempo QTR Feel</td>
</tr>
<tr>
<td>GM_Hard_Rock</td>
<td>Upbeat Groove</td>
</tr>
<tr>
<td>GM_Hard_Rock</td>
<td>16th Feel 1</td>
</tr>
<tr>
<td>GM_Hard_Rock</td>
<td>16th Feel 2</td>
</tr>
<tr>
<td>GM_Hard_Rock</td>
<td>8th Rock Feel</td>
</tr>
<tr>
<td>GM_Hard_Rock</td>
<td>8th Driving</td>
</tr>
<tr>
<td>GM_Hard_Rock</td>
<td>4-On-The-Floor</td>
</tr>
<tr>
<td>GM_Hard_Rock</td>
<td>Slow QTR 1</td>
</tr>
<tr>
<td>GM_Hard_Rock</td>
<td>Slow QTR 3</td>
</tr>
<tr>
<td>GM_Hard_Rock</td>
<td>Slow QTR 4</td>
</tr>
<tr>
<td>GM_Hard_Rock</td>
<td>Busy QTR 4</td>
</tr>
<tr>
<td>GM_Hard_Rock</td>
<td>Busy QTR 6</td>
</tr>
<tr>
<td>GM_Hard_Rock</td>
<td>4-Feel QTR 1</td>
</tr>
<tr>
<td>GM_Hard_Rock</td>
<td>Saturated QTR</td>
</tr>
<tr>
<td>GM_Hard_Rock</td>
<td>Displaced Groove</td>
</tr>
<tr>
<td>GM_Hard_Rock</td>
<td>Clave QTR</td>
</tr>
</tbody>
</table>
<!-- Product Name -->
<h3 id="product-hi-octane-1">Hi-Octane</h3>
<!-- Product Table -->
<table class="table table-striped">
<thead>
<tr>
<th>PBF Name</th>
<th>Song Name</th>
</tr>
</thead>
<tbody>
<tr>
<td>GM_Hi-Octane</td>
<td>Bonus 1 Triplet Feel</td>
</tr>
<tr>
<td>GM_Hi-Octane</td>
<td>Bonus 2 (3-4)</td>
</tr>
<tr>
<td>GM_Hi-Octane</td>
<td>Bonus 3 Quarter Feel</td>
</tr>
<tr>
<td>GM_Hi-Octane</td>
<td>Bonus 4 Double time</td>
</tr>
<tr>
<td>GM_Hi-Octane</td>
<td>Bonus 5 Half-time</td>
</tr>
<tr>
<td>GM_Hi-Octane</td>
<td>Bonus 6 (5-4)</td>
</tr>
<tr>
<td>GM_Hi-Octane</td>
<td>140 Song 1</td>
</tr>
<tr>
<td>GM_Hi-Octane</td>
<td>164 Song 2</td>
</tr>
<tr>
<td>GM_Hi-Octane</td>
<td>152 Song 3</td>
</tr>
<tr>
<td>GM_Hi-Octane</td>
<td>110 Song 4</td>
</tr>
<tr>
<td>GM_Hi-Octane</td>
<td>170 Song 5</td>
</tr>
<tr>
<td>GM_Hi-Octane</td>
<td>145 Song 6</td>
</tr>
<tr>
<td>GM_Hi-Octane</td>
<td>146 Song 7 (3-4)</td>
</tr>
<tr>
<td>GM_Hi-Octane</td>
<td>185 Song 8</td>
</tr>
<tr>
<td>GM_Hi-Octane</td>
<td>168 Song 9</td>
</tr>
<tr>
<td>GM_Hi-Octane</td>
<td>175 Song 10 Shuffle Feel</td>
</tr>
<tr>
<td>GM_Hi-Octane</td>
<td>160 Song 11 Shuffle Feel</td>
</tr>
<tr>
<td>GM_Hi-Octane</td>
<td>130 Song 12</td>
</tr>
<tr>
<td>GM_Hi-Octane</td>
<td>175 Song 13</td>
</tr>
<tr>
<td>GM_Hi-Octane</td>
<td>145 Song 14</td>
</tr>
<tr>
<td>GM_Hi-Octane</td>
<td>130 Song 15</td>
</tr>
</tbody>
</table>
<!-- Product Name -->
<h3 id="product-jazz-buddy-1">Jazz Buddy</h3>
<!-- Product Table -->
<table class="table table-striped">
<thead>
<tr>
<th>PBF Name</th>
<th>Song Name</th>
</tr>
</thead>
<tbody>
<tr>
<td>GM_Jazz_Buddy</td>
<td>Jazz Ballad 1</td>
</tr>
<tr>
<td>GM_Jazz_Buddy</td>
<td>Jazz Ballad 2</td>
</tr>
<tr>
<td>GM_Jazz_Buddy</td>
<td>Jazz Ballad 3</td>
</tr>
<tr>
<td>GM_Jazz_Buddy</td>
<td>Swing Beat</td>
</tr>
<tr>
<td>GM_Jazz_Buddy</td>
<td>Afro-Jazz</td>
</tr>
<tr>
<td>GM_Jazz_Buddy</td>
<td>Post Bop</td>
</tr>
<tr>
<td>GM_Jazz_Buddy</td>
<td>Bongo Beat</td>
</tr>
<tr>
<td>GM_Jazz_Buddy</td>
<td>Jazz Shuffle</td>
</tr>
<tr>
<td>GM_Jazz_Buddy</td>
<td>2-Feel Jazz</td>
</tr>
<tr>
<td>GM_Jazz_Buddy</td>
<td>Jazz Waltz</td>
</tr>
<tr>
<td>GM_Jazz_Buddy</td>
<td>Moderate Blues</td>
</tr>
<tr>
<td>GM_Jazz_Buddy</td>
<td>Jazz Samba</td>
</tr>
<tr>
<td>GM_Jazz_Buddy</td>
<td>Bossa</td>
</tr>
<tr>
<td>GM_Jazz_Buddy</td>
<td>Jazz Mambo</td>
</tr>
<tr>
<td>GM_Jazz_Buddy</td>
<td>Swinging Ride</td>
</tr>
<tr>
<td>GM_Jazz_Buddy</td>
<td>110 3-4 Basic Bop</td>
</tr>
<tr>
<td>GM_Jazz_Buddy</td>
<td>250 Uptempo Swing</td>
</tr>
<tr>
<td>GM_Jazz_Buddy</td>
<td>Jump Swing</td>
</tr>
<tr>
<td>GM_Jazz_Buddy</td>
<td>Jazz Swung Bossa</td>
</tr>
<tr>
<td>GM_Jazz_Buddy</td>
<td>Bossa w Samba Kick</td>
</tr>
</tbody>
</table>
<!-- Product Name -->
<h3 id="product-led-head-1-1">Led Head 1</h3>
<!-- Product Table -->
<table class="table table-striped">
<thead>
<tr>
<th>PBF Name</th>
<th>Song Name</th>
</tr>
</thead>
<tbody>
<tr>
<td>GM_Led_Head_1</td>
<td>055 S01 Dazed 12-8</td>
</tr>
<tr>
<td>GM_Led_Head_1</td>
<td>066 S02 Quarter</td>
</tr>
<tr>
<td>GM_Led_Head_1</td>
<td>070 S03 Levee</td>
</tr>
<tr>
<td>GM_Led_Head_1</td>
<td>088 S04 Stairway</td>
</tr>
<tr>
<td>GM_Led_Head_1</td>
<td>097 S05 HeartBreak</td>
</tr>
<tr>
<td>GM_Led_Head_1</td>
<td>100 S06 Hills</td>
</tr>
<tr>
<td>GM_Led_Head_1</td>
<td>116 S07 Since 6-4</td>
</tr>
<tr>
<td>GM_Led_Head_1</td>
<td>135 S08 Misty</td>
</tr>
<tr>
<td>GM_Led_Head_1</td>
<td>144 S09 Achilles</td>
</tr>
<tr>
<td>GM_Led_Head_1</td>
<td>144 S10 Same Song</td>
</tr>
</tbody>
</table>
<!-- Product Name -->
<h3 id="product-led-head-2-1">Led Head 2</h3>
<!-- Product Table -->
<table class="table table-striped">
<thead>
<tr>
<th>PBF Name</th>
<th>Song Name</th>
</tr>
</thead>
<tbody>
<tr>
<td>GM_Led_Head_2</td>
<td>12-8 Dazed</td>
</tr>
<tr>
<td>GM_Led_Head_2</td>
<td>12-8 Quit</td>
</tr>
<tr>
<td>GM_Led_Head_2</td>
<td>Black</td>
</tr>
<tr>
<td>GM_Led_Head_2</td>
<td>Immigrant</td>
</tr>
<tr>
<td>GM_Led_Head_2</td>
<td>Achilles</td>
</tr>
<tr>
<td>GM_Led_Head_2</td>
<td>Maid</td>
</tr>
<tr>
<td>GM_Led_Head_2</td>
<td>Rock</td>
</tr>
<tr>
<td>GM_Led_Head_2</td>
<td>Communication</td>
</tr>
</tbody>
</table>
<!-- Product Name -->
<h3 id="product-metal-1">Metal</h3>
<!-- Product Table -->
<table class="table table-striped">
<thead>
<tr>
<th>PBF Name</th>
<th>Song Name</th>
</tr>
</thead>
<tbody>
<tr>
<td>GM_Metal</td>
<td>137 Tom Groove 1</td>
</tr>
<tr>
<td>GM_Metal</td>
<td>122 Modetate Metal</td>
</tr>
<tr>
<td>GM_Metal</td>
<td>164 HT to BB</td>
</tr>
<tr>
<td>GM_Metal</td>
<td>132 Tom Groove 2</td>
</tr>
<tr>
<td>GM_Metal</td>
<td>140 BB to Skank</td>
</tr>
<tr>
<td>GM_Metal</td>
<td>136 Backbeats</td>
</tr>
<tr>
<td>GM_Metal</td>
<td>150 DBeat Skank</td>
</tr>
<tr>
<td>GM_Metal</td>
<td>164 BB to HT</td>
</tr>
<tr>
<td>GM_Metal</td>
<td>152 5-4 Metal</td>
</tr>
<tr>
<td>GM_Metal</td>
<td>142 Toms to DBeat</td>
</tr>
<tr>
<td>GM_Metal</td>
<td>176 Triplet Feel</td>
</tr>
<tr>
<td>GM_Metal</td>
<td>175 HT to BB</td>
</tr>
<tr>
<td>GM_Metal</td>
<td>180 Skank to Backbeat</td>
</tr>
<tr>
<td>GM_Metal</td>
<td>166 Half-Time</td>
</tr>
<tr>
<td>GM_Metal</td>
<td>200 BB to 4-Feel</td>
</tr>
<tr>
<td>GM_Metal</td>
<td>148 Triplet Metal</td>
</tr>
<tr>
<td>GM_Metal</td>
<td>192 Hybrid Beat</td>
</tr>
<tr>
<td>GM_Metal</td>
<td>182 3-4 Set 1</td>
</tr>
<tr>
<td>GM_Metal</td>
<td>194 3-4 Set 2</td>
</tr>
<tr>
<td>GM_Metal</td>
<td>150 BB to HT</td>
</tr>
<tr>
<td>GM_Metal</td>
<td>210 Bomb</td>
</tr>
<tr>
<td>GM_Metal</td>
<td>136 4-4 Triplet Sixes</td>
</tr>
<tr>
<td>GM_Metal</td>
<td>187 3-4 Triplet Feel</td>
</tr>
</tbody>
</table>
<!-- Product Name -->
<h3 id="product-odd-metal-1">Odd Metal</h3>
<!-- Product Table -->
<table class="table table-striped">
<thead>
<tr>
<th>PBF Name</th>
<th>Song Name</th>
</tr>
</thead>
<tbody>
<tr>
<td>GM_Odd_Metal</td>
<td>102 3-4 Spoon</td>
</tr>
<tr>
<td>GM_Odd_Metal</td>
<td>120 3-4 Tom Groove</td>
</tr>
<tr>
<td>GM_Odd_Metal</td>
<td>135 3-4 Tom Groove</td>
</tr>
<tr>
<td>GM_Odd_Metal</td>
<td>157 3-4 Surge</td>
</tr>
<tr>
<td>GM_Odd_Metal</td>
<td>168 3-4 Signal</td>
</tr>
<tr>
<td>GM_Odd_Metal</td>
<td>170 3-4 Creep</td>
</tr>
<tr>
<td>GM_Odd_Metal</td>
<td>162 3-4 Turbo</td>
</tr>
<tr>
<td>GM_Odd_Metal</td>
<td>175 3-4 Upbeat</td>
</tr>
<tr>
<td>GM_Odd_Metal</td>
<td>186 3-4 Manic</td>
</tr>
<tr>
<td>GM_Odd_Metal</td>
<td>190 3-4 Frumpy Live</td>
</tr>
<tr>
<td>GM_Odd_Metal</td>
<td>195 3-4 8th Kick</td>
</tr>
<tr>
<td>GM_Odd_Metal</td>
<td>200 3-4 Distress</td>
</tr>
<tr>
<td>GM_Odd_Metal</td>
<td>200 3-4 Triplet</td>
</tr>
<tr>
<td>GM_Odd_Metal</td>
<td>130 5-4 Tom Groove</td>
</tr>
<tr>
<td>GM_Odd_Metal</td>
<td>142 5-4 Tom Groove</td>
</tr>
<tr>
<td>GM_Odd_Metal</td>
<td>145 5-4 Floor Tom Groove</td>
</tr>
<tr>
<td>GM_Odd_Metal</td>
<td>165 5-4 Skipper</td>
</tr>
<tr>
<td>GM_Odd_Metal</td>
<td>170 5-4 Deceive</td>
</tr>
<tr>
<td>GM_Odd_Metal</td>
<td>174 5-4 Uptight</td>
</tr>
<tr>
<td>GM_Odd_Metal</td>
<td>210 5-4 8th Kick</td>
</tr>
<tr>
<td>GM_Odd_Metal</td>
<td>182 5-4 Hammer</td>
</tr>
<tr>
<td>GM_Odd_Metal</td>
<td>184 5-4 Hang</td>
</tr>
<tr>
<td>GM_Odd_Metal</td>
<td>185 5-4 Downbeat</td>
</tr>
<tr>
<td>GM_Odd_Metal</td>
<td>200 5-4 Triplet</td>
</tr>
<tr>
<td>GM_Odd_Metal</td>
<td>110 7-4 Tom Groove</td>
</tr>
<tr>
<td>GM_Odd_Metal</td>
<td>112 7-4 Slacker</td>
</tr>
<tr>
<td>GM_Odd_Metal</td>
<td>120 7-4 Tom Groove</td>
</tr>
<tr>
<td>GM_Odd_Metal</td>
<td>128 7-4 Tom Grooves</td>
</tr>
<tr>
<td>GM_Odd_Metal</td>
<td>132 7-4 Ghost</td>
</tr>
<tr>
<td>GM_Odd_Metal</td>
<td>132 7-4 Possum</td>
</tr>
<tr>
<td>GM_Odd_Metal</td>
<td>145 7-4 Times</td>
</tr>
<tr>
<td>GM_Odd_Metal</td>
<td>172 7-4 Machine</td>
</tr>
<tr>
<td>GM_Odd_Metal</td>
<td>200 7-4 Sparse</td>
</tr>
<tr>
<td>GM_Odd_Metal</td>
<td>095 7-8 Push</td>
</tr>
<tr>
<td>GM_Odd_Metal</td>
<td>100 7-8 Bones</td>
</tr>
<tr>
<td>GM_Odd_Metal</td>
<td>118 7-8 Woven</td>
</tr>
<tr>
<td>GM_Odd_Metal</td>
<td>128 7-8 Dark</td>
</tr>
<tr>
<td>GM_Odd_Metal</td>
<td>155 7-8 Sweat</td>
</tr>
<tr>
<td>GM_Odd_Metal</td>
<td>155 7-8 Sweat ALT</td>
</tr>
</tbody>
</table>
<!-- Product Name -->
<h3 id="product-police-beats-1">Police Beats</h3>
<!-- Product Table -->
<table class="table table-striped">
<thead>
<tr>
<th>PBF Name</th>
<th>Song Name</th>
</tr>
</thead>
<tbody>
<tr>
<td>GM_Police_Beats</td>
<td>147 S01 Moon Walker</td>
</tr>
<tr>
<td>GM_Police_Beats</td>
<td>082 S02 Little Thing</td>
</tr>
<tr>
<td>GM_Police_Beats</td>
<td>135 S03 Roxy</td>
</tr>
<tr>
<td>GM_Police_Beats</td>
<td>140 S04 Dont Stand</td>
</tr>
<tr>
<td>GM_Police_Beats</td>
<td>128 S05 Wrapped</td>
</tr>
<tr>
<td>GM_Police_Beats</td>
<td>150 S06 Message</td>
</tr>
<tr>
<td>GM_Police_Beats</td>
<td>144 S07 Losing You</td>
</tr>
<tr>
<td>GM_Police_Beats</td>
<td>078 S08 Lonely</td>
</tr>
<tr>
<td>GM_Police_Beats</td>
<td>147 S09 Da Da</td>
</tr>
<tr>
<td>GM_Police_Beats</td>
<td>168 S10 One World</td>
</tr>
<tr>
<td>GM_Police_Beats</td>
<td>114 B01 Breath</td>
</tr>
<tr>
<td>GM_Police_Beats</td>
<td>145 B02 Hole</td>
</tr>
<tr>
<td>GM_Police_Beats</td>
<td>124 B03 Pain King</td>
</tr>
<tr>
<td>GM_Police_Beats</td>
<td>162 B04 Driven 1</td>
</tr>
<tr>
<td>GM_Police_Beats</td>
<td>162 B04 Driven 2</td>
</tr>
<tr>
<td>GM_Police_Beats</td>
<td>135 S03 Roxy ALT</td>
</tr>
<tr>
<td>GM_Police_Beats</td>
<td>147 S01 Moonwalker ALT</td>
</tr>
<tr>
<td>GM_Police_Beats</td>
<td>130 Bonus Track A</td>
</tr>
<tr>
<td>GM_Police_Beats</td>
<td>134 Bonus Track B</td>
</tr>
<tr>
<td>GM_Police_Beats</td>
<td>130 Bonus Track C</td>
</tr>
<tr>
<td>GM_Police_Beats</td>
<td>132 Bonus Track D</td>
</tr>
<tr>
<td>GM_Police_OPP</td>
<td>078 Lonely</td>
</tr>
<tr>
<td>GM_Police_OPP</td>
<td>082 Little Thing</td>
</tr>
<tr>
<td>GM_Police_OPP</td>
<td>114 Breath</td>
</tr>
<tr>
<td>GM_Police_OPP</td>
<td>124 Pain King</td>
</tr>
<tr>
<td>GM_Police_OPP</td>
<td>128 Wrapped</td>
</tr>
<tr>
<td>GM_Police_OPP</td>
<td>135 Roxy</td>
</tr>
<tr>
<td>GM_Police_OPP</td>
<td>140 Dont Stand</td>
</tr>
<tr>
<td>GM_Police_OPP</td>
<td>140 Spirits</td>
</tr>
<tr>
<td>GM_Police_OPP</td>
<td>144 Losing You</td>
</tr>
<tr>
<td>GM_Police_OPP</td>
<td>145 Hole</td>
</tr>
<tr>
<td>GM_Police_OPP</td>
<td>147 Da Da</td>
</tr>
<tr>
<td>GM_Police_OPP</td>
<td>147 Moon Walker</td>
</tr>
<tr>
<td>GM_Police_OPP</td>
<td>150 Message</td>
</tr>
<tr>
<td>GM_Police_OPP</td>
<td>160 Synch II</td>
</tr>
<tr>
<td>GM_Police_OPP</td>
<td>162 Driven</td>
</tr>
</tbody>
</table>
<!-- Product Name -->
<h3 id="product-punk-1">Punk</h3>
<!-- Product Table -->
<table class="table table-striped">
<thead>
<tr>
<th>PBF Name</th>
<th>Song Name</th>
</tr>
</thead>
<tbody>
<tr>
<td>GM_Punk</td>
<td>Song 1</td>
</tr>
<tr>
<td>GM_Punk</td>
<td>Song 2</td>
</tr>
<tr>
<td>GM_Punk</td>
<td>Song 3</td>
</tr>
<tr>
<td>GM_Punk</td>
<td>Song 4</td>
</tr>
<tr>
<td>GM_Punk</td>
<td>Song 5</td>
</tr>
<tr>
<td>GM_Punk</td>
<td>Song 6</td>
</tr>
<tr>
<td>GM_Punk</td>
<td>Song 7</td>
</tr>
<tr>
<td>GM_Punk</td>
<td>Song 8</td>
</tr>
<tr>
<td>GM_Punk</td>
<td>Song 9</td>
</tr>
<tr>
<td>GM_Punk</td>
<td>Song 10</td>
</tr>
<tr>
<td>GM_Punk</td>
<td>Bonus Set</td>
</tr>
</tbody>
</table>
<!-- Product Name -->
<h3 id="product-retro-funk-1">Retro Funk</h3>
<!-- Product Table -->
<table class="table table-striped">
<thead>
<tr>
<th>PBF Name</th>
<th>Song Name</th>
</tr>
</thead>
<tbody>
<tr>
<td>GM_Retro_Funk</td>
<td>093 Chicken</td>
</tr>
<tr>
<td>GM_Retro_Funk</td>
<td>096 Low Down</td>
</tr>
<tr>
<td>GM_Retro_Funk</td>
<td>095 Funky Drumma</td>
</tr>
<tr>
<td>GM_Retro_Funk</td>
<td>110 Cold</td>
</tr>
<tr>
<td>GM_Retro_Funk</td>
<td>110 Get Up</td>
</tr>
<tr>
<td>GM_Retro_Funk</td>
<td>114 Give It</td>
</tr>
<tr>
<td>GM_Retro_Funk</td>
<td>116 Say It</td>
</tr>
<tr>
<td>GM_Retro_Funk</td>
<td>125 Sole Food</td>
</tr>
<tr>
<td>GM_Retro_Funk</td>
<td>128 Cant Stand</td>
</tr>
<tr>
<td>GM_Retro_Funk</td>
<td>129 Jab-OH</td>
</tr>
<tr>
<td>GM_Retro_Funk</td>
<td>137 Amen</td>
</tr>
<tr>
<td>GM_Retro_Funk</td>
<td>146 Get It</td>
</tr>
</tbody>
</table>
<!-- Product Name -->
<h3 id="product-rock-2-1">Rock 2</h3>
<!-- Product Table -->
<table class="table table-striped">
<thead>
<tr>
<th>PBF Name</th>
<th>Song Name</th>
</tr>
</thead>
<tbody>
<tr>
<td>GM_Rock_2</td>
<td>090 Song 1 3-4</td>
</tr>
<tr>
<td>GM_Rock_2</td>
<td>066 Song 2 6-8</td>
</tr>
<tr>
<td>GM_Rock_2</td>
<td>072 Song 3 16th Rock</td>
</tr>
<tr>
<td>GM_Rock_2</td>
<td>074 Song 4</td>
</tr>
<tr>
<td>GM_Rock_2</td>
<td>085 Song 5 Displaced</td>
</tr>
<tr>
<td>GM_Rock_2</td>
<td>088 Song 06 Funky</td>
</tr>
<tr>
<td>GM_Rock_2</td>
<td>090 Song 7 Displaced Mix</td>
</tr>
<tr>
<td>GM_Rock_2</td>
<td>098 Song 08</td>
</tr>
<tr>
<td>GM_Rock_2</td>
<td>104 Song 09</td>
</tr>
<tr>
<td>GM_Rock_2</td>
<td>108 S10 Displaced</td>
</tr>
<tr>
<td>GM_Rock_2</td>
<td>110 Song 11</td>
</tr>
<tr>
<td>GM_Rock_2</td>
<td>115 Song 12 Train</td>
</tr>
<tr>
<td>GM_Rock_2</td>
<td>120 Song 13 Half-Time</td>
</tr>
</tbody>
</table>
<!-- Product Name -->
<h3 id="product-rock-essentials-1-1">Rock Essentials 1</h3>
<!-- Product Table -->
<table class="table table-striped">
<thead>
<tr>
<th>PBF Name</th>
<th>Song Name</th>
</tr>
</thead>
<tbody>
<tr>
<td>GM_Rock_Essentials_1</td>
<td>Ballad 1</td>
</tr>
<tr>
<td>GM_Rock_Essentials_1</td>
<td>Ballad 2</td>
</tr>
<tr>
<td>GM_Rock_Essentials_1</td>
<td>Slow Rock 1</td>
</tr>
<tr>
<td>GM_Rock_Essentials_1</td>
<td>Slow Rock 2</td>
</tr>
<tr>
<td>GM_Rock_Essentials_1</td>
<td>Moderate Rock 1</td>
</tr>
<tr>
<td>GM_Rock_Essentials_1</td>
<td>Moderate Rock 2</td>
</tr>
<tr>
<td>GM_Rock_Essentials_1</td>
<td>Moderate Rock 3</td>
</tr>
<tr>
<td>GM_Rock_Essentials_1</td>
<td>Moderate Rock 4</td>
</tr>
<tr>
<td>GM_Rock_Essentials_1</td>
<td>Moderate Rock 5</td>
</tr>
<tr>
<td>GM_Rock_Essentials_1</td>
<td>Moderate Rock 6</td>
</tr>
<tr>
<td>GM_Rock_Essentials_1</td>
<td>Floor Tom Rock</td>
</tr>
<tr>
<td>GM_Rock_Essentials_1</td>
<td>Four On The Floor</td>
</tr>
<tr>
<td>GM_Rock_Essentials_1</td>
<td>16th Rock 1</td>
</tr>
<tr>
<td>GM_Rock_Essentials_1</td>
<td>16th Rock 2</td>
</tr>
<tr>
<td>GM_Rock_Essentials_1</td>
<td>16th Rock 3</td>
</tr>
<tr>
<td>GM_Rock_Essentials_1</td>
<td>Half Time Rock 1</td>
</tr>
<tr>
<td>GM_Rock_Essentials_1</td>
<td>Half Time Rock 2</td>
</tr>
<tr>
<td>GM_Rock_Essentials_1</td>
<td>Half-Time Rock 3</td>
</tr>
<tr>
<td>GM_Rock_Essentials_1</td>
<td>Hard Rock</td>
</tr>
<tr>
<td>GM_Rock_Essentials_1</td>
<td>Driving Rock 1</td>
</tr>
<tr>
<td>GM_Rock_Essentials_1</td>
<td>Driving Rock 2</td>
</tr>
<tr>
<td>GM_Rock_Essentials_1</td>
<td>Driving Rock 3</td>
</tr>
<tr>
<td>GM_Rock_Essentials_1</td>
<td>Driving Rock 4</td>
</tr>
<tr>
<td>GM_Rock_Essentials_1</td>
<td>Driving Rock 5</td>
</tr>
</tbody>
</table>
<!-- Product Name -->
<h3 id="product-rock-essentials-2-1">Rock Essentials 2</h3>
<!-- Product Table -->
<table class="table table-striped">
<thead>
<tr>
<th>PBF Name</th>
<th>Song Name</th>
</tr>
</thead>
<tbody>
<tr>
<td>GM_Rock_Essentials_2</td>
<td>088 Waltz Traditional</td>
</tr>
<tr>
<td>GM_Rock_Essentials_2</td>
<td>088 Waltz Traditional Stick</td>
</tr>
<tr>
<td>GM_Rock_Essentials_2</td>
<td>088 Waltz Traditional ALT</td>
</tr>
<tr>
<td>GM_Rock_Essentials_2</td>
<td>090 Waltz on 3</td>
</tr>
<tr>
<td>GM_Rock_Essentials_2</td>
<td>100 Waltz on 1</td>
</tr>
<tr>
<td>GM_Rock_Essentials_2</td>
<td>100 3-4 1 Stick</td>
</tr>
<tr>
<td>GM_Rock_Essentials_2</td>
<td>100 3-4 1</td>
</tr>
<tr>
<td>GM_Rock_Essentials_2</td>
<td>100 3-4 2 Stick</td>
</tr>
<tr>
<td>GM_Rock_Essentials_2</td>
<td>100 3-4 2</td>
</tr>
<tr>
<td>GM_Rock_Essentials_2</td>
<td>100 3-4 Shuffle Feel 1 Stick</td>
</tr>
<tr>
<td>GM_Rock_Essentials_2</td>
<td>100 3-4 Shuffle Feel 1</td>
</tr>
<tr>
<td>GM_Rock_Essentials_2</td>
<td>100 3-4 Shuffle Feel 2 Stick</td>
</tr>
<tr>
<td>GM_Rock_Essentials_2</td>
<td>100 3-4 Shuffle Feel 2</td>
</tr>
<tr>
<td>GM_Rock_Essentials_2</td>
<td>120 3-4 Ghosts</td>
</tr>
<tr>
<td>GM_Rock_Essentials_2</td>
<td>120 3-4 1</td>
</tr>
<tr>
<td>GM_Rock_Essentials_2</td>
<td>120 3-4 2</td>
</tr>
<tr>
<td>GM_Rock_Essentials_2</td>
<td>140 3-4 1 Quarter</td>
</tr>
<tr>
<td>GM_Rock_Essentials_2</td>
<td>140 3-4 2 8ths</td>
</tr>
<tr>
<td>GM_Rock_Essentials_2</td>
<td>140 3-4 2 Quarter</td>
</tr>
<tr>
<td>GM_Rock_Essentials_2</td>
<td>160 3-4 1 Quarter</td>
</tr>
<tr>
<td>GM_Rock_Essentials_2</td>
<td>160 3-4 2 Quarter</td>
</tr>
<tr>
<td>GM_Rock_Essentials_2</td>
<td>160 3-4 3 Quarter</td>
</tr>
<tr>
<td>GM_Rock_Essentials_2</td>
<td>160 3-4 4 Quarter</td>
</tr>
<tr>
<td>GM_Rock_Essentials_2</td>
<td>075 6-8 Ballad 1</td>
</tr>
<tr>
<td>GM_Rock_Essentials_2</td>
<td>075 6-8 Ballad 2</td>
</tr>
<tr>
<td>GM_Rock_Essentials_2</td>
<td>075 6-8 Ballad 3</td>
</tr>
<tr>
<td>GM_Rock_Essentials_2</td>
<td>075 6-8 Ballad 4</td>
</tr>
<tr>
<td>GM_Rock_Essentials_2</td>
<td>075 6-8 Ballad 5</td>
</tr>
<tr>
<td>GM_Rock_Essentials_2</td>
<td>080 6-8 1</td>
</tr>
<tr>
<td>GM_Rock_Essentials_2</td>
<td>080 6-8 2</td>
</tr>
<tr>
<td>GM_Rock_Essentials_2</td>
<td>080 6-8 3</td>
</tr>
<tr>
<td>GM_Rock_Essentials_2</td>
<td>080 6-8 4</td>
</tr>
<tr>
<td>GM_Rock_Essentials_2</td>
<td>080 6-8 5</td>
</tr>
<tr>
<td>GM_Rock_Essentials_2</td>
<td>110 6-8 Driving 1</td>
</tr>
<tr>
<td>GM_Rock_Essentials_2</td>
<td>110 6-8 Driving 2</td>
</tr>
<tr>
<td>GM_Rock_Essentials_2</td>
<td>110 6-8 Driving 3</td>
</tr>
<tr>
<td>GM_Rock_Essentials_2</td>
<td>110 6-8 Driving 4</td>
</tr>
<tr>
<td>GM_Rock_Essentials_2</td>
<td>110 6-8 Driving 5</td>
</tr>
<tr>
<td>GM_Rock_Essentials_2</td>
<td>060 12-8 1</td>
</tr>
<tr>
<td>GM_Rock_Essentials_2</td>
<td>060 12-8 2</td>
</tr>
<tr>
<td>GM_Rock_Essentials_2</td>
<td>060 12-8 3</td>
</tr>
<tr>
<td>GM_Rock_Essentials_2</td>
<td>120 12-8 1</td>
</tr>
<tr>
<td>GM_Rock_Essentials_2</td>
<td>120 12-8 2</td>
</tr>
<tr>
<td>GM_Rock_Essentials_2</td>
<td>120 12-8 3</td>
</tr>
<tr>
<td>GM_Rock_Essentials_2</td>
<td>120 12-8 4</td>
</tr>
<tr>
<td>GM_Rock_Essentials_2</td>
<td>120 12-8 5</td>
</tr>
<tr>
<td>GM_Rock_Essentials_2</td>
<td>120 12-8 6</td>
</tr>
<tr>
<td>GM_Rock_Essentials_2</td>
<td>060 12-8 Swung 1</td>
</tr>
<tr>
<td>GM_Rock_Essentials_2</td>
<td>060 12-8 Swung 2</td>
</tr>
<tr>
<td>GM_Rock_Essentials_2</td>
<td>060 12-8 Swung 3</td>
</tr>
<tr>
<td>GM_Rock_Essentials_2</td>
<td>100 HTF Shuffle 1</td>
</tr>
<tr>
<td>GM_Rock_Essentials_2</td>
<td>100 HTF Shuffle 2</td>
</tr>
<tr>
<td>GM_Rock_Essentials_2</td>
<td>100 HTF Shuffle 3</td>
</tr>
<tr>
<td>GM_Rock_Essentials_2</td>
<td>100 HTF Shuffle 4</td>
</tr>
<tr>
<td>GM_Rock_Essentials_2</td>
<td>100 HTF Shuffle 5</td>
</tr>
<tr>
<td>GM_Rock_Essentials_2</td>
<td>100 HTF Shuffle 42TF</td>
</tr>
<tr>
<td>GM_Rock_Essentials_2</td>
<td>135 HT Shuffle 1</td>
</tr>
<tr>
<td>GM_Rock_Essentials_2</td>
<td>135 HT Shuffle 2</td>
</tr>
<tr>
<td>GM_Rock_Essentials_2</td>
<td>135 HT Shuffle 3</td>
</tr>
<tr>
<td>GM_Rock_Essentials_2</td>
<td>135 HT Shuffle 4</td>
</tr>
<tr>
<td>GM_Rock_Essentials_2</td>
<td>135 HT Shuffle 5</td>
</tr>
<tr>
<td>GM_Rock_Essentials_2</td>
<td>135 HT Shuffle 6</td>
</tr>
<tr>
<td>GM_Rock_Essentials_2</td>
<td>135 HT Shuffle 7</td>
</tr>
<tr>
<td>GM_Rock_Essentials_2</td>
<td>135 Shuffle Combo 1</td>
</tr>
<tr>
<td>GM_Rock_Essentials_2</td>
<td>135 Shuffle Combo 2</td>
</tr>
<tr>
<td>GM_Rock_Essentials_2</td>
<td>135 Shuffle Combo 3</td>
</tr>
<tr>
<td>GM_Rock_Essentials_2</td>
<td>135 Shuffle Combo 4</td>
</tr>
<tr>
<td>GM_Rock_Essentials_2</td>
<td>135 Shuffle Combo 5</td>
</tr>
<tr>
<td>GM_Rock_Essentials_2</td>
<td>135 Shuffle Combo 6</td>
</tr>
<tr>
<td>GM_Rock_Essentials_2</td>
<td>135 Shuffle Combo Ghosts</td>
</tr>
<tr>
<td>GM_Rock_Essentials_2</td>
<td>135 Shuffle Ghosts</td>
</tr>
<tr>
<td>GM_Rock_Essentials_2</td>
<td>135 Shuffle 1</td>
</tr>
<tr>
<td>GM_Rock_Essentials_2</td>
<td>135 Shuffle 2</td>
</tr>
<tr>
<td>GM_Rock_Essentials_2</td>
<td>135 Shuffle 3</td>
</tr>
<tr>
<td>GM_Rock_Essentials_2</td>
<td>135 Shuffle 4</td>
</tr>
<tr>
<td>GM_Rock_Essentials_2</td>
<td>135 Shuffle 5</td>
</tr>
<tr>
<td>GM_Rock_Essentials_2</td>
<td>135 Shuffle 5 Ghosts</td>
</tr>
<tr>
<td>GM_Rock_Essentials_2</td>
<td>135 Shuffle 6</td>
</tr>
<tr>
<td>GM_Rock_Essentials_2</td>
<td>135 Shuffle 7</td>
</tr>
<tr>
<td>GM_Rock_Essentials_2</td>
<td>135 Shuffle 8</td>
</tr>
<tr>
<td>GM_Rock_Essentials_2</td>
<td>135 Shuffle 9</td>
</tr>
<tr>
<td>GM_Rock_Essentials_2</td>
<td>135 Shuffle 10</td>
</tr>
<tr>
<td>GM_Rock_Essentials_2</td>
<td>135 Shuffle 11</td>
</tr>
<tr>
<td>GM_Rock_Essentials_2</td>
<td>135 Shuffle 12</td>
</tr>
<tr>
<td>GM_Rock_Essentials_2</td>
<td>135 Shuffle 42TF</td>
</tr>
<tr>
<td>GM_Rock_Essentials_2</td>
<td>200 Shuffle Toms</td>
</tr>
<tr>
<td>GM_Rock_Essentials_2</td>
<td>170 Jazz 42TF</td>
</tr>
<tr>
<td>GM_Rock_Essentials_2</td>
<td>200 Shuffle 2-Beat 1</td>
</tr>
<tr>
<td>GM_Rock_Essentials_2</td>
<td>194 Shuffle 2-Beat 2</td>
</tr>
<tr>
<td>GM_Rock_Essentials_2</td>
<td>170 Shuffle QTR 1</td>
</tr>
<tr>
<td>GM_Rock_Essentials_2</td>
<td>170 Shuffle QTR 2</td>
</tr>
<tr>
<td>GM_Rock_Essentials_2</td>
<td>200 Shuffle Snare</td>
</tr>
<tr>
<td>GM_Rock_Essentials_2</td>
<td>100 16th Rock 1</td>
</tr>
<tr>
<td>GM_Rock_Essentials_2</td>
<td>100 16th Rock 2</td>
</tr>
<tr>
<td>GM_Rock_Essentials_2</td>
<td>100 16th Rock 3</td>
</tr>
<tr>
<td>GM_Rock_Essentials_2</td>
<td>100 16th Rock 4</td>
</tr>
<tr>
<td>GM_Rock_Essentials_2</td>
<td>092 16th Rock 5</td>
</tr>
<tr>
<td>GM_Rock_Essentials_2</td>
<td>100 Rock 16ths 6</td>
</tr>
<tr>
<td>GM_Rock_Essentials_2</td>
<td>120 Rock 19</td>
</tr>
</tbody>
</table>
<!-- Product Name -->
<h3 id="product-rush-beats-1">Rush Beats</h3>
<!-- Product Table -->
<table class="table table-striped">
<thead>
<tr>
<th>PBF Name</th>
<th>Song Name</th>
</tr>
</thead>
<tbody>
<tr>
<td>GM_Rush_Beats</td>
<td>090 Sawyer</td>
</tr>
<tr>
<td>GM_Rush_Beats</td>
<td>120 Lime</td>
</tr>
<tr>
<td>GM_Rush_Beats</td>
<td>200 Bastille</td>
</tr>
<tr>
<td>GM_Rush_Beats</td>
<td>140 Fly</td>
</tr>
<tr>
<td>GM_Rush_Beats</td>
<td>145 Barchetta</td>
</tr>
<tr>
<td>GM_Rush_Beats</td>
<td>138 Anthem</td>
</tr>
<tr>
<td>GM_Rush_Beats</td>
<td>142 Closer</td>
</tr>
<tr>
<td>GM_Rush_Beats</td>
<td>100 Bangkok</td>
</tr>
<tr>
<td>GM_Rush_Beats</td>
<td>160 New World</td>
</tr>
<tr>
<td>GM_Rush_Beats</td>
<td>112 Lessons</td>
</tr>
<tr>
<td>GM_Rush_Beats</td>
<td>144 Wheels</td>
</tr>
<tr>
<td>GM_Rush_Beats</td>
<td>140 XYZ</td>
</tr>
<tr>
<td>GM_Rush_Beats</td>
<td>080 Working</td>
</tr>
<tr>
<td>GM_Rush_Beats</td>
<td>200 Bastille ALT</td>
</tr>
<tr>
<td>GM_Rush_Beats</td>
<td>135 4 to 6</td>
</tr>
<tr>
<td>GM_Rush_Beats</td>
<td>136 Red Jam</td>
</tr>
<tr>
<td>GM_Rush_Beats</td>
<td>090 Sawyer ALT</td>
</tr>
<tr>
<td>GM_Rush_Beats</td>
<td>136 Fly ALT</td>
</tr>
<tr>
<td>GM_Rush_Beats</td>
<td>104 Bang Jam</td>
</tr>
<tr>
<td>GM_Rush_Beats</td>
<td>132 Displaced</td>
</tr>
<tr>
<td>GM_Rush_Beats</td>
<td>124 7-8 Jam</td>
</tr>
</tbody>
</table>
<!-- Product Name -->
<h3 id="product-southern-rock-1">Southern Rock</h3>
<!-- Product Table -->
<table class="table table-striped">
<thead>
<tr>
<th>PBF Name</th>
<th>Song Name</th>
</tr>
</thead>
<tbody>
<tr>
<td>GM_Southern_Rock</td>
<td>140 S01 Hiway Song</td>
</tr>
<tr>
<td>GM_Southern_Rock</td>
<td>120 S02 Train Train</td>
</tr>
<tr>
<td>GM_Southern_Rock</td>
<td>100 S03 12-8 Whipping Post</td>
</tr>
<tr>
<td>GM_Southern_Rock</td>
<td>080 S04 Cant You See</td>
</tr>
<tr>
<td>GM_Southern_Rock</td>
<td>110 S05 Hurry Sundown</td>
</tr>
<tr>
<td>GM_Southern_Rock</td>
<td>095 S06 Midnight Rider</td>
</tr>
<tr>
<td>GM_Southern_Rock</td>
<td>120 S07 Saturday Night Special</td>
</tr>
<tr>
<td>GM_Southern_Rock</td>
<td>180 S08 Flirtin with Disaster</td>
</tr>
<tr>
<td>GM_Southern_Rock</td>
<td>115 S09 Needle and Spoon</td>
</tr>
<tr>
<td>GM_Southern_Rock</td>
<td>060 S10 Simple Man</td>
</tr>
<tr>
<td>GM_Southern_Rock</td>
<td>130 S11 Rockin Into the Night</td>
</tr>
<tr>
<td>GM_Southern_Rock</td>
<td>100 S12 Road Fever</td>
</tr>
<tr>
<td>GM_Southern_Rock</td>
<td>118 S13 Freebird</td>
</tr>
<tr>
<td>GM_Southern_Rock</td>
<td>210 S14 One Way Out</td>
</tr>
<tr>
<td>GM_Southern_Rock_OPP</td>
<td>140 S1 Hiway Song</td>
</tr>
<tr>
<td>GM_Southern_Rock_OPP</td>
<td>120 S2 Train Train</td>
</tr>
<tr>
<td>GM_Southern_Rock_OPP</td>
<td>100 S3 Whipping Post</td>
</tr>
<tr>
<td>GM_Southern_Rock_OPP</td>
<td>080 S4 Cant You See</td>
</tr>
<tr>
<td>GM_Southern_Rock_OPP</td>
<td>110 S5 Hurry Sundown</td>
</tr>
<tr>
<td>GM_Southern_Rock_OPP</td>
<td>095 S6 Midnight Rider</td>
</tr>
<tr>
<td>GM_Southern_Rock_OPP</td>
<td>120 S7 Saturday Night Special</td>
</tr>
<tr>
<td>GM_Southern_Rock_OPP</td>
<td>180 S8 Flirtin with Disaster</td>
</tr>
<tr>
<td>GM_Southern_Rock_OPP</td>
<td>115 S9 Needle and Spoon</td>
</tr>
<tr>
<td>GM_Southern_Rock_OPP</td>
<td>60 S10 Simple Man</td>
</tr>
<tr>
<td>GM_Southern_Rock_OPP</td>
<td>120 S11 Rockin Into Night</td>
</tr>
<tr>
<td>GM_Southern_Rock_OPP</td>
<td>100 S12 Road Fever</td>
</tr>
<tr>
<td>GM_Southern_Rock_OPP</td>
<td>118 S13 Freebird</td>
</tr>
<tr>
<td>GM_Southern_Rock_OPP</td>
<td>210 S14 One Way Out</td>
</tr>
</tbody>
</table>
<!-- Product Name -->
<h3 id="product-world-beats-1">World Beats</h3>
<!-- Product Table -->
<table class="table table-striped">
<thead>
<tr>
<th>PBF Name</th>
<th>Song Name</th>
</tr>
</thead>
<tbody>
<tr>
<td>GM_World_Beats</td>
<td>086 African Groove</td>
</tr>
<tr>
<td>GM_World_Beats</td>
<td>115 African Conga</td>
</tr>
<tr>
<td>GM_World_Beats</td>
<td>120 6-8 Afro-Cuban Congas</td>
</tr>
<tr>
<td>GM_World_Beats</td>
<td>125 6-8 Afro-Cuban Congas</td>
</tr>
<tr>
<td>GM_World_Beats</td>
<td>158 6-8 Afro Beat</td>
</tr>
<tr>
<td>GM_World_Beats</td>
<td>068 Ballad</td>
</tr>
<tr>
<td>GM_World_Beats</td>
<td>078 Ballad</td>
</tr>
<tr>
<td>GM_World_Beats</td>
<td>135 Bembe</td>
</tr>
<tr>
<td>GM_World_Beats</td>
<td>096 Bolero</td>
</tr>
<tr>
<td>GM_World_Beats</td>
<td>120 Bossa A1</td>
</tr>
<tr>
<td>GM_World_Beats</td>
<td>120 Bossa A2</td>
</tr>
<tr>
<td>GM_World_Beats</td>
<td>120 Bossa A3</td>
</tr>
<tr>
<td>GM_World_Beats</td>
<td>128 Cha Cha</td>
</tr>
<tr>
<td>GM_World_Beats</td>
<td>142 Chambo</td>
</tr>
<tr>
<td>GM_World_Beats</td>
<td>119 Modern</td>
</tr>
<tr>
<td>GM_World_Beats</td>
<td>135 Modern</td>
</tr>
<tr>
<td>GM_World_Beats</td>
<td>196 Mambo</td>
</tr>
<tr>
<td>GM_World_Beats</td>
<td>205 Mambo</td>
</tr>
<tr>
<td>GM_World_Beats</td>
<td>115 Percussion Jam</td>
</tr>
<tr>
<td>GM_World_Beats</td>
<td>150 Samba 1</td>
</tr>
<tr>
<td>GM_World_Beats</td>
<td>154 Samba 2</td>
</tr>
<tr>
<td>GM_World_Beats</td>
<td>188 Songo</td>
</tr>
<tr>
<td>GM_World_Beats</td>
<td>117 Tom Groove</td>
</tr>
<tr>
<td>GM_World_Beats</td>
<td>096 Tumbao Slow</td>
</tr>
<tr>
<td>GM_World_Beats</td>
<td>132 Tumbao Medium</td>
</tr>
<tr>
<td>GM_World_Beats</td>
<td>182 Tumbao Fast</td>
</tr>
<tr>
<td>GM_World_Beats</td>
<td>132 Reggae One Drop 1</td>
</tr>
<tr>
<td>GM_World_Beats</td>
<td>128 Reggae One Drop 2</td>
</tr>
<tr>
<td>GM_World_Beats</td>
<td>132 Reggae Rockers</td>
</tr>
<tr>
<td>GM_World_Beats</td>
<td>126 Reggae Steppers</td>
</tr>
<tr>
<td>GM_World_Beats</td>
<td>132 Rumba Gringo</td>
</tr>
<tr>
<td>GM_World_Beats</td>
<td>118 Rumba Drums 1A</td>
</tr>
<tr>
<td>GM_World_Beats</td>
<td>114 Rumba Drums 1B</td>
</tr>
<tr>
<td>GM_World_Beats</td>
<td>120 Rumba Drums 2</td>
</tr>
<tr>
<td>GM_World_Beats</td>
<td>118 Mozambique Drums</td>
</tr>
</tbody>
</table>
</div>]]>
    </content>
  </entry>
  <entry>
    <id>https://groovemonkee.com/blogs/blog/installing-groove-monkee-files-into-bfd-3-5</id>
    <published>2025-05-07T08:52:00-05:00</published>
    <updated>2025-05-07T08:55:14-05:00</updated>
    <link rel="alternate" type="text/html" href="https://groovemonkee.com/blogs/blog/installing-groove-monkee-files-into-bfd-3-5"/>
    <title>Installing Groove Monkee Files into BFD 3.5</title>
    <author>
      <name>Groove Monkee</name>
    </author>
    <summary type="html">
      <![CDATA[<p>Install our grooves in BFD 3.5 effortlessly with our simple guide and video instructions.</p><p><a class="read-more" href="https://groovemonkee.com/blogs/blog/installing-groove-monkee-files-into-bfd-3-5">More</a></p>]]>
    </summary>
    <content type="html">
      <![CDATA[<p><span>If you've purchased any of our products and use <a href="https://www.bfddrums.com/" target="_blank" title="BFD Drums website" rel="noopener">BFD 3.5</a> for your drum production, there's good news: getting them to work together is refreshingly easy. No need to tinker with keymaps or hunt through cryptic settings — just follow these straightforward steps and you’ll be jamming in minutes.</span></p>
<p><span>For a visual walkthrough, check out our <a href="https://youtu.be/H9BT4TX9Edc" target="_blank" title="Installing Groove Monkee files into BFD 3.5" rel="noopener">Video Tutorial</a></span></p>
<p><iframe title="YouTube video player" src="https://www.youtube-nocookie.com/embed/H9BT4TX9Edc?si=2RE03HNeJcZh-yWu" height="315" width="560"></iframe></p>
<h3><span>Step 1: Locate Your BFD Files</span></h3>
<p><span>First, open your Groove Monkee product folder. Then open the "Other MIDI Mappings" directory.  Inside you'll find folders labeled either "BFD2" or "BFD3." Good news: both versions are compatible with BFD 3.5, so you can use either one.</span></p>
<p><span><strong>Tip</strong>: You DO NOT have to change the keymap when importing or playing our BFD 2 or BFD 3 files!</span></p>
<h3><span>Step 2: Find the Right Folder in BFD</span></h3>
<p><span>Now, let’s drop those grooves where BFD 3.5 expects to find them:</span></p>
<ul data-spread="false">
<li>
<p><span>Open your Documents folder.</span></p>
</li>
<li>
<p><span>Navigate to the "BFD Drums" folder.</span></p>
</li>
<li>
<p><span>Head into the "BFD3 Core Library" and look for the "Grooves" subfolder.</span></p>
</li>
</ul>
<h3><span>Step 3: Paste the BFD Files</span></h3>
<p><span>Paste the Groove Monkee folder you copied (either BFD2 or BFD3) right into the Grooves folder. No edits, no re-mapping, no headaches.</span></p>
<h3><span>Step 4: Rescan in BFD 3.5</span></h3>
<p><span>Time to let BFD know that new content has arrived:</span></p>
<ul data-spread="false">
<li>
<p><span>In BFD, click the </span><span><strong>Menu</strong></span><span> button in the upper-left.</span></p>
</li>
<li>
<p><span>Go to </span><span><strong>Tools &gt; Set up content Locations</strong></span><span>.</span></p>
</li>
<li>
<p><span>Click </span><span><strong>Rescan All</strong></span><span>.</span></p>
</li>
<li>
<p><span>Once the scan finishes, click </span><span><strong>Done.</strong></span><span> </span></p>
</li>
<li>
<p><span>Click outside the gray box to return to the main interface.</span></p>
</li>
</ul>
<h3><span>Step 5: Find Your Grooves</span></h3>
<p><span>Want to dig right into your new MIDI content? Use BFD's filter options:</span></p>
<ul data-spread="false">
<li>
<p><span>Click the </span><span><strong>Filter</strong></span><span> icon next to the search bar.</span></p>
</li>
<li>
<p><span>Browse by </span><span><strong>Author</strong></span><span>, </span><span><strong>Library</strong></span><span>, or </span><span><strong>Genre</strong></span><span> to zero in on the Groove Monkee files.</span></p>
</li>
</ul>
<h3><span>That’s It!</span></h3>
<p><span>Your Groove Monkee grooves are now ready to rock inside BFD 3.5.</span></p>
<p><span>Got questions or need a hand? </span><a disabled href="https://www.groovemonkee.com/pages/contact-us"><span>Contact us here</span></a><span>.</span></p>]]>
    </content>
  </entry>
  <entry>
    <id>https://groovemonkee.com/blogs/blog/how-to-audition-midi-files-in-magix-samplitude</id>
    <published>2025-04-01T03:30:00-05:00</published>
    <updated>2025-04-01T04:32:51-05:00</updated>
    <link rel="alternate" type="text/html" href="https://groovemonkee.com/blogs/blog/how-to-audition-midi-files-in-magix-samplitude"/>
    <title>How to Audition MIDI Files in Magix Samplitude</title>
    <author>
      <name>Groove Monkee</name>
    </author>
    <summary type="html">
      <![CDATA[<p>Learn how to import and audition MIDI files with Magix Samplitude.</p><p><a class="read-more" href="https://groovemonkee.com/blogs/blog/how-to-audition-midi-files-in-magix-samplitude">More</a></p>]]>
    </summary>
    <content type="html">
      <![CDATA[<h3 id="how-to-audition-midi-files-in-magix-samplitude" class="atx">How to Audition MIDI Files in Magix Samplitude</h3>
<p>If you’re a musician or producer looking to streamline your workflow with MIDI files, Magix Samplitude offers a powerful and flexible platform to bring your ideas to life. In this quick guide, we’ll walk through a simple process to audition MIDI files using a VST instrument in Samplitude—perfect for experimenting with sounds, crafting drum tracks, or building full arrangements. For this example, we’ll use EZdrummer, but the beauty of this method is that it works with any VST instrument you prefer. Let’s dive in!</p>
<h3>Watch the Companion Video</h3>
<p><iframe width="560" height="315" src="https://www.youtube-nocookie.com/embed/hTBAHMrvwjY?si=mGAI70PBSXo4mU-S" title="YouTube video player"></iframe></p>
<h4 id="step-1-adding-a-vst-instrument" class="atx">Step 1: Adding a VST Instrument</h4>
<p>To get started, open your Samplitude project and select the track where you’d like to add your VST instrument. Click on <strong>"Add plug-in"</strong> in the track’s interface—this opens up a world of sonic possibilities. From there, navigate to the <strong>"Plug-in browser"</strong> and select <strong>"VST"</strong> to access your virtual instruments. Scroll through your options and pick the one that suits your vibe—whether it’s EZdrummer for punchy drum sounds or a synth for atmospheric pads. Once you’ve made your choice, hit <strong>"OK"</strong> to load it up.</p>
<h4 id="step-2-configuring-routing-options" class="atx">Step 2: Configuring Routing Options</h4>
<p>Before the instrument is fully integrated, you’ll need to choose your routing options. For simplicity, the "simple" routing works great for straightforward playback, as shown in the video above.</p>
<p>However, if you’re working on something more complex—like mixing a multi-layered drum kit—consider the <strong>"multi-channel"</strong> option. This gives you individual outputs for each drum element (kick, snare, hi-hat, etc.), making it a game-changer for detailed mixing. Select your preference and click <strong>"OK"</strong> to lock it in.</p>
<h4 id="step-3-importing-your-midi-file" class="atx">Step 3: Importing Your MIDI File</h4>
<p>Now it’s time to bring in your MIDI file. Head to the <strong>"File"</strong> menu at the top of Samplitude, click <strong>"Import,"</strong> and then click <strong>"Load MIDI File."</strong> A window will pop up prompting you to browse your computer—find the MIDI file you want to audition and click <strong>"Open."</strong> Once it’s loaded, you’ll see an option called <strong>"Single Track."</strong> Double-click this to import the MIDI data directly into your selected track, where it’ll sync up with your VST instrument.</p>
<h4 id="why-this-matters-for-musicians" class="atx">Why This Matters for Musicians</h4>
<p>This process is a fantastic way to quickly test out ideas or preview MIDI compositions without committing to a full arrangement. Whether you’re a drummer tweaking beats with EZdrummer, a keyboardist layering synths, or a producer experimenting with pre-made MIDI loops, Samplitude’s flexibility makes it easy to audition sounds on the fly. Plus, the ability to switch between simple and multi-channel routing gives you control over how much detail you want to dive into—perfect for both rough sketches and polished productions.</p>
<h4 id="pro-tip-enhance-your-sound-with-effects" class="atx">Pro Tip: Enhance Your Sound with Effects</h4>
<p>Once your MIDI file is imported, take advantage of Samplitude’s effects capabilities to shape your sound. You can add effects like <strong>reverb</strong> to create depth and space, <strong>compression</strong> to tighten up dynamics, <strong>EQ</strong> to sculpt the tone, and more. </p>
<h4 id="wrap-up" class="atx">Wrap-Up</h4>
<p>Auditioning MIDI files in Magix Samplitude is a straightforward yet powerful technique that every musician should have in their toolkit. With just a few clicks, you can load up a VST instrument, import a MIDI file, and start exploring your creative potential. So grab your favorite VST, fire up Samplitude, and let your imagination fly.</p>
<p>Happy producing!</p>]]>
    </content>
  </entry>
  <entry>
    <id>https://groovemonkee.com/blogs/blog/how-to-import-a-beat-buddy-project</id>
    <published>2025-03-05T08:45:49-06:00</published>
    <updated>2025-12-29T14:17:21-06:00</updated>
    <link rel="alternate" type="text/html" href="https://groovemonkee.com/blogs/blog/how-to-import-a-beat-buddy-project"/>
    <title>How to Import a Beat Buddy Project</title>
    <author>
      <name>Groove Monkee</name>
    </author>
    <summary type="html">
      <![CDATA[<p>Learn how to import a project using the BeatBuddy Manager.</p><p><a class="read-more" href="https://groovemonkee.com/blogs/blog/how-to-import-a-beat-buddy-project">More</a></p>]]>
    </summary>
    <content type="html">
      <![CDATA[<p>In this post, I'll explain how you can import a Beat Buddy project into the BeatBuddy Manager. You'll find the application at <a href="https://bbmo.singularsound.com/" title="Beat Buddy Manager Online app" rel="noopener" target="_blank">https://bbmo.singularsound.com</a>.</p>
<p>Check out the video below or the detailed instructions that follow.</p>
<p>
<iframe width="560" height="315" src="https://www.youtube-nocookie.com/embed/HaNFkNoe-4A?si=ctQZngUcrYL9kvtx" title="YouTube video player" frameborder="0" allow="accelerometer; autoplay; clipboard-write; encrypted-media; gyroscope; picture-in-picture; web-share" referrerpolicy="strict-origin-when-cross-origin" allowfullscreen></iframe>
</p>
<h2>Step-by-Step Instructions</h2>
<ol>
<li>
<p><strong>Connect Your Beat Buddy Pedal to Your Computer</strong></p>
<ul>
<li>
<strong>Option 1: USB Connection</strong><br>Plug your Beat Buddy pedal into your computer using a USB cable. </li>
<li>
<strong>Option 2: SD Card Connection</strong><br>Alternatively, power off your Beat Buddy pedal, remove the SD card, and insert it into your computer’s SD card reader. </li>
<li>Once connected, locate your Beat Buddy project. This is the root directory of the SD card or the root directory of the USB connection to your pedal.</li>
</ul>
</li>
<li>
<p><strong>Open BeatBuddy Manager Online (BBMO)</strong></p>
<ul>
<li>Launch a web browser (Google Chrome is recommended for compatibility) and navigate to <a href="https://bbmo.singularsound.com/" title="Beat Buddy Manager Online app" rel="noopener" target="_blank">https://bbmo.singularsound.com</a>.</li>
</ul>
<ul>
<li>
<strong>Warning: </strong>please read the information on the app's Welcome screen!</li>
</ul>
</li>
<li>
<p><strong>Import Your Beat Buddy Project</strong></p>
<ul>
<li>Click the "Open Project" button</li>
<li>Navigate to the location of your Beat Buddy project</li>
<li>If you're connecting to your pedal with USB or your pedal's SD card, select the entire drive (not a folder or a file)</li>
<li>Confirm your selection by clicking "Select Folder".</li>
</ul>
</li>
<li>
<p><strong>Manage Your Project</strong></p>
<ul>
<li>You can now use app to edit and manage your Beat Buddy content.</li>
<li>This includes importing new PBF files, editing songs, creating new songs and more.</li>
<li>PBF file import: <a href="https://groovemonkee.com/blogs/blog/import-a-pbf-file-using-the-bbmo" title="How to Import a PBF File" rel="noopener" target="_blank">How Import a PBF File</a>
</li>
</ul>
</li>
</ol>
<h2 class="atx" id="additional-tips">Our Beat Buddy Collection</h2>
<div>Click here to browse our Beat Buddy compatible products: <a href="https://groovemonkee.com/collections/beatbuddy-packs">https://groovemonkee.com/collections/beatbuddy-packs</a>
</div>
<p> </p>
<h2>Beat Buddy Support Links</h2>
<p>If you need assistance with your Beat Buddy or the Beat Buddy Manager, please contact Singular Sound support. For your convenience, we've posted some related links below.</p>
<p><a title="Singular Sound Support page" href="https://www.singularsound.com/pages/support" target="_blank">Singular Sound Support</a></p>
<p><a title="BeatBuddy Manager Online" href="https://bbmo.singularsound.com/" target="_blank">Beat Buddy Manager Online</a></p>
<p><a title="BeatBuddy Default Content (SD backup)" href="https://mybeatbuddy.s3.amazonaws.com/BeatBuddy_Default_Content+2.1-Project-SD_Card_Backup.zip" target="_blank">Beat Buddy Default Content (SD backup)</a></p>]]>
    </content>
  </entry>
  <entry>
    <id>https://groovemonkee.com/blogs/blog/soundpaint-free-engine</id>
    <published>2025-01-22T14:39:44-06:00</published>
    <updated>2025-01-22T14:41:53-06:00</updated>
    <link rel="alternate" type="text/html" href="https://groovemonkee.com/blogs/blog/soundpaint-free-engine"/>
    <title>Soundpaint: Infinite Sonic Possibilities</title>
    <author>
      <name>Groove Monkee</name>
    </author>
    <summary type="html">
      <![CDATA[<p>Soundpaint, a revolutionary free virtual instrument platform is redefining how musicians and producers interact with sound. </p><p><a class="read-more" href="https://groovemonkee.com/blogs/blog/soundpaint-free-engine">More</a></p>]]>
    </summary>
    <content type="html">
      <![CDATA[<p> </p>
<p>In the world of music production, creativity thrives when paired with the right tools. Enter <strong>Soundpaint</strong>, a revolutionary virtual instrument platform that’s redefining how musicians and producers interact with sound. With its <strong>free engine</strong>, Soundpaint provides a powerful entry point to explore limitless sonic textures and expressive possibilities—all without breaking the bank.</p>
<p><img alt="" src="https://cdn.shopify.com/s/files/1/0267/7825/files/soundpaint_540x320_49992d7a-8ea6-4f7e-a462-1bc365ff156a.jpg?v=1737576856"></p>
<h3><strong>What is Soundpaint?</strong></h3>
<p>Soundpaint is a cutting-edge music creation platform designed for ultimate realism and expressiveness. At its core, Soundpaint uses an advanced technology called <strong>Real-Time Hybrid Sampling</strong>. This innovation allows for seamless, fluid transitions between articulations and dynamic layers, delivering an organic sound that feels as if you’re playing a live instrument.</p>
<p>Unlike traditional sampling methods that rely on pre-recorded segments stitched together, Soundpaint’s approach creates a deeply responsive and immersive experience. Whether you’re composing an orchestral masterpiece or experimenting with cinematic soundscapes, the platform adapts to your style, making it a versatile tool for musicians of all genres.</p>
<hr>
<h3><strong>What Makes the Free Engine Special?</strong></h3>
<p>The <strong>Soundpaint Free Engine</strong> isn’t just a stripped-down version of the platform; it’s a fully functional tool that opens the doors to Soundpaint’s unique world of sound design. Here’s what makes it stand out:</p>
<ol>
<li>
<p><strong>Completely Free Access:</strong><br>Downloading and installing it is straightforward, giving you a professional-grade tool without requiring an upfront investment. You need to create a free account but no credit card is required.</p>
</li>
<li>
<p><strong>High-Quality Free Instruments:</strong><br>Alongside the engine, Soundpaint offers 14 free instruments that showcase its capabilities. From rich pianos to lush soundscapes, these instruments are crafted with meticulous attention to detail, providing a taste of what the platform can achieve.</p>
</li>
<li>
<p><strong>Infinite Expression:</strong><br>Thanks to Soundpaint’s real-time responsiveness, the free engine offers unprecedented control over dynamics and articulation. This makes it ideal for producers seeking to add life and movement to their tracks.</p>
</li>
<li>
<p><strong>Expandable Library:</strong><br>The free engine acts as a gateway to a growing library of premium instruments and sound packs. While these expansions are paid, they integrate seamlessly, letting you build your collection over time.</p>
</li>
</ol>
<hr>
<h3><strong>Spotlight: The 1928 Vintage Grand Steinway</strong></h3>
<p>One of the standout free instruments available on Soundpaint is the 8 GB <strong>1928 Vintage Grand Steinway</strong>, a meticulously captured recreation of a legendary piano with a rich history and unmatched tonal quality.</p>
<ul>
<li>
<p><strong>A Glimpse into History:</strong><br>This Steinway piano hails from 1928, an era renowned for its craftsmanship and attention to detail. The instrument embodies a warm, resonant tone that exudes vintage charm, making it perfect for classical, jazz, and cinematic compositions.</p>
</li>
<li>
<p><strong>Expressive and Dynamic:</strong><br>Leveraging Soundpaint’s Real-Time Hybrid Sampling, the 1928 Vintage Grand Steinway offers an incredibly expressive playing experience. The dynamic range is broad, capturing the subtle nuances of soft key presses and the commanding power of forte notes.</p>
</li>
<li>
<p><strong>Ideal for Any Genre:</strong><br>Whether you’re scoring an emotional scene, composing a soulful ballad, or exploring ambient soundscapes, this piano adapts beautifully, delivering a sound that feels alive.</p>
</li>
<li>
<p><strong>Completely Free:</strong><br>Yes, you read that right! This world-class instrument is available for free with the Soundpaint engine. Download it <a rel="noopener" href="https://soundpaint.com/products/1928-vintage-grand-steinway?variant=41055380242603"><span>here</span></a> and experience its magic for yourself.</p>
</li>
</ul>
<hr>
<h3><strong>Why Soundpaint is a Game-Changer</strong></h3>
<p>One of Soundpaint’s biggest strengths is its ability to break the limitations of traditional virtual instruments. With its free engine, you can experience firsthand:</p>
<ul>
<li>
<p><strong>Limitless Creativity:</strong><br>The platform supports unconventional sound design, making it perfect for modern music production, film scoring, or experimental compositions.</p>
</li>
<li>
<p><strong>Ease of Use:</strong><br>Despite its advanced features, Soundpaint is intuitive and user-friendly. Both beginners and seasoned professionals can dive in and start creating.</p>
</li>
<li>
<p><strong>Ultra-Realistic Results:</strong><br>Whether you’re layering sounds or playing solo instruments, Soundpaint’s technology ensures a realism that stands out in any mix.</p>
</li>
</ul>
<hr>
<h3><strong>Getting Started with Soundpaint</strong></h3>
<p>Getting started with Soundpaint’s free engine is easy:</p>
<ol>
<li>
<p><strong>Visit the Soundpaint Website:</strong><br>Create a free account at the <a href="https://soundpaint.com/pages/free-engine" target="_blank" rel="noopener">Soundpaint Free Engine page</a><a href="https://soundpaint.com/pages/free-engine"></a>. No credit card is required.</p>
</li>
<li>
<p><strong>Download and Install:</strong><br>Follow the simple steps to download the engine and its free instruments.</p>
</li>
<li>
<p><strong>Explore and Create:</strong><br>Dive into the world of expressive sound design and let your creativity flow.</p>
</li>
</ol>
<hr>
<h3><strong>Conclusion</strong></h3>
<p>Soundpaint’s free engine is more than just a tool; it’s a creative partner that empowers you to craft music that resonates. Whether you’re looking to experiment with new sounds or enhance your productions with unparalleled realism, Soundpaint has you covered.</p>
<p>With no cost to get started, there’s never been a better time to explore the possibilities of Soundpaint. Download the free engine today and begin your journey into a world of infinite sonic expression.</p>]]>
    </content>
  </entry>
  <entry>
    <id>https://groovemonkee.com/blogs/blog/auditioning-midi-drum-loops-in-cubase-14</id>
    <published>2024-12-16T14:27:23-06:00</published>
    <updated>2024-12-16T14:28:59-06:00</updated>
    <link rel="alternate" type="text/html" href="https://groovemonkee.com/blogs/blog/auditioning-midi-drum-loops-in-cubase-14"/>
    <title>Auditioning MIDI Drum Loops in Cubase 14</title>
    <author>
      <name>Groove Monkee</name>
    </author>
    <summary type="html">
      <![CDATA[<span data-mce-fragment="1">This guide walks you through the process of previewing MIDI files in </span><a title="Steinberg Cubase" href="https://www.steinberg.net/cubase/" data-mce-fragment="1" data-mce-href="https://www.steinberg.net/cubase/" target="_blank">Cubase 14</a><span data-mce-fragment="1"> using the MediaBay window.</span><p><a class="read-more" href="https://groovemonkee.com/blogs/blog/auditioning-midi-drum-loops-in-cubase-14">More</a></p>]]>
    </summary>
    <content type="html">
      <![CDATA[<p data-mce-fragment="1">This guide walks you through the process of previewing MIDI files in <a href="https://www.steinberg.net/cubase/" title="Steinberg Cubase" target="_blank">Cubase 14</a> using the MediaBay window.</p>
<p data-mce-fragment="1">You'll learn how to set up Groove Agent (a virtual instrument for drums) as your playback device and connect it to the MediaBay for seamless MIDI auditioning. The steps include adding and configuring Groove Agent, opening the MediaBay, linking the instrument to the MediaBay, and previewing MIDI files with your chosen kit.</p>
<h3 class="atx" id="step-1-add-groove-agent-and-load-a-kit">Step 1: Add Groove Agent</h3>
<h4 class="atx">Add an Instrument Track</h4>
<ul>
<li>On the left side of Cubase’s <strong>Tracks area</strong>, right-click and select <strong>Add Instrument Track</strong>.</li>
<li>In the <strong>Instrument</strong> drop-down menu, choose <strong>Groove Agent SE 5</strong> (or another instrument you prefer).</li>
<li>Optionally, enter a name for the track and click <strong>Add Track</strong>.</li>
</ul>
<p>The Image below shows the project window and the "Tracks area" (#2)</p>
<p> <img data-mce-fragment="1" src="https://cdn.shopify.com/s/files/1/0267/7825/files/ProjectWindow_480x480.png?v=1734379641" alt="" data-mce-src="https://cdn.shopify.com/s/files/1/0267/7825/files/ProjectWindow_480x480.png?v=1734379641"></p>
<h4><strong>Load a Kit</strong></h4>
<ul>
<li>Make sure to load a drum kit or sound library into Groove Agent so it’s ready for playback. This step ensures you can hear the MIDI file previews in action.</li>
</ul>
<hr>
<h3 class="atx" id="step-2-open-the-mediabay-window">Step 2: Open the MediaBay Window</h3>
<ul>
<li>Open the MediaBay by pressing <strong>F5</strong> or selecting <strong>MediaBay</strong> from the <strong>Media</strong> menu.</li>
<li>The MediaBay window will appear, showing a wide range of audio, MIDI, and instrument files stored in your library.</li>
</ul>
<p>The image below shows the MediaBay window</p>
<p><img alt="" src="https://cdn.shopify.com/s/files/1/0267/7825/files/mediabay_480x480.png?v=1734379773"></p>
<hr>
<h3 class="atx" id="step-2-open-the-mediabay-window"></h3>
<h3 class="atx" id="step-3-connect-groove-agent-in-the-mediabay">Step 3: Connect Groove Agent in the MediaBay</h3>
<ul>
<li>In the <strong>lower-right corner</strong> of the MediaBay window, select a virtual instrument for previewing MIDI files. <strong>See #5 below</strong>.</li>
<li>By default, this drop-down will show <strong>Not Connected</strong>.</li>
<li>Select <strong>Groove Agent</strong> from the list and set the output to <strong>Main</strong> (or the appropriate option for your setup).</li>
</ul>
<p><img alt="" src="https://cdn.shopify.com/s/files/1/0267/7825/files/MIDI_preview_controls_480x480.png?v=1734379431"></p>
<hr>
<h3 class="atx" id="step-4-preview-midi-files-using-the-mediabay">Step 4: Preview MIDI Files Using the MediaBay</h3>
<ul>
<li>Browse through the MIDI files in the MediaBay. When you find one you’d like to audition, click on it.</li>
<li>With Groove Agent connected, you’ll hear the MIDI file played back using the loaded kit.</li>
<li>Adjust the preview volume or settings as needed to fit your workflow.</li>
</ul>
<p>The image below shows the controls available in the MediaBay.</p>
<p><img alt="" src="https://cdn.shopify.com/s/files/1/0267/7825/files/MIDI_preview_controls_480x480.png?v=1734379431"></p>
<p>Here's what the controls do:</p>
<div>
<ol>
<li>
<p><strong>Transport controls</strong></p>
<p>Starts and stops the preview.</p>
</li>
<li>
<p><strong>Preview Level fader</strong></p>
<p>Specifies the preview level.</p>
</li>
<li>
<p><strong>Auto Play New Results Selection</strong></p>
<p>Automatically plays back the selected file.</p>
</li>
<li>
<p><strong>Wait for Project Play</strong></p>
<p>Synchronizes the play and stop functions from the <strong>Transport</strong> panel with the play and stop buttons in the <strong>Previewer</strong> section.</p>
<p>To use this option to its full extent, set the left locator to the beginning of a bar, then start playing back the project using the <strong>Transport</strong> panel. The loops that you now select from the <strong>Results</strong> list start in perfect sync with the project.</p>
</li>
<li>
<p><strong>Output</strong></p>
<p>Allows you to select the output device.</p>
</li>
<li>
<p><strong>Link to Project Tempo</strong></p>
<p>Plays back the selected file in sync with the project, starting at the project cursor position.</p>
</li>
</ol>
</div>
<h3 class="atx" id="step-5-drag-and-drop">Step 5: Drag and Drop</h3>
<ul>
<li>When you find a loop you like, simply drag it from the Media Browser into the desired track in your project.</li>
</ul>
<h3><strong>A note on MIDI File compatibility</strong></h3>
<p>Please keep in mind that your MIDI files must be compatible with the plug-in you choose. You should be able to use files that follow the General MIDI (GM) standard with most of the <span data-mce-fragment="1">Groove Agent 5 SE</span><span> </span>kits. Check the documentation if the plug-in you're using doesn't sound right.</p>
<p>Click <a title="General MIDI Drum map" href="https://bonzo.groovemonkee.com/resources/docs/General_MIDI_Drum_Map.pdf" target="_blank">here to download our General MIDI Drum Map PDF</a></p>
<h3>Summary</h3>
<p>Previewing MIDI files in Cubase 14 using the MediaBay is a straightforward process that can greatly enhance your music production workflow.</p>
<p>By following these steps—adding Groove Agent and loading a kit, opening the MediaBay window, connecting Groove Agent within the MediaBay—you can quickly find and test the perfect MIDI patterns for your project. Master these steps, and you’ll unlock the full potential of Cubase’s MediaBay for your music production needs. </p>]]>
    </content>
  </entry>
  <entry>
    <id>https://groovemonkee.com/blogs/blog/import-a-pbf-file-using-the-bbmo</id>
    <published>2024-09-24T08:00:00-05:00</published>
    <updated>2025-12-29T15:46:16-06:00</updated>
    <link rel="alternate" type="text/html" href="https://groovemonkee.com/blogs/blog/import-a-pbf-file-using-the-bbmo"/>
    <title>Import a PBF File using the BBMO</title>
    <author>
      <name>Groove Monkee</name>
    </author>
    <summary type="html">
      <![CDATA[<p>Learn how to import a PBF file into your <span data-mce-fragment="1">Beat Buddy </span>using the online version of the Beat Buddy Manager.</p><p><a class="read-more" href="https://groovemonkee.com/blogs/blog/import-a-pbf-file-using-the-bbmo">More</a></p>]]>
    </summary>
    <content type="html">
      <![CDATA[<p>In this post I'll explain how to import a PBF file using the online version of the <a title="Online version of the BeatBuddy Manager" href="https://bbmo.singularsound.com/" target="_blank">Beat Buddy Manager</a>. These instructions work for both Mac and PC users.</p>
<p>Please be aware that the desktop version of the Beat Buddy Manager is discontinued. If you need instructions for the desktop app, please see this post: <a href="https://groovemonkee.com/blogs/blog/importing-a-pbf-file-into-beatbuddy" title="Beat Buddy Desktop App Instructions"><span>https://groovemonkee.com/blogs/blog/importing-a-pbf-file-into-beatbuddy</span></a></p>
<h2><span>Find the Beat Buddy PBF File</span></h2>
<p><span>If you purchased a Beat Buddy compatible MIDI pack from us, here's how you can find the PBF file:</span></p>
<ol>
<li><span>Open the "Other MIDI Mappings" folder of your download</span></li>
<li><span>Open the folder that ends with "BB" </span></li>
<li><span>You'll find the PBF file inside the folder with "PBF" at the end.</span></li>
</ol>
<h3><span>Mega Pack Users</span></h3>
<ol>
<li><span>Open the "Other MIDI Mappings" folder of your download</span></li>
<li><span>Extract the zip file named "Mega Pack BB" </span></li>
<li><span>The PBF files are stored in the folder named "PBF Files"</span></li>
</ol>
<h2><span>Video</span></h2>
<p><iframe title="YouTube video player" src="https://www.youtube-nocookie.com/embed/mwUD9rfLtCU?si=WM0b9L7vb5fwlQOQ" height="315" width="560"></iframe></p>
<h2>Setting Up Your Project</h2>
<p><strong>Important</strong>: Before you can import a PBF file, you <strong>MUST</strong> load a project into the manager app. You can import your pedal's project by connecting to your pedal via USB or by inserting your SD card into your computer.</p>
<p>Our blog post: <a href="https://groovemonkee.com/blogs/blog/how-to-import-a-beat-buddy-project" title="Importing a project into the Beat Buddy manager" rel="noopener" target="_blank">How to Import a Beat Buddy Project</a></p>
<p>See the video below for a demonstration.</p>
<p><iframe title="YouTube video player" src="https://www.youtube-nocookie.com/embed/a__rlMIsmr4?si=g69sfY-fEPaS1la8" height="315" width="560"></iframe></p>
<p><strong>Tip</strong>: See "Setting Up for the First Time" in the <a href="https://cdn.shopify.com/s/files/1/0534/3386/0260/files/BeatBuddy_Manager_Online_Manual_v1.3.x.pdf?v=1716581261" title="Beat Buddy manager manual" rel="noopener" target="_blank">Beat Buddy Manager Online Manual</a>.</p>
<p>Once you have loaded a project, you can install PBF files using the instructions below. </p>
<h2>Installing a PBF file</h2>
<p>Installing a PBF file is easy. It only takes a few clicks!</p>
<p>Click on "Import Song" in the upper right side of the Online Beat Buddy Manager. Please see the image below.</p>
<p>Select the PBF file(s) and click "Open". This will add the PBF file(s) to your project.</p>
<p>Next, save your project by clicking the "Save Project" button (upper right side).</p>
<p>If you're ready, you can now sync the project to your Beat Buddy's SD card.</p>
<div style="text-align: start;"><img style="float: none;" alt="Beat Buddy Manager Online - Import PBF File button" src="https://cdn.shopify.com/s/files/1/0267/7825/files/import_pbf.jpg?v=1720468572"></div>
<h2>Sync to your SD Card</h2>
<p>Once you have saved your project, you can sync it to a connected SD card.</p>
<p>First, connect your Beat Buddy or insert the SD card into your computer.<br><br>1. Click on Sync to SD Card <span>(upper right side - see image below)</span><br>2. Select your SD card as the location for the sync<br>3. Leave the browser open and keep your computer from going to<br>sleep or the process will slow down or stop.</p>
<p><img src="https://cdn.shopify.com/s/files/1/0267/7825/files/sync_to_SD_card_480x480.jpg?v=1720469791" alt=""> </p>
<p>If you have questions about our <a href="https://groovemonkee.com/collections/midi-loops" title="Groove Monkee MIDI Packs">products</a>, please contact us. Our support info is located on our Support menu's <a href="https://groovemonkee.com/pages/contact-us" title="Groove Monkee Contact Info">Contact Us page</a>.</p>
<h2>Beat Buddy Support Links</h2>
<p>If you need assistance with your Beat Buddy or the Beat Buddy Manager, please contact Singular Sound support. For your convenience, we've posted some related links below.</p>
<p>Support page: <a title="Singular Sound Support page" href="https://www.singularsound.com/pages/support" target="_blank">https://www.singularsound.com/pages/support</a></p>
<p>If any of the links below are broken, please try the link above.</p>
<p><a title="BeatBuddy Manager Online" href="https://bbmo.singularsound.com/" target="_blank"><span>Beat Buddy Manager Online</span></a></p>
<p><a title="BeatBuddy Default Content (SD backup)" href="https://mybeatbuddy.s3.amazonaws.com/BeatBuddy_Default_Content+2.1-Project-SD_Card_Backup.zip" target="_blank">Beat Buddy Default Content (SD backup)</a></p>
<p><a title="BeatBuddy Manager Online Manual" href="https://cdn.shopify.com/s/files/1/0534/3386/0260/files/BeatBuddy_Manager_Online_Manual_v1.3.x.pdf?v=1716581261" target="_blank">Beat Buddy Manager Online Manual</a></p>]]>
    </content>
  </entry>
  <entry>
    <id>https://groovemonkee.com/blogs/blog/5-great-free-eq-vst-plugins</id>
    <published>2024-09-12T08:33:46-05:00</published>
    <updated>2024-09-12T08:33:46-05:00</updated>
    <link rel="alternate" type="text/html" href="https://groovemonkee.com/blogs/blog/5-great-free-eq-vst-plugins"/>
    <title>5 Great Free EQ VST Plugins</title>
    <author>
      <name>Groove Monkee</name>
    </author>
    <summary type="html">
      <![CDATA[Discover the top 5 free EQ plugins, explore the fundamentals of EQ, and elevate your mixing skills with 5 expert tips.<p><a class="read-more" href="https://groovemonkee.com/blogs/blog/5-great-free-eq-vst-plugins">More</a></p>]]>
    </summary>
    <content type="html">
      <![CDATA[<p>EQ (equalization) is a critical tool in any mixing or mastering process, and there are some fantastic free plugins available that can provide professional-level quality.</p>
<p>In this post, you'll find a curated list of the top 5 free EQ plugins, complete with direct links for easy access. Additionally, we offer a concise overview of EQ basics, an introduction to the three main types of EQ, and five expert tips to help you make the most of these tools.</p>
<p>Whether you're new to EQ or looking to refine your skills, this guide provides everything you need to get started.</p>
<p>Here are five of the top free EQ VST plugins that are widely appreciated for their functionality and flexibility.</p>
<ol>
<li>
<a href="https://www.tokyodawn.net/tdr-nova/" target="_blank"><strong>TDR Nova (Tokyo Dawn Labs)</strong></a>
<ul>
<li>
<strong>Type</strong>: Dynamic EQ</li>
<li>
<strong>Key Features</strong>: Combines parametric equalization with a dynamic processor. It's great for precise control over frequencies with added compression or expansion for specific bands.</li>
<li>
<strong>Best Use Case</strong>: Perfect for both basic EQ tasks and more complex dynamic equalization where you're targeting problem frequencies that change over time.</li>
</ul>
<p><strong>Website:</strong> <a href="https://www.tokyodawn.net/tdr-nova/" target="_blank">https://www.tokyodawn.net/tdr-nova/</a></p>
</li>
<div><img style="float: none;" alt="TDR Nova" src="https://cdn.shopify.com/s/files/1/0267/7825/files/nova_eq_480x480.png?v=1726143799"></div>
<!-- Warmy EP1A -->
<li>
<a href="https://www.kiiveaudio.com/products/warmy-ep1a-v2" target="_blank"><strong>Warmy EP1A V2</strong></a>
<ul>
<li>
<strong>Type</strong>: Analog-style Pultec EQ plugin</li>
<li>
<strong>Key Features</strong>: Smooth and warm EQ curves, tube emulation for vintage tone, low CPU usage, and built-in saturation control.</li>
<li>
<strong>Best Use Case</strong>: Ideal for adding warmth and character to vocals, drums, and bass in both mixing and mastering contexts.</li>
</ul>
<p><strong>Website:</strong> <a href="https://www.kiiveaudio.com/products/warmy-ep1a-v2" target="_blank">https://www.kiiveaudio.com/products/warmy-ep1a-v2</a></p>
</li>
<div style="text-align: start;" data-mce-style="text-align: start;"><img alt="Warmy EP1A" src="https://cdn.shopify.com/s/files/1/0267/7825/files/WarmyEQ_480x480.webp?v=1726145451"></div>
<!-- MEqualizer -->
<li>
<a href="https://www.meldaproduction.com/MEqualizer" target="_blank"><strong>MEqualizer (Melda Production)</strong></a>
<ul>
<li>
<strong>Type</strong>: Parametric EQ</li>
<li>
<strong>Key Features</strong>: 6-band EQ with spectrum analyzer, automatic gain compensation, and MIDI learn. It's very intuitive and has some great presets for quick adjustments.</li>
<li>
<strong>Best Use Case</strong>: Great for everyday EQ needs, especially for shaping tones and balancing instruments.</li>
</ul>
<p><strong>Website:</strong> <a href="https://www.meldaproduction.com/MEqualizer" target="_blank">https://www.meldaproduction.com/MEqualizer</a></p>
</li>
<div><img alt="MEqualizer EQ" src="https://cdn.shopify.com/s/files/1/0267/7825/files/MEqualizer_480x480.jpg?v=1726145501"></div>
<!-- Blue Cat's Triple EQ -->
<li>
<a href="https://www.bluecataudio.com/Products/Product_TripleEQ/" target="_blank"><strong>Blue Cat's Triple EQ</strong></a>
<ul>
<li>
<strong>Type</strong>: Semi-parametric EQ</li>
<li>
<strong>Key Features</strong>: A 3-band EQ with adjustable low, mid, and high frequencies. It’s simple but powerful for shaping the sound in a more analog fashion.</li>
<li>
<strong>Best Use Case</strong>: Ideal for quick, straightforward adjustments during mixing.</li>
</ul>
<p><strong>Website:</strong> <a href="https://www.bluecataudio.com/Products/Product_TripleEQ/" target="_blank">https://www.bluecataudio.com/Products/Product_TripleEQ/</a></p>
</li>
<div><img alt="Blue Cat's Triple EQ" src="https://cdn.shopify.com/s/files/1/0267/7825/files/blue_cat_triple_eq_480x480.png?v=1726145519"></div>
<!-- Ozone 11 Mastering EQ -->
<li>
<a href="https://www.native-instruments.com/en/products/izotope/ozone-11-eq/" target="_blank"><strong>Ozone 11 Mastering EQ</strong></a>
<ul>
<li>
<strong>Type</strong>: Precision digital mastering EQ plugin</li>
<li>
<strong>Key Features</strong>: Dynamic EQ with real-time frequency response, mid/side processing, AI-assisted mastering tools, and highly customizable controls for detailed sound shaping.</li>
<li>
<strong>Best Use Case</strong>: Perfect for mastering and final mix adjustments, especially when clarity, balance, and precision are needed across the frequency spectrum.</li>
</ul>
<p><strong>Website:</strong> <a href="https://www.native-instruments.com/en/products/izotope/ozone-11-eq/" target="_blank">https://www.native-instruments.com/en/products/izotope/ozone-11-eq/</a></p>
</li>
<div></div>
<img alt="Ozone 11 Mastering EQ" src="https://cdn.shopify.com/s/files/1/0267/7825/files/ozone_11_800x_43d7ab7a-43ee-4ade-95b8-69c9a56f1788_480x480.webp?v=1726147695">
</ol>
<h3>EQ Basics: What is Equalization?</h3>
<p>EQ (or equalization) is a tool used in audio processing to adjust the balance of different frequencies in a sound. Imagine you're listening to a live band — the EQ is like a sound technician who controls the volume knobs for each instrument, deciding which instruments (or parts of the sound) should be louder or quieter.</p>
<p>Here's a simple analogy: Think of sound as a painting, and the EQ as the paintbrush. Just like you can brighten certain colors or mute others, EQ allows you to enhance or reduce certain frequency ranges in a sound.</p>
<h4>Main Frequency Bands</h4>
<ul>
<li>
<strong>Low (20 Hz - 200 Hz)</strong>: These are the deep bass sounds — think kick drums or bass guitar. Adjusting these frequencies controls the "weight" or "thump" in your track.</li>
<li>
<strong>Low-Mid (200 Hz - 1 kHz)</strong>: This range covers many instruments' body or warmth, like guitars and vocals. Be careful, as too much here can make things sound "muddy."</li>
<li>
<strong>High-Mid (1 kHz - 5 kHz)</strong>: This is where clarity and intelligibility of vocals sit. Boosting too much here can make things sound harsh or nasal, while cutting too much can make it dull.</li>
<li>
<strong>High (5 kHz - 20 kHz)</strong>: This range gives the "air" or "sparkle" to your mix, like cymbals or the high-end of a vocal. Be gentle, as boosting too much can create an ear-piercing effect.</li>
</ul>
<h4>Key EQ Types</h4>
<ol>
<li>
<strong>Parametric EQ</strong>: Gives you full control over the frequency, bandwidth (how wide the range is), and gain (how much you're boosting or cutting). This is the most flexible and powerful type of EQ.</li>
<li>
<strong>Graphic EQ</strong>: Breaks the frequency spectrum into fixed bands, each with its own fader. You adjust these faders to increase or decrease certain frequencies. It’s less flexible than a parametric EQ but great for broad, quick adjustments.</li>
<li>
<strong>Dynamic EQ</strong>: Combines EQ with compression. It changes its settings dynamically based on the input signal, allowing it to target and adjust problem frequencies only when they become an issue.</li>
</ol>
<h3>Pro Tips for Using EQ</h3>
<ol>
<li>
<strong>Cut before you boost</strong>: A common beginner mistake is to boost a lot of frequencies to make things sound clearer or louder. Instead, try cutting problematic frequencies. For example, if a vocal sounds muddy, try cutting a bit around 200-400 Hz before boosting higher frequencies.</li>
<li>
<strong>Use narrow cuts and wide boosts</strong>: When cutting frequencies, use a narrow bandwidth (or "Q") to remove only the problem areas. When boosting, use a wider Q to create a more natural sound.</li>
<li>
<strong>High-pass and low-pass filters are your friends</strong>: A high-pass filter removes low frequencies, and a low-pass filter removes high frequencies. Use a high-pass filter on non-bass instruments (like guitars, vocals, etc.) to remove unwanted low-end rumble. Similarly, use a low-pass filter on bass-heavy instruments to remove unnecessary high-frequency noise.</li>
<li>
<strong>Sweep to find problem frequencies</strong>: If you're not sure where the problem frequency is, boost the gain on a narrow band and slowly sweep across the frequency spectrum until you find the offending sound. Then, cut that frequency.</li>
<li>
<strong>EQ in context</strong>: Don’t solo a track and EQ it to sound perfect in isolation. Always EQ in the context of the full mix. A snare drum that sounds great on its own may clash with the guitars or vocals, so EQ everything while listening to the whole mix.</li>
</ol>]]>
    </content>
  </entry>
  <entry>
    <id>https://groovemonkee.com/blogs/blog/5-awesome-free-compressors</id>
    <published>2024-08-08T14:30:31-05:00</published>
    <updated>2024-08-09T07:17:02-05:00</updated>
    <link rel="alternate" type="text/html" href="https://groovemonkee.com/blogs/blog/5-awesome-free-compressors"/>
    <title>5 Awesome Free Compressors</title>
    <author>
      <name>Groove Monkee</name>
    </author>
    <summary type="html">
      <![CDATA[Discover 5 FREE compressors that can transform your drum tracks, plus the ultimate secret to achieving a pro-level sound.<p><a class="read-more" href="https://groovemonkee.com/blogs/blog/5-awesome-free-compressors">More</a></p>]]>
    </summary>
    <content type="html">
      <![CDATA[<p>Are you constantly purchasing drum apps or samples in the quest for the perfect sound? Before you spend more money, consider sharpening your mixing skills, especially in the realm of compression. By mastering compression techniques, you can unlock the full potential of your drum tracks and overall mixes, without breaking the bank.</p>
<p>In this post, I’ll introduce you to the five best free VST compressors that can take your mixes to the next level. Additionally, you'll find valuable mixing tips and links to YouTube videos that will help you get started with compression.</p>
<h2>Drum Mixing Secret Weapon: Parallel Compression</h2>
<p>Did you know know that <a title="Wikipedia Parallel compression" href="https://en.wikipedia.org/wiki/Parallel_compression" target="_blank"><em>parallel compression</em></a> can <span data-mce-fragment="1">significantly elevate</span> your drum tracks? Alongside using separate tracks for each drum element (kick, snare, toms, etc.), parallel compression is one of the most effective techniques to enhance your drum sounds. Before diving into the free compressors, let's explore some essential compression tips to get you started.</p>
<h2>3 Essential Tips for Compressing Drums</h2>
<p> </p>
<p><strong>1. Use a suitably long attack time</strong></p>
<p>Don't kill the transients! A good starting point is to set the attack time around 30 milliseconds (ms). This allows the initial punch of the drum hit to come through before the compression kicks in.</p>
<p><strong>2. Opt for a Short Release Time</strong></p>
<p>A quick release time helps the compressor recover quickly, maintaining the energy and rhythm of the drum track.</p>
<p><strong> 3. Find the "Sweet Spot" with the Threshold</strong></p>
<p>The threshold setting determines when compression begins. Carefully listen and adjust to find that perfect balance where the compression enhances without overpowering. For more on this, check out the “Drum Compression Basics” video linked below.</p>
<h2>The Five Best Free VST Compressors</h2>
<p> </p>
<h3>
<a href="https://www.audiodamage.com/pages/free-and-legacy" title="Rough Rider 3 by Audio Damage" target="_blank">Rough Rider 3</a> <img height="240" width="470" alt="" src="https://cdn.shopify.com/s/files/1/0267/7825/files/roughrider_480x480.jpg?v=1723128542">
</h3>
<p><a href="https://www.audiodamage.com/pages/free-and-legacy" title="Rough Rider 3" target="_blank">Rough Rider 3</a> is renowned for its aggressive sound, making it an excellent choice for drums and other rhythmic elements. It’s a bit more "hands-on," with various knobs that allow you to dial in the precise sound you’re after. When starting out, experiment with the threshold, release, and attack times to understand how each parameter affects the compression.</p>
<h3>
<a href="https://www.tokyodawn.net/tdr-kotelnikov/" title="TDR Kotelnikov by Tokyo Dawn Records" target="_blank">TDR Kotelnikov</a> <img alt="" src="https://cdn.shopify.com/s/files/1/0267/7825/files/Kotelnikov_480x480.png?v=1723128623">
</h3>
<p> </p>
<p>A favorite among many, the <a href="https://www.tokyodawn.net/tdr-kotelnikov/" title="TDR Kotelnikov" target="_blank">TDR Kotelnikov</a> is an extremely versatile compressor with advanced dynamics processing capabilities and a clean, transparent sound. Like Rough Rider, it offers individual controls for threshold, attack, and release, giving you detailed control over your compression.</p>
<h3><a href="https://www.acustica-audio.com/shop/products/TAN" title="Acustica Tan compressor" target="_blank">Acustica Tan compressor</a></h3>
<p><img alt="" src="https://cdn.shopify.com/s/files/1/0267/7825/files/tan_compressor_2_480x480.png?v=1723129556"></p>
<p> </p>
<p>The <a href="https://www.acustica-audio.com/shop/products/TAN" title="Tan Compressor by Acustica" target="_blank">Tan compressor</a> is a classic analog VCA compressor that provides a wide range of sound-shaping options to meet your musical needs. It features controls for attack, release, threshold, ratio, gain, dry/wet, and more. The standout feature is the "Shmod" control, which allows you to easily shape the attack of any audio source.</p>
<h3><a title="DC1A by Klanghelm" href="https://klanghelm.com/contents/products/DC1A" target="_blank">DC1A by Klanghelm</a></h3>
<p><img alt="" src="https://cdn.shopify.com/s/files/1/0267/7825/files/DC1A3_reduced_480x480.jpg?v=1723129877"></p>
<p> </p>
<p>Don’t be fooled by its simplicity. The <a href="https://klanghelm.com/contents/products/DC1A" title="DC1A by Klanghelm" target="_blank">DC1A compressor</a> offers only an input and output knob, but its performance is anything but basic. It delivers from gentle, almost invisible leveling to heavy pumping with crunchy saturation, making it versatile enough for a variety of drum sounds.</p>
<h3><a title="ComBear Compressor by W. A. Production" href="https://www.pluginboutique.com/product/2-Effects/8-Compressor/3985-ComBear" target="_blank">ComBear Compressor</a></h3>
<p><img data-mce-fragment="1" src="https://cdn.shopify.com/s/files/1/0267/7825/files/combear_compressor_480x480.jpg?v=1723129690" alt="" data-mce-src="https://cdn.shopify.com/s/files/1/0267/7825/files/combear_compressor_480x480.jpg?v=1723129690"> </p>
<p> </p>
<p>Specifically designed for parallel compression, <a href="https://www.pluginboutique.com/product/2-Effects/8-Compressor/3985-ComBear" target="_blank" title="ComBear Compressor" rel="noopener noreferrer">ComBear</a> is a powerful and dynamic plugin that brings incredible sound and feel to drums, synths, vocals, and more. The Compress knob allows you to increase the parallel compression from 0 to 100, giving you a simple yet effective way to control your mix.</p>
<h3>Must-Watch Compression Videos</h3>
<p> </p>
<p>Learn the fundamentals of drum compression in this easy-to-follow guide.</p>
<p><a href="https://www.youtube.com/watch?v=lxjWGp4egFU" target="_blank" data-mce-href="https://www.youtube.com/watch?v=lxjWGp4egFU">Drum Compression Basics</a></p>
<p> </p>
<p>Dive deeper into parallel compression and how it can transform your mixes.  </p>
<p><a href="https://www.youtube.com/watch?v=ehY4Yr0jom0" target="_blank" data-mce-href="https://www.youtube.com/watch?v=ehY4Yr0jom0">Advanced Mixing - Parallel Processing</a></p>
<p> </p>
<p>Discover the hidden power of parallel processing in this insightful video.</p>
<div></div>
<div><a href="https://www.youtube.com/watch?v=i75xI0c6LVs" target="_blank" data-mce-href="https://www.youtube.com/watch?v=i75xI0c6LVs">This is the secret to every great mix (parallel processing)</a></div>]]>
    </content>
  </entry>
  <entry>
    <id>https://groovemonkee.com/blogs/blog/how-to-audition-midi-loops-in-cubase-13</id>
    <published>2024-06-04T12:39:26-05:00</published>
    <updated>2024-12-16T14:15:11-06:00</updated>
    <link rel="alternate" type="text/html" href="https://groovemonkee.com/blogs/blog/how-to-audition-midi-loops-in-cubase-13"/>
    <title>How to Audition MIDI Files in Cubase 13</title>
    <author>
      <name>Groove Monkee</name>
    </author>
    <summary type="html">
      <![CDATA[Learn how to audition MIDI drum loops in Cubase using the Media Browser window.<p><a class="read-more" href="https://groovemonkee.com/blogs/blog/how-to-audition-midi-loops-in-cubase-13">More</a></p>]]>
    </summary>
    <content type="html">
      <![CDATA[<h3>Introduction</h3>
<p>Auditioning MIDI files in <a href="https://www.steinberg.net/cubase/" title="Cubase product page" target="_blank">Cubase</a> is easy. After some initial setup you can use the MediaBay window to audition MIDI files and drag them into your project.</p>
<p>In this post, I'll explain how to audition MIDI drum loops, provide some tips on organizing your MIDI files and discuss a few issues and solution to the problems you may encounter.</p>
<p>I used Cubase Elements 13 for this post but the same process appears to be the same in other versions. It seems the <span data-mce-fragment="1">Media Bay window hasn't changed much over the years which is good news for Cubase users!</span></p>
<h3><span data-mce-fragment="1">Organizing Your Files</span></h3>
<p>This section is not mandatory but is considered "best practice".</p>
<p>It's a good idea to create a single folder to hold all of your MIDI files. For example, create a "MIDI Files" folder inside of your "Documents" folder.</p>
<p>Inside that folder, consider creating a folder for all of the files you've created yourself plus one for every other source. For example, create a folder for each company you've bought files from.</p>
<p>The reason for this is simple: to reduce the time it takes Cubase to find and catalog any new files you add in the future. If you organize your files this way, you can direct Cubase to scan a specific folder rather than all MIDI files or your entire hard drive. </p>
<h3>Previewing MIDI files using the MediaBay </h3>
<p>First, I'll start with the most basic instructions. If you have problems, please see the sections below.</p>
<p>1. <strong>Create a new Cubase Project</strong></p>
<p>Unless you've got some experience with this, I suggest that you create a new Cubase project for this tutorial. It will be easier to troubleshoot potential problems if your project only has one instrument track and a single instrument. </p>
<p>2. <strong>Add a drum plug-in to your project</strong></p>
<p>Add a drum plug-in to your project. <strong>Load a drum kit</strong>, if necessary.</p>
<p>For this post, I used Groove Agent 5 SE but you can use any plug-in you like.</p>
<p><strong>A note on MIDI File compatibility</strong></p>
<p>Please keep in mind that your MIDI files must be compatible with the plug-in you choose. You should be able to use files that follow the General MIDI (GM) standard with most of the <span data-mce-fragment="1">Groove Agent 5 SE</span> kits. Check the documentation if you're using another plug-in if the files don't sound right.</p>
<p>3. <strong>Open the MediaBay Window</strong></p>
<p>Next, open the MediaBay window by pressing the F5 key or selecting "MediaBay" from the "Media" menu.</p>
<p>4. <strong>Play a MIDI file</strong></p>
<p>Navigate to your MIDI files folder and click on a MIDI file and it should start to play. If not, you can use the controls at the bottom of the MediaBay to play and stop the file. See the image below for more information.</p>
<p><strong>Hint</strong>: there's an "Auto Play" button on the right of the lower section of the MediaBay.</p>
<p>5. <strong>Drag the file into your project</strong></p>
<p>You can drag files onto the plug-in track to build your drum track.</p>
<p><strong>Problems? </strong></p>
<p>Please see the sections below for answers to the most common issues you will likely face.</p>
<h3>Common Problems</h3>
<p>If you're having a problem, here are solutions to some of the most common issues. Even if you're not having a problem, it's a good idea to read through the Cubase MediaBay documentation.</p>
<p>The image below highlights some important areas of the MediaBay window. </p>
<ol>
<li><span>Show Media Types selector</span></li>
<li>Zone controls<span></span>
</li>
<li>Play and stop buttons</li>
<li>Preview volume control</li>
<li>Plug-in selector</li>
<li>Auto play control</li>
</ol>
<div style="text-align: start;"><img style="float: none;" alt="" src="https://cdn.shopify.com/s/files/1/0267/7825/files/cubase_mediabay_numbered_800.png?v=1717521871"></div>
<h4>No MIDI Files</h4>
<p>There could be a few reasons why Cubase isn't finding your MIDI files.</p>
<p>1. <strong>Scan your files</strong></p>
<p>If you cannot find your MIDI files, please scan your MIDI files folder or your entire system, if necessary. </p>
<p>Right click on the drive or folder you want to scan and click "Rescan Disk" or "Quick Rescan Disk".</p>
<p>2. <strong>Enable "MIDI Files" in the MediaBay</strong></p>
<p>The MediaBay works with all media types, not just MIDI files. Make sure that  "MIDI Files" is selected for "Show Media Types" in the MediaBay or you won't be able to access them. See item #1 in the image above.</p>
<p><strong>Warning</strong>: You may have to rescan your files if you had to manually choose to show MIDI files.</p>
<p><strong>Note</strong>: Cubase considers "MIDI Loops" and "MIDI Files" to be two different but related concepts. From the standpoint of Cubase, we provide "MIDI Files".  Please see their documentation for additional info.</p>
<h4>No Sound </h4>
<p>There are several reasons why you may not hear any output when playing your files.</p>
<p>1. <strong>Speakers</strong></p>
<p>Please make sure your speakers are turned on and that no other app is blocking Cubase from accessing the audio driver. </p>
<p>2. <strong>Drum Kit</strong></p>
<p>Make sure you've selected a drum kit within your plug-in. Some plug-ins load a drum kit by default but some do not. Groove Agent 5 does not.</p>
<p>3. <strong>Enable your drum plug-in</strong></p>
<p>You may have to enable your drum plug-in in the lower section of the MediaBay. Look for a drop down box in the lower right of the MediaBay and select your plug-in, if necessary. See item #6 in the image above.</p>
<h4>Wrong Tempo</h4>
<p>Files will play at your project's tempo. Please adjust the project tempo, if necessary.</p>
<h4>Sounds Wrong</h4>
<p>If the beat doesn't sound right, it probably means that your drum kit's mapping doesn't match the file's mapping.</p>
<p>The industry standard is called "General MIDI" or "GM" but most companies don't follow it. Instead, they choose to map their drums in a random fashion causing incompatibility problems. Many Groove Agent 5 SE kits seem to follow the General MIDI standard but there's no guarantee. </p>
<h4>Missing Controls</h4>
<p>The MediaBay is actually composed of several sections called "zones". You can open and close these zones individually. The controls used for this are located near the top right of the MediaBay window. <span data-mce-fragment="1">See item #2 in the image above.</span></p>
<h3></h3>
<h3>Conclusion</h3>
<p>Auditioning MIDI files with the Cubase MediaBay is fairly easy after the initial setup. Once you've set up your folder structure, scanned your files and set up the MediBay correctly, you shouldn't have any problems. Hopefully, this post has given you the information needed to start working with your MIDI files today.</p>
<h3>Need help?</h3>
<p>If you have questions about this post or any of our products, please contact us. <a href="https://groovemonkee.com/pages/contact-us" title="Groove Monkee Contact Info">Click here to view our contact information</a></p>]]>
    </content>
  </entry>
  <entry>
    <id>https://groovemonkee.com/blogs/blog/mac-installation-help</id>
    <published>2024-04-08T12:35:21-05:00</published>
    <updated>2024-04-09T07:32:29-05:00</updated>
    <link rel="alternate" type="text/html" href="https://groovemonkee.com/blogs/blog/mac-installation-help"/>
    <title>Mac Installation Help</title>
    <author>
      <name>Groove Monkee</name>
    </author>
    <summary type="html">
      <![CDATA[How to install our files without an installer.<p><a class="read-more" href="https://groovemonkee.com/blogs/blog/mac-installation-help">More</a></p>]]>
    </summary>
    <content type="html">
      <![CDATA[<h3>Disclaimer</h3>
<p>This information only applies to our paid products. For our free products, please see the documentation provided in your download.</p>
<h3>Mac Installers Discontinued </h3>
<p>Unfortunately we've found it necessary to discontinue our Mac installers. While installers are not necessary, they are convenient so we hope to provide them again in the future.</p>
<h3>Installation Information </h3>
<p>IF necessary, you can install the MIDI files manually. It all depends on what you're using for your drum sounds. With most software, installation of MIDI files isn't even possible. If you use Logic or Garage Band it is not possible so please see the next section.</p>
<p>Bottom line: Most users don't need to install MIDI files! Our installers support a small number of popular apps. You'll find installation instructions for all of them plus a few more below.</p>
<h3>Apple Products </h3>
<p>At this time (early 2024), it isn't possible to install MIDI files into Logic or Garage Band. The loop browser window only auditions audio files, not MIDI files. Feel free to store your MIDI files anywhere that's convenient for you.</p>
<p>You should use our General MIDI files with Logic and Garage Band kits because they usually follow the <span data-mce-fragment="1">General MIDI drum mapping. </span></p>
<h3>General Information</h3>
<p>Here are the most important things for you to know:<br data-mce-fragment="1"><br data-mce-fragment="1">All of the MIDI files are stored in the folder named: "Other MIDI Mappings"</p>
<p>Each folder inside the "Other MIDI Mappings" folder contains the same files but in a different format.<br data-mce-fragment="1"><br data-mce-fragment="1">If you need <strong>General MIDI files </strong>you'll find them here:</p>
<p>Other MIDI Mappings/&lt;Product Name&gt; GM<br data-mce-fragment="1"><br data-mce-fragment="1">Installation instructions can be downloaded here:<br data-mce-fragment="1"><a title="https://bonzo.groovemonkee.com/resources/docs/Read_Me.pdf" href="https://bonzo.groovemonkee.com/resources/docs/Read_Me.pdf">https://bonzo.groovemonkee.com/resources/docs/Read_Me.pdf</a></p>
<p>To find the files for a specific app, download the PDF linked below: <a title="https://bonzo.groovemonkee.com/resources/docs/Apps_to_Folder_Table.pdf" href="https://bonzo.groovemonkee.com/resources/docs/Apps_to_Folder_Table.pdf" data-mce-fragment="1" target="_blank" data-mce-href="https://bonzo.groovemonkee.com/resources/docs/Apps_to_Folder_Table.pdf">https://bonzo.groovemonkee.com/resources/docs/Apps_to_Folder_Table.pdf</a></p>
<h3>Installation for Popular Apps </h3>
<p>Here are installation instructions for the most popular drum apps:<br data-mce-fragment="1"><br data-mce-fragment="1"><strong>Addictive Drums 2</strong>: <a title="Install instructions for Addictive Drums 2" href="https://groovemonkee.com/blogs/blog/how-to-install-midi-files-into-addictive-drums-2">https://groovemonkee.com/blogs/blog/how-to-install-midi-files-into-addictive-drums-2</a><br data-mce-fragment="1"><br data-mce-fragment="1"><strong>Beat Buddy</strong>: <a title="Install instructions for Beat Buddy" href="https://groovemonkee.com/blogs/blog/importing-a-pbf-file-into-beatbuddy">https://groovemonkee.com/blogs/blog/importing-a-pbf-file-into-beatbuddy</a><br data-mce-fragment="1"><br data-mce-fragment="1"><strong>BFD3</strong>: <a title="Install instructions for BFD3" href="https://groovemonkee.com/blogs/blog/14182425-bfd3-installation">https://groovemonkee.com/blogs/blog/14182425-bfd3-installation</a><br data-mce-fragment="1"><br data-mce-fragment="1"><strong>EZdrummer 2</strong>: <a title="Install instructions for EZdrummer 2" href="https://groovemonkee.com/blogs/blog/ezdrummer-2-midi-installation">https://groovemonkee.com/blogs/blog/ezdrummer-2-midi-installation</a><br data-mce-fragment="1"><br data-mce-fragment="1"><strong>EZdrummer 3</strong>: <a title="Install instructions for EZdrummer 3" href="https://groovemonkee.com/blogs/blog/how-to-install-midi-files-into-ezdrummer3-with-a-linked-folder">https://groovemonkee.com/blogs/blog/how-to-install-midi-files-into-ezdrummer3-with-a-linked-folder</a><br data-mce-fragment="1"><br data-mce-fragment="1"><strong>Superior Drummer 3</strong>: <a title="Install instructions for Superior Drummer 3" href="https://groovemonkee.com/blogs/blog/how-to-install-midi-files-into-superior-drummer-3-with-a-linked-folder">https://groovemonkee.com/blogs/blog/how-to-install-midi-files-into-superior-drummer-3-with-a-linked-folder</a><br data-mce-fragment="1"><br data-mce-fragment="1"><strong>Steven Slate 5</strong>: <a title="Install instructions for Steven Slate Drums 5" href="https://groovemonkee.com/blogs/blog/steven-slate-drums-5-midi-installation">https://groovemonkee.com/blogs/blog/steven-slate-drums-5-midi-installation</a></p>
<p><strong>Note</strong>: The instructions above work for SSD version 5.5 also. </p>
<h3>Support</h3>
<p>For additional details, please see the following file in your download: <strong>"Installation and Support Info"</strong></p>
<p>If you still need assistance, please let us know. Our contact information can be found in the <a title="Groove Monkee Info" href="https://groovemonkee.com/pages/contact-us">Contact Us</a> section of our website.</p>]]>
    </content>
  </entry>
  <entry>
    <id>https://groovemonkee.com/blogs/blog/krimh-drums-overview</id>
    <published>2024-02-14T05:00:09-06:00</published>
    <updated>2024-02-14T05:09:36-06:00</updated>
    <link rel="alternate" type="text/html" href="https://groovemonkee.com/blogs/blog/krimh-drums-overview"/>
    <title>Krimh Drums Overview</title>
    <author>
      <name>Groove Monkee</name>
    </author>
    <summary type="html">
      <![CDATA[An overview of <span data-mce-fragment="1">Krimh Drums Free by </span><a data-mce-fragment="1" title="BorgenDigital.com" href="https://bogrendigital.com/" data-mce-href="https://bogrendigital.com/">Borgen Digital</a>.<p><a class="read-more" href="https://groovemonkee.com/blogs/blog/krimh-drums-overview">More</a></p>]]>
    </summary>
    <content type="html">
      <![CDATA[<p>Krimh Drums Free by <a href="https://bogrendigital.com/" title="BorgenDigital.com" target="_blank" rel="noopener noreferrer">Borgen Digital</a> is a cutting-edge software instrument bringing contemporary, high-energy metal drum sounds to your DAW of choice.<br><br>Created by acclaimed metal producer Jens Bogren, whose credits include Arch Enemy, Opeth, and Kreator, in partnership with the drummer Kerim “Krimh” Lechner, this instrument promises a fresh and modern sonic palette.</p>
<h3>Overview</h3>
<p><a href="https://bogrendigital.com/collections/all/products/krimh-drums-free" title="Krimh Drums Free" target="_blank">Krimh Drums Free</a> is available absolutely free from Borgen Digital, a producer of high quality samples and music production plugins.</p>
<p>The free version includes a great sounding metal drum kit with the following:</p>
<ul>
<li>Double kick drums (with automatic double kick feature)</li>
<li>Hi-hat with 10 articulations</li>
<li>3 Crash Cymbals</li>
<li>China, Ride and Splash Cymbals</li>
<li>3 Toms</li>
</ul>
<p>To use Krimh drums, you must install Kontakt Player by <a href="https://www.native-instruments.com/" title="Native Instruments home page" target="_blank">Native Instruments</a>. Good news: you can use the free version of <span data-mce-fragment="1">Kontakt Player also.</span></p>
<h4><span data-mce-fragment="1">MIDI Browser</span></h4>
<p><span data-mce-fragment="1">The plugin includes a MIDI browser that allows you to audition MIDI files and drag and drop them into your DAW (music recording software).</span></p>
<h4><span data-mce-fragment="1">Mixer</span></h4>
<p>The full version includes an impressive looking mixer. Unfortunately, the mixer is disabled in the free version.</p>
<h3>MIDI Browser</h3>
<p>The MIDI browser window ("Grooves" window) allows you to audition MIDI loops and drag them directly into your recording software. This is a great, time saving feature because many DAWs like Apple's Garage Band and Logic don't support it.</p>
<p><strong>Below</strong>: the location of the "Grooves" Window</p>
<p><img src="https://cdn.shopify.com/s/files/1/0267/7825/files/groove_browser_button_800x690_e26b3198-4885-434d-8668-30404e733c3e.png?v=1707859306" alt="Krimh Drums Grooves button"></p>
<p>At the time of this writing, (February of 2024), the Krimh MIDI browser window plays files mapped per the General MIDI standard and will convert them to the Krimh kit mapping when you drag them into your recording software.</p>
<p><strong>Note</strong>: We include drum loops mapper per the General MIDI standard in all of our <a title="Groove Monkee MIDI drum loops" href="https://groovemonkee.com/collections/midi-loops">MIDI Drum Loop packs</a>.</p>
<h4>Proper Tom Triggering</h4>
<p>Another nice yet overlooked feature implemented by Krimh drums is the fact that all tom hits will be triggered, even if you're using the free kit. For example, if your MIDI contains low floor tom hits (General MIDI #41), Krimh will redirect those notes to the high floor tom. Many similar products fail to do this requiring the user to move MIDI notes around. </p>
<h3>MIDI Loops</h3>
<p>The free version of Krimh  drums includes 12 MIDI files. The full version includes over 100 files.</p>
<h3>Conclusion</h3>
<p>The free version of Krimh Drums is a great sounding metal drum kit with some interesting features such as automatic double kick drum playing and a MIDI groove browser.</p>
<p>Unlike many other free kits, Krimh drums includes a complete drum kit with detailed hi-hats, 5 cymbals and 3 toms. </p>
<p>While it requires the Kontakt player by Native Instruments, it's definitely worth checking out!</p>
<p>You can download Krimh drums by visiting <a data-mce-fragment="1" href="https://bogrendigital.com/" title="BorgenDigital.com" data-mce-href="https://bogrendigital.com/">Borgen Digital</a>.</p>]]>
    </content>
  </entry>
  <entry>
    <id>https://groovemonkee.com/blogs/blog/using-ml-drums</id>
    <published>2023-12-23T14:24:53-06:00</published>
    <updated>2025-03-22T04:30:06-05:00</updated>
    <link rel="alternate" type="text/html" href="https://groovemonkee.com/blogs/blog/using-ml-drums"/>
    <title>Using ML Drums</title>
    <author>
      <name>Groove Monkee</name>
    </author>
    <summary type="html">
      <![CDATA[We now support ML Drums! Check out our overview of this incredible, cost effective drum app.<p><a class="read-more" href="https://groovemonkee.com/blogs/blog/using-ml-drums">More</a></p>]]>
    </summary>
    <content type="html">
      <![CDATA[<p>In this post, I'll explain some of the features and attributes of <a href="https://ml-sound-lab.com/" title="ML Drums home page" target="_blank">ML Drums</a>, a great-sounding drum app that's been getting really popular lately. </p>
<h3>MIDI Files for ML Drums</h3>
<p>We now include MIDI drum loops for ML Drums in all of our <a href="https://groovemonkee.com/collections/midi-loops" title="Groove Monkee MIDI drum loops">MIDI Drum Packs</a>. You'll find the grooves in the folder named: Other MIDI Mappings</p>
<p>Inside, look for the folder that ends with "ML Drums".</p>
<p><strong>Example</strong>: "Blues ML Drums"</p>
<p>If you've made any purchases in the past, you can download the latest version here:</p>
<p><a href="https://edl.groovemonkee.com/login" title="Groove Monkee Product Downloads" target="_blank"> https://edl.groovemonkee.com/login</a></p>
<p><strong>IMPORTANT</strong>: You will need to create a password the first time you try to login there. Your web shop password will NOT work.</p>
<p>Use the password reset to get a temporary password. Temporary passwords expire in 30 minutes.</p>
<p><strong>Note</strong>: Our files are optimized for the paid version of ML Drums version 2. See the kit limitations of the free version below.</p>
<h3>Drum Maps for ML Drums</h3>
<p>We also include a set of ML Drums "drum maps" for several leading DAWs: Cubase, Magix, Reaper and Studio One.</p>
<p>You'll find the maps in the 'Extras' folder of your product download.  </p>
<p><strong>What's a drum map?</strong></p>
<p>A drum map is a visual editing tool. It adds drum names to your music software's MIDI editing screen. This makes it much easier to program and edit MIDI beats. See the image below for an example.</p>
<p><img alt="ML Drum drum map for Studio One" src="https://cdn.shopify.com/s/files/1/0267/7825/files/ml_drums_drum_map.jpg?v=1703260542"></p>
<h3>ML Drums Kit Summary </h3>
<p>ML Drums has MASSIVE kits! Here's a breakdown of what most kits include.</p>
<h4>Cymbals</h4>
<p>ML Drums includes a staggering 9 cymbals plus a stax and a bell.</p>
<p>Most kits have 3 crash cymbals, a ride, 3 china cymbals and 2 splash cymbals. Impressive! </p>
<h3>Sounds</h3>
<p>ML Drums sounds fantastic and it comes with a large selection of kit presets. It's truly amazing how good modern drum apps sound compared to 20 years ago! </p>
<h3>The Mixer Page</h3>
<p> </p>
<p><img alt="ML Drums Mixer page" src="https://cdn.shopify.com/s/files/1/0267/7825/files/ml_drums_mixer.jpg?v=1703264583"></p>
<p>One of the things I really like about ML Drums is the mixer page. It's got just about everything you'd need to tweak your drum sounds for the sound you need. Here's an overview of the available channel settings and effects:</p>
<ul>
<li>3 band EQ</li>
<li>Saturation (all instrument groups)</li>
<li>Snare channel has top and bottom mic controls</li>
<li>Panning for all toms (look for the yellow knobs)</li>
<li>OH, Room Reverb (snare, kick, toms and room only)</li>
<li>Solo/mute buttons for each track</li>
</ul>
<p>The snare channel features a top and bottom mic setting. That's something you don't always get.</p>
<p>The master channel features a compressor that includes a parallel compression setting! You should definitely check that out! </p>
<h3>Pricing</h3>
<p>ML Drums is very reasonably priced. Add-on packs cost just 40 euros. </p>
<h3>Free Version</h3>
<p>ML Drums has a free version if you'd like to try it yourself. You can download it from their site <a href="https://ml-sound-lab.com/" title="ML Drum home page" target="_blank">HERE</a>.</p>
<p><strong>Note</strong>: the free version sounds great but it has some limitations. Please note that the free version does not include:</p>
<ul>
<li>Floor tom 2 (MIDI #41)</li>
<li>Rack tom 1 (MIDI #48)</li>
<li>Crash 2</li>
<li>Splash cymbals</li>
<li>China 2</li>
</ul>
<h3>Summary</h3>
<p>ML Drums is now one of the best sounding, powerful drum apps on the market.  It has massive kits and an extensive mixing page that few can match. Considering all that you get, it's very reasonably priced.</p>
<p>Check out their web site and download the free kit (see the limitations above). </p>
<p> </p>]]>
    </content>
  </entry>
  <entry>
    <id>https://groovemonkee.com/blogs/blog/ezdrummer-2-midi-installation</id>
    <published>2023-11-15T16:12:04-06:00</published>
    <updated>2023-11-22T08:47:05-06:00</updated>
    <link rel="alternate" type="text/html" href="https://groovemonkee.com/blogs/blog/ezdrummer-2-midi-installation"/>
    <title>EZDrummer 2 MIDI Installation</title>
    <author>
      <name>Groove Monkee</name>
    </author>
    <summary type="html">
      <![CDATA[Learn how to quicky install MIDI files into Toontrack's EZdrummer 2. The files will be included in Search also!<p><a class="read-more" href="https://groovemonkee.com/blogs/blog/ezdrummer-2-midi-installation">More</a></p>]]>
    </summary>
    <content type="html">
      <![CDATA[<p>In this post I'll explain how to manually install MIDI files into EZdrummer 2 by <a title="Toontrack Home Page" href="https:\\toontrack.com" target="_blank">Toontrack</a>. All of our paid <a title="Groove Monkee MIDI Packs" href="https://groovemonkee.com/collections/midi-loops">MIDI Drum Loop packs</a> include files for EZdrummer (and Superior Drummer).</p>
<p>If you have EZdrummer 3, you can click here to view our <a href="https://groovemonkee.com/blogs/blog/how-to-install-midi-files-into-superior-drummer-3-with-a-linked-folder" title="EZdrummer 3 MIDI installation instructions"><span data-mce-fragment="1">EZdrummer 3 </span>MIDI Installation Instructions</a>,</p>
<h3>PC Installer</h3>
<p>Our paid products do contain a PC installer that works with EZdrummer 2 but we had to discontinue our Mac Installers unfortunately.</p>
<p>If you have a Mac, please follow the instructions below.</p>
<h3>Manual Installation</h3>
<p>Installing MIDI files into EZdrummer 2 is surprisingly easy. It takes less than 1 minute to install a folder of MIDI files into EZdrummer 2 using the steps below.</p>
<ol>
<li>Click on the main menu</li>
<li>Click on "Settings"</li>
<li>Click "MIDI Libraries"</li>
</ol>
<p>This will open up a dialog box allowing you to manage your 3rd party MIDI options including search.</p>
<p><em>Image</em>: see the image below for a screenshot of the menu options</p>
<p><img src="https://cdn.shopify.com/s/files/1/0267/7825/files/1-menu-midi-libraries.jpg?v=1700066085" alt="EZdrummer 2 menu: Add Folder to User Libraries" data-mce-fragment="1" data-mce-src="https://cdn.shopify.com/s/files/1/0267/7825/files/1-menu-midi-libraries.jpg?v=1700066085"> </p>
<p>4. Next, click on "Add Folder to User Libraries" This opens a window in either Windows Explorer or Mac Finder depending on your system.</p>
<p><img src="https://cdn.shopify.com/s/files/1/0267/7825/files/2-add-folder.jpg?v=1700066624" alt="EZdrummer 2 - Add folder dialog" data-mce-fragment="1" data-mce-src="https://cdn.shopify.com/s/files/1/0267/7825/files/2-add-folder.jpg?v=1700066624"></p>
<p>5. Navigate to the folder you wish to install.</p>
<h3>Finding the Groove Monkee MIDI Files</h3>
<p>All of our MIDI files are stored in the folder named "Other MIDI Mappings". Look for the folder that ends with "Toontrack". Example: "Blues Classics Toontrack".</p>
<p><strong>IMPORTANT</strong>: You need the folder <em>inside</em> the "Toontrack" folder.</p>
<p><strong>Mega Pack users</strong></p>
<p>If you have our <a href="https://groovemonkee.com/products/mega-pack" title="Groove Monkee Mega Pack" target="_blank">Mega Pack</a>, open the <span data-mce-fragment="1">"Other MIDI Mappings" folder and </span>l<span data-mce-fragment="1">ook for the zip file that ends with "Toontrack". Extract that zip file to your hard drive. </span></p>
<p><strong>Mega Pack</strong>: you may install the entire unextracted Toontrack folder rather than installing each individual folder.</p>
<p>6. Select the folder you want to install and click "Select Folder" to return to the previous screen.</p>
<p>7. Click "Ok" to begin the installation process.</p>
<p>For a single pack, installation should happen almost instantaneously. It may take a minute or two to install our Mega Pack.</p>
<h3>EZdrummer 2 Search</h3>
<p>One benefit of this installation method is that it adds the files to EZdrummer's Search feature by default. In the image below, the Ballads pack was installed and those files will appear in search automatically.</p>
<h3></h3>
<p><img src="https://cdn.shopify.com/s/files/1/0267/7825/files/3-pack-plus-search-added.jpg?v=1700067480" alt="EZdrummer 2 User Files View" data-mce-fragment="1" data-mce-src="https://cdn.shopify.com/s/files/1/0267/7825/files/3-pack-plus-search-added.jpg?v=1700067480"></p>
<h3></h3>
<h3>Installed Files</h3>
<p>Once the files are installed, you'll see them on the left side of the "Browser" window under "User Libraries".  The image below shows our "<a href="https://groovemonkee.com/products/ballad-midi-drum-loops" title="Groove Monkee Ballads" target="_blank">Ballads</a>" pack after installation.</p>
<p> <img src="https://cdn.shopify.com/s/files/1/0267/7825/files/4-browser-view.jpg?v=1700067791" alt='EZdrummer 2 - Browser view" - User Libraries' data-mce-fragment="1" data-mce-src="https://cdn.shopify.com/s/files/1/0267/7825/files/4-browser-view.jpg?v=1700067791"></p>
<h3>Installation Reminders</h3>
<p>Just remember that ALL MIDI files are stored in the "Other MIDI Mappings" folder of your download. </p>
<p>Also, be sure to install the folder INSIDE our "Toontrack" folder.</p>
<p>If you have our Mega Pack, install the entire "Toontrack" folder (after extracting it).</p>
<h3>Support </h3>
<p>We offer support 7 days a week. If you have questions about our products or need additional assistance with this installation, please reach out via our <a href="https://groovemonkee.com/pages/contact-us" title="Groove Monkee Contact Information">Contact Page</a>.</p>
<p> </p>
<p> </p>
<p> </p>
<p> </p>
<p> </p>]]>
    </content>
  </entry>
  <entry>
    <id>https://groovemonkee.com/blogs/blog/auditioning-midi-drum-loops-in-cubase-12</id>
    <published>2023-08-27T06:57:41-05:00</published>
    <updated>2024-12-05T07:56:55-06:00</updated>
    <link rel="alternate" type="text/html" href="https://groovemonkee.com/blogs/blog/auditioning-midi-drum-loops-in-cubase-12"/>
    <title>Auditioning MIDI Drum Loops in Cubase 12</title>
    <author>
      <name>Groove Monkee</name>
    </author>
    <summary type="html">
      <![CDATA[Learn how to audition and play MIDI drum loops in Cubase 12 using Groove Agent 5 SE.<p><a class="read-more" href="https://groovemonkee.com/blogs/blog/auditioning-midi-drum-loops-in-cubase-12">More</a></p>]]>
    </summary>
    <content type="html">
      <![CDATA[<h2>Introduction</h2>
<p>In this post you'll learn how to audition and play MIDI drum loops in <a href="https://www.steinberg.net/cubase/" title="Cubase Home Page" data-mce-href="https://www.steinberg.net/cubase/" target="_blank">Cubase 12</a>. The process should be about the same in most recent versions of Cubase. <br data-mce-fragment="1"><br data-mce-fragment="1">We'll be using the following for this tutorial:<br data-mce-fragment="1"><br data-mce-fragment="1"> - <a href="https://www.steinberg.net/cubase/" title="Cubase Product Page" target="_blank">Cubase Elements 12</a><br data-mce-fragment="1"> - Groove Agent 5 SE (included with Cubase Elements 12) <br data-mce-fragment="1"> - Our <a href="https://groovemonkee.com/products/drum-freebie-pak-gm" title="Groove Monkee Freebie Pack" target="_blank">GM Freebie Pack</a> of MIDI drum loops (optional)<br data-mce-fragment="1"> <br data-mce-fragment="1">To audition the MIDI files, we'll be using the "Browser" tab in Groove Agent 5.</p>
<h3>Drum Kit</h3>
<p>I'll be using the "Break me down" kit that comes with Groove Agent 5 SE. I've selected it because it generally follows the General MIDI (GM) mapping standard.</p>
<p>Feel free to use whatever kit you like but please be sure the kit and your MIDI loops follow the same mapping scheme!</p>
<h3>Getting Started</h3>
<p>For this tutorial, I created a 'Groove Monkee' folder in my 'Documents' folder and saved our some MIDI files there. It's a good idea to organize and store your MIDI drum loops in one location so you can find them quickly. </p>
<h3>Open Cubase</h3>
<p>To get started, open Cubase. Then create a new project. Name it anything you like.</p>
<p> <strong>Note</strong>: you can also launch Groove Agent in stand alone mode.</p>
<h3>Adding Groove Agent</h3>
<p>Next, add Groove Agent 5 SE to your Cubase project. Here's one way you can do it:</p>
<p>1. Right click to the left of the Cubase track area and select "Add Instrument Track"</p>
<p>2. Select Groove Agent for the Instrument.</p>
<p> Adding Groove Agent will also create an empty MIDI track. You can drag and drop MIDI drum loops there.</p>
<h3>Load a Kit into Groove Agent</h3>
<p>Load the kit called "Break me down". It's categorized in Groove Agent as "Rock/Metal" with a "Sub Style" of "Alternative Rock"</p>
<p>Again, I chose this kit because it follows the GM mapping standard. This ensures that it will play GM mapped MIDI drum loops correctly.</p>
<p>Some of the other Groove Agent 5 SE kits are GM mapped also. I inspected a bunch of the kits and here's a list of those that follow the GM mapping standard:</p>
<p><img alt="Groove Agent Kits" src="https://cdn.shopify.com/s/files/1/0267/7825/files/cubase_gm_kits.png?v=1617999093"></p>
<p><a href="https://bonzo.groovemonkee.com/resources/docs/cubase_gm_mapped_kits.pdf" title="Groove Agent GM mapped kits" target="_blank">Click here to download a PDF list of the kits</a></p>
<p><strong>Note</strong>: It's probable that other kits follow the GM standard as well</p>
<h3>Play a MIDI Drum Loop</h3>
<p>While there are multiple ways to play MIDI loops in Cubase, we'll be using Groove Agent 5 here. Alternatives include the Cubase Media Bay and the Loop Browser. </p>
<p>To play MIDI files in Groove Agent 5 SE, follow these steps:</p>
<ul>
<li>Click on the folder-shaped icon on the right side of Groove Agent to open the "Load Panel" (just above and to the right of the drum kit image)</li>
<li>Click on "Browser"</li>
<li>Navigate to your MIDI files folder  </li>
<li>Select a file and play it</li>
</ul>
<p> <strong>Note</strong>: you'll find the play controls on the bottom right side of <span data-mce-fragment="1">Groove Agent when the "Load Panel" is open.</span></p>
<h3>Drag a Loop into Cubase</h3>
<p>Select any MIDI drum loop and drag it into your the MIDI track assigned to Groove Agent. Be sure to adjust the tempo if necessary!</p>
<p><strong>Note</strong>: we add the tempo to the beginning of each file name. The time signature is listed just after the tempo. We don't add the time signature if it's 4-4.</p>
<p><strong>Example</strong>: "088 12-8 Slow Blues" has a tempo of 88 BPM and a time signature of 12-8.</p>
<p>No sound? Check to make sure that you've loaded a kit. If necessary, check your track and audio settings too.</p>
<h3>Conclusion</h3>
<p>That's it! It's very easy to browse, audition and play MIDI drum loops using Cubase and Groove Agent. Again, just be sure that the drum kit and your drum loops follow the same mapping scheme.</p>
<h3>Questions?</h3>
<p>If you have questions about this post or any of our products, please contact us. <a href="https://groovemonkee.com/pages/contact-us" title="Groove Monkee Contact Information">Click here to view our contact information</a></p>]]>
    </content>
  </entry>
  <entry>
    <id>https://groovemonkee.com/blogs/blog/how-to-use-the-free-version-of-ssd5-5</id>
    <published>2023-04-04T12:17:54-05:00</published>
    <updated>2023-04-13T14:24:17-05:00</updated>
    <link rel="alternate" type="text/html" href="https://groovemonkee.com/blogs/blog/how-to-use-the-free-version-of-ssd5-5"/>
    <title>How to Use the Free Version of SSD5.5</title>
    <author>
      <name>Groove Monkee</name>
    </author>
    <summary type="html">
      <![CDATA[Learn how to use the Free version of SSD5 plus get links to free MIDI and General MIDI IOMaps.<p><a class="read-more" href="https://groovemonkee.com/blogs/blog/how-to-use-the-free-version-of-ssd5-5">More</a></p>]]>
    </summary>
    <content type="html">
      <![CDATA[<p>In this post I'll discuss how you can use a really great sounding FREE VST drum app: <a href="https://stevenslatedrums.com/ssd5/#SSD5FREE" target="_blank" title="SSD5.5 Free Version" rel="noopener noreferrer">Steven Slate Drums v.5.5</a>.</p>
<p>I've also provided a link to some free MIDI files for SSD5.</p>
<p>Finally, I created two SSD5 'IOMaps' that allow you to use MIDI files with SSD5 that are mapped according the General MIDI (GM) standard.</p>
<p><strong>Note</strong>: Sometimes I'll refer to SSD5.5 as SSD5. For the purposes of this post, they are the same.</p>
<h3>Installing the Free Version of SSD5.5 </h3>
<p>1. If necessary, sign up for a free account at the <a href="https://stevenslatedrums.com/" target="_blank" title="Steven Slate Drums home page" rel="noopener noreferrer">Steven Slate Drums web site</a></p>
<p>2. Go to the 'YOUR PRODUCTS' section of your account and click on 'SSD5.5 FREE'</p>
<p>3. Download the installer for your operating system (Windows or Mac).</p>
<p>4. Follow their instructions to complete the installation.</p>
<h3>SSSD5.5 Free Overview</h3>
<p>The free version includes 3 kits and some MIDI files. The kits, like almost all Slate kits are fantastic. This is a serious, pro-level drum app!
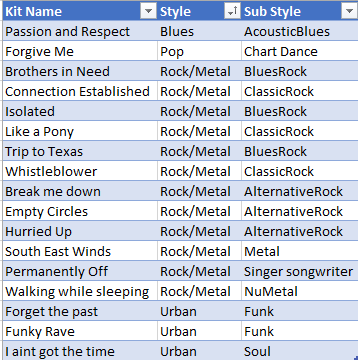
 </p>
<h3>Kit Tab</h3>
<p>This tab is actually labeled 'Create'. You can select either factory kits or user kits, if any. The kits are arranged in categories although the free version only includes rock kits.</p>
<p>To load a kit, just double click on it.
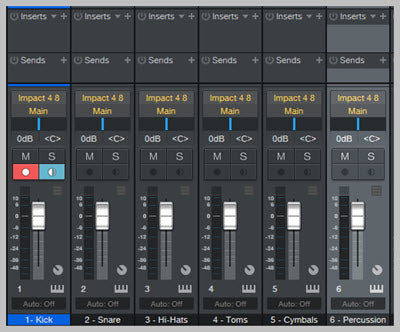
 </p>
<h3>Mixer Tab</h3>
<p>The app has a professional-level mixer tab that allow you to control every aspect of each individual instrument. You can control the kick (in/out), snare (top/bottom), hi-hat, all toms individually and the ride. You also get controls for the overhead mics and the two room mics.</p>
<p>Here's an image of the mixer tab:</p>
<p><img src="https://cdn.shopify.com/s/files/1/0267/7825/files/mixer_page_699a91d5-81ad-409d-aba3-80e7cd9b1dae_600x600.png?v=1680530565" alt="SSD5 Mixer Tab"></p>
<h4>Grooves Tab</h4>
<p>Click on the grooves tab and you'll be able to audition MIDI files and drag and drop them into your project.</p>
<p>At the bottom of the Grooves tab you'll find some convenient controls as shown in the image below. They are: auto-play, play and loop/repeat. You can also adjust the playback speed (1/2, 1x 2x) and dynamics.</p>
<p><img src="https://cdn.shopify.com/s/files/1/0267/7825/files/groove_controls_600x600.png?v=1680525623" alt="SSD5 Grooves Tab"></p>
<h3>SSD5 MIDI File Notes</h3>
<p>Steven Slate Drums uses a proprietary mapping scheme. This means that you can't play MIDI files mapped for the General MIDI standard. The files need to be mapped for SSD5 or one of the other supported apps such as EZdrummer or Addictive Drums.</p>
<p>
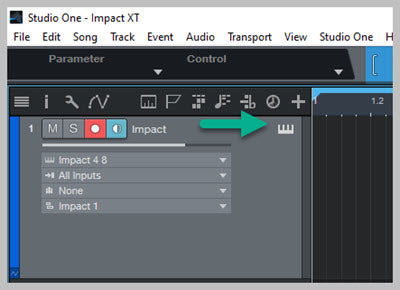
To play other MIDI files, you need to load an appropriate 'IOMap'. To do this, go to the 'Map' tab and select a map using the 'Load Preset' button on the bottom right side.</p>
<p>Here's a listing of the 'IOMaps' included with SSD5:</p>
<p>Ad2<br>Alesis DM10<br>Alesis Strike<br>Bfd3<br>EZDrummer2<br>Pearl Mimic Pro<br>Roland TD30<br>Studio Drummer<br>Superior3<br>Yamaha DTX900<br>Yamaha DTXplorer</p>
<p><strong>Note</strong>: All of our <a href="https://groovemonkee.com/collections/midi-loops" target="_blank" title="Groove Monkee MIDI Loops" rel="noopener noreferrer">MIDI drum loop packs</a> (except our 'Freebies') include MIDI  files mapped for SSD5 (plus over 20 others).</p>
<h3>Playing General MIDI Files</h3>
<p>If you look at the list of IOMaps above you'll notice one glaring omission: General MIDI. While the '<span>Roland TD30' IOMap is very close, it's far from perfect. The same can be said for the EZdrummer and Superior Drummer maps. </span></p>
<p><span>To ensure that you can play all GM (General MIDI) files correctly, I've created two SSD5 IOMaps. You can download them using the link below:</span></p>
<p><a href="https://bonzo.groovemonkee.com/resources/downloads/SSD5_GM_IOMAPS.zip" title="SSD5 General MIDI  IOMaps"><span>Download SSD5 General MIDI IOMaps</span></a></p>
<h4><span>About the IOMaps</span></h4>
<p><span>One map uses the standard hi-hat and ride articulations (tips). Use this when you need a lighter feel.</span></p>
<p><span>The other map ('Shanks') can be used for rock, hard rock, etc.</span></p>
<h4><span>Installing the IOMaps</span></h4>
<p>To install the IOMaps, unzip (extract) the file you downloaded (link above). Then copy the two files into your SSD5 'IOMaps' folder.</p>
<h4>Finding the IOMaps folder</h4>
<p>The 'IOMaps' folder is in your SSD5 'Library' folder. It's very easy to get the location of your Library folder.</p>
<p>1. Open SSD5 if necessary</p>
<p>2. Click on the 'Settings' tab</p>
<p>3. Near the top, you'll see a folder path as shown in the image below: </p>
<p><img src="https://cdn.shopify.com/s/files/1/0267/7825/files/base_directory_600x600.png?v=1680530690" alt="SSD5 Library Folder Location"></p>
<p>4. Open that location using Finder (Mac) or File Explorer (Windows)</p>
<p>5. Paste the two IOMaps into the 'IOMaps' folder</p>
<p><strong>Note</strong>: You may have to restart SSD5 to see the newly installed IOMaps.</p>
<h4>Using the General MIDI IOMaps</h4>
<p>Open the SSD5 'Map' tab. S<span>elect a map using the 'Load Preset' button on the bottom right side. </span></p>
<p><span>That's it! You should now be able to play MIDI files mapped per the General MIDI (GM) standard.</span></p>
<h4>Free General MIDI Files</h4>
<p>I created a small sample of GM files you can use to test the SSD5 GM IOMaps. You can download the files using the link below:</p>
<p><a href="https://bonzo.groovemonkee.com/resources/downloads/Groove_Monkee_GM_Samples.zip" title="Groove Monkee General MIDI Files">Download GM Mapped MIDI Files</a></p>
<h4>Installing MIDI Files into SSD5</h4>
<p>Installing MIDI files into SSD5 is also very easy. </p>
<p>1. Open your SSD5 'Library' folder. See the instructions above ('Finding the IOMaps folder').</p>
<p>2. Open the 'Grooves' folder.</p>
<p>3. Paste the folder into your SSD5 'Grooves' folder.</p>
<h4>Specially Formatted SSD5 Folders</h4>
<p>To view MIDI files in the SSD5 'Grooves' tab, the files must be stored in folders that are formatted correctly. Check out the image below to see the correct way to name folders for SSD5.</p>
<p><strong>Note</strong>: The free files linked above are formatted correctly.</p>
<p><img src="https://cdn.shopify.com/s/files/1/0267/7825/files/folder_structure_600x600.jpg?v=1680532388" alt="SSD5 Folder Naming Example"></p>
<p>SSD5 looks for 'song' folders with one or more 'parts' folders inside. Each parts folder can hold grooves, fills, intros or anything else you like. It's really up to you.</p>
<p><strong>Note</strong>: if you buy one of our <a href="https://groovemonkee.com/collections/midi-loops" target="_blank" title="Groove Monkee MIDI Drum Packs" rel="noopener noreferrer">MIDI Drum Loop packs</a>, we have done all of this work for you. The files are also mapped to work with default SSD5 drum mapping so you don't need to change the IOMap.</p>
<h4>Renaming Folders for SSD5</h4>
<p>Here's what you need to do if your folders are not ready for SSD5.</p>
<p>1. add '.lib' to the top-level folder. For example, if you have a folder of MIDI files called 'Cool MIDI' change it to 'Cool MIDI.lib'.</p>
<p>2. For each 'song' folder inside of the top-level folder, add '.sng' to it. For example, if you have a folder called 'Jazz Beats' change it to 'Jazz Beats.sng'. </p>
<p>3. For each folder inside a song folder, add '.prt' which makes it a parts folder.</p>
<p>Here's a summary of the instructions above.</p>
<p>1. Add .lib to the top-level folder </p>
<p>2. Add .sng to each song folder in the top-level folder</p>
<p>3. Add .prt to each part folder inside every song folders</p>
<p><strong>Warning</strong>: Each song needs at least one parts folder and you cannot have parts folders inside other parts folders!</p>
<h3>Wrap Up</h3>
<p>In this post I explained how to download and install the Free version of Steven Slate Drums 5.5 aka SSD5.5 Free. </p>
<p>After describing some of the more important features of SSD5.5 like the kits, the kit and mix tabs, I explained how to play MIDI files in SSD5.5.</p>
<p>After that I covered the topic of IOMaps, how to load them and the fact that there's no way to accurately play all General MIDI files without an IOMap.</p>
<p>Then I explained how to download and install two custom General MIDI IOMaps. A discussion of General MIDI files followed along with a link to download some free GM files to test the IOMaps in SSD5.</p>
<p>Finally, I discussed the folder structure needed for SSD5 MIDI files and explained how to rename your folders so you'll be able to play them in SSD5.5 using the IOMaps.</p>
<h3>Support</h3>
<p>Feel free to contact us with questions about using our files with Steven Slate Drums. Our contact info can be found on our<span> </span><a href="https://groovemonkee.com/pages/contact-us" title="Groove Monkee Contact Information">Contact Us</a><span> </span>page.</p>
<p> </p>
<p> </p>
<p> </p>
<p> </p>
<p> </p>
<p>  </p>
<p> </p>
<p> </p>
<p> </p>
<p> </p>
<p> </p>
<p> </p>
<p> </p>
<p> </p>
<p> </p>
<p> </p>
<p> </p>
<p> </p>
<p> </p>
<p> </p>
<p> </p>
<p> </p>]]>
    </content>
  </entry>
  <entry>
    <id>https://groovemonkee.com/blogs/blog/how-to-build-a-drum-kit-in-studio-one</id>
    <published>2023-02-17T11:14:00-06:00</published>
    <updated>2023-02-17T11:14:00-06:00</updated>
    <link rel="alternate" type="text/html" href="https://groovemonkee.com/blogs/blog/how-to-build-a-drum-kit-in-studio-one"/>
    <title>How to Build a Drum Kit in Studio One</title>
    <author>
      <name>Groove Monkee</name>
    </author>
    <summary type="html">
      <![CDATA[Learn to build a Studio One drum kit that's compatible with the General MIDI standard. Includes a link to a template you can download to get you started.<p><a class="read-more" href="https://groovemonkee.com/blogs/blog/how-to-build-a-drum-kit-in-studio-one">More</a></p>]]>
    </summary>
    <content type="html">
      <![CDATA[<p>In this post I'll explain how you can create your own drum kit for Studio One's dedicated drum app, Impact XT.</p>
<p>This kit will be compatible with the General MIDI (GM) standard. This will allow you to play any MIDI drum loops that follow the GM standard and share your grooves and projects with others easily. </p>
<p>Building a kit is actually easy - you just have to drag and drop drum samples onto pads in Impact XT. </p>
<p><strong>Free Template</strong>: I've included a link below to download a GM compatible preset to get you started. You can use it each time you make a preset for Impact XT.</p>
<p><strong>Pro Tips</strong>: I also included a couple of tips at the end to help you get more realistic sounding drum tracks.</p>
<p>Let's get started! </p>
<h3>General MIDI (GM) Compatibility</h3>
<p>If you want to play MIDI drum loops produced by others you need a kit that follows the same layout or "mapping". The industry standard is called "General MIDI" or just "GM" for short. </p>
<p>Without a common standard, you have to rearrange some or most of the notes in every single file or rearrange your kit mapping (if possible). Having a standard avoids all of this unnecessary work and allows you to start making music immediately.  </p>
<p>All of our MIDI Drum Loop packs include files mapped per the GM standard. Click here to <a href="https://groovemonkee.com/collections/midi-loops" title="Groove Monkee MIDI Drum loops">Browse our MIDI Drum Loop Collection</a></p>
<p><strong>Note: </strong>As of early 2023, only ONE of the kits provided with Impact XT follow the GM standard. You can view this <a href="https://groovemonkee.com/blogs/blog/studio-one-6-playing-midi-drum-loops" target="_blank" title="Playing MIDI Loops in Studio One" rel="noopener noreferrer">blog post on Studio One 6</a> to learn more.</p>
<h4></h4>
<h3>Download the GM Template</h3>
<p>First, download our <a href="https://bonzo.groovemonkee.com/resources/downloads/studio_one/GM_DRUMS.preset" target="_blank" title="Impact XT GM compatible preset" rel="noopener noreferrer">Free Impact XT GM Template</a>. The pads in this preset are already named with all of the drum kit pieces needed for a complete GM drum kit . You can reuse it as many times as necessary. </p>
<p>Save the preset in your Studio One "presets" folder for Impact. You should be able to find the <span>"presets"</span> folder here:</p>
<p>Documents\Studio One\Presets\PreSonus\Impact</p>
<p><strong>PC</strong>: C:\Users\&lt;username&gt;\Documents\Studio One\Presets\PreSonus\Impact</p>
<p><strong>Mac</strong>: /Users/&lt;username&gt;/Documents/Studio One/Presets/PreSonus/Impact</p>
<p>The image below shows our GM_Drums template.</p>
<p><img src="https://cdn.shopify.com/s/files/1/0267/7825/files/template_400_480x480.jpg?v=1676326392" alt="Impact XT  pads"></p>
<h3>Drum Samples Needed</h3>
<p>You'll need some drum samples to build a kit. <a href="https://bedroomproducersblog.com/2021/07/02/free-drum-kits/" target="_blank" title="Free Drum kits" rel="noopener noreferrer">Bedroomproducersblog</a> has a list of 10+ sites with good, free drum samples. Read more <a href="https://bedroomproducersblog.com/2021/07/02/free-drum-kits/" target="_blank" title="Free Drum samples" rel="noopener noreferrer">here</a>.</p>
<h3>Building a Drum Kit</h3>
<p>Building a kit with our GM preset is very easy. Here are the steps needed to make your own kit.</p>
<h4>1. Add Impact XT into Studio One</h4>
<p>Open the Studio One 'Instruments' view (F6) and then click on 'PreSonus'.</p>
<p>Drag Impact into an empty area and Studio One will create an instrument track loaded Impact as shown in the video below.</p>
<p><iframe width="560" height="315" src="https://www.youtube-nocookie.com/embed/CI1zeuw060M" title="YouTube video player" frameborder="0" allow="accelerometer; autoplay; clipboard-write; encrypted-media; gyroscope; picture-in-picture; web-share" allowfullscreen=""></iframe></p>
<p><strong>Tip</strong>: Anytime you need to view the Impact interface, click on the piano-like icon in the upper right corner of your Impact instrument track as shown in the image below.</p>
<p> <img src="https://cdn.shopify.com/s/files/1/0267/7825/files/open_impact_400_480x480.jpg?v=1676325896" alt="Open Impact XT"></p>
<h4>2. Import our GM Drums preset into Impact XT</h4>
<p>Depending on where you stored our GM preset, you may have to import it first. </p>
<p>To import a preset, click on the Impact preset menu (upper left side, next to the two arrow icons). Then click on 'Import Preset'.</p>
<p>Select to the preset you wish to import and click 'Ok'.</p>
<p><img src="https://cdn.shopify.com/s/files/1/0267/7825/files/preset_menu_400_480x480.jpg?v=1676325991" alt="Impact XT preset menu"></p>
<p>To check for our preset, scroll through the list of available Impact kits and look for <strong>GM_DRUMS</strong>.  </p>
<p><strong>Rename the preset!</strong></p>
<p>To rename the preset, select the Impact preset menu (<span>upper left side next to the two arrow icons) and select 'Store Preset'. On this page you can rename the preset, add an optional description and save the preset to a specific subfolder (optional).</span></p>
<h4>3. Open the Studio One 'Files' view</h4>
<p>Studio One makes it easy to drag samples into Impact pads using their 'Files' view. You can audition audio files, MIDI files and more in this view.</p>
<p>To open the Files view, select 'Browser' from the View menu. The browser window should open on the right-hand side of Studio One.</p>
<p><strong>Note</strong>: The short cut is F9 on both Mac and PC. </p>
<p>Then select the 'Files' tab to open the Files view. In this window, you can browse for files that are stored anywhere on your computer.</p>
<h4>4. Adding a sample to a pad</h4>
<p>Navigate to your drum samples using the File view window. Select a drum sample and drag it onto a pad in Impact. Rename the pad if necessary.</p>
<p><iframe width="560" height="315" src="https://www.youtube-nocookie.com/embed/24RY4xwyeik" title="YouTube video player" frameborder="0" allow="accelerometer; autoplay; clipboard-write; encrypted-media; gyroscope; picture-in-picture; web-share" allowfullscreen=""></iframe></p>
<p>You can also assign a choke group, assign an output channel and tweak the sample's sound in many different ways.</p>
<p><strong>Note</strong>: See below for additional information about choke groups and channel assignments. We've already created a choke group for the hi-hats and we are using 6 mixing channels for the kit.</p>
<p>Continue building your drum kit like this until you're satisfied with it. Don't forget to save your work occasionally!</p>
<h4>Cymbals</h4>
<p>The GM standard has 4 cymbals (not counting the 2 rides): crash 1, china, splash and crash 2.</p>
<p>Our GM template works as expected even if you only have 2 crash cymbals.  That's because Crash 1 is routed to the Splash cymbal and Crash 2 is routed to the China cymbal.</p>
<p>If you have samples for the splash and/or the china, you can add those in bank 'B'. Impact has a total of 7 banks (A through H). You can select a bank along the left edge of Impact.</p>
<p><strong>Pad Routing </strong></p>
<p>The image below shows the default instrument routing for Crash 1. You can change or remove the alternative instrument. To change it, type in a new value. It will accept either a note like 'C2' or a number like 52. To delete it, just click and delete the value.</p>
<p><img src="https://cdn.shopify.com/s/files/1/0267/7825/files/pad_routing_480x480.jpg?v=1676325796" alt="Impact XT pad routing"></p>
<h4>Toms</h4>
<p>Our preset covers all 6 toms specified in the GM mapping because two of the slots handle two toms each.</p>
<p>The High Rack Tom covers MIDI notes 50 and 48 while the Floor Tom covers MIDI notes 43 and 41, the high and low floor toms respectively.</p>
<h3>Pro Tip 1: Choke Groups</h3>
<p>To silence a sound you need to 'choke' it. A 'choke group' allows you to define a set of sounds that will silence each other automatically.</p>
<p>The most common and useful example involves hi-hats. To be realistic, you need to silence an open hi-hat whenever a hi-hat 'pedal' or 'closed' hi-hat is triggered.</p>
<p><strong>Note</strong>: our GM Drums preset includes a choke group for the hi-hats.</p>
<h4>How to Create a Choke Group </h4>
<p>Click on one of the pads. On the upper right side of Impact you'll see information about the pad including a 'Choke' setting. Select a number for the choke group. </p>
<p>Next, assign each of the related pads to the same choke group. Finally, update your preset. On the upper left side of Impact, there's a an icon to the left of the two arrow icons. Click that icon and select <em>'Update preset</em>'.</p>
<h3>
<span>Pro Tip 2: </span>Multi-Channel Mixing</h3>
<p>Separating your drum sounds into many different channels can dramatically improve the quality of your sound.</p>
<p>By default, Impact has 9 channels you can use. You can group related sounds together into separate channels for better mixes. Then you can control each group separately. You can apply different effects to each group and adjust the panning, volume, etc. </p>
<p>Our GM Drums preset is configured to use six channels. </p>
<ol>
<li>Kick</li>
<li>Snares</li>
<li>Hi-Hats</li>
<li>Toms</li>
<li>Cymbals</li>
<li>Percussion</li>
</ol>
<p>For convenience, you can rename the channels in the Studio One 'Mix' view as shown at the bottom of the image below.</p>
<p><img src="https://cdn.shopify.com/s/files/1/0267/7825/files/channel_renamed_400_480x480.jpg?v=1676326253" alt="Rename a mixer channel in Studio One"></p>
<h4>Changing a Pad's Channel</h4>
<p>A pad's channel assignment is visible in the lower right side of the pad. To change the pad's channel, click on the number and select another channel. Then save (update) your kit when finished.</p>
<h4>Studio One Effects for Drums</h4>
<p>Studio One includes a very generous amount of effects and effect groups. You'll find effect groups designed for your entire kit along with those made for specific drum sounds like kick and snare. </p>
<p>Open the Studio One 'Mix' tab, select a channel's 'Insert' drop down and then click 'Drums' to see what's available. You'll find some really cool, easy to use effects here! </p>
<p><img src="https://cdn.shopify.com/s/files/1/0267/7825/files/effect_presets_480x480.jpg?v=1676326330" alt="Studio One effect presets"></p>
<h3>Support</h3>
<p>Feel free to contact us with questions about using our files with Studio One. Our contact info can be found on our <a href="https://groovemonkee.com/pages/contact-us" title="Groove Monkee Contact Information">Contact Us</a> page.</p>]]>
    </content>
  </entry>
  <entry>
    <id>https://groovemonkee.com/blogs/blog/studio-one-6-playing-midi-drum-loops</id>
    <published>2023-01-18T11:44:59-06:00</published>
    <updated>2025-07-11T03:49:40-05:00</updated>
    <link rel="alternate" type="text/html" href="https://groovemonkee.com/blogs/blog/studio-one-6-playing-midi-drum-loops"/>
    <title>Studio One 6 - Playing MIDI Drum Loops</title>
    <author>
      <name>Groove Monkee</name>
    </author>
    <summary type="html">
      <![CDATA[Learn how to play MIDI loops in Studio One 6 using the Impact XT instrument. Impact XT is included in Studio One.<p><a class="read-more" href="https://groovemonkee.com/blogs/blog/studio-one-6-playing-midi-drum-loops">More</a></p>]]>
    </summary>
    <content type="html">
      <![CDATA[<p>Are you looking for software that auditions MIDI files easily? Or maybe you 're already using Studio One 6 and would like to learn how to play MIDI drum loops? If so, I hope this post will help you.</p>
<p><strong>Note</strong>: These instructions should also work for Studio One version 5 and possibly later versions as well.</p>
<p>In this post, I'll discuss how to play MIDI drum loops in version 6 of Studio One by <a rel="noopener noreferrer" title="Presonus Home page" href="https://shop.presonus.com/" target="_blank">PreSonus</a>. Studio One is one of the best DAWs (Digital Audio Workstation) for those wishing to use MIDI loops in their musical productions. </p>
<p>It allows you to audition MIDI loops BEFORE importing them and has lots of other nice features as well.</p>
<h3>Adding Impact XT to Studio One</h3>
<p>To add Impact to Studio One 6 follow these steps:</p>
<p>1) Click on the 'Browse' tab (lower right corner)</p>
<p>2) Click on the 'Instruments' tab (top right side)</p>
<p>3) Click on 'PreSonus' to view all available instruments</p>
<p>4) Drag Impact into your project as shown in the video below</p>
<p><strong>Note</strong>: a track will be created for you if necessary.</p>
<p>Video: Adding Impact XT to Studio One</p>
<p><iframe title="YouTube video player" src="https://www.youtube-nocookie.com/embed/N3Zg22RZiYY" height="315" width="560"></iframe> </p>
<h3>The Best Studio One Kit for MIDI Drum Loops</h3>
<p>The best <span>Impact XT </span>kit is the "Tom Brechtlein Kit". That's because it sounds good and because it follows the General MIDI mapping standard. The other Impact kits I tried do not. As a result, they're only good for programming your own beats.</p>
<h4>Changing Kits in Impact XT</h4>
<p>The video above shows how to change kits in Impact. Here's how you do it:</p>
<p>Look for the drop down box just above 'Impact XT' near the top left side of Impact XT. It reads 'default' . Click that box and select a kit.</p>
<h4>Build your own kits</h4>
<p>You can actually build your own Impact kits using any drum samples you have. You can even edit the each pad's parameters to dial in the sound you're looking for.</p>
<h3>The Studio One 'Files' Window</h3>
<p>You can audition MIDI files using the 'Files' window. This window allows you to browse through the MIDI files on your hard drive and play them using any instrument you've loaded into your project.</p>
<p>In the video below, I open the Files window and play a MIDI file.</p>
<p><iframe title="YouTube video player" src="https://www.youtube-nocookie.com/embed/jLVAQ0EKxkQ" height="315" width="560"></iframe></p>
<h4>File Window Controls </h4>
<p>The image below shows the controls available in the Files window. </p>
<p><img alt="Studio One Files Window Controls" src="https://cdn.shopify.com/s/files/1/0267/7825/files/Files_Window_Play_Controls-text.jpg?v=1673987515"></p>
<h4><br></h4>
<p>Here's a summary of the controls.</p>
<ol>
<li>Play button</li>
<li>Stop</li>
<li>Play file in a loop</li>
<li>Play at your song's tempo</li>
<li>Displays the active instrument (what you'll hear)</li>
<li>File length in beats</li>
</ol>
<p><strong>Warning</strong>: You must select an instrument such as Impact XT when auditioning MIDI files in Files window. You won't hear anything unless you select an instrument! </p>
<p>You can also build a drum track by adding MIDI files into your Studio One project. I'll cover that in the next section.</p>
<h3>Adding MIDI Files into Studio One</h3>
<p>To build a drum track in Studio One, you can drag MIDI files from the Files window as shown in the video below. Select a file and drag it onto to an existing drum track.</p>
<p><iframe title="YouTube video player" src="https://www.youtube-nocookie.com/embed/1wewwG0FVkc" height="315" width="560"></iframe></p>
<h4>Looping </h4>
<p>As show in the video above, you can also turn on the 'looping' feature allowing the file to play continuously. To set the loop's end points, place your mouse on the upper left of the MIDI clip until your cursor changes shape and then drag to the right, stopping at the end of the file.</p>
<p>The image below shows the most commonly used controls such as play, loop, etc.</p>
<p><strong>Tip</strong>: You can also start and stop play using the spacebar.</p>
<div style="text-align: left;"><img style="float: none;" alt="Studio One Main controls" src="https://cdn.shopify.com/s/files/1/0267/7825/files/Main_Play_Controls-text_600x600.jpg?v=1673988479"></div>
<div>
<h3>Viewing the MIDI Data</h3>
</div>
<p>To view the actual MIDI data, double click on the loop. This should open the Editor window. When using Impact, you'll be able to see the drum names on the left side of the window with the MIDI data to the right. as shown in the image below. <img alt="Studio One MIDI Editor window" src="https://cdn.shopify.com/s/files/1/0267/7825/files/Editor_Window-Drum-names_600x600.png?v=1674055289"></p>
<p>You can edit the MIDI data in this view. For example, you could select all of the ride hits and drag them to the hi-hat. You can also edit individual hits (velocity, timing, drum type).</p>
<h3>Summary</h3>
<p>PreSonus Studio One 6 is a good choice if you're looking for recording software that allows you to audition MIDI files easily. You can browse and audition MIDI files from anywhere on your hard drive and then drag them into Studio One to arrange a drum track very quickly. You can also change tempo, loop sections and edit the files easily.</p>
<p>The best Impact kit I've found is <span>the "Tom Brechtlein Kit" but you can always build your own or use any other VST instrument.</span></p>
<p><span>PreSonus offers a free trial that includes Impact XT so you can test it out yourself.</span></p>
<h4>Need Help?</h4>
<p>Feel free to contact us with questions about using our files with Studio One. Our contact info can be found on our <a title="Groove Monkee Contact Information" href="https://groovemonkee.com/pages/contact-us">Contact Us</a> page.</p>
<p> </p>]]>
    </content>
  </entry>
  <entry>
    <id>https://groovemonkee.com/blogs/blog/how-to-install-midi-files-into-addictive-drums-2</id>
    <published>2022-12-15T10:00:15-06:00</published>
    <updated>2022-12-15T10:00:15-06:00</updated>
    <link rel="alternate" type="text/html" href="https://groovemonkee.com/blogs/blog/how-to-install-midi-files-into-addictive-drums-2"/>
    <title>How To Install MIDI Files into Addictive Drums 2</title>
    <author>
      <name>Groove Monkee</name>
    </author>
    <summary type="html">
      <![CDATA[Learn how to install our MIDI files into Addictive Drums 2.<p><a class="read-more" href="https://groovemonkee.com/blogs/blog/how-to-install-midi-files-into-addictive-drums-2">More</a></p>]]>
    </summary>
    <content type="html">
      <![CDATA[<p>In this post I'll explain how to install our MIDI files (paid) into <a href="https://www.xlnaudio.com/" target="_blank" title="XLN Audio" rel="noopener noreferrer">Addictive Drums 2</a>. </p>
<p><span>All <a href="https://groovemonkee.com/collections/midi-loops" title="Groove Monkee MIDI Drum Loops">Groove Monkee MIDI Drum packs</a> are compatible with Addictive Drums 1 and 2. If you make a purchase you’ll find that our files are mapped correctly, have categories, tempo, time signature and will appear in searches.</span></p>
<p><span> <strong>Note</strong>: Our Free MIDI packs do not have files for Addictive Drums.</span></p>
<p><span>The installation process is just 4 easy steps so let's get started!</span></p>
<h3><span>Step 1: Find the Groove Monkee files</span></h3>
<p><span>Our Addictive Drums loops are stored in the "Other MIDI Mappings" folder of your download. The AD folder will end with "AD".</span></p>
<p><span><strong>Note</strong>: The Mega Pack has a zip file named 'Mega Pack AD'. Decompress that file and install the folder inside.</span></p>
<p><span>Copy the folder so you can paste it into your AD2 External MIDI folder.</span></p>
<p><span>The video below demonstrates this step.</span></p>
<p><span><iframe width="560" height="315" src="https://www.youtube-nocookie.com/embed/_5FD_gfydZ4" title="YouTube video player" frameborder="0" allow="accelerometer; autoplay; clipboard-write; encrypted-media; gyroscope; picture-in-picture" allowfullscreen=""></iframe></span></p>
<h3>Step 2: Open the AD External MIDI Folder</h3>
<p><span>Open Addictive Drums and click on the "?" menu in the upper right corner.</span></p>
<p><span>Select 'Open External MIDI Folder' as shown in the video below.</span></p>
<p><span><iframe width="560" height="315" src="https://www.youtube-nocookie.com/embed/b7vz-OdhFJg" title="YouTube video player" frameborder="0" allow="accelerometer; autoplay; clipboard-write; encrypted-media; gyroscope; picture-in-picture" allowfullscreen=""></iframe></span></p>
<h3><span>Step 3: Paste our AD folder into your External MIDI Folder</span></h3>
<p><span>Paste our folder into your External MIDI Folder as shown in the video clip below.</span></p>
<p><span><iframe width="560" height="315" src="https://www.youtube-nocookie.com/embed/y2mz0IE0wrI" title="YouTube video player" frameborder="0" allow="accelerometer; autoplay; clipboard-write; encrypted-media; gyroscope; picture-in-picture" allowfullscreen=""></iframe><br></span></p>
<h3><span>Step 4: Refresh your AD Library</span></h3>
<p><span>The files won't appear inside Addictive Drums until you refresh your library.</span></p>
<p><span>To refresh, click on the "?" menu in the upper right corner and select 'Refresh MIDI Library'.</span></p>
<p><span><iframe width="560" height="315" src="https://www.youtube-nocookie.com/embed/RT42cL4zwXA" title="YouTube video player" frameborder="0" allow="accelerometer; autoplay; clipboard-write; encrypted-media; gyroscope; picture-in-picture" allowfullscreen=""></iframe></span></p>
<p>That's all there is to it! But if you need assistance, please contact us. You'll find our contact info on our <a href="https://groovemonkee.com/pages/contact-us" title="Groove Monkee Contact Info">Contact Us</a> page.</p>
<p>Thanks for reading and enjoy the grooves! </p>
<p> </p>
<p> </p>]]>
    </content>
  </entry>
  <entry>
    <id>https://groovemonkee.com/blogs/blog/how-to-install-midi-files-into-superior-drummer-3-with-a-linked-folder</id>
    <published>2022-11-20T13:49:01-06:00</published>
    <updated>2023-12-05T06:29:39-06:00</updated>
    <link rel="alternate" type="text/html" href="https://groovemonkee.com/blogs/blog/how-to-install-midi-files-into-superior-drummer-3-with-a-linked-folder"/>
    <title>How to Install MIDI Files into Superior Drummer 3 with a Linked Folder</title>
    <author>
      <name>Groove Monkee</name>
    </author>
    <summary type="html">
      <![CDATA[<span>Learn the easiest method for installing our MIDI Files into Superior Drummer 3. </span><p><a class="read-more" href="https://groovemonkee.com/blogs/blog/how-to-install-midi-files-into-superior-drummer-3-with-a-linked-folder">More</a></p>]]>
    </summary>
    <content type="html">
      <![CDATA[<p>There are several ways to install MIDI files into <a title="Toontrack web site" href="https://www.toontrack.com/" target="_blank">Superior Drummer 3</a>. In another <a title="Install MIDI into Superior Drummer 3" href="https://groovemonkee.com/blogs/blog/how-to-install-midi-into-superior-3">blog post</a>, I discuss an alternative method in detail.<br><br>This method is by far the easiest and fastest but you <strong>cannot move or delete the files once you've installed them</strong>. If you do, you'll have to remove the linked folder and install it again.</p>
<h3>Instructions</h3>
<p>First, store the folder you want to install in a permanent location on your computer.</p>
<h3>Finding Our Toontrack Files</h3>
<p>To find our Toontrack files, open your product folder and then open the 'Other MIDI Mappings' folder. <br><br>Look for the folder that ends with 'Toontrack'. Example: 'Blues Toontrack'</p>
<ul>
<li>For individual packs, install the folder inside of our 'Toontrack' folder.</li>
<li>For our <a title="Groove Monkee Mega Pack" href="https://groovemonkee.com/collections/bundles/products/mega-pack" target="_blank">Mega Pack</a>, install the folder named 'Mega Pack Toontrack'. This is stored as a zip file so you'll have to extract it first. </li>
</ul>
<p>Next, open Superior Drummer 3 and install the files per the instructions below.</p>
<ol>
<li>click on the 'Grooves' tab</li>
<li>click on 'Options' (upper left side)</li>
<li>click on 'User MIDI and Linked folders'</li>
<li>click on 'Add linked folder'</li>
<li>select the folder you wish to install and click 'open'</li>
</ol>
<p><strong>IMPORTANT</strong>: Make sure you activate the following setting:</p>
<p><span>Grooves &gt; Options &gt; User MIDI and Linked Folders &gt; <em>Show MIDI files from Subfolders</em></span></p>
<p>The video below demonstrates the process of adding a linked folder.</p>
<p><iframe title="YouTube video player" src="https://www.youtube-nocookie.com/embed/KJ_qqIyEkzw" height="315" width="560" allowfullscreen="" allow="accelerometer; autoplay; clipboard-write; encrypted-media; gyroscope; picture-in-picture" frameborder="0"></iframe><br><br><strong>Warning</strong>: As stated above, you cannot move the linked folder. If you do, the files will no longer be available and you'll have to install the folder again.</p>
<h3>Superior Drummer 3 Compatibility</h3>
<p>All <a title="Groove Monkee MIDI Drum Loops" href="https://groovemonkee.com/collections/midi-loops">Groove Monkee MIDI Drum packs</a> are compatible with all versions of Toontrack Superior Drummer. We've been supporting their products since 2006!</p>
<h3>Questions? Need Help?</h3>
If you need assistance or have questions about our products, please let us know. You'll find our information on our <a title="Groove Monkee Contact information" href="https://groovemonkee.com/pages/contact-us">Contact Us</a> page.]]>
    </content>
  </entry>
  <entry>
    <id>https://groovemonkee.com/blogs/blog/bfd3-midi-installation</id>
    <published>2022-10-22T10:48:47-05:00</published>
    <updated>2024-09-07T05:11:45-05:00</updated>
    <link rel="alternate" type="text/html" href="https://groovemonkee.com/blogs/blog/bfd3-midi-installation"/>
    <title>BFD3 MIDI Installation</title>
    <author>
      <name>Groove Monkee</name>
    </author>
    <summary type="html">
      <![CDATA[Learn how to install our files into BFD3. Complete instructions with videos included. Fast and easy. You'll be playing along in minutes!<p><a class="read-more" href="https://groovemonkee.com/blogs/blog/bfd3-midi-installation">More</a></p>]]>
    </summary>
    <content type="html">
      <![CDATA[<p>In this post I'll explain how to install our products into <a title="BFD3 Drums by inMusicBrands" href="https://www.bfddrums.com/" target="_blank">BFD3</a> or "BFD Drums" as it is known since the company was sold to inMusic Brands. Then I'll show you how to find and play the files you just installed. This is all very easy so let's get started!</p>
<h3>Find the Files</h3>
<p>You can install our BFD2 files - they are 100% compatible with BFD3. </p>
<p>You'll find the BFD2 folder in the '<strong>Other MIDI Mappings</strong>' folder of your download. Look for the folder with 'BFD2' at the end. Some of our products have BFD3 files that you can use. There's really no difference.</p>
<p><strong>Note</strong>: This does NOT apply to our free downloads. </p>
<p>Video: the video below shows the location of the BFD2 or BFD3 files in your download</p>
<p><iframe title="YouTube video player" src="https://www.youtube-nocookie.com/embed/Q186tQbixaE" height="315" width="560" allowfullscreen="" allow="accelerometer; autoplay; clipboard-write; encrypted-media; gyroscope; picture-in-picture" frameborder="0"></iframe></p>
<h3>Install the Files</h3>
<p>To install the files, you simply copy and paste our BFD2 or BFD3 folder into your BFD3 'Grooves' folder.</p>
<h4>Find your BFD3 Grooves Folder</h4>
<p><strong>Important</strong>: There are usually two BFD3 'Grooves' folders. Do NOT use the one inside the folder named "BFD3 Core Library"! </p>
<p>BFD3 is usually installed into a folder called 'BFD Drums' inside the 'Documents' folder. You may have chosen a different location during installation. Here is the location of the user 'Grooves' folder on my computers.</p>
<p><strong>PC</strong>: C:\Users\[username]\Documents\BFD Drums\BFD3\Grooves</p>
<p><strong>Mac</strong>: <span>Users/[username]/Documents/BFD Drums/BFD3/Grooves</span></p>
<p><span>Copy our BFD2 folder and paste it into your BFD Drums/Grooves folder.</span></p>
<p><strong>Tip</strong>: you can easily find the location of your BFD3 installation by clicking on the 'Tools' menu and then selecting 'Set up content locations'.</p>
<p>The image below shows the BFD3 install location on my Mac</p>
<h4><img alt="BFD3 Content location" src="https://cdn.shopify.com/s/files/1/0267/7825/files/content-locations-page-cropped.png?v=1666361978"></h4>
<h4>Rescan user Content Paths</h4>
<p>Finally, rescan your User Content to add the files into BFD3.  </p>
<ol>
<li>Click <span>on the 'Tools' menu</span>
</li>
<li><span>Select 'Set up content locations'</span></li>
<li><span>Click on 'Rescan User Content Paths'</span></li>
</ol>
<p><span>That's it! You should now be ready to jam!</span></p>
<p><span>Video: Add new content by scanning your BFD3 user content</span></p>
<p><span><iframe title="YouTube video player" src="https://www.youtube-nocookie.com/embed/KFxvwtea1BQ" height="315" width="560" allowfullscreen="" allow="accelerometer; autoplay; clipboard-write; encrypted-media; gyroscope; picture-in-picture" frameborder="0"></iframe></span></p>
<div style="text-align: start;"></div>
<h3>Play the Files</h3>
<p>To find and play the new grooves, go to the 'Grooves' tab. Then click on the 'Library' button. You'll see a drop down list of products including ours. Select the product you want to explore and the grooves will appear in the section below.</p>
<p>To see all of the files in a specific bundle, double click on it. The individual files will appear at the very bottom of the left hand side.</p>
<p><strong>Note</strong>: the numbers listed next to the products are the total number of BUNDLES included in the product, not the total number of files. A bundle may contain up to 36 individual MIDI files. </p>
<p>In the video below, I select our 'Big Easy' pack and play a couple of grooves.</p>
<p>video: Find and play grooves from a specific product</p>
<p><iframe title="YouTube video player" src="https://www.youtube-nocookie.com/embed/I6jrRwlIDQE" height="315" width="560" allowfullscreen="" allow="accelerometer; autoplay; clipboard-write; encrypted-media; gyroscope; picture-in-picture" frameborder="0"></iframe> </p>
<h4>Need help?</h4>
<p><span>If you have questions or need support, please contact us. </span><span>Our contact information can be found on our </span><a title="Groove Monkee Contact Information" href="https://groovemonkee.com/pages/contact-us">Contact Us</a><span> page.</span></p>
<p> </p>
<p> </p>]]>
    </content>
  </entry>
</feed>
