https://iceesocial.com/blogs/icee-social-blog.atomICEE Social - The ICEE Social Blog2026-02-10T13:53:08-05:00ICEE Socialhttps://iceesocial.com/blogs/icee-social-blog/how-to-set-up-shopify-ucp-for-agentic-search-the-icee-social-guide-to-ai-driven-sales2026-02-10T13:53:08-05:002026-06-02T11:57:31-04:00How to Set Up Shopify UCP for Agentic Search: The ICEE Social Guide to AI-Driven SalesMark Perini
At ICEE Social, we believe that UCP isn't the end of the road for your website; rather, it's the AI superhighway that will bring high-intent customers to your website that never would have been prospects in the past. We view the Universal Commerce Protocol (UCP) as a lighthouse designed to spotlight your brand in a sea of competitors. The best part? Just by being on Shopify, you're already ahead of the game. We are moving from a world of "search and click" to a world of "ask and buy," and Shopify's new UCP is the bridge that puts your products directly into AI conversations.
What is UCP?
The Universal Commerce Protocol is a transformative open standard built in partnership with Google that automatically connects your store to AI agents across Google Search, Gemini, Microsoft Copilot, and ChatGPT. Instead of managing individual integrations, UCP allows your products to be discovered and purchased directly within AI conversations where customers are already shopping. It handles complex checkout flows—including discount codes, loyalty credentials, & subscriptions with zero integration friction.
Essentially, agentic commerce transforms every conversational interface into a sales channel with zero integration friction, giving you native presence wherever customers have conversations while maintaining full control from your admin panel.
Step 1: Activating Your Agentic Presence
To turn your store into a lighthouse for AI discovery, you must first enable the infrastructure within your admin.
Navigate to Settings → Sales Channels → Agentic
Look for the "Introducing agentic storefronts" module.
Click
Review how your product data is sent to Shopify Catalog for Agentic Storefronts to see exactly how your catalog appears to AI agents. The global Shopify Catalog uses your default listings automatically, so no heavy setup is required to start.
Visual guide below:
Make sure the Allow Shopify to manage for me switch is checked to enabled first and foremost. Then go down and click over to get the modal that shows how your products are being synced.
This is a free platform change where you could potentially add Agentic Description into a metafield and the agents can reference that instead of the natural description.
Here's the product specific information and how you map it:
You can also update the grouping or the options and where that should all be pulled from.
Step 2: Optimizing with "Agentic Descriptions" (AGO)
Traditional SEO helps humans find you; Agentic Growth Optimization (AGO) ensures AI agents recommend you. At ICEE Social, we specialize in mapping your data so that AI agents see the most relevant information first.
Custom Mapping: You can map where you want the product description, title, and category to come from.
Agentic Metafields: We recommend creating a specific metafield for an "Agentic Description". By mapping this field in your Default Listing settings, you can feed AI agents technical specs and high-intent data that might not belong in your front-end marketing copy.
Precision Grouping: You can also update product grouping and options to ensure the Shopify Catalog remains in perfect sync with your storefront.
Step 3: Fueling the AI Knowledge Base
An AI agent can only sell what it understands. To ensure agents represent your brand accurately, you need to manage your backend "brain" via the Shopify Knowledge Base app.
Backend Intelligence: This is not a customer-facing widget; it is a system that allows you to customize the information AI agents use when shoppers ask about your products, policies, and store details.
Strategic FAQs: The app automatically generates FAQs based on your store settings and allows you to create custom answers to highlight your unique value propositions.
Analytics: You can view analytics to see exactly what buyers are asking through AI agents, helping you refine your data to capture even more high-intent traffic.
Let ICEE Social Spotlight Your Brand
UCP is the superhighway, and ICEE Social is the partner that ensures your brand is positioned to lead the pack. We don't just "set up" accounts; we architect entire commerce systems designed for the future of search.
We can help you with:
AGI Strategy: Developing a long-term plan for Agentic Growth Optimization (AGO) to prepare your brand for the autonomous shopping era.
Site Migrations: Comprehensive technical migrations—including complex moves from Salesforce Commerce Cloud to Shopify Plus—that protect your SEO and data integrity.
Design & Development: Creating high-converting storefronts and technical solutions tailored to your specific business requirements.
Let ICEE Social Power Your Agentic Future
Setting up UCP is simple, but optimizing it for maximum ROI requires a strategic touch.
At ICEE Social, we specialize in the technical SEO and metadata architecture required to win in the agentic era. We are here to help!
Ready to turn every AI conversation into a sales channel? Contact us today to schedule an AI Commerce Audit.
]]>
https://iceesocial.com/blogs/icee-social-blog/how-we-helped-bring-nostaligia-back-to-a-beloved-toy-brand2025-05-08T17:41:01-04:002025-05-08T17:41:04-04:00How We Helped Bring Nostalgia Back to A Beloved Toy BrandMark Perini
How We Helped Bring Nostalgia Back to A Beloved Toy Brand. Migration from Salesforce Commerce Cloud over to Shopify Plus.
]]>
https://iceesocial.com/blogs/icee-social-blog/announcing-the-brand-new-lean-mean-shopify-pos-go-machine2022-09-27T12:30:11-04:002025-05-22T19:00:53-04:00Announcing: The Brand New Lean Mean Shopify POS GO MachineMark Perini
Establishing ourselves as one of the first expert Shopify POS agencies in NYC has uniquely positioned us at the forefront of everything that’s evolving in the POS world. We have had the privilege of exploring novel technologies that are launching. In keeping with that, we are extremely excited to announce the launch of Shopify POS GO.
]]>
ICEE Social began its ecommerce journey back in 2009. At first, we specialized in bringing Brick and Mortar retailers online. By 2013, we had progressed to bringing legacy New York brands online via Shopify Plus and in-person via Shopify POS. We love to say that we have ‘grown up alongside Shopify.’ As an agency, we continued to deepen our practices and grow our offerings as Shopify rolled out game-changing feature after game-changing feature. A major component of that omnichannel evolution included Shopify POS and implementing a true Retail Operating System across these retailers.
Establishing ourselves as one of the first expert Shopify POS agencies in NYC has uniquely positioned us at the forefront of everything that’s evolving in the POS world. We have had the privilege of exploring novel technologies that are launching. In keeping with that, we are extremely excited to announce the launch of Shopify POS GO.
The Shopify POS Go device is a three-in-one Retail Operating System. It combines a Card Reader + 1D + 2D barcode scanner (meaning it can read barcodes or Gift Card QR codes or Receipts and port your staff straight to the order) + it acts as your POS backend without the need of an external iPhone or iPad. The POS Go is a one stop shop and invaluable tool for running your retail empire.
There are three retail customer profiles that we can see this device really serving. If you’re looking to streamline store management, this new tool might be for you.
1) Traditional Brick and Mortar Retail
Are you a Brick and Mortar retailer that has a permanent cash wrap station? Are you looking for a mobile device that can be used when there’s a major sale, during holiday season, when there’s a major drop happening or a seasonal rush? This device is absolutely for you. POS Go will be a major upgrade when you find yourself in a time crunch or with a long line. Simply have one of your associates jump into the line and start checking people out before they reach the cash wrap!
If you’re considering experiential/mixed retail, then there’s a real chance that you don’t need a traditional cashwrap. In this situation, you can arm your associates with a few mobile POS Go devices and train your staff to be able take orders anywhere in your shop. There’s no need for your customers to stand in line or to leave your curated retail experience. Customers can simply tap, and they’re off! It is important to note that this lightning speed technology still delivers customers their own personalized receipt via text or email. No features of a traditional cash wrap are excluded.
3) Pop Up Shops
The final merchant group that the Shopify POS Go mobile device is perfect for are merchants that participate in Pop up shops. Pop up shops are a great way to get in front of your customers, establish relationships and test the retail environment, all without a huge investment of capital. With the brand new Shopify POS Go device, you no longer need an iPad, a card reader and a barcode scanner to sell on the go. The all-in-one design makes it perfect for holiday markets, marketing/PR events & more.
If you’re:
A retailer and you’ve ever wondered how many extra POS stations you need during sale times.
A retailer who has ever had a line that winds out of the store's front door during limited drops or sales.
Ready to level up your retail experience with experiential retail.
Then POS Go might be the brand new tool you need in your retail arsenal. This handheld, one stop shop can help to unify Shopify’s Online platform with Shopify POS.
At ICEE Social, we are truly obsessed with empowering our customers to seamlessly blend their online store experience with their in-store experiences. Now, you can do that with ease.
Need some help getting started? Get in touch with our team for retail migrations or POS strategy advice.
Contact Our Team
Need POS Migration Help?
Brand New To Shopify?
]]>
https://iceesocial.com/blogs/icee-social-blog/how-to-migrate-gift-cards-onto-shopify2021-07-13T09:16:24-04:002025-05-22T18:57:16-04:00How to Migrate Gift Cards to Shopify with EaseICEE Social
Any savvy retailer that wanted to compete with enterprise businesses would need to have a proper sales and marketing strategy that included Gift Cards. As we continued to migrate these merchants onto an omnichannel solution viaShopify POSandShopify Online, we kept needing solutions to migrate these merchants' Gift Cards.
]]>
The world has forever changed and, as a result, brands have had to pivot their businesses online. An unexpected silver lining of this digital revolution is that consumers young and old learned how to shop online – and they are doing so in record numbers.
At ICEE Social, we too hunkered down during this revolution to try and support brands and migrate as many merchants as we could onto Shopify.
As we were migrating stores fully online, we began to see a pattern. Almost all of the established brands that we were bringing to Shopify & Shopify POS had one thing in common: a ton of Gift Cards that they needed to migrate as well.
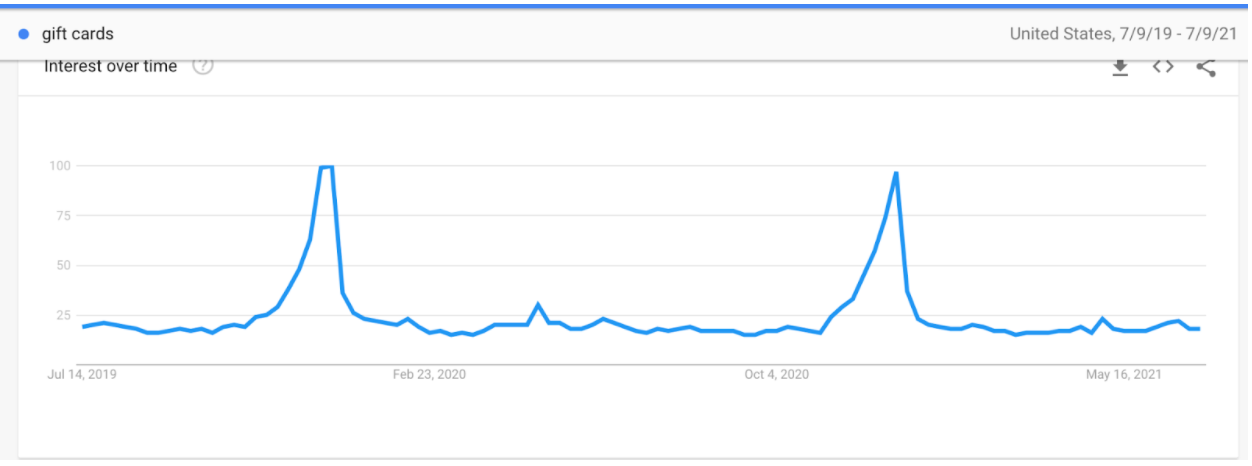
People's search queries for Gift Cards during the holidays 7/9/19 - 7/9/21 via Google Trends
The majority of these retailers had a legacy POS system and a Shopify Online store, or a legacy POS system connected to an outdated CMS via a broken middleware system. In almost every case, there was a huge disconnect between merchant’s brick and mortar business and their online stores.
In hindsight, this should have been obvious. Any savvy retailer that wanted to compete with enterprise businesses would need to have a proper sales and marketing strategy that included Gift Cards.
As we continued to migrate these merchants onto an omnichannel solution via Shopify POS and Shopify Online, we kept needing solutions to migrate these merchants' Gift Cards.
Looking back in the past few years we have built a ton of private Gift Card migration tools. Our goal for 2021 was to build a tool that merchants and entrepreneurs could use on their own to migrate their Gift Cards from their legacy POS system or legacy CMS. The culmination of this effort resulted in us building a brand new Shopify App called Selling Point. We set out to lower the barrier to entry for merchants to be able to migrate all of their Gift Cards to Shopify with ease, in addition to other elements of their migration such as products, customers & photos.
We are really excited to arm all of you merchants with the tools you need to migrate to a true Retail Operating System like Shopify.
Now that we’ve got you thinking about Gift Cards, you may recall that during the pandemic businesses that never had an online store had their most loyal customers buy IOU gift cards that could be redeemed in store once everything opened back up. Gift cards remain a great way to promote in-store and local sales.
Here are some winning strategies to grow your Gift Card offering:
Promote your Gift Cards with a corporate gifting strategy in mind. Target your wholesale clients and give them the option to send their other clients a Gift Card to your business for the holidays. That way, they can both support a local business and avoid the discomfort of shopping around for gifts that their customers may or may not like.
Run a promotion on your store where you give a discount on Gift Card purchases. Think of it as an advance to your store for future sales for your most loyal customers.
If you’d like more winning strategies, support with our new app or for us to assist with your migration, please contact us below.
Get the app:
Step-by-Step Guide
Video Walkthrough
Help Center
Contact Support
]]>
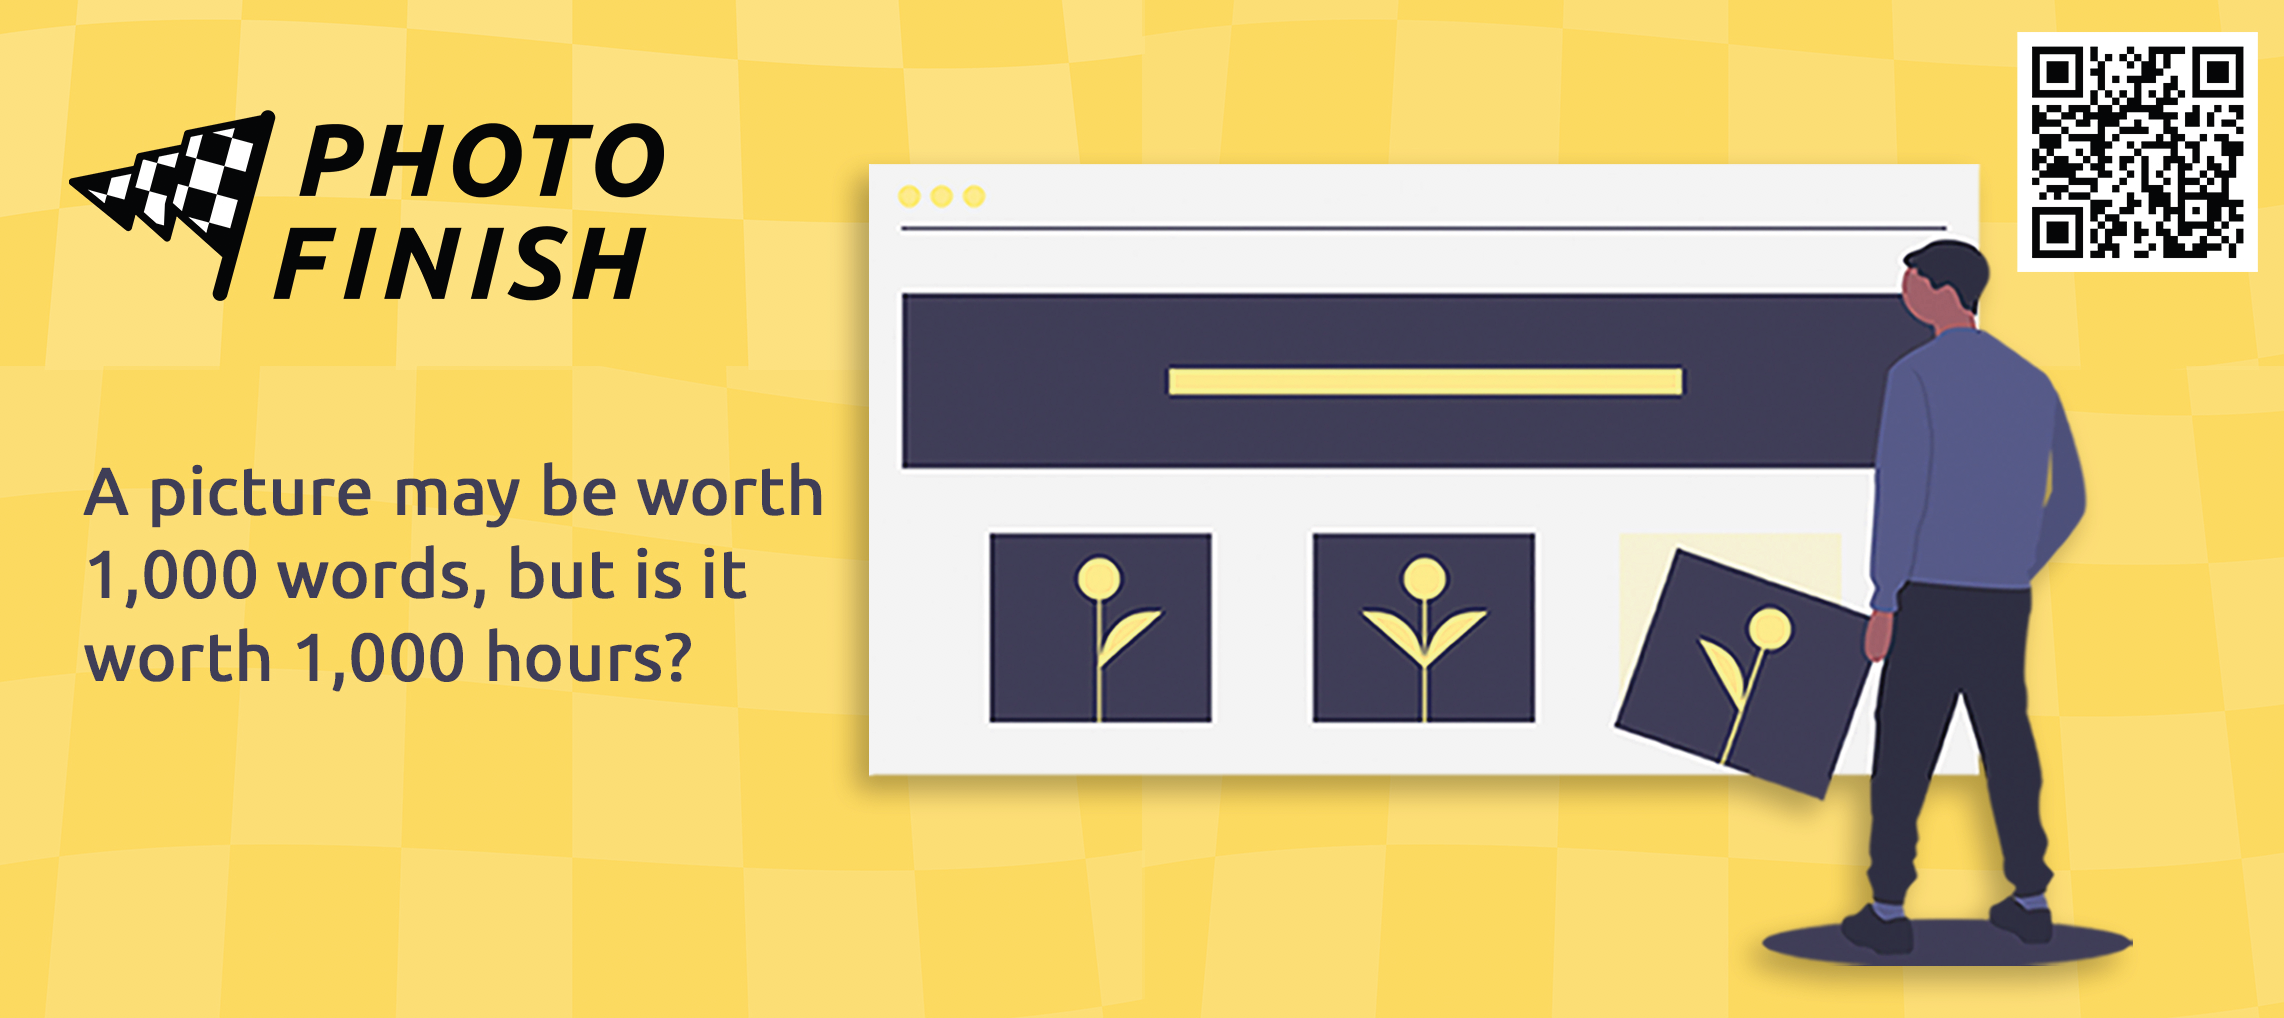
https://iceesocial.com/blogs/icee-social-blog/how-do-you-bulk-upload-images-into-shopify-product-pages2021-01-15T16:31:29-05:002025-02-26T14:55:36-05:00How do you bulk upload images into Shopify product pages?Mark PeriniPhoto Finish! The idea for Photo Finish came about as we became consumed with the data entry component of batch photo uploads during migrations. It was draining our time as merchants waited in line for our help with their pressing offline → online transition. Around the same time, Shopify launched their COVID-19 App Challenge.
]]>
As a result of the COVID-19 pandemic shutting and shuttering brick & mortar stores, merchants were pressed to become creative if they were to remain profitable. For many, this meant a transition offline to online. To meet the growing demand, (transitioning online without the accompaniment of a Shopify Expert can feel a bit daunting for those newer to the e-commerce world, and understandably so), we too transitioned. While ICEE Social has worked to transition hundreds of stores on to Shopify from other platforms or from outdated POS systems, during COVID-19, Offline → Online migrations to Shopify became our #1 Priority. We are proud to have completed 25+ offline → online migrations since the pandemic hit. One of the greatest joys of founding ICEE social has been helping my fellow entrepreneurs experience the success of their online stores. Finding new ways to sell, market and manage merchandise in light of a global pandemic has only strengthened our merchants. Together, we have reached deeper into the depths of creativity and innovation to ensure continued success.
Through this experience, light was shed on a few areas of the Shopify Migration process that could benefit from enhancement and automation.
Firstly, stores who are offline/brick & mortar only, know very well that the majority of POS systems do not allow for product images. That means that when they choose to transition online, they will need to bring thousands of products photos online all at the same time. What does this result in? The need to manually attach a photo to each and every product page--time consuming and monotonous! For merchants who are in a bind to launch online, and fast, there is no time to waste. For those who are not in a bind to launch, this process is still frustrating, monotonous and time consuming. Often, a data entry specialist or on-staff web developer is tasked with the bulk photo uploading and photo/product matching task, begrudgingly.
Our Solution:Photo Finish! The idea for Photo Finish came about as we became consumed with the data entry component of batch photo uploads during migrations. It was draining our time as merchants waited in line for our help with their pressing offline → online transition. Upon further discussion with our trusted development partner, friend and coding genius, Robbie Sherrard, we knew this was a hole in the Shopify ecosystem that needed to be filled. Around the same time, Shopify launched their COVID-19 App Challenge. It was the kick in the butt we needed to partner up and get this idea coded and off the ground!
Next Steps: Upon developing Photo Finish to meet the aforementioned need, we also recognize that existing brands can harness the power of batch photo uploads. Photo Finish is highly beneficial for merchants who often flip their merchandise for each season, launch new product lines or have swift product turnover/updates. Weekly drops or quarterly updates do not have to be the bane of your existence!
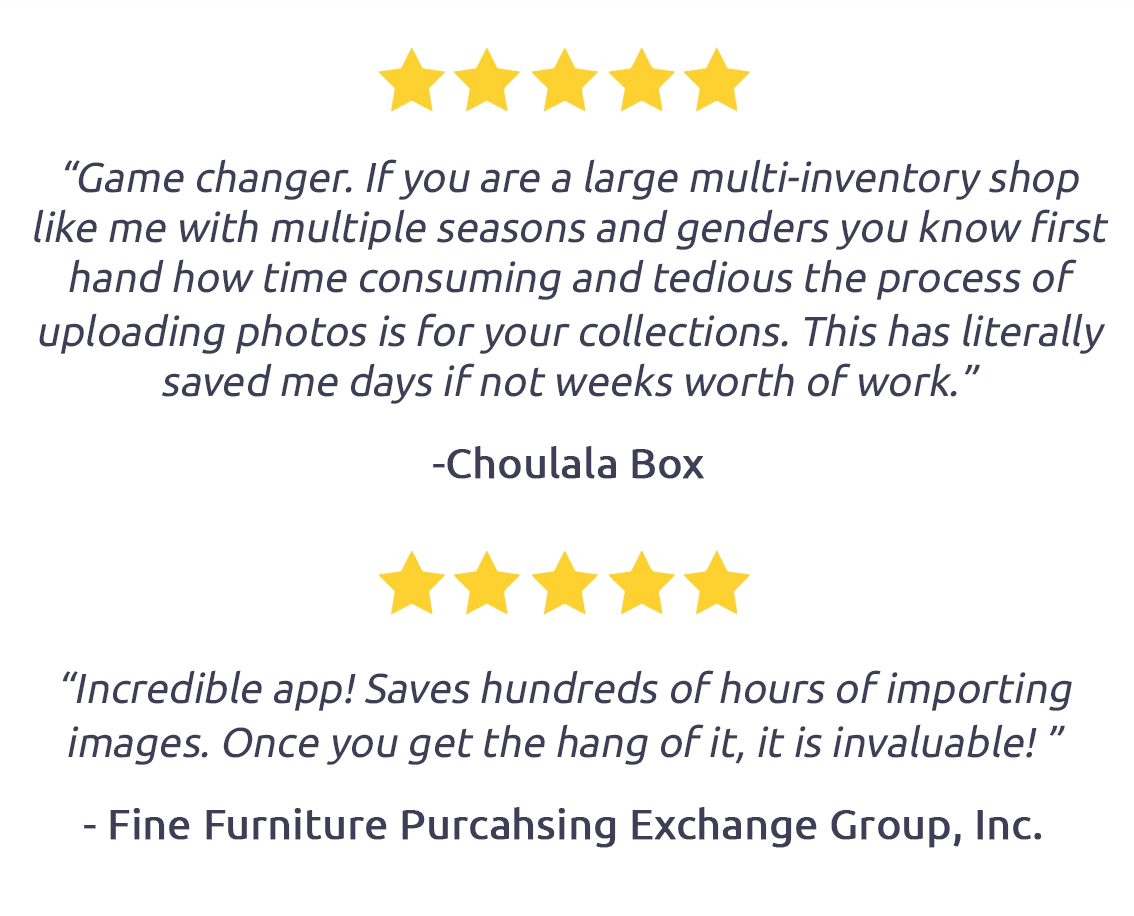
Merchants who have tested Photo Finish have expressed how exasperating and frustrating it is to transition from Fall to Winter, Spring to Summer or launch a new 1000-piece collection. One Photo Finish Customer stated that photo uploading is their "least favorite part of their Shopify experience." A premier tenant of our agency has always been to ensure an entrepreneur faces as few barriers to entry as possible. Our goal is for our clients to be able to manage their store WITHOUT us!
Photo Finish helps take timely data entry out of the equation, something an agency is often onboarded for, making the process of ongoing store management more seamless, independent and enjoyable. Hard working merchants can now focus on other aspects of their online store.
How Does It Work?
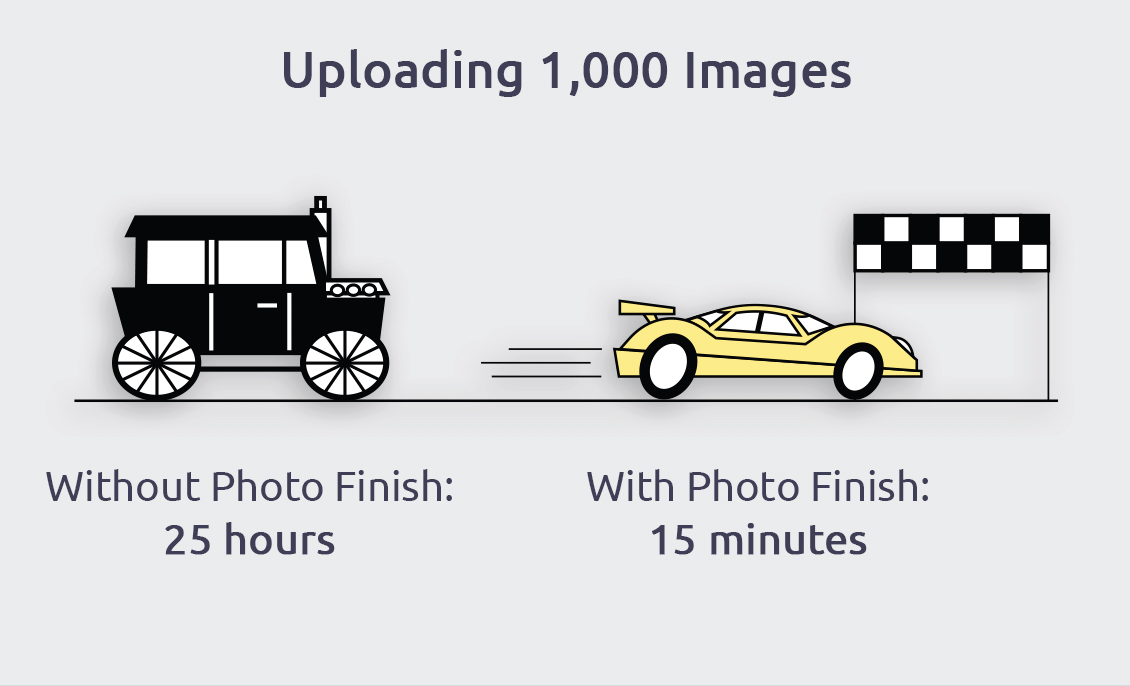
Say you want to upload 1,000 products. On average, each product has three corresponding photos. You’re looking at around 25 hours of active work (1.5 minutes x 1,000 products / 60 minutes in an hour). With Photo Finish, you’re done in minutes, with just a few clicks of your mouse.
Using Shopify’s product import tool in conjunction with Dropbox, Photo Finish lets merchants upload thousands of photos in a tiny fraction of the time it would take to do so manually.
As we like to say, A picture may be worth 1,000 words but is it worth a 1,000 hours?
Get the app:
Step-by-Step Guide
Video Walkthrough
Help Center
]]>
https://iceesocial.com/blogs/icee-social-blog/5-e-commerce-design-hacks-from-a-pro2019-04-30T22:41:00-04:002025-02-26T14:55:54-05:005 E-Commerce Design Hacks From a ProMark PeriniFrom my ten years of consulting on e-commerce optimization, I’ve learned that converting online shoppers into buyers is about pulling all the right levers. Stick to the winning formula (a clean, consistent, and easy-to-navigate website that speaks to your brand mission) and watch your conversions go up.
]]>
From my ten years of consulting on e-commerce optimization, I’ve learned that converting online shoppers into buyers is about pulling all the right levers.
Get all five tips and read the full story on PayPal's Business Resource Center!
]]>
https://iceesocial.com/blogs/icee-social-blog/top-5-best-shopify-flows-for-shopify-plus-stores2018-01-02T21:32:00-05:002025-02-26T14:56:14-05:00Top 5 Best Shopify Flows for Your Shopify Plus StoreMark PeriniLooking to Accelerate Your Business? Automation is the Answer! Let's be honest, running a successful Ecommerce business is a full-time job. Even the most seasoned business owner will encounter the need to live-chat with customers, add new products to their store, merchandise their products, or update collections, all in a single day's work.
]]>
Looking to Accelerate Your Business? Automation is the Answer!
Let's be honest, running a successful Ecommerce business is a full-time job. Even the most seasoned business owner/entrepreneur will encounter the need to live-chat with customers, add new products to their store, refund a customer, merchandise their products, update collections, or beta testing their next big idea all in a single day's work.
The efficient completion of these tasks is required to keep your business functioning and require attention day after day, week after week. Now, you could of course hire additional employees to alleviate the burden of this monotonous task completion and enhance your efficiency or your could turn on some automation. That's where Shopify Flow steps in.
Getting Started With Shopify Flow
Shopify Flow is an extremely robust backend tool for store owners. This visual tool requires no coding knowledge, making it perfect for Shopify store owners and developers who want to quickly and easily automate their stores.
Setting Up Your First Workflow
Getting started with Shopify Flow is easy and a lot like using IFTT or Zapier. To get started take a look at your day to day checklists and try to identify any repetitive tasks you would like to eliminate (the more time spent on repetitive tasks = less time running/building your business effectively). Write those all down somewhere and save it. Once you've got a list of a few items let's try and automate them. Is your biggest headache managing inventory? There's a workflow for that. Or maybe it's making sure that expedited orders get out first? There's a workflow for that too.
1) Select a trigger for this example we will use when order risk is analyzed.
2) Next select a condition (a time when this should be run). For this particular example choose if 'Order Risk Level' is equal to 'High'. This way we are only targeting high risk orders and not every order.
3) Select 'Send Email' as your 'Action' when the condition is true
4) Update the email template for whatever you think you or your customer service agent will need to successfully vet the transaction. i.e. (Phone number, Customer Name, Shipping/Billing Address)
5) Now let's build for if the condition not being true. So if 'order risk' is not 'High':
6) Then we select the action we want. For us we want to 'Capture the Payment' if it's not high risk as we've found 99% of all orders that aren't marked as high risk go through without a hitch. So we automate the process.
7) The final step is saving your workflow and enabling it. Once you enable the flow your automation starts automatically! You can disable it at any time and edit it to your liking! Congratulations on creating your first Shopify Workflow.
Want this workflow for your store you can download it here:
1. Workflow that runs when a customer makes an order:
When a new order comes through and the client pays for expedited shipping (Overnight Shipping or Two Day Shipping) for example. The system sends an automated email to your logistics/shipping department to alert them of the expedited shipping. We created this workflow to make sure that these orders get priority while shipping. This is especially helpful during high volume selling times of year (Black Friday/Holiday Sales).
If product variant 'color' is added to store then add a corresponding tag to the product to make your product line more searchable and easier to add to smart collections
3. Workflow that run when the inventory for a product changes:
When a product is low in stock, automatically receive a notification, send a reorder email to your vendor, and add a tag so it can be surfaced on your store to create urgency for the customer. This workflow only executes when the product is a certain vendor and the product includes a “reorder” tag, but both can easily be removed if not needed.
To include urgency messaging on your product pages when an item is low stock, use the code below to reference the "low stock" tag this workflow adds to a product.
{% if product.tags contains "low stock" %} Hurry! Only left in stock {% endif %}
4. Workflow that run when the inventory for a product changes:
When a product is out of stock, automatically hide the product from your online store and notify your marketing team to pause any marketing efforts that include that item. When the item is back in stock, republish to the online store and notify the team that it's back in stock.
This workflow currently runs for all products, but you could alter it so it only executes for discontinued products. In this case, you can add a condition that causes the workflow only to run when a "discontinued" tag is present , and then remove the part of the workflow that republishes the product (download an example here).
Easily implement loyalty and retention initiatives by segmenting customers with customer tags based on their lifetime spend. In the same workflow, also reward your top customers by notifying your customer service team when customers have passed spend thresholds so they can send a personal thank you gift.
]]>
https://iceesocial.com/blogs/icee-social-blog/knowing-what-to-charge-discover-your-freelance-rate2017-04-02T11:55:00-04:002025-02-26T14:57:08-05:00Knowing What to Charge: Discover Your Freelance RateMark Perini
Without fail, the most frequent question I receive from designers & developers alike is how to effectively estimate costs, & figure out what their personal hourly rates should be.
No matter how you plan on billing, whether it be hourly, by retainer, or project-based, knowing your personal hourly rate is key to giving a fair estimate.
]]>
Without fail, the most frequent question I receive from freelance designers and developers alike is how to effectively estimate costs, and figure out what their personal hourly rates should be.
No matter how you plan on billing, whether it be hourly, by retainer, or project-based, you must calculate your personal hourly rate in order to give a fair estimate. Naturally, you want to get paid for your time and expenses, and turn a profit so you can save for a rainy day or a much needed exotic vacation.
]]>
https://iceesocial.com/blogs/icee-social-blog/how-to-design-a-wholesale-store-on-shopify2016-01-12T12:28:00-05:002025-02-26T14:55:14-05:00How to Design a Wholesale Store on ShopifyMark Perini
What's wholesale got to do with your role as a designer or developer?
Well, a lot actually. According to Forbes, the B2B market is “expected to grow to $6.7 trillion in gross merchandise value by 2020.” That’s a lot of dollars that your clients can easily grab a piece of while utilizing their existing Shopify store.
]]>
What's wholesale got to do with your role as a designer or developer?
Well, a lot actually. According to Forbes, the B2B market is “expected to grow to $6.7 trillion in gross merchandise value by 2020.” That’s a lot of dollars that your clients can easily grab a piece of while utilizing their existing Shopify store.
Building a wholesale store is one of my number one requests as a Shopify Expert. If you haven’t built one yet, it can be a great way to re-engage a client with whom you’ve lost touch. Maybe they’ve never thought B2B was possible, and if that's the case, you could be the inspiration for a new-found revenue stream. Plus, it's worth mentioning to your clients that online wholesale trashes the antiquated system of wholesalers having to buy from a catalog or worse — a line sheet.
For the developer, the best news is that with a little jimmy rigging and one clever app, you can design a wholesale shop for your clients almost out of the box with Shopify.
Looking for some great Shopify wholesale store examples?
Before you can start building a wholesale store, you have to decide what kind of wholesale site you want to build. There are two main types of wholesale stores that exist: those that are solely dedicated to wholesale or those that are B2C sites that have a VIP/wholesale aspect.
For the purpose of this article, I’m going to use three shops I have built on Shopify as examples: Teroforma Wholesale, Bellocq Tea Wholesale and Whisky Stones. Teroforma Wholesale & Bellocq Tea are both examples of an entirely wholesale-dedicated store or a fully custom B2B setup, while Whisky Stones has a wholesale portal within a store that is predominantly B2C.
But before we get to our end result, we need to take a few steps backwards and start at the beginning.
Understand what you have to work with
The first question you'll likely encounter on this type of project is: “How do we lock down a store and allow only approved customers buy at our wholesale prices? What tools do we have at our disposal to make this happen?”
Before we get started, let's see what Shopify has available natively. If you go into "Settings → Checkout", you have the option to enable a requirement that a customer needs be logged in before they can make a purchase.
Given that wholesale transactions are largely done in a gated system, this seems like a good place to start. But you’ll quickly realize that someone could just start a new account and checkout without any approval process. Additionally, there also exists the looming mystery of how you would add new customers yourself.
Also let’s not forget that with this method, your shop wouldn’t be entirely gated to the public. That means people who aren’t wholesale customers would be able to see your wholesale prices, which is far from what we want (especially if we offer B2C products as well). One option would be to password protect the whole site in the "Settings → Online Store" section (seen below).
That core problem with this method is that everyone needs the same password and anyone that has it could enter the site at any time.
To overcome this, we need a way to segment our customers and institute an approval process. We need a way to lock down your store and simultaneously be able to import new wholesale customers manually. Thankfully, there’s an app for that.
Creating a wholesale approval process
Enter Locksmith by Isaac Bowen. At only $9.00 a month, this is an extremely powerful app that’s beautifully coded and elegantly designed. The best thing about Locksmith is that it can either lock down your whole site (in the case of dedicated wholesale store like Teroforma Wholesale) or it can be used to lock down a certain collection within your store (in the case of the partially wholesale store like Whisky Stones).
In both cases we’re going to set the key to only permit people who are signed in and for customers that are tagged with “wholesale”. The wholesale tag is how we are going to institute our approval process to our customer list.
Now we’ve got to import our new customer list (Let’s operate on the assumption that this is a new store so we’ll be importing our entire customer list). To simplify this process, Isaac and I coordinated on a new bulk import feature so that we could add tags and passwords for all the newly imported customers.
You can important your customers information manually or by uploading a CSV. Once you've done this, just open the Locksmith app in the Shopify Admin and add a password and a tag. Once you’re done and everything imports successfully, your wholesale site is ready to rock. Wasn’t that easy?
Now when someone comes to your front page they will see something like this:
Of course, out of the box this page will look like the account login screen that your standard theme supplies. But with a little CSS and some liquid magic, you can customize it to look however you like. Ta da!
You can do all of this within the Locksmith app "Settings". In the case of Teroforma Wholesale, I created the landing page above using a javascript snippet that’s essentially covering the entire site and when you click “I’m buying for my store” it disappears. Alternatively, if you pick "I’m buying for myself," it ports you to the B2C site Teroforma.
Helping your client run their wholesale store
Running a wholesale business is no easy feat. If your clients are new to wholesale, they're more than likely to have plenty of questions for you. Here are some of the most frequently asked questions that I've received from wholesale merchants.
Question 1: How do your wholesale clients accept new applications?
The answer for this question will vary depending on your client and the type and amount of wholesale customers they want to be working with. In the case of Teroforma Wholesale, we made a new wholesale customer application link that links to a dedicated contact form page.
If someone passes the application process, then we can easily add the "wholesale" tag to their new customer account and give them the password that you attached to said account (we do all of this through the Locksmith app).
Question 2: What if your wholesale client needs to sell their stock in case packs and they don’t want people to be able to break up their wholesale inventory?
There is an easy solution for this: you can force their selection by using a dropdown for quantity.
To do this, we first need to make a new product template — we are calling this one "case-packs-of-six":
Based on your client's requirements, you can make as many of these as you need.
Once we've created our new template, we copy over the original product liquid and then edit the quantity function. Here’s the original code (this will vary based on your theme):
<p> Quantity (units in case pack increments)</p></div>
<divclass="quantity_dropdown"><!--style class for the dropdown>-->
<labelfor="qty"></label>
<selectid="quantity"name="quantity">
{% for i in (1..12) %}<!-- i is the interval value that we are going to multiplying. -->
<optionvalue="{{ i | times:6}}">{{ i | times:6 }}</option> <!-- we use a multiple that corresponds to your case pack in this case we have packs of 6 but you can use any multiple.-->
{% endfor %}
</select></div>
<inputtype="submit"name="add"class="btn_c"id="addToCart"value="{{ 'products.product.add_to_cart' | t }}">
As seen above, our wholesale customers can now only pick quantities from 6 to 72 at a multiple of 6.
Question 3: What if your wholesale client wants a minimum order total for their wholesale transactions?
This is a simple liquid fix. For this example, let's say we want a requirement of a $200 minimum subtotal to be able to check out.
With this requirement in place, customers who don’t have a sufficient subtotal will not see the checkout button. We can of course style this and make it more pronounced and to our liking, but this covers the basics.
As shown above, customers with a subtotal that is more than the minimum in their cart will be able to checkout normally.
Here’s the liquid update to the cart.liquid search for the “submit” input. Put this liquid code above it and add the “{%endif%}” directly after.
{% if customer.tags contains 'Wholesale' and cart.total_price < 20000 %}
<p> Your wholesale total must be $200 or more.</p>
{% else %}
<inputtype="submit"name="update"class="btn--secondary update-cart"value="{{ 'cart.general.update' | t }}">
<inputtype="submit"name="checkout"class="btn checkout"value="{{ 'cart.general.checkout' | t }}">
If you need even more control over the “set minimum and maximum order” and “item amounts” and don’t want to code a custom solution, then you can check out the Order LimitsShopify app. It’s a phenomenal app that offers tons of options for maximum and minimum item limits, plus you can set different item limits on each individual product.
Question 4: What if your wholesale clients need net 30 or 60 terms?
We can do this with manual payments natively on Shopify. Go to "Settings → Payments" then click "Create a new custom payment method".
You can name your new payment method whatever you like. In this case, we named it "Pre-Approved Net 30 Terms".
You can also fill in some additional details that will be presented on the checkout screen and the Thank You page.
Now your client's approved wholesale customers can checkout without putting in their payment information every time.
The nice thing about setting up a wholesale shop on Shopify is that you can copy over everything you have previously built and make a B2C website in the same style. That way, the customer UX remains the same regardless of whether they are a wholesale or retail customer.
Question 5: What if my client's wholesale customers aren’t required to pay taxes?
To exempt certain customers from taxes, you can go to "Customers" in the Shopify Admin to edit your customer information by clicking "Customer is tax exempt". You can also do this in bulk by using your customer CSV.
Start designing wholesale stores today
Creating a wholesale stores is a great opportunity for developers to bring some of their more old school B2B clients into the ubiquitous world of ecommerce. Whether you are building a full-fledged wholesale store or just adding wholesale capabilities to a B2C store, Shopify has everything you need to make the transition as seamless as possible.
]]>
https://iceesocial.com/blogs/icee-social-blog/how-to-make-a-brands-page-on-shopify2015-10-22T23:45:00-04:002025-02-26T14:56:33-05:00How to make a brands page on ShopifyMark Perini
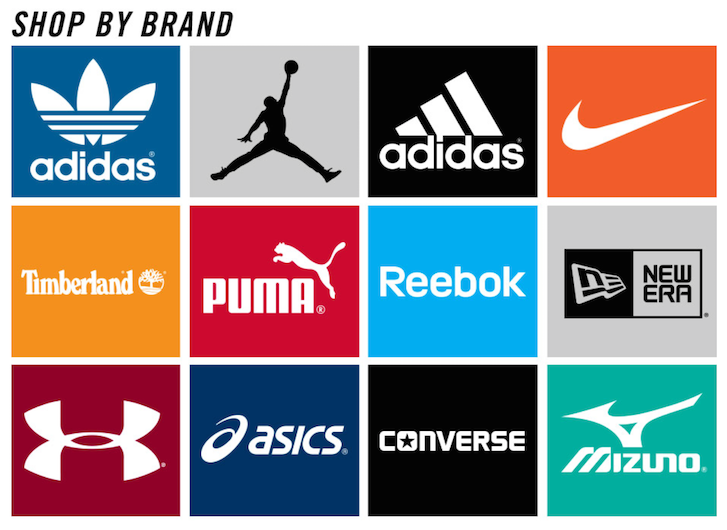
Let’s say you’ve got a client, and said client is a boutique owner. Arguably, the most powerful asset in their arsenal is their ability to showcase the brands that they have partnered with to sell.
Enter the brands page: A quick, visually exciting way for customers to find new collections and brands that they know and trust.
]]>
Let’s say you’ve got a client, and said client is a boutique owner. Arguably, the most powerful asset in their arsenal is their ability to showcase the brands that they have partnered with to sell.
Enter the brands page: A quick, visually exciting way for customers to find new collections and brands that they know and trust. Pages like this are important because there is both brand recognition and a sense of trust. Your client's brand has proven to be established/trusted enough for other brands to want to be showcased.
Now you come to realize that there is not a great way to showcase collections-within-collections so (being the problem solver that you are) you turn to the good old www.myshopify.com/collections/all.
However, a problem arises. Now every collection you’ve ever created is here. So you get bags and blazers, as well as the trends/brands you want to showcase. So you do what any programmer/designer does — you try and jimmyrig it.
You jump into the collection liquid and start typing away:
However, you realize quite quickly that while this will work in the interim, as soon as your client gets new stock or adds a new collection, your quick solution will go awry fairly quickly.
The answer? Mixing Liquid with a link list.
The first step to making all of your brand page dreams come true is getting all the collections in order.
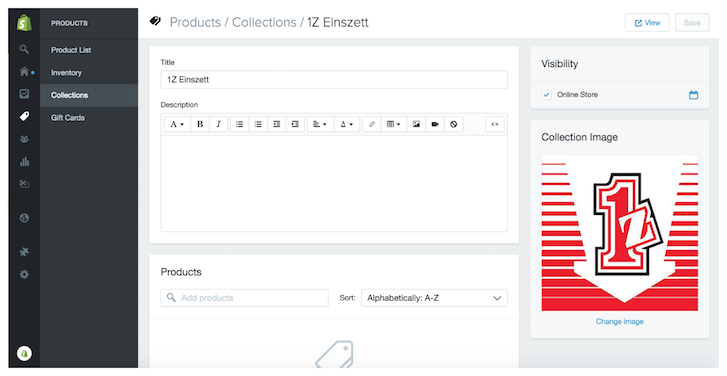
Step 1: Create collections
Create all the collections you’ll want to display, and get all the pictures you want to display for said collections in order. (Just like with products, everything looks better when it's the same size.)
For me, I'll be building a brand's page so I'll be uploading all the different brand pictures into the collections.
Step 2: Create a link list within the navigation
This is where you (or your client) can order/reorder the soon to be made brands/trends page. I called said link list “brands” just for this example. (But you can call it whatever you like.)
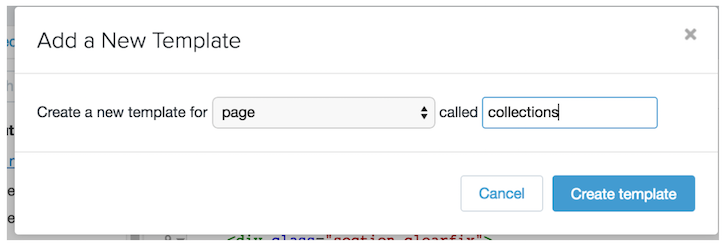
Step 3: Create the page template
Go into the theme editor and click "Edit HTML/CSS."
Next, you need to make a new page template. In this case I called it collections. Presto! You’ve got a new page template.
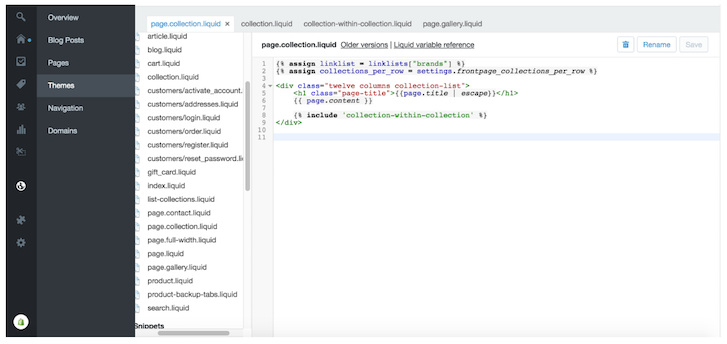
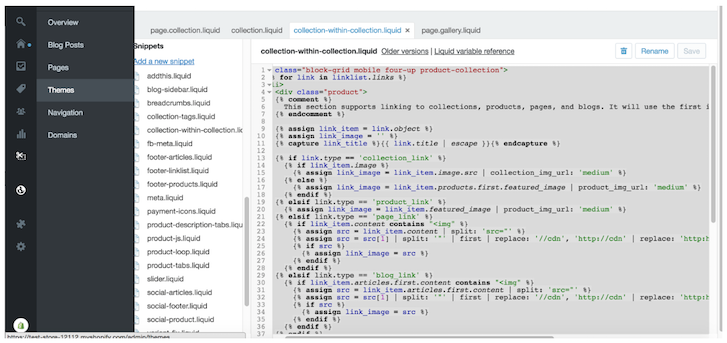
Now we need to add the elusive collection-within-collection. This is where all the magic happens. Create a new snippet and call it collection-within-collection.
<ulclass="block-grid mobile four-up product-collection">
{% for link in linklist.links %} //Here we are saying use the links in the linklist we created and assign them to the below code
<li>
<divclass="product">
{% comment %}
You can connect collections, products, pages, & even blogs. By default it will use the first product that appears on a collection or you can pick a featured image.
{% endcomment %}
{% assign link_item = link.object %} //Creates a new variable for link_item using link.object which in-turn can access any of the attributes that are available (product, collection, page or blog)
{% assign link_image = '' %}//creates a new variable for link_image which assigns
{% capture link_title %}{{ link.title | escape }}{% endcapture %}//grab the link title and assign it as the link.title
{% if link.type == 'collection_link' %}//if the link type is a collection then use this set of rules
{% if link_item.image %}//if there is a link_item image then proceed to the next step
{% assign link_image = link_item.image.src | collection_img_url: 'medium' %}//if there is a featured collection image use that and size it as a medium image
{% else %}//Otherwise
{% assign link_image = link_item.products.first.featured_image | product_img_url: 'medium' %}//Grab the first product image and use that as the image
{% endif %}
{% elsif link.type == 'product_link' %}//If it's a product link instead of a collection link
{% assign link_image = link_item.featured_image | product_img_url: 'medium' %}//Assign the featured image for said product
{% elsif link.type == 'page_link' %}//However, if it's a page link then follow the rules below
{% if link_item.content contains "<img" %}//If the content of the page has an <imgtaginitthenproceedtothenextstep
<ahref="{{ link_item.url }}"title="{{ link_title }}">//Here is where it all comes together make the link_item.url click-able and link to the content and add the title using link_title
<spanclass="thumbnail">
{% if link_image != '' %} //if link_image does not equal '' then continue to the next step
<img {% ifsettings.align_height %}style="max-height:{{ settings.collection_height }}px"{% endif %} src="{{ link_image }}"alt="{{ link_title }}" />//check if there are settings for align_height if so add it to the style otherwise just get the link_image and make the alt tag the link title
{% endif %}
</span>
<spanclass="product-title">
{{ link_title }} //add the link title (it's click-able)
You can connect collections, products, pages, and even blogs. By default, it will use the first product that appears on a collection or you can pick a featured image as we’ve done.
<ulclass="block-grid mobile four-up product-collection">
{% for link in linklist.links %}
<li>
<divclass="product">
{% comment %}
You can connect collections, products, pages, & even blogs. By default it will use the first product that appears on a collection or you can pick a featured image as we’ve done.
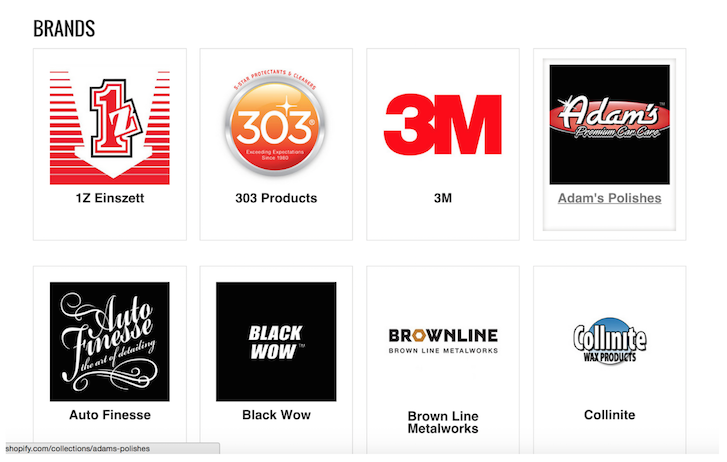
Now all you’ve got to do is create a brand’s page and change the template to page.collection and click save.
Step 7: Admire your handy work
When you click on the collection pictures, they will link to all the products that are housed in said collection! It’s a really powerful tool. The best part is your client can easily switch the order and switch the collections out right from the link list we created (in this case, it’s called "Brands").
Let me know if you have any questions, or if you’ve got some ideas that save you time with Shopify.


 Step 2: Optimizing with "Agentic Descriptions" (AGO)


 After downloading, follow