https://www.ledfactorymart.com/blogs/news.atomLED FACTORY MART - News2026-05-08T15:14:31+08:00LED FACTORY MARThttps://www.ledfactorymart.com/blogs/news/how-to-install-2014-2024-toyota-4runner-led-headlights2026-05-08T15:14:31+08:002026-05-08T16:15:13+08:00How to Install 2014-2024 Toyota 4Runner LED HeadlightsMillerJasonUpgrade your Toyota 4Runner (2014-2024) with our Full-LED Quad-Projector Headlights. Featuring a sharp Z-shaped beam, dynamic startup sequences, and sequential signals, this guide covers everything from DIY installation to professional service options in Ontario, CA.
]]>
Want to completely transform the look of your 4Runner’s front end and achieve track-level lighting performance? These Full-LED Quad-Projector Headlights feature sharp Z-shaped low-beam cut-off lines, powerful high beams, dynamic startup sequence DRLs, and sequential turn signals. It is one of the most popular upgrades on the market today, offering 12,000LM of output and a crisp 6000K color temperature.
This guide will walk you through every step of the process, from disassembly to final light adjustment.
I. Pre-Installation & Safety
Tools Needed:
10mm socket, panel removal tool, Phillips screwdriver, and an 8mm socket for beam adjustment.
Safety Precautions:
Disconnect Battery: Always disconnect the negative battery terminal to prevent short circuits. Wheel Positioning: Turn front wheels outward to gain better access to the inner fender and bumper clips. Organize Parts: Keep all original screws and nuts; you will need them to secure the new units. Protection: Wear gloves and consider taping the edges of your fenders to prevent scratches during bumper removal.
II. Step-by-Step Installation
1. Disassemble the Front End
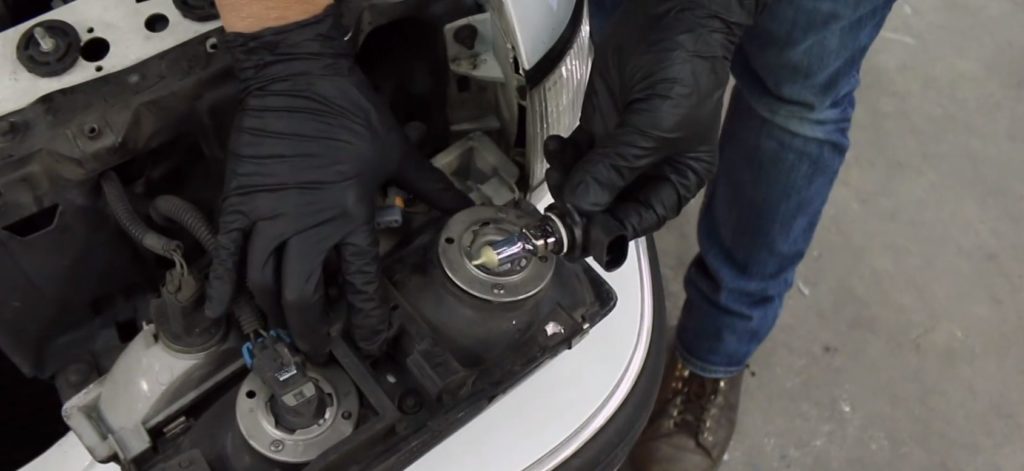
Remove the upper front grille and loosen the front bumper. Disconnect all factory headlight connectors and carefully remove the stock headlight assemblies.
2. Transfer Mounting Brackets
Remove the stock headlight brackets from your original lights.
Install these original brackets onto your new Quad LED headlights using the three existing screws.
3. Wiring and Connections (Plug & Play)
Green Label: Connect to the Low Beam plug.
Blue Label: Connect to the High Beam plug.
White Label: Connect to the DRL/Sequential sub-harness.
Grey Plug: Connect to the factory Turn Signal socket.
4. Fuse Box Connection
Route the provided sub-harness across the engine bay. For the DRL and startup sequence, plug the harness into a switch panel or the DRL fuse slot (minimum 15 Amps) in the fuse box.
Plug it into a switch panel or If you don't have a switch panel, plug it into the DRL fuse slot (No less than 15amps).
5. Beam Calibration
Before reassembling the bumper, test all functions: Low Beam, High Beam, DRL Startup, and Sequential Signals. Use an 8mm socket on the silver adjustment screw at the back of the housing to calibrate the beam height to avoid blinding oncoming traffic.
III. Support & Warranty
This product comes with a 2-year warranty. If you encounter any issues during installation, you can reach out for help within 24 hours:
Email: support@ledfactorymart.com
Tutorials: Scan the QR code on your manual for detailed instructional videos.
IV. Professional Installation Service
If you prefer to have an expert handle the installation, we offer Free Installation Services! With in-home installation, you’ll have the chance to receive a surprise gift. You can schedule an appointment online and visit our location:
Ready to hit the road? Enjoy the modern aesthetic and superior safety of your new 4Runner lighting system!
]]>
https://www.ledfactorymart.com/blogs/news/toyota-tundra-led-fog-light-installation-guide2026-01-04T11:42:06+08:002026-01-21T16:45:49+08:002025 Toyota Tundra LED Fog Light Installation GuideMillerJason
Step-by-step DIY guide to install LED Fog Lights on Toyota Tundra, Tacoma, & 4Runner. Boost visibility with 6000LM and amber turn signals. Installation takes just 30 minutes.
Quick Install • Plug & Play • No Vehicle Modification Required
Upgrading your factory fog lights to LED fog lights with turn signal is one of the easiest ways to improve both visibility and vehicle appearance. With basic tools and about 30 minutes, you can complete the installation at home—no professional experience required.
Preparation
Before starting, ensure you have the following tools ready:
Plastic Pry Tool: Essential for removing the bumper bezel without scratching your paint.
Phillips Head Screwdriver: To remove the factory mounting screws.
T-Tap Connectors: To tap the new fog light's signal wire into the vehicle's turn signal circuit.
Step-by-Step Installation Instructions
1. Remove Bumper Caps: Insert your plastic pry tool into the gap of the bumper cover. Gently wedge them out and unhook the cover from the side panels to pull it straight off.
2. Unscrew the Housing: Use your Phillips head screwdriver to remove the two bolts located on each side of the factory light.
3. Disconnect OEM Harness: Pull the light out, press the clip on the connector, and release the factory wiring.
4. Identify Left & Right: Check the back of the new lights for "L" (Left) and "R" (Right) markings. Ensure the letters are at the bottom so the logo faces the correct way.
5. Plug & Play Connection: Simply plug the factory harness directly into the new fog light's main plug for a direct fit.
6. Wire the Turn Signals: Locate the yellow wire on the new light. Use a T-Tap connector to tap this wire into your vehicle's factory turn signal bulb wire near the headlights.
7. Mount the Light: Slide the new LED unit into place and secure it using the original Phillips screws.
8. Pre-check: Before reinstalling covers, turn on the fog lights and hazards to ensure both the white and amber functions are working correctly.
9. Reinstall the Bezel: Insert the two ends of the bezel first, then push the middle section in until all clips lock flush with the bumper.
10. Final Results:Once installed, your Tundra will feature: OEM+ Look: The lights maintain a stock appearance while adding modern functionality. Increased Visibility: The fog lights will now blink in sync with your turn signals, providing extra safety and a unique look.
]]>
https://www.ledfactorymart.com/blogs/news/installation-guide-flush-mount-tail-lights-for-jeep-wrangler-jl-20182025-12-23T16:30:11+08:002025-12-23T17:29:28+08:00Installation Guide——Flush Mount Tail Lights for Jeep Wrangler JL (2018+)Lclaire
🚗 Upgrade Your Jeep Wrangler JL: Complete Flush Mount Tail Light Installation Guide
If you’re looking for an easy and effective way to upgrade the rear appearance and visibility of your Jeep Wrangler JL (2018+), these Flush Mount Tail Lights are a practical yet stylish choice. They not only enhance the overall look of your Jeep, but their low-profile design also helps reduce the risk of damage during off-road adventures.
Compared to factory tail lights, Flush Mount LED tail lights offer several key advantages:
Low-Profile Design: Sits closer to the body, reducing the risk of scratches or impact damage while off-roading.
High-Brightness LEDs: Improves visibility for brake lights, turn signals, and reverse lights, enhancing driving safety.
Clean, Modern Look: A sleeker and more aggressive appearance that perfectly matches a modified Jeep style.
Plug & Play Installation: Designed to work with the factory wiring harness for a quick and easy install.
These upgrades deliver both performance and visual appeal, making them a high-value modification for Wrangler JL owners.
🎥 Installation & Review by Truax Off-Road
We’re excited to collaborate with @Truax Off-Road, a popular YouTube creator in the Jeep community, who provides a hands-on review and step-by-step installation guide for these slim-profile Jeep tail lights.
🛠 Installation Preparation
Before starting the installation, make sure to:
✔ Park the vehicle on a flat, safe surface ✔ Turn off the engine and remove the key ✔ Prepare basic tools such as screwdrivers and a wrench
Most Flush Mount tail lights are designed for direct plug-and-play installation, with no cutting, splicing, or soldering required.
📍 Step-by-Step Installation Guide
1️⃣ Remove the Factory Tail Lights
Tail Light Mounting Screw Location
Remove the mounting screws from the edge of the tail light.
Carefully pull the tail light assembly outward.
Disconnect the factory wiring harness.
Remove the external resistor.
Remove the mounting bracket from the old tail light (3 screws).
⏱ Estimated time: 5–10 minutes
2️⃣ Prepare the New Tail Lights
Unbox the new tail lights and confirm all parts are included.
Transfer the factory mounting bracket to the new tail light.
Take out the included external resistor mounting bracket.
Secure the external resistor to the bracket.
3️⃣ Connect the Wiring Harness
Plug the new tail light connector into the factory wiring harness.
Our product features a Plug & Play design, requiring no additional wiring.
Ensure all connections are secure to prevent flickering or malfunction.
4️⃣ Install and Secure the Tail Lights
Position the tail light into the factory mounting location.
Make sure it sits flush with the vehicle body.
Reinstall and tighten the mounting screws (do not overtighten).
⏱ Estimated time: 10–15 minutes
5️⃣ Function Test
Turn the vehicle power on (engine start not required).
Your brand-new, slim-profile JL tail lights are now installed!
Test all lighting functions:
✔ Running lights ✔ Brake lights ✔ Left & right turn signals
✔ Reverse lights
If any function doesn’t work properly, recheck the wiring connections.
🚀 Installation Tips
✔ If your vehicle is equipped with blind spot monitoring or rear cross-traffic sensors, additional adjustment or calibration may be required. ✔ Ensure all seals and gaskets are properly seated to prevent water intrusion. ✔ If warning lights or errors appear after installation, a diagnostic tool such as Tazer or OBD may help reset the system.
🎉 Final Thoughts
Once installed, your Jeep Wrangler JL will instantly look cleaner, more aggressive, and more refined. Visibility is significantly improved at night and during braking, adding both safety and style. This simple upgrade delivers a noticeable transformation with minimal installation effort.
If you’re still deciding whether to upgrade your tail lights, we hope this guide helps you make the right choice 😉
Light Up Your Jeep and Start a True Holiday Adventure
Christmas is more than just a season for giving—it is the perfect time to upgrade your Jeep and prepare for new adventures ahead. During the 2025 Christmas season, whether you are refreshing your own Jeep Wrangler (JL / JK / JT) or choosing a practical yet stylish gift for a Jeep enthusiast, high-quality modification accessories are always a smart choice.
This guide highlights the best Jeep Christmas upgrade picks, covering lighting upgrades, exterior protection, and practical accessories, making your holiday shopping easy and rewarding.
🔥 1. Lighting Upgrades: Make Your Jeep Stand Out in the Dark
Lighting upgrades remain the core of Jeep modifications and are among the most popular Christmas gifts.
⭐ RGB LED Headlights (Top Christmas Favorite)
If you are looking for an upgrade that delivers both performance and festive visual impact, RGB headlights are highly recommended.
Multi-color RGB modes with white and color lighting options
High-output LED chips for enhanced night driving and off-road visibility
Plug-and-play installation, compatible with Jeep JL / JT / JK
🎁 Best for: Jeep owners who value individuality, visual impact, and holiday-style upgrades
For a low-profile yet highly practical Christmas gift, cargo liners and interior protection accessories are ideal.
Dirt-resistant, mud-proof, scratch-resistant, and durable
Non-lighting product with a very high repurchase rate
Fits all Jeep JL 4-Door models
① Eco-Friendly TPE Jeep Cargo Liner & Seat Back Protector Set
🎁 3. Christmas Gift Quick Selection Guide
Gift Recipient
Recommended Products
Personal Upgrade
RGB Headlights / LED Light Bars
Off-Road Enthusiasts
Spotlights / Fog Lights
New Jeep Owners
LED Light Bars / Protection Accessories
Practical Users
Cargo Liners / Storage Accessories
🎄 4. Why Christmas Is the Best Time to Upgrade Your Jeep
🎅 Exclusive Christmas discounts & free gift promotions
🚚 Full year-end inventory with wide model coverage
🎁 One upgrade, multiple benefits: performance, safety, and style
🚀 Conclusion: Make Your Jeep the Star This Christmas
A truly great Christmas gift is not just about appearance—it is something you can rely on every time you hit the road. Whether it is lighting upgrades or practical modifications, high-quality Jeep accessories make winter adventures brighter, safer, and more stylish.
🎄 This Christmas, upgrade your Jeep and begin a brand-new adventure in 2025.
]]>
https://www.ledfactorymart.com/blogs/news/tacoma-christmas-shopping-guide-20252025-12-08T13:52:54+08:002026-01-21T16:46:27+08:00Tacoma Christmas Shopping Guide 2025MillerJason
From December 4th to December 15th, we’re launching our Christmas Warm-Up Sale with exclusive bundles, free gifts, and limited-time discounts.
]]>
Get Ready for Christmas Deals from December 4th to 15th!
The holiday season is here, and it’s the best time to upgrade your ride or prepare meaningful gifts for family and friends. From December 4th to December 15th, we’re launching our Christmas Warm-Up Sale with exclusive bundles, free gifts, and limited-time discounts.
🎁 1. Buy Combo Sets & Get a Free Christmas Wreath
During the event period, select headlight and fog-light combo sets or grille + light bundles automatically come with a FREE LED Christmas Wreath — perfect for decorating your home or gifting to someone special.
Limited stock. Free gift while supplies last.
🎄 2. Orders Over $299 Also Receive a Free Wreath
Even if you’re not purchasing a combo, you can still get in on the holiday fun — Any order over $299 will include a free Christmas wreath, no code needed.
✨ 3. Extra 10% Storewide Discount
Enjoy an additional 10% OFF on all qualifying items across the store during the Christmas warm-up period.
Use code XMAS10 at checkout and save even more this season.
🔥 Why You Should Shop Early
🎅 Free gifts are limited — once gone, they're gone
📦 Beat the holiday shipping rush
💡 Best time to upgrade headlights, fog lights, grilles & accessories
Whether you’re upgrading your own truck or shopping for a car enthusiast, our Christmas Warm-Up Sale is the perfect time to save and enjoy exclusive holiday bonuses.
]]>
https://www.ledfactorymart.com/blogs/news/3rd-gen-toyota-tacoma-led-headlights-how-to-install2025-12-08T11:15:13+08:002026-01-21T16:47:47+08:003rd Gen Toyota Tacoma LED Headlights How To InstallMillerJason
Whether you're upgrading to TRD Pro-style headlights or a full LED projector system, this installation blog will help you finish the job safely and correctly.
]]>
Upgrading to LED projector headlights is one of the best mods you can do for your Toyota Tacoma. In this guide, we’ll walk you through the full installation process based on a real installation video, including grille removal, headlight removal, wiring setup, and fuse connection.
Whether you're upgrading to TRD Pro-style headlights or a full LED projector system, this installation blog will help you finish the job safely and correctly.
Tools You Will Need
10 mm socket
10 mm ratchet
Trim removal tool
Fuse puller (included with your vehicle)
Gloves (optional)
Step 1 — Prepare the Vehicle
🔧 Rotate the Wheel Outward
Turn the front wheel outward to give yourself more room to access the inner fender and bumper clips.
🔧 Open the Hood
Lift the hood and secure it in place.
Step 2 — Remove the Front Grille
1️⃣ Remove Center Bolts
Using a 10 mm socket, remove the two bolts located at the center of the grille.
2️⃣ Remove Grille Clips
Use a trim removal tool to take out the two clips on both sides of the grille.
3️⃣ Disconnect the Sensor Connector
Grip the two clips holding the grille-top sensor connector. Press and release the connector clip to unplug it.
Once the wiring harness is disconnected, you can now pull the entire grille off the vehicle.
Step 3 — Remove the Bumper & Clips
1️⃣ Remove the Bolt
Use a 10 mm ratchet and trim tool to remove the single bolt securing the bumper.
2️⃣ Release the Side Tab
Use your finger to push the plastic tab up and over the bumper edge. Gently pull the bumper outward.
3️⃣ Remove the Plastic Clip
Use the trim tool to remove the plastic clip beneath the headlight.
Step 4 — Remove the Headlight Assembly
1️⃣ Disconnect Headlamp Connector
Unplug the main headlight connector. Remove the bottom 10 mm bolt located under the headlight.
2️⃣ Remove Top Bolts
Take out the two 10 mm bolts on top of the headlamp.
3️⃣ Remove the Six Plastic Clips
There are six plastic clips securing the bumper to the vehicle front:
4 clips on the radiator support
1 clip under each headlight
After this, you can safely pull out the entire headlamp.
4️⃣Unplug All Connectors
Disconnect all original wiring from the headlight.
Step 5 — Wiring Instructions
Before installing the headlight back into the vehicle, clean out any dry dust or dirt inside the housing area.
Color-Matched Main Connectors: Connect the gray, black, and color-matched plugs from the harness to the matching connectors on the headlight.
Other Connectors: All other connectors are simple plug-and-play. Two connectors requires no wiring—just leave it plugged in as original.
Step 6 — Fuse Tap Connection
1️⃣Connect the black long-tube harness to the fuse tap.
2️⃣Insert the previously removed 10A fuse into the add-a-fuse harness.
Make sure to secure excess wiring away from:
Hot components
Moving parts
Step 7 — Install Lights Back on the Vehicle
Repeat the same process for the headlight on the other side.
Then reinstall:
The headlights
All clips
The bumper
The grille
The sensor connector
When everything is plugged back in, the installation is officially complete!
✅ Final Check
Before closing the hood, test the following:
Low beam
High beam
DRL
Sequential turn signals
Marker lights
Any additional functions your LED headlights include
]]>
https://www.ledfactorymart.com/blogs/news/installation-guide-9-rgbw-headlights-for-2018-2025-jeep-jl-and-jt2025-12-04T12:18:00+08:002025-12-15T10:02:19+08:00Installation Guide – 9" RGBW Headlights for 2018-2025 Jeep JL and JTLclaireInstallation Guide – 9" RGBW Headlights & RGBW Fog Lights
For 2018–2025 Jeep Wrangler JL & Gladiator JT
Before You Begin
Turn off the vehicle and disconnect the battery.
Prepare the necessary tools: screwdriver set, trim clip removal tool, etc.
Lay out all components and ensure the wiring harnesses and connectors are complete and undamaged.
Step 1 — Remove the Front Grille
(Image Example: Removing the front grille)
Open the hood.
Remove all the plastic clips along the top of the gril
Gently pull the grille outward from the bottom to release the lower clips.
Step 2 — Remove the Factory Headlights
(Image Example: Removing screws from the stock headlight)
Remove the screws securing the factory headlights.
Unplug the factory wiring connector.
Take out the headlight assembly from the housing.
Step 3 — Install the New 9" RGBW Headlights
(Image Example: Positioning the new headlight into place)
Align the new headlight with the factory mounting position.
Connect the plug-and-play harness to the original vehicle socket.
Connect the RGBW module’s control wire to the headlight’s RGBW harness.
Secure the new headlight using the original screws.
Step 4 — Connect the RGBW Controller
(Image Example: Wiring diagram for controller installation)
Mount the RGBW controller behind the grille in a dry and stable location.
Connect the left and right headlights to the corresponding ports on the controller.
Organize the wiring away from heat sources and moving parts.
Connect the RGBW module’s positive and negative wires to the vehicle’s battery control panel (Red = positive, Black = negative).
Step 5 — Reinstall the Front Grille
(Image Example: Reinstalling the front grille)
Align the lower grille clips and press them back into place.
Reinstall all upper clips.
Close the hood.
Installation Complete!
Your 9" RGBW headlights and RGBW fog lights are now successfully installed and ready for use.
]]>
https://www.ledfactorymart.com/blogs/news/black-friday-jeep-deals-up-to-50-off-at-led-factory-mart2025-11-24T14:48:18+08:002025-11-25T15:46:48+08:00Black Friday Jeep Deals — Up to 50% OFF at LED Factory Mart!Lclaire🔥 Black Friday Jeep Deals — Up to 50% OFF at LED Factory Mart!
Ready for the biggest shopping event of the year? This Black Friday, upgrade your Jeep Wrangler (JK/JL) and Gladiator JT with premium LED accessories! From high-performance headlights to off-road light bars, tail lights, and grille lighting — enjoy up to 50% OFF across the entire Jeep collection.
Whether you want better visibility, safer night driving, a tougher exterior look, or enhanced off-road capability, this is the best time of the year to upgrade your Jeep.
📅 Key Black Friday Dates
Date
Event
Nov 1 – Nov 17
Early Access Black Friday Sale
Nov 18 – Nov 28
Official Black Friday Sale
Nov 28 (For a limited time of 3 hours)
Limited-time flash sale
Nov 29 – Dec 1
Cyber Monday Final Call
Be sure to subscribe to our newsletter and follow our social pages to unlock early-bird codes and exclusive discounts.
💡 How to Save More on Jeep Upgrades This Black Friday
1. Buying a Single Jeep Item? Enjoy 15% OFF
Our best-selling Jeep lighting upgrades are all included:
Upgrade your Jeep’s front-end presence + nighttime visibility with zero extra cost.
🎁 Extra Bonus: Upload a Review to Claim Jeep Rewards
After receiving your order, upload a photo or video review to claim one of the following gifts:
$100 Starbucks Gift Card
Christmas Wreath
Free Jeep Accessories or Tools
Your review helps fellow Jeep owners — and earns you exclusive rewards.
Why Jeep Owners Trust LED Factory Mart
✈️ Fast & Free Shipping
🔄 30-Day Hassle-Free Returns
✅ 2-Year LED Warranty
⭐ Trusted by Tens of Thousands of Jeep Drivers Worldwide
]]>
https://www.ledfactorymart.com/blogs/news/black-friday-saving-guides-the-best-bronco-accessories-deals-are-here2025-11-19T17:59:43+08:002025-11-25T13:46:18+08:00Black Friday Saving Guides: The Best Bronco Accessories Deals Are Here!Richard Pan
Are you ready to take advantage of the biggest shopping event of the year? This Black Friday, enjoy incredible discounts on Ford Bronco accessories at LED Factory Mart—where you can get your dream upgrades at up to 50% off regular prices!
Preparing for next summer? Grab a Bronco Cover starting at only $49 in our limited-time flash sale section.
Protect your Bronco from dust, sun, and weather—at the lowest price you'll see all year.
Buy 1 Get 1 Free on Selected Products
One of the most exciting offers this Black Friday
🎁 Buy our best-selling Bronco Fog Lights and get a Grille Light for FREE!
This is the perfect combo to instantly level up your Bronco’s front-end lighting and style with zero extra cost.
🎁Bonus: Review & Earn Rewards
This Black Friday, we’re not just offering discounts — we’re giving back! After purchase, upload a photo or video review on your product page to receive one of the following:
$100 Starbucks Gift Card
🎄 Christmas Wreath
🔧 Free Car Accessories or Gear
Why Shop With LED Factory Mart?
✈️ Free & Fast Delivery
🔄 30 Days Easy Return
✅ LED 2-Year Warranty
]]>
https://www.ledfactorymart.com/blogs/news/black-friday-shopping-guide-2025-save-big-on-toyota-tacoma-tundra-4runner-lighting-upgrades2025-11-12T11:52:55+08:002026-01-21T16:48:46+08:00Toyota Lighting Black Friday Shopping Guide 2025| Best Deals & Smart Saving TipsMillerJason
Get ready for Black Friday 2025 with our ultimate shopping guide! Discover the best deals, smart buying tips, and exclusive discounts to help you save big this holiday season.
]]>
Black Friday 2025 is coming — and it’s your best chance to upgrade your ride for less! Whether you drive a Toyota Tacoma, Tundra, or 4Runner, this year’s Black Friday Sale is packed with exclusive lighting deals that combine performance, style, and unbeatable prices.
Let’s dive into the ultimate Black Friday Shopping Guide for off-roaders and truck lovers.
🗓 Key Black Friday Dates to Remember
Date
Event
Nov 1 – Nov 17
Early Access Black Friday Sale
Nov 18 – Nov 28
Official Black Friday Sale
Nov 28 (For a limited time of 3 hours)
Limited-time flash sale
Nov 29 – Dec 1
Cyber Monday Final Call
Be sure to subscribe to our newsletter and follow our social pages to unlock early-bird codes and exclusive discounts.
🚀 How to Prepare for the Sale
Build Your Wishlist Now Add your favorite headlights, fog lights, and light bars to your wishlist — so you can check out fast once deals drop.
Compare Before You Buy Know your model fitment (2016–2023 Tacoma? 2014+ Tundra? 2010–2025 4Runner?) and compare specs before the rush begins.
Sign In Early Create your account and save your address to make checkout lightning fast.
Set Your Budget Decide how much you want to spend — trust us, it’s easy to go wild during Black Friday.
Check for Combo Offers Look for bundles like Headlight + Fog Light Sets or Roof Light Bar Kits to maximize your savings.
💡 Top Black Friday Picks You Can’t Miss
1️⃣ LED Projector Headlights - Up to 40% OF
Sharper beam, sleek DRL design, and full plug-and-play installation.
3️⃣ Hidden Light Bars & Roof-Mount Kits - Save up to $200
Add extra brightness for off-road night runs. Check out the 32" Hidden Light Bar for 2016–2023 Tacoma, featuring 3 mounting brackets for perfect fitment.
This Black Friday, we’re not just offering discounts — we’re giving back! After purchase, upload a photo or video review on your product page to receive one of the following:
🎁 $100 Starbucks Gift Card
🎄 Christmas Wreath
🔧 Free Car Accessories or Gear
🛞Why Shop With Us This Black Friday?
✅ Direct Fit for Toyota Models — No cutting or rewiring required.
💧 Fully Sealed Construction — 100% waterproof and weatherproof.
⚡ Plug & Play Design — Install in minutes.
🌎 Fast U.S. Shipping — Warehouses on both coasts.
💬 Trusted by Thousands of Tacoma & 4Runner Owners
🏁 Final Tip: Don’t Wait Until It’s Too Late
Once the countdown hits, popular models sell out fast. Get your wishlist ready, sign up for early access, and be the first to unlock the best deals of the year.
Upgrade your truck. Light your path. Dominate this Black Friday.
]]>
https://www.ledfactorymart.com/blogs/news/the-ultimate-jeep-headlight-installation-guide-jl-jt-jk-models2025-10-31T17:03:00+08:002025-11-03T17:04:56+08:00The Ultimate Jeep Headlight Installation Guide (JL / JT / JK Models)ChenWade
The Ultimate Jeep Headlight Installation Guide (JL / JT / JK Models)
Step-by-step instructions for Wrangler and Gladiator owners
Audience
This guide is designed for Jeep owners and DIY enthusiasts with basic hands-on experience and access to standard tools.
⚙️ Important Safety Reminder
Before starting, always disconnect the negative terminal of the battery to prevent short circuits or triggering ECU errors. If your installation involves running wires through the firewall, reprogramming the ECU, or modifying the CAN bus configuration, seek professional help. All instructions below are based on Led Factorymart installation kits and verified community experience.
🧰 Preparation (All Models)
Required Tools
Phillips / Flathead screwdrivers
Torx bits: T15, T20, T25 (depending on screw type)
8mm and 10mm sockets with ratchet
Wrenches or Allen keys (if needed)
Plastic trim removal tools (to avoid scratching clips)
Electrical tape, insulation tape, and zip ties
Multimeter (for testing voltage and ground)
A flat wall and level ground (for headlight aiming)
🚗 Step-by-Step for JL (2018+) and JT (2020+)
(Wrangler JL and Gladiator JT share almost identical wiring and mounting structures)
Led Factorymart headlights are designed as Plug & Play solutions with dedicated harnesses to eliminate error codes or flickering.
Installation Steps
1.Open the Hood – Secure it with the prop rod.
2.Disconnect the Battery – Remove the negative terminal first.
3.Remove the Front Grille – Use a plastic trim tool to pop out the clips carefully.
4.Unbolt the Factory Headlights – Use Torx (T15 or T20) to remove 3–4 screws and unplug the connectors.
5.Prepare the New Headlights – Do a quick “dry fit” test to ensure plug compatibility.
Connect DRL and Turn Signal Wires
Left Front (Driver Side)
Turn Signal → White/Green
Parking Light → White/Brown
DRL → White/Yellow
Right Front (Passenger Side)
Turn Signal → White/Tan
Parking Light → White/Orange
DRL → White/Dark Blue
DRL Circuit Notes
OEM halogen models use a separate BCM output for DRL.
Aftermarket LED headlights (with Halo or DRL rings) should connect to White/Yellow or White/Dark Blue wires, or to an ACC/Ignition power source for “always on.”
If your headlight includes RGB or Halo effects, use an inline fuse and relay isolation.
Testing and Troubleshooting
Use a multimeter to confirm voltage on each wire:
Parking lights ON → 12V on White/Brown or White/Orange
Turn signals ON → Pulsing 12V on White/Green (left) or White/Tan (right)
Ignition ON (no lights) → 12V on White/Yellow or White/Dark Blue (DRL)
Verify that all grounds (usually Black or Gray) connect securely to metal.
Note: Some 2018–2020 JL North American models may have DRL disabled in BCM; a Tazer JL programmer can enable it.
Secure the New Headlights – Align and tighten all mounting screws evenly.
Reconnect Battery & Test – Check low beam, high beam, DRL, and turn signal. If flickering or error codes appear, install the included anti-flicker harness from Led Factorymart.
Seal & Protect – Wrap all exposed wire ends with electrical tape and ensure watertight connectors.
Headlight Aiming – Park 25 feet (7.6m) from a wall. Adjust beams per manufacturer’s spec.
Finalize Installation – Reattach grille and clips, check all fasteners, and log installation details for warranty.
🛠️ JK (2007–2018 Wrangler) Step-by-Step Installation
The JK uses a different mounting system but remains the most common 7-inch headlight swap among Jeep owners.
Installation Steps
①Disconnect the Battery (negative terminal).
②Remove Grille Clips – Pry out six upper plastic clips with a trim tool.
③Unbolt Factory Headlights – Use Torx (T15/T20) to remove the retaining ring screws.
④Using a Torx T-15 driver, remove the 4 retaining ring screws securing your factory headlights in place.
④Disconnect Wiring Harness from the back of the headlight.
⑤ Prepare the New Headlight Unpack the new Led Factorymart headlight and check all accessories. Most models include an H4 adapter or direct-fit plug for simple plug-and-play installation. If your headlight features a Halo or DRL ring, connect the DRL (white/yellow or white/blue wire) to an ignition-on or fused ACC power source, as specified in the manual. Ensure all wires are secure and insulated before installation.
⑥Install and Align – Insert the new LED light, align tabs, reinstall retaining ring, and tighten screws.
⑦Reconnect Wiring and test all light functions.
⑧Reinstall Grille and all clips securely.
⑨Aim Your Headlights on a flat wall for proper beam pattern.
(If your JK is newer, you may also need to release the small red safety tab on the factory connector before unplugging.)
⚡ Technical Notes: Flickering & Error Codes
Switching from halogen to LED changes circuit resistance, causing the Jeep’s CAN bus to think a bulb has failed.
Led Factorymart includes a built-in anti-flicker harness that stabilizes voltage and prevents warning lights.
OEM LED upgrade kits often require software programming and full rewiring — far more complex than Led Factorymart’s plug-and-play system.
🔧 Final Aiming and Night Test
Park 25 feet (7.6m) from a flat wall.
Mark beam centers with tape. Adjust height so the beam pattern sits slightly below center.
Test both low and high beams at night — confirm even illumination and no glare to oncoming traffic.
🧭 Quick Troubleshooting Guide
Symptom
Possible Cause
Solution
Flickering or warning light
CAN bus resistance mismatch
Use the Led Factorymart anti-flicker adapter
Light won’t turn on
Reversed connector or blown fuse
Check polarity and fuse box
DRL or Turn not working
Miswired connection
Verify color mapping per model
Moisture inside lens
Incomplete seal
Reapply silicone or RTV if necessary
🏁 Conclusion: Why Choose Led Factorymart
Installing headlights shouldn’t be complicated — and with Led Factorymart’s precision-engineered Plug & Play kits, it isn’t. Each headlight set is tested for Jeep JL, JT, and JK compatibility, includes vehicle-specific wiring harnesses, and offers:
💡 Error-free installation (CAN bus ready)
⚡ Anti-flicker protection built in
🧩 Direct OEM connectors – no cutting or splicing
🛠️ Detailed PDF & video guides for every Jeep model
💬 Dedicated technical support team ready to help with wiring or aiming
With Led Factorymart, you get more than headlights — you get a professional-grade lighting upgrade designed for durability, clarity, and simplicity.
Light up your next adventure — confidently, safely, and stylishly.
]]>
https://www.ledfactorymart.com/blogs/news/3rd-gen-tacoma-2025-halloween-mods-guide2025-10-31T14:16:02+08:002026-01-21T16:49:14+08:003rd Gen Tacoma Halloween Mods GuideMillerJasonHalloween isn’t just for costumes and candy — it's the perfect time to transform your Tacoma into a head-turning, night-ready beast. Whether you're hitting Halloween trails, joining a spooky night meet, or simply want to show off on the road, nothing boosts the vibe like the right lighting setup.
Let’s walk through the best lighting upgrades to make your Tacoma glow like a haunted legend this Halloween — and stay sharp long after the holiday.
👻 Why Lighting Mods Are a Must This Halloween
Night adventures need visibility — spooky nights = darker roads.
Safety meets style — stand out and see better.
Seasonal events + truck meets — be the most eye-catching rig out there.
Fall + winter season prep — you're upgrading for the dark months ahead anyway.
Think of this as your Tacoma’s Halloween costume — but one that actually boosts performance.
Minimal mod, max Halloween glow. Perfect add-on if you're doing pumpkin patch night shoots 🎃 👀
Soft With DRL & Turn Signals that give your truck that predator vibe.
Easy Installation with Simple Wiring.
Aggressive Look with Horizon Series Grille.
📸 Halloween Tacoma Show-Off Challenge
Post your Halloween Tacoma build & tag us for a chance to win free LED accessories + merch 🎁
Hashtags to use: #ledfactorymart
🕯️ Final Words
Halloween only lasts one night — but your lighting upgrades will transform every drive long after the pumpkins fade.
Whether you're building a night-crawler Tacoma or gearing up for foggy season, now’s the time to upgrade. Light smarter, look meaner, drive safer.
This year — don’t just trick-or-treat. Trail-or-treat. 🚙🌒
]]>
https://www.ledfactorymart.com/blogs/news/how-to-decorate-a-car-for-halloween-bronco-special2025-10-19T19:15:00+08:002025-10-20T19:18:22+08:00How to decorate a car for halloween | Bronco SpecialRichard Pan
Doesn't it feel like Halloween arrives earlier every year? Around my neighborhood, as soon as the kids start school, skeletons and spiderwebs appear on lawns and trees. And it's not just homes and yards that are decked out in Halloween decorations. More and more people are getting into the spirit of Halloween in their cars, too.
Maybe it's the popularity of "trick-or-treating"—where you park with other revelers and hand out candy from your car's trunk—or maybe it's because social media has fueled our yearly desire to outdo ourselves. Car costumes are everywhere these days. And you know what? They're hilarious!
Here are some great ways to incorporate your car into the Halloween festivities:
Pumpkin Face
Draw or cut out pumpkin faces from orange paper and tape them to your hood or windows. You can even install battery-powered LED lights behind the pumpkins to make them glow at night.
Dark Lighting
Install color-changing LED light strips inside or under your car. Orange or purple lighting effects will give your Bronco an eerie glow at night.
Cockpit Decorations
Place small skulls, fake spiderwebs, or miniature pumpkins on the dashboard or passenger seat to make every drive fun.
Skull and Ghost Decorations
Use stickers, spray paint, or magnetic decals to decorate the car body or windows with skulls, ghosts, and other elements.
"Trick or Treat" Cargo Bench Decoration
If your Bronco has a cargo bed, transform it into a Halloween candy station so friends can just "take candy" when they visit!
Add Sound Effects
Sound effects can elevate your Halloween car decorations and make them memorable. A portable Bluetooth speaker can play spooky sound effects or a chilling playlist to set the mood. If your car decorations are movie-themed, consider playing a movie soundtrack in the background. Keep the volume low, especially if children are close by.
Social Sharing
After your Halloween decorations are complete, don't forget to take photos and share them on social media! You can participate in our Bronco Halloween UGC event, upload photos of your car's creative decoration, and have a chance to win limited prizes.
]]>
https://www.ledfactorymart.com/blogs/news/rear-pillar-brake-light-installation-guide-for-2010-2024-toyota-4runner2025-09-25T18:33:02+08:002026-01-21T16:49:46+08:00Rear Pillar Brake Light Installation Guide for 2010–2024 Toyota 4RunnerMillerJason
Want to add cooler, safer lighting to the rear of your Toyota 4Runner (2010–2024)? The Rear Pillar Brake Light is an excellent choice. This article provides a detailed step-by-step installation guide to help you easily complete the upgrade.
1. Use a pry tool to remove the passenger side tailgate trim.
2. Remove the white clip from the decorative panel and install it on the passenger side pillar light.
3. Use an electric drill to make a small hole at the pillar light harness,and pass the harness of the pillar light through the small hole. (Note: No hole needs to bed rilled on the driver's side,the harness can be passed directly.)
Connect the New Brake Light
4.Install the pillar lights in the original car hole position.
5.The wiring harness of the pillar lamp passes through the small hole and is routed along the lining above the tail-gate toward the driver's side.
6.The wiring harness for the pillar lights is routed along the lining under the tail-gate toward the passenger side and then along the direction of the tail lamp.
7.On the inside of the trunk,open the cover behind the taillight.
8.Take out the adapter harness and connect the adapter harness to the pillar light harness.
9.Unplug the taillight plug and connect one end of the taillight plug to the adapter harness.
10.Connect the other end of the two.
11.Put the wiring harness plug behind the taillight and close the cover.
12.Repeat the above steps to install the pillar light on the driver's side.The installation is complete.
]]>
https://www.ledfactorymart.com/blogs/news/how-to-install-trail-marker-lights-for-ford-bronco2025-08-27T12:03:00+08:002025-11-25T13:46:42+08:00How To Install Trail Marker Lights for Ford Bronco?Richard Pan
Tools and Materials Needed
●10mm Socket ●Pry Bar
Step 1: Remove your original trail sight
Use a 10mm socket to remove the bolt
Step 2: Remove the seal of the original
Use the tool to pry off the seal of the original
Step 3: Remove the seal completely and attach it to the new trail sight lights
Step 4: Replace the new trail sight marker lights back to the Bronco
Use the provided bolt to install and tighten it back into place
Step 5: Remove the flender flare for easier access to the wheel well
Push the pin right here that was removed, plus one bolt that you can remove here, and then peel back the fender flare so you can access the headlight
Step 6: Unplug the headlight harness
Step 7: Pull through the connector from the trial site light and clip it into the included harness
Step 8: Plug the headlight connector that you removed into the harness provided
Check out a more detailed installation video
]]>
https://www.ledfactorymart.com/blogs/news/how-to-install-jeep-jl-headlights-step-by-step-guide2025-08-24T09:53:06+08:002025-08-26T10:58:48+08:00How to Install Jeep JL Headlights: Step-by-Step GuideChenWade
Upgrading your Jeep Wrangler JL JT LED Headlight is one of the most popular modifications among Wrangler owners. Not only does it give your Jeep a modern, aggressive look, but it also improves visibility and safety during night driving or off-road adventures.
If you’ve recently purchased 9 inch LED headlight with DRL & turn signals, this guide will walk you through the complete installation process. It’s beginner-friendly, requires only basic tools, and can usually be completed in about 30–45 minutes.
Tools You’ll Need
Prepare the following tools before starting:
Power Tool (optional, for faster installation)
1/4 Ratchet
1/4 Extension
10 mm Socket – for removing and reinstalling headlight bolts
Metal Panel Popper – for removing grille clips
Flat Screwdriver
⚠️ Note: When using power tools, always ensure that you do not overtighten the screws, as this can damage the mounting hardware or headlight housing.
Step-by-Step Installation
Step 1: Open the Hood
Lift and secure the hood to access the grille.
Step 2: Locate the Six Push Pins on Top of the Grille
Identify the six plastic push pins securing the top of the grille.
Step 3: Remove the Six Push Pins
Use the Metal Panel Popper or flat screwdriver to carefully pop out the push pins.
Step 4: Remove the Grille
Gently pull the grille towards you starting from the bottom corners.
Lift the grille with a gentle upward motion, releasing the lower clips. After disengaging the clips, carefully pull the grille out to complete the removal process. Set the grille aside for future re-installation.
Step 5: Remove the Headlight Bolts
Using 1/4 Ratchet + 10 mm Socket, remove the three bolts holding each headlight.
Step 6: Disconnect the Headlight Harness
Pull the headlight forward and disconnect the wiring harness from the back.
Step 7: Prepare the New Headlights
Take out your 9 inch LED headlight with DRL & turn signals and check the included hardware.
Step 8: Install the New Headlights
Reconnect the harness to the new headlights, then secure each headlight with the three 10 mm bolts using 1/4 Ratchet + 10 mm Socket.
Jeep JL Front Headlight Wiring Instructions
Left Front Headlight:
Turn Signal (Turn): White/Green wire
Parking Light (Park): White/Brown wire
Daytime Running Light (DRL): White/Yellow wire
Right Front Headlight:
Turn Signal (Turn): White/Brown wire
Parking Light (Park): White/Orange wire
Daytime Running Light (DRL): White/Dark Blue wire
📌 Usage Notes:
Connect the LED headlight wires for Turn, Park, and DRL to the corresponding factory wires of the same color.
Ensure all connections are secure to avoid any loose contact during driving.
After wiring, test all functions to confirm Turn signals, Parking lights, and DRL operate correctly.
1.Begin by inserting and connecting the DRL wire into the headlight assembly. DO NOT USE DIELECTRIC GREASE!
2.Connect the headlight’s plug into the corresponding connector.
3.Next, link the turn signal yellow wire from the DRL harness to the headlight assembly.
SCREW THE HEADLIGHTS BOLTS
4.After ensuring all the plugs are securely connected, initiate the process of screwing in the headlight bolts. Repeat the same steps for the other side of the headlight.
Step 10: Reinstall the Grille
Align the grille and push it back until all clips snap into place.
Step 11: Reinstall the Six Push Pins
Insert all six push pins to secure the grille.
Final Product
Your Jeep Wrangler JL now features upgraded 9 inch LED headlights with DRL & turn signals. Test low beam, high beam, DRL, and turn signals to ensure everything functions correctly.
Q: Can I install JL headlights myself? A: Most Jeep Wrangler JL JT LED Headlights are plug-and-play. If you can use basic tools, you can complete the installation at home.
Q: Will it affect my Jeep’s warranty? A: Installing DOT/SAE-approved 9 inch LED headlights generally does not void the warranty.
Q: How do I adjust the headlight beam? A: Use the adjustment screw on the back of the headlight assembly to set the correct height and angle.
]]>
https://www.ledfactorymart.com/blogs/news/installing-fog-lights-on-2022-2025-toyota-tundra2025-08-23T17:03:19+08:002025-08-23T17:03:22+08:00Installing Fog Lights on 2022-2025 Toyota TundraFianoledfactorymart
Step-by-step installation guide for adding fog lights to the 2022-2025 Toyota Tundra, making the process simple and clear for every truck owner.
]]>
Mary, ”As a proud owner of a 2022 Toyota Tundra, I’ve been customizing my truck step by step. One upgrade I recently added was a set of LED fog lights. These not only improve visibility during night driving and heavy rain, but also give the front end a much more aggressive look. Here’s my full experience of installing fog lights on my Tundra.”
1.Use trim tool to remove the decorative panel on the driver's side as shown in the picture.
2. Place the fog lamp in the reserved position, aligning it with the clips.
3. Use a 10mm socket and a screwdriver to loosen the screws and clips of the fender liner.
4. Unplug the installation plug on the original vehicle's front bumper wiring harness.
5. Connect the corresponding lines as shown.
6. Connect the red wire of the new fog lamp to the fuse, and then to the ACC.
7. The black wire of the new fog lamp is connected to the negative pole of the battery.
8. Close the hood and the installation is complete.
Why Upgrade to LED Fog Lights?
Better Visibility: LED fog lamps provide a brighter and wider beam.
Modern Look: With sequential turn signals and DRL (Daytime Running Light) features, the Tundra’s face looks sharper and more premium.
Durability: Most aftermarket fog lights are built with aluminum housing and IP67 waterproof rating, making them perfect for both daily driving and off-road use.
]]>
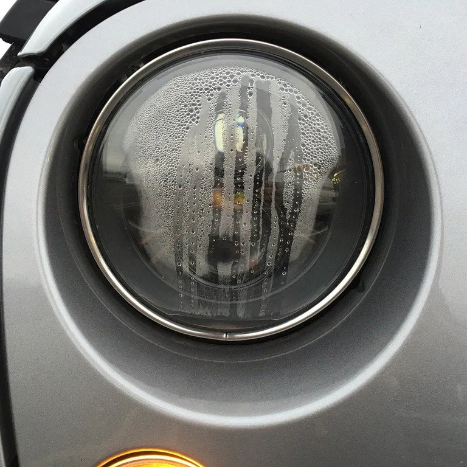
https://www.ledfactorymart.com/blogs/news/what-should-i-do-if-my-newly-installed-jeep-headlights-look-foggy2025-06-02T17:45:00+08:002025-08-26T11:01:11+08:00What should I do if my newly installed jeep headlights look foggy?ChenWadeWhat should I do if my newly installed jeep headlights look foggy?
Are your new Jeep headlights looking foggy or hazy? This is a common problem, even with factory-installed HID headlights. In this post, you will learn easy ways to clear up cloudy headlights and improve visibility.
Keep reading for simple tips to fix and prevent headlight fogging.
Key Takeaways
· Foggy headlights on new Jeeps can be caused by condensation inside or oxidation outside. Studies show cloudy headlights may cut light output by up to 50%, making night driving dangerous.
· To fix surface fog, use a headlight restoration kit, toothpaste, or baking soda. Experts say these home methods work well as first steps before buying new lights.
· If you see moisture inside the lens, check for broken seals or cracks. Use butyl rubber sealant and silica gel packs to block and dry out water.
· Applying UV protection film and regular cleaning help stop future fogging. KAVACA Ceramic Coated PPF is one option used in 2024 for long-term clarity and protection.
· Inspect headlights after washing your Jeep or driving in rain for any signs of leaks. Address small problems early to prevent bigger repairs later, as advised by users like poughkeepsie in 2024 who recommend stopping condensation at the start.
Identify the Cause of Foggy Headlights
Foggy headlights can make it hard to see at night. You need to find out if the problem is inside or outside the light.
Check for moisture or condensation inside the lens
Look for drops of water or a foggy film inside your new Jeep headlights. Condensation often forms because cooled air in the headlight contracts and draws in moisture. Sealant failure, blocked vents, physical damage, or old gaskets can cause this problem.
Some dealers said that condensation is normal and will burn off from bulb heat. In 2024, user poughkeepsie disagreed with this advice; he stated that stopping condensation before it starts is better.
Find out if you see moisture buildup or streaks on the lens surface. Moisture inside the headlight can make your lights appear dim and less safe at night. It may also point to problems like seal leaks or broken seals where water gets in easily.
Addressing these issues early helps prevent more serious damage later on.
Inspect for oxidation on the outer surface
Check your headlights for yellow or cloudy spots on the surface. Sun exposure causes headlight oxidation, turning clear plastic foggy and dull. Aging plastic and UV ray degradation are the top reasons for this problem, especially on Jeep headlights.
Dirt and grime build up fast as well, making things worse.
Surface oxidation lowers visibility while driving at night or in bad weather. Studies show that cloudy headlights can cut light output by 50 percent or more. You may also notice roughness when touching the lens; this points to sun damage on headlights.
Headlights become foggy and yellow due to oxidation from sun exposure and grime, says automotive experts.
After checking for signs of headlight oxidation, you can pick a cleaning method to restore clarity.
Methods to Clear Foggy Headlights
You have many ways to clear foggy headlights at home. Simple cleaning steps can help your new headlights look bright and clear again.
Use a headlight restoration kit
A headlight restoration kit is a fast foggy headlight repair method. Start by applying masking tape around the headlights to protect your Jeep’s paint. These kits often come with sandpaper, polish, and a sealant for DIY headlight restoration.
Most include fine sandpaper; use it gently if cloudiness remains after cleaning. Carefully follow each step in the instructions for best results.
Headlight cleaning kits remove oxidation from the outer surface to improve clarity. They are an effective option for clearing cloudy headlights before replacing them entirely. Many people choose this foggy headlight solution because it costs less than professional services or new lights.
If these methods do not fix the problem, seek help from a specialist who offers advanced headlight refurbishment techniques.
Clean with toothpaste or baking soda
Non-gel toothpaste and baking soda work well as abrasive cleaners for foggy headlight cleaning. These items polish the polycarbonate lens without scratching it. Apply a small amount of non-gel, whitening toothpaste or make a paste with baking soda and water.
Use a soft-bristled brush to scrub gently in circles. Buff the surface with a clean towel to remove any residue.
Plastic lens restoration using these household products offers an easy DIY headlight cleaning method. Many car owners choose this option before trying commercial car care products or headlight restoration kits.
Toothpaste has just the right amount of grit to help clear cloudy headlights, says many auto experts.
Use this simple step for oxidized headlight cleaning and regular car headlight maintenance.
Try rubbing alcohol or vinegar solution
Rubbing alcohol or a vinegar solution can clean hazy headlight lenses fast. Vinegar works well to remove dirt and discoloration from foggy headlights. Mix three parts water with one part white distilled vinegar for the best results.
Soak a microfiber cloth in the solution and scrub the lens using small circles. For tough stains, apply baking soda with vinegar, then rinse thoroughly.
Rubbing alcohol also helps clear cloudy headlights by cutting through grime on oxidized surfaces. Wipe it on with a soft cloth, then dry right away to prevent streaking. These home remedies offer cheap DIY headlight cleaning and help restore clear lights without expensive products.
Fixing moisture problems will further protect your new Jeep headlights from getting cloudy again.
Addressing Moisture Issues
A poor seal can let water or air get inside your headlights. Use simple methods to dry them out and keep the lights clear.
Ensure proper sealing of the headlight unit
Inspect the bulb seals closely for cracks or damage. Damaged seals can let water enter and cause fog inside your headlight unit. Use butyl rubber sealant around all seams to keep out moisture.
This creates a strong barrier against water ingress.
Check for signs of moisture after washing your Jeep or driving in heavy rain. Regular maintenance checks help catch small leaks early. If you notice severe seal damage, contact a professional for repair or replacement to protect the headlight unit and prevent further issues with moisture detection and sealing integrity.
Dry out condensation using silica gel packs or heat
Silica gel packets are good at absorbing moisture inside headlight assemblies. Place a few desiccant packs inside the unit to help remove humidity and prevent condensation from coming back.
These absorbent packets act as a drying agent and can dehumidify the space over time.
A hair dryer on low heat can also help evaporate moisture trapped in the headlights. Hold it about six inches away from the lens and move it around gently for several minutes. Sunlight will work, too, if you leave your Jeep parked in direct light for a few hours.
Both methods help with moisture removal by speeding up evaporation inside the housing.
Preventing Future Fogging
You can take simple steps to help keep your headlights clear. Caring for your lights now may save you from more problems later.
Apply a UV protection film or sealant
UV protection film helps stop fading and oxidation of headlights from sun exposure. Paint protection film (PPF) is a great choice for new or restored headlights. KAVACA Ceramic Coated PPF gives long-lasting, hydrophobic coverage that keeps lights clear and bright.
Applying a UV resistant coating or weatherresistant sealant will help guard against sun damage and moisture.
This step is key for headlight preservation. Protective headlight film blocks harmful rays while making cleaning easy. Sealants add another layer to keep water out and slow down oxidation.
Use these products as part of routine headlight maintenance to prevent future fogging and protect your investment.
Regularly clean and maintain the headlights
Using a UV headlight sealant helps protect the lens. Keeping up with regular headlight cleaning is just as important for visibility and safety. Wash the headlights often with mild car soap or a dedicated headlight cleaner.
Do not use harsh chemicals or strong household cleaners because they can damage the lens surface.
Clean at least once every month, or more often if you drive on dusty roads. Apply a UV sealant after each deep clean to help prevent future fogging and keep lens clarity high. This routine maintenance also supports safe driving, especially at night or in bad weather conditions.
Regular care extends the life of your headlights and keeps them looking clear.
Conclusion
Foggy headlights can make driving at night hard and unsafe. You do not have to replace your new headlights right away. Try cleaning them with simple home items like toothpaste or baking soda and vinegar.
If these steps do not work, you may need help from a professional service. Keep your headlights clean for better visibility and safer trips in your Jeep Grand Cherokee Summit.
FAQs
1. Why do my newly installed Jeep headlights look foggy?
Moisture can get trapped inside the headlight housing during installation. Dust or residue from handling may also cause a cloudy appearance.
2. How can I fix foggy headlights on my Jeep after installation?
First, check if there is moisture or condensation inside the lens. If so, remove the headlight and let it dry completely in a warm place; then reinstall it with proper sealing.
3. Should I use any products to clean new foggy headlights?
If outside haze remains after drying, gently wipe the surface using a soft cloth and mild soap mixed with water. Avoid harsh chemicals that might scratch plastic lenses.
4. When should I seek help for persistent fogginess in my Jeep’s new headlights?
If cleaning and drying do not clear up the issue, contact your installer or dealer for advice since faulty seals or manufacturing defects may need professional repair or replacement.
]]>
https://www.ledfactorymart.com/blogs/news/10-best-fathers-day-gifts-for-motorcycle-dads2025-05-30T19:14:01+08:002025-05-30T19:14:01+08:0010 Best Father's Day Gifts for Motorcycle DadsChenWade10 Best Father's Day Gifts for Motorcycle Dads
Finding the right Father’s Day gift for a motorcycle-loving dad can be hard. Many dads enjoy new riding gear, but choosing from so many products is tough. This list shares the 10 best Father's Day gifts for motorcycle dads and explains what makes each one special.
Check out these top ideas to make your dad’s day great!
Key Takeaways
· The Arai XD-5 Helmet offers premium safety and comfort for $839.95, with advanced features like an updated ventilation system and multiple fit options.
· The Cardo Packtalk Pro lets up to 15 riders talk together using clear JBL speakers and Dynamic Mesh Communication; it costs $459 and includes a crash-detection emergency alert.
· Practical gifts like the Cortech Super 2.0 Magnetic Tank Bag (up to 12 liters) and motorcycle maintenance kits ($50–$100) help dads carry gear or make repairs on rides.
· Experiences such as guided scenic tours on famous routes (Blue Ridge Parkway, Pacific Coast Highway, Tail of the Dragon) create lasting memories with family or friends.
· Personalized motorcycle artwork, custom gear, or keyrings add a special touch by showing your dad’s name or favorite bike—these unique items celebrate his passion for riding.
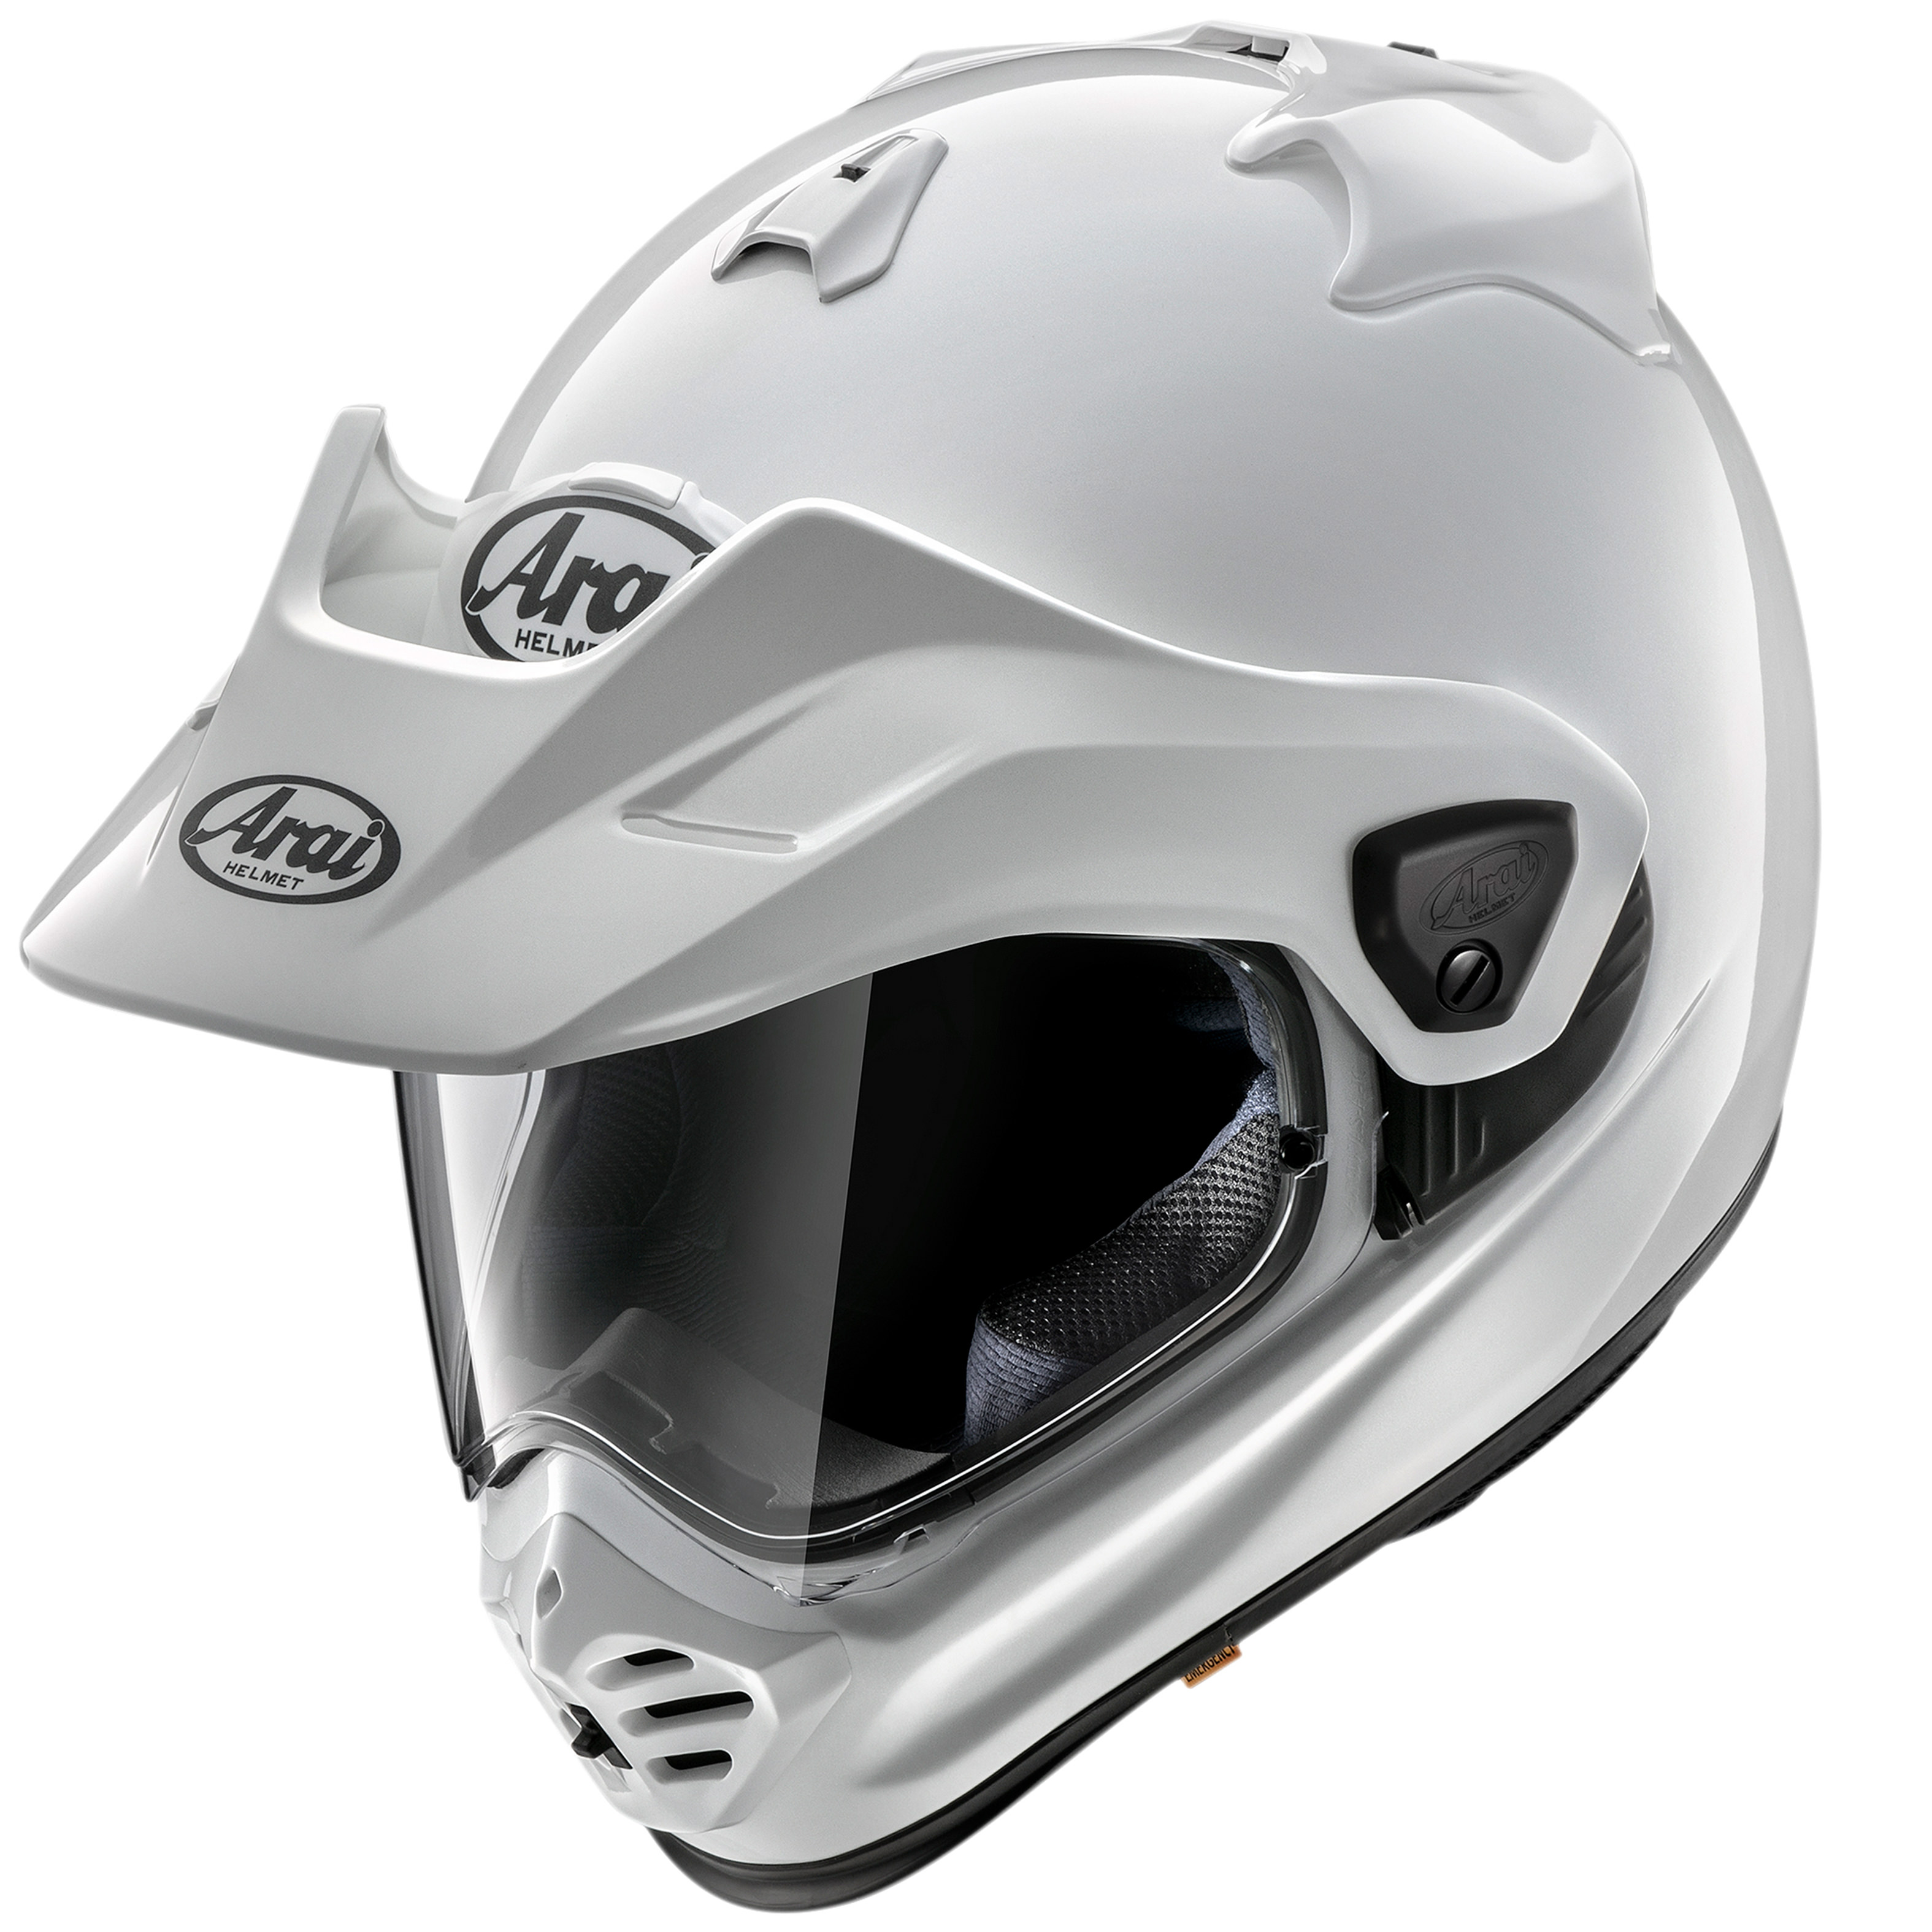
Arai XD-5 Helmet
The Arai XD-5 Helmet gives great protection and comfort for motorcycle dads. It blends modern style with safety, making every ride safe and stylish.
Features & Benefits
The Arai XD-5 Helmet is a top pick for motorcycle dads. It combines advanced safety with comfort and style.
1. Intermediate Oval (IO) shape ensures a proper fit for many head types.
2. Multiple interior-fit shapes boost comfort during long rides.
3. Tool-free shield swaps use the VAS-A Max Vision system for quick and easy changes.
4. Updated ventilation system offers improved airflow and keeps riders cool.
5. Round, smooth shell design helps deflect impact if an accident happens.
6. Precise fit system allows riders to adjust the helmet for maximum comfort.
7. Large, clear shield offers great vision in all weather conditions.
8. Stylish design makes this helmet look sleek on any bike.
9. Priced at $839.95, it reflects premium quality and high-end protection.
10. Durable build ensures the helmet will last through many adventures.
Why It’s a Great Gift
Arai XD-5 Helmet works for adventure, offroad riding, and as a full-face street motorcycle helmet. Its new shell design gives better impact protection to keep dads safe. Riders can choose from many colors and graphics, so it fits any style.
This multipurpose helmet is both practical and thoughtful. It has advanced safety features and stands out as a high-quality present at $839.95. Easy to use for different rides; it offers strong value as versatile headgear for any motorcycle dad.
Cortech Super 2. 0 Magnetic Tank Bag
The Cortech Super 2.0 Magnetic Tank Bag offers secure storage for road trips. Its strong magnets keep your items safe during every ride.
Key Features
This tank bag fits many riders’ needs. It stands out because of its smart design and easy use.
· Offers an expandable capacity of up to 12 liters for plenty of storage.
· Uses strong magnets for secure attachment to metal tanks; keeps the bag in place even at high speeds.
· Made from high quality materials so it lasts through rain and road trips.
· Converts into a backpack for easy carrying off the bike; helps dads move gear hands-free.
· Features a strap mounting option for non-metal tanks, making it versatile for all motorcycle types.
· Provides reliable fastening that does not loosen during rides or rough roads.
· Includes a durable construction which resists wear from sun, wind, and debris.
· Designed with magnetic attachment that allows quick setup and removal without hassle.
· Comes with versatile functionality; holds tools, maps, snacks, or devices securely on any journey.
Practical Uses for Riders
Moving from key features, the Cortech Super 2.0 Magnetic Tank Bag offers real value for daily riders and travelers. Many use it to store water bottles, snacks, and smartphones within easy reach.
The magnetic base holds firmly without scratching metal tanks. "It’s my go-to storage for rides across town or out on the highway," says long-distance rider Tom Evans.
Commuters find it helpful for carrying wallets, keys, and small tools. Tourers pack maps or gloves in the main compartment for fast access during stops. Its secure design fits different motorcycle styles and meets travel needs year-round.
The tank bag makes every ride more convenient by keeping essentials close at hand on trips of any length.
Cardo Packtalk Pro
The Cardo Packtalk Pro lets motorcycle dads stay in touch with friends while riding. Its clear sound and strong connection make group rides safer and more fun.
Communication Benefits
Cardo Packtalk Pro gives riders wireless connectivity to phones and GPS devices. Riders can talk with up to 15 people using Dynamic Mesh Communication. This means clear group communication, even on busy roads.
JBL speakers give top audio quality and sound clarity so voices stay crisp.
Riders get real-time traffic alerts and turn-by-turn GPS directions while they ride. The system supports quick collaboration between friends or family on the road. Connecting mobile devices is easy, helping riders answer calls, use navigation, or check updates without stopping their bikes.
Features That Stand Out
Clear sound and smart features give the Cardo Packtalk Pro an edge. Riders enjoy easy chats and safety while on the move.
1. Highend communication system makes group rides simple, letting up to 15 riders talk at once.
2. Durable construction keeps this device strong for outdoor use; the IP67 waterproof design protects it from water and dust.
3. Longdistance communication works well with a range of up to 1 mile, even between two moving bikes.
4. Advanced technology includes Bluetooth connectivity for calls, music, or GPS instructions during rides.
5. Automatic emergency alert uses a crash-detection sensor; if it senses a crash, it sends help alerts right away.
6. Software upgrades happen over-the-air; users get new features without wires or computer connections.
7. Safety feature lets loved ones know if something goes wrong after an accident is detected.
8. Motorcycle intercom allows handsfree operation with simple voice commands for safe chatting on the road.
9. Weatherproof design keeps all parts working in rain or dust storms, so rides are never cut short by bad weather.
10. Priced at $459, this device packs premium functions that suit tech-loving motorcycle dads who want real value.
Motorcycle Maintenance Kit
A motorcycle maintenance kit helps dads keep their bikes in top shape. It makes a useful Father’s Day present for any rider.
Essential Components
Every dad who rides needs smart tools to keep his bike in top shape. A good motorcycle maintenance kit includes many must-have items.
· Socket set helps with loosening and tightening bolts on different bike parts.
· Pliers give a strong grip for cutting wires or holding small objects during repairs.
· Screwdriver set is useful for work on body panels, seats, and handlebar controls.
· Chain lubricant keeps the bike chain smooth and extends its life.
· Oil filter wrench allows quick removal and fitting of oil filters during oil changes.
· Spark plug socket fits spark plugs tightly, making it easier to change them out.
· Tire pressure gauge shows if the tires are filled at safe levels for every trip.
· Chain breaker and rivet tool make replacing old chains simple and safe.
· Brake fluid helps keep brakes working well for better stopping power.
· Cable luber makes it easy to clean and oil throttle or clutch cables without taking them apart.
· Wrenches work on nuts of all sizes, which is important for most bike fixes.
· Tire repair kits fix flats quickly so dads get back on the road faster.
Most complete maintenance kits cost between $50 to $100 and come packed with these helpful tools. Every item has a real use that supports safer rides and longer-lasting bikes.
Why It’s Useful for Dads
A motorcycle maintenance kit helps dads keep their bikes in top shape. It covers gaps in essential motorcycle toolkit items, making repairs easier at home or on the road. This set often includes tools for quick fixes and important motorcycle upkeep accessories.
These tools protect bike appearance and boost performance during every ride.
Having a motorcycle emergency kit increases safety and keeps dads ready for surprises on long trips. Motorcycle preparedness equipment ensures he will not get stuck due to small problems.
Tools like tire gauges, wrenches, and cleaning gear are key parts of any motorcycle tool set. Regular use saves money, time, and stress while supporting safe family adventures together.
Scenic Motorcycle Tour
A scenic motorcycle tour gives dads a fun way to enjoy fresh air and open roads. This gift creates special memories with every mile.
Benefits of a Guided Tour
A guided motorcycle tour gives dads a special way to enjoy the road. These tours offer stress relief, bonding, and outdoor fun.
1. Guides choose scenic routes with beautiful views, making each ride more relaxing.
2. Tours create great chances for group travel and adventure with other riders.
3. Dads can explore new destinations and see nature up close during these trips.
4. Guided motorcycle tours help lower stress since everything is planned out for the group.
5. The group setting helps build friendships and strengthens family bonds while riding together.
6. Many fathers enjoy sightseeing tours that blend travel companionship with nature exploration.
7. Riders feel safer because guides know the best paths and local routes.
8. Tour companies provide support vehicles for emergencies or maintenance needs.
9. New rides in 2024 often include stops at famous spots and fun outdoor excursions.
10. These motorcycle riding experiences bring memories that last long after Father’s Day passes.
Next, see why a Rider Safety Kit makes an excellent gift for motorcycle dads who care about safety on every journey.
Popular Destinations to Consider
Motorcycle dads love exploring new scenic routes. Many popular roads offer breathtaking views and exciting twists.
1. Blue Ridge Parkway stretches for 469 miles across the Appalachian Highlands. This route is famous among motorcycle enthusiasts for its sweeping curves, mountain roads, and stunning outdoor adventure spots.
2. Pacific Coast Highway (California State Route 1) runs along over 650 miles of coastal highways. Riders enjoy ocean views, roadside tourist attractions, and winding roads from San Francisco to Los Angeles.
3. Tail of the Dragon in North Carolina and Tennessee features 318 twisting roads in just 11 miles. It draws riders from around the world looking for thrilling motorcycle touring experiences.
4. Day trips or multi-day adventures let dads experience scenic motorcycle tours at their own pace. These journeys include options that pass through small towns or beautiful wilderness areas, perfect for a family road trip or solo ride.
5. Each destination stands out with unique sights: mountain tunnels on Blue Ridge Parkway, dramatic cliffs on Pacific Coast Highway, and dense forests near the Tail of the Dragon—all favorites for outdoor adventure seekers and riders who crave amazing views.
Rider Safety Kit
A well-packed rider safety kit can help your dad stay prepared for any trip. Give him peace of mind with gear that keeps him safe on the road.
Items to Include
Every rider needs a good Rider Safety Kit. This kit keeps dads safe and ready for any road problem.
1. Emergency medical kit saves lives in an accident with bandages, wipes, and pain relief.
2. Tire patch kit fixes flat tires fast, so dads do not get stranded.
3. High visibility clothing helps drivers see riders during day and night rides.
4. Goggles cleaner keeps vision clear in dust or rain.
5. Tire pressure gauge checks that tires have the right air, which makes riding safer.
6. Motorcycle tool kit puts all basic tools under the seat for quick repairs.
7. Safety vest adds extra visibility in low light or foggy weather.
8. Reflective tape sticks onto helmets and bikes to shine in headlights at night.
9. Multitool handles small fixes like tightening bolts while on the road.
10. Tire inflator pumps up low tires without stopping at gas stations.
First aid kits, tire repair tools, and reflective gear are smart safety picks for any motorcycle dad’s ride. Lens cleaners and air gauges add more protection from unseen risks on every journey.
Enhancing Safety on the Road
Including the right items in a rider safety kit leads to better protection and peace of mind. Roadside emergency preparedness makes sure dads stay ready for flat tires or small repairs.
A good motorcycle emergency kit combines comfort, convenience, and advanced motorbike safety gear. For example, add a rider first aid kit with bandages and antiseptics for quick care.
Motorcycle maintenance tools are key parts of any roadside assistance kit. Simple tools like wrenches or tire patches let riders fix problems fast. Expert groups recommend motorcycle skills classes as early as 2024 to boost road safety even more.
Smart riders also carry road safety accessories such as reflective vests and gloves for greater visibility; these small steps help keep every ride safer for dad.
Saddle Bags
Saddle bags help dads carry tools, snacks, and gear on every ride. They keep items safe and easy to reach for any trip.
Storage Benefits
Saddle bags provide extra storage space for long motorcycle rides. Riders can use them to carry keys, snacks, and other essentials. Many dads choose styles made from leather, synthetic materials, or hard-shell designs.
These luggage options help store commuting supplies and packable gear safely.
Secure storage keeps riding essentials protected during travel. Hard-shell saddlebag styles offer more cargo capacity for longer trips. Leather bags suit classic bikes while synthetic ones resist weather better.
Different sizes fit different motorcycles so each dad finds a perfect match for his needs.
Types of Saddle Bags for Different Needs
Easy access to gear makes any ride smoother. Many motorcycle dads enjoy picking the right saddle bags for their trips.
1. Leather saddle bags offer a classic style and last for years with proper care.
2. Synthetic saddle bags use man-made materials that resist rain and dirt, making them easy to clean.
3. Hardshell saddle bags provide tough protection and keep items safe on long rides or during bad weather.
4. Waterproof saddle bags use special linings or coatings that keep gear dry in heavy rain, which is great for touring dads in wet places.
5. Secure fastening helps bags stay firmly attached to the bike; clips, buckles, and locking lids stop theft and bag loss at high speeds.
6. Multiple compartments help dads organize tools, snacks, maps, and tech gadgets easily during any journey.
7. Saddle bag options include large sizes for cross-country rides or smaller ones for city commutes; riders pick based on trip length and storage needs.
8. Different saddle bag styles let dads match their bikes with custom looks such as sleek black hard cases or vintage brown leather pouches made by trusted brands since 1980s.
9. Equestrian saddle bags work well on motorcycles too; they offer extra pockets and strong seams from horse riding designs adapted for motorbikes.
10. Saddle bag materials now range from rugged cowhide to lighter plastics so every rider finds what fits best.
Each type meets different needs based on weather, how much space is needed, and personal taste in style or function.
Treblab HD-360 Portable Bluetooth Speaker
The Treblab HD-360 Portable Bluetooth Speaker plays music clearly on the go. It is small and easy to carry for road trips or camp stops.
Features & Benefits for Motorcycle Trips
Treblab HD-360 Portable Bluetooth Speaker makes any motorcycle trip better. It plays clear, loud music that fills the air on the road.
· 360-degree surround sound spreads music in every direction so all can hear.
· With a high power output of 90W, it delivers crisp and strong audio even outdoors.
· Water resistance is rated at IPX4, so it handles splashes or light rain without damage.
· Enjoy up to 20 hours of playtime, which covers long rides or day trips without charging.
· Dual speaker connectivity lets riders connect two speakers for even bigger sound effects during group stops.
· Portable build means packing it in saddlebags is easy and quick.
· Bluetooth wireless connectivity pairs with phones or GPS devices fast and simply.
· Durable construction makes this speaker good for outdoor use and rough roads.
Personalized Motorcycle Artwork
10. Personalized Motorcycle Artwork: Give your dad a custom motorcycle art piece that celebrates his love for riding and makes him smile every day—find more ideas in the full list!
Why Custom Art is Memorable
Personalized motorcycle artwork captures special memories and real-life experiences. A custom illustration shows your dad’s unique bike, his favorite ride, or even a shared trip.
Watercolor style gives each piece an artistic and warm touch.
Custom art offers unlimited revisions. This ensures the final painting matches what you want. Digital format means you get instant access to the finished artwork. Individualized painting becomes a one-of-a-kind gift that speaks to your dad’s story in a way mass-produced gifts cannot match.
Ideas for Personalization
Moving from why custom art is memorable, there are many ways to make motorcycle gifts personal and special. See these ideas that use real facts and options for truly unique results.
1. Choose a Custom Initial Name Motorcycle Helmet Keyring, which lets you add Dad's initials or full name for a unique touch.
2. Pick a Personalized Biker Key Ring with options to engrave special words or dates.
3. Change the background colors of keychains so they match your dad’s favorite bike or jacket.
4. Add custom text to keyrings, like “#1 Dad” or a personal message from you.
5. Order unique motorcycle keyrings that feature his favorite bike brand, style, or model logo.
6. Get custom biker keychains shaped like helmets, leather jackets, or even tiny motorcycles.
7. Personalize wall decor with his name, his motorcycle’s image, or the family’s last name for garage display.
8. Select customized motorcycle gear such as gloves with embroidered initials or patches with meaningful symbols.
9. Design unique motorcycle art with his ride as the focus and use family inside jokes in the design text.
10. Create custom biker merchandise like mugs, T-shirts, or hats featuring his nickname or bike’s number plate.
Personalized Motorcycle Metal Wall Art
These choices use important features like background and text customization shown in current product trends from 2024 and let your dad feel truly celebrated on Father’s Day.
Conclusion
Finding the right Father’s Day gift for a motorcycle dad can be easy with so many great choices. These top ten gifts add fun, comfort, and safety to every ride. From cool helmets to handy speaker systems, there is something special for every bike-loving dad.
Give your father a gift that matches his passion for riding this year. He will enjoy these thoughtful picks on every adventure.
FAQs
1. What are the best Father's Day gifts for motorcycle dads?
The top gifts include riding gloves, a sturdy helmet, waterproof boots, a quality leather jacket, and safety goggles. You can also choose phone mounts or saddle bags to help on long rides.
2. Are there affordable gift options for motorcycle dads?
Yes, you can buy keychains with bike logos, cleaning kits for motorcycles, or reflective vests that improve safety without spending much.
3. How do I pick the right size when buying gear as a gift?
Check your dad’s current gear sizes before buying new items like jackets or gloves. Look at brand sizing charts online to make sure they fit well.
4. Can these gifts be used by all types of motorcycle riders?
Most of these gifts suit any rider who enjoys time on their bike; whether he rides cruisers or sport bikes, practical gear and accessories work for all styles.
]]>
https://www.ledfactorymart.com/blogs/news/top-5-perfect-tacoma-owner-father-s-day-gifts2025-05-29T16:51:17+08:002025-07-30T10:18:13+08:00Top 5 Perfect Tacoma Owner Father’s Day GiftsFianoledfactorymart
Finding the right gift for your Tacoma-loving dad can be hard. Many dads love accessories that make their trucks better or cooler. This list will give you easy and fun Father’s Day gift ideas that any Tacoma owner will enjoy.
]]>
Finding the right gift for your Tacoma-loving dad can be hard. Many dads love accessories that make their trucks better or cooler. This list will give you easy and fun Father’s Day gift ideas that any Tacoma owner will enjoy.
Custom-Fit All-Weather Floor Mats
Custom-fit all-weather floor mats keep the Tacoma’s interior clean, rain or shine. These floor mats fit perfectly and protect against mud, snow, and spills. Truck owner gifts like these make cleanup quick after outdoor adventures or busy family days. Popular brands such as WeatherTech and Husky Liners create tough mats for Tacoma models from 2016 to today.
Tacoma Leather Key Fob Cover
A Tacoma Leather Key Fob Cover protects the key fob from scratches and drops. Fathers who love their Tacoma trucks will appreciate this practical gift. Genuine leather adds a classic look to car accessories and feels great in hand. Many covers feature precise cutouts for easy button access, making daily use smooth and simple.
Tacoma Bed Storage Organizer
Maximize your Tacoma's storage space with a bed storage organizer. These handy organizers fit perfectly in the truck bed, allowing you to keep tools and gear neatly arranged. They help prevent any clutter and make accessing items quick and easy.
Tacoma LED Headlights
Upgrading to LED headlights enhances safety during nighttime adventures or adverse weather conditions. The stylish look of these lights adds a modern touch to your truck's appearance. Tacoma owners can enjoy reduced energy consumption too. This feature makes them an eco-friendly choice.
Toyota Tacoma Tumbler
A Toyota Tacoma tumbler makes a great gift for any Tacoma owner. Many tumblers are spill-proof, ensuring mess-free travels. They fit in most cup holders, making them convenient on-the-go companions. Each time your dad uses it, he will think of his favorite truck.
Pick something thoughtful that he will use every day. Celebrate the special bond with unique presents this Father’s Day!
]]>
https://www.ledfactorymart.com/blogs/news/how-to-clean-your-foggy-headlights2025-05-28T18:49:28+08:002025-07-30T10:19:23+08:00How To Clean Your Foggy HeadlightsFianoledfactorymart
Look inside the headlight housing for water vapor or moisture buildup. Moisture from water vapor can create condensation on the lens or inner walls. This fogginess is common and does not mean there is a defect in your lights.
Look inside the headlight housing for water vapor or moisture buildup. Moisture from water vapor can create condensation on the lens or inner walls. This fogginess is common and does not mean there is a defect in your lights. Condensation typically does not affect how well your headlights work. Most of the time, condensation goes away by itself within 2 to 3 weeks, depending on weather conditions. Heavy moisture may need extra help to dry out. A hairdryer works well to blow hot, dry air into the vent or onto the outside of the unit. If major condensation remains, you might have to remove the headlamp assembly for better drying.
Identify the Cause of Fogging
Foggy headlights can lower your visibility and safety. Find out what is making the lights cloudy or hazy to fix the problem fast.
Moisture Ingress
Moisture ingress happens when water gets inside your headlights. This often comes from a cracked housing or faulty seals. Small leaks in the light housing allow water to enter, which leads to internal fogging or condensation inside headlights.
Sometimes, headlights need ventilation, but these vents can let moisture in as well. Water infiltration causes misting, fogging, or drops of moisture on the inner lens. Many fogged headlights show signs soon after installation if there are seal issues. Cracks and poor seals are common problems that can lead to serious water ingress issues and may require repair right away.
Oxidation of Headlight Material
After checking for water inside the lights, look at the outside for other problems. Oxidation of headlight material often causes yellowing and fogging on acrylic headlights. UV rays break down the protective clear coat over time. This weathering leads to cracks in polycarbonate plastic and leaves a hazy layer on your lights.
Headlight oxidation can cut visibility by up to 50 percent while driving at night. Deterioration of headlight protective coating usually appears as white or yellow spots and small surface cracks.
Steps to Remove Fog or Moisture
You can use simple tools at home to clear up foggy headlights. Learn which methods work best for restoring light output and clarity.
Use a Hairdryer to Evaporate Moisture
Set a hairdryer to warm or hot. Blow dry air into the vent or onto the outside of the foggy headlights. This hot air treatment helps evaporate trapped moisture fast. If condensation covers most of the headlamp assembly, take it out for better results. Add silica gel packets inside after drying to absorb any leftover water.
Check your headlights often for signs of new moisture buildup. Using a blow dryer is a quick way to handle light headlight condensation and support other moisture removal methods.
Clean the Surface with a Restorer Product
After using a hairdryer to remove moisture, focus on getting the headlight surface clear. Headlight cleaning products from auto stores work well for foggy headlight repair. These kits often include a DIY headlight restoration solution and soft cloths.
Home remedies can also help. Mix toothpaste with baking soda for gentle scrubbing. Wear latex gloves before applying any cleaning solution for headlights. Use soapy water and a lint-free rag to wipe away dirt first. For extra shine, apply WD-40 to a microfiber cloth, not directly on the light surface.
Gently rub in small circles until you see clearer results. A soft-bristled brush lifts stubborn grime without scratching the lens during your routine of headlight maintenance or headlight care products use.
Prevent Future Fogging
You can protect your lights with simple steps. Read more tips to keep your lights clear and bright.
Seal Headlight Gaps Properly
Inspect the seals on your headlight assembly. Make sure there are no visible gaps or cracks. Old or worn weather seals may let in moisture and debris, which can cause fogging inside the headlights.
Replace any damaged weather seals right away to keep water out. Apply silicone sealant along the edges of the headlight for extra moisture protection. Use enough sealant to cover all small gaps around each light. Good sealing prevents condensation by keeping air and water from entering the assembly.
Apply UV Protective Coating
UV protection on headlights breaks down over time. This makes them look cloudy and faded. You can prevent this by applying a UV-resistant coating or a headlight protection film (PPF). Many car owners use a UVprotective headlight treatment right after installation to keep their lights clear.
Certified professionals offer custom-fitted headlight protection kits for new cars. These kits help with preventing headlight fogging and scratches. Headlight maintenance is easier with these coatings, which last longer than basic cleaners.
More Questions?Contact Us with your information and our Customer Service representative will contact you.
]]>
https://www.ledfactorymart.com/blogs/news/common-whip-light-problems-solutions2025-05-27T16:36:29+08:002025-07-30T10:21:52+08:00Common Whip Light Problems & SolutionsFianoledfactorymart
In this guide, we’ll walk you through quick fixes for the most common whip light issues—ensuring your lights stay bright, durable, and road-ready.
]]>
Upgrading your vehicle with high-performance whip lights can enhance visibility and style, but occasional issues may arise. Whether you're dealing with wiring problems, flickering lights, or waterproofing concerns, we’ve got you covered. In this guide, we’ll walk you through quick fixes for the most common whip light issues—ensuring your lights stay bright, durable, and road-ready.
Light Not Turning On?
- Check connections for loose wiring or corrosion. - Test the power source (fuse, switch, or battery).
Flickering or Intermittent Operation?
- Ensure secure wiring and proper grounding. - Replace damaged cables or connectors if needed.
Water Damage or Condensation?
- Verify IP68-rated sealing. - Reapply waterproof tape or sealant if necessary.
Dim Lighting?
- Inspect for voltage drops or poor wiring. - Upgrade to higher-quality LEDs if brightness fades.
Pro Tips for Longevity
Use dielectric grease on connectors to prevent corrosion.
Route wires away from heat and moving parts.
Regularly inspect mounts for stability, especially off-road.
Need More Help?
If troubleshooting doesn’t resolve the issue, our support team is here to assist. Shop our premium whip lights for unbeatable durability and performance! 🔧 Drive brighter, drive safer!
]]>
https://www.ledfactorymart.com/blogs/news/five-year-cost-report-for-jeep-recon-vs-solid-state-battery-suv2025-04-27T17:03:29+08:002025-07-29T18:37:48+08:00Five-Year Cost Report for Jeep Recon VS Solid-State Battery SUVFianoledfactorymartDeciding between buying a Jeep Recon or a solid-state battery SUV is tough.This blog post will show you the five-year cost calculation for both vehicles. Find out which is better for your budget.
]]>
The cost of owning a Jeep Recon can add up quickly over five years. In contrast, a solid-state battery SUV may offer significant savings on maintenance and fuel costs.
Owning a Jeep Recon involves several costs. First, buyers face depreciation, which typically hits around 10-15% annually for new vehicles. Maintenance costs can add to that over time but often remain manageable compared to other SUVs. Insurance rates also play a role and can vary based on factors like location and driver history.
Fuel expenses are another important factor in ownership costs. The average fuel economy of the Jeep Recon affects spending at the gas pump. Estimated yearly fuel costs could reach around $2,000, depending on driving habits and gas prices. Overall, understanding these elements helps in making an informed decision about whether to buy a Jeep Recon or consider options like solid-state battery SUV.
Cost of Ownership for Solid-state Battery SUV
Solid-state battery SUVs offer lower ownership costs compared to traditional vehicles. These cars come with reduced maintenance expenses due to fewer moving parts in their batteries. Electric models usually have fewer components that can wear out. Owners often enjoy savings on fuel since electric charging typically costs less than gas.
Insurance rates for electric cars tend to be competitive as well. Many insurance companies recognize the safety features built into these vehicles, which can lead to discounts. Overall, considering long-term savings and cost comparison shows that solid-state battery SUV may provide a financially smart choice over time.
Comparison and Long-term Savings
The Jeep Recon and solid-state battery SUV present distinct cost differences over five years. Owners can expect higher depreciation costs with the Jeep due to its traditional combustion engine. Electric SUV, especially those with solid-state batteries, generally maintain their value better thanks to rising demand for eco-friendly vehicles.
Long-term savings appear more favorable for electric models. Charging costs are considerably lower than gas prices. Also, electric cars typically need less maintenance compared to conventional vehicles like the Jeep Recon. Insurance rates might be lower as well since many insurers offer discounts for electric vehicle owners.
Factors to Consider Before Purchasing
Several key aspects come into play before making a purchase. Evaluating these factors can help you decide between a Jeep Recon and a solid-state battery SUV.
1. Analyze your budget carefully. Determine how much you can spend on either vehicle while accounting for long-term costs.
2. Review the reliability of both options. Research customer reviews to see which vehicle performs better in daily use.
3. Assess fuel efficiency for each vehicle type. Solid-state battery SUVs may offer lower charging costs compared to traditional vehicles.
4. Compare insurance rates based on different models. Some SUVs may have higher premiums due to their features or safety ratings.
5. Contemplate the resale value after five years of ownership. Check depreciation rates for both the Jeep Recon and electric SUVs to gauge future worth.
6. Investigate available vehicle trim options that meet your needs and preferences, as different trims will impact cost and features.
7. Explore car release dates for solid-state battery SUVs, as newer models might come with updated technology and benefits.
8. Understand potential maintenance expenses associated with a Jeep versus an electric SUV, as they often differ significantly in upkeep requirements.
9. Factor in local incentives for electric vehicles that could reduce overall costs when purchasing a solid-state battery SUV.
10. Evaluate the driving range of each option since it impacts how convenient each vehicle will be for your lifestyle.
These considerations will guide you in determining whether to buy a Jeep Recon or opt for a solid-state battery SUV based on your individual needs and financial situation.
Conclusion
Choosing between a Jeep Recon and a solid-state battery SUV requires careful thought. Analyze the costs for each option. Understand how depreciation, maintenance, and insurance add up over five years. Electric vehicles can offer long-term savings that may appeal to many buyers. Make sure to evaluate your driving habits and preferences before making your final decision.
FAQs
1. What is the cost difference between a Jeep Recon and a solid-state battery SUV over five years?
The five-year cost calculation report provides an in-depth comparison of the costs associated with owning a Jeep Recon versus a solid-state battery SUV, including vehicle pricing and other expenses.
2. How can I find car reviews for the Jeep Recon and solid-state battery SUV?
You can find detailed car reviews on various online platforms that include information about vehicle release dates, plugin hybrid features, vehicle pictures, and more to help you decide which one to buy.
3. Are there any advantages of choosing a plugin hybrid like the Jeep Recon over a solid-state battery SUV?
A plugin hybrid like the Jeep Recon may offer different benefits than a solid-state battery SUV. These might include lower initial purchase price or availability of models if new technology vehicles have not been released yet.
4. Where can I get reliable car cost comparisons for these two types of vehicles?
There are several reliable sources available online where you can access comprehensive car cost comparisons between different types of vehicles such as the Jeep Recon and Solidstate Battery SUV.
]]>
https://www.ledfactorymart.com/blogs/news/2025-jeep-wrangler-upgrade-guide-city-to-extreme-off-road-mods2025-04-25T14:43:23+08:002025-07-29T18:51:03+08:00Jeep Wrangler Upgrade Guide: City to Extreme Off-Road ModsFianoledfactorymart
Many Jeep owners want to upgrade their rides for better performance. In 2025, the Jeep Wrangler has several new features for off-roading and commuting. This guide will show you how to make practical modifications for any adventure.
]]>
Many Jeep owners want to upgrade their rides for better performance. In 2025, the Jeep Wrangler has several new features for off-roading and commuting. This guide will show you how to make practical modifications for any adventure.
Heavy-Duty Suspension Lift Kits
Heavy-duty suspension lift kits enhance your Jeep's off-road capability. These upgrades raise the vehicle's height, improving ground clearance and allowing for better maneuverability on rugged terrain.
A lifted Jeep can conquer obstacles like rocks and logs with ease. Many drivers prefer these lifts to accommodate larger tires, which boosts traction on mud or rocky trails.
These kits often come with enhanced shock absorbers and control arm upgrades for a smoother ride. They also improve stability during daily driving. Investing in suspension lift kits allows you to enjoy both urban commuting and extreme off-roading adventures.
LED Lighting: Increased Visibility
Enhanced lighting upgrades significantly improve visibility in various driving conditions. Low-light scenarios can pose challenges when off-roading or commuting at night. Upgrading to LED lights provides brighter illumination and consumes less energy.
Consider installing light bars for increased forward vision during dark trails.
These enhancements not only boost safety but also add a stylish touch to your Jeep modification project. With the right lighting, you enhance your vehicle's trail-rated capability, making it more adaptable for both urban commuting and extreme off-road adventures.
All- or Mud-Terrain Tires
All-terrain or mud-terrain tires offer excellent traction for different driving conditions. These tires feature aggressive tread patterns that grip the road and improve off-road performance.
They allow your Jeep to conquer rugged trails without losing control. For daily driving, all-terrain tires provide a smoother ride on city streets.
Mud-terrain tires excel in wet and muddy terrain. Their deeper treads help push through thick mud, giving you confidence on challenging paths. Choosing the right size is crucial for optimal performance.
Roof racks and storage solutions are essential for your Jeep. They provide extra space without crowding the interior. High-quality roof racks can hold gear and equipment securely. Choose a rack that fits well with your Jeep model.
Consider options that allow for easy access and removal.
Storage solutions add convenience to daily commutes or off-roading adventures. Organize tools, camping gear, or recreational items effortlessly. Use tents to protect your belongings from rain and mud while conquering rugged trails.
With the right configuration, you maximize utility without sacrificing style in your off-road pickup truck.
Winch & Recovery Gear
A winch is essential for any off-road vehicle. It helps pull your Jeep out of tough spots. You can find various types of winches, ranging from electric to hydraulic. Pick one that fits your adventures and budget.
Recovery gear complements the winch for safe rescues. Equip yourself with straps, shackles, and gloves.
Using recovery gear ensures a smooth process in emergencies. These tools help clear obstacles or recover stuck vehicles quickly. Investing in quality gear guarantees reliability when you need it most.
For serious off-roading challenges, having a dependable winch and recovery equipment enhances your Jeep's trail-rated capability while maintaining practicality for daily driving modifications.
Performance Exhaust Systems
After improving the protection of your Jeep with upgraded skid plates, consider enhancing performance with a performance exhaust system. Such systems boost engine efficiency and power output.
They allow for better airflow by reducing restrictions in the exhaust path. This upgrade enhances horsepower and torque, making your vehicle more capable on rugged trails.
In addition to providing a performance gain, these systems also give your Jeep a deeper sound that off-road enthusiasts enjoy. Upgrading to an aftermarket exhaust can improve fuel efficiency as well.
Upgraded Skid Plates
Upgraded skid plates protect your Jeep’s undercarriage from rocks, debris, and rough terrain. These plates shield vital components like the transmission and fuel tank. They reduce damage during off-roading adventures.
Most options use high-strength materials to offer durability and reliability in tough conditions.
Installing upgraded skid plates enhances your Jeep's overall performance off-road while ensuring safety for daily driving. A well-protected vehicle can conquer rugged trails without worry.
Conclusion
Modifications can transform your ride for any adventure. Upgrading your Jeep gives you more capability on and off the road. A well-planned upgrade ensures practicality for daily drives and thrilling off-road experiences.
Explore the options available in 2025 and make your Jeep truly yours. Embrace the journey ahead with confidence.
]]>
https://www.ledfactorymart.com/blogs/news/how-i-transformed-my-tacoma-with-just-a-few-simple-upgrades2025-04-14T17:45:09+08:002025-07-30T10:21:28+08:00How I Transformed My Tacoma with Just a Few Simple Upgradestabe tabe
A few simple upgrades took my stock Tacoma to the next level—improving comfort, style, and off-road capability without sacrificing resale value.
]]>
The 3rd generation Toyota Tacoma is already a solid platform — capable, reliable, and ready to go from day one. But what if you could make it even better, without breaking the bank or voiding your warranty? I took my stock Tacoma and gave it a few smart, simple upgrades that elevated the daily driving experience, off-road performance, and overall utility.
Here’s how small changes made a big difference.
Key Takeaways
Simple mods like heated seats and a chalk bag cupholder can dramatically boost everyday comfort.
Staying mostly stock helps maintain resale value while still allowing subtle personalization.
Fluid film treatment protects the undercarriage from rust — especially important if you drive in snowy or coastal regions.
LED lighting upgrades improve safety, visibility, and aesthetics.
A custom tool kit and minor suspension tweaks prep your Tacoma for serious adventures.
Why Simple Upgrades Matter
You don’t have to lift your truck five inches and throw on 35s to make it yours. For most Tacoma owners, the real joy is in the details — functional, thoughtful upgrades that feel good to use every day.
Adding heated seats instantly made my winter commutes more enjoyable, and dropping a chalk bag cupholder into the center console gave me a better way to stash climbing gear or snacks. These little comforts go a long way.
Why I Kept My Tacoma Mostly Stock
1. Cost-Effective Choices
Upgrades don’t have to be expensive to be effective. I stuck to affordable, reversible changes that enhanced my Tacoma without diminishing its reliability.
A great example? Heated seat kits designed specifically for Tacomas. They’re easy to install and make a big difference.
2. Resale Value Matters
While wild mods are fun, they’re not for everyone. Keeping my Tacoma near-stock means I’ll attract a wider range of buyers later. Less risk, more flexibility.
Easy & Budget-Friendly Upgrades
Chalk Bag Cupholder
This small add-on quickly became one of my favorite upgrades. It holds my chalk bag snugly while I’m heading to the crag, but it’s also perfect for trail snacks, sunglasses, or charging cables.
Heated Seats
Cold mornings hit different when you’ve got warm seats. The kit I used came with factory-style switches and took only a few hours to install. This one’s a no-brainer if you live in colder climates.
Fluid Film Undercarriage Coating
Tacomas are tough, but rust doesn’t care. I applied fluid film to the frame and undercarriage to prevent corrosion — especially useful if you’re in the Midwest or near the coast.
LED Light Swap
One of the best value upgrades I’ve done. LED headlights and fog lights improve road visibility and give the truck a cleaner, modern look.
Center Console Organizer Tray
I added a drop-in tray to keep everyday gear organized — multi-tools, coins, phone chargers. Small change, huge convenience.
Custom Tool Kit
Off-roading or not, having a truck-specific tool kit has saved me multiple times. Mine includes: tire patch kit, socket set, fuse tap kit, jack, and jumper cables.
Off-Road Enhancements Without Going Overboard
Suspension Upgrade
I didn’t go full lift kit — just upgraded the rear shocks and added progressive bump stops. The ride is smoother and more planted when I’m loaded down.
Wheels & Tires
Going up one size in all-terrain tires gave my Tacoma better grip on gravel and snow. I stuck with a lightweight wheel to preserve MPG and handling.
Conclusion: Build What Works for You
You don’t need thousands of dollars or a shop full of tools to transform your Tacoma. Start with simple, satisfying upgrades — the ones that improve your drive and make your truck work better for your lifestyle.
My Tacoma still looks stock to most people. But I know every upgrade made it a little more mine.
]]>
https://www.ledfactorymart.com/blogs/news/how-my-tacoma-became-my-basecamp2025-04-14T17:09:28+08:002025-07-29T18:53:12+08:00How My Tacoma Became My Basecamptabe tabe
A pro photographer shares how she turned her Tacoma into a go-anywhere basecamp with smart mods like fog lights, side steps, and a rooftop tent.
]]>
Finding the perfect basecamp for your adventures can be tough. For me, the answer was simple: a Toyota Tacoma. As a professional photographer constantly chasing light in remote places, I needed a vehicle that offered versatility, durability, and space. After a few smart upgrades, my Tacoma became more than a truck — it became home.
Key Takeaways
The Tacoma was chosen for its versatility, durability, and storage capacity — perfect for overlanding.
Key upgrades included a rooftop tent, suspension enhancements, dual battery system, and the Cache Basecamp 2.5 system.
The Tacoma comfortably towed a Basecamp 20 and 23, proving its reliable towing performance.
Thoughtful prep — from tire upgrades to a strong rear bumper — ensured the truck was trail-ready.
Add-ons like drawer systems, canopies, and our side steps made it not just functional, but livable.
Choosing the Right Vehicle for Overlanding
Versatility
The Tacoma’s ability to adapt is what makes it ideal for overlanding. Whether I’m towing a compact Basecamp 20 or loaded up for a week in the mountains, it handles it all. With the Cache Basecamp 2.5 system, it seamlessly transforms into a full-function mobile workstation.
What really surprised me was how much space I could free up by optimizing storage — from tailgate drawer systems to custom side steps that double as low-profile rock sliders. Every inch counts when your truck is your home.
Durability
Durability isn’t optional when your destination is 50 miles of washboard roads away. My Tacoma — built from Toyota’s bulletproof reliability — handled it all. I’ve clocked over 600 miles in a single trip towing a full Basecamp 23 trailer with zero issues.
Pairing that with upgraded suspension and skid plates made a big difference. The Cache Basecamp system, made for 2016–2023 Tacomas, took the toughness up a notch with rugged, trail-tested gear.
Towing Capacity
Towing capacity is often overlooked until you’re halfway up a grade with a trailer. The Tacoma handles the Basecamp 20 and 23 with surprising ease, especially after upgrading the rear suspension.
With added accessories like trailer mirrors and proper weight distribution, it tows confidently. Upgraded fog lights also made early-morning departures and rainy climbs safer — clarity you don’t appreciate until you need it.
Storage Space
Overlanding requires smart storage. My Tacoma’s bed setup, paired with modular drawer systems and an awning, gave me space for camera gear, tools, and trail essentials. A canopy turned the bed into an enclosed, secure cargo zone.
Combined with side steps and rear swing-out bumpers, accessing all that gear became simple, even in mud or snow.
The game changer. My rooftop tent opened up remote camping possibilities I never thought possible. Easy to deploy, dry, and elevated — no more cold ground or rushing water concerns.
It’s also a perfect pair with the Cache Basecamp drawer setup, letting me sleep up top while all gear is locked and organized below. A true two-level mobile camp.
Suspension Upgrades
I quickly learned stock suspension wasn’t enough. I swapped in beefier shocks and springs — which gave me more clearance, better load handling, and smoother rides on fire roads.
That upgrade alone let me go farther, with more gear, and less fatigue. It also stabilized the truck when fully loaded with a tent, fridge, and recovery gear.
Tires
All-terrain tires were non-negotiable. They provided the grip and durability I needed on gravel, rock, and snow.
They also gave the Tacoma a more aggressive stance — both visually and functionally. With the added weight of upgrades, a quality tire makes all the difference.
Rear Bumper
Swapping the rear bumper wasn’t just for looks. A reinforced, overland-rated bumper made towing safer and gave me better recovery options.
It also added a mount point for a spare tire, shovel, and hi-lift jack — all tools I’ve actually used on trail.
Dual Battery System
Powering a fridge, camera gear, and lights off-grid meant I needed a second battery. I added a dual battery setup with solar charging capability.
It’s the reason I can stay out for days without worrying about draining the starter battery. Plus, it integrates well with the fog lights and rooftop accessories I’ve added.
Taking My Tacoma Basecamp on the Road
Preparation
Preparation makes or breaks a trip. Here’s my personal checklist:
Verify towing specs before hitching the Basecamp 20
Secure tools and gear using modular drawer systems
Check electrical systems before heading into remote zones
With this setup, I can confidently roll into any destination — from alpine lakes to desert washes.
Camping Gear
Every piece of gear has a home. My rooftop tent packs into a low-profile shell. Drawer systems hold kitchen supplies. My side steps help me reach the roof rack easily.
Fog lights illuminate my entire camp area without draining too much power, and my fridge runs off the second battery system. I’ve added a canvas awning, turning the side of the truck into shaded shelter.
Maintenance and Repairs
Every few weeks, I check tire tread, clean the air filter, and inspect all wiring. I’ve had to replace a cracked fog light lens once — but hey, better that than losing visibility.
Keeping recovery gear handy has saved me twice already — once pulling out a stuck Tacoma, and once getting myself out of mud.
Conclusion
The Toyota Tacoma is more than capable — with the right upgrades, it becomes unstoppable. From the Cache Basecamp system to smart add-ons like dual fog lights, overland tents, and modular side steps, I’ve built a truck that can keep up with my adventures.
If you’re looking to build your own basecamp — start with a Tacoma, and make it yours.
]]>
https://www.ledfactorymart.com/blogs/news/2024-toyota-tacoma-vs-chevy-colorado2025-04-14T14:46:20+08:002025-07-30T10:19:00+08:002024 Toyota Tacoma vs Chevy Coloradotabe tabe
Picking the right pickup truck can be tough. The 2024 Toyota Tacoma and Chevy Colorado both bring a lot to the table. This blog compares their power, comfort, and safety to help you decide which fits your lifestyle better—whether you're towing, trail riding, or daily driving.
Key Takeaways
The 2024 Toyota Tacoma offers a hybrid model, giving it a tech-forward edge.
The Chevy Colorado leads in towing capacity with up to 7,700 pounds.
Both trucks offer advanced infotainment and safety systems.
The Tacoma excels in off-road performance and introduces a turbocharged I-4 engine.
Reliability ratings favor the Tacoma over the Colorado.
Power and Performance
Both trucks bring impressive performance specs, but they go about it differently. The Tacoma introduces hybrid power, while the Colorado pushes towing limits.
Engine Options and Horsepower
The 2024 Toyota Tacoma offers two standout options: a 2.7-liter turbo I-4 engine and a 2.4-liter turbocharged i-FORCE hybrid. These setups deliver solid power and improved fuel efficiency. In contrast, engine specs for the 2024 Chevy Colorado remain less detailed but include a strong gas-only setup.
The Tacoma’s hybrid option gives it a clear technological advantage, especially for buyers looking for better mileage without sacrificing power.
For drivers who frequently navigate mixed driving environments—city streets during the week, dirt trails on weekends—the hybrid Tacoma provides versatility and efficiency. Additionally, turbocharged engines in both trucks offer smooth acceleration and torque, particularly helpful when merging or hauling heavy gear.
Towing and Payload Capacity
The Chevy Colorado can tow up to 7,700 lbs, making it a great choice for those needing to haul more. The Tacoma tops out at 6,500 lbs, which is still respectable.
However, Tacoma fans often prioritize off-road agility over raw towing numbers. Pairing the Tacoma with rugged upgrades—like our fog lights that boost visibility on night trails—makes it an even better off-road performer.
Both trucks offer strong payload capacities, but the Tacoma's multi-link rear suspension and terrain management systems give it an edge in rocky or uneven landscapes where precision matters more than power.
Interior and Technology
Both trucks have leveled up on comfort and convenience, with plenty of thoughtful touches inside.
Comfort and Convenience Features
The Tacoma's seats are praised for comfort, especially on long drives. While the Colorado offers slightly more rear legroom, Tacoma’s cabin features more upscale materials and durable finishes.
Tacoma’s ride is also aided by its advanced suspension system, which smooths out rough terrain—especially helpful if you’ve equipped your truck with aftermarket side steps like these, which double as both functional steps and light-duty rock sliders.
In terms of practicality, the Tacoma’s interior is well thought-out, with plenty of storage compartments and modular space for tools, gear, or trail essentials. Drivers who take their trucks into remote areas will appreciate the available power outlets and wireless charging pads for keeping devices and GPS units charged.
Infotainment Systems
Both trucks offer touchscreen displays with Apple CarPlay and Android Auto. The Tacoma’s system is responsive and easy to use, while the Colorado’s screen is slightly larger.
Voice controls and Bluetooth work seamlessly in both, and each truck can be upgraded with premium audio systems. Tacoma’s hybrid model even offers fuel-efficiency tracking through the infotainment interface.
Beyond that, both systems now include over-the-air update capability, meaning your truck's software stays current without needing a dealership visit. The Tacoma also includes multi-terrain camera view, which is a big plus for technical off-roading.
Safety and Reliability
Safety and long-term reliability play a huge role in any truck-buying decision.
Standard and Available Safety Features
The Tacoma comes standard with Toyota Safety Sense, which includes adaptive cruise control, automatic emergency braking, and lane departure alert. The Colorado counters with forward collision alerts and rear park assist.
Both trucks can be equipped with extras like blind spot monitoring and rear cross-traffic alerts, but only the Tacoma combines those with proven off-road stability features.
Also worth noting: the Tacoma's safety systems are tuned for off-road situations, with brake-force distribution and crawl control designed to assist in low-traction environments.
Reliability Ratings
According to consumer data, the Toyota Tacoma consistently ranks higher in reliability than the Colorado. Owners report fewer issues over time and longer-lasting performance. This peace of mind is part of why many buyers lean toward the Tacoma—even if it means giving up a bit of towing power.
Routine maintenance is generally easier with the Tacoma as well. Toyota's widespread dealer network and reputation for durable parts make it an appealing long-term investment.
Off-Roading and Customization Potential
When it comes to aftermarket customization and off-road chops, Tacoma is the reigning champ in the midsize pickup class. Its ground clearance, approach angles, and accessory ecosystem are second to none.
You’ll find more community support and upgrade options with Tacoma—from roof-top tents and bed racks to performance lights and rock armor. For instance, our low-profile side steps are designed to blend into the body line while giving extra clearance. Our fog lights are engineered to cut through dust, rain, and snow without blinding oncoming traffic—perfect for night runs through the backcountry.
Meanwhile, the Colorado is improving fast. The ZR2 trim especially shows promise in handling rough terrain, but the aftermarket support and parts variety still lags behind Toyota’s.
Which Truck Comes Out on Top?
It depends on what you need. The Chevy Colorado is a strong choice for towing and interior space, but the 2024 Toyota Tacoma wins for off-road use, tech options, and long-term reliability.
If you're customizing your truck for trails, camping, or overlanding, Tacoma is the better canvas. And with smart add-ons like our low-profile side steps and high-performance fog lights, your Tacoma becomes more than just a truck—it becomes your adventure rig.
Ready to build yours?
]]>
https://www.ledfactorymart.com/blogs/news/what-jeep-easter-eggs-does-have2025-04-14T11:45:54+08:002025-07-29T18:53:37+08:00What Jeep Easter eggs does have?Fianoledfactorymart
Jeep Easter Eggs began with designer Michael Santoro in 1997, introducing hidden designs like a small gecko in the Jeep Wrangler TJ. This tradition continues across various models .Drivers enjoy searching for these Easter Eggs in their vehicles which adds excitement to ownership.
]]>
Have you ever wondered what makes your Jeep unique? One hidden gem is Jeep Easter eggs, started by designer Michael Santoro in 1997. This blog will guide you through finding these hidden symbols and secret designs in various models.
What are Jeep Easter Eggs?
Jeep Easter Eggs are hidden designs found in various Jeep vehicles. These clever embellishments add a fun twist to the driving experience.
Hidden details and designs in Jeep vehicles
Jeep vehicles feature hidden details and designs known as Easter eggs. These unique decorations surprise owners and celebrate the Jeep brand's history. Michael Santoro, a designer, introduced this concept in 1997 with a small gecko on the interior of the Jeep Wrangler TJ.
Today, many models contain these concealed icons.Wrangler JL models showcase some of the most creative Easter egg designs. Other models like the Renegade, Grand Cherokee, Cherokee, Compass, and Gladiator also hide fun surprises inside and out. For example, the Gladiator has flip-flops cleverly placed in its cowl. The Compass displays a gecko on its plastic molding near the windshield. Owners can find these secret symbols on windshields, hoods, accessories, or infotainment displays throughout their Jeep vehicles.
Jeep models showcase unique Easter eggs that surprise and delight drivers. Each model, from the Wrangler JL to the Cherokee, features special designs that tell a story or pay tribute to the brand's heritage.
Wrangler JL
The Wrangler JL hides fun and surprising Jeep Easter eggs for owners to discover. You can find various hidden features throughout the vehicle. Some of these surprises include secret decals and cryptic markings that add a playful touch. Wrangler JL models boast some of the most exciting Easter eggs in the lineup. Jeep designers cleverly placed at least one hidden detail on each unit, encouraging drivers to explore their vehicles closely. Search carefully, and you might uncover unique details like vintage Willys Jeep editions or whimsical animals tucked away in unexpected spots.
Renegade
Jeep Renegade models showcase unique Easter eggs. These surprise features delight owners with hidden details, like a playful gecko on the plastic molding of the windshield. You can discover these camouflaged icons while exploring your vehicle. Each emblem or decoration serves as a reminder of Jeep’s love for creativity and the great outdoors. Discovering them brings joy to every journey in your Renegade.
Grand Cherokee
The Grand Cherokee holds some delightful surprises for Jeep enthusiasts. This model features hidden designs that add charm and personality to the vehicle. One notable Easter egg includes decals of vintage Willys Jeep editions. These can often appear on windows or wheels, sparking joy for those who discover them. Jeep Easter eggs in the Grand Cherokee create a fun experience for owners. They may find these subtle decorations in various locations like the windshield or infotainment displays.
Gladiator
The Jeep Gladiator features some fun Easter eggs that will surprise owners. A popular hidden detail is the decal of flip-flops found in the cowl. This clever design adds a playful touch to this rugged truck. Besides the flip-flops, various models also hold other sneaky features and mysterious emblems scattered throughout. Jeep Easter Eggs provide a unique opportunity for discovery. Many drivers enjoy finding these unnoticed embellishments as they explore their vehicles. The joy of uncovering these hidden gems enhances the overall ownership experience.
Tips for locating them in your Jeep
Jeep owners can enjoy the thrill of hunting for Easter eggs. Start by checking common locations like the windshield glass, hood cowling, and even infotainment displays. For example, the Jeep Compass hides a small gecko on its plastic molding. You might spot vintage Willys Jeep decals on Wrangler windows or wheels. The Wrangler models feature many unique designs to discover. Keep your eyes peeled while you explore both inside and outside your vehicle. Joining online communities can also enhance your search experience.
Sharing finds with fellow enthusiasts can bring excitement to the chase. Happy egg hunting!
]]>
https://www.ledfactorymart.com/blogs/news/top-7-mods-to-transform-your-2024-tacoma-into-a-trail-beast2025-04-14T11:24:58+08:002025-07-29T18:54:05+08:00Top 7 Mods to Transform Your 2024 Tacoma into a Trail Beasttabe tabe
Looking to take your 2024 Toyota Tacoma off the beaten path? This guide breaks down the top 7 must-have mods—from upgraded fog lights and diff lockers to steel bumpers, beadlock wheels, snorkels, and rock sliders. Each mod is designed to boost performance, protection, and trail-readiness without going over the top. Whether you're tackling mud, rocks, or river crossings, these upgrades will help turn your Tacoma into a true trail beast.
For Tacoma owners looking to build a trail-ready machine, a few smart upgrades can take your truck from stock to unstoppable. Whether you're hitting rocky terrain, or muddy trails, or heading out for the weekend, these top mods help improve performance, protection, and capability.
Improved Leaf and Coil Springs
Upgrading your suspension is a game-changer. Enhanced leaf and coil springs improve support and articulation, especially when paired with longer shocks. The result? Better stability, smoother rides over rough ground, and more control in technical spots. It also sets the stage for future upgrades like lift kits or beefier tires.
Longer Shocks
Longer shocks allow for more suspension travel, keeping your tires planted when the trail gets tricky. More travel means better traction and comfort, especially when crawling over rocks or dropping into ruts. If you’re serious about off-road performance, this is a must.
Differential Lockers
Traction is everything off-road. Diff lockers ensure both wheels on an axle spin together, helping you power through mud, loose gravel, or steep climbs without getting stuck. It's a small part with a big impact on capability.
Steel Bumpers & Winch
Steel bumpers not only add serious protection but also allow you to mount essentials like a winch. A properly rated winch can pull you out of mud, snow, or sand with ease. It’s one of those things you hope you won’t need — until you do. And yes, our featured fog lights integrate cleanly with most aftermarket bumper setups for better visibility in bad weather.
Beadlock Wheels
When running low tire pressures for off-road traction, beadlock wheels prevent the tire from slipping off the rim. They also let you confidently air down for better grip. Combine them with sturdy side steps — like our low-profile, trail-rated set — to protect your rocker panels and give you a better step up after a long, muddy day.
Snorkel
A snorkel helps protect your engine when crossing streams or dealing with heavy dust. By raising the air intake above the fender line, you reduce the risk of hydro-lock and extend the life of your filter. It’s a simple way to prep for deep water or desert runs.
Rock Sliders
Your doors and rocker panels are vulnerable off-road. Rock sliders take the hit so your body panels don’t have to. For Tacoma owners who like tight trails and rocky routes, sliders are a must. Our bolt-on design installs with no drilling and pairs perfectly with rooftop tents for overland setups.
Ready for the Trail?
These seven upgrades can dramatically improve how your Tacoma performs and survives off-road. From suspension to armor to lighting and accessories, building a capable rig is all about balance. Take your time, do it right, and you’ll be ready to tackle anything the trail throws your way.
Looking for a clean build with practical upgrades? Our side steps, fog lights, and overland tents are tested in real-world conditions and designed to fit seamlessly into your Tacoma’s style and function.
]]>
https://www.ledfactorymart.com/blogs/news/2025-toyota-tacoma-vs-ford-ranger2025-04-03T16:35:26+08:002025-07-29T18:52:23+08:002025 Toyota Tacoma vs Ford Rangertabe tabeThe battle between the 2025 Toyota Tacoma and Ford Ranger is heating up. These two trucks have a lot to offer, but they come with their own unique sets of features. The Tacoma is known for its safety, off-road skills, and a hybrid model that loves the earth.
On the other side, the Ranger boasts more muscle thanks to its twin-turbo engine and wins over buyers with top-notch interior quality. Yet, it misses out on a hybrid option, setting these trucks apart in eco-friendliness.
Both vehicles are stirring conversations among potential buyers. People wonder about their reliability, which could make or break their choice. With no set release date for the Tacoma yet, anticipation builds up.
Reviewers praise both for different reasons
The Ranger for its comfort and power combo; the Tacoma for how it handles and what it offers.
Choosing becomes a real task with so much on line. Stay tuned to compare them closer.
Key Takeaways
The 2025 Ford Ranger offers more horsepower and a nicer interior but lacks a hybrid option, making the Toyota Tacoma stand out for its fuel efficiency and off-road capabilities.
Ownership costs over five years may favor the Tacoma due to its potential savings on fuel with its hybrid model, while the Ranger's twin-turbocharged engine could lead to higher fuel expenses.
Both trucks have unique features suited to different needs: Tacoma excels in safety and environment-friendly performance, while the Ranger focuses on power and comfort.
Engine options greatly influence each truck's overall performance; the Tacoma provides balanced power with a focus on hybrid efficiency, whereas the Ranger prioritizes raw horsepower output.
Buyers should consider additional features based on their lifestyle needs such as off-road packages for improved capability, side steps for easier cabin access, or advanced technology packages for enhanced safety and convenience.
Pricing and Ownership Costs
Pricing plays a big role in choosing between the 2025 Tacoma and Ranger. Monthly payments can vary, so it's smart to look at ownership costs over five years.
Invoice price
The invoice price represents the amount that dealers pay for vehicles like the 2025 Tacoma and Ranger. This cost often varies between models, impacting potential ownership costs. The 2025 Ford Ranger tends to offer better overall value for money according to reviewers.
Buyers interested in a midsize pickup truck should consider both vehicle prices and features.
For those focused on reliability, both trucks maintain high standards in performance ratings. The Toyota Tacoma excels with its strong safety features and off-road capabilities, while the Ford Ranger impresses with its horsepower from a twin-turbocharged engine.
These factors play a crucial role when comparing pricing between these two popular truck models.
Manufacturer suggested retail price
Moving on from the invoice price, let's discuss the manufacturer suggested retail price (MSRP) for both trucks. The 2025 Ford Ranger carries a higher MSRP than the Toyota Tacoma. Reviewers praise this pricing as offering more value due to its nicer interior and better horsepower.
Consumers will notice that the Tacoma excels in hybrid efficiency and safety features, which may justify its MSRP.
The differences in MSRP influence buyer decisions. The Ford Ranger stands out for its blend of comfort and power but lacks an eco-friendly hybrid option like the Tacoma offers. Buyers often consider how these factors affect their long-term ownership costs when choosing between these midsize pickup trucks.
Monthly payment estimate
Buyers can expect varying monthly payments for the 2025 Tacoma and Ranger. The prices depend on factors like financing terms, credit score, and model selection. Monthly payment estimates typically range from $400 to $600 for both trucks.
The Ford Ranger offers great value with its impressive features. Reviewers note that it has a nicer interior than the Tacoma. Money spent on the Ranger might lead to better comfort and ride quality.
Although the Tacoma excels in safety and off-road performance, some buyers may find the higher monthly payment less appealing due to its pricing structure compared to other options in the truck market trends.
5-year ownership costs
Shifting from monthly payments to the broader picture of ownership costs reveals some key details. The 5-year ownership costs for both the 2025 Tacoma and Ranger can vary significantly.
Owners often consider maintenance, fuel, insurance, and depreciation in their budgets.
The Toyota Tacoma stands out for its hybrid efficiency and off-road performance. This leads to potential savings on fuel over time. On the other hand, the Ford Ranger offers more horsepower but lacks a hybrid option.
Reviewers suggest that while it provides greater comfort and a nicer interior, it might demand higher long-term expenses due to its non-hybrid engine's fuel consumption. Prospective buyers need to weigh these factors carefully as they evaluate pricing and value between these two trucks.
Dimensions and Specifications
Dimensions and Specifications: The Tacoma and Ranger showcase impressive size differences, influencing cargo space and interior comfort. Check out their measurements to see how they stack up against each other!
Exterior and interior dimensions
The 2025 Toyota Tacoma and the Ford Ranger have distinct exterior and interior dimensions. The Tacoma features a rugged design that emphasizes its off-road capabilities. Its length provides ample space for passengers and gear, making it ideal for outdoor adventures, including overlanding with rooftop tents.
On the other hand, the Ranger has a more refined look with a spacious cabin designed for comfort.
Inside both trucks, you will find user-friendly layouts. The Tacoma offers durable materials suited for rough use while ensuring safety is paramount across all models. In contrast, the Ranger’s nicer interior appeals to drivers looking for style without sacrificing function.
These differences in size and layout contribute to each truck's unique appeal in the competitive market of pickups.
Next up, we’ll explore engine performance and mileage stats between these two vehicles.
Cargo area dimensions
Cargo area dimensions play a crucial role in comparing the 2025 Tacoma vs Ranger. The Toyota Tacoma offers ample space, allowing you to haul gear with ease. Its bed length provides versatility for various tasks.
On the other hand, the Ford Ranger also boasts a generous cargo area that matches many drivers' expectations.
Reviewers often highlight how both trucks cater to different needs. While the Tacoma excels in off-road capabilities and rugged use, the Ranger shines with its nicer interior and overall value.
Buyers appreciate this balance between practical cargo space and comfort when choosing their next truck.
Brakes and fuel tank capacity
Moving from cargo area dimensions, let's examine the brakes and fuel tank capacity of the 2025 Ford Ranger and Toyota Tacoma. The Ford Ranger features advanced braking systems designed to enhance performance on various terrains.
This truck offers reliable stopping power, which is crucial for off-road capabilities.
The 2025 Toyota Tacoma also excels in this area with equally impressive brake systems that ensure safety and control. Both trucks have sizeable fuel tanks, giving them excellent range for long trips or off-road adventures, where added visibility with upgraded fog lights can make a real difference.
Buyers appreciate these features when considering overall vehicle performance and reliability ratings. Each model delivers enough capability to meet most drivers' needs, making them strong contenders in the automotive industry.
Suspension and axle information
The 2025 Toyota Tacoma and the Ford Ranger offer strong suspension and axle setups that enhance their off-road capabilities. The Tacoma features a high-strength steel frame with an independent front suspension and a solid rear axle.
This design allows for better handling on rough terrain.
On the other hand, the Ford Ranger comes equipped with an advanced suspension system featuring an independent front setup for improved comfort. Its rear has a solid axle as well, giving it excellent towing capacity.
Reviewers highlight how these features impact truck performance in various conditions. Both models aim to provide reliable handling with different strengths tailored to driver preferences.
Engine and Mileage
The 2025 Tacoma and Ranger offer powerful engine options that deliver impressive horsepower. Both trucks promise solid mileage, making them practical choices for daily driving and off-road adventures.
Engine type and displacement
The 2025 Ford Ranger features a twin-turbocharged engine that delivers impressive power. This engine type enhances the truck's capability for both everyday driving and off-road adventures.
Toyota Tacoma, on the other hand, offers a different set of strengths in performance and hybrid efficiency. While the Ranger excels in horsepower, many drivers appreciate the Tacoma’s reliability and well-rounded performance.
Displacement plays a crucial role in how each vehicle performs under various conditions. The Tacoma's engine focuses on delivering balanced power while maintaining fuel efficiency.
In contrast, the Ranger prioritizes high output with its powerful setup, making it attractive for those who want more muscle in their trucks. Both vehicles feature unique engines designed to cater to diverse needs—whether users prioritize raw power or hybrid capabilities.
Fuel system and horsepower
Engine type and displacement transition smoothly into fuel system and horsepower. The Ford Ranger features a twin-turbocharged engine that delivers impressive power. It outshines the Toyota Tacoma with higher horsepower, making it stand out in performance comparisons.
This strength translates to an enjoyable driving experience, especially for those who prioritize speed.
The Toyota Tacoma also impresses with its efficient hybrid option, showcasing eco-friendly technology without sacrificing too much power. While both trucks offer solid performance, the Ranger's horsepower gives it an edge for buyers focused on capability.
Drivers will appreciate how these vehicles balance their fuel systems and overall performance features to cater to various needs in truck specifications.
Engine oil cooler
The Ford Ranger and Toyota Tacoma both feature an engine oil cooler. This component helps maintain optimal engine temperatures during operation. The 2025 Ford Ranger’s twin-turbocharged engine benefits from this cooling system, enhancing power without overheating.
This ensures the truck performs well even under heavy loads.
In contrast, the Toyota Tacoma also relies on an efficient oil cooler to support its hybrid efficiency and performance capabilities. Both vehicles pay attention to reliability, which is essential for off-road adventures or daily driving in various conditions.
Choosing between these two trucks will depend on how much you value features like horsepower versus interior comfort and overall value for your money.
Mileage and fuel economy
The 2025 Toyota Tacoma impresses with its mileage and fuel economy. Buyers can expect good efficiency, especially from the hybrid option. This makes it a smart choice for those who seek both performance and savings at the pump.
On the other hand, Ford Ranger offers more horsepower than Tacoma, but lacks an environmentally conscious hybrid option. Its twin-turbocharged engine provides plenty of power but may not match Tacoma's fuel-saving capabilities.
When considering off-road capabilities, both trucks perform well on rugged terrain. The choice between them often depends on personal preferences for interior features and comfort level during drives.
Buyers engaged in Reddit discussions often highlight these aspects, showcasing their interest in how vehicle size impacts overall driving experience.
Transmission and Drivetrain
The Tacoma and Ranger both offer various transmission options that enhance driving performance. Each truck features a unique drivetrain setup, giving drivers different experiences on the road or off it.
Transmission type and gear ratios
Both the 2025 Ford Ranger and Toyota Tacoma showcase different transmission options that impact their performance. The Ranger features a smooth automatic transmission with precise gear ratios, enhancing driving comfort.
This model offers excellent power delivery through its twin-turbocharged engine.
On the other hand, the Tacoma provides a reliable automatic transmission as well but focuses more on durability and off-road capabilities. Gear ratios in both vehicles ensure optimal performance across various terrains.
Reviewers appreciate how each truck caters to specific needs in the realms of vehicle size and dimensions, allowing buyers to make informed choices based on their preferences for car reviews.
Drivetrain information
The 2025 Ford Ranger features a powerful twin-turbocharged engine that pumps out impressive horsepower. This truck's drivetrain ensures solid performance on various terrains. Its automatic transmission delivers smooth shifts, enhancing the driving experience.
In contrast, the Toyota Tacoma focuses more on off-road capabilities and reliability. While it may not match the Ranger's horsepower, its efficient design excels in durability. Both trucks offer distinct advantages that cater to different driver preferences and needs.
Transfer case model and power take off
The 2025 Ford Ranger features a reliable transfer case model that enhances its off-road capabilities. This system distributes power effectively to the front and rear wheels, ensuring stability on various terrains.
The power take-off option allows for additional functionality, making it easier to use tools or equipment while on the job site or during adventures.
In comparison, the Toyota Tacoma offers impressive engine options but does not provide a similar power take-off feature. This difference might influence buyers who require more versatility from their vehicles.
Both trucks excel in specific areas, so understanding these details helps potential owners make informed choices about which features best meet their needs. Next, let's explore the dimensions and specifications of both models.
Summary and Conclusion
The comparison of the 2025 Tacoma and Ford Ranger highlights key strengths in safety, performance, and comfort. Choose the vehicle that best fits your lifestyle for a rewarding driving experience.
Comparison of key features
The 2025 Toyota Tacoma and Ford Ranger both offer unique features that appeal to different drivers. Tacoma excels in safety and off-road capabilities, making it a strong choice for adventurous types.
Buyers will appreciate its hybrid options that boost efficiency. In contrast, the Ranger delivers more horsepower thanks to its twin-turbocharged engine, which provides ample power for various tasks.
Reviewers highlight the Ranger's comfortable interior as a key advantage. This truck offers great value for money with its blend of comfort and capability. Despite lacking an environmentally friendly hybrid option, the Ranger still impresses many drivers looking for performance-packed features.
Both trucks provide reliability, but potential buyers should weigh each vehicle’s strengths against their specific needs before deciding.
Overall vehicle ratings
Moving from the comparison of key features to overall vehicle ratings reveals some important insights. Reviewers rate the 2025 Toyota Tacoma highly for its safety, off-road capabilities, and hybrid efficiency.
Conversely, many consider the Ford Ranger a better value due to its superior interior comfort and greater horsepower.
Both vehicles have mixed opinions on reliability. Buyers often weigh these ratings heavily in their decisions. The Ranger stands out for a twin-turbocharged engine that delivers ample power but lacks a hybrid option.
In contrast, the Tacoma impresses with its solid performance and comprehensive features while maintaining strong safety records.
Recommended options
Choosing the right options can enhance the driving experience. Here are some recommended features for both trucks.
1. Consider the off-road package for the 2025 Toyota Tacoma. This option improves its offroad capabilities significantly.
2. Look at the Ford Ranger's technology package. It includes advanced safety features and a better infotainment system, making it a value choice.
3. Opt for hybrid efficiency in the Tacoma if fuel economy matters to you. The hybrid model excels in mileage and overall efficiency.
4. Choose upgraded interior materials for the Ranger. Reviewers praise its nicer interior, which adds comfort and style.
5. Explore tow packages for both trucks if you need extra capability. These options increase towing capacity, helping with larger loads.
6. Check available wheel and tire upgrades on both models. Larger tires improve performance in rough terrains and enhance overall aesthetics.
7. Select all-weather floor mats for added protection against dirt and spills in either truck’s cabin.
8. Assess bed liner options for added durability in cargo areas of both vehicles.
Selecting these options can improve your driving experience with either model while enhancing their offroad capabilities and overall value.
Final decision and conclusion
Moving on to the final decision and conclusion, buyers face an interesting choice between the 2025 Ford Ranger and Toyota Tacoma. The Tacoma stands out for its safety features, off-road capabilities, and hybrid efficiency.
In contrast, the Ranger impresses with more horsepower and a comfortable interior that reviewers appreciate.
Both vehicles are reliable options but cater to different needs. The Ranger’s twin-turbocharged engine offers strong performance but lacks a hybrid variant. While the Tacoma showcases excellent performance in various conditions, it may appeal more to those focused on environmental impact.
Each model has unique vehicle features that potential buyers should weigh carefully during their comparison test.


 Protect your Bronco from dust, sun, and weather—at the lowest price you'll see all year.


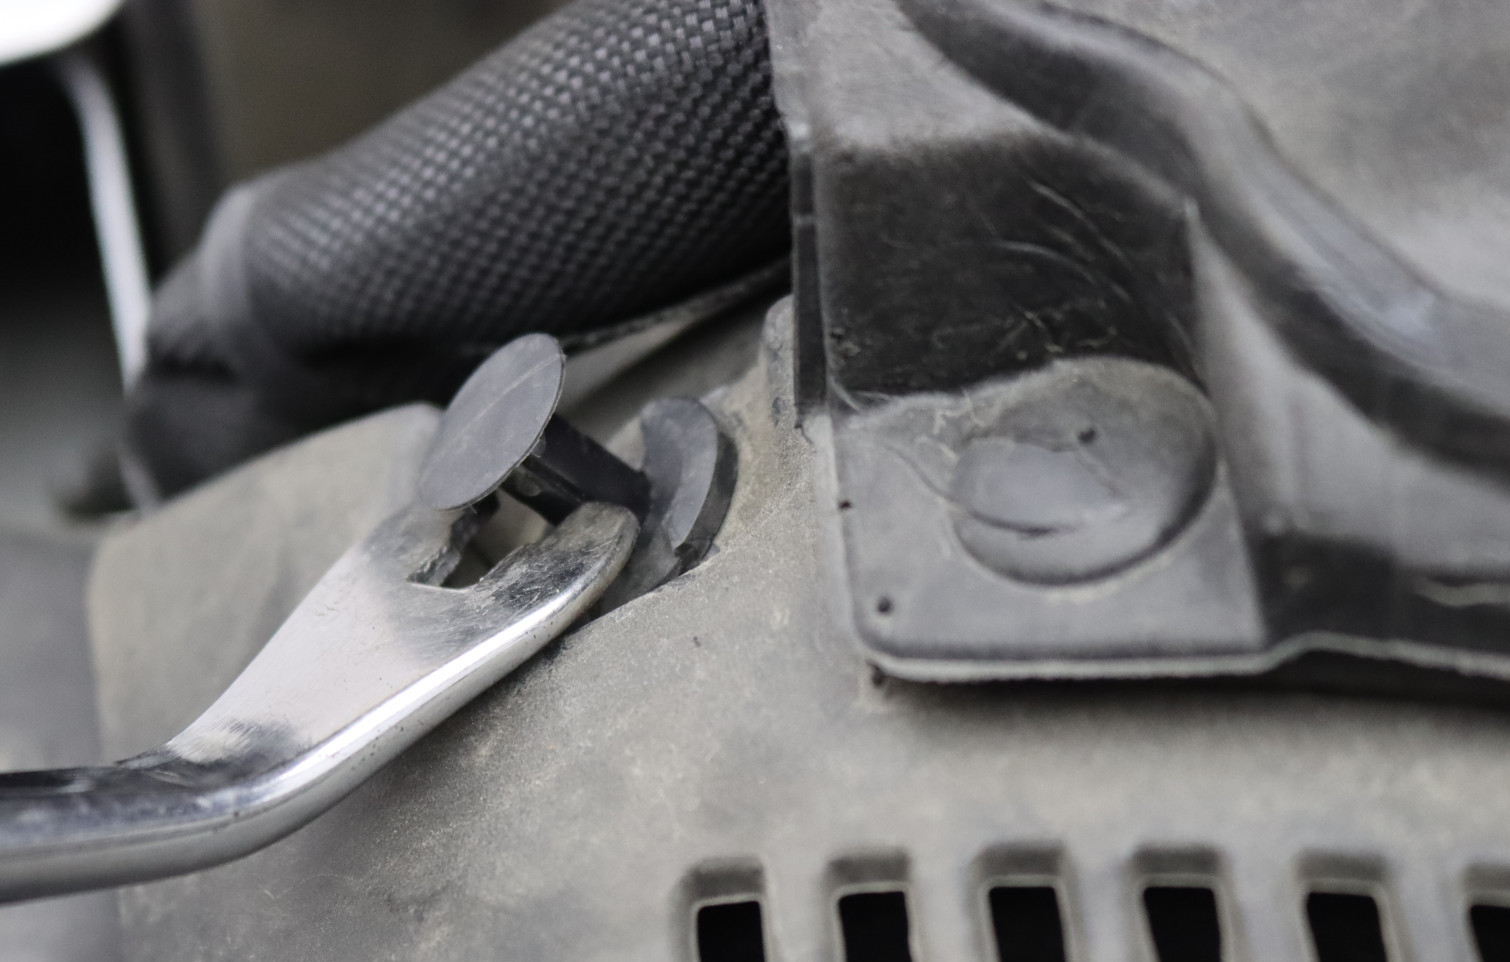

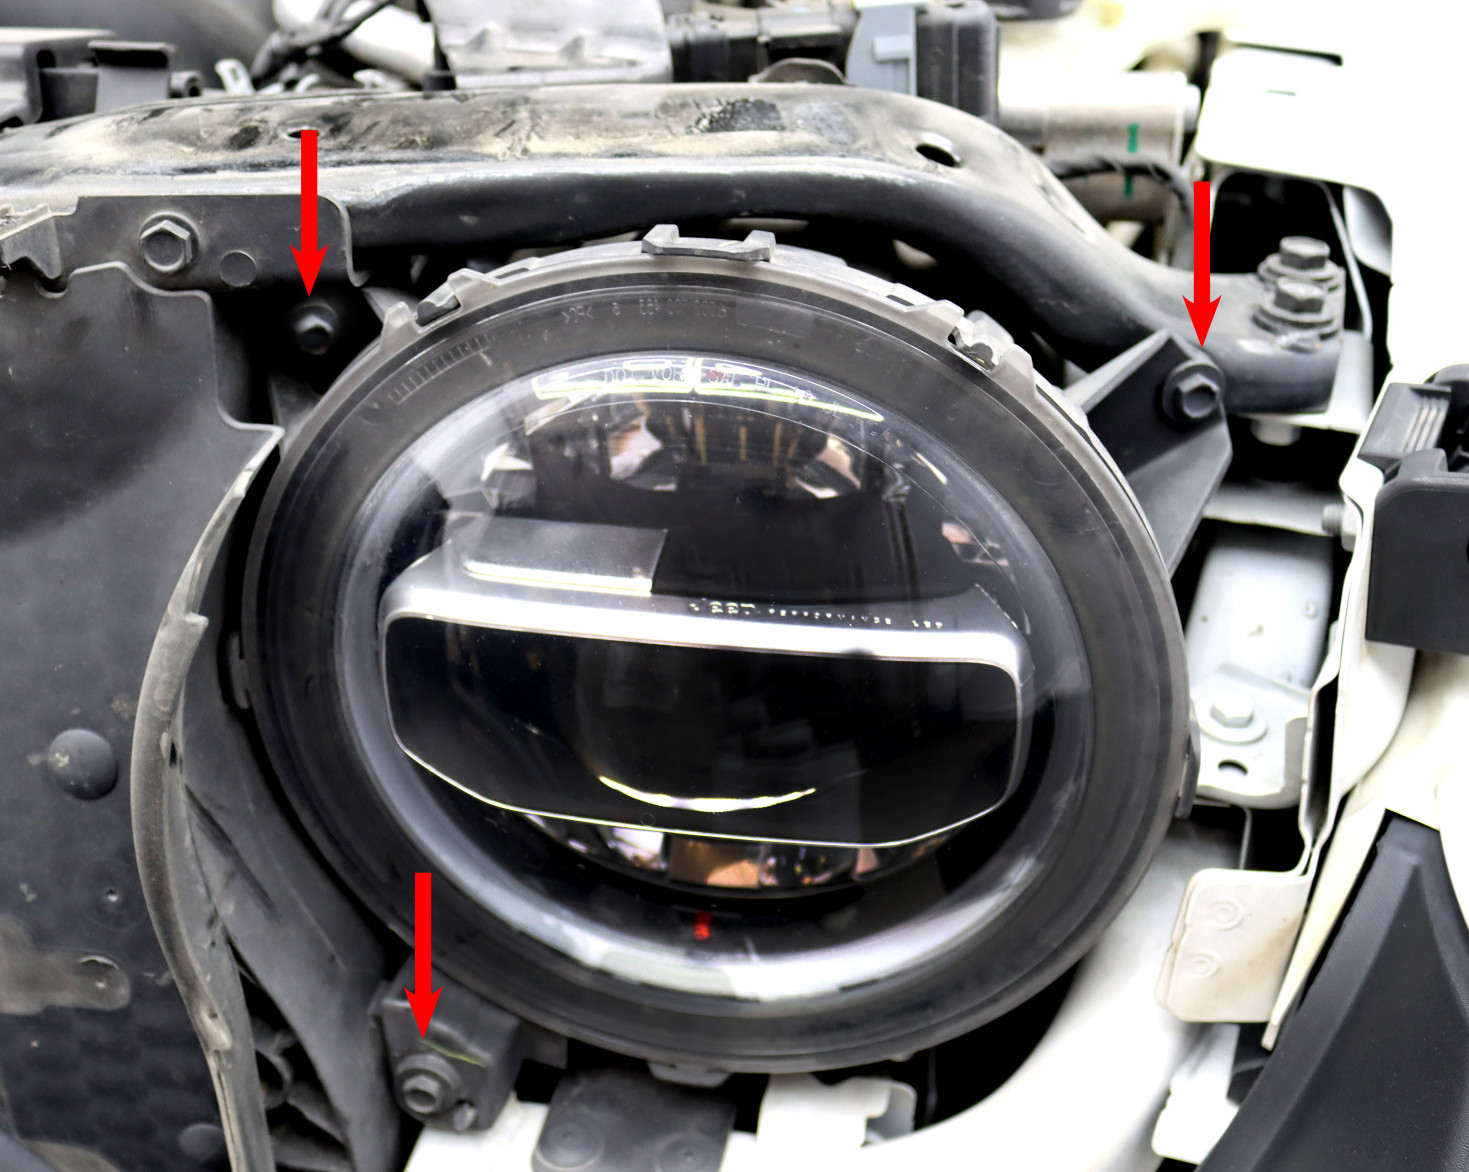
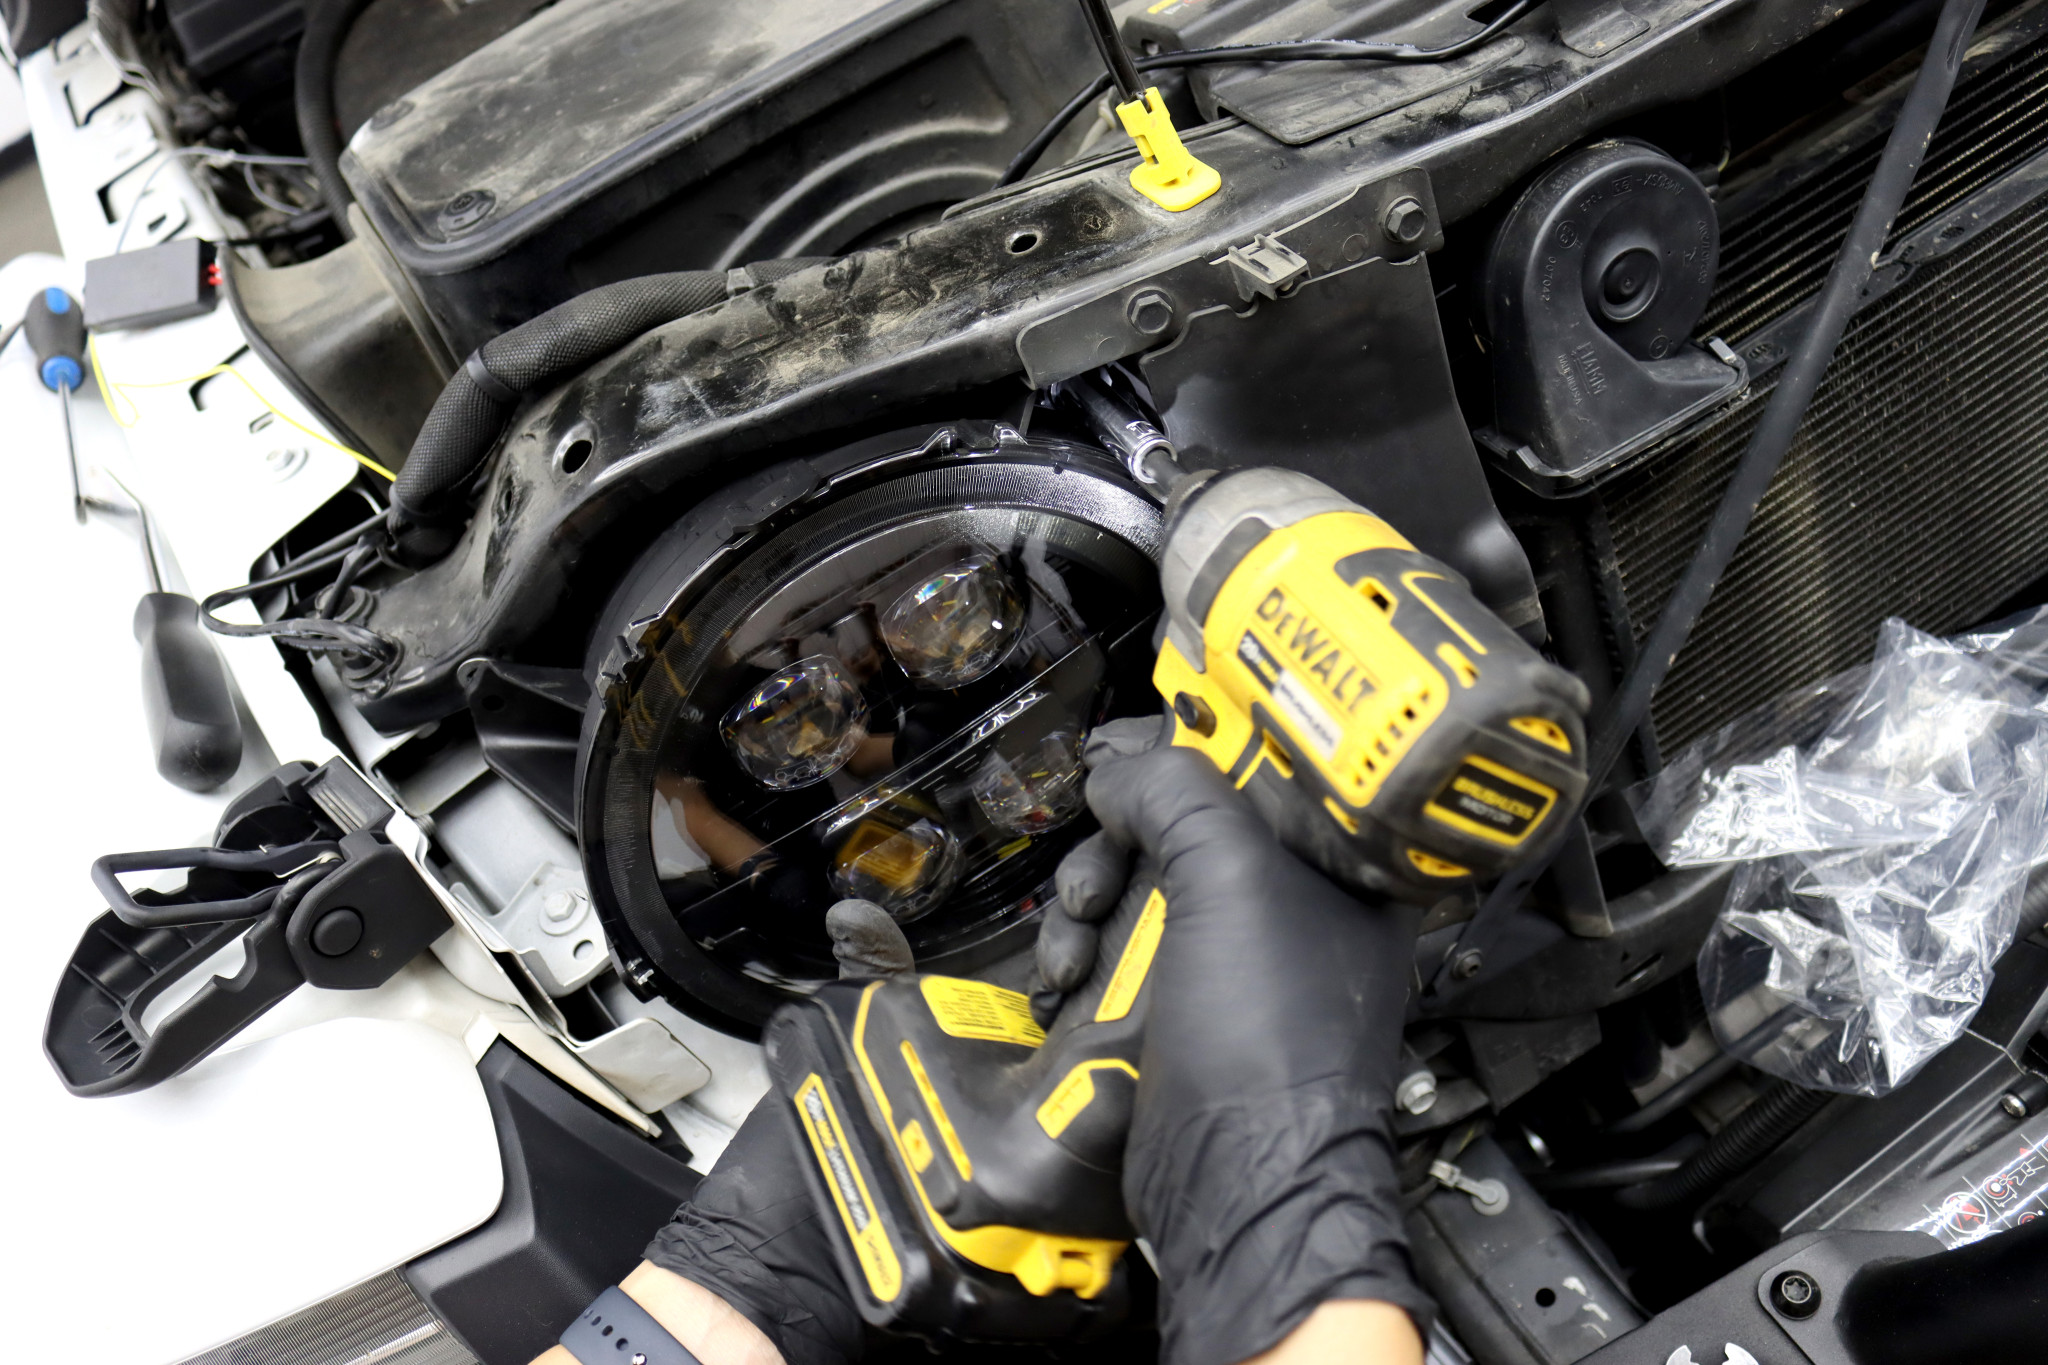
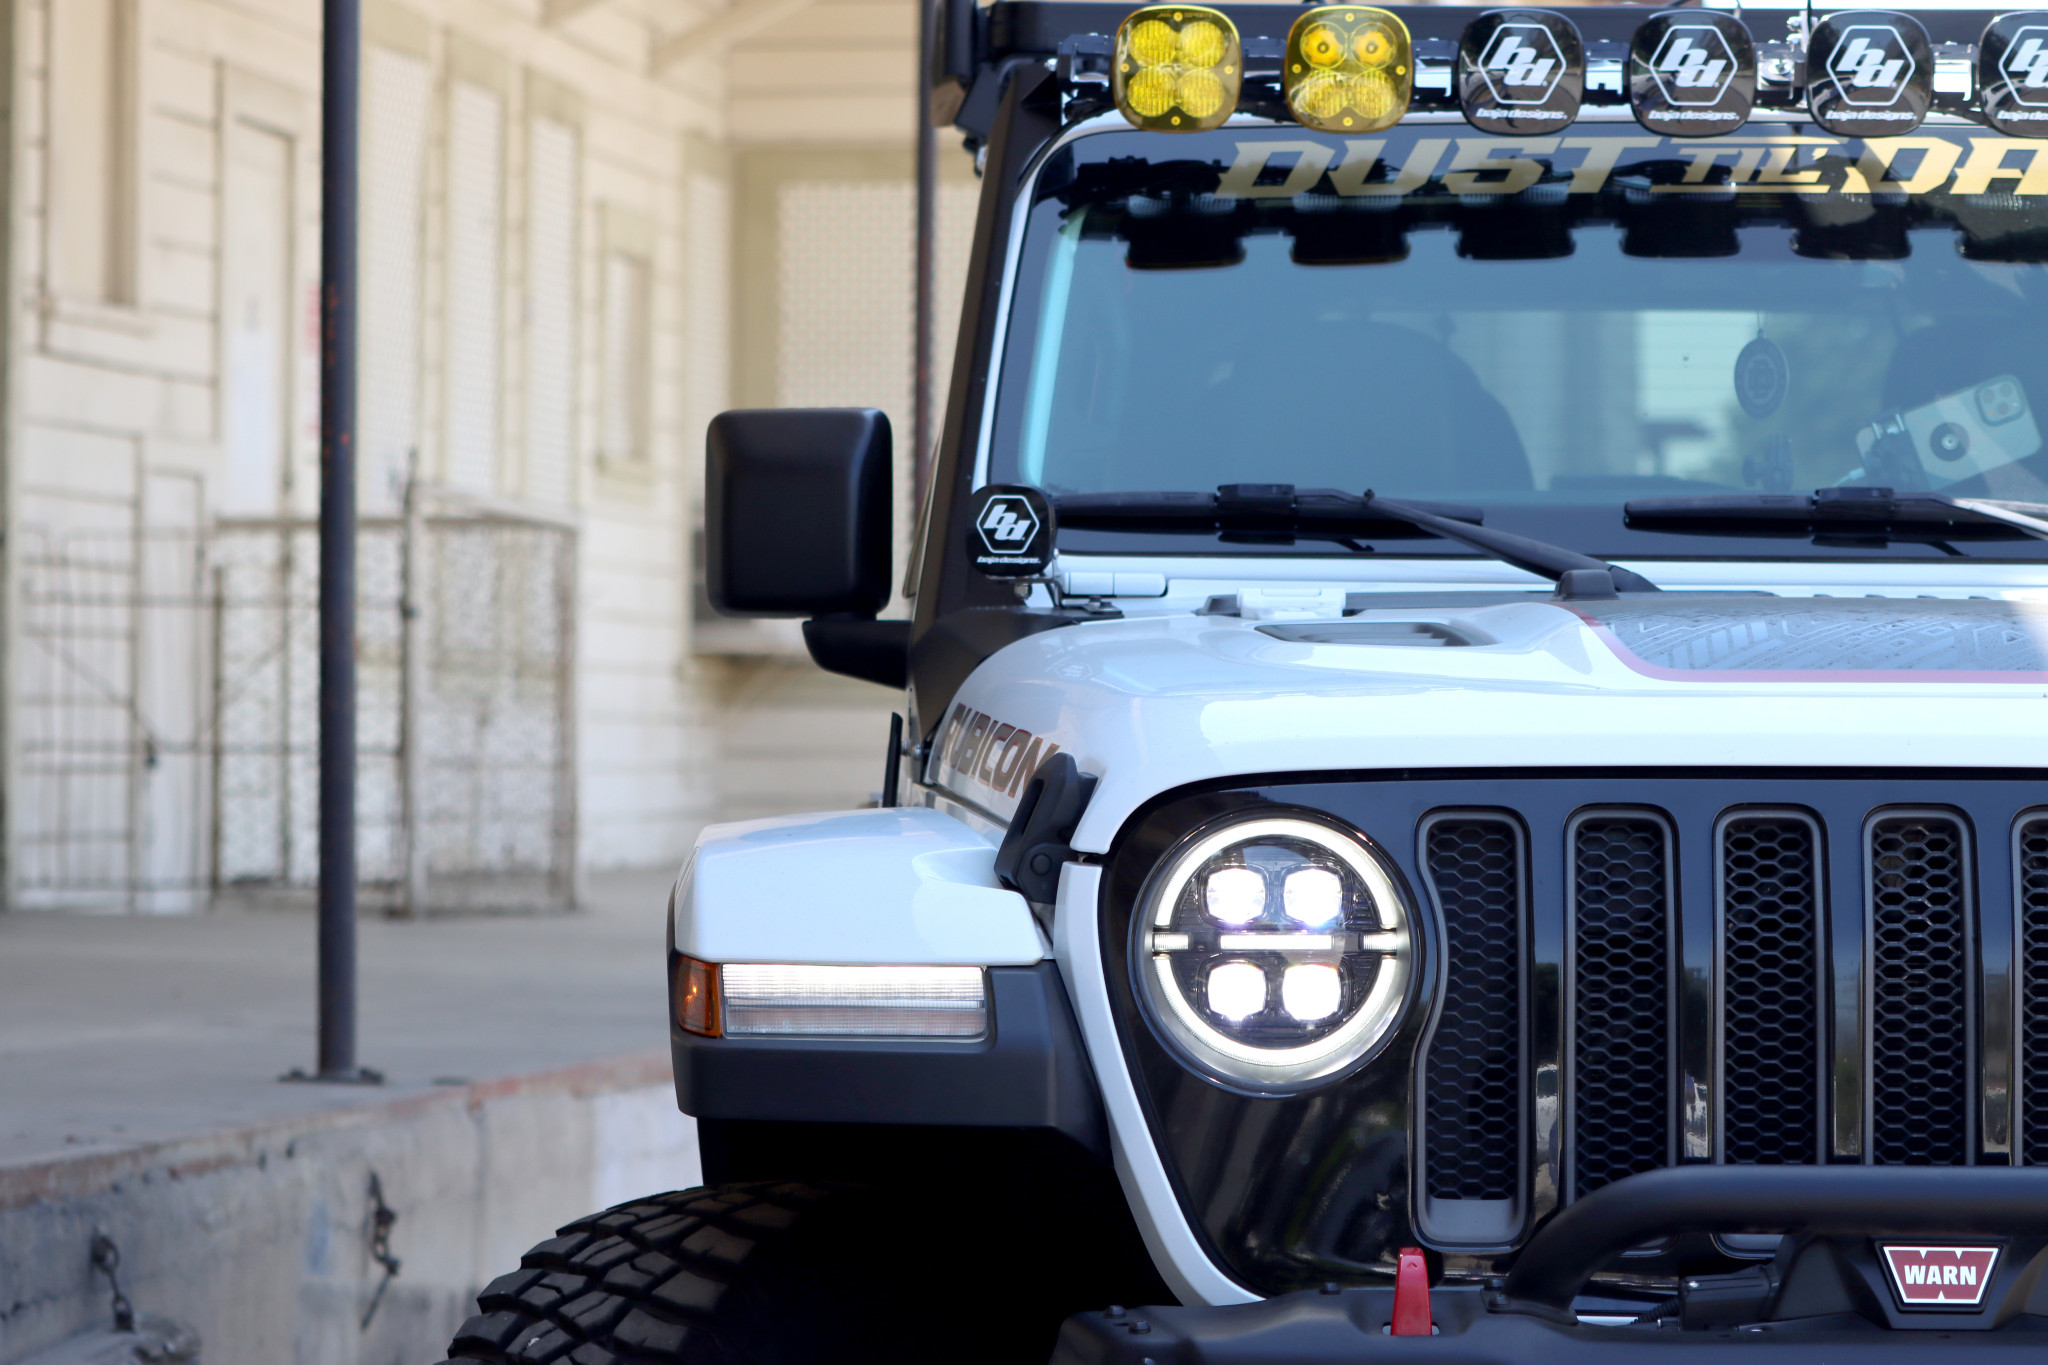


 Halloween isn’t just for costumes and candy — it's the perfect time to transform your Tacoma into a head-turning, night-ready beast. Whether you're hitting Halloween trails, joining a spooky night meet, or simply want to show off on the road, nothing boosts the vibe like the right lighting setup.