<?xml version="1.0" encoding="UTF-8"?>
<feed xml:lang="en" xmlns="http://www.w3.org/2005/Atom" xmlns:opensearch="http://a9.com/-/spec/opensearch/1.1/" xmlns:s="http://jadedpixel.com/-/spec/shopify">
  <id>https://www.otterwax.com/blogs/journal.atom</id>
  <link rel="alternate" type="text/html" href="https://www.otterwax.com/blogs/journal"/>
  <link rel="self" type="application/atom+xml" href="https://www.otterwax.com/blogs/journal.atom"/>
  <title>Otter Wax - Care Guides &amp; Product Tutorials</title>
  <updated>2025-03-24T17:27:09-07:00</updated>
  <author>
    <name>Otter Wax</name>
  </author>
  <entry>
    <id>https://www.otterwax.com/blogs/journal/leather-care-product-guide-how-to-choose-when-to-use</id>
    <published>2025-03-24T17:27:09-07:00</published>
    <updated>2025-03-26T08:04:01-07:00</updated>
    <link rel="alternate" type="text/html" href="https://www.otterwax.com/blogs/journal/leather-care-product-guide-how-to-choose-when-to-use"/>
    <title>Leather Care Product Guide | How To Choose &amp; When To Use</title>
    <author>
      <name>Otter Wax</name>
    </author>
    <summary type="html">
      <![CDATA[<p>At Otter Wax, we make a full line of leather care products designed to work beautifully together—but each product also stands strong on its own.</p><p><a class="read-more" href="https://www.otterwax.com/blogs/journal/leather-care-product-guide-how-to-choose-when-to-use">More</a></p>]]>
    </summary>
    <content type="html">
      <![CDATA[<p>COMMON QUESTIONS: "Do I need to use all of your products at the same time on in a particular order?" The short answer? No—you don’t need to use them all at once. At Otter Wax, we make a full line of leather care products designed to work beautifully together—but each product also stands strong on its own. Think of it like a skincare routine: some days you just need to wash and moisturize, and other days you might go all out with exfoliation and serums. It all depends on the condition of your leather and what kind of care it needs.</p>
<p>"Do your leather care products need to be used in a specific order?" Not necessarily—But you can absolutely use all four in sequence for a full restoration. But if your leather just needs a quick refresh or a little weatherproofing, feel free to pick the product that fits the job. Our system is flexible, and it’s all about giving you the tools to care for your leather in a way that fits your needs.Let’s break it down step by step... Let’s break it down step by step.</p>
<p>STEP #1 SADDLE SOAP TO CLEAN Use this when: Your leather is dirty, stained, or starting to look dull. Why it matters: Before conditioning or waterproofing, you always want to start with a clean surface. Our Saddle Soap gently lifts away dirt, sweat, and grime without drying out the leather. Think of it as a reset button—it prepares the leather to absorb oils and waxes more effectively. How often: Only when needed—usually every few months or when visible dirt builds up.</p>
<p>STEP #2 LEATHER SALVE TO CONDITION Use this when: Leather feels dry, stiff, or is starting to crack. Why it matters: The Leather Salve deeply nourishes and repairs dry or damaged leather. It’s rich, buttery, and packed with natural waxes and oils that sink deep into the leather to restore flexibility and strength. If your leather is vintage, heavily used, or exposed to sun and dryness, this is your go-to. How often: Every few months or as needed—especially in dry climates or for older leather.</p>
<p>STEP #3 LEATHER OIL TO NOURISH &amp; SHINE Use this when: You want to maintain softness, restore natural luster, or do quick upkeep. Why it matters: Leather Oil is lighter than the Salve and great for routine maintenance. It soaks in fast and gives your leather a healthy glow. It also works well as a follow-up after using Leather Salve—think of it like moisturizer after a deep conditioning treatment. How often: Monthly, or anytime your leather starts to look a little dull or dry.</p>
<p>STEP #4 PROTECT WITH BOOT WAX Use this when: You want to waterproof your leather or protect it from the elements. Why it matters: Boot Wax creates a water-resistant barrier, helping prevent water stains, salt damage, and general wear from the outdoors. It’s especially useful for boots, bags, or jackets exposed to rain, snow, or mud. How often: As needed—before wet weather, hiking trips, or winter wear. Reapply when water stops beading on the surface.</p>
<p>YOUR LEATHER CARE, YOUR ROUTINE You can mix and match which products you use depending on your leather’s condition and what it needs. Here’s a quick reference: LEATHER IS... Dirty / Stained Dry / Cracked / Stiff Dull / Dry / Cracked Wet / Rainy / Heavy Use Full Restoration / Deep Care WE RECOMMEND... Saddle Soap Leather Salve Leather Oil Boot Wax Saddle Soap → Leather Salve → Leather Oil → Boot Wax</p>
<p>FINAL THOUGHTS Think of leather care like skincare, but for your favorite leather goods. You wouldn’t exfoliate, deep moisturize, and sunscreen every single day—but each plays a key role in a healthy routine. You don’t have to use all Otter Wax products at once, but knowing what each one does helps you give your leather exactly what it needs, when it needs it. Got a question about your specific item? Reach out anytime—we’re always happy to help.</p>]]>
    </content>
  </entry>
  <entry>
    <id>https://www.otterwax.com/blogs/journal/a-pilots-everyday-carryall</id>
    <published>2022-04-15T16:15:53-07:00</published>
    <updated>2022-04-16T12:42:32-07:00</updated>
    <link rel="alternate" type="text/html" href="https://www.otterwax.com/blogs/journal/a-pilots-everyday-carryall"/>
    <title>New Life For A Family Heirloom Leather Briefcase</title>
    <author>
      <name>Otter Wax</name>
    </author>
    <content type="html">
      <![CDATA[<div style="text-align: right;"><img src="https://cdn.shopify.com/s/files/1/0189/5302/files/IMG_0884_240x240.png?v=1650064943" alt="Emma Bryson Horizon Airlines Pilot" style="margin-bottom: 5px; margin-left: 5px; float: right;" width="206" height="209"></div>
<meta charset="UTF-8">
<p><span>This project is special because it comes from my sister-in-law, Emma, who recently inherited this leather briefcase that belonged to her grandmother. As a pilot for Horizon Airlines, Emma is constantly on the move and wanted to be able to use the bag to haul around all of her flight manuals and paperwork.</span></p>
<p>She sent it over to me hoping to get it to a point where it would not only look better, but also for it to be able to withstand the wear-and-tear of heavy daily use. </p>
<p>Cleaning and conditioning this briefcase was pretty straightforward, but it did pose a couple challenges, namely a stubborn ink stain, scratches, and visible dry cracking. Follow along to see how we were able address these issues and get this bag back to looking better than it has in years.</p>
<div style="text-align: center;"><img src="https://cdn.shopify.com/s/files/1/0189/5302/files/otter-wax-best-way-to-clean-leather-messenger-bag-2.jpg?v=1650057494" alt="best way to clean leather messenger bag with otter wax saddle soap" style="float: none;"></div>
<meta charset="UTF-8">
<p><span>The bag itself is well-constructed, but the visible ink stains and dry cracking had Emma just about ready to clip its wings. It's obviously been heavily used for a long time without much in the way of cleaning or conditioning. </span></p>
<p><span>I'm pretty good at being able to look past surface-level defects, and what I saw underneath was a bag made from super high quality leather that's been gradually softened and broken-in over a couple decades of use.</span></p>
<div style="text-align: center;"><img src="https://cdn.shopify.com/s/files/1/0189/5302/files/damaged-and-scratched-leather.png?v=1650059838" alt=""></div>
<p><span>
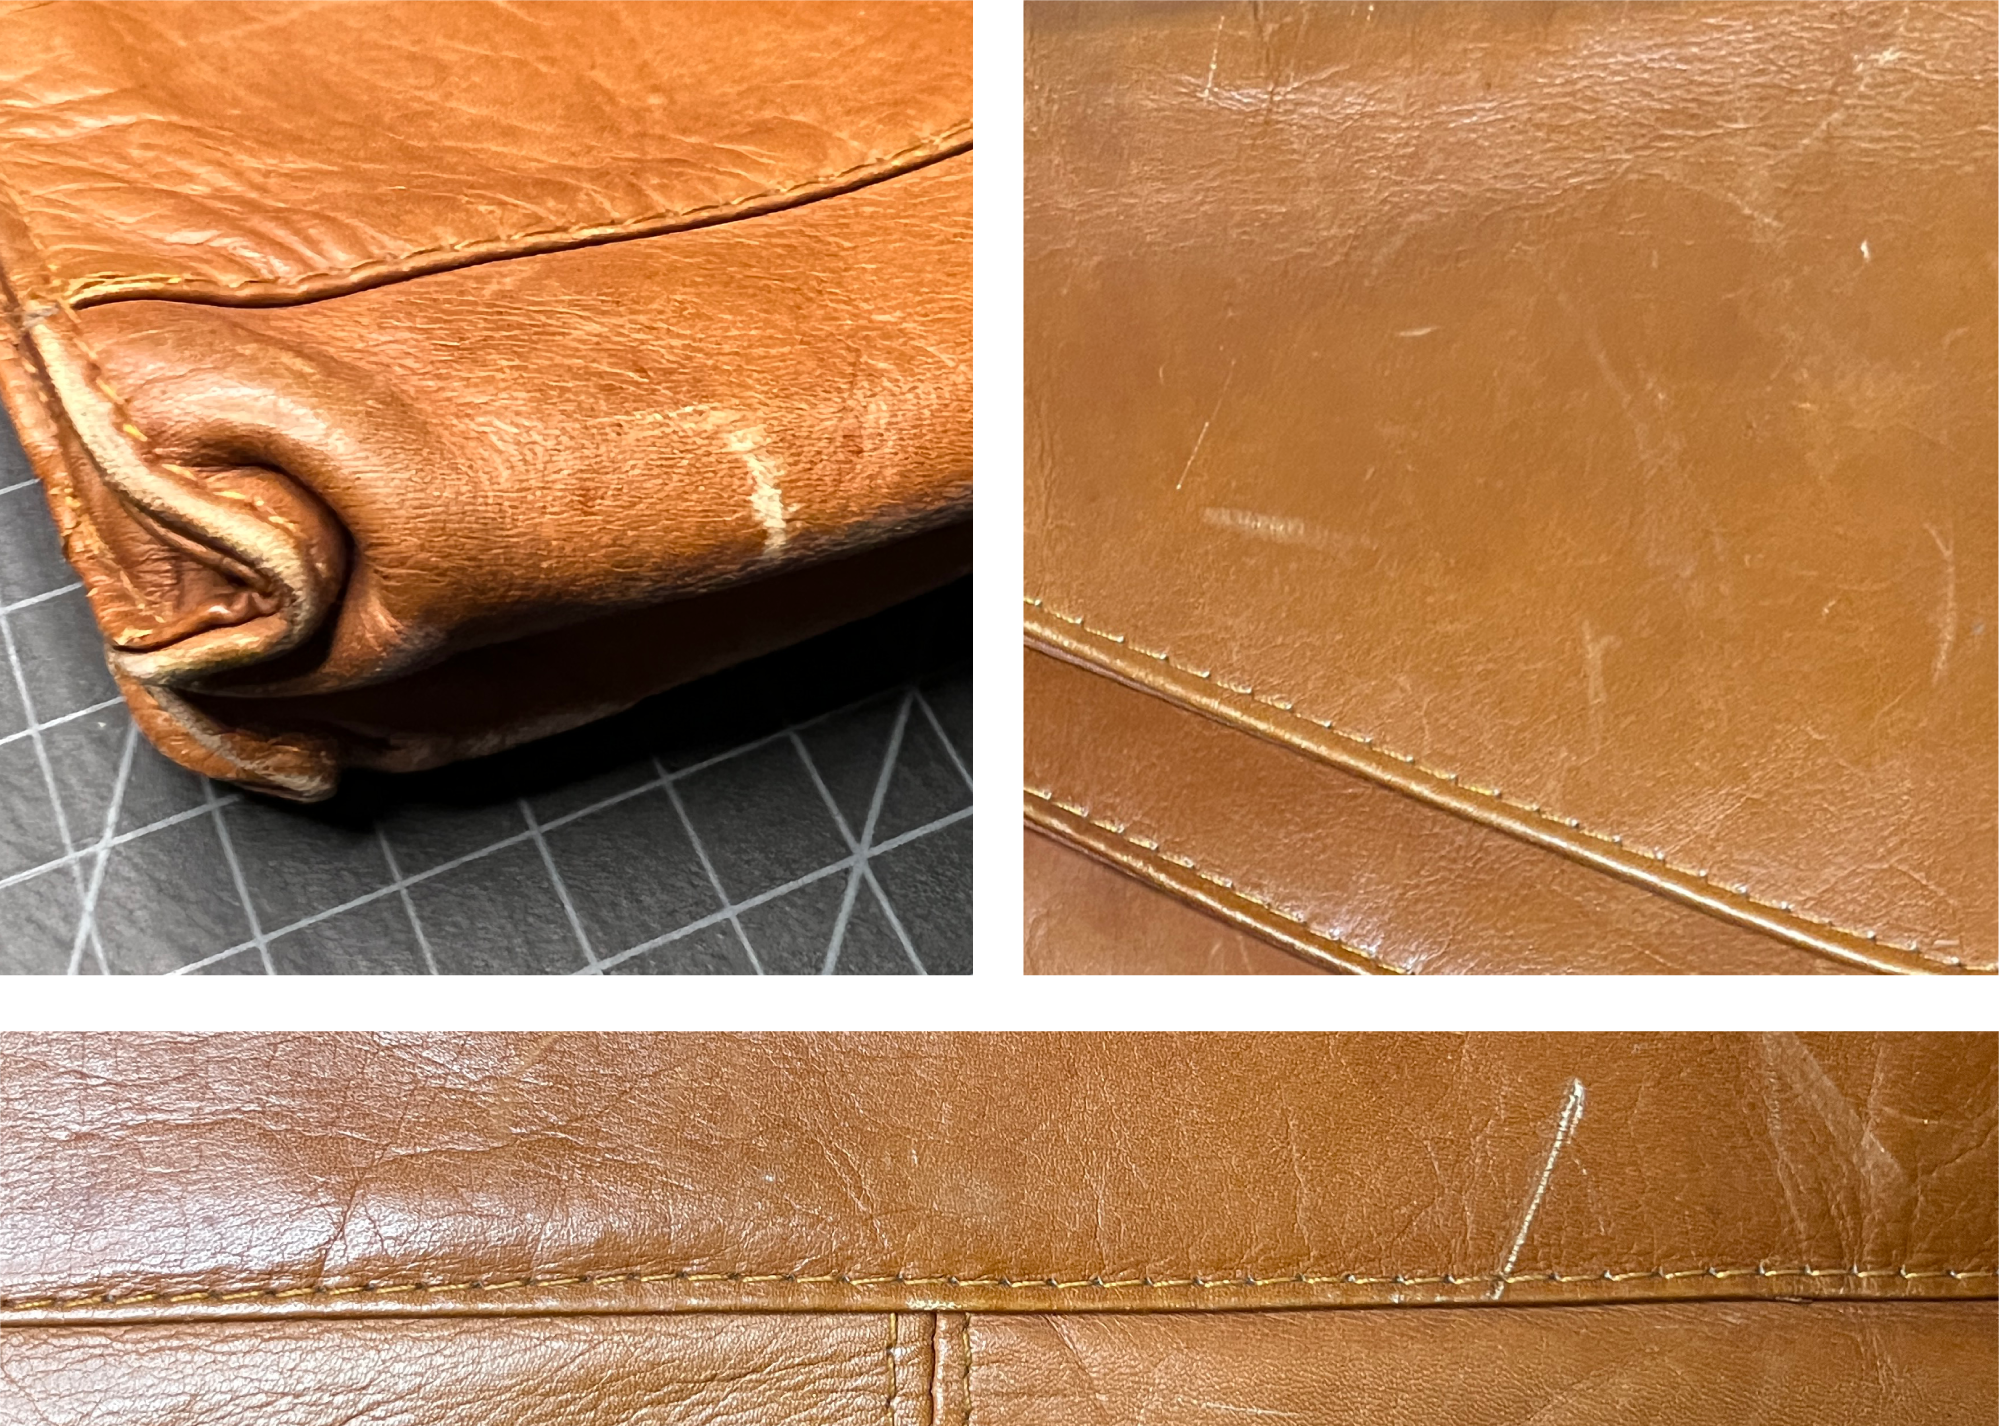
The ink stains present the biggest challenge, especially because they've had so much time to settle into the pores of the leather. Ink stains are notoriously difficult to extract from leather, think of it almost like removing a tattoo. You want to be able to remove as much of the dye as possible, but scrub too hard and you'll risk damaging the leather or permanent discoloration. </span></p>
<p>
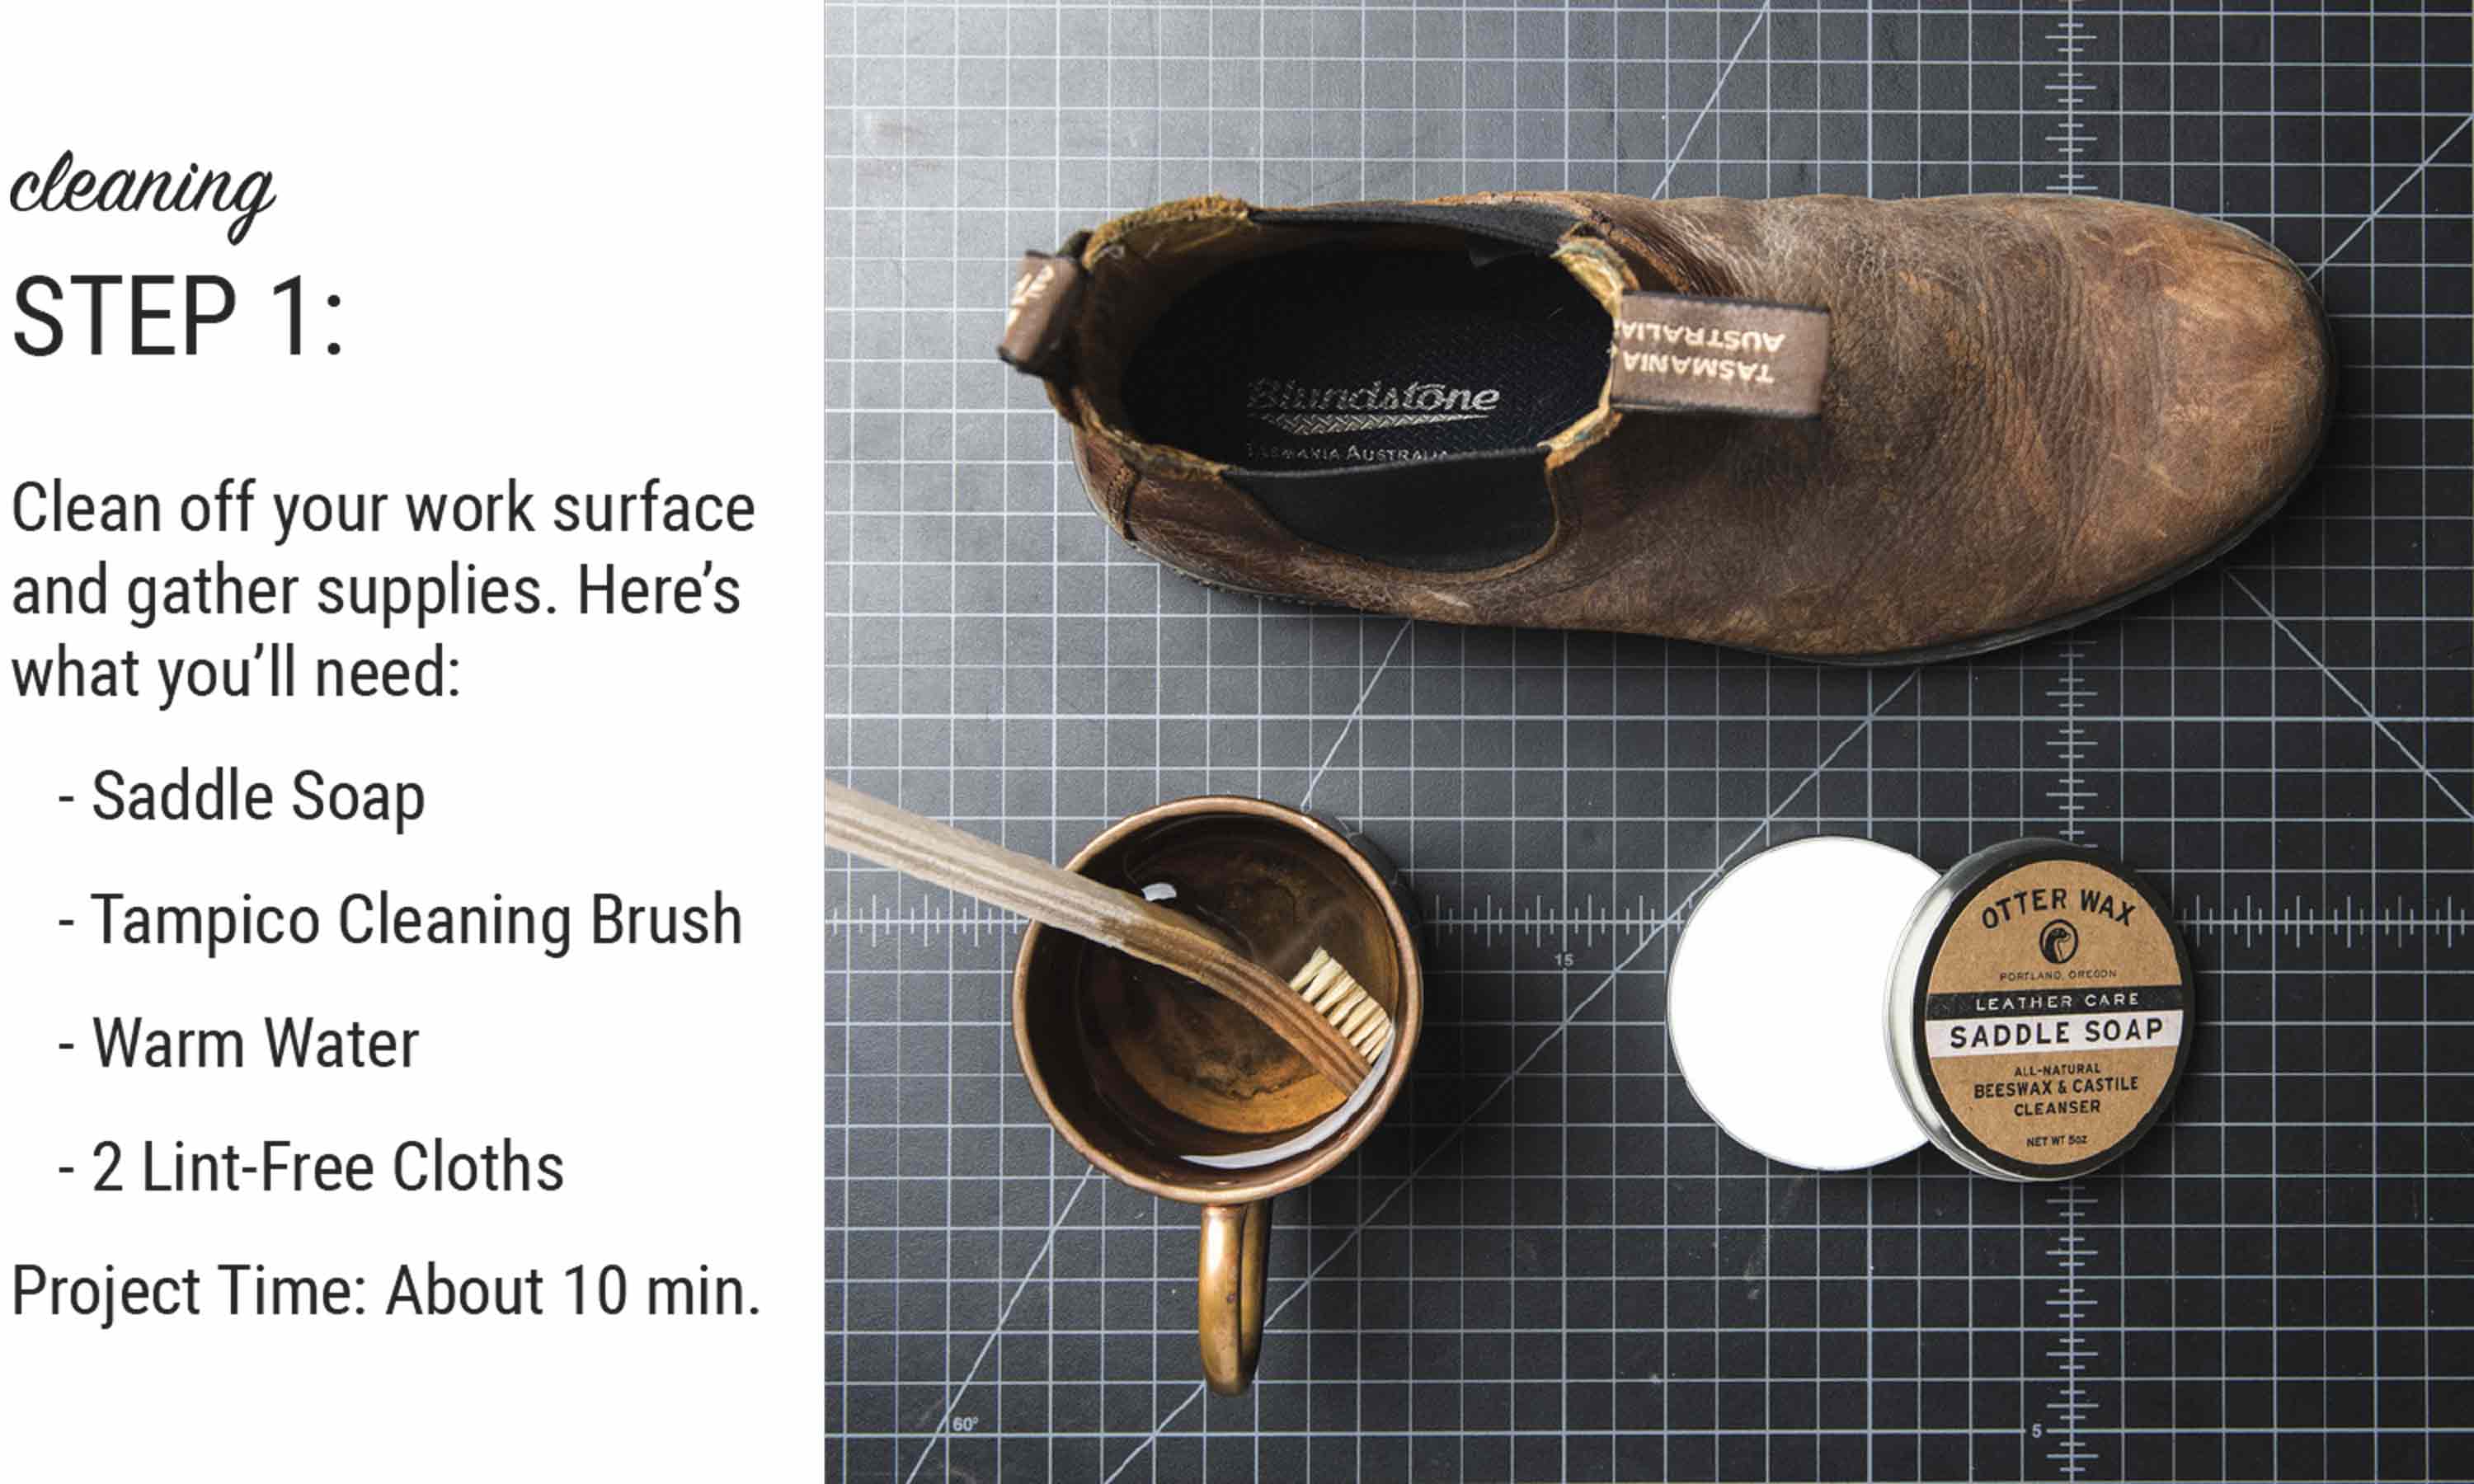
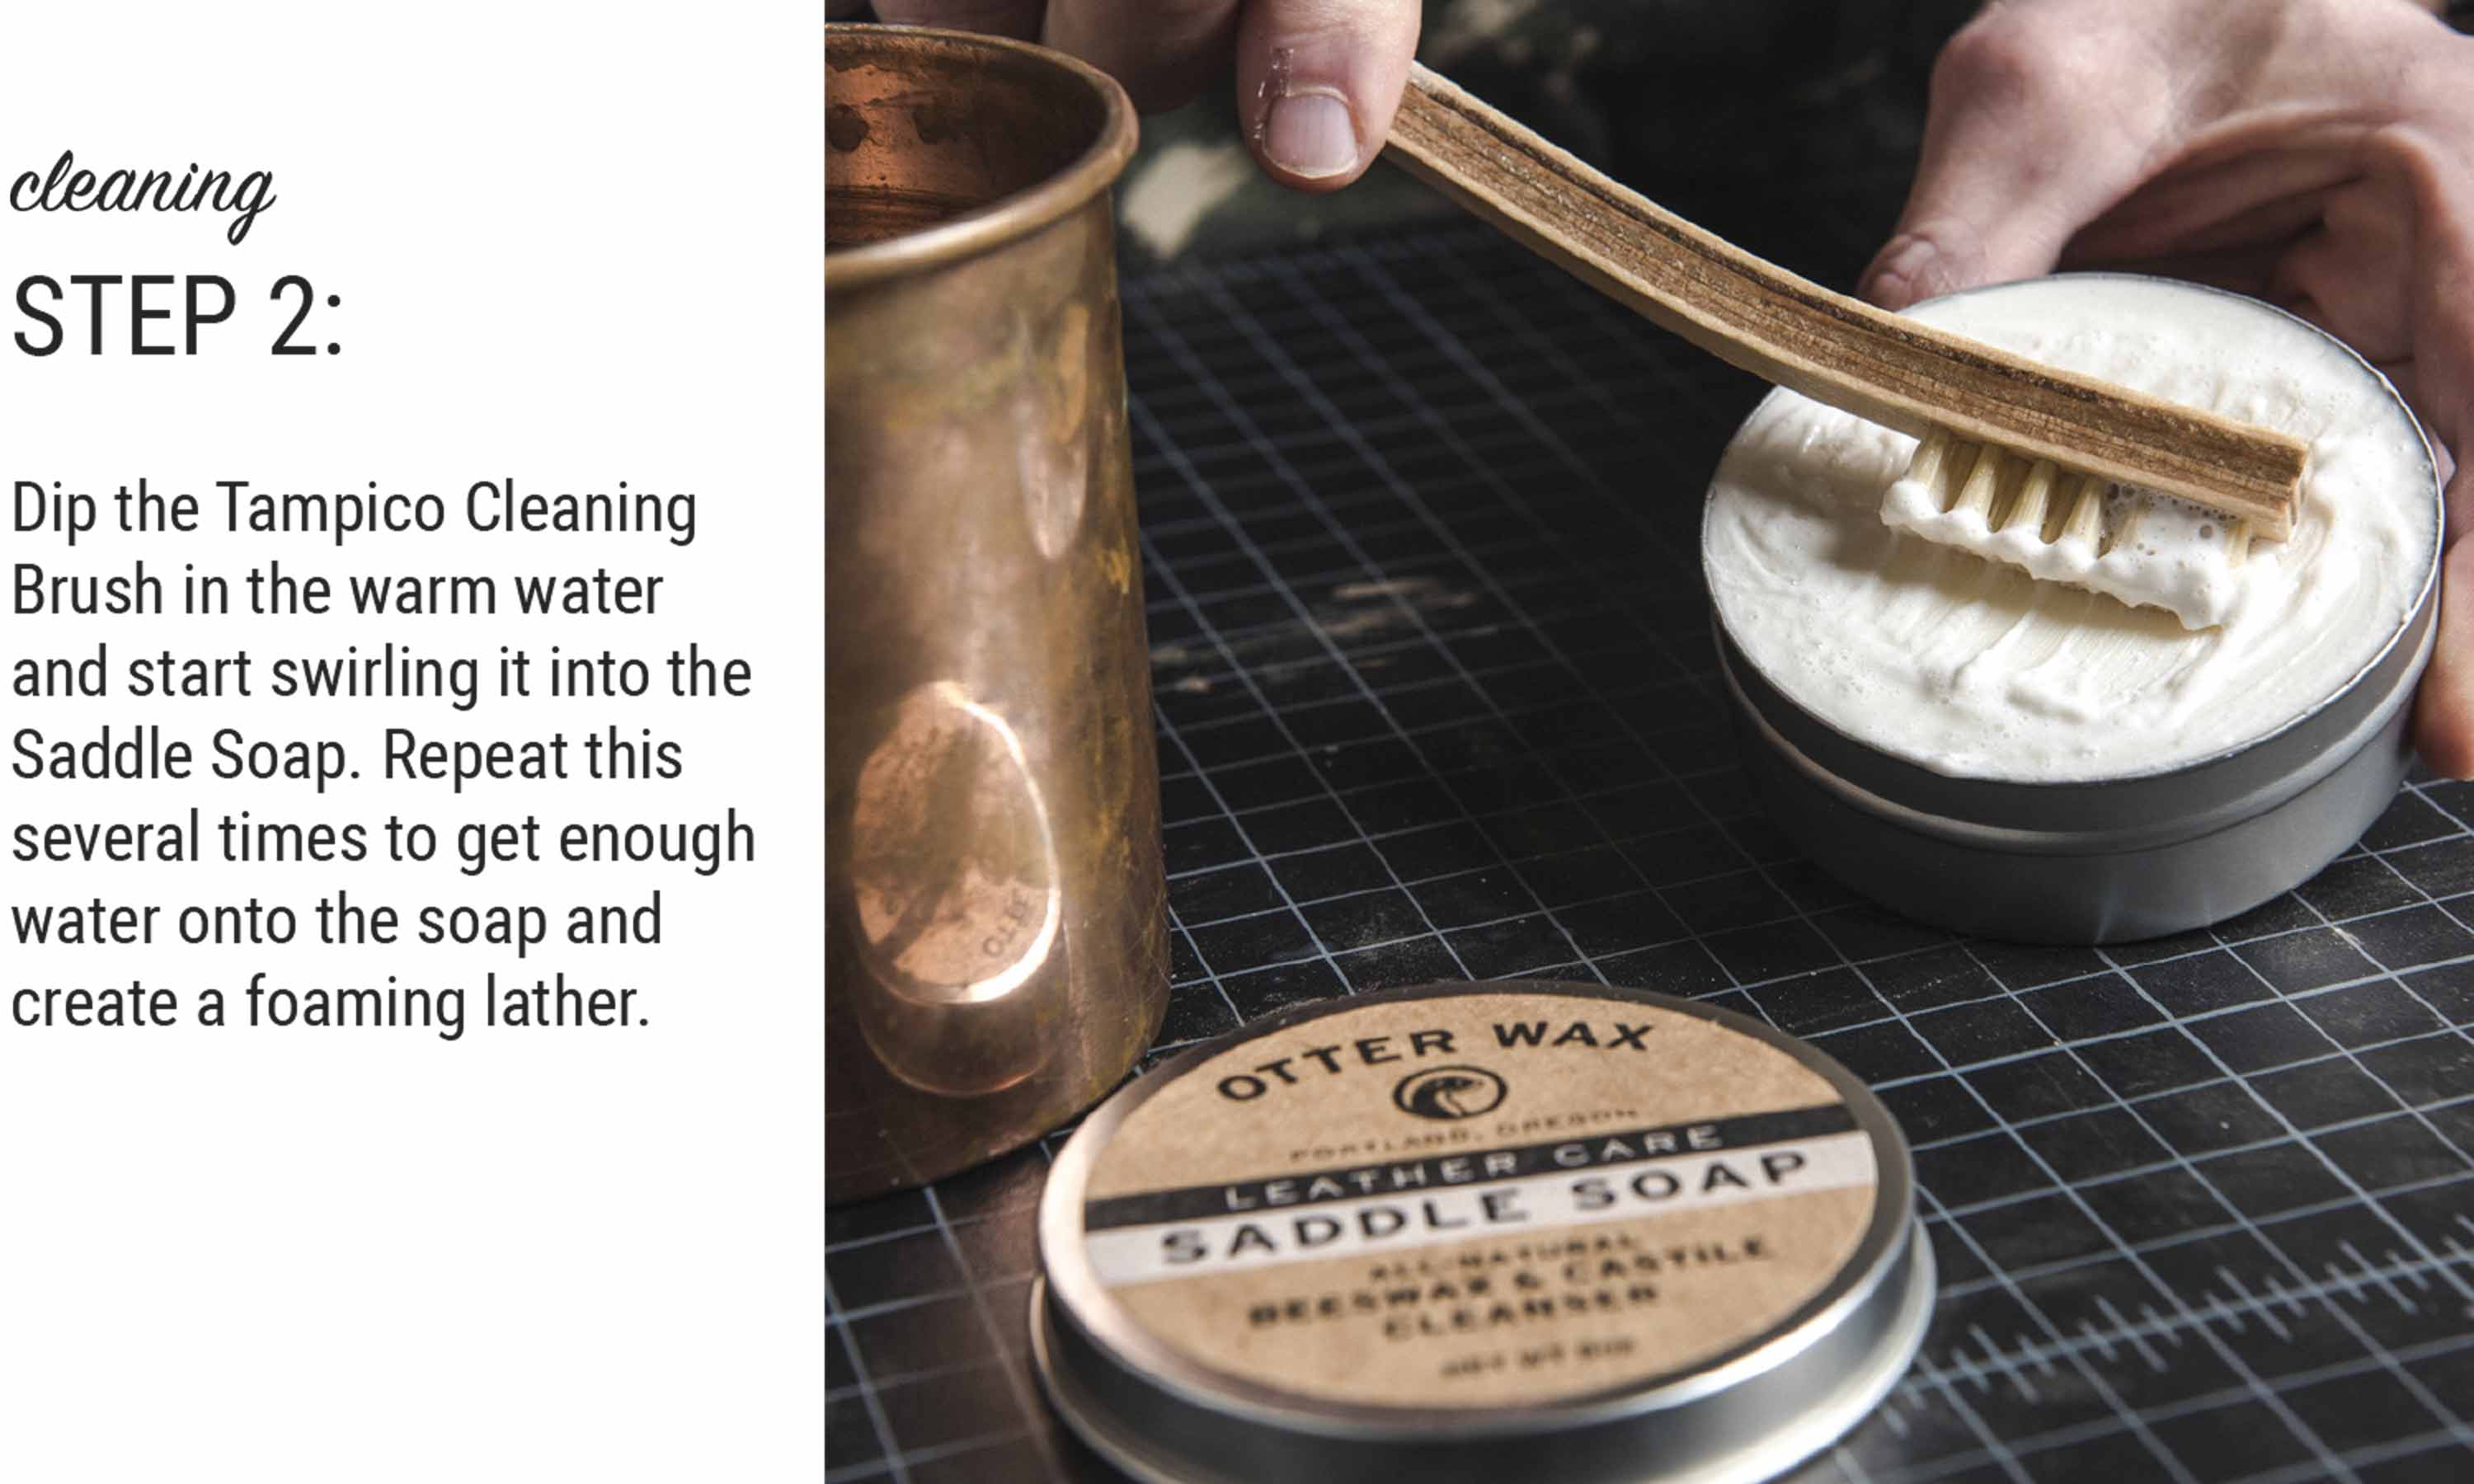
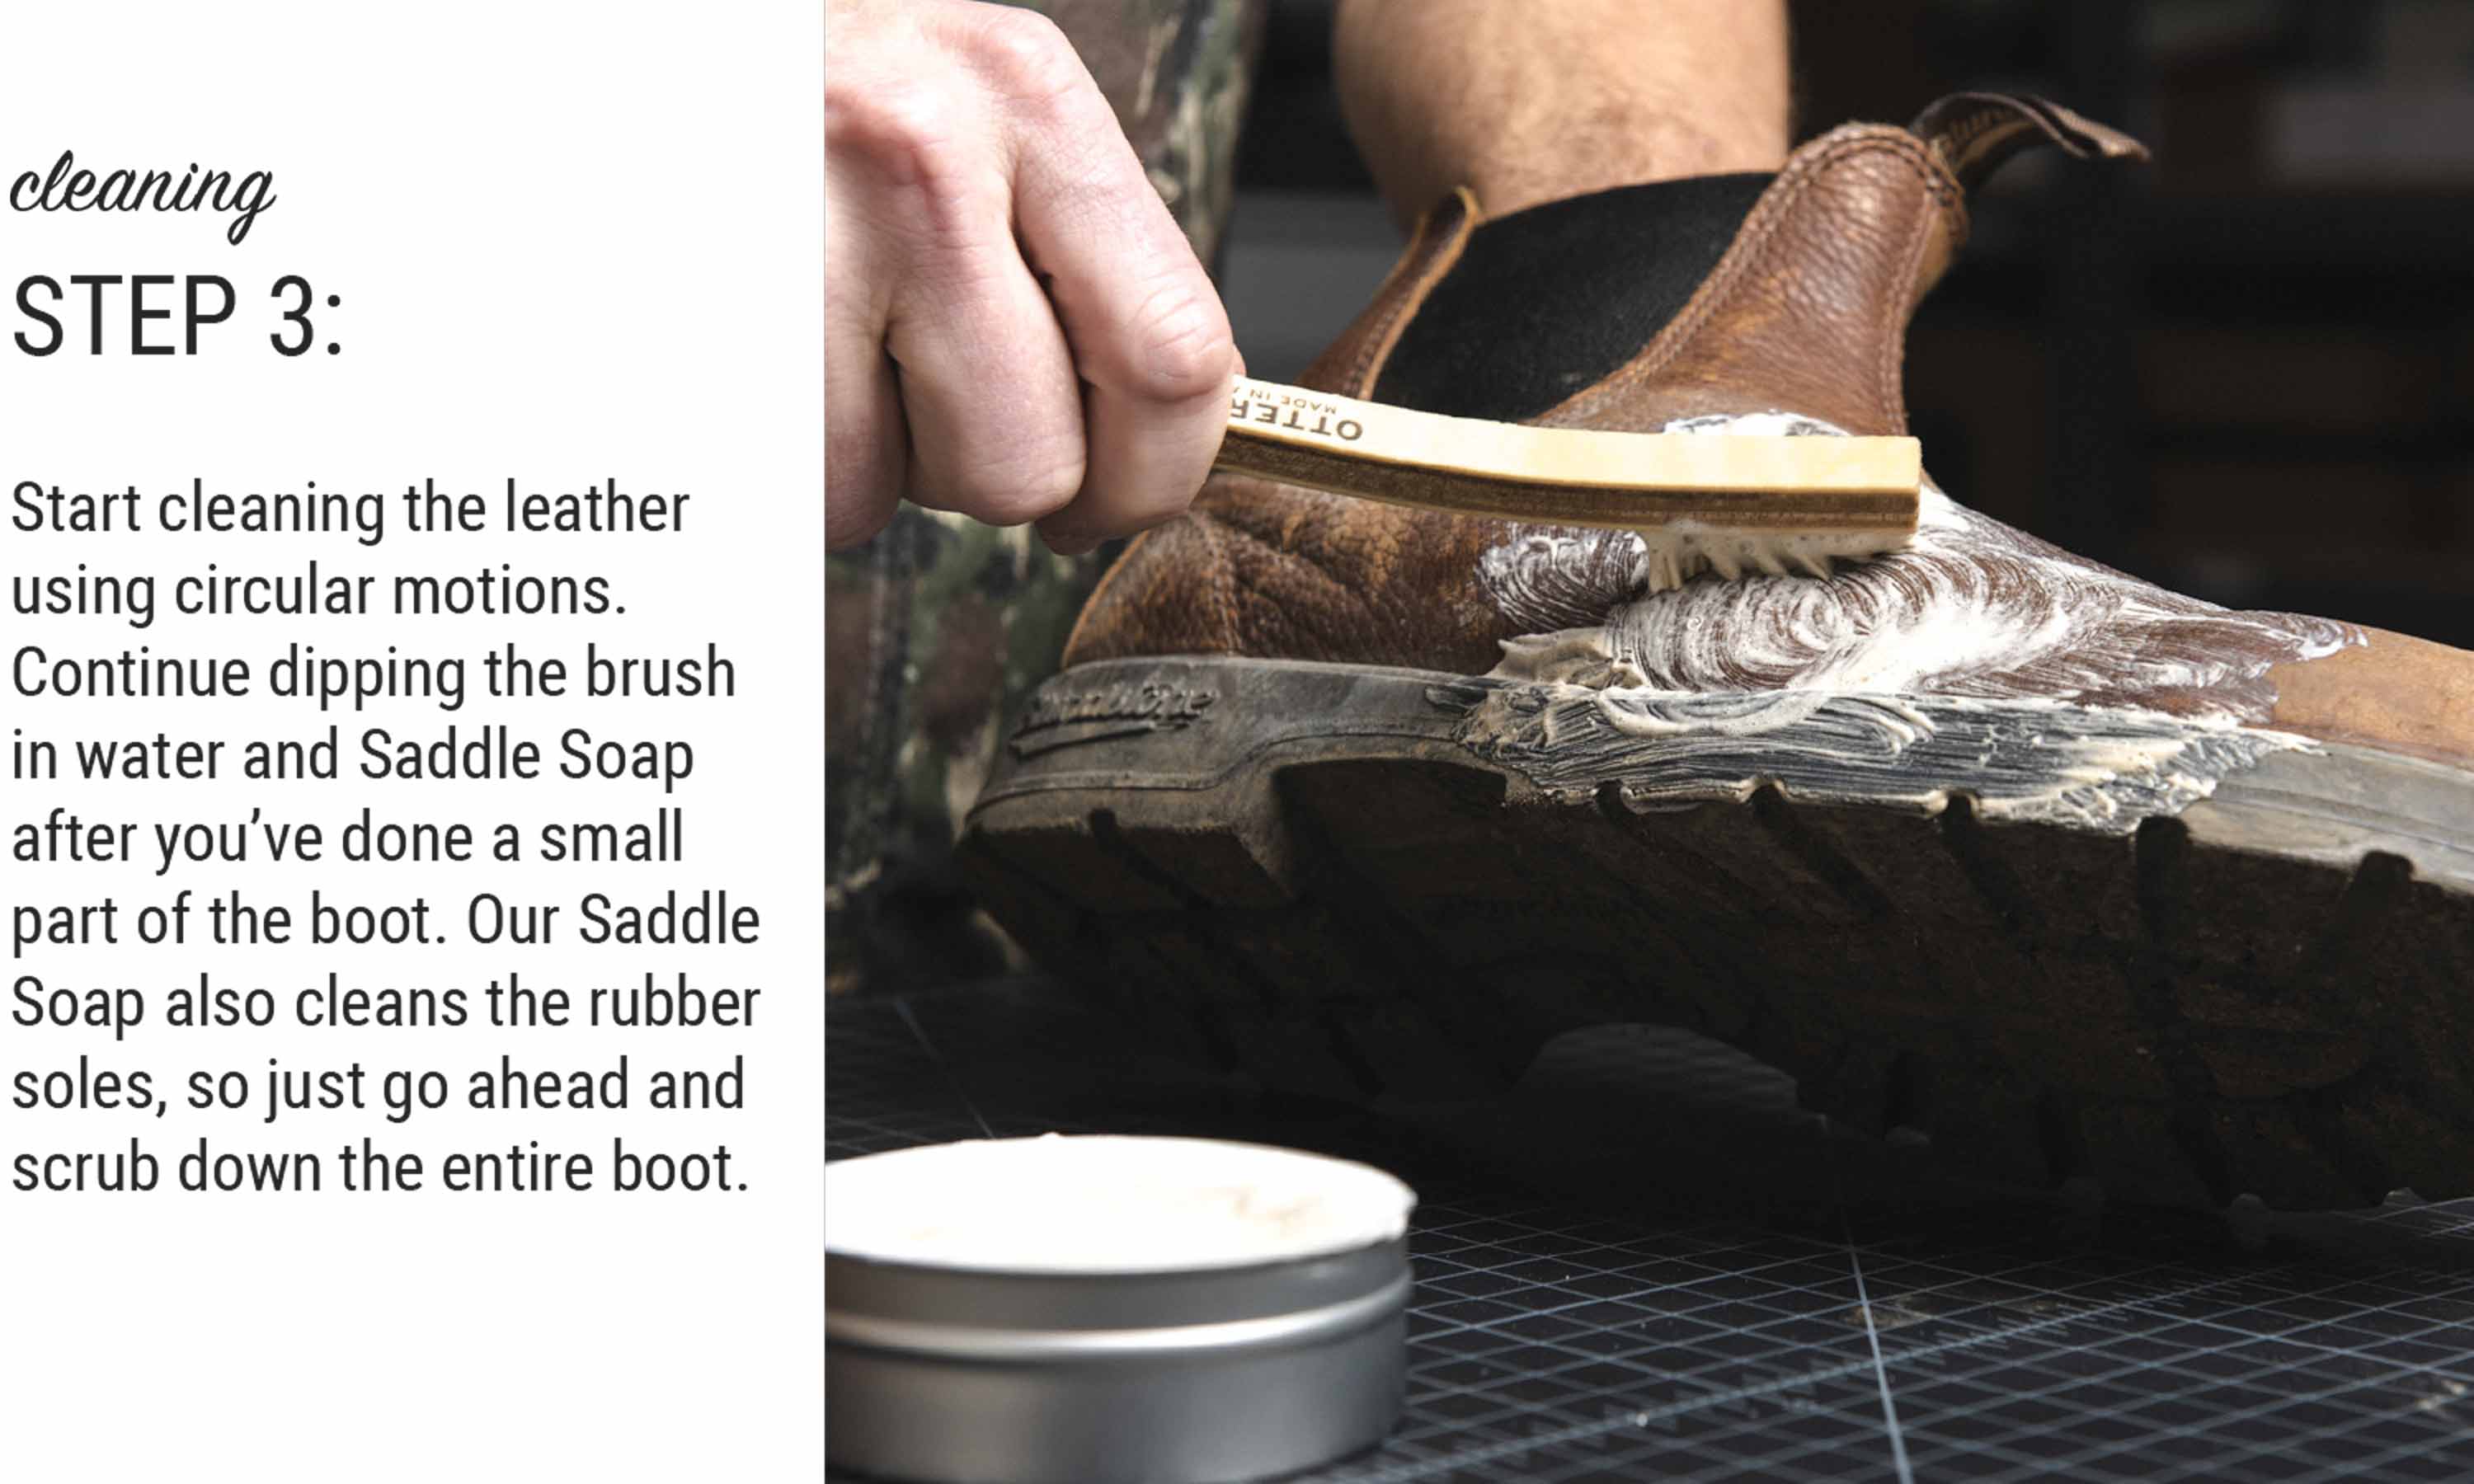
How hard you attack the stain really depends on the condition of the leather. This leather is pretty resilient, so I chose to be a little more aggressive and go after the stain with our <a href="https://www.otterwax.com/collections/leather-care/products/saddle-soap" target="_blank" title="Otter Wax Saddle Soap Leather Cleaner" rel="noopener noreferrer">Saddle Soap</a>, warm water, and a power scrubber with a medium-stiffness nylon bristle.</p>
<div style="text-align: center;"><img src="https://cdn.shopify.com/s/files/1/0189/5302/files/otter_wax_how_to_clean_a_leather_messenger_bag_1.jpg?v=1650057246" alt="best way to clean leather messenger bag with otter wax saddle soap" style="float: none;"></div>
Had to bring out the big guns to get at those ink stains. The scrubbing attachment on this mechanical screwdriver won the day and did a fantastic job at deleting the ink that had settled into the surface.
<div style="text-align: center;"><img src="https://cdn.shopify.com/s/files/1/0189/5302/files/Cleaning-and-wiping-down-leather.png?v=1650060718" alt="otter wax best way to clean leather with saddle soap"></div>
<p style="text-align: left;">
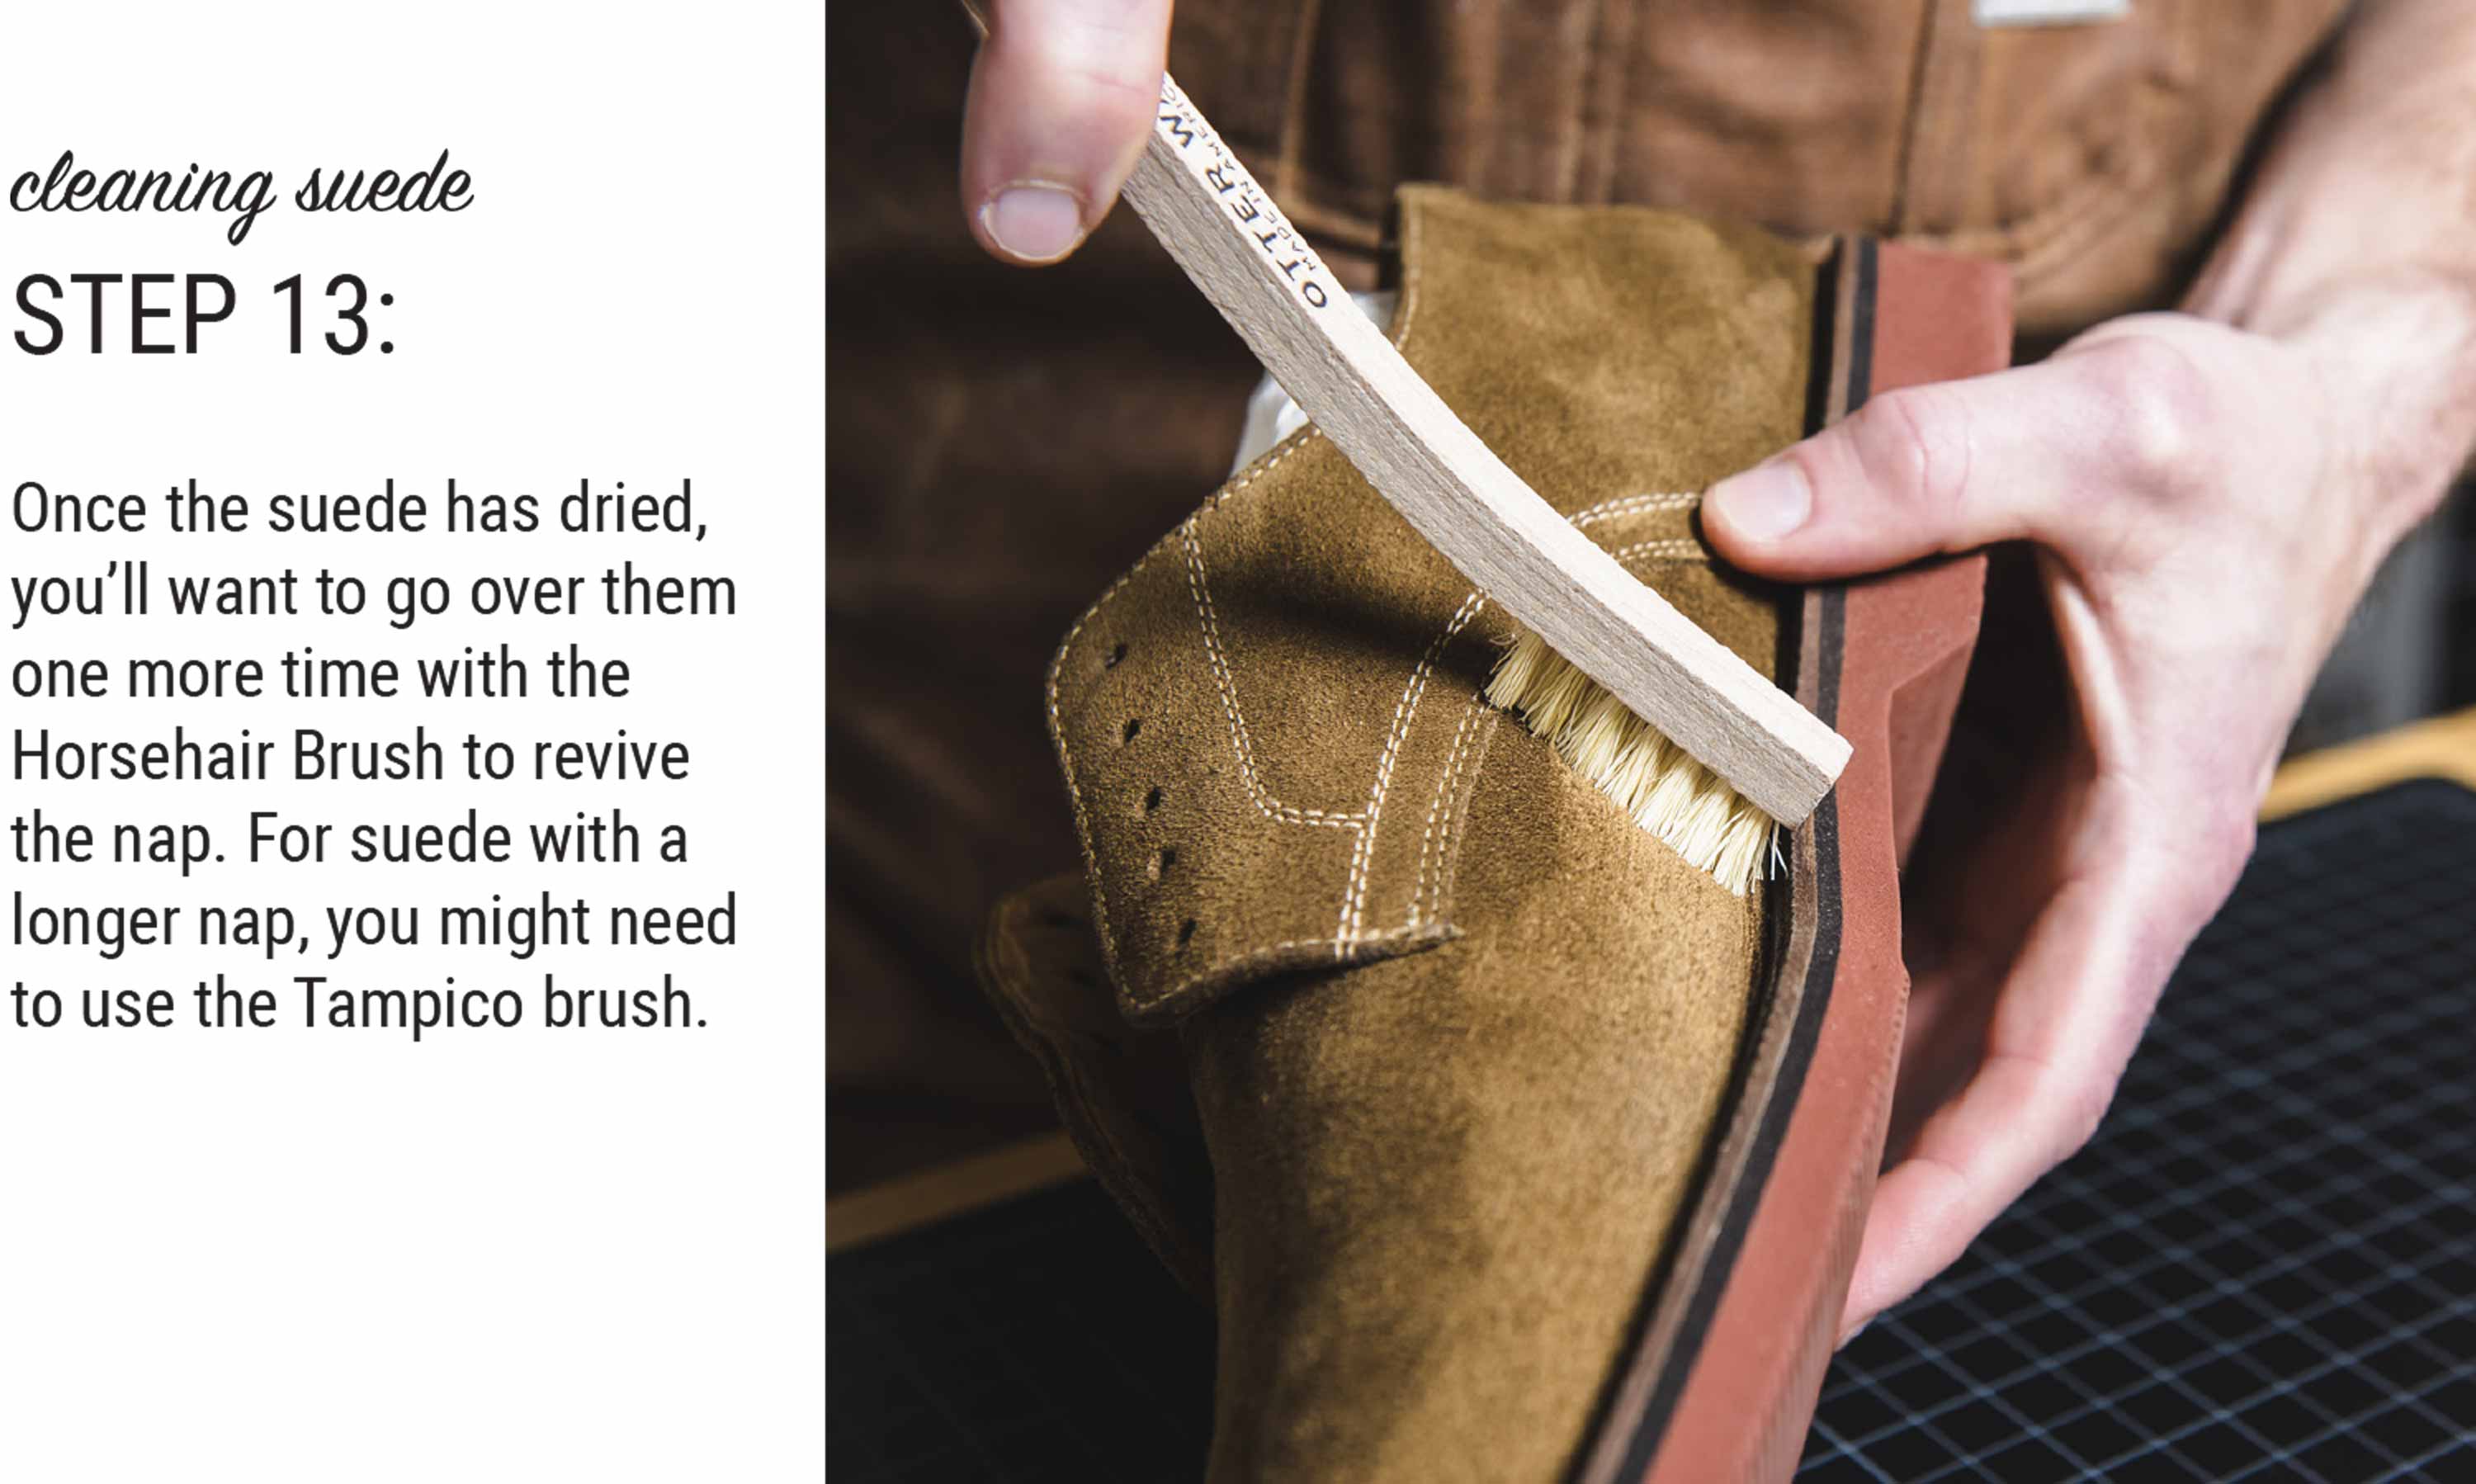
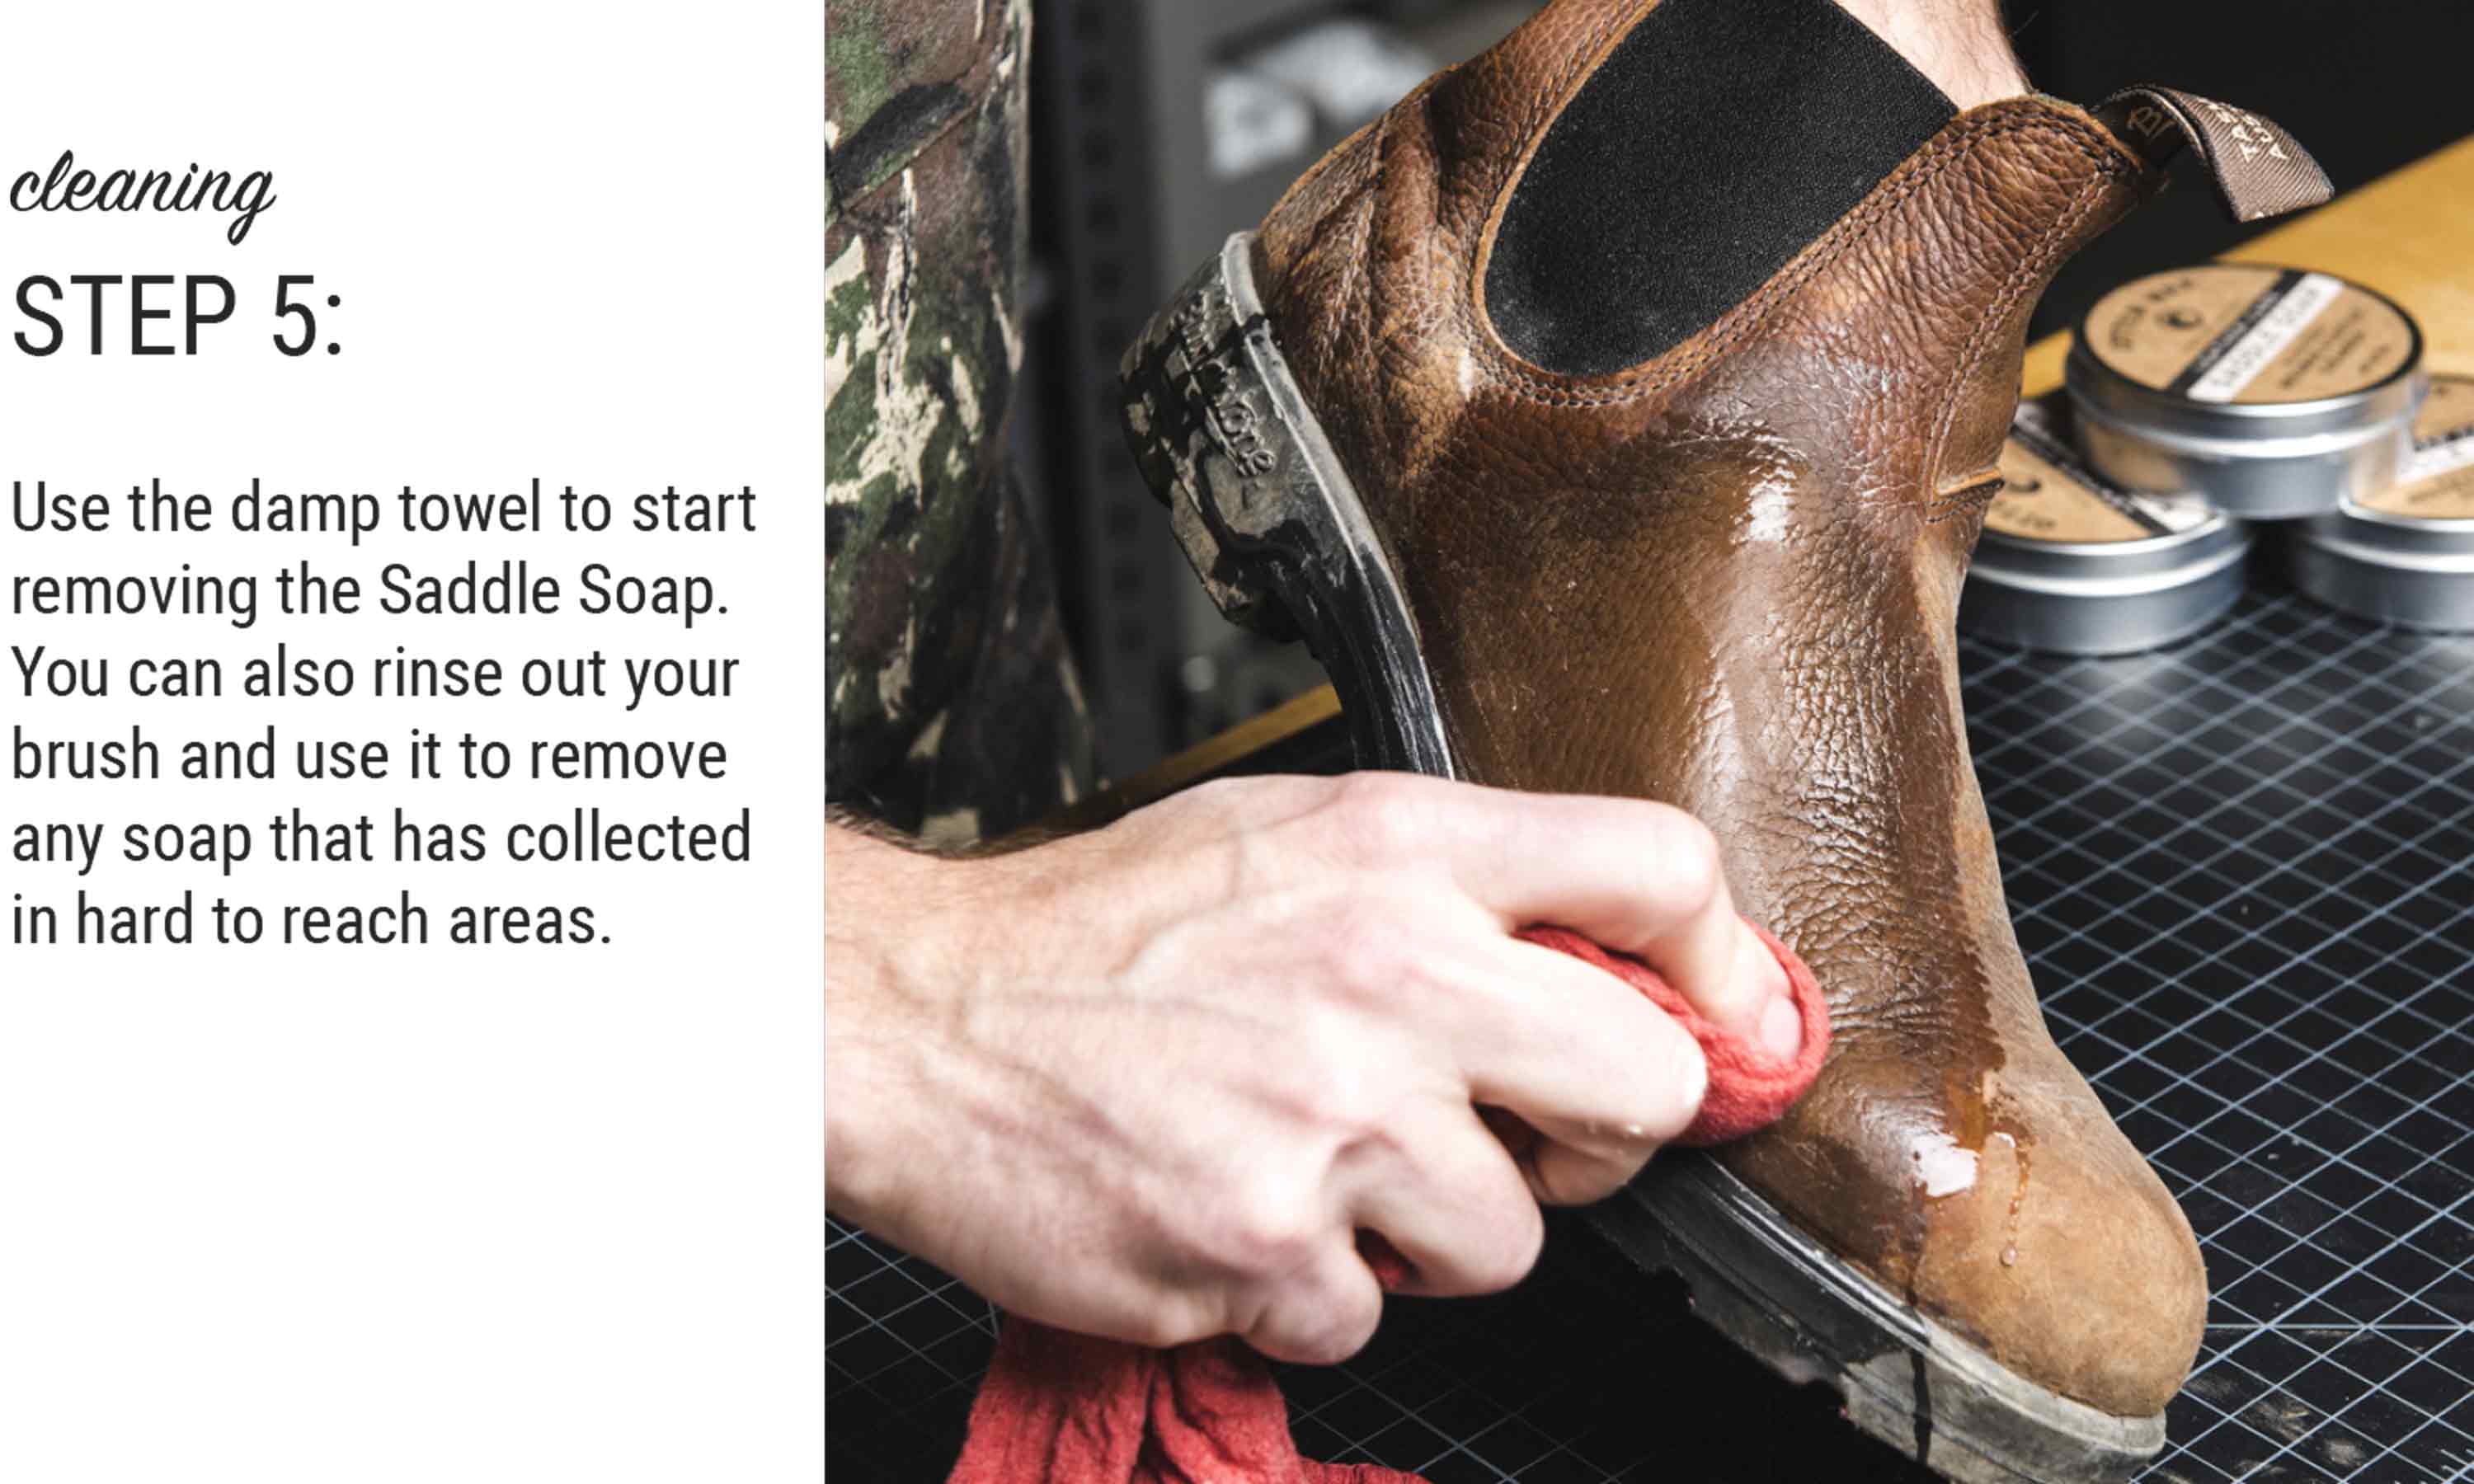
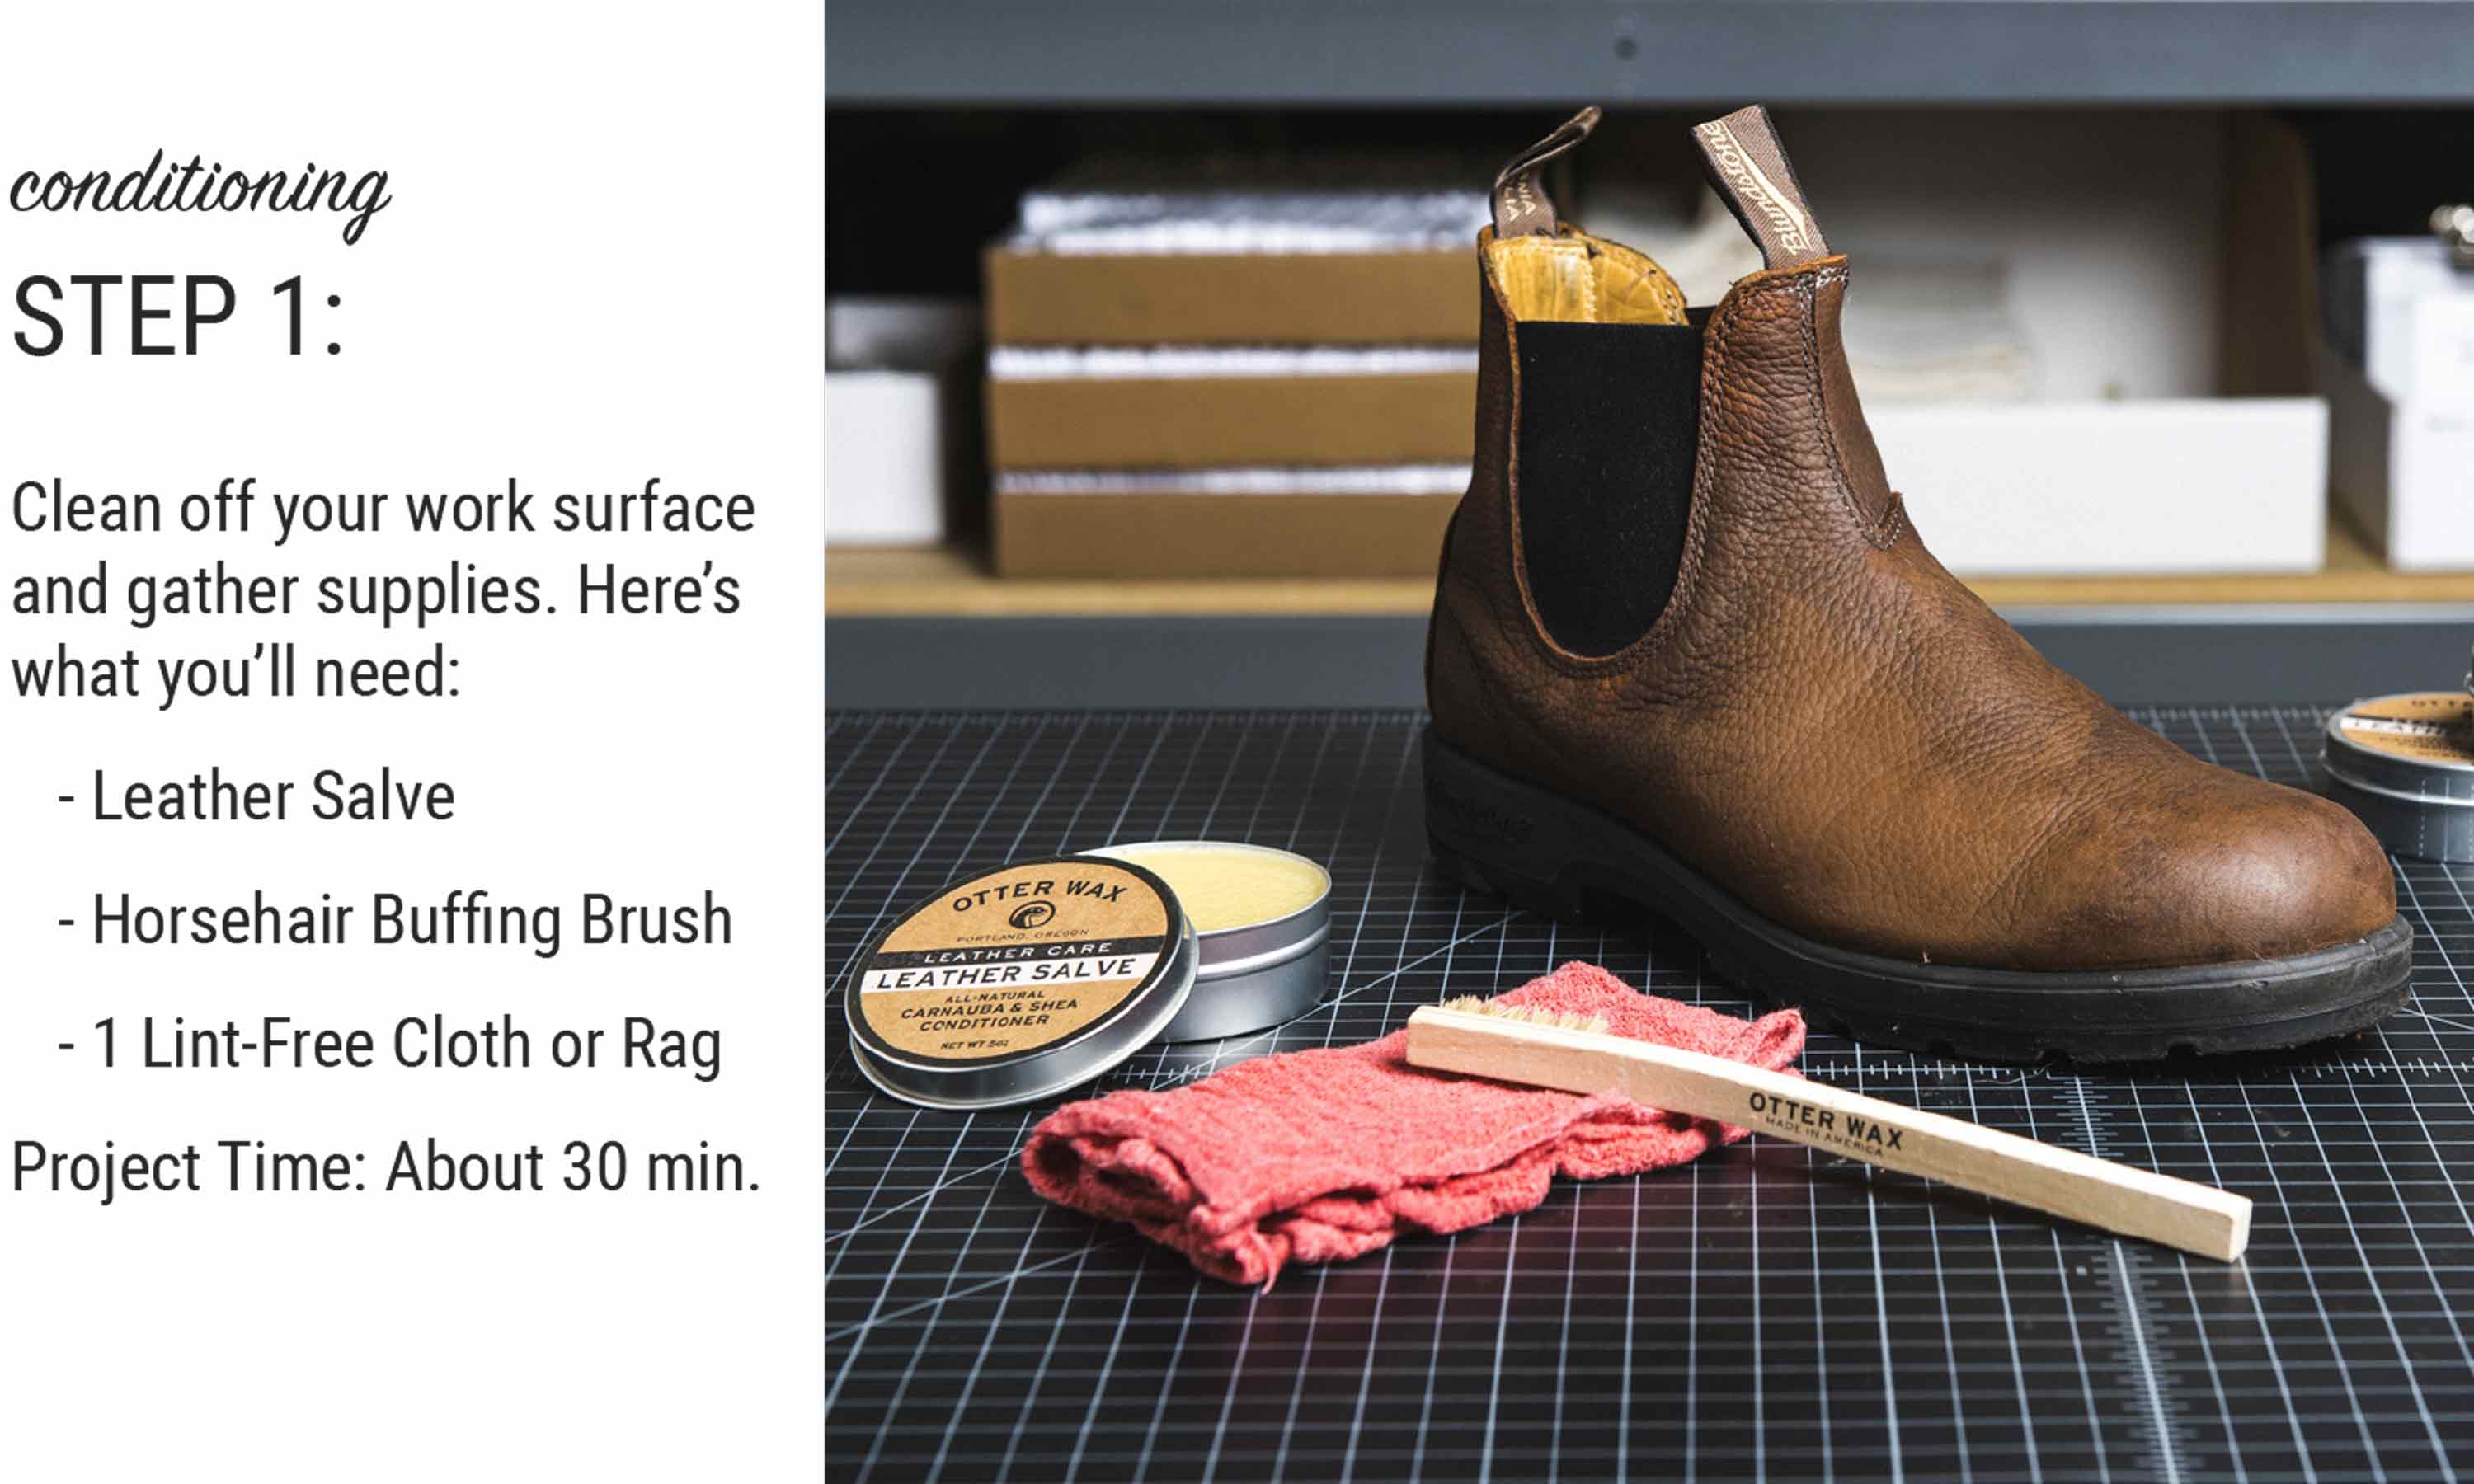
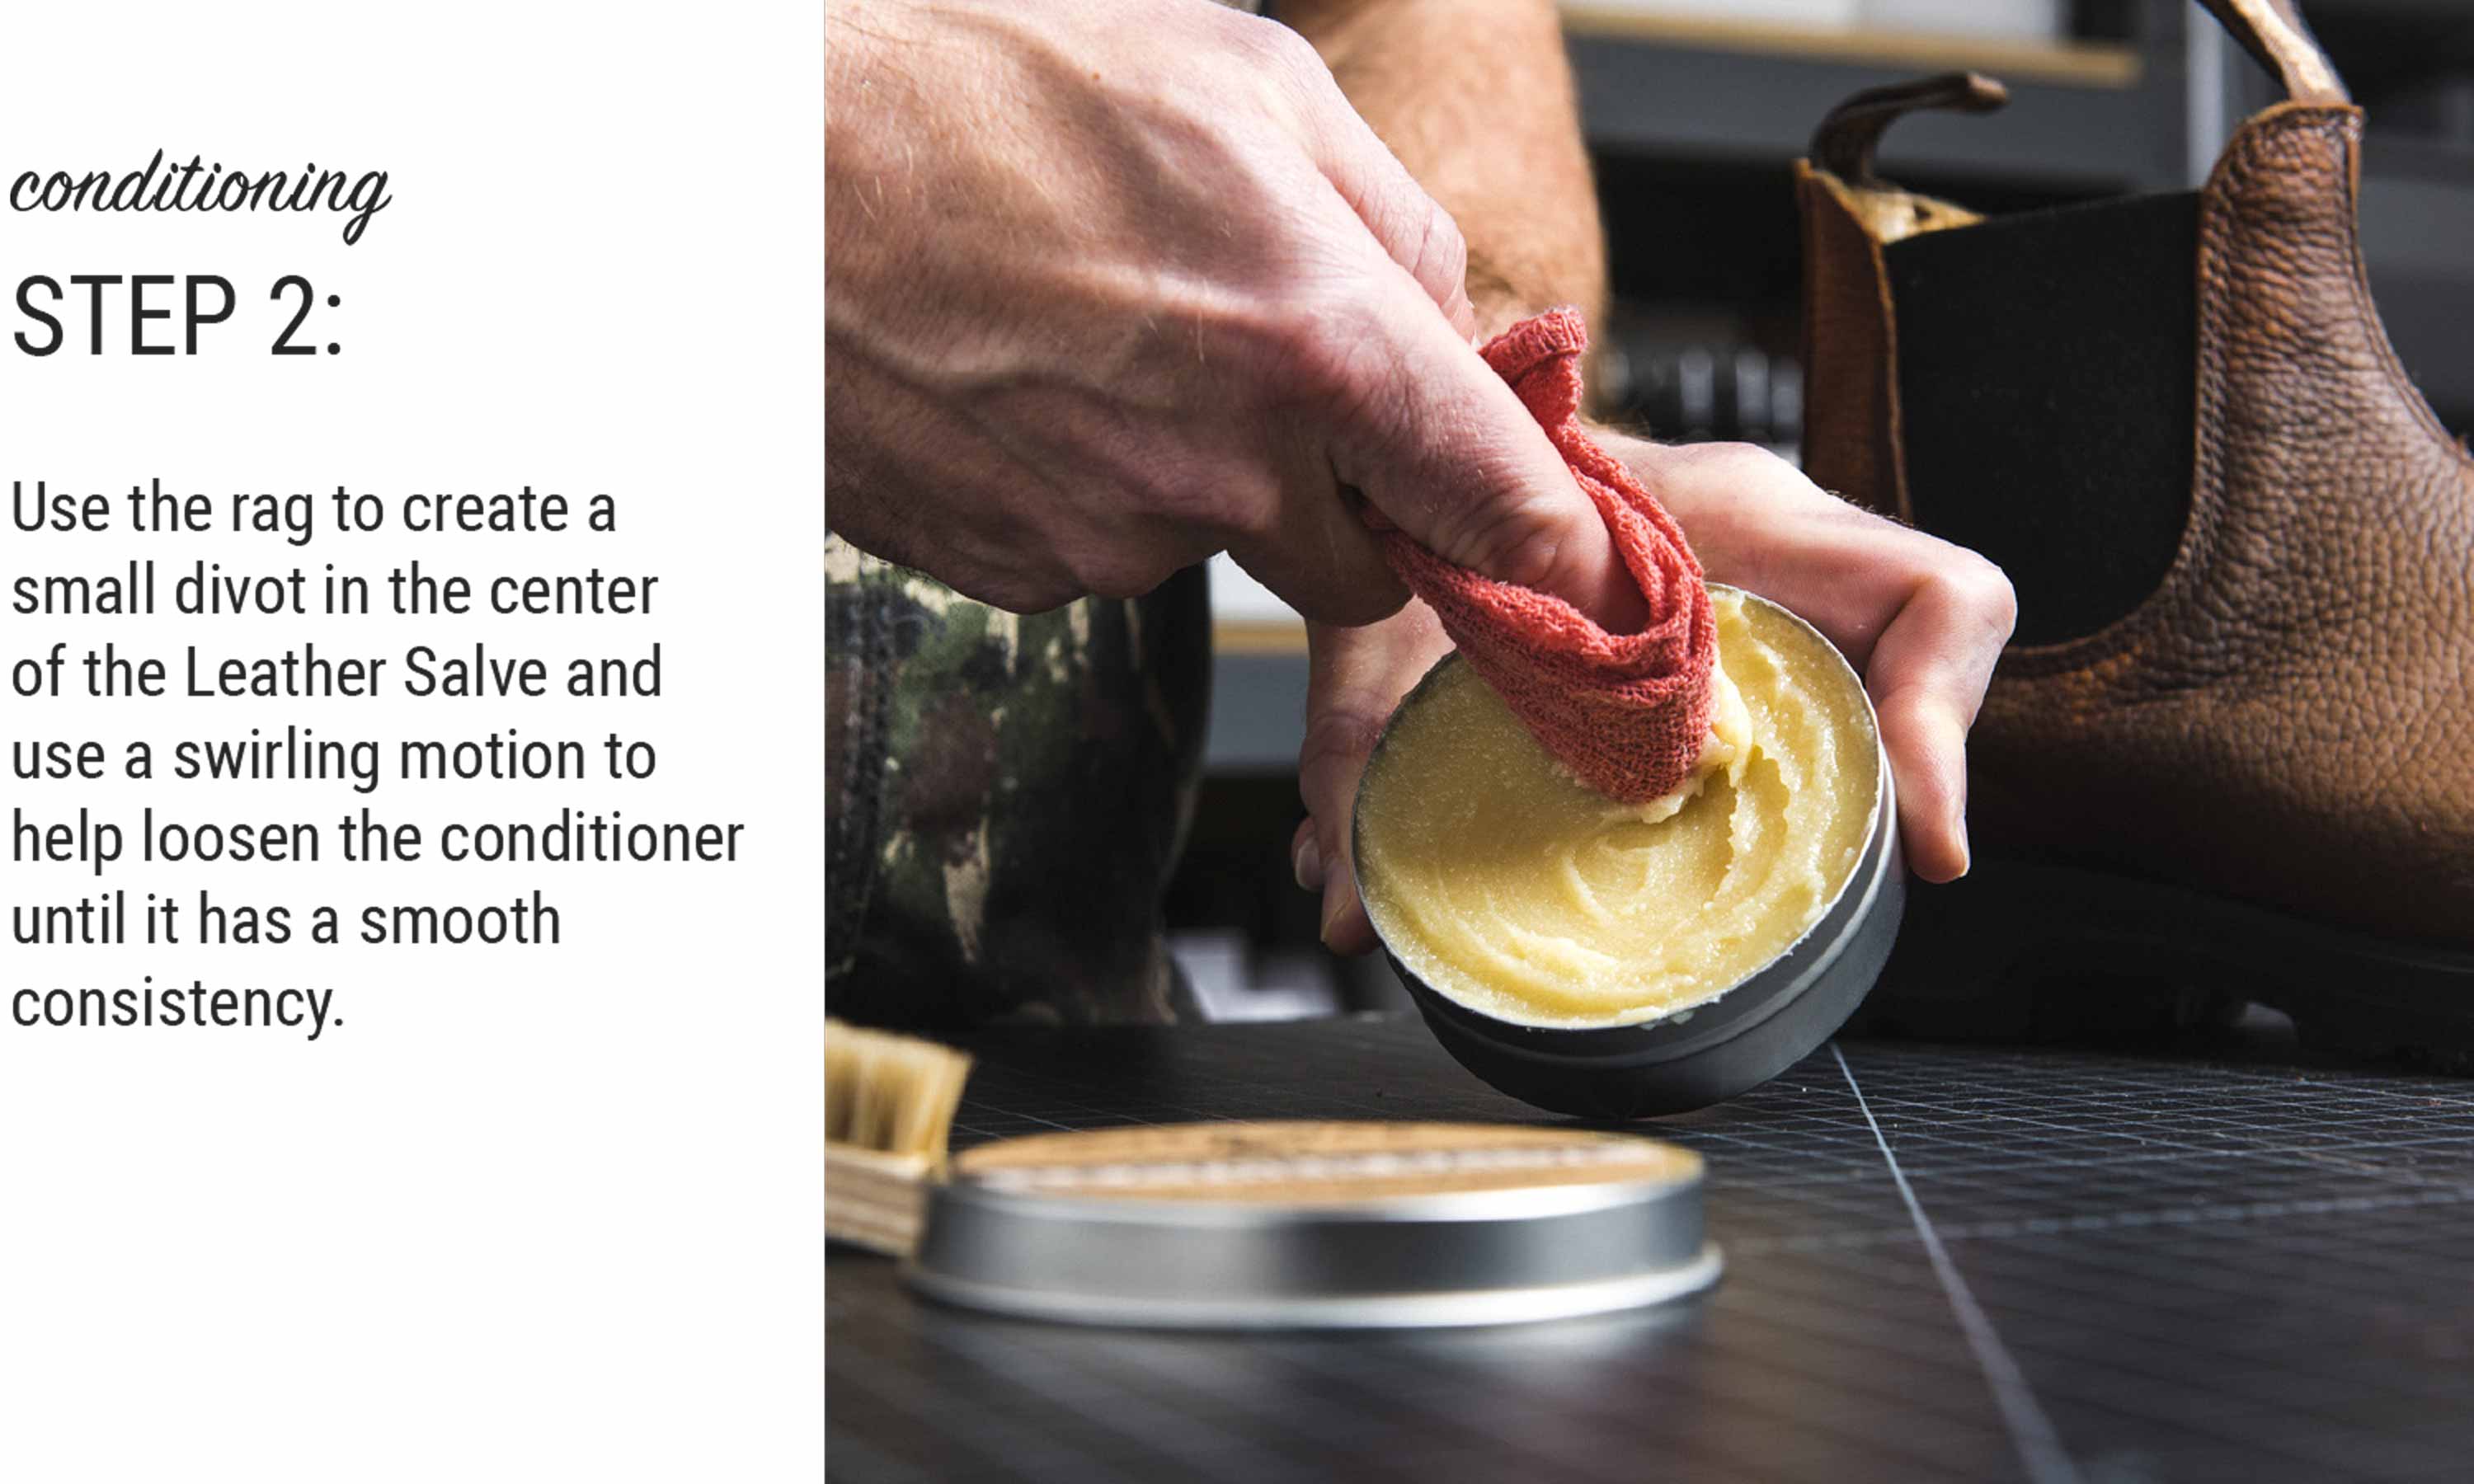
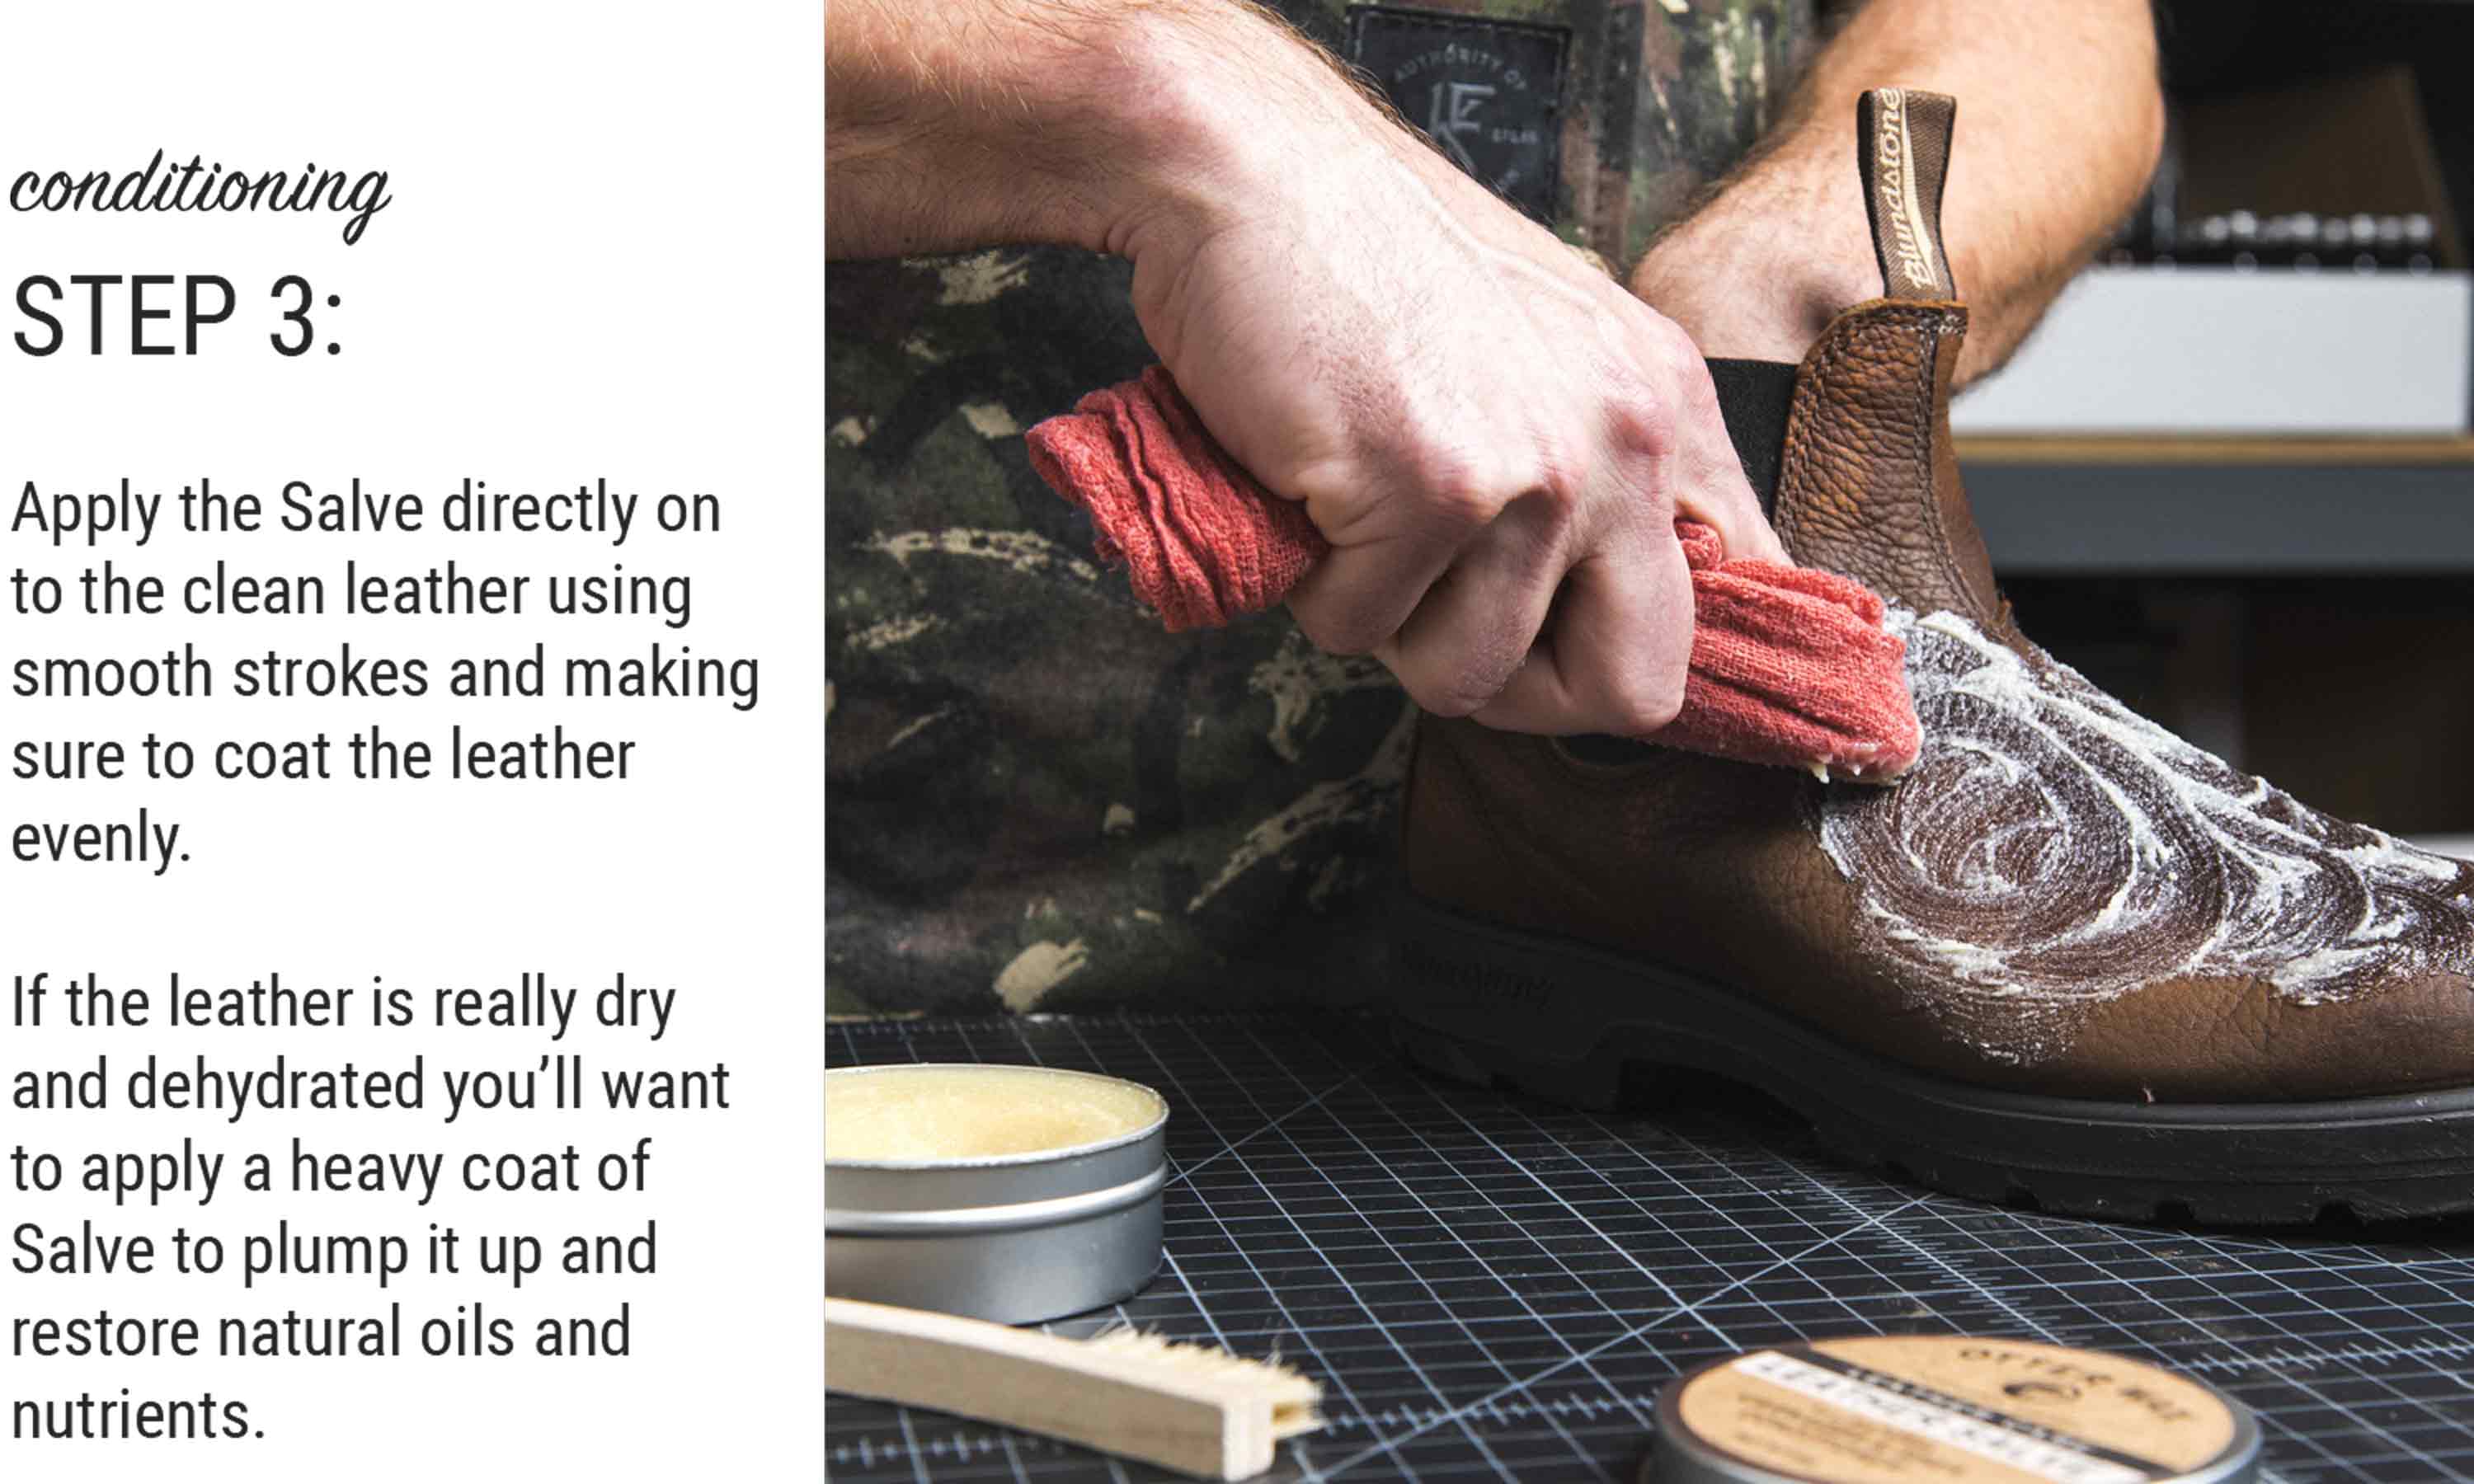
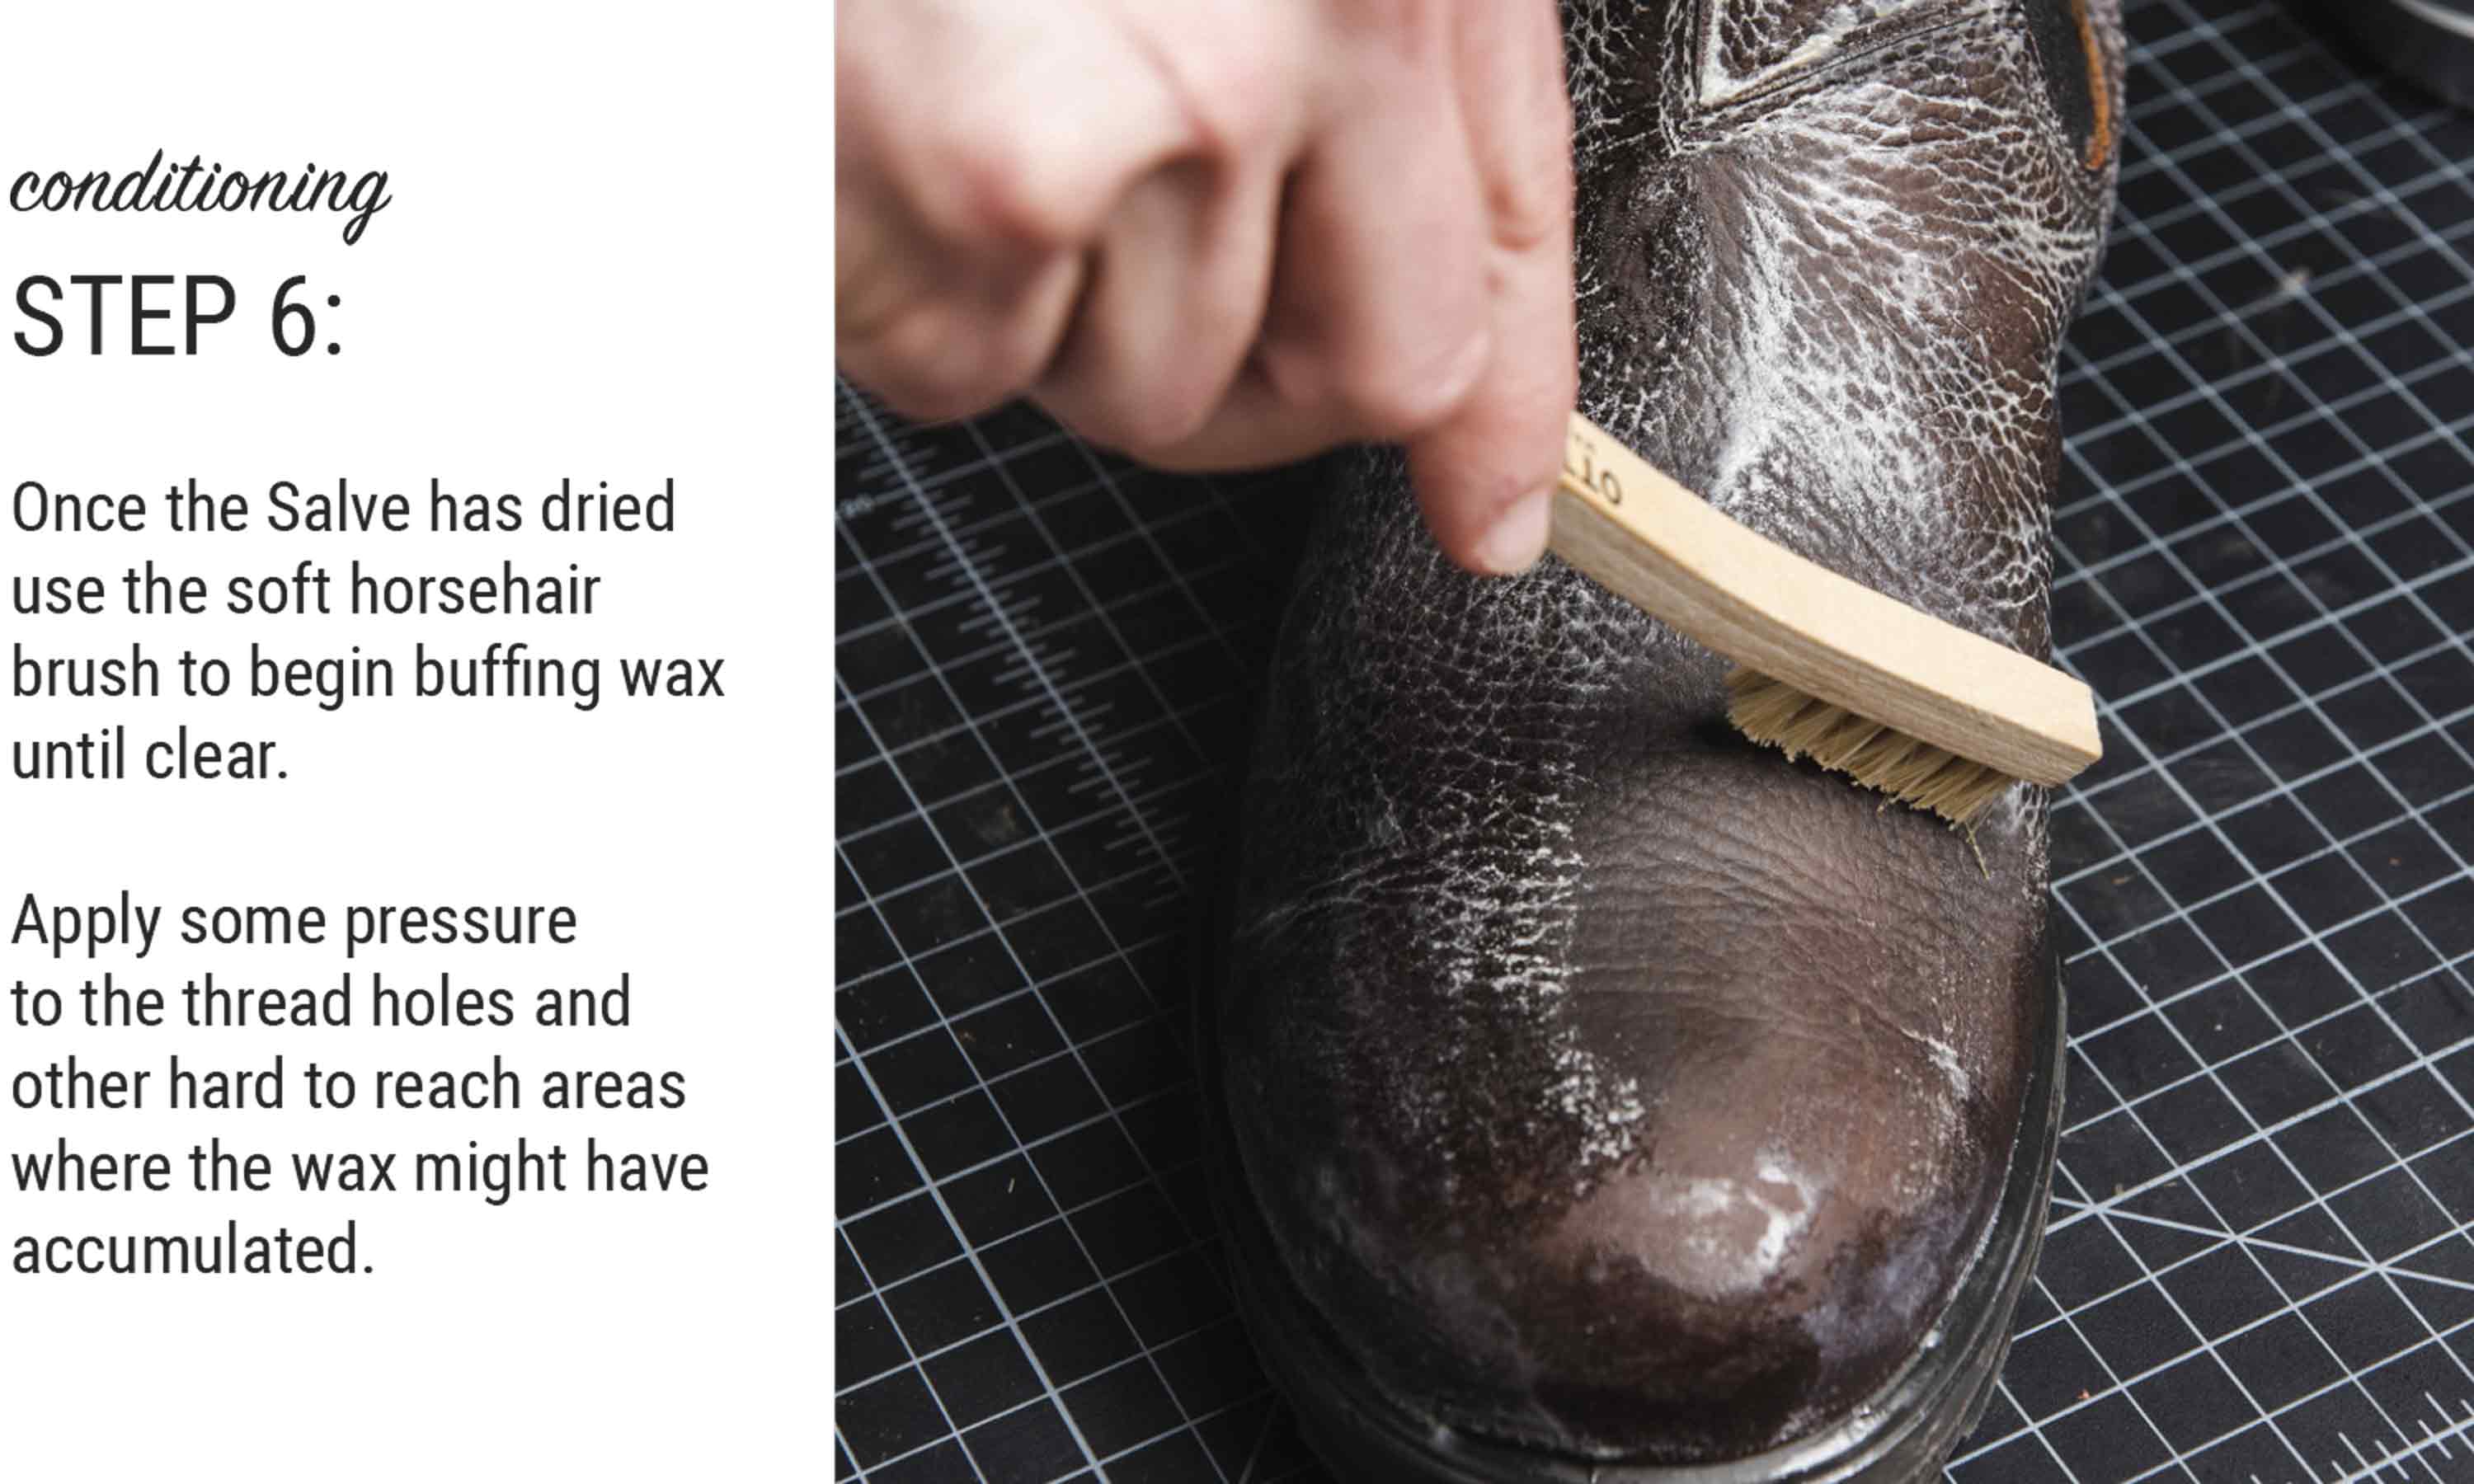
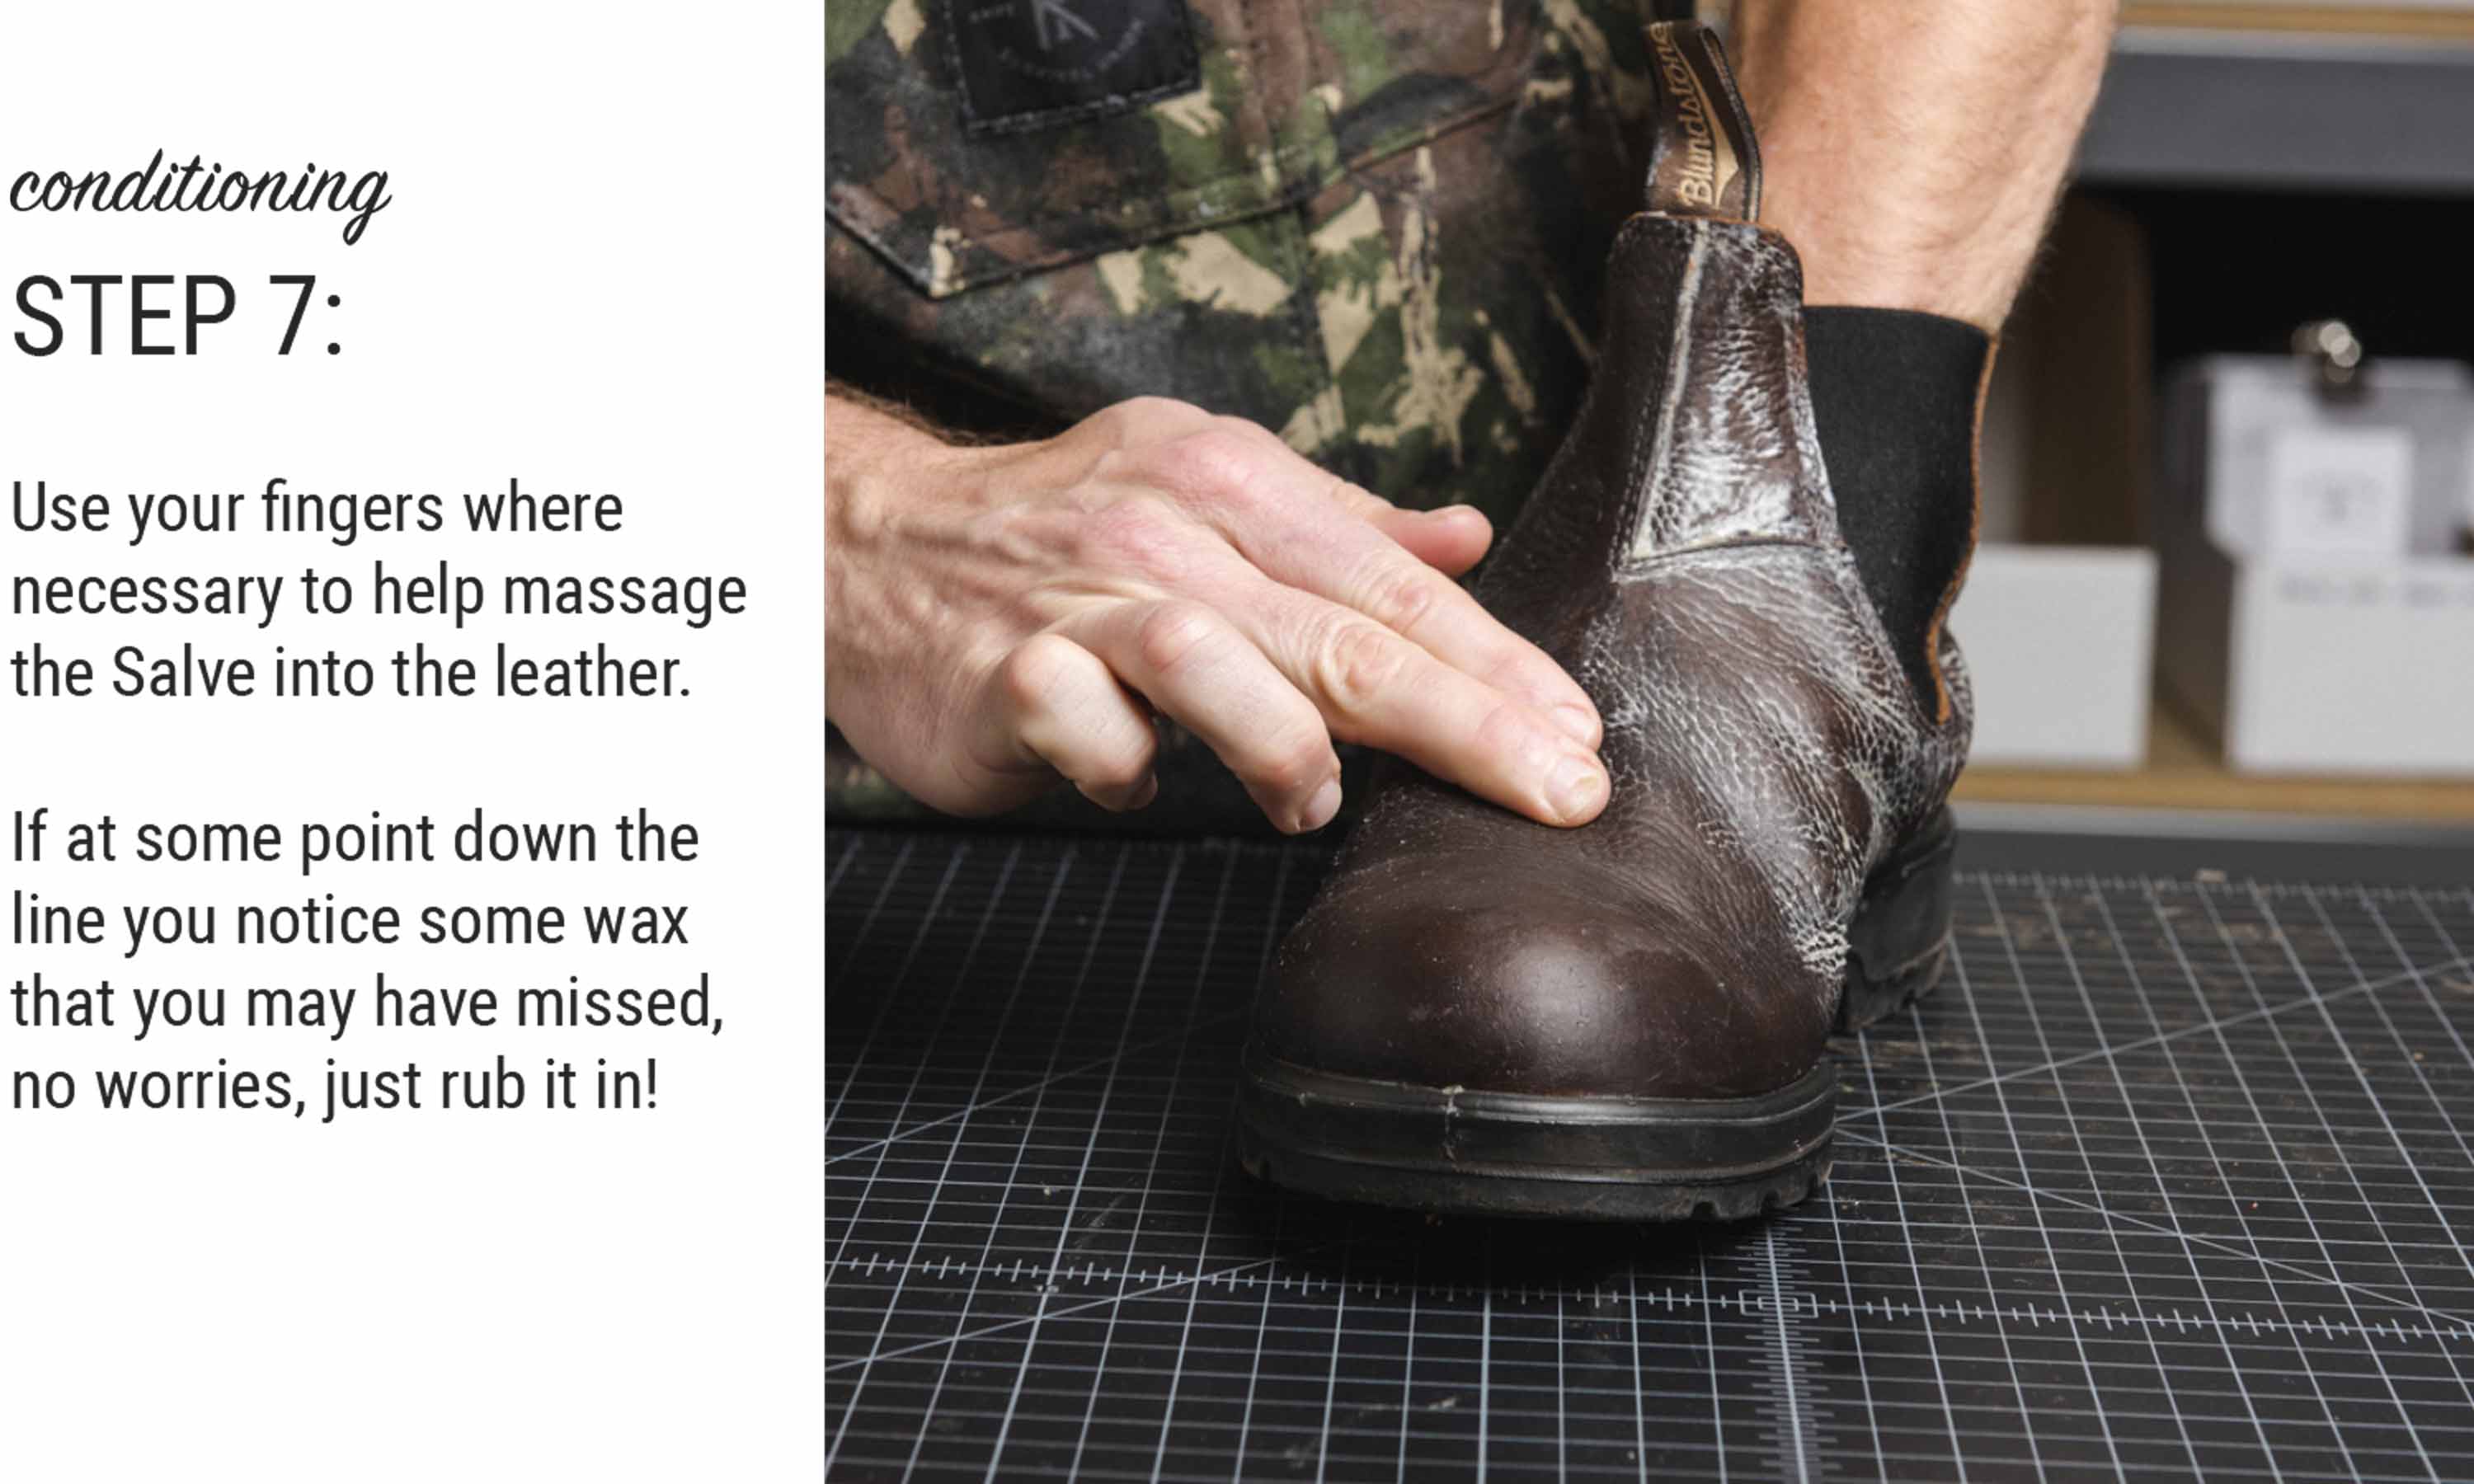
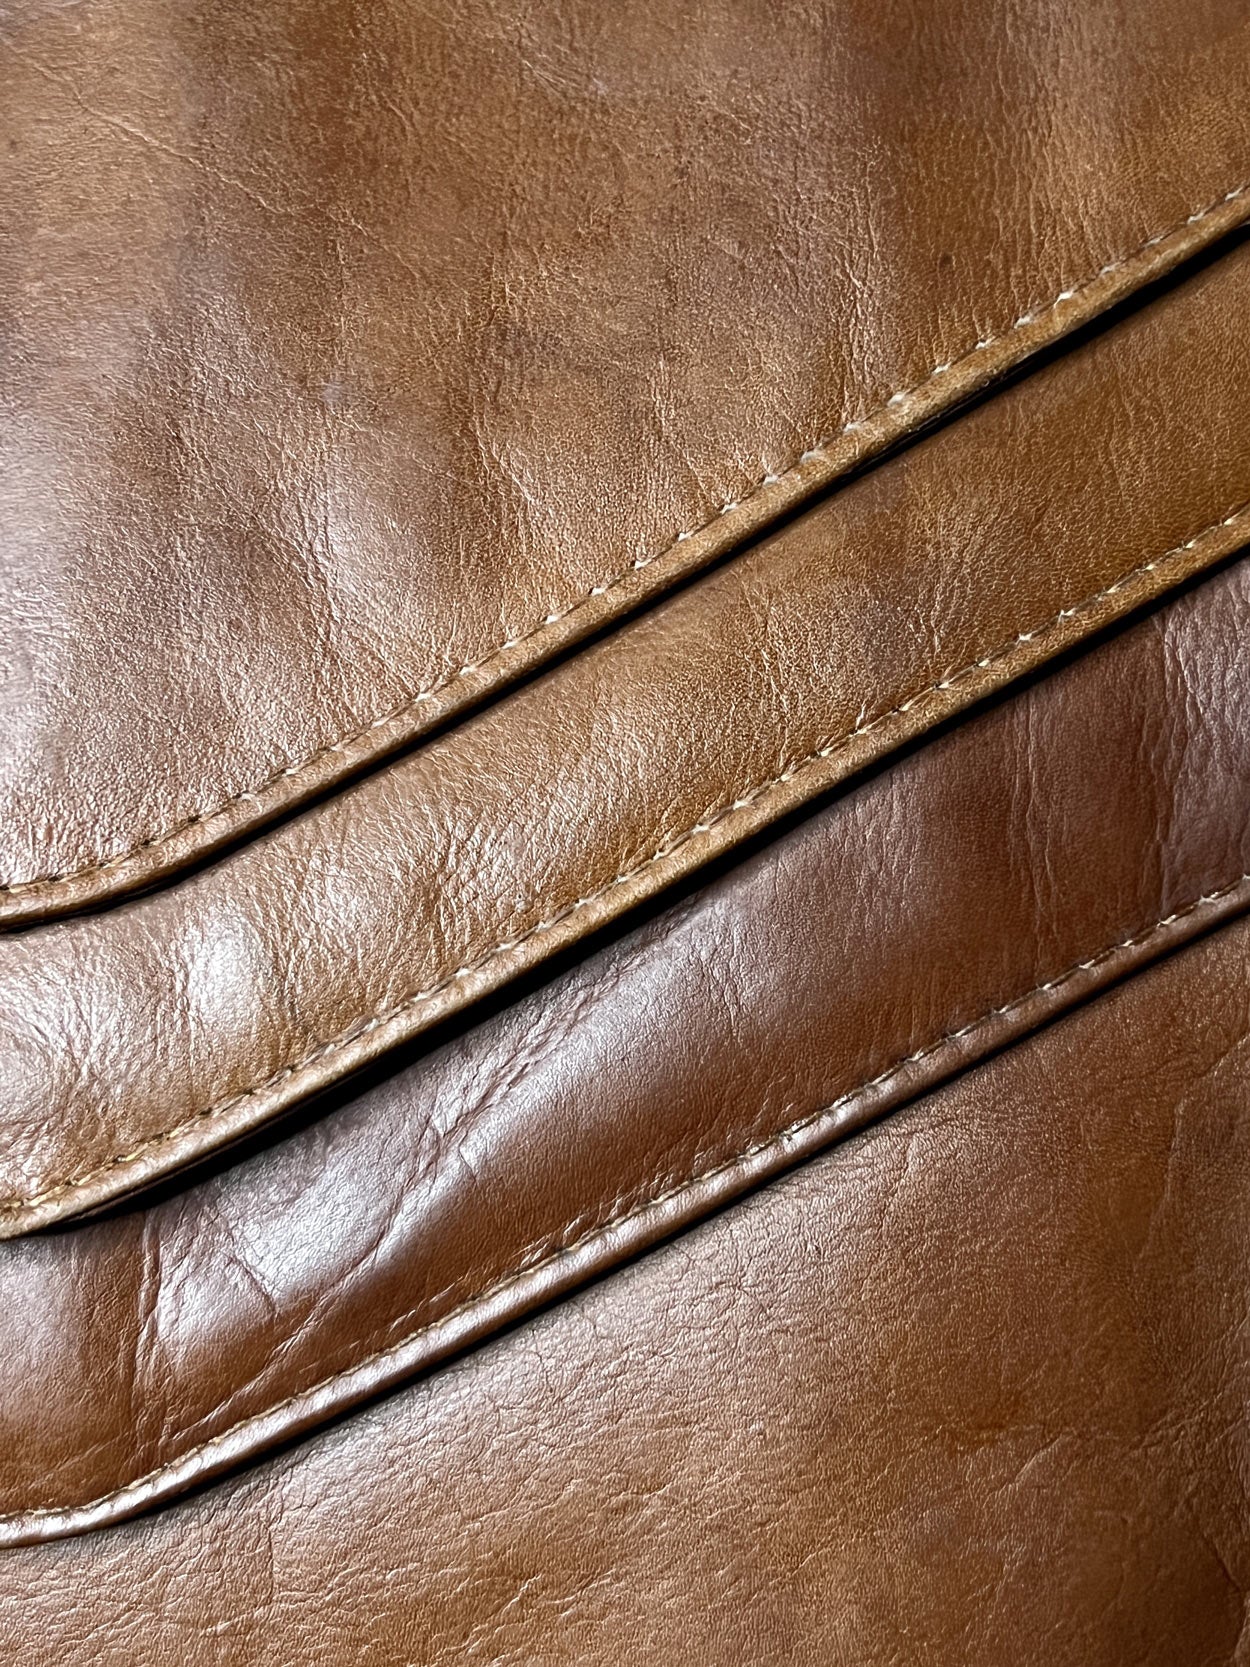
After wiping all the residue left over from the cleaning process it was time to apply our <a href="https://www.otterwax.com/collections/leather-care/products/leather-salve" title="Otter Wax Leather Conditioner Salve">Leather Salve</a> to provide a deep conditioning treatment and really moisturize the dried out leather. </p>
<div style="text-align: center;"><img src="https://cdn.shopify.com/s/files/1/0189/5302/files/How-to-clean-and-condition-leather-with-otter-wax-leather-salve.png?v=1650061608" alt="how to clean and condition leather with otter wax leather salve" style="float: none;"></div>
<p style="text-align: left;">
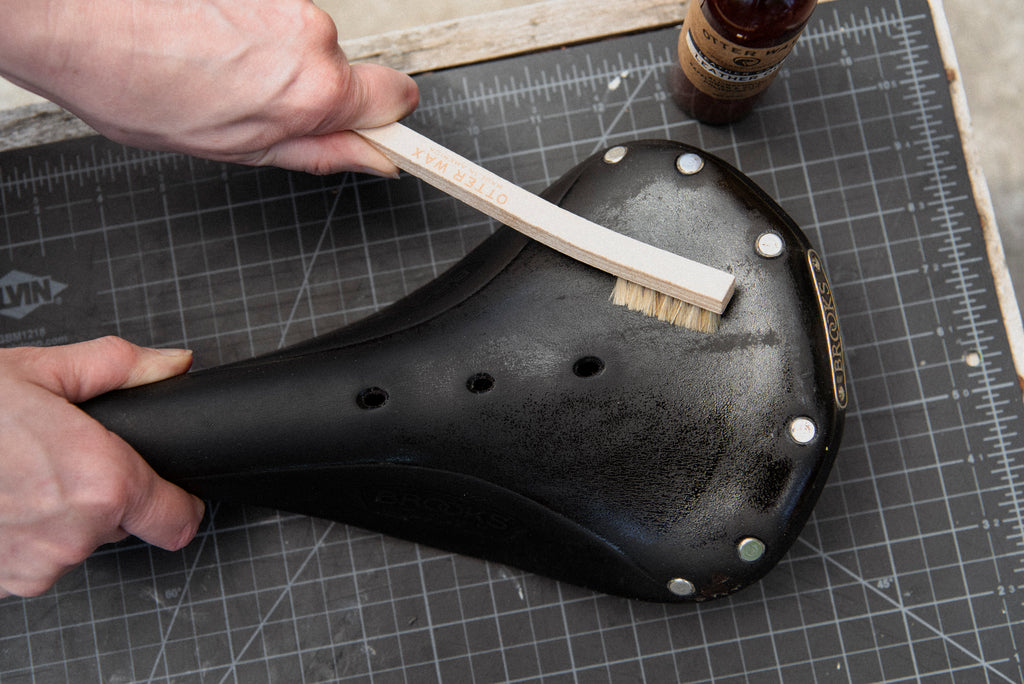
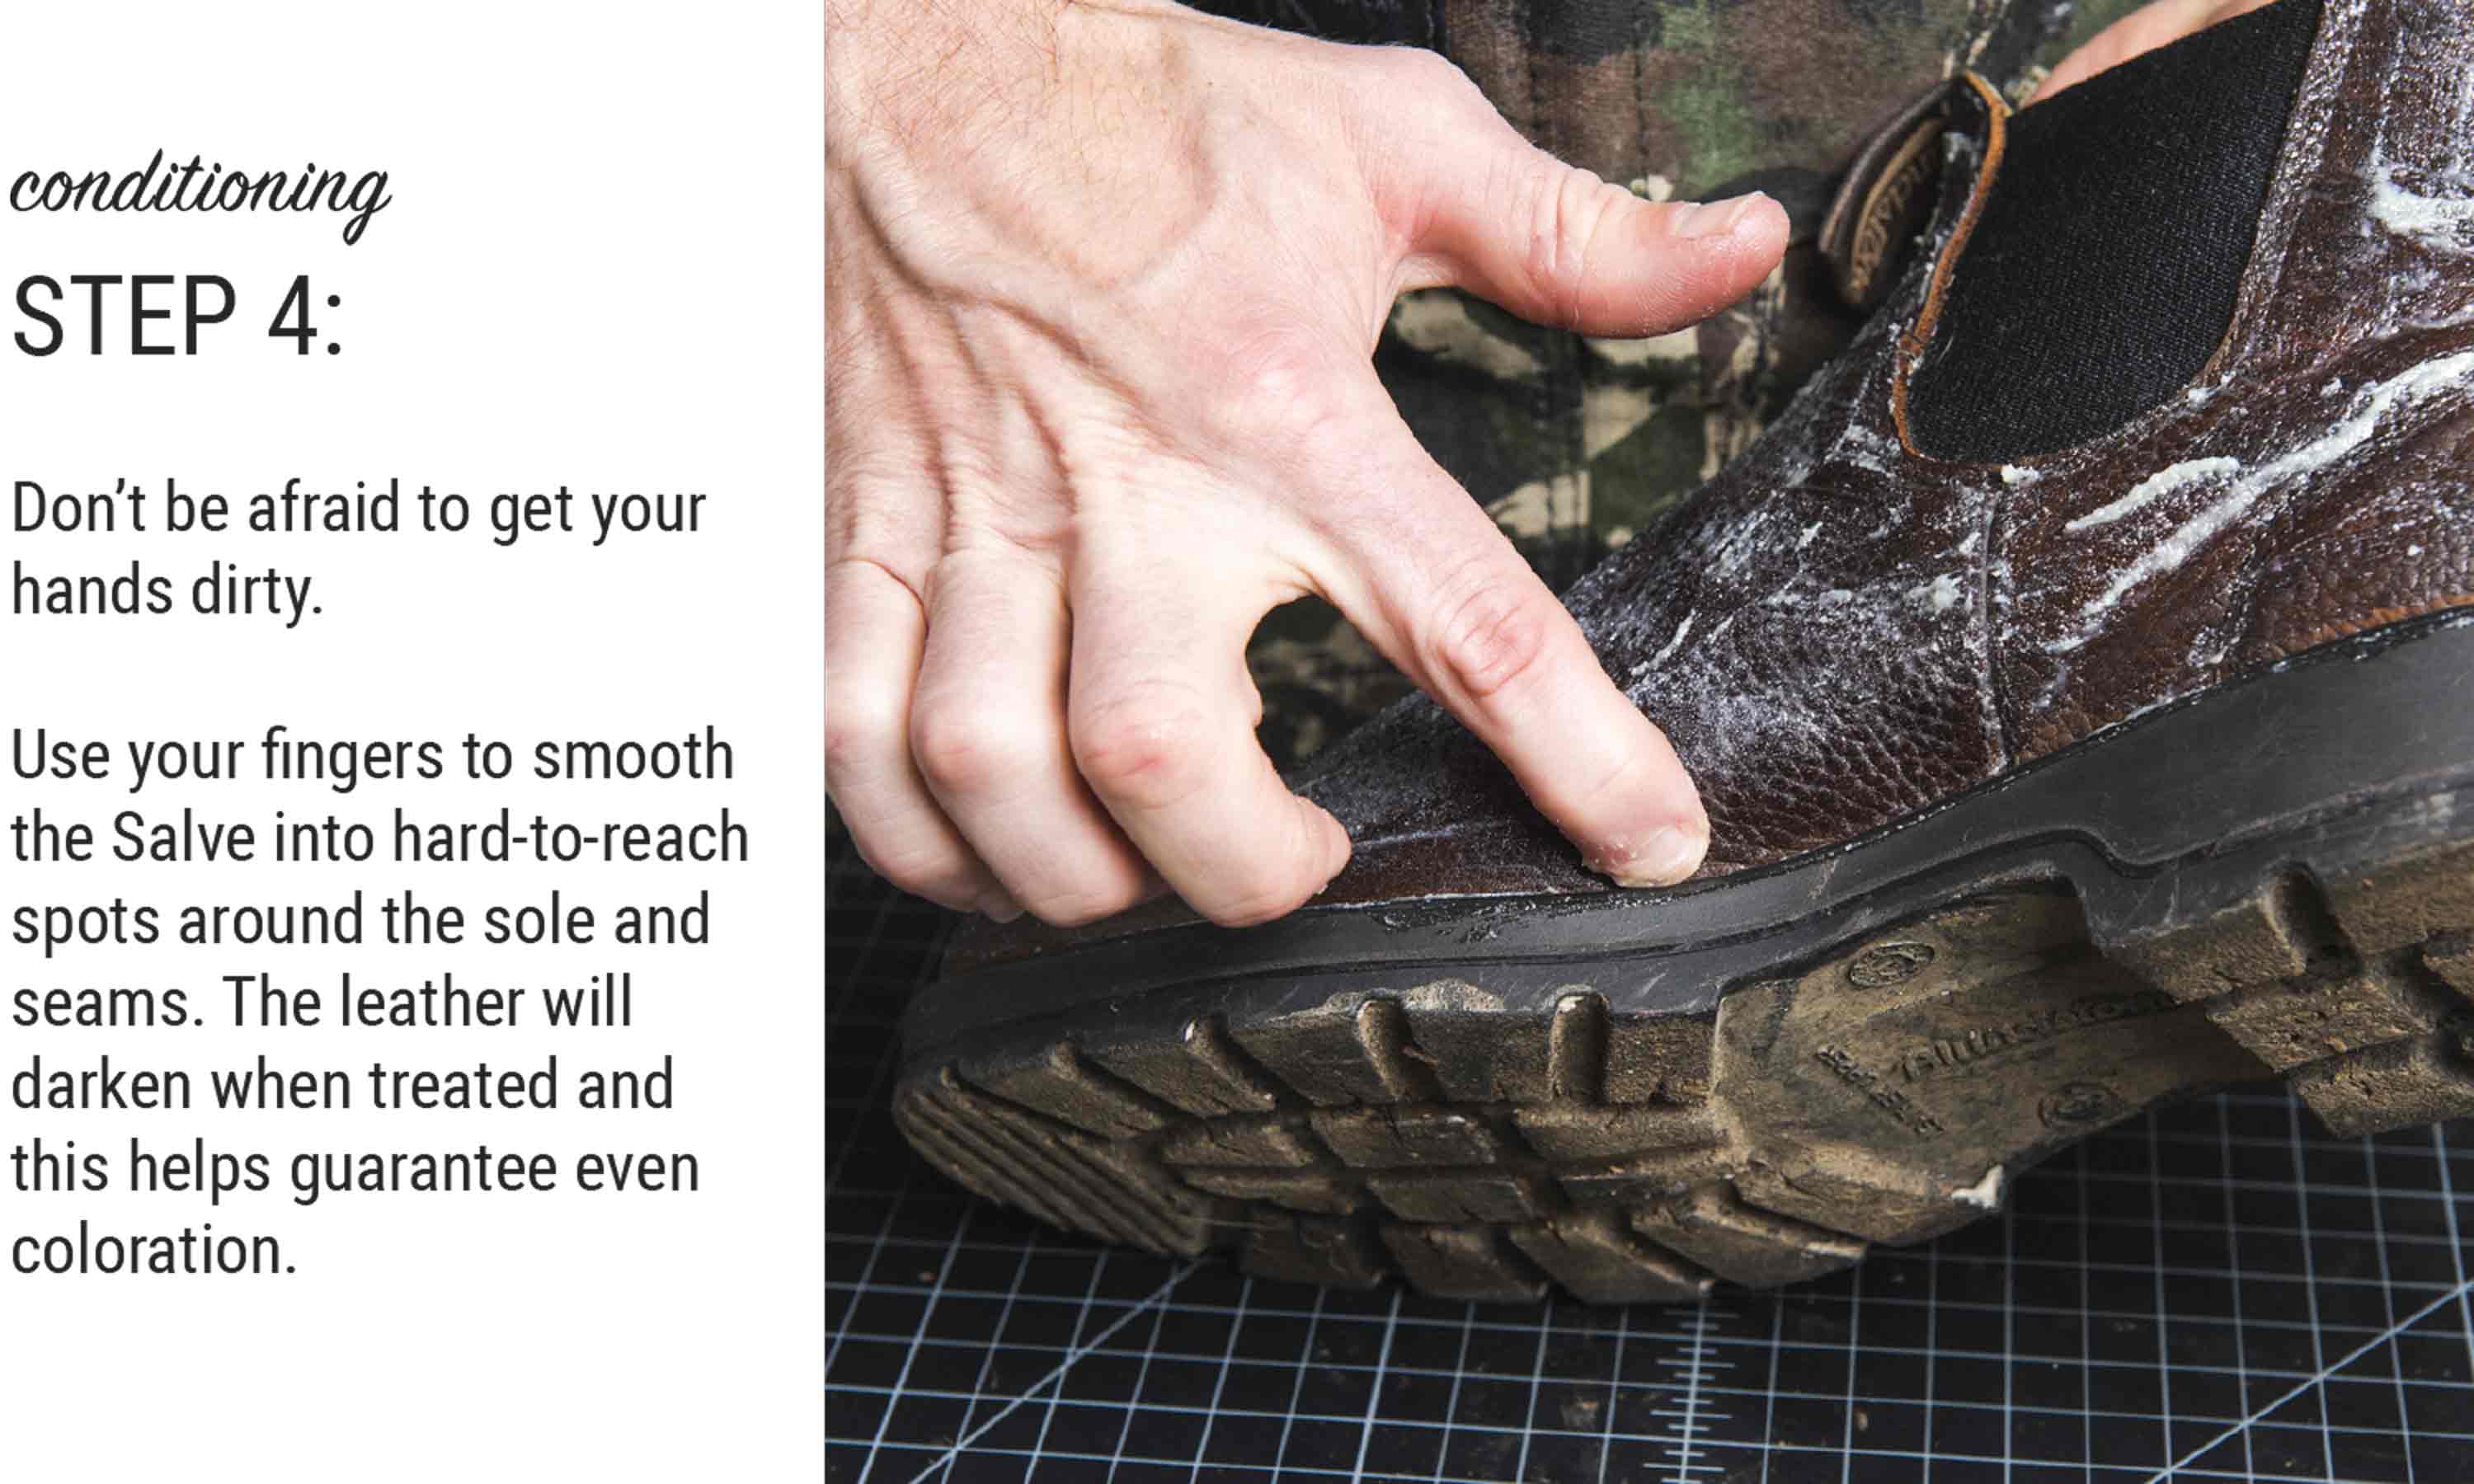
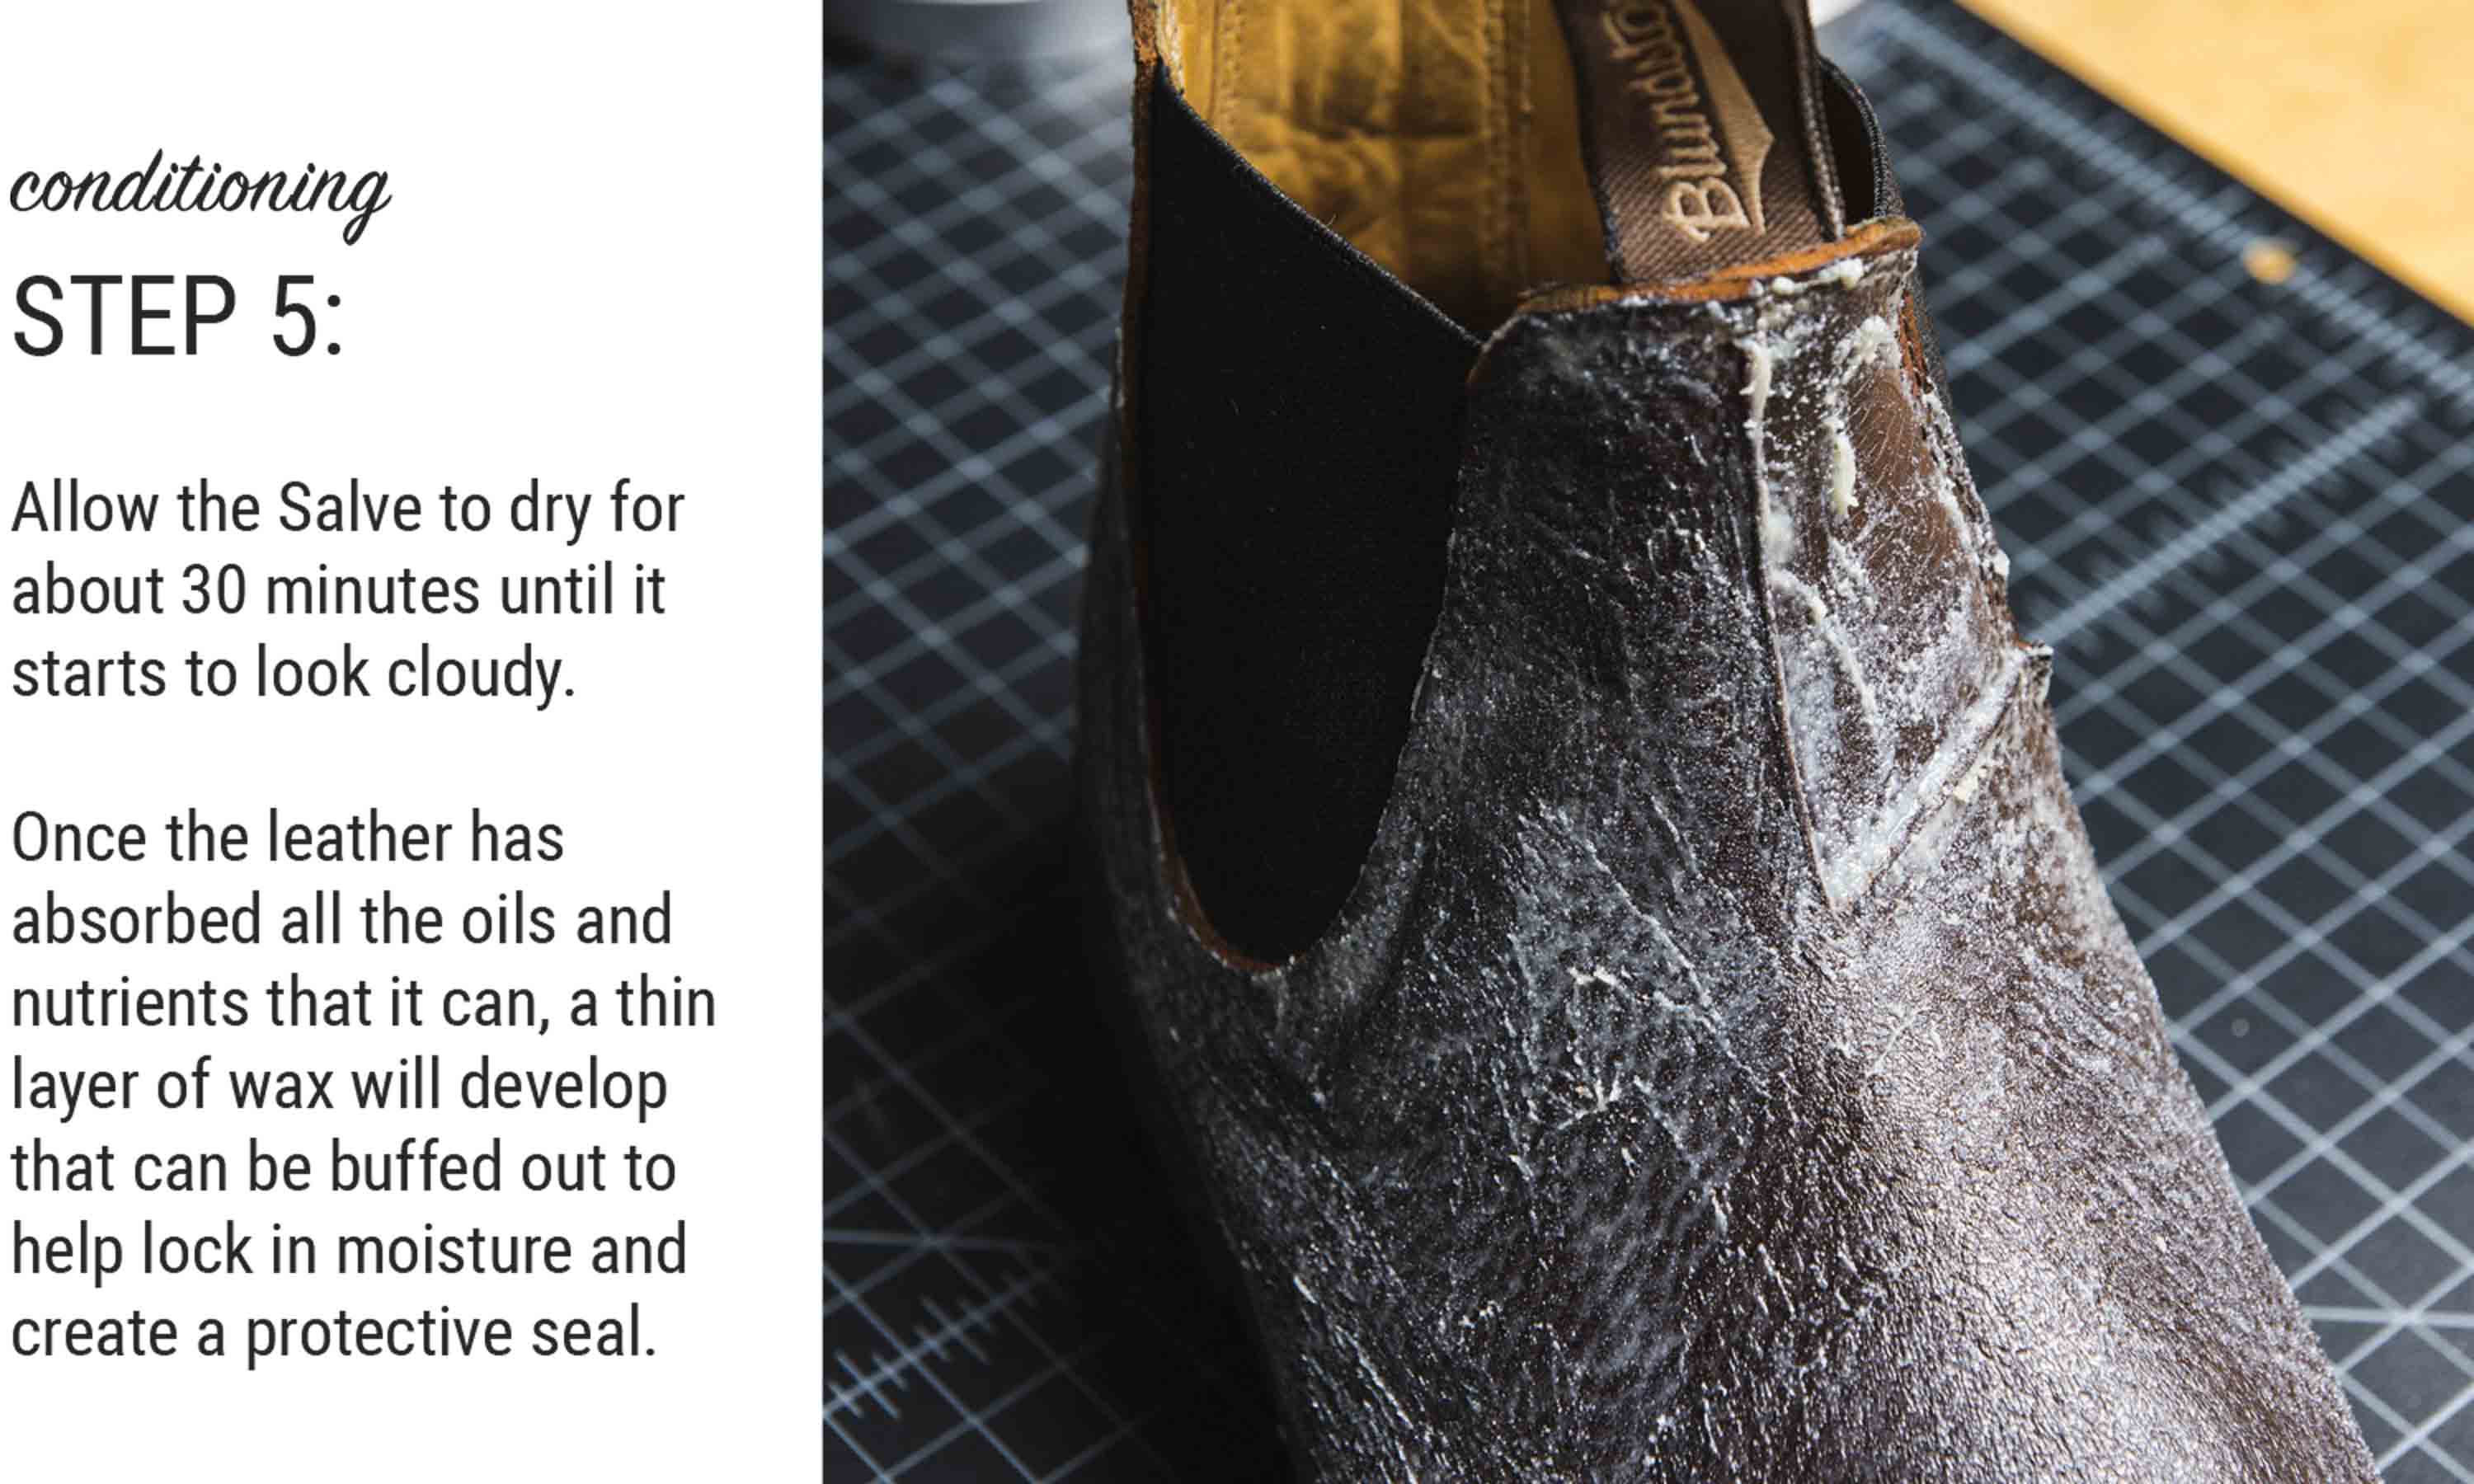
I used both horsehair brushes to buff the surface of the Leather Salve clear, using the large brush for most of the surface and the smaller brush to buff the hard-to-reach spots and thread seams where the Salve tends to accumulate. I recommend going over everything twice just to make sure that you've evened everything out and buffed out anywhere the Salve might have accumulated.</p>
<div style="text-align: center;"><img src="https://cdn.shopify.com/s/files/1/0189/5302/files/otter-wax-leather-oil.jpg?v=1650061880" alt="how to apply otter wax leather oil to condition leather"></div>
<p style="text-align: left;">For the final step, I went over the entire bag with a healthy coating of our <a href="https://www.otterwax.com/collections/leather-care/products/leather-oil" target="_blank" title="Otter Wax Leather Oil Polish &amp; Conditioner" rel="noopener noreferrer">Leather Oil</a>. The great thing about our <a href="https://www.otterwax.com/collections/leather-care/products/leather-oil" target="_blank" title="Otter Wax Leather Oil Polish &amp; Conditioner" rel="noopener noreferrer">Leather Oil</a> is that if you use it relatively often you'll never have to go through the entire reconditioning process.</p>
<p style="text-align: left;">Our <a href="https://www.otterwax.com/collections/leather-care/products/leather-oil" target="_blank" title="Otter Wax Leather Oil Polish &amp; Conditioner" rel="noopener noreferrer">Leather Oil</a> helps maintain moisture levels in the leather and helps keep it from ever drying out to the point where conditioning would be necessary.</p>
<img src="https://cdn.shopify.com/s/files/1/0189/5302/files/otter-wax-conditioned-leather.jpg?v=1650062329" alt="otter wax how to condition and polish leather">Since it's family, I decided to go the extra mile and mist the inside of the bag with a room/linen spray from a local company called <a href="https://www.runninglateshop.com" target="_blank" title="Running Late Apothecary" rel="noopener noreferrer">Running Late Apothecary</a>. The one I used is called <a href="https://www.runninglateshop.com/shop-all/botanical-room-spray-tabor" target="_blank" title="Running Late Apothecary Tabor Room Spray" rel="noopener noreferrer">Tabor</a>, and smells like crushed Douglas Fir Needles. Super fresh. It’s great stuff and I highly recommend it.<img src="https://cdn.shopify.com/s/files/1/0189/5302/files/tabor-running-late-room-and-linen-spray.jpg?v=1650062060" alt="running late apothecary tabor room and linen spray"><meta charset="UTF-8">
<p style="text-align: left;"><img src="https://cdn.shopify.com/s/files/1/0189/5302/files/otter-wax-cleaned-and-conditioned-leather-bag.jpg?v=1650063194" alt="Otter Wax How To Clean And Condition Leather Messenger Bag" style="float: none;"></p>
<div style="text-align: center;"></div>]]>
    </content>
  </entry>
  <entry>
    <id>https://www.otterwax.com/blogs/journal/waterproof-vans-sneakers-with-otter-wax-heavy-duty-fabric-wax</id>
    <published>2021-04-08T15:02:54-07:00</published>
    <updated>2021-08-12T13:32:50-07:00</updated>
    <link rel="alternate" type="text/html" href="https://www.otterwax.com/blogs/journal/waterproof-vans-sneakers-with-otter-wax-heavy-duty-fabric-wax"/>
    <title>Waterproof Vans Sneakers With Otter Wax Heavy Duty Fabric Wax</title>
    <author>
      <name>Otter Wax</name>
    </author>
    <summary type="html">
      <![CDATA[Waterproofing your Vans sneakers with Otter Wax is fast, easy, and a great way to extend the useful life of your favorite shoes.<p><a class="read-more" href="https://www.otterwax.com/blogs/journal/waterproof-vans-sneakers-with-otter-wax-heavy-duty-fabric-wax">More</a></p>]]>
    </summary>
    <content type="html">
      <![CDATA[<div style="text-align: left;">Our resident photographer Thomas gave us the idea for this project, which was surprising because we're not sure if we've ever even seen him <em>not</em> wearing this pair of sneakers. As an avid skateboarder, cyclist, and nature photographer, these sneakers were, let's just say, a little ripe. But it was nothing a few sprays of our <a href="https://www.otterwax.com/collections/fabric-care/products/odor-eliminator" target="_blank" title="Otter Wax Odor Eliminator" rel="noopener noreferrer">Odor Eliminator</a> couldn't handle, and before too long we were back in business and ready to wax these up.</div>
<div style="text-align: left;">
<img src="https://cdn.shopify.com/s/files/1/0189/5302/files/OW_Vans_Wax-1_1024x1024.jpg?v=1617915531" alt="How To Waterproof Vans Sneakers With Otter Wax Fabric Wax" style="margin: 0pxpx 0pxpx 0pxpx 0pxpx; float: none;">
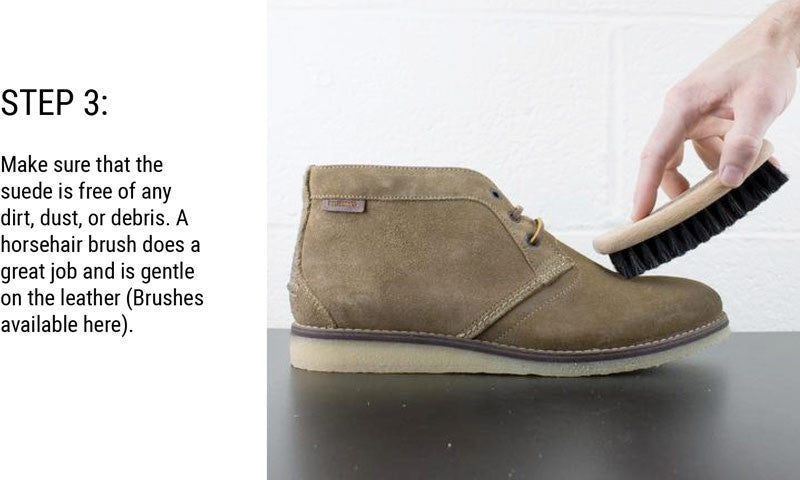
The outside of the sneakers was surprisingly clean, so all we had to do to was brush them off to make sure that the surface was free of any dirt, dust, or debris.</div>
<div style="text-align: center;"><img src="https://cdn.shopify.com/s/files/1/0189/5302/files/OW_Vans_Wax-3_1024x1024.jpg?v=1617915572" alt="How To Waterproof Vans Sneakers With Otter Wax Fabric Wax" style="margin: 0pxpx 0pxpx 0pxpx 0pxpx; float: none;"></div>
<div style="text-align: left;">If your sneakers have any mud, caked on grime, or stains, we recommend cleaning with our <a href="https://www.otterwax.com/collections/fabric-care/products/canvas-cleaner" target="_blank" title="Waxed Canvas Spot Cleaner" rel="noopener noreferrer">Spot-Cleaner</a> before applying wax. Having a clean surface when waxing an unwaxed fabric is super important because anything that isn't removed will get permanently sealed in under the layer of wax when applied.<img src="https://cdn.shopify.com/s/files/1/0189/5302/files/OW_Vans_Wax-4_1024x1024.jpg?v=1617915596" alt="How To Waterproof Vans Sneakers With Otter Wax Fabric Wax" style="margin: 0pxpx 0pxpx 0pxpx 0pxpx; float: none;">
</div>
<div style="text-align: left;">Push a couple inches of the wax bar out of the protective sleeve and fold the ends over. This helps you to keep a good grip on the wax and allows you to nestle it into your palm so that you can apply downward pressure when rubbing the bar back and forth. That friction helps the wax to warm up and spread out across the fabric easier.</div>
<div style="text-align: center;"><img src="https://cdn.shopify.com/s/files/1/0189/5302/files/OW_Vans_Wax-5_1024x1024.jpg?v=1617915632" alt="How To Waterproof Vans Sneakers With Otter Wax Fabric Wax" style="margin: 0pxpx 0pxpx 0pxpx 0pxpx; float: none;"></div>
<div style="text-align: left;">Use the sharper corners and edges of the bar to wax corners, seams, and other difficult-to-reach spots.</div>
<div style="text-align: center;"><img src="https://cdn.shopify.com/s/files/1/0189/5302/files/OW_Vans_Wax-8_1024x1024.jpg?v=1617915745" alt="How To Waterproof Vans Sneakers With Otter Wax Fabric Wax"></div>
<div style="text-align: left;">Once you've given the sneakers a thorough coating, rub the wax into the upper layer of the fabric to help smooth out any uneven spots and create a nice smooth layer of wax.</div>
<p><img src="https://cdn.shopify.com/s/files/1/0189/5302/files/OW_Vans_Wax-10_1024x1024.jpg?v=1617915783" alt="How To Waterproof Vans Sneakers With Otter Wax Fabric Wax"></p>
<p>Expect the sneakers to be slightly tacky to the touch for about a week. Feel free to wear them right away, but just be careful to keep dirt and pet hair away from the fabric until it's fully cured as it'll still be a little tacky. Cure time depends on any number of factors. For example, you can expect it to take longer for your wax to cure in cold and humid conditions or if you've applied a really thick layer of wax. You can expect your wax to cure faster if you're waxing in a place that's hot and dry, or if you've applied a really thin layer of wax.<img src="https://cdn.shopify.com/s/files/1/0189/5302/files/OW_Vans_Wax-15_1024x1024.jpg?v=1617915813" alt="How To Waterproof Vans Sneakers With Otter Wax Fabric Wax">
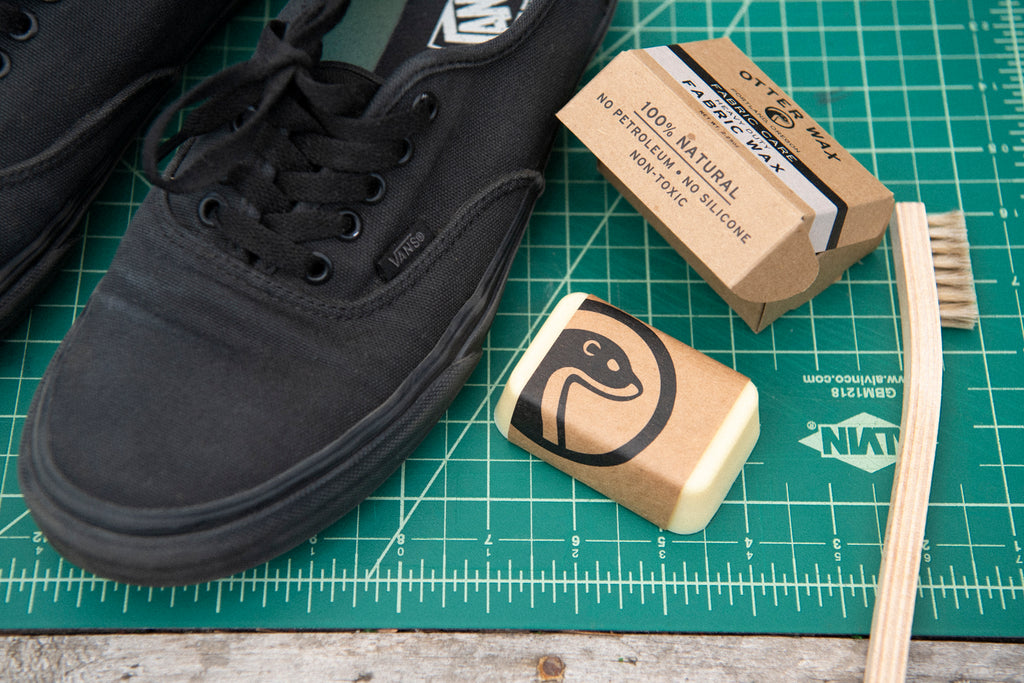
Most importantly, make sure you get outside, get some fresh air, and enjoy the look and functionality of your newly waxed sneakers.</p>]]>
    </content>
  </entry>
  <entry>
    <id>https://www.otterwax.com/blogs/journal/clean-condition-a-brooks-england-leather-saddle</id>
    <published>2021-04-08T13:50:53-07:00</published>
    <updated>2025-09-10T09:39:01-07:00</updated>
    <link rel="alternate" type="text/html" href="https://www.otterwax.com/blogs/journal/clean-condition-a-brooks-england-leather-saddle"/>
    <title>How To Clean &amp; Condition A Brooks England Leather Saddle Bike Seat</title>
    <author>
      <name>Otter Wax</name>
    </author>
    <summary type="html">
      <![CDATA[Leather bike seats require special attention due to the level of abuse that they endure. Use Otter Wax Leather Care products to clean, condition, and protect your Brooks England Leather Saddle Bike Seat, and help make it last a lifetime.<p><a class="read-more" href="https://www.otterwax.com/blogs/journal/clean-condition-a-brooks-england-leather-saddle">More</a></p>]]>
    </summary>
    <content type="html">
      <![CDATA[<div style="text-align: left;">Leather bike seats require special attention due to the level of abuse that they endure. A leather bike seat like this has to deal with a variety of factors that typically work against it. In addition to regular abrasion from the pants worn by the rider, the seat is often exposed to sun, rain, and salt-containing sweat that all work together to dry out and break down leather unless corrective measures are taken... which is where Otter Wax Leather Care comes in!</div>
<div style="text-align: center;"><img src="https://cdn.shopify.com/s/files/1/0189/5302/files/OW_BrooksSaddle-4_1024x1024.jpg?v=1617910867" alt="Clean &amp; Condition Brooks Leather Saddle Bicycle Seat With Otter Wax Saddle Soap, Leather Salve, &amp; Leather Oil" style="margin-right: 40px; margin-left: 40px; float: none;" width="1024x1024" height="1024x1024"></div>
<p style="text-align: left;">Today we're working to revive this beautiful <a href="https://www.brooksengland.com/en_us/b17.html?cId=92-item-135" target="_blank" title="Brooks England B17 Leather Saddle" rel="noopener noreferrer">Brooks England B17 Saddle</a> made from a high quality vegetable tanned leather dyed black. We'll first be using our <a href="https://58xl97i6loh4lfdt-1895302.shopifypreview.com/collections/leather-care/products/saddle-soap" target="_blank" title="Otter Wax Saddle Soap" rel="noopener noreferrer">Saddle Soap</a> to give the leather a quick clean to remove grime from the surface and also open up the pores of the leather. We'll follow that with a light coat of our <a href="https://58xl97i6loh4lfdt-1895302.shopifypreview.com/collections/leather-care/products/leather-salve" target="_blank" title="Otter Wax Leather Salve" rel="noopener noreferrer">Leather Salve</a> to restore hydration and repair dry-cracking. Finally, we'll follow up with a thin coat of our <a href="https://58xl97i6loh4lfdt-1895302.shopifypreview.com/collections/leather-care/products/leather-oil" target="_blank" title="Otter Wax Leather Oil" rel="noopener noreferrer">Leather Oil</a> for an extra kick of hydrating nutrients and to revive natural luster and shine.</p>
<div></div>
<div style="text-align: center;"><img src="https://cdn.shopify.com/s/files/1/0189/5302/files/OW_BrooksSaddle-6_1024x1024.jpg?v=1617911041" alt="Clean &amp; Condition Brooks Leather Saddle Bicycle Seat With Otter Wax Saddle Soap, Leather Salve, &amp; Leather Oil" style="float: none;" width="1024x1024" height="1024x1024"></div>
<div></div>
<div><img src="https://cdn.shopify.com/s/files/1/0189/5302/files/OW_BrooksSaddle-8_1024x1024.jpg?v=1617911102" alt="Clean &amp; Condition Brooks Leather Saddle Bicycle Seat With Otter Wax Saddle Soap, Leather Salve, &amp; Leather Oil" style="margin: 0pxpx 0pxpx 0pxpx 0pxpx; float: none;" width="1024x1024" height="1024x1024"></div>
<p style="text-align: left;">For cleaning, you'll need a container of warm/hot water, a tin of Saddle Soap, and one of our medium-abrasive <a href="https://58xl97i6loh4lfdt-1895302.shopifypreview.com/collections/leather-care/products/tampico-cleaning-brush" target="_blank" title="Otter Wax Tampico Cleaning Brush" rel="noopener noreferrer">Tampico Cleaning Brushes</a>. The hot water helps to loosen any grime while also opening up the pores of the leather and the Tampico bristles are coarse enough to scrub off grime without scratching or damaging the leather.</p>
<div></div>
<div><img src="https://cdn.shopify.com/s/files/1/0189/5302/files/OW_BrooksSaddle-10_1024x1024.jpg?v=1617911142" alt="Clean &amp; Condition Brooks Leather Saddle Bicycle Seat With Otter Wax Saddle Soap, Leather Salve, &amp; Leather Oil" style="margin: 0pxpx 0pxpx 0pxpx 0pxpx; float: none;" width="1024x1024" height="1024x1024"></div>
<p style="text-align: left;">Dip the brush in the water, swirl it in the soap until it softens up, and then apply directly to the leather. Repeat this process until you've covered the entire leather surface. It's important to always treat the entire item in order to achieve an even finish and coloration.</p>
<div></div>
<div><img src="https://cdn.shopify.com/s/files/1/0189/5302/files/OW_BrooksSaddle-11_1024x1024.jpg?v=1617911168" alt="Clean &amp; Condition Brooks Leather Saddle Bicycle Seat With Otter Wax Saddle Soap, Leather Salve, &amp; Leather Oil" style="margin: 0pxpx 0pxpx 0pxpx 0pxpx; float: none;" width="1024x1024" height="1024x1024"></div>
<p style="text-align: left;">Use a damp rag to wipe away the Saddle Soap and any lingering white soapy residue. Repeat the cleaning process if necessary until the surface is completely free of any dirt, grime, dust, debris, etc. Use a soft-bristle <a href="https://58xl97i6loh4lfdt-1895302.shopifypreview.com/collections/leather-care/products/horsehair-upkeep-brush" target="_blank" title="Horsehair Buffing Brush" rel="noopener noreferrer">Horsehair Buffing Brush</a> to buff away any soapy residue still present in hard-to-reach spots like seams and edges.</p>
<div></div>
<div><img src="https://cdn.shopify.com/s/files/1/0189/5302/files/OW_BrooksSaddle-13_1024x1024.jpg?v=1617911331" alt="Clean &amp; Condition Brooks Leather Saddle Bicycle Seat With Otter Wax Saddle Soap, Leather Salve, &amp; Leather Oil" style="margin: 0pxpx 0pxpx 0pxpx 0pxpx; float: none;" width="1024x1024" height="1024x1024"></div>
<p style="text-align: left;">Once you've thoroughly cleaned the surface of the leather, you'll want to immediately apply a thin coating of our Leather Salve while the pores of the leather are still soft and open. Create a divot in the middle of the tin with a lint-free cloth and swirl until it begins to soften. For this process, a rag cut from an old t-shirt works great. Use smooth, circular strokes and massage a thin layer of the Salve into the leather.</p>
<div></div>
<div><img src="https://cdn.shopify.com/s/files/1/0189/5302/files/OW_BrooksSaddle-15_1024x1024.jpg?v=1617911229" alt="Clean &amp; Condition Brooks Leather Saddle Bicycle Seat With Otter Wax Saddle Soap, Leather Salve, &amp; Leather Oil" style="margin: 0pxpx 0pxpx 0pxpx 0pxpx; float: none;" width="1024x1024" height="1024x1024"></div>
<p style="text-align: left;">Let the leather rest for an hour or until you see a very thin, white residue begin to appear on the surface of the leather. This happens as the leather absorbs the oils and nutrients while forming a protective wax barrier that adds a layer of protection as well as helps to seal in the leather treatment for a long-lasting conditioning treatment. Use a soft brush or cloth to buff the thin wax layer until the white residue becomes transparent.</p>
<div></div>
<div><img src="https://cdn.shopify.com/s/files/1/0189/5302/files/OW_BrooksSaddle-14_1024x1024.jpg?v=1617911299" alt="Clean &amp; Condition Brooks Leather Saddle Bicycle Seat With Otter Wax Saddle Soap, Leather Salve, &amp; Leather Oil" style="margin: 0pxpx 0pxpx 0pxpx 0pxpx; float: none;" width="1024x1024" height="1024x1024"></div>
<p style="text-align: left;">It's perfectly fine to apply the Leather Oil immediately after the Leather Salve. Leather is like a sponge, it can only absorb as much as it can absorb. So the Leather Oil helps us maximize absorption. Apply the Leather Oil with a cloth or soft brush and then allow it to sit for an hour or so. After an hour, if the leather surface isn't dry to the touch, any excess oil can be buffed or wiped away.</p>
<div></div>
<div><img src="https://cdn.shopify.com/s/files/1/0189/5302/files/OW_BrooksSaddle-16_1024x1024.jpg?v=1617911383" alt="Clean &amp; Condition Brooks Leather Saddle Bicycle Seat With Otter Wax Saddle Soap, Leather Salve, &amp; Leather Oil" style="margin: 0pxpx 0pxpx 0pxpx 0pxpx; float: none;" width="1024x1024" height="1024x1024"></div>
<p style="text-align: left;">After letting the leather rest overnight, give the leather a quick buff with the horsehair brush and you're ready to ride.</p>
<div></div>
<div><img src="https://cdn.shopify.com/s/files/1/0189/5302/files/OW_BrooksSaddle-18_1024x1024.jpg?v=1617911409" alt="Clean &amp; Condition Brooks Leather Saddle Bicycle Seat With Otter Wax Saddle Soap, Leather Salve, &amp; Leather Oil" style="margin: 0pxpx 0pxpx 0pxpx 0pxpx; float: none;" width="1024x1024" height="1024x1024"></div>
<p style="text-align: left;">Going through this whole process 1~2 times a year is likely all that your leather will require, but we recommend giving it a light coating of Leather Oil every week or so during the riding season to help maintain moisture and hydration.</p>
<div></div>
<div><img src="https://cdn.shopify.com/s/files/1/0189/5302/files/OW_BrooksSaddle-17_1024x1024.jpg?v=1617911471" alt="Clean &amp; Condition Brooks Leather Saddle Bicycle Seat With Otter Wax Saddle Soap, Leather Salve, &amp; Leather Oil" style="margin: 0pxpx 0pxpx 0pxpx 0pxpx; float: none;" width="1024x1024" height="1024x1024"></div>
<p style="text-align: left;"> </p>
<div></div>]]>
    </content>
  </entry>
  <entry>
    <id>https://www.otterwax.com/blogs/journal/how-to-condition-and-protect-leather-furniture</id>
    <published>2021-03-30T14:59:41-07:00</published>
    <updated>2021-08-12T13:33:21-07:00</updated>
    <link rel="alternate" type="text/html" href="https://www.otterwax.com/blogs/journal/how-to-condition-and-protect-leather-furniture"/>
    <title>How To Condition &amp; Protect Leather Furniture</title>
    <author>
      <name>Otter Wax</name>
    </author>
    <summary type="html">
      <![CDATA[This is a guided tutorial where we'll show you how to care for your leather couch, sofa, or bench with Otter Wax Leather Oil. Keep new leather looking great and revive older leathers by applying every 4~6 months or more depending on use and conditions. Application is quick, easy, and mess-free.<p><a class="read-more" href="https://www.otterwax.com/blogs/journal/how-to-condition-and-protect-leather-furniture">More</a></p>]]>
    </summary>
    <content type="html">
      <![CDATA[<center>
<iframe src="https://www.youtube.com/embed/SOy-1WtX3II" title="YouTube video player" allow="accelerometer; autoplay; clipboard-write; encrypted-media; gyroscope; picture-in-picture" allowfullscreen="" width="560" height="315" frameborder="0"></iframe>
<p style="text-align: left;">This is a guided tutorial where we'll show you how to care for your leather couch, sofa, or bench with Otter Wax Leather Oil. Keep new leather looking great and revive older leathers by applying every 4~6 months or more depending on use and conditions. Application is quick, easy, and mess-free.</p>
<p style="text-align: left;">This is the <a href="https://www.polyandbark.com/products/luca-leather-bench?variant=18970265550921" target="_blank" title="Poly &amp; Bark Luca Bench" rel="noopener noreferrer">Luca Bench</a> from our friends at <a href="https://www.polyandbark.com/" target="_blank" title="Poly &amp; Bark Furniture" rel="noopener noreferrer">Poly &amp; Bark</a>. It’s upholstered in cognac tanned, full-grain aniline leather and our Oil will help it last a lifetime. Otter Wax Leather Oil is safe to use on all types and colors of leather because our products never contain synthetic dyes, chemicals, or petroleum.</p>
<p style="text-align: left;">All you need is a bottle of our Leather Oil, a couple of lint-free cloths, and a small soft-bristle brush.</p>
<center><img src="https://cdn.shopify.com/s/files/1/0189/5302/files/Otter_Wax_Poly_Bark_Bench-5_1024x1024.jpg?v=1615413439" alt="How To Care For Full-Grain Aniline or Semi-Aniline Leather Furniture With Otter Wax Leather Oil"></center>
<center><img src="https://cdn.shopify.com/s/files/1/0189/5302/files/Otter_Wax_Poly_Bark_Bench-7.jpg?v=1615414643" alt="How To Care For Full-Grain Aniline or Semi-Aniline Leather Furniture With Otter Wax Leather Oil"></center>
<center><img src="https://cdn.shopify.com/s/files/1/0189/5302/files/Otter_Wax_Poly_Bark_Bench-10.jpg?v=1615414827" alt="How To Care For Full-Grain Aniline or Semi-Aniline Leather Furniture With Otter Wax Leather Oil"></center>
<center><img src="https://cdn.shopify.com/s/files/1/0189/5302/files/Otter_Wax_Poly_Bark_Bench-26.jpg?v=1615415469" alt="How To Care For Full-Grain Aniline or Semi-Aniline Leather Furniture With Otter Wax Leather Oil"></center>
<p style="text-align: left;">Before you begin, ensure the surface is free of any dust, crumbs, or pet hair. Dampen a cloth in warm water, ring out excess, and wipe down the entire item. Remember that leather is skin, using the warm water opens leather pores and facilitates better absorption when the oil is applied.</p>
<center><img src="https://cdn.shopify.com/s/files/1/0189/5302/files/Otter_Wax_Poly_Bark_Bench-39.jpg?v=1615415690" alt="How To Care For Full-Grain Aniline or Semi-Aniline Leather Furniture With Otter Wax Leather Oil"></center>
<p style="text-align: left;">Give the bottle a good shake and always dispense the oil first onto your cloth first and then to the leather.</p>
<center><img src="https://cdn.shopify.com/s/files/1/0189/5302/files/Otter_Wax_Poly_Bark_Bench-85.jpg?v=1615416358" alt="How To Care For Full-Grain Aniline or Semi-Aniline Leather Furniture With Otter Wax Leather Oil"></center>
<p style="text-align: left;">Dispensing Leather Oil directly to the leather will result in a splotchy uneven finish. If this happens, it's not the end of the world. The leather will even back out over the next several days in dry conditions.</p>
</center><center><img src="https://cdn.shopify.com/s/files/1/0189/5302/files/Otter_Wax_Poly_Bark_Bench-35.jpg?v=1615415589" alt="How To Care For Full-Grain Aniline or Semi-Aniline Leather Furniture With Otter Wax Leather Oil"></center>
<p>Always test on a small inconspicuous area to make sure you’ll be happy with the results. Temporary darkening may occur and is especially common when treating light color leathers.</p>
<center><img src="https://cdn.shopify.com/s/files/1/0189/5302/files/Otter_Wax_Poly_Bark_Bench-43.jpg?v=1615415806" alt="How To Care For Full-Grain Aniline or Semi-Aniline Leather Furniture With Otter Wax Leather Oil"></center>
<p>Dispense oil onto a dry cloth, then begin applying using a smooth circular motion. Make sure that whenever you apply Leather Oil that you are applying to the entire item.</p>
<center><img src="https://cdn.shopify.com/s/files/1/0189/5302/files/Otter_Wax_Poly_Bark_Bench-48.jpg?v=1615415884" alt="How To Care For Full-Grain Aniline or Semi-Aniline Leather Furniture With Otter Wax Leather Oil"></center>
<p>Use the soft brush for those hard to reach spots like seams and corners.</p>
<center><img src="https://cdn.shopify.com/s/files/1/0189/5302/files/Otter_Wax_Poly_Bark_Bench-51.jpg?v=1615415949" alt="How To Care For Full-Grain Aniline or Semi-Aniline Leather Furniture With Otter Wax Leather Oil"></center><center><img src="https://cdn.shopify.com/s/files/1/0189/5302/files/Otter_Wax_Poly_Bark_Bench-53.jpg?v=1615416002" alt="How To Care For Full-Grain Aniline or Semi-Aniline Leather Furniture With Otter Wax Leather Oil"></center><center><img src="https://cdn.shopify.com/s/files/1/0189/5302/files/Otter_Wax_Poly_Bark_Bench-70.jpg?v=1615416085" alt="How To Care For Full-Grain Aniline or Semi-Aniline Leather Furniture With Otter Wax Leather Oil"></center><center><img src="https://cdn.shopify.com/s/files/1/0189/5302/files/Otter_Wax_Poly_Bark_Bench-73.jpg?v=1615416495" alt="How To Care For Full-Grain Aniline or Semi-Aniline Leather Furniture With Otter Wax Leather Oil"></center>
<p>Small surface scratches from pet claws can be blended in, but it's important to note that scratches that involve any kind of tearing are permanent. If the leather is torn or ripped, your leather will need to be cared for by a professional in your area that specializes in torn leather.</p>
<center><img src="https://cdn.shopify.com/s/files/1/0189/5302/files/Otter_Wax_Poly_Bark_Bench-86.jpg?v=1615416601" alt="How To Care For Full-Grain Aniline or Semi-Aniline Leather Furniture With Otter Wax Leather Oil"></center>
<p>It's important to remember that leather is unique because it ages along with how it's used and cared for. Leather that is nourished and hydrated consistently can be used heavily every day and still last for decades. </p>
<p>It's also important for people to let go of the idea of leather looking the same as when they bought it. Leather holds the memories of the people that use it, so it's important to try and embrace all the uniqueness that well-cared-for leather has to offer.</p>
<center><img src="https://cdn.shopify.com/s/files/1/0189/5302/files/Otter_Wax_Poly_Bark_Bench-80.jpg?v=1615416674" alt="How To Care For Full-Grain Aniline or Semi-Aniline Leather Furniture With Otter Wax Leather Oil"></center>]]>
    </content>
  </entry>
  <entry>
    <id>https://www.otterwax.com/blogs/journal/how-to-otter-wax-a-bridge-and-burn-jacket</id>
    <published>2019-10-30T15:46:00-07:00</published>
    <updated>2021-08-12T13:32:50-07:00</updated>
    <link rel="alternate" type="text/html" href="https://www.otterwax.com/blogs/journal/how-to-otter-wax-a-bridge-and-burn-jacket"/>
    <title>How To Wax A Bridge &amp; Burn Trucker Jacket</title>
    <author>
      <name>Chris Chase</name>
    </author>
    <summary type="html">
      <![CDATA[<span>Step-by-step photo tutorial showing how to use Otter Wax Fabric Wax to waterproof a Bridge &amp; Burn Trucker Jacket.</span><p><a class="read-more" href="https://www.otterwax.com/blogs/journal/how-to-otter-wax-a-bridge-and-burn-jacket">More</a></p>]]>
    </summary>
    <content type="html">
      <![CDATA[<p style="text-align: justify;">For this tutorial, we teamed up with our good friends at <strong><span style="text-decoration: underline;"><a href="https://www.instagram.com/bridgeandburn/" target="_blank" title="Bridge &amp; Burn PDX" rel="noopener noreferrer">Bridge &amp; Burn</a></span></strong> to wax up one of their new <strong><span style="text-decoration: underline;"><a href="https://www.bridgeandburn.com/collections/women/products/douglas-grey-herringbone-womens-classic-waxed-canvas-trucker-jacket?variant=30350981267490" target="_blank" title="Bridge &amp; Burn Douglas Grey Herringbone Jacket" rel="noopener noreferrer">Douglas Grey Herringbone</a></span></strong> jackets. The jacket is constructed from this really great factory-waxed British Millerain fabric woven with a subtle herringbone pattern.</p>
<p style="text-align: justify;">This particular fabric is really easy to work with for a couple of reasons. First off, since the fabric is woven really tight, it lacks the 'toothiness' of a heavy canvas, which means that it won't take as much wax to fully treat the jacket. Additionally, we're working with a factory-waxed fabric that's already been saturated with wax, so naturally we'll end up using less than we would with an un-waxed fabric.</p>
<p style="text-align: justify;">We only ended up using about half of one of our <span style="text-decoration: underline;"><strong><a href="https://www.otterwax.com/collections/waxes/products/otter-wax-large-bar" target="_blank" title="Otter Wax Heavy Duty Fabric Wax Large Bar" rel="noopener noreferrer">Large Bars</a></strong></span> on this jacket, and we applied a pretty thick layer of wax.</p>
<h6 style="text-align: center;"><img alt="How To Otter Wax A Bridge And Burn Twill Jacket" src="//cdn.shopify.com/s/files/1/0189/5302/files/How-To-Otter-Wax-A-Bridge-And-Burn-Jacket-1.jpg?v=1572460463" style="float: none;"></h6>
<p style="text-align: justify;">You might be wondering, why it's even worth the effort to Otter Wax a jacket that's made from factory-waxed fabric in the first place. Two reasons:</p>
<p style="text-align: justify; padding-left: 30px;">1. It will vastly improve upon the existing waterproofing ability of the fabric. Water is going to bead up and roll right off.</p>
<p style="text-align: justify; padding-left: 30px;">2. The fabric will take on somewhat of waxy-shine that gives it the slight appearance of leather. It's going to look awesome.</p>
<p style="text-align: center;"><img alt="How To Otter Wax A Bridge And Burn Twill Jacket" src="//cdn.shopify.com/s/files/1/0189/5302/files/How-To-Otter-Wax-A-Bridge-And-Burn-Jacket-2.jpg?v=1572460671" style="float: none; margin: 0px;"></p>
<p style="text-align: justify;">Pushing the bar out of the wax paper wrap helps you keep a nice grip on the bar while you're waxing. You'll inevitably get some wax on your hands, but it definitely helps keep the mess factor under control.</p>
<p style="text-align: center;"><img alt="How To Otter Wax A Bridge And Burn Twill Jacket" src="//cdn.shopify.com/s/files/1/0189/5302/files/How-To-Otter-Wax-A-Bridge-And-Burn-Jacket-3.jpg?v=1572460837" style="float: none; margin: 0px;"></p>
<p style="text-align: justify;">Start by applying downward pressure. Not so much that you end up chipping the bar, but hard enough that you create some friction when you begin rubbing the bar back and forth on the fabric. </p>
<p style="text-align: center;"><img alt="How To Otter Wax A Bridge And Burn Twill Jacket" src="//cdn.shopify.com/s/files/1/0189/5302/files/How-To-Otter-Wax-A-Bridge-And-Burn-Jacket-4.jpg?v=1572461082" style="float: none; margin: 0px;"></p>
<p style="text-align: justify;">Once you've thoroughly waxed a small area of the jacket, smooth it out with your fingers or with the beveled edge of one of our Smoothing Tools. This helps work the wax into the upper layer of the fabric and helps the wax bond to the garment.</p>
<p style="text-align: center;"><img alt="How To Otter Wax A Bridge And Burn Twill Jacket" src="//cdn.shopify.com/s/files/1/0189/5302/files/How-To-Otter-Wax-A-Bridge-And-Burn-Jacket-5.jpg?v=1572461217" style="float: none; margin: 0px;"></p>
<p style="text-align: justify;">Utilize the edges of the bar for hard-to-reach spots like seams and pockets. </p>
<p style="text-align: center;"><img alt="How To Otter Wax A Bridge And Burn Twill Jacket" src="//cdn.shopify.com/s/files/1/0189/5302/files/How-To-Otter-Wax-A-Bridge-And-Burn-Jacket-6.jpg?v=1572462838" style="float: none; margin: 0px;"></p>
<hr>
<p style="text-align: justify;">No matter what fabric you're waxing, you'll always end up with the occasional clumps of wax that form when the wax collects around seams.</p>
<p style="text-align: justify;">To help even things out and remove any unsightly clumps of wax, use the sharp corner of the Smoothing Tool to scrape it out and then smooth out the area with the beveled edge.</p>
<p style="text-align: center;"><img alt="How To Otter Wax A Bridge And Burn Twill Jacket" src="//cdn.shopify.com/s/files/1/0189/5302/files/How-To-Otter-Wax-A-Bridge-And-Burn-Jacket-7.jpg?v=1572462953" style="float: none; margin: 0px;"></p>
<p style="text-align: justify;"> </p>
<p style="text-align: justify;">Once the jacket has been fully waxed, you'll want to hang it in a warm, dry place for about 72 hours to allow excess oils to evaporate off the fabric, leaving the wax bonded to the fibers. But make no mistake, waxing fabric will always, always change the way that a fabric looks and feels. Even after 72 hours, you can expect to feel a slight tack to the jacket. It's perfectly normal, and will continue to fade over time.</p>
<p style="text-align: justify;">If you're concerned about the wax coming off on furniture or car seats, you can simply rub the waxed fabric between your finger. Did any waxes or oils end up on your hands? If so, just use some caution around furniture and car seats and take the jacket off before sitting.</p>
<p style="text-align: justify;"><img src="//cdn.shopify.com/s/files/1/0189/5302/files/Bridge-And-Burn-Trucker-Jacket.jpg?v=1580855863" alt=""><img src="//cdn.shopify.com/s/files/1/0189/5302/files/Bridge-And-Burn-Trucker-Jacket-2.jpg?v=1580855884" alt=""></p>
<div></div>]]>
    </content>
  </entry>
  <entry>
    <id>https://www.otterwax.com/blogs/journal/how-to-apply-heat-activated-fabric-dressing</id>
    <published>2018-02-02T19:07:00-08:00</published>
    <updated>2021-08-12T13:32:50-07:00</updated>
    <link rel="alternate" type="text/html" href="https://www.otterwax.com/blogs/journal/how-to-apply-heat-activated-fabric-dressing"/>
    <title>How To Apply Heat-Activated Fabric Dressing</title>
    <author>
      <name>Otter Wax</name>
    </author>
    <summary type="html">
      <![CDATA[<span>This step-by-step tutorial covers how to apply Otter Wax Heat-Activated Fabric Dressing. </span><p><a class="read-more" href="https://www.otterwax.com/blogs/journal/how-to-apply-heat-activated-fabric-dressing">More</a></p>]]>
    </summary>
    <content type="html">
      <![CDATA[<p> </p>
<div style="text-align: center;">
<a href="https://www.otterwax.com/collections/fabric-care/products/fabric-dressing" target="_blank" rel="noopener noreferrer" title="How To Use Otter Wax Heat Activated Fabric Dressing"><img alt="how to waterproof fabric with otter wax heat activated fabric dressing" src="//cdn.shopify.com/s/files/1/0189/5302/files/Fabric-Dressing-1.jpg?9658746620194459619" style="float: none; margin-top: 10px; margin-bottom: 10px;"></a><br>
<p> </p>
<div style="text-align: center;">
<a href="https://www.otterwax.com/collections/fabric-care/products/fabric-dressing" target="_blank" rel="noopener noreferrer" title="How To Use Otter Wax Heat Activated Fabric Dressing"><img alt="how to waterproof fabric with otter wax heat activated fabric dressing" src="//cdn.shopify.com/s/files/1/0189/5302/files/Otter-Wax-Fabric-Dressing-Melting.gif?9468753771678604413" style="margin-top: 10px; margin-bottom: 10px; float: none;"></a>
<p> </p>
<div style="text-align: center;">
<a href="https://www.otterwax.com/collections/fabric-care/products/fabric-dressing" target="_blank" rel="noopener noreferrer" title="How To Use Otter Wax Heat Activated Fabric Dressing"><img alt="how to waterproof fabric with otter wax heat activated fabric dressing" src="//cdn.shopify.com/s/files/1/0189/5302/files/Fabric-Dressing-3.jpg?3339225712455273663" style="margin-top: 10px; margin-bottom: 10px; float: none;"></a>
<p> </p>
<div style="text-align: center;">
<a href="https://www.otterwax.com/collections/fabric-care/products/fabric-dressing" target="_blank" rel="noopener noreferrer" title="How To Use Otter Wax Heat Activated Fabric Dressing"><img alt="how to waterproof fabric with otter wax heat activated fabric dressing" src="//cdn.shopify.com/s/files/1/0189/5302/files/Tip-1.jpg?16758322862792696778" style="margin-top: 10px; margin-bottom: 10px; float: none;"></a>
<p> </p>
<div style="text-align: center;">
<a href="https://www.otterwax.com/collections/fabric-care/products/fabric-dressing" target="_blank" rel="noopener noreferrer" title="How To Use Otter Wax Heat Activated Fabric Dressing"><img alt="how to waterproof fabric with otter wax heat activated fabric dressing" src="//cdn.shopify.com/s/files/1/0189/5302/files/Fabric-Dressing-4.jpg?7384450464661037179" style="margin-top: 10px; margin-bottom: 10px; float: none;"></a>
<p> </p>
<div style="text-align: center;">
<a href="https://www.otterwax.com/collections/fabric-care/products/fabric-dressing" target="_blank" rel="noopener noreferrer" title="How To Use Otter Wax Heat Activated Fabric Dressing"><img alt="how to waterproof fabric with otter wax heat activated fabric dressing" src="//cdn.shopify.com/s/files/1/0189/5302/files/Fabric-Dressing-5.jpg?15675705552285993079" style="margin-top: 10px; margin-bottom: 10px; float: none;"></a>
<p> </p>
<div style="text-align: center;">
<a href="https://www.otterwax.com/collections/fabric-care/products/fabric-dressing" target="_blank" rel="noopener noreferrer" title="How To Use Otter Wax Heat Activated Fabric Dressing"><img alt="how to waterproof fabric with otter wax heat activated fabric dressing" src="//cdn.shopify.com/s/files/1/0189/5302/files/Fabric-Dressing-6.jpg?14936518488792243506" style="margin-top: 10px; margin-bottom: 10px; float: none;"></a>
<p> </p>
<div style="text-align: center;">
<a href="https://www.otterwax.com/collections/fabric-care/products/fabric-dressing" target="_blank" rel="noopener noreferrer" title="How To Use Otter Wax Heat Activated Fabric Dressing"><img alt="how to waterproof fabric with otter wax heat activated fabric dressing" src="//cdn.shopify.com/s/files/1/0189/5302/files/Fabric-Dressing-7.jpg?15857003079448786724" style="margin-top: 10px; margin-bottom: 10px; float: none;"></a>
<p> </p>
<div style="text-align: center;">
<a href="https://www.otterwax.com/collections/fabric-care/products/fabric-dressing" target="_blank" rel="noopener noreferrer" title="How To Use Otter Wax Heat Activated Fabric Dressing"><img alt="how to waterproof fabric with otter wax heat activated fabric dressing" src="//cdn.shopify.com/s/files/1/0189/5302/files/Fabric-Dressing-8.jpg?1486981312916727866" style="margin-top: 10px; margin-bottom: 10px; float: none;"></a>
<p> </p>
<div style="text-align: center;">
<a href="https://www.otterwax.com/collections/fabric-care/products/fabric-dressing" target="_blank" rel="noopener noreferrer" title="How To Use Otter Wax Heat Activated Fabric Dressing"><img alt="how to waterproof fabric with otter wax heat activated fabric dressing" src="//cdn.shopify.com/s/files/1/0189/5302/files/Tip-2.jpg?14181772870970155151" style="margin-top: 10px; margin-bottom: 10px; float: none;"></a>
<p> </p>
<div style="text-align: center;">
<a href="https://www.otterwax.com/collections/fabric-care/products/fabric-dressing" target="_blank" rel="noopener noreferrer" title="How To Use Otter Wax Heat Activated Fabric Dressing"><img alt="how to waterproof fabric with otter wax heat activated fabric dressing" src="//cdn.shopify.com/s/files/1/0189/5302/files/Fabric-Dressing-9.jpg?6526740834150051213" style="margin-top: 10px; margin-bottom: 10px; float: none;"></a>
<p> </p>
<div style="text-align: center;">
<a href="https://www.otterwax.com/collections/fabric-care/products/fabric-dressing" target="_blank" rel="noopener noreferrer" title="How To Use Otter Wax Heat Activated Fabric Dressing"><img alt="how to waterproof fabric with otter wax heat activated fabric dressing" src="//cdn.shopify.com/s/files/1/0189/5302/files/TIP-3.jpg?3188188203036165112" style="margin-top: 10px; margin-bottom: 10px; float: none;"></a>
<p> </p>
<div style="text-align: center;">
<a href="https://www.otterwax.com/collections/fabric-care/products/fabric-dressing" target="_blank" rel="noopener noreferrer" title="How To Use Otter Wax Heat Activated Fabric Dressing"><img alt="how to waterproof fabric with otter wax heat activated fabric dressing" src="//cdn.shopify.com/s/files/1/0189/5302/files/Results.jpg?10310113018387634303" style="margin-top: 10px; margin-bottom: 10px; float: none;"></a>
<p> </p>
<div style="text-align: center;">
<a href="https://www.otterwax.com/collections/fabric-care/products/fabric-dressing" target="_blank" rel="noopener noreferrer" title="How To Use Otter Wax Heat Activated Fabric Dressing"><img alt="how to waterproof fabric with otter wax heat activated fabric dressing" src="//cdn.shopify.com/s/files/1/0189/5302/files/Cookie-1.jpg?6232426658474249040" style="margin-top: 10px; margin-bottom: 10px; float: none;"></a>
<p> </p>
<div style="text-align: center;">
<a href="https://www.otterwax.com/collections/fabric-care/products/fabric-dressing" target="_blank" rel="noopener noreferrer" title="How To Use Otter Wax Heat Activated Fabric Dressing"><img alt="how to waterproof fabric with otter wax heat activated fabric dressing" src="//cdn.shopify.com/s/files/1/0189/5302/files/Cookie-2.jpg?6232426658474249040" style="margin-top: 10px; margin-bottom: 10px; float: none;"></a>
<p> </p>
<div style="text-align: center;">
<a href="https://www.otterwax.com/collections/fabric-care/products/fabric-dressing" target="_blank" rel="noopener noreferrer" title="How To Use Otter Wax Heat Activated Fabric Dressing"><img alt="how to waterproof fabric with otter wax heat activated fabric dressing" src="//cdn.shopify.com/s/files/1/0189/5302/files/Cookie-4.jpg?6232426658474249040" style="margin-top: 10px; margin-bottom: 10px; float: none;"></a>
<p> </p>
<div style="text-align: center;">
<a href="https://www.otterwax.com/collections/fabric-care/products/fabric-dressing" target="_blank" rel="noopener noreferrer" title="How To Use Otter Wax Heat Activated Fabric Dressing"><img alt="how to waterproof fabric with otter wax heat activated fabric dressing" src="//cdn.shopify.com/s/files/1/0189/5302/files/Cookie-5.jpg?6232426658474249040" style="margin-top: 10px; margin-bottom: 10px; float: none;"></a>
<p> </p>
</div>
</div>
</div>
</div>
</div>
</div>
</div>
</div>
</div>
</div>
</div>
</div>
</div>
</div>
</div>
</div>
</div>]]>
    </content>
  </entry>
  <entry>
    <id>https://www.otterwax.com/blogs/journal/suede-cleaner</id>
    <published>2018-01-25T18:00:00-08:00</published>
    <updated>2021-08-12T13:33:21-07:00</updated>
    <link rel="alternate" type="text/html" href="https://www.otterwax.com/blogs/journal/suede-cleaner"/>
    <title>How To Clean Suede Shoes</title>
    <author>
      <name>Otter Wax</name>
    </author>
    <summary type="html">
      <![CDATA[<p><span>Here's a step-by-step guide guide (with photos) to show you the best way to care for suede and nubuck.</span></p><p><a class="read-more" href="https://www.otterwax.com/blogs/journal/suede-cleaner">More</a></p>]]>
    </summary>
    <content type="html">
      <![CDATA[<p>In the past, we've written about <span style="text-decoration: underline;"><a href="https://www.otterwax.com/blogs/journal/54409669-the-ultimate-waxed-suede-tutorial" target="_blank" title="The Ultimate Waxed Suede Tutorial" rel="noopener noreferrer">waxing suede</a></span>, but the results of adding a layer of wax have a lasting effect on the look and feel of the leather. Waxing suede creates a great look in addition to waterproofing, but this post is just going to be about cleaning your untreated suede.</p>
<p>Before we get down to brass tacks, let's all get on the same page about why suede is such a great material worth taking care of. It's important for everyone to understand that leather is an extension of your lifestyle and that it will evolve over time and with use. Like our own skin, leather is porous and malleable. This is why your wallet probably curves to the shape of your back pocket, or why it's darker where you always grab it from the oils on your skin.</p>
<p style="float: right;"><br><br></p>
<p>Suede is different from smooth leather because it is <span>rubbed by an abrasive wheel to raise a velvet-like nap on its surface. This process breaks down the protective outer layer of skin and exposes the soft leather underneath. It's also what make suede notoriously absorbent and prone to staining. A single raindrop has the ability to leave an unsightly mark on your loafers.</span></p>
<p><span>Our foaming Suede Cleaner is different from other cleaners because it is formulated to lift dirt and stains from delicate suede while also conditioning. Alcohol-based cleaners will dehydrate the pores of the leather. While alcohol and chemicals might be good for removing stains, they leave the suede more susceptible to future staining. The combination of Aloe Vera, Vitamin-C, and With Hazel makes cleaning really easy, with the added bonus that you're also leaving the leather hydrated and conditioned.</span></p>
<p> </p>
<div style="text-align: center;">
<a href="https://www.otterwax.com/collections/clean/products/suede-cleaner" target="_blank" rel="noopener noreferrer" title="Otter Wax Suede Cleaner"><img alt="how to clean sueded leather with otter wax suede cleaner" src="//cdn.shopify.com/s/files/1/0189/5302/files/Cleaning-Suede-1.jpg?7728670834508886044" style="float: none; margin-top: 10px; margin-bottom: 10px;"></a><br>
<p> </p>
<div style="text-align: center;">
<a href="https://www.otterwax.com/collections/clean/products/suede-cleaner" target="_blank" rel="noopener noreferrer" title="Otter Wax Suede Cleaner"><img alt="how to clean sueded leather with otter wax suede cleaner" src="//cdn.shopify.com/s/files/1/0189/5302/files/Cleaning-Suede-2.jpg?15340489504391703474" style="margin-top: 10px; margin-bottom: 10px; float: none;"></a>
<p> </p>
<div style="text-align: center;">
<a href="https://www.otterwax.com/collections/clean/products/suede-cleaner" target="_blank" rel="noopener noreferrer" title="Otter Wax Suede Cleaner"><img alt="how to clean sueded leather with otter wax suede cleaner" src="//cdn.shopify.com/s/files/1/0189/5302/files/Cleaning-Suede-3.jpg?15340489504391703474" style="margin-top: 10px; margin-bottom: 10px; float: none;"></a>
<p> </p>
<div style="text-align: center;">
<a href="https://www.otterwax.com/collections/clean/products/suede-cleaner" target="_blank" rel="noopener noreferrer" title="Otter Wax Suede Cleaner"><img alt="how to clean sueded leather with otter wax suede cleaner" src="//cdn.shopify.com/s/files/1/0189/5302/files/Cleaning-Suede-4.jpg?15340489504391703474" style="margin-top: 10px; margin-bottom: 10px; float: none;"></a>
<p> </p>
<div style="text-align: center;">
<a href="https://www.otterwax.com/collections/clean/products/suede-cleaner" target="_blank" rel="noopener noreferrer" title="Otter Wax Suede Cleaner"><img alt="how to clean sueded leather with otter wax suede cleaner" src="//cdn.shopify.com/s/files/1/0189/5302/files/Cleaning-Suede-5.jpg?15340489504391703474" style="margin-top: 10px; margin-bottom: 10px; float: none;"></a>
<p> </p>
<div style="text-align: center;">
<a href="https://www.otterwax.com/collections/clean/products/suede-cleaner" target="_blank" rel="noopener noreferrer" title="Otter Wax Suede Cleaner"><img alt="how to clean sueded leather with otter wax suede cleaner" src="//cdn.shopify.com/s/files/1/0189/5302/files/Cleaning-Suede-6.jpg?15340489504391703474" style="margin-top: 10px; margin-bottom: 10px; float: none;"></a>
<p> </p>
<div style="text-align: center;">
<a href="https://www.otterwax.com/collections/clean/products/suede-cleaner" target="_blank" rel="noopener noreferrer" title="Otter Wax Suede Cleaner"><img alt="how to clean sueded leather with otter wax suede cleaner" src="//cdn.shopify.com/s/files/1/0189/5302/files/Cleaning-Suede-7.jpg?15340489504391703474" style="margin-top: 10px; margin-bottom: 10px; float: none;"></a>
<p> </p>
<div style="text-align: center;">
<a href="https://www.otterwax.com/collections/clean/products/suede-cleaner" target="_blank" rel="noopener noreferrer" title="Otter Wax Suede Cleaner"><img alt="how to clean sueded leather with otter wax suede cleaner" src="//cdn.shopify.com/s/files/1/0189/5302/files/Cleaning-Suede-8.jpg?15340489504391703474" style="margin-top: 10px; margin-bottom: 10px; float: none;"></a>
<p> </p>
<div style="text-align: center;">
<a href="https://www.otterwax.com/collections/clean/products/suede-cleaner" target="_blank" rel="noopener noreferrer" title="Otter Wax Suede Cleaner"><img alt="how to clean sueded leather with otter wax suede cleaner" src="//cdn.shopify.com/s/files/1/0189/5302/files/Cleaning-Suede-9.jpg?15340489504391703474" style="margin-top: 10px; margin-bottom: 10px; float: none;"></a>
<p> </p>
<div style="text-align: center;">
<a href="https://www.otterwax.com/collections/clean/products/suede-cleaner" target="_blank" rel="noopener noreferrer" title="Otter Wax Suede Cleaner"><img alt="how to clean sueded leather with otter wax suede cleaner" src="//cdn.shopify.com/s/files/1/0189/5302/files/Cleaning-Suede-10.jpg?15340489504391703474" style="margin-top: 10px; margin-bottom: 10px; float: none;"></a>
<p> </p>
<div style="text-align: center;">
<a href="https://www.otterwax.com/collections/clean/products/suede-cleaner" target="_blank" rel="noopener noreferrer" title="Otter Wax Suede Cleaner"><img alt="how to clean sueded leather with otter wax suede cleaner" src="//cdn.shopify.com/s/files/1/0189/5302/files/Cleaning-Suede-11.jpg?15340489504391703474" style="margin-top: 10px; margin-bottom: 10px; float: none;"></a>
<p> </p>
<div style="text-align: right;">
<a href="https://www.otterwax.com/collections/clean/products/suede-cleaner" target="_blank" rel="noopener noreferrer" title="Otter Wax Suede Cleaner"><img alt="how to clean sueded leather with otter wax suede cleaner" src="//cdn.shopify.com/s/files/1/0189/5302/files/Cleaning-Suede-12.jpg?15340489504391703474" style="margin-top: 10px; margin-bottom: 10px; float: none;"></a>
<p> </p>
<div style="text-align: right;">
<a href="https://www.otterwax.com/collections/clean/products/suede-cleaner" target="_blank" rel="noopener noreferrer" title="Otter Wax Suede Cleaner"><img alt="how to clean sueded leather with otter wax suede cleaner" src="//cdn.shopify.com/s/files/1/0189/5302/files/Otter-Wax-Suede-Cleaner.gif?10004188364382367105" style="margin-top: 10px; margin-bottom: 10px; float: none;"></a>
<p> </p>
<div style="text-align: center;"><a href="https://www.otterwax.com/collections/clean/products/suede-cleaner" target="_blank" rel="noopener noreferrer" title="Otter Wax Suede Cleaner"><img alt="how to clean sueded leather with otter wax suede cleaner" src="//cdn.shopify.com/s/files/1/0189/5302/files/Cleaning-Suede-13.jpg?15340489504391703474" style="margin-top: 10px; margin-bottom: 10px; float: none;"></a></div>
</div>
</div>
</div>
</div>
</div>
</div>
</div>
</div>
</div>
</div>
</div>
</div>
</div>
<h1><span style="background-color: #ffffff; color: #ffffff;">How To Clean Suede Shoes </span></h1>
<h2><span style="background-color: #ffffff; color: #ffffff;">Step by step instructions for how to clean suede and nubuck leather with Otter Wax Conditioning Suede Cleaner </span></h2>
<h3><span style="background-color: #ffffff; color: #ffffff;">All Natural Leather Care Tutorial</span></h3>]]>
    </content>
  </entry>
  <entry>
    <id>https://www.otterwax.com/blogs/journal/how-to-clean-leather-blundstone-boots-with-saddle-soap</id>
    <published>2017-10-17T18:35:00-07:00</published>
    <updated>2021-08-12T13:36:38-07:00</updated>
    <link rel="alternate" type="text/html" href="https://www.otterwax.com/blogs/journal/how-to-clean-leather-blundstone-boots-with-saddle-soap"/>
    <title>How To Clean Leather Blundstone Boots With Otter Wax Saddle Soap</title>
    <author>
      <name>Otter Wax</name>
    </author>
    <summary type="html">
      <![CDATA[<span>Blundstone makes a great boot, and this tutorial shows you in 5 steps how easy it is to keep them clean so that they last for years to come.</span><p><a class="read-more" href="https://www.otterwax.com/blogs/journal/how-to-clean-leather-blundstone-boots-with-saddle-soap">More</a></p>]]>
    </summary>
    <content type="html">
      <![CDATA[<h5>Blundstone Boots are made to last, which is why taking the time and effort to clean and condition is crucial to protecting your investment. We got these boots from our good friends at <span style="text-decoration: underline;"><a href="https://australianboot.com" target="_blank" title="Australian Boot Company" rel="noopener noreferrer">Australian Boot Company</a></span> and immediately put them to the test while demolishing and replacing a large retaining wall. We can't say enough about how well these performed, so if you're up in Canada be sure to check them out, they have the largest selection of Blundstone sizes and styles.</h5>
<div style="text-align: center;"><img alt="" src="//cdn.shopify.com/s/files/1/0189/5302/files/OtterWaxBlundstone-1.jpg?v=1508453294" style="float: none; margin-top: 10px; margin-bottom: 10px;"></div>
<h5>Leather will dry out over time, but dries out even faster when dirty. When allowed to dry, dirt and mud will rob your leather of oils and nutrients. Think of leather like a sponge. When it's dry and dehydrated it's going to absorb any moisture that it comes into contact with, resulting in stains and blotches. Even worse is when leather dries out to the point that it begins to crack.</h5>
<h5>Using our Saddle Soap is the best way to clean your pair of Blundstone Boots without robbing the leather of essential oils and nutrients. <span>Specially formulated using a proprietary blend of all-natural beeswax, castile soap, and hydrating oils, Saddle Soap gently cleans and revives leather. Made without harsh detergents, chemicals, or dyes, this product is safe to use on all types and colors of leather.</span>
</h5>
<p style="text-align: center;"> </p>
<p style="text-align: center;"><img alt="" src="//cdn.shopify.com/s/files/1/0189/5302/files/How-to-Clean-Leather-Blundstone-Boots_c6e00b8a-7ed6-4dd3-9566-82ce26378ed0.jpg?v=1508516507" style="float: none;"></p>
<p style="text-align: center;"> </p>
<div style="text-align: center;"><img alt="How To Clean Leather Blundstone Boots With Otter Wax Saddle Soap" src="//cdn.shopify.com/s/files/1/0189/5302/files/Cleaning---1.jpg?v=1508191960" style="display: block; float: none; margin-left: auto; margin-right: auto; margin-top: 20px;"></div>
<p> </p>
<p> </p>
<div style="text-align: center;"> </div>
<div style="text-align: center;"><img alt="How To Clean Leather Blundstone Boots With Otter Wax Saddle Soap" src="//cdn.shopify.com/s/files/1/0189/5302/files/Cleaning---2.jpg?v=1508192733" style="float: none;"></div>
<p>  </p>
<div style="text-align: center;"> </div>
<div style="text-align: center;"><img alt="How To Clean Leather Blundstone Boots With Otter Wax Saddle Soap" src="//cdn.shopify.com/s/files/1/0189/5302/files/Cleaning---3.jpg?v=1508193552" style="float: none;"></div>
<p> </p>
<p> </p>
<div style="text-align: center;"> </div>
<div style="text-align: center;"><img alt="How To Clean Leather Blundstone Boots With Otter Wax Saddle Soap" src="//cdn.shopify.com/s/files/1/0189/5302/files/Cleaning---4.jpg?v=1508193994" style="float: none;"></div>
<p> </p>
<p> </p>
<div style="text-align: center;"> </div>
<div style="text-align: center;"><img alt="How To Clean Leather Blundstone Boots With Otter Wax Saddle Soap" src="//cdn.shopify.com/s/files/1/0189/5302/files/Cleaning---5.jpg?v=1508194599" style="float: none;"></div>
<p> </p>
<p> </p>
<div style="text-align: center;"> </div>
<div style="text-align: left;"><img alt="How To Clean Leather Blundstone Boots With Otter Wax Saddle Soap" src="//cdn.shopify.com/s/files/1/0189/5302/files/Cleaning---6_e21ba740-231f-4f74-b282-01623a0242b9.jpg?v=1508202437" style="display: block; margin-left: auto; margin-right: auto; float: none;"></div>]]>
    </content>
  </entry>
  <entry>
    <id>https://www.otterwax.com/blogs/journal/pointer-jacket-tutorial</id>
    <published>2017-03-28T13:51:00-07:00</published>
    <updated>2025-10-29T14:07:36-07:00</updated>
    <link rel="alternate" type="text/html" href="https://www.otterwax.com/blogs/journal/pointer-jacket-tutorial"/>
    <title>How to Waterproof a Pointer Brand Chore Coat With Otter Wax Fabric Wax</title>
    <author>
      <name>Otter Wax</name>
    </author>
    <summary type="html">
      <![CDATA[<p style="text-align: left;">If you've ever thought about improving the performace of apparel by adding a layer of Otter Wax, you've probably thought about using it on a jacket. A project like this will take a little work, but you'll be rewarded with a jacket that will last a lifetime.</p><p><a class="read-more" href="https://www.otterwax.com/blogs/journal/pointer-jacket-tutorial">More</a></p>]]>
    </summary>
    <content type="html">
      <![CDATA[<p style="text-align: left;">If you've ever thought about improving the performace of apparel by adding a layer of Otter Wax, you've probably thought about using it on a jacket. A project like this will take a little work, but you'll be rewarded with a jacket that will last a lifetime.</p>
<p style="text-align: left;">In this tutorial, we'll be applying our <a href="https://www.otterwax.com/collections/waxes/products/otter-wax-large-bar" title="Otter Wax Heavy Duty Fabric Wax Large" target="_blank">Heavy Duty Fabric Wax</a> to a Pointer Brand Brown Duck Chore Coat. We love waxing up the canvas that Pointer Brand uses. It's 100% cotton and has a nice, thick texture that allows our wax to be thoroughly incorporated into the top layer of canvas. Since this is a single-layer coat, we've elected to use our bars of Heavy Duty Fabric wax in order to ensure that the wax stays on the outside of the coat. Using something like our <a href="https://www.otterwax.com/collections/waxes/products/fabric-dressing" title="Otter Wax Heat Activated Fabric Dressing" target="_blank">Fabric Dressing</a> would likely soak through, so if you wanted to wear this coat with with just a t-shirt underneath, you won't have to worry about your skin being in contact with the waxed fabric. It's not like there's anything wrong with having waxed canvas touching your skin, it's just that it's not really all that comfortable, and can feel kind of clammy against your skin. Save the <a href="https://www.otterwax.com/collections/waxes/products/fabric-dressing" title="Heat Activated Fabric Dressing">Fabric Dressing</a> for when you want to wax something with a lining on the inside.</p>
<p>You can expect this project to take about 1-2 hours, and then a couple days of cure time to allow some of the oils to evaporate off the canvas before wearing. A canvas like this one will absorb a fair amount of wax, so don't be surprised if after a few days of hanging it's still somewhat tacky to the touch. This is totally normal and the jacket is wearable, so just put it on and get outside!</p>
<p>Here's what you'll need:</p>
<ul>
<li>
<p>2x - <a href="https://www.otterwax.com/collections/waxes/products/otter-wax-large-bar" title="Otter Wax Heavy Duty Fabric Wax Large Bar" target="_blank">Heavy Duty Fabric Wax | Large Bar</a></p>
</li>
<li>
<p>1x - <a href="https://www.otterwax.com/collections/brushes-tools/products/smoothing-tool" title="Otter Wax Wood Smoothing Tool" target="_blank">Wooden Smoothing Tool</a></p>
</li>
<li>
<p>1x - Heat Gun (Optional)</p>
</li>
<li>
<p>1~2 Hours + Cure Time</p>
</li>
</ul>
<ul></ul>
<p style="text-align: center;"><img alt="How To Otter Wax a Pointer Brand Chore Coat" src="https://cdn.shopify.com/s/files/1/0189/5302/files/Step-1_0774cef6-fbef-40c0-97e5-e14d5671bcaf.jpg?v=1490381552" style="float: none;"></p>
<p style="text-align: center;"><img alt="How To Otter Wax a Pointer Brand Chore Coat" src="https://cdn.shopify.com/s/files/1/0189/5302/files/Close-Up-Before.jpg?v=1490384462" style="float: none;"></p>
<p style="text-align: center;"><img alt="How To Otter Wax a Pointer Brand Chore Coat" src="https://cdn.shopify.com/s/files/1/0189/5302/files/Close-Up-After.jpg?v=1490384586" style="float: none;"></p>
<p style="text-align: center;"><img alt="How To Otter Wax a Pointer Brand Chore Coat" src="https://cdn.shopify.com/s/files/1/0189/5302/files/Step-2_7cf9111e-dd8a-4ce6-a766-788f6abefcbe.jpg?v=1490382734" style="float: none;"></p>
<p style="text-align: center;"><img alt="How To Otter Wax a Pointer Brand Chore Coat" src="https://cdn.shopify.com/s/files/1/0189/5302/files/Step-3_e91e4d62-1905-4b0a-bd31-e03a627e4758.jpg?v=1490383090" style="float: none;"></p>
<p style="text-align: center;"><img alt="How To Otter Wax a Pointer Brand Chore Coat" src="https://cdn.shopify.com/s/files/1/0189/5302/files/Step-4_e7aa102d-c465-43e0-8b77-dd4184313ade.jpg?v=1490383373" style="float: none;"></p>
<p style="text-align: center;"><img alt="How To Otter Wax a Pointer Brand Chore Coat" src="https://cdn.shopify.com/s/files/1/0189/5302/files/Step-5_557cd01b-393a-4e92-9e6d-1af5e3e169f5.jpg?v=1490383573" style="float: none;"></p>
<p style="text-align: center;"><img alt="How To Otter Wax a Pointer Brand Chore Coat" src="https://cdn.shopify.com/s/files/1/0189/5302/files/Step-6_6e6f9f81-4979-48d6-b7dd-2c2e3fdbb645.jpg?v=1490389380" style="float: none;"></p>
<p style="text-align: center;"><img alt="How To Otter Wax a Pointer Brand Chore Coat" src="https://cdn.shopify.com/s/files/1/0189/5302/files/Step-7_8d29a233-dd2e-4e1f-ab90-5333fb2c03a0.jpg?v=1490384196" style="float: none;"></p>
<p style="text-align: center;"><img alt="How To Otter Wax a Pointer Brand Chore Coat" src="https://cdn.shopify.com/s/files/1/0189/5302/files/Waxed-Pointer-Jacket.jpg?v=1490385125" style="float: none;"></p>]]>
    </content>
  </entry>
  <entry>
    <id>https://www.otterwax.com/blogs/journal/how-to-condition-leather-blundstone-boots</id>
    <published>2017-03-26T19:26:00-07:00</published>
    <updated>2021-08-12T13:33:22-07:00</updated>
    <link rel="alternate" type="text/html" href="https://www.otterwax.com/blogs/journal/how-to-condition-leather-blundstone-boots"/>
    <title>How To Condition Leather Blundstone Boots</title>
    <author>
      <name>Otter Wax</name>
    </author>
    <summary type="html">
      <![CDATA[<p>This tutorial covers how to apply Otter Wax Leather Salve. Our all-natural Carnauba &amp; Shea Butter Conditioner provides our deepest level of hydration to all types of leather. </p><p><a class="read-more" href="https://www.otterwax.com/blogs/journal/how-to-condition-leather-blundstone-boots">More</a></p>]]>
    </summary>
    <content type="html">
      <![CDATA[<h5>Blundstone Boots are made to last, which is why taking the time and effort to keep them clean and conditioned is crucial to protecting your investment. We got these boots from our good friends at <span style="text-decoration: underline;"><a href="https://australianboot.com/" target="_blank" title="Australian Boot Company" rel="noopener noreferrer">Australian Boot Company</a></span> and immediately put them to the test while demolishing and replacing a large retaining wall. We can't say enough about how well these performed, so if you're up in Canada be sure to check them out, they have the largest selection of Blundstone sizes and styles.</h5>
<div style="text-align: center;"><img alt="How To Condition Leather Blundstone Boots With Otter Wax Leather Salve" src="//cdn.shopify.com/s/files/1/0189/5302/files/How-To-Condition-Leather-Blundstone-Boot-With-Otter-Wax-Leather-Salve-1.jpg?v=1508462027" style="margin-top: 10px; margin-bottom: 10px; float: none;"></div>
<h5>This tutorial covers how to apply <span style="text-decoration: underline;"><a href="https://www.otterwax.com/collections/condition/products/leather-salve" target="_blank" title="Otter Wax Leather Salve" rel="noopener noreferrer">Otter Wax Leather Salve</a></span>. This all-natural salve provides our deepest level of conditioning to all types of leather.</h5>
<p style="text-align: center;"><img alt="" src="//cdn.shopify.com/s/files/1/0189/5302/files/important-note_98b66615-63eb-4cbd-8172-37de157174ca.jpg?v=1508514915" style="float: none;"></p>
<h5>Aside from black leather, please note that darkening will occur, as is typical with any kind of treatment. This will fade over time, but it's important to remember that leather in any form is an extension of you. It doesn't matter whether it's a couch, a pair of boots, or a jacket; leather is always going to evolve as it ages. Yes, treating your leather will change how it looks, but our goal is to help leather age well so that it lasts for many years to come.</h5>
<h5>Before applying Leather Salve, you'll want to make sure that your leather is clean so that the pores of the leather will be able to evenly absorb this treatment (we recommend our <span style="text-decoration: underline;"><a href="https://www.otterwax.com/collections/clean/products/saddle-soap" target="_blank" title="Otter Wax Saddle Soap" rel="noopener noreferrer">Saddle Soap</a></span>). This treatment can be used on leather in any condition since the leather is only going to absorb as much oil and nutrients as its pores have room for.</h5>
<h5>Once applied, any additional Salve that can't be absorbed by the leather will create a cloudy layer of wax when the treatment has dried. A cloudy layer of wax indicates that the leather is fully saturated, and once the treatment has dried this can be buffed clear to help seal in oils and nutrients as well as provide a layer of protection.</h5>
<p style="text-align: center;"><img alt="" src="//cdn.shopify.com/s/files/1/0189/5302/files/difference_ef65075b-c98f-421c-90a8-e0fb88989188.jpg?v=1508515024" style="float: none;"></p>
<h5>Our Leather Salve is an excellent way to introduce a large amount of oils and nutrients to the leather. It's a thick paste that once applied, will take a bit longer to soak into the leather. When applied in larger quantities, it also has the additional benefit of providing the extra layer of wax for added protection. The application process also takes a little longer and requires a bit more effort to ensure even coverage. On the other hand, our <span style="text-decoration: underline;"><a href="https://www.otterwax.com/collections/leather-care/products/leather-oil" target="_blank" title="Otter Wax Leather Oil" rel="noopener noreferrer">Leather Oil</a></span> provides a quick nourishing treatment that also gives the leather a bit more shine, but needs to be applied more frequently because it doesn't get sealed in with the layer of wax like our Leather Salve. If Leather Oil is applied frequently, you might find that your leather rarely needs the deep conditioning that our Leather Salve provides.</h5>
<p> </p>
<p style="text-align: center;"><img alt="" src="//cdn.shopify.com/s/files/1/0189/5302/files/Salve-Tutorial.jpg?v=1508515558" style="float: none;"></p>
<p> </p>
<div style="text-align: center;"><img alt="How To Condition Leather Blundstone Boots With Otter Wax Leather Salve" src="//cdn.shopify.com/s/files/1/0189/5302/files/Conditioning---1_f823997c-fd46-44b5-b00f-aa6652c9dcb3.jpg?v=1508464452" style="display: block; float: none; margin-left: auto; margin-right: auto; margin-top: 20px;"></div>
<p> </p>
<div style="text-align: center;"> </div>
<div style="text-align: center;"><img alt="How To Condition Leather Blundstone Boots With Otter Wax Leather Salve" src="//cdn.shopify.com/s/files/1/0189/5302/files/Conditioning---2.jpg?v=1508203522" style="float: none;"></div>
<p>  </p>
<div style="text-align: center;"> </div>
<div style="text-align: center;"><img alt="How To Condition Leather Blundstone Boots With Otter Wax Leather Salve" src="//cdn.shopify.com/s/files/1/0189/5302/files/Conditioning---3.jpg?v=1508204093" style="float: none;"></div>
<p> </p>
<div style="text-align: center;"> </div>
<div style="text-align: center;"><img alt="How To Condition Leather Blundstone Boots With Otter Wax Leather Salve" src="//cdn.shopify.com/s/files/1/0189/5302/files/Conditioning---4.jpg?v=1508204581" style="float: none;"></div>
<p> </p>
<div style="text-align: center;"> </div>
<div style="text-align: center;"><img alt="How To Condition Leather Blundstone Boots With Otter Wax Leather Salve" src="//cdn.shopify.com/s/files/1/0189/5302/files/Conditioning---5.jpg?v=1508205019" style="float: none;"></div>
<p> </p>
<div style="text-align: center;"> </div>
<div style="text-align: left;"><img alt="How To Condition Leather Blundstone Boots With Otter Wax Leather Salve" src="//cdn.shopify.com/s/files/1/0189/5302/files/Conditioning---6.jpg?v=1508205370" style="display: block; margin-left: auto; margin-right: auto; float: none;"></div>
<p> </p>
<div style="text-align: center;"> </div>
<div style="text-align: left;"><img alt="How To Condition Leather Blundstone Boots With Otter Wax Leather Salve" src="//cdn.shopify.com/s/files/1/0189/5302/files/Conditioning---7.jpg?v=1508205686" style="float: none;"></div>
<p> </p>
<div style="text-align: center;"> </div>
<div style="text-align: left;"><img alt="How To Condition Leather Blundstone Boots With Otter Wax Leather Salve" src="//cdn.shopify.com/s/files/1/0189/5302/files/Conditioning---8.jpg?v=1508206093" style="float: none;"></div>]]>
    </content>
  </entry>
  <entry>
    <id>https://www.otterwax.com/blogs/journal/how-to-waterproof-leather-boots-with-otter-wax-boot-wax</id>
    <published>2017-03-24T16:30:00-07:00</published>
    <updated>2021-08-12T13:36:38-07:00</updated>
    <link rel="alternate" type="text/html" href="https://www.otterwax.com/blogs/journal/how-to-waterproof-leather-boots-with-otter-wax-boot-wax"/>
    <title>How To Waterproof Leather Blundstone Boots With Otter Wax Boot Wax</title>
    <author>
      <name>Chris Chase</name>
    </author>
    <summary type="html">
      <![CDATA[<span>This tutorial shows you in 6 steps how to waterproof a pair of leather Blundstone boots with Otter Wax Boot Wax, our all-natural beeswax &amp; lanolin treatment.</span><p><a class="read-more" href="https://www.otterwax.com/blogs/journal/how-to-waterproof-leather-boots-with-otter-wax-boot-wax">More</a></p>]]>
    </summary>
    <content type="html">
      <![CDATA[<p style="text-align: center;"><img alt="How To Waterproof Leather Boots Using Otter Wax Boot Wax" src="//cdn.shopify.com/s/files/1/0189/5302/files/waterproofing-1.jpg?v=1508280071" style="float: none;"></p>
<p> </p>
<p style="text-align: center;"><img alt="How To Waterproof Leather Boots Using Otter Wax Boot Wax" src="//cdn.shopify.com/s/files/1/0189/5302/files/waterproofing---2.jpg?v=1508280339" style="float: none;"></p>
<p> </p>
<p style="text-align: center;"><img src="//cdn.shopify.com/s/files/1/0189/5302/files/waterproofing---3_9d4b56da-8d20-4509-b4a2-0c8a172d70e0.jpg?v=1508542509" alt="How To Waterproof Leather Boots Using Otter Wax Boot Wax"></p>
<p> </p>
<p style="text-align: center;"><img alt="How To Waterproof Leather Boots Using Otter Wax Boot Wax" src="//cdn.shopify.com/s/files/1/0189/5302/files/waterproofing---4.jpg?v=1508281011" style="float: none;"></p>
<p> </p>
<p style="text-align: center;"><img alt="How To Waterproof Leather Boots Using Otter Wax Boot Wax" src="//cdn.shopify.com/s/files/1/0189/5302/files/waterproofing---5.jpg?v=1508281264" style="float: none;"></p>
<p> </p>
<p style="text-align: center;"><img alt="How To Waterproof Leather Boots Using Otter Wax Boot Wax" src="//cdn.shopify.com/s/files/1/0189/5302/files/waterproofing---6.jpg?v=1508281556" style="float: none;"></p>
<p> </p>
<p style="text-align: center;"><img alt="How To Waterproof Leather Boots Using Otter Wax Boot Wax" src="//cdn.shopify.com/s/files/1/0189/5302/files/waterproofing---7.jpg?v=1508281836" style="float: none;"></p>]]>
    </content>
  </entry>
  <entry>
    <id>https://www.otterwax.com/blogs/journal/54409669-the-ultimate-waxed-suede-tutorial</id>
    <published>2017-03-23T18:13:00-07:00</published>
    <updated>2022-04-11T10:10:00-07:00</updated>
    <link rel="alternate" type="text/html" href="https://www.otterwax.com/blogs/journal/54409669-the-ultimate-waxed-suede-tutorial"/>
    <title>The Ultimate Waxed Suede Tutorial</title>
    <author>
      <name>Otter Wax</name>
    </author>
    <summary type="html">
      <![CDATA[<p style="text-align: left;">This tutorial is a little different than what we've done in the past since we're actually going to be using our Heavy Duty Fabric Wax on sueded leather. The end result is something you'll want to see!</p><p><a class="read-more" href="https://www.otterwax.com/blogs/journal/54409669-the-ultimate-waxed-suede-tutorial">More</a></p>]]>
    </summary>
    <content type="html">
      <![CDATA[<p>This tutorial is a little different than what we've done in the past since we're actually going to be using our <a href="http://www.otterwax.com/collections/fabric-care/products/otter-wax-regular-bar">Heavy Duty Fabric Wax</a> on sueded leather. Truth be told, suede is one of my favorite things to wax because it's going to add a ton of character while also improving on function by making them waterproof. Before we get down to the waxing, it's important to highlight some things about suede that make it different from other types of leather.</p>
<p style="float: right;"><a href="http://www.otterwax.com/collections/fabric-care/products/otter-wax-regular-bar"><img alt="How to Wax Suede with Otter Wax" src="//cdn.shopify.com/s/files/1/0189/5302/files/1_large.jpg?7445508896506191735" style="float: right; margin: 25px;"></a>During processing, thick cowhides are typically sliced down to three "splits", consisting of top-grain, interior, and underside. While the first two splits are processed into leather that's finished to be all smooth and shiny, the underside split is what's used to make our suede. Just like our own skin, the outer layers of cowhide are tougher than the new skin underneath, which is why these layers are usually used to make firmer, more rigid leathers. In contrast, the underside layer used to make suede has a lot more flexibility, making it ideal for when comfort is a priority. Think of it this way, a black motorcycle jacket made with top-grain leather is usually going to weigh a ton and be really stiff before it's broken in, while a suede jacket is going to be relatively light and flexible right from the start. In addition to all this, suedes have varying degrees of "nap" (the little hairs that stick out from the leather). The length of the nap depends on how it's processed and is usually a good indicator of quality. A really short nap is going to be more expensive, but will have a great 'velvety' appearance.</p>
<p>For this tutorial, we'll be waxing a pair of suede <a title="Julian Crepe Chukka Boot" href="http://www.wolverine.com/US/en/julian-crepe-chukka-boot/18266M.html?dwvar_18266M_color=W00652#start=1">1883 Wolverine Men's Chukkas</a>.</p>
<p style="float: left;">Applying our Heavy Duty Fabric Wax to suede is relatively straight forward project, however I've thrown in a couple of optional steps depending on what look you want to achieve. From start to finish this project took about 30 minutes, and used up about 3/4 of one of our <a href="http://www.otterwax.com/collections/fabric-care/products/otter-wax-regular-bar">Regular Size Otter Wax</a> bars.</p>
<div style="float: left;"></div>
<div style="text-align: center;"><img alt="How to Wax Suede with Otter Wax" src="//cdn.shopify.com/s/files/1/0189/5302/files/2_large.jpg?11170965148766923440" style="float: none;"></div>
<p> </p>
<p style="text-align: left;">I'd say the suede has a medium nap, but the top part of the boot seems to be made with slightly higher grade. It doesn't really matter though, since the wax we'll be applying is going to lay all of those leather fibers down. One of the things I really like about finishing suede with our wax is how it will take on the appearance of a smooth patent leather, but there's still some degree of texture left, giving it a much more natural look. Wolverine lists the color as Crepe, but they're almost a medium brown. Once waxed, they will darken up considerably.</p>
<p> </p>
<p style="text-align: center;"><img alt="Step 1: Remove the laces." src="//cdn.shopify.com/s/files/1/0189/5302/files/Step-1_d40b661c-ca2f-438d-a5b2-82fadb474819.jpg?v=1490378779" style="float: none;"></p>
<p style="text-align: center;"><img alt="Step 2: Stuff boot with crumpled paper so that everything is supported evenly. I wouldn't advise using a shoe horn since it won't support the top half of the boot." src="//cdn.shopify.com/s/files/1/0189/5302/files/Step-2_10de29a9-44f7-4da4-912c-ae9142cd8c18.jpg?v=1490378849" style="float: none;"></p>
<p style="text-align: center;"><img alt="Step 3: Make sure that the suede is free of any dirt, dust, or debris. A horsehair brush does a great job and is gentle on the leather (Brushes available here). " src="//cdn.shopify.com/s/files/1/0189/5302/files/Step-3_23f429d1-ef5b-451a-b0f0-c695e4add63a.jpg?v=1490378878" style="float: none;"></p>
<p style="text-align: center;"><img alt="Step 4: Start rubbing the wax onto the suede. Use a little bit of pressure while rubbing the bar back and forth to create friction. This helps soften the wax and makes is spread out easier." src="//cdn.shopify.com/s/files/1/0189/5302/files/Step-4_30d10ace-eefc-479d-8aae-cb1c8a9b38d0.jpg?v=1490378969" style="float: none;"></p>
<p style="text-align: center;"><img alt="Step 5: Start by applying the wax to one part of the boot at a time. Once it's been applied to a medium size area, smooth it out with your fingers to create an even coating." src="//cdn.shopify.com/s/files/1/0189/5302/files/Step-5_736f09f9-224f-4235-aeb8-79da46213a37.jpg?v=1490378902" style="float: none;"></p>
<p style="text-align: center;"><img alt="Step 6: Use the edges of the bar to reach difficult areas." src="//cdn.shopify.com/s/files/1/0189/5302/files/Step-6_d4bcce35-c267-427d-a55e-bbcfe4545fa5.jpg?v=1490379006" style="float: none;"></p>
<p style="text-align: center;"><img alt="Step 7: Thoroughly coat the seams." src="//cdn.shopify.com/s/files/1/0189/5302/files/Step-7_d7d03d10-39ec-4f48-bc90-e44cd292d2e8.jpg?v=1490379042" style="float: none;"></p>
<p style="text-align: center;"><img alt="Step 8: To help spread the wax faster, use a heat gun to warm up the end of the bar. When the wax gets shiny from melting, apply directly to the leather. Use caution to prevent burning either yourself or the leather. Always use on the lowest setting." src="//cdn.shopify.com/s/files/1/0189/5302/files/Step-8_efa38316-01ad-43dc-bc7b-0fdb247c44a2.jpg?v=1490379065" style="float: none;"></p>
<p style="text-align: center;"><img alt="Step 9: When using a heat gun to help spread the wax, you're going to end up with a pretty heavy coating of wax. At this point, you might be wondering what you've gotten yourself into. Everything is going to be just fine once we move on to the next step." src="//cdn.shopify.com/s/files/1/0189/5302/files/Step-9_a72bf494-3361-477a-b8de-e55d98a20ac4.jpg?v=1490379089" style="float: none;"></p>
<p style="text-align: center;"><img alt="Step 10: To create an even coloration, melt the wax into the suede. The wax will get shiny for a second and then absorb into the suede as the pores open up from the heat." src="//cdn.shopify.com/s/files/1/0189/5302/files/Step-10_a634c7cd-80ab-40ca-8599-b7233d188b17.jpg?v=1490379128" style="float: none;"></p>
<p style="text-align: center;"><img alt="Note: If you like the idea of a more matte finish, you can stop at this point. Skip to step 12 to see how to to clean everything up and get rid of any leftover wax left in those hard to reach spots." src="//cdn.shopify.com/s/files/1/0189/5302/files/Sidenote_da04547f-8371-4a8f-b738-05a88f4d0fd3.jpg?v=1490379159" style="float: none;"></p>
<p style="text-align: center;"><img alt="Step 11: If you want the suede to have a little bit of a shine to it you can add another layer of wax. Apply the wax directly to the leather without using any heat." src="//cdn.shopify.com/s/files/1/0189/5302/files/Step-11_c34eedc0-2423-49ba-8e0e-54d78ccab390.jpg?v=1490379186" style="float: none;"></p>
<p style="text-align: center;"><img alt="Step 12: Use a wooden smoothing tool (available here) or similar item to remove any spots of leftover wax. You can also smooth out any areas that might be slightly uneven." src="//cdn.shopify.com/s/files/1/0189/5302/files/Step-12_16af2042-f620-4258-beaf-88b7f1daa093.jpg?v=1490379209" style="float: none;"></p>
<p style="text-align: center;"><img alt="Step 13: Apply pressure and use the flat side of the tool to remove wax from seams. This helps push the wax into the seam for a better seal and removes excess wax that might have clumped around the threads." src="//cdn.shopify.com/s/files/1/0189/5302/files/Step-13_a3887658-4748-4874-92ee-40cc4fe113a4.jpg?v=1490379231" style="float: none;"></p>
<p style="text-align: center;"><img alt="Before &amp; After. Here's the before-and-after of the waxed suede chukka boot. As time passes, these will develop a great patina on the pressure points (toe, heel, and sides) that will give a little extra shine to the front and sides of the boot." src="//cdn.shopify.com/s/files/1/0189/5302/files/Result_b8fb41c9-b8ec-4106-a9d7-6135bb263e46.jpg?v=1490379269" style="float: none;"></p>
<p style="text-align: center;"><img alt="Final Result The finished Wolverine Chukka waxed with Otter Wax." src="//cdn.shopify.com/s/files/1/0189/5302/files/Result2_05eae8b8-140e-4b59-95c2-77d196c8f42c.jpg?v=1490379317" style="float: none;"></p>
<p style="text-align: center;"><img alt="Field Testing Reapply was as often as necessary or desired." src="//cdn.shopify.com/s/files/1/0189/5302/files/Note_854df873-6ee6-42dd-94b2-d33de41f2ef0.jpg?v=1490379353" style="float: none;"></p>]]>
    </content>
  </entry>
  <entry>
    <id>https://www.otterwax.com/blogs/journal/how-to-shine-leather-blundstone-boots</id>
    <published>2017-03-22T11:51:00-07:00</published>
    <updated>2021-08-12T13:36:39-07:00</updated>
    <link rel="alternate" type="text/html" href="https://www.otterwax.com/blogs/journal/how-to-shine-leather-blundstone-boots"/>
    <title>How To Polish and Shine Leather Blundstone Boots</title>
    <author>
      <name>Otter Wax</name>
    </author>
    <summary type="html">
      <![CDATA[<p>This tutorial covers how to apply Otter Wax Leather Oil. This all-natural treatment is the best way to give your boots a quick shine while also conditioning.</p><p><a class="read-more" href="https://www.otterwax.com/blogs/journal/how-to-shine-leather-blundstone-boots">More</a></p>]]>
    </summary>
    <content type="html">
      <![CDATA[<p><img src="//cdn.shopify.com/s/files/1/0189/5302/files/polishing-1.jpg?v=1508278059" alt=""></p>
<p><img src="//cdn.shopify.com/s/files/1/0189/5302/files/polishing-2.jpg?v=1508278316" alt=""></p>
<p><img src="//cdn.shopify.com/s/files/1/0189/5302/files/polishing-3.jpg?v=1508278497" alt=""></p>
<p><img src="//cdn.shopify.com/s/files/1/0189/5302/files/polishing-4.jpg?v=1508279110" alt=""></p>
<p><img src="//cdn.shopify.com/s/files/1/0189/5302/files/polishing-5.jpg?v=1508279359" alt=""></p>
<p><img src="//cdn.shopify.com/s/files/1/0189/5302/files/polishing-6.jpg?v=1508279754" alt=""></p>]]>
    </content>
  </entry>
  <entry>
    <id>https://www.otterwax.com/blogs/journal/how-to-waterproof-a-hat-with-otter-wax</id>
    <published>2017-03-20T16:47:00-07:00</published>
    <updated>2021-08-12T13:36:39-07:00</updated>
    <link rel="alternate" type="text/html" href="https://www.otterwax.com/blogs/journal/how-to-waterproof-a-hat-with-otter-wax"/>
    <title>How To Waterproof A Hat With Otter Wax</title>
    <author>
      <name>Otter Wax</name>
    </author>
    <summary type="html">
      <![CDATA[<p style="text-align: left;">Of all the different projects to choose from, using Otter Wax to waterproof a hat might be one of the quickest, easiest, and most rewarding. This step-by-step guide will provide you with some tips and strategies for achieving the fantastic look of waxed canvas paired with the function and utility of a waterproof seal.</p><p><a class="read-more" href="https://www.otterwax.com/blogs/journal/how-to-waterproof-a-hat-with-otter-wax">More</a></p>]]>
    </summary>
    <content type="html">
      <![CDATA[<h5>Of all the different projects to choose from, using Otter Wax to waterproof a hat might be one of the quickest, easiest, and most rewarding. The process is pretty straightforward in that you're just rubbing wax onto the surface of the hat and then letting it cure, however the shape of a hat can present some unique challenges. The goal of this step-by-step guide is to provide you with some tips and strategies for achieving the fantastic look of waxed canvas paired with the function and utility of a waterproof seal.</h5>
<h5>What you'll need:</h5>
<ul>
<li>
<h5><a href="https://www.otterwax.com/collections/fabric-care/products/otter-wax-regular-bar?variant=950313709" target="_blank" title="Otter Wax Regular Bar" rel="noopener noreferrer">Otter Wax Regular Bar (1x)</a></h5>
</li>
<li>
<h5>Cotton or Poly-Blend Hat (1x)</h5>
</li>
<li>
<h5>45~60 Minutes</h5>
</li>
</ul>
<p style="text-align: center;"><img alt="How To Wax A Hat With Otter Wax" src="//cdn.shopify.com/s/files/1/0189/5302/files/how-to-wax-a-hat-with-otter-wax-2.jpg?9602676099637019997" style="float: none; margin: 10px 5px 10px 5px;"></p>
<h5 style="text-align: left;">The first thing you're going to want to do is check the manufacturers label to learn what fabric your hat is made from. 100% Cotton is best, and a 60/40 Cotton/Poly Blend will also work well. Our wax bonds best with natural fibers, so you'll probably experience some wax pilling or rejection if the hat is constructed from a fabric where a synthetic material comprises all or a majority of the fabric.</h5>
<h5 style="text-align: left;"></h5>
<p style="float: right;"> </p>
<h5 style="text-align: left;">The hat we're using for this project is from our collaboration with Coal Headwear, the Otter Wax Richmond SE. The hat is your standard 5-panel camp hat with a leather strapback and is 100% Cotton, making it perfect for waxing. The canvas itself is relatively light-weight with a pretty tight weave. This means that it will require less wax than a heavier canvas, but also might require more frequent touch-ups to maintain the waterproofing capabilities.</h5>
<h5 style="text-align: left;">We're using the Richmond SE, but keep in mind that you can do this with virtually any hat, old or new. Just make sure that before waxing the canvas is free of any dirt, dust, or debris that may get sealed in when the wax is applied. You might need to give it a wash, but usually a lint roller will do the trick.</h5>
<h3 style="text-align: center;">Ready. Set. Let's Wax.</h3>
<table>
<tbody>
<tr>
<td style="width: 400px;">
<h2 style="text-align: center; padding-left: 30px;">Step 1:</h2>
<h5 style="padding-left: 30px;">Start with the bill of your hat. This will be the easiest part to wax and will help give you a good idea for how the fabric will look once it's been treated. Use some elbow grease to apply pressure and rub the bar back and forth to create a little friction heat.</h5>
</td>
<td style="text-align: right;"><img alt="How To Wax A Hat With Otter Wax" src="//cdn.shopify.com/s/files/1/0189/5302/files/how-to-wax-a-hat-with-otter-wax-3.jpg?9602676099637019997" style="float: none; margin-left: 0px; margin-right: 0px;"></td>
</tr>
</tbody>
</table>
<table>
<tbody>
<tr>
<td style="width: 400px;">
<h2 style="text-align: center; padding-left: 30px;">Step 2:</h2>
<h5 style="padding-left: 30px;">You're getting there, but if the fabric looks like this, you've still got some work to do. You can see how it's a little splotchy, but what we want is a uniform appearance. Apply some more pressure and create friction to really help work the wax into the fabric.</h5>
</td>
<td style="text-align: right;"><img alt="How To Wax A Hat With Otter Wax" src="//cdn.shopify.com/s/files/1/0189/5302/files/how-to-wax-a-hat-with-otter-wax-4.jpg?9602676099637019997" style="margin-left: 0px; margin-right: 0px; float: none;"></td>
</tr>
</tbody>
</table>
<table>
<tbody>
<tr>
<td style="width: 400px;">
<h2 style="text-align: center; padding-left: 30px;">Step 3:</h2>
<h5 style="padding-left: 30px;">This is what the fabric should look like when fully waxed. Note the uniform appearance. You can also see how wax has penetrated into the threading.  When the hat gets wet, this is most likely where water will be able to penetrate. Making sure these little needle holes are coated with wax is going to offer great protection and is exactly how you want it to look.</h5>
<h5 style="padding-left: 30px;">At this point, don't worry too much about the wax accumulating in the seams. When you're finished you can just scrape the excess wax out with a toothpick.</h5>
</td>
<td style="text-align: right;"><img alt="How To Wax A Hat With Otter Wax" src="//cdn.shopify.com/s/files/1/0189/5302/files/how-to-wax-a-hat-with-otter-wax-5.jpg?9602676099637019997" style="margin-left: 0px; margin-right: 0px; float: none;"></td>
</tr>
</tbody>
</table>
<table>
<tbody>
<tr>
<td style="width: 400px;">
<h2 style="text-align: center; padding-left: 30px;">Step 4:</h2>
<h5 style="padding-left: 30px;">As the wax slowly begins to heat up by way of friction, you'll notice that you can start making longer strokes with the bar. Make sure you're using the edges of the bar to get into the creases and other hard to reach areas.</h5>
</td>
<td style="text-align: right;"><img alt="How To Wax A Hat With Otter Wax" src="//cdn.shopify.com/s/files/1/0189/5302/files/how-to-wax-a-hat-with-otter-wax-6.jpg?9602676099637019997" style="margin-left: 0px; margin-right: 0px; float: none;"></td>
</tr>
</tbody>
</table>
<table>
<tbody>
<tr>
<td style="width: 400px;">
<h2 style="text-align: center; padding-left: 30px;">Step 5:</h2>
<h5 style="padding-left: 30px;">Even if you've done this a million times, after the first coat of wax you'll probably notice that there are still some parts where it didn't spread out evenly. Use your fingers to smooth the wax around and really work it into the fabric until everything looks even.</h5>
</td>
<td style="text-align: right;"><img alt="How To Wax A Hat With Otter Wax" src="//cdn.shopify.com/s/files/1/0189/5302/files/how-to-wax-a-hat-with-otter-wax-7.jpg?9602676099637019997" style="margin-left: 0px; margin-right: 0px; float: none;"></td>
</tr>
</tbody>
</table>
<table>
<tbody>
<tr>
<td style="width: 400px;">
<h2 style="text-align: center; padding-left: 30px;">Step 6:</h2>
<h5 style="padding-left: 30px;">Ok, now for the hard part. This hat doesn't have a lot of structure to it, so it's going to be a little difficult to get it flat enough so that you can wax a large area. Start using shorter strokes and just focus on waxing about 2" section. Once that area is fully waxed, move onto the next.</h5>
<h5 style="padding-left: 30px;">In this picture, I'm using one hand on the inside of the hat to hold the fabric taut and create that small waxing surface.</h5>
</td>
<td style="text-align: right;"><img alt="How To Wax A Hat With Otter Wax" src="//cdn.shopify.com/s/files/1/0189/5302/files/how-to-wax-a-hat-with-otter-wax-8.jpg?9602676099637019997" style="margin-left: 0px; margin-right: 0px; float: none;"></td>
</tr>
</tbody>
</table>
<table>
<tbody>
<tr>
<td style="width: 400px;">
<h2 style="text-align: center; padding-left: 30px;">Step 7:</h2>
<h5 style="padding-left: 30px;">Here's a tip to make this process a little easier. Find a smooth bowl that fits snugly inside the hat. This will give you a nice hard surface that will help prevent the wax from bunching up the fabric* when being applied.</h5>
<h5 style="padding-left: 30px;">*More on this later.</h5>
</td>
<td style="text-align: right;"><img alt="How To Wax A Hat With Otter Wax" src="//cdn.shopify.com/s/files/1/0189/5302/files/how-to-wax-a-hat-with-otter-wax-9.jpg?9602676099637019997" style="margin-left: 0px; margin-right: 0px; float: none;"></td>
</tr>
</tbody>
</table>
<table>
<tbody>
<tr>
<td style="width: 400px;">
<h2 style="text-align: center; padding-left: 30px;">Step 8:</h2>
<h5 style="padding-left: 30px;">Continue working the wax into the fabric one section at a time. Make sure that all of the seams are throughly waxed. Not only will this help to waterproof, but it also helps to protect the thread from fraying over time and will extend the lifespan of the hat.</h5>
</td>
<td style="text-align: right;"><img alt="How To Wax A Hat With Otter Wax" src="//cdn.shopify.com/s/files/1/0189/5302/files/how-to-wax-a-hat-with-otter-wax-10.jpg?9602676099637019997" style="margin-left: 0px; margin-right: 0px; float: none;"></td>
</tr>
</tbody>
</table>
<table>
<tbody>
<tr>
<td style="width: 400px;">
<h2 style="text-align: center; padding-left: 30px;">Step 9:</h2>
<h5 style="padding-left: 30px;">If the hat starts to slide around the bowl, hold it firmly in place while you complete each section.</h5>
</td>
<td style="text-align: right;"><img alt="How To Wax A Hat With Otter Wax" src="//cdn.shopify.com/s/files/1/0189/5302/files/how-to-wax-a-hat-with-otter-wax-11.jpg?9602676099637019997" style="margin-left: 0px; margin-right: 0px; float: none;"></td>
</tr>
</tbody>
</table>
<table>
<tbody>
<tr>
<td style="width: 400px;">
<h2 style="text-align: center; padding-left: 30px;">Step 10:</h2>
<h5 style="padding-left: 30px;">This photo shows some of the bunching that was mentioned earlier. This happens primarily when attempting to use long strokes on a lighter-weight fabric without a lot of rigidity. Sometimes this can be fixed by smoothing the wax into the creases with your fingers, and other times you may have to go over these areas with the bar again to make sure the wax creates a uniform seal.</h5>
<h5 style="padding-left: 30px;">When fully waxed, reapply as often as necessary or desired. It's perfectly fine to apply more wax directly onto previously treated fabric.</h5>
</td>
<td style="text-align: right;"><img alt="How To Wax A Hat With Otter Wax" src="//cdn.shopify.com/s/files/1/0189/5302/files/how-to-wax-a-hat-with-otter-wax-12.jpg?9602676099637019997" style="margin-left: 0px; margin-right: 0px; float: none;"></td>
</tr>
</tbody>
</table>
<table>
<tbody>
<tr>
<td style="text-align: right;"><img alt="How To Wax A Hat With Otter Wax" src="//cdn.shopify.com/s/files/1/0189/5302/files/otter-waxed-cotton-hat-1.jpg?12794127717178209569" style="margin-left: 0px; margin-right: 0px; float: none;"></td>
<td style="text-align: right;"><img alt="How To Wax A Hat With Otter Wax" src="//cdn.shopify.com/s/files/1/0189/5302/files/otter-waxed-cotton-hat-2.jpg?12794127717178209569" style="margin-left: 0px; margin-right: 0px; float: none;"></td>
</tr>
</tbody>
</table>
<h5 style="text-align: left;">Once the hat is fully waxed, you'll probably notice that it still feels slightly tacky to the touch. Of course it is, you just rubbed wax all over it. If this doesn't bother you, you can absolutely wear it immediately, but we typically suggest allowing the wax to "cure" for about 48~72 hours in a warm and dry place to allow the wax to bond with the fibers. This is really a rough estimate on time since there are all sorts of conditions that could lengthen the amount of time it takes for the oils to evaporate off. If it's cold and humid, you can expect it to take a little bit longer to feel dry to the touch.</h5>
<h5 style="text-align: left;">When it comes to cleaning a waxed hat (or any waxed fabric for that matter), remember that washing or drycleaning is completely out of the question. The agitation from washing and the chemicals from drycleaning will break down all the wax that you just applied. Instead, treat small stains or splotches with a soft bristle brush and some of our <a href="https://www.otterwax.com/collections/fabric-care/products/canvas-cleaner?variant=950285737" target="_blank" title="Otter Wax Canvas Cleaner" rel="noopener noreferrer"><span style="text-decoration: underline;">Canvas Cleaner</span></a>. Spot cleaning may still result in losing some wax, but once it's dry you simply reapply some more wax to that spot.</h5>
<h5 style="text-align: left;">If you start to notice that the inside of your hat smells a little funky or starts to feel a little sticky, all you have to do is spray the inside with <a href="https://www.otterwax.com/collections/fabric-care/products/odor-eliminator?variant=1288316316" target="_blank" title="Otter Wax Odor Eliminator" rel="noopener noreferrer"><span style="text-decoration: underline;">Odor Eliminator</span></a>. Odor and stickiness is caused by bacteria living off the moisture that can't escape. Our <a href="https://www.otterwax.com/collections/fabric-care/products/odor-eliminator?variant=1288316316" target="_blank" title="Otter Wax Odor Eliminator" rel="noopener noreferrer"><span style="text-decoration: underline;">Odor Eliminator</span></a> is comprised of cultures of living enzymes that will actually digest the bad bacteria and eliminate the problem rather than just cover it up with fragrance.</h5>
<h5 style="text-align: left;"></h5>
<p style="text-align: center;"><img alt="How To Wax A Hat With Otter Wax" src="//cdn.shopify.com/s/files/1/0189/5302/files/how-to-wax-a-hat-with-otter-wax-13.jpg?v=1477005470" style="margin-top: 10px; margin-bottom: 10px; float: none;"></p>
<p style="text-align: center;"> </p>
<h5 style="text-align: center;">Ready to try it yourself? Just click on the picture below to head over to our shop where you can get yourself a bar and start waxing!</h5>
<p style="text-align: center;"><a href="https://www.otterwax.com/collections/fabric-care/products/otter-wax-regular-bar?variant=950313709" title="Otter Wax Regular Bar"><img alt="Otter Wax Regular Bar" src="//cdn.shopify.com/s/files/1/0189/5302/files/Otter-Wax-Regular-Bar-Open-Box_medium.jpg?v=1477006237" style="display: block; margin-left: auto; margin-right: auto; float: none;"></a></p>]]>
    </content>
  </entry>
  <entry>
    <id>https://www.otterwax.com/blogs/journal/53091589-wet-weather-leather-care</id>
    <published>2015-09-17T12:56:00-07:00</published>
    <updated>2025-10-29T14:10:09-07:00</updated>
    <link rel="alternate" type="text/html" href="https://www.otterwax.com/blogs/journal/53091589-wet-weather-leather-care"/>
    <title>Wet Weather Leather Care</title>
    <author>
      <name>Otter Wax</name>
    </author>
    <summary type="html">
      <![CDATA[<h6><img style="display: block; margin-left: auto; margin-right: auto;" src="//cdn.shopify.com/s/files/1/0189/5302/files/wetweather?6935471563753973851"></h6>
<h6>We all know how expensive a pair of leather boots or shoes can be, so with rainy weather fast approaching we wanted to pass along some tips to help you protect your investment. Remember that leather is skin, but without a system to replenish natural oils, the leather will dry out like a sponge. Otter Wax Leather Care products provide continuous hydration, keeping the leather plumped up and resistant to water and staining.</h6><p><a class="read-more" href="https://www.otterwax.com/blogs/journal/53091589-wet-weather-leather-care">More</a></p>]]>
    </summary>
    <content type="html">
      <![CDATA[<h6><img style="display: block; margin-left: auto; margin-right: auto;" src="//cdn.shopify.com/s/files/1/0189/5302/files/readyforwet.jpg?6375387672697475484"></h6>
<h6>We all know how expensive a pair of leather boots or shoes can be, so with rainy weather fast approaching we wanted to pass along some tips to help you protect your investment. Remember that leather is skin, but without a system to replenish natural oils, the leather will dry out like a sponge. Otter Wax Leather Care products provide continuous hydration, keeping the leather plumped up and resistant to water and staining.</h6>
<table width="100%">
<tbody>
<tr>
<td> <img src="//cdn.shopify.com/s/files/1/0189/5302/files/saddle-soap_compact.jpg?10317310009952844555">
</td>
<td>
<h6>Before conditioning leather, it's always best to start with a clean slate. Dirt, dust, and debris can clog the pores of the leather and prevent conditioning treatments from being absorbed evenly. Our Saddle Soap is made from a base of Beeswax and Castile Soap and provides a deep clean without utilizing harsh detergents or chemicals which can cause leather to dry out and break down over time.</h6>
</td>
</tr>
</tbody>
</table>
<table width="100%">
<tbody>
<tr>
<td> <img src="//cdn.shopify.com/s/files/1/0189/5302/files/leather-salve_compact.jpg?10317310009952844555">
</td>
<td>
<h6>When leather gets dry, it's going to absorb anything it comes into contact with, resulting in water, mud, and salt marks that can leave the leather permanently stained. Our Leather Salve utilizes natural waxes, butters, and oils to quickly and evenly reintroduce vital oils and nutrients to the leather. When the Salve has been absorbed, a thin layer of white wax will form on the surface. Use a horsehair brush or soft cloth to buff until transparent. This thin layer of wax acts as a protective barrier against the elements, but also helps to seal in the oils and nutrients absorbed by the leather.</h6>
</td>
</tr>
</tbody>
</table>
<table width="100%">
<tbody>
<tr>
<td> <img alt="" src="//cdn.shopify.com/s/files/1/0189/5302/files/leather-oil_compact.jpg?10317310009952844555" style="float: left;">
</td>
<td>
<h6>Our Leather Oil is the most versatile product from our Leather Care line. It's a fantastic way to add a bit of natural shine to leather, but it also functions as a quick and easy way to maintain continual hydration and extend the amount of time between full conditioning treatments. Made from a base of safflower and vitamin-E oil, this treatment is rich in oleic acids that are vital to maintaining healthy skin. Simply pour a few drops onto a soft cloth, wipe onto leather, and you're done!</h6>
</td>
</tr>
</tbody>
</table>
<p> </p>
<table width="100%">
<tbody>
<tr>
<td style="float: left;"> <img alt="" src="//cdn.shopify.com/s/files/1/0189/5302/files/boot-wax_compact.jpg?10317310009952844555" style="float: left;">
</td>
<td>
<h6>If your goal is to completely seal leather with a heavy-duty layer of waterproofing, a quick application of our Boot Wax what will do the trick. A thick blend of natural beeswax and lanolin protects leather and is also a great way to make sure all the seams are completely sealed. Before launching a new ship, captains used to coat their propellers with lanolin to prevent barnacles from latching on. One coating would last for the lifetime of the ship, and now we utilize it to help make your boots last a lifetime.</h6>
</td>
</tr>
</tbody>
</table>]]>
    </content>
  </entry>
  <entry>
    <id>https://www.otterwax.com/blogs/journal/17880824-waxing-rising-sun-work-pants-with-otter-wax</id>
    <published>2015-03-26T09:33:00-07:00</published>
    <updated>2021-08-12T13:36:39-07:00</updated>
    <link rel="alternate" type="text/html" href="https://www.otterwax.com/blogs/journal/17880824-waxing-rising-sun-work-pants-with-otter-wax"/>
    <title>How To Wax A Pair Of Rising Sun Canvas Work Pants</title>
    <author>
      <name>Otter Wax</name>
    </author>
    <summary type="html">
      <![CDATA[<span>This video tutorial covers how to apply Otter Wax Fabric Wax to a pair of Rising Sun Denim work pants.</span><p><a class="read-more" href="https://www.otterwax.com/blogs/journal/17880824-waxing-rising-sun-work-pants-with-otter-wax">More</a></p>]]>
    </summary>
    <content type="html">
      <![CDATA[<center><iframe src="https://player.vimeo.com/video/104980535?color=ffffff&amp;title=0&amp;byline=0&amp;portrait=0" webkitallowfullscreen="" mozallowfullscreen="" allowfullscreen="" frameborder="0" height="500" width="750"></iframe></center>]]>
    </content>
  </entry>
</feed>
