https://proedu.com/blogs/news.atomPRO EDU - PRO EDU News & Updates2025-04-29T10:09:45-05:00PRO EDUhttps://proedu.com/blogs/news/discover-a-new-approach-to-photo-editing-retouch4me-62025-04-29T10:09:45-05:002025-04-29T10:16:22-05:00Discover a new approach to photo editing: Retouch4meGary MartinAs a photographer, you know how challenging it can be to manage a large volume of images after a photoshoot. Whether you are a beginner, an advanced enthusiast, or an experienced professional, sorting photos, optimizing their quality, and enhancing specific aspects such as colors, contrast, and sharpness takes a lot of time.
If you work with commercial clients who have tight schedules and high expectations, the challenge becomes even greater. By optimizing your editing workflow, you can deliver high-quality results and exceed your clients' expectations. This leads to more satisfied customers and better business opportunities.
That’s why it’s important to find ways to improve your workflow by taking advantage of efficient solutions—without having to step out of your comfort zone or switch to new software.
Retouch4me focuses on this issue, offering a wide range of AI-powered plugins that provide efficient and precise automatic retouching. Each plugin is designed to handle different aspects of photo retouching, ensuring high-quality image editing. These plugins include tools for skin retouching, skin tone adjustments, clothing enhancements, and color correction—providing a complete set of features for time-saving editing.
This way, you can achieve satisfying results while improving the efficiency of your editing workflow. Retouch4me acts as your personal retouching assistant, allowing you to speed up the process by 80% to 100% without working overtime.
Unlike other photo editing software, Retouch4me preserves the natural skin texture and other image details, ensuring that the final edited image looks realistic and natural.
Who is it for?
Photo editing plays a crucial role in enhancing the quality of images across various genres. Different types of photos require different editing approaches, making Retouch4me an ideal platform for photographers, designers, advertising agencies, and institutions working with visual content.
With its editing tools, Retouch4me is also highly beneficial for professional retouchers working in studios or as freelancers.
Additionally, Retouch4me serves as a valuable platform for educational institutions, including schools, colleges, and universities that offer courses in photography and retouching. The platform can be used to teach students both basic and advanced retouching techniques.
How It Works
Retouch4me offers flexible plugins that can be used independently or as part of popular photo editing software like Adobe Photoshop and Capture One. This gives you the freedom to choose your preferred program and work with maximum flexibility. You can access the plugins through the Retouch4me panel, which can be downloaded for free from their website. It is easy to access, and its user-friendly interface makes navigating and using the plugins simple.
The plugins function as layers, keeping your original image intact while giving you control over adjusting each effect individually (if needed). Whether you are working on a single image or processing a large batch, the plugins efficiently handle multiple images, making batch editing effortless.
The Retouch4me team is committed to continuously improving and updating their plugins to provide you with the most advanced photo editing tools. If you have any questions that are not answered on the FAQ page or in the available tutorials, you can use the live chat feature on their website for assistance.
Retouch4me plugins are compatible with Windows 7 (x64), Windows 10 (x64), Windows 11, and macOS 10.14+.
Overview: AI Plugins for Automated Retouching
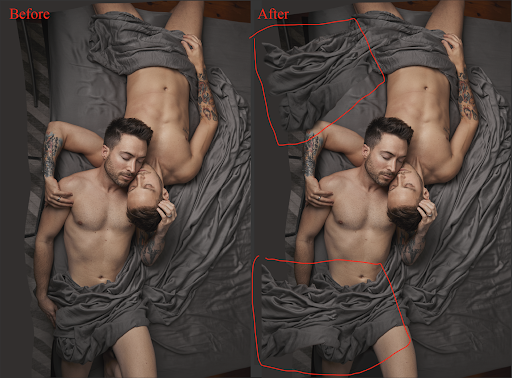
To showcase the effectiveness of their plugins, Retouch4me provides demo presentations and before-and-after images on their website. You can also test all plugins for free to experience the high-quality results for yourself.
Pricing
Retouch4me offers a collection of fifteen plugins, two of which are free. The free plugins include Frequency Separation and Color Match. The latter gives you access to a LUT Cloud, which contains a library of ready-to-use free color filters as well as premium packs available for purchase.
Most plugins can be purchased individually for $124, including Eye Vessels, Heal, Eye Brilliance, Portrait Volumes, Skin Tone, White Teeth, Fabric, Skin Mask, Mattifier, and Dust. Only two plugins, Dodge & Burn and Clean Backdrop, are priced slightly higher at $149. The eye-related plugins are also available as a cost-effective bundle.
At first glance, the total price of approximately $1,500 for all plugins may seem high. However, when considering the amount of time saved from not having to manually perform all these retouching tasks, the investment becomes worthwhile. Regular use of these plugins means less pressure, less stress, and significantly less effort in post-production.
]]>
https://proedu.com/blogs/news/discover-a-new-approach-to-photo-editing-retouch4me-52025-04-29T10:09:45-05:002025-04-29T10:14:06-05:00Discover a new approach to photo editing: Retouch4meGary MartinAs a photographer, you know how challenging it can be to manage a large volume of images after a photoshoot. Whether you are a beginner, an advanced enthusiast, or an experienced professional, sorting photos, optimizing their quality, and enhancing specific aspects such as colors, contrast, and sharpness takes a lot of time.
If you work with commercial clients who have tight schedules and high expectations, the challenge becomes even greater. By optimizing your editing workflow, you can deliver high-quality results and exceed your clients' expectations. This leads to more satisfied customers and better business opportunities.
That’s why it’s important to find ways to improve your workflow by taking advantage of efficient solutions—without having to step out of your comfort zone or switch to new software.
Enter Retouch4me...
Retouch4me focuses on this issue, offering a wide range of AI-powered plugins that provide efficient and precise automatic retouching. Each plugin is designed to handle different aspects of photo retouching, ensuring high-quality image editing. These plugins include tools for skin retouching, skin tone adjustments, clothing enhancements, and color correction—providing a complete set of features for time-saving editing.
This way, you can achieve satisfying results while improving the efficiency of your editing workflow. Retouch4me acts as your personal retouching assistant, allowing you to speed up the process by 80% to 100% without working overtime.
Unlike other photo editing software, Retouch4me preserves the natural skin texture and other image details, ensuring that the final edited image looks realistic and natural.
Who is it for?
Photo editing plays a crucial role in enhancing the quality of images across various genres. Different types of photos require different editing approaches, making Retouch4me an ideal platform for photographers, designers, advertising agencies, and institutions working with visual content.
With its editing tools, Retouch4me is also highly beneficial for professional retouchers working in studios or as freelancers.
Additionally, Retouch4me serves as a valuable platform for educational institutions, including schools, colleges, and universities that offer courses in photography and retouching. The platform can be used to teach students both basic and advanced retouching techniques.
How It Works
Retouch4me offers flexible plugins that can be used independently or as part of popular photo editing software like Adobe Photoshop and Capture One. This gives you the freedom to choose your preferred program and work with maximum flexibility. You can access the plugins through the Retouch4me panel, which can be downloaded for free from their website. It is easy to access, and its user-friendly interface makes navigating and using the plugins simple.
The plugins function as layers, keeping your original image intact while giving you control over adjusting each effect individually (if needed). Whether you are working on a single image or processing a large batch, the plugins efficiently handle multiple images, making batch editing effortless.
The Retouch4me team is committed to continuously improving and updating their plugins to provide you with the most advanced photo editing tools. If you have any questions that are not answered on the FAQ page or in the available tutorials, you can use the live chat feature on their website for assistance.
Retouch4me plugins are compatible with Windows 7 (x64), Windows 10 (x64), Windows 11, and macOS 10.14+.
Overview: AI Plugins for Automated Retouching
To showcase the effectiveness of their plugins, Retouch4me provides demo presentations and before-and-after images on their website. You can also test all plugins for free to experience the high-quality results for yourself.
Pricing
Retouch4me offers a collection of fifteen plugins, two of which are free. The free plugins include Frequency Separation and Color Match. The latter gives you access to a LUT Cloud, which contains a library of ready-to-use free color filters as well as premium packs available for purchase.
Most plugins can be purchased individually for $124, including Eye Vessels, Heal, Eye Brilliance, Portrait Volumes, Skin Tone, White Teeth, Fabric, Skin Mask, Mattifier, and Dust. Only two plugins, Dodge & Burn and Clean Backdrop, are priced slightly higher at $149. The eye-related plugins are also available as a cost-effective bundle.
At first glance, the total price of approximately $1,500 for all plugins may seem high. However, when considering the amount of time saved from not having to manually perform all these retouching tasks, the investment becomes worthwhile. Regular use of these plugins means less pressure, less stress, and significantly less effort in post-production.
]]>
https://proedu.com/blogs/news/discover-a-new-approach-to-photo-editing-retouch4me-42025-04-29T10:09:45-05:002025-04-29T10:12:50-05:00Discover a new approach to photo editing: Retouch4meGary MartinAs a photographer, you know how challenging it can be to manage a large volume of images after a photoshoot. Whether you are a beginner, an advanced enthusiast, or an experienced professional, sorting photos, optimizing their quality, and enhancing specific aspects such as colors, contrast, and sharpness takes a lot of time.
If you work with commercial clients who have tight schedules and high expectations, the challenge becomes even greater. By optimizing your editing workflow, you can deliver high-quality results and exceed your clients' expectations. This leads to more satisfied customers and better business opportunities.
That’s why it’s important to find ways to improve your workflow by taking advantage of efficient solutions—without having to step out of your comfort zone or switch to new software.
Enter Retouch4me...
Retouch4me focuses on this issue, offering a wide range of AI-powered plugins that provide efficient and precise automatic retouching. Each plugin is designed to handle different aspects of photo retouching, ensuring high-quality image editing. These plugins include tools for skin retouching, skin tone adjustments, clothing enhancements, and color correction—providing a complete set of features for time-saving editing.
This way, you can achieve satisfying results while improving the efficiency of your editing workflow. Retouch4me acts as your personal retouching assistant, allowing you to speed up the process by 80% to 100% without working overtime.
Unlike other photo editing software, Retouch4me preserves the natural skin texture and other image details, ensuring that the final edited image looks realistic and natural.
Who is it for?
Photo editing plays a crucial role in enhancing the quality of images across various genres. Different types of photos require different editing approaches, making Retouch4me an ideal platform for photographers, designers, advertising agencies, and institutions working with visual content.
With its editing tools, Retouch4me is also highly beneficial for professional retouchers working in studios or as freelancers.
Additionally, Retouch4me serves as a valuable platform for educational institutions, including schools, colleges, and universities that offer courses in photography and retouching. The platform can be used to teach students both basic and advanced retouching techniques.
How It Works
Retouch4me offers flexible plugins that can be used independently or as part of popular photo editing software like Adobe Photoshop and Capture One. This gives you the freedom to choose your preferred program and work with maximum flexibility. You can access the plugins through the Retouch4me panel, which can be downloaded for free from their website. It is easy to access, and its user-friendly interface makes navigating and using the plugins simple.
The plugins function as layers, keeping your original image intact while giving you control over adjusting each effect individually (if needed). Whether you are working on a single image or processing a large batch, the plugins efficiently handle multiple images, making batch editing effortless.
The Retouch4me team is committed to continuously improving and updating their plugins to provide you with the most advanced photo editing tools. If you have any questions that are not answered on the FAQ page or in the available tutorials, you can use the live chat feature on their website for assistance.
Retouch4me plugins are compatible with Windows 7 (x64), Windows 10 (x64), Windows 11, and macOS 10.14+.
Overview: AI Plugins for Automated Retouching
To showcase the effectiveness of their plugins, Retouch4me provides demo presentations and before-and-after images on their website. You can also test all plugins for free to experience the high-quality results for yourself.
Pricing
Retouch4me offers a collection of fifteen plugins, two of which are free. The free plugins include Frequency Separation and Color Match. The latter gives you access to a LUT Cloud, which contains a library of ready-to-use free color filters as well as premium packs available for purchase.
Most plugins can be purchased individually for $124, including Eye Vessels, Heal, Eye Brilliance, Portrait Volumes, Skin Tone, White Teeth, Fabric, Skin Mask, Mattifier, and Dust. Only two plugins, Dodge & Burn and Clean Backdrop, are priced slightly higher at $149. The eye-related plugins are also available as a cost-effective bundle.
At first glance, the total price of approximately $1,500 for all plugins may seem high. However, when considering the amount of time saved from not having to manually perform all these retouching tasks, the investment becomes worthwhile. Regular use of these plugins means less pressure, less stress, and significantly less effort in post-production.
]]>
https://proedu.com/blogs/news/discover-a-new-approach-to-photo-editing-retouch4me-32025-04-29T10:09:45-05:002025-04-29T10:12:24-05:00Discover a new approach to photo editing: Retouch4meGary Martin
As a photographer, you know how challenging it can be to manage a large volume of images after a photoshoot. Whether you are a beginner, an advanced enthusiast, or an experienced professional, sorting photos, optimizing their quality, and enhancing specific aspects such as colors, contrast, and sharpness takes a lot of time.
If you work with commercial clients who have tight schedules and high expectations, the challenge becomes even greater. By optimizing your editing workflow, you can deliver high-quality results and exceed your clients' expectations. This leads to more satisfied customers and better business opportunities.
That’s why it’s important to find ways to improve your workflow by taking advantage of efficient solutions—without having to step out of your comfort zone or switch to new software.
Enter Retouch4me...
Retouch4me focuses on this issue, offering a wide range of AI-powered plugins that provide efficient and precise automatic retouching. Each plugin is designed to handle different aspects of photo retouching, ensuring high-quality image editing. These plugins include tools for skin retouching, skin tone adjustments, clothing enhancements, and color correction—providing a complete set of features for time-saving editing.
This way, you can achieve satisfying results while improving the efficiency of your editing workflow. Retouch4me acts as your personal retouching assistant, allowing you to speed up the process by 80% to 100% without working overtime.
Unlike other photo editing software, Retouch4me preserves the natural skin texture and other image details, ensuring that the final edited image looks realistic and natural.
Who is it for?
Photo editing plays a crucial role in enhancing the quality of images across various genres. Different types of photos require different editing approaches, making Retouch4me an ideal platform for photographers, designers, advertising agencies, and institutions working with visual content.
With its editing tools, Retouch4me is also highly beneficial for professional retouchers working in studios or as freelancers.
Additionally, Retouch4me serves as a valuable platform for educational institutions, including schools, colleges, and universities that offer courses in photography and retouching. The platform can be used to teach students both basic and advanced retouching techniques.
How It Works
Retouch4me offers flexible plugins that can be used independently or as part of popular photo editing software like Adobe Photoshop and Capture One. This gives you the freedom to choose your preferred program and work with maximum flexibility. You can access the plugins through the Retouch4me panel, which can be downloaded for free from their website. It is easy to access, and its user-friendly interface makes navigating and using the plugins simple.
The plugins function as layers, keeping your original image intact while giving you control over adjusting each effect individually (if needed). Whether you are working on a single image or processing a large batch, the plugins efficiently handle multiple images, making batch editing effortless.
The Retouch4me team is committed to continuously improving and updating their plugins to provide you with the most advanced photo editing tools. If you have any questions that are not answered on the FAQ page or in the available tutorials, you can use the live chat feature on their website for assistance.
Retouch4me plugins are compatible with Windows 7 (x64), Windows 10 (x64), Windows 11, and macOS 10.14+.
Overview: AI Plugins for Automated Retouching
To showcase the effectiveness of their plugins, Retouch4me provides demo presentations and before-and-after images on their website. You can also test all plugins for free to experience the high-quality results for yourself.
Pricing
Retouch4me offers a collection of fifteen plugins, two of which are free. The free plugins include Frequency Separation and Color Match. The latter gives you access to a LUT Cloud, which contains a library of ready-to-use free color filters as well as premium packs available for purchase.
Most plugins can be purchased individually for $124, including Eye Vessels, Heal, Eye Brilliance, Portrait Volumes, Skin Tone, White Teeth, Fabric, Skin Mask, Mattifier, and Dust. Only two plugins, Dodge & Burn and Clean Backdrop, are priced slightly higher at $149. The eye-related plugins are also available as a cost-effective bundle.
At first glance, the total price of approximately $1,500 for all plugins may seem high. However, when considering the amount of time saved from not having to manually perform all these retouching tasks, the investment becomes worthwhile. Regular use of these plugins means less pressure, less stress, and significantly less effort in post-production.
]]>
https://proedu.com/blogs/news/discover-a-new-approach-to-photo-editing-retouch4me-22025-04-29T10:09:45-05:002025-04-29T10:12:13-05:00Discover a new approach to photo editing: Retouch4meGary Martin
As a photographer, you know how challenging it can be to manage a large volume of images after a photoshoot. Whether you are a beginner, an advanced enthusiast, or an experienced professional, sorting photos, optimizing their quality, and enhancing specific aspects such as colors, contrast, and sharpness takes a lot of time.
If you work with commercial clients who have tight schedules and high expectations, the challenge becomes even greater. By optimizing your editing workflow, you can deliver high-quality results and exceed your clients' expectations. This leads to more satisfied customers and better business opportunities.
That’s why it’s important to find ways to improve your workflow by taking advantage of efficient solutions—without having to step out of your comfort zone or switch to new software.
Enter Retouch4me...
Retouch4me focuses on this issue, offering a wide range of AI-powered plugins that provide efficient and precise automatic retouching. Each plugin is designed to handle different aspects of photo retouching, ensuring high-quality image editing. These plugins include tools for skin retouching, skin tone adjustments, clothing enhancements, and color correction—providing a complete set of features for time-saving editing.
This way, you can achieve satisfying results while improving the efficiency of your editing workflow. Retouch4me acts as your personal retouching assistant, allowing you to speed up the process by 80% to 100% without working overtime.
Unlike other photo editing software, Retouch4me preserves the natural skin texture and other image details, ensuring that the final edited image looks realistic and natural.
Who is it for?
Photo editing plays a crucial role in enhancing the quality of images across various genres. Different types of photos require different editing approaches, making Retouch4me an ideal platform for photographers, designers, advertising agencies, and institutions working with visual content.
With its editing tools, Retouch4me is also highly beneficial for professional retouchers working in studios or as freelancers.
Additionally, Retouch4me serves as a valuable platform for educational institutions, including schools, colleges, and universities that offer courses in photography and retouching. The platform can be used to teach students both basic and advanced retouching techniques.
How It Works
Retouch4me offers flexible plugins that can be used independently or as part of popular photo editing software like Adobe Photoshop and Capture One. This gives you the freedom to choose your preferred program and work with maximum flexibility. You can access the plugins through the Retouch4me panel, which can be downloaded for free from their website. It is easy to access, and its user-friendly interface makes navigating and using the plugins simple.
The plugins function as layers, keeping your original image intact while giving you control over adjusting each effect individually (if needed). Whether you are working on a single image or processing a large batch, the plugins efficiently handle multiple images, making batch editing effortless.
The Retouch4me team is committed to continuously improving and updating their plugins to provide you with the most advanced photo editing tools. If you have any questions that are not answered on the FAQ page or in the available tutorials, you can use the live chat feature on their website for assistance.
Retouch4me plugins are compatible with Windows 7 (x64), Windows 10 (x64), Windows 11, and macOS 10.14+.
Overview: AI Plugins for Automated Retouching
To showcase the effectiveness of their plugins, Retouch4me provides demo presentations and before-and-after images on their website. You can also test all plugins for free to experience the high-quality results for yourself.
Pricing
Retouch4me offers a collection of fifteen plugins, two of which are free. The free plugins include Frequency Separation and Color Match. The latter gives you access to a LUT Cloud, which contains a library of ready-to-use free color filters as well as premium packs available for purchase.
Most plugins can be purchased individually for $124, including Eye Vessels, Heal, Eye Brilliance, Portrait Volumes, Skin Tone, White Teeth, Fabric, Skin Mask, Mattifier, and Dust. Only two plugins, Dodge & Burn and Clean Backdrop, are priced slightly higher at $149. The eye-related plugins are also available as a cost-effective bundle.
At first glance, the total price of approximately $1,500 for all plugins may seem high. However, when considering the amount of time saved from not having to manually perform all these retouching tasks, the investment becomes worthwhile. Regular use of these plugins means less pressure, less stress, and significantly less effort in post-production.
]]>
https://proedu.com/blogs/news/discover-a-new-approach-to-photo-editing-retouch4me-12025-04-29T10:09:45-05:002025-04-29T10:09:48-05:00Discover a new approach to photo editing: Retouch4meGary Martin
As a photographer, you know how challenging it can be to manage a large volume of images after a photoshoot. Whether you are a beginner, an advanced enthusiast, or an experienced professional, sorting photos, optimizing their quality, and enhancing specific aspects such as colors, contrast, and sharpness takes a lot of time.
If you work with commercial clients who have tight schedules and high expectations, the challenge becomes even greater. By optimizing your editing workflow, you can deliver high-quality results and exceed your clients' expectations. This leads to more satisfied customers and better business opportunities.
That’s why it’s important to find ways to improve your workflow by taking advantage of efficient solutions—without having to step out of your comfort zone or switch to new software.
Enter Retouch4me...
Retouch4me focuses on this issue, offering a wide range of AI-powered plugins that provide efficient and precise automatic retouching. Each plugin is designed to handle different aspects of photo retouching, ensuring high-quality image editing. These plugins include tools for skin retouching, skin tone adjustments, clothing enhancements, and color correction—providing a complete set of features for time-saving editing.
This way, you can achieve satisfying results while improving the efficiency of your editing workflow. Retouch4me acts as your personal retouching assistant, allowing you to speed up the process by 80% to 100% without working overtime.
Unlike other photo editing software, Retouch4me preserves the natural skin texture and other image details, ensuring that the final edited image looks realistic and natural.
Who is it for?
Photo editing plays a crucial role in enhancing the quality of images across various genres. Different types of photos require different editing approaches, making Retouch4me an ideal platform for photographers, designers, advertising agencies, and institutions working with visual content.
With its editing tools, Retouch4me is also highly beneficial for professional retouchers working in studios or as freelancers.
Additionally, Retouch4me serves as a valuable platform for educational institutions, including schools, colleges, and universities that offer courses in photography and retouching. The platform can be used to teach students both basic and advanced retouching techniques.
How It Works
Retouch4me offers flexible plugins that can be used independently or as part of popular photo editing software like Adobe Photoshop and Capture One. This gives you the freedom to choose your preferred program and work with maximum flexibility. You can access the plugins through the Retouch4me panel, which can be downloaded for free from their website. It is easy to access, and its user-friendly interface makes navigating and using the plugins simple.
The plugins function as layers, keeping your original image intact while giving you control over adjusting each effect individually (if needed). Whether you are working on a single image or processing a large batch, the plugins efficiently handle multiple images, making batch editing effortless.
The Retouch4me team is committed to continuously improving and updating their plugins to provide you with the most advanced photo editing tools. If you have any questions that are not answered on the FAQ page or in the available tutorials, you can use the live chat feature on their website for assistance.
Retouch4me plugins are compatible with Windows 7 (x64), Windows 10 (x64), Windows 11, and macOS 10.14+.
Overview: AI Plugins for Automated Retouching
To showcase the effectiveness of their plugins, Retouch4me provides demo presentations and before-and-after images on their website. You can also test all plugins for free to experience the high-quality results for yourself.
Pricing
Retouch4me offers a collection of fifteen plugins, two of which are free. The free plugins include Frequency Separation and Color Match. The latter gives you access to a LUT Cloud, which contains a library of ready-to-use free color filters as well as premium packs available for purchase.
Most plugins can be purchased individually for $124, including Eye Vessels, Heal, Eye Brilliance, Portrait Volumes, Skin Tone, White Teeth, Fabric, Skin Mask, Mattifier, and Dust. Only two plugins, Dodge & Burn and Clean Backdrop, are priced slightly higher at $149. The eye-related plugins are also available as a cost-effective bundle.
At first glance, the total price of approximately $1,500 for all plugins may seem high. However, when considering the amount of time saved from not having to manually perform all these retouching tasks, the investment becomes worthwhile. Regular use of these plugins means less pressure, less stress, and significantly less effort in post-production.
]]>
https://proedu.com/blogs/news/learn-photography-online-master-your-camera-skills-from-home2024-11-27T16:24:43-06:002024-11-28T13:10:39-06:00Learn Photography Online: Master Your Camera Skills from HomeGary MartinMore]]>
Learning photography online has become a popular way to develop skills and creativity from the comfort of home. Many courses are available, so photographers of all levels can find something to suit their needs.
We can start our journey by exploring beginner-friendly options that teach the fundamentals of composition and camera settings. As we progress, we can move on to more specialized topics like portrait lighting or landscape photography.
One of the best things about online learning is the flexibility it offers. We can study at our own pace, fitting lessons around our schedules. This makes it easier to balance our photography education with other commitments.
Key Takeaways
Online courses cater to all skill levels, from beginners to advanced photographers
We can learn specialized techniques and post-processing skills through targeted online classes
Flexible learning options allow us to improve our photography at our own pace
Understanding the Basics
Learning photography starts with grasping key concepts. We'll explore different types of photography, learn about exposure settings, and discover how to create visually appealing images.
Exploring Photography Genres
Photography offers many exciting genres to try. Landscape photography captures nature's beauty. Portrait photography focuses on people. Street photography documents everyday life.
Wildlife photography lets us get close to animals. Macro photography reveals tiny details. Sports photography freezes action. Fashion photography showcases style and trends.
Each genre has its own techniques. Landscape photographers use wide-angle lenses. Portrait artists work on posing and lighting. Street photographers need quick reflexes.
We suggest trying different genres. This helps you find what you enjoy most. It also builds varied skills that make you a better photographer overall.
Mastering the Exposure Triangle
The exposure triangle is key to taking good photos. It includes three elements: aperture, shutter speed, and ISO. These work together to create proper exposure.
Shutter speed affects motion blur. Fast speeds freeze action, while slow speeds create blur.
ISO changes the camera's light sensitivity. Higher ISO works better in low light but can add noise.
We need to balance these three elements. This helps us achieve the right exposure and creative effects in our photos.
Learning Composition Techniques
Good composition makes photos more appealing. The rule of thirds is a basic guideline. We imagine a grid over our image. Important elements should line up with these lines or intersections.
Leading lines guide the viewer's eye through the photo. These can be roads, fences, or other linear elements.
Framing uses objects in the scene to surround the main subject. This draws attention to the focal point.
Symmetry and patterns create visual interest. We can find these in nature or architecture.
Balance is important too. We distribute visual weight evenly in the frame.
By practicing these techniques, we improve our photo composition skills. This helps us create more engaging and powerful images.
Choosing the Right Equipment
Picking the right camera and understanding its settings are key steps for new photographers. We'll explore the pros and cons of different camera types and explain essential settings to help you get started.
Mirrorless cameras are newer and gaining popularity. They're often smaller and lighter than DSLRs. Mirrorless models use electronic viewfinders, which show a preview of your shot with current settings applied.
Both types can produce excellent photos. We recommend trying out both to see which feels more comfortable in your hands. Consider factors like size, weight, and available lenses when making your choice.
Understanding Camera Settings
Mastering camera settings is crucial for taking control of your photos. The three main settings to learn are aperture, shutter speed, and ISO.
Aperture controls depth of field. A wider aperture (smaller f-number) creates a blurrier background. Shutter speed affects motion blur. Faster speeds freeze action, while slower speeds can create artistic blur.
ISO adjusts the camera's light sensitivity. Higher ISO values are useful in low light but can introduce noise. We suggest starting in aperture priority mode to practice adjusting these settings.
Photography skills take practice to develop. We'll explore key techniques for capturing stunning portraits, weddings, landscapes, and documentary images.
Portrait and Wedding Photography
Portrait and wedding photography require attention to detail and people skills. We recommend using natural light when possible for flattering portraits. Position subjects near windows or in shaded outdoor areas. For group shots, arrange people in a staggered formation rather than straight lines.
Wedding photography demands quick thinking. We suggest creating a shot list with the couple beforehand. This ensures you capture all key moments. Use a mix of candid and posed shots throughout the day. A telephoto lens helps capture emotional moments discreetly.
Key equipment for portraits and weddings:
Fast prime lenses (85mm f/1.8 is versatile)
External flash
Reflector for fill light
Landscape and Documentary Techniques
Landscape photography is about patience and planning. We recommend scouting locations in advance and visiting during golden hour. A sturdy tripod is essential for sharp images in low light. Use a small aperture (f/11-f/16) for wide depth of field.
For compelling compositions, follow the rule of thirds. Include foreground elements to add depth. A polarizing filter can enhance colors and reduce glare.
Documentary photography tells stories through images. We suggest immersing yourself in the subject matter. Build rapport with people you photograph. Anticipate moments before they happen.
Equipment tips for landscapes and documentaries:
Wide-angle lens (16-35mm range)
Neutral density filters
Weather-sealed camera body
Post-Processing and Editing
Post-processing and editing are key skills for digital photographers. These techniques help enhance images and create stunning final results. We'll explore two popular software options for photo editing.
Adobe Photoshop Essentials
Adobe Photoshop is a powerful tool for photo editing. It offers a wide range of features for enhancing images. We use layers to make non-destructive edits, allowing us to adjust our work at any time.
The healing brush and clone stamp tools help remove unwanted elements from photos. For color correction, we rely on adjustment layers like Curves and Levels. These tools give us precise control over brightness, contrast, and color balance.
Photoshop's selection tools are crucial for isolating specific parts of an image. We can then apply effects or make changes to just those areas. The software also provides filters for creative effects and sharpening tools to bring out detail.
Lightroom for Photographers
Lightroom is designed specifically for photographers' workflow needs. It excels at organizing and managing large collections of photos. We use it to import, sort, and tag our images for easy retrieval.
The develop module is where we make most of our edits. We can adjust exposure, contrast, and color with intuitive sliders. Lightroom's presets allow us to apply consistent looks across multiple photos quickly.
For local adjustments, we use brushes and graduated filters. These tools let us enhance specific areas of an image. Lightroom also offers powerful noise reduction and sharpening features to improve image quality.
We can sync edits across multiple photos, saving time when working with similar images. Lightroom's export options help us prepare photos for various uses, from web to print.
Taking Your Photography Further
Photography offers endless opportunities for growth and creativity. We can push our skills to new heights through creative projects and building a professional portfolio.
Creative Projects and Challenges
Creative projects spark innovation and keep our photography fresh. We recommend trying a 365 project, where we take one photo every day for a year. This builds consistency and forces us to find beauty in the everyday.
Another idea is to pick a theme like "red" or "circles" and shoot only that for a week. This trains our eye to spot interesting compositions.
We can also challenge ourselves with new techniques. Long exposure photography captures motion beautifully. Macro photography reveals tiny worlds. Both require practice but yield stunning results.
Joining online photo challenges pushes us out of our comfort zone.
Building a Professional Portfolio
A strong portfolio showcases our best work and personal style. We start by selecting 15-20 of our absolute best images. Quality trumps quantity here.
We organize photos by theme or style for easy viewing. Categories might include portraits, landscapes, or street photography.
Online platforms offer simple ways to create a polished portfolio website. These often include customizable templates designed for photographers.
We make sure to include a brief artist statement. This explains our vision and approach to potential clients.
Regularly updating our portfolio keeps it fresh. We aim to swap out older images with newer, better work every few months.
Education and Coursework
Online photography courses offer a flexible way to learn new skills.
We'll explore how to choose the right course and the benefits of free options.
Beginners may want an introductory course covering camera basics and composition. More advanced photographers might look for specialized topics.
Check the course content and instructor credentials. Look for courses that offer hands-on projects and feedback on your work.
This practical experience is crucial for improving your skills.
Time commitment is another factor. Some courses are self-paced, while others have set schedules. Choose one that fits your lifestyle and learning preferences.
Benefits of Free Online Photography Courses
Free online photography courses are a great way to start learning or expand your skills without financial risk. They often cover a wide range of topics, from basic techniques to more advanced concepts.
These courses allow you to:
Learn at your own pace
Access materials anytime, anywhere
Explore different areas of photography before committing to paid courses
Many free courses are offered by reputable institutions. For example, Michigan State University provides photography courses through online platforms.
While free courses may not offer certificates, they still provide valuable knowledge and practice opportunities. They're ideal for hobbyists or those testing the waters before diving deeper into photography education.
Advancing Your Career
Advancing a career in photography takes skill and strategy. We'll explore how to use photography as a communication tool and market your talents effectively.
Photography as Communication
Photography is a powerful way to share ideas and stories. We need to think about what message our images convey.
Good photos grab attention and make people feel something.
To improve, we should practice different styles. Try landscape, portrait, and street photography. Each type helps us learn new skills.
We can also join online photo groups. These let us get feedback on our work. It's a chance to see how others view our photos.
Taking an online photography course can teach us new techniques. We'll learn about lighting, composition, and editing. These skills help our photos stand out.
Marketing Your Skills
Getting noticed as a photographer takes work. We need to show off our best shots.
Creating a strong portfolio is key. It should highlight our unique style.
Social media is a great tool for photographers. We can share our work on Instagram or Facebook. This helps us reach more people.
Entering photo contests can boost our career. It's not just about winning. Contests let us compare our work to others. They also help us gain exposure.
Networking is crucial. We should attend photo events and workshops. This lets us meet other photographers and potential clients. Building these connections can lead to new opportunities.
Frequently Asked Questions
Online photography courses offer flexible learning options for beginners and experienced photographers alike. Many provide certificates upon completion and can be completed at your own pace. Let's explore some common questions about learning photography online.
What are the best online photography courses for beginners?
Beginners can find great options for learning photography online. Many platforms offer comprehensive courses covering basics like composition, exposure, and camera settings. Some popular choices include Coursera, Udemy, and CreativeLive.
These courses often include video lessons, assignments, and feedback from instructors. They can help new photographers build a strong foundation in technical skills and creative techniques.
Can I obtain a certificate from a free online photography course?
However, not all free courses offer certificates. It's important to check the course details before enrolling if certification is important to you.
How long does it typically take to learn photography online?
The time it takes to learn photography online varies depending on the course and your dedication.
Some short courses can be completed in a few weeks, while more comprehensive programs may take several months.
We recommend setting aside regular time each week for study and practice. Consistency is key in developing your skills and understanding of photography concepts.
Is it possible to become proficient in photography through online courses?
Yes, it's possible to become proficient in photography through online courses.
Many successful photographers have honed their skills through online learning.
Combine online learning with plenty of hands-on practice for best results.
What are the advantages of enrolling in online photography classes?
Online photography classes offer several benefits. They provide flexibility, allowing you to learn at your own pace and schedule. You can access course materials from anywhere with an internet connection.
Many online courses are more affordable than in-person workshops. They often include a wide range of topics, from basic techniques to advanced editing skills.
How do online photography courses compare to in-person workshops?
Online courses and in-person workshops each have their strengths.
Online courses offer flexibility and often cover a broader range of topics over a longer period. They're great for learning at your own pace.
In-person workshops provide hands-on experience and immediate feedback. They're ideal for intensive learning and networking with other photographers.
Consider your learning style and goals when choosing between online and in-person options.
]]>
https://proedu.com/blogs/news/meaning-of-portraiture-exploring-identity-through-art2024-11-27T16:24:32-06:002024-11-28T13:10:43-06:00Meaning of Portraiture: Exploring Identity Through ArtGary MartinMore]]>
Portraiture is a fascinating art form that captures the essence of individuals. It goes beyond simply creating a likeness. The making of portraits involves skill, insight, and the ability to reveal something deeper about the subject.
Artists who practice portraiture aim to show more than just how a person looks. They try to capture personality, emotions, and the subject's inner world.
This can be done through painting, photography, or other visual arts.
We find portraiture in many places. It's in museums, homes, and even on our phones. Portraits help us remember people, celebrate them, and understand who they are.
Key Takeaways
Portraiture is an art form that reveals a person's character beyond their appearance
Artists use various techniques to capture the subject's essence in portraits
Portraits play a key role in preserving memories and celebrating individuals
Historical Evolution of Portraiture
Portraiture has changed a lot over time. Artists have found new ways to show people in their work. Let's look at how portraits have grown from old times to now.
Ancient Traditions
We see the start of portraiture in old cultures. Early portraits were often for nobles. In Egypt, they painted faces on mummy cases. These showed what the dead person looked like.
Greek and Roman artists made stone busts. These showed real people's faces. They tried to get every detail right.
In the Middle Ages, most art was about religion. But some kings and queens had their faces put in books or on coins. This helped people know who was in charge.
Renaissance Developments
The Renaissance changed how we make portraits. Artists got better at showing what people really looked like. They used new ways to paint that made things look more real.
Portraiture is the art of creating visual representations of people. We'll explore how it's done in traditional art and photography.
Portraiture in Art
Portraiture in art means making images of people. We often think of paintings when we talk about portraits. Artists use different materials to portray their subjects.
Portrait painting is a key part of this art form. We see artists capture a person's looks and personality on canvas. They use things like color, light, and pose to show who the person is.
Portraits can be big or small. Some fit in your hand, while others are as tall as a wall. We call the tiny ones "miniatures."
Photographic Portraiture
Photography changed how we make portraits. We use cameras instead of brushes to capture people's images. This lets us freeze a moment in time.
In photo portraits, we think about lighting, angles, and backgrounds. These help show the subject's character. We can take formal studio shots or casual snapshots.
Digital technology gives us new ways to edit and share portraits. We can now easily change how a portrait looks after we take it.
Elements of Portraiture
Portraiture is made up of key components that work together to capture a subject's likeness and essence. These elements allow artists to create meaningful representations of individuals.
Composition and Detail
The arrangement of visual elements in a portrait is crucial. We place the subject carefully within the frame to draw focus to important features. Background and props add context and symbolism.
Details bring the portrait to life. We pay close attention to facial features, clothing textures, and small gestures. These nuances reveal character and create a sense of realism.
Framing choices impact the overall feel. A close-up emphasizes intimacy, while a full-body pose provides more information about the subject's appearance and status.
Color and Light
Color and light shape the mood and atmosphere of a portrait. We use warm tones to create a welcoming feel or cool hues for a more serious tone.
Lighting directs the viewer's eye and adds depth. Soft, diffused light flatters the subject. Dramatic lighting with strong shadows creates intensity and mystery.
Color choices in clothing and background complement the subject's skin tone. We select palettes that enhance the overall composition and evoke specific emotions.
Facial Expressions and Identity
The face is the focal point of most portraits. We capture facial expressions to convey the subject's personality and inner state. A slight smile or furrowed brow can speak volumes.
Eyes are especially important. We strive to capture the "spark" that brings a portrait to life. The direction of the subject's gaze impacts how viewers connect with the image.
Posture and body language also communicate identity. A confident stance or relaxed pose reveals aspects of the subject's character. We consider these elements carefully to create a comprehensive representation of the individual.
Notable Portraits in History
Portraits have captured important figures and moments throughout history. We'll explore some of the most famous painted and sculpted portraits that have left a lasting impact on art and culture.
Iconic Painted Portraits
The Mona Lisa by Leonardo da Vinci is perhaps the most recognizable portrait in the world. Her enigmatic smile has fascinated viewers for centuries.
Another iconic work is "Girl with a Pearl Earring" by Johannes Vermeer. This painting is known for its subject's captivating gaze and the luminous quality of her skin.
Self-portraits offer unique insights into artists' minds. Rembrandt created nearly 100 self-portraits over his lifetime, showing his aging process. Frida Kahlo's self-portraitss, like "Self-Portrait with Thorn Necklace and Hummingbird," reveal her inner struggles and Mexican heritage.
Sculpture Portraits
Sculptural portraits bring a three-dimensional element to capturing likeness. Ancient Roman busts provide detailed records of emperors and other notable figures.
Michelangelo's sculpture of David is a masterpiece of Renaissance art. While not a portrait of a specific person, it represents the ideal male form.
Auguste Rodin's "The Thinker" is a famous example of a more abstract portrait. It depicts a nude male figure in deep contemplation, embodying the act of thinking itself.
Modern sculptors like Alberto Giacometti created stylized portraits that capture the essence of their subjects through elongated forms.
Styles and Techniques
Portraiture has evolved to encompass a wide range of artistic approaches. Artists use various methods to capture the essence of their subjects, from realistic depictions to abstract interpretations.
Realism and Abstraction
Realism in portraiture aims to create lifelike depictions of subjects. We see this in works that capture precise details of a person's appearance. Artists carefully render facial features, skin textures, and expressions. They often use techniques like glazing to add depth and luminosity to skin tones.
On the other hand, abstract portraiture takes a less literal approach. It focuses on conveying emotions or ideas rather than exact likeness. We might see distorted forms, bold colors, or symbolic elements. Cubist portraits, for example, break down the human form into geometric shapes.
Self-portraits allow artists to explore their own image through both realistic and abstract styles. These works often reveal deep personal insights.
Digital and Mixed Media
Modern portraiture has embraced new technologies and materials. Digital art tools now allow for unique and captivating portraits. Artists can manipulate photos or create entirely digital paintings. These works can range from photorealistic to highly stylized.
Mixed media portraiture combines different materials and techniques. An artist might use paint, collage, and digital elements in a single work. This approach allows for rich textures and layered meanings.
We're seeing a trend towards more experimental portraits. Some artists incorporate text, found objects, or interactive elements. These works push the boundaries of what we consider a portrait to be.
Psychology of Portraiture
Portraiture involves complex psychological aspects between the photographer, subject, and viewer. We examine how these relationships shape the portrayal of identity and emotional connection in portrait photography.
Understanding the Subject
We need to build rapport with our subjects to capture their true essence. This requires empathy and creating a comfortable environment. We aim to reveal the subject's personality and inner emotions through our lens.
Body language and facial expressions are key. We look for subtle cues that convey the subject's state of mind. Props and settings can also provide insight into identity.
Trust is crucial. When subjects feel at ease, they're more likely to show authentic expressions. We use conversation and positive reinforcement to help them relax.
Viewer's Perception
Portraits evoke emotional responses in viewers. We'll consider how composition, lighting, and pose influence interpretation. A direct gaze often creates a stronger connection with the audience.
Cultural context shapes how viewers perceive portraits. Symbols and clothing can convey status or profession. We consider these elements when crafting our shots.
Viewers may project their own experiences onto portraits. This can lead to varied interpretations of the same image. We aim to create depth that invites contemplation and personal connection.
The Cultural Significance of Portraits
Portraits have shaped how we view history and culture for centuries. They tell stories about people and societies in unique ways. Let's look at how portraits record history and impact modern life.
Portraits as Historical Records
Portraits mark where art, life stories, and history meet. We see them as windows into the past. They show us how people looked and dressed long ago.
Portraits also reveal social status and power. Kings and queens used them to show their wealth. Artists added symbols to tell more about the person.
In courts, portraits had political importance too. Rulers sent painters to make pictures of potential wives. This helped with marriage plans between royal families.
Influence on Modern Culture
Today, portraits still shape how we see ourselves and others. Social media selfies are a new type of self-portrait. They let us control how the world sees us.
Portrait photography changed how we remember people. School photos and family pictures became common. Now, most of us have many portraits of ourselves.
Portraits preserve stories and identities. They show what different groups value. Museums use portraits to teach about history and culture.
We still use portraits to mark important moments. Graduation photos and wedding portraits are good examples. They help us remember big life events.
Challenges and Considerations
Creating portraits raises complex issues about representation and identity. Artists face tough choices when depicting someone's likeness and essence.
Ethical Implications
We must think carefully about the ethics of portraiture. Getting consent is key, especially for public figures or marginalized groups. Artists should respect privacy and avoid exploitation.
Cultural sensitivity matters too. How we depict cultural identity through portraits can have big impacts. We need to watch out for stereotypes or misrepresentation.
There's also the question of truth in portraiture. How much should artists idealize or alter someone's appearance? Finding the right balance between flattery and honesty is tricky.
The Future of Portraiture
New tech is changing how we make and view portraits. Digital tools let artists create in fresh ways. AI can even generate portraits from data.
But this brings new issues. We worry about fake portraits and deep fakes fooling people. Privacy becomes harder to protect with facial recognition.
Still, tech offers exciting possibilities. Virtual and augmented reality could make portraits more interactive. We might see portraits that change based on who's looking at them.
The core goal of capturing someone's essence remains. But how we do it keeps evolving.
Frequently Asked Questions
Portraiture raises many questions about its definition, history, and interpretation. We explore key aspects of this art form, from its core elements to its role in modern art.
What elements define a portrait in the context of visual art?
A portrait shows a person's likeness. It captures their face, personality, and mood. Portraits can be paintings, sculptures, or photos. They often include the subject's body and surroundings.
Some portraits show just the face. Others include the whole person. The artist chooses what to show based on their goals.
How has the concept of portraiture evolved throughout art history?
Portraiture has changed a lot over time. Early portraits were very basic. They focused on status symbols more than realistic features.
Renaissance artists made portraits more lifelike. They showed people's unique features. Modern artists experiment with new styles and ideas in portraits.
In which ways do portrait photographs differ from painted portraits?
Photos capture a moment in time. Paintings take longer and show the artist's view. Photos can be more realistic, but both can be altered.
Painted portraits often idealize the subject. Photos can do this too, but they start with a real image. Both types of portraits can express the subject's personality.
What are the main categories or styles of portraiture in art?
There are many styles of portraiture. Realistic portraits aim to look just like the person. Abstract portraits use shapes and colors to show the subject.
Conceptual portraits focus on ideas more than looks. Self-portraits are made by artists of themselves. Group portraits show multiple people together.
How does one interpret the meaning behind a portrait?
We look at many things to understand a portrait. The subject's pose and expression are important. We also consider the background and any objects included.
The artist's style and technique matter too. Historical context can help explain choices in older portraits. Sometimes artists leave clues about the subject's personality or life.
What role does portraiture play in contemporary art?
Portraiture is still important in modern art. Artists use new methods like digital art to make portraits. Some focus on identity and representation in their work.
Contemporary portraits often challenge traditional ideas. They might mix styles or use unexpected materials. Many artists use portraits to comment on social issues.
]]>
https://proedu.com/blogs/news/creative-cloud-photoshop-tutorials-essential-skills-for-digital-artists2024-11-27T16:24:10-06:002024-11-28T13:10:47-06:00Creative Cloud Photoshop Tutorials: Essential Skills for Digital ArtistsGary MartinMore]]>
Adobe Creative Cloud offers a wide range of Photoshop tutorials for beginners and experts alike. These lessons cover everything from basic photo editing to advanced graphic design techniques.
Whether you're a student, hobbyist, or professional, there's a tutorial to help you improve your skills and unleash your creativity.
We know that starting with Photoshop can feel overwhelming. That's why Adobe provides step-by-step guides to help you get comfortable with the software.
You'll learn how to use essential tools, adjust colors, and create stunning visual effects. As you progress, you can explore more complex topics like photo manipulation and typography.
Creative Cloud members have access to thousands of fonts and resources to enhance their projects. With regular practice and guidance from these tutorials, you'll soon be creating professional-looking designs and edits with ease.
Step-by-step guides help users master essential tools and techniques.
Creative Cloud offers extensive resources to support learning and project creation.
Getting Started with Photoshop
Photoshop is a powerful tool for digital image editing. We'll walk you through the initial steps to begin using this software effectively.
Download and Installation
To start using Photoshop, we need to download it from Adobe's website. We recommend getting the Creative Cloud version for the latest features.
Here's a quick guide to install Photoshop:
Go to Adobe's website
Click "Free Trial" or "Buy Now"
Choose a plan
Download the Creative Cloud desktop app
Open the app and install Photoshop
After installation, we can launch Photoshop and sign in with our Adobe ID.
Understanding the User Interface
Photoshop's interface might seem complex at first, but it's organized for easy use.
Key areas of the interface include:
Toolbar: Contains tools for editing and creating
Options bar: Shows settings for the selected tool
Panels: Provide additional functions and information
Canvas: The main working area for our images
We can customize the layout by dragging panels and adjusting the workspace. This helps us work more efficiently based on our needs.
Setting Preferences for Optimal Workflow
Customizing Photoshop's preferences can greatly improve our workflow. To access preferences, we go to Edit > Preferences (Windows) or Photoshop > Preferences (Mac).
Important preferences to consider:
Performance: Adjust memory usage and graphics processor settings
File Handling: Set auto-save frequency
Interface: Choose color theme and font size
We can also set up keyboard shortcuts for our most-used tools. This saves time and makes our work smoother.
Basic Editing Techniques
Photoshop offers powerful tools for enhancing images. We'll explore key techniques to improve your photos and create stunning visuals.
Cropping and Resizing Images
Cropping helps focus on the main subject of an image. To crop, we select the Crop Tool from the toolbar. We can then drag the edges to remove unwanted areas.
Resizing changes the dimensions of an image. We go to Image > Image Size to adjust the width and height. It's important to maintain the aspect ratio to avoid distortion.
For web images, we often need to reduce file size. We use Save for Web to compress images while keeping good quality.
Adjusting Brightness and Contrast
Brightness and contrast controls help improve image tone. We find these adjustments under Image > Adjustments.
The Levels tool lets us fine-tune shadows, midtones, and highlights. We drag the sliders to adjust each area separately.
For more control, we use Curves. This powerful tool allows us to adjust specific tonal ranges. We click on the curve to add points and drag to modify the tone.
Working with Layers and Masks
Layers are a key feature in Photoshop. They let us work on different parts of an image separately. We can add new layers from the Layers panel.
We use masks to hide or reveal parts of a layer. To add a mask, we click the mask icon in the Layers panel. Black hides, white reveals, and gray partially hides.
Blending modes change how layers interact. We can experiment with different modes to create unique effects. Opacity controls layer transparency.
Advanced Photo Manipulation
Advanced photo manipulation techniques can transform ordinary images into stunning works of art. We'll explore powerful tools and methods to take your Photoshop skills to the next level.
Content-Aware Editing
Content-Aware editing in Photoshop allows us to seamlessly remove or add elements to images. We can use the Content-Aware Fill tool to erase unwanted objects and automatically replace them with matching background content.
For more complex edits, the Content-Aware Move tool lets us reposition objects within an image while Photoshop intelligently fills in the gaps. This is great for adjusting compositions or creating surreal scenes.
The Content-Aware Scale feature is useful for resizing specific parts of an image without distorting key elements. We can selectively stretch backgrounds or compress foregrounds to achieve the perfect layout.
Retouching and Restoration
Advanced retouching techniques help us restore damaged photos or create flawless portraits. The Healing Brush tool is essential for removing blemishes, wrinkles, or scratches while preserving texture.
For precise edits, we use the Clone Stamp tool to paint over imperfections with sampled pixels from elsewhere in the image. This works well for fixing larger damaged areas in old photos.
Frequency separation is a powerful method for retouching skin. We separate texture and color onto different layers, allowing us to smooth skin tones without losing important detail.
The Dodge and Burn tools let us selectively lighten or darken areas to enhance depth and dimension in portraits or landscapes.
Using Filters for Creative Effects
Photoshop's filters offer endless possibilities for creative photo manipulation. The Filter Gallery provides a wide range of artistic effects we can combine and customize.
For more control, we use Smart Filters. These non-destructive filters can be adjusted or masked at any time, allowing for experimentation without permanent changes.
The Camera Raw filter gives us powerful color grading and tonal adjustment options. We can use it to create dramatic atmosphere or correct exposure issues in our images.
Blur filters like Field Blur and Tilt-Shift let us simulate depth of field effects or draw focus to specific areas of a photo.
Text and Typography
Typography plays a huge role in design. We'll explore key techniques for working with text in Photoshop, from basic editing to advanced effects.
Adding and Editing Text Layers
To add text in Photoshop, we use the Type Tool. Click it in the toolbar and click on the canvas to start typing. We can change the font, size, and color in the options bar.
To edit existing text, double-click the text layer. This lets us modify the content.
For precise positioning, we use the Move Tool. It helps align text with other elements.
Text layers are versatile. We can apply layer styles like drop shadows or outer glows to make text pop.
To create curved text, we use the Path Selection Tool. Draw a path, then use the Type Tool to add text along it.
For 3D text, we use the 3D panel. It lets us extrude text and apply materials.
The Warp Text option bends text into shapes. It's great for logos or decorative headings.
We can create custom brushes to add texture to text. This works well for grunge or distressed looks.
Layer masks help blend text with images. We can make text appear to be part of a landscape or texture.
Creating Custom Text Styles
Text styles save time when working on large projects. We create them by setting up text how we want, then saving it as a style.
To make a new style, we format text with the desired font, size, and color. Then we click the "Create new style" button in the Character panel.
We can include layer styles in our text styles too. This lets us quickly apply complex effects to new text layers.
For consistency, we often create a set of styles for headings, body text, and captions. This ensures a cohesive look across our designs.
Text styles can be shared between documents. We export them as .asl files and import them into other projects.
Graphic Design Projects
Photoshop offers powerful tools for creating stunning graphic design projects. We'll explore three key areas where you can apply your skills to make impactful designs.
Designing Logos and Branding Elements
Logos are the face of a brand. We start by sketching ideas on paper or in Photoshop's drawing tools. Next, we use shape tools to create vector-based elements that stay crisp at any size.
For text, we experiment with different fonts and customize them to fit the brand's personality. We might add effects like drop shadows or gradients to make the logo pop.
Color is crucial. We use Photoshop's color picker to choose a palette that matches the brand's identity. We also create variations for different backgrounds and uses.
Photoshop tutorials can help refine logo design skills. They cover techniques like creating 3D effects or using layer styles for unique looks.
Creating Web Graphics and Banners
Web graphics need to be eye-catching and load quickly. We start by setting up our document with the right dimensions and resolution for web use.
For banners, we focus on clear messaging and strong visuals. We use Photoshop's type tools to create attention-grabbing headlines. Images are carefully selected and edited to support the message.
We create buttons and icons using shape tools and layer styles. These elements should be consistent with the overall design and easy to understand at a glance.
Animated banners can be made using Photoshop's timeline feature. We create frame-by-frame animations or use tweening for smooth motion.
Designing Print Materials
Print design requires attention to detail and an understanding of color modes. We always work in CMYK mode for accurate color reproduction in print.
Brochures and flyers are common print projects. We start with a clear layout, using guides and grids to align elements. Text is formatted for easy reading, and images are placed strategically.
We use Photoshop's brushes and shapes to add decorative elements that enhance the design without overwhelming it.
For business cards, we focus on making a strong first impression. We design within standard card dimensions and leave room for bleed. We make sure text is legible at small sizes.
Photoshop for Students and Teachers
Adobe provides special deals and resources for students and teachers using Photoshop. We'll explore the discounts, project ideas, and learning communities available.
There are also student-focused video courses on the Adobe website. These cover everything from basics to advanced techniques.
For peer support, check out Adobe's online forums. Students and teachers can ask questions and share tips.
Many schools also have Adobe user groups. These are great for in-person learning and networking.
Optimizing Workflow and Productivity
Photoshop offers many ways to work faster and smarter. We'll explore how to customize your setup, automate tasks, and use cloud features to boost efficiency.
Customizing Toolbars and Shortcuts
We can speed up our Photoshop work by setting up custom toolbars and keyboard shortcuts. The Workspace feature lets us save our ideal layout for quick access.
To make a custom toolbar:
Go to Edit > Toolbars
Drag tools to rearrange
Click "Save Toolbar"
For shortcuts, we use Edit > Keyboard Shortcuts. We can set keys for our most-used tools and menu items. This cuts down on mouse clicks and saves time.
It's smart to group similar tools together. For example, put all our retouching tools in one section of the toolbar. This keeps our workflow smooth and organized.
Batch Processing and Automation
Photoshop's batch tools help us edit many images at once. We use the Droplets feature to apply the same edits to a folder of photos. This is great for tasks like resizing or adding watermarks.
To create a Droplet:
Make an action with our desired edits
Go to File > Automate > Create Droplet
Choose our action and save location
We can also use scripts for complex tasks. Scripts are text files with Photoshop commands. They can do things like create layouts or apply effects that would take hours by hand.
Collaboration and Cloud Integration
Creative Cloud makes team projects easier. We can share files, fonts, and color palettes with our collaborators. This keeps everyone on the same page and speeds up feedback.
Some key cloud features:
Libraries: Store and share assets across projects
Cloud Documents: Access our work from any device
Version History: Track changes and revert if needed
We can also use third-party integrations to connect Photoshop with project management tools. This helps us track deadlines and communicate with our team without leaving the app.
By using these cloud tools, we create a smoother workflow between design and production stages.
Frequently Asked Questions
Adobe Creative Cloud offers many helpful resources for learning Photoshop. We'll answer common questions about finding tutorials, free options, and best practices for beginners.
How can I find beginner-level tutorials for Adobe Photoshop within Creative Cloud?
Creative Cloud has a dedicated Learn Photoshop section. Here, we offer tutorials for all skill levels, including beginners.
We organize content by topic and difficulty. You can easily find basic lessons on tools, techniques, and features.
Are there any free tutorials available for Photoshop in Adobe Creative Cloud?
Yes, we provide many free Photoshop tutorials in Creative Cloud. Our Creative Cloud tutorials page has a wide selection of free content.
These include video lessons, step-by-step guides, and hands-on projects. You don't need a paid subscription to access these resources.
What resources does Adobe Creative Cloud offer for learning Photoshop?
We offer a variety of learning resources for Photoshop in Creative Cloud. These include video tutorials, written guides, and interactive lessons.
Our Photoshop Learn & Support page is a great starting point. It has FAQs, troubleshooting tips, and links to more in-depth content.
How can I download tutorials for Photoshop from Creative Cloud?
Many of our tutorials are available online and don't require downloading. For video content, you can often stream directly from our website.
Some tutorials may offer downloadable project files. These help you follow along with the lessons. Check the tutorial description for any available downloads.
What are the best practices for beginners to learn Adobe Photoshop through tutorials?
We recommend starting with basic tutorials that cover Photoshop's interface and core tools. Practice each new skill as you learn it.
Work through tutorials in order of difficulty. Don't rush to advanced topics before mastering the basics. Regular practice is key to improving your skills.
Can I find step-by-step guides for Adobe Photoshop within the Creative Cloud platform?
These guides break down complex tasks into simple steps. They often include screenshots to help you follow along easily.
]]>
https://proedu.com/blogs/news/photography-portraiture-essential-techniques-for-capturing-personality2024-11-27T16:24:02-06:002024-11-28T13:10:45-06:00Photography Portraiture: Essential Techniques for Capturing PersonalityGary MartinMore]]>
Portrait photography captures the essence of people through images. It's an art that blends technical skill with creative vision.
Portrait photography aims to show a person's personality using lighting, backdrops, and poses.
Taking great portraits needs practice and know-how. We need to think about camera settings, angles, and how to make people feel at ease.
Good lighting is key. It can be soft light from a window or carefully set up studio lights.
There are many types of portrait photos. Some are formal, while others are more casual or artistic. The goal is always to create an image that truly shows who the person is.
Key Takeaways
Portrait photography combines technical skills and creativity to capture a person's essence
Lighting, composition, and subject comfort are crucial elements in creating compelling portraits
Different portrait styles serve various purposes, from formal headshots to artistic expressions
Fundamentals of Portrait Photography
Portrait photography involves key elements that work together to create compelling images. These include composition, lighting, and posing techniques.
Understanding Composition
Composition is vital in portrait photography. We use the rule of thirds to place our subject off-center for a more interesting image. This creates balance and draws the viewer's eye.
We also pay attention to the background. A clean, simple backdrop can make the subject stand out. Busy backgrounds can distract from the main focus.
Perspective plays a big role too. We change our camera angle to affect how the subject appears. A low angle can make someone look powerful. A high angle can make them seem smaller or more approachable.
We use framing techniques to guide attention. Natural frames like doorways or tree branches can add depth to the portrait.
Mastering Lighting
Lighting shapes the mood and feel of a portrait. We use different types of light to create various effects.
Natural light is great for outdoor portraits. Soft, diffused light on a cloudy day flatters most subjects. Golden hour light, just after sunrise or before sunset, gives a warm glow.
For studio shots, we control the lighting setup. Key light is the main light source. Fill light softens shadows. Rim light adds definition to the subject's outline.
We adjust camera settings to match the lighting. ISO, aperture, and shutter speed work together to capture the right exposure.
Good posture is key. We ask subjects to sit or stand up straight, but not stiffly. Slight angles create more interesting shapes than straight-on poses.
We pay attention to hand placement. Relaxed hands look better than tense ones. We often have subjects touch their face or hair for a natural look.
Eye contact affects the mood. Looking directly at the camera creates a connection with the viewer. Looking away can seem more thoughtful or candid.
We use these basic pose ideas:
S-curve for full-body shots
45-degree angle to slim the body
Chin slightly down to define the jawline
Technical Aspects of Portraiture
Mastering the technical side of portrait photography is crucial for capturing stunning images. The right gear, settings, and techniques can make a big difference in the final result.
Camera Gear Essentials
For portrait photography, we recommend using a DSLR or mirrorless camera for their superior image quality and control. An 85mm lens is ideal for portraits, as it provides flattering perspective and compression. This focal length helps separate the subject from the background nicely.
A sturdy tripod is essential for keeping your camera steady, especially in low light situations. It allows for slower shutter speeds without introducing camera shake.
Consider investing in external flashes or continuous lighting to have more control over your portrait lighting. Softboxes or umbrellas can help diffuse the light for a softer, more flattering look.
Optimal Camera Settings
When shooting portraits, we usually aim for a wide aperture like f/1.8 or f/2.8. This creates a shallow depth of field, blurring the background and making the subject stand out.
For sharp focus, use single-point autofocus and place it on the subject's eyes. A shutter speed of at least 1/125th of a second helps prevent motion blur.
Set your ISO as low as possible while maintaining proper exposure. This keeps image noise to a minimum.
Depth of Field Dynamics
Depth of field is a powerful tool in portrait photography. A shallow depth of field, achieved with a wide aperture, creates a dreamy, soft background that doesn't distract from the subject.
To maximize this effect, increase the distance between your subject and the background. Move closer to your subject or use a longer focal length.
Be careful not to set your aperture too wide, as you may lose sharpness in important facial features. Finding the right balance is key to creating professional-looking portraits.
Portrait Lighting Techniques
Lighting is crucial for creating stunning portraits. We'll explore key techniques to enhance your portrait photography skills.
Natural vs. Studio Light
Natural light offers a soft, flattering look for portraits. We can use window light or shoot outdoors during golden hour for warm, gentle illumination. Cloudy days provide diffused light that's great for even skin tones.
Studio light gives us more control. We can adjust the intensity, direction, and quality of light. Strobes and continuous lights are common options. Strobes offer powerful bursts, while continuous lights let us see the effect in real-time.
Both natural and studio light have pros and cons. Natural light is free and can look very natural. Studio light works in any weather and time of day. The choice depends on the desired mood and available resources.
Lighting Equipment and Modifiers
Basic lighting gear includes:
Strobes or continuous lights
Light stands
Softboxes or umbrellas
Reflectors
Light modifiers shape and control the quality of light. Softboxes create soft, diffused light that's flattering for skin. Meanwhile, umbrellas spread light over a wide area. Reflectors, on the other hand, bounce light to fill in shadows.
Grid spots focus light into a narrow beam, while snoots create a tight circle of light. Gels add color to your light source.
We can also use DIY options. A white sheet makes a great diffuser, and foam core boards work well as reflectors. Experiment with different modifiers to find what works best for your style.
Key light: The main light source, usually placed at a 45-degree angle to the subject.
Fill light: Softer light that fills in shadows, often placed opposite the key light.
Rim light: Backlight that separates the subject from the background.
We can adjust the intensity of each light to create different moods. A strong key light with minimal fill creates dramatic shadows, while even lighting across all three sources gives a softer look.
This versatile system works for both studio and location shoots. It's a great starting point for learning portrait lighting techniques.
The Art of Crafting Portraits
Portrait photography goes beyond simply taking pictures of people. It's about capturing the essence of a person and telling their story through images.
Conveying Personality and Identity
In portrait photography, we aim to show who a person really is. We do this by using lighting, poses, and settings that match their personality.
For example, we might use soft light for a gentle person or bold colors for someone outgoing. Props can help too. A musician might hold their instrument, while an artist could be surrounded by their work. These items give clues about who the person is.
Facial expressions are key. We encourage natural smiles or thoughtful looks to reveal inner feelings. Sometimes, we ask subjects to think of a happy memory to bring out genuine emotions.
Incorporating Storytelling
Every portrait can tell a story. We choose locations that mean something to the subject. A teacher might be photographed in their classroom, while a chef could be in their kitchen.
We also use body language to show a person's story. A confident pose can suggest success, while a relaxed posture might show someone at peace.
Lighting plays a big role in storytelling. Soft, warm light can create a cozy feel, while harsh shadows might suggest mystery or drama.
Styles and Themes in Portraiture
There are many styles of portraits. Traditional portraits often show people looking directly at the camera with a plain background. These focus on the face and expression.
Environmental portraits show people in their usual settings. This gives more context about their life or work.
Conceptual portraiture uses creative ideas to represent a person's traits or beliefs. This might involve unusual props or settings.
Lifestyle portraits capture people doing everyday activities. These feel more natural and candid.
We choose the style based on what fits the subject best. Some people shine in formal portraits, while others come alive in casual, candid shots.
Types and Genres of Portrait Photography
Portrait photography has many different styles and approaches. We'll explore some key types that capture people's essence in unique ways.
Traditional and Lifestyle Portraits
Traditional portraits focus on formal, posed shots. The subject looks directly at the camera, often with a neutral expression. These portraits are common for professional headshots or school photos.
Lifestyle portraits take a more casual approach. We capture people in natural settings doing everyday activities. This style shows personality and tells a story about the subject's life.
Headshots are a specific type of traditional portrait. They focus tightly on the face and are used for business, acting, or modeling.
Backdrops play a big role in traditional portraits. We use plain backgrounds to keep attention on the subject. Popular choices include:
Solid colors
Gradient backgrounds
Simple patterns
Wedding and Family Portraiture
Wedding photography is a mix of styles. It includes formal posed shots and candid moments. We capture the couple, family groups, and key events throughout the day.
Family portraits can be formal or casual. We often take these outdoors or in the family's home. The goal is to show relationships and connections between family members.
Creative portraits push boundaries. We use unusual angles, lighting, or props to make striking images. This style allows for artistic expression and unique results.
This approach gives context to the subject's life and work. It tells a fuller story about who they are.
Self-portraits are a chance for photographers to be creative. We can experiment with different techniques when we're both photographer and subject.
Post-Processing and Presentation
Post-processing and presentation are key steps in creating stunning portraits. We'll explore how to edit photos for maximum impact and choose the right formats to showcase your work.
Editing for Impact
When editing portrait photography examples, we start by adjusting exposure and color balance. This brings out the best in our subjects' features.
Next, we focus on skin retouching. We smooth out blemishes while keeping a natural look.
Enhancing eyes and hair can make portraits pop. We use dodge and burn techniques to add depth, and cropping helps improve composition after the fact.
We recommend using presets as starting points. They save time and give a consistent style. But we always tweak them to fit each photo's unique needs.
Choosing Formats and Mediums
Selecting the right format is crucial for presenting stunning portraits. For online sharing, we use JPEG files. They offer a good balance of quality and file size.
For print, we opt for TIFF or RAW formats. These preserve more detail for large prints.
We always do a test print to check colors and sharpness.
Consider the display medium too. Social media favors square crops, while galleries often prefer traditional aspect ratios.
We create both color and black-and-white versions. This gives clients options and can highlight different aspects of the portrait.
Building a Portrait Photography Portfolio
Creating a strong portrait photography portfolio is key to showcasing your skills and attracting clients.
We recommend starting with 20-30 of your best images that highlight your unique style and expertise.
When selecting photos, focus on variety. Include different lighting setups, poses, and subjects to show your range. Professional portrait photography often features a mix of studio and outdoor shots.
Try these portrait photography ideas:
• Use window light for soft, flattering portraits
• Shoot during golden hour for warm, dreamy outdoor shots
• Experiment with creative poses and expressions
Building rapport with subjects is crucial. We find that talking and joking with clients helps them relax and results in more natural photos.
When designing your portfolio website, choose a clean, modern layout that puts your images front and center. Make sure it's easy to navigate on both desktop and mobile devices.
Don't forget to include a brief "About Me" section. This helps potential clients get to know you and your approach to photography.
Regularly update your portfolio with new work to keep it fresh. As your skills improve, replace older images with your latest and greatest shots.
Remember, confidence is key in portrait photography. The more you practice, the more comfortable you'll become directing subjects and capturing their best angles.
Frequently Asked Questions
Portrait photography involves many technical and artistic aspects. We'll address some common questions about equipment, techniques, and creative approaches to help you improve your portrait skills.
How do I choose the right lens for portrait photography?
A 70-200mm zoom lens offers versatility for different framing options. It lets you shoot from farther away, which can make subjects feel more at ease.
What lighting setup works best for indoor portrait photography?
Soft, diffused light works well for indoor portraits. A large window can provide lovely natural light. Position your subject at an angle to the window for flattering shadows.
For artificial lighting, use a softbox or umbrella to diffuse the light source. This creates smooth, even illumination. A three-point lighting setup with key, fill, and backlight is a classic choice for well-balanced portraits.
What are some effective composition techniques in portrait photography?
The rule of thirds is a good starting point. Place your subject's eyes along the top third line of the frame. This creates a balanced, pleasing composition.
Leading lines can draw attention to your subject. Use architectural elements or props to create lines that lead to the person's face.
Negative space around your subject can create a powerful, dramatic effect. Don't be afraid to leave empty areas in your frame.
How can I capture a subject's personality in portrait photography?
Talk to your subject and help them relax. A genuine expression often comes from natural conversation. Ask them about their interests or tell a joke to bring out a smile.
Incorporate props or settings that reflect the person's hobbies or profession. This adds context and depth to the portrait.
Experiment with different poses and angles. Sometimes an unexpected perspective can reveal a new side of someone's personality.
What post-processing techniques can enhance portraits?
Subtle skin smoothing can improve the overall look of a portrait. But be careful not to overdo it and lose natural texture.
Dodging and burning can enhance facial features. You can lighten the eyes and darken the eyebrows slightly to make them stand out.
Color grading can set the mood of your portrait. Warm tones often create a friendly, inviting feel, while cooler tones can be more dramatic.
How has portrait photography evolved over time?
Early portraits required long exposure times, resulting in stiff, formal poses. As camera technology improved, more natural and candid styles became possible.
The rise of social media has influenced portrait trends. Selfies and casual snapshots have become a form of everyday portraiture.
]]>
https://proedu.com/blogs/news/what-is-a-portraiture-exploring-the-art-of-capturing-human-essence2024-11-27T16:23:44-06:002024-11-28T13:10:41-06:00What is a Portraiture: Exploring the Art of Capturing Human EssenceGary MartinMore]]>
Portraiture is a fascinating art form that captures the essence of individuals through visual representation. It's more than just painting or photographing someone's face. Portraiture is the art of creating a likeness of a person, capturing their personality, mood, and character in a single image.
We often see portraits in museums, homes, and even on our phones. They can be paintings, drawings, sculptures, or photographs. Each portrait tells a story, revealing something unique about the subject.
Artists use different techniques to bring out the subject's inner qualities, making portraiture a powerful tool for expression and communication.
Key Takeaways
Portraiture captures a person's likeness, personality, and mood in visual form
This art form has evolved over thousands of years, using various mediums
Portraits serve as powerful tools for expression and storytelling in society
Historical Evolution of Portraiture
Portraiture has changed a lot over time. Artists have tried new ways to show people in their art. Let's look at how portraits have changed from ancient times to today.
Ancient Roots and the Renaissance
Ancient Egyptian art gave us some of the first portraits. They painted people on walls and made sculptures. These showed who was important back then.
In the Renaissance, portraits became more lifelike. Artists learned to paint people as they really looked. Leonardo da Vinci's Mona Lisa is a famous example. It shows how good artists were at capturing faces.
During this time, only rich people could get their portraits made. Kings, queens, and nobles were common subjects. Artists used oil paints to make their work look very real.
Modern and Contemporary Progressions
In modern times, portraits changed a lot. Artists started to play with new styles. They didn't always try to make people look exactly like they do in real life.
Some famous modern portraits include:
"Girl with a Pearl Earring" by Johannes Vermeer
Pablo Picasso's cubist portraits
Andy Warhol's colorful celebrity prints
Contemporary artists now use many different ways to make portraits. They might use photos, videos, or even digital art. Some mix old and new methods to create unique looks.
Today, anyone can have their portrait made. It's not just for rich or famous people anymore. We can even take selfies on our phones!
Defining Portraiture
Portraiture is a type of art that focuses on depicting people. It aims to show what a person looks like and sometimes reveals their personality or mood.
Artistic Representation
Portraiture is an artistic representation of a person. It can be made using different methods like painting, drawing, sculpture, or photography. The goal is to capture a person's likeness.
Portraits often show a person's face, but they can include more of the body too. Some portraits only show part of a face. Artists try to catch unique features that make each person look like themselves.
We see portraiture in many places. It's in art museums, history books, and even on money. People have used portraits to remember important figures for a very long time.
This art form has changed over time. In the past, portraits were often very formal. Now, they can be more creative and show different sides of a person.
We can group portraiture into types:
Self-portraits
Group portraits
Full-body portraits
Head and shoulder portraits
Portraiture isn't just about making an exact copy of how someone looks. It's also about showing who they are as a person. Artists use color, style, and setting to add meaning to their portraits.
Technical Aspects of Portrait Creation
Creating portraits involves various techniques and tools. Artists use both traditional and modern methods to capture a subject's likeness and essence.
Traditional Techniques
Drawing is a fundamental skill in portrait creation. We use pencils, charcoal, or ink to sketch the subject's features. Shading techniques help add depth and dimension.
Painting portraits requires careful color mixing and brushwork. Oil paints offer rich textures, while watercolors create softer effects. We often start with a basic sketch before applying paint layers.
Sculptors create 3D portraits using clay, stone, or metal. They focus on form, texture, and proportion to bring subjects to life. Tools like chisels and modeling knives are essential for shaping materials.
Digital Innovations
Digital art has revolutionized portrait creation. We use graphics tablets and styluses to draw directly on computer screens.
Adobe Photoshop is a popular software for digital portraits. It offers layers, brushes, and filters for endless creative possibilities. We can easily adjust colors, lighting, and textures.
Plugins enhance digital portrait workflows. Imagenomic tools, for example, help smooth skin and reduce blemishes. These save time and improve image quality.
3D modeling software allows us to create digital sculptures. We can manipulate virtual clay and add realistic textures. This opens up new possibilities for portrait artists.
The Portrait Artist's Toolbox
Portrait artists rely on essential tools and techniques to create compelling likenesses. We'll explore key elements that help bring portraits to life, focusing on composition, lighting, and mood.
Understanding Composition
Composition is crucial in portraiture. We start by choosing the right perspective. This affects how viewers perceive the subject.
The rule of thirds is a helpful guide. We imagine the canvas divided into a 3x3 grid. Placing key features along these lines creates balance.
Framing is another important aspect. We consider what to include or exclude. This helps focus attention on the subject.
We also think about the subject's pose. It can convey personality and mood. A relaxed pose might suggest approachability, while a formal pose can indicate authority.
Mastering Lighting and Mood
Lighting is a powerful tool in portraiture. It shapes the subject's features and sets the overall mood.
We often use chiaroscuro, a technique of strong contrasts between light and dark. This adds depth and drama to a portrait.
Key light is the main light source. It defines the primary shadows and highlights. Fill light softens shadows, adding detail to darker areas.
We might use reflectors to bounce light onto the subject. This helps illuminate shadowed areas without harsh direct light.
The direction of light matters too. Side lighting can emphasize texture, while frontal lighting tends to flatten features.
Expression and Emotion in Portraits
Portraits go beyond mere likeness. They capture the inner world of the subject through expressions and emotions. Artists use various techniques to bring out the essence of their sitters.
Capturing the Essence
Artists aim to reveal the true nature of their subjects in portraits. They look for key moments that show personality and mood. Lighting, pose, and setting all play a role in this process.
Portraiture is an art form that brings depth to images. It tells stories through subtle details. A slight tilt of the head or a faraway look can speak volumes.
We see this in works by masters like Rembrandt. His self-portraits show a range of emotions over his lifetime. Each piece gives us a glimpse into his state of mind at that moment.
Facial Expressions and Character
The face is central to showing emotion in portraits. Artists study the nuances of facial muscles to convey feelings accurately. A furrowed brow, a gentle smile, or intense eyes can reveal much about a person.
Portraiture has evolved to focus more on emotional depth. In the past, portraits often showed people as stoic and formal. Now, we see a wider range of expressions in art.
We can learn a lot about someone from their portrait. The way they hold themselves, their gaze, and their facial features all contribute to our understanding of their character. Artists work to bring these elements together in a cohesive image.
The Role of Portraiture in Society
Portraits play a key part in how we see ourselves and others. They show power, identity, and culture in unique ways.
Symbol of Power and Wealth
Portraits often display power and wealth. Kings, queens, and leaders have used them to show their status. Rich people ask artists to paint them in fancy clothes with nice things.
We see this in old royal paintings. The subjects wear crowns and fine robes. They stand in grand rooms with expensive items. This tells viewers they are important and have money.
Some portraits show virtue too. A leader might be painted looking wise or brave. This makes people think well of them.
Personal and Cultural Identity
Portraits also tell us about who people are. They can show someone's job, hobbies, or beliefs. Self-portraits let artists share how they see themselves.
We learn a lot from these images. They show how people dressed and lived in the past. This helps us understand different cultures and times.
Portraits can make us feel connected to history. We see real faces from long ago. This brings the past to life in a special way.
Portraiture Beyond the Canvas
Portraiture has expanded far beyond traditional paintings. New mediums allow artists to capture subjects in innovative ways. This pushes the boundaries of the art form.
Portrait Photography
Portrait photography lets artists instantly capture a subject's likeness and essence. Photographers use lighting, angles, and composition to reveal personality.
Digital tools give even more creative control. We can adjust colors, remove flaws, or add artistic effects after the shoot. This blends reality with the photographer's vision.
Some portrait photographers stage elaborate scenes. Others prefer candid shots that catch genuine moments. Either way, the goal is to show the subject's true character.
Sculptural and Alternative Forms
Sculptural portraits add a 3D element to portraiture. Artists mold clay, carve stone, or weld metal to create lifelike or abstract representations.
We can walk around these works to see every angle. This gives a more complete view of the subject than a flat painting allows.
Digital art opens up even more possibilities. Artists use software to create portraits that could never exist in the physical world. These might incorporate fantastical elements or morph the subject in impossible ways.
Some artists combine multiple media. They might project video onto sculptures or incorporate found objects into paintings. This pushes portraiture into new and exciting realms.
Learning and Education in Portraiture
Portraiture offers a rich field for learning and education. We can gain much from studying and creating portraits.
Artists learn to capture a person's likeness and essence through practice. This involves honing observation skills and technical abilities.
We see portraiture as a way to understand history and culture. Portraits show us how people lived and what they valued in different times.
Students can explore various techniques in portraiture:
Drawing
Painting
Photography
Sculpture
These methods help develop artistic skills and creativity.
Portraiture teaches us about human expression and emotion. We learn to pick up on subtle cues in facial features and body language.
In art classes, students often start with self-portraits. This helps them understand proportions and build confidence in their abilities.
We use portraits to study:
Lighting
Composition
Color theory
Personality representation
Museums and galleries offer great resources for learning about portraiture. We can see works from different periods and styles up close.
Portraiture also teaches patience and persistence. Capturing a person's essence takes time and practice.
Frequently Asked Questions
Portraiture is a rich and diverse art form with many facets to explore. We'll address some common questions about its unique characteristics, historical influence, cultural significance, and technical aspects.
What distinguishes portraiture in art from other artistic representations?
Portraiture focuses on capturing a person's likeness and essence. It aims to show the subject's physical features, personality, and sometimes social status. Unlike landscape or still life art, portraiture centers on human subjects.
Artists use facial expressions, posture, and symbolic elements to convey the sitter's character. This personal approach sets portraiture apart from other art forms.
How has the history of portraiture influenced modern portrait photography?
Traditional painting techniques have shaped modern portrait photography. Photographers often draw inspiration from classical lighting, composition, and posing methods.
What are some notable examples of portraiture across different cultures?
Ancient Egyptian funerary portraits showed idealized depictions of the deceased. Renaissance Europe saw a rise in commissioned portraits of nobility and wealthy merchants.
In Japan, ukiyo-e woodblock prints often featured portraits of actors and courtesans. African masks, while not realistic portraits, represent ancestral spirits or idealized human traits.
In what ways does portraiture serve as a tool for personal or historical identity?
Portraits preserve a person's appearance and status for future generations. They can document important figures in history, politics, and culture.
Family portraits and self-portraits offer insights into personal identities and relationships. In museums, portrait collections help us understand past eras and social structures.
How is a self-portrait defined, and how does it differ from other forms of portraiture?
A self-portrait is an artist's depiction of themselves. It allows for deep self-reflection and experimentation with technique and expression.
Self-portraits often reveal the artist's inner world more intimately than commissioned portraits. They can serve as a form of autobiography, showing the artist's growth over time.
What techniques are commonly employed in the creation of photographic portraits?
Common techniques include Rembrandt lighting and butterfly lighting.
Composition rules like the rule of thirds help create balanced and appealing images.
Photographers also pay attention to background choice, lens selection, and camera angle to enhance the portrait's impact.
]]>
https://proedu.com/blogs/news/saying-no-will-make-you-a-better-photographer2024-07-09T12:10:04-05:002024-07-09T12:10:04-05:00Saying No Will Make You a Better Photographer: The Power of Selective FocusGary MartinMore]]>
Saying No Will Make You a Better Photographer: The Power of Selective Focus
MENTAL HEALTH IS GOOD FOR PHOTOGRAPHY
Achieving success as a photographer hinges on our ability to focus. The world offers a kaleidoscope of opportunities—projects to launch, people to meet, and a myriad of subjects, from nature to the urban landscape, awaiting capture through our lenses. A torrent of creative ventures may beckon us, each promising its own rewards, yet learning to decline is as crucial as grasping the camera itself.
Feeling swamped by a sea of tasks is a common plight. The administrative side vies for our attention: customer interaction, image editing, communication, and promotion. In parallel runs a river of creative impulses, urging us to explore fresh concepts or novel landscapes. Balancing these demands is essential; it’s the fine art of discernment that keeps us afloat.
Often, turning down requests is key to preserving our well-being. Whether it's passing up additional photo editing, foregoing networking coffee dates, or eschewing potential collaborations, these moments of refusal are signposts of our commitment to our craft. Similarly, a gleaming new idea may tempt us, but we must evaluate its worth against the ongoing projects that require our dedication.
In saying 'no,' we are not merely turning away transient opportunities. We are affirming our commitment to projects and partnerships that truly resonate with our vision, much like a painter selects a palette with care. Setting these boundaries not only nurtures our own mental resilience but also fortifies our photographic pursuits.
Mastering the gentle art of refusal becomes a testament to our strength. We exchange the good for the great, choosing excellence over expediency. It is a deliberate practice, one that requires resolve but guarantees the preservation of our mental space—space that is fertile ground for the cultivation of compelling imagery and a composed life amidst the cacophony of choices.
The Advantages of Selective Agreement for Photographers
Unleashing Creativity Through Time Management
Allocating our time is a definitive act of self-expression. In photography, where artistry and innovation are paramount, having the leeway to explore our creative depths is invaluable. Rejecting offers that don't align with our growth or values clears the way for personal and professional evolution. Whether it's developing new techniques, experimenting with black and white contrasts, or finding respite, choosing wisely lets us invest in pursuits that truly resonate with who we are and aspire to become.
By filtering opportunities, we safeguard time for these enriching activities, ensuring that every moment contributes to our journey in the art of photography.
Focusing on Quality over Quantity in Projects
Good photographs arise from intent, not happenstance. When we are discerning with our project selection, we mirror the concept of thoughtful composition in photography—focusing on quality components that will yield the best collective image. This conscious choice elevates our work and amplifies our presence in the field. Our chosen assignments should reflect our standards, dreams, and the principles championed by renowned photographers through inspirational quotes about photography. Prioritization allows us to:
Advance Careers: Targeting projects that foster growth
Seek Opportunities: Open doors to new challenges
Enhance Skills: Improve with significant undertakings
These steps culminate in a robust portfolio that tells a tale of meticulous curation and dedication to the art form.
Prioritizing Relationships in Our Network
Interactions hold profound value in our lives, especially as photographers. Our community, from loved ones to business collaborators, is a foundational pillar. However, discernment in allocating our time means we can nurture the relationships that help us flourish while graciously declining others. In practicing this, we ensure our emotional well-being and fortify bonds that genuinely matter. Consider this hierarchy:
Loved Ones: For personal support and inspiration
Mentees: To impart knowledge and shape the future of photography
Partnerships: For mutual growth and creating art together
Aligning our time with our priorities cultivates a balanced, fulfilling network that is both supportive and inspiring.
Through these strategies, we, as photographers, control our narrative and steer our lives toward fulfillment. It’s in these thoughtful decisions that we find the essence of the art of photography—not merely in the pictures we take, but in the lives we lead.
How a Photographer Can Decline Requests
We understand the struggle of rejecting requests while aiming to serve others. The challenge intensifies when we're brimming with exciting ideas. Still, mastering the rejection can offer peace and focus. Here's a straightforward approach:
Assess the Ask: Consider the request carefully. Does it align with our goals and capacity?
Prioritize: Put our existing commitments first to avoid spreading ourselves too thin.
Be Direct: Communicate our decision with polite yet firm clarity.
Offer Alternatives: If possible, suggest other photographers or a later date.
Stay True: Keep our professional integrity intact by not overcommitting.
Grasping Our Inspirations
Taking a moment to reflect on what drives us to pursue photography can clarify the paths we choose. Perhaps we are drawn to the joy of engaging with people through our lens. In contrast, a year-long project capturing inanimate subjects might conflict with this passion. Remember, every photographer has a unique spark that ignites their creativity. Figures like Ansel Adams and Diane Arbus found their motivation in the beauty of nature and the complexity of human subjects, respectively.
Our drives may stem from desires for recognition, achievement, or the fulfillment that comes from aiding others. We acknowledge that these motivations are deeply personal and there's no incorrect reason for our photographic journey. With a firm grasp on our internal compass, we can confidently navigate through a multitude of options, making choices that align with what we treasure most. This inner direction ensures we remain true to ourselves and our artistic vision.
SET YOUR GUIDELINES
Understanding our goals is like following a compass; outlining our guidelines is akin to marking key points on a map. Within photography, these guidelines ensure we align every action with our core intentions.
Consider principles such as: benefitting our business, aiding others, and fostering connections. These serve as benchmarks for our decision-making.
Selecting the guidelines that resonate with us is crucial. Whether we embrace a single principle or an array, the impact on our photography—be it with a camera or on film—is profound. The reflective process of considering our ideal life and identity as photographers assists in determining these guiding standards.
Protect Your Downtime
Taking time to unwind is as essential as the work we pour into our careers. It's not a luxury—it's a cornerstone of well-being. Allowing ourselves time to relax is crucial for maintaining mental health, tackling stress effectively, and fostering productivity. Think of it as refueling our inner reserves so we can journey toward our goals with renewed vigor.
As beginners in photography, reading about techniques and practicing with our cameras are important, but so is stepping back to recharge. Remember, saying no to overloading our schedule is saying yes to a healthier, more balanced life. When opportunities come knocking, consider the value of your serene moments. Defend those precious periods fiercely, for they are the silent partners to our success. Saying yes to everything can drain our energy, and it's vital to remind ourselves that saying no is often part of sustaining a harmonious life.
KNOW YOUR NON-NEGOTIABLES
In the realm of personal principles, each of us holds certain standards that are absolute. These are our personal lines in the sand, dictating actions we refuse to take. They shape our identity and preserve our dignity. Everyone’s limits vary, and it's alright if ours do not mirror another's.
For instance, an artist might firmly state, "I refuse to adjust my client's appearance in post-editing." This assertion honors their commitment to authenticity. Similarly, one could firmly decide, "No agreement without a contract," ensuring professional boundaries and clarity.
These boundaries guide us in recognizing opportunities that align with our values and goals, empowering us to decline what doesn't promote our well-being. Susan Sontag's dedication to the art of observation and intuition can inspire us to observe closely what truly resonates with our core beliefs, thereby reinforcing decisions that reflect our deepest convictions.
CONCLUSION
We understand that the power of refusal is as vital as the willingness to accept. By filtering opportunities through our motivation, core values, essential rest periods, and non-negotiable life aspects, we sharpen our ability to decline offers that stray us from our desired path. This discernment enables us to embrace the endeavors, connections, and concepts that propel us toward our aspirations.
Remember, dispensing a 'no' should not carry guilt—it's this boundary that empowers us to commit to what genuinely matters, letting us flourish into our optimum selves.
]]>
https://proedu.com/blogs/news/how-i-turned-an-ordinary-portrait-into-conceptual-art2024-07-09T11:32:46-05:002024-07-09T11:32:46-05:00Guest Blog: How I Turned An Ordinary Portrait Into Conceptual ArtGary MartinThere are various approaches one can take to create conceptual portraiture. Sound logic will tell you to pre-plan your concept before the shoot and to do so in as much detail as possible.
There are various approaches one can take to create conceptual portraiture. Sound logic will tell you to pre-plan your concept before the shoot and to do so in as much detail as possible. This will allow you to define the mood, plan the color palette, scout locations, gather props, etc. so that all these elements work in harmony towards the defined concept.
For this shoot, I had the luxury of having significantly more creative freedom than my typical commissions. I went into the session with no pre-defined concept in mind. The only predefined expectation was to deliver *a* conceptual portrait. The couple had complete trust in the process and did not impose any themes.
Shooting
The shoot was scheduled to take place on location. This usually helps the subjects be more at ease, especially if the shoot is taking place in their own home - which was the case for this couple.
I started this shoot with a brief dialogue with the couple to get to know them better. This is always an important part of any session I shoot. It puts the subjects at ease, allows me to get to know them better and study both their expressiveness and chemistry. We discussed which directions to explore during the session, and their wish was to showcase romance with a touch of sensuality.
Since the expected outcome was a conceptual image that was going to be worked in post-processing, the locations and background didn’t matter so much throughout the shoot. I was simply looking for neutral backgrounds that could be easily altered in Photoshop if need be.
We started the session in the comfort of the living room with some “standard” portraits to break the ice, and worked our way toward the portraits intended for the conceptual image.
The final image was shot with the couple lying on their bed. I was standing on a stool directly above them. I lit them with a Godox AD600 shot through a 42” Westcott octabox on camera left, tilted downwards towards the subjects.
In order to illustrate the marital status of the couple, I made sure to incorporate their hands with the rings into the portrait.
Culling
When shooting for conceptual art, the culling process is simultaneously easy and subtle. You know right away which scene/pose is the winner - it speaks to you instantly. It’s therefore easy to quickly discard entire sets of images.
But once you are left with the set of captures from the chosen scene, it suddenly becomes very subtle. It’s all about finding *the* perfect capture with the perfect expressions, the perfect body language, the perfect hand placements, etc.
In this particular shoot, I was able to find a single capture where I was satisfied with all these elements. However, it could happen that the perfect expression is in one photo and the perfect hands are in another. I’m not a purist, so I'm not afraid of compositing different elements if need be, but it wasn’t necessary for this shoot.
I like using Photo Mechanic in my culling to quickly move back and forth between subtle variations to pick my favorite(s).
Capture One
Capture One is an integral part of my workflow. Sure, you can probably get similar results using your favorite tools such as Lightroom or Adobe Camera Raw. But I just like the slightly different tools at my disposal in Capture One, especially those for color control. I also find that Capture One allows me to push my RAW files to slightly more extremes with cleaner outputs than what I am personally able to achieve with other tools.
The main issues of the RAW capture were some lost details in the shadows and skin tone inconsistencies. The changes are summarized in the screen captures below.
Below is a closer look at the main areas where the changes are more noticeable. Notice the recovered details in the hair and the more uniform skin tones.
Retouching
You’ll notice that the retouching in each of these steps is very subtle, sometimes barely noticeable in a small screen grab, and that’s really the key here. The sum of subtle changes is a dramatic change.
Puppet Warp
I started the retouching process by tweaking the pose of the couple by using Photoshop’s Puppet Warp. The main goal is to add some dynamism and enhance the sensual mood of the image.
Cloning
I cloned some of the sheets to add some flow to the image and hide the tense hand.
Skin Correction
I mainly evened out color density issues, cleaned some of the forehead wrinkles and improved skin tone consistency. I used a mixture of healing brush, stamp tool, gradient mask on color blending mode and frequency separation to achieve this.
Dodging & Burning
I did some slight dodging and burning to define the pectorals and to overall give the subjects a bit more depth overall. Here is the result.
Concept
I defined and refined the concept throughout the retouching process. As mentioned, you should ideally set the concept before the shooting even begins. But for the aforementioned reasons , I had some creative freedom which allowed me to define and refine my concept throughout the later stages.
The dictionary defines “concept” as an abstract or generic idea generalized from particular instances. I chose to tell the generic idea of love from the particular instance of this moment.
Illustrating “love” in a portrait is a pretty beaten path. Almost all couples’ portraits aim to do this and only this! So to bring this portrait to the next level, it needed some artistic merit. There’s no other way to attain this crucial step but to immerse yourself in art and art history (and be warned: it’s a continuous and never-ending journey).
The way I can over-over-oversimplify this concept is that a work of art is all about balancing elements with their contrasting opposites. For example, Michelangelo used the contrast of smooth skin against the textured cloth in his famous Pieta. Similarly, the smooth skin of the subjects in this portrait is contrasted by the wrinkled sheets in the original photo.
The portrait was shot with somewhat neutral gray sheets. This made it easy to color them in a different color. I chose to make them red to symbolize passion and highlight the main concept of love. I used a Hue/Saturation adjustment layer in “colorize” mode with the settings below to color the sheets.
Compositing
I wanted to elevate the image further by incorporating additional contrasting elements. I first experimented with contrasting the masculinity of the subjects with the softness of flowers. To give a more painterly feel to the image, I simply used paintings of flowers! Royalty-free old master paintings from museums, to be precise.
I then tried to contrast the main theme of Love. The overall composition and subject placement didn’t at all hint at a renaissance painting by themselves. But somehow the overall image was starting to feel like a renaissance painting, at least to me.
I wanted to continue pushing in that direction and decided to introduce the biblical symbol of a snake to add some tension with the main theme. It was a photo I had taken more than 10 years ago at the local zoo.
After matching the density and colors of this old photo with Curves adjustment layers, I added the snake in the corner, pointed directly towards the center.
Color-Grading
The final step to complete the concept and bring cohesiveness is color-grading. I opted for the below color palette and pushed the hues and saturation around to neutralize other colors.
Overall the image has an analogous scheme as becomes evident when the dominant colors are viewed on a color wheel.
… And A Title!
This step is essential as it just gives meaning to the entire piece and breathes life into it. A title sets the viewer on a certain path and mindset to begin exploring the image.
I’ve chosen to title this image “Forgive Me Father, For I Have Loved” to highlight the tension created by the various elements of the image.
With all these elements put together, here’s what I got:
Ara Hagopian is a WPPI Master Photographer and the leader of Badger Photography, a Montreal-based award-winning Studio. He wrote this blog post, and all images are shared with his permission.
]]>
https://proedu.com/blogs/news/dramatic-lighting-transforming-spaces-with-impactful-design2024-06-25T17:14:18-05:002024-06-25T17:20:27-05:00Dramatic Lighting: Transforming Spaces with Impactful DesignGary Martin
Creating dramatic lighting in photography can elevate the mood and emotion of your images. Learn how to use light and shadow to create stunning portraits that captivate viewers.
]]>
Creating dramatic lighting in photography can instantly elevate the mood and emotion of your images. By controlling the quality and direction of light, we can craft stunning portraits that captivate viewers. The key to achieving dramatic lighting lies in understanding how to use light and shadow to create contrast and depth.
In our blog post, we will explore various techniques and tools for setting up dramatic lighting. From adjusting your camera settings to choosing the right light modifiers, we'll provide practical tips that you can apply to your own photography. Whether you're using natural light or artificial sources, dramatic lighting can help you create powerful and memorable images.
We’ll also examine case studies from renowned photographers to see how they achieve dramatic effects in their work. By the end of this article, you'll have a solid grasp on how to use light to create atmosphere and intensity in your photos.
Key Takeaways
Understand the basics of dramatic lighting to enhance mood and emotion.
Learn camera settings and techniques for achieving dramatic effects.
Explore tools and creative practices to master dramatic portrait lighting.
Fundamentals of Dramatic Lighting
Dramatic lighting can transform photos by emphasizing contrast and shadows. It shapes the mood and feel of an image, making the scene more engaging and powerful to the viewer.
Understanding Light and Shadow
Light and shadow are essential elements in creating dramatic lighting. Hard light sources, like direct sunlight or small lamps, cast sharp, defined shadows. These shadows create strong contrast between light and dark areas, adding depth to the photo.
On the other hand, soft light sources, such as diffused or natural light, produce gentler transitions and softer shadows. Both light types are useful, depending on the desired effect. Using various light modifiers like snoots or diffusers helps control light direction and shadow intensity, achieving the desired dramatic effect.
Role of Contrast in Dramatic Effects
Contrast is another crucial factor. High contrast between light and dark areas makes an image stand out. To increase contrast, we can skip using fill lights, which typically reduce shadows. Instead, we might use a black reflector to enhance shadows.
Low contrast produces a more subtle and flat appearance. For dramatic portraits, high contrast is usually more effective. By controlling contrast, we can draw attention to key subjects or features, making them more prominent and impactful.
The Impact of Lighting on Mood and Atmosphere
Lighting dramatically influences a photograph's mood and atmosphere. Bright, direct lighting can create a harsh and intense atmosphere, suitable for edgy or dynamic scenes. Conversely, softer, diffused lighting often results in a calm, serene mood, ideal for tranquil or intimate moments.
We understand that manipulating light and shadows can evoke different emotions. Light direction also plays a role. Lighting from above might appear dramatic and mysterious, while lighting from below can create a more ominous effect. Knowing how to light different scenes, like day exteriors or indoor settings, helps us better craft the desired atmosphere.
By mastering dramatic lighting techniques, we can significantly impact our photographs' overall narrative and emotional depth.
Camera Settings and Techniques for Dramatic Effects
In achieving dramatic effects, key elements like camera settings, angles, and focus techniques play essential roles. Understanding how to balance aperture, ISO, and shutter speed is crucial.
Aperture, ISO, and Shutter Speed
Aperture controls the amount of light entering the camera. For striking portraits, a wide aperture (like f/2.8) can create a shallow depth of field, emphasizing the subject against a blurred background.
ISO affects your camera's sensitivity to light. Lower ISOs (e.g., 100-400) are best for reducing noise in well-lit environments. Higher ISOs can be used in low light but may introduce graininess. Mastering ISO settings ensures clarity in various lighting conditions.
Shutter speed determines how long the camera sensor is exposed to light. Fast speeds (1/1000s) freeze motion, while slower speeds (1/60s or below) can introduce blur, suitable for dynamic effects. Adjusting these three settings—the exposure triangle—enhances the drama in your shots.
Working with Camera Angles and Focus
Changing camera angles can dramatically impact your photos. Low angles can make subjects appear powerful, while high angles can make them seem vulnerable. Experiment with different perspectives to create the desired emotional response.
Focus is another critical element. For dramatic portraits, keep the eyes in sharp focus, ensuring they stand out. Use manual focus if automatic settings struggle in low light or complex scenes. For more creative effects, selective focus on a specific detail can draw attention and create a compelling image.
Using these techniques together can elevate the visual impact of your photography, making each shot more engaging.
The Exposure Triangle in Dramatic Photography
The exposure triangle—aperture, ISO, and shutter speed—must be well-balanced to achieve dramatic effects. Understanding how these aspects interact is key. For example, a wide aperture with a fast shutter speed requires a higher ISO in low light.
When photographing moving subjects, like in commercial beverage photography, a faster shutter speed helps to capture motion crisply. Balancing the triangle ensures that light, sensitivity, and time work together harmoniously for the most dramatic effect.
Mastering these settings and techniques allows us to create powerful, evocative images that captivate viewers.
Lighting Tools and Modifiers
When creating dramatic lighting, the right tools and modifiers play a crucial role. This section covers different types of light sources, how to choose suitable modifiers, and the creative use of lighting equipment.
From Natural to Artificial Lighting Sources
Dramatic lighting can be achieved using both natural light and artificial light. Natural light, like sunlight, can create stunning effects when used wisely. For instance, ambient light during golden hour adds warmth and depth to photos. Artificial lighting options include flash and strobe lights, which provide consistent and controllable light output. Continuous lights, such as LEDs, allow us to see the shadows and highlights in real time, making them easier to work with. Balancing natural and artificial light often yields the most striking images.
Choosing the Right Modifiers for Desired Effects
Modifiers shape and soften the light to achieve different effects. A softbox, for instance, spreads light evenly, creating soft shadows that are perfect for portraits. Umbrellas, both reflective and shoot-through, are versatile and portable, making them a popular choice for photographers. For tighter control, tools like grids and snoots focus the light into a narrow beam, which is essential for dramatic lighting. Barn doors attach to lights to direct the light precisely where we want it, giving us great control over the scene. Reflectors can bounce light to fill in shadows, adding a natural touch to our images.
Creative Use of Lighting Equipment
Creative lighting involves thinking outside the box. We might use multiple lights to highlight different aspects of a subject or backlighting to create silhouettes. Experimenting with colored gels can add a vibrant dimension to our photos, as detailed in The Art Of Shaping Colored Light. Another method is using a snoot to generate a spotlight effect, similar to the look in a James Bond movie title sequence. Grid modifiers help in creating focused light areas, enhancing texture and drama. Combining these techniques with cinematic lighting principles, as seen in the Cinematic Portraiture course, can elevate our photography to the next level.
Different lighting setups can drastically change the emotion and depth of a portrait. Rembrandt lighting is one technique where a small triangle of light illuminates the cheek opposite the light source. This approach adds a classic touch to the portrait.
Split lighting divides the face into equal halves of light and shadow, lending a moody, intense look. For less dramatic yet effective lighting, loop lighting places a light at an angle, creating a loop-shaped shadow under the nose.
Butterfly lighting, with a light directly above and in front of the subject, produces shadows under the nose and chin, highlighting the model's bone structure. Broad lighting is useful when the subject's face is slightly turned, with the broader side of the face being lit, emphasizing the lit areas over the shadowed ones.
Controlling Light for Strong Emotional Portraits
Controlling light involves not just the type of setup but also the use of modifiers. Using a rim light from behind the subject creates an outline of light, separating them from the background and adding depth.
Using a backlight further enhances the separation effect, creating a halo around the subject’s head and shoulders. By skipping the fill light, shadows are deepened, resulting in a more dramatic contrast.
Using black reflectors or other methods to absorb light on one side can enhance shadows, establishing a strong emotional tone in the portrait. This method works well for indoor settings where light can be controlled, such as in fine art portraiture.
Advanced Techniques for Portrait Photography
For those looking to further enhance their portrait photography, advanced techniques offer a pathway to professional results. Utilizing multiple light sources and modifiers like grids and snoots can focus light with precision, adding texture and dimension to the portrait.
Manual mode on a camera allows detailed control over exposure settings, which is crucial for capturing the full range of dramatic lighting effects.
Mastering post-production techniques such as retouching can add the finishing touch, as seen in advanced portrait retouching. These advanced skills enable us to produce stunning, high-end images that capture the desired mood and emotion.
By learning and applying these methods, we can transform our portrait photography, creating compelling and dramatic images that stand out.
Creative Practices and Case Studies
Exploring the techniques of renowned photographers and analyzing iconic examples can help us understand how to create compelling dramatic lighting in our own work.
Exploring Notable Photographers' Techniques
Annie Leibovitz is a master of dramatic lighting. She often uses a mix of soft and hard light to draw attention to the subject while maintaining shadow details. This creates depth and adds emotional weight to her portraits.
Another example is Yousuf Karsh, who used chiaroscuro to emphasize the subject's features. He positioned his lights to create strong contrasts between light and dark areas in the image.
We can also look at creative lighting techniques by using tools like set.a.light 3D. This lighting simulation software allows us to experiment with various setups before actual shoots, saving time and effort.
Analyzing Iconic Dramatic Lighting Examples
One iconic example of dramatic lighting is Karsh's portrait of Winston Churchill. The use of hard lighting from the side created intense shadows, emphasizing Churchill's stern expression. This technique gives a powerful and authoritative feel to the portrait.
In modern photography, dramatic sunset portraits by contemporary artists can be a great source of inspiration. These case studies often show how to balance artificial and natural light to create dramatic effect.
By examining these examples, we gain insights into how different light angles, intensities, and sources can drastically alter the mood and impact of a photograph.
Frequently Asked Questions
Dramatic lighting enhances the mood and emotional impact in both photography and cinematography. It plays a crucial role in visual arts, shaping how viewers perceive the scene by manipulating light and shadows.
How does dramatic lighting enhance the mood in photography?
Dramatic lighting can transform a simple photograph into a powerful image by increasing contrast and depth. It highlights the subject while creating intriguing shadows, adding emotional weight and intensity to the scene.
What techniques are used to create dramatic lighting in portrait photography?
To create dramatic lighting in portraits, we often skip the fill light to deepen shadows. Using a negative fill, such as placing a black reflector on the shadow side, can further enhance contrast. Artificial hard light from small sources also effectively produces strong shadows and highlights.
Can you provide examples of dramatic lighting in cinematography?
In cinematography, dramatic lighting is used to evoke specific emotions. For instance, low-key lighting creates suspense in horror films. High-contrast scenes in film noir use shadows to build tension. Dramatic lighting is also common in thrillers to enhance elements of mystery and danger.
What role does lighting play in conveying drama in visual arts?
Lighting in visual arts defines the atmosphere and can convey emotions without words. It directs the viewer's attention to specific elements, emphasizes textures, and creates a sense of time and space, adding depth to the composition.
What setup is required for achieving dramatic lighting effects in a studio environment?
In a studio, achieving dramatic lighting requires careful placement of lights. Using off-camera flash and experimenting with light direction and intensity are key. Diffusers can help control light spread, while reflectors can fine-tune shadows and highlights.
What are the different styles of dramatic lighting and their impact on viewer perception?
Different styles include Rembrandt lighting, characterized by a distinct triangle of light on the cheek, and split lighting, which divides the face into equal light and dark halves. Each style affects how viewers perceive the subject, enhancing drama and emotional impact. Famous photographers like Annie Leibovitz employ these techniques to craft memorable images.
]]>
https://proedu.com/blogs/news/c4d-classes-master-3d-modeling-and-animation2024-06-25T17:01:25-05:002024-06-25T17:01:33-05:00C4d Classes: Master 3D Modeling and AnimationGary Martin
Cinema 4D (C4D) is an essential tool for anyone looking to create stunning 3D animations and designs. For beginners and advanced users alike, finding the right class can make a huge difference in mastering the software. Whether you're starting from scratch or looking to refine your skills, there are several courses designed to guide you through the process.
A great way to learn Cinema 4D is through structured courses available online. For example, the Cinema 4D Basecamp from School of Motion offers a 12-week program with flexible learning hours. This course covers everything from basic modeling to advanced texturing and rendering techniques.
You can also dive into PRO EDU's courses on CGI, C4D, Arch Viz, Redshift Render, and also get 3D Models to use with the PRO PLAN in their CGI Course Collection.
If you prefer a different pace and style, Cineversity provides comprehensive beginner guides to get you started. For a more immersive experience, consider the Cinema 4D Masterclass on Skillshare or the in-depth courses available on Domestika.
Key Takeaways
CGI For Photographers in Cinema 4D Basecamp is a great place to start for photographers getting into CGI.
Cineversity offers beginner guides perfect for starting out with Cinema 4D.
Advanced and comprehensive courses are available on Skillshare and Domestika for various skill levels.
Getting Started with Cinema 4D
Cinema 4D is a powerful tool for 3D modeling, animation, and rendering. For new users, it's essential to become familiar with the interface, setting up projects, and mastering the basic tools and commands.
Understanding the Interface
Cinema 4D has a user-friendly interface that helps beginners dive into 3D design. The main areas include the Object Manager, Attribute Manager, and Viewport.
The Object Manager lists all objects in your scene, allowing you to easily select and organize them. The Attribute Manager displays the properties of the selected object, which can be adjusted to change its appearance. The Viewport is where you see and interact with your 3D models.
Navigating the interface smoothly is crucial for productivity. Keyboard shortcuts can speed up your workflow, and customizing your layout ensures that you have the tools you need close at hand. By learning how to navigate these areas, you set a foundation for efficient work with Cinema 4D.
Setting Up Your First Project
When starting your first project in Cinema 4D, it's important to configure a few essential settings. Begin by setting your project preferences like frame rate and output resolution under the Edit menu.
Next, create a new scene and use the File menu to save your project frequently. Establish an organized file structure from the start to keep all assets and files in order. This prevents confusion and lost files later on.
For beginners, working with simple primitives like cubes and spheres helps you understand basic modeling. As you get comfortable, you can explore more advanced modeling techniques. Remember to utilize resources such as the Intro to CGI: Cinema 4D + Octane course to further develop your skills.
Basic Tools and Commands
Mastering basic tools and commands is vital for a smooth workflow. The Move, Scale, and Rotate tools are the primary tools you'll use to manipulate objects in your scene.
Commands like Undo and Redo ensure you can quickly correct mistakes. Learning how to create and modify splines and generators allows for more complex shapes and models.
Understanding how to apply textures and materials to your models adds realism and detail. Familiarize yourself with deformers to bend and squish your objects creatively. Resources such as Getting Started are great for beginners to build confidence.
By focusing on these tools and commands, you'll be able to bring your 3D designs to life effectively and efficiently.
Modeling & Texturing Techniques
We will cover essential tools and techniques for creating 3D models and applying textures. We will also explore different 3D modeling tools and options for designing and texturing your 3D creations.
Creating Your First 3D Model
When starting with 3D modeling, it's important to learn the basics. Begin by setting up your workspace in Cinema 4D. Familiarize yourself with the layout and tools, ensuring a smoother workflow. Starting with simple shapes like cubes and spheres helps in practicing transformations such as scaling, rotating, and moving.
From there, you can progress to creating more complex objects. It's beneficial to follow tutorials, such as this intro to 3D modeling in C4D, which guides you through setup, modeling, and unwrapping a complete product.
Exploring Texturing Options
Texturing is a critical step in bringing your 3D models to life. Begin by understanding the basics of UV mapping, which ensures that textures apply correctly on your models. Texturing involves adding materials to your models, giving them colors, patterns, and surface details like roughness or glossiness.
Learning how to use different texturing techniques in Cinema 4D can significantly improve your models. For example, creating a commercial-grade CGI beverage involves not only modeling but also applying realistic textures that enhance the final product’s appearance.
Utilizing 3D Modeling Tools
Cinema 4D offers a wide range of tools for 3D modeling, each suited for different tasks. The extrude, bevel, and bridge tools, for instance, are fundamental for shaping objects. Point and edge modes allow for precise adjustments.
Advanced modeling tools, such as MoGraph and deformers, help create more complex structures. You can also integrate other software like Photoshop for additional detail work, as seen in creating shoe renderings which combine modeling and retouching for realistic finishes.
Using these tools effectively can make your 3D modeling process efficient and flexible, allowing you to create intricate and detailed models.
Animation and Motion Graphics
We are diving into the essential aspects of Animation and Motion Graphics, covering everything from basic principles to advanced techniques. This section will help you understand how to animate and integrate motion graphics effectively.
Animation Fundamentals
In this subsection, we explore the core principles of animation. To animate effectively, we need to understand key concepts like timing, spacing, and squash and stretch. Timing involves controlling the speed of movements to create a sense of realism or exaggeration. Spacing refers to the distance between frames, affecting the smoothness of motion.
Another important principle is squash and stretch. This technique gives characters and objects a dynamic feel, showing flexibility and weight. Understanding these basics will set a strong foundation for creating engaging animations.
Integrating Motion Graphics
Motion graphics, often referred to as "mograph," play a crucial role in enhancing visual storytelling. When we integrate motion graphics with our animations, we add a layer of information and aesthetics. We use tools like Adobe After Effects to create stunning visuals that complement our animations.
Text animation, shape layers, and transitions aid in presenting information smoothly and attractively. For example, animating text in a way that it flows naturally with the overall project can draw attention and maintain viewer interest. Effective use of motion graphics ensures the animation is not only visually appealing but also informative.
Advanced Animation Techniques
For those looking to push the boundaries, advanced animation techniques are essential. These techniques involve more complex concepts like character rigging, dynamics simulations, and particle effects. Character rigging allows us to create a skeletal structure for characters, making them easier to animate.
Dynamics simulations add realism, helping us to create lifelike interactions between objects, like collisions or cloth movement. Particle effects add elements such as fire, smoke, or magic effects, enhancing the overall impact. Mastering these advanced techniques opens up endless possibilities in the field of animation and motion graphics.
For more in-depth learning, the Cinema 4D Basecamp course offers comprehensive training on these topics.
Lighting, Cameras, and Rendering
In this section, we will cover the essentials of mastering lighting, camera techniques, and optimizing render settings. These elements are crucial for creating stunning 3D scenes in Cinema 4D and Redshift.
Mastering Lighting in Scenes
Lighting is a key element in any 3D scene. Proper lighting can make a scene look realistic and vibrant. We should consider both natural and artificial light sources. Using various types of lights, such as area lights, spotlights, and HDRI maps, can bring different qualities to our renders.
Tip: When creating interior scenes, use soft shadows and subtle light decay to add realism.
Using Redshift for Cinema 4D, we can also create physically accurate lighting models. This helps simulate real-world lighting behaviors. It’s important to experiment with different lighting setups to find the right balance for each scene.
Camera Techniques for Dynamic Shots
Cameras in Cinema 4D offer flexibility to create dynamic shots that enhance the overall impact of our scenes. We need to master the use of camera settings such as focal length, depth of field, and motion blur.
To achieve cinematic effects, using the RS Bokeh feature helps create depth of field and beautiful out-of-focus highlights. This adds a professional touch to our renders.
Framing our shots effectively can also improve the composition, directing the viewer’s attention to the most important parts of the scene. By combining these techniques, we can produce engaging and visually appealing renders.
Optimizing Render Settings
Render settings are crucial for achieving the best balance between quality and performance. In Cinema 4D and Redshift, we should optimize settings like sample rate, noise threshold, and global illumination to improve render times without compromising quality.
One useful practice is to use render regions to test specific parts of a scene. This allows us to fine-tune our settings and see the results quickly. Additionally, adjusting the Redshift Object Tag can help control how individual objects contribute to the final render.
Optimizing settings for our hardware ensures efficient rendering. This includes leveraging GPU acceleration for faster performance and better handling of complex scenes.
By mastering these aspects, we can significantly improve the quality and efficiency of our rendered projects.
Career Development and Continuing Education
Building a strong professional portfolio and advancing our careers requires ongoing learning and certification. Cinema 4D courses offer essential skills that can help us grow and excel in our professional journey.
Building a Professional Portfolio
A professional portfolio showcases our skills, achievements, and experiences. For those working with Cinema 4D, including finished projects such as animations, 3D models, and visual effects is crucial.
Taking an online Cinema 4D course helps us learn techniques that can be directly applied to our projects. Including before-and-after comparisons within our portfolio can highlight our ability to improve and refine digital creations. The goal is to demonstrate versatility and expertise in various aspects of 3D design and animation.
Cinema 4D in the Industry
Cinema 4D is widely used in industries such as film, advertising, and gaming. Understanding the applications of this software can help us target the right job opportunities.
These industries value professionals who can produce high-quality 3D visuals. Enrolling in tailored courses provides us with relevant skills. We can explore programs offered by Framingham State University and similar institutions to stay updated on industry standards and advancements in 3D technology.
Getting Certified and Advancing Your Career
Certification can set us apart in a competitive job market. Completing specific career development programs validates our skills and knowledge to potential employers.
Many organizations offer certifications in Cinema 4D, such as comprehensive training sessions or workshops. By achieving these certifications, we demonstrate commitment to our craft and readiness for advanced professional challenges. Regularly updating our skills through continuing education ensures we stay ahead in the rapidly evolving field of 3D design and animation.
Frequently Asked Questions
We have gathered some common questions to help you better understand how to learn and master Cinema 4D.
What are the best online platforms to learn Cinema 4D?
Some of the top platforms for learning Cinema 4D include Cineversity and Skillshare. These platforms offer a wide range of tutorials and courses designed for both beginners and advanced users.
How can beginners get started with learning Cinema 4D?
Beginners can start with introductory courses like the one offered by Cineversity, which covers the basics of Cinema 4D. These courses provide a solid foundation, covering essential terms and initial projects that help you get hands-on experience quickly.
What is the duration of a typical Cinema 4D course?
The duration of Cinema 4D courses varies. Some beginner courses can be completed in a few hours, while more comprehensive ones, like the Cinema 4D Masterclass on Skillshare, may take up to 8 hours or more.
Are there any high-quality Cinema 4D courses available for free?
Yes, some platforms offer free high-quality courses. For example, Cineversity provides a variety of free tutorials that cover fundamental aspects of Cinema 4D, making it accessible for those who are new to the software.
Can I find in-person Cinema 4D training classes?
In-person training for Cinema 4D is less common but can be found through specific workshops or events. Often, these are held by established professionals or during industry conferences, providing an opportunity for hands-on learning with guidance.
What are the challenges of learning Cinema 4D for newcomers?
For newcomers, the challenges of learning Cinema 4D include understanding complex features and tools, as well as integrating the software into their workflow. It can be overwhelming at first, but starting with beginner-friendly courses and consistent practice will help ease the learning curve.
]]>
https://proedu.com/blogs/news/how-to-be-a-car-photographer-mastering-automotive-imagery-techniques2024-06-25T09:34:21-05:002024-06-25T09:34:21-05:00How To Be A Car Photographer: Mastering Automotive Imagery TechniquesGary Martin
Becoming a car photographer can merge your passion for cars and photography into a fulfilling career. Master essential techniques, build a robust portfolio, and network within the car enthusiast community to grow your business.
]]>
Are you passionate about cars and photography? Becoming a car photographer can be a fulfilling career that merges these two interests. To excel in car photography, you need to master both photography basics and specialized techniques. This includes understanding camera settings, lighting intricacies, and composition methods that highlight a vehicle's beauty and power.
Building a robust professional portfolio is essential. It showcases your best work and helps potential clients or employers see your capabilities. By demonstrating versatility in capturing stunning car images, you'll attract more opportunities. Additionally, having the right gear and preparation will set you up for success in capturing high-quality automotive images.
Finally, launching your car photography business involves networking with car enthusiasts, manufacturers, and other photographers. Engaging with communities can lead to new opportunities, helping you grow your career in car photography.
Key Takeaways
Master photography basics and specialized car photography techniques.
Build a versatile and professional portfolio.
Network within the car enthusiast community to grow your business.
Light painting is crucial when photographing cars. Each vehicle presents unique challenges based on its shape, color, and year of manufacture, making a tailored lighting approach essential. By customizing the light setup, we can bring out the car's best features, whether it's a classic muscle car or a high-performance supercar.
We use different light sources like flash photography, constant lights, and strobes to achieve this. For example, the ice light and the modeling light of our BronColor Siros strobe help us control the highlights and shadows, emphasizing the car's lines and contours. This technique not only highlights the vehicle's aggressive lines but also ensures the final image looks natural and cohesive.
To illustrate, let's consider our session with the 2016 Shelby GT350. We adopted a high-angle lighting approach to accentuate its bold design. This setup mimicked natural light, creating well-defined shadows and maintaining a consistent look from front to back. This method also helped integrate the car seamlessly into the background.
Throughout the process, we pay close attention tominimizing reflections, especially with glossy vehicles. Using tools like astrip softbox, we control the light precisely, section by section, ensuring each part of the car is illuminated without unwanted glare.
Effective light painting also involves considering the surrounding environment. By balancing the flash with ambient light, we avoid an over-processed look. For instance, while lighting the Shelby GT350, we kept some natural light on the car's upper surfaces, blending it with the scene's ambient light. This approach ensures the car remains part of its setting rather than appearing as a cutout.
These techniques extend beyond cars. We apply similar principles when photographing other products like motorbikes, adjusting the light to highlight their unique features and textures. This adaptability demonstrates light painting's versatility and foundational importance in creating compelling automotive photography.
Understanding Photography Basics
To excel in car photography, we need to grasp the fundamentals of photography. This includes selecting the right camera, mastering lighting, and applying composition techniques.
Camera Types and Choices
When it comes to choosing a camera, we can opt for a DSLR or a mirrorless camera. DSLRs are known for their durability and extensive lens selection, making them popular for capturing high-quality images. Mirrorless cameras, on the other hand, offer the advantage of being more lightweight and compact while providing excellent image quality and faster autofocus.
Additionally, it's important to understand the various settings like aperture, shutter speed, and ISO. A wide aperture (lower f-number) creates a shallow depth of field, ideal for isolating the car from the background. Adjusting the shutter speed can help capture motion, making it crucial for photographing moving cars.
Understanding Lighting
Lighting plays a pivotal role in car photography. Natural light is often the best option, preferably during the golden hours (just after sunrise and before sunset), as it creates a soft and flattering light. Meanwhile, artificial light sources like LED panels or flash units can be used to highlight specific parts of the car or to shoot in low-light conditions.
We should always pay attention to the direction and quality of light. Front lighting reveals all details but can make the image appear flat. Side lighting emphasizes texture and shape, which is great for highlighting the car's contours. Backlighting can create dramatic silhouettes and is useful for more artistic shots.
Composition Principles
Composition is about arranging elements in the frame to create a visually appealing image. To capture stunning car images, it’s essential to know the classic angles, such as eye-level shots, side views, and 45-degree corner views.
Using the rule of thirds can help balance the image by placing the car off-center. Leading lines, such as roads or fences, can guide the viewer’s eye towards the car. It’s also important to manage the background, ensuring it doesn’t distract from the main subject. In night car photography, de-emphasizing the background using a wide aperture and fast shutter speed can keep the focus on the car.
For more in-depth tips, refer to car photography tips to refine your skills and capture breathtaking images.
Mastering Car Photography Techniques
To master car photography, we must focus on various essential techniques, including how to capture motion, the art of shooting at car shows, effectively photographing car interiors, and unique methods like light painting for night photography.
Panning and Motion
Panning is a vital technique for showcasing car movement. It involves moving the camera in sync with the car's motion at a slow shutter speed to create a dynamic effect. This results in sharp images of the vehicle against a blurred background, emphasizing speed.
To achieve this, we set our camera to a slower shutter speed, typically between 1/30 to 1/60 seconds. A steady hand or a tripod helps maintain focus on the car while blurring the background. Practice and timing are crucial for perfection.
Shooting at Car Shows
Car shows present a unique challenge due to crowded backgrounds and reflections. We navigate these challenges by carefully choosing our angles and timing our shots to avoid unwanted elements. Early morning or late afternoon light is ideal for minimizing harsh reflections.
Using a polarizing filter can also help reduce glare and enhance colors. Additionally, focusing on specific parts or features of the vehicles instead of wide shots can lead to more impactful images. Patience and attention to detail are key.
Capturing Car Interiors
Photographing interiors requires attention to detail and lighting. Natural light through open windows often provides the best illumination. We avoid harsh sunlight, which can create unflattering shadows and highlights.
For low-light conditions, using a tripod helps maintain the sharpness at slower shutter speeds. Experimenting with different angles, like shooting from the backseat, can capture the overall feel of the interior. Highlighting unique features such as the dashboard, seats, and controls adds depth to the images.
Light Painting and Night Photography
Light painting is an advanced technique perfect for night shoots. It involves using a prolonged shutter speed and a light source to "paint" light onto the car, resulting in dramatic and artistic images. We set up our camera on a tripod to ensure stability during the long exposure.
Using a low ISO setting and adjusting the aperture based on ambient light helps control the exposure. We move a continuous light source, such as a flashlight, around the car to highlight contours and details. This method requires practice but offers striking and professional results.
For more advanced techniques, Easton Chang offers extensive insights into commercial car photography and retouching. His tutorials delve into creating compelling car images at a professional level. By mastering these techniques, we will significantly elevate our car photography skills.
Building a Professional Portfolio
Creating a professional car photography portfolio involves carefully selecting your best work, leveraging online platforms and social media, and engaging in effective networking to attract clients.
Selecting Your Best Work
First, we must scrutinize our existing collection of car photos. We should prioritize images that showcase our technical skills and creativity. High-quality DSLR or mirrorless cameras are essential for capturing sharp details.
Editing plays a vital role; we should ensure that colors are true to life, and any distracting elements are minimized. We must also be mindful of consistency in style, which reflects our unique photographic perspective. Before-and-after comparisons can help illustrate our editing prowess.
An organized portfolio makes it easier for clients to see our capabilities. Grouping photos by themes, such as vintage cars, sports cars, or luxury vehicles, can help create a focused presentation.
Online Presence and Social Media
Having a strong online presence is imperative. We should start by creating a professional photography website that is easy to navigate. This site should feature our portfolio, contact information, and a blog where we can share photography tips and recent projects.
Social media platforms like Instagram, Facebook, and Pinterest are also crucial. Regularly posting our top shots and engaging with car enthusiasts and potential clients can significantly increase our visibility. Hashtags and geotags help in reaching a broader audience.
Utilizing social media stories and live sessions can offer viewers a behind-the-scenes look at our work, humanizing our brand. This multi-channel engagement fosters a stronger connection with followers, turning them into potential clients.
Networking and Client Building
Building a network is crucial for any professional car photographer. Attending car shows, photography meetups, and industry events provides excellent opportunities for networking. Bringing business cards to these events ensures we can leave a lasting impression.
Forming relationships with car dealers, auto magazines, and automotive brands can lead to lucrative commissions. We should also consider joining online communities and forums dedicated to car photography to share our work and gain insights.
Following up with past clients for feedback and referrals helps maintain professional relationships. Consistency in our work and professionalism in our interactions prove invaluable. As our network grows, so will our portfolio and reputation.
Preparation and Gear
In car photography, selecting the right equipment, choosing optimal locations and timing, and preparing the car are crucial steps to capture stunning images.
Choosing the Right Gear
Our camera bag should include a mix of reliable, versatile gear. A DSLR or mirrorless camera with a wide dynamic range is essential. When it comes to lenses, a wide-angle lens is ideal for capturing the entire vehicle and its surroundings. For detailed shots, a telephoto lens helps highlight specific features like wheels, mirrors, or exhausts.
We should always carry a tripod to keep the camera steady during long exposure shots, crucial during low-light conditions.
Additional accessories like a polarizing filter can reduce glare and reflections on the car's surface.
We don't necessarily need the most expensive equipment, but reliable gear that suits our style and needs is a priority.
Location and Timing
Scouting the right location is vital. Urban settings, scenic landscapes, or industrial backgrounds each offer unique aesthetics. We should always consider the make, model, and color of the car when selecting a background that complements or contrasts effectively.
Golden hour (shortly after sunrise or before sunset) provides soft, diffused light that minimizes harsh shadows and highlights the car's details.
Parking lots, open roads, or natural settings can all provide compelling backdrops for our shoots.
We must also be mindful of the weather, as it impacts the lighting and reflections on the car surface. Cloudy days provide even, soft lighting, while clear skies offer bright and sharp light.
Car Preparation
Before any shoot, the car must be spotless. Cleaning the car thoroughly, including the wheels and mirrors, ensures it looks its best in the photos. We need to be mindful of the car's make and model, as different vehicles might require different detailing techniques.
Remove any personal items from the interior to maintain a professional look.
A quick touch-up during the shoot might be necessary to remove dust or fingerprints.
Small details like tire pressure and shiny rims can make a significant difference in achieving that perfect shot.
For stunning car photos, preparation is key: focusing on the right gear, ideal locations and timing, and meticulous car preparation ensures our work stands out.
Launching a Car Photography Business
Entering the car photography industry requires understanding market demands, honing business acumen, and establishing competitive pricing strategies. We aim to guide you through these steps effectively.
Understanding the Market
It's essential to grasp the dynamics of the car photography industry. Car enthusiasts, dealerships, and commercial clients are the mainstays of demand. Identifying whether car enthusiasts require imagery for personal use or dealerships need high-quality photos for sales can help us tailor our services.
We should also study famous car photographers to understand trends and techniques that attract clients. Staying updated with tech advancements, such as new camera gear or editing software, ensures we remain competitive.
Developing Business Skills
Running a car photography business isn't just about taking great photos; it also requires solid business skills. We must develop effective marketing strategies, including creating eye-catching business cards and a professional website showcasing our portfolio.
Networking with car photography clients at events and car meets provides opportunities to build relationships and secure contracts. Additionally, we should consider the logistics of running a business, such as accounting, taxes, and securing necessary licenses.
Pricing and Making Money
Setting the right prices is critical for profitability. We need to research competitor pricing and understand our costs, including equipment, software, and travel expenses. Offering different packages can help cater to various client needs.
Building strong relationships with dealerships can lead to consistent work. It’s also beneficial to diversify our income streams by exploring commercial photography and selling prints or stock images online. By strategically pricing our services, we can ensure sustainable earnings and growth in our career.
Frequently Asked Questions
In car photography, the right equipment, capturing angles, and career opportunities are crucial. Understanding pricing, earnings, and unique aspects of this genre can guide aspiring professionals.
What equipment is essential for a beginner in car photography?
For beginners, a sturdy DSLR or mirrorless camera is essential. Pair it with a versatile lens such as a 24-70mm for flexibility. A tripod helps in stabilizing shots. Lighting gear, though not always necessary, can enhance photos, especially in low light situations. Remember, basic gear is often sufficient.
What are effective techniques for capturing different car photography angles?
To capture different angles, try shooting from low perspectives to emphasize size and design. High angles can showcase the car in its environment. Experiment with wide shots and close-ups. Panning techniques highlight motion, useful for dynamic shots. Each angle tells a unique story about the vehicle.
How can one start a career in automotive photography?
Starting in automotive photography often begins with a passion for cars and photography. Building a portfolio is critical; attend car events and practice. Networking with industry professionals can open doors. Some photographers, such as those from Furoore, highlight the importance of marketing and proper business registration.
What are the average earnings for a professional car photographer?
Professional car photographers can earn varying amounts depending on experience, clientele, and location. Entry-level photographers might make less initially, but established professionals working with high-profile clients or publications can earn a substantial income. Specialized niches can also impact earning potential.
How should pricing be structured for professional car photoshoots?
Pricing should reflect the time, effort, and resources involved. We suggest considering factors such as location, post-processing time, and client usage rights for the images. Some photographers charge by the hour, while others offer package deals. Pricing should be clear and transparent to avoid misunderstandings.
What distinguishes car photography from other types of photography?
Car photography focuses on capturing the essence and design of vehicles. Unlike portrait or landscape photography, it requires a unique understanding of reflections, angles, and the vehicle’s structure. The goal is to highlight the vehicle's aesthetics, performance features, and often its brand identity, making it distinct from other photography genres.
]]>
https://proedu.com/blogs/news/free-image-resizer-resize-photos-online-for-perfect-fit2024-06-10T14:16:29-05:002024-06-10T14:17:30-05:00Free Image Resizer: Resize Photos Online for Perfect FitGary Martin
In today's digital world, resizing images while maintaining quality is crucial for various uses, including social media and professional presentations. Free online image resizers offer a quick and efficient way to adjust photos to specific dimensions. These tools save time and negate the need for specialized software, making the resizing process accessible to everyone.
]]>
A Free Image Resizer Tutorial: Resize Your Photos Online
In the digital age, resizing images without compromising quality is essential for various applications, from social media to professional presentations. Free online image resizers allow us to quickly and efficiently adjust photos to meet specific dimensions. These tools not only save time but also eliminate the need for specialized software, making the process accessible to everyone.
A range of free image resizers is available online, each offering unique features that cater to different needs. Whether you need to crop, resize, compress, or add effects, there’s an online tool ready to assist. For example, Adobe Express provides an intuitive interface to resize images with a few clicks, perfect for sharing across social channels.
Ease of use is a significant advantage of these tools. Websites like PicResize and Instasize enable users to upload, tweak, and download images in no time. With these accessible solutions, you can ensure your visuals are always optimized for their intended purpose.
Key Takeaways
Free online tools make resizing images simple and efficient.
Features include cropping, compressing, and adding effects.
User-friendly interfaces ensure anyone can use them.
Understanding Image Resizing
Image resizing is crucial for optimizing visual content across various platforms. Key aspects include maintaining image quality, understanding pixel dimensions, and the importance of resolution.
The Importance of Image Resizing
Resizing images helps tailor visual content to meet specific needs. Different platforms, such as social media, websites, or print media, have unique size requirements. By adjusting the pixel dimensions and resolution, we can ensure that our images fit these various formats without losing quality.
For online use, resizing is essential to maintain fast loading times. Smaller image files load quicker, enhancing user experience. Additionally, resizing images ensures that they display correctly across different devices, from desktops to smartphones.
Understanding the relationship between pixels per inch (ppi) and image quality is key. Higher ppi values generally yield sharper images, crucial for print media. Online, a lower ppi often suffices, balancing quality and file size.
Common Image Resizing Terminology
Pixels: The smallest unit of a digital image, determining its resolution. More pixels usually mean higher image quality.
PPI (Pixels Per Inch): This measures the pixel density of an image, impacting its clarity and detail. Higher ppi is better for print; lower ppi is adequate for web.
Pixel Dimensions: Refers to the width and height of an image in pixels. Adjusting these dimensions is fundamental in resizing.
Image Resolution: The total number of pixels in an image, influencing its overall sharpness and detail. High-resolution images are vital for crisp print results but can be downsized for web use.
Image Quality: A subjective measure of how clear and detailed an image appears. It can be affected by pixel dimensions and ppi. Balancing quality and file size is crucial in image resizing.
Understanding these terms helps us make informed decisions when resizing images for different purposes. They are essential for achieving the best balance between image quality and file size.
Selecting the Right Image Resizer
Choosing the best free image resizer involves considering important features and ensuring it supports the file formats you use most frequently, such as PNG, JPG, GIF, and BMP.
Features to Look for in a Resizing Tool
When evaluating a tool for image resizing, certain features can greatly enhance usability and output quality. First, ease of use is critical. A straightforward user interface can save time and reduce frustration. Look for tools that allow drag-and-drop functionality, as well as intuitive navigation through resizing options.
Second, check whether the tool provides batch processing. This feature is especially valuable when dealing with multiple images, saving effort and ensuring consistency across your resized assets. Additionally, having advanced settings like preserving aspect ratio and choosing specific dimensions can make resizing more precise.
Another crucial feature is the quality of output. Make sure the resizer maintains high image quality with minimal loss. Some tools offer options to balance between file size and quality, which is useful for web applications where loading speed matters. Lastly, support for multiple file formats such as JPEG, PNG, and BMP ensures broader compatibility and flexibility in your projects.
Supported Image Formats
Not all free image resizers support the same range of file formats. It’s essential to verify that the tool you select is compatible with the image formats you commonly use. The most widely supported formats include PNG, JPG, GIF, and BMP.
PNG format is preferred for its lossless compression and ability to handle transparent backgrounds. JPG, or JPEG, is widely used due to its balance of compression and quality, making it ideal for photographs. GIF is less common but necessary for simple animations and low-color images. BMP is another essential format, particularly for high-quality images that don’t require compression.
Ensuring that your chosen tool supports these formats means you can work seamlessly with a variety of images without needing additional conversion tools. Additionally, the ability to switch between formats within the resizing tool can streamline your workflow, making it easier to prepare images for different uses, whether for web, print, or social media.
Step-by-Step Guide to Resizing Images
Resizing images accurately is essential, whether for social media or printing. We will cover the detailed steps required to resize, crop, and scale images for different purposes.
How to Resize Images for Social Media
To resize images for social media, we first need to select the platform. Different networks like Instagram, Facebook, and Twitter have their own preferred dimensions. For Instagram, a common aspect ratio is 1:1, while Facebook often requires a 16:9 or 4:3 ratio for posts and cover photos.
Open the image in any online image resizer. Upload the image first, then choose the target dimensions or aspect ratio. For instance, an Instagram post typically needs 1080x1080 pixels. Adjust the dimensions accordingly and verify the quality by previewing.
Next, crop or adjust the image's composition if needed. Ensure that vital elements are well-centered and visible. Use the crop tool to emphasize the important parts of the image. Lastly, use other editing tools to rotate or flip the image if required.
Save the resized image and upload it to your social media platform.
Resizing Images for Printing
For printing, the process involves resizing images to specific dimensions in inches and ensuring a high resolution, usually 300 pixels per inch (PPI). Begin by opening your image in an editor like Adobe Express.
Set the units to inches and enter the desired dimensions, such as 8x10 inches. Ensure the aspect ratio matches your print frame. This prevents distortion when the image is printed.
Choose the resize option and set the resolution to at least 300 PPI. This ensures that the printed image is clear and not pixelated.
Use cropping tools to adjust the composition similarly to our social media process. Focus on fitting the image within the designated print size while maintaining the key elements.
Save the final image file in a high-resolution format, such as TIFF or PNG, and proceed to print.
Additional Editing and Features
When using an online image resizer, it's beneficial to be aware of additional editing and privacy features. This ensures a comprehensive tool not just for resizing but also for enhancing image quality and maintaining security.
Enhancing Images with Editing Tools
Many image resizers offer more than just size adjustments. Tools like PicResize allow users to crop, rotate, and add various effects, making it a versatile option for bloggers and social media enthusiasts.
The options to reduce file size without compromising quality are crucial for sharing images on platforms like Facebook, Instagram, or Twitter. Advanced features include converting image formats (e.g., BMP to JPG), optimizing for faster loading speeds, and preserving image resolution. For frequent users, features like batch processing can be a significant time-saver, especially when preparing visuals for multiple platforms.
Ensuring Privacy and Security
Ensuring the privacy and security of your images is paramount. Many services, such as Adobe Express, prioritize privacy by guaranteeing that uploaded images are deleted automatically after processing. This means your photos won’t be stored on their servers long-term.
Security measures include encrypted SSL connections, ensuring that your data remains safe during upload and download. Browser-based tools offer a layer of security by operating locally within your browser rather than uploading to a cloud-hosted server. This minimizes the risk of unauthorized access. Using platforms that emphasize privacy gives us peace of mind, knowing that our files are protected while we work on enhancing and resizing our images.
Frequently Asked Questions
We address common concerns about resizing images online, offering practical solutions using various free tools.
How can I resize an image without losing quality using online tools?
Using platforms like Adobe Express ensures high-quality image resizing. By maintaining aspect ratio and choosing the correct file type, we can minimize quality loss. Adobe's tool specifically enhances resized images, keeping them sharp.
What are the best free online services to resize photos?
For the best free services, we recommend Image Resizer, inPixio, and Kapwing. These platforms offer user-friendly interfaces and strong performance, making them ideal for quick, hassle-free image resizing.
Can I resize images to a specific file size, such as 20kb or 100kb, online?
Yes, services like imResizer allow us to specify target file sizes during the resizing process. These tools make it possible to meet file size requirements without compromising the visual quality of photos.
Is it possible to bulk resize multiple photos at once online for free?
Bulk resizing can be done using tools such as Kapwing and Image Resizer. These platforms support batch processing, enabling us to resize multiple images simultaneously, which saves time and effort.
How do I change the dimensions of a JPEG image without downloading software?
We can use online services such as inPixio and Adobe Express to resize JPEG images. These platforms support direct uploads and resizing, eliminating the need for any software installation.
Are there simple tools available online for resizing images quickly?
Quick and easy tools include Image Resizer and imResizer. These services provide straightforward options for resizing images with minimal steps, making them excellent for fast adjustments.
]]>
https://proedu.com/blogs/news/behind-the-lens-real-life-success-stories-from-commercial-photographers-insights-and-inspirations2024-03-08T15:38:26-06:002024-04-11T15:57:51-05:00Behind the Lens: Real-Life Success Stories from Commercial Photographers – Insights and InspirationsGary MartinIn our exploration of real-life success stories in commercial photography, we uncover the fusion of creativity, technical skill, and relentless pursuit of vision that defines the careers of those who have made a mark in this competitive field
In the dynamic world of commercial photography, every snapshot tells a story not just of the subject, but of the artist behind the camera. Achieving success in this field is often a combination of technical skill, creative insight, networking savvy, and a relentless pursuit of one's vision.
It's a journey marked by continuous learning, adapting, and refining one's craft. We stand to gain valuable insights by exploring the real-life success stories of those who have made a mark in the competitive sphere of commercial photography.
These narratives are more than mere accounts of personal triumph; they are a tapestry woven from the myriad challenges, turning points, and moments of realization that these photographers have encountered.
From understanding the business aspects of photography to mastering the latest technological tools, the stories of these visual artists reveal the multi-faceted nature of carving out a successful career. They underscore the importance of a well-crafted portfolio, the benefits of education and collaboration, and the ever-evolving trends that shape the future of photography.
Key Takeaways
Successful commercial photographers combine creativity with technical expertise.
Networking and a strong portfolio are crucial for career advancement.
Continual education and adaptability to trends are key in the ever-changing photography landscape.
The Journey to Success
In commercial photography, success is not just about snapping pictures; it's a complex fusion of mastering the creative process, developing a distinct professional identity, nurturing client trust and overcoming the multifaceted challenges of the industry.
Embracing the Creative Process
We understand that the heart of commercial photography lies in the creative process. It’s here that inspiration takes form through the play of color and composition. The journey begins with the ability to visualize a concept, then to translate that vision into a tangible photograph.
Learning from industry masters, like Erik Almas, reminds us that the essentials of this process are something we must continually practice and refine.
Developing a Professional Identity
Establishing a professional identity is also vital. This means building confidence in our style and approach to photography. Our personal touch becomes our brand, differentiating us in a competitive market.
This personal branding guides not only the work we produce but also the clients with whom we engage. As we carve out our niche, our professional narrative shapes our career path.
Building Trust with Clients
One of the cornerstones of our success is the relationship we have with our clients. Forming and maintaining client trust is paramount and is cultivated through every interaction and job completed. By fostering strong, personal engagement with clients, we build a reputable image and encourage repeat business.
Such connections are not merely transactional; they're partnerships that can lead to mutual success.
Overcoming Industry Challenges
The path to achievement in commercial photography is riddled with hurdles, from competition to industry volatility. We recognize that success often comes from not just navigating but embracing these challenges – finding the causes that drive us and pushing past setbacks with resilience.
We draw on our creative and professional prowess to remain adaptable and to thrive amidst adversity.
Throughout our journey, we continually hone our craft, seal our identity, earn trust, and rise above challenges, all in pursuit of photography success.
The Business of Photography
In the commercial photography industry, photographers must blend artistry with savvy business acumen to thrive. We'll explore proven marketing strategies to enhance visibility, the importance of fostering strong client connections, the intricacies of licensing and sales, and how setting the right pricing strategy is crucial to our business success.
Marketing Strategies for Visibility
Instagram has become an indispensable tool for photographers to showcase their work. By leveraging targeted hashtags, we can ensure that our projects gain exposure to the right audience. A commitment to consistent branding across all platforms elevates our professional presence, making it easier for clients to remember and recognize us.
Nurturing Client Relationships
The connection with our clients forms the backbone of our business. It's not just about securing a single project; it's about nurturing a sense of loyalty and trust. Personal touches, like sending custom thank you notes or sharing behind-the-scenes glimpses of our work, make our clients feel valued and more likely to return.
Mastering the Art of Licensing and Sales
Understanding the nuances of licensing and sales determines how well we can monetize our work. Clear communication about the rights and usage of photographs ensures there is no ambiguity in our agreements. Managing these aspects well ensures that we receive appropriate fees and maintain control over how our images are used.
Setting a Pricing Strategy
Deciding on a pricing strategy requires careful consideration of several factors. We need to factor in the scope of the project, the budget of our client, as well as our own time and expenses. It is essential to balance being competitive in the market with ensuring that we are compensated fairly for our expertise and creative input.
Technical Savvy
In commercial photography, the mastery of technical skills paves our way to capturing compelling images. Proficiency in selecting the right equipment, understanding composition and light, staying current with digital advancements, and mastering post-processing are crucial.
Choosing the Right Equipment
We know that the camera is an extension of our vision. Selecting a DSLR or mirrorless camera with the appropriate sensor size gives us the versatility to shoot in various lighting conditions.
Lenses are just as important, each offering a distinct perspective. The choice between a wide-angle lens and a telephoto lens can alter the storytelling of our images. Our gear, from tripods to filters, must align with the style and requirements of our shoots.
Understanding Composition and Light
Composition is the backbone of our photographs. We meticulously arrange visual elements using techniques like the rule of thirds and leading lines to create balance within the frame. Light, on the other hand, is the soul.
Whether it's the soft diffusion of a cloudy day or the dramatic contrast of golden hour, understanding and manipulating light enables us to produce images with depth and emotion. Through our control of shadows and highlights, we dictate the mood and energy of our photography.
Keeping Up with Digital Advances
The digital world evolves rapidly, and we stay on the cutting edge. Embracing advancements in camera technology allows us to experiment with new features, from improved autofocus systems to high dynamic range (HDR) capabilities. We keep abreast of the latest software updates and digital techniques to ensure our workflow remains efficient and our output, state-of-the-art.
The Importance of Post-Processing
Post-processing is the final step in our journey to perfection. Our images often require adjustments in color and exposure, which we fine-tune through editing software. We employ various editing techniques to enhance or correct details, making the difference between a good image and a great one. Post-processing is not just about correction; it's an avenue for artistic expression, allowing us to imprint our unique style onto every image we craft.
Artistic Explorations
In the realm of commercial photography, we continually push the boundaries of creativity. Our artistic explorations are not just about capturing images; they are a quest to express feelings, convey beauty, and tell compelling stories through various genres and subjects.
Experimenting with Different Genres
We see the world through a vast array of lenses—portraiture, landscapes, street, macro, and astro photography are but a few. Each genre offers a unique challenge to showcase creativity. In portraiture, we aim to unveil the soul behind the face, while landscapes allow us to present nature's grandeur on a scale that touches on the sublime. Street photography sharpens our instincts and macro opens up the miniature worlds around us. When we look up to the skies for astro photography, we are reminded of the endless possibilities that lie in the cosmos.
Finding Inspiration in the Mundane
It's often in the mundane that we find unexpected joy and beauty. A shadow cast by a household item or the intricate texture of a well-worn fabric—there are stories lurking in every corner waiting to be captured. By focusing on the ordinary, we give it new life and elevate the commonplace to fine art. This practice not only enriches our portfolio but also hones our ability to see the extraordinary in the everyday.
Capturing the Essence of Real Estate and Architecture
When it comes to real estate and architecture photography, we are tasked with capturing the essence of structures as living, breathing spaces. By carefully considering the interplay of light, shadow, and scale, we aim to evoke the feelings that these spaces are meant to convey. Whether it’s a cozy cottage that exudes warmth or a skyscraper that commands respect, our photographs stand as testaments to the human ability to craft environments that resonate both functionally and aesthetically.
The Power of a Portfolio
In the competitive field of commercial photography, our portfolio serves as the most persuasive tool to showcase our talent and secure recognition. It is our visual resume, providing a window into our best work.
Curating a Compelling Collection
We carefully select images that not only exemplify our best technical skills but also tell a story, emphasizing projects that have emotional impact or a memorable narrative. Consistency in style and quality throughout our portfolio assures potential clients of our reliable talent. Each image is a representation of the variety and depth of our capabilities, letting the photos speak for themselves.
Leveraging Social Media Platforms
Social media, especially platforms like Instagram, play a crucial role in presenting our portfolio to a broader audience. By curating an engaging Instagram feed, we connect with our followers through our work, which can translate to a stronger professional network and potential client leads. Regular updates with high-quality images can sustain interest and keep our audience anticipating our next project.
Using Exhibits to Showcase Talent
Participating in exhibitions can further elevate our portfolio. Exhibits provide a physical space to display our work and invite live feedback, offering a tangible experience that can be powerful and resonant. A successful exhibit often hinges on the selection of pieces that have the most impact on the viewer, fostering connection and leaving a lasting memory of our talent.
Education and Collaboration
In the dynamic field of commercial photography, education and collaboration stand as pillars of growth. We delve into how knowledge acquisition and partnerships fuel success stories behind the lens.
Mastering Photography through Education
Education forms the cornerstone of any photographer's journey. By engaging in formal education or attending workshops and courses, we build a robust foundation of technical skills and creative approaches. A comprehensive guide by PRO EDU emphasizes the importance of continuous learning to stay competitive and innovative.
The Benefits of Networking and Collaboration
Our networks provide valuable opportunities for collaboration, bringing diverse experience and expertise to the table. As we forge connections, we open doors to potential clients, projects, and resources. Collaborating with others can lead to fair partnerships, as mentioned in the photographer's guide to fair partnerships, ensuring equitable compensation and mutual growth.
Engaging with Photography Communities
Being part of a photography community nurtures our professional development through the support of like-minded individuals. Communities offer a platform for sharing resources, discussing trends, and solving challenges collaboratively. They are a breeding ground for connection and support, as stories from the SmugMug campaign 'This Lens' illustrate.
Sharing Knowledge and Experience
Sharing our knowledge and experience is vital for collective advancement. Whether serving as mentors, contributing to forums, or writing educational content, we strengthen our community’s skill set. This sharing of insights enriches the community, ensuring that collective experience and teaching stay current with the evolving landscape of photography.
Trends and Future Directions
In commercial photography, staying cognizant of the prevailing trends is vital for our success while keeping an eye on the horizon prepares us for inevitable changes. We'll explore the current patterns shaping our industry and the innovations that may redefine our craft.
Analyzing Trends in Commercial Photography
Today's commercial photographers have to master a blend of artistic and technical skills. Raw file handling and tethered shooting are essential for high-quality captures, as noted in the tips for succeeding in commercial photography. Retouching has moved towards creating flawless yet realistic results, balancing skin and product refinement. What's more, brands now seek photographers who can combine photography with 3D elements — a trend known as CGI integration — creating innovative and captivating visuals.
CGI Integration: Marrying photography with digital art for innovative outcomes.
Anticipating the Future of Photography
As we look to the future, the photography industry must be ready for rapid evolution. With technological advances, the boundaries between photography and other visual forms are blurring. We anticipate a significant shift towards immersive experiences, such as virtual and augmented reality used in commercial projects. This shift doesn't just mean learning new techniques; it's about adapting our mindset to fully embrace the potential of these tools. Our role as photographers will expand beyond the lens — we'll become orchestrators of multimedia experiences.
Immersive Experiences: Embrace VR and AR as the new frontiers.
Adaptation and Learning: Continuous education to harness futuristic technologies.
Our understanding of trends and preparation for the future are fundamental. We must keep innovating and adapting, ensuring we can meet the demands of brands seeking cutting-edge visual storytelling.
The Lifestyle of a Photographer
The life of a commercial photographer blends creativity with the rigor of meeting client needs, often involving a juggling act between fulfilling assignments and maintaining personal wellbeing. Our lifestyle is a complex balance of freedom, flexibility, and challenge.
Balancing Personal Life and Assignments
We find that maintaining a balance between our personal lives and professional assignments is crucial. Our schedules can be unpredictable, sometimes leaving us working long, irregular hours to meet a project deadline or catch the perfect light for a shoot. It's vital for us to set boundaries and designate time for family and relaxation to keep our energy levels high and stress at bay. This balance is not only important for our personal satisfaction but also for sustaining creativity and focus when on assignment.
Managing the Freelance Lifestyle
Embracing the freelance lifestyle means adapting to fluctuating workloads and income. We enjoy the freedom it brings, allowing us to choose assignments that align with our interests and values. To manage the ebbs and flows, we prioritize:
Financial Planning: Ensuring stability by budgeting for lean periods.
Time Management: Allocating hours for active marketing during quieter times.
Networking: Building relationships that can lead to consistent work.
This proactive approach helps us stay grounded and secure in our freelance journey.
Health and Wellbeing for Creatives
We understand that our health and wellbeing are paramount in supporting our creative endeavors. Long hours of editing or multiple shoots can take a toll on our physical health, so we:
Exercise Regularly: To stay physically fit and to boost mental clarity.
Practice Mindfulness: To reduce stress and maintain our mental health.
Prioritize Sleep: Ensuring we get enough rest to recover and stay sharp.
By taking steps to look after our health, we aim to sustain our longevity and success in the industry.
Frequently Asked Questions
In this section, we address crucial inquiries about the methods, strategies, and influences that mold a successful career in commercial photography.
What techniques do successful commercial photographers use to capture impactful images?
How can aspiring photographers build a successful career in commercial photography?
Aspiring photographers should focus on networking, building a strong portfolio, and constantly improving their skills. Education in business and marketing is also vital, as it helps in establishing a brand and attracting potential clients.
Which photographers have influenced commercial photography with their innovative styles?
Photographers like Annie Leibovitz, with her distinctive portraiture work, have set standards in editorial and commercial photography. Their innovative approaches to storytelling and imagery have left a lasting impact on the industry.
What business strategies contribute to a commercial photographer's success?
Effective business strategies include understanding the target market, crafting a distinctive brand, and providing unparalleled client service. Diversifying revenue streams and leveraging social media for marketing are also critical for success.
How do prominent documentary photographers impact the commercial photography industry?
Prominent documentary photographers bring a sense of realism and storytelling that often crosses over into commercial work. Their ability to capture candid moments adds authenticity to commercial imagery, making campaigns more relatable.
What role does post-processing play in the success of commercial photography?
Post-processing is a crucial step for ensuring the final image aligns with the creative vision and client's needs. Techniques like color grading, retouching, and compositing enable photographers to polish and enhance their images for maximum impact.
]]>
https://proedu.com/blogs/news/the-future-of-commercial-photography-navigating-emerging-trends-and-decade-projections2024-03-08T15:10:58-06:002024-04-11T15:57:51-05:00The Future of Commercial Photography: Navigating Emerging Trends and Decade ProjectionsGary MartinAdvances in camera technologies and the integration of artificial intelligence are pivotal in shaping the future of commercial photography, demanding adaptability and strategic planning from photographers to ensure sustained success
The landscape of commercial photography is constantly evolving, with new technologies shaping both the creation and consumption of imagery. As we look forward into the next decade, it is essential to identify the trends that will influence the industry in 2024 and beyond.
Advances in camera technologies, the integration of artificial intelligence, and the dynamic of market forces all play vital roles in how we, as photographers and industry professionals, will navigate the future.
Understanding the impact of social media and the burgeoning resurgence of analog photography are additional facets that will dictate the future of photography. New frontiers are emerging, expanding the scope and reach of commercial photography into previously untapped realms.
This ever-shifting terrain not only affects the tools and techniques employed but also the business landscape, setting new expectations for the employment outlook of photographers. Preparing for what lies ahead is key; staying informed and adaptable will help us ensure sustained success in our field.
Key Takeaways
Emerging technologies and social media are influencing commercial photography trends.
Adapting to market changes and AI advancements is crucial for future success.
Diversification and strategic planning are imperative for photographers in 2024.
Evolving Camera Technologies and Tools
In the next decade, we can anticipate significant shifts in the photography landscape prompted by the evolution of camera technologies and tools. Our focus will be on two core developments: the emergence of smartphone cameras as serious tools for commercial photography and the continual improvements in DSLR and mirrorless systems.
The Rise of Smartphone Cameras
Smartphone cameras have evolved into sophisticated imaging tools, rivaling traditional cameras in certain contexts. Brands like Apple and Samsung have integrated advanced sensors and computational photography algorithms, enabling smartphone cameras to produce high-quality images. Features such as multiple lenses with varying focal lengths and depth-sensing capabilities allow for professional-level photography in a pocket-sized device. For photographers, this means a more accessible and immediate way to capture commercial-quality images, with portability that traditional cameras can't match.
Advancements in DSLR and Mirrorless Systems
The DSLR and mirrorless camera market continues to innovate, driven by key players like Nikon, Canon, Sony, and Olympus. We observe a trend toward mirrorless technology due to its lighter build, increased autofocus speeds, and superior video capabilities. Recent advancements include:
Improved Sensor Technology: Larger and more advanced sensors are providing better low-light performance and higher dynamic range.
Enhanced Autofocus Systems: These systems are faster and more accurate, with eye-tracking capabilities that offer precise focus for portrait photography.
Connectivity: New DSLR and mirrorless models have enhanced connectivity features, making it easier to transfer photos directly to smartphones or cloud storage.
4K and 8K Video: With the adoption of higher-resolution video capture, these cameras are not only for stills but also cater to a growing demand for high-quality video content.
Camera technology continues to progress, providing us with tools that are more capable and versatile, catering to both the traditional photographer and the modern content creator.
The Impact of Artificial Intelligence on Photography
In the realm of commercial photography, AI has become a fundamental component, shaping various aspects of the craft, from editing workflows to camera functionalities. We are witnessing a significant transformation as these technologies evolve.
AI-Enhanced Editing and Post-Processing
AI-driven tools have revolutionized the way we approach editing and post-processing. Platforms like Adobe have integrated AI to expedite complex editing tasks, which previously consumed hours of manual effort. For instance, Adobe's Sensei leverages AI to automate tasks like object selection and background removal, enabling photographers to achieve precise edits with minimal input. The integration of AI in photography also facilitates adaptive filters and effects, which can be tailored to the specific style or requirements of a project, ensuring both efficiency and consistency in the final outputs.
Key AI Editing Features:
Automatic object selection and masking
Adaptive filters and AI-enhanced effects
Content-aware fill and retouching
Autofocus and Tracking Innovations
AI has substantially boosted the capabilities of autofocus (AF) and tracking systems, which are indispensable in modern commercial photography. We see cameras using intelligent algorithms that identify subjects within a frame and predict their movement, which is crucial for capturing sharp images in dynamic scenarios. For example, the latest cameras offer AI-powered eye-tracking autofocus, which ensures that a subject's eye is in focus in portraits, even if they are moving. This technology not only enhances the reliability of autofocus systems but also allows photographers to concentrate on composition and storytelling.
Key AI Autofocus Advancements:
Eye-tracking AF for pinpoint accuracy in portraits
Predictive tracking for moving subjects
Enhanced AF performance in low light and complex conditions
Photography Industry Market Dynamics
In this section, we'll examine the substantial elements of the photography industry's market dynamics, focusing on the global context and scrutinizing sales and revenue. Our emphasis will be on the latest market trends and factual revenue figures.
Global Market Overview
According to recent data, the photography industry's global market is expected to experience continued growth. We see regions such as North America and Europe as pivotal players, with the United States holding a significant market share. This is indicative of the industry's robust engagement with digital transformation and technology integration. The Photographic Services Global Market Report suggests that the industry, despite past disruptions, is on a path to recovery with projected increases in value.
Sales and Revenue Analysis
When we turn our attention to sales and revenue, we endeavor to report precise figures. The photography market size is on an upward trajectory — a trend underscored by projections that estimate the global photography market could reach $44.07 billion by 2025. The Compound Annual Growth Rate (CAGR) is another critical metric assessing the industry's health, with forecasts indicating a CAGR of approximately 2.2% for certain segments, emphasizing the commercial photography market's strength and potential for expansion.
Social Media Influence on Photography Trends
As we explore the transformative impact of social media on the commercial photography landscape, it's evident that platforms like Instagram and TikTok are at the forefront of shaping visual content. These platforms have become pivotal in dictating how we present and consume photography.
Rise of Visual Platforms
Social media platforms have evolved into visual arenas where photography is more than mere representation—it's communication. Instagram, for instance, has moved beyond a photo-sharing app to become a beacon of photographic trends, often setting the tone for visual aesthetics in commercial photography. We've witnessed the platform influence the rise of minimalistic layouts and authentic, lifestyle-oriented shots that resonate with audiences.
TikTok has introduced a different dynamic by popularizing short-form video content. This has led to a cross-pollination where still photography on platforms often incorporates elements of motion or animation to capture the fleeting attention of scrolling users.
E-commerce and Product Imagery
In e-commerce, product photography has been revolutionized by social media influence. Social media platforms become virtual storefronts, requiring product imagery that engages potential customers. We understand the necessity for high-quality and visually appealing product photos, as they significantly affect consumer decisions. Platforms like Instagram have given rise to an entire genre of product photography that leans heavily on lifestyle images, where products are displayed in relatable, aspirational settings that encourage viewers to imagine the products in their own lives.
E-commerce brands are leveraging these platforms to showcase products through user-generated content and influencer partnerships, blurring the lines between conventional advertising and organic customer experience. Such imagery not only showcases the product but also tells a story, aligning with the brand's identity and values that their audience can identify with.
The Resurgence of Analog and Film Photography
In recent years, we've witnessed a notable return to film photography. As digital technology dominates our daily lives, a growing number of photographers are drawn to the charm of analog processes and the tactile experience they provide.
Lomography and Vintage Appeal
Lomography has emerged as a vibrant movement, fueled by a longing for the nostalgia and aesthetic of the past. We're seeing a wave of photographers who are engaging with older, often mechanical cameras for their distinct vintage appeal. These cameras, like the colorful plastic Lomo LC-A, are beloved for their simplicity and the unique, often unexpected results they produce. Our pursuit of vintage visuals is more than a trend—it's a poignant connection to photography's roots.
The Texture and Quality of Film
When it comes to film photography, the texture and quality of images are unmatched. Film grants us a range of tonal variations and a depth that is hard to replicate with digital sensors. We're recognizing that each film stock contributes its character to our photographs, from the vivid colors of a slide film to the fine grain of a high-quality black and white film. This tangible quality resonates strongly with those of us who seek a more authentic, hands-on approach to photography, typically associated with analog photography.
New Frontiers in Photography
In this section, we explore the transformative potential of virtual and augmented reality in photography, as well as the expansive vistas opened by aerial photography and drone technology.
Virtual and Augmented Reality Integration
The integration of virtual reality (VR) and augmented reality (AR) into photography is revolutionizing the way we experience and create images. These technologies enable us to create immersive photography experiences, allowing viewers to step inside a photo and interact with the environment in a multidimensional space. For instance, applications in real estate allow potential buyers to take virtual tours of properties from anywhere in the world.
Aerial Photography and Drone Technology
Aerial photography has been elevated to new heights with the advent of drones. These flying cameras have democratized aerial perspectives, making them accessible to more photographers. They enable us to capture breathtaking landscapes and cityscapes from angles that were once impossible without a helicopter. In addition, drones are advancing in terms of their automation and flight capabilities, offering photographers innovative ways to approach their craft.
Business and Employment Outlook for Photographers
In the coming decade, we can anticipate significant shifts within the photography industry, influencing both business prospects and employment patterns. Our insights focus on diverse niches that present opportunities, as well as the challenges that professional photographers may face.
Opportunities in Various Photography Niches
Within the realm of commercial photography, we see an emergent trend toward specialization. The demand for wedding photographers remains robust, as couples continuously seek to immortalize their special day with high-quality imagery. Wedding photography is a pillar in the industry, often considered recession-proof due to its emotional significance.
Meanwhile, real estate photographers also experience increased demand; the dynamic property market calls for compelling visual portfolios that can only be provided by skilled professionals. This niche requires a keen eye for detail and an ability to highlight the assets of any property, a service that continues to prove its value in successful property listings.
Professional photographers who adapt to these niches and stay abreast of current trends can expect to find a steady stream of opportunities. Pursuing continued education and honing skills in post-processing and digital presentation will aid in remaining competitive in these areas.
Challenges and Obstacles in the Profession
Despite these niches flourishing, the photography profession faces its share of hurdles. Given the saturation of the market and the rise of high-quality smartphone cameras, distinguishing oneself as a professional hinges on both marketing skills and photographic excellence.
One key obstacle we must navigate is employment competition. With projections indicating an average growth in photography jobs, staying ahead of the curve implies not only producing stellar work but also cultivating a desirable brand and business acumen.
Additionally, maintaining a successful photography business requires handling the economic pressures of freelance work. Unpredictable income streams and the responsibility for one's own benefits are realities that necessitate strategic financial planning and client relationship management.
We understand that adaptability and entrepreneurial spirit are as vital as photographic talent. By embracing these strengths, we will be poised to meet and overcome the challenges that lie ahead in the photography profession.
Preparing for the Future
Analyzing the latest industry statistics helps us predict where the commercial photography market is heading. We observe a consistent pattern of growth, with a notable shift towards digital and AI-enhanced imaging tools. The market size suggests an expansion of opportunities, but also a demand for high-quality content that stands out in a competitive space.
We must recognize that the future of photography lies in innovation and adaptability. Here are essential strategies we can employ:
Stay Current: Keep learning about new technologies and software that enhance photography.
Invest in Quality: Prioritize the acquisition of high-grade equipment to produce superior imagery.
Master Post-Processing: Develop skills in editing software to add value to our photographs.
Embrace Marketing: Understand the power of social media and SEO to promote our work effectively.
Key Trends
Authenticity: Images that tell a genuine story are becoming more desirable.
Technology Integration: Using drones and 360° cameras for a fresh perspective.
Sustainability: Showcasing eco-friendly practices within the industry.
By adopting these key trends, we position ourselves to not just survive, but thrive in the evolving landscape of commercial photography. Let us embrace these changes with enthusiasm and a proactive mindset.
Frequently Asked Questions
In this section, we address common inquiries regarding the trajectory of commercial photography, focusing on technological, artistic, and economic developments.
What advancements are expected in drone photography over the next ten years?
Drone photography technology is anticipated to improve significantly, with advancements in battery life and automated flight capabilities. These improvements will allow photographers to capture shots from new vantage points and in more extended sessions.
How might artificial intelligence impact professional photography in the coming decade?
How will the persistent preference for film photography affect future photographic technology trends?
The continued interest in film photography may lead to a resurgence of analog cameras and a blend of film and digital techniques. This could result in technology that captures the aesthetics of film with the convenience of digital workflows.
What innovations could potentially revolutionize photography by 2030?
Emerging technologies like Light Field cameras, which allow focus adjustment after a photo is taken, and advancements in computational photography, might revolutionize the ways we capture and interact with images.
In what ways are 3D modeling technologies expected to integrate with photography practices?
3D modeling is likely to become more integrated, particularly in product and architectural photography, enabling highly realistic and customizable imagery. This can help photographers create detailed previews and virtual environments.
What are the financial prospects for photographers in the evolving digital era?
The financial prospects seem promising as the global market for photographic services continues to grow. Photographers who adapt to digital trends and diversify their skills, such as drone photography or 3D modeling, are likely to see increased opportunities.
]]>
https://proedu.com/blogs/news/why-photographers-need-to-use-3d-lut-color-grading-profiles-enhancing-visual-impact2024-02-29T14:12:34-06:002024-04-11T15:57:55-05:00Why Photographers Need to Use 3D LUT Color Grading Profiles: Enhancing Visual ImpactGary MartinDiscover the transformative power of 3D LUTs in photography, a tool that enables precise color transformation and mood setting across your projects. Mastering these can significantly elevate the professional standard of your work, ensuring consistency and efficiency in your color grading process.
Color grading with 3D LUTs (Lookup Tables) has become an essential process for photographers looking to elevate their visual storytelling. These tools allow us to transform the color and tone of images with precision, giving us the power to convey a specific mood or style. Whether mimicking the look of classic film stock or crafting a unique color profile, 3D LUTs serve as a bridge between our creative vision and the final image.
The integration of 3D LUTs into the digital workflow simplifies the color grading process, making it more accessible and time-efficient. This empowers us to maintain consistency across various shots and projects, ensuring that our work meets professional standards. In a highly competitive industry, the capacity to utilize 3D LUTs efficiently can significantly enhance the quality and impact of our photography.
Key Takeaways
3D LUTs enable precise color transformation and mood setting.
They simplify consistency and efficiency in the color grading process.
Mastery of 3D LUTs can elevate the professional standard of a photographer’s work.
The Role of 3D LUTs in Modern Photography
In the realm of digital photography, the coloration of an image is as vital as the content within it. We leverage 3D LUTs to enrich and accurately convey the visual stories we aim to tell through our images.
Understanding Color Grading and LUTs
3D LUTs—short for three-dimensional Lookup Tables—are an advanced tool we employ in color grading to transform an image's hue, saturation, and brightness values from one state to another. In essence, they map one color space to another, using a cube grid structure that provides precise control over color alterations. This transformative process applied to an image or footage can drastically enhance its aesthetic.
With color grading, we aren't merely tweaking the contrast or saturation; we're sculpting the image's palette to elicit specific emotional responses from the viewer. When our footage or photographs seem lifeless or inconsistent, a well-designed 3D LUT can be the key to imbuing them with vitality and visual coherence.
Benefits of Using 3D LUTs
One significant benefit we gain from using 3D LUTs is time efficiency. Rather than adjusting colors manually for hours, a 3D LUT can be applied with a single click, instantly giving photographs a polished and professional appearance. By utilizing 3D LUTs, we can also maintain a consistent look across multiple images, which is especially valuable for projects that require a uniform visual theme.
The color grading capabilities of 3D LUTs extend beyond simple corrections or enhancements; they allow us to craft unique and creative looks that might otherwise be challenging to replicate using standard editing software alone. Whether we're aiming for a vintage tone, a cinematic vibe, or a moody atmosphere, 3D LUTs offer a range of artistic possibilities that can elevate our imagery to new heights.
Essential Color Grading Tools and Software
In the realm of photography and videography, the ability to finesse the color palette of content is key to achieving a unique aesthetic and visual storytelling. We need reliable and sophisticated tools to manipulate colors to our precise vision.
Popular Software for Color Grading
Among the myriad of color grading applications available, a few stand out for their extensive capabilities and industry-wide adoption. DaVinci Resolve is celebrated for its advanced color correction tools and node-based workflow, making it a top choice for professionals. Those of us integrated into the Adobe ecosystem often turn to Premiere Pro and After Effects for their seamless integration and robust coloring features. Final Cut Pro offers intuitive color grading for MacOS users, standing out with its Magnetic Timeline and powerful color correction abilities. When it comes to still images, Photoshop remains a giant for its precision and versatility. Here's a quick reference list of these tools:
DaVinci Resolve: Comprehensive, node-based color grading.
Adobe Premiere Pro: Part of the Adobe Creative Suite with robust color tools.
Adobe After Effects: For complex motion graphics and color grading.
Final Cut Pro: A go-to for Mac users with an intuitive interface.
Adobe Photoshop: The quintessential tool for photo color correction.
Choosing the Right Tools for Color Profiles
Selecting the correct tools and software can fundamentally affect the outcome of our color grading process. We advise evaluating the software's compatibility with the industry-recognized 3D LUTs (Lookup Tables), which are crucial for precise color transformation. Plugins can enhance the capabilities of our existing software—Adobe Premiere Pro and After Effects can incorporate a variety of plugins to streamline workflows. Always look for tools that support a wide range of formats and offer the flexibility needed for cross-platform work. Our goal is to find software that not only simplifies our workflow with user-friendly interfaces but also provides us with the most control and accuracy over our color grading.
Working with Color Spaces and LUTs
In this section, we'll explore the intricacies of color spaces and how 3D LUTs are applied for a consistent and creative color grading process.
Color Space Fundamentals
We often encounter an array of color spaces, such as sRGB, Adobe RGB, and DCI-P3. These color spaces define the range of colors, or color gamut, that a camera can capture or a monitor can display. When working with video, log footage is commonplace; it retains more data by flattening the image, presenting it in a neutral color space known as a log profile—examples include S-Log or C-Log. This maximizes dynamic range and provides more flexibility in post-production. A standard color space such as Rec. 709 is typically used for broadcast, ensuring uniformity across various displays.
Applying a 3D LUT is a transformative process, converting the flat log footage into a more visually appealing and display-specific color space. It's like using a highly customized preset that modifies color values across three dimensions: hue, saturation, and luminance. This process is often referred to as normalization, which adapts the log data to a color space like Rec. 709. By mapping the wider gamut and dynamic range of log footage to standard displays, 3D LUTs ensure that the monitor shows accurate colors as intended by the videographer.
For instance, when using a Calibration LUT, one can correct inaccuracies in a display to ensure adherence to a specific color space or standard, maintaining consistency across all viewing platforms. Understanding and effectively applying these tools is crucial for us to achieve predictable and high-quality results in our color grading workflow.
The Technicalities of LUTs in Video Editing
In video editing, Lookup Tables (LUTs) are essential tools that dictate how colors are translated from the capture to the final output. Understanding their technicalities enables us to make precise adjustments and maintain creative control over our video footage.
The Difference Between 1D and 3D LUTs
1D LUTs operate on a singular value, adjusting brightness or contrast, without considering the other color channels. They are limited to a straight-line transformation across a singular dimension, thus impacting only the luminance of a pixel within an image. However, 3D LUTs consider red, green, and blue color channels simultaneously, offering a cube-like representation of color changes. This enables complex color shifts and can more accurately translate the intended look across all hues and tones in the video footage. While 1D LUTs can serve for basic corrections and establishing a linear response from a camera, 3D LUTs are indispensable when detailed color grading is our objective.
1D LUTs:
Single dimension
Affects luminance
Basic corrections
3D LUTs:
Three dimensions (Red, Green, Blue)
Affects hue and saturation
Advanced color grading
Understanding the Impact of Bit Depth on LUTs
Bit depth is another significant factor when dealing with LUTs. It defines the number of potential values that describe each color channel of a pixel. Commonly, we encounter 8-bit, 10-bit, and 12-bit depths in video editing. Higher bit depth allows for more color information and finer gradation, which is particularly beneficial when we apply LUTs for color grading. The more information available, the smoother the transitions and minimization of banding in our calibrated monitor display. When a video footage's bit depth is manipulated using a LUT, subtlety in shadow detail and highlight roll-off can be preserved or enhanced. It's crucial that we match the LUT's precision to the project's bit depth to ensure the best results.
Bit depths:
8-bit: 256 values per channel
10-bit: 1,024 values per channel
12-bit: 4,096 values per channel
Considerations:
Higher bit depths = smoother color transitions
Choose LUTs that match project's bit depth
By incorporating the appropriate LUTs and considering the bit depth of our video footage, we can achieve a high degree of color fidelity and ensure that the final output aligns with our creative vision.
Creative Expression through Color Grading
As photographers, we have the power to evoke emotions and craft narratives through the strategic use of color grading. By manipulating contrast, saturation, and tones, we can transform the visual impact of our images.
Influencing Emotion and Storytelling with Color
Emotion and storytelling are at the heart of effective photography. Through color grading, we can shift the mood of an image, emphasizing warmth for a joyful scene or cool tones for a somber atmosphere. Contrast plays a pivotal role; high contrast can create a feeling of drama and tension, while low contrast might convey softness and subtlety. By adjusting these elements, we tell a story that resonates on an emotional level.
Creating a Visual Style with LUT Presets
Using LUT presets, we are able to establish a consistent visual style across a series of photographs or a film project. Think of these presets as the secret sauce that gives our images a signature look—be it a vintage appeal or a futuristic vibe. Color presets derived from the filmmaking industry can provide a rich palette for our photographic work, allowing us to stand out with a stylistic identity that is recognizable and unique. With these tools, saturation and tones become levers for our creative vision, solidifying our mark in the visual world.
Practical Workflow for Color Grading
In photography, effective use of color grading can transform the visual narrative. We'll walk through setting up an efficient workflow and guiding our projects from calibration to final output, ensuring consistency and professional quality.
Setting Up for Efficient Color Grading
Firstly, we must establish our workspace for precise color correction. Calibration LUTs become indispensable, ensuring our monitors reflect accurate colors. It is fundamental to start with proper exposure and white balance in our footage. We aim to maintain the highest possible dynamic range, which allows for greater flexibility in post-production.
Next, we integrate color correction into our timeline seamlessly. Our workflow begins with correction, adjusting exposure and color balance to create a neutral starting point. This involves meticulously tweaking highlights, shadows, and midtones to achieve an even color balance across the board.
From Calibration to Final Output
After we've laid the groundwork with correction, we apply creative color grading. At this stage, using a 3D LUT can drastically streamline the process. A 3D LUT helps us map the colors of our footage to a new color space that aligns with our creative vision.
We scrutinize our viewing conditions at every step - the light in our workspace can influence how we perceive colors on-screen. Regularly reverting to calibration tools throughout the color grading phase ensures consistency before we render the final output. Our workflow is methodical, and our standards are stringent, because our artistic endeavors deserve nothing less.
Advanced Color Grading Techniques
In the realm of photography, color grading can transcend a simple image into a storytelling masterpiece. We're diving into nuanced methods that harness the power of 3D LUTs, focusing on skin tones and drama to elevate our visuals.
Mastering the Use of LUTs for Skin Tones
With Lookup Tables (LUTs), we possess a powerful tool to ensure skin tones appear natural and consistent across our work. The subtleties of skin tones are paramount; they can either make a portrait feel lifelike or artificial. We meticulously adjust parameters within our LUTs, targeting the RGB spectrum to balance luminance and hues. This meticulous work makes certain that every skin tone we capture is represented with authenticity and clarity.
Adjust RGB Balance: For skin tones, fine-tuning the red and yellow channels can yield a more natural appearance.
Control Luminance: Luminance adjustments can highlight details or soften imperfections on the skin.
Adjusting LUT Parameters for Dramatic Effect
When aiming to instill a sense of drama, tweaking the parameters of a LUT can vastly change the atmosphere of an image. We approach the color grading process with a vision, altering RGB values and luminance to craft a mood that aligns with our artistic intent.
Increase Contrast: Boost contrast for a more striking image.
Alter Saturations: Modifying color saturations can amplify the emotional impact.
By deftly manipulating these parameters, we infuse our images with a compelling narrative depth. Each adjustment in our color grading process contributes to the storytelling, making every photograph not just a picture, but a memorable scene.
Collaboration and Industry Standards
In the realm of visual storytelling, it's essential for photographers to work seamlessly with other professionals and adhere to the widely accepted color standards. This synergy not only ensures a consistent look across various parts of a project but also simplifies post-production workflows.
Working with Directors and Cinematographers
We find that collaboration with directors and cinematographers is crucial when it comes to implementing color grading profiles. Directors often have a specific vision for their project, and cinematographers capture that vision through their lens. As photographers, we use 3D LUTs (Lookup Tables) as the bridge to translate their vision into the final image. This process allows for a preset color look that maintains the director's vision while ensuring the cinematographer's work is represented accurately.
In practical terms, when we use industry-standard cinematic colour grading LUTs, there's an implicit understanding amongst all parties. We're speaking a common language that's based on mutual professional respect and aesthetic agreement. Whether we're applying these LUTs on videos or images, this common ground supports the desired outcome.
Adhering to Industry Standards in Color Grading
One cannot overstate the importance of adhering to industry standards in color grading. Following these standards allows us as photographers, as well as videographers and colorists, to deliver work that meets the expectations of the audience and the industry alike. Using established LUTs provides a consistent benchmark for color treatment and ensures the seamless integration of footage from various camera manufacturers.
By aligning ourselves with these standards, we also facilitate a smoother transition in post-production. This comes especially in handy when handling footage across different software and systems. Indeed, working within industry standards is a testament to professionalism and dedication to craftsmanship in our field.
Resources and Further Learning
In this section, we will explore various avenues for photographers to expand their expertise in 3D LUT color grading. From online resources to continuing education, there are countless opportunities to deepen our understanding and refine our skills in this field.
Online Resources and Communities for LUTs
To stay ahead in the dynamic domain of color grading, it's crucial for us to leverage the wealth of online resources available. Websites like lutify.me and filtergrade offer a diverse range of LUTs suitable for different styles and projects. For those interested in high-quality cinematic LUTs, rocketstock is an excellent destination. On the other hand, ground control is a valuable resource for free LUTs and color grading tutorials.
Moreover, platforms such as motion array provide extensive libraries of assets, including LUTs specifically designed for various editing software like Avid Media Composer and Adobe After Effects. Engaging in active communities within these sites can significantly enrich our learning and professional growth.
Continuing Education in Color Grading
As the technology and techniques in photography evolve, so does the necessity for ongoing education in color grading. We can sharpen our skills through dedicated platforms such as premium beat which not only supplies LUTs but also insightful tutorials and industry news. Similarly, fixthephoto offers tutorials and services to perfect our grading techniques.
Furthermore, for those of us looking to integrate LUTs into more advanced workflows, software such as skylum luminar provides advanced tools tailored to photography enthusiasts. Regardless of our skill level, committing to continual learning and application is key to mastering the art of color grading.
Frequently Asked Questions
In our experience with 3D LUT color grading, we've encountered a range of questions that photographers commonly ask. These answers draw from industry best practices to enhance the visual quality and efficiency of photo processing.
How does 3D LUT color grading enhance the visual quality of photographs?
What advantages do photographers have when using 3D LUTs over traditional color grading methods?
Using 3D LUTs saves us time and ensures consistency. It simplifies complex color transformations into a single action compared to manual adjustments, thus streamlining the post-production workflow.
Can 3D LUTs simulate film looks, and are there benefits to using film emulation LUTs?
Yes, 3D LUTs can recreate the color aesthetics of various film stocks. The benefit for us lies in achieving a classic film look digitally, which adds a desired stylistic element to our photographs without the cost and process of actual film development.
How do photographers choose the appropriate 3D LUT profile for a specific image or project?
We select a 3D LUT by considering the mood, lighting, and narrative of the image or project. Familiarizing ourselves with different LUT previews and understanding the tonal adjustments each one provides is essential in making the right choice.
In what situations are 3D LUTs most effective for color grading in photography?
The effectiveness of 3D LUTs is often noted in batch processing, where we can apply a uniform look to a series of photos. They are also invaluable in crafting a specific visual style or when matching photos to pre-existing video content.
What are the differences between 1D and 3D LUTs, and why might a photographer prefer one over the other?
1D LUTs adjust only one color or tone at a time, whereas 3D LUTs can adjust colors in multidimensional space, affecting the hue, saturation, and brightness simultaneously. We prefer using 3D LUTs for complex color grading tasks to achieve more nuanced and comprehensive results.
]]>
https://proedu.com/blogs/news/navigating-the-business-of-commercial-photography-a-guide-to-pricing-contracts-and-licensing2024-02-16T14:22:22-06:002024-04-11T15:57:52-05:00Navigating the Business of Commercial Photography: A Guide to Pricing, Contracts, and LicensingGary MartinDive into the business side of commercial photography with our comprehensive guide on pricing, contracts, and licensing. Learn how to establish a profitable pricing model, negotiate contracts that protect your interests, and manage licensing to maximize your earnings.
Venturing into the realm of commercial photography involves more than just a keen eye for composition and the ability to capture stunning images. It's crucial to grasp the nuances of the business side, which can often be as complex as the creative process itself.
As commercial photographers, we confront a tapestry of pricing models, contract negotiations, and licensing agreements. Understanding how to navigate these elements is key to establishing a sustainable and profitable enterprise.
Accurately setting prices for our services sets the foundation for our business's financial health. It's about striking a balance that reflects the value of our work, our expertise, and the market demand.
In parallel, mastering the art of contract negotiation ensures we protect our interests and clearly outline the terms of our service offerings. Furthermore, managing licenses plays a pivotal role, as it dictates how our images are used by clients and can greatly affect our revenue.
Effective pricing and contract negotiation are fundamental to a photographer's financial stability.
Properly managing image licenses can significantly impact a photographer's earnings.
Understanding Commercial Photography
In commercial photography, we must be precise in defining our services and understanding their worth. Let’s explore how to identify the range and set the value for these specialized photography skills.
Defining The Scope
The scope of commercial photography involves creating images specifically for business purposes. This can range from product advertisements to business headshots. Our focus here is to establish clear expectations and deliverables which, in turn, ensure the smooth execution of projects.
A thorough understanding helps us identify our niche within commercial photography, allowing us to specialize and cater to distinct market segments. For example, the Association of Photographers provides resources and standards that can guide us in specifying the parameters of our photography services.
Recognizing Market Value
When it comes to recognizing market value, it's critical that we conduct diligent research to discern what our work is worth within the commercial photography market. Factors that determine the value include the quality of work, the complexity of the shoot, and the usage rights of the images.
We should leverage various tools and resources, such as the Erik Almas course on composite photography, to stay informed about current rates and ensure that our pricing reflects our expertise and the demands of the market. It is our responsibility to communicate our value to clients and uphold the standards of the market.
Setting Your Pricing
In the world of commercial photography, effectively setting our pricing is crucial for our business's success. That means we need to develop a robust pricing strategy, establish a clear day rate, and accurately calculate additional fees.
Establishing a Pricing Strategy
Our pricing strategy is the foundation of financial success in commercial photography. To ensure profitability, we must consider our experience, market demand, and the unique value we offer. We also need to be adaptable and revise our strategy as we grow. It's essential to research the commercial photography pricing landscape to set a competitive yet fair price that reflects the quality of our work.
Determining Your Day Rate
Our day rate is a reflection of not just our time, but also our expertise, operational costs, and the quality of our equipment. We should calculate our day rate by accounting for these factors and ensuring it aligns with our financial goals. Here's a structure we can use to determine our day rate:
Operational Costs: Consider fixed and variable costs.
Experience: More experience often justifies higher rates.
Equipment: Higher quality gear usually commands higher fees.
Calculating Additional Fees
Beyond our day rate, we must account for additional fees that may apply to a project. These could include post-production time, assistants, travel expenses, and rental gear. Each fee should be itemized and communicated transparently to the client. When it comes to licensing, we must charge according to the usage scope—more extensive use warrants higher fees. A resource for understanding how to navigate these charges is The Complete Guide to Pricing Commercial Photography.
Negotiating Contracts
When we navigate the intricacies of commercial photography contracts, our focus is on securing terms that honor our creative work and firm standing on pricing, licensing, and permitted use. Let’s ensure that we’re equipped with the knowledge of each clause, skilled negotiation tactics, and a solid grasp of rights and licensing.
Key Elements of a Photography Contract
Contracts are the backbone of professional agreements, serving as a legal document that protects both parties. To ensure our interests are safeguarded, we must include several crucial components:
Scope of Work: Clearly define the project's boundaries and expectations.
Payment Terms: Specify rates, licensing fees, and payment schedules.
Cancellation Policy: Outline the terms if the client cancels or we cannot fulfill the contract.
Deliverables: Enumerate the final products and formats we will provide.
Copyright and Usage Rights: Clarify the extent of image use granted to the client.
By detailing these areas, we minimize ambiguities and set the stage for a transparent relationship with our clients.
Negotiation Techniques
Negotiation is pivotal in establishing a contract that’s fair and beneficial. Here are some strategies we employ:
Preparation: Research industry standards and our client’s budget to establish realistic expectations.
Assertiveness: Confidently communicate our value and why our pricing reflects the quality of our work.
Flexibility: Consider alternative solutions or compromises, such as adjusting deliverables, to meet the client's needs while still protecting our interests.
These techniques place us in a favorable position to reach an amicable agreement.
Handling Rights and Licensing
Our photographs are our intellectual property, and licensing regulates how our clients can use them. We address the following in our contracts:
Permitted Use: Specify how the images can be used, including the media, duration, and geography.
Licensing Fee: Determine fees based on the usage scope; more extensive use commands a higher fee.
Exclusivity: Decide whether to grant exclusive rights to the client, which may also affect the pricing.
By clearly articulating these factors, we maintain control over our work's use and ensure that we receive appropriate compensation for different licensing scenarios.
Managing Licenses
In commercial photography, effective license management is crucial. We'll guide you through understanding usage rights and setting up flexible licensing options to meet client needs and protect your work.
Understanding Usage Rights and Fees
Commercial photography licensing is centered around usage rights—the specific ways in which an image can be used by a client. These rights are often defined by several parameters, such as:
Duration: How long the image can be used.
Location: Geographic limits on where the image can be displayed.
Distribution: The media through which the image can be shared.
Exclusivity: Whether the rights granted are exclusive to the client or non-exclusive.
To stay competitive and client-friendly, we should aim to provide a range of licensing options. Flexibility is key to cater to varying budgets and project scopes. Remember to document these options in contracts meticulously to avoid misunderstandings. Here's how we might define licensing tiers:
In commercial photography, pre-production sets the foundation for a successful shoot. It's where we meticulously plan every detail, ensuring we have the budget and resources to achieve the client’s vision.
Budgeting for Your Shoot
We begin by determining the expenses associated with the project. It’s essential to account for every aspect: from equipment rental to talent fees, including props, wardrobe, and hair and makeup services. We also consider the cost of assistants to support the production. To avoid unexpected costs:
List all potential expenses.
Assign a cost estimate to each item.
Factor in a contingency for unforeseen costs.
Organizing Teams and Equipment
With a clear budget in place, our next step is to assemble our team and organize the equipment needed. We ensure that team roles are defined, and that every member knows their responsibilities. We secure all necessary equipment, arranging for rentals if our in-house gear isn't sufficient. Props and wardrobe require special attention, with choices often aligned closely with the brand’s aesthetic. For hair and makeup, professionals are selected who can deliver the desired look under the constraints of the shoot.
By proactively managing these pre-production elements, we lay the groundwork for effective execution of commercial photography projects.
Post-Production Workflow
After the shoot wraps up, we enter the critical phase of post-production. This is where we elevate our work from just images to polished, professional photography ready for delivery.
Editing and Retouching
In editing, we select the best images from the shoot based on our client's requirements and our creative judgment. Each selected image is then adjusted for color balance, exposure, and contrast to ensure a consistent look across the entire set of photographs. Retouching takes this a step further by addressing specific imperfections in the images, such as blemishes on products or skin, and can involve more complex adjustments like compositing different images.
Calculating Post-Production Time
To effectively invoice our clients, we meticulously document post-production time, often in half-hour increments. We factor in the time spent on each of the following tasks:
Selecting and cataloging images
Basic adjustments: cropping, color correction, exposure adjustments
Advanced retouching: skin or product imperfections, background removal
Post-production time directly influences our pricing and must be realistically estimated before the project starts to ensure that our invoice reflects the work done.
Handling Business Operations
In managing our commercial photography business, we focus on concrete strategies for financial stability and brand growth. Attention to details in taxes, insurance, and client acquisition ensures our operations run smoothly and profitably.
Dealing with Taxes and Insurance
Taxes: We carefully track our earnings and expenses to create an accurate profit and loss estimate. By doing so, we ensure that our tax filings reflect the true financial health of our business. We set aside a percentage of each payment as an advance on our tax obligations, preventing unexpected liabilities at the end of the fiscal year.
Itemize Deductions: We list all possible deductible expenses to reduce taxable income.
Quarterly Payments: We pay estimated taxes quarterly to avoid underpayment penalties.
Insurance: We maintain comprehensive business insurance to protect our equipment and liability.
Equipment Insurance: This covers damage or loss, allowing us to replace gear swiftly.
Liability Insurance: It safeguards our business against claims from third parties.
Marketing and Client Acquisition
Our marketing plan is tailored to highlight our value proposition and to build our reputation in the commercial photography market. To acquire and retain clients, we develop and maintain:
Value Proposition: We articulate what sets us apart from competitors, focusing on our unique skill set and the quality of our work.
Competitive Edge: Clearly defined service offerings that showcase our expertise.
Client Outreach: We leverage both digital and traditional marketing strategies to reach potential clients.
Networking: Engaging with industry professionals and attending events.
Online Presence: Keeping our portfolio updated and being active on social media.
By managing these business operations with expertise and foresight, we lay the groundwork for a successful and sustainable commercial photography enterprise.
Maximizing Profits and Scaling
In commercial photography, our ultimate target is to maximize profits while effectively scaling our business. This requires a strategic approach to expanding and identifying long-term growth opportunities.
Expanding Your Photography Business
To expand our photography business, we focus on three primary aspects: increasing our operational capacity, diversifying our services, and optimizing pricing structures.
Operational Capacity: Ensuring we have the right technology is essential. Investing in high-caliber equipment enhances our productivity and the quality of our output, leading to a higher production fee due to the value delivered.
Equipment: Upgrade to state-of-the-art cameras and editing software.
Staffing: Hire skilled professionals or work with reliable consultants.
Studio Space: Consider the costs and benefits of owning versus paying rental fees.
Diversifying Services: Offering a broad spectrum of photography services allows us to attract a more significant share of the market.
Specializations: Introduce new genres of commercial photography into our offerings.
Package Deals: Create bundled services that provide value to clients and increase our profits.
Optimizing Pricing: Develop a nuanced pricing strategy that reflects the value we provide while remaining competitive.
A balanced approach to production charges ensures we cover costs and generate profit.
Consider usage fees carefully, adjusting for the breadth and duration of the usage.
Strategies for Long-Term Growth
Developing strategies for long-term growth is critical to our business's endurance. We must set clear goals and analyze our progress regularly.
Profit Analysis: We meticulously track our earnings and expenses to understand our financial health. This helps us make informed decisions about reinvesting profits for growth.
Utilize profit and loss statements to identify trends and opportunities for cost savings.
Market Research: Staying ahead of the curve involves continuous market research to inform our strategic decisions.
Examine industry trends and adjust our business model to meet the demands of the evolving marketplace.
Networking and Partnerships: Building strong professional relationships can lead to collaborative projects that expand our reach and increase our revenue.
Engage with other creatives and businesses to create a referral network that benefits all involved parties.
By concentrating on these areas, we are equipped to drive our commercial photography business towards sustained profitability and scale effectively in the market.
Frequently Asked Questions
In our collective experience, we have identified several recurring inquiries about the business aspects of commercial photography that matter to professionals in our field, including specific pricing strategies, the structuring of packages, and understanding licensing fees.
How do you price commercial product photography?
Pricing commercial product photography involves assessing the project scope, including the number of products, unique shots needed, and image usage rights. It's essential to factor in pre-production work, post-processing time, and the value these images provide to the client's marketing efforts.
How do you structure photography pricing packages for clients?
We structure photography pricing packages by offering tiered options that cater to various client needs. Each package includes a defined number of hours, deliverables, and sometimes, additional services like retouching. Customization depending on the project scope gives clients flexibility and clear choices.
What factors should be considered when calculating day rates for commercial photographers?
When calculating day rates, we consider our level of expertise, operational costs, and the market rates. It's also critical to include the time spent on the shoot and related activities such as setup and breakdown. Travel expenses and equipment rental, if applicable, also play a part in the final rate.
What is the best method to calculate licensing fees for photography?
The best method to calculate licensing fees is by evaluating the duration and breadth of image use, including geographical reach, mediums, and exclusivity of the images. Using industry-standard tools and guidelines, such as fotoQuote software, helps in determining appropriate fees.
How can usage fees be determined for different types of photography licensing?
Determining usage fees for different types of photography licensing requires us to look at factors like the client's size, the impact and visibility of the images, and the length of time the images will be used. Combining these aspects with tools that offer pricing benchmarks ensures fair pricing.
What are standard practices for charging clients in commercial photography?
Standard practices for charging clients in commercial photography include defining clear terms upfront, establishing a base creative fee, and itemizing additional costs like assistants, travel, or rental gear. Transparently detailing the usage rights for the images in the contract is also standard to avoid future disputes.
]]>
https://proedu.com/blogs/news/the-ultimate-gear-checklist-for-commercial-photographers-essential-equipment-breakdown2024-02-16T14:02:36-06:002024-04-11T15:57:52-05:00The Ultimate Gear Checklist for Commercial Photographers: Essential Equipment BreakdownGary MartinEquip yourself for success in commercial photography with our ultimate gear checklist, covering everything from cameras to post-production tools, ensuring every shoot delivers professional-level results.
Embarking on a career in commercial photography isn't just about having an eye for a great shot. It involves an intricate balancing act between creative prowess and technical know-how.
We understand that the right gear can significantly streamline the workflow and enhance the quality of the final product, which is why a well-thought-out gear checklist is paramount. Knowing what equipment is truly essential can make the difference between a cumbersome process and a seamless shoot.
When we look into the essentials of commercial photography gear, we must consider the varied demands of different projects. It's crucial not only to amass high-quality cameras and lenses but also to incorporate supportive lighting, accessories, and editing tools that align with the dynamic nature of commercial assignments.
Establishing a clear checklist ensures that we are always prepared, regardless of the location or subject matter, and it helps maintain the integrity of our photography business.
A comprehensive gear list addresses various project demands, from shooting to post-production.
Preparedness with proper equipment supports the success and reputation of a photography business.
Understanding Commercial Photography
In commercial photography, our success hinges on distinct specialties, a strong brand identity, and effective marketing strategies. Let's explore these key pillars to ensure our work stands out in a crowded market.
Defining Your Specialty in Photography
We must first identify our niche within the broad field of commercial photography. Whether our focus is on product photography, fashion, food, or architectural imaging, specializing allows us to hone our craft and cater to specific client needs. Building a portfolio that showcases our specialty not only reflects our expertise but also attracts the clientele aligned with our chosen niche.
Building a Strong Photography Brand
The essence of our brand conveys who we are and what we stand for in the commercial photography industry. Developing our brand involves more than just a logo or a style; it's about creating a consistent experience across all touchpoints, from our website to our business cards. A cohesive brand builds trust and makes us easily recognizable to potential clients.
Marketing Strategies for Photographers
Our marketing plan is the engine that drives our business forward. It must encompass various tactics, from social media presence and networking to SEO and direct outreach. By integrating these approaches with a clear understanding of our target audience, we ensure that our marketing efforts efficiently connect us with those who require our specialized services.
With a robust marketing strategy, we turn our brand and portfolio into powerful tools for growth and recognition.
Essential Photography Equipment
Before we dive into the specifics, it's vital to understand that the right equipment serves as the backbone of commercial photography. Our gear choices can significantly impact the quality of the final images and the efficiency of our workflow.
Choosing the Right Camera System
When we're selecting a camera system, it's essential to consider what type of photography we'll be specializing in. For high-resolution images and superb performance in various lighting conditions, full-frame DSLRs have been the industry standard.
However, mirrorless cameras are now equally competitive, offering lighter weight, live exposure previews, and less mechanical wear due to the absence of a mirror mechanism. For instance, the dynamic range and color depth of these systems can make a substantial difference in post-production.
Lenses and Their Creative Uses
Lenses are arguably as important as the camera itself, as they dictate the composition and feel of the images. A versatile kit should contain:
Wide-angle lenses: Ideal for capturing expansive scenes and architectural shots.
Standard lenses: The go-to for a natural field of view, perfect for portraits and general use.
Telephoto lenses: Essential for bringing distant subjects closer with clarity.
Macro lenses: Allow us to capture life-size close-up details that are crucial for product photography.
Each lens has its creative uses, for example, a wide-angle can exaggerate space and depth, whereas a telephoto can compress it, affecting how we convey our subject.
Importance of Quality Tripods and Supports
No matter the steadiness of our hands, we will need a reliable tripod for certain shots. It's not only about preventing camera shake; a sturdy tripod is crucial for framing shots accurately, especially for long exposures or panorama stitches.
The Gitzo GT2545T Series 2 Traveler Carbon Fiber Tripod is a favored choice among professionals for its balance of strength and portability. Additionally, gimbals and monopods provide support in more active or confined shooting scenarios.
Lighting and Accessories
In commercial photography, lighting isn't just about visibility; it's about setting a mood, creating atmosphere, and bringing out the best in the subject matter. Our toolbox must be versatile enough to handle any lighting scenario.
Mastering Lighting Techniques
To achieve creative control over our images, we must be adept at using various lighting techniques. We design complex light setups using speedlights and strobes, applying knowledge of light modifiers, like softboxes and umbrellas, to shape and direct light.
We also regularly employ reflectors to fill in shadows and add light where necessary. Understanding light ratios, color temperature, and the inverse square law are indispensable for producing consistent and high-quality commercial photographs.
Selecting Lighting Gear
We carefully select lighting gear based on the needs of the project. Our primary considerations include:
Power Output: The wattage of strobes impacts the extent to which we can control ambient light.
Recycling Time: Speed is crucial in commercial work, thus quick recycling times are preferred to reduce waiting between shots.
Durability: Our gear must withstand various on-location challenges; robust construction is key.
Compatibility with Modifiers: We ensure our lights work well with the range of modifiers we might need.
When on assignment, we rely on trusted brands and may use remote triggers like PocketWizard to synchronize our lights wirelessly, enhancing our ability to be flexible and responsive.
Must-Have Photography Filters
Filters are the silent heroes in our photography gear list. They provide us with creative control and ensure image quality. List of filters we consider essential:
Polarizing Filters: These filters remove glare from reflective surfaces, enrich the blue of skies, and enhance colors.
Neutral Density Filters: For shooting with wider apertures in bright conditions or achieving long exposures, these are indispensable.
We may also use other filters like UV filters to protect our lenses, and color filters to adjust the mood and feel of our images. Light meters continue to play an essential role in our workflow, assisting us in achieving precise exposures.
On-Site Essentials
Before we dive into the specific items, it's crucial for us to pack smartly for the job at hand. Our on-site essentials will ensure we're prepared for any condition and can carry out our photography tasks efficiently.
Packing the Right Clothes for Any Job
Our choice of clothing can impact our performance at a shoot. We must wear comfortable attire that allows us to move freely and handle our equipment with ease. For instance, cargo pants with multiple pockets are practical, giving us quick access to lens caps or memory cards.
Shoes with good grip are non-negotiable, especially when we're working on uneven terrain. Lastly, a sturdy belt can be a great addition to secure gear pouches.
Preparing for Diverse Weather Conditions
Weather can be unpredictable, and being prepared is key to managing any shoot successfully. We should always pack a rugged, weatherproof camera bag like a Lowepro, which not only protects our gear but can withstand a variety of conditions.
Sunny Days: Always bring a pair of reliable sunglasses and a hat to shield ourselves from harsh sunlight.
Rainy Days: A camera rainsleeve is essential to keep our gear dry. It's compact and can easily fit in our bag.
Cold Days: Layering our clothes can help us retain body heat while enabling us to shed layers if we get too warm. Gloves designed for photographers allow for dexterity while keeping our hands warm.
By focusing on essentials like a well-chosen camera bag and the right clothes for the weather, we're setting ourselves up for success in the commercial photography field.
Post-Photography Process
After the shoot, we enter the critical phase of refining our visuals. Here, we perfect our images through detailed post-photography processes, focusing on impactful photo editing workflows and the intricacies of both basic and advanced retouching techniques.
Effective Photo Editing Workflows
When discussing photo editing, we emphasize the need for a structured workflow. We manage our images meticulously in Adobe Lightroom, acknowledging its role as an essential editing software in our field. Our workflow typically follows these steps:
Import and backup: Safeguarding our work is paramount.
Sort and categorize: Organization is key for efficiency.
Basic adjustments: Including exposure, contrast, and white balance.
Detailed edits: Where we apply our understanding of color theory and composition to enhance visual appeal.
By adhering to a defined process, we prevent any oversight and ensure that our final output consistently meets the high standards of commercial photography.
Retouching Basics and Advanced Techniques
Effective retouching can elevate a good photo to a great one. For us, retouching is an art form requiring a keen eye and a solid grasp of advanced techniques. We typically address the basics first, such as:
Removing blemishes
Adjusting color balance
Refining contrast
Then, we advance to more sophisticated techniques that may include:
Frequency separation for detailed skin work
Dodge and burn for dynamic range manipulation
Color grading to set the tone and mood of the image
Understanding the nuanced dynamics of light and shadow, we leverage these techniques to sculpt our images into their final, client-ready form.
Business and Legal Considerations
When we dive into commercial photography, managing the business and legal aspects is crucial. Ensuring our contracts are foolproof, understanding licensing, and pricing our services accurately will help establish trust with our clients and safeguard our work.
Creating a Solid Photography Contract
We need a comprehensive contract that outlines the scope of work, delivery timelines, and payment terms. Our contract should also include cancellation policies and liability limitations to protect both parties. By having a clear and thorough photography contract, we mitigate the risks involved in commercial projects and ensure clarity in all business interactions.
Understanding Licensing and Usage Rights
Licensing and usage rights can be complex, but they're the bedrock of our commercial photography business. We need to specify the types of usage—such as commercial, editorial, or personal—and the duration of the license. Be clear about whether the client is obtaining exclusive rights or whether we retain the option to license the images to other parties. Educating clients about the essentials of composite photography and usage rights builds trust and prevents future disputes.
Pricing Your Photography Services
Determining the pricing for our services demands a balance between our skill level, market rates, and the specifics of the project. We should consider the cost of our time, equipment, and expenses. It's helpful to provide different pricing packages to accommodate various client needs.
Ensuring our pricing is clear and justifiable helps maintain the professionalism of our business and prevents misunderstandings about professional photography equipment and its impact on pricing.
Maintaining Photography Gear
When it comes to maintaining our photography gear, we understand that regular cleaning and proper maintenance are vital for ensuring our equipment's longevity and performance.
Cleaning
For camera equipment, a routine we follow includes:
Lens Care: We use a lens brush and microfiber cloth to gently remove dust and fingerprints from lenses. Lens cleaning fluid can help with stubborn smudges.
Sensor Cleaning: Occasionally, our camera sensors may require cleaning. We either use a sensor cleaning kit carefully or outsource to professionals to avoid damage.
Lighting Equipment
Regular Dusting: Soft brushes are perfect for removing dust from our lighting equipment.
Cable Checks: We inspect cables for signs of wear and tear, replacing them as necessary to prevent electrical hazards.
Maintenance Checklists
Camera Body: We check for firmware updates and battery health.
Lenses: We ensure that all moving parts operate smoothly.
A simple checklist helps us keep track of our maintenance routines:
Frequency
Equipment Part
Action
Weekly
Camera body & lenses
Dusting and visual inspection
Monthly
Sensor & lens glass
Cleaning with appropriate tools
Bi-annually
Lighting & support gear
Deep clean and operational check
As needed
All equipment
Firmware updates, battery checks
It's crucial that we store our gear in a controlled environment, safeguarding it from extreme temperatures and humidity, as advised in A beginner's guide to photography gear maintenance, keeping it ready for our next shoot.
By adhering to these maintenance practices, we help preserve our photographic equipment's integrity and ensure we are always prepared for our commercial photography assignments.
Advanced Gear for Specific Needs
Each genre of commercial photography presents its own set of challenges requiring specific equipment. We'll guide you through essential gear tailored for travel, low light conditions, and wedding photography to ensure you're prepared for any situation.
Travel Photography Considerations
When it comes to travel photography, we prioritize portability and versatility. A sturdy tripod is non-negotiable—it must be lightweight yet durable. Carbon fiber tripods strike an excellent balance between strength and weight, making them ideal for long treks. Additionally, a 5 in 1 reflector is indispensable due to its compact design that offers various lighting options on the go.
Essential Travel Photography Gear:
Lightweight, sturdy tripod
Multi-functional 5 in 1 reflector
Weather-resistant camera bag
Gear for Low Light Conditions
In low light conditions, the right gear can make all the difference. We rely on fast lenses with wide apertures, such as f/1.4 or f/2.8, which allow more light to reach the sensor and help capture sharp images without increasing the ISO too much. A tripod is also essential here—it steadies the camera for long exposures, eliminating the risk of blurriness from hand-held shooting.
Low Light Gear Essentials:
Fast lenses (f/1.4, f/2.8)
Sturdy tripod for stable long exposures
Special Equipment for Wedding Photographers
Wedding photographers need gear that can handle a dynamic and fast-paced environment. A 5 in 1 reflector is crucial for managing unpredictable lighting, especially when shooting portraits. Alongside this, a reliable flash that can be synced to the camera ensures well-lit shots even in dimly lit venues.
Wedding Photographer's Gear List:
Rapid-deploy tripod for quick repositioning
Versatile 5 in 1 reflector for on-the-spot lighting adjustments
In this section, we cover the essentials that every commercial photographer needs to know. From the must-have gear to specialized tools for outdoor shoots, we provide clear and concise answers to commonly asked questions.
What essential equipment should every commercial photographer have?
Every commercial photographer should invest in a high-quality camera and a range of lenses suitable for different shooting conditions. A sturdy tripod and reliable lighting equipment are also critical for capturing sharp, well-lit images.
How can I achieve professional-quality photos with my gear?
Achieving professional-quality photos starts with understanding your equipment's capabilities and limitations. Use natural light to your advantage, employ a tripod for stability, and experiment with camera settings to create the desired effect. Post-production software can also enhance your photos.
What are the key items to include in a photography business startup kit?
A photography business startup kit should include a professional camera, a selection of lenses, a tripod, lighting equipment, reflectors, and backup batteries. Don't forget essential business tools such as a portfolio website, business cards, and accounting software.
Which tools and accessories are must-haves for outdoor photography?
For outdoor photography, include a durable camera bag, lens filters like Ultraviolet filters to protect your lens and improve image quality, a weatherproof cover, and a portable reflector. A spare battery and memory cards are also indispensable.
Can you list the critical photography tools necessary for a beginner?
A beginner should start with a basic DSLR or mirrorless camera, a versatile zoom lens, a tripod, and a simple lighting setup. As skills improve, they can explore additional lenses, external flash units, and editing software to refine their technique.
What does a comprehensive professional photography equipment list entail?
A comprehensive professional photography equipment list includes several camera bodies, a wide range of lenses, tripods, studio lighting, backdrops, and reflectors. Freelance commercial photographer rates often reflect the investment in such extensive gear. Advanced post-production tools and continuous education on new equipment and techniques are also vital components.
]]>
https://proedu.com/blogs/news/mastering-lighting-techniques-for-commercial-photography-expert-insights-for-pro-level-results2024-02-16T13:53:24-06:002024-04-11T15:46:42-05:00Mastering Lighting Techniques for Commercial Photography: Expert Insights for Pro-Level ResultsGary MartinDiscover the transformative power of mastering lighting techniques in commercial photography. Elevate your imagery from ordinary to extraordinary with expert insights into professional-level results.
Mastering lighting techniques is a crucial part of commercial photography that can transform the mundane into the magnificent. As we navigate the complex world of professional photography, it becomes apparent that light is not just a tool for illumination but a means of sculpting the visual story we aim to tell.
Understanding how to manipulate light effectively allows us to highlight textures, create mood, and enhance the composition of our images.
As commercial photographers, our mission extends beyond capturing an image; we endeavor to convey a message or evoke an emotion that resonates with the viewer. To achieve this, we need a solid grasp of both natural and artificial lighting.
We harness the subtleties of natural light to add authenticity, while artificial light offers us control to create consistent and targeted effects in our imagery. Advanced lighting techniques open up a myriad of possibilities to represent a brand or product in its best light, quite literally.
Post-production further refines our lighting choices, enabling us to fine-tune details that might not have been possible in the shooting environment. Whether adjusting the exposure, tweaking the shadows, or enhancing specific highlights, the post-production process is an integral step in the commercial photography workflow.
Key Takeaways
Effective lighting shapes the narrative and mood of commercial photography.
Mastery of both natural and artificial light is essential for creating compelling images.
Post-production is a critical phase for perfecting the lighting in a photograph.
Understanding the Basics of Photography Lighting
Before we dive into the minutiae, it's essential for us to grasp how lighting, color, and camera settings interplay to form the foundation of commercial photography. Let's examine these core principles, ensuring that we can manipulate them to our advantage.
Exploring Color and Light
Color temperature and white balance are pivotal to the perception of color in our images. Color temperature is measured in Kelvin, with lower numbers indicating warmer, amber-hued light and higher numbers reflecting cooler, bluish light.
We adjust white balance to neutralize color casts and maintain color accuracy in varying lighting conditions. For instance, the golden hour provides a warm color temperature that can evoke feelings of nostalgia or warmth in a photograph.
The Importance of Shadows and Highlights
Shadows and highlights define the depth and dimension of our subjects, giving them a sense of presence and texture. We harness the directional nature of light to sculpt these effects, knowing that hard light sharpens shadows for a dramatic effect, while soft light creates subtler transitions.
For product shots, this technique of manipulating shadows and highlights can make an item pop and attract the viewer's attention.
Mastering Camera Settings for Optimal Lighting
We achieve optimal exposure by balancing ISO, shutter speed, and aperture—the three pillars of the exposure triangle. ISO governs the sensor's sensitivity to light, while the shutter speed dictates the duration of light hitting the sensor. Aperture controls the breadth of light allowed through the lens.
Each setting affects the other; for instance, a low ISO can reduce grain but might necessitate a slower shutter speed or wider aperture. A thorough understanding of these settings allows us to effectively manage the exposure and depth of field in function of our creative lighting intentions.
Natural Light vs. Artificial Light
In commercial photography, mastering the interplay between natural and artificial light is essential. We must know when to harness the warmth of sunlight during the golden hours or how to manipulate soft window light. Similarly, artificial lighting such as strobe and continuous lighting can be pivotal in creating the desired ambiance in a shot. Let's explore effective techniques for using both types of light to our advantage.
Harnessing the Golden Hours
Golden hour light offers a warm, diffused glow that can enhance product shots with a natural essence. To capitalize on this, we arrange our shoot to coincide with the first or last hour of sunlight during the day. This time is ideal for softer shadows and a golden hue that can make our subject matter truly stand out.
Using Window Light and Reflectors
We often turn to window light as a primary source of natural light. It's a versatile and soft light that provides a consistent and diffused illumination. By positioning our items near a window, we can capture this soft light, and using reflectors, we are able to bounce it back, reducing harsh shadows and evenly distributing light across the subject.
Introduction to Strobe and Continuous Lighting
Artificial light, from sources like strobe and continuous lighting, gives us complete control over the lighting environment. Strobe lighting offers a high-intensity flash of light for freezing motion, making it ideal for capturing sharp images with precision. On the other hand, continuous lighting allows us to see the lighting effect in real-time, which is perfect for making fine adjustments to achieve the desired mood or effect in our imagery.
Advanced Lighting Techniques for Commercial Photography
In the realm of commercial photography, understanding and mastering advanced lighting techniques is crucial. They allow us to manipulate mood, texture, and dimension in images, thereby elevating the visual narrative we aim to convey. With precision and careful planning, these techniques can produce stunning imagery that catches the eye and serves the client's vision with distinction.
Creating Depth and Dimension
We harness the power of contrast and shadow to infuse depth into our images. Key to this is the directional use of light, especially with off-camera flash, to cast shadows that sculpt subjects and add a tactile feel to the two-dimensional medium. Strategic positioning of strobe lighting, slightly off to one side, can emulate the natural play of light and shadow, giving a sense of three-dimensionality to the subject.
Incorporating Gels and Diffusers for Dramatic Effects
Gels and diffusers are powerful tools in our arsenal, enabling us to introduce rich, vibrant colors or soften harsh lights to suit the mood of the shoot. By attaching colored gels to light sources, we can colorize the scene, adding drama and emotion. Simultaneously, diffusers come into play when we look to create a gentle spread of light, reducing contrast and softening shadows for a more flattering illumination.
Utilizing Off-Camera Flash and Strobe Lighting
Moving beyond the confines of natural light sources, we explore the dynamic realm of off-camera flash and strobe lighting to exercise full control over the lighting in a scene. We often combine these with various light modifiers, like softboxes, to shape and direct light with precision. This allows us to construct tailored lighting setups that bring focus to specific areas, highlight textures, and create a controlled environment that complements the subject matter.
The Role of Light In Defining Texture and Mood
Lighting is a pivotal element in commercial photography that dictates the texture and mood of the image. Our precise control over the quality and direction of light allows us to sculpt the subject in a way that aligns with the desired emotional response.
Balancing Hard and Soft Lighting
Hard light creates deep shadows and enhances the texture of a subject, giving us stark contrasts and sharp edges. In contrast, soft light wraps around the subject, reducing shadows and texture for a more gentle and uniform appearance. We often use diffusers and reflectors to transform hard light into soft light, tailoring the illumination to our needs.
Using Backlighting to Enhance Texture
Backlighting emphasizes the texture of a subject by illuminating it from behind. This technique casts fine shadows along the textures and edges, effectively bringing out details that would otherwise remain flat or unnoticed. It's an excellent way to add depth and dimension, particularly when depicting materials like fabrics, food, or even glass.
Lighting for Mood
The mood of a photograph is largely influenced by the quality and direction of light. Natural light offers a vast spectrum, from the warm hue of a sunset to the cool tone of a shaded area, which can evoke a range of emotional responses. We use light strategically to convey the desired atmosphere, whether it's a bright, cheerful ambiance or a somber, dramatic scene.
Composition and Lighting
In commercial photography, mastering the interplay between composition and lighting is fundamental. We consider not just the subject but also how light and shadow contribute to the overall aesthetic.
Principles of Three-Point Lighting
Three-point lighting is a classic setup that can dramatically enhance the composition of an image. It consists of a key light, the main light source that delineates the form and structure of the subject. The fill light controls contrast, softening the shadows created by the key light. Lastly, we use the backlight or rim light to separate the subject from the background, adding depth and dimension to the image. We often adjust the intensity and angle of these lights to fine-tune the photograph's mood and focus.
Key Light: Main light source, determines form
Fill Light: Reduces contrast, softens shadows
Backlight: Separates subject from background
The Impact of Lighting Position on Composition
The positioning of lighting elements within a scene directly affects its composition. For example, side lighting can emphasize texture and form, creating a sense of volume in the photograph. We place lights strategically to guide the viewer’s eye through the image, using highlights and shadows to craft visual narratives. The quality of light is equally important; we might choose a hard light for a striking, high-contrast composition or soft light for subtler, more even textures.
Side Lighting: Emphasizes texture, adds volume
Quality of Light: Hard for contrast, soft for evenness
Through these techniques, we control not just the light but the shadows as well, carefully shaping our images to convey the intended message or emotion.
Lighting for Different Genres of Photography
As we delve into the realm of commercial photography, it's imperative to understand how lighting techniques vary significantly across different genres. Each genre demands a distinct approach to lighting to accentuate the subject's best features or to convey a particular mood.
Portrait Lighting Essentials
Portrait photography is about capturing the essence of an individual's character. We often use three-point lighting setups to achieve depth and dimension on the subject's face. This includes a key light, which is the main light source, a fill light to soften shadows, and a backlight to separate the subject from the background. Soft, diffused light sources help us avoid harsh shadows and highlight the subject's facial features.
Key Light: Main source of light; placed at a 45-degree angle to the subject.
Fill Light: Reduces shadows caused by the key light; less intense and placed on the opposite side.
Back Light: Provides depth; placed behind the subject.
Product Photography Lighting
In product photography, our goal is to make the product look as appealing as possible. We meticulously control lighting to define the product's textures, colors, and shapes. High-key lighting setups, often with softboxes, are used to create a clean, minimalistic look. A combination of hard and soft light can bring out the texture and material of products, with hard light creating defined shadows and contrast, while soft light minimizes shadows and reduces reflection.
Soft Light: For even illumination; softboxes or diffusers are typical choices.
Hard Light: For texture and contrast; direct light sources without diffusion.
Capturing Light in Landscapes and Events
Lighting in landscape and event photography can be challenging, as we rely heavily on ambient light. In landscapes, we look to utilize natural light during the golden and blue hours, when sunlight is softer and the colors are more vibrant. For events, we manipulate what's available and sometimes incorporate artificial light into our setups to ensure key moments are well-lit and free from distracting shadows.
Golden Hour: Just after sunrise or before sunset; offers warm, diffused light.
Blue Hour: Just before sunrise or after sunset; provides a cooler tone and even light.
In all genres of photography, lighting is our most potent tool. We must master its subtleties and nuances to create impactful imagery that stands out in the competitive field of commercial photography.
Post-Production and Lighting
In commercial photography, post-production is where we refine and enhance our images. Our goal is to maintain a consistent quality across all photos and ensure that the lighting conveys the intended mood and message.
Achieving Consistency in Editing
To achieve consistency in editing, we meticulously match lighting conditions across the series of images. This involves a detailed process of comparing shadows, highlights, and overall tonality. Tools like the histogram help us maintain a balanced exposure throughout our edits, ensuring that all images feel cohesive when viewed side by side. Utilizing presets and synchronized settings across batches of photos can expedite this process while preserving uniformity.
Understanding Color Temperature and Balance
Color temperature plays a vital role in defining the mood of an image. In post-production, we use our knowledge of color theories and tools to adjust the white balance, ensuring the colors in our images appear natural and true to life. Meticulous attention to color temperature helps us avoid any color cast that might distract from the image's visual impact. We strive to keep a balanced color temperature throughout different images by using reference points like a gray card during shooting and matching these references during the editing process.
Frequently Asked Questions
In our pursuit to master the art of lighting in commercial photography, we encounter several recurring questions. Whether it's about elevating product details, choosing the right equipment, or achieving color accuracy, each query plays a crucial role in refining our imagery.
What are key light positioning strategies for enhancing product details in commercial photography?
We employ various positioning strategies such as side lighting to emphasize texture and angled lighting to reveal subtle product features. Strategic use of light directionality can bring out the best in product details for that perfect shot.
What lighting equipment is essential for a professional product photography setup?
A professional product photography setup requires a dependable camera body with a full-frame sensor for superior image quality, various lenses for flexibility, and a mix of speedlights and strobes. Light modifiers, such as softboxes, are also essential for sculpting the light.
How does light quality affect the representation of products in photographs?
Light quality, encompassing color temperature and light softness, crucially impacts how products appear in photos. Harsh light might create unwanted shadows, while soft, diffused light can flatter product features and maintain true colors.
What is the role of lighting in showcasing a product's texture and color accuracy?
Lighting is pivotal in highlighting a product's texture and ensuring colors are represented accurately. By controlling the intensity and direction of light, we can enhance or soften textures and accurately match the product's true colors.
How can studio lighting be adjusted to minimize reflections on shiny surfaces in product photos?
We minimize reflections on shiny surfaces by adjusting the angle of incidence and using polarizing filters. Soft diffusion and careful positioning of light sources also prevent hot spots and reflections in product photography.
What techniques do commercial photographers employ to ensure consistent lighting across multiple product shoots?
To ensure consistency, we use calibrated light meters and maintain a standard setup for all shots. Repetition and documentation of lighting positions and settings also help achieve a uniform look across multiple product photographs.
]]>
https://proedu.com/blogs/news/elevating-commercial-photography-with-cgi-and-retouching-techniques2024-02-14T09:40:27-06:002024-04-11T15:57:48-05:00Elevating Commercial Photography with CGI and Retouching TechniquesGary MartinTake commercial photography one step further with CGI, where mastering retouching methods enable photographers to offer an enhanced range of services, resulting in more dynamic and polished imagery for commercial clients.
Diversifying Your Skills with Commercial Photography and CGI
In the competitive field of commercial photography, versatility and continual skill development are key to staying relevant and advancing one's career. As the industry evolves with technological advancements, photographers must embrace new tools and techniques.
Incorporating Computer-Generated Imagery (CGI) and mastering retouching methods enable photographers to offer an enhanced range of services, resulting in more dynamic and polished imagery for commercial clients. These skills contribute to creating compelling visual narratives that go beyond traditional photography, offering clients innovative solutions that can help their products stand out in a crowded marketplace.
Developing proficiency in CGI (computer generated images) allows us to craft images that might be impossible to capture through traditional photography alone, due to constraints of physics or budget. By combining photographic elements with digitally created ones, we can produce visuals that are both unique and impactful.
Similarly, refining retouching techniques empowers us to elevate the quality of our images. Mastery of lighting, color correction, and detailed editing ensures that the final photographs meet both our creative vision and the high standards demanded in the commercial sphere.
Key Takeaways
Embracing CGI and retouching advances the range and quality of services in commercial photography.
Acquiring CGI skills allows for the creation of unique and otherwise impossible visual assets.
Mastering retouching enhances image quality and ensures the vision aligns with commercial standards.
Understanding Commercial Photography
In commercial photography, we harness the power of visuals to enhance advertising efforts while navigating the intersection of creativity and commerce. Our expertise in this field is pivotal for effective brand representation and product showcase.
The Role of Photography in Advertising
Advertising is a powerful tool, and photography is a key component in its success. When we talk about product photography, it's all about capturing the essence of items in a way that will entice potential buyers.
Each image should convey a message, evoke emotions, and create a connection between the product and the consumer. In adopting modern techniques such as CGI (Computer Generated Imagery), we can produce imaginative and impactful visuals that stand out in the vast ocean of advertisements.
Photography's role extends beyond mere representation; it's integral in branding and positioning. As commercial photographers, our work doesn't stop at the click of the shutter—it includes retouching to ensure the end result aligns perfectly with the client's advertising vision and strategy.
Balancing Art and Business
We walk a fine line between maintaining artistic integrity and fulfilling business objectives. Our commercial photography offerings must not only be aesthetically pleasing but should also address the practicalities of business and marketing goals.
In the realm of business, particularly the competitive field of advertising, commercial photography is an investment by the client. It's our job to ensure that investment pays off by creating compelling imagery that sells products and services, reinforces brand identity, and appeals to the target audience.
By integrating advanced skills like CGI and sophisticated retouching techniques, we enhance the value we provide to our clients, demonstrating that we are not just photographers but comprehensive visual solution providers.
Mastering CGI in Photography
We're entering an exciting era where CGI plays a vital role in commercial photography. With an understanding of CGI fundamentals and incorporating 3D models, we can elevate our craft and offer clients innovative visual solutions.
Fundamentals of CGI
CGI, or Computer-Generated Imagery, is a powerful tool that allows us to create detailed and photorealistic images from scratch. For us photographers, mastering CGI means learning the core concepts like texturing, lighting, and rendering. These skills enable us to design convincing 3D environments and objects that can be indistinguishable from real-life scenes or studio shots.
Texturing involves applying surface details to 3D models to give them a lifelike appearance.
Lighting in CGI mimics real-world light sources, enhancing the realism of our creations.
Rendering is the process where we generate the final image from our designed scene.
Understanding these concepts is vital as we blend CGI with traditional photography to produce compelling compositions. By learning CGI for photographers, we adapt to industry changes and meet evolving visual demands.
Incorporating 3D Models
Incorporating 3D models requires us to be meticulous and creative. We begin by selecting or creating models that fit our project's requirements, ensuring they are to scale and detailed accurately. Using software like Capture One for tethered shooting allows us to seamlessly align our photographs with the 3D elements within our CGI software, creating engaging and innovative compositions.
Identify the purpose of the 3D model in the scene.
Ensure scale and perspective match between the photographed elements and the 3D models.
We then integrate these 3D models into a scene, consider the interaction of light between the model and the environment, and finalize the image with a rendering process that brings our artistic vision to life.
Essential Retouching Techniques
When we incorporate essential retouching techniques into our commercial photography practice, it is important to ensure that our images match the highest standards of the industry. This involves proficiency in advanced Photoshop skills and mastering the art of compositing to create flawless visuals.
Advanced Photoshop Skills
Understanding and utilizing layer masks is fundamental in Photoshop; they allow us to non-destructively edit parts of an image. By doing so, we can manipulate light and color, enhance textures, and correct blemishes seamlessly. To retouch images effectively, we must become proficient with tools such as the Healing Brush, Clone Stamp, and Patch Tools, ensuring to work on separate layers to preserve the original data.
Healing Brush: for minor blemishes.
Clone Stamp: for precise duplications.
Patch Tool: for larger areas of texture.
Consistently using Adjustment Layers for color correction and exposure adjustments is another key skill. These layers offer us the flexibility to fine-tune our edits at any point during the process.
The Art of Compositing
Compositing involves combining multiple images to create a single, cohesive piece. It is an art form that requires a keen eye for detail and a solid understanding of perspective and lighting.
We start by selecting elements from various sources.
We then place them into a single layout, paying close attention to the consistency of light sources and shadows.
By employing layer masks and blending modes, we ensure that each element interacts naturally within the scene.
Compositing not only enhances the storytelling aspect of our photographs but also provides a level of creativity and originality that distinguishes our work in the commercial sector.
Lighting and Visualization
In the realm of commercial photography, we understand that the mastery of lighting and visualization is crucial in transforming an ordinary image into a remarkable visual experience. Our focus in this section is on harnessing studio light to craft scenes and crafting visuals that leave a lasting impact.
Crafting with Studio Light
When we approach studio lighting, we prioritize creating a lighting setup that offers both control and flexibility. Studio lights provide us with the ability to manipulate shadows and highlights precisely. For instance, by placing a key light at a 45-degree angle to our subject, we introduce depth and dimension. We may use softboxes or umbrellas to diffuse the light, softening shadows for a more flattering result. An effective lighting setup often involves a combination of both direct and indirect light sources, enabling us to shape the light perfectly for our subject's unique form and texture.
Creating Impactful Visuals
To translate our vision into impactful visuals, we pay attention to the interplay between light and the elements within our scene. It is essential for us to consider not just the intensity of the light but also its color and direction. For instance:
Direct Light: Creates bold, hard-edged shadows and emphasizes texture.
Diffused Light: Softens the scene, reduces contrast, and is generally flattering.
By adjusting these aspects, we can conjure a specific mood or highlight the key features of our subject. Moreover, the use of backlight or rim light can help in separating the subject from the background, adding depth to the visualization. Throughout this process, we continuously observe and adjust our lighting setup to ensure it complements our creative intentions.
Elevating Product Images
In commercial photography, we understand that the right techniques can transform product images from straightforward shots to captivating visuals. Our focus lies in leveraging CGI and retouching to enhance the details and allure, especially for items like jewelry and cosmetics, where the finer aspects make a significant impact.
Techniques for Jewellery and Cosmetics
Jewelry thrives on brilliance and sparkle, which is captured best through meticulous lighting and post-production polishing. We use advanced retouching methods to highlight the intricate details of each piece, from the shine on a diamond to the texture of precious metals. For instance:
Reflection Control: We keep reflections in check to ensure the jewelry's luster doesn't overwhelm the image.
Color Accuracy: We adjust the hues and saturation to match the true colors of the gemstones and metals.
Cosmetics, on the other hand, demand an approach that emphasizes their textures and tones. Our CGI techniques allow us to present these products in various scenarios, showcasing their applications and effects on the skin.
Texture Emphasis: We focus on the product's consistency, whether matte, glossy, or shimmering.
Color Consistency: We maintain color integrity across all visuals for consistency.
High-Resolution and Detailing
In high-resolution photography, every detail counts. We ensure that our product images are sharply focused with a depth of field that accentuates the product's features. High-resolution imagery is vital for online sales, where customers expect to see the products up close.
Close-Ups: Zooming in to capture intricate details that might otherwise go unnoticed.
Clarity: Ensuring each image is crisp, with no blur that can detract from the perceived quality of the product.
Detailing in product images is not just about resolution; it's about presenting the product in its best light, by expertly balancing shadows and highlights to create depth and dimension. This is crucial for accurately representing the quality and craftsmanship of the products.
By incorporating these methods, we consistently deliver product images that not only elevate the perceived value of the products but also entice customers and distinguish our clients in the marketplace.
Post-Processing and Workflow
Incorporating CGI and retouching into our commercial photography workflow necessitates a refined approach to post-processing. We aim to enhance efficiency and create visual impact through advanced editing techniques.
Efficiency in the Editing Process
We embrace a methodical editing workflow to ensure efficiency. This begins with selective culling, where we identify the images with the most potential. Our priority is to maintain a consistent output, leveraging tools like presets and batch processing, which can be seen in action through resources detailing 6 essential steps in any post-processing workflow. By doing so, we substantially reduce editing time without compromising quality.
Our photography workflow is equipped with non-destructive editing techniques that allow us to revert changes and adjust parameters any time.
Layered Editing and Impact
In the realm of CGI and retouching, the use of layered editing in software such as Photoshop can be vital. We use layers to separate different elements of our edits, such as color correction, compositing, or texture adjustments, ensuring each modification enhances the image without limiting future adjustments.
The cumulative impact of layered editing is significant. Every layer serves a purpose, from subtle retouching to bold CGI elements, conferring upon us the ability to manipulate our images with precision. Our approach is systematic yet flexible, allowing us to create complex imagery that aligns with our commercial clients' visions. To master these impactful techniques, a comprehensive understanding of tools offered in programs like Adobe® Photoshop® is essential, as pointed out in guides like The Ultimate Guide to Learning Photography: Post-Processing.
The Business of Commercial Photography
In the fast-paced world of commercial photography, success hinges on our ability to blend creativity with business savvy. We must manage client expectations effectively while marketing and selling our skills to stay ahead in a competitive landscape.
Navigating Client Expectations
When dealing with clients, clear communication from the get-go is pivotal. This means understanding and setting project scopes, deliverables, and deadlines before we commence work. It's crucial to establish a comprehensive brief, ensuring we're aligned with client needs and visions. Our goal is always to deliver work that not only meets but exceeds expectations; this often entails being upfront about the possibilities and limitations of CGI and retouching, so clients harbor realistic outcomes.
Moreover, adapting to feedback is part of our process. We ensure an iterative approach, where client input is assimilated and reflected in the final product. If we can manage this, not only does it result in superior work, but it also solidifies our reputation for professionalism and reliability.
Marketing and Selling Your Skills
Our skills are our most significant assets and marketing them requires a multifaceted approach. We've found that a strong portfolio showcasing diverse CGI and retouching abilities alongside traditional photography is essential in demonstrating our range to potential clients.
Developing a targeted marketing campaign can help us reach the businesses that would most benefit from our services. Whether through social media, email newsletters, or industry networking, it's crucial to highlight specific skills and how they add value to a client's project or business. Emphasis on before-and-after examples can illustrate the tangible impact of our skills on commercial projects.
It's about selling not just our photographs, but the vision and expertise behind them. We position ourselves not just as photographers, but as problem-solvers who can contribute to the overall success of a client's business.
Staying Ahead of the Curve
In commercial photography, remaining competitive hinges on our continuous evolution and adaptation. We harness advancements in technology and refine our skill sets to stand out effectively in a bustling industry.
Embracing New Technologies
By integrating CGI (computer-generated imagery) and sophisticated retouching methods into our workflow, we not only elevate the visual quality of our projects but also broaden the spectrum of creative outcomes we can offer to clients. It is critical to invest time in mastering these tools to deliver compelling images that meet the dynamic needs of the market.
Learning New Software: Keeping abreast with the latest CGI software allows us to produce lifelike, intricate visuals that can be challenging to capture through traditional photography alone.
The commercial photography scene is packed with talent; thus, diversification becomes a vital strategy. We build a versatile portfolio that showcases a rich amalgamation of classic photography with CGI and retouching artistry.
Boosting Skills: Regular training and practice in CGI and retouching can set us apart, making us more attractive to potential clients who seek cutting-edge visual content.
Understanding the Competition: Awareness of industry standards and competitors' offerings informs our approach, inspiring us to push creative boundaries while maintaining a solid technical foundation.
Frequently Asked Questions
In this section, we cover some of the most common questions about expanding your commercial photography skills with CGI and retouching techniques.
What are the essential steps to start incorporating CGI into commercial photography?
To begin with CGI, we first familiarize ourselves with basic 3D modeling software. Next, we learn how to create realistic textures and lighting. It's crucial to understand how to integrate these CGI elements into our existing photos to create a seamless final image.
How can a photographer effectively blend photo retouching techniques into their workflow?
Blending photo retouching into our workflow starts with organizing our post-processing steps. We often begin with basic adjustments and blemish removal, and progressively move on to more advanced techniques such as frequency separation or dodging and burning, ensuring consistency and efficiency across our work.
What are the core skills needed to master CGI for enhancing commercial photography?
Mastering CGI requires a strong grasp of digital sculpting, texturing, and lighting. We also need to be proficient in using CGI software and have an understanding of how CGI complements various photographic styles to achieve desired outcomes.
In what ways can commercial photographers keep their retouching skills relevant and up-to-date?
To keep our retouching skills current, we regularly practice with new techniques and tools, follow industry trends, and seek feedback from peers. Participating in workshops or courses can also be beneficial for staying ahead in the field.
What resources are recommended for photographers looking to advance their CGI skills?
For advancing our CGI skills, we often turn to online tutorials, software-specific training, and industry forums. It is also helpful to study the work of CGI specialists and engage in community discussions for practical insights and support.
How does mastering retouching impact the business side of commercial photography?
Mastering retouching can significantly enhance the quality of our images, which often leads to higher client satisfaction and the potential for increased rates. It also allows us to offer a wider range of services, from basic touch-ups to intricate image manipulations, broadening our market appeal.
]]>
https://proedu.com/blogs/news/learn-car-automotive-photography-with-easton-chang-pro-edu2024-02-12T14:51:32-06:002024-04-11T15:57:39-05:00Car photography tips and how-to guide : Free Tutorial For PhotographersGary MartinMore]]>
Car Photography: Mastering Automotive Shots Like a Pro
Car photography is an exciting and dynamic niche that requires a combination of technical skills, creative vision, and a passion for automobiles. With the right tips, tricks, and techniques, one can develop the ability to capture stunning images of both stationary and moving vehicles. Whether you're a professional photographer looking to expand your expertise or an avid car enthusiast wanting to improve your shots, this tutorial will provide essential information to help you elevate your car photography skills.
One of the factors that make car photography stand out is its ability to convey the emotions and essence of the subject. The sleek lines, intricate details, and reflections, when captured effectively, can evoke a sense of motion and energy, even in a still image. Understanding the interplay of light, composition, and camera settings is crucial to consistently creating eye-catching shots. By implementing various shooting techniques, you can bring out the unique character of each vehicle and showcase its best features.
Key Takeaways
Mastering car photography involves understanding essential techniques and developing creative vision.
Consider factors such as light, camera settings, and shooting techniques to capture unique aspects of each vehicle.
Experiment with advanced methods and post-production to further enhance your car photography skills.
About Easton Chang
Biography
Easton Chang is a world-renowned automotive photographer. Throughout his career, he has demonstrated an impressive ability to capture the essence and beauty of performance cars. With clients such as Cadillac, Jaguar, Mazda, General Motors, Ford Lexus, Audi, and Porsche, Easton's work spans across international borders and can be seen in various advertisements and magazine covers.
Photographic Style and Achievements
Chang's unique style combines dramatic lighting and action-packed compositions to create truly captivating images. In his work, we can see that he utilizes various techniques, including long-exposure shots and creative camera angles, to make the cars stand out and evoke powerful emotion in the viewer. Not only is his work visually striking, but he has also received widespread recognition both from the car industry and the photography community.
One excellent opportunity to learn from Easton Chang's photographic expertise is by watching his Commercial Car Photography & Retouching tutorial on PRO EDU. This tutorial showcases the secrets to creating dramatic and breathtaking car images, enabling photographers to enhance their skills in this genre.
In conclusion, Easton Chang is a truly exceptional automotive photographer. By learning from his tutorials and analyzing his work, automotive photographers can sharpen their skills and create captivating images of their own.
Car Photography Essentials
Camera Gear and Settings
When it comes to car photography, using the right gear and settings is crucial. Start by selecting a high-quality camera; DSLR or mirrorless cameras are preferred by many professionals. A versatile lens, such as a 24-70mm zoom lens, will provide flexibility to shoot at different angles and distances.
It's essential to fine-tune your camera settings to suit the specific shooting conditions. For example, use a fast shutter speed to capture motion, such as when photographing a moving car. Adjust the aperture according to the desired depth of field, and the ISO to control image noise.
Here are some suggested settings to start with:
Shutter speed: 1/250s or faster
Aperture: f/8 for maximum sharpness
ISO: 100 or the lowest possible
Lighting and Techniques
Proper lighting is key to capturing stunning car images. Natural light, especially during the golden hour, can provide dramatic results. However, if you can't shoot outdoors, consider shooting indoors with controlled lighting. Essential lighting equipment includes a softbox or diffuser to soften harsh light and reflectors to bounce light onto darker areas of the car.
Experiment with various lighting techniques like light painting, where you use a continuous light source during a long exposure to "paint" the car with light. This adds a dynamic and artistic touch to the image.
Composition and Angles
To elevate your car photography, pay close attention to composition and angles. Unique perspectives can help your images stand out. Try shooting from:
Low angles, emphasizing the car's aggressive stance
High angles, showing the top view of the car
Eye-level, for a more traditional and relatable view
Incorporate leading lines, such as roads or fences, to draw the viewer's eye towards the car. Also, consider the rule of thirds for a balanced composition.
Our Car Photography Tutorial provides further guidance and inspiration, allowing you to incorporate these essential tips into your workflow.
Remember, patience and practice are key to mastering car photography. Keep refining your skills and experimenting with new techniques, and you're sure to capture stunning images of your favorite automobiles.
Shooting Techniques
In this section, we'll provide insights into various shooting techniques that can be applied to car photography. These techniques will help you in capturing stunning images that showcase the beauty and power of automobiles.
Static Shots
Static shots are essential in car photography as they allow you to focus on the finer details, such as the car's curves, lines, and design elements. Here are some quick tips for capturing compelling static shots:
Camera angle: Experiment with various angles to find the most flattering perspective for your subject. Low angles tend to emphasize the car's power and stance.
Lighting: Use natural light whenever possible, and be aware of the sun's position to avoid harsh shadows or overexposure. Reflections on the car's surfaces can be enhanced using light painting techniques.
Composition: Pay attention to the background, and try to choose a location that complements the car's design without overpowering it. Incorporating leading lines and other compositional elements can help guide the viewer's eye through the image.
Panning and Tracking
Panning and tracking shots involve following a moving car with your camera to create a sense of speed and motion. These shots can be tricky to master but, when executed well, can result in dynamic, engaging images. Some tips include:
Shutter speed: Use a slow shutter speed (typically between 1/30 and 1/60) to create motion blur in the background while keeping the car sharp.
Stabilization: A tripod with a smooth panning head can be beneficial in keeping your camera movement steady during the shot.
To make your panning and tracking shots stand out, try incorporating moving car techniques like motion blur, which can be achieved by slowing down your shutter speed and maintaining a steady hand as you follow the car through its movement.
Action Shots
Action shots are an exciting aspect of car photography, capturing the car in its element as it maneuvers around corners or accelerates down straightaways. These shots require quick reflexes and a good understanding of the car's performance capabilities. Here are some pointers to consider when taking action shots:
Anticipate the moment: Pay close attention to the car's movements, and anticipate turns, braking, and acceleration to be ready for the shot.
Continuous shooting mode: Use your camera's continuous shooting mode to ensure you capture the perfect moment.
Focus: Make use of your camera's auto-focus tracking settings to keep your subject in focus as it moves through the frame.
Incorporate these techniques and tips into your car photography skill set, and you'll be well on your way to capturing breathtaking automotive images, whether you're simply showcasing a vehicle on social media or diving into a full-fledged car photography tutorial.
Advanced Car Photography
In this section, we will delve into some advanced car photography techniques that can help you take your automotive photography skills to the next level. We will cover two popular techniques: Rigging and Light Painting.
Rigging
Rigging is a technique used to create dynamic images by attaching a camera to a stable rig on the car. This creates the illusion of movement while keeping the car in focus. Rigging can be a complex process, but with a bit of practice and the right equipment, you can achieve amazing results.
Equipment needed:
Camera with a wide-angle lens
Camera rig with suction cups and arms
Car with a smooth surface for attaching the rig
Steps to follow:
Set up the rig: Attach the rig to a secure location on the car, such as the roof or the hood.
Angle the camera: Adjust the angle of the camera, so it captures the desired composition.
Choose a slow shutter speed: This will blur the background while keeping the car in focus. Typically, a shutter speed between 1/4 and 1/8 of a second works well.
Use ND filters: To avoid overexposure, use neutral density (ND) filters.
Shoot in burst mode: Capturing multiple images in quick succession increases the chance of getting a perfect shot.
Light Painting
Light painting is an innovative technique that involves using a light source to paint the car with light during a long exposure. The result is a stunning image that highlights the curves and features of the car.
Equipment needed:
Camera capable of long exposures
Tripod to stabilize the camera
Light source (LED light bar, flashlight, etc.)
Steps to follow:
Set up in a dark environment: Choose a location with minimal ambient light, such as a garage or a remote area at night.
Stabilize the camera: Place the camera on a tripod and compose the shot.
Set a long exposure: Adjust the camera settings to use a long exposure, typically around 15-30 seconds.
Paint the car with light: Start the exposure and move around the car with your light source, illuminating its features while staying out of frame. Experiment with different angles and light intensities for varied results.
Combine exposures: If necessary, combine multiple exposures in post-processing to create the final image.
By mastering these advanced car photography techniques and following our Car Photography Tutorial, you will be able to take your automotive photography to new heights. Remember, practice is key, and don't be afraid to experiment with different settings and techniques. Happy shooting!
Post-Production Mastery
Retouching Tools and Techniques
In the world of car photography, it is essential to master retouching tools and techniques to bring out the best in your images. Utilizing software like Adobe Photoshop and Lightroom can help elevate your photos to the next level. Let's explore some of the vital retouching tools and techniques that we can use.
Clone Stamp: This tool helps in removing unwanted elements or spots on an image by cloning an area nearby to cover it up. Clone Stamp works wonders to remove dust or dirt on the car surface.
Dodging and Burning: Dodge and Burn tools can enhance the overall contrast, highlighting the curves and features of the car. Dodge tool lightens the area, while the Burn tool darkens the portion you paint with the brush.
Color grading: Adjusting the hues, saturation, and luminance can create a unique atmosphere and make your car photography stand out. Split Toning is a technique in Lightroom that helps in achieving color grades by adding different tones to highlights and shadows.
Layer masks: Utilizing layer masks in Photoshop allows us to blend multiple exposures and make selective edits without affecting the entire image. This non-destructive editing technique provides greater control over the final result.
Post-Production Workflow
Having an organized post-production workflow is vital for efficient and consistent results. Here's a suggested workflow to enhance your car photography:
Import and cull images: Start by importing your photos into Lightroom or your preferred editing software. Go through your images, and select the best ones for editing, deleting or rejecting the ones that did not turn out well.
Basic adjustments: Apply general corrections and adjustments such as exposure, white balance, contrast, and lens correction to get a good base for further editing.
Retouching: Use the retouching techniques mentioned earlier, like Clone Stamp, Dodging, and Burning, to remove imperfections and enhance the overall look of your car images.
Creative editing: Apply color grading, filters, and effects to give your images a unique visual style and atmosphere.
Sharpening and noise reduction: Before exporting, apply sharpening and noise reduction as needed to achieve the desired level of detail and clarity in your images.
Export and save: Finally, export the edited images in the desired formats for various platforms, such as print or web. Save your edits, presets, and actions for future use.
Frequently Asked Questions
How can I improve my automotive photography skills?
To improve your automotive photography skills, it's essential to practice and experiment with different techniques. Start by mastering various angles, lighting, and composition methods. For instance, avoid shooting at eye level and try getting low or high angles to capture the car's unique lines. Also, build connections with people in the auto industry to gain access to remarkable vehicles and opportunities.
What are the optimal camera settings to capture dynamic images of cars?
The optimal camera settings for dynamic car images may vary based on the conditions and car style. Generally, use a narrow to moderate aperture (f/8 to f/11), keep the ISO low to reduce noise, and choose a fast shutter speed (1/1000) to freeze motion. Experimenting with these settings will help you capture the right balance between sharpness and motion blur.
How does the rule of thirds apply to composing striking car photographs?
The rule of thirds is a composition technique that helps to create balanced and visually appealing images. Divide the frame into nine equal parts with two horizontal and two vertical lines, then place the car or its focal points along these lines or at their intersections. This method creates tension and interest in the photograph, resulting in more striking car images.
What lighting techniques can enhance the aesthetic appeal of car photography?
Using natural and artificial light effectively can enhance car photography. Try shooting during the "golden hour" (just after sunrise or before sunset) for soft and warm lighting. Additionally, use artificial sources like reflectors, diffusers, or LED panels to illuminate specific areas and control shadows. Experimenting with different positions and angles of light will highlight the car's design and create visually appealing images.
What equipment is essential for a beginner in car photography?
For beginners, investing in a quality DSLR or mirrorless camera with interchangeable lenses is crucial. A wide-angle lens (16-35mm) and a telephoto lens (70-200mm) can provide versatility in capturing various shots. A sturdy tripod will help in stabilizing the camera for long exposures and sharp images. Additional equipment like polarizing filters, remote triggers, and a basic lighting setup can also improve your car photography.
Can you offer some advanced car photography techniques for professional-looking shots?
To achieve professional-looking car photographs, consider these advanced techniques:
Panning: Track the car with your camera while using a slower shutter speed to create motion blur in the background while keeping the car sharp.
Rig shots: Attach a camera rig to the car to capture unique perspectives with a sense of motion, while keeping the car in focus.
Light painting: Use a long exposure in a dark environment and "paint" the car with a light source like an LED panel, resulting in dramatic and well-lit images.
Post-processing: Edit your images in software like Adobe Lightroom or Photoshop to enhance colors, contrast, and other attributes for a professional finish.
Experiment with these techniques to create stunning and dynamic car photographs that stand out from the competition.
]]>
https://proedu.com/blogs/news/photography-courses-near-me-elevate-your-skills-with-online-classes2024-02-01T14:46:57-06:002024-04-11T15:57:46-05:00Photography Courses Near Me: Elevate Your Skills with Online ClassesGary MartinPhotography Courses Near Me: Elevate Your Skills with Local Classes
Embarking on a journey in photography can enrich your life, offering a new perspective on the world and a means to capture and share your vision. Whether you are a novice looking to understand the basics or an intermediate photographer aiming to sharpen your skills, there is a wide range of photography courses available to suit your needs. From exploring the fundamentals of lighting and composition to mastering lighting and post-processing techniques, there is no shortage of learning opportunities.
Local workshops and classes offer hands-on experience and personalized instruction, which can be an invaluable part of learning photography. However, for those who prefer a flexible schedule or cannot attend in-person, online photography classes are a great alternative. They cover various genres of photography, such as portraiture, landscape, or documentary, and often include both pre-recorded and live sessions.
For those wanting to delve deeper into the field, specialized courses in retouching, equipment use, and photo editing software are available to further refine your craft. Additionally, for those aspiring to turn a passion into a profession, there are programs that equip you with essential photography business skills.
Key Takeaways
Photography courses cater to different skill levels, from beginners to advanced photographers.
Learning can occur through local workshops, online classes, or specialized programs.
Training is available in practical photography techniques, advanced editing software, and business skills for photographers.
Understanding Photography Basics
Before we explore specific courses, it's important to understand that the essentials of photography include knowing the different camera types and how they function, as well as mastering the basics of composition and lighting. These foundational skills are vital for capturing quality images.
Camera Types and Functions with Dixie Dixon at PRO EDU
Our journey into photography begins by discerning the various cameras at our disposal. In the Dixie Dixon course at PRO EDU, we learn about:
DSLR Cameras: Known for their interchangeable lenses and reflex mirrors.
Mirrorless Cameras: Compact in size, these cameras forego the mirror mechanism of DSLRs.
Point-and-Shoot Cameras: Easy-to-use, fixed-lens cameras perfect for beginners.
Medium Format Cameras: Offering superior image quality with larger sensors, ideal for professional use.
Each camera type presents unique functions and potential for creativity.
Fundamentals of Composition and Lighting with Jason Buff
For our advanced photographers, we recommend the workshops with Chris Knight, a master of intricate photographic techniques. These workshops delve into nuanced topics such as advanced lighting setups and post-processing skills required for professional-level work.
Online Photography Classes
In our digital era, online photography classes provide flexible learning options that cater to both beginners and experienced photographers. These classes offer the opportunity to improve skills and knowledge in the comfort of one’s home and get every course when you sign up for their PRO PLAN.
Self-Paced Learning At PRO EDU
At PRO EDU, we emphasize self-paced learning, allowing you to digest complex photography techniques at your own speed. Our courses cover a wide range of topics, from the basics of using a camera to advanced post-production techniques. You'll find that our lessons are crafted by professional photographers who share their insights and workflows to help you produce compelling images.
Interactive Online Courses in Retouching at PRO EDU
For those of us looking to master the art of retouching, our interactive online courses at PRO EDU are second to none. With detailed instruction on various retouching methods, we ensure that you learn the subtle nuances of enhancing photographs. Our interactive modules come with hands-on projects that provide practical experience and direct feedback from accomplished retouchers.
Portraiture Specialty Courses
Engaging in specialty portraiture courses enables us to refine our skills like this course with Tim Tadder and action sports photography, focusing on specific aspects of portraiture such as color use, retouching techniques, and artistic expression. These courses are tailored to enhance our understanding and practical abilities for professional outcomes in portraiture photography.
The Science Of Color With Kate Woodman
When we delve into The Science of Color with Kate Woodman, we learn to master the manipulation and application of color in our portrait work. This course is integral for those of us looking to elevate our portraiture through the studied use of color theory and precise application in our images.
Commercial Retouching With Hugo Ceneviva
Commercial Retouching with Hugo Ceneviva allows us to grasp the nuances of high-end image refinement. We learn critical retouching techniques that are essential for producing commercially viable portraits that stand out in a crowded marketplace due to their polish and professionalism.
Fine Art Portraiture with Gemmy Woud Binnen-Dijk
Our venture into Fine Art Portraiture with Gemmy Woud Binnen-Dijk introduces us to the techniques needed to create evocative and timeless portraits. This course emphasizes the storytelling aspect of portraiture, blending technical skill with creative vision to craft works that resonate as fine art.
Implicit in these specialty courses is the art of utilizing colored gels to create mood and atmosphere in portraiture, a skill set expounded upon in Long Exposure Portraits with Jake Hicks, where we explore innovative lighting techniques that add a dramatic flair to our photography toolkit.
Specialty Retouching Courses
In our pursuit of digital photography proficiency, we acknowledge the profound impact of specialty retouching courses. These workshops are purpose-built to enhance our images with industry-standard techniques employed by the professionals.
Commercial Retouching
We recognize the intricacies of product and corporate branding in Commercial Retouching. The meticulous process, as demonstrated in workshops by experts like Sef McCullough, underscores the power of detail-oriented work. This involves techniques that maintain product integrity while also ensuring they are visually appealing.
Cinematic Color Grading
Moving towards the more artistic realm of retouching, Cinematic Color Grading is essential for those of us aspiring to imbue our images with a filmic quality. Justin Lister's instruction shows us how to apply color theory and grading techniques that transform photographs into cinematic pieces. Our images benefit from strategic adjustments, akin to those used in the motion picture industry.
Advanced Skin Workflow
Lastly, the domain of portraiture brings us face-to-face with Advanced Skin Workflow. Nino Batista's course guides us through nuanced skin retouching methods that honor texture and tone, elevating the natural beauty found in human skin. We learn to execute retouches that feel authentic and resist the pitfalls of over-editing.
Photography Equipment Training
In our "Photography Equipment Training" section, we focus on essential components to enhance your photography skills: understanding the use of various lenses and maintaining your camera gear.
Lens Selection Guides
When selecting lenses, we consider factors such as aperture, focal length, and lens type to match our photographic needs. Prime lenses typically offer sharper images with a fixed focal length, while zoom lenses provide versatility with variable focal lengths. For example, a 50mm prime lens is excellent for portraits, offering a wide aperture for shallow depth of field.
Wide Aperture Lenses: Ideal for low light and bokeh effects.
Telephoto Lenses: Best for wildlife or sports photography, allowing close-ups from a distance.
Wide-Angle Lenses: Suitable for landscapes and architectural photography.
Camera Maintenance
Proper camera maintenance ensures our equipment's longevity and reliability. We regularly clean our camera sensors to avoid dust spots on images, which is especially crucial after changing lenses in outdoor environments. It's also important to check for firmware updates that can improve camera performance.
Camera Body Maintenance:
Check seals for weather damage.
Keep the body clean from dust and moisture.
Lens Care:
Regularly clean the lens elements with a proper cleaning solution.
Inspect lens mounts and replace them if worn.
By adhering to these practices, we maintain our gear in top condition, ready for any photographic opportunity.
Photo Editing Software Tutorials
In this section, we cover tutorials for industry-leading photo editing software, providing resources to master Adobe Photoshop and Lightroom.
Adobe Photoshop Courses at PRO EDU
For those of us seeking in-depth knowledge and professional techniques in Adobe Photoshop, PRO EDU offers comprehensive Photoshop classes catering to various skill levels. From beginner to advanced, these tutorials dive into aspects such as layering, retouching, and color grading, equipping us with the skills necessary to produce professional-grade work.
Lightroom Essentials PRO EDU
Understanding the nuances of Lightroom is critical, and PRO EDU's Lightroom tutorials focus on essentials that can streamline our photo editing workflow. These tutorials highlight efficient methods for photo sorting, editing, and color correction, thus enabling us to fully utilize Lightroom’s capabilities for image enhancement.
Photography Business Skills
In the competitive field of photography, understanding business operations is crucial. Mastering marketing and pricing strategies can significantly influence our success as professional photographers.
Marketing for Photographers
Marketing is the lifeblood that helps to attract and retain clients. Developing a strong brand identity and online presence is essential. We leverage social media platforms to showcase our work and connect with potential clients. Networking with other professionals and engaging in community events can also expand our visibility. Educational resources, for instance, business, pricing, and marketing tutorials, offer valuable insights to hone our marketing strategies further.
Pricing For Photographers
Pricing is a delicate balance that affects our profitability. It's important to research the current market rates to set competitive prices. We must consider our costs, time, and target profit margins. Structured pricing models, such as tiered packages or a la carte services, allow us to cater to various customer needs while highlighting our value. By understanding our worth and communicating it effectively, we establish sustainable pricing that benefits both us and our clients.
Frequently Asked Questions
In this section, we answer common queries to guide those interested in taking photography classes, whether you're starting out or looking to refine your skills.
What are some recommended beginner photography classes available at PRO EDU?
Are there any photography classes specifically designed for adults?
Yes, many courses offer photography tips tailored for adults, focusing on both foundational skills and specialized techniques.
How can I find free photography courses that are available locally?
Local community centers, libraries, and colleges often host free photography courses, and you can also check online community boards for local offerings.
What options are there for online photography courses that offer quality education?
Various online platforms provide quality education in photography, such as iPhotography Course, which offers a range of online courses suited for different expertise levels.
Where can I find in-person photography classes in my vicinity?
To find in-person classes, check with local photography studios, community colleges, and adult education programs, as they frequently run hands-on photography courses.
What opportunities are there for teens interested in learning photography?
Many community centers, schools, and photography studios offer summer camps, after-school programs, and workshops specifically designed to cultivate teens’ photography skills.
]]>
https://proedu.com/blogs/news/ai-workflow-bots-for-photographers-automatic-blog-generation-machine2024-01-24T10:59:47-06:002024-04-11T15:57:47-05:00AI Workflow Bots For Photographers | Automatic Blog Generation MachineGary Martin
AI Workflow Bots For Photographers Are Your New Content Generation Machine - PRO EDU
Leveraging the latest in artificial intelligence, we have crafted a suite of tools disrupting the current content creation landscape, particularly for those looking to sharpen their SEO strategy and learn more about advanced tools like SEM RUSH. We integrate advanced software like Airtable to craft personalized content strategies, enabling professionals, such as photographers, to enhance their visibility in specific local markets.
The AI-driven tools we've built not only generate blog post titles, targeted keywords, and suitable thumbnails but also tailor the writing style and tone to your personal brand, allowing you to connect with your audience more authentically.
Through the power of automation, this technology streamlines content delivery directly to platforms like WordPress and Google Docs, facilitating backups and ensuring all SEO elements like Meta Titles and Descriptions, as well as Image Alt Tags, are optimized without manual intervention.
Our system is designed to save you time on the technical aspects of content strategy so you can focus on your passion and creativity. Moreover, we provide comprehensive SEO education to help you understand the mechanics behind your digital presence. Our forthcoming series of AI tools will continue to transform your workflow and content management practices.
Key Takeaways
AI tools significantly improve SEO strategies through customized, automated content generation.
Automated workflows expedite content delivery and ensure comprehensive SEO optimization.
Alongside advanced tools, we offer SEO education to empower users with essential knowledge for digital success.
Overview of the SEO Blog Creation Tool
Initial Configuration
We have streamlined the initial setup for an SEO blog creation tool that needs only a one-time configuration. Utilizing Airtable, we establish a framework tailored for businesses – take for example a senior photographer in Kansas City. This setup covers everything from generating blog titles and identifying prime keywords to selecting an appropriate thumbnail, ensuring that local search rankings for potential clients are optimized.
Airtable Integration: Connect to Airtable for content management.
Blog Elements: Titles, targeted keywords, and thumbnail suggestions.
Personalization: Input the location, name, and desired blog perspective.
Writing Style: Choose varying writing styles to match the desired tone.
Advantages for Local Search Engine Optimization
We're focusing heavily on amplifying local online visibility. By employing our tool, businesses are positioned to overtake competitors in local search results. This is critical for being discovered by local clients actively seeking your services on search engines.
Local Emphasis: Target keywords relevant to the local demographic.
Client Searches: Optimize for phrases potential local clients are using.
Competitive Advantage: Analyze and exploit keyword gaps left by competitors.
Assessing the Keyword Opportunity
Recognizing what sets you apart from competitors on the search engines is key. We analyze the keyword gaps to pinpoint opportunities for ranking. Our tool facilitates this analysis by comparing your content against that of competitors to reveal crucial keywords they may have overlooked.
Keyword Identification: Target phrases your competitors are missing.
Result Analysis: Understand why competitors rank where they do.
Content Strategy: Develop a strategy based on these keyword opportunities.
Integration and Automation
Platforms: Seamless integration with WordPress and Google Docs.
Backup: Automatic backups of articles, metadata, and SEO elements in Google Drive.
Customization: Tailor inputs to align with your brand and content goals.
Tailoring Content Outputs
Data Input Considerations
Step
Action
Description
1
Identify Location
Input our locality to shape local SEO presence.
2
Add Personal Details
Include our name to personalize the strategy.
3
Choose Perspective
Select the narrative voice for our blog posts.
Selecting Voice and Target Audience
Voice Customization:
We can emulate a range of writing styles, be it poetic, journalistic, or avant-garde.
Audience Focus:
Who: Determine the demographic we're addressing to tailor the content.
Why: Ensuring relevance by aligning the content with the audience’s interests and search behaviors.
Using these systems, we can strategically boost our content's reach and effectiveness in engaging our desired audience.
Streamlining Content Creation Procedures
Collaborative Interface with Airtable
Our integration with Airtable serves as the foundation for crafting an impactful content strategy. This integration enables us to input crucial data specific to any location—like Kansas City for our recent work with a senior photographer. Here, we've established a strategy aimed at enhancing local search engine presence. By inputting basic information such as location and business name, as well as preferences for blog voice and target audience, Airtable assists in organizing and initiating our content workflow.
Inputs Required:
Location
Business Name
Desired Blog Perspective
Style of Writing
Outputs Provided:
Blog Titles
Targeted Keywords
Suggested Topics
Thumbnail Recommendations
Additional Local Ranking Keywords
Automated Content Production
Our AI-driven content generator is a revolutionary tool for creating SEO-optimized blog posts. With an initial setup, we can produce content automatically. The system tailors articles based on a variety of styles, from the poetic flair of Shakespeare to the unique voice of Hunter S. Thompson, ensuring variety and freshness in our writing. Aimed at those searching locally online, these blogs are crafted to increase visibility and dominate local search rankings.
Content Parameters:
Tone of Voice
Target Audience
Blog Style
Content Distribution and Preservation
Upon creation, our content not only reaches platforms like WordPress but also gets systematically organized in Google Docs and Airtable, ready for publishing wherever required—Squarespace included. We ensure every blog article is backed up in Google Drive, accompanied by essential SEO elements like Meta Titles, Meta Descriptions, and Image Alt Tags. Orchestrating the distribution and backup process allows us to focus on the creative aspects without the burden of repetitive tasks.
Implementation and Backup:
Direct Publishing to WordPress
Documentation in Google Docs
Spreadsheet Setup for Easy Uploads
Detailed SEO Attributes Backup in Google Drive
Educating on Search Engine Optimization
We have recently launched a revolutionary SEO blog generator that simplifies content creation. By configuring it just once, you unlock the ability to produce blog posts on demand. Our example showcases a Senior Photographer based in Kansas City who specializes in luxury and fine art photography, all set to climb the local search rankings.
We've integrated this tool with Airtable to orchestrate an entire content strategy, generating not just blog titles but also pinpointing targeted keywords for ranking. This also encompasses sourcing thumbnails—should you not possess suitable images—the additional keywords bolstering your local visibility when potential clients scour Google for your services.
Setting up is straightforward: input your location, name, and the narrative perspective for these blogs. Customization extends to the writing style, allowing the emulation of distinctive literary voices from Shakespeare to Hunter S. Thompson, adapting to your desired tone and audience.
The content generation is just part of the picture; deployment follows suit with direct feeds to WordPress and Google Docs, including backup provisions to ease your workload. Our objective is to handle the heavy lifting of content management, enabling you to focus on your creative endeavors.
Our offering also encompasses an SEO educational toolkit. We guide you through leveraging the free ChatGPT API provided with an OpenAI account, tailoring your content inputs, selecting enticing images from Pexels, and seamlessly managing data through Airtable and Excel spreadsheets. Final touchpoints include comprehensive backup solutions with fully formatted Google Drive documents, complete with Meta Titles, Meta Descriptions, Image Alt Tags, and all SEO essentials.
This introduction to our AI-driven tools is merely a preview of what's in store. We welcome you to explore the AI Workflow Bot Series at PRO EDU to enhance and automate your SEO strategies.
New AI Solutions Unveiled
We've recently launched a groundbreaking AI-powered SEO blog creator that automates the production of content, significantly impacting your strategy for online content. This tool needs only a one-time setup and leverages the capabilities of Airtable to tailor a content strategy for businesses like a senior photographer in Kansas City. It autonomously crafts blog titles, pinpoints focus keywords meant for local ranking, suggests topics for thumbnails, and identifies auxiliary keywords that boost local search visibility on Google for potential clients.
Through this ingenious tool, we aim to lead in local SEO by utilizing keyword gap analysis from SEM Rush which investigates what competitors are doing right for page one visibility, and identifying opportunities for your growth. You input your business details, desired blog perspective, and preferred writing style, ranging from classic authors to contemporary writers to suit your brand's voice. The tool is designed to understand your audience, generating relevant content at an astonishing pace.
Furthermore, we've streamlined content deployment; this AI integrates seamlessly with WordPress and Google Docs, automating backup processes. It's constructed to take on tasks so you can concentrate on creative endeavors. Accompanying this AI, we provide comprehensive SEO training to ensure a fundamental understanding of the technology.
Starting with Airtable, we guide you through integrating the free ChatGPT API for OpenAI account holders. We also assist in customizing inputs, sourcing thumbnail images from Pexels, and managing content publication via platforms like Squarespace, backed with a complete organization in Google Drive. Here, every article is stored with full SEO optimization, including meta titles, meta descriptions, image alt tags, and keywords. This AI SEO blog generator is one among the many innovative tools we are introducing over the next few months, aiming to revolutionize your content creation workflow through our AI Workflow Bot Series at PRO EDU.
]]>
https://proedu.com/blogs/news/the-art-of-color-grading-in-photography2023-12-28T10:32:23-06:002024-04-11T15:57:46-05:00The Art of Color Grading In PhotographyGary MartinDive into "The Art of Color Grading: Mastering the Visual Mood in Photography," where you'll unlock the secrets of transforming images through color theory and technical mastery, elevating your storytelling to new emotional heights
]]>
The Art of Color Grading: Mastering the Visual Mood in Photography
Color grading stands as a pivotal aspect in the transformation of visual storytelling, offering an expansive palette with which we paint emotions and set the mood in our photographic compositions. Through meticulous manipulation of hues, saturation, and light, we can impart a sense of time, enhance narrative depth, and evoke specific emotional responses from the viewer.
This practice is not solely reserved for the realm of cinema; it has also found a significant place in photography, where theart of color gradinghelps in shaping the visual coherence and the overall aesthetic of a series or body of work.
The Art of Color Grading: Mastering the Visual Mood in Photography
Color grading stands as a pivotal aspect in the transformation of visual storytelling, offering an expansive palette with which we paint emotions and set the mood in our photographic compositions. Through meticulous manipulation of hues, saturation, and light, we can impart a sense of time, enhance narrative depth, and evoke specific emotional responses from the viewer.
This practice is not solely reserved for the realm of cinema; it has also found a significant place in photography, where the art of color grading helps in shaping the visual coherence and the overall aesthetic of a series or body of work.
Understanding the subtleties of color theory is a fundamental step in mastering color grading, allowing us to construct imagery with harmonious color schemes or dramatic contrasts that serve our creative vision. Coupling this knowledge with the technical prowess in various color grading tools and software propels our ability to refine our photos, pushing them beyond the boundaries of the camera's capture. The journey through color grading is a confluence of art and technology, where we learn to bend the science of color to the artistry of our storytelling.
Key Takeaways
Color grading is essential in setting the mood and enhancing the narrative in both photography and cinema.
Mastery of color theory and technical knowledge is crucial to successful color grading.
The application of color grading influences viewer perception and elevates the emotional impact of an image.
Understanding Color Theory
Before delving into practical applications, we must grasp the conceptual underpinnings of color theory, which are grounded in both the emotional impact of colors and their scientific relationships. Our exploration begins by understanding the dual nature of color as both an artistic and psychological tool.
Fundamentals of Color Psychology
Color psychology plays a pivotal role in our photographic journey, as each hue represents a spectrum of emotions and cultural significances. It's crucial for us to acknowledge that red may evoke feelings of passion or urgency, while blue often conveys a sense of calmness and trust. The impact of color psychology transcends mere aesthetic choices, directly influencing the mood and emotion within an image.
The Color Wheel and Color Relationships
An instrumental tool in mastering color theory is the color wheel, where we see complementary colors (opposite each other on the wheel) create dynamic contrasts, while analogous colors (adjacent to each other) ensure harmony and subtlety. Our knowledge of the color wheel allows for intentional adjustments in hue, steering the color temperature warmer or cooler to craft the desired atmosphere. Understanding this framework empowers us to apply these principles effectively to enhance the storytelling power of our photographs.
The Technical Side of Color Grading
In the realm of photography, mastering the technical side of color grading is essential for us to elevate the visual impact of our images. Understanding the intricate processes and tools at our disposal enables us to precisely shape the color narrative of our work.
Color Grading vs. Color Correction
Color grading and color correction may seem similar, but they serve distinct purposes in our workflow. Color correction is our first step, where we adjust the white balance, exposure, and contrast to fix any issues inherent in the raw image. It's about achieving a neutral starting point. On the other hand, color grading is an artistic tool. Here we apply creative stylistic adjustments to color, brightness, and saturation levels to evoke specific moods and themes.
Understanding the Histogram and Scope
The histogram provides us with a graphical representation of the tonal distribution in our image. Reading this correctly informs us how to manipulate the shadows, highlights, and mid-tones using levels and curves in tools like Photoshop or Lightroom. Simultaneously, using the scope helps us to ensure our adjustments fall within the desired color gamut and maintain a balanced look across the image.
White Balance and Color Matching
Proper adjustment of white balance is crucial for color matching, particularly when we’re merging photos from different sources. It ensures that the white in the images truly appears white, which lays the groundwork for consistent coloration throughout. In professional software like Photoshop, we can work in LAB color space to fine-tune white balance with precision or match colors based on lighting conditions to keep the color temperature coherent across a series of photos.
Color Grading in Photography
Color grading transforms the emotional impact of an image by adjusting tones and colors. Through this technique, we can steer the viewer's perception and solidify the narrative we wish to convey.
Achieving the Right Mood and Tone
Mood and tone are the soul of a photograph. By manipulating colors in an image, we not only enhance its visual appeal but also imbue it with emotion. For instance, cool tones often convey a sense of calmness or melancholy, while warm tones can evoke feelings of joy or nostalgia.
Cool Tones: Often used to express sadness or detachment
Warm Tones: Convey warmth, comfort, or excitement
Working with Light: Shadows and Highlights
The interplay between shadows and highlights defines an image's dimensionality and texture. We use shadows to deepen the sense of space and produce a tactile feeling. Highlights, on the other hand, draw attention to the salient features and textures within the photo. By finessing these elements:
Deepen shadows to enhance depth
Boost highlights to emphasize key details
Advanced Techniques: From Split Toning to Selective Color
Split toning allows us to assign different colors to the shadows and highlights, creating a unique aesthetic. This method can emphasize the image's mood or even change it completely. Selective color, a more focused approach, alters only specific color ranges within an image, which can highlight specific elements or create contrasts that weren't originally present.
Split Toning: Adjust shadows and highlights with contrasting hues
Selective Color: Alter specific hues without affecting the whole image
Our mastery of color grading techniques gives us the power to not only correct but also to stylize our photographs, ensuring that the images we present tell the story we intend, with the exact mood and aesthetic we envision.
Tools and Software for Color Grading
In the realm of photography, the right tools and software are crucial for color grading. They can transform a good image into a visual masterpiece by enhancing mood, style, and emotional impact. Let's explore some of the key solutions professionals and enthusiasts alike turn to.
Professional Software: DaVinci Resolve and Adobe Photoshop
DaVinci Resolve has emerged as a front-runner in the world of color grading for video, renowned for its advanced colorist tools and high-quality output. It's a comprehensive editing platform that caters to nuanced color adjustment, with a wide array of features for color correction and grading at a professional level.
Adobe Photoshop stands tall for still images, offering a plethora of color adjustment tools within its ecosystem. Photoshop's versatility allows us to manipulate colors down to the finest detail, whether it's through Curves, Color Balance, or more advanced features like LUTs (Look-Up Tables) and color channels.
Mobile and Desktop Alternatives: Snapseed and Others
While professional-grade software can be complex, there are more accessible options that provide quality results. Snapseed is a popular choice for photographers who need a reliable mobile app with a user-friendly interface for quick edits on-the-go. It includes a solid range of editing features, from basic tweaks to selective color adjustments.
For those who prefer a desktop application, Capture One is another excellent option that caters to photographers looking to finely tune their images. It boasts a robust set of color grading tools tailored for precision, offering a similar level of control as Photoshop but with a focus on raw image processing.
The Rise of AI in Color Grading Software
The integration of Artificial Intelligence (AI) is revolutionizing color grading software. AI streamlines the editing process by analyzing images and suggesting automatic color adjustments. This technology is increasingly present in editing apps, making color grading more accessible to novices without sacrificing the quality professionals expect.
Color Grading in Cinema and TV
Color grading shapes the visual mood and style of our cinematic experiences. Through meticulous adjustment of colors, a film can evoke emotions and translate the director's vision.
The Role of the Cinematographer and Director
In filmmaking, the collaboration between the cinematographer and the director is crucial in defining the visual narrative. We understand that the cinematographer, also known as the director of photography (DP), is responsible for capturing the visual essence of the screenplay. It is during post-production that color grading comes into play, a process where both the DP and the director make decisive choices that cement the film's visual style. For instance, a decision to warm up the color temperature can make a scene feel more intimate, while a cooler palette can evoke detachment or desolation.
Historic Techniques to Modern Day: Technicolor to ACES
Historically, processes like Technicolor established the foundation for color in film by using dye-transfer techniques to enhance the vibrancy of movies. Our journey from Technicolor to the modern ACES (Academy Color Encoding System) reflects a continuous evolution in how we present color in cinema.
Technicolor, for example, was responsible for the rich, saturated colors seen in classics like The Wizard of Oz. Today, ACES provides us a standardized workflow that preserves the director's creative intent across different display formats, from the cinema screen to your home TV. By employing ACES, we ensure that colors rendered in post-production remain true and consistent, delivering the exact visual style the filmmaker intended.
Meanwhile, color grading within both cinema and television has reached new heights. With the use of sophisticated software, we are able to manipulate shades and contrasts to a degree of precision that was unimaginable in the era of Technicolor. Our ultimate goal with color grading remains the same: to create a deeply immersive, emotional, and visually captivating experience for every viewer.
Creating a Personal Style
In the realm of photography, the images we present to the world are not just snapshots but rather extensions of our artistic voice. We'll discuss how personal style, through consistency and a unique color scheme, plays a pivotal role in establishing a brand and emotional connection with our audience.
The Importance of Consistency and Branding
Maintaining a cohesive visual style across our work is essential. It strengthens our brand's identity and ensures that our visual language communicates the same taste and aesthetic across different platforms. By doing so, we foster a subconscious association between our images and our distinct style, which resonates emotionally with our viewers.
Consistency: Every photo we publish should be an ambassador of our brand. Whether it be the mood, tone, or color, our audience should immediately recognize our hand in the creation.
Branding: Branding isn't only for products; it's for artists as well. When we establish a consistent visual style, we essentially craft our brand. This recognition is what sets us apart and makes us memorable in the crowded market of visual content.
Developing a Unique Color Scheme
Selecting a distinctive color scheme is a powerful tool for defining our visual style. Colors are more than just shades; they carry emotion and meaning. A thoughtfully constructed color scheme can evoke the specific feelings and moods we aim to convey through our work.
Color Schemes:
Monochromatic: Utilizing variations in lightness and saturation of a single color to create a harmonious and balanced effect.
Complementary: Pairing colors opposite each other on the color wheel to create a dynamic and striking impact.
Analogous: Choosing colors that are side by side on the color wheel; known for being pleasing to the eye and creating a serene and comfortable design.
Our selection of colors should reflect the taste and emotion we wish to convey, setting the tone for our body of work. This unified color approach across our portfolio not only sharpens our aesthetic but also strengthens the emotional thread that binds our photographs together.
The Impact of Color Grading on Viewer Perception
We understand that color grading is not just about beautifying images; it's a powerful tool to shape viewer perception. Through careful manipulation of colors, we can guide the audience on a visual journey that aligns with the narrative and emotional arc of our story.
Using Color to Tell a Story
We use color grading to enhance the narrative elements of our visual content. By adjusting hues and tones, we can introduce or change the atmosphere of a scene. For instance, warm tones often signify happiness or nostalgia, while cooler tones can suggest sadness or tension. Our ability to alter these nuances helps us to control the pacing and focus of the story. Strategic choices in a palette can also emphasize important plot points, leading to a more immersive storytelling experience.
Influencing Audience Emotions
The practice of color grading goes beyond aesthetic appeal and delves into the realm of color psychology. We can influence the audience's emotions by choosing colors that induce specific feelings. Saturated colors may imbue a scene with vibrance and energy, while desaturated colors might evoke a sense of bleakness or despair. By adjusting contrasts and color balances, we craft an emotional landscape that resonates with viewers, often on a subconscious level, enhancing the overall emotive power of our content.
Frequently Asked Questions
In our journey through color grading, we encounter questions that hone our skills and deepen our understanding of this crucial aspect of photography and film.
How can one apply color grading techniques to enhance photography?
We use color grading to bring out emotions and set the tone of our photographs. By manipulating hues, saturation, and luminance, we can dramatically alter the mood and impact of an image. For tips on enhancing photos through color grading, explore this guide by Boris FX.
What are the fundamentals of color grading for film and video?
The fundamentals of color grading for film and video include understanding color theory, the emotional impact of colors, and the technical use of scopes and waveform monitors. To effectively tell a story, one must master the delicate balance between artistic vision and the technical aspects of color grading.
What tools and software are considered industry standard for professional color grading?
Professional color grading often involves tools and software like DaVinci Resolve, Adobe Premiere Pro, and Final Cut Pro. These offer advanced features that cater to the high demands of industry professionals and are widely used for their comprehensive color grading capabilities.
Can you describe the process of achieving neutral color grading in images?
To achieve neutral color grading in images, we first perform color correction to ensure accurate representation of colors. This sets a balanced starting point, after which we can apply subtle color enhancements without biasing the image toward any particular color palette.
How does color harmony affect the mood and storytelling in photography?
Color harmony is elemental in photography as it directly influences the viewer's emotional response. By using complementary colors or analogous schemes, we can create a sense of peace or drama, aiding the visual storytelling in our photographs. Understanding color harmony enables us to guide the viewer's experience and enhance narrative depth.
What steps are involved in replicating color grading styles from one photo to another?
To replicate color grading styles from one photo to another, we start by analyzing the color palette and grading techniques used in the original photo. Then, we manually adjust the color settings of the other photos to match or use presets and LUTs (Look-Up Tables) to apply similar grading efficiently. Consistency in color grading across images is key to maintaining a uniform style, which could be observed through the resources provided by SmugMug.
]]>
https://proedu.com/blogs/news/copyright-of-ai-generated-images-for-photographers2023-12-26T16:58:39-06:002024-04-11T15:57:45-05:00Copyright of AI-generated images For PhotographersGary MartinExplore how the integration of AI tools like Midjourney into photography workflows can enhance creativity, while also navigating the crucial legal implications of copyright and ownership in the digital age.
Midjourney Copyright For Photographers: Navigating Rights and Licensing
In this digital age, where the boundaries of photography are being redrawn against human authorship, we find ourselves at a crossroads of challenges and opportunities. It's a brave new world for both the up-and-coming and the seasoned photographer, a world where artificial intelligence tools like Midjourney aren't just tools; they're game-changers helping human authors create.
Here's the crux: Midjourney is more than a platform; it's a revolution in AI art generation. But with great power comes great responsibility, especially in understanding the intricacies of copyright laws. This isn't just about knowing the rules; it's about mastering them in a landscape that's constantly evolving.
Think about it. Midjourney isn't just enabling creative expression; it's redefining it. For photographers, this means treading into uncharted territory where the lines between human creativity and AI-generated art blur on works created. It's not just about creating; it's about owning your creation in a world where intellectual property rights are as complex as they are crucial.
This is the new frontier of photography in the digital age. It's an exciting time, but it's also a time that demands a keen understanding of the legal landscape in regards to copyright protection. As photographers, we're not just capturing images; we're navigating a world where innovation meets regulation, where the art of the future meets the laws of today.
Prompt: an image of darth vader as a player on the NBA team the Los Angeles Lakers, --ar 16:9 --s 50 --v 6.0 --style raw
Blending Midjourney with our photography workflows isn't just about enhancing creativity; it's about navigating a new legal landscape. Merging AI with traditional techniques brings forth crucial questions about ownership and copyright because ai generated artwork cannot be copyrighted.
It's essential, now more than ever, to forge best practices in this AI-infused era, ensuring our creative works are protected and our business decisions are informed. This isn't just a shift in how we create; it's a pivotal turn in how we protect and commercialize our art.
Key Takeaways
Understanding copyright laws is crucial for photographers using AI tools like Midjourney.
Integrating AI into professional work necessitates awareness of legal implications.
Photographers must establish best practices for AI interaction to protect their work.
We are approaching new frontiers in copyright and it's changing everyday and it's important to understand the ethical uses.
Understanding Copyright in Photography
In this section, we'll guide you through the fundamental legal principles of copyright in photography, focusing on the rights granted to photographers and the role of the US Copyright Office in protecting these rights with the Supreme Court. The last think you need is to be standing in front of a federal judge, so pay attention.
Legal Framework and Rights
Copyright in photography protects the creator's original works from unauthorized use. As photographers, we hold the exclusive rights to reproduce, distribute, and display our photos, as well as to create derivative works. Our legal framework accommodates both economic rights, which allow us to benefit financially from our work, and moral rights, which protect our personal connection to the photograph.
US Copyright Office and Registration
When it comes to registration, the US Copyright Office plays a pivotal role in issuing copyright to images created and or images generated. Although our copyright exists from the moment our work is created, registering with the US Copyright Office adds a layer of legal protection, making it easier to claim statutory damages in the event of infringement. It is important for us to register our works if we anticipate the need to enforce our copyrights either domestically or internationally.
Midjourney's Role in Photography
Midjourney is perhaps the best known generative AI and has revolutionized the landscape of visual arts, tightly intertwining photography with artificial intelligence to expand creative boundaries and redefine the artistic process for photographers wanting to create ai generated art.
AI Image Generator
Midjourney's AI image generator serves as a powerful tool enabling photographers to explore new horizons in image creation. By leveraging artificial intelligence, we can generate complex images from textual descriptions, providing a novel avenue to visualize ideas that may be challenging to capture through traditional photography methods.
Key features include:
Style Emulation: Photographers can reproduce the aesthetics of famous artists.
Idea Prototyping: Swiftly translate concepts into visual drafts.
Variational Output: Produce multiple image variations for a single prompt.
Midjourney AI and the Creative Process
Incorporating Midjourney AI into the creative process offers artists the ability to augment their work with intricacies that might not be possible to achieve manually. This fusion of technology not only streamlines workflow but also injects a fresh perspective into the realm of photographic arts. By inputting specific keywords, we as photographers can mold the AI's output to align with our unique artistic vision.
Inspiration Cultivation: Fostering creativity through exposure to AI-generated visual suggestions.
Technical Augmentation: Enhancing photographic techniques with AI-generated components.
Creative Collaboration: Viewing AI as a collaborative partner in the art-making process.
Photographers and Copyright
Photographs are a form of intellectual property, and as such, the original creators hold certain rights to their work, but not that this varies from the United States and other countries. Ensuring proper attribution and obtaining consent for use are pivotal for both respecting and protecting these rights.
Attribution and Ownership
We must acknowledge that, within the realm of copyright, attribution plays a crucial role in identifying and respecting the original creator of a photograph in any ai system. This is not just a courtesy but a legal acknowledgment that can hold weight in disputes over intellectual property. When photographers claim ownership, they're asserting their legal rights to be recognized as the source of the work and to control how their photographs are used. An entity cannot use a photo without proper acknowledgment of its creator, a practice that is often enforced through copyright law.
Protecting Work and Consent
Consent stands as a foundational element in the usage of photographs. As photographers, we must protect our work by stipulating how others can use it, often through licenses or contractual agreements. If an entity wishes to use a photograph, they must obtain consent from the photographer—who maintains the right to allow or refuse the use—often determined by the specifics of the licensing terms. Without securing proper consent, the use of a photograph might infringe upon the copyright held by the original creator, leading to potential legal action.
Steven Thaler & Views On AI Authorship
Stephen Thaler, a notable figure in the debate over AI and intellectual property rights, has made several statements regarding his stance on AI-generated patents and copyrights. In one of his legal battles, Thaler argued that rejecting AI-generated patents "curtails our patent system's ability — and thwarts Congress's intent — to optimally stimulate innovation and technological progress." This statement reflects his belief in the potential of AI to contribute significantly to various fields, ranging from medicine to energy, and his concern that not recognizing AI creations could hinder technological advancement
]]>
https://proedu.com/blogs/news/who-is-photographer-peter-hurley-the-pro-edu-podcast-with-gary-martin2023-12-19T11:39:05-06:002023-12-19T11:39:58-06:00Who Is Photographer Peter Hurley | The PRO EDU Podcast with Gary MartinGary Martin
Who Is Photographer Peter Hurley: Master of Headshot Photography
When we consider renowned names in contemporary photography, Peter Hurley stands out as a leading figure. He is acclaimed for his expertise in headshot photography, with a sharp focus on crafting expressive portraits that resonate on a personal level. Peter Hurley operates out of New York and Los Angeles, bringing his eye for detail to every executive business portrait and actor headshot he composes.
With a background that spans beyond the camera, our understanding of Hurley's multidimensional career adds depth to his photographic achievements. Before he became synonymous with quality portraiture, Hurley’s life included pursuits such as sailing, where he dedicated himself to training for the Olympic Games, and modeling, where he appeared in campaigns for notable brands like Polo Sport and Abercrombie & Fitch. His transition into photography was marked by bringing the same intensity and drive that characterized his previous endeavors.
Our appreciation of Peter Hurley's work is enhanced by his role as an educator and mentor within the photography community. He has cultivated a reputation not only for his stellar images but also for his ability to teach and inspire other photographers. By sharing his unique methodology and perspectives on achieving the perfect headshot, Hurley has influenced a generation of photographers to aspire toward the same standard of excellence that defines his work.
Early Career and Rise to Fame
Before we earned a distinguished reputation in the world of photography, our early career traversed a path that was somewhat unconventional for a photographer. Our initial professional pursuits were not behind the camera; in fact, they were far from it. We began our journey as a model and an actor—industries that introduced us to the sparkling allure of the camera's eye.
We transitioned into photography almost by serendipity. Encouraged by prominent photographers, we bought our first camera and lens. Our New York base played a pivotal role in our early development, providing a vibrant, diverse backdrop for our budding career and crucial networking opportunities in the creative arts.
Here is a succinct timeline of our career's transformation:
Modeling and Acting: Our first exposure to the lens, gaining insight into composition from the subject's perspective.
Photographer's Assistant: We learned the intricacies of professional shoots, honing our skills in lighting and frame composition.
Headshot Photography: We made a name for ourselves with our unique approach to capturing the essence of a subject.
Our career truly catapulted when we focused our lens on headshots, ultimately becoming synonymous with premium portrait photography. Our work's quality quickly caught the attention of clients and industry professionals, and our portfolio expanded to include a host of commercial and advertising work. We attribute our rise to fame to relentless determination, a clear artistic vision, and the bustling dynamics of New York, which always kept us on the pulse of modern trends and styles in photography.
Signature Style and Techniques
We understand that Peter Hurley is renowned for his unique approach to headshot and portrait photography. His signature style exudes a crisp, sharp aesthetic, emphasizing the subject's eyes and ensuring they are the focal point of the image. One of his well-known techniques involves the deliberate definition of the jawline, which adds depth and character to the headshot.
Lighting Techniques: Hurley has popularized a lighting setup known as the "triangle" style. This involves strategic placement of lights to sculpt the face and highlight features.
Directing Subjects: We appreciate the way Hurley engages with his subjects. He coaches them on minor adjustments in posture and facial expressions, achieving a natural look.
Headshot Specifics: In typical Hurley fashion, a headshot is not just about capturing a person's likeness; it's about bringing out their personality. He often shares insights on how slight changes in the angle of a subject's head can affect the portrait's outcome.
In summary, our knowledge of Peter Hurley's approach reveals a combination of technical skill and the ability to elicit and capture the subtle nuances of personality in his subjects, distinguishing his work in the field of portrait photography.
Establishment of Headshot Crew
In response to the growing demand for quality professional headshots, Peter Hurley founded Headshot Crew, a platform he created to elevate the headshot photography industry through community development and education.
Platform and Community Building
Headshot Crew serves as an expansive network, uniting headshot photographers worldwide. We facilitate direct feedback, learning experiences, and offer a Photographer's Toolkit to enhance the skills of our members. Our efforts ensure that photographers can book a session today and, in doing so, take their headshot business to the next level. The community aspect is paramount; it's a place to connect, collaborate, and grow as professionals in the field.
Sponsorship and Partnerships
Partnership and sponsorship have been integral components of Headshot Crew's growth. Through strategic alliances with photography gear companies, service providers, and educational platforms, we have been able to offer a comprehensive suite of tools that are essential for our members. These relationships not only support our operational infrastructure but also enrich the Headshot Crew with resources that are indispensable to a headshot photographer’s success.
Educational Contributions and Workshops
Peter Hurley’s expertise in portrait photography extends beyond the camera lens; we recognize him as a leading instructor in the field. This renowned photographer contributes significantly to the education of fellow photographers by offering various learning experiences that focus on his unique approach to capturing compelling headshots.
Workshops: He runs in-person workshops which are crafted to elevate the skills of participants. A blend of hands-on training and theoretical knowledge equips attendees with practical insights they can apply to their craft.
Headshot Intensive Workshops: At these intensive workshops, Peter Hurley shares game-changing techniques that boost photographers’ confidence and prowess behind the camera.
Online Coaching: For those unable to attend in-person events, he offers a comprehensive online coaching system. Through these sessions, participants learn to produce headshots that stand out in the competitive industry.
Headshot Crew: Hurley's Headshot Crew is a platform where photographers can connect, network, and further hone their skills under his guidance.
During events such as NAB New York, a hub for the media, entertainment, and technology industries, Hurley's educational contributions come through his participation and lectures, promoting best practices in photography ventures.
We value his commitment to sharing his profound knowledge, which has shaped many into fine artisans of portrait photography. His educational efforts ensure a legacy that transcends his own impressive body of work.
Personal Insights from Interviews
In our exploration of Peter Hurley's career, we've uncovered insights from various interviews that shed light on his personality and professional evolution. These dialogues reveal more than just the technical skill behind his photography; they capture the essence of his creative spirit and forward-thinking approach to the craft.
Conversations and Anecdotes
During his Podcast Interview with PRO EDU, we learned that Hurley's foray into photography was as unexpected as it was fortuitous. Initially a model and actor, his keen eye for aesthetics was honed in front of the lens before he ever considered stepping behind the camera. This unique perspective has allowed him to resonate with his subjects in a way that is both intimate and empowering, leading to portraits that go beyond mere images to become character studies.
In other personal anecdotes, particularly at events like Photo Plus Expo, Hurley emphasizes the importance of confidence—both in himself and his subjects. The infectious enthusiasm with which he speaks about photography is a testament to his belief in the power of a good headshot. A strong advocate for professionalism and precision, he credits much of his success to his dedication to these qualities.
Future Endeavors and Collaborations
Looking to the future, Hurley's openness to collaboration is evident. His attendance at NAB New York, an event for media, entertainment, and technology professionals, shows his commitment to staying abreast of industry trends and technological advancements. He views these events not just as learning opportunities but as a chance to network with creative minds, explore potential partnerships, and forecast the trajectory of portrait photography in the digital age.
Our findings portray Peter Hurley not just as a photographer but as an innovator and educator who continues to inspire our community with his passion and expertise.
Frequently Asked Questions
In our exploration of Peter Hurley's work, we encounter several common inquiries. We'll address these questions with focused and factual responses that reflect Hurley's impact on photography.
What is the technique of 'squinching' and how is it used in photography?
'Squinching' is a technique popularized by Peter Hurley. It involves slightly squinting the lower eyelid which adds confidence to the subject's expression. Photographers use this subtle change to create more engaging and dynamic headshots.
How has Peter Hurley influenced portrait photography with his lighting techniques?
Peter Hurley has made significant contributions to portrait photography with his unique approach to lighting, notably through his "triangle" setup which highlights facial features with an even, flattering light, thereby creating his signature look.
What are some key elements to consider when creating a professional headshot?
When crafting a professional headshot, photographers focus on capturing the subject's genuine expression and ensuring that the lighting flatters their facial features. The background and the subject's attire are also chosen carefully to avoid distractions and convey the intended professional image.
Which lighting setup is synonymous with Peter Hurley's portrait style?
The lighting setup synonymous with Peter Hurley's style is known as the "triangle lighting" or "kino flo". This involves surrounding the subject with lights at strategic angles to produce soft, diffused light that enhances the subject's features without harsh shadows.
Can you identify the distinctive qualities of acting headshots?
Acting headshots exhibit distinct qualities such as a strong connection with the camera, conveying an actor's range and personality. These headshots are crafted to capture the essence of the actor's character and versatility, often used to attract casting directors.
What are the main purposes of portrait photography in today's media landscape?
In today's media landscape, portrait photography is utilized to convey personal branding, tell stories, and create connections. It rounds out everything from corporate marketing to social media presence, highlighting individuals in a way that text alone cannot achieve.