<?xml version="1.0" encoding="UTF-8"?>
<feed xml:lang="en-US" xmlns="http://www.w3.org/2005/Atom" xmlns:opensearch="http://a9.com/-/spec/opensearch/1.1/" xmlns:s="http://jadedpixel.com/-/spec/shopify">
  <id>http://www.royaldesignstudio.com/blogs/how-to-stencil.atom</id>
  <link rel="alternate" type="text/html" href="http://www.royaldesignstudio.com/blogs/how-to-stencil"/>
  <link rel="self" type="application/atom+xml" href="http://www.royaldesignstudio.com/blogs/how-to-stencil.atom"/>
  <title>Royal Design Studio - How To Stencil</title>
  <updated>2014-02-14T14:18:46-08:00</updated>
  <author>
    <name>Royal Design Studio</name>
  </author>
  <entry>
    <id>http://www.royaldesignstudio.com/blogs/how-to-stencil/12269389-stencil-basics-stenciling-with-discharge-paste</id>
    <published>2014-02-14T14:18:46-08:00</published>
    <updated>2015-01-14T15:36:05-08:00</updated>
    <link rel="alternate" type="text/html" href="http://www.royaldesignstudio.com/blogs/how-to-stencil/12269389-stencil-basics-stenciling-with-discharge-paste"/>
    <title>Stencil Basics: Stenciling with Discharge Paste</title>
    <author>
      <name>MELANIE ROYALS</name>
    </author>
    <summary type="html">
      <![CDATA[<img src="//cdn.shopify.com/s/files/1/0094/1122/files/stencil-discharge-paste-how-to-t_compact.jpg?8929"><p><a class="read-more" href="http://www.royaldesignstudio.com/blogs/how-to-stencil/12269389-stencil-basics-stenciling-with-discharge-paste">More</a></p>]]>
    </summary>
    <content type="html">
      <![CDATA[<p style="text-align: left;"><a title="Jacquard Discharge Paste" href="http://www.royaldesignstudio.com/collections/stencil-supplies/products/jacquard-discharge-paste"><img alt="Stencilinig with Jacquard Discharge Paste. Great for stenciled tshirts via Royal Design Studio Stencils" style="display: block; margin-left: auto; margin-right: auto;" src="//cdn.shopify.com/s/files/1/0094/1122/files/Stenciling-discharge-paste-tips-tricks.jpg?8936"></a></p>
<p> </p>
<p>
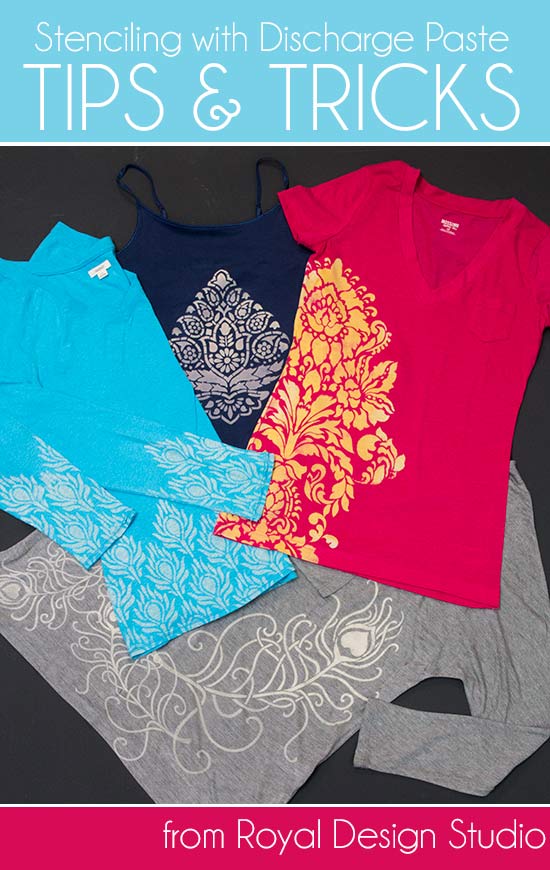
Discharging is the process of removing dye from fabric in a controlled manner. <a title="Jacquard Discharge Paste" href="http://www.royaldesignstudio.com/collections/stencil-supplies/products/jacquard-discharge-paste">Jacquard Discharge Paste</a> can be painted or stamped on dyed natural fiber fabric, and its thick viscosity makes it ideal for using on fabrics with <a href="http://www.royaldesignstudio.com/pages/stencils-stencil-supplies">Royal Design Studio Stencils</a>.</p>
<p>Discharge Paste will safely remove color from natural fibers and is also safe for use with silk. Unlike bleach, Discharge Paste will not weaken or deteriorate the fabric.</p>
<p> </p>
<p style="text-align: left;"><a title="Jacquard Discharge Paste" href="http://www.royaldesignstudio.com/collections/stencil-supplies/products/jacquard-discharge-paste"><img alt="How to stencil with Jacquard Discharge Paste via Royal Design Studio Stencils" style="display: block; margin-left: auto; margin-right: auto;" src="//cdn.shopify.com/s/files/1/0094/1122/files/Stenciling-curtains-discharge-paste_9cc082c3-74d5-4731-a737-d941993bef2b.jpg?8935"></a></p>
<h3></h3>
<h3><strong></strong></h3>
<h3><strong>
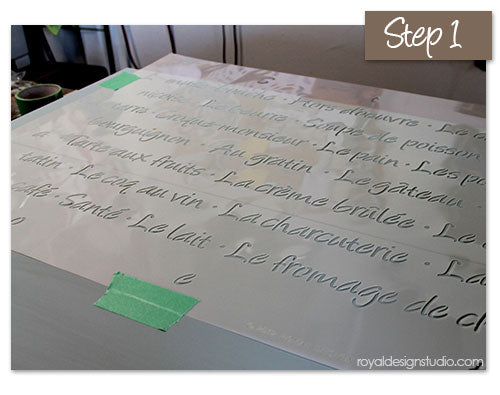
Basic Discharge Paste with Stencils Process</strong></h3>
<ol>
<li>Discharge Paste can be stenciled on natural fabrics just as you would any other stencil paint medium.</li>
<li>Secure your fabric. If stenciling an article of clothing we recommend inserting heavy paper or a piece of cut cardboard to ensure that fabric will lie flat and not shift while stenciling.
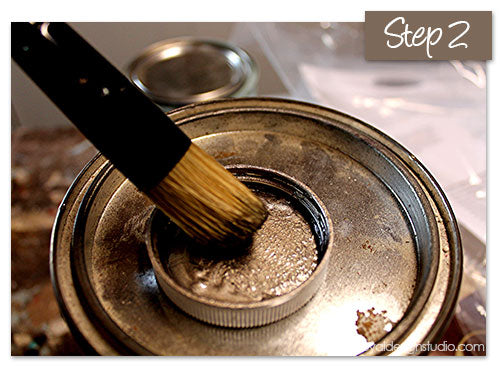
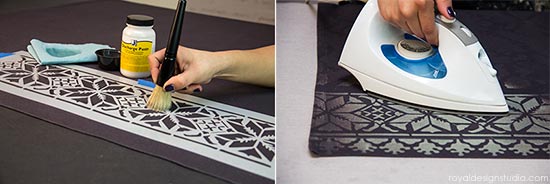
</li>
<li>Dip just the tips of a<a title="Best Stencil Brushes from Royal Design Studio" href="http://www.royaldesignstudio.com/collections/stencil-brushes"> Stencil Brush</a> into Discharge Paste and offload excess paste onto paper towels.</li>
<li>
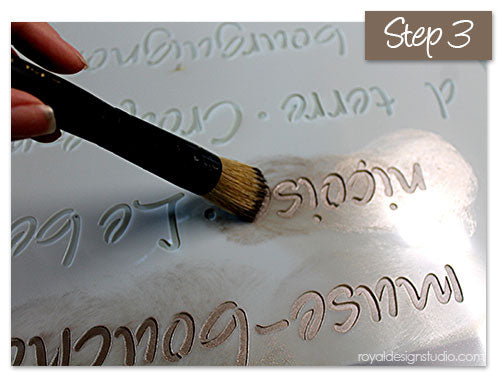
Apply the Discharge Paste through the stencil using either a swirling or pouncing motion. Discharge Paste is a clear medium, so on some fabrics it can be difficult to see where you have stenciled. We recommend that you run the stencil brush over each element 2-3 times to ensure complete coverage.</li>
<li>
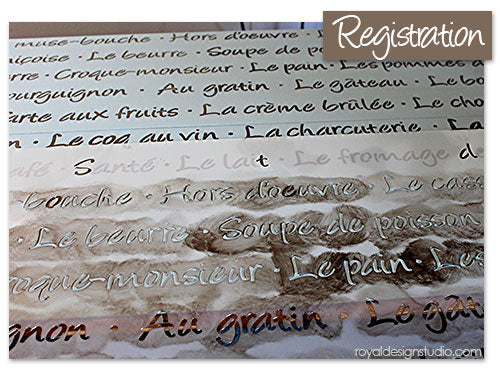
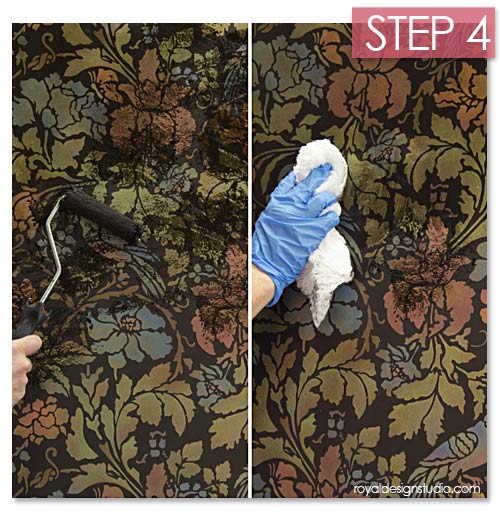
Allow the Discharge Paste to dry on the fabric. This should take approximately 20 minutes.</li>
<li>When the paste is dry, iron with steam on the highest setting possible that is appropriate for your fabric type until you achieve the desired amount of color removal from the fabric, usually about 10 minutes.</li>
<li>Wash your discharged fabric before using or wearing to remove any residual Discharge Paste.</li>
</ol><p> </p>
<h3><strong>Discharge Paste Stenciling Tips</strong></h3>
<ul>
<li>You can achieve different degrees of discharging by the amount of Discharge Paste you apply and by the time you spend steam ironing.</li>
<li>For a less dramatic discharge, experiment with less time and pressure with your steam iron and also try using a pressing cloth or paper towel between your iron and fabric.</li>
</ul><p> </p>
<p style="text-align: left;"><a title="Jacquard Discharge Paste" href="http://www.royaldesignstudio.com/collections/stencil-supplies/products/jacquard-discharge-paste"><img alt="Tips for how to stencil with Jacquard Discharge Paste via Royal Design Studio stencils" style="display: block; margin-left: auto; margin-right: auto;" src="//cdn.shopify.com/s/files/1/0094/1122/files/Stenciling-scarf-discharge-paste.jpg?8934"></a></p>
<p> </p>
<ul>
<li>
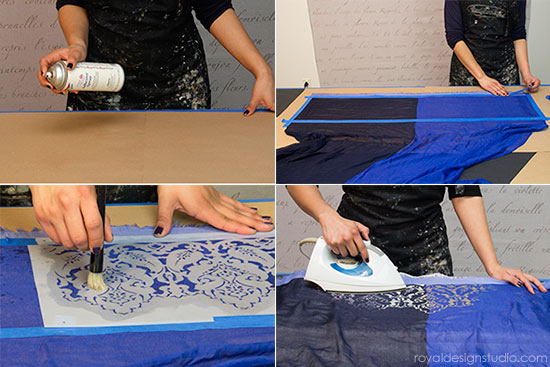
Sheer or thin fabrics can be secured to a working surface by applying a light misting of spray adhesive to paper that has been laid out on your surface. Lay your fabric carefully over a misted surface and secure additionally with tape.</li>
<li>Use a good iron! If your iron spits out water while you are ironing, it can dissolve some of the Discharge Paste that is present on the fabric, creating a discharged “water spot”.</li>
<li>If you find after ironing that your discharged areas are uneven, you can always go back and stencil more Discharge Paste on and iron again.</li>
<li>Because the Discharge Paste can be hard to see on some fabrics, it can be difficult to properly line up your stencil repeat with an allover pattern. If you wish, you can stencil one repeat, let it dry, and then iron it to reveal a strong pattern before continuing to stencil additional repeats.</li>
</ul><p> </p>
<h3><strong>Discharge Paste Safety Precautions</strong></h3>
<ul>
<li>Discharge Paste is fairly safe to use, but DOES give off a strong odor as it is ammonia-based.</li>
<li>Always use in a well-ventilated area and/or wear a safety mask designed to project from fume inhalation.</li>
<li>Avoid prolonged contact with skin and avoid any contact with eyes.</li>
<li>Do not apply by spraying.</li>
<li>Do NOT ever mix Discharge Paste with bleach or any other medium.</li>
</ul><p> </p>
<p>You can find <a href="http://www.royaldesignstudio.com/collections/stencil-supplies/products/jacquard-discharge-paste" title="Jacquard Discharge Paste">Jacquard Discharge Paste in our store here</a></p>
<p><a href="#temp_created_link"> </a></p>
<p>Check out these Stencil Projects Using Jacquard Discharge Paste:</p>
<p><a title="Tribal Batik Stenciled Place Mats" href="http://www.royaldesignstudio.com/blogs/how-to-stencil/12265713-how-to-stencil-tribal-batik-place-mats-with-discharge-paste">Tribal Batik Place Mats with Discharge Paste</a></p>
<p> </p>
<p> </p>]]>
    </content>
  </entry>
  <entry>
    <id>http://www.royaldesignstudio.com/blogs/how-to-stencil/12265713-how-to-stencil-tribal-batik-place-mats-with-discharge-paste</id>
    <published>2014-02-14T14:12:37-08:00</published>
    <updated>2015-01-14T15:36:05-08:00</updated>
    <link rel="alternate" type="text/html" href="http://www.royaldesignstudio.com/blogs/how-to-stencil/12265713-how-to-stencil-tribal-batik-place-mats-with-discharge-paste"/>
    <title>How to Stencil: Tribal Batik Place Mats with Discharge Paste</title>
    <author>
      <name>MELANIE ROYALS</name>
    </author>
    <summary type="html">
      <![CDATA[<div style="text-align: left;"><img alt="stencil discharge paste" src="//cdn.shopify.com/s/files/1/0094/1122/files/African-Tribal-Placemats-t_compact.jpg?8928"></div><p><a class="read-more" href="http://www.royaldesignstudio.com/blogs/how-to-stencil/12265713-how-to-stencil-tribal-batik-place-mats-with-discharge-paste">More</a></p>]]>
    </summary>
    <content type="html">
      <![CDATA[<p><img style="display: block; margin-left: auto; margin-right: auto;" src="//cdn.shopify.com/s/files/1/0094/1122/files/How-to-stencil-discharge-paste.jpg?8927"></p>
<p> </p>
<p>Set a festive table with Batik Tribal place mats stenciled with Jacquard Discharge Paste. This is SUCH AND EASY and fun technique that you can use on DIY stenciled fabric and clothing projects. We took some plain place mats and napkins we found at <a title="Pier 1" target="_blank" href="http://www.pier1.com/">Pier 1 Imports</a> and transformed them with one of our many <a title="African Stencils " href="http://www.royaldesignstudio.com/collections/african-stencils">African Stencils</a>. Read on to see how it's done!</p>
<p> </p>
<p><img style="display: block; margin-left: auto; margin-right: auto;" src="//cdn.shopify.com/s/files/1/0094/1122/files/stenciling-placemats-and-napkins.jpg?8926"></p>
<p> </p>
<p>We found these colorful <a title="Pier 1" href="http://www.pier1.com/dining-entertaining/table_linens,default,sc.html?cgid=table_linens&amp;nav=left">place mats and napkins at Pier 1 Imports</a> and were thrilled to find that our new African Tribal Batik Furniture stencil fit them too a T!</p>
<p> </p>
<p><img style="display: block; margin-left: auto; margin-right: auto;" src="//cdn.shopify.com/s/files/1/0094/1122/files/Supplies-stenciling-discharge-paste.jpg?8926"></p>
<p> </p>
<p> </p>
<p><strong>Supplies for this Stencil Project:</strong></p>
<ul>
<li><a title="African Tribal Batik Furniture Stencil" href="http://www.royaldesignstudio.com/collections/african-stencils/products/tribal-batik-furniture-stencil">African Tribal Batik Furniture Stencil</a></li>
<li><a title="Jacquard Discharge Paste" href="http://www.royaldesignstudio.com/collections/stencil-supplies/products/jacquard-discharge-paste">Jacquard Discharge Paste</a></li>
<li><a title="Best Stencil Brushes from Royal Design Studio" href="http://www.royaldesignstudio.com/collections/stencil-brushes">1.5" Stencil Brush</a></li>
<li>Bounty Paper Towels</li>
<li>Tape</li>
<li>Steam Iron</li>
<li>Cotton Place Mats and Napkins</li>
</ul><p> </p>
<p><a title="African Tribal Batik Furniture Stencil" href="http://www.royaldesignstudio.com/collections/new-stencil-designs/products/tribal-batik-furniture-stencil"><img style="display: block; margin-left: auto; margin-right: auto;" src="//cdn.shopify.com/s/files/1/0094/1122/files/Stencil-with-discharge-paste-1.jpg?8926"></a></p>
<p> </p>
<p><strong>Step 1:</strong> Tape off around the edge of your place mats along the seam, so that you can stencil just the inside area with Jacquard Discharge Paste. The Discharge Paste can be stenciled just as you would use any other stencil paint medium. Load just the tips of the stencil brush with Discharge Paste and offload excess paste onto Bounty Paper Towels. Apply through the stencil with a swirling motion. Go over each area 2-3 times to ensure that you are getting full coverage with the Discharge Paste. Allow the paste to dry completely-about 20 minutes.</p>
<p> </p>
<p><a title="African Tribal Batik Furniture Stencil" href="http://www.royaldesignstudio.com/collections/new-stencil-designs/products/tribal-batik-furniture-stencil"><img style="display: block; margin-left: auto; margin-right: auto;" src="//cdn.shopify.com/s/files/1/0094/1122/files/Stenciling-with-discharge-paste-2.jpg?8926"></a></p>
<p> </p>
<p><strong>Step 2:</strong> After the stenciling has dried, "discharge" the dye from the fabric using a steam iron on the highest possible setting for your fabric. Iron each area until the color removal is complete. Depending on your fabric, this can take up to 10 minutes. The Discharge Paste is ammonia based, and will give off an odor. Always use Discharge Paste with good ventilation and consider wearing an appropriate respirator mask for further protection.</p>
<p> </p>
<p><a title="African Tribal Batik Furniture Stencil" href="http://www.royaldesignstudio.com/collections/new-stencil-designs/products/tribal-batik-furniture-stencil"><img style="display: block; margin-left: auto; margin-right: auto;" src="//cdn.shopify.com/s/files/1/0094/1122/files/Stenciling-napkins-discharge-paste.jpg?8926"></a></p>
<p> </p>
<p><strong>Step 3:</strong> To create a coordinating accent on the corners of the napkins, tape off the square portion of the stencil pattern and stencil it in each corner of the napkin. Let dry and steam iron as in Step 2 above.</p>
<p> </p>
<p><img style="display: block; margin-left: auto; margin-right: auto;" src="//cdn.shopify.com/s/files/1/0094/1122/files/Discharge-Paste-stenciling-placemats.jpg?8946"></p>
<p> </p>
<p>We stenciled six different colors of place mats and coordinating napkins and arranged them here so that the napkin colors provided some contrast to the place mats below.</p>
<p>It is important to note that the Jacquard Discharge Paste will react differently with different fabrics, depending on the original fabric color AND the type of commercial dye that was used. Whenever possible, test a small inconspicuous area to see what your final result will be. There are NO guarantees with this technique BUT it does open the door to MANY fun possibilities for fabric accessories around the the house as well as stenciled shirts, jeans, and more!</p>
<p> </p>
<p>Be sure to check out our <a title="Stencil with Discharge Paste" href="http://www.royaldesignstudio.com/blogs/how-to-stencil/12269389-stencil-basics-stenciling-with-discharge-paste">Stencil Basics: Stenciling with Discharge Paste</a> post for complete details and information on stenciling with Jacquard Discharge Paste.</p>
<p> </p>
<p> </p>
<p> </p>]]>
    </content>
  </entry>
  <entry>
    <id>http://www.royaldesignstudio.com/blogs/how-to-stencil/12181117-stencil-how-to-reverse-stenciling-and-gilding-on-glass</id>
    <published>2014-02-09T15:22:24-08:00</published>
    <updated>2015-01-14T15:40:44-08:00</updated>
    <link rel="alternate" type="text/html" href="http://www.royaldesignstudio.com/blogs/how-to-stencil/12181117-stencil-how-to-reverse-stenciling-and-gilding-on-glass"/>
    <title>Stencil How-to: Reverse Stenciling and Gilding on Glass</title>
    <author>
      <name>MELANIE ROYALS</name>
    </author>
    <summary type="html">
      <![CDATA[<img src="//cdn.shopify.com/s/files/1/0094/1122/files/How-to-reverse-gilding-on-glass-t_compact.jpg?8757"><p><a class="read-more" href="http://www.royaldesignstudio.com/blogs/how-to-stencil/12181117-stencil-how-to-reverse-stenciling-and-gilding-on-glass">More</a></p>]]>
    </summary>
    <content type="html">
      <![CDATA[<p style="text-align: left;"><a title="Royal Stencil Size" href="http://www.royaldesignstudio.com/collections/royal-stencil-size"><img alt="How to reverse stencil and gild on glass with Royal Stencil Size and gold leaf" style="display: block; margin-left: auto; margin-right: auto;" src="//cdn.shopify.com/s/files/1/0094/1122/files/How-to-reverse-gilding-on-glass.jpg?8751"></a></p>
<p> </p>
<p>In this stencil tutorial we share how easy it is to create a verre églomisé finish on glass using our Clear Royal Stencil Size. <b>Verre églomisé</b> is a French term that literally translates to "glass gilded" and refers to the process where the reverse side of glass is gilded with gold or other metal leaf. Our <a title="Clear Royal Stencil Size" href="http://www.royaldesignstudio.com/collections/royal-stencil-size/products/clear-stencil-size">Clear Royal Stencil Size</a>, with its gel-like formula is designed to make this technique easy to achieve with any of the <a title="Stencils from Royal Design Studio" href="http://www.royaldesignstudio.com/pages/stencils-stencil-supplies">stencils from Royal Design Studio</a>.</p>
<p>Read on to find out how to recreate this elegant look on glass tabletops, or for glass cabinet doors and even framed art pieces.</p>
<p> </p>
<p><strong>Stencil Supplies for this Project:</strong></p>
<ul>
<li><a title="Florence Tile Stencil" href="http://www.royaldesignstudio.com/products/large-florence-tile-wall-stencil">Large Florence Tile Stencil</a></li>
<li><a title="Royal Stencil Size" href="http://www.royaldesignstudio.com/collections/royal-stencil-size">Royal Stencil Size: Clear</a></li>
<li><a title="Metal Leaf for Gilding" href="http://www.royaldesignstudio.com/collections/metal-leaf">Gold Metal Leaf</a></li>
<li>Stencil Pouncer Tool</li>
<li><a title="Stencil Creme Paints from Royal Design Studio" href="http://www.royaldesignstudio.com/collections/stencil-cremes">Royal Stencil Crème: Flat Black</a></li>
<li>Modern Masters Dead Flat Varnish</li>
<li>Lambswool pad</li>
</ul>
<p> </p>
<p style="text-align: center;"><a title="Clear Royal Stencil Size" href="http://www.royaldesignstudio.com/collections/royal-stencil-size/products/clear-stencil-size"><img alt="How to stencil and gild on glass with a reverse stencil technique using Royal Stencil Size" src="//cdn.shopify.com/s/files/1/0094/1122/files/Reverse-Stencil-and-Gilding-Glass-1-4_e721c824-1256-4ed5-b5a2-0dcf63459488.jpg?8756"></a></p>
<p> </p>
<p><strong>Step 1:</strong> Clean your glass piece using glass cleaner or alcohol and a lint free rag or microfiber cloth.</p>
<p><strong>Step 2:</strong> We have found that the foam tipped stencil pouncer tools that are available in craft stores (such as Michaels) are ideal for this technique on glass.To use the stencil pouncer tool, dip the foam tip into the Clear Royal Stencil Size and pounce of the excess size onto paper towels. Apply the size through the stencil using a straight up and down pouncing motion.</p>
<p>Allow the Stencil Size to get "tacky", which will take approximately 15 minutes. You will know that the size has reached the right level of "tack" if you press your finger down on it and feel resistance and hear a "pop" as you pull your finger off quickly.</p>
<p><em> Note: You can also use a <a title="Best Stencil Brushes from Royal Design Studio" href="http://www.royaldesignstudio.com/collections/stencil-brushes">Stencil Brush from Royal Design Studio</a> if you carefully offload the excess size from your stencil brush before stenciling and use a light pressure. </em></p>
<p><strong>Step 3:</strong> Use a soft, natural bristle brush to lay and pounce sheets of <a title="Gold Metal Leaf" href="http://www.royaldesignstudio.com/collections/metallics-and-gilding/">Gold Metal Leaf</a> through the stencil on to the tacky size.</p>
<p><strong>Step 4:</strong> With the stencil still in place, burnish the size by pressing over it firmly with a lambswool pad or soft cotton cloth.</p>
<p> </p>
<p style="text-align: center;"><a title="Clear Royal Stencil Size" href="http://www.royaldesignstudio.com/collections/royal-stencil-size/products/clear-stencil-size"><img alt="How to stencil and gild on glass with a reverse stencil technique using Royal Stencil Size" src="//cdn.shopify.com/s/files/1/0094/1122/files/Reverse-Stencil-and-Gilding-Glass-5-8_77e870c8-d49e-41f8-ad37-9baf7672df9e.jpg?8757"></a></p>
<p> </p>
<p><strong>Step 5:</strong> Check your final effect with the leaf by looking at the stenciled leaf on the back of the glass and also turning the glass over to see how it will look through the front side of the glass.</p>
<p><strong>Step 6:</strong> Depending on how completely you covered the Stencil Size with the leaf, there may be some open areas between the pieces of leaf. For this technique we are "reverse stenciling", meaning that we are stenciling the layers as they will be seen through the glass from front to back. Adding a layer of black paint, such as<a title="Flat Black Stencil Creme" href="http://www.royaldesignstudio.com/collections/stencil-cremes/products/flat-black-stencil-creme"> Flat Black Stencil Creme</a>, with a stencil pouncing tool will fill in any open areas. It will also add depth and color behind and around the leaf when it is viewed from the top side of the glass.</p>
<p><strong>Step 7:</strong> Reverse stenciling on glass also means that the side of the glass we are stenciling on will not be touched or receive daily wear and tear. It is important to seal and protect it though, so that the glass can be cleaned of loose leaf and fingerprints before turning it over and installing it.</p>
<p>You can use any type of water-based varnish for this step. We just happened to use some Modern Masters Dead Flat Varnish we had on hand. Again, use the foam stencil pouncing tool to apply the varnish for best results. Allow the varnish to dry completely.</p>
<p><strong>Step 8:</strong> Clean the stenciled side of the glass with regular glass cleaner using a lint free towel or microfiber cloth.</p>
<p> </p>
<p style="text-align: center;"><a title="Florence Wall Tile Stencil" href="http://www.royaldesignstudio.com/products/large-florence-tile-wall-stencil"><img alt="How to stencil and gild on glass with a reverse stencil technique using Royal Stencil Size" src="//cdn.shopify.com/s/files/1/0094/1122/files/How-to-reverse-gilding-on-glass-table.jpg?8757"></a></p>
<p> </p>
<p>Viola! A verre églomisé finish on a glass tabletop! Because your stencil work is done on the reverse side of the glass, it is fully protected. Also, viewing the gilding through the thick glass gives it an interesting dimensional effect as well as adding to the overall rich look of the metal leaf.</p>
<p>This project represents just the beginning of the possibilities that can be achieved with reverse gilding on glass. Consider using different colors of metal leaf-even within the same stencil. Also, you can spray paint over the whole back of the glass in any color to provide a solid background that compliments the leaf.</p>
<p>Please feel free to share your OWN ideas in the comments below, and we always appreciated seeing and being able to share pictures of your projects. Please send them to projects(at)royaldesignstudio.com at any time!</p>
<p> </p>
<p><strong>Find more inspiring stencil tutorial using Royal Stencil Size here:</strong></p>
<ul>
<li><a title="Distressed Silver Cabinet Door" href="http://www.royaldesignstudio.com/blogs/how-to-stencil/12128081-stencil-how-to-using-royal-stencil-size-for-a-silver-accented-cabinet-door">Distressed Stenciled Silver Cabinet Door</a></li>
<li><a title="How to Gild a Frame" href="http://www.royaldesignstudio.com/blogs/how-to-stencil/12150489-how-to-gild-a-frame-with-royal-stencil-size">How to Gild a Frame with Royal Stencil Size</a></li>
<li><a title="Copper Gilded Flowers Wall Finish" href="http://www.royaldesignstudio.com/blogs/how-to-stencil/12150869-how-to-stencil-copper-leaf-hydrangea-wall-finish">Copper Gilded Floral Motifs Wall Finish</a></li>
</ul>]]>
    </content>
  </entry>
  <entry>
    <id>http://www.royaldesignstudio.com/blogs/how-to-stencil/12150869-how-to-stencil-copper-leaf-hydrangea-wall-finish</id>
    <published>2014-02-09T12:35:52-08:00</published>
    <updated>2015-01-14T15:40:44-08:00</updated>
    <link rel="alternate" type="text/html" href="http://www.royaldesignstudio.com/blogs/how-to-stencil/12150869-how-to-stencil-copper-leaf-hydrangea-wall-finish"/>
    <title>How to Stencil: Copper Leaf Hydrangea Wall Finish</title>
    <author>
      <name>MELANIE ROYALS</name>
    </author>
    <summary type="html">
      <![CDATA[<img src="//cdn.shopify.com/s/files/1/0094/1122/files/Copper-Leaf-Gilding-on-Wall-T_compact.jpg?8739"><p><a class="read-more" href="http://www.royaldesignstudio.com/blogs/how-to-stencil/12150869-how-to-stencil-copper-leaf-hydrangea-wall-finish">More</a></p>]]>
    </summary>
    <content type="html">
      <![CDATA[<p style="text-align: center;"><img src="//cdn.shopify.com/s/files/1/0094/1122/files/Copper-Leaf-Gilding-Stencils-on-Wall.jpg?8739" alt="How to stencil a copper leaf floral wall finish using Royal Stencil Size"></p>
<p> </p>
<p>Get ready to make your walls glimmer and glow! Here we show you how to stencil a rich allover wall treatment using randomly placed Japanese Hydrangea flower stencil motifs with copper metal leaf and our new Royal Stencil Size. The Royal Stencil Size is a special “glue” for metal leaf that comes in a clear formula, and also pre-tinted in Black and Red. Like our Royal Stencil Cremes, it features a thick, creamy finish. This allows you to apply the size through the stencil easily and cleanly, wait a few minutes, and then apply the metal leaf of your choice through the stencil to create a crisp, gilded design. </p>
<p> </p>
<p>This copper leaf wall finish features our Black Royal Stencil Size with a broken leaf technique that allows some of the black background to show through, creating more depth and interest. A large floral stencil motif is used randomly on the wall here to create a unique allover pattern that would be ideal for a stenciled feature wall or even a whole room wall finish. </p>
<p> </p>
<p style="text-align: left;"><a href="http://www.royaldesignstudio.com/products/japanese-hydrangea-floral-stencil" title="Japanese Hydrangea Floral Stencil"><img style="display: block; margin-left: auto; margin-right: auto;" src="//cdn.shopify.com/s/files/1/0094/1122/files/Copper-Leaf-Gilding-Stencils-on-Wall-Supplies.jpg?8740" alt="Stenciling supplies for how to stencil a copper leaf floral wall finish using Royal Stencil Size"></a></p>
<p> </p>
<p><strong>Stencil Supplies you will need for this project:</strong></p>
<ul>
<li><a href="http://www.royaldesignstudio.com/products/japanese-hydrangea-floral-stencil" title="Japanese Hydrangea Floral Stencil">Large Japanese Hydrangea Floral Stencil</a></li>
<li><a href="http://www.royaldesignstudio.com/collections/stencil-brushes/products/1-1-2-stencil-brush" title="Stencil Brush">1.5" Stencil Brush</a></li>
<li><a href="http://www.royaldesignstudio.com/collections/royal-stencil-size" title="Royal Stencil Size">Black Royal Stencil Size</a></li>
<li><a href="http://www.royaldesignstudio.com/collections/metal-leaf" title="Metal Leaf for Gilding">Copper Leaf</a></li>
<li><a href="http://www.royaldesignstudio.com/collections/stencil-brushes/products/super-large-3-stencil-wax-brush" title='Large 3" Stencil Brush'>Large 3" Stencil/Wax Brush</a></li>
<li><a href="http://www.royaldesignstudio.com/collections/annie-sloan-wax/products/annie-sloan-soft-wax-clear" title="Annie Sloan Soft Wax">Annie Sloan Soft Wax</a></li>
<li>Painters Tape</li>
<li>Paper Towels</li>
<li>Lambswool Pad</li>
<li><a href="http://www.royaldesignstudio.com/collections/stencil-brushes/products/motsenbachers-lift-off-5" title="Latex Paint Remover">Motsenbocker’s Lift Off Latex Paint Remover</a></li>
<li>Scrub Brush</li>
</ul><p><span>You can start with any wall color painted in a good quality flat or eggshell latex paint.  In this case, we painted 2 coats of </span><span></span><a href="http://www.royaldesignstudio.com/collections/annie-sloan-chalk-paint-collection/" title="Chalk Paint® Decorative Paint">Chalk Paint® Decorative Paint</a><span> in the color Olive.</span></p>
<p> </p>
<p><span>For this finish we have chosen to take a large stencil motif and repeat it randomly. This will require some designing on your part, but it is really quite easy. We recommend starting in the middle of the wall and working out from there, turning the stencil as you go</span></p>
<p> </p>
<p style="text-align: center;"><a href="http://www.royaldesignstudio.com/products/japanese-hydrangea-floral-stencil" title="Japanese Hydrangea Floral Stencil"><img src="//cdn.shopify.com/s/files/1/0094/1122/files/Copper-Leaf-Gilding-Stencils-on-Wall-1.jpg?8741" alt="Stenciling with Royal Stencil Size for a copper leaf wall finish"></a></p>
<p> </p>
<p> </p>
<p><strong>Step 1:</strong> Apply the Royal Stencil Size through the stencil with a basic "dry-brush" stencil technique. Load just the tips of the stencil brush with Royal Stencil Size and offload excess onto paper towels using a hard circular motion. Stencil the size through the stencil with a light, circular motion to apply the size evenly.</p>
<p> </p>
<p>Stencil one layer of size though 3 or 4 Japanese Hydrangea stencil repeats. Then go back and stencil a second layer of size through each one again. After two coats, the Stencil Size will achieve the right level of "tackiness" for applying the leaf after about 15 minutes, so you can keep moving through each stenciled element in order to apply the 2 layers of Stencil Size and then move on to applying the Copper Leaf in Step 2.  </p>
<p>You will repeat this same process to complete the stenciling of 3 or 4 repeats as you move across the wall.</p>
<p> </p>
<p style="text-align: center;"><a href="http://www.royaldesignstudio.com/products/japanese-hydrangea-floral-stencil" title="Japanese Hydrangea Floral Stencil"><img src="//cdn.shopify.com/s/files/1/0094/1122/files/Copper-Leaf-Gilding-Stencils-on-Wall-2.jpg?8742" alt="Gilding with Royal Stencil Size and copper leaf for a gilded wall finish"></a></p>
<p> </p>
<p><strong>Step 2:</strong> Replace the stencil over the first motif and apply the copper leaf in a broken manner through the stencil to leave some of the Black Royal Stencil Size showing through. Do this by removing a sheet of copper leaf from the book and breaking it into smaller pieces as you  place it through the stencil.</p>
<p><span style="line-height: 1.2;"> </span></p>
<p style="text-align: center;"><a href="http://www.royaldesignstudio.com/products/japanese-hydrangea-floral-stencil" title="Japanese Hydrangea Floral Stencil"><img src="//cdn.shopify.com/s/files/1/0094/1122/files/Copper-Leaf-Gilding-Stencils-on-Wall-3.jpg?8743" alt="Gilding with Royal Stencil Size and copper leaf for a gilded wall finish"></a></p>
<p> </p>
<p><strong>Step 3:</strong> Use a lambswool pad (purchased from the paint department at Home Depot or Lowes) to press and buff the leaf into place. Alternatively you can use a soft cotton rag or even the flat of your hand. As you burnish the leaf it will continue to break down into smaller piece, filling in more of the exposed black areas. </p>
<p> </p>
<p style="text-align: center;"><a href="http://www.royaldesignstudio.com/products/japanese-hydrangea-floral-stencil" title="Japanese Hydrangea Floral Stencil"><img src="//cdn.shopify.com/s/files/1/0094/1122/files/Copper-Leaf-Gilding-Stencils-on-Wall-4.jpg?8744" alt="How to clean a stencil after using Royal Stencil Size"></a>.</p>
<p> </p>
<p><strong>Step 4:</strong> Remove the stencil and clean before moving on in to the second set of repeats. The easiest and fastest way to clean the stencil is to lay it on a flat surface. This could be a plastic covered tabletop, large sink, or even a bathtub. Spray the dirty stencil with Motsenbocker's Lift Off and let it set for a minute or so</p>
<p> </p>
<p style="text-align: center;"><a href="http://www.royaldesignstudio.com/products/japanese-hydrangea-floral-stencil" title="Japanese Hydrangea Floral Stencil"><img src="//cdn.shopify.com/s/files/1/0094/1122/files/Copper-Leaf-Gilding-Stencils-on-Wall-5.jpg?8745" alt="How to clean a stencil after gilding with Royal Stencil Size"></a></p>
<p> </p>
<p><strong>Step 5:</strong> A scrub brush makes it easy to clean the stencil quickly and will not damage the stencil by bending any of the tiny points or pieces in the pattern. Scrub with a hard pressure on both sides of the stencil.</p>
<p> </p>
<p style="text-align: center;"><a href="http://www.royaldesignstudio.com/products/japanese-hydrangea-floral-stencil" title="Japanese Hydrangea Floral Stencil"><img src="//cdn.shopify.com/s/files/1/0094/1122/files/Copper-Leaf-Gilding-Stencils-on-Wall-6.jpg?8746" alt="How to clean a stencil after stenciling with Royal Stencil Size"></a></p>
<p> </p>
<p><strong>Step 6:</strong> Rinse the stencil off and pat dry with a towel before continuing on the wall.</p>
<p> </p>
<p style="text-align: center;"><a href="http://www.royaldesignstudio.com/collections/annie-sloan-wax/products/annie-sloan-soft-wax-clear" title="Annie Sloan Soft Wax"><img src="//cdn.shopify.com/s/files/1/0094/1122/files/Copper-Leaf-Gilding-Stencils-on-Wall-7.jpg?8747" alt="How to use Annie Sloan Soft Wax"></a></p>
<p> </p>
<p> </p>
<p><strong>Step 7:</strong> If it is left unsealed, copper leaf can tarnish over time, especially in a humid environment. Copper leaf (and gold leaf) can be sealed with shellac, oil-based polyurethane, or wax. Here, we demonstrate an easy way to seal the stenciled floral elements with wax.</p>
<p>Load a large stencil/wax brush with just a SMALL amount of wax on the tips of the brush and offload any excess wax off the brush by rubbing in a hard circular motion onto paper towels. </p>
<p> </p>
<p style="text-align: center;"><a href="http://www.royaldesignstudio.com/products/japanese-hydrangea-floral-stencil" title="Japanese Hydrangea Floral Stencil"><img src="//cdn.shopify.com/s/files/1/0094/1122/files/Copper-Leaf-Gilding-Stencils-on-Wall-8.jpg?8748" alt="How to use Annie Sloan Soft Wax to protect a copper leaf stenciled finish"></a></p>
<p> </p>
<p><strong>Step 8:</strong> Replace a clean stencil over the stenciled elements and use a light pressure to swirl a thin layer of wax through the stencil. Repeat this over each of the stenciled element.</p>
<p> </p>
<p style="text-align: center;"><a href="http://www.royaldesignstudio.com/products/japanese-hydrangea-floral-stencil" title="Japanese Hydrangea Floral Stencil"><img src="//cdn.shopify.com/s/files/1/0094/1122/files/Copper-Leaf-Gilding-Stencils-on-Wall-9.jpg?8749" alt="Buffing Annie Sloan Soft Wax on a copper gilded stencil "></a></p>
<p> </p>
<p><strong>Step 9:</strong> Once the wax has dried, replace the stencil one more time and buff the wax with a piece of lambswool pad or a soft cotton rag. The wax will not only seal the leaf but will add more depth to the overall look.</p>
<p> </p>
<p style="text-align: center;"><a href="http://www.royaldesignstudio.com/products/japanese-hydrangea-floral-stencil" title="Japanese Hydrangea Floral Stencil"><img src="//cdn.shopify.com/s/files/1/0094/1122/files/Copper-Leaf-Gilding-Stencils-Wall-Stencils-final.jpg?8750" alt="How to stencil a copper leaf floral wall finish using Royal Stencil Size"></a></p>
<p> </p>
<p>The final gilded stencil finish in a room setting is quite dramatic and dazzling. You can use this same technique with different colors of metal leaf and size. Consider translating this idea to stenciled furniture or even a medallion stencil on a ceiling from our <a href="http://www.royaldesignstudio.com/collections/ceiling-stencils" title="Ceiling Stencils">Ceiling Stencil Collection</a>.</p>
<p> </p>
<p><strong>See more How-to Tutorials on how to use Royal Stencil Size:</strong></p>
<p><a href="http://www.royaldesignstudio.com/blogs/how-to-stencil/12150489-how-to-gild-a-frame-with-royal-stencil-size" title="How to Gild a Frame">How to Gild a Frame with Gold Leaf and Royal Stencil Size</a></p>
<p><a href="http://www.royaldesignstudio.com/blogs/how-to-stencil/12128081-stencil-how-to-using-royal-stencil-size-for-a-silver-accented-cabinet-door" title="Silver Stenciled Cabinet Door">Distressed Stenciled Silver Cabinet Finish</a></p>
<p><a title="Reverse Stenciling Gilding Glass" href="http://www.royaldesignstudio.com/blogs/how-to-stencil/12181117-stencil-how-to-reverse-stenciling-and-gilding-on-glass">Reverse Stenciled and Gilded Glass with Royal Stencil Size</a></p>]]>
    </content>
  </entry>
  <entry>
    <id>http://www.royaldesignstudio.com/blogs/how-to-stencil/12150489-how-to-gild-a-frame-with-royal-stencil-size</id>
    <published>2014-02-08T12:40:33-08:00</published>
    <updated>2015-01-14T15:40:44-08:00</updated>
    <link rel="alternate" type="text/html" href="http://www.royaldesignstudio.com/blogs/how-to-stencil/12150489-how-to-gild-a-frame-with-royal-stencil-size"/>
    <title>How to Gild a Frame with Royal Stencil Size</title>
    <author>
      <name>MELANIE ROYALS</name>
    </author>
    <summary type="html">
      <![CDATA[<img src="//cdn.shopify.com/s/files/1/0094/1122/files/How-to-gild-a-frame-T_compact.jpg?8750"><p><a class="read-more" href="http://www.royaldesignstudio.com/blogs/how-to-stencil/12150489-how-to-gild-a-frame-with-royal-stencil-size">More</a></p>]]>
    </summary>
    <content type="html">
      <![CDATA[<p style="text-align: left;"><a title="Royal Stencil Size" href="http://www.royaldesignstudio.com/collections/royal-stencil-size"><img alt="How to gild a frame with Royal Stencil Size and Gold Leaf" style="display: block; margin-left: auto; margin-right: auto;" src="//cdn.shopify.com/s/files/1/0094/1122/files/How-to-Gild-a-Frame.jpg?8736"></a></p>
<p> </p>
<p>Our <a title="Royal Stencil Size" href="http://www.royaldesignstudio.com/collections/royal-stencil-size">Royal Stencil Size medium</a> is designed to allow you to add metal leaf or Metallic Foils to stencil patterns in way that is fast, fun, and easy! But, it is also PERFECT for gilding furniture, frames, and molding as well.<strong> Royal Stencil Size features a thick, creamy formula</strong> and it comes in Clear, Black, and Red. The <a title="Red Stencil Size" href="http://www.royaldesignstudio.com/collections/royal-stencil-size/products/red-stencil-size">Red Stencil Size</a> is heavily pigmented in a red "bole" color, which is the classic color used behind traditional gold leafing. In this tutorial we show you how to transform a "blah" store bought picture frame with shimmery gold leaf in a matter of minutes. Really, it's THAT easy!! Read on to find out....</p>
<p> </p>
<p style="text-align: left;"><a title="Royal Stencil Size" href="http://www.royaldesignstudio.com/collections/royal-stencil-size"><img alt="Supplies for How to gild a frame with Royal Stencil Size and Gold Leaf" style="display: block; margin-left: auto; margin-right: auto;" src="//cdn.shopify.com/s/files/1/0094/1122/files/How-to-gild-a-frame-supplies.jpg?8736"></a></p>
<p> </p>
<p>Supplies you will need for this project:</p>
<ul>
<li><a href="http://www.royaldesignstudio.com/collections/royal-stencil-size" title="Royal Stencil Size">Royal Stencil Size: Red</a></li>
<li><a href="http://www.royaldesignstudio.com/collections/metal-leaf" title="Gold Metal Leaf">Gold Metal Leaf</a></li>
<li>Painter’s Tape</li>
<li>Paper Towels</li>
<li>Artist’s Brush</li>
<li><a href="http://www.royaldesignstudio.com/products/annie-sloan-soft-wax-dark" title="Annie Sloan Soft Wax Dark">Annie Sloan Soft Wax Dark</a></li>
<li>Lambs Wool Pad</li>
<li>Soft Natural Bristle Brush</li>
</ul>
<p> </p>
<ul></ul>
<p style="text-align: left;"><a title="Royal Stencil Size" href="http://www.royaldesignstudio.com/collections/royal-stencil-size"><img alt="How to gild a frame with Royal Stencil Size and Gold Leaf" style="display: block; margin-left: auto; margin-right: auto;" src="//cdn.shopify.com/s/files/1/0094/1122/files/How-to-gild-a-frame-tape.jpg?8736"></a></p>
<p style="text-align: left;"> </p>
<p> </p>
<p><strong>Step 1:</strong> If  you are working on a frame that holds a print or image you want to keep and it is not easy to remove it, you can simply tape off the glass from your frame to protect it from the size.</p>
<p> </p>
<p style="text-align: center;"><a title="Royal Stencil Size" href="http://www.royaldesignstudio.com/collections/royal-stencil-size"><img alt="How to gild a frame with Royal Stencil Size and Gold Leaf" src="//cdn.shopify.com/s/files/1/0094/1122/files/How-to-gild-a-frame-stencil-size.jpg?8736"></a></p>
<p> </p>
<p><strong>Step 2:</strong> Using an artist's brush, small bristle brush, or foam brush, paint the frame with a single, even coat of the Red Stencil Size. The tinted size provides excellent color coverage so one coat should be all that is necessary. Let it set for 15-30 minutes (approx.) until the size becomes "tacky", not wet. You can test this by pressing your finger onto the size and pulling away quickly. If you feel some resistance, and here a "pop", the size is ready to accept the gold leaf.</p>
<p> </p>
<p style="text-align: center;"><a title="Royal Stencil Size" href="http://www.royaldesignstudio.com/collections/royal-stencil-size"><img alt="How to gild a frame with Royal Stencil Size and Gold Leaf" src="//cdn.shopify.com/s/files/1/0094/1122/files/Apply_Leaf_3.jpg?8737"></a></p>
<p> </p>
<p><strong>Step 3:</strong> This project uses imitation gold leaf, also known as <a href="http://www.royaldesignstudio.com/collections/metal-leaf/products/gold-leaf" title="Gold Metal Leaf">Dutch Metal Gold Leaf</a>. It comes in a "book" of 25 sheets of 5.5" squares. It is not as delicate as real gold leaf, and can be handled in your hands fairly easily, though some people prefer to wear cotton gloves to keep the oil from their fingers from transferring to the leaf. Here we show using a soft, natural bristle brush to tap the leaf into the recessed areas of the frame, and are applying the leaf intentionally to let some of the background show through. If you want to apply a solid layer of the gold leaf, you can do that by simply filling in any "gaps" with additional leaf. </p>
<p> </p>
<p style="text-align: center;"><a title="Royal Stencil Size" href="http://www.royaldesignstudio.com/collections/royal-stencil-size"><img alt="How to gild a frame with Royal Stencil Size and Gold Leaf" src="//cdn.shopify.com/s/files/1/0094/1122/files/How-to-gild-a-frame-burnish.jpg?8737"></a></p>
<p> </p>
<p><strong>Step 4:</strong> Once you have achieved the coverage you want with the leaf you can burnish it with a soft cotton cloth or a piece of lambswool. You can usually find lambswool in the paint department at Home Depot or Lowes. Burnishing will adhere the leaf better to the size and also remove the excess bits of leaf. Note that as the leaf breaks down into smaller particles (even dust) it will fill in the open areas even more.</p>
<p> </p>
<p style="text-align: left;"><a title="Royal Stencil Size" href="http://www.royaldesignstudio.com/collections/royal-stencil-size"><img alt="How to gild a frame with Royal Stencil Size and Gold Leaf" style="display: block; margin-left: auto; margin-right: auto;" src="//cdn.shopify.com/s/files/1/0094/1122/files/How-to-gild-a-frame-waxing.jpg?8737"></a></p>
<p> </p>
<p><strong>Step 5:</strong> Both composition Gold Leaf and Copper Leaf need to be sealed, not only for protection but to keep them from tarnishing over time. You can seal with shellac, oil-based polyurethane (spray or brush), or with clear or tinted wax. In this case we wanted to give the frames a more antiqued look, so sealed with a coat of <a title="Annie Sloan Soft Wax" href="http://www.royaldesignstudio.com/products/annie-sloan-soft-wax-dark">Annie Sloan Soft Wax in Dark</a>.</p>
<p>Apply a thin layer of wax overall with a wad of cheesecloth, and burnish with a soft cloth or lambswool after it has dried to the touch.</p>
<p> </p>
<p style="text-align: center;"><img alt="Gold Leafing. How to gild a frame with Royal Stencil Size and Gold Leaf" src="//cdn.shopify.com/s/files/1/0094/1122/files/How-to-Gild-a-Frame-final.jpg?8737"></p>
<p> </p>
<p>The finished gilded frames look SO much more elegant and interesting than the originals! Now that you know how simple it is to gild with Royal Stencil Size and <a title="Metal Leaf for Gilding" href="http://www.royaldesignstudio.com/collections/metal-leaf">Metal Leaf</a> we're sure you will find MANY uses for this technique on craft and furniture projects around your house.</p>
<p> </p>
<p><strong>Find out how to use Royal Stencil Size for gilding with stencil patterns here:</strong></p>
<p><a title="Stenciled Silver Leaf" href="http://www.royaldesignstudio.com/blogs/how-to-stencil/12128081-stencil-how-to-using-royal-stencil-size-for-a-silver-accented-cabinet-door">Stenciled Cabinet Door with Antique Silver Leaf</a></p>
<p><a title="Copper Gilded Flowers Wall Finish" href="http://www.royaldesignstudio.com/blogs/how-to-stencil/12150869-how-to-stencil-copper-leaf-hydrangea-wall-finish">Copper Leaf Floral Wall Finish</a></p>
<p><a title="Reverse Stenciling Gilding Glass" href="http://www.royaldesignstudio.com/blogs/how-to-stencil/12181117-stencil-how-to-reverse-stenciling-and-gilding-on-glass">Reverse Stenciled and Gilded Glass</a></p>
<br>
<p> </p>]]>
    </content>
  </entry>
  <entry>
    <id>http://www.royaldesignstudio.com/blogs/how-to-stencil/12128081-stencil-how-to-using-royal-stencil-size-for-a-silver-accented-cabinet-door</id>
    <published>2014-02-07T18:08:19-08:00</published>
    <updated>2015-01-14T15:40:44-08:00</updated>
    <link rel="alternate" type="text/html" href="http://www.royaldesignstudio.com/blogs/how-to-stencil/12128081-stencil-how-to-using-royal-stencil-size-for-a-silver-accented-cabinet-door"/>
    <title>Stencil How-to: Using Royal Stencil Size for a Silver Accented Cabinet Door</title>
    <author>
      <name>MELANIE ROYALS</name>
    </author>
    <summary type="html">
      <![CDATA[<img src="//cdn.shopify.com/s/files/1/0094/1122/files/Stenciled-Cabinet-Door-with-Silver-Leaf-T_compact.jpg?8728"><p><a class="read-more" href="http://www.royaldesignstudio.com/blogs/how-to-stencil/12128081-stencil-how-to-using-royal-stencil-size-for-a-silver-accented-cabinet-door">More</a></p>]]>
    </summary>
    <content type="html">
      <![CDATA[<p style="text-align: left;"><a title="Royal Stencil Size" href="http://www.royaldesignstudio.com/collections/royal-stencil-size"><img alt="How to stencil and gild with Royal Stencil Size over Chalk Paint® decorative paint" style="display: block; margin-left: auto; margin-right: auto;" src="//cdn.shopify.com/s/files/1/0094/1122/files/Royal-Stencil-Size-Cabinet-How-to.jpg?8706"></a></p>
<p> </p>
Our <a title="Chalk Paint® decorative paint" href="http://www.royaldesignstudio.com/collections/annie-sloan-chalk-paint-collection/">Signature Royal Stencil Size gilding medium</a> is designed to make it easy for you to add gilded accents to your stenciled furniture, wall, and ceiling projects!
<p>Here, we show you how to use our pre-tinted Black Royal Stencil Size and<a title="Butterfly Kisses Furniture Stencil" href="http://www.royaldesignstudio.com/products/butterfly-kisses-furniture-stencil"> Chalk Paint® Decorative Paint</a> to create a beautiful antiqued pattern finish on a cabinet door. The Black Stencil Size makes it fast and easy to add both a black color AND gilding size to an area in one quick step. The Royal Stencil Size offers amazing coverage and <span style="color: #000000;">sets up for gilding quickly, so you can get your project done faster.</span> Not just for stenciling, it's ideal for adding gilded details to moldings and other small areas as you'll see in this tutorial. Read on! <br><br></p>
<p style="text-align: left;"><a title="Chalk Paint® decorative paint " href="http://www.royaldesignstudio.com/collections/annie-sloan-chalk-paint-collection/"><img alt="Stencil Supplies for how to stencil with Royal Stencil Size over Chalk Paint" style="display: block; margin-left: auto; margin-right: auto;" src="//cdn.shopify.com/s/files/1/0094/1122/files/Stencil-Supplies_559f6cf3-12d4-42a3-ba8a-54429d91db23.jpg?8706"></a></p>
<p> </p>
<p><strong>Stencil Supplies for This Project</strong></p>
<ul>
<li><a title="Chalk Paint® French Linen" href="http://www.royaldesignstudio.com/collections/annie-sloan-chalk-paint-collection/products/french-linen-annie-sloan-chalk-paint">Butterfly Kisses Furniture Stencil</a></li>
<li><a title="Royal Stencil Size" href="http://www.royaldesignstudio.com/collections/royal-stencil-size/products/black-stencil-size">Black Royal Stencil Size</a></li>
<li><a title="Stencil Brush" href="http://www.royaldesignstudio.com/collections/stencil-brushes/products/1-stencil-brush">1” Stencil Brush</a></li>
<li>
<a title="Aluminum Silver Leaf" href="http://www.royaldesignstudio.com/collections/metallics-and-gilding/products/imitation-silver-leaf">Aluminum Leaf (Imitation Silver</a>)</li>
<li>Chalk Paint® Decorative Paint: <a title="Chalk Paint® in Graphite" href="http://www.royaldesignstudio.com/collections/annie-sloan-chalk-paint-collection/products/graphite-annie-sloan-chalk-paint">Graphite</a>, <a title="Foam Roller Stencil Supplies" href="http://www.royaldesignstudio.com/collections/stencil-rollers">French Linen</a>
</li>
<li><a title="Stain and Stain" href="http://www.royaldesignstudio.com/collections/stain-and-seal/products/van-dyke-brown-stain-and-seal">Foam Roller / Tray</a></li>
<li>Small Artist’s Brush</li>
<li><a title="Cheese Cloth" href="http://www.royaldesignstudio.com/products/cheese-cloth">Van Dyke Stain &amp; Seal</a></li>
<li>So Slow Extender for Stain &amp; Seal</li>
<li>1” Blue Painter’s Tape</li>
<li><a title="Stain and Stain" href="http://www.royaldesignstudio.com/collections/stain-and-seal">Cheesecloth</a></li>
<li>400-grit Sandpaper</li>
</ul><p style="text-align: left;"><a title="Chalk Paint® Decorative Paint" href="http://www.royaldesignstudio.com/collections/annie-sloan-chalk-paint-collection/"><img alt="Cabinet Door tutorial. Using Chalk Paint" style="display: block; margin-left: auto; margin-right: auto;" src="//cdn.shopify.com/s/files/1/0094/1122/files/Paint-with-Chalk-Paint.jpg?8706"></a></p>
<p> </p>
<p><strong>Step 1:</strong> Paint the cabinet door with 1-2 coats of Chalk Paint in Graphite using a brush or foam roller. Allow to dry between coats and after final coat. Once dry, use Painter’s Tape to tape off the areas of the door or molding that you want remain the Graphite color.</p>
<p><strong>Step 2:</strong> Use a 4” foam roller to paint 2 coats of Chalk Paint® in French Linen on the exposed areas. Allow to dry.</p>
<p> </p>
<p style="text-align: left;"><a title="Royal Stencil Size" href="http://www.royaldesignstudio.com/collections/royal-stencil-size"><img alt="How to stencil over Chalk Paint with Royal Stencil Size from Royal Design Studio" style="display: block; margin-left: auto; margin-right: auto;" src="//cdn.shopify.com/s/files/1/0094/1122/files/Stencil-Size.jpg?8706"></a></p>
<p> </p>
<p><strong>Step 3:</strong> Center an allover stencil pattern in the raised panel area of the door. Stencil the pattern with the Black Royal Stencil Size. Royal Stencil Size is best applied through a stencil using a "Dry Brush" stenciling method. To Dry Brush, simply load the tips of the brush with Stencil Size and offload onto paper towels before applying through the stencil. Stencil Size is best applied in 2 thin coats, especially over a porous surface such as Chalk Pant®.</p>
<p>For this project, we repeated the stencil over the whole panel area and then went back to the original starting point and added a second coat. Allow the size to come "to tack" for approximately 15 minutes. If the size is too wet, the metal leaf will not stick well. Conversely, if the size is too dry, the leaf will not stick well. Depending on environmental conditions, i.e. heat, humidity, surface, you will have an approximate good working time of 30-60 minutes once the Stencil Size has come to proper "tack".</p>
<p> </p>
<p style="text-align: left;"><a title="Butterfly Kisses Furniture Stencil" href="http://www.royaldesignstudio.com/products/butterfly-kisses-furniture-stencil"><img alt="How to use Royal Stencil Size to gild a stencil pattern with silver leaf" style="display: block; margin-left: auto; margin-right: auto;" src="//cdn.shopify.com/s/files/1/0094/1122/files/Silver-Leaf-and-Burnish.jpg?8706"></a></p>
<p> </p>
<p><strong>Step 4:</strong> Place the stencil back over the starting position and apply Aluminum (Imitation Silver) leaf over the stenciled areas leaving some open black areas. The easiest way to accomplish that is to crumble or tear the leaf into small pieces and place them randomly.</p>
<p><strong>Step 5:</strong> Use a piece of lambswool (we find them in the paint department!) to press and buff the leaf down as you go. Buffing the leaf will break it into even smaller pieces that will continue to fill in some of the open areas of black. Lift the stencil now and again to check the look, and fill in with additional leaf as desired. Once completed, remove all tape and move on to Step 6.</p>
<p><em>Note: Of course if you wish, you can fill the design with a more solid layer of leaf. This is simply a matter of personal taste or what your project piece calls for!</em></p>
<p style="text-align: left;"><a title="Royal Stencil Size" href="http://www.royaldesignstudio.com/collections/royal-stencil-size"><img alt="How to use Black Royal Stencil Size to gild cabinet door panels" style="display: block; margin-left: auto; margin-right: auto;" src="//cdn.shopify.com/s/files/1/0094/1122/files/Size-and-Gild-Edges.jpg?8706"></a></p>
<p> </p>
<p><strong>Step 6:</strong> Reapply Painter's Tape to the recessed area around the raised panel, so that you can easily paint on the size for gilding just the small rounded carving that curves up to the flap part of the door. Use a flat or round artist's brush to paint one good coat of Royal Stencil Size over that area and also the outer edge of the door. Allow this to come "to tack", approx. 15-20 minutes.</p>
<p><strong>Step 7:</strong> Apply silver leaf over the areas covered with the Black Stencil Size, leaving some open areas to let the black stencil size show through, as you did with the stenciled center panel. This will result in a distressed, crackle effect which is very interesting!</p>
<p> </p>
<p style="text-align: left;"><a title="Butterfly Kisses Furniture Stencil" href="http://www.royaldesignstudio.com/products/butterfly-kisses-furniture-stencil"><img alt="How to use Black Royal Stencil Size to gild cabinet door panels" style="display: block; margin-left: auto; margin-right: auto;" src="//cdn.shopify.com/s/files/1/0094/1122/files/Gild-door-edges-and-sand.jpg?8706"></a></p>
<p> </p>
<p><strong>Step 8:</strong> Buff the entire panel again with a piece of lambs wool. Remove all of the Painter's Tape.<span style="color: #ff0000;"></span></p>
<p><strong>Step 9:</strong> Sand lightly with 400 grit sandpaper. This will distress the painted French Linen areas and allow some of the underlying Graphite paint to show through. The sanding will also smooth and "tighten up" the porous Chalk Paint® surface for the next steps. Wipe the entire panel piece down with a soft rag.</p>
<p> </p>
<p style="text-align: left;"><a title="Stain and Seal Water-based Gel Stains" href="http://www.royaldesignstudio.com/collections/stain-and-seal"><img alt="How to antique a cabinet door panel with stain by Royal Design Studio" style="display: block; margin-left: auto; margin-right: auto;" src="//cdn.shopify.com/s/files/1/0094/1122/files/Stain-and-Seal.jpg?8706"></a></p>
<p> </p>
<p><strong>Step 10:</strong> <a title="Stain and Seal Water-based Gel Stains" href="http://www.royaldesignstudio.com/collections/stain-and-seal">Stain and Seal is a water-based gel stain</a> for wood finishing. It also makes a GREAT glaze medium and toning layer for metallic finishes as the translucent dye colors bite into the surface, giving it a very rich look. It dries VERY quickly and is very heavily pigmented, so we always recommend it being used with the addition of <a title="So Slow" href="http://www.royaldesignstudio.com/collections/stain-and-seal/products/soslow-super-extender">So Slow Super Extender for Stain and Seal</a>. Add about 40% So Slow into Van Dyke Brown Stain and Seal to make an antiquing glaze. Use a soft, natural bristle brush to brush on an even coat of the stain mix over a workable area.</p>
<p><strong>Step 11: </strong>Use a wad of cheesecloth to remove excess glaze and smooth it over the surface. Keep rubbing the glaze back until you get the desired effect. It looks nice to allow an extra bit of glaze to puddle in the recessed areas of the molded edges. Continue until the entire door panel is covered. If you want a darker look, allow the first layer of stain mix to dry and add another. It is better to do two thin layers of stain to get a darker color than one heavier, more opaque layer as you have more working time with the addition of more So Slow. <em><strong>Note: Do not add more than 50% So Slow into your stain mix</strong></em>.<span style="color: #ff0000;"></span></p>
<p><strong>Finishing:</strong> Of course you will want to protect your furniture or cabinet finish with an additional durable finish. You can choose to use any water-based topcoat or wax over this finish once it is completely dry.</p>
<p> </p>
<p style="text-align: left;"><a title="Butterfly Kisses Furniture Stencil" href="http://www.royaldesignstudio.com/products/butterfly-kisses-furniture-stencil"><img alt="How to use Black Royal Stencil Size to gild cabinet door panels painted with Chalk Paint®" style="display: block; margin-left: auto; margin-right: auto;" src="//cdn.shopify.com/s/files/1/0094/1122/files/Stenciled-Cabinet-Door-with-Silver-Leaf.jpg?8706"></a></p>
<p> </p>
<p>The final finish is a very handsome and classic look for both traditional AND contemporary furniture. For a more modern look, you can change the stencil pattern, of course, as well as applying the leaf more uniformly throughout. The addition of the Stain and Seal gives a rich, glowing look to the Chalk Paint® that is quite different from wax alone. <a title="How to Gild a Frame" href="http://www.royaldesignstudio.com/blogs/how-to-stencil/12150489-how-to-gild-a-frame-with-royal-stencil-size">Stain and Seal</a> comes in a wide variety of earth tones, so there is a color that is perfect for every shade of paint!</p>
<p> </p>
<p><strong>There a many other ways to use Royal Stencil Size!</strong></p>
<p><a title="Reverse Stenciling Gilding Glass" href="http://www.royaldesignstudio.com/blogs/how-to-stencil/12181117-stencil-how-to-reverse-stenciling-and-gilding-on-glass">How to Gild a Frame with Royal Stencil Size</a></p>
<p><a title="Copper Gilded Flowers Wall Finish" href="http://www.royaldesignstudio.com/blogs/how-to-stencil/12150869-how-to-stencil-copper-leaf-hydrangea-wall-finish">Copper Gilded Floral Wall Finish</a></p>
<p><a href="#temp_created_link">Reverse Stenciled and Gilded Glass</a></p>]]>
    </content>
  </entry>
  <entry>
    <id>http://www.royaldesignstudio.com/blogs/how-to-stencil/11890533-stencil-how-to-using-chalk-paint-to-stencil-a-custom-brush-box</id>
    <published>2014-01-29T06:07:00-08:00</published>
    <updated>2015-01-14T15:36:05-08:00</updated>
    <link rel="alternate" type="text/html" href="http://www.royaldesignstudio.com/blogs/how-to-stencil/11890533-stencil-how-to-using-chalk-paint-to-stencil-a-custom-brush-box"/>
    <title>Stencil How-to: Using Chalk Paint&#xAE; to Stencil a Custom Brush Box</title>
    <author>
      <name>MELANIE ROYALS</name>
    </author>
    <summary type="html">
      <![CDATA[<img src="//cdn.shopify.com/s/files/1/0094/1122/files/African-Protea-Stencil-Brush-Box-t_5616551f-8e03-4c7d-a87e-f3669dc1aa1f_compact.jpg?8487"><p><a class="read-more" href="http://www.royaldesignstudio.com/blogs/how-to-stencil/11890533-stencil-how-to-using-chalk-paint-to-stencil-a-custom-brush-box">More</a></p>]]>
    </summary>
    <content type="html">
      <![CDATA[<p><img style="display: block; margin-left: auto; margin-right: auto;" src="//cdn.shopify.com/s/files/1/0094/1122/files/PicMonkey-Collage.jpg?8350"></p>
<p> </p>
<p>Our <a title="Free Stencil of the Month" href="http://www.royaldesignstudio.com/products/free-10-stencil">FREE African Protea Stencil of the Month</a> is the perfect floral pattern for all sorts of DIY craft stenciling projects around your house. Recently, we updated a stencil brush box here in our studio with this fun, Art Deco-inspired flower design. See how we completed this fast and easy stencil project below!</p>
<p> </p>
<p><strong>Stencil Supplies for this Project:</strong></p>
<ul>
<li>Wooden Crate. You can find a similar <a title="Wine bottle crate" href="http://www.save-on-crafts.com/six-slot-wood-wine-bottle-crate-with-rope-handles.html">divided wooden crate here</a><strong><br></strong>
</li>
<li>
<a title="Best Stencil Brushes from Royal Design Studio" href="http://www.royaldesignstudio.com/collections/stencil-brushes">Stencil Brushes</a>: 1” and 3/8”</li>
<li>
<a title="Chalk Paint® Decorative Paint" href="http://www.royaldesignstudio.com/collections/annie-sloan-chalk-paint-collection/">Chalk Paint® Decorative Pant</a>: Barcelona Orange, Arles, Antibes Green</li>
<li>
<a title="Annie Sloan Soft Wax" href="http://www.royaldesignstudio.com/collections/annie-sloan-chalk-paint-collection/products/annie-sloan-soft-wax-clear">Annie Sloan Soft Wax</a>: Clear Wax, Dark Wax</li>
<li>400 grit sandpaper, <a target="_blank" title="Cheese Cloth" href="http://www.royaldesignstudio.com/products/cheese-cloth">Cheese Cloth</a>, Measuring tape, Painter's tape, Paper towels</li>
</ul><p> </p>
<p><strong>Step-by-Step Stenciling:</strong></p>
<ol>
<li>Gather all of your stencil supplies.</li>
<li>Measure and plan the layout for the stencil. To keep the pattern symmetrical and fit 5 repeats of the African Protea Flower stencil we alternated the flower shape to face up and down and started with one flower in the exact center.</li>
<li>To get better coverage of the more translucent Barcelona and Antibes Green Chalk Paint® colors, we stenciled first the entire pattern with a more opaque paint, Arles Yellow.</li>
<li>Then, we stenciled the flower with Barcelona Orange, and the leaves and detail with Antibes Green. Allow to dry.</li>
<li>To protect your stenciling (optional) apply a thin layer of Clear Soft Wax with cheesecloth and remove all excess wax by rubbing with a hard circular motion.</li>
<li>Lightly distress the stenciling by going over it lightly with 400 grit sandpaper.</li>
<li>For a more antiqued look, add a final thin layer of Dark Wax. Remove excess wax, allow to dry, and buff with a soft cloth.</li>
<li>Enjoy your handiwork!</li>
</ol><ol></ol><p> </p>
<p><img style="display: block; margin-left: auto; margin-right: auto;" src="//cdn.shopify.com/s/files/1/0094/1122/files/African-Protea-Stencil-Project.jpg?8350"></p>
<p> </p>
<p>The African Protea stencil is perfect for ALL SORTS of furniture stenciling projects-but it's great for fabric stenciling too. See how we used it with our <a title="Stenciling with Stencil Creme Paints" href="http://www.royaldesignstudio.com/collections/stencil-cremes">Metallic Stencil Creme paints</a> to stencil some pretty custom pillows!</p>]]>
    </content>
  </entry>
  <entry>
    <id>http://www.royaldesignstudio.com/blogs/how-to-stencil/11890485-stencil-how-to-diy-stenciled-pillows-with-our-african-protea-stencil</id>
    <published>2014-01-28T13:03:55-08:00</published>
    <updated>2015-01-14T15:36:05-08:00</updated>
    <link rel="alternate" type="text/html" href="http://www.royaldesignstudio.com/blogs/how-to-stencil/11890485-stencil-how-to-diy-stenciled-pillows-with-our-african-protea-stencil"/>
    <title>Stencil How-to: DIY Stenciled Pillows with our African Protea Stencil</title>
    <author>
      <name>MELANIE ROYALS</name>
    </author>
    <summary type="html">
      <![CDATA[<img src="//cdn.shopify.com/s/files/1/0094/1122/files/Protea-Flower-Stencil-Pillows-t_f3aba754-1a65-409b-8adf-cebd71ba42cd_compact.jpg?8488"><p><a class="read-more" href="http://www.royaldesignstudio.com/blogs/how-to-stencil/11890485-stencil-how-to-diy-stenciled-pillows-with-our-african-protea-stencil">More</a></p>]]>
    </summary>
    <content type="html">
      <![CDATA[<p style="text-align: left;"><a title="Stenciling with Stencil Creme Paints" href="http://www.royaldesignstudio.com/collections/stencil-cremes"><img alt="Stenciled Pillow DIY project with Stencil Creme Paints from Royal Design Studio" style="display: block; margin-left: auto; margin-right: auto;" src="//cdn.shopify.com/s/files/1/0094/1122/files/Protea-Flower-Stencil-on-Pillows.jpg?8350"></a></p>
<p> </p>
<p><strong>Great News!! Our FREE Stencil of the Month feature is BACK!!</strong></p>
<p> </p>
<p>Each month we will be sending out a newly designed stencil pattern with each order. This month our<a title="Free Stencil of the Month" href="http://www.royaldesignstudio.com/products/free-10-stencil"> free pattern is the African Protea Flower stencil.</a> This Art Deco-inspired motif is perfect for craft stencil projects on furniture, fabric and more.</p>
<p>We've even created a couple new DIY stencil how-to projects to get you inspired and on your way. First up? Stenciled pillow projects that you can easily do on store-bought pillows using our metallic <a title="Best Stencil Creme Paints" href="http://www.royaldesignstudio.com/collections/stencil-cremes">Stencil Creme Paints</a>. Let's get started....</p>
<p> </p>
<p><strong>Stencil Supplies for this project:</strong></p>
<ul>
<li>Pillow covers (ours are black velvet and a cream colored silk fabric)</li>
<li>Stencil Creme paints: <a title="Metallic Teal Stencil Creme" href="http://www.royaldesignstudio.com/collections/stencil-cremes/products/teal-stencil-creme">Metallic Teal</a>, <a title="Shimmer Pint Stencil Creme Paint" href="http://www.royaldesignstudio.com/collections/stencil-cremes/products/pink-stencil-creme">Shimmer Pink</a>, <a title="Lime Shine Stencil Creme" href="http://www.royaldesignstudio.com/collections/stencil-cremes/products/lime-shine-stencil-creme">Lime Shine</a>
</li>
<li>
<a title="Best Stencil Brushes from Royal Design Studio" href="http://www.royaldesignstudio.com/collections/stencil-brushes">Stencil Brushes</a>: 1", 3/4", 3/8"</li>
<li>Measuring Tape, Striping Tape (find at an auto supply store), Paper Towels</li>
</ul><p> </p>
<p><strong>Step-by-Step Stenciling Process:</strong></p>
<ol>
<li>Gather your stencil supplies.</li>
<li>Measure and mark out your pattern on your pillow. We did a formal, side-by-side grid pattern and used striping tape to mark out the lines.</li>
<li>Center the African Protea Flower stencil in the gridded area. Use a 1" stencil brush to stencil the main body of the flower in Metallic Teal Stencil Creme.</li>
<li>Stencil the leaves of the flower with Lime Shine Stencil Creme using a 3/4" brush and stencil the flower detail with a 3/8" brush using Shimmer Pink.</li>
<li>Remove the tape and insert the pillow form. Viola!</li>
<li>For the off-white pillow form we stenciled a simple border pattern and alternated the direction of the flower so it has a lovely interlocking effect. The colors used were <a title="Flat Black Stencil Creme" href="http://www.royaldesignstudio.com/collections/stencil-cremes/products/flat-black-stencil-creme">Flat Black Stencil Creme</a>, Pink Flamingo, and Metallic Teal.</li>
</ol> 
<p style="text-align: left;"><a title="Free Stencil of the Month" href="http://www.royaldesignstudio.com/products/free-10-stencil"><img alt="Stenciled Pillow DIY project with Stencil Creme Paints from Royal Design Studio" style="display: block; margin-left: auto; margin-right: auto;" src="//cdn.shopify.com/s/files/1/0094/1122/files/Protea-Flower-Stencil-Pillows.jpg?8350"></a></p>
<p> </p>
<p>Stenciling pillows is a super easy way to add a custom accent to your decor. The bright colors of the Stencil Cremes really sparkle on the black velvet, and look soft and pretty on lighter colors.</p>
<p>We hope you enjoy this FREE stencil sent with all orders through the month of February and come back each month to claim a fun new stencil pattern for yourself!</p>
<p> </p>
<p><strong>Looking for more Fabric Stenciling Ideas?? Here you go!</strong></p>
<ul>
<li>Our <a title="African Plumes Wall Furniture Stencil" href="http://www.royaldesignstudio.com/products/african-plumes-furniture-stencil">African Plumes Stencil</a> looks AMAZING on stenciled pillows too.</li>
<li>Create your own<a title="Stenciled Table Runners" href="http://www.royaldesignstudio.com/blogs/stencil-ideas/10344305-easy-gift-idea-custom-stencil-holiday-table-runners"> custom stenciled table runners</a>. A DIY stencil newbie shows you how!</li>
<li>
<a title="Stylish Stenciled Scarves" href="http://www.royaldesignstudio.com/blogs/stencil-ideas/10301865-a-pretty-handy-girl-stencils-stylish-scarves-for-holiday-gifts">Stylish stenciled scarves</a> make a great gift for a friend--or to keep for yourself.</li>
</ul><p> </p>]]>
    </content>
  </entry>
  <entry>
    <id>http://www.royaldesignstudio.com/blogs/how-to-stencil/10604681-stencil-how-to-stenciling-a-lampshade</id>
    <published>2013-12-09T14:25:09-08:00</published>
    <updated>2015-01-14T15:40:44-08:00</updated>
    <link rel="alternate" type="text/html" href="http://www.royaldesignstudio.com/blogs/how-to-stencil/10604681-stencil-how-to-stenciling-a-lampshade"/>
    <title>Stencil How-To: Stenciling a Lampshade</title>
    <author>
      <name>MELANIE ROYALS</name>
    </author>
    <summary type="html">
      <![CDATA[<div style="text-align: left;"><a title="Forest Floor Damask Stencil" href="http://www.royaldesignstudio.com/products/forest-floor-damask-stencil"><img alt="DIY stenciled lampshade project. How to use Royal Stencil Creme metallici paints with the Forest Floor Damask Stencil " src="//cdn.shopify.com/s/files/1/0094/1122/files/stencil_a_lampshade.jpg?5527"></a></div><p><a class="read-more" href="http://www.royaldesignstudio.com/blogs/how-to-stencil/10604681-stencil-how-to-stenciling-a-lampshade">More</a></p>]]>
    </summary>
    <content type="html">
      <![CDATA[<p style="text-align: left;"><a title="Forest Floor Damask Stencil" href="http://www.royaldesignstudio.com/products/forest-floor-damask-stencil" target="_blank"><img alt="Easy DIY stencil project! How to stencil a lampshade with metallic Stencil Creme Paints | Royal Design Studio Stencils" src="//cdn.shopify.com/s/files/1/0094/1122/files/stenciled-lampshade-how-to.jpg?5462" style="display: block; margin-left: auto; margin-right: auto;"></a> </p>
<p>Are you looking for an easy peasy DIY stencil project that can be done in a dash AND adds a darling dose of color and pattern to an otherwise boring light fixture?? Well, look no further because we have a super simple how-to stencil project for you today: Lampshade stenciling! You can stencil on almost ANY flat surfaced lampshade, but the ever-popular drum shaped shades are by far the easiest. You simply need to wrap the stencil and pattern around the shade and dab on some color for a brilliant new look!</p>
<p> </p>
<p style="text-align: left;"><a title="Metallic Stencil Creme Paints" href="http://www.royaldesignstudio.com/collections/stencil-cremes" target="_blank"><img alt="How to stencil project. Stencl a lampshade with Chalk Paint® decorative paint and Royal Stencil Cremes from Royal Design Studio stencils" src="//cdn.shopify.com/s/files/1/0094/1122/files/1-supplies.jpg?5457" style="display: block; margin-left: auto; margin-right: auto;"></a></p>
<p style="text-align: left;"> </p>
<p style="text-align: left;"><strong>Supplies for this Stencil Project:</strong></p>
<ul>
<li>
<a title="Forest Floor Damask Wall Stencil" href="http://www.royaldesignstudio.com/products/forest-floor-damask-stencil">Forest Floor Damask Stencil</a> from the <a title="Bonnie Christine Stencil Collection" href="http://www.royaldesignstudio.com/collections/bonnie-christine-stencils">Bonnie Christine Stencil Collection</a>
</li>
<li>
<a title="Metallic Stencil Creme Paints" href="http://www.royaldesignstudio.com/collections/stencil-cremes">Royal Stencil Creme Paints</a> in Antique Gold and Bright Gold</li>
<li><a title="Best Stencil Brushes from Royal Design Studio" href="http://www.royaldesignstudio.com/collections/stencil-brushes/products/1-1-2-stencil-brush">1.5" Stencil Brush</a></li>
<li>
<a title="Chalk Paint®" href="http://www.royaldesignstudio.com/collections/annie-sloan-chalk-paint-collection/">Chalk Paint Decorative Paint</a>: Aubusson Blue and Florence</li>
<li><a title="Foam Roller Stencil Supplies" href="http://www.royaldesignstudio.com/collections/stencil-rollers">Foam Stencil Roller, Roller Handle, Paint Tray</a></li>
<li>Plain white or off-white drum shade</li>
</ul><p style="text-align: left;">Our lampshade was covered in a canvas-type fabric, but you can also you an inexpensive paper shade. For either type, you can stencil directly on the lampshade surface, as is, or paint it in the color of your choice!</p>
 
<p><a title="Foam rollers for stencling and basepainting in a DIY stenciled lampshade project | Royal Design Studio Stencils" href="http://www.royaldesignstudio.com/collections/stencil-rollers" target="_blank"><img src="//cdn.shopify.com/s/files/1/0094/1122/files/3-base-coat.jpg?5459" style="display: block; margin-left: auto; margin-right: auto;"></a> </p>
<p><strong>Step 1:</strong><br>We wanted a more colorful lampshade, so decided to first give it two coats of Chalk Paint® decorative paint in a custom color mix we created by combining 1 part <a title="Aubusson Blue Chalk Paint® decorative paint" href="http://www.royaldesignstudio.com/products/aubusson-blue-annie-sloan-chalk-paint">Aubusson Blue</a> and 1 part<a title="Florence Chalk Paint® decorative paint" href="http://www.royaldesignstudio.com/products/florence-annie-sloan-chalk-paint"> Florence</a>. This makes the perfect shade of Turquoise blue!! We simply rolled it on with a foam roller. You can do two coats quickly because the Chalk Paint® dries VERY fast.</p>
<p> </p>
<p style="text-align: left;"><a title="Forest Floor Damask Stencil" href="http://www.royaldesignstudio.com/products/forest-floor-damask-stencil" target="_blank"><img alt="DIY stenciled lampshade project. How to use Royal Stencil Creme metallici paints with the Forest Floor Damask Stencil | Royal Design Studio" src="//cdn.shopify.com/s/files/1/0094/1122/files/4-stencil.jpg?5460" style="display: block; margin-left: auto; margin-right: auto;"></a> </p>
<p><strong>Step 2:</strong><br>Lampshades will generally have a seam in them. This is where you will begin-and end-your stencil pattern. Run tape along one side of the seam to protect it and begin stenciling on the opposite side of the seam. You may find it easier to use a stencil spray adhesive on the back of the stencil to keep it in place, but we prefer to just use Painter's Tape whenever possible. That is what we did here. As we can back around to the seam, we simply moved the tape to the other side to finish the pattern cleanly.</p>
<p>The stenciling itself was done with a custom color mix created by combining 1 part <a title="Antique Gold Stencil Creme Paint" href="http://www.royaldesignstudio.com/collections/stencil-cremes/products/antique-gold-stencil-creme">Antique Gold Stencil Creme</a> and 1 part <a title="Bright Gold Stencil Creme Paint" href="http://www.royaldesignstudio.com/collections/stencil-cremes/products/bright-gold-stencil-creme">Bright Gold Stencil Creme</a>. You will find that, like Chalk Paint®, you can mix almost limitless color of Royal Stencil Creme paints! Follow the basic <a title="How to Stencil: Stencil Creme Paints" href="http://www.royaldesignstudio.com/blogs/how-to-stencil/5172162-basic-brush-stenciling-with-royal-stencil-cremes">How to Brush Stencil with Stencil Cremes instructions found here</a> for more details on best stencil techniques!</p>
<p> </p>
<p style="text-align: center;"><a title="Forest Floor Damask Wall Stencil" href="http://www.royaldesignstudio.com/products/forest-floor-damask-stencil" target="_blank"><img alt="DIY stenciled lampshade project. How to use Royal Stencil Creme metallici paints with the Forest Floor Damask Stencil | Royal Design Studio" src="//cdn.shopify.com/s/files/1/0094/1122/files/forest-floor-stencil-final.jpg?5461"></a> </p>
<p style="text-align: center;"> </p>
<p>And viola....our colorful new lamp is ready to light up your room! The best part is that you can coordinate your paint colors to match your decor, and this project is SO fast and easy, you can change it again on a whim. You can find boring, inexpensive lamps and shades everywhere from thrift stores, yard sales, outlets-even your Mom's basement.</p>
<p><em>Shown above with a canvas art piece stenciled with our <a title="Starry Night Moroccan Stencil" href="http://www.royaldesignstudio.com/collections/moroccan-stencils/products/starry-moroccan-night-stencil">Starry Night Moroccan Stencil</a>.</em></p>
<p><strong>Here are a few more fun Stencil How-to Projects to satisfy your DIY urges....</strong></p>
<p><a title="How to stencil burlap" href="http://www.royaldesignstudio.com/blogs/how-to-stencil/9816830-stencil-how-to-burlap-table-runner">Stencil a Burlap Table Runner</a></p>
<p>Pillow talk! <a title="Stencil a Pillow" href="http://www.royaldesignstudio.com/blogs/how-to-stencil/8729085-fabric-stencil-how-to-lace-pillows">Stencil a delicate Lace Doily design on a pillow</a></p>
<p><a title="How to Stencil Canvas Art" href="http://www.royaldesignstudio.com/blogs/how-to-stencil/8368295-stencil-how-to-colorful-moroccan-canvas-art">How to Stencil: Colorful Canvas Art</a> with Moroccan Stencils</p>]]>
    </content>
  </entry>
  <entry>
    <id>http://www.royaldesignstudio.com/blogs/how-to-stencil/10080045-stencil-how-to-a-joyful-holiday-canvas</id>
    <published>2013-11-11T17:54:30-08:00</published>
    <updated>2015-01-14T15:40:44-08:00</updated>
    <link rel="alternate" type="text/html" href="http://www.royaldesignstudio.com/blogs/how-to-stencil/10080045-stencil-how-to-a-joyful-holiday-canvas"/>
    <title>Stencil How-to: A Joyful Holiday Canvas</title>
    <author>
      <name>MELANIE ROYALS</name>
    </author>
    <summary type="html">
      <![CDATA[<img src="//cdn.shopify.com/s/files/1/0094/1122/files/Stencil-Holiday-Canvas-How-To-T_compact.jpg?5178"><p><a class="read-more" href="http://www.royaldesignstudio.com/blogs/how-to-stencil/10080045-stencil-how-to-a-joyful-holiday-canvas">More</a></p>]]>
    </summary>
    <content type="html">
      <![CDATA[<p><img style="display: block; margin-left: auto; margin-right: auto;" src="//cdn.shopify.com/s/files/1/0094/1122/files/Holiday-Stencil-Canvas-Project-Hometalk.jpg?5176"></p>
<p> </p>
<p style="text-align: left;">Get into the true spirit of the Holiday Season with this inspiring stenciled canvas project that we created especially for our <a title="HomeTalk features Royal Design Studio" href="http://www.hometalk.com/">Hometalk</a> <a title="HomeTalk Google+ Hangout with Royal Design Studio" href="https://plus.google.com/u/0/events/ce7n6tenof2gvtddt2se404bb84">Google+ Hangout</a>! Foregoing the usual red and green, we chose an elegant color palette of white, blue and gold that would be ideal for decorating for Christmas or Hanukkah, and can even be left up to enjoy long after the December holidays!!</p>
<p> </p>
<p><img style="display: block; margin-left: auto; margin-right: auto;" src="//cdn.shopify.com/s/files/1/0094/1122/files/Stenciled-Canvas-Stencil-Supplies.jpg?5177"> </p>
<div style="text-align: left;"><strong>Stencil Supplies for this Project:</strong></div>
<div style="text-align: left;">We've assembled a specially priced <a title="Holiday Joy Stenciled Canvas Kit" href="http://www.royaldesignstudio.com/collections/typography-stencils/products/holiday-joy-stencil-kit"><strong>Holiday Joy Stencil Kit</strong></a> that includes all of the stencils and supplies shown above. It includes...</div>
<div style="text-align: left;">
<ul>
<li><a title="Love Joy Peace Lettering Stencil" href="http://www.royaldesignstudio.com/products/love-joy-peace-lettering-stencil">Love, Joy, Peace Typography Stencil</a></li>
<li><a title="Mini Brocade Stencil" href="http://www.royaldesignstudio.com/products/mini-brocade-furniture-stencil">Mini Brocade Furniture Stencil</a></li>
<li>2 birds from our <a title="Sweet Tweets Lace Bird Stencil Set from Royal Design Studio" href="http://www.royaldesignstudio.com/collections/furniture-stencils/products/sweet-tweets-lace-bird-set">Sweet Tweets Stencil Set A</a>
</li>
<li><a title="Antique Gold Stencil Creme Paint from Royal Design Studio" href="http://www.royaldesignstudio.com/collections/stencil-cremes/products/antique-gold-stencil-creme">Antique Gold Stencil Creme Paint</a></li>
<li><a title="Bright Gold Stencil Creme Paint from Royal Design Studio" href="http://www.royaldesignstudio.com/collections/stencil-cremes/products/bright-gold-stencil-creme">Bright Gold Stencil Creme Paint</a></li>
<li>
<a title="Chalk Paint® decorative paint in Pure White" href="http://www.royaldesignstudio.com/collections/annie-sloan-chalk-paint-collection/products/pure-white-annie-sloan-chalk-paint">Chalk Paint® Decorative Paint in Pure White</a> and <a title="Annie Sloan Chalk Paint® Napoleonic Blue sold by Royal Design Studio" href="http://www.royaldesignstudio.com/products/napoleonic-blue-annie-sloan-chalk-paint">Napoleonic Blue</a> (sample size)</li>
<li>3-<a title="Best Stencil Brushes from Royal Design Studio" href="http://www.royaldesignstudio.com/collections/stencil-brushes/products/1-stencil-brush">1" Stencil Brushes</a>
</li>
<li>2-2" <a title="Best Stencil Foam Brushes from Royal Design Studio" href="http://www.royaldesignstudio.com/products/foam-brush">Foam Brushes</a>
</li>
</ul>
</div>
<div style="text-align: left;">
<strong>Additional supplies you will need include</strong>: 24" x 30" Artist's Canvas, Painter's Tape, Paint Roller and Tray, Ruler, Pencil</div>
<div style="text-align: left;">
<strong>To Begin:</strong> Basecoat your Artist's Canvas with 1-2 coats of the Pure White Chalk Paint® from Annie Sloan.</div>
<p> </p>
<p style="text-align: center;"><img src="//cdn.shopify.com/s/files/1/0094/1122/files/Measure-for-Stencil_large.jpg?5177"></p>
<p> </p>
<div style="text-align: left;"><strong>Step 1:</strong></div>
<div style="text-align: left;">Measure in from the outer edge of the canvas 2.5" on each side and draw a pencil line with a ruler.</div>
<p> </p>
<p><img style="display: block; margin-left: auto; margin-right: auto;" src="//cdn.shopify.com/s/files/1/0094/1122/files/Tape-for-Stenciling_large.jpg?5177"></p>
<p> </p>
<div style="text-align: left;"><strong>Step 2:</strong></div>
<div style="text-align: left;">Use a good quality Painter's Tape (we used <a title="We recommend Frog Tape for Royal Design Studio Stencil Projects" href="http://frogtape.com/">Frog Tape</a>) to tape off a rectangular "frame" within the frame. Place the tape on the INSIDE of your pencil line. Notice how we mitered the corners to get a nice clean corners for our painted frame.</div>
<div style="text-align: left;"> </div>
<p><img style="display: block; margin-left: auto; margin-right: auto;" src="//cdn.shopify.com/s/files/1/0094/1122/files/Stencil-Frame-Edge_large.jpg?5177"></p>
<p> </p>
<div style="text-align: left;"><strong>Step 3:</strong></div>
<div style="text-align: left;">Frog Tape is designed to give you clean lines when painting after you burnish it well. As an insurance step to get a nice clean edge you can first use an offloaded Stencil Brush with your Stencil Creme mix in a light circular motion to further "seal" the edge. <strong>The gold color we used throughout is a custom mix of 3 parts Bright Gold to 1 part Antique Gold Stencil Creme.</strong>
</div>
<p> </p>
<p><img style="display: block; margin-left: auto; margin-right: auto;" src="//cdn.shopify.com/s/files/1/0094/1122/files/Paint-Gold-Stencil-Creme_large.jpg?5177"></p>
<p> </p>
<div style="text-align: left;"><strong>Step 4:</strong></div>
<div style="text-align: left;">Use a Foam Brush to then brush 2-3 quick coats of the<strong> Stencil Creme paint mix</strong> to get a nice bright gold effect. Note: Stencil Cream paints offer excellent coverage for stenciling, but when painting over a white background they DO require more layers to get good depth of coverage. Be sure to paint the sides of the canvas too! Allow to dry.</div>
<p> </p>
<p style="text-align: center;"><img src="//cdn.shopify.com/s/files/1/0094/1122/files/Stencil-Lace-Edge-Canvas_large.jpg?5177"></p>
<p> </p>
<div style="text-align: left;"><strong>Step 5:</strong></div>
<div style="text-align: left;">With the Painter's Tape still in place, stencil the Mini Brocade Furniture Stencil all around in the gold frame area. The built-in stencil registration marks will make it easy to repeat the stencil, even though you are just stenciling a small portion of it at one time. Use Annie Sloan Chalk Paint® in Pure White again to match the background. The Chalk Paint® is perfect for stenciling and will dry fast, allowing you to stencil 2 layers of paint one after the other to get good coverage. Be sure to offload your stencil brush after dipping into fresh paint by swirling it onto a good quality paper towel to remove excess paint. This will help prevent having paint bleed under the stencil.</div>
<p> </p>
<p style="text-align: center;"><img src="//cdn.shopify.com/s/files/1/0094/1122/files/Stencil-Words-on-Canvas_large.jpg?5177"></p>
<p> </p>
<div style="text-align: left;"><strong>Step 6:</strong></div>
<div style="text-align: left;">Center the Love, Joy, Peace stencil in the canvas. Stencil with the gold Stencil Creme Mix, again taking care to offload your stencil brush well.</div>
<p> </p>
<p style="text-align: center;"><img src="//cdn.shopify.com/s/files/1/0094/1122/files/Stencil-Bird-Stencils_large.jpg?5177"></p>
<p> </p>
<div style="text-align: left;"><strong>Step 7:</strong></div>
<div style="text-align: left;">Place the two Sweet Tweets bird stencils as shown so that they look like they are sitting on the stenciled letters. Stencil with 2-3 layers of Annie Sloan's Napoleonic Blue Chalk Paint® to get good coverage and depth of color.</div>
<p> </p>
<p style="text-align: center;"><img src="//cdn.shopify.com/s/files/1/0094/1122/files/Stars-Wall-Stencil-Starry-Night_large.jpg?5177"></p>
<p> </p>
<div style="text-align: left;"><strong>Background Option:</strong></div>
<div style="text-align: left;">We painted the wall behind our Stenciled Canvas project to match!! The wall was rolled with 2 coats of <a title="Annie Sloan Chalk Paint® Napoleonic Blue sold by Royal Design Studio" href="http://www.royaldesignstudio.com/products/napoleonic-blue-annie-sloan-chalk-paint">Annie Sloan's Napoleonic Blue Chalk Paint®</a> and stenciled with the same gold Stencil Creme mix using our <a title="Starry Night Stencil by Royal Design Studio" href="http://www.royaldesignstudio.com/products/starry-night-stencil">Starry Night Wall Stenci</a>l. Note that we chose to simply stencil in the smaller stars of the pattern. This star stencil actually give you multiple options for how to use it!</div>
<p> </p>
<p style="text-align: center;"><img src="//cdn.shopify.com/s/files/1/0094/1122/files/Stencil-Holiday-Canvas-How-To-Final.jpg?5178"></p>
<p> </p>
<div style="text-align: left;">Now you have a beautiful custom art piece that you can use year after year or give as a gift to someone special. The words in the <strong>Love, Joy, Peace Stencil</strong> could also be used separately, making it very versatile. Note that the stenciled "frame" option we show is one you can incorporate into other canvas artworks (simply switch up the color and the stencils), or even use this stencil idea on walls and furniture pieces.</div>
<div style="text-align: left;"> </div>
<div style="text-align: left;"><strong>Wishing you much Love, Joy, and PEACE this Holiday Season!!</strong></div>
<div style="text-align: left;"> </div>
<div style="text-align: left;">Want more GREAT stencil project ideas!</div>
<div style="text-align: left;">See how the <a title="Starry Night Wall Stencil Project from Royal Design Studio" href="http://www.royaldesignstudio.com/blogs/stencil-ideas/8250705-stenciled-stars-come-out-to-play">Starry Night Wall Stencil was used for an updated little girl's room</a>.</div>
<div style="text-align: left;">More on <a title="Stenciling Techniques from Royal Design Studio" target="_blank" href="http://www.royaldesignstudio.com/blogs/how-to-stencil/8384153-stencil-how-to-metallic-moroccan-stencils">Stenciling with Annie Sloan Chalk Paint® and Royal Stencil Creme Paints</a>
</div>
<div style="text-align: left;">Follow<a title="Follow Royal Design Studio on Hometalk" href="http://www.hometalk.com/royaldesignstudio"> Royal Design Studio on Hometalk!</a>
</div>]]>
    </content>
  </entry>
  <entry>
    <id>http://www.royaldesignstudio.com/blogs/how-to-stencil/9816830-stencil-how-to-burlap-table-runner</id>
    <published>2013-11-04T15:48:57-08:00</published>
    <updated>2015-01-14T15:36:06-08:00</updated>
    <link rel="alternate" type="text/html" href="http://www.royaldesignstudio.com/blogs/how-to-stencil/9816830-stencil-how-to-burlap-table-runner"/>
    <title>Stencil How-To: Burlap Table Runner</title>
    <author>
      <name>MELANIE ROYALS</name>
    </author>
    <summary type="html">
      <![CDATA[<div style="text-align: left;"><img src="//cdn.shopify.com/s/files/1/0094/1122/files/stenciled-burlap-table-runner.jpg?5081" alt="Stencil a Fall Table Runner project with Chalk Paint® and the Teardrop Trellis wall stencil from Royal Design Studio"></div><p><a class="read-more" href="http://www.royaldesignstudio.com/blogs/how-to-stencil/9816830-stencil-how-to-burlap-table-runner">More</a></p>]]>
    </summary>
    <content type="html">
      <![CDATA[<p style="text-align: left;"><a target="_blank" title="Teardrop Trellis Allover Wall Stencil" href="http://www.royaldesignstudio.com/products/teardrop-trellis-wall-stencil"><img alt="Stencil a Fall Table Runner project with Chalk Paint® and the Teardrop Trellis wall stencil from Royal Design Studio" src="//cdn.shopify.com/s/files/1/0094/1122/files/DIY-Table-Runner.jpg?4916" style="display: block; margin-left: auto; margin-right: auto;"></a> </p>
<p>Set the stage for a fabulous tabletop by stenciling your own custom burlap table runner with a fresh, modern stencil pattern from Royal Design Studio!. Of course the <strong>beauty of stenciling is that YOU get to select your own pattern and paint colors</strong>, allowing you to customize your table wear to fit your own decorating tastes, color scheme, and design style. Stenciling a table runner on burlap is so super easy and cost effective, you can easily stencil multiple table runners to fit every mood, season, or holiday celebration. Below, we show you how to get this great look for the fall season, but a quick trip through our <a title="Allover Patterns Stencil Collection" href="http://www.royaldesignstudio.com/collections/allover-pattern-stencils">Allover Patterns Stencils Collection </a> will reveal designs suitable for a multitude of stencil decorating projects-for any season or reason.</p>
<p> </p>
<p><strong>Stencil and Supplies for this Project:</strong></p>
<ul>
<li>
<a title="Teardrop Trellis Wall Stencil" href="http://www.royaldesignstudio.com/products/teardrop-trellis-wall-stencil">Teardrop Trellis Allover Stencil</a> by Bari J for Royal Design Studio</li>
<li>
<a title="Chalk Paint® decorative paint colors" href="http://www.royaldesignstudio.com/collections/annie-sloan-chalk-paint-collection/">Chalk Paint® Decorative Paint</a>: French Linen and Barcelona Orange</li>
<li><a title="Best Stencil Brushes from Royal Design Studio" href="http://www.royaldesignstudio.com/collections/stencil-brushes">1 1/2” Stencil Brush</a></li>
<li>Small or Medium <a href="http://www.royaldesignstudio.com/collections/stencil-rollers/products/4-nylon-roller-set">Foam Paint Roller</a>, <a href="http://www.royaldesignstudio.com/collections/stencil-rollers/products/14-stencil-roller-handle">Roller Handle</a>, <a href="http://www.royaldesignstudio.com/products/4-paint-roller-tray">Paint Tray</a>
</li>
<li>Burlap Fabric</li>
<li>Measuring tape</li>
<li>Scissors</li>
<li>Painter’s tape, Paper Towels, Contractor’s Paper</li>
</ul><p style="text-align: left;"> <a title="How to Stencil Projects | Royal Design Studio" href="http://www.royaldesignstudio.com/pages/how-to-stencil"><img src="//cdn.shopify.com/s/files/1/0094/1122/files/Step-1_970352ff-a608-44e6-8e2b-c7533b71220e.jpg?4923" style="display: block; margin-left: auto; margin-right: auto;" alt="Stencil a Fall Table Runner How-To from Royal Design Studio"></a></p>
<p><strong> </strong></p>
<p><strong>Step One:</strong></p>
<p>Measure the burlap fabric to fit desired length and cut to size. Natural Burlap can be purchased by the yard or on the roll at most fabric stores. It's such an inexpensive yet versatile stenciling and decorating material, it's nice to always have some on hand!</p>
<p style="text-align: left;"> <a title="How to Stencil Projects | Royal Design Studio" href="http://www.royaldesignstudio.com/pages/how-to-stencil"><img src="//cdn.shopify.com/s/files/1/0094/1122/files/Step-1-Tip.jpg?4924" style="display: block; margin-left: auto; margin-right: auto;" alt="Stencil a Fall Table Runner How-To from Royal Design Studio"></a></p>
<p> </p>
<p><strong>Pro Tip</strong>: To make sure you cut in a straight line, a good tip is to pull out some Burlap treads where you want to cut through. This will give you a straight edge to follow with the scissors.  If you wish to create a nice fringed edge all around, continue to pull threads off until you get the desired depth of fringe. </p>
<p style="text-align: left;"> <a title="How to Stencil Projects | Royal Design Studio" href="http://www.royaldesignstudio.com/pages/how-to-stencil"><img src="//cdn.shopify.com/s/files/1/0094/1122/files/Stenciled-Table-Runner-Step-2.jpg?4929" style="display: block; margin-left: auto; margin-right: auto;" alt="Stencil a Fall Table Runner How-To from Royal Design Studio"></a></p>
<p> </p>
<p><strong>Step Two:</strong></p>
<p>Run Painter's Tape in the desired width (1.5" shown here) around all of the edges of your runner to create a "frame" in which you will apply your paint.</p>
<p style="text-align: left;"> <a title="Chalk Paint® French Linen" href="http://www.royaldesignstudio.com/collections/annie-sloan-chalk-paint-collection/products/french-linen-annie-sloan-chalk-paint"><img src="//cdn.shopify.com/s/files/1/0094/1122/files/Step-3_70afaf6e-4ce4-4c2d-b218-fee8a96ebeb7.jpg?4926" style="display: block; margin-left: auto; margin-right: auto;" alt="Stencil a Fall Table Runner How-To from Royal Design Studio"></a></p>
<p> </p>
<p><strong>Step 3:</strong></p>
<p>You could, of course, start <strong>stenciling directly on the raw burlap</strong>, but we wanted to create a two-toned pattern in Chalk Paint® decorative paint using both <a title="Chalk Paint® French Linen" href="http://www.royaldesignstudio.com/collections/annie-sloan-chalk-paint-collection/products/french-linen-annie-sloan-chalk-paint">French Linen Chalk Paint</a> and <a title="Chalk Paint® Barcelona Orange" href="http://www.royaldesignstudio.com/collections/annie-sloan-chalk-paint-collection/products/barcelona-orange-annie-sloan-chalk-paint">Barcelona Orange Chalk Paint</a>. Here we show using a foam roller to roll a coat of French Linen inside the taped area. Allow to dry.</p>
<p style="text-align: left;"> <a title="Teardrop Trellis Allover Wall Stencil " href="http://www.royaldesignstudio.com/products/teardrop-trellis-wall-stencil"><img alt="Stencil a Fall Table Runner project with Chalk Paint® and the Teardrop Trellis wall stencil from Royal Design Studio" src="//cdn.shopify.com/s/files/1/0094/1122/files/Stenciled-Table-Runner-Step-4.jpg?4928" style="display: block; margin-left: auto; margin-right: auto;"></a></p>
<p> </p>
<p><strong>Step 4:</strong></p>
<p>The Teardrop Trellis stencil is a symmetrical pattern, so a main design element should be centered on the painted area of the burlap runner. This will allow the pattern to end the same at each side and each end of the table runner. Find the center point and place one of the large triangles so that the center point mark falls into the middle of it. Use 1 ½ Stencil brush with Chalk Paint® in Barcelona Orange to stencil the pattern throughout. The registration marks contained in the stencil will allow you to easily repeat the pattern perfectly.<strong> Be sure to offload excess paint off the brush onto paper towels each time you reload the brush to avoid having paint seep under the stencil!</strong></p>
<p> </p>
<p style="text-align: left;"><a title="Teardrop Trellis Allover Wall Stencil" href="http://www.royaldesignstudio.com/products/teardrop-trellis-wall-stencil"><img alt="Stencil a Fall Table Runner project with Chalk Paint® and the Teardrop Trellis wall stencil from Royal Design Studio" src="//cdn.shopify.com/s/files/1/0094/1122/files/Teardrop-Trellis.jpg?4934" style="display: block; margin-left: auto; margin-right: auto;"></a></p>
<p style="text-align: left;">When you have finished stencils, simply remove the tape and you are ready to accessorize you new table top beauty with seasonal decor and coordinating candles. Stenciling on burlap is super fast and easy and there are SO many ways you can incorporate the two: stenciled tablecloths, pillows, place mats, curtains, and even wall hangings.</p>
<p style="text-align: left;"> </p>
<p style="text-align: left;"><strong>Looking for more How-to Stencil projects for fabric stenciling?</strong></p>
<p style="text-align: left;">Check out <a title="How to stencil fabric pillows" href="http://www.royaldesignstudio.com/blogs/how-to-stencil/8729085-fabric-stencil-how-to-lace-pillows">How to stencil a plain canvas pillow with a Lace Doily Pattern</a>.</p>
<p style="text-align: left;">Learn how to use <a title="Stencil with Chalk Paint®" href="http://www.royaldesignstudio.com/blogs/how-to-stencil/7855395-stencil-how-to-faded-silk-suzani-fabric-finish">Chalk Paint® to stencil an easy Suzani Fabric Effect.</a></p>
<p style="text-align: left;"> </p>
<p style="text-align: left;">Find daily stencil project ideas and inspiration on our <a title="Royal Design Studio on Facebook" href="https://www.facebook.com/RoyalDesignStencils.ModelloDesigns">Royal Design Studio Facebook Page</a> and share your own! We'd love to see how you interpret this stenciled burlap table runner idea for yourself!</p>
<p style="text-align: left;"> </p>
<p style="text-align: left;"><a title="Melanie Royals | Royal Design Studio" href="http://www.royaldesignstudio.com/pages/about-royal-design-studio"><img alt="Melanie Royals, President and Creative Director of Royal Design Studio" style="display: block; margin-left: auto; margin-right: auto;" src="//cdn.shopify.com/s/files/1/0094/1122/files/Melanie-Royals-stencil-artist_4eaf6ed5-51c0-4347-bf45-3248a944f36f.jpg?5070"></a></p>]]>
    </content>
  </entry>
  <entry>
    <id>http://www.royaldesignstudio.com/blogs/how-to-stencil/9762570-stencil-how-to-wedding-photo-booth-backdrop</id>
    <published>2013-10-30T13:32:34-07:00</published>
    <updated>2015-01-14T15:36:06-08:00</updated>
    <link rel="alternate" type="text/html" href="http://www.royaldesignstudio.com/blogs/how-to-stencil/9762570-stencil-how-to-wedding-photo-booth-backdrop"/>
    <title>Stencil How-To: Wedding Photo Booth Backdrop</title>
    <author>
      <name>MELANIE ROYALS</name>
    </author>
    <summary type="html">
      <![CDATA[<div style="text-align: left;"><img src="//cdn.shopify.com/s/files/1/0094/1122/files/stenciled-photo-booth-backdrop.jpg?4975" alt="Stencil How-To: Create a Custom DIY Wedding Photo Booth Backdrop"></div><p><a class="read-more" href="http://www.royaldesignstudio.com/blogs/how-to-stencil/9762570-stencil-how-to-wedding-photo-booth-backdrop">More</a></p>]]>
    </summary>
    <content type="html">
      <![CDATA[<div style="text-align: left;">
<a title="Modern Stencils for Photo Booth Backdrop" href="http://www.royaldesignstudio.com/collections/modern-stencils"><img alt="Stencil your own fun Photo Booth Backdrop with Modern Stencils from Royal Design Studio" src="//cdn.shopify.com/s/files/1/0094/1122/files/DIY-photo-booth-3.jpg?4970" style="display: block; margin-left: auto; margin-right: auto;"></a> </div>
<div></div>
<div>Wedding bells will be ringing soon for one our creative team members here at Royal Design Studio!! Our very own Lizelly (shown left) is getting married in a few weeks in an intimate backyard wedding. Lizelly is my go-to girl here for "all things stencil". She works with me to create our latest stencil patterns and creates many of the beautiful accompanying graphics you see here on our website and <a href="https://www.facebook.com/RoyalDesignStencils.ModelloDesigns">Royal Design Studio Facebook Page</a>. She and her fiance are wisely saving most of their money for a<strong> dream honeymoon</strong> to Paris, but of course she still wants to create a lovely setting and festive atmosphere for her friends and family to enjoy-so she is doing many creative, DIY projects for her special day. One of these projects was to create a custom photo booth backdrop with our Step Up Triangles Stencil. Lizelly favors clean, bold, geometric patterns and this design from our <a href="http://www.royaldesignstudio.com/collections/modern-stencils">Modern Stencils Collection</a> is one of her favorites! This is a<strong> super easy stencil project</strong> that can be done in just a little time for LOTS of fun on the wedding day! Here's how....</div>
<div> </div>
<div></div>
<div></div>
<div style="text-align: left;"><a href="http://www.royaldesignstudio.com/products/step-up-triangles-stencil" target="_blank"><img alt="Stencil your own fun Photo Booth Backdrop with Modern Stencils from Royal Design Studio" src="//cdn.shopify.com/s/files/1/0094/1122/files/1-Stencil-Supplies.jpg?4843" style="display: block; margin-left: auto; margin-right: auto;"></a></div>
<div></div>
<div></div>
<div>
<p><strong>Photo Booth Backdrop Stencils and Supplies:</strong></p>
<p><a href="http://www.royaldesignstudio.com/products/step-up-triangles-stencil" title="Modern Triangles Stencil"><span>Large Step-up Triangles Stencil</span></a></p>
<p><span><a href="http://www.royaldesignstudio.com/collections/stencil-brushes/products/allover-stencil-brush" title='2" Stencil Brush'>2" Stencil Brush</a><br></span></p>
<p><span><a href="http://www.royaldesignstudio.com/collections/stencil-cremes" title="Stencil Creme Paints">Royal Stencil Creme Paints</a>: Bright Gold, Copper Kettle, Pearl Oyster</span></p>
<p>Small or Medium <a href="http://www.royaldesignstudio.com/collections/stencil-rollers/products/4-nylon-roller-set">Nylon Paint Roller</a>, <a href="http://www.royaldesignstudio.com/collections/stencil-rollers/products/14-stencil-roller-handle">Roller Handle</a>, <a href="http://www.royaldesignstudio.com/products/4-paint-roller-tray">Paint Tray</a></p>
<p>Off White Eggshell Latex Paint</p>
<p>Painter’s tape, Paper Towels</p>
<p>Heavy Canvas, Paper, Dropcloth, or Fabric</p>
<p> </p>
</div>
<div style="text-align: left;"><strong><a href="http://www.royaldesignstudio.com/products/step-up-triangles-stencil" target="_blank"><img alt="Stencil your own fun Photo Booth Backdrop with Modern Stencils from Royal Design Studio" src="//cdn.shopify.com/s/files/1/0094/1122/files/2-Stencil-Paint-Roller_e39cd5f4-eb12-4a61-bac7-34968a4ffb1c.jpg?4866" style="display: block; margin-left: auto; margin-right: auto;"></a>Step 1</strong></div>
<div>
<p>Lizelly used some heavy Roclon canvas that we have here at the studio. This material is actually used to create light-blocking window treatments and can be found nationwide at fabric stores, like <a href="http://www.joann.com/" title="Jo-Ann's Fabrics">Jo-Ann's Fabrics</a>. Otherwise, you could substitute dropcloth canvas, fabric curtains or heavy paper for your backdrop material. Roll the canvas with 2 coats of the latex paint color of your choice.</p>
<p> </p>
</div>
<div>
<p style="text-align: left;"><a href="http://www.royaldesignstudio.com/products/step-up-triangles-stencil" target="_blank"><img alt="Stencil your own fun Photo Booth Backdrop with Modern Stencils from Royal Design Studio" src="//cdn.shopify.com/s/files/1/0094/1122/files/3-Tape-Stencil.jpg?4845" style="display: block; margin-left: auto; margin-right: auto;"></a><strong>Step 2</strong></p>
<p>When stenciling a symmetrical allover stencil design in a featured area like this, it's always best to center the pattern so that it ends at the same place on both sides of the canvas. Determine the center vertical line of the backdrop and center one of the triangle elements there. Simply use <a href="http://www.scotchblue.com/wps/portal/3M/en_US/Scotch-BlueBrand/Scotch-Blue/?WT.mc_id=www.scotchblue.com"><span class="st">ScotchBlue™</span> Painter's Tape</a> to keep the stencil in place.</p>
</div>
<div></div>
<div style="text-align: left;"><a href="http://www.royaldesignstudio.com/products/step-up-triangles-stencil" target="_blank"><img alt="Stencil your own fun Photo Booth Backdrop with Modern Stencils from Royal Design Studio" src="//cdn.shopify.com/s/files/1/0094/1122/files/4-Step_Up_Triangles-Stenciling.jpg?4846" style="display: block; margin-left: auto; margin-right: auto;"></a></div>
<div> </div>
<div></div>
<div></div>
<div><strong>Step 3</strong></div>
<div>
<p>Lizelly has a specific color scheme for her wedding decorations and wanted to create the perfect matching shade of gold. She combined our <a href="http://www.royaldesignstudio.com/collections/stencil-cremes">Royal Stencil Creme paints</a> at a rate of 1 part Bright Gold + 1/8 part Copper Kettle + 1/8 part Pearl Oyster. The Stencil Creme colors can be easily customized in this way to create many glorious shades of shimmering metallic color.  Stencil Creme paints are best used with one of our <a title="Best Stencil Brushes from Royal Design Studio" href="http://www.royaldesignstudio.com/collections/stencil-brushes">Signature Stencil Brushes</a>, and our large 2" stencil brush holds a large amount of paint, allowing you to cover a larger area quickly.</p>
<p> </p>
</div>
<div style="text-align: left;"> <a href="http://www.royaldesignstudio.com/products/step-up-triangles-stencil" target="_blank"><img alt="DIY Wedding Project! Stencil your own fun Photo Booth Backdrop with Modern Stencils from Royal Design Studio" src="//cdn.shopify.com/s/files/1/0094/1122/files/photo-booth-fun.jpg?4847" style="display: block; margin-left: auto; margin-right: auto;"></a>
</div>
<div> </div>
Of course a super FUN Photo Booth requires accessories that allow your guests to get a little silly! Here, Lizelly and creative co-workers Krista and Valeria had fun hamming it up with fun props they created from clip-art via <a title="Wedding Photo Booth Clip Art" href="https://creativemarket.com/GraphicMarket/8714-Mustache-Spectacles-Lips-Clip-Art">Creative Market</a>. Instructions are posted on the page!! Lizelly changed the colors to black and cut hers out with some excess white around the design element, embellish a bit with a gold sharpy and attach the stick with glue.<br><p> </p>
<p>Congratulations on your BIG day, Lizelly! We wish you a long and loving marriage filled with much laughter, and the Paris honeymoon of your dreams!!</p>
<p> </p>
<p><img style="display: block; margin-left: auto; margin-right: auto;" src="//cdn.shopify.com/s/files/1/0094/1122/files/Melanie-Royals-stencil-artist_4eaf6ed5-51c0-4347-bf45-3248a944f36f.jpg?4971"></p>]]>
    </content>
  </entry>
  <entry>
    <id>http://www.royaldesignstudio.com/blogs/how-to-stencil/8728773-stencil-how-to-birds-on-a-wire</id>
    <published>2013-09-17T07:16:22-07:00</published>
    <updated>2015-01-14T15:36:06-08:00</updated>
    <link rel="alternate" type="text/html" href="http://www.royaldesignstudio.com/blogs/how-to-stencil/8728773-stencil-how-to-birds-on-a-wire"/>
    <title>Stencil How-to: Birds on a Wire</title>
    <author>
      <name>MELANIE ROYALS</name>
    </author>
    <summary type="html">
      <![CDATA[<img src="//cdn.shopify.com/s/files/1/0094/1122/files/Lace-Bird-Stencil-How-to-t_compact.jpg?3254" alt=""><p><a class="read-more" href="http://www.royaldesignstudio.com/blogs/how-to-stencil/8728773-stencil-how-to-birds-on-a-wire">More</a></p>]]>
    </summary>
    <content type="html">
      <![CDATA[<p style="text-align: center;"><a title="Lacy Bird Stencil Set" href="http://www.royaldesignstudio.com/products/sweet-tweets-lace-bird-sets-a-b"><img src="//cdn.shopify.com/s/files/1/0094/1122/files/stenciled-lace-birds-on-wire.jpg?3254" alt="How to stencil tutorial with the new Lace Bird Stencils-Sweet Tweets from Royal Design Studio"></a></p>
<p> </p>
<p>Our new <strong>Lace Bird Stencils, Sweet Tweets</strong>, star in this colorful wall stencil how-to project that will have you chirping a happy tune! <br>This would be a super fun stencil project for a nursery or child's room. YOU get to design it and decide where you want to paint the "wires" (done with tape!) and can do as much or as little as you want. Consider this stencil idea for a feature wall-and if you don't want to do the whole wall you can simply use tape to paint in vertical "poles" where you wish and run the wires between them.</p>
<p> </p>
<p><strong>Stencil Supplies Needed for This Project:</strong></p>
<ul>
<li>Royal Design Studio Stencils: <a title="Bird Stencil Sets" href="http://www.royaldesignstudio.com/collections/motif-stencils/products/sweet-tweets-lace-bird-sets-a-b">Sweet Tweets Bird Stencil Sets A/B</a>
</li>
<li><a href="http://www.royaldesignstudio.com/collections/stencil-brushes" target="_blank">Stencil Brushes</a></li>
<li><a title="Stencil Creme Paint" href="http://www.royaldesignstudio.com/collections/stencil-cremes/products/flat-black-stencil-creme">Royal Stencil Crème Paint: Flat Black</a></li>
<li>Assorted acrylic or latex paint colors: Bright Green , Blue, Orange, Pink</li>
<li>
<a href="http://www.royaldesignstudio.com/collections/stencil-rollers" target="_blank">Medium or Large Paint Roller</a>, <a href="http://www.royaldesignstudio.com/collections/stencil-rollers/products/14-stencil-roller-handle">Roller Handle</a>, <a href="http://www.royaldesignstudio.com/products/4-paint-roller-tray">Paint Tray</a>
</li>
<li>1/4" striping tape (found at auto parts or auto detailing stores) and 1" Painter's Tape</li>
<li>Contractor's Paper, Paper Towels</li>
<li>Dimensional Flower Accents (we used the stick-on variety found in the scrapbook area of a crafts store)</li>
</ul>
<p> </p>
<p style="text-align: center;"><img src="//cdn.shopify.com/s/files/1/0094/1122/files/Stencil-tape_0562a19a-e646-4626-8803-028af1675a9b.jpg?3256" alt=""></p>
<p><br><strong>Step 1:</strong><br>Use the 1/4" striping tape (stretched tight to keep it straight) to define where the wires will be that your birds will be sitting on. You can pencil in lines to start and lay the tape over them, or just eyeball it. We didn't want our wires to be perfectly horizontal, but if YOU do, you should use a large level to get your lines straight. Be sure you are leaving enough space between the wires for the birds to fit comfortably. Then run 1" tape on the top and bottom of the 1/4" tape. Remove the 1/4" tape to reveal the space in between.</p>
<p><br><strong>Step 2:</strong><br>Use black paint and a 1" Stencil Brush with the <a title="How to Stencil with a Stencil Brush" href="http://www.royaldesignstudio.com/blogs/how-to-stencil/5172162-basic-brush-stenciling-with-royal-stencil-cremes">Dry Brush Stencil Technique</a> to stencil the spaces in between the two tape lines, creating your "wires". Remove the tape.</p>
<p> </p>
<p style="text-align: center;"><a title="Sweet Tweets Bird Stencils Set" href="http://www.royaldesignstudio.com/products/sweet-tweets-lace-bird-sets-a-b"><img src="//cdn.shopify.com/s/files/1/0094/1122/files/bird-stencil-in-place.jpg?3254" alt="Stencil How to using lace bird stencils from Royal Design Studio-Sweet Tweets!"></a></p>
<p> </p>
<p><strong>Step 3:</strong><br>Place your <a href="http://www.royaldesignstudio.com/collections/motif-stencils/products/sweet-tweets-lace-bird-sets-a-b">Large Sweet Tweets Bird stencils </a>in a nice arrangement along the wires. You can put the birds as close or as far apart as desired. Also try flipping the stencils around to get different looks. Noticed how we staggered our birds so that they are not necessarily sitting right on top of each other.</p>
<p> </p>
<p style="text-align: center;"><a title="Sweet Tweets Bird Stencils with Lace" href="http://www.royaldesignstudio.com/collections/motif-stencils/products/sweet-tweets-lace-bird-sets-a-b"><img src="//cdn.shopify.com/s/files/1/0094/1122/files/Stencil-Lace-Birds.jpg?3254" alt="How to stencil tutorial with the new Lace Bird Stencils-Sweet Tweets from Royal Design Studio"></a></p>
<p> </p>
<p><strong>Step 4:</strong><br>Stencil in the birds in the colors of your choice. We wanted mainly black birds, but accented them nicely with brightly colored birds in pink, lime green, turquoise blue, and orange-using some leftover latex sample paint colors that we had on hand. You could also use craft acrylic paints or, if you want a metallic look, consider using our bright metallic colored <a title="Royal Stencil Creme Paints" href="http://www.royaldesignstudio.com/collections/stencil-cremes">Royal Stencil Creme Paints</a>!</p>
<p><br>We recommend using <a title='1" Stencil Brush' href="http://www.royaldesignstudio.com/collections/stencil-brushes/products/1-stencil-brush">1" Stencil Brushes </a>(one for each color) and using a <strong>dry brush stencil technique</strong> for your stenciling.</p>
<p> </p>
<p style="padding-left: 30px;"><img style="display: block; margin-left: auto; margin-right: auto;" src="//cdn.shopify.com/s/files/1/0094/1122/files/flowers-for-stencils.jpg?3254" alt=""></p>
<p> </p>
<p style="text-align: center;"><a title="Lace Bird Stencils" href="http://www.royaldesignstudio.com/collections/motif-stencils/products/sweet-tweets-lace-bird-sets-a-b"><img src="//cdn.shopify.com/s/files/1/0094/1122/files/stencil-birds-flowers.jpg?3254" alt=""></a></p>
<p style="text-align: center;"><a title="Lace Bird Stencils" href="http://www.royaldesignstudio.com/collections/motif-stencils/products/sweet-tweets-lace-bird-sets-a-b">How to stencil tutorial with the new Lace Bird Stencils-Sweet Tweets and cute stick-on flowers</a></p>
<p> </p>
<p><strong>Step 5:</strong><br>An adorable addition to this stenciled wall treatment is to add colorful stick-on fabric flowers that can be found in the scrapbook section of your local craft store. These are SO fun to add-and really take the project to another dimension. Of course you want to consider placing these out of reach of little hands....</p>
<p> </p>
<p style="text-align: center;"><a title="Cute Lace Bird Stencils Set" href="http://www.royaldesignstudio.com/collections/motif-stencils/products/sweet-tweets-lace-bird-sets-a-b"><img src="//cdn.shopify.com/s/files/1/0094/1122/files/Lace-Bird-Stencil-How-to.jpg?3254" alt="How to stencil tutorial with the new Lace Bird Stencils-Sweet Tweets from Royal Design Studio"></a></p>
<p><br>How adorable IS this?! We even added some tiny flowers on some of the birds heads as additional accents. If you have problems getting your flowers to stick you can additional extra-strong double sided tape.</p>
<p>Be sure to check out another precious project using our <a title="Bird Stencils" href="http://www.royaldesignstudio.com/collections/motif-stencils/products/sweet-tweets-lace-bird-sets-a-b">Small Sweet Tweet Birds</a> along with our <a title="Lace Doily Stencils" href="http://www.royaldesignstudio.com/collections/motif-stencils/products/large-lace-doily-set">Lace Doily Stencils</a> on canvas: Stencil How-to: Lace Canvas Combo.</p>]]>
    </content>
  </entry>
  <entry>
    <id>http://www.royaldesignstudio.com/blogs/how-to-stencil/8728869-stencil-how-to-lace-canvas-combo</id>
    <published>2013-09-13T06:07:13-07:00</published>
    <updated>2015-01-14T15:35:10-08:00</updated>
    <link rel="alternate" type="text/html" href="http://www.royaldesignstudio.com/blogs/how-to-stencil/8728869-stencil-how-to-lace-canvas-combo"/>
    <title>Stencil How-to: Lace Canvas Combo</title>
    <author>
      <name>MELANIE ROYALS</name>
    </author>
    <summary type="html">
      <![CDATA[<a title="Lace Stencils" href="http://www.royaldesignstudio.com/collections/stencil-impressions"><img src="//cdn.shopify.com/s/files/1/0094/1122/files/Bird-Lace-Stencil-Canvas-Project-t_compact.jpg?3254" alt=""></a><p><a class="read-more" href="http://www.royaldesignstudio.com/blogs/how-to-stencil/8728869-stencil-how-to-lace-canvas-combo">More</a></p>]]>
    </summary>
    <content type="html">
      <![CDATA[<p style="text-align: center;"><a title="Lace Doily Stencils" href="http://www.royaldesignstudio.com/collections/stencil-impressions"></a><a title="Lace Doily Stencil Impressions" href="http://www.royaldesignstudio.com/collections/stencil-impressions"><img src="//cdn.shopify.com/s/files/1/0094/1122/files/Bird-Lace-Stencils-Project.jpg?3367" alt="Lovely lace stencil project using Chalk Paint® and stencils from Royal Design Studio"></a></p>
<p> <br>This stencil how-to shows you the easy steps to create an adorable piece of custom stenciled canvas art that would be a sweet treat for any new nursery or toddler's room. We've combined a series of stencils from our Lace Stencil Collection in a unique design piece. Featuring lacy bird motifs and large, detailed doily designs and a soft paint color scheme, this easy little stencil project can be easily done in and hour-and enjoyed for years!</p>
<br><p style="text-align: center;"><a title="Chalk Paint® decorative paint" href="http://www.royaldesignstudio.com/collections/annie-sloan-chalk-paint-collection/"><img src="//cdn.shopify.com/s/files/1/0094/1122/files/Bird-Lace-Stencil-Canvas-2.jpg?3254" alt="Roller stenciling with Chalk Paint® and Royal Design Studio stencils"></a></p>
<p><br><strong>Supplies You Will Need for this Stencil Project:</strong></p>
<p>Stencils from Royal Design Studio: <a href="http://www.royaldesignstudio.com/products/victoria-lace-doily-stencil" target="_blank">Victoria Lace Doily Stencil</a>, <a href="http://www.royaldesignstudio.com/products/elizabeth-lace-doily-stencil" target="_blank">Elizabeth Lace Doily Stencil</a>, <a href="http://www.royaldesignstudio.com/products/diana-lace-doily-stencil" target="_blank">Diana Lace Doily Stencil</a>, <a title="Sweet Lace Bird Stencils" href="http://www.royaldesignstudio.com/products/sweet-tweets-lace-bird-set">Sweet Tweets Lace Bird Set</a></p>
<p><a href="http://www.royaldesignstudio.com/collections/annie-sloan-chalk-paint-collection/">Chalk Paint® Decorative Paint Colors</a>: <a href="http://www.royaldesignstudio.com/products/old-white-annie-sloan-chalk-paint" target="_blank">Old White</a>, <a href="http://www.royaldesignstudio.com/products/louis-blue-annie-sloan-chalk-paint" target="_blank">Louis Blue</a>, <a href="http://www.royaldesignstudio.com/products/pure-white-annie-sloan-chalk-paint" target="_blank">Pure White</a></p>
<p>Small or Medium <a href="http://www.royaldesignstudio.com/collections/stencil-rollers/products/4-nylon-roller-set">Foam Paint Roller</a>, <a href="http://www.royaldesignstudio.com/collections/stencil-rollers/products/14-stencil-roller-handle">Roller Handle</a>, <a href="http://www.royaldesignstudio.com/products/4-paint-roller-tray">Paint Tray</a></p>
<p><a href="http://www.royaldesignstudio.com/collections/stencil-brushes" target="_blank">Stencil Brush</a></p>
<p>Spray Adhesive (we prefer 3M Super 77 spray adhesive)</p>
<p><span style="color: #444444;">Stretched Canvas:</span> 30" x 24"<br><br><strong>Chalk Paint® Decorative Paint Custom Color Mixes</strong></p>
<p>Create a custom blue color mix by combining Chalk Paint® in Old White and Louis Blue together at a 1:1 ratio. This will be your lighter blue color mix that you will use to base coat the canvas. For the darker blue stencil color, simply use Louis Blue.<br><br><strong>A Note on our Doily Stencil Designs:</strong></p>
<p>Our lace doily stencils are part of our Stencil Impressions series. These uniquely designs stencils feature a 2-part design, including a large silhouette shape and a design detail layer. For this project we are simply using the design detail layer. See this informative <a title="How to use Stencil Impressions Stencils" href="http://www.royaldesignstudio.com/blogs/how-to-stencil/5865247-stencil-impressions-techniques">Stencil Impressions Techniques booklet </a>for more info and idea for using this type of stencil pattern.</p>
  <br><p style="text-align: center;"><a title="Lace Doily Stencils" href="http://www.royaldesignstudio.com/collections/stencil-impressions"><img src="//cdn.shopify.com/s/files/1/0094/1122/files/Bird-Lace-Stencil-Canvas-3.jpg?3254" alt="Lace Doily stencils from Royal Design Studio"></a></p>
<p></p>
<p><strong>Step 1:</strong></p>
<p>Lay the lace doily stencils on some protective contractor's paper and mist them lightly with Spray Adhesive. Follow our pattern arrangement if you wish to place the stencils randomly on the canvas so that a large portion of eash stencil is hanging off the edge of the canvas.</p>
<br><p><a title="Bird Lace Stencils" href="http://www.royaldesignstudio.com/products/sweet-tweets-lace-bird-set"><img style="display: block; margin-left: auto; margin-right: auto;" src="//cdn.shopify.com/s/files/1/0094/1122/files/Bird-Lace-Stencil-Canvas-4.jpg?3254" alt="How to create adorable stenciled canvas art with Royal Design Studio lace stencils"></a></p>
<br><p><strong>Step 2:</strong></p>
<p>Randomly place your <strong>Sweet Tweets Lace Bird stencils</strong> to rest their adorable little feet on the stenciled lace doilies. Again, feel free to follow our design arrangement as shown on the completed canvas project. Use a 1" Stencil Brush to stencil the birds with Chalk Paint® in Pure White. It may take a couple of layers of paint to get complete coverage for the birds. A good trick is to lay all of our bird stencils out and give each one one stenciled coat of paint. Then, go back to the first bird and start over. Chalk Paint® decorative paint dries super fast!</p>
<br><p style="text-align: center;"><img src="//cdn.shopify.com/s/files/1/0094/1122/files/Bird-Lace-Stencil-Canvas-5.jpg?3254" alt="Canvas stencil project using Chalk Paint® and lace stencils from Royal Design Studio"></p>
<p></p>
<p><strong>Optional:</strong></p>
<p>Finish off the outside edge of the wrapped canvas by hot-gluing white lace around the edge.</p>
<br><p style="text-align: center;"><a title="Fleur de Lace Stencil" href="http://www.royaldesignstudio.com/products/fleur-de-lace-stencil"><img src="//cdn.shopify.com/s/files/1/0094/1122/files/Bird-Lace-Stencil-Canvas-Project_b0a4d3cf-7a98-461d-8ed8-5e78a2556243.jpg?3367" alt="Lovely lace stencil project using Chalk Paint® and stencils from Royal Design Studio"></a></p>
<br><p>The final canvas project looks pretty as a picture hanging over a simple oak dresser that has been painted with Chalk Paint® in Pure White. To dress up the top of the dresser and continue the sweet lace them, we stenciled the small <a href="https://royaldesignstudio.myshopify.com/admin/blogs/1132562/articles/8728869#temp_created_link">Fleur De Lace Stencil</a> in the lighter <a title="Louis Blue Chalk Paint®" href="http://www.royaldesignstudio.com/products/louis-blue-annie-sloan-chalk-paint">Louis Blue Chalk Paint®</a> mix, and finished it off with the darker color mix on the drawer handles. Accented with simple, pure white accessories, this makes a lovely, handcrafted space that is both sweet and soothing.</p>
<br><p> </p>]]>
    </content>
  </entry>
  <entry>
    <id>http://www.royaldesignstudio.com/blogs/how-to-stencil/8729085-fabric-stencil-how-to-lace-pillows</id>
    <published>2013-09-10T08:27:11-07:00</published>
    <updated>2015-01-14T15:36:06-08:00</updated>
    <link rel="alternate" type="text/html" href="http://www.royaldesignstudio.com/blogs/how-to-stencil/8729085-fabric-stencil-how-to-lace-pillows"/>
    <title>Fabric Stencil How-to: Lace Pillows</title>
    <author>
      <name>MELANIE ROYALS</name>
    </author>
    <summary type="html">
      <![CDATA[<img src="//cdn.shopify.com/s/files/1/0094/1122/files/Stenciled-Pillow-t_compact.jpg?3254" alt="How to stencil a plain canvas pillow cover with a lace doily stencil"><p><a class="read-more" href="http://www.royaldesignstudio.com/blogs/how-to-stencil/8729085-fabric-stencil-how-to-lace-pillows">More</a></p>]]>
    </summary>
    <content type="html">
      <![CDATA[<p style="text-align: center;"><a title="Catherine Lace Doily Stencil" href="http://www.royaldesignstudio.com/products/catherine-lace-doily-stencil"><img src="//cdn.shopify.com/s/files/1/0094/1122/files/Pillow-Stencil-How-to.jpg?3254" alt="Stencil a lovely Lace Doily pillow with this stencil tutorial from Royal Design Studio stencils"></a></p>
<p> </p>
<p>Stenciling on plain fabric pillows is one of the fastest, easiest ways to personalize your home decor! You can MAKE your own pillow covers, of course, but plain pillows that are perfect for stenciling are easily found in discount stores these days such as Marshalls, TJ Max, HomeGoods, etc. All you need is a <a title="Royal Design Studio Stencils" href="http://www.royaldesignstudio.com/pages/stencils-stencil-supplies">stencil pattern from Royal Design Studio</a>, some <a title="Stencil Creme Paint" href="http://www.royaldesignstudio.com/collections/stencil-cremes">stencil paint </a>that is suitable for fabric, and about a hour's worth of time! Read on for tips and more details....</p>
<p> </p>
<p style="text-align: center;"><a title="Catherine Lace Doily Stencil" href="http://www.royaldesignstudio.com/products/catherine-lace-doily-stencil"><img src="//cdn.shopify.com/s/files/1/0094/1122/files/pillow-stencil-supplies.jpg?3254" alt="Stencil supplies for stenciling a lace doily pillow cover from Royal Design Studio stencils"></a></p>
<p> </p>
<p>We found that our <strong>Catherine Lace Doily stencil</strong> fit perfectly on this plain white canvas pillow cover. We could have stenciled it in a light gray or other pastel color for a soft look, but wanted a more dramatic accent for the setting we were putting it in-so went with Black Stencil Creme. The Stencil Creme paints that we've developed are perfect for stenciling walls, furniture and even fabrics. Unlike acrylic paints, they remain soft on the surface-which is of course what you want on a pillow!</p>
<p>All of our <strong>Lace Doily Stencil patterns</strong> come in two layers: a silhouette shape layer and a design detail layer which is common to our entire <a title="Stencil Impressions Collection" href="http://www.royaldesignstudio.com/collections/stencil-impressions">Stencil Impressions Collection</a>. Because we were working on an off white background it wasn't necessary to use the silhouette shape layer. We will be using a simple stencil shading technique around the edge to define the lace doily design.</p>
<p> </p>
<p><strong>Stencil Supplies You'll Need for This Project:</strong></p>
<p><a href="http://www.royaldesignstudio.com/products/catherine-lace-doily-stencil" target="_blank">Catherine Lace Doily Stencil</a></p>
<p><a title="Stencil Creme Paint" href="http://www.royaldesignstudio.com/collections/stencil-cremes/products/flat-black-stencil-creme">Royal Stencil Cream: Flat Black</a></p>
<p><a href="http://www.royaldesignstudio.com/collections/stencil-brushes" target="_blank">1" Stencil Brush</a></p>
<p>Contractor's Paper, Paper Towels, Heavy Paper, Spray Adhesive (we love 3M Super 77)</p>
<br>
<p style="text-align: center;"> </p>
<p style="text-align: center;"><a title="Catherine Lace Doily Stencil" href="http://www.royaldesignstudio.com/products/catherine-lace-doily-stencil"><img src="//cdn.shopify.com/s/files/1/0094/1122/files/pillow-stenciling.jpg?3254" alt="First steps for stenciling a lace doily stencil on a fabric pillow cover"></a></p>
<p> </p>
<p><strong>Step 1:</strong><br>If you are using the proper "dry brush" stencil method, you shouldn't have any paint bleed-through on your fabric, but as a precaution you can line your pillow cover on the inside with smooth, heavy paper or plastic.<br><br></p>
<p><strong>Step 2:</strong><br>Because the stencil detail layer of the Catherine Doily doesn't have a blank outer edge of mylar to it (we will be stenciling both inside AND outside the stencil) we recommend the use of <strong>3M Super 77 spray adhesive to hold the stencil in place</strong>. Lay the stencil front side down on a large sheet of paper and spray a LIGHT coating of spray adhesive while holding the can about 12" away. Allow the adhesive to "set up" for a few minutes before centering the stencil adhesive side down on the pillow cover.<br><br></p>
<p><a title="Catherine Lace Doily Stencil" href="http://www.royaldesignstudio.com/products/catherine-lace-doily-stencil"><img style="display: block; margin-left: auto; margin-right: auto;" src="//cdn.shopify.com/s/files/1/0094/1122/files/stenciling-a-doily.jpg?3254" alt="How to stencil a lace doily stencil pattern on a plain fabric pillow cover"></a></p>
<p> </p>
<p><strong>Step 3:<br>"Dry-Brush" stenciling:</strong> Load a 1" Stencil Brush by dipping <strong>just the tips of the brush into Black Stencil Creme Paint</strong> (or substitute with acrylic paint). Offload excess paint by rubbing the brush firmly in a circular motion on good quality paper towels. Stencil the inside details of the doily pattern by using a firm circular motion with the brush and continuously moving the brush over the surface. See <a title="Stencling with Royal Stencil Creme Paints" href="http://www.royaldesignstudio.com/blogs/how-to-stencil/5172162-basic-brush-stenciling-with-royal-stencil-cremes">Basic Brush Stenciling with Royal Stencil Cremes</a> for more info on this stencil technique.</p>
<p>PRO TIP! It is always better to stencil 2 thin layers of paint as opposed to one thick layer-especially on fabric where there is no room for error-or paint bleed-unders. Start light and build up color slowly to be safe.<br><br></p>
<p><strong>Step 4:</strong><br>Stencil carefully around the outer edge of the pattern to define the edge and create a slight shadow. To achieve this effect, use a very dry stencil brush and position the brush so that most of it rests on the mylar and just a portion of it touches the fabric area outside the stencil. <strong>Push the brush into the edge of the mylar</strong> as you stencil using a tight circular motion. <strong>PRACTICE this stencil technique first</strong> on a piece of scrap paper if it's a new technique for you!<br><br></p>
<p><a title="Lace Doily Stencils" href="http://www.royaldesignstudio.com/products/catherine-lace-doily-stencil"><img style="display: block; margin-left: auto; margin-right: auto;" src="//cdn.shopify.com/s/files/1/0094/1122/files/how-to-pillow-stencil.jpg?3254" alt="Before and After stenciling a lace doily stencil design on plain canvas pillow covers"></a></p>
<p> </p>
<p>As we said above, stenciling pillows is a quick, inexpensive way to personalize your decor. It's easy to switch out pillow covers to fit your decorating mood and to welcome a new season. You can even stencil a different pattern and color on both the front and back of a plain pillow to pull double decorating duty!!</p>
<p><strong>Here are a few more tips for successful fabric stenciling:</strong></p>
<ul>
<li>It's best to stencil on natural fabrics such as cotton, linen, silk, burlap, and even cotton velvet</li>
<li>If you are planning wash your stenciled fabric project often it's best to pre-wash the fabric to remove the sizing.</li>
<li>Besides our Royal Stencil Creme Paints you can also stencil with specially designed fabric stencil paints or even regular acrylic or latex paint.</li>
<li>Add a few drops Textile Medium (found at Craft Stores) to acrylic or latex paint to make the paint softer on the surface and also help it to bond better with the fabric.</li>
<li>Heat-set the fabric after stenciling by putting your item in the dryer on high for 30 minutes. Wash with cold water.</li>
<li>See even more <a title="Fabric Stenciling Tips" href="http://www.royaldesignstudio.com/blogs/how-to-stencil/3759082-stenciling-on-fabric">Basic Tips for Stenciling on Fabric</a> here.</li>
</ul>]]>
    </content>
  </entry>
  <entry>
    <id>http://www.royaldesignstudio.com/blogs/how-to-stencil/8728897-stencil-how-to-lovely-lace-doily-wall</id>
    <published>2013-09-04T00:00:00-07:00</published>
    <updated>2015-01-14T15:35:10-08:00</updated>
    <link rel="alternate" type="text/html" href="http://www.royaldesignstudio.com/blogs/how-to-stencil/8728897-stencil-how-to-lovely-lace-doily-wall"/>
    <title>Stencil How-to: Lovely Lace Doily Wall</title>
    <author>
      <name>MELANIE ROYALS</name>
    </author>
    <summary type="html">
      <![CDATA[<img src="//cdn.shopify.com/s/files/1/0094/1122/files/Lace-Doily-Stencil-How-t_compact.jpg?3254" alt=""><p><a class="read-more" href="http://www.royaldesignstudio.com/blogs/how-to-stencil/8728897-stencil-how-to-lovely-lace-doily-wall">More</a></p>]]>
    </summary>
    <content type="html">
      <![CDATA[<p style="text-align: center;"><a title="Large Lace Doilies Stencils Set" href="http://www.royaldesignstudio.com/collections/stencil-impressions"><img src="//cdn.shopify.com/s/files/1/0094/1122/files/Lace-Doily-Stencil-How-to.jpg?3254" alt="Lovely Lace Doily Stencils. A great stencil tutorial from Royal Design Studio"></a></p>
<p> </p>
<p>Learn how to stencil a lovely lace feature wall. Romantic lace accents are ON TREND for everything from clothing to furniture, and this stencil tutorial shows you how to translate this great look to a fabulous, original feature wall using the <a href="http://www.royaldesignstudio.com/collections/stencil-impressions">Large Lace Doilies Stencils Set from Royal Design Studio</a>.</p>
<p>Our Lace Doily Stencils are part of our <a title="Stencil Impressions Stencils Collection" href="http://www.royaldesignstudio.com/collections/stencil-impressions">Stencil Impressions Collection</a>. This type of stencil comes in two parts: a large silhouette shape and a design detail layer. We have created an instructional flipbook showing <a title="How to Use Stencil Impressions Stencils" href="http://www.royaldesignstudio.com/blogs/how-to-stencil/5865247-stencil-impressions-techniques">basic Stencil Impressions stencil applications</a> which we highly recommend your refer to for more ideas and information. For this project we are using JUST the design detail layers, which get laid out on the wall randomly and moved as needed to complete the random design.</p>
<p><strong>Stencil Supplies for This Project:</strong></p>
<ul>
<li><a href="http://www.royaldesignstudio.com/products/large-lace-doily-set" target="_blank">Large Lace Doily Stencils Set</a></li>
<li>
<a href="http://www.royaldesignstudio.com/collections/annie-sloan-chalk-paint-collection/">Chalk Paint® Decorative Paint Colors</a>: <a href="http://www.royaldesignstudio.com/products/old-white-annie-sloan-chalk-paint" target="_blank">Old White</a> + <a href="http://www.royaldesignstudio.com/products/napoleonic-blue-annie-sloan-chalk-paint" target="_blank">Napoleonic Blue</a><br>Small or Medium  <a href="http://www.royaldesignstudio.com/collections/stencil-rollers/products/4-nylon-roller-set">Foam Paint Roller</a>, <a href="http://www.royaldesignstudio.com/collections/stencil-rollers/products/14-stencil-roller-handle">Roller Handle</a>, <a href="http://www.royaldesignstudio.com/collections/stencil-brushes" target="_blank">Paint Tray</a>
</li>
<li>
<a title="Lift-Off Stencil Cleaner" href="http://www.royaldesignstudio.com/products/motsenbachers-lift-off-5">Motsenbacker's Lift-Off #5</a> (to clean stencils)</li>
<li>Contractor's Paper, Paper Towels, Spray adhesive (we use 3M Super 77)</li>
</ul><p> NOTE: Start with a fresh white or an off-white wall color as you base. This will be the color of the doilies themselves after the stenciling. </p>
<p> </p>
<p style="text-align: center;"><a title="Lace Doily Stencils Set" href="http://www.royaldesignstudio.com/collections/stencil-impressions/products/large-lace-doily-set"><img src="//cdn.shopify.com/s/files/1/0094/1122/files/Spray-Stencil-1.jpg?3254" alt="How to stencil tutorial with Lace Doily stencils from Royal Design Studio"></a></p>
<p> </p>
<p><strong>Step 1:</strong><br>Lay the stencils down on heavy contractors' paper (or similar) and mist the backs lightly with Spray Adhesive. Hold the can about 12" away and just give it a LIGHT misting. All the adhesive to set up for a few minutes before applying the stencil to the wall. You will create your own unique arrangement with the stencils, placing them as close or as far apart as you wish on the wall surface.</p>
<p> </p>
<p style="text-align: center;"><a title="Stencil with Chalk Paint" href="http://www.royaldesignstudio.com/collections/annie-sloan-chalk-paint-collection/"><img src="//cdn.shopify.com/s/files/1/0094/1122/files/Chalk-Paint-2_d2f1b3e5-76f0-413c-8eeb-f8eaee8da5bb.jpg?3254" alt="How to stencil with Chalk Paint® decorative paint"></a></p>
<strong>Step 2:</strong><br>Mix the Chalk Paint® decorative paint colors Old White and Napoleonic Blue at a rate of 1:1. It is not necessary to use Chalk Paint® for this technique, however we like that the paint covers very, dries quickly has a thick consistency which helps to keep excess paint from seeping under the stencil. Load a foam roller with paint and offload excess paint onto contractor's paper or paper towels.<br><p> </p>
<p style="text-align: center;"><a title="Stencil with Chalk Paint®" href="http://www.royaldesignstudio.com/collections/annie-sloan-chalk-paint-collection/"><img src="//cdn.shopify.com/s/files/1/0094/1122/files/Roller-paint-stencil-on-wall-3.jpg?3254" alt="Roller stenciling with Chalk Paint® decorative paint and lace stencils from Royal Design Studio"></a></p>
<p> </p>
<p><strong>Step 3:</strong><br>Begin rolling using a cross hatch motion in the areas in between the stencil first and move to the stencil areas themselves as the paint roller becomes more dried out.<br><br><strong>Step 4:</strong><br>Continue rolling in your working area until you get complete coverage. This may take two quick coats-but as we said, the paint dries very quickly allowing for  easy re-coating by the time you complete each area. Allow the paint to fade out randomly as you approach the areas where you will be moving the stencils into to continue the pattern you are developing.</p>
<p><a title="Lace Doily Stencils Set" href="http://www.royaldesignstudio.com/collections/stencil-impressions/products/large-lace-doily-set"><img style="display: block; margin-left: auto; margin-right: auto;" src="//cdn.shopify.com/s/files/1/0094/1122/files/move-wall-stencil-5.jpg?3254" alt="Roller stenciling with Chalk Paint® decorative paint and lace stencils from Royal Design Studio"></a></p>
<p> </p>
<p><strong>Step 5:</strong></p>
<p>As you complete each area move the patterns up, down, and across the wall to continue your pattern development. Note that because the Chalk Paint® will be applied rather heavily you will want to clean your stencil patterns periodically with Motsenbacker's Lift-Off and respray them with the spray adhesive.</p>
<p> </p>
<p style="text-align: center;"><a title="Lace Doily Stencils Set" href="http://www.royaldesignstudio.com/collections/stencil-impressions/products/large-lace-doily-set"><img src="//cdn.shopify.com/s/files/1/0094/1122/files/wall-stenciled-with-lace-doilies.jpg?3254" alt="Lovely Lace Doily Stencils. A great stencil tutorial from Royal Design Studio"></a></p>
<p><br>Stenciling a feature wall is a great way accent a pretty space while keeping your stencil time under control. The Lace Doily stencils are ideal for adding a little more romance in the bedroom and would also be lovely for a little girl's room. They looks equally fabulous on pillows, curtains and tablecloths. Stay tuned for another tutorial on stenciling this lace doily pillow coming soon!</p>
<p><strong>Find MORE Lace stencil project how-to's here:</strong></p>
<p><a title="How to Stencil a Lace Doily" href="http://www.royaldesignstudio.com/blogs/how-to-stencil/8729263-stencil-how-to-lace-doily-stripe">Stencil How-to: Lace Doily Stripe</a></p>]]>
    </content>
  </entry>
  <entry>
    <id>http://www.royaldesignstudio.com/blogs/how-to-stencil/8729263-stencil-how-to-lace-doily-stripe</id>
    <published>2013-08-27T10:46:10-07:00</published>
    <updated>2015-01-14T15:38:26-08:00</updated>
    <link rel="alternate" type="text/html" href="http://www.royaldesignstudio.com/blogs/how-to-stencil/8729263-stencil-how-to-lace-doily-stripe"/>
    <title>Stencil How-to: Lace Doily Stripe</title>
    <author>
      <name>MELANIE ROYALS</name>
    </author>
    <summary type="html">
      <![CDATA[<a title="Lace Doily Stencil-Margaret" href="http://www.royaldesignstudio.com/products/margaret-lace-doily-stencil"><img src="//cdn.shopify.com/s/files/1/0094/1122/files/Lace-wall-stencil-doilies-t_compact.jpg?3254" alt=""></a><p><a class="read-more" href="http://www.royaldesignstudio.com/blogs/how-to-stencil/8729263-stencil-how-to-lace-doily-stripe">More</a></p>]]>
    </summary>
    <content type="html">
      <![CDATA[<p style="text-align: center;"><a title="Lace Doily Stencil Margaret" href="http://www.royaldesignstudio.com/products/margaret-lace-doily-stencil"><img src="//cdn.shopify.com/s/files/1/0094/1122/files/Lace-wall-stencil-doilies.jpg?3254" alt="How to stencil tutorial to create a lacy stripe treatment with a Lace Doily Stencil from Royal Design Studio"></a></p>
<p> </p>
<p>Here's a simple and simply lovely <strong>how to stencil tutorial</strong> for using one of our romantic lace doily designs, the <a title="Margaret Doily Lace Stencil from Royal Design Studio" href="http://www.royaldesignstudio.com/products/margaret-lace-doily-stencil">Margaret Doily Lace stencil</a>. Rather than repeat the stencil pattern randomly on the wall, consider creating an elegant focal point on a wall by repeating the stencil vertically to create a lacy stripe effect.</p>
<p>All of our Lace Doily stencil patterns come in 2 layers-a silhouette shape layer and a design detail layer. This gives you different options for how to use them. In this case, we started with a soft yellow color on the wall (created with a 1:1 mix of Chalk Paint® in Arles and Cream). In order to get a white doily we first use the silhouette shape layer to paint a solid white shape.</p>
<p><br><strong>Stencil Supplies for This Project:</strong></p>
<p><a href="http://www.royaldesignstudio.com/products/margaret-lace-doily-stencil" target="_blank">Margaret Lace Doily Stencil</a></p>
<p><a href="http://www.royaldesignstudio.com/collections/annie-sloan-chalk-paint-collection/">Chalk Paint® Decorative Paint Colors</a>: <a href="http://www.royaldesignstudio.com/products/pure-white-annie-sloan-chalk-paint" target="_blank">Pure White</a>, <a href="http://www.royaldesignstudio.com/products/paris-gray-annie-sloan-chalk-paint" target="_blank">Paris Grey</a>, <a href="http://www.royaldesignstudio.com/products/french-linen-annie-sloan-chalk-paint" target="_blank">French Linen</a>, <a href="http://www.royaldesignstudio.com/products/arles-annie-sloan-chalk-paint" target="_blank">Arles </a>+ <a href="http://www.royaldesignstudio.com/products/cream-annie-sloan-chalk-paint" target="_blank">Cream</a></p>
<p>Small <a href="http://www.royaldesignstudio.com/collections/stencil-rollers/products/4-nylon-roller-set">Foam Paint Roller,</a> <a href="http://www.royaldesignstudio.com/collections/stencil-rollers/products/14-stencil-roller-handle">Roller Handle</a>, &amp; <a href="http://www.royaldesignstudio.com/products/4-paint-roller-tray">Paint Tray</a></p>
<p><a title="Stencil Brushes" href="http://www.royaldesignstudio.com/collections/stencil-brushes">Stencil Brushes</a></p>
<p>Contractor's Paper, Paper Towels, Painter's Tape, Level, Ruler, Spray Adhesive (we love 3M Super 77)</p>
<br><p> </p>
<p style="text-align: center;"><a title="Lace Doily Stencil" href="http://www.royaldesignstudio.com/products/margaret-lace-doily-stencil"><img src="//cdn.shopify.com/s/files/1/0094/1122/files/Lace-Doily-Stencil-1-2.jpg?3254" alt="Stenciling the Margaret Doily Lace stencil for a feature wall how-to stencil tutorial | Royal Design Studio"></a></p>
<p style="text-align: left;"><strong>Step 1:</strong><br>Use a level and soft pencil to mark a "plumb" line on the wall where you want the center of your lacy stripe to be.<br><br></p>
<p style="text-align: left;"><strong>Step 2:</strong><br>Use a Sharpie marker and ruler to draw a line down the center of both layers of the doily stencil pattern.</p>
<p style="text-align: center;"><a title="Doily Lace Stencil" href="http://www.royaldesignstudio.com/products/margaret-lace-doily-stencil"><img src="//cdn.shopify.com/s/files/1/0094/1122/files/Lace-Doily-Stencil-3-4.jpg?3254" alt="Stenciling the Margaret Doily Lace stencil for a feature wall how-to stencil tutorial | Royal Design Studio"></a></p>
<p style="text-align: left;"> </p>
<p style="text-align: left;"><strong>Step 3:</strong><br>Begin by stencil painting in the silhouette layer of the doily pattern. Align the line you made on the stencil up with the pencil line on your wall.<br><br></p>
<p style="text-align: left;"><strong>Step 4:</strong><br>This step is optional, but helps you to get a cleaner edge on your stencil print as you will have little to no bleed-under with the paint when using a Stencil Brush. Load a <a title='1.5" Stencil Brush' href="http://www.royaldesignstudio.com/collections/stencil-brushes/products/1-1-2-stencil-brush">1.5" Stencil Brush</a> with Chalk Paint® in Pure White, and offload excess paint by swirling on a paper towel. Use a circular motion with the brush to paint all around the edge of the open shape. This will build up a little ridge of paint around the edge of the stencil which will discourage any paint seepage when you use the foam roller to stencil on the next step.</p>
<p style="text-align: left;"> </p>
<p style="text-align: center;"><a title="Margaret Doily Lace Stencil" href="http://www.royaldesignstudio.com/products/margaret-lace-doily-stencil"><img src="//cdn.shopify.com/s/files/1/0094/1122/files/Lace-Doily-Stencil-5-6.jpg?3254" alt="Stenciling the Margaret Doily Lace stencil for a feature wall how-to stencil tutorial | Royal Design Studio"></a></p>
<p style="text-align: left;"> </p>
<p style="text-align: left;"><strong>Step 5:</strong><br>Load a 4" foam roller with Pure White paint and offload excess paint on paper towels or contractor's paper. Use a light but firm pressure to fill in the silhouette shape of the stencil with the white paint. You will need to do at least 2 coats for good coverage, but the Chalk Paint® dries super fast!</p>
<p style="text-align: left;"><strong>Step 6:</strong><br>One all your silhouette shapes are completely filled in and dry, spray the doily detail layer of the stencil lightly with spray adhesive and position it carefully over the painted white shape.</p>
<p style="text-align: left;"> </p>
<p style="text-align: center;"><a title="Lace Doily Wall Stencil" href="http://www.royaldesignstudio.com/products/margaret-lace-doily-stencil"><img src="//cdn.shopify.com/s/files/1/0094/1122/files/Lace-Doily-Stencil-7-8.jpg?3254" alt="How to stencil tutorial to create a lacy stripe treatment with a Lace Doily Stencil from Royal Design Studio"></a></p>
<p style="text-align: left;"> </p>
<p style="text-align: left;"><strong>Step 7:</strong><br>Tape the silhouette stencil layer back in place. This will keep the gray paint used in the next step from getting on your wall!</p>
<p style="text-align: left;"><br><strong>Step 8:</strong><br>Mix the Chalk Paint® color Paris Gray and French Linen 1:1 to create a warm, soft gray. Use a <a title='1" Stencil Brush' href="http://www.royaldesignstudio.com/collections/stencil-brushes/products/1-stencil-brush">1" Stencil Brush </a>to stencil in the detail areas of the design with solid color. (Substitute any warm gray craft paint if you wish)</p>
<p style="text-align: center;"><a title="Lace Doily Wall Stencil" href="http://www.royaldesignstudio.com/products/margaret-lace-doily-stencil"><img src="//cdn.shopify.com/s/files/1/0094/1122/files/Large-Doily-Wall-Stencil.jpg?3254" alt="How to stencil tutorial to create a lacy stripe treatment with a Lace Doily Stencil from Royal Design Studio"></a></p>
<p style="text-align: left;"><br>The stenciled lace doily stripe creates a perfect backdrop and accent for a romantic spot in a sunny room. Here, we've finished off the look with a coordinating white stenciled table and some thrift store milk glass vases filled and white roses.</p>
<p style="text-align: left;"><strong>Here are some additional ideas for this stenciled stripe effect to get your creative paint wheels turning:</strong></p>
<ul>
<li>Stencil some doilies down the center of a table runner, on a door, or at the edge of floor to ceiling curtains.</li>
<li>Create a horizontal stripe around a high ceiling to create a lacy valance effect.</li>
<li>Stencil a large doily design, such as our <a title="Elizabeth Lace Doily Stencil from Royal Design Studio" href="http://www.royaldesignstudio.com/products/elizabeth-lace-doily-stencil">Elizabeth Lace Doily Stencil</a> on a wood floor down a long hallway.</li>
</ul><p style="text-align: left;"> </p>
<p style="text-align: center;"><a title="Victoria Lace Doily Stencil" href="http://www.royaldesignstudio.com/products/victoria-lace-doily-stencil"><img src="//cdn.shopify.com/s/files/1/0094/1122/files/stenciled-table-with-lace.jpg?3262" alt="Large Victoria Doily Stencil pattern stenciled on a tabletop | Royal Design Studio"></a></p>
<p style="text-align: left;"> </p>
<p style="text-align: left;"><strong>Stencil Bonus!!</strong> The gorgeous <a title="Victoria Doily Lace Stencil from Royal Design Studio" href="http://www.royaldesignstudio.com/products/victoria-lace-doily-stencil">Victoria Doily Lace stencil</a> was used in the same colors to glam up a simple table. The Victoria Doily is quite large at 21" wide, and we centered on the small round tabletop, allowing the design to run off the edge. It makes for a great allover stencil effect!</p>
<p style="text-align: left;"> </p>]]>
    </content>
  </entry>
  <entry>
    <id>http://www.royaldesignstudio.com/blogs/how-to-stencil/8384153-stencil-how-to-metallic-moroccan-stencils</id>
    <published>2013-08-08T17:32:25-07:00</published>
    <updated>2015-01-14T15:40:44-08:00</updated>
    <link rel="alternate" type="text/html" href="http://www.royaldesignstudio.com/blogs/how-to-stencil/8384153-stencil-how-to-metallic-moroccan-stencils"/>
    <title>Stencil How-to: Metallic Moroccan Stencils</title>
    <author>
      <name>MELANIE ROYALS</name>
    </author>
    <summary type="html">
      <![CDATA[<p><img alt="" src="//cdn.shopify.com/s/files/1/0094/1122/files/excerpt_3.jpg?2804"></p><p><a class="read-more" href="http://www.royaldesignstudio.com/blogs/how-to-stencil/8384153-stencil-how-to-metallic-moroccan-stencils">More</a></p>]]>
    </summary>
    <content type="html">
      <![CDATA[<p style="text-align: center;"><a href="http://www.royaldesignstudio.com/collections/moroccan-stencils" target="_blank"><img alt="How to use Moroccan stencils and metallic stencil cremes to create an elegant art wall installation" src="//cdn.shopify.com/s/files/1/0094/1122/files/Metallic-Moroccan-Stencils_1f17d4a0-4c50-428f-94d4-2fe23d6faf86.jpg?2814"></a> </p>
<p>For this stencil how-to we show you how to use stencils from our <a title="Moroccan Stencils from Royal Design Studio" href="http://www.royaldesignstudio.com/collections/moroccan-stencils">Moroccan Stencil Collection</a> with shimmering metallic Stencil Creme paints for a fabulous DIY wall art project on watercolor paper. It's and easy and elegant to incorporate many different allover stencil patterns and you can then create a unique and moveable collage-style installation on your walls that is easy to rearrange as you wish!</p>
<p style="text-align: center;"><a href="http://www.royaldesignstudio.com/collections/stencil-cremes"><img alt="Using Royal Stencil Creme paints and Moroccan stencils from Royal Design Studio to create lovely wall art" src="//cdn.shopify.com/s/files/1/0094/1122/files/Supplies_colors_large.jpg?2705"></a></p>
<p> </p>
<p><strong>Stencil Supplies you will need for this project:</strong><br><br></p>
<ul>
<li>
<a title="Stencil Creme Paints from Royal Design Studio" href="http://www.royaldesignstudio.com/collections/stencil-cremes">Royal Stencil Creme paints*</a>: Bright Gold, Antique Gold, Pearl Oyster, Smoked Oyster, Antique Silver</li>
<li>
<a title="Chalk Paint® decorative paint in Pure White" href="http://www.royaldesignstudio.com/collections/annie-sloan-chalk-paint-collection/">Pure White Chalk Paint®</a> decorative paint</li>
<li><a href="http://www.royaldesignstudio.com/products/foam-brush">2" Foam Brushes</a></li>
<li>1" and 1.5"<a title="Best Stencil Brushes from Royal Design Studio" href="http://www.royaldesignstudio.com/collections/stencil-brushes"> Stencil Brushes</a>
</li>
<li>22" x 30" heavy watercolor paper (purchased from Michaels)</li>
<li>Blue low-tack Painter's Tape</li>
<li>Drywall T-Square or other metal straight edge</li>
</ul><p>*Our <strong>Royal Stencil Creme paints are now available in 2oz. AND 8oz. sizes</strong>. If you are doing a larger project we recommend checking out the 8oz. sizes</p>
<p> </p>
<p><strong>Custom Stencil Creme Color Combinations:</strong></p>
<ul>
<li>Champagne: 1x Bright Gold + 1X Pearl Oyster + .25X Smoked Oyster</li>
<li>Medium Gold: 1X Bright Gold + 1X Antique Gold</li>
<li>Light Oyster: 1X Smoked Oyster + 1X Pearl Oyster</li>
</ul><p> </p>
<p style="text-align: center;"><a href="http://http://www.royaldesignstudio.com/collections/moroccan-stencils" style="text-align: center;"><img alt="Moroccan Stencils from Royal Design Studio look amazing in soft metallic colors" src="//cdn.shopify.com/s/files/1/0094/1122/files/Moroccan-Stencils_3.jpg?2717"></a></p>
<p style="text-align: left;"> </p>
<p style="text-align: left;">For this project, I wanted to showcase some of our <strong>new Moroccan stencil patterns</strong> that were developed for our <a title="Moroccan Stencils and Painting Retreat" href="http://www.royaldesignstudio.com/blogs/workshops-events/7833789-new-moroccan-stencils-on-the-horizon">Moroccan Stencil Painting Retreat </a>in May 2013. Since the project there is awaiting publication I can't share it yet, but wanted to recreate the same sort of mix of Moroccan patterns in soft metallic colors-some layered tone-on-tone and some just utilizing the pretty white texture of the watercolor paper.</p>
<p style="text-align: left;"><b><br>Royal Design Studio Moroccan Stencils Used:</b></p>
<ul>
<li><a href="http://www.royaldesignstudio.com/products/bird-tile-moroccan-stencil">Bird Tile Moroccan Stencil</a></li>
<li><a href="http://www.royaldesignstudio.com/products/starry-moroccan-night-stencil">Starry Moroccan Night Stencil</a></li>
<li><a href="http://www.royaldesignstudio.com/products/moroccan-roundabout-border-stencil">Moroccan Roundabout Border</a></li>
<li><a href="http://www.royaldesignstudio.com/products/hexagons-border-moroccan-stencil">Hexagons Border Moroccan</a></li>
<li><a href="http://www.royaldesignstudio.com/products/small-tangier-lattice">Small Tangier Lattice</a></li>
<li><a href="http://www.royaldesignstudio.com/products/palace-trellis-moroccan-stencil">Palace Trellis Stencil </a></li>
<li><a href="http://www.royaldesignstudio.com/products/fez-blanket-moroccan-stencil">Fez Blanket Moroccan Stencil</a></li>
</ul><p style="text-align: center;"><a href="http://www.royaldesignstudio.com/collections/moroccan-stencils" style="text-align: center;"><img alt="How to prepare watercolor paper for stenciling" src="//cdn.shopify.com/s/files/1/0094/1122/files/Step1_large.jpg?2705"></a></p>
<p><b>Step 1:</b><br> The sheets of watercolor paper naturally have a beautiful irregular edge which provides a nice organic frame for the stenciled artwork. If you are using a full sheet of paper you can simply proceed to Step 2. If you want to create smaller sheet of paper you will need to recreate that torn edge on each side of your smaller sheet. Use a large straight edge (we used a T-square designed for drywall installation) and simply tear the paper along the straight edge to separate it into smaller sizes. Also tear off a small strip around the edges where the paper has a straight cut on it.</p>
<p style="text-align: center;"><a href="http://www.royaldesignstudio.com/collections/moroccan-stencils" style="text-align: center;"><img alt="Setting up paper for stencils" src="//cdn.shopify.com/s/files/1/0094/1122/files/Step2_large.jpg?2705"></a></p>
<p><b>Step 2:</b><br> Create a squared-off rectangle within the torn edges. Use the T-square (or similar) to measure in about a half inch or so and create nice square corners with a soft pencil. Run Painter's Tape outside of that line to create a clean-edged tape "frame". Now you are ready to either start to stencil (if you want to incorporate the natural white background like we did with our <a title="Palace Trellis Moroccan Stencil" href="http://www.royaldesignstudio.com/collections/moroccan-stencils/products/palace-trellis-moroccan-stencil">Palace Trellis Moroccan Stencil</a>) OR apply a layer of Stencil Creme paint to the background if creating a tone-on-tone stencil treatment. For our Moroccan artwork we combined a bit of both techniques for more interest and variation.</p>
<p style="text-align: center;"><a href="http://www.royaldesignstudio.com/collections/stencil-cremes" style="text-align: center;"><img alt="How to begin stenciling project with metallic stencil cremes" src="//cdn.shopify.com/s/files/1/0094/1122/files/Step3_large.jpg?2705"></a></p>
<p><b>Step 3:</b><br> Use a foam brush or foam roller to apply two or more coats of metallic Stencil Creme paint to the background. You can use the colors straight from the jar, play with your own creative color mixes, or follow our color mixes above.</p>
<p style="text-align: center;"><a href="http://www.royaldesignstudio.com/collections/moroccan-stencils" style="text-align: center;"><img alt="How to paint project using Moroccan stencils from Royal Design Studio" src="//cdn.shopify.com/s/files/1/0094/1122/files/Step4_large.jpg?2705"></a> </p>
<p><b>Step 4:</b><br> For stenciling over our painted metallic backgrounds we used Pure White Chalk Paint®  on some and various custom mixes of Stencil Creme paints on others.</p>
<p style="text-align: center;"><img alt="Moroccan stencil wall art project using patterns and Stencil Cremes from Royal Design Studio. Click for How-to stencil!" src="//cdn.shopify.com/s/files/1/0094/1122/files/stenciling-moroccan-stencils_a0d2de8a-4d44-42fc-a659-ae41059db851.jpg?2818"></p>
<p><br>Once the<strong> stencil fun is over the design fun begins</strong>! After playing with an arrangement on a floor or large tabletop, use low-tack double sided foam squares from 3M to affix the stenciled watercolor paper to your wall. Alternatively, you could fix them to the wall with decorative push pins. We began our design with our larger pieces of paper and then played with the smaller pieces over them to get a nice, balanced mix of sizes and colors throughout our wall art installation.</p>
<p>Check out these other Stencil How-to Projects for more ideas for using both Moroccan stencil patterns and Metallic Stencil Cremes:</p>
<ul>
<li><a title="Moroccan Stencils as Canvas Art" href="http://www.royaldesignstudio.com/blogs/how-to-stencil/8368295-stencil-how-to-colorful-moroccan-canvas-art">How to Stencil Colorful Moroccan Canvas Art</a></li>
<li><a title="How to stencil with Stencil Cremes" href="http://www.royaldesignstudio.com/blogs/how-to-stencil/5172162-basic-brush-stenciling-with-royal-stencil-cremes">Basic Brush Stenciling with Royal Stencil Cremes</a></li>
<li><a title="Stencil Cremes with Chalk Paint®" href="http://www.royaldesignstudio.com/blogs/how-to-stencil/7028870-sparkle-up-chalk-paint-with-stencil-cremes">Sparkle Up Chalk Paint® with Royal Stencil Cremes</a></li>
</ul><p><strong><em>Happy Stenciling!</em></strong></p>
<p><strong><em><img style="display: block; margin-left: auto; margin-right: auto;" alt="" src="//cdn.shopify.com/s/files/1/0094/1122/files/Melanie-Royals-stencil-artist.jpg?2832"></em></strong></p>]]>
    </content>
  </entry>
  <entry>
    <id>http://www.royaldesignstudio.com/blogs/how-to-stencil/8368295-stencil-how-to-colorful-moroccan-canvas-art</id>
    <published>2013-07-28T19:05:37-07:00</published>
    <updated>2015-01-14T15:38:26-08:00</updated>
    <link rel="alternate" type="text/html" href="http://www.royaldesignstudio.com/blogs/how-to-stencil/8368295-stencil-how-to-colorful-moroccan-canvas-art"/>
    <title>Stencil How-to: Colorful Moroccan Canvas Art</title>
    <author>
      <name>MELANIE ROYALS</name>
    </author>
    <summary type="html">
      <![CDATA[<p style="text-align: left;"><img alt="Bright Moroccan Stencils" src="//cdn.shopify.com/s/files/1/0094/1122/files/excerpt_1.jpg?2792"> </p><p><a class="read-more" href="http://www.royaldesignstudio.com/blogs/how-to-stencil/8368295-stencil-how-to-colorful-moroccan-canvas-art">More</a></p>]]>
    </summary>
    <content type="html">
      <![CDATA[<p style="text-align: center;"><a href="http://www.royaldesignstudio.com/collections/moroccan-stencils" style="text-align: center;"><img alt="How to stencil Moroccan inspired art on canvas with Royal Design Studio stencils" src="//cdn.shopify.com/s/files/1/0094/1122/files/collage_3.jpg?2689"></a></p>
<p style="text-align: left;"> </p>
<p style="text-align: left;">What a fun, Fun, <b>FUN stencil project </b>how-to we have to share with you! Create your own <b>custom stenciled canvas art collection</b> by following our step-by-step tutorial below. Learn how to combine a limited color palette, bright color blocking, and super easy stenciling techniques to create your own colorful canvas beauties.</p>
<p style="text-align: center;"> <a href="http://www.royaldesignstudio.com/collections/annie-sloan-chalk-paint-collection" style="text-align: center;"><img alt="Annie Sloan Chalk Paint and Moroccan stencils to create colorful canvas art" src="//cdn.shopify.com/s/files/1/0094/1122/files/paint-colors.jpg?2669"></a></p>
<p style="text-align: center;"> </p>
<p style="text-align: left;"><b><a href="http://www.royaldesignstudio.com/collections/annie-sloan-chalk-paint-collection/"><span>Chalk Paint® Decorative Paint Colors</span></a>:</b> Pure White, English Yellow, Old White, Antoinette, Emperor’s Silk, Barcelona Orange, Arles</p>
<p style="text-align: left;">We used a fresh 4-color palette for our stenciled canvases. Of course, you can use any of the l<b>ovely colors of Chalk Paint®</b> right out of the jar, but it's super fun to get creative with some simple color mixing. We encourage you to experiment on you own to come up with gorgeous hues....OR simply follow our easy paint color recipes below. <b>Hint: </b>translate the ratios to whatever unit of measure you are using to mix enough paint for the size of your project, i.e. 1C Antoinette to 2/3C Emperor's Silk.</p>
<p style="text-align: left;"> </p>
<p style="text-align: left;"><b><span>Colorful Custom Chalk Paint® Color Combinations:</span></b></p>
<p style="text-align: left;"><span>Bright Pink: 1x <a href="http://www.royaldesignstudio.com/products/antoinette-annie-sloan-chalk-paint">Antoinette Chalk Paint</a> + 2/3x <a href="http://www.royaldesignstudio.com/products/emperors-silk-annie-sloan-chalk-paint">Emperor’s Silk Chalk Paint</a></span></p>
<p style="text-align: left;"><span>Lemon Yellow: 1x English Yellow Chalk Paint + 1/3x <a href="http://www.royaldesignstudio.com/products/old-white-annie-sloan-chalk-paint">Old White Chalk Paint</a><br></span></p>
<p style="text-align: left;"><span>Orange Sherbet: 1x <a href="http://www.royaldesignstudio.com/products/barcelona-orange-annie-sloan-chalk-paint">Barcelona Orange Chalk Paint</a> + 1/4x <a href="http://www.royaldesignstudio.com/products/arles-annie-sloan-chalk-paint">Arles Chalk Paint</a> + 1/4x <a href="http://www.royaldesignstudio.com/products/pure-white-annie-sloan-chalk-paint">Pure White Chalk Paint</a></span></p>
<p style="text-align: left;"> </p>
<p><b><span>Additional Stencil Project Supplies:</span></b></p>
<p><span><span><span>Assorted Sizes of <a href="http://www.royaldesignstudio.com/collections/stencil-brushes">Royal Design Studio Stencil Brushes</a></span></span> </span></p>
<p> </p>
<p><a href="http://www.royaldesignstudio.com/collections/stencil-rollers/products/4-nylon-roller-set"><span>Foam Paint Roller</span></a><span>, </span><a href="http://www.royaldesignstudio.com/collections/stencil-rollers/products/14-stencil-roller-handle"><span>Roller Handle</span></a><span>, </span><a href="http://www.royaldesignstudio.com/products/4-paint-roller-tray"><span>Paint Tray</span></a></p>
<p><span><span><span>Contractor's Paper, Paper Towels, Painter's Tape</span></span></span></p>
<p><span>4-18”x24” Gallery Wrapped Canvases (available at your local arts or crafts store)</span></p>
<p style="text-align: center;"><a href="http://www.royaldesignstudio.com/collections/moroccan-stencils" style="text-align: center;"><img alt="How to use Moroccan stencils to paint bright canvas artwork" src="//cdn.shopify.com/s/files/1/0094/1122/files/stencils_1.jpg?2673"></a></p>
<p style="text-align: left;"> </p>
<p><span>We chose 8 different stencils from our <a href="http://www.royaldesignstudio.com/collections/moroccan-stencils">Moroccan Stencil Collection</a></span><span>for this project-looking for patterns that had a similar theme, yet offered some variety in shapes and scales. We also chose some allover patterns and some border patterns for more variety. You can do a similar project with stencils that you might have on hand, or with less patterns-but we recommend using at least 5 different designs. <br></span></p>
<p><b><span>Royal Design Studio Moroccan Stencils:</span></b></p>
<p> </p>
<ul>
<li><span><a href="http://www.royaldesignstudio.com/products/small-atlas-allover">Small Atlas Allover Stencil</a></span></li>
<li><span><a href="http://www.royaldesignstudio.com/products/small-meknes-circles-moroccan-stencil">Small Moroccan Meknes Circles</a></span></li>
<li><span><a href="http://www.royaldesignstudio.com/products/small-tangier-lattice">Small Tangier Lattice Stencil</a></span></li>
<li><a href="http://www.royaldesignstudio.com/products/moroccan-key-stencil"><span>Small Moroccan Key Stencil</span></a></li>
<li><span><a href="http://www.royaldesignstudio.com/products/minaret-border-moroccan-stencil">Minaret Border Moroccan Stencil</a></span></li>
<li><span><a href="http://www.royaldesignstudio.com/products/tray-border-moroccan-stencil">Tray Border Moroccan Stencils</a></span></li>
<li><a href="http://www.royaldesignstudio.com/products/squared-diamonds-moroccan-stencil"><span>Squared Diamonds Moroccan Stencil</span></a></li>
<li><span><a href="http://www.royaldesignstudio.com/products/star-diamonds-moroccan-furniture-stencil">Star Diamonds Moroccan Furniture Stencil</a></span></li>
</ul><div style="text-align: center;"><a href="http://www.royaldesignstudio.com/collections/annie-sloan-chalk-paint-collection" style="text-align: center;"><img alt="Stenciling colorful creations on canvas with Royal Design Studio " src="//cdn.shopify.com/s/files/1/0094/1122/files/base-coats_1.jpg?2693"></a></div>
<div style="text-align: left;">
<br><b>Basecoating and Color Blocking:</b><br> When color blocking canvases (which look absolutely fab even without stencils BTW) aim for a little variety in the width and placement of your stripes in relation to how the canvases will be placed on your wall. Follow our color and layout examples shown above or brainstorm your own!!</div>
<p style="text-align: center;"><span> </span><a href="http://www.royaldesignstudio.com/collections/annie-sloan-chalk-paint-collection" style="text-align: center;"><img alt="DIY Stencil art on canvas with Moroccan stencil designs" src="//cdn.shopify.com/s/files/1/0094/1122/files/STEP-2.jpg?2673"></a></p>
<p style="text-align: left;"><b>Step 1:<br></b>Use a short-nap paint roller to roll two coats of each of the <b>custom Chalk Paint® colors</b> and Pure White Chalk Paint on the canvases and allow them to dry.<b><br></b></p>
<p style="text-align: center;"><a href="http://www.royaldesignstudio.com/collections/annie-sloan-chalk-paint-collection" style="text-align: center;"><img alt="How to Stencil Custom Artwork with Moroccan Stencils by Royal Design Studio" src="//cdn.shopify.com/s/files/1/0094/1122/files/STEP-4.jpg?2675"></a></p>
<p style="text-align: left;"><b>Step 2:<br></b>Use tape to mask off stripes of varying widths and shapes. Burnish the tape well and roll a contrasting paint color within the taped-off area. Allow this to dry.<b><br></b></p>
<p style="text-align: center;"><a href="http://www.royaldesignstudio.com/products/moroccan-key-stencil"><img alt="Moroccan stencils on canvas DIY" src="//cdn.shopify.com/s/files/1/0094/1122/files/STEP-12.jpg?2695"></a></p>
<p style="text-align: left;"><b>Step 3:<br></b>Use the painter's tape again to mask off each section as you work. The <b>stenciling here is all done with the same colors of Chalk Paint®</b> that are used for the base coats. Because of the small project size and small size of the stencil openings it is best to simply use stencil brushes for the stenciling. The Chalk Paint® will cover VERY well and dry quickly. Dip just the tip of the <b>stencil brush</b> straight into the paint and offload any excess paint well on good quality paper towels by rubbing the brush hard in a circular motion. Use that same circular motion and a light pressure to then apply the paint within the stencil openings.</p>
<p style="text-align: center;"><a href="http://www.royaldesignstudio.com/products/moroccan-key-stencil" style="text-align: center;"><img alt="Stenciling step-by-step with Royal Design Studio" src="//cdn.shopify.com/s/files/1/0094/1122/files/STEP-8.jpg?2679"></a></p>
<p style="text-align: left;"><b>Step 4:<br></b>For some patterns you may want to introduce two colors, as we did with the <a href="http://www.royaldesignstudio.com/products/moroccan-key-stencil">Moroccan Key stencil</a> above. Note that we've not cared that a bit of the pink color has crept into the stencil openings. That is because the Pure White Chalk Paint® used in the next step will cover it nicely and it will help us with placement!</p>
<p style="text-align: center;"><a href="http://www.royaldesignstudio.com/products/moroccan-key-stencil" style="text-align: center;"><img alt="Stenciling turorial on how to paint your own Moroccan designs on canvas" src="//cdn.shopify.com/s/files/1/0094/1122/files/STEP-9.jpg?2681"></a></p>
<p style="text-align: left;"><b>Step 5:<br></b>You can simply use a smaller <a href="http://http://www.royaldesignstudio.com/collections/stencil-brushes">Stencil Brush</a> to isolate a color within a certain design element, but sometimes it's just as easy to use tape to isolate the element cleanly. That is what we did here for the star diamond shape.<b><br></b></p>
<p style="text-align: center;"><a href="http://www.royaldesignstudio.com/products/moroccan-key-stencil" style="text-align: center;"><img alt="How to stencil Moroccan inspired art on canvas" src="//cdn.shopify.com/s/files/1/0094/1122/files/STEP-10.jpg?2683"></a></p>
<p style="text-align: left;"><b>Step 6:<br></b>Then we simply moved that single element around and lined it up over the edges of each star shape that was previously "outlined" with pink paint.<b><br></b></p>
<p style="text-align: center;"><a href="http://www.royaldesignstudio.com/collections/moroccan-stencils" style="text-align: center;"><img alt="DIY stenciling on canvas with Moroccan Key Stencil by Royal Design Studio" src="//cdn.shopify.com/s/files/1/0094/1122/files/STEP-11.jpg?2685"></a></p>
<p style="text-align: left;"><b>Step 7:<br></b>Most of the stencil patterns are done in one color, however, making this a super fast and fun little stencil project. One thing that we did to tie all of the canvases together a bit more was to use one of the patterns, the<a href="http://www.royaldesignstudio.com/products/minaret-border-moroccan-stencil"> Minaret Border stencil</a>, in a little different way on each of the canvases<b>. </b>In the image above we are simply stenciling one half of the design in white to create a simple detail coming off the allover Moroccan stencil pattern to the left.</p>
<p style="text-align: center;"><img alt="Stencil How-to: Colorful Moroccan Canvas Art" src="//cdn.shopify.com/s/files/1/0094/1122/files/Moroccan-Stencils-Canvas-Art_grande.jpg?2715"> </p>
<p style="text-align: left;"> </p>
<p style="text-align: left;"><b>TA DA:</b><br> Here is our final stenciled canvas layout on the wall. We opted to arrange the canvases in a pinwheel fashion but they could be placed side by side, or all hung stacked in the same direction, of course. If stenciling canvas isn't your cup of tea, imagine how GREAT this type of treatment would look on a fun furniture piece or a funky floorcloth.</p>
<p style="text-align: left;">Bright colors don't quite suit you? Substitute a more neutral and sedate color palette of beige and taupe and you have a COMPLETELY different look! That's <b>the beauty of decorating with stencils!</b> YOU get to make all the design choices to fit your taste and palette.</p>
<p style="text-align: left;"><b><i>Happy Stenciling!</i><br></b></p>]]>
    </content>
  </entry>
  <entry>
    <id>http://www.royaldesignstudio.com/blogs/how-to-stencil/8000811-stencil-how-to-ikat-fabric-effect</id>
    <published>2013-05-31T13:42:50-07:00</published>
    <updated>2015-01-14T15:38:26-08:00</updated>
    <link rel="alternate" type="text/html" href="http://www.royaldesignstudio.com/blogs/how-to-stencil/8000811-stencil-how-to-ikat-fabric-effect"/>
    <title>Stencil How-to: Ikat Fabric Effect</title>
    <author>
      <name>MELANIE ROYALS</name>
    </author>
    <summary type="html">
      <![CDATA[<p><a href="http://www.royaldesignstudio.com/collections/allover-ethnic-stencils/products/khanjali-ikat-stencil"><img src="//cdn.shopify.com/s/files/1/0094/1122/files/Ikat-How-to-stencil.jpg?1838"></a> </p><p><a class="read-more" href="http://www.royaldesignstudio.com/blogs/how-to-stencil/8000811-stencil-how-to-ikat-fabric-effect">More</a></p>]]>
    </summary>
    <content type="html">
      <![CDATA[<p style="text-align: center;"> <a style="text-align: center;" href="http://www.royaldesignstudio.com/collections/allover-ethnic-stencils/products/khanjali-ikat-stencil"><img alt="How to stencil an Ikat fabric effect on walls with Chalk Paint® and the Khanjali Ikat stencil from Royal Design Studio. Easy stenciled finish!" src="//cdn.shopify.com/s/files/1/0094/1122/files/Ikat-wall-stencil-fabric-project.jpg?1854"></a></p>
<p>Do you want to learn a super <b>fast and easy stencil technique to create a realistic looking Ikat fabric effect</b> on a wall or piece of furniture. Well then, read on my friends! Ikat fabrics (pronounced EE-kat) have been all the trend rage for some time now, elevating this iconic weave to "classic, here to stay" design status. </p>
<p><b>Ikat is hardly new though</b>-it is one of the oldest forms of textile decoration that involves resist-dying the threads prior to weaving,and this technique is used in many variations and styles throughout the world. Modern day Ikat fabrics are primarily printed to simulate the classic look of woven Ikat, which produces the distinctive look of an uneven (even jagged) edge with a somewhat blurred effect. Our new Khanjali Ikat stencil is designed with it's own vertical movement and blurred edge effect built in-but this easy stencil technique will add even more of that special Ikat fabric vibe to the look. Let's get started!</p>
<p style="text-align: center;"><a style="text-align: center;" href="http://www.royaldesignstudio.com/collections/decorative-finishing-tools/"><img alt="Stenciling supplie for how to stencil an Ikat fabric effect on walls" src="//cdn.shopify.com/s/files/1/0094/1122/files/Ikat-stencil-project-supplies.jpg?1854"></a> </p>
<p><b>Stencil Supplies you will need:</b></p>
<ul>
<li><a href="http://www.royaldesignstudio.com/collections/allover-ethnic-stencils/products/khanjali-ikat-stencil">Khanjali Ikat Wall Stencil from Royal Design Studio</a></li>
<li><a href="http://www.royaldesignstudio.com/collections/stencil-cremes/products/pearl-oyster-stencil-creme">Royal Stencil Creme Paint: Pearl Oyster</a></li>
<li>
<a href="http://www.royaldesignstudio.com/collections/annie-sloan-chalk-paint-collection/">Chalk Paint® Decorative Paint Colors</a>: Country Gray, Old Ochre, Provence, Versailles, Old White</li>
<li><a href="http://www.royaldesignstudio.com/collections/stencil-brushes">3-1" Stencil Brushes</a></li>
<li>
<a href="http://www.royaldesignstudio.com/collections/stencil-rollers/products/4-nylon-roller-set">Nylon Paint Roller</a>, <a href="http://www.royaldesignstudio.com/collections/stencil-rollers/products/14-stencil-roller-handle">Roller Handle</a>, <a href="http://www.royaldesignstudio.com/products/4-paint-roller-tray">Paint Tray</a>
</li>
<li><a href="http://www.royaldesignstudio.com/collections/decorative-finishing-tools/products/2-chip-brush-set-of-6">2" or 3" Double Chip Brush</a></li>
<li>Contractor's Paper, Paper Towels, Painter's Tape</li>
</ul><p><b>Painting your background color:</b></p>
<p>We used a 1:1 mix of <a href="http://www.royaldesignstudio.com/collections/annie-sloan-chalk-paint-collection/products/old-ochre-annie-sloan-chalk-paint">Country Gray</a> and <a href="http://www.royaldesignstudio.com/collections/annie-sloan-chalk-paint-collection/products/old-ochre-annie-sloan-chalk-paint">Old Ochre Chalk Paint®</a> for our background and rolled it on in two layers. You can substitute any good quality latex paint in a similar tone-but definitely choose a matte finish that will match the sheen of the Chalk Paint® stencil colors. </p>
<ul></ul><p style="text-align: center;"><a style="text-align: center;" href="http://www.royaldesignstudio.com/collections/allover-ethnic-stencils/products/khanjali-ikat-stencil"><img alt="Easy Ikat stencil effect. Full how to post on using the Khanjali Ikat stencil from Royal Design Studio with Chalk Paint® decorative paint" src="//cdn.shopify.com/s/files/1/0094/1122/files/1-Ikat-wall-stencil-blue.jpg?1854"></a> </p>
<p><b>Step 1:</b> The <b>Khanjali Ikat Stencil looks great stenciled <b>simply </b> in one color</b>, but we invite you to take it up a notch (and get a more realistic looking Ikat pattern) by stenciling in two or more colors. We used <a href="http://www.royaldesignstudio.com/collections/annie-sloan-chalk-paint-collection/products/provence-annie-sloan-chalk-paint">Provence Chalk Paint</a> and <a href="http://www.royaldesignstudio.com/collections/annie-sloan-chalk-paint-collection/products/versailles-annie-sloan-chalk-paint">Versailles Chalk Paint</a>, which compliment each other in a very soft, understated way. The easiest way to incorporate two colors in a single layer stencil is to use appropriately size stencil brushes that allow you to isolate the colors in different areas of the pattern. <b>Chalk Paint® works great for stenciling </b>as it covers well, dries quickly and has a nice matte finish. Simply load the tips of your stencil brush into the paint, offload in a circular motion on paper towels, and swirl through the stencil. For this <b>Ikat stencil finish</b>, it is actually desirable that your stenciling is not completely "even" (even easier!) and that some of the Provence blue color creeps into the areas that will be later filled in with Versailles green. In fact, we purposely put some blue in the green areas and vice versa for a more natural, unified look!</p>
<p style="text-align: center;"><a style="text-align: center;" href="http://www.royaldesignstudio.com/collections/allover-ethnic-stencils/products/khanjali-ikat-stencil"><img alt="Easy Ikat stencil effect. Full how to post on using the Khanjali Ikat stencil from Royal Design Studio with Chalk Paint® decorative paint" src="//cdn.shopify.com/s/files/1/0094/1122/files/2-Ikat-wall-stencil-green.jpg?1854"></a> </p>
<p><b>Step 2:</b> Use a <b>new, dry stencil brush to stencil the Versailles color</b> in the remaining open areas of the design. You can follow the same color distribution plan that we did or experiment with your own. You could even introduce another color in some of the smaller design elements for additional contrast.</p>
<p style="text-align: center;"><a style="text-align: center;" href="http://www.royaldesignstudio.com/collections/allover-ethnic-stencils/products/khanjali-ikat-stencil"><img alt="Easy Ikat stencil effect. Full how to post on using the Khanjali Ikat stencil from Royal Design Studio with Chalk Paint® decorative paint" src="//cdn.shopify.com/s/files/1/0094/1122/files/3-Ikat-wall-stencil-pearl.jpg?1854"></a> </p>
<p><b>Step 3:</b> <i>This is an optional step that will introduce a little shimmer here and there in your stenciled finish</i>, and also will start to accentuate the vertical movement that is inherent in Ikat patterns. <b>Dip the tips of a new, dry stencil brush into the Pearl Oyster Stencil Creme</b> and offload slightly on paper towels. Then, holding the brush an angle as show, swipe the brush vertically up and down over the stencil pattern here and there to create subtle vertical lines. It is very important to <b>use a very light pressure on the brush and to do this very sporadically</b>. As always, it's a good idea to practice first! If you end up with too much coverage from this, simply go back over areas with the Chalk Paint colors you stenciled first. </p>
<p style="text-align: center;"><a style="text-align: center;" href="http://www.royaldesignstudio.com/collections/decorative-finishing-tools/"><img alt="Using Chalk Paint® decorative paint as a wash for a stria effect to create a stenciled Ikat fabric finish" src="//cdn.shopify.com/s/files/1/0094/1122/files/4-Ikat-wall-stencil-glaze.jpg?1854"></a></p>
<p><b>Step 4:</b> Create a paint wash by mixing <a href="http://www.royaldesignstudio.com/collections/annie-sloan-chalk-paint-collection/products/old-white-annie-sloan-chalk-paint">Old White Chalk Paint®</a> with water at about a 1:1 ratio and mix well. Dip the tips of your chip brush into the wash and remove excess paint by squeezing lightly with a rag or paper towels. Then additionally drag the brush (held at a low angle) across the contractor's paper to remove even more paint and get the fine stria effect that you will want on your wall. </p>
<p style="text-align: center;"><a style="text-align: center;" href="http://www.royaldesignstudio.com/collections/allover-ethnic-stencils/products/khanjali-ikat-stencil"><img alt="Easy Ikat stencil effect. Full how to post on using the Khanjali Ikat stencil from Royal Design Studio with Chalk Paint® decorative paint" src="//cdn.shopify.com/s/files/1/0094/1122/files/5-Ikat-wall-stencil-stria.jpg?1854"></a></p>
<p><b>Step 5:</b> Using a very light pressure,<b> drag the chip brush at a low angle straight up and down over your entire wall finish</b>. Concentrate on a small area at a time and aim for a random, organic look. This stria layer will follow the fine lines you created with the Pearl Oyster Stencil Creme. Because your a painting this overall it will also add to the IIkat fabric effect and serve to soften the entire finish-knocking back the Provence and Versailles colors slightly and unifying the overall look.</p>
<p style="text-align: center;"><a style="text-align: center;" href="http://www.royaldesignstudio.com/collections/allover-ethnic-stencils/products/khanjali-ikat-stencil"><img alt="Easy Ikat stencil effect. Full how to post on using the Khanjali Ikat stencil from Royal Design Studio with Chalk Paint® decorative paint" src="//cdn.shopify.com/s/files/1/0094/1122/files/Ikat-Wall-Stencil-Khanjali.jpg?1854"></a></p>
<p><b>Completed Khanjali Ikat stencil wall finish.</b> We hope you enjoyed this stencil tutorial and your creative gears are-a-grinding! Of course there are many ways to mix it up a little: Change the stencil colors, stencil light colors over a dark background, leave out the stria, etc. etc. Besides wall stenciling, we also offer a <a href="http://www.royaldesignstudio.com/collections/allover-ethnic-stencils/products/khanjali-ikat-stencil">smaller scale version of the Khanjali stencil</a> that is perfect for fabric and furniture stenciling projects, or for even stenciling smaller wall areas such as niches, powder room ceilings, below a chairrail or in molding framed panels. Don't forget the possibilities of stenciled rugs and floors!!</p>
<p>AND, if you can stand it,  here's another great idea for <a href="http://www.royaldesignstudio.com/blogs/how-to-stencil/7855395-stencil-how-to-faded-silk-suzani-fabric-finish">stenciling a multi-color Ikat look with a stencil roller</a>!</p>
<p>Happy Creating!</p>
<p style="text-align: center;"><img src="//cdn.shopify.com/s/files/1/0094/1122/files/Melanie-Royals-stencil-artist.jpg?1854"></p>]]>
    </content>
  </entry>
  <entry>
    <id>http://www.royaldesignstudio.com/blogs/how-to-stencil/7973661-stencil-how-to-easy-sponge-roller-texture-and-stencil-shadow-shift</id>
    <published>2013-05-27T09:56:37-07:00</published>
    <updated>2015-01-14T15:35:10-08:00</updated>
    <link rel="alternate" type="text/html" href="http://www.royaldesignstudio.com/blogs/how-to-stencil/7973661-stencil-how-to-easy-sponge-roller-texture-and-stencil-shadow-shift"/>
    <title>Stencil How-to: Easy Sponge Roller Texture and Stencil Shadow-Shift</title>
    <author>
      <name>MELANIE ROYALS</name>
    </author>
    <summary type="html">
      <![CDATA[<p><img src="//cdn.shopify.com/s/files/1/0094/1122/files/damask-wall-stencil-corsini-t_1.jpg?1750"><br>  </p><p><a class="read-more" href="http://www.royaldesignstudio.com/blogs/how-to-stencil/7973661-stencil-how-to-easy-sponge-roller-texture-and-stencil-shadow-shift">More</a></p>]]>
    </summary>
    <content type="html">
      <![CDATA[<p style="text-align: center;"><img alt="How to Stencil: Allover Corsini Damask stencil with a textured sponge finish and shadow shift technique. " src="//cdn.shopify.com/s/files/1/0094/1122/files/How-to-stencil-sponge-texture.jpg?1744"> </p>
<p>Here's a <b>super pretty stencil how-to</b> that is perfect for creating a unique, textured look with an <a href="http://www.royaldesignstudio.com/collections/allover-damask-stencils">allover damask wall stencil</a>-or any stencil that you want to add a soft, lacy effect to. We combine this sponge stencil technique here with a simple drop shadow or shadow-shift technique that adds more depth and dimension. The sponge roller stencil effect goes very fast but the drop shadow technique requires that you <b>stencil the pattern twice</b>-which takes some extra time, so we recommend limiting this effect to a stenciled feature wall or lovely piece of furniture. <b><br></b></p>
<p><b>Stencil Supplies you will need:</b></p>
<ul>
<li>
<a href="http://www.royaldesignstudio.com/products/corsini-damask-stencil">Royal Design Studio Stencil: Corsini Damask Damask Pattern</a> Large</li>
<li>Benjamin Moor Aura Paint: Cotswald/AF-150 (base coat)</li>
<li>
<a href="http://www.royaldesignstudio.com/collections/stencil-rollers/products/6-sea-sponge-stencil-roller">6" Sea Sponge Roller</a> and <a href="http://www.royaldesignstudio.com/collections/stencil-rollers/products/14-stencil-roller-handle">Paint Roller Frame</a>
</li>
<li>Large <a href="http://www.royaldesignstudio.com/products/sea-wool-sponge">Sea Wool Sponge</a>
</li>
<li>
<a href="http://www.royaldesignstudio.com/collections/stencil-rollers/products/8-paint-roller-tray">8" Paint Roller tray</a> </li>
<li>
<a href="http://www.royaldesignstudio.com/collections/stencil-brushes/products/1-1-2-stencil-brush">1 1/2" Stencil Brush</a> </li>
<li>Americana Craft Paint in Neutral Grey</li>
<li><a href="http://www.royaldesignstudio.com/products/folk-art-extender">Folk Art Extender</a></li>
<li>Valspar Latex paint in Swiss Coffee (flat)</li>
<li>Blue Painter's Tape and Paper Towels </li>
<li>Contractor's Butcher Paper </li>
</ul><p style="text-align: center;"> </p>
<p style="text-align: center;"><a style="text-align: center;" href="http://www.royaldesignstudio.com/products/corsini-damask-stencil"><img alt="Stencil How-to: Start by stenciling Corsini Damask stencil allover with a stencil brush and craft acrylic paint" src="//cdn.shopify.com/s/files/1/0094/1122/files/Damask-stencil-sponge-finish-1.jpg?1744"></a> </p>
<p><b>Step1:</b> Mix a little Folk Art Extender into your acrylic paint to provide better paint flow off your <a href="http://www.royaldesignstudio.com/collections/stencil-brushes">stencil brush</a>, as well as a softer, more translucent stenciled "shadow". Load just the tips of a large stencil brush and offload excess paint onto good quality paper towels. Stencil in the open areas of your pattern using a soft, swirling motion with the brush.</p>
<p><b>Note:</b> Alternatively, you could use a soft gray latex paint and a flocked foam roller to roll the first stenciled layer on the wall. See <a href="http://www.royaldesignstudio.com/blogs/how-to-stencil/7178768-stencil-how-to-ombre-chevron-stripe-pattern">tips for roller stenciling here</a>.</p>
<p style="text-align: center;"><img alt="Stencil How-to: Repeating  allover Corsini Damask stencil from Royal Design Studio" src="//cdn.shopify.com/s/files/1/0094/1122/files/Damask-stencil-sponge-finish-2.jpg?1744"> </p>
<p><b>Step 2: </b>Repeat the stencil pattern with this first color over your project area. All of our <b>allover pattern stencils have built in registration marks</b> which make it easy to maintain perfect alignment with your stencil. The <a href="http://www.royaldesignstudio.com/products/corsini-damask-stencil">Corsini Damask Stencil</a> uses laser cut stencil lines that correspond to previously stenciled areas as you move the stencil across the wall. Clean your stencil when finished-we recommend using <a href="http://www.royaldesignstudio.com/products/motsenbachers-lift-off-5">Motsenbackers Lift-Off #5</a> latex paint remover!</p>
<p style="text-align: center;"><a style="text-align: center;" href="http://www.royaldesignstudio.com/collections/stencil-rollers/products/6-sea-sponge-stencil-roller"><img alt="Stencil How-to: Using a sponge roller to roll through a wall stencil for a textured effect" src="//cdn.shopify.com/s/files/1/0094/1122/files/Damask-stencil-sponge-finish-3.jpg?1744"></a> </p>
<p><b>Step 3:</b> Put some off-white latex paint (we used an old standard, Swiss Coffee) in a roller tray. Completely dampen your sponge roller and us a terry towel to <b>squeeze out ALL excess water</b>. The sponge should be completely wrung out-damp but definitely NOT dripping. Roll the dampened sponge through the paint in the tray and evenly redistribute paint and remove excess on the textured part of the paint tray. Roll gently on contractor's paper to remove even more paint.</p>
<p style="text-align: center;"><a href="http://www.royaldesignstudio.com/products/6-sea-sponge-stencil-roller"><img alt="Corsini Damask stencil how-to: Use paint and a sponge roller to create a lacy textured effect" src="//cdn.shopify.com/s/files/1/0094/1122/files/Damask-stencil-sponge-finish-4.jpg?1750"></a><br>  </p>
<p><b>Step 4:</b> Replace your clean stencil over your original starting point for your stenciling. <b>Keeping the stencil pattern level</b>, shift the stencil on the diagonal (up and to the right) between 1/16" and 1/8". The amount of your lighter background color that you see exposed will end up being the amount of  "shadow" that you will be left with after the next step.  </p>
<p><i><b>STENCIL PRO TIP:</b> Practice this first on some scrap paper so that you get the amount of "shift" down. Shift too much and you will be left with a dizzying effect. Shift too little and you won't have a definitive shadow.</i></p>
<p>Use a <b>VERY LIGHT pressure to roll the paint-loaded sponge roller across the exposed stencil areas</b>. You really just want to allow the weight of the roller itself to do the work for you. If you press too hard, you will risk pushing paint under the stencil and also lose the lacy, open effect of the sponge roller. You are aiming for something similar to the look of powdered sugar that has been sprinkled over a cake! </p>
<p>Lift the stencil to check your look often. If there are areas that you would like to fill in a little more with sponged paint, go on to Step 5.</p>
<p style="text-align: center;"><a style="text-align: center;" href="http://www.royaldesignstudio.com/products/sea-wool-sponge"><img alt="Stencil How: Use a sea sponge with stencils to create a textured pattern print" src="//cdn.shopify.com/s/files/1/0094/1122/files/Damask-stencil-sponge-finish-5.jpg?1744"></a> </p>
<p><b>Step 5:</b> I like to use a regular dampened sea sponge to <b>fill in smaller areas of the stencil with more control</b>. Wet and wring out your sponge well and dab the prickly side into the paint in your paint tray. Offload excess paint as before onto contractor's paper.</p>
<p style="text-align: center;"><img alt="How-to Stencil: Sponging paint through a damask stencil pattern for a lacy, textured effect" src="//cdn.shopify.com/s/files/1/0094/1122/files/Damask-stencil-sponge-finish-6.jpg?1744"> </p>
<p><b>Step 6:</b> Dab the paint-loaded sponge lightly here and there when and where you want to create a more even look. Go slowly with this and keep lifting the stencil to see how it looks and where you might need to fill in more. Take care not to fill in TOO much paint, or too evenly, as you will lose the textured effect if you fill in with too much paint. You should be able to move your stencil almost immediately without smearing previously sponged areas if you are offloading your sponge and sponge roller as directed! </p>
<p style="text-align: center;"><a style="text-align: center;" href="http://www.royaldesignstudio.com/products/corsini-damask-stencil"><img alt="How-to stencil: Using the Corsini Damask wall stencil with a sponge painted effect and shadow shift technique for a special stencil finish" src="//cdn.shopify.com/s/files/1/0094/1122/files/damask-wall-stencil-corsini.jpg?1744"></a><br>  </p>
<p><b>Final Stencil Finish:</b> The final look of this stenciled finish is very soft and special-yet dramatic and dimensional thanks to the shadow layer. You can do this stencil technique without the shadow layer also, of course, and it can provide a very pretty tone-on-tone effect when done with subtle colors. Alternatively, chose dramatically different colors-like white sponged over black for a more dramatic stenciled effect.</p>
<p><b>Do you love this stencil-shift or "drop shadow" effect?</b> Be sure to check also out this <a href="http://www.royaldesignstudio.com/blogs/how-to-stencil/7143120-stencil-how-to-create-a-drop-shadow-effect-for-a-crowning-touch">Stencil How-to featuring a drop shadow technique</a> with our <a href="http://www.royaldesignstudio.com/collections/stencil-cremes">Royal Stencil Creme stencil paints</a>! </p>]]>
    </content>
  </entry>
  <entry>
    <id>http://www.royaldesignstudio.com/blogs/how-to-stencil/7908799-stencil-how-to-stamping-the-splendor-damask</id>
    <published>2013-05-19T17:01:16-07:00</published>
    <updated>2015-01-14T15:31:59-08:00</updated>
    <link rel="alternate" type="text/html" href="http://www.royaldesignstudio.com/blogs/how-to-stencil/7908799-stencil-how-to-stamping-the-splendor-damask"/>
    <title>Stencil How-to: Stamping the Splendor Damask</title>
    <author>
      <name>MELANIE ROYALS</name>
    </author>
    <summary type="html">
      <![CDATA[<p><a style="text-align: left;" href="http://www.royaldesignstudio.com/products/splendor-damask-bari-j-wall-stencil"><img alt="How to combine stencils with stamps for a wall finish" src="//cdn.shopify.com/s/files/1/0094/1122/files/how-to-stencil-with-stamps-t.jpg?1668"></a><br>  </p><p><a class="read-more" href="http://www.royaldesignstudio.com/blogs/how-to-stencil/7908799-stencil-how-to-stamping-the-splendor-damask">More</a></p>]]>
    </summary>
    <content type="html">
      <![CDATA[<p style="text-align: center;"><a style="text-align: center;" href="http://www.royaldesignstudio.com/products/splendor-damask-bari-j-wall-stencil"><img alt="Stencil How-to: Combining allover wall stencils with craft stamps for a fun, decorative wall finish. Splendor Damask Stencil by Bari J for Royal Design Studio Stencils" src="//cdn.shopify.com/s/files/1/0094/1122/files/Stencils-stamps-stencil-technique.jpg?1654"></a> </p>
<p>Stenciling a feature wall or whole room is a GREAT way to add pattern and personality to any space. Here's an easy idea to put an even MORE personal stamp on your next stencil project: create a fun and unique pattern-in-pattern look with the addition of an allover craft stamp.</p>
<p><b>For this Stencil Project You Will Need:</b></p>
<p><a href="http://www.royaldesignstudio.com/products/splendor-damask-bari-j-wall-stencil">Splendor Damask Stencil by Bari J for Royal Design Studio</a></p>
<p><a href="http://www.royaldesignstudio.com/collections/stencil-rollers">6" Flocked Foam Roller and Roller Handle for Stenciling</a></p>
<p>Rubber Craft Stamp (we found this musical notes stamp at Michael's but you can find many cool rubber stamps online) </p>
<p>Ink Stamp Pad (we used StazOn permanent solvent ink in Timber Brown, also from Michael's)</p>
<p>Paint Colors- Behr Premium Ultra Interior Eggshell in P460-4 Lagoon Rock and Ultra Pure White</p>
<p> </p>
<p style="text-align: center;"><a style="text-align: center;" href="http://www.royaldesignstudio.com/products/splendor-damask-bari-j-wall-stencil"><img alt="Combine an allover wall stencil with decorative stamping to create a super fun wall finish. Splendor Damask stencil from Royal Design Studio" src="//cdn.shopify.com/s/files/1/0094/1122/files/how-to-stencil-with-stamps.jpg?1654"></a> </p>
<p><b>We suggest you practice!<br></b>It's a good idea to practice any new-to-you stenciled wall finish on a sample board before tackling your actual wall surface. You can create a sample board by painting a scrap piece of wood, drywall, or even posterboard with your wall color. Then stencil a small area so that you can get a feel for the stamping technique. At the very least, practice stamping on a piece of paper first. *smile*<b> <br></b></p>
<p><b>Step 1: </b>Starting with the pattern centered on your feature wall, use the basic foam roller stencil technique outlined here to stencil the Splendor Damask pattern (or stencil of YOUR choice) on your wall. Note that it may take 2 coats of paint for complete coverage, especially when stenciling white over a deep colored base coat. Clean your stencil prior to Step 2. (We recommend <a href="http://www.royaldesignstudio.com/products/motsenbachers-lift-off-5">spraying the stencil with Motsenbackers Lift Off</a>, let it soak for a 10 minutes, and clean with a stiff bristled scrub brush)</p>
<p><b>Step 2:</b> Replace your clean stencil over your wall stenciling and tape it securely. Load your Rubber Stamp well by pressing and tapping the Stamp Ink Pad over it, aiming for even, uniform coverage. If you feel like you got too much ink on the stamp, print it first on a scrap piece of paper</p>
<p><b>Step 3:</b> With the stencil in place, press the loaded Rubber Stamp firmly onto the surface. You will work out your own technique but I found the firmly hitting the stamp with the heel of my hand worked well. If you want a uniform look to your stamping, it's best to reload the stamp every time. If you want a more distressed look that fades in and out you can load your stamp less often. Just remember, it's pretty much impossible to line up the stamp in exactly the same place if you decide you want to go back and add more color.</p>
<p><b>Step 4:</b> There may be times you just want to focus in on adding stamped pattern to a certain area. In that case, simply tape a piece of paper over the areas you want to protect or keep the stamp from printing in.</p>
<p><b>Special Note:</b> The permanent stamp inks DEFINITELY will leave their mark on your stencils. As in, you may have a lovely stamped pattern on your stencil for years to come! This will not affect your ability to use the stencil for more painting projects in the future though!</p>
<p style="text-align: center;"><img src="//cdn.shopify.com/s/files/1/0094/1122/files/Melanie-Royals-stencil-artist.jpg?1672"></p>]]>
    </content>
  </entry>
  <entry>
    <id>http://www.royaldesignstudio.com/blogs/how-to-stencil/7844761-stencil-how-to-bloomers-flower-stencils</id>
    <published>2013-05-14T19:11:21-07:00</published>
    <updated>2015-01-13T16:32:10-08:00</updated>
    <link rel="alternate" type="text/html" href="http://www.royaldesignstudio.com/blogs/how-to-stencil/7844761-stencil-how-to-bloomers-flower-stencils"/>
    <title>Stencil How-to: Bloomers Flower Stencils</title>
    <author>
      <name>MELANIE ROYALS</name>
    </author>
    <summary type="html">
      <![CDATA[<p style="text-align: left;"><img alt="Bloomer Zinnia Flower Stencils. Stencil How-to from Royal Design Studio" src="//cdn.shopify.com/s/files/1/0094/1122/files/Zinnia-flower-stencil-project-t_1.jpg?1638"><br>  </p><p><a class="read-more" href="http://www.royaldesignstudio.com/blogs/how-to-stencil/7844761-stencil-how-to-bloomers-flower-stencils">More</a></p>]]>
    </summary>
    <content type="html">
      <![CDATA[<p style="text-align: center;"><a href="http://www.royaldesignstudio.com/products/big-bloomers-stencil-set"><img src="//cdn.shopify.com/s/files/1/0094/1122/files/Zinnia-flower-stencil-project.jpg?1566" alt="Bloomers stencil with fun colors"></a> </p>
<p>Fab Flower Alert! Here's a helpful stencil how-to for using the zinnia flower stencils that we call BLOOMERS from the lovely <a href="http://www.royaldesignstudio.com/collections/bonnie-christine-stencils">Bonnie Christine Stencil Collection from Royal Design Studio</a>. The Bloomer Stencil Sets each feature 2 different sized flower stencils that come in 3 simple-to-use layers and offer maximum design and color combinations. We wanted to show you how easy it is to use these stencils and to "layer" them for a completely custom effect. For this project we used the <a href="http://www.royaldesignstudio.com/collections/bonnie-christine-stencils/products/big-bloomers-stencil-set">Big Bloomers Flower Stencil Set</a> as well as the <a href="http://www.royaldesignstudio.com/products/medium-bloomers-stencil-set">Medium Bloomers Flower Stencil Set </a>for even more pattern variety.</p>
<p style="text-align: center;"><a style="text-align: center;" href="http://www.royaldesignstudio.com/collections/decorative-finishing-tools/"><img alt="Tools for stenciling and decorative finishing from Royal Design Studio" src="//cdn.shopify.com/s/files/1/0094/1122/files/flower-stencil-project-supplies.jpg?1566"></a> </p>
<p><b>Paint Colors and Stencil Supplies:</b></p>
<p>You can choose any paint colors you want for your Bloomers stencils, of course, but we recommend a colorful garden variety. We find that the blog <a href="http://design-seeds.com/">Design Seeds</a> is a perfect place for color inspiration and loved the combination of bright colors in the color set shown above/left. We matched them up with some Behr color chips and had some Premium Plus Ultra sample paint pots mixed up in these colors: Luscious Mango GLO06, Japanese Koi P210-7, Glitterati P120-7, Optimum Blue M540-7, Explorer Blue M470-5. We love these Behr paints for roller stencil, as we outlined in this basic <a href="http://www.royaldesignstudio.com/blogs/how-to-stencil/7178768-stencil-how-to-ombre-chevron-stripe-pattern">Roller Stencil How-to</a>, and we HIGHLY recommend using our <a href="http://www.royaldesignstudio.com/collections/stencil-rollers/products/flocked-stencil-roller-kit">4" Flocked Foam Stencil Roller</a> for the best stencil results! Use one of our quality <a href="http://www.royaldesignstudio.com/collections/stencil-brushes">Stencil Brushes</a> to add some detailing at the end.</p>
<p style="text-align: center;"><a style="text-align: center;" href="http://www.royaldesignstudio.com/products/big-bloomers-stencil-set"><img alt="Zinnia flower stencils sets-Bloomers from Royal Design Studio stencils come in 3 layers to maximum color and pattern combinations" src="//cdn.shopify.com/s/files/1/0094/1122/files/Bloomers-Flower-Stencils.jpg?1586"></a></p>
<p><b>First, let's get acquainted with the Bloomer flower stencils! </b></p>
<p>These are flower stencils with a difference. They feature multiple layers that allow you to create more flower variety as you wish. On the left you see the <b>Silhouette/Shield layers</b>. On the the right is the <b>Flower Petal Detail layer</b>-which you can easily use ALONE or in combination OVER the Silhouette later if you want to create a more solid looking flower and add a contrasting color. The Shield layer can be used when you want to create the look of layered flowers, as you will place it over a finished flower to "shield" it while you stencil your "behind" flower OVER it. Get it? Well, read on then.....but first-note that we labeled each stencil with a letter, number and UP arrow. This will help you keep track of what goes with what when using multiple flowers for your stencil project.</p>
<p style="text-align: center;"><a href="http://www.royaldesignstudio.com/products/medium-bloomers-stencil-set" title="Bloomers Stencil Pattern Set"><img alt="Zinnia flower stencils sets-Bloomers from Royal Design Studio stencils come in 3 layers to maximum color and pattern combinations" src="//cdn.shopify.com/s/files/1/0094/1122/files/stencil-flowers-2-layers.jpg?1566"></a> </p>
<p><b>2 Layer Bloomers:</b> </p>
<p>Start with the Silhouette layer first and use the Flocked Foam stencil roller to roll on a full-coverage coat or two of the color you have chosen for the background. Note that the Behr Ultra Premium paints offers great coverage and dries quickly-making it ideal for roller stenciling. The heavy body of the paint combined with the superior roller GREATLY reduces the chance of having paint seep under your stencil-AS LONG AS you remove the excess paint from the roller on paper towels before stencils (not shown-<a href="http://www.royaldesignstudio.com/blogs/how-to-stencil/7178768-stencil-how-to-ombre-chevron-stripe-pattern">see this Stencil How-to</a>)</p>
<p>Use the built in registration marks to align the Flower Petal Detail layer over the Silhouette layer correctly and roller stencil on your contrasting color. Easy Peasy!</p>
<p style="text-align: center;"><a style="text-align: center;" href="http://www.royaldesignstudio.com/products/medium-bloomers-stencil-set"><img alt="Create beautiful, layered Zinnia flower stencils with the Bloomers Stencil Sets from Royal Design Studio" src="//cdn.shopify.com/s/files/1/0094/1122/files/how-to-flower-stencils.jpg?1566"></a> </p>
<p><b>Creating Layers Bloomers:</b></p>
<p>It's super easy to create <b>layered stenciled flowers</b> by using the corresponding Shield layer over a previously stenciled flower-whether you did it in one layer or two. With the shield in place, simply position and tape a Bloomer layer of choice over it, then stencil. The Shield will protect your first flower from the paint, and you will end up with a much more interesting layout with some flowers layered here and there.</p>
<p><b>A NOTE on Design Layout: </b></p>
<p>Aim for a nice balance of size, scale, and spacing between flowers. Don't bunch TOO many together or you will get an overcrowded look. Start stenciling towards the middle of your wall and tape your different flower layers up in a small arrangement to get a good visual of how they will look before you start. Then simply work out from there-creating as you go. Alternatively, you might want to <b>draw up a quick sketch of your wall</b> to help you with pattern placement.</p>
<p style="text-align: center;"><a style="text-align: center;" href="http://www.royaldesignstudio.com/products/medium-bloomers-stencil-set"><img alt="Use stencil brushes to add a center color detail to the Bloomers Zinnia flower stencils from Royal Design Studio" src="//cdn.shopify.com/s/files/1/0094/1122/files/Stencil-flower-centers.jpg?1566"></a> </p>
<p><b>Details, Details:</b></p>
<p>Use a Stencil Brush to put a contrasting paint color in the flower centers on some or all of your Bloomers flower stencils. This is a great way to add some color PUNCH, and also to help pull and balance the colors in your flower wall stencil project!</p>
<p> </p>
<p style="text-align: center;"><img src="//cdn.shopify.com/s/files/1/0094/1122/files/Melanie-Royals-stencil-artist.jpg?1636"></p>]]>
    </content>
  </entry>
  <entry>
    <id>http://www.royaldesignstudio.com/blogs/how-to-stencil/7855395-stencil-how-to-faded-silk-suzani-fabric-finish</id>
    <published>2013-05-12T16:50:24-07:00</published>
    <updated>2015-01-14T15:36:06-08:00</updated>
    <link rel="alternate" type="text/html" href="http://www.royaldesignstudio.com/blogs/how-to-stencil/7855395-stencil-how-to-faded-silk-suzani-fabric-finish"/>
    <title>Stencil How-to: Faded Silk Suzani Fabric Finish</title>
    <author>
      <name>MELANIE ROYALS</name>
    </author>
    <summary type="html">
      <![CDATA[<p style="text-align: left;"><a href="http://www.royaldesignstudio.com/products/silk-road-suzani-stencil"><img alt="Roller Stencil Finish with Suzani Stencil from Royal Design Studio" src="//cdn.shopify.com/s/files/1/0094/1122/files/Silk-Fabric-Stencil-Effect-t_1.jpg?1588"></a> </p><p><a class="read-more" href="http://www.royaldesignstudio.com/blogs/how-to-stencil/7855395-stencil-how-to-faded-silk-suzani-fabric-finish">More</a></p>]]>
    </summary>
    <content type="html">
      <![CDATA[<p style="text-align: center;"><a style="text-align: center;" href="http://www.royaldesignstudio.com/products/silk-road-suzani-stencil" title="Silk Road Suzani Stencil"><img alt="Stencil a faded silk fabric effect with the Suzani stencil from Royal Design Studio stencils" src="//cdn.shopify.com/s/files/1/0094/1122/files/How-to-stencil-fabric-effect.jpg?1584"></a> </p>
<p>Are you looking for a <b>fast, fun, and easy stencil wall finish</b>? This Stencil How-to offers just that-and it provides a totally custom fabric effect that you can easily switch up by trying different color combinations! We have found that Chalk Paint® decorative paint by Annie Sloan is ideal for this finish. This heavy, fast-drying, opaque paint has the perfect amount of body that helps to keep the colors from muddying too much and bleeding excessively under the stencil edge, even when using a healthy amount of paint. </p>
<p>This is a very forgiving, organic roller-stencil finish, as all the inconsistencies that are naturally created only serve to help with the overall effect-so relax and have fun with this stencil effect!</p>
<p><b>Stencil Supplies You Will Need for This Finish: </b>We chose a blue color scheme over a soft gray-blue basecoat<b><br></b></p>
<ul>
<li><a href="http://www.royaldesignstudio.com/products/silk-road-suzani-stencil">Silk Road Suzani stencil from Royal Design Studio</a></li>
</ul><ul>
<li>
<a href="http://www.royaldesignstudio.com/collections/annie-sloan-chalk-paint-collection/">Chalk Paint® Decorative Paint</a>: Aubusson Blue, Pure White, Napoleonic Blue</li>
</ul><ul>
<li>
<a href="http://www.royaldesignstudio.com/products/4-nylon-roller-set" title="4 inch nylon rollers for stenciling from Royal Design Studio">4" Nylon Roller</a>s for Stenciling, <a href="http://www.royaldesignstudio.com/products/11-stencil-roller-handle" title="11 inch roller handle from Royal Design Studio">11" Roller Handle</a>, <a href="http://www.royaldesignstudio.com/products/8-paint-roller-tray" title="8 inch roller tray from Royal Design Studio">8" Roller Tray</a>
</li>
</ul><ul>
<li>Blue Painter's Tape, Paper Towels</li>
</ul><p style="text-align: center;"><a style="text-align: center;" href="http://www.royaldesignstudio.com/collections/annie-sloan-chalk-paint-collection/"><img alt="How-to use Chalk Paint® decorative paint with stencils to create a faded silk fabric finish" src="//cdn.shopify.com/s/files/1/0094/1122/files/Chalk-Paint-Stencil-Colors.jpg?1584"></a> </p>
<p><b>Step 1:</b> Pour all three colors of Chalk Paint® decorative paint side-by-side in an 8" roller tray, taking care not to mix the colors together. Note the we placed the Pure White Chalk Paint® in the middle to add more contrast to our finish.</p>
<p style="text-align: center;"><a style="text-align: center;" href="http://www.royaldesignstudio.com/collections/annie-sloan-chalk-paint-collection/"><img alt="Use 3 colors of Chalk Paint® decorative paint for a stencil roller finish that looks like fabric. Royal Design Studio stencils." src="//cdn.shopify.com/s/files/1/0094/1122/files/Roll-Chalk-Paint.jpg?1584"></a> </p>
<p><b>Step 2:</b> Carefully load a 4" nylon nap roller by rolling through the paint and up onto the textured portion of the roller tray. Make sure to pull your roller straight so that the colors stay separated on the roller.</p>
<p style="text-align: center;"><a style="text-align: center;" href="http://www.royaldesignstudio.com/collections/annie-sloan-chalk-paint-collection/"><img alt="Use 3 colors of Chalk Paint® decorative paint for a stencil roller finish that looks like fabric. Royal Design Studio stencils." src="//cdn.shopify.com/s/files/1/0094/1122/files/Chalk-Paint-Roller-Stencil.jpg?1584"></a> </p>
<b>Step 3:</b> Even though the Chalk Paint® decorative paint features a very thick consistency that makes it ideal for roller stencil techniques, you will want to remove some of the excess paint and allow the colors to blend a bit at the edges. Roll the wet roller gently over a stack of paper towels or onto contractor's heavy butcher paper.<br><p style="text-align: center;"><a style="text-align: center;" href="http://www.royaldesignstudio.com/products/silk-road-suzani-stencil" title="Silk Road Suzani Stencil"><img alt="Silk Road Suzani stencil from Royal Design Studio stencils. How-to create a stenciled fabric finish." src="//cdn.shopify.com/s/files/1/0094/1122/files/Suzani-Stencil.jpg?1584"></a> </p>
<p><b>Step 4:</b> Begin with your Silk Road Suzani stencil centered on your feature or focal point wall (so that the pattern ends the same at the left and right edges). There is no need to use stencil spray adhesive with this technique. It is very forgiving and if a little paint seeps delicately under the stencil here and there it will only add to the authenticity of the finish.</p>
<p style="text-align: center;"><a href="http://www.royaldesignstudio.com/products/silk-road-suzani-stencil" title="Silk Road Suzani Stencil"><img alt="How-to create a stenciled fabric finish. Silk Road Suzani stencil from Royal Design Studio stencils. " src="//cdn.shopify.com/s/files/1/0094/1122/files/Stencil-with-Roller_1.jpg?1584"></a> </p>
<b>Step 5: </b> Begin with a light pressure and roll the loaded paint roller straight up and down over the open stencil areas. Roll up and down in a small area until you get the coverage you desire.<br><p style="text-align: center;"><a href="http://www.royaldesignstudio.com/products/silk-road-suzani-stencil" title="Silk Road Suzani Stencil"><img alt="How-to create a stenciled fabric finish with a roller and Chalk Paint® decorative paint. Silk Road Suzani stencil from Royal Design Studio stencils. " src="//cdn.shopify.com/s/files/1/0094/1122/files/Roller-Stenciling-Suzani.jpg?1584"></a> </p>
<p><b>Step 6:</b> Use the window and laser cut registration marks in the stencil to easily line up the pattern repeats as you work across the wall. When you begin a new section overlap the roller slightly on the previous pass. The Chalk Paint® will dry very quickly, so you don't have to worry much about smearing your previous prints. Over a large surface area, you will want to stop periodically to clean your stencil with <a href="http://www.royaldesignstudio.com/collections/stencil-brushes/products/motsenbachers-lift-off-5">Motsenbocher's Lift Off #5</a>. We also recommend that you switch out to a new roller now and then to keep you colors from muddying too much and refill your paint tray carefully.</p>
<p style="text-align: center;"><a href="http://www.royaldesignstudio.com/products/silk-road-suzani-stencil" title="Silk Road Suzani Stencils"><img src="//cdn.shopify.com/s/files/1/0094/1122/files/Stencil-Silk-Fabric.jpg?1584"></a> </p>
<p>Like we said above, this stencil finish can be done in many different colorways, according to your taste and decorating style. Some other lovely color dramatic color combinations with Chalk Paint include:</p>
<p><a href="http://www.royaldesignstudio.com/collections/annie-sloan-chalk-paint-collection/products/cream-annie-sloan-chalk-paint">Cream Chalk Paint</a> / <a href="http://www.royaldesignstudio.com/collections/annie-sloan-chalk-paint-collection/products/arles-annie-sloan-chalk-paint">Arles Chalk Paint</a> /<a href="http://www.royaldesignstudio.com/collections/annie-sloan-chalk-paint-collection/products/barcelona-orange-annie-sloan-chalk-paint"> Barcelona Orange Chalk Paint</a> on a soft white background</p>
<p><a href="http://www.royaldesignstudio.com/collections/annie-sloan-chalk-paint-collection/products/old-ochre-annie-sloan-chalk-paint">Old Ochre Chalk Paint</a> / <a href="http://www.royaldesignstudio.com/collections/annie-sloan-chalk-paint-collection/products/old-white-annie-sloan-chalk-paint">Old White Chalk Paint</a> / <a href="http://www.royaldesignstudio.com/collections/annie-sloan-chalk-paint-collection/products/henrietta-annie-sloan-chalk-paint">Henrietta Chalk Paint</a> on a <a href="http://www.royaldesignstudio.com/collections/annie-sloan-chalk-paint-collection/products/florence-annie-sloan-chalk-paint">Florence Chalk Paint </a>background</p>
<p>For a softer, more neutral look:</p>
<p><a href="http://www.royaldesignstudio.com/collections/annie-sloan-chalk-paint-collection/products/paloma-annie-sloan-chalk-paint">Paloma Chalk Paint</a>, <a href="http://www.royaldesignstudio.com/collections/annie-sloan-chalk-paint-collection/products/versailles-annie-sloan-chalk-paint">Versailles Chalk Paint</a>, and <a href="http://www.royaldesignstudio.com/collections/annie-sloan-chalk-paint-collection/products/old-white-annie-sloan-chalk-paint">Old White Chalk Paint</a> on a background of<a href="http://www.royaldesignstudio.com/collections/annie-sloan-chalk-paint-collection/products/old-violet-annie-sloan-chalk-paint"> Old Violet Chalk Paint</a></p>
<p>Happy Stenciling!</p>
<p style="text-align: center;"><img src="//cdn.shopify.com/s/files/1/0094/1122/files/Melanie-Royals-stencil-artist.jpg?1586"></p>]]>
    </content>
  </entry>
  <entry>
    <id>http://www.royaldesignstudio.com/blogs/how-to-stencil/7569768-whoa-baby-sweet-nursery-stenciling</id>
    <published>2013-03-25T11:51:50-07:00</published>
    <updated>2015-01-14T15:41:19-08:00</updated>
    <link rel="alternate" type="text/html" href="http://www.royaldesignstudio.com/blogs/how-to-stencil/7569768-whoa-baby-sweet-nursery-stenciling"/>
    <title>Whoa Baby! Sweet Nursery Stenciling</title>
    <author>
      <name>Regina  Garay</name>
    </author>
    <summary type="html">
      <![CDATA[<p style="text-align: left;"><img alt="Circling Allover Stencil from Royal Design Studio" src="//cdn.shopify.com/s/files/1/0094/1122/files/thumbnail_4.jpg?1136"> </p><p><a class="read-more" href="http://www.royaldesignstudio.com/blogs/how-to-stencil/7569768-whoa-baby-sweet-nursery-stenciling">More</a></p>]]>
    </summary>
    <content type="html">
      <![CDATA[<p style="text-align: center;"> <a style="text-align: center;" href="http://www.royaldesignstudio.com/products/circling-allover-stencil"><img alt="Stenciling Your Nursery with Royal Design Studio Stencils" src="//cdn.shopify.com/s/files/1/0094/1122/files/Circling-Allover-Stencil-bo_1.jpg?1144"></a> </p>
<p>Whoa, Baby! There are <b><i>so many</i> fun ways to incorporate stencils and pattern into a nursery that tie in with any color scheme</b>, whether it be pink, blue or gender-neutral colors such as yellow or green.  A story or favorite piece of artwork might spark the idea for a beautiful theme and/or color scheme -- and stencils are a fantastic way to help add interest to the chosen design.  <b>Stenciling is very versatile and you can incorporate the pattern on a feature wall</b>, furniture piece, pillows, floor rugs and even the lampshades in a nursery. <a href="http://www.royaldesignstudio.com/">Royal Design Studio</a> has a <a href="http://www.royaldesignstudio.com/collections/childrens-and-nursery-stencils">Children's &amp; Nursery Stencil Collection</a> but Kathryn of <a href="http://www.youtube.com/user/DoItOnaDime?feature=watch" target="_blank”">Do It On a Dime</a> decided upon the <a href="http://www.royaldesignstudio.com/products/circling-allover-stencil">Circling Allover Stencil</a> from our <a href="http://www.royaldesignstudio.com/collections/allover-modern-stencils">Allover Modern Stencils Collection</a>. It's an effervescent and contemporary design -- perfect for baby Carson!</p>
<p style="text-align: center;"><a style="text-align: center;" href="http://www.royaldesignstudio.com/products/circling-allover-stencil"><img alt="Rolling Paint onto a Stencil | Nursery Project by Do It On a Dime | Royal Design Studio" src="//cdn.shopify.com/s/files/1/0094/1122/files/Circling-Allover-Stencil-du_1.jpg?1142"></a></p>
<p style="text-align: center;">   <a style="text-align: center;" href="http://www.royaldesignstudio.com/products/circling-allover-stencil"><img alt="Circling Allover Stencil in Nursery | Project by Kathryn of Do It On a Dime | Royal Design Studio" src="//cdn.shopify.com/s/files/1/0094/1122/files/Circling-Allover-Stencil-3.jpg?1138"></a></p>
<p style="text-align: left;">Kathryn is currently expecting and so her husband Charlie pitched in to help, too!  She says <b>the stenciling process was so easy that "even if you stink at painting like I do, you can <i>totally </i>stencil"</b> -- just what we've been saying! Charlie enjoyed this DIY stenciling project and they thought the end result was cute, whimsical and created a great design statement. We think it's fantastic, too!  As to the time it took them to stencil the feature wall?  TWO hours! Time for that Happy Stencil Dance!</p>
<p style="text-align: center;"> </p>
<p style="text-align: center;"> <a style="text-align: center;" href="http://www.royaldesignstudio.com/products/circling-allover-stencil"><img alt="Circling Allover Stencil on Nursery Feature Wall | Project by Do It On a Dime | Royal Design Studio Stencil" src="//cdn.shopify.com/s/files/1/0094/1122/files/Circling-Allover-Stencil.jpg?1140" height="415" width="556"></a></p>
<p style="text-align: center;"> </p>
<p style="text-align: center;"><iframe src="http://www.youtube.com/embed/ZcT4jfXYepQ" allowfullscreen="allowfullscreen" frameborder="0" height="315" width="420"></iframe></p>
<p style="text-align: left;">The super adorable Kathryn created a <a href="http://www.youtube.com/watch?v=ZcT4jfXYepQ&amp;feature=youtu.be" target="_blank”">video stencil tutorial for her YouTube channel</a> to showcase her entire process. The video is full of good stenciling tips for when you tackle your DIY stenciling project! She included the stencil supplies you will need and visuals on everything from prepwork to lining up the stencil to rolling the color in. Oh -- and there's a $50 Stencil Shopping Spree Giveaway, too!<span style="color: #9fc5e8;"><b> Be sure to click into her video to watch the how-to AND enter to win!  The deadline is March 31, 2013.</b></span></p>
<p style="text-align: left;">Did you know that studies show that adding color and pattern reflects as a calmer and happier nursery environment for a baby?  It's also a more relaxing and joyful space for both Mom and Dad to be in as well.  <b>Have fun creating the best space for your baby with stencils, color and decor</b> you picked out with love!  Many thanks to Kathryn for sharing hers!</p>
<p style="text-align: center;"> </p>
<p><b><i>No need to wait nine months for special nursery &amp; kids rooms ideas - check out MORE below!</i></b></p>
<ul>
<li>Project Nursery shared a <a href="http://www.royaldesignstudio.com/blogs/stencil-ideas/6058370-stenciled-nursery-is-playfully-elegant">glam, pink stenciled nursery</a> with our Ribbon Damask Stencil!</li>
</ul><ul>
<li>Our Endless Circles Lattice helped pull together <a href="http://www.royaldesignstudio.com/blogs/stencil-ideas/5956375-cozy-cottage-cute-stenciled-nursery-diy">a simple, sophisticated nursery</a> for Cozy Cottage Cute!</li>
</ul><ul>
<li>Have an older child? Here's a clever <a href="http://www.royaldesignstudio.com/blogs/stencil-ideas/6394950-board-and-batten-moroccan-feature-wall">"board and batten" stencil wall treatment</a> to update a nursery for boyhood.</li>
</ul><ul>
<li>Our pin-spiring <a href="http://pinterest.com/royalstencils/stenciled-painted-kids-rooms/" target="_blank”">Stenciled &amp; Painted Kids' Room pinboard</a> will surely get your creative juices flowing!</li>
</ul><p>Have a Stencil-rific day!</p>
<p style="text-align: center;"><img src="//cdn.shopify.com/s/files/1/0094/1122/files/Suzy-_-Regina-Footer.jpg?1134"></p>]]>
    </content>
  </entry>
  <entry>
    <id>http://www.royaldesignstudio.com/blogs/how-to-stencil/7499452-transform-a-chest-with-chalk-paint-furniture-stencils</id>
    <published>2013-03-18T09:57:53-07:00</published>
    <updated>2015-01-14T15:35:11-08:00</updated>
    <link rel="alternate" type="text/html" href="http://www.royaldesignstudio.com/blogs/how-to-stencil/7499452-transform-a-chest-with-chalk-paint-furniture-stencils"/>
    <title>Transform a Chest with Chalk Paint&#xAE; &amp; Furniture Stencils</title>
    <author>
      <name>MELANIE ROYALS</name>
    </author>
    <summary type="html">
      <![CDATA[<p style="text-align: left;"><a href="http://www.royaldesignstudio.com/collections/annie-sloan-chalk-paint-collection/"><img alt="Chalk Paint supplies for stenciling furniture" src="//cdn.shopify.com/s/files/1/0094/1122/files/Stencil-Supplies_3.jpg?1590"></a><br>  </p><p><a class="read-more" href="http://www.royaldesignstudio.com/blogs/how-to-stencil/7499452-transform-a-chest-with-chalk-paint-furniture-stencils">More</a></p>]]>
    </summary>
    <content type="html">
      <![CDATA[<p style="text-align: center;"><a href="http://www.royaldesignstudio.com/collections/moroccan-stencils/products/moorish-fleur-de-lis-moroccan-stencil"><img alt="How to stencil furniture with Chalk Paint and Royal Design Studio stencils" src="//cdn.shopify.com/s/files/1/0094/1122/files/How-to-furniture-stencil.jpg?1058"></a></p>
<p>An afternoon of stenciling can transform an ugly duckling old wooden dresser into a beautiful swan! This stencil how-to combines <a href="http://www.royaldesignstudio.com/collections/annie-sloan-chalk-paint-collection/">Chalk Paint® decorative paint from Annie Sloan</a> with a fast stencil finish using our Moroccan stencil, Moorish Fleur de Lis. Originally posted on the Annie Sloan Unfolded blog, this <a href="http://www.anniesloanunfolded.com/UnfoldedBlog/?s=old+white+chalk+paint+gets+dressed+up" target="_blank">stenciled furniture project by Debbie Hayes</a> is the perfect stencil project for beginners and seasoned stencilers alike. Bonus! This project also features a one time use vinyl stencil from our sister pattern company <a href="http://www.modellodesigns.com/">Modello Designs</a>.</p>
<p>Start your furniture stencil project simply by cleaning the chest well with something like Dirtex or even just Dawn dish soap and water. With Chalk Paint, there is NO need for stripping or sanding-simply de-greasing.</p>
<div style="text-align: center;"><a style="text-align: center;" href="http://www.royaldesignstudio.com/collections/annie-sloan-chalk-paint-collection/"><img alt="Chalk Paint® decorative paint and stencil supplies for furniture stenciling with Royal Design Studio stencils" src="//cdn.shopify.com/s/files/1/0094/1122/files/Stencil-Supplies_2.jpg?1080"></a></div>
<p><b>Gather your stencil supplies</b>: <a href="http://www.royaldesignstudio.com/products/moorish-fleur-de-lis-moroccan-stencil">Moorish Fleur de Lis Furniture Stencil</a>, <a href="http://www.royaldesignstudio.com/collections/annie-sloan-chalk-paint-collection/products/old-white-annie-sloan-chalk-paint">Old White Chalk Paint</a>, <a href="http://www.royaldesignstudio.com/collections/annie-sloan-chalk-paint-collection/products/annie-sloan-soft-wax-clear">Annie Sloan Soft Wax</a>, <a href="http://www.royaldesignstudio.com/collections/stencil-brushes">1" Stencil Brush</a>. Debbie also painted the insides of the drawers with<a href="http://www.royaldesignstudio.com/collections/annie-sloan-chalk-paint-collection/products/barcelona-orange-annie-sloan-chalk-paint"> Barcelona Orange Chalk Paint</a> for an unexpected POP of color!</p>
<p style="text-align: center;"><a href="http://www.royaldesignstudio.com/collections/annie-sloan-chalk-paint-collection/products/old-white-annie-sloan-chalk-paint"><img alt="Stenciling with Old White Chalk Paint® decorative paint and Royal Design Studio stencils" src="//cdn.shopify.com/s/files/1/0094/1122/files/furniture-stencil-how-1.jpg?1080"></a> </p>
<p><b>Step 1:</b> Chalk Paint® is GREAT for furniture stenciling because it covers quickly and dries fast. You can pour out a small amount into a small plastic cup to keep the paint from drying out in the can. Dip<b> JUST THE TIPS of the stencil brush</b> into the paint and offload the excess paint by swirling onto good quality paper towels.</p>
<p style="text-align: center;"><a href="http://www.royaldesignstudio.com/products/moorish-fleur-de-lis-moroccan-stencil"><img alt="Furniture stenciling how to with Moroccan stencil Moorish Fleur de Lis from Royal Design Studio stencils" src="//cdn.shopify.com/s/files/1/0094/1122/files/furniture-stencil-how-2.jpg?1080"></a> </p>
<p><b>Step 2:</b> If you want your <b>allover stencil pattern to end the same on the left and right </b>sides, begin by centering a vertical row of the fleur de lis elements in the center front of the chest. If you a going for a distressed stenciled look (like Debbie) don't worry about getting completely even coverge with the paint. If you want a <b>more solid look, you may need to stencil each area twice</b> for complete coverage. The Moorish Fleur de Lis has built in registration marks (like all of our allover pattern stencils) so it is easy to line up each repeat of the stencil perfectly.</p>
<p style="text-align: center;"><img alt="How to furniture stencil project at Royal Design Studio stencils" src="//cdn.shopify.com/s/files/1/0094/1122/files/furniture-stencil-how-3.jpg?1080"> </p>
<p><b>Step 3:</b> For the side panels, Debbie used <b>vinyl stencils that she had from our sister company Modello Designs</b>. These are one-time-use, adhesive backed stencils, and this <a href="http://www.modellodesigns.com/Category.asp?cat_idno=3&amp;type_idno=2">pattern is available to be custom-sized as OrnPan111</a>. She measured her side panels and cut the pattern to fit. This particular design is ALSO available as a <b>reusable mylar stencil</b> on this site. It is the <a href="http://www.royaldesignstudio.com/collections/classic-panel-stencils/products/villa-classic-panel-stencil">Villa Classic Panel Stencil</a>-and may be the perfect fit for YOUR furniture stencil project.</p>
<p style="text-align: center;"><img alt="Stenciling furniture with a Modello vinyl stencil from Modello Designs" src="//cdn.shopify.com/s/files/1/0094/1122/files/furniture-stencil-how-4.jpg?1080"> </p>
<p><b>Step 4:</b> Install the <b>Modello Designs vinyl masking stencil </b>(if using) according to the included installation instructions. Basically, you need to burnish the design, remove the protective Backing Paper, adhere to the surface, burnish again, and then remove the Transfer Tape (shown).</p>
<p style="text-align: center;"><img alt="Stenciling a chest with a Modello vinyl stencil from Modello Designs" src="//cdn.shopify.com/s/files/1/0094/1122/files/furniture-stencil-how-5.jpg?1080"> </p>
<p><b>Step 5:</b> Stencil the masking stencil pattern as you did the mylar stencil pattern in Step 2.</p>
<p style="text-align: center;"><a style="text-align: center;" href="http://www.royaldesignstudio.com/products/annie-sloan-soft-wax-clear"><img alt="Soft Wax from Annie Sloan to seal and protect stenciled furniture" src="//cdn.shopify.com/s/files/1/0094/1122/files/furniture-stencil-how-6.jpg?1080"></a> </p>
<p><b>Step 6:</b> Allow the Chalk Paint® stenciled areas to dry thoroughly. Apply a coat of<b> Annie Sloan Soft Wax with a brush or soft cloth</b>. The Soft Wax will soften the Chalk Paint a bit, so if you rub hard you can further distress and soften the stenciled areas as you wax. If you DON'T want further distressing use a lighter pressure. Either way, you will want to <b>remove the excess wax as you work with a clean cloth</b>. Allow the first layer of wax to dry about 30 minutes and repeat with an additional layer of wax for more protection. Let your final layer of wax dry for several hours (or overnight) and buff to a soft sheen. Note: if you want to "antique" your stenciled finish, you can substitute <a href="http://www.royaldesignstudio.com/products/annie-sloan-soft-wax-dark">Annie Sloan Dark Wax</a> for the second layer of wax.</p>
<p style="text-align: center;"><a href="http://www.royaldesignstudio.com/collections/moroccan-stencils"><img alt="Furniture stencil project with Moroccan stencils and Chalk Paint® decorative paint from Annie Sloan" src="//cdn.shopify.com/s/files/1/0094/1122/files/Moroccan-stenciled-furniture.jpg?1080"></a> </p>
<p>Accessorize your finished furniture stencil project with some new fancy drawer pulls! We love how Debbie left the top of the chest unpainted. It allows the <b>stencil pattern on the front to really stand out</b>-and if you wood is in decent shape, this is a great option for stenciled furniture.</p>
<p style="text-align: center;"><a style="text-align: center;" href="http://www.royaldesignstudio.com/products/moroccan-arches-furniture-stencil"><img alt="Moroccan Arches furniture stencil from Royal Design Studio on a stenciled chest" src="//cdn.shopify.com/s/files/1/0094/1122/files/stencil-Urban-Cottage.jpg?1080"></a> </p>
<p>Here is another <b>cute take on a Moroccan stenciled furniture project</b> from our friends at <a href="http://www.royaldesignstudio.com/blogs/stencil-ideas/6371764-up-against-the-wall-in-an-airstream-trailer">Urban Cottage</a>. Here, the <a href="http://www.royaldesignstudio.com/products/moroccan-arches-furniture-stencil">Small Moroccan Arches furniture stencil</a> was stenciled sideways on a small furniture piece. Again this combines stenciling with a color like  Old White Chalk Paint and leaves some of the wood unpainted for a great custom finish.</p>
<p>Find more Stencil and Furniture Painting Tips with Chalk Paint® Decorative Paint!</p>
<ul>
<li><a href="http://www.royaldesignstudio.com/blogs/how-to-stencil/tagged/stencil-basics">Stenciling Basics</a></li>
<li><a href="http://www.royaldesignstudio.com/blogs/how-to-stencil/tagged/furniture-stencils">Stenciling on Furniture </a></li>
<li><a href="http://www.royaldesignstudio.com/blogs/how-to-stencil/tagged/stenciled-furniture" title="Stenciled and painted furniture">Furniture Painting and Finishing</a></li>
</ul><p> </p>]]>
    </content>
  </entry>
  <entry>
    <id>http://www.royaldesignstudio.com/blogs/how-to-stencil/7361448-furniture-stenciling-french-menu-lettering-stencil</id>
    <published>2013-02-19T14:37:06-08:00</published>
    <updated>2015-01-14T15:35:11-08:00</updated>
    <link rel="alternate" type="text/html" href="http://www.royaldesignstudio.com/blogs/how-to-stencil/7361448-furniture-stenciling-french-menu-lettering-stencil"/>
    <title>Furniture Stenciling: French Menu Lettering Stencil</title>
    <author>
      <name>MELANIE ROYALS</name>
    </author>
    <summary type="html">
      <![CDATA[<p><img src="//cdn.shopify.com/s/files/1/0094/1122/files/Stencil-lettering-t.jpg?890"> </p><p><a class="read-more" href="http://www.royaldesignstudio.com/blogs/how-to-stencil/7361448-furniture-stenciling-french-menu-lettering-stencil">More</a></p>]]>
    </summary>
    <content type="html">
      <![CDATA[<p><i>In this Furniture Stencil How-to, Michele and Ken Hiley of <a href="http://www.stiltskinstudios.com/">Stiltskin Studios</a> share one of their favorite tricks for adding a surprise to their painted furniture tabletops: Stenciling the table leaves that are generally inserted when entertaining with a beautiful complimentary pattern and finish.</i></p>
<p style="text-align: center;"><a style="text-align: center;" href="http://www.royaldesignstudio.com/pages/how-to-stencil"><img alt="How to stencil a tabletop with a French Menu Lettering Stencil from Royal Design Studio" src="//cdn.shopify.com/s/files/1/0094/1122/files/Stencil-lettering_table.jpg?890"></a> </p>
<p>While we love the flexibility of dining tables with leaves, the leaves themselves,however, always pose a dilemma... you see, we typically only use our leaves during the holidays.</p>
<p>This means that while the tabletop is being used and abused, the leaves are stored away, staying pristine...and when we drag them out to use, they TOTALLY: a) don't match b) make us realize how much wear our tabletop has sustained throughout the year! Problem solved! We simply paint and stencil the leaves to coordinate, but not match, the tabletop. This allows us to pick up a fun accent color that we might not want for every day use and get a little creative with our painted furniture! </p>
<p>When we want to get creative, we immediately pull out my paint and formulate a plan...a plan that always includes a fabulous stencil design from <a href="http://www.royaldesignstudio.com/">Royal Design Studio</a>. Royal Design Studio Stencils and products seriously changed the way we think about stencils </p>
<p>We used to have visions of boring ivy borders and single color roses...along with not-so-fond memories of paint bleeding under the stencil borders. We were NOT fans Turns out, <b>Royal Design Studio stencils</b> are beyond hip...so many cool designs, it's hard to choose (which would explain why we have so many!) We now have an entire stencil library...and we still covet more! </p>
<p>Another surprising thing we learned along the way? Stenciling is really pretty simple if you have the right tools and listen to the experts Once you've painted the surface and allowed it to dry (stencils look amazing on stained wood, too!) you're ready to get started. </p>
<p><b>Here's what you'll need for your stencil project: </b></p>
<ul>
<li>
<a href="http://www.royaldesignstudio.com/pages/stencils-stencil-supplies">Royal Design Studio Stencil </a>that works well for your surface area. We used the <a href="http://www.royaldesignstudio.com/products/french-menu-lettering-stencil">French Menu Lettering Stencil</a>.</li>
<li>
<a href="http://www.royaldesignstudio.com/collections/stencil-brushes">Stencil Brushes</a> (we keep at least three sizes of stencil brushes on hand) </li>
<li>
<a href="http://www.royaldesignstudio.com/collections/stencil-cremes">Stencil Creme</a> Paints in color/colors of your choice. We used <a title="Royal Stencils Smoked Oyster Stencil Creme" target="_blank" href="http://www.royaldesignstudio.com/products/smoked-oyster-stencil-creme">Smoked Oyster Stencil Creme</a>. If you don't want a metallic finish, or want a different color than what is available, our second choice is Annie Sloan Chalk Paint. It's thick enough to work well with stencils.</li>
<li>Paper Towels</li>
<li>Painters Tape or Spray Adhesive </li>
<li><a href="http://www.royaldesignstudio.com/collections/stencil-cremes">Motsenbocker's Lift Off #5 for Stencil Cleaning </a></li>
</ul><p><b>Chalk Paint® Decorative Paint Colors and Soft Wax:</b></p>
<ul>
<li><a href="http://www.royaldesignstudio.com/collections/annie-sloan-chalk-paint-collection/products/old-white-annie-sloan-chalk-paint">Old White Chalk Paint®</a></li>
<li><a href="http://www.royaldesignstudio.com/collections/annie-sloan-chalk-paint-collection/products/old-ochre-annie-sloan-chalk-paint">Old Ochre Chalk Paint®</a></li>
<li><a href="http://www.royaldesignstudio.com/collections/annie-sloan-chalk-paint-collection/products/duck-egg-blue-annie-sloan-chalk-paint">Duck Egg Blue Chalk Paint®</a></li>
<li><a href="http://www.royaldesignstudio.com/collections/annie-sloan-chalk-paint-collection/products/annie-sloan-soft-wax-clear">Annie Sloan Clear Soft Wax</a></li>
<li><a href="http://www.royaldesignstudio.com/collections/annie-sloan-chalk-paint-collection/products/annie-sloan-soft-wax-dark">Annie Sloan Dark Soft Wax</a></li>
</ul><ul></ul><p>Our table had two leaves, and the <b>French Menu Lettering Stencil</b> was perfect...fortunately, it fit the width and we only had to measure the length in order to position our stencil for maximum impact.</p>
<p style="text-align: center;"><a href="http://www.royaldesignstudio.com/collections/typography-stencils"><img alt="Typography lettering stencil from Royal Design Studio with French Menu phrases" src="//cdn.shopify.com/s/files/1/0094/1122/files/Tape-stencil.jpg?890"></a> </p>
<p><b>Step 1: Tape Stencil in Place</b></p>
<p>While spray adhesive works great, we save it for larger stencils being applied to walls or other vertical surfaces... when working on a flat surface, we find that simply taping the edges works great. </p>
<p style="text-align: center;"><a style="text-align: center;" href="http://www.royaldesignstudio.com/collections/stencil-cremes"><img alt="Stenciling on furniture with Stencil Creme paints from Royal Design Studio" src="//cdn.shopify.com/s/files/1/0094/1122/files/Stencil-brush-paint.jpg?890"></a> </p>
<p><b>Step 2: Load Your Stencil Brush-Then Offload!</b></p>
<p>We made sure the leaves were firmly together, then taped on the stencil, starting at the upper edge You'll want to DAB your brush into the paint...we prefer to just dip from the <b>Stencil Creme paint</b> that is in the cap.</p>
<p>Now off-load your paint on to your paper towel or rag until your brush is nearly dry...a wet brush is NOT your friend here!</p>
<p style="text-align: center;"><img alt="French Menu lettering stencil from Royal Design Studio on Chalk Paint® table stenciling project" src="//cdn.shopify.com/s/files/1/0094/1122/files/Stencil-swirl-paint.jpg?890"> </p>
<p><b>Step 3: Stencil with a Soft Touch </b></p>
<p>We like to applying the paint on the stencil itself before we apply it to the area to be painted. This ensures any extra paint is removed before you move into the open stencil areas.</p>
<p>You'll notice lots of paint all around the font in the photos...that's because they best way to apply paint when stenciling is to swirl your brush in a circular motion. Remember, you can always add more paint. </p>
<p>Here's why we prefer <b>Stencil Cremes from Royal Design Studio</b>:</p>
<ul>
<li>They are the perfect consistency for stenciling...a bit thicker than regular paint but thin enough to spread evenly.</li>
<li>They dry almost immediately, which is handy when you are over-lapping your stencil. Who wants to wait around for paint to dry? </li>
<li>The provide incredible coverage for stenciling.</li>
<li>You can apply wax or other sealants right over the creme...they don't smear or smudge.</li>
<li>They are formulated for easy clean up!</li>
</ul><p>Once, we wanted white, so we purchased a stencil cream from the craft store...Disaster! It was too thin and after four passes, still not opaque. Then, when I went to wax the stenciled area, off it all came! </p>
<p>Trust us on this...for long-term durability and ease of use, stick with what works best! Once we've completed our first pass on the stencil, we like to do a second pass with the Stencil Cremes in the same fashion. We want opaque coverage, and a second pass makes sure we get it! </p>
<p style="text-align: center;"><a href="http://www.royaldesignstudio.com/collections/allover-damask-stencils"><img alt="Allover stencil from Royal Design Studio with easy registration marks for perfect stencil alignment." src="//cdn.shopify.com/s/files/1/0094/1122/files/Stencil-Registration.jpg?890"></a> </p>
<p><b>Royal Design Studio Stencils</b> feature <b>built-in pattern registration marks</b>, making it easy to perfectly line up your stencil for the next section. In this case, much of the stencil was left hanging off the leaves. We found it was best to support this section in an upward fashion, rather than letting it hang down...we simply held that section up, which ensured the stencil on the table stayed lying flat.</p>
<p>We repeated the process on the second section. Once dry, we applied a thin layer of <b>Annie Sloan Clear Soft Wax</b> over the leaves. After allowing it to dry we applied <b>Annie Sloan Dark Wax</b>, thinned with mineral spirits to create a "glaze", removed the excess. allowed it to dry and then buffed lightly. </p>
<p style="text-align: center;"><a href="http://www.royaldesignstudio.com/collections/typography-stencils/products/french-menu-lettering-stencil"><img alt="Furniture stencil and Chalk Paint® project How-to by Stiltskin Studios on Royal Design Studio " src="//cdn.shopify.com/s/files/1/0094/1122/files/Stenciled-Table_2.jpg?890"></a> </p>
<p>Now the utilitarian leaves are a focal point! In fact, we LOVE this French Menu Lettering Stencil so much, we have BIG plans for it in our own home... stay tuned! </p>
<p><b>Want to see more furniture decorative with our stencils and Chalk Paint® decorative paint? </b></p>
<ul>
<li>See more <a href="http://www.paintandpattern.com/?s=chalk+paint" title="Paint + Pattern Chalk Paint Projects">Chalk Paint projects</a> in our Paint + Pattern digital magazine!</li>
<li>Pretty Handy <a href="http://www.royaldesignstudio.com/blogs/stencil-ideas/7282660-pretty-handy-table-rescue">Stenciled Table Transformation</a> with our <a href="http://www.royaldesignstudio.com/products/lisboa-tile-stencil">Lisboa Tile Stencil</a>.</li>
<li>Game ON! Adorable <a href="http://www.royaldesignstudio.com/blogs/stencil-ideas/6810630-colorful-stencil-games-with-chalk-paint">stenciled game table</a>.</li>
</ul><p> </p>
<p style="text-align: center;"><a href="http://www.stiltskinstudios.com/" target="_blank"><img src="//cdn.shopify.com/s/files/1/0094/1122/files/michele_blog_footer.jpg?900"></a> </p>]]>
    </content>
  </entry>
  <entry>
    <id>http://www.royaldesignstudio.com/blogs/how-to-stencil/7332100-creative-coloring-antiquing-with-stencils</id>
    <published>2013-02-15T08:21:38-08:00</published>
    <updated>2015-01-14T15:41:19-08:00</updated>
    <link rel="alternate" type="text/html" href="http://www.royaldesignstudio.com/blogs/how-to-stencil/7332100-creative-coloring-antiquing-with-stencils"/>
    <title>Creative Coloring &amp; Antiquing with Stencils</title>
    <author>
      <name>MELANIE ROYALS</name>
    </author>
    <summary type="html">
      <![CDATA[<p style="text-align: left;"><img alt="Stencils with Stencil Creme Paints" src="//cdn.shopify.com/s/files/1/0094/1122/files/Stencils-layers-t_1.jpg?892"></p><p><a class="read-more" href="http://www.royaldesignstudio.com/blogs/how-to-stencil/7332100-creative-coloring-antiquing-with-stencils">More</a></p>]]>
    </summary>
    <content type="html">
      <![CDATA[<p>Stenciling with a single color of paint can be fast and easy, but we have an easy way for you to take your wall stencil projects up a notch by adding soft layers of metallic color with our <a href="http://www.royaldesignstudio.com/collections/stencil-cremes">Royal Stencil Creme collection of stencil paints</a>. <b>Each of the stencil layers</b> shown below is beautiful unto itself, and the amount of color layering that you do is a matter of personal taste-and time! Our goal is to show you that layering colors of the Royal Stencil Creme paints is an easy and effective way to build up a subtle but rich look in your stencil projects.</p>
<p style="text-align: center;"><a style="text-align: center;" href="http://www.royaldesignstudio.com/collections/stencil-cremes"><img alt="How to stencil a wall pattern stencil with Royal Stencil Creme paints" src="//cdn.shopify.com/s/files/1/0094/1122/files/Color-Blush-Stenciling.jpg?853"></a> </p>
<p><b>For this Stencil Project you will need:</b></p>
<p><a href="http://www.royaldesignstudio.com/products/french-floral-damask-stencil">French Floral Damask Wall Stencil</a> (we used the large size)<b> <br></b></p>
<p>Dark brown paint for base coat</p>
<p><a href="http://www.royaldesignstudio.com/collections/stencil-brushes">Assorted Stencil Brushes </a></p>
<p>Royal Stencil Creme colors:</p>
<ul>
<li><a href="http://www.royaldesignstudio.com/collections/stencil-cremes/products/antique-gold-stencil-creme">Antique Gold</a></li>
<li><a href="http://www.royaldesignstudio.com/collections/stencil-cremes/products/pink-stencil-creme">Shimmer Pink</a></li>
<li><a href="http://www.royaldesignstudio.com/collections/stencil-cremes/products/orange-ice-stencil-creme">Orange Ice</a></li>
<li><a href="http://www.royaldesignstudio.com/collections/stencil-cremes/products/royal-blue-stencil-creme">Royal Blue</a></li>
<li><a href="http://www.royaldesignstudio.com/collections/stencil-cremes/products/lime-shine-stencil-creme">Lime Shine</a></li>
<li><a href="http://www.royaldesignstudio.com/collections/stencil-cremes/products/lilac-stencil-paint">Frosted Lilac</a></li>
<li><a href="http://www.royaldesignstudio.com/collections/stencil-cremes/products/teal-stencil-creme">Teal</a></li>
<li><a href="http://www.royaldesignstudio.com/collections/stencil-cremes/products/bronze-age-stencil-creme">Bronze Age</a></li>
</ul><p><a href="http://www.royaldesignstudio.com/collections/stain-and-seal">Stain and Seal American Walnut</a></p>
<p><a href="http://www.royaldesignstudio.com/collections/stain-and-seal/products/soslow-super-extender">So Slow Super Extender</a></p>
<p style="text-align: center;"><a style="text-align: center;" href="http://www.royaldesignstudio.com/products/french-floral-damask-stencil"><img alt="French Floral Damask Wall Stencil Pattern" src="//cdn.shopify.com/s/files/1/0094/1122/files/Stencil-creme-gold.jpg?853"></a> </p>
<p><b>Step 1:</b> Start by <b>stenciling the pattern overall with a large stencil brush</b> and Antique Gold Royal Stencil Creme. The stencil creme paints provide AMAZING coverage, so this layer will actually go very quickly. You can read more basics about<a href="http://www.royaldesignstudio.com/blogs/how-to-tips/5867941-how-to-use-royal-stencil-creme-paints"> how to use Royal Stencil Creme paints </a>here. </p>
<p style="text-align: center;"><img alt="Wall pattern stencil French Floral Damask from Royal Design Stduio" src="//cdn.shopify.com/s/files/1/0094/1122/files/Stencil-creme-color.jpg?853"> </p>
<p><b>Step 2:</b> Replace the stencil over the pattern and use a <b>very dry, offloaded stencil brush</b> with a soft touch to "blush" various colors back over the Antique Gold paint-almost as if you are simply tinting the gold here and there. We used Royal Blue on the birds and smaller flowers and alternated Shimmer Pink and Orange Ice on the larger flowers. Lime <br> Shine is used on the leaves. The branches were left Antique Gold at this point. It's perfectly FINE to go outside the lines and let the colors blend into each other. In fact, it <b>creates a much more "painterly" look</b> to have some blue and pink in the leaves and some touches of green here and there in the birds and flowers....</p>
<p style="text-align: center;"><a href="http://www.royaldesignstudio.com/collections/stencil-cremes"><img alt="Use Royal Stencil Creme paints to create a beautiful wall stencil pattern" src="//cdn.shopify.com/s/files/1/0094/1122/files/Stencil-creme-add-color.jpg?853"></a> </p>
<p><b>Step 3</b>: Continue on, if desired, to add more depth and dimension to your stenciling. Here we introduced some Frosted Lilac and Teal into the blue areas and layered pink over orange and vice versa in the flowers. Blush the birds bellies with some pink and highlight with additional green. There are really <b>no "rules" to this stencil technique</b>, and you can layer colors until you are happy with your overall look.</p>
<p style="text-align: center;"><a href="http://www.royaldesignstudio.com/collections/stain-and-seal"><img alt="Antiquing a wall stencil with Stain and Seal water-based stains from Royal Design Studio" src="//cdn.shopify.com/s/files/1/0094/1122/files/Stencil-creme-antique.jpg?853"></a> </p>
<p><b>Step 4</b>: An ideal way to add even more depth and richness to an elegant stenciled finish like this is to add an <b>antiquing or toning glaze layer</b>. Besides providing more depth and color, this translucent layer of glaze will tone down your stencil colors (if desired!) and create a more unified overall look. Stain and Seal is a water-based gel stain for wood, but works wonderfully as a glaze-as long as you add So Slow Extender to it. Without the extender you will get an opaque look that simply will dry too fast to use over a stenciled finish. </p>
<p>Mix the <b>American Walnut Stain and Seal with about 30% So Slow Super Extender</b>. Roll on in small, workable areas and pat off excess while "smooshing" with cheesecloth to soften any ridges or "method of application" marks. <b>Feather the edges of the glaze out</b> to irregular edges and then move out to a new area and feather the glaze back in to the previous area. This will help you to avoid any "lap lines" Feel free to spritz your glaze areas lightly with water if it is drying too fast, or simply add more extender to your mix.</p>
<p style="text-align: center;"><a style="text-align: center;" href="http://www.royaldesignstudio.com/products/french-floral-damask-stencil"><img alt="Floral Damask Wall Stencil in pretty metallic colors using Royal Design Stuido Stencil Cremes" src="//cdn.shopify.com/s/files/1/0094/1122/files/Stencil-creme-stenciling.jpg?855"></a> </p>
<p>Don't think that this stencil technique is limited to walls. This would be a fabulous finish for a<b> furniture stencil project</b> too. Our Stencil Creme paints also work amazingly well on fabric. And just imagine this stencil technique (minus the antiquing glaze) on velvet drapes or pillows!</p>
<b> </b>
<p><b>Want to learn more advanced stencil techniques?</b></p>
<ul>
<li>Check out our extensive and highly regarded <a href="http://www.royaldesignstudio.com/collections/books-videos">Instructional Stencil Video</a> series.</li>
<li>Melanie's book <a href="http://www.royaldesignstudio.com/collections/books-videos/products/painted-illusions-trompe-loeil-stencil-effects">Painted Illusions</a> is full of <b>fabulous stenciled finishes</b> that incorporate glazes, textures and more!</li>
<li>Check out our whole <a href="http://www.royaldesignstudio.com/pages/how-to-stencil">How to Stencil area</a> on this website</li>
</ul>]]>
    </content>
  </entry>
  <entry>
    <id>http://www.royaldesignstudio.com/blogs/how-to-stencil/7258506-stencil-how-to-playing-dress-up-with-stencils</id>
    <published>2013-01-29T18:16:57-08:00</published>
    <updated>2015-01-14T15:36:06-08:00</updated>
    <link rel="alternate" type="text/html" href="http://www.royaldesignstudio.com/blogs/how-to-stencil/7258506-stencil-how-to-playing-dress-up-with-stencils"/>
    <title>Stencil How to: Playing Dress Up with Stencils</title>
    <author>
      <name>MELANIE ROYALS</name>
    </author>
    <summary type="html">
      <![CDATA[<p><img src="//cdn.shopify.com/s/files/1/0094/1122/files/stencil-supplies_1.jpg?766"> </p><p><a class="read-more" href="http://www.royaldesignstudio.com/blogs/how-to-stencil/7258506-stencil-how-to-playing-dress-up-with-stencils">More</a></p>]]>
    </summary>
    <content type="html">
      <![CDATA[<p style="text-align: center;"><a style="text-align: center;" href="http://www.royaldesignstudio.com/collections/bari-j-stencils/products/sew-fun-dress-form-bari-j-stencil"><img alt="Mixed media wall stencil project with the Sew Fun Dress Form stencil by Bari J for Royal Design Studio" src="//cdn.shopify.com/s/files/1/0094/1122/files/Stencils-with-Mod-Podge.jpg?766"></a><br>  </p>
Did you love playing "dress up" as a little girl? Well, even BIG girls can play dress up-<b>with stencils</b>! We thought it would be super fun to show you how to combine one of our <a href="http://www.royaldesignstudio.com/collections/bari-j-stencils">new wall stencils from the Bari J Stencil Collection</a>, the Sew Fun Dress Form, with some of <a href="http://www.barijonline.com/" target='_blank"'>Bari J.'s actual fabric designs</a> for Art Gallery fabrics. This is a fabulous <b>mixed media wall stencil project</b> that can use things you already have around your studio or craft room-OR have fun shopping for just the right fabrics and notions. No sewing machine required-just lots of creativity!<br><br><p style="text-align: center;"><a style="text-align: center;" href="http://www.royaldesignstudio.com/collections/bari-j-stencils/products/sew-fun-dress-form-bari-j-stencil"><img alt="Wall stencil project using mixed media and fabric with the Sew Fun Dress Form stencil by Bari J for Royal Design Studio" src="//cdn.shopify.com/s/files/1/0094/1122/files/stencil-project-supplies.jpg?766"></a> </p>
<p style="text-align: left;"><b>Supplies Needed for this Stencil Project:</b><br></p>
<ul>
<li>Royal Design Studio Stencil: <a href="http://www.royaldesignstudio.com/collections/bari-j-stencils/products/sew-fun-dress-form-bari-j-stencil">Sew Fun Dress Form wall stencil</a>
</li>
<li>Behr Premium Plus Ultra Paint: (basecoat) MSL043 Nasturtium, (stenciling) S460-7 Deep Breath</li>
<li><a href="http://www.royaldesignstudio.com/collections/stencil-brushes/products/3-4-stencil-brush">3/4" Stencil Brush</a></li>
<li>Mod Podge Stiffy Fabric Stiffener</li>
<li>Assorted Fabrics from the <a href="http://www.liveartgalleryfabrics.com/bariJCollection.html" target='_blank"'>Bari J. Fabric Collection</a>
</li>
<li>Painter's Tape</li>
<li>3M Super 77 Spray Adhesive</li>
<li>Assorted Embellishment (ribbon, buttons, scrapbooking elements)</li>
<li>Hot Glue Gun</li>
<li>Baking Sheet or Shallow Tray</li>
<li>Wax Paper</li>
</ul><p style="text-align: center;"><img alt="Using Mod Podge Stiffy Fabric Stiffener for a mixed media wall stencil project via Royal Design Studio stencils" src="//cdn.shopify.com/s/files/1/0094/1122/files/Mod-Podge-Stiffy.jpg?766"><br><br>  </p>
<p style="text-align: left;"><b>Step 1:</b> Following manufacturer's directions, apply <b>Mod Podge Stiffy Fabric Stiffener</b> to both sides of the fabric with a chip brush making sure the fabric gets saturated thoroughly. Lay wet fabric on a nonstick surface to dry, making sure the fabric is completely flat while it dries. Note: If the fabric becomes wrinkled while it dries you can iron out the wrinkles by placing the fabric between two sheets of wax paper. This prevents the fabric from sticking to the iron or the surface. Set the iron on low and iron on a hard surface.</p>
<p style="text-align: center;"><a style="text-align: center;" href="http://www.royaldesignstudio.com/collections/bari-j-stencils/products/sew-fun-dress-form-bari-j-stencil"><img alt="Stenciling the Bari J Sew Fun Dress Form stencil pattern on a wall" src="//cdn.shopify.com/s/files/1/0094/1122/files/stencil-dress-form-pattern.jpg?766"></a><br></p>
<p style="text-align: left;"><b>Step 2:</b> While your fabric is drying, go ahead and determine the placement for your <b>Sew Fun Dress Form stencils</b>. See this how-to post for more tips on <a href="http://www.royaldesignstudio.com/blogs/how-to-stencil/7143120-stencil-how-to-create-a-drop-shadow-effect-for-a-crowning-touch">laying out a stencil motif pattern on a wal</a>l. Stencil in the top and bottom of stencil pattern in Behr paint color <i>Deep Breath</i> or a similar color in a craft fluid acrylic paint. Note that the dress form body is taped off to keep the stenciled paint from getting into that area. We then traced the dress form with chalk using the stencil as a guide for fabric placement. Alternatively, you could simply <b>stencil ALL in blue paint</b>, as the fabric shapes will cover the "body".</p>
<p style="text-align: center;"><img alt="Tracing a pattern with a stencil" src="//cdn.shopify.com/s/files/1/0094/1122/files/trace-stencil-pattern.jpg?766"><br></p>
<p style="text-align: left;"><b>Step 3:</b> When the fabric is dry and flat, use the clean stencil to trace the dress form outline on the back side of your fabric. Play with how the shape of the dress form works in different areas of the fabric to create different looks. Cut out the patterns with a good pair of scissors. The <b>Mod Podge Stiffy Fabric Stiffener</b> will keep your fabric from fraying, giving you a nice clean edge.</p>
<p style="text-align: center;"><a style="text-align: center;" href="http://www.royaldesignstudio.com/collections/bari-j-stencils"><img alt="Bari J fabrics and trims for a fun wall stencil project via Royal Design Studio" src="//cdn.shopify.com/s/files/1/0094/1122/files/fabric-trims-for-stencil.jpg?766"></a></p>
<p style="text-align: left;"><b>Step 4:</b> Gather all your little ribbons and assorted goodies and have a good old time accessorizing your dresses. It is a good idea to lay them out on a table so you can plan how the patterns and colors of the dress forms will work to compliment each other in your overall design scheme.</p>
<p style="text-align: center;"><img src="//cdn.shopify.com/s/files/1/0094/1122/files/fabrin-in-stencil.jpg?768"><br></p>
<p style="text-align: left;"><b>Step 5:</b> Spray the back side of the fabric dress forms with a good misting of spray adhesive, paying attention to the edges of the fabric. <b>Note:</b> <i>Be sure to allow for good ventilation and protect surrounding areas when using Spray Adhesive.</i> Allow the adhesive to set up for a couple minutes before placing the fabric forms on the wall. Use a credit card or similar "tool" to smooth and bond the fabric shapes to the wall securely</p>
<p style="text-align: center;"><img alt="Mixed media wall stencil project with the Sew Fun Dress Form stencil by Bari J for Royal Design Studio" src="//cdn.shopify.com/s/files/1/0094/1122/files/glue-gun.jpg?768"> </p>
<p style="text-align: left;"><b>Step 6:</b> Add embellishments by using a hot glue gun. Apply the glue to the embellishments not the surface, and stick into place. Watch out for those fingers!</p>
<p style="text-align: center;"><a style="text-align: center;" href="http://www.royaldesignstudio.com/collections/bari-j-stencils"><img alt="Mixed media wall stencil project with the Sew Fun Dress Form stencil by Bari J for Royal Design Studio" src="//cdn.shopify.com/s/files/1/0094/1122/files/stencil-pattern-dress-form.jpg?768"></a></p>
<p style="text-align: left;">Who knew you could have <b>Sew Much Fun with stencils</b>?! Well, actually, WE did, and hope you are inspired to try this type of project for your own studio, little girl's room, or as a way to personalize your closet.</p>
<p style="text-align: left;">Here are some other ideas for using this type of <b>mixed media stencil idea</b>:</p>
<ul>
<li>Using fabric for the large silhouette area of the stencil pattern along would work equally well with the <a href="http://www.royaldesignstudio.com/products/parlor-chair-bari-j-wall-stencil">Parlor Chair wall stencil from Bari J</a>.</li>
<li>You can see another stencil technique where we <a href="http://www.royaldesignstudio.com/blogs/how-to-stencil/7229796-stencil-how-to-patterned-parlor-chairs">stenciled pattern in pattern to create a fabric look</a>. </li>
<li>Use this stencil and technique for framed canvas art, or even on a very special gift box. </li>
<li>Substitute newspaper, patterned paper or pretty gift wrap for the fabric. </li>
<li>Use your amazing imagination for many more ideas: cut up maps, posters, love letters, photocopies of family photos, etc.</li>
<li>Use an <a href="http://www.royaldesignstudio.com/blogs/how-to-stencil/3763692-stencil-embossing">Embossed Stencil Technique</a> for the Dress Form frame for added dimension.</li>
</ul><p>We'd sure LOVE to see and share pics of YOUR stencil projects. Please send to projects@royaldesignstudio.com. Happy Painting! </p>]]>
    </content>
  </entry>
  <entry>
    <id>http://www.royaldesignstudio.com/blogs/how-to-stencil/7229796-stencil-how-to-patterned-parlor-chairs</id>
    <published>2013-01-24T09:20:36-08:00</published>
    <updated>2015-01-14T15:36:06-08:00</updated>
    <link rel="alternate" type="text/html" href="http://www.royaldesignstudio.com/blogs/how-to-stencil/7229796-stencil-how-to-patterned-parlor-chairs"/>
    <title>Stencil How-to: Patterned Parlor Chairs</title>
    <author>
      <name>MELANIE ROYALS</name>
    </author>
    <summary type="html">
      <![CDATA[<p style="text-align: left;"><img alt="How to stencil pattern in a stencil design" src="//cdn.shopify.com/s/files/1/0094/1122/files/stencil-pattern-t_compact.jpg?704"> </p><p><a class="read-more" href="http://www.royaldesignstudio.com/blogs/how-to-stencil/7229796-stencil-how-to-patterned-parlor-chairs">More</a></p>]]>
    </summary>
    <content type="html">
      <![CDATA[<p style="text-align: center;"><img src="//cdn.shopify.com/s/files/1/0094/1122/files/How-to-stencil-pattern-chairs.jpg?705"></p>
<p>It's two, two, two stencil patterns in one!<b> </b>This stencil tutorial shows you how to use small allover stencils from our <a href="http://www.royaldesignstudio.com/collections/furniture-stencils">Furniture Stencils Collection</a> to dress up our super adorable Bari J Parlor Chair stencil<b>. </b>We are loving the whimsical patterns in our <a href="http://www.royaldesignstudio.com/collections/bari-j-stencils">Bari J Stencil Collection</a>, and this two-part chair stencil, with its large chair cushion layer, is perfect for this <b>pattern in pattern stencil technique!</b> We chose bright colors to compliment our "Granny Chic" look, and mixed the colors around on the chairs for lots of a variety. We have found that Behr Premium Plus Ultra paints (Home Depot) are super for stenciling-especially roller stenciling with our <b>Flocked Stencil Rollers</b>! It is a paint/primer in one and covers VERY well, dries quickly, and is heavy bodied. You can purchase small sample pots of the colors you want in a size that is ideal for stencil projects.<b><br></b></p>
<p><b>For this stencil project you will need:</b></p>
<p>Base Color of this wall: Behr Premium Plus Ultra Latex Paint-Ginger Jar</p>
<p>Royal Design Studio Stencils:<span> </span><a href="http://www.royaldesignstudio.com/products/parlor-chair-bari-j-wall-stencil">Parlor Chair stencil</a>, <a href="http://www.royaldesignstudio.com/products/lovely-lace-furniture-stencil">Lovely Lace stencil</a>, <a href="http://www.royaldesignstudio.com/products/mini-brocade-furniture-stencil">Mini Brocade stencil</a>, <a href="http://www.royaldesignstudio.com/products/victorian-grillework-stencil">Small Victorian Grillework stenci</a>l, <a title="Swedish Flower Field Stencil" href="http://www.royaldesignstudio.com/products/swedish-flower-field-stencil">Swedish Flower Field stencil</a>, and <a href="http://www.royaldesignstudio.com/products/lacy-leaves-furniture-stencil">Lacy Leaves stencil </a></p>
<p style="text-align: center;"><b style="text-align: center;"><a href="http://www.royaldesignstudio.com/pages/stencils-stencil-supplies"><img alt="Stencil project supplies including stencil brushes " src="//cdn.shopify.com/s/files/1/0094/1122/files/wall-stencil-supplies.jpg?705"></a> </b></p>
<p><b>Additional Supplies for Stenciling</b></p>
<ul>
<li>Behr Premium Plus Ultra sample pots: MSL043 Nasturtium, M160-5 Pink Damask, 320D-5 Sweet Maple, PPU6-9 Polished Pearl, P460-4 Lagoon Rock, S460-7 Deep Breath, P130-7 Glamorous</li>
<li><a href="http://www.royaldesignstudio.com/collections/stencil-rollers/products/flocked-stencil-roller-kit">4" Flocked Foam Stencil Roller Set </a></li>
<li><a href="http://www.royaldesignstudio.com/collections/stencil-brushes">Stencil Brushes </a></li>
<li>Stencil spray adhesive</li>
<li>Painter's Tape</li>
<li>Paper Towels</li>
<li>Plastic Plates</li>
</ul><p style="text-align: center;"><b style="text-align: center;"><a href="http://www.royaldesignstudio.com/products/parlor-chair-bari-j-wall-stencil"><img alt="How to layout the Parlor Chair wall stencil" src="//cdn.shopify.com/s/files/1/0094/1122/files/stencil-pattern-on-wall.jpg?705"></a> </b></p>
<b> </b>
<p><b><b>Step 1: </b></b>This is an optional step, but can be very helpful for plotting out an <b>allover stencil pattern</b> created from a single motif stencil. Stencil your pattern once on a piece of paper and make multiple photocopies. We did this not only to lay out our pattern visually, but also to mark what paint colors would go on each chair cushion. Note that this is a <b>two-layer stencil</b> and the layers fit together like puzzle pieces. The two layers allow you to easily introduce a different color in a different pattern area.</p>
<p style="text-align: center;"><a style="text-align: center;" href="http://www.royaldesignstudio.com/products/flocked-stencil-roller-kit"><img alt="Use a flocked stencil roller for perfect stenciling" src="//cdn.shopify.com/s/files/1/0094/1122/files/stencil-with-roller.jpg?705"></a> </p>
<p><b>Step 2: </b>Because you will use small amounts of many different colors of paint, you can just pour out a little at a time onto a large plastic plate. Load the <b>Flocked Foam Stencil Roller</b> evenly with paint and remove excess paint by rolling over a stack of paper towels or absorbent paper. Push firmly, paying special attention to the ends of the roller where paint tends to be heavier. It's important to have the paint evenly loaded on the roller and not have excess wet paint-which will naturally seep<span> under the stencil. The Flocked Foam Stencil Roller is covered with a thin velour fabric coating-which helps resist those paint run-unders, but you always need to take the time to offload excess paint to leave a "dry" roller before stenciling. </span></p>
<p style="text-align: center;"><a style="text-align: center;" href="http://www.royaldesignstudio.com/pages/paint-create"><img alt="Best supplies for stencils include flocked stencil paint roller" src="//cdn.shopify.com/s/files/1/0094/1122/files/stenciling-stencil-roller.jpg?705"></a></p>
<p><b>Step 3:</b> This stencil comes in two parts-A and B. We started here with layer B. Tape the stencil on the wall, checking to make sure it's level. Use an even, steady, not-too-heavy pressure on the roller as you roll over the stencil surface. This primer in the paint makes it cover very well- and quickly, but <b>take some time to go slow at first to get used to how much paint and pressure you need to get a great stencil print</b>. Short even strokes in all directions helps the paint go on evenly. If you're planning on having different colored chairs like ours, make sure to clean the stencil before going on to a different color and use a fresh roller as well. <a href="http://www.royaldesignstudio.com/collections/stencil-rollers/products/motsenbachers-lift-off-5">Use Motsenbochers Lift-Off 5 for quick and easy stencil cleaning!</a></p>
<p style="text-align: center;"><img alt="Stenciling the Lovely Lace stencil in a pattern in pattern stenciled effect" src="//cdn.shopify.com/s/files/1/0094/1122/files/stencil-pattern-stencil-bru.jpg?705"> </p>
<p><b>Step 4:</b> To begin stenciling the small <b>allover stencil patterns</b> on the chairs, place the stencil layer B back on your stenciled print. This will shield your surface from getting pieces of the stencil pattern painted where you don't want it. To stencil the pattern center the small pattern stencil in the middle of the part B opening. Use a stencil brush to stencil the pattern in a complimentary color, making sure to <b>offload the brush on a paper towel </b>before applying it to the surface. Note the registration marks on the pattern so that<span>  </span>you can make it repeat correctly.</p>
<p style="text-align: center;"><span><a style="text-align: center;" href="http://www.royaldesignstudio.com/collections/stencil-brushes"><img alt="Stenciling with a stencil brush" src="//cdn.shopify.com/s/files/1/0094/1122/files/stencil-chair-legs.jpg?705"></a> </span></p>
<p><b>Step 5:</b> Stencil Layer A using a third color using a stencil brush or roller, making sure that it lines up properly with Layer B. Use the pinpoint stencil registration marks to get it lined up perfectly. You may need to go over the stencil twice to get complete coverage with the paint, particularly with darker colors.</p>
<p style="text-align: center;"> </p>
<p style="text-align: center;"><a style="text-align: center;" href="http://www.royaldesignstudio.com/products/parlor-chair-bari-j-wall-stencil"><img alt="Stencil pattern in pattern with the Parlor Chair wall stencil from Royal Design Studio" src="//cdn.shopify.com/s/files/1/0094/1122/files/wall-pattern-stencils.jpg?705"></a> </p>
<p>How cute ARE these stenciled, patterned Parlor Chairs?! This is a great project for<b> </b>your craft room or little girl's room. You can have so much fun mixing and matching paint colors and small <b>allover stencil patterns </b>to create you own unique look.</p>
<p style="text-align: center;"><a href="http://www.royaldesignstudio.com/collections/bari-j-stencils/products/parlor-chair-bari-j-wall-stencil"><img alt="Wall stencil detail of small allover stencil patterns in Parlor Chair stencils" src="//cdn.shopify.com/s/files/1/0094/1122/files/wall-stencil-detail.jpg?705"></a> </p>
<p>We painted a tired old resin frame with the same paint colors to tie in to our stencil pattern color theme, and you can do the same with accessories and furniture in YOUR room.</p>
<p style="text-align: center;"><a style="text-align: center;" href="http://www.royaldesignstudio.com/collections/bari-j-stencils/products/parlor-chair-bari-j-wall-stencil"><img alt="Adorable wall stencil! The Parlor Chair stencil from the Bari J Collection by Royal Design Studio" src="//cdn.shopify.com/s/files/1/0094/1122/files/wall-stencil-parlor-chair_1.jpg?707"></a> </p>
<p style="text-align: center;"><i>Of course the <b>Parlor Chair stencil</b> looks equally lovely stenciled simply in solid colors. </i></p>
<p>We hope that this stencil tutorial sparks some creative ideas for you for stenciling allover patterns into other stencil designs. Our <a href="http://www.royaldesignstudio.com/collections/bari-j-stencils/products/sew-fun-dress-form-bari-j-stencil">Bari J Dress Form stencil</a> and <a href="http://www.royaldesignstudio.com/collections/bari-j-stencils/products/large-cameo-set-bari-j-stencils">Silhouette Cameo Stencils Set </a>would work equally well for this fun stenciling technique!</p>]]>
    </content>
  </entry>
</feed>
