<?xml version="1.0" encoding="utf-8"?><feed xmlns="http://www.w3.org/2005/Atom" ><generator uri="https://jekyllrb.com/" version="4.3.4">Jekyll</generator><link href="https://blogs.visoftinc.com/feed.xml" rel="self" type="application/atom+xml" /><link href="https://blogs.visoftinc.com/" rel="alternate" type="text/html" /><updated>2025-01-27T09:06:15-05:00</updated><id>https://blogs.visoftinc.com/feed.xml</id><title type="html">Visoft, Inc. Blogs</title><subtitle>The Visoft, Inc. Blogs are here to help you with programming issues and tutorials on the hottest topics on the Web.</subtitle><entry><title type="html">Using Context API for Easy State Management in React Apps</title><link href="https://blogs.visoftinc.com/2023/06/08/using-context-api-react-apps/" rel="alternate" type="text/html" title="Using Context API for Easy State Management in React Apps" /><published>2023-06-08T00:00:00-04:00</published><updated>2023-06-08T00:00:00-04:00</updated><id>https://blogs.visoftinc.com/2023/06/08/using-context-api-react-apps</id><content type="html" xml:base="https://blogs.visoftinc.com/2023/06/08/using-context-api-react-apps/"><![CDATA[<p><img src="https://images.visoftinc.com/2023-06-05/react-logo.jpeg" alt="React Logo" class="aligncenter" /></p>

<p>Are you searching for an expedient way to control State in your Web and Mobile applications?</p>

<p>React’s Context API can offer a straightforward yet alluring resolution. Its formidable attributes equip developers to store and fetch data from any point of their application effortlessly. This blog post will examine how to use the Context API for state management in web and mobile applications. You’ll also learn why the Context API is preferable to other options when managing State, along with a few best practices that should be kept in mind while employing it.</p>

<h2 id="understanding-reacts-context-api">Understanding React’s Context API</h2>

<p>The Context API of React is a remarkably potent tool for managing State in React applications, providing an uncluttered manner to pass data down the component tree without having to feed props from one element to another manually. Initially released with version 16.3, it has become increasingly sought-after by developers due to its simplicity and scalability compared to alternative solutions for administering global State in apps featuring this library. This inclusion presents some unique features such as being able to assemble multiple contexts within a single application; sharing these among varied components while also allotting their own set of values; achieving improved performance through lazy loading rather than charging all data upfront; organizing related values into distinct contexts facilitating greater reusability throughout the app; plus gaining enhanced clarity on any given time regarding where precisely particular pieces of information are employed across the entire codebase thanks indeed allowing debugging capabilities increased visibility over usage locations. These characteristics make the Context API compellingly beneficial for overseeing universal states inside projects built upon React combined, granting greater stability yet offering considerable adaptiveness concerning how you arrange your source code!</p>

<h2 id="benefits-of-using-context-api-for-state-management">Benefits of using Context API for State Management</h2>

<p>React’s Context API is a highly potent and supple tool used for managing application state. It allows developers to keep track of data while sharing it amongst components without transferring props manually or utilizing other libraries such as Redux. Furthermore, using the Context API is generally more straightforward than conventional tools utilized for State Management.</p>

<p>The primary profit from employing React’s Context API when handling application state lies in its scalability capabilities; dealing with expansive applications with numerous nested components can be difficult because multiple elements need pass-down properties throughout each layer present within them. Utilizing React’s context object at this topmost component permits all embedded layers access through every aspect of propagation, thus making maintenance painless compared to complex property passing methods or outside resource provisioning from another library.</p>

<p>In addition, utilizing Reacts’ phase benefits even more by enabling direct access explicitly into any contained area inside your app - eliminating slow database calls and complicated object hierarchies so that you can obtain something needed for UI element rendering! The suppleness offered concerning different pieces of state separation is interconnected if required, making usage convenient too, allowing distinct contexts to be created separately depending on what type authentication tokens are desired before connecting these altogether where needed – simplifying various types of data segregation though still attainable quickly whenever wanted! Finally, because React’s contextual objects are merely JavaScript based, they aren’t tasking nor arduous, further finding appeal among starters seeking uncomplicated solutions akin to those found via Redux during the initial stages of deploying and implementing development entirely around React’s hooks!</p>

<h2 id="setting-up-the-context-api-in-your-project">Setting up the Context API in your project</h2>

<p>The Context API offered by React is a powerful tool that can easily manage the State of web and mobile applications. It provides an interface between components to share variables and functions, thus facilitating developers in tracking various aspects of their applications. The primary benefit of using this API is decreased complexity due to storage at one site instead of several components or files.</p>

<p>Implementing the Context API into a project necessitates constructing an instance by calling React’s <code class="language-plaintext highlighter-rouge">createContext()</code> function; it will return two properties: <code class="language-plaintext highlighter-rouge">Provider</code> and <code class="language-plaintext highlighter-rouge">Consumer</code>. The former enables furnishing values for sharing among assorted elements while the latter equips them with access from any point within your app via wrapping those constituents inside <code class="language-plaintext highlighter-rouge">{children}</code>. Furthermore, these providers are able to pass down functions as well, so they become globally available, which simplifies state management, avoiding prop drilling problems often experienced when dealing with extensively profoundly nested data structures without utilizing this API. Additionally, multiple contexts are supported in an application; it permits separating states distinctively, making oversight easier instead keeping related ones enclosed in single-context objects, which could prove troublesome for more complicated projects encompassing more intricate conditions requiring frequent alterations., To use such a feature during setup, call upon <code class="language-plaintext highlighter-rouge">createContext()</code> again but include further details like name or id attribute following the documentation provided on the official website pertaining to the React library.”</p>

<h2 id="creating-and-providing-a-context-in-web-and-mobile-apps">Creating and providing a context in web and mobile apps</h2>

<p>Promoting and delivering a context in web apps is of the utmost importance when looking to manage State. React’s Context API provides an enormously valuable tool for developers that permits them to maintain this State easily across components while keeping their code neat and orderly. The Context API offers a system allowing developers to build variables that are available throughout the whole application, no matter where they may be required from. This makes it far more straightforward than having to pass down props through several levels of components or employing more complex solutions such as Redux or MobX.</p>

<p>The Context API also enables convenient customization regarding how data is accessed, stored, and updated too. For instance, if you need to store user information within your app, you can use the <code class="language-plaintext highlighter-rouge">createContext</code> method to create a specific context item with whatever required attributes. Providing this Context object by way of the prop so other components have access without needing to explicitly define it each time use occurs. This prop makes life much simpler for developers who must keep track of their own data and employ consistently among different parts of their program without rewriting code regularly.</p>

<p>Moreover, React’s Context API allows coders further freedom when controlling the State inside applications. It enables them to designate what types of updates will occur based on selected conditions being met or variable values changing. An example would include; if specific requirements are fulfilled (such as someone logging into the app), then prearranged actions could follow suit (like fetching new material from an external source). This suggests that programmers do not require manually checking every single parameter anytime something changes – instead, they might arrange regulations causing specified moves automatically whenever those criteria become satisfied. This assists in managing abundant amounts of State since all logic needed is appropriately hidden away at one site instead widespread amongst multiple elements with various states triggers necessitating monitored singularly any point modification transpires.</p>

<p>Finally, React’s Context APT improves debugging practice due supplying helpful communication errors that don’t feature correctly because its inherent error management scheme captures any mistakes before reaching main production level programming- resulting in fewer malfunctions and smoother performance integrated! To sum up, using React’s Context APIs eases rule handling vastly while increasing execution speed, forming a tremendously invaluable resource for both mobile development &amp; web!</p>

<p><img src="https://images.visoftinc.com/2023-06-05/react-code.jpeg" alt="React Code" class="aligncenter" /></p>

<h2 id="updating-state-using-the-usecontext-hook">Updating State using the <code class="language-plaintext highlighter-rouge">useContext</code> hook</h2>

<p>The Context API of React offers developers a highly efficient approach to managing the State in their applications. One significant advantage associated with using the Context API is that it allows for direct updating of states from inside a component by the way and means of utilizing the <code class="language-plaintext highlighter-rouge">useContext</code> hook feature present within React itself. With this modernized form of data storage, information can be shared between components without having to pass props down through them manually.</p>

<p>By providing access to an application’s context object, changes can occur conveniently directly off any given component rather than needing said prop drilling throughout various levels in order achieve this same outcome–which leads towards improved efficiency by removing redundant propagation passing all together as well as making life easier on those maintaining codebases over time due its clean nature compared other processes requiring manual input instead. Additionally, when used correctly, users see enhancement performance-wise due to avoidance of unnecessary rerendering happening caused by either unrelated elements sharing passed props or extreme nesting children calling upon parent objects more so than contextual usage like provided out-of-the-box per se, React’s own systemization thereof; henceforth noting importance understanding such tool potential pitfalls accompany careless utilization lack thereof respectively.</p>

<p>Overall, React’s Context API is a practical solution tackling complex organizational structures found in web/mobile programming and provides a seamless method of transitioning data states internally through the <code class="language-plaintext highlighter-rouge">useContext</code> hook. However, utmost caution is advised against mismanagement or consequences stemming from the incomplete adoption of bonus features made available therein.</p>

<h2 id="integrating-with-external-apis-for-dynamic-data">Integrating with external APIs for dynamic data</h2>

<p>The React Context API provides a powerful and effective way to manage State in web and mobile applications. Using the Context API, developers can store global application data in one location that is accessible by all components within their app, thus, enabling them to keep an account of any changes across the entire application as well as providing a method for easy sharing of data between components without requiring manual props passing down.</p>

<p>Integrating with external APIs is one among many utilization cases for React’s Context API. When necessitating dynamic information-gathering from other sources, Context becomes ideal since it permits storage while ensuring the availability of such collected detail throughout the entirety or parts of this program, either through page loadings or user interactions like pressing buttons or picking items off dropdown menus. To begin setting up the react’s context API, make sure you establish a new object where initial values are stored prior to obtaining any particular info externally. Then, inside your parent component (where creation takes place), add functions/hook which calls out toward this outside source when necessary. Lastly, use the <code class="language-plaintext highlighter-rouge">useContext</code> hook so children components may effortlessly read shared states without having direct access.</p>

<p>React’s Context API significantly simplifies system operations compared to using prop drilling / redux alternatives, including rapid building capabilities for and better structured maintainable Apps over time due to its ability to pass values swiftly at once instead of writing unique code each time.</p>

<h2 id="handling-complex-state-structures-efficiently">Handling complex state structures efficiently</h2>

<p>The React Context API is a handy tool for managing complex state structures in web and mobile development. It allows designers to conveniently store, access, and modify data within their applications without resorting to bulky global variables or frameworks such as Redux. This makes it appropriate for small-scale and larger projects requiring more powerful solutions for managing states.</p>

<p>Context API offers an approach by which elements can access information from the parent component without forwarding props down numerous levels of the element tree, making it much easier and quicker when constructing apps with elaborate navigation systems. Furthermore, using Context instead of conventional methods like sending props through each level of the element tree lets developers decrease excessive rerenders caused by prop modifications from higher stages in construction.</p>

<p>Context also permits developers to share info across components regardless if they have different positioning inside the complete application structure, resulting in teams working on separate parts at once, not needing any worries regarding relocating props between sections of code or assembling exhausting universal variables to watch over multiple files.</p>

<p>Employing React’s Context API would afford software engineers several merits while building web &amp; mobile applications: fastening up development time because it lessens complication considering management status; and augmenting execution thanks to reducing the number of unnecessary remounts: additionally allowing uncomplicated sharing based on facts all across features no matter where situated within general app design. The effortlessness of utilizing Context renders brilliant solutions, whatever kind of job requires proficiently organized handling either large scale /small scale, facilitating creators allotment period inventiveness rather than fussing how to handle them.</p>

<h2 id="best-practices-and-tips-for-optimizing-performance">Best practices and tips for optimizing performance</h2>

<p>Utilizing React’s Context API is an effective method of managing the State within applications. It can be used in mobile and web-based apps, allowing a unified means to handle data. By using this tool, developers can maintain consistency between multiple components that span their entire application.</p>

<p>Let’s review several techniques and tips that should be implemented during development to maximize performance with React’s Context API.
Firstly, always use the most recent version available when creating any program by utilizing this particular context object, as doing so will ensure all newly added features or bug fixes make their way into your personalized app, something that could lead to greater levels of security while increasing overall performance at the same time.</p>

<p>Secondly, do not pass in anything more than what is necessary when constructing a context object before establishing its value property; if you happen to need only one component’s State inside another tree, then just send through the said piece rather than overdoing yourself by sending across bulk from either source - doing such might result in prolonged calculations alongside rerendering troubles which would ultimately lower general response speed. Similarly, whenever updating values within these contexts, exercise caution again because passing complete arrays or objects back into identical ones produces unhelpful results like excessive calculations and other similar issues related to rendering processes, hence why it should be avoided as well!</p>

<p>Lastly, keep track of whether inputted props have been altered before attempting different changes on states since taking note counts allows you to dodge unwanted updates involved but especially in larger scale programs affiliated with intricate structures where throughout the render cycle, changing must take place due to changed props transferred down via parent sets. Finally, after nesting them together, try keeping nested forms shallow otherwise resulting overhead load caused by extra computations run on each frame up rise above reasonable limits.</p>

<h1 id="conclusion">Conclusion</h1>

<p>In conclusion, the Context API supplied by React is a potent instrument for managing State in web and mobile applications. It facilitates an intuitive method of accessing, handling, and updating data across the entire application. The API permits the easy establishment of global state variables that can be used in any component without passing props down multiple levels of components. This process simplifies keeping track of all data within the app, guaranteeing that changes are reflected promptly through each part. By utilizing this Context API, developers may streamline state management in their respective projects resulting in improved overall efficiency.</p>

<h2 id="need-help-with-your-react-project">Need help with your React project?</h2>

<p>Visoft Inc. is a clear choice for those searching for coding aid. Our company provides various services, from training to products, making it feasible for clients to receive the assistance they require concerning coding matters. Our highly proficient and educated team will collaborate with you to create tailor-made solutions that suit your needs and budget constraints. Moreover, regardless of whether the task is simple or intricate, we possess all the relevant qualifications and knowledge to complete tasks correctly on one first attempt. Therefore there should be no more hesitation - contact us today if coding help is what you are looking for!</p>]]></content><author><name>Damien White</name></author><category term="react" /><category term="javascript" /><category term="react" /><category term="javascript" /><category term="context" /><category term="state-management" /><summary type="html"><![CDATA[Learn how to use React's Context API for easy state management in web and mobile apps. Understand benefits, setup, create/provide context, consume data & more.]]></summary><media:thumbnail xmlns:media="http://search.yahoo.com/mrss/" url="https://images.visoftinc.com/2023-06-05/react-logo.jpeg" /><media:content medium="image" url="https://images.visoftinc.com/2023-06-05/react-logo.jpeg" xmlns:media="http://search.yahoo.com/mrss/" /></entry><entry><title type="html">Rails Counter Cache Gotcha</title><link href="https://blogs.visoftinc.com/2021/03/01/rails-counter-cache-gotcha/" rel="alternate" type="text/html" title="Rails Counter Cache Gotcha" /><published>2021-03-01T00:00:00-05:00</published><updated>2021-03-01T00:00:00-05:00</updated><id>https://blogs.visoftinc.com/2021/03/01/rails-counter-cache-gotcha</id><content type="html" xml:base="https://blogs.visoftinc.com/2021/03/01/rails-counter-cache-gotcha/"><![CDATA[<p><img src="https://images.visoftinc.com/2021-02-27/abacus.jpeg" alt="Abacus" class="aligncenter" /></p>

<h2 id="introduction">Introduction</h2>

<p>Today I was attempting to use Rails’ counter cache feature to save on expensive queries. My model’s association is a <code class="language-plaintext highlighter-rouge">has_many :through</code>. I ran into issues on my first attempt but eventually came across the answer after beating my head against a wall for quite some time.</p>

<p><strong>TL;DR: If you use a custom <code class="language-plaintext highlighter-rouge">counter_cache</code> column on your <code class="language-plaintext highlighter-rouge">belongs_to</code>, duplicate that on the <code class="language-plaintext highlighter-rouge">has_many</code> associations as well.</strong></p>

<h2 id="models">Models</h2>

<p>Let’s work with a standard, easy to understand, <code class="language-plaintext highlighter-rouge">has_many :through</code> models:</p>

<div class="language-ruby highlighter-rouge"><div class="highlight"><pre class="highlight"><code><span class="k">class</span> <span class="nc">Physician</span> <span class="o">&lt;</span> <span class="no">ApplicationRecord</span>
  <span class="n">has_many</span> <span class="ss">:appointments</span>
  <span class="n">has_many</span> <span class="ss">:patients</span><span class="p">,</span> <span class="ss">through: :appointments</span>
<span class="k">end</span>

<span class="k">class</span> <span class="nc">Appointment</span> <span class="o">&lt;</span> <span class="no">ApplicationRecord</span>
  <span class="n">belongs_to</span> <span class="ss">:physician</span>
  <span class="n">belongs_to</span> <span class="ss">:patient</span>
<span class="k">end</span>

<span class="k">class</span> <span class="nc">Patient</span> <span class="o">&lt;</span> <span class="no">ApplicationRecord</span>
  <span class="n">has_many</span> <span class="ss">:appointments</span>
  <span class="n">has_many</span> <span class="ss">:physicians</span><span class="p">,</span> <span class="ss">through: :appointments</span>
<span class="k">end</span>
</code></pre></div></div>

<h2 id="counter-cache-attempt-1">Counter Cache, Attempt #1</h2>

<p>Now let’s implement counter cache on these models with custom column names. On the <code class="language-plaintext highlighter-rouge">belongs_to</code> side of the association, we’ll set up our counter caches for physicians and patients.</p>

<div class="language-ruby highlighter-rouge"><div class="highlight"><pre class="highlight"><code><span class="k">class</span> <span class="nc">Appointment</span> <span class="o">&lt;</span> <span class="no">ApplicationRecord</span>
  <span class="n">belongs_to</span> <span class="ss">:physician</span><span class="p">,</span> <span class="ss">counter_cache: :patients_size</span>
  <span class="n">belongs_to</span> <span class="ss">:patient</span><span class="p">,</span> <span class="ss">counter_cache: :physicians_size</span>
<span class="k">end</span>
</code></pre></div></div>

<h3 id="migration">Migration</h3>

<p>Now, we need to add these counter cache columns with a migration:</p>

<div class="language-ruby highlighter-rouge"><div class="highlight"><pre class="highlight"><code><span class="k">class</span> <span class="nc">AddRenderingCountsToCampaign</span> <span class="o">&lt;</span> <span class="no">ActiveRecord</span><span class="o">::</span><span class="no">Migration</span><span class="p">[</span><span class="mf">6.0</span><span class="p">]</span>
  <span class="k">def</span> <span class="nf">change</span>
    <span class="n">add_column</span> <span class="ss">:physicians</span><span class="p">,</span> <span class="ss">:patients_size</span><span class="p">,</span> <span class="ss">:integer</span><span class="p">,</span> <span class="ss">default: </span><span class="mi">0</span><span class="p">,</span> <span class="ss">null: </span><span class="kp">false</span>
    <span class="n">add_column</span> <span class="ss">:patients</span><span class="p">,</span> <span class="ss">:physicians_size</span><span class="p">,</span> <span class="ss">:integer</span><span class="p">,</span> <span class="ss">default: </span><span class="mi">0</span><span class="p">,</span> <span class="ss">null: </span><span class="kp">false</span>

    <span class="n">reversible</span> <span class="k">do</span> <span class="o">|</span><span class="n">dir</span><span class="o">|</span>
      <span class="n">dir</span><span class="p">.</span><span class="nf">up</span> <span class="k">do</span>
          <span class="no">Physician</span><span class="p">.</span><span class="nf">find_each</span> <span class="p">{</span> <span class="o">|</span><span class="nb">p</span><span class="o">|</span> <span class="no">Physician</span><span class="p">.</span><span class="nf">reset_counters</span><span class="p">(</span><span class="nb">p</span><span class="p">,</span> <span class="ss">:patients</span><span class="p">)</span> <span class="p">}</span>
          <span class="no">Patient</span><span class="p">.</span><span class="nf">find_each</span> <span class="p">{</span> <span class="o">|</span><span class="nb">p</span><span class="o">|</span> <span class="no">Patient</span><span class="p">.</span><span class="nf">reset_counters</span><span class="p">(</span><span class="nb">p</span><span class="p">.</span><span class="nf">id</span><span class="p">,</span> <span class="ss">:physicians</span><span class="p">)</span> <span class="p">}</span>
      <span class="k">end</span>
    <span class="k">end</span>
  <span class="k">end</span>
<span class="k">end</span>
</code></pre></div></div>

<p>This migration will set up our database with these new columns and set values for existing Physicians and Patients via <code class="language-plaintext highlighter-rouge">reset_counters</code>.</p>

<p>Be sure to run <code class="language-plaintext highlighter-rouge">rails db:migrate</code></p>

<h2 id="test-it">Test It</h2>

<p>After that, we can now test it in the Rails console.</p>

<div class="language-bash highlighter-rouge"><div class="highlight"><pre class="highlight"><code>1] pry<span class="o">(</span>main<span class="o">)&gt;</span> p <span class="o">=</span> Physician.last
  Physician Load <span class="o">(</span>4.5ms<span class="o">)</span>  ...
<span class="o">=&gt;</span> <span class="c">#&lt;Physician:0x00007fd7aa4acb60. ..&gt;</span>
<span class="o">[</span>2] pry<span class="o">(</span>main<span class="o">)&gt;</span> p.patients.size
   <span class="o">(</span>5.6ms<span class="o">)</span>  SELECT COUNT<span class="o">(</span><span class="k">*</span><span class="o">)</span> FROM ...
<span class="o">=&gt;</span> 1
</code></pre></div></div>

<p>Hmm, from my understanding, the <code class="language-plaintext highlighter-rouge">size</code> method should be using our counter cache, not issuing a <code class="language-plaintext highlighter-rouge">SQL COUNT</code> query in the database. What’s going on here?</p>

<h2 id="digging-into-the-documentation">Digging into the Documentation</h2>

<p>So, it’s not working. Querying the web, it’s difficult to find help with this issue. That is until you dig into the Rails docs, specifically the <a href="https://apidock.com/rails/v6.0.0/ActiveRecord/Associations/ClassMethods/has_many"><code class="language-plaintext highlighter-rouge">has_many</code> method</a></p>

<p>Scrolling through the options for <code class="language-plaintext highlighter-rouge">has_many</code>, you’ll come across <code class="language-plaintext highlighter-rouge">:counter_cache</code> and it says: “This option can be used to configure a custom named <code class="language-plaintext highlighter-rouge">:counter_cache</code>. You only need this option, when you customized the name of your <code class="language-plaintext highlighter-rouge">:counter_cache</code> on the <code class="language-plaintext highlighter-rouge">#belongs_to</code> association.”</p>

<p>Eureka! We customized the name of our <code class="language-plaintext highlighter-rouge">:counter_cache</code>, so let’s give this a try!</p>

<h2 id="attempt-2">Attempt #2</h2>

<p>Let’s revisit the models and make this modification.</p>

<div class="language-ruby highlighter-rouge"><div class="highlight"><pre class="highlight"><code><span class="k">class</span> <span class="nc">Physician</span> <span class="o">&lt;</span> <span class="no">ApplicationRecord</span>
  <span class="n">has_many</span> <span class="ss">:appointments</span><span class="p">,</span> <span class="ss">counter_cache: :patients_size</span>
  <span class="n">has_many</span> <span class="ss">:patients</span><span class="p">,</span> <span class="ss">through: :appointments</span><span class="p">,</span> <span class="ss">counter_cache: :patients_size</span>
<span class="k">end</span>

<span class="k">class</span> <span class="nc">Appointment</span> <span class="o">&lt;</span> <span class="no">ApplicationRecord</span>
  <span class="n">belongs_to</span> <span class="ss">:physician</span><span class="p">,</span> <span class="ss">counter_cache: :patients_size</span>
  <span class="n">belongs_to</span> <span class="ss">:patient</span><span class="p">,</span> <span class="ss">counter_cache: :physicians_size</span>
<span class="k">end</span>

<span class="k">class</span> <span class="nc">Patient</span> <span class="o">&lt;</span> <span class="no">ApplicationRecord</span>
  <span class="n">has_many</span> <span class="ss">:appointments</span><span class="p">,</span> <span class="ss">counter_cache: :physicians_size</span>
  <span class="n">has_many</span> <span class="ss">:physicians</span><span class="p">,</span> <span class="ss">through: :appointments</span><span class="p">,</span> <span class="ss">counter_cache: :physicians_size</span>
<span class="k">end</span>
</code></pre></div></div>

<p>Now, we’ll hop back into the Rails console and test it out:</p>

<div class="language-bash highlighter-rouge"><div class="highlight"><pre class="highlight"><code>1] pry<span class="o">(</span>main<span class="o">)&gt;</span> p <span class="o">=</span> Physician.last
  Physician Load <span class="o">(</span>4.5ms<span class="o">)</span>  ...
<span class="o">=&gt;</span> <span class="c">#&lt;Physician:0x00007fd7aa4acb60. ..&gt;</span>
<span class="o">[</span>2] pry<span class="o">(</span>main<span class="o">)&gt;</span> p.patients.size
  <span class="o">=&gt;</span> 1
</code></pre></div></div>

<p>Yay! Now it works!</p>

<blockquote>
  <p>Note that I added the <code class="language-plaintext highlighter-rouge">:counter_cache</code> option on both <code class="language-plaintext highlighter-rouge">has_may</code> associations. If not, and you tried to do <code class="language-plaintext highlighter-rouge">p.appointments.size</code>, it would query the DB again.</p>
</blockquote>

<h2 id="conclusion">Conclusion</h2>

<p>This was a tough nut to crack. Again, most blog posts on the web don’t outline this gotcha. The answer is in the Rails docs but somewhat hidden. I hope this post helps another dev save some time and sanity.</p>]]></content><author><name>Damien White</name></author><category term="ruby" /><category term="ruby-on-rails" /><category term="rails" /><category term="ruby" /><category term="rails" /><category term="activerecord" /><summary type="html"><![CDATA[Rails' counter cache wasn't working, but I made it work in the end.]]></summary><media:thumbnail xmlns:media="http://search.yahoo.com/mrss/" url="https://images.visoftinc.com/2021-02-27/abacus.jpeg" /><media:content medium="image" url="https://images.visoftinc.com/2021-02-27/abacus.jpeg" xmlns:media="http://search.yahoo.com/mrss/" /></entry><entry><title type="html">Ember Octane + ESLint + Prettier</title><link href="https://blogs.visoftinc.com/2019/12/04/ember-octane-eslint-prettier/" rel="alternate" type="text/html" title="Ember Octane + ESLint + Prettier" /><published>2019-12-04T00:00:00-05:00</published><updated>2019-12-04T00:00:00-05:00</updated><id>https://blogs.visoftinc.com/2019/12/04/ember-octane-eslint-prettier</id><content type="html" xml:base="https://blogs.visoftinc.com/2019/12/04/ember-octane-eslint-prettier/"><![CDATA[<p><img src="https://images.visoftinc.com/2019-12-03/pretty-sunset.jpg" alt="Pretty Sunset" class="aligncenter" /></p>

<h2 id="introduction">Introduction</h2>

<p>I started a brand new Ember Octane project today. The first thing I wanted to do was set up <a href="https://github.com/prettier/prettier/">prettier</a> in my Ember app. I started using prettier for a client, and I adopted the practice myself. If you aren’t familiar with prettier, it’s a library that formats your code in an opinionated way. Not everyone will like the defaults, but prettier is very configurable (which I will show you).</p>

<blockquote>
  <p>Note these steps can be used for any JavaScript project. I’ll show the changes to a new Ember Octane project, but the NPM libraries will work in other projects as well.</p>
</blockquote>

<h2 id="overview">Overview</h2>

<p>If you aren’t familiar with prettier, take the example below (from the <a href="https://github.com/prettier/prettier/">README on GitHub</a>).</p>

<h3 id="input">Input</h3>

<div class="language-javascript highlighter-rouge"><div class="highlight"><pre class="highlight"><code><span class="c1">// Given this line of code...</span>
<span class="nf">foo</span><span class="p">(</span>
  <span class="nf">reallyLongArg</span><span class="p">(),</span>
  <span class="nf">omgSoManyParameters</span><span class="p">(),</span>
  <span class="nc">IShouldRefactorThis</span><span class="p">(),</span>
  <span class="nf">isThereSeriouslyAnotherOne</span><span class="p">()</span>
<span class="p">);</span>
</code></pre></div></div>

<h3 id="output">Output</h3>

<div class="language-javascript highlighter-rouge"><div class="highlight"><pre class="highlight"><code><span class="c1">// You'll end up with something like this...</span>
<span class="nf">foo</span><span class="p">(</span>
  <span class="nf">reallyLongArg</span><span class="p">(),</span>
  <span class="nf">omgSoManyParameters</span><span class="p">(),</span>
  <span class="nc">IShouldRefactorThis</span><span class="p">(),</span>
  <span class="nf">isThereSeriouslyAnotherOne</span><span class="p">()</span>
<span class="p">);</span>
</code></pre></div></div>

<p>As you can see it really cleans up your code.</p>

<h2 id="install">Install</h2>

<p>You are going to need a few node packages:</p>

<div class="language-bash highlighter-rouge"><div class="highlight"><pre class="highlight"><code>npm <span class="nb">install</span> <span class="nt">--save-dev</span> eslint-plugin-prettier
npm <span class="nb">install</span> <span class="nt">--save-dev</span> <span class="nt">--save-exact</span> prettier
npm <span class="nb">install</span> <span class="nt">--save-dev</span> eslint-config-prettier
</code></pre></div></div>

<p>Let’s look at these packages.</p>

<ul>
  <li>The first, <code class="language-plaintext highlighter-rouge">eslint-plugin-prettier</code>, allows prettier and eslint to work together.</li>
  <li>The second, <code class="language-plaintext highlighter-rouge">prettier</code>, is the prettier library.</li>
  <li>Finally, <code class="language-plaintext highlighter-rouge">eslint-config-prettier</code> turns off eslint rules that conflict with prettier.</li>
</ul>

<h2 id="configuration">Configuration</h2>

<p>Once you install these, you’re going to have to modify your <code class="language-plaintext highlighter-rouge">.eslintrc.js</code> file.</p>

<p>Your <code class="language-plaintext highlighter-rouge">extends</code> section should look like this:</p>

<div class="language-javascript highlighter-rouge"><div class="highlight"><pre class="highlight"><code><span class="kd">extends</span><span class="p">:</span> <span class="p">[</span>
  <span class="dl">'</span><span class="s1">plugin:prettier/recommended</span><span class="dl">'</span><span class="p">,</span>
  <span class="dl">'</span><span class="s1">eslint:recommended</span><span class="dl">'</span><span class="p">,</span>
  <span class="dl">'</span><span class="s1">plugin:ember/recommended</span><span class="dl">'</span><span class="p">,</span>
<span class="p">],</span>
</code></pre></div></div>

<p>The new item there is: <code class="language-plaintext highlighter-rouge">'plugin:prettier/recommended'</code>,</p>

<p>This does three things:</p>

<ol>
  <li>Enables <code class="language-plaintext highlighter-rouge">eslint-plugin-prettier</code>.</li>
  <li>Sets the <code class="language-plaintext highlighter-rouge">prettier/prettier</code> rule to <code class="language-plaintext highlighter-rouge">"error"</code>.</li>
  <li>Extends the <code class="language-plaintext highlighter-rouge">eslint-config-prettier configuration</code>.</li>
</ol>

<p>Now you can customize prettier with a <code class="language-plaintext highlighter-rouge">.prettierrc</code> file. This can be YAML or JSON. I’ve opted for JSON, and the following is my config:</p>

<div class="language-json highlighter-rouge"><div class="highlight"><pre class="highlight"><code><span class="p">{</span><span class="w">
  </span><span class="nl">"printWidth"</span><span class="p">:</span><span class="w"> </span><span class="mi">80</span><span class="p">,</span><span class="w">
  </span><span class="nl">"tabWidth"</span><span class="p">:</span><span class="w"> </span><span class="mi">2</span><span class="p">,</span><span class="w">
  </span><span class="nl">"useTabs"</span><span class="p">:</span><span class="w"> </span><span class="kc">false</span><span class="p">,</span><span class="w">
  </span><span class="nl">"semi"</span><span class="p">:</span><span class="w"> </span><span class="kc">true</span><span class="p">,</span><span class="w">
  </span><span class="nl">"singleQuote"</span><span class="p">:</span><span class="w"> </span><span class="kc">true</span><span class="p">,</span><span class="w">
  </span><span class="nl">"trailingComma"</span><span class="p">:</span><span class="w"> </span><span class="s2">"all"</span><span class="p">,</span><span class="w">
  </span><span class="nl">"bracketSpacing"</span><span class="p">:</span><span class="w"> </span><span class="kc">true</span><span class="p">,</span><span class="w">
  </span><span class="nl">"arrowParens"</span><span class="p">:</span><span class="w"> </span><span class="s2">"avoid"</span><span class="p">,</span><span class="w">
  </span><span class="nl">"requirePragma"</span><span class="p">:</span><span class="w"> </span><span class="kc">false</span><span class="p">,</span><span class="w">
  </span><span class="nl">"insertPragma"</span><span class="p">:</span><span class="w"> </span><span class="kc">false</span><span class="p">,</span><span class="w">
  </span><span class="nl">"proseWrap"</span><span class="p">:</span><span class="w"> </span><span class="s2">"preserve"</span><span class="w">
</span><span class="p">}</span><span class="w">
</span></code></pre></div></div>

<p>This config was generated by <a href="https://michelelarson.com/prettier-config/">Michael Larson’s Generator</a>. It’s an excellent tool for customizing prettier easily. I recommend that you use this to personalize prettier to your liking.</p>

<h2 id="running-prettier-on-your-code">Running Prettier on Your Code</h2>

<p>I have a new Ember Octane project that I started. There is one commit in the git history for the initial Ember Octane application. I wanted to start with a clean, pretty project. I executed prettier from the terminal to update everything in my project:</p>

<div class="language-bash highlighter-rouge"><div class="highlight"><pre class="highlight"><code>prettier <span class="nt">--write</span> <span class="s1">'\*_/_.{js,css,html}'</span>
</code></pre></div></div>

<p>This updates all the default files for a new Ember Octane project. You’ll end up modifying ten of Ember Octane’s default files. Also, in Figure 01 below, you’ll notice the changes to <code class="language-plaintext highlighter-rouge">package.json</code> and <code class="language-plaintext highlighter-rouge">package-lock.json</code> for the addition of the node libraries. Another file is <code class="language-plaintext highlighter-rouge">.prettierrc</code> which holds our prettier configuration.</p>

<figure>
  <img src="https://images.visoftinc.com/2019-12-03/figure01.png" alt="Figure 01 - Ember Octane's Updated Files" />
  <figcaption>Figure 01 - Ember Octane's Updated Files</figcaption>
</figure>

<h2 id="editor-enhancements">Editor Enhancements</h2>

<p>To enhance our developer experience, we can use editor packages to make using prettier easier. I use <a href="https://atom.io">Atom</a>, and there is a <a href="https://atom.io/packages/prettier-atom">prettier package</a> that will automatically format your code on save (if you choose, Figure 02).</p>

<figure>
  <img src="https://images.visoftinc.com/2019-12-03/figure02.png" alt="Figure 02 - The Prettier Package Options" />
  <figcaption>Figure 02 - The Prettier Package Options</figcaption>
</figure>

<blockquote>
  <p>Note in Figure 02, there is the first option to use prettier with eslint, make sure you check that for your Ember Octane project.</p>
</blockquote>

<p>Once installed, when you are on a JavaScript file, you’ll notice a prettier option in your status bar (Figure 03)</p>

<figure>
  <img src="https://images.visoftinc.com/2019-12-03/figure03.png" alt="Figure 03 - The Prettier Status Bar Icon" />
  <figcaption>Figure 03 - The Prettier Status Bar Icon</figcaption>
</figure>

<p>If, for some reason, you don’t want your file to be formatted, you can click on the green icon and disable it from updating on save. Of course, that sort of defeats the purpose of keeping your code “pretty.”</p>

<h2 id="conclusion">Conclusion</h2>

<p>I like using it to format my code in a deterministic way. I don’t have to worry about other devs or even myself from creating messy code. If you want to take this to the next level, have prettier run when you <a href="https://stefanzweifel.io/posts/run-prettier-or-php-cs-fixer-with-github-actions/">commit to GitHub with an Action</a></p>]]></content><author><name>Damien White</name></author><category term="javascript" /><category term="ember" /><category term="javascript" /><category term="prettier" /><category term="eslint" /><category term="ember" /><summary type="html"><![CDATA[Format your new Ember Octane or any JavaScript project with Prettier and integrate it with ESLint.]]></summary><media:thumbnail xmlns:media="http://search.yahoo.com/mrss/" url="https://images.visoftinc.com/2018-12-03/pretty-sunset.jpg" /><media:content medium="image" url="https://images.visoftinc.com/2018-12-03/pretty-sunset.jpg" xmlns:media="http://search.yahoo.com/mrss/" /></entry><entry><title type="html">Riding Rails - Building a Web App (Part 05)</title><link href="https://blogs.visoftinc.com/2018/04/02/riding-rails-part-05/" rel="alternate" type="text/html" title="Riding Rails - Building a Web App (Part 05)" /><published>2018-04-02T00:00:00-04:00</published><updated>2018-04-02T00:00:00-04:00</updated><id>https://blogs.visoftinc.com/2018/04/02/riding-rails-part-05</id><content type="html" xml:base="https://blogs.visoftinc.com/2018/04/02/riding-rails-part-05/"><![CDATA[<p><img src="https://images.visoftinc.com/2018-04-02/industrial-railway.jpg" alt="Industrial Railway" class="aligncenter" /></p>

<p>Hello again and congrats! You’ve made it to the end of the series (Part 5) of Riding Rails. Today we’ll develop a details view for each job and wrap up the series. This series is just a taste of what you can do with Rails. Anyway, let’s get started</p>

<blockquote>
  <p>Yikes! Here you are at Part 5 and you haven’t read the others? Check out <a href="/2018/03/05/riding-rails-part-01/">Part 1</a>, <a href="/2018/03/12/riding-rails-part-02/">Part 2</a>, <a href="/2018/03/19/riding-rails-part-03/">Part 3</a>, and <a href="/2018/03/26/riding-rails-part-04/">Part 4</a>.</p>
</blockquote>

<h2 id="last-time">Last Time</h2>

<p>Last time you had some homework to work on creating a better partial view for each <code class="language-plaintext highlighter-rouge">job</code>. How did you make out? I’m sure yours look better than Figure 1!</p>

<figure>
  <img src="https://images.visoftinc.com/2018-04-02/figure01.jpg" alt="Figure 1: Minor Enhancements" />
  <figcaption>Figure 1: Minor Enhancements</figcaption>
</figure>

<p>And the tiny bit of ERB code that produced Figure 1.</p>

<div class="language-erb highlighter-rouge"><div class="highlight"><pre class="highlight"><code><span class="nt">&lt;li</span> <span class="na">class=</span><span class="s">"job"</span><span class="nt">&gt;</span>
  <span class="nt">&lt;h6&gt;</span><span class="cp">&lt;%=</span> <span class="n">job</span><span class="p">.</span><span class="nf">title</span> <span class="cp">%&gt;</span><span class="nt">&lt;/h6&gt;</span>
  <span class="nt">&lt;p&gt;</span>
    <span class="cp">&lt;%=</span> <span class="n">job</span><span class="p">.</span><span class="nf">company</span> <span class="cp">%&gt;</span> <span class="ni">&amp;#183;</span> <span class="cp">&lt;%=</span> <span class="n">job</span><span class="p">.</span><span class="nf">type</span> <span class="cp">%&gt;</span> <span class="ni">&amp;#183;</span>
    Posted on <span class="cp">&lt;%=</span> <span class="n">job</span><span class="p">.</span><span class="nf">posted_at</span> <span class="cp">%&gt;</span><span class="nt">&lt;/p&gt;</span>
<span class="nt">&lt;/li&gt;</span>
</code></pre></div></div>

<p>This sets us up to change the <code class="language-plaintext highlighter-rouge">title</code> into a link to the details, but before we venture into that, there are two glaring issues with our search results. First, they aren’t sorted by date. Second, that date isn’t exactly friendly. Let’s fix that sort first.</p>

<h2 id="sorting">Sorting</h2>

<p>We get <code class="language-plaintext highlighter-rouge">jobs</code> in two places in our app, and from two different sources. First, we’ll tackle the homepage. Since we are querying our database and utilizing ActiveRecord, there is a method we can use called <code class="language-plaintext highlighter-rouge">order</code>. Hop into the <code class="language-plaintext highlighter-rouge">HomeController</code> and make that change, tacking it on the end of <code class="language-plaintext highlighter-rouge">limit</code>.</p>

<p>If you review the <a href="http://guides.rubyonrails.org/active_record_querying.html#ordering">ordering docs</a>, you’ll see that the default order is ascending. Not exactly what we want, so we’ll specify descending.</p>

<div class="language-ruby highlighter-rouge"><div class="highlight"><pre class="highlight"><code><span class="k">class</span> <span class="nc">HomeController</span> <span class="o">&lt;</span> <span class="no">ApplicationController</span>
  <span class="k">def</span> <span class="nf">index</span>
    <span class="vi">@jobs</span> <span class="o">=</span> <span class="no">Job</span><span class="p">.</span><span class="nf">limit</span><span class="p">(</span><span class="mi">10</span><span class="p">).</span><span class="nf">order</span><span class="p">(</span><span class="ss">posted_at: :desc</span><span class="p">)</span>
  <span class="k">end</span>
<span class="k">end</span>
</code></pre></div></div>

<p>That was easy, right? Now onto the <code class="language-plaintext highlighter-rouge">SearchController</code>. We are querying GitHub Jobs here and just taking them in the order that they come to us. The <code class="language-plaintext highlighter-rouge">jobs</code> here are in an Array. Here we’ll use Ruby’s <code class="language-plaintext highlighter-rouge">sort_by</code> <a href="https://ruby-doc.org/core-2.5.0/Enumerable.html#method-i-sort_by">method to do the sorting</a>.</p>

<div class="language-ruby highlighter-rouge"><div class="highlight"><pre class="highlight"><code><span class="k">class</span> <span class="nc">SearchController</span> <span class="o">&lt;</span> <span class="no">ApplicationController</span>
  <span class="k">def</span> <span class="nf">index</span>
    <span class="n">redirect_to</span> <span class="n">root_url</span> <span class="k">if</span> <span class="n">params</span><span class="p">[</span><span class="ss">:term</span><span class="p">].</span><span class="nf">blank?</span>

    <span class="n">results</span> <span class="o">=</span> <span class="no">GithubJobs</span><span class="p">.</span><span class="nf">import</span><span class="p">(</span><span class="n">params</span><span class="p">[</span><span class="ss">:term</span><span class="p">])</span>
    <span class="vi">@jobs</span> <span class="o">=</span> <span class="n">results</span><span class="p">.</span><span class="nf">sort_by</span> <span class="p">{</span> <span class="o">|</span><span class="n">r</span><span class="o">|</span> <span class="o">-</span><span class="n">r</span><span class="p">.</span><span class="nf">posted_at</span><span class="p">.</span><span class="nf">to_i</span> <span class="p">}</span>
  <span class="k">end</span>
<span class="k">end</span>
</code></pre></div></div>

<p>The code is separated into two lines for clarity. You can also call <code class="language-plaintext highlighter-rouge">sort_by</code> tacked on the end of the <code class="language-plaintext highlighter-rouge">import</code> method. Anyhoo, what’s going on here in the code block is that it’s taking a result (<code class="language-plaintext highlighter-rouge">job</code>) from GitHub, and converting it to an integer so that we can sort it in descending order (denoted by the minus sign). By default, the sort would be ascending, like Rails. We could have also used Ruby’s <code class="language-plaintext highlighter-rouge">sort</code> to do the same thing.</p>

<p>With that out of the way, let’s work on that date.</p>

<h2 id="datehelpers">DateHelpers</h2>

<p>Rails has a <a href="http://api.rubyonrails.org/classes/ActionView/Helpers/DateHelper.html">bunch of DateHelpers available</a>. We can utilize <a href="http://api.rubyonrails.org/classes/ActionView/Helpers/DateHelper.html#method-i-time_ago_in_words"><code class="language-plaintext highlighter-rouge">time_ago_in_words</code></a> to give our date a nice look. To see something like “2 days ago” is nicer than a big long date string. Using this is super simple, open up your <code class="language-plaintext highlighter-rouge">_job</code> partial and call the method with the date like so:</p>

<div class="language-erb highlighter-rouge"><div class="highlight"><pre class="highlight"><code><span class="nt">&lt;li</span> <span class="na">class=</span><span class="s">"job"</span><span class="nt">&gt;</span>
  <span class="nt">&lt;h6&gt;</span><span class="cp">&lt;%=</span> <span class="n">job</span><span class="p">.</span><span class="nf">title</span> <span class="cp">%&gt;</span><span class="nt">&lt;/h6&gt;</span>
  <span class="nt">&lt;p&gt;</span>
    <span class="cp">&lt;%=</span> <span class="n">job</span><span class="p">.</span><span class="nf">company</span> <span class="cp">%&gt;</span> <span class="ni">&amp;#183;</span> <span class="cp">&lt;%=</span> <span class="n">job</span><span class="p">.</span><span class="nf">type</span> <span class="cp">%&gt;</span> <span class="ni">&amp;#183;</span>
    Posted <span class="cp">&lt;%=</span> <span class="n">time_ago_in_words</span><span class="p">(</span><span class="n">job</span><span class="p">.</span><span class="nf">posted_at</span><span class="p">)</span> <span class="cp">%&gt;</span><span class="nt">&lt;/p&gt;</span>
<span class="nt">&lt;/li&gt;</span>
</code></pre></div></div>

<p>This is a handy, built-in helper that Rails provides. If it didn’t, we could have <a href="http://api.rubyonrails.org/classes/ActionController/Helpers.html">written a custom helper</a>, which is just a function to do what we wanted. We’d call it the same way as <code class="language-plaintext highlighter-rouge">time_ago_in_words</code>.</p>

<h2 id="details-view">Details View</h2>

<p>Our app is coming along; however, without being able to see the details of the job, it provides minimal value. We’ll fix this shortcoming in the following sections.</p>

<h3 id="resource-routing">Resource Routing</h3>

<p>We’ll start by creating a <code class="language-plaintext highlighter-rouge">JobsController</code>, and we’ll utilize resource-based routing, one of the greatest features of Rails. The concept of resources in Rails simply equates to setting up actions for CRUD based operations related to a model. Instead of specifying seven routes, we can denote a resource and only have one route in our routes.rb file. You’re probably wondering about the seven routes. Well, they are all related to CRUD operations, so you have (this is the HTTP verb and the action name): <code class="language-plaintext highlighter-rouge">GET index</code>, <code class="language-plaintext highlighter-rouge">GET show</code>, <code class="language-plaintext highlighter-rouge">GET new</code>, <code class="language-plaintext highlighter-rouge">GET edit</code>, <code class="language-plaintext highlighter-rouge">POST create</code>, <code class="language-plaintext highlighter-rouge">PUT/PATCH update</code>, and <code class="language-plaintext highlighter-rouge">DELETE destroy</code>.</p>

<p>Let’s see it in action and see what Rails does. Navigate to <code class="language-plaintext highlighter-rouge">http://localhost:3000/foo</code> (an undefined route) in development. You’ll see we have two routes right now, <code class="language-plaintext highlighter-rouge">root</code> and <code class="language-plaintext highlighter-rouge">search</code>. Now open up <code class="language-plaintext highlighter-rouge">config/routes.rb</code> and add the following line under the two routes we previously added:</p>

<div class="language-ruby highlighter-rouge"><div class="highlight"><pre class="highlight"><code><span class="no">Rails</span><span class="p">.</span><span class="nf">application</span><span class="p">.</span><span class="nf">routes</span><span class="p">.</span><span class="nf">draw</span> <span class="k">do</span>
  <span class="o">...</span>
  <span class="n">resources</span> <span class="ss">:jobs</span>
<span class="k">end</span>
</code></pre></div></div>

<p>Refresh the browser, and you’ll see the new routes:</p>

<figure>
  <img src="https://images.visoftinc.com/2018-04-02/figure02.jpg" alt="Figure 2: Resources Routing Results" />
  <figcaption>Figure 2: Resources Routing Results</figcaption>
</figure>

<p>Now for our app, we don’t need full resource routing because we won’t have CRUD operations available to the user for now. All we need is the <code class="language-plaintext highlighter-rouge">GET jobs#show</code> route. We can do this two ways, by specifying a <code class="language-plaintext highlighter-rouge">get</code> route, as we saw in an earlier part of this tutorial, or we can tell Rails either the actions we want to include (<code class="language-plaintext highlighter-rouge">only</code>) or exclude (<code class="language-plaintext highlighter-rouge">except</code>). Since we only need one, we’ll use the <code class="language-plaintext highlighter-rouge">only</code> option:</p>

<div class="language-ruby highlighter-rouge"><div class="highlight"><pre class="highlight"><code><span class="no">Rails</span><span class="p">.</span><span class="nf">application</span><span class="p">.</span><span class="nf">routes</span><span class="p">.</span><span class="nf">draw</span> <span class="k">do</span>
  <span class="err">…</span>
  <span class="n">resources</span> <span class="ss">:jobs</span><span class="p">,</span> <span class="ss">only: </span><span class="p">[</span><span class="ss">:show</span><span class="p">]</span>
<span class="k">end</span>
</code></pre></div></div>

<p>If you refresh <code class="language-plaintext highlighter-rouge">http://localhost:3000/foo</code>, you’ll see that we now have only three routes. Now let’s work on the controller and view for the show route.</p>

<h3 id="jobscontroller">JobsController</h3>

<p>Let’s create the <code class="language-plaintext highlighter-rouge">JobsController</code> now. Create a new file in <code class="language-plaintext highlighter-rouge">app/controllers</code> called <code class="language-plaintext highlighter-rouge">jobs_controller.rb</code>. In that file, we’ll need just one action, <code class="language-plaintext highlighter-rouge">show</code>:</p>

<div class="language-ruby highlighter-rouge"><div class="highlight"><pre class="highlight"><code><span class="k">class</span> <span class="nc">JobsController</span> <span class="o">&lt;</span> <span class="no">ApplicationController</span>
  <span class="k">def</span> <span class="nf">show</span>
  <span class="k">end</span>
<span class="k">end</span>
</code></pre></div></div>

<p>Now in this action, we need to handle two use-cases. The first is if the user clicks on our homepage where we have the job records stored in our database. This is the typical use case. But in ours, we need to handle results from our database and ones from the search. For jobs not in our database, we’ll look up the details based on the <code class="language-plaintext highlighter-rouge">details_url</code> that will be passed to us.</p>

<div class="language-ruby highlighter-rouge"><div class="highlight"><pre class="highlight"><code><span class="k">class</span> <span class="nc">JobsController</span> <span class="o">&lt;</span> <span class="no">ApplicationController</span>
  <span class="k">def</span> <span class="nf">show</span>
    <span class="nb">id</span> <span class="o">=</span> <span class="n">params</span><span class="p">[</span><span class="ss">:id</span><span class="p">].</span><span class="nf">to_i</span>
    <span class="k">if</span> <span class="nb">id</span> <span class="o">&gt;</span> <span class="mi">0</span>
      <span class="vi">@job</span> <span class="o">=</span> <span class="no">Job</span><span class="p">.</span><span class="nf">find</span><span class="p">(</span><span class="nb">id</span><span class="p">)</span>
    <span class="k">else</span>
      <span class="n">result</span> <span class="o">=</span> <span class="no">JSON</span><span class="p">.</span><span class="nf">parse</span> <span class="nb">open</span><span class="p">(</span><span class="s2">"</span><span class="si">#{</span><span class="n">params</span><span class="p">[</span><span class="ss">:details_url</span><span class="p">]</span><span class="si">}</span><span class="s2">.json"</span><span class="p">).</span><span class="nf">read</span>
      <span class="vi">@job</span> <span class="o">=</span> <span class="no">Job</span><span class="p">.</span><span class="nf">build</span><span class="p">(</span><span class="n">result</span><span class="p">)</span>
    <span class="k">end</span>
  <span class="k">end</span>
<span class="k">end</span>
</code></pre></div></div>

<p>That code should be pretty self-explanatory. First, we convert the <code class="language-plaintext highlighter-rouge">params</code> hash’s <code class="language-plaintext highlighter-rouge">:id</code> to an integer. Normally, we could just pass in the <code class="language-plaintext highlighter-rouge">params[:id]</code> directly to <code class="language-plaintext highlighter-rouge">find</code>, but here we want to make sure the value is greater than zero. We’ll be passing in an id of zero when the record isn’t part of our database. In the <code class="language-plaintext highlighter-rouge">else</code> we’ll get a <code class="language-plaintext highlighter-rouge">:details_url</code> passed in via the <code class="language-plaintext highlighter-rouge">params</code>, and from there we can query GitHub Jobs and get the details. If you’re new to Ruby, the string may look a little strange (<code class="language-plaintext highlighter-rouge">"#{params[:details_url]}.json"</code>). This is <a href="http://ruby-for-beginners.rubymonstas.org/bonus/string_interpolation.html">Ruby’s string interpolation</a>. First, you need to use double quotes for this. Next anything between <code class="language-plaintext highlighter-rouge">#{...}</code> is a Ruby command/variable. So here we’re just appending <code class="language-plaintext highlighter-rouge">.json</code> to the end of the <code class="language-plaintext highlighter-rouge">details_url</code>.</p>

<h3 id="show-view">Show View</h3>

<p>Let’s see if you can add the view without guidance. Remember, it’s convention based. We have a <code class="language-plaintext highlighter-rouge">JobsController</code> with a <code class="language-plaintext highlighter-rouge">show</code> action; what does Rails expect? Here is a sample layout for your job show view:</p>

<div class="language-erb highlighter-rouge"><div class="highlight"><pre class="highlight"><code><span class="nt">&lt;div</span> <span class="na">class=</span><span class="s">"container"</span><span class="nt">&gt;</span>
  <span class="nt">&lt;div</span> <span class="na">class=</span><span class="s">"row"</span><span class="nt">&gt;</span>
    <span class="nt">&lt;h1&gt;</span><span class="cp">&lt;%=</span> <span class="vi">@job</span><span class="p">.</span><span class="nf">title</span> <span class="cp">%&gt;</span><span class="nt">&lt;/h1&gt;</span>
    <span class="nt">&lt;div</span> <span class="na">class=</span><span class="s">"col-md-8"</span><span class="nt">&gt;</span>
      <span class="nt">&lt;p&gt;</span>
        <span class="nt">&lt;a</span> <span class="na">href=</span><span class="s">"</span><span class="cp">&lt;%=</span> <span class="vi">@job</span><span class="p">.</span><span class="nf">company_url</span> <span class="cp">%&gt;</span><span class="s">"</span><span class="nt">&gt;</span>
          <span class="cp">&lt;%=</span> <span class="vi">@job</span><span class="p">.</span><span class="nf">company</span> <span class="cp">%&gt;</span>
        <span class="nt">&lt;/a&gt;</span>
        <span class="ni">&amp;#183;</span> <span class="cp">&lt;%=</span> <span class="vi">@job</span><span class="p">.</span><span class="nf">type</span> <span class="cp">%&gt;</span> <span class="ni">&amp;#183;</span>
        Posted <span class="cp">&lt;%=</span> <span class="n">time_ago_in_words</span><span class="p">(</span><span class="vi">@job</span><span class="p">.</span><span class="nf">posted_at</span><span class="p">)</span><span class="cp">%&gt;</span> ago
      <span class="nt">&lt;/p&gt;</span>
      <span class="nt">&lt;p&gt;</span><span class="cp">&lt;%=</span><span class="n">raw</span> <span class="vi">@job</span><span class="p">.</span><span class="nf">description</span> <span class="cp">%&gt;</span><span class="nt">&lt;/p&gt;</span>
    <span class="nt">&lt;/div&gt;</span>
  <span class="nt">&lt;div</span> <span class="na">class=</span><span class="s">"col-md-4"</span><span class="nt">&gt;</span>
    <span class="nt">&lt;img</span> <span class="na">src=</span><span class="s">"</span><span class="cp">&lt;%=</span> <span class="vi">@job</span><span class="p">.</span><span class="nf">company_logo</span> <span class="cp">%&gt;</span><span class="s">"</span> <span class="na">alt=</span><span class="s">"Logo"</span> <span class="nt">/&gt;</span>
    <span class="nt">&lt;p&gt;</span><span class="cp">&lt;%=</span><span class="n">raw</span> <span class="vi">@job</span><span class="p">.</span><span class="nf">how_to_apply</span> <span class="cp">%&gt;</span><span class="nt">&lt;/p&gt;</span>
  <span class="nt">&lt;/div&gt;</span>
<span class="nt">&lt;/div&gt;</span>
</code></pre></div></div>

<p>Most of this should be easy to understand, except for <code class="language-plaintext highlighter-rouge">raw</code>. By default, ERB will escape HTML characters with the standard output brackets (<code class="language-plaintext highlighter-rouge">&lt;%= ... %&gt;</code>). In this case, we’re getting our <code class="language-plaintext highlighter-rouge">description</code> and <code class="language-plaintext highlighter-rouge">how_to_apply</code> from a trusted source (GitHub Jobs), and we want the HTML to render. To do this, we specify the <code class="language-plaintext highlighter-rouge">raw</code> helper, which will do exactly what we want. Be cautious with <code class="language-plaintext highlighter-rouge">raw</code>; we’re only using it here because of the trusted source. If this were user input, there could be malicious code, and we wouldn’t want to execute it.</p>

<p>Did you figure out where to put the file? If not, it’s <code class="language-plaintext highlighter-rouge">app/views/jobs/show.html.erb</code>. All views go into the <code class="language-plaintext highlighter-rouge">app/views</code> directory. Since we have a <code class="language-plaintext highlighter-rouge">JobsController</code>, Rails will look for a <code class="language-plaintext highlighter-rouge">jobs</code> directory. In the controller, we have one action, <code class="language-plaintext highlighter-rouge">show</code>, thus the <code class="language-plaintext highlighter-rouge">show.html.erb</code> file.</p>

<h3 id="linking">Linking</h3>

<p>At this point, we need to change our <code class="language-plaintext highlighter-rouge">_job</code> partial to link to the <code class="language-plaintext highlighter-rouge">show</code> action. The route helper methods created are <code class="language-plaintext highlighter-rouge">job_path</code> (relative path) and <code class="language-plaintext highlighter-rouge">job_url</code> (absolute URL). With this knowledge, we can change the job partial. We need to have a condition here; if we have an <code class="language-plaintext highlighter-rouge">id</code> we’ll link to the job with just a path of <code class="language-plaintext highlighter-rouge">/jobs/:id</code>. However, for models that have an <code class="language-plaintext highlighter-rouge">id</code> of <code class="language-plaintext highlighter-rouge">nil</code> (ones from GitHub Jobs), we will pass in a zero for the <code class="language-plaintext highlighter-rouge">:id</code> and pass along the <code class="language-plaintext highlighter-rouge">source_url</code> as a query string parameter.</p>

<div class="language-erb highlighter-rouge"><div class="highlight"><pre class="highlight"><code><span class="nt">&lt;li</span> <span class="na">class=</span><span class="s">"job"</span><span class="nt">&gt;</span>
  <span class="nt">&lt;h6&gt;</span>
    <span class="cp">&lt;%</span> <span class="k">if</span> <span class="n">job</span><span class="p">.</span><span class="nf">id</span> <span class="cp">%&gt;</span>
      <span class="cp">&lt;%=</span> <span class="n">link_to</span> <span class="n">job</span><span class="p">.</span><span class="nf">title</span><span class="p">,</span> <span class="n">job</span> <span class="cp">%&gt;</span>
    <span class="cp">&lt;%</span> <span class="k">else</span> <span class="cp">%&gt;</span>
      <span class="cp">&lt;%=</span> <span class="n">link_to</span> <span class="n">job</span><span class="p">.</span><span class="nf">title</span><span class="p">,</span> <span class="n">job_path</span><span class="p">(</span><span class="mi">0</span><span class="p">,</span> <span class="ss">details_url: </span><span class="n">job</span><span class="p">.</span><span class="nf">source_url</span><span class="p">)</span> <span class="cp">%&gt;</span>
    <span class="cp">&lt;%</span> <span class="k">end</span> <span class="cp">%&gt;</span>
  <span class="nt">&lt;/h6&gt;</span>
   ...
<span class="nt">&lt;/li&gt;</span>
</code></pre></div></div>

<p>In the first case, we can just pass along the <code class="language-plaintext highlighter-rouge">job</code> model and Rails will automatically use the <code class="language-plaintext highlighter-rouge">id</code> property passing it to the <code class="language-plaintext highlighter-rouge">jobs_path</code>. This is simply a <a href="http://api.rubyonrails.org/classes/ActionView/Helpers/UrlHelper.html#method-i-link_to">shortcut method</a> on <code class="language-plaintext highlighter-rouge">link_to</code>. Otherwise, we’ll explicitly build the job path using the helper method <code class="language-plaintext highlighter-rouge">job_path</code> giving it an <code class="language-plaintext highlighter-rouge">id</code> of 0 and a <code class="language-plaintext highlighter-rouge">details_url</code> query param of <code class="language-plaintext highlighter-rouge">job.source_url</code>.</p>

<p>Now go ahead and give both use cases a try (from the database, assuming you have some records and the search results). Both should work, and you’ll see the different URLs based on the way you entered the <code class="language-plaintext highlighter-rouge">show</code> route.</p>

<figure>
  <img src="https://images.visoftinc.com/2018-04-02/figure03.jpg" alt="Figure 3: Different Urls" />
  <figcaption>Figure 3: Different Urls</figcaption>
</figure>

<h2 id="wrap-up">Wrap Up</h2>

<p>Congrats, you’ve made it! It’s been a reasonably long ride over the past five parts of this tutorial, Riding Rails. We walked through building a simple application with Rails. In this last part, we skipped testing because of time, but I would encourage you to go back and add tests. That’s one of the advantages of using generators since it creates a test file for you. However, there’s no reason why we can’t build one ourselves.</p>

<p>Remember, this application works, but could use some more coding. For example, we only handled GitHub Jobs, and we wanted to make this an aggregator of jobs from different sites. We didn’t persist any jobs to our database, but we saw in <a href="/2018/03/19/riding-rails-part-03/">Part 3</a> how to do so. Like any app, there is always room for improvement.</p>

<p>Anyway, I hope you enjoyed the series. Feel free to leave a comment or contact us. Happy Rubying!</p>]]></content><author><name>Damien White</name></author><category term="ruby" /><category term="ruby-on-rails" /><category term="rails" /><category term="ruby" /><category term="rails" /><category term="riding-rails" /><category term="job_slayer" /><summary type="html"><![CDATA[Join us in creating a Ruby on Rails application from scratch that allows us to search for jobs. This is part 5, the final of the series.]]></summary><media:thumbnail xmlns:media="http://search.yahoo.com/mrss/" url="https://images.visoftinc.com/2018-04-02/industrial-railway.jpg" /><media:content medium="image" url="https://images.visoftinc.com/2018-04-02/industrial-railway.jpg" xmlns:media="http://search.yahoo.com/mrss/" /></entry><entry><title type="html">Riding Rails - Building a Web App (Part 04)</title><link href="https://blogs.visoftinc.com/2018/03/26/riding-rails-part-04/" rel="alternate" type="text/html" title="Riding Rails - Building a Web App (Part 04)" /><published>2018-03-26T00:00:00-04:00</published><updated>2018-03-26T00:00:00-04:00</updated><id>https://blogs.visoftinc.com/2018/03/26/riding-rails-part-04</id><content type="html" xml:base="https://blogs.visoftinc.com/2018/03/26/riding-rails-part-04/"><![CDATA[<p><img src="https://images.visoftinc.com/2018-03-26/railway-station.jpg" alt="Railway Station" class="aligncenter" /></p>

<p>Thanks for coming back, this is Part 4 of Riding Rails. Today we’ll be discussing routing, controllers, and views. These will finally bring our application to life. I’m going to try to keep this part short, but we have a lot to cover. Let’s get started!</p>

<blockquote>
  <p>Missed <a href="/2018/03/05/riding-rails-part-01/">Part 1</a>, <a href="/2018/03/12/riding-rails-part-02/">Part 2</a>, or <a href="/2018/03/19/riding-rails-part-03/">Part 3</a>? No worries, we’ll wait for you while you catch up.</p>
</blockquote>

<h2 id="to-generate-or-not">To Generate Or Not</h2>

<p>In <a href="/2018/03/19/riding-rails-part-03/">Part 3</a>, we added all the files we needed by hand. It took a little extra time to set everything up. While that’s typical, it doesn’t make for a great tutorial. Because of this, we’ll use another of Rails’ generators, the controller generator. Before generating anything, let’s look at the help:</p>

<div class="language-bash highlighter-rouge"><div class="highlight"><pre class="highlight"><code>rails g controller <span class="nt">--help</span>
</code></pre></div></div>

<p>We’re going to customize the generator with switches. We don’t need a lot of files right now, so we’ll turn off the creation of JavaScript and the Helper. We will also turn off Routes and add these manually. Once you learn about routing, you can have Rails create the routes for you. Finally, we will start with one controller action called <code class="language-plaintext highlighter-rouge">index</code>. Here is the full command:</p>

<div class="language-bash highlighter-rouge"><div class="highlight"><pre class="highlight"><code>rails g controller Home index <span class="nt">--no-javascripts</span> <span class="nt">--no-helper</span> <span class="nt">--skip-routes</span>
</code></pre></div></div>

<blockquote>
  <p>Tack on a <code class="language-plaintext highlighter-rouge">--pretend</code> to the end if you want to preview what is going to happen.</p>
</blockquote>

<p>With this command, four files will be generated for us: a controller, a view, a test, and a stylesheet. Isn’t that easier than listing all the paths, the files, and the base contents for each one? I hear a resounding, “Yes!”</p>

<h2 id="routes">Routes</h2>

<p>Rails is an MVC (model, view, controller) framework. I’ll skip the typical drawing of the three pillars of MVC and just show it to you in action.</p>

<blockquote>
  <p>If you’re truly missing the MVC diagram, there are already <a href="http://lmgtfy.com/?t=i&amp;q=MVC">hundreds on the web</a>.</p>
</blockquote>

<p>Start by re-running Guard, and have it run all the tests (hit Enter or type <code class="language-plaintext highlighter-rouge">all</code> and Enter at the prompt). We have a failing test. Let’s see what Rails generated by opening up the controller test (<code class="language-plaintext highlighter-rouge">test/controllers/home_controller_test.rb</code>). Well, hey! Rails created a test that we would have had to write ourselves. It simply tests that the index action can be retrieved. It’s failing because we haven’t entered a route yet. Luckily, creating a route is super simple. Open <code class="language-plaintext highlighter-rouge">config/routes.rb</code> and inside the <code class="language-plaintext highlighter-rouge">Rails.application.routes.draw</code> block add one line:</p>

<div class="language-ruby highlighter-rouge"><div class="highlight"><pre class="highlight"><code><span class="n">get</span> <span class="s1">'home'</span><span class="p">,</span> <span class="ss">to: </span><span class="s1">'home#index'</span>
</code></pre></div></div>

<p>In doing that we’re simply saying, direct HTTP <code class="language-plaintext highlighter-rouge">GET</code> requests to the <code class="language-plaintext highlighter-rouge">HomeController</code>’s <code class="language-plaintext highlighter-rouge">index</code> action. Now, in the test that’s failing, change <code class="language-plaintext highlighter-rouge">home_index_url</code> to just <code class="language-plaintext highlighter-rouge">home_url</code>. With the way this route is written, the routing helpers created by Rails would be <code class="language-plaintext highlighter-rouge">home_url</code> and <code class="language-plaintext highlighter-rouge">home_path</code>. The <code class="language-plaintext highlighter-rouge">home_path</code> (which we’ll just call “the path” for this <code class="language-plaintext highlighter-rouge">home</code> route), is just the relative path to the action, like <code class="language-plaintext highlighter-rouge">/home</code>. The URL (<code class="language-plaintext highlighter-rouge">home_url</code>) is the full path: <code class="language-plaintext highlighter-rouge">http://localhost:3000/home</code>. We could change the name of the helpers by passing an explicit <code class="language-plaintext highlighter-rouge">as: 'something'</code>, and that would give you helpers named <code class="language-plaintext highlighter-rouge">something_url</code> and <code class="language-plaintext highlighter-rouge">something_path</code>. If you want to be explicit, just tack on <code class="language-plaintext highlighter-rouge">, as: 'home'</code> to the route you created in <code class="language-plaintext highlighter-rouge">config/routes.rb</code>.</p>

<h2 id="rails-server">Rails Server</h2>

<p>Back in <a href="/2018/02/26/starting-with-rails/">Starting With Rails</a> we started the Rails server. If you don’t remember the command, it’s merely <code class="language-plaintext highlighter-rouge">rails s</code> or <code class="language-plaintext highlighter-rouge">rails server</code>. Open a new Terminal instance for the server and go ahead and run it. Remember that you have to be in the root directory of your project. Then open your browser and navigate to <code class="language-plaintext highlighter-rouge">http://localhost:3000</code>. You’re greeted with Figure 1.</p>

<figure>
  <img src="https://images.visoftinc.com/2018-03-26/figure01.png" alt="Figure 1: Yay! You’re on Rails!" />
  <figcaption>Figure 1: Yay! You’re on Rails!</figcaption>
</figure>

<p>Now try, <code class="language-plaintext highlighter-rouge">http://localhost:3000/home</code>, and we see Figure 2.</p>

<figure>
  <img src="https://images.visoftinc.com/2018-03-26/figure02.png" alt="Figure 2: Our current home page" />
  <figcaption>Figure 2: A Bare Page</figcaption>
</figure>

<h2 id="routing---the-return">Routing - The Return</h2>

<p>Before we go any further, we want our <code class="language-plaintext highlighter-rouge">home#index</code> action to be the <a href="http://guides.rubyonrails.org/routing.html#using-root">root</a> of the site. We can tell Rails that we have a root easily in the <code class="language-plaintext highlighter-rouge">routes.rb</code>. In fact, do we want people hitting <code class="language-plaintext highlighter-rouge">/home</code> anymore? Probably not, simply the <code class="language-plaintext highlighter-rouge">/</code> of the root would look cleaner. We can shrink our routes file just to be the following:</p>

<div class="language-ruby highlighter-rouge"><div class="highlight"><pre class="highlight"><code><span class="no">Rails</span><span class="p">.</span><span class="nf">application</span><span class="p">.</span><span class="nf">routes</span><span class="p">.</span><span class="nf">draw</span> <span class="k">do</span>
  <span class="n">root</span> <span class="s1">'home#index'</span>
<span class="k">end</span>
</code></pre></div></div>

<p>Go to the root URL in the browser again. The welcome message is gone, and we see our <code class="language-plaintext highlighter-rouge">home#index</code> view. Perfect. Try hitting <code class="language-plaintext highlighter-rouge">http://localhost:3000/home</code>, and since we’re in the development environment, you get what I think every MVC framework should give you, a list of all your routes (Figure 3).</p>

<figure>
  <img src="https://images.visoftinc.com/2018-03-26/figure03.png" alt="Figure 3: List of Routes" />
  <figcaption>Figure 3: List of Routes</figcaption>
</figure>

<p>Isn’t that awesome? Of course, we only have one route, but that’s rare.</p>

<p>Before we move on, let’s fix that failing test. Match the code below, and the test should now pass:</p>

<div class="language-ruby highlighter-rouge"><div class="highlight"><pre class="highlight"><code><span class="k">class</span> <span class="nc">HomeControllerTest</span> <span class="o">&lt;</span> <span class="no">ActionDispatch</span><span class="o">::</span><span class="no">IntegrationTest</span>
  <span class="nb">test</span> <span class="s2">"should get index"</span> <span class="k">do</span>
    <span class="n">get</span> <span class="n">root_url</span>
    <span class="n">assert_response</span> <span class="ss">:success</span>
  <span class="k">end</span>
<span class="k">end</span>
</code></pre></div></div>

<h2 id="views">Views</h2>

<p>Now that we have our homepage/root all set let’s work on adding content. For ease of styling and such, I’m going to use Bootstrap v4, which has finally been released to production. We could include it from the CDN, but there is a <a href="https://github.com/twbs/bootstrap-rubygem">gem available</a>. Since we’re doing everything in Rails, let’s install the gem. We need two again, because Bootstrap relies on jQuery as well (and popper.js, but that’s already required by the <code class="language-plaintext highlighter-rouge">bootstrap-rubygem</code>). Time to add them to the <code class="language-plaintext highlighter-rouge">.gemfile</code>.</p>

<div class="language-ruby highlighter-rouge"><div class="highlight"><pre class="highlight"><code><span class="c1"># use bootstrap</span>
<span class="n">gem</span> <span class="s1">'bootstrap'</span><span class="p">,</span> <span class="s1">'~&gt; 4.0.0'</span>
<span class="c1"># bootstrap needs jquery</span>
<span class="n">gem</span> <span class="s1">'jquery-rails'</span>
</code></pre></div></div>

<p>You know the drill by now, <code class="language-plaintext highlighter-rouge">bundle install</code> and then restart your Rails server.</p>

<p>Last step, we have to import Bootstrap in our stylesheet. We’ll use the <code class="language-plaintext highlighter-rouge">app/assets/stylesheets/home.scss</code> stylesheet here, and it should look like:</p>

<div class="language-css highlighter-rouge"><div class="highlight"><pre class="highlight"><code><span class="o">//</span> <span class="nt">Custom</span> <span class="nt">bootstrap</span> <span class="nt">variables</span> <span class="nt">must</span> <span class="nt">be</span> <span class="nt">set</span> <span class="nt">or</span> <span class="nt">imported</span> <span class="o">*</span><span class="nt">before</span><span class="o">*</span> <span class="nt">bootstrap</span><span class="o">.</span>
<span class="k">@import</span> <span class="s1">"bootstrap"</span><span class="p">;</span>
</code></pre></div></div>

<p>Refresh your browser, and you’ll see a style change right away (Figure 4)</p>

<figure>
  <img src="https://images.visoftinc.com/2018-03-26/figure04.png" alt="Figure 4: A style change" />
  <figcaption>Figure 4: A Style Change</figcaption>
</figure>

<p>Alright, on the homepage we’re going to show a form for searching as well as a list of jobs loaded from our database. That means we need some data from our controller. Let’s hop over there and get a list of jobs for the homepage; then we’ll come back and use the data.</p>

<h2 id="controllers">Controllers</h2>

<p>Open up <code class="language-plaintext highlighter-rouge">app/controllers/home_controller.rb</code> and take a look. There is a class with one method. This method is an action because we route to it. With just that empty little method, Rails, by convention will search for a view file to render. So, if you have a <code class="language-plaintext highlighter-rouge">HomeController</code>, Rails will look for <code class="language-plaintext highlighter-rouge">app/views/home/index.html.erb</code>. Notice the name of the view matches that of the action, and that it’s under a <code class="language-plaintext highlighter-rouge">home</code> directory. Rails does all this for us, without us having to specify anything. That’s the beauty of convention over configuration.</p>

<p>Let’s do some work on the index action and query the jobs that we have in our database. To use ActiveRecord, you simply use the class name of the domain model and call methods off of it.</p>

<div class="language-ruby highlighter-rouge"><div class="highlight"><pre class="highlight"><code><span class="k">class</span> <span class="nc">HomeController</span> <span class="o">&lt;</span> <span class="no">ApplicationController</span>
  <span class="k">def</span> <span class="nf">index</span>
    <span class="vi">@jobs</span> <span class="o">=</span> <span class="no">Job</span><span class="p">.</span><span class="nf">limit</span><span class="p">(</span><span class="mi">10</span><span class="p">)</span>
  <span class="k">end</span>
<span class="k">end</span>
</code></pre></div></div>

<p>There is an <code class="language-plaintext highlighter-rouge">all</code> method which obviously returns all items in the set, but I don’t think we want to show everything we have on the homepage. Here we are using <code class="language-plaintext highlighter-rouge">limit(10)</code> so we’ll only get back ten records. Now you’re probably wondering what’s up with <code class="language-plaintext highlighter-rouge">@jobs</code>. This is called an instance variable. In Ruby, a variable that starts with an <code class="language-plaintext highlighter-rouge">@</code> is an instance variable. In Rails, these are special because they are exposed to the view.</p>

<h2 id="back-to-views">Back to Views</h2>

<p>Can you believe that’s all we need to do on the controller side? Don’t believe it? Well, I’ll prove it. Let’s use the <code class="language-plaintext highlighter-rouge">@jobs</code> collection in our view (<code class="language-plaintext highlighter-rouge">app/views/home/index.html.erb</code>).</p>

<div class="language-erb highlighter-rouge"><div class="highlight"><pre class="highlight"><code><span class="nt">&lt;div</span> <span class="na">class=</span><span class="s">"container"</span><span class="nt">&gt;</span>
  <span class="nt">&lt;h1&gt;</span>Jobs<span class="nt">&lt;/h1&gt;</span>

  <span class="nt">&lt;ul&gt;</span>
  <span class="cp">&lt;%</span> <span class="vi">@jobs</span><span class="p">.</span><span class="nf">each</span> <span class="k">do</span> <span class="o">|</span><span class="n">job</span><span class="o">|</span> <span class="cp">%&gt;</span>
    <span class="nt">&lt;li&gt;</span><span class="cp">&lt;%=</span> <span class="n">job</span><span class="p">.</span><span class="nf">title</span> <span class="cp">%&gt;</span><span class="nt">&lt;/li&gt;</span>
  <span class="cp">&lt;%</span> <span class="k">end</span> <span class="cp">%&gt;</span>
  <span class="nt">&lt;/ul&gt;</span>
<span class="nt">&lt;/div&gt;</span>
</code></pre></div></div>

<p>This is very simple markup. With ERB, when you are doing something (like <code class="language-plaintext highlighter-rouge">each</code>) you use <code class="language-plaintext highlighter-rouge">&lt;% ... %&gt;</code>. Notice there is no equals sign in there for the loop. When you want to display something, you add an equal sign like this, <code class="language-plaintext highlighter-rouge">&lt;%= ... %&gt;</code>. This yields the output in Figure 5. Note that I only have one record in my database at the moment.</p>

<figure>
  <img src="https://images.visoftinc.com/2018-03-26/figure05.png" alt="Figure 5: A Simple List" />
  <figcaption>Figure 5: A Simple List</figcaption>
</figure>

<p>Before we add a search form, we need a new action to handle the post. We could use the same controller to do this, but let’s add a challenge and use a different controller and action. We’ll call this <code class="language-plaintext highlighter-rouge">search</code> and only accept an HTTP <code class="language-plaintext highlighter-rouge">POST</code>.</p>

<p>This is no different (apart from the name) than what we just did earlier. If you choose to generate it, here’s the command:</p>

<div class="language-bash highlighter-rouge"><div class="highlight"><pre class="highlight"><code>rails g controller Search index <span class="nt">--no-helper</span> <span class="nt">--skip-routes</span> <span class="nt">--no-assets</span>
</code></pre></div></div>

<p>Add a route called <code class="language-plaintext highlighter-rouge">search</code> that points to <code class="language-plaintext highlighter-rouge">search#index</code>, remember this will be <code class="language-plaintext highlighter-rouge">POST</code> only. Here’s the whole file:</p>

<div class="language-ruby highlighter-rouge"><div class="highlight"><pre class="highlight"><code><span class="no">Rails</span><span class="p">.</span><span class="nf">application</span><span class="p">.</span><span class="nf">routes</span><span class="p">.</span><span class="nf">draw</span> <span class="k">do</span>
  <span class="n">root</span> <span class="s1">'home#index'</span>
  <span class="n">post</span> <span class="s1">'search'</span><span class="p">,</span> <span class="ss">to: </span><span class="s1">'search#index'</span>
<span class="k">end</span>
</code></pre></div></div>

<p>Finally don’t forget to fix the new broken test that we have from generating the new controller. When you have done it should look like the following.</p>

<div class="language-ruby highlighter-rouge"><div class="highlight"><pre class="highlight"><code><span class="o">...</span>
<span class="k">class</span> <span class="nc">SearchControllerTest</span> <span class="o">&lt;</span> <span class="no">ActionDispatch</span><span class="o">::</span><span class="no">IntegrationTest</span>
  <span class="nb">test</span> <span class="s2">"should post to index"</span> <span class="k">do</span>
    <span class="n">post</span> <span class="n">search_url</span>
    <span class="n">assert_response</span> <span class="ss">:success</span>
  <span class="k">end</span>
<span class="k">end</span>
</code></pre></div></div>

<p>Now let’s look at the form on the homepage.</p>

<div class="language-erb highlighter-rouge"><div class="highlight"><pre class="highlight"><code>  <span class="cp">&lt;%=</span> <span class="n">form_tag</span> <span class="n">search_path</span><span class="p">,</span> <span class="ss">class: </span><span class="s1">'form-inline'</span> <span class="k">do</span> <span class="cp">%&gt;</span>
    <span class="nt">&lt;div</span> <span class="na">class=</span><span class="s">"form-group mb-2"</span><span class="nt">&gt;</span>
      <span class="cp">&lt;%=</span> <span class="n">label_tag</span> <span class="ss">:term</span><span class="p">,</span> <span class="kp">nil</span><span class="p">,</span> <span class="ss">class: </span><span class="s1">'sr-only'</span> <span class="cp">%&gt;</span>
      <span class="cp">&lt;%=</span> <span class="n">text_field_tag</span> <span class="ss">:term</span><span class="p">,</span> <span class="kp">nil</span><span class="p">,</span> <span class="ss">class: </span><span class="s1">'form-control'</span><span class="p">,</span> <span class="ss">placeholder: </span><span class="s1">'Enter a Search Term'</span> <span class="cp">%&gt;</span>
    <span class="nt">&lt;/div&gt;</span>
    <span class="nt">&lt;button</span> <span class="na">type=</span><span class="s">"submit"</span> <span class="na">class=</span><span class="s">"btn btn-primary mb-2"</span><span class="nt">&gt;</span>Search<span class="nt">&lt;/button&gt;</span>
  <span class="cp">&lt;%</span> <span class="k">end</span> <span class="cp">%&gt;</span>
</code></pre></div></div>

<p>That’s straight Bootstrap v4 with <a href="http://guides.rubyonrails.org/form_helpers.html">Form Helpers provided by Rails</a>.</p>

<h2 id="wiring-up-the-search">Wiring Up the Search</h2>

<p>Everything is pretty much in place at this point. The only thing we need to do is handle the search. Where do you do work like that? If you said the controller, awesome! Open up <code class="language-plaintext highlighter-rouge">app/controllers/search_controller.rb</code>. Inside the <code class="language-plaintext highlighter-rouge">index</code> action we’ll query GitHub Jobs, which we built in <a href="/2018/03/19/riding-rails-part-03/">Part 3</a>. Our <code class="language-plaintext highlighter-rouge">term</code> parameter will be passed to the controller via the <code class="language-plaintext highlighter-rouge">params</code> hash. Let’s see the code in action.</p>

<div class="language-ruby highlighter-rouge"><div class="highlight"><pre class="highlight"><code><span class="k">class</span> <span class="nc">SearchController</span> <span class="o">&lt;</span> <span class="no">ApplicationController</span>
  <span class="k">def</span> <span class="nf">index</span>
    <span class="n">redirect_to</span> <span class="n">root_url</span> <span class="k">if</span> <span class="n">params</span><span class="p">[</span><span class="ss">:term</span><span class="p">].</span><span class="nf">blank?</span>

    <span class="vi">@jobs</span> <span class="o">=</span> <span class="no">GithubJobs</span><span class="p">.</span><span class="nf">import</span><span class="p">(</span><span class="n">params</span><span class="p">[</span><span class="ss">:term</span><span class="p">])</span>
  <span class="k">end</span>
<span class="k">end</span>
</code></pre></div></div>

<p>There are just two lines here, but the only thing you haven’t seen yet is the <code class="language-plaintext highlighter-rouge">redirect_to</code> method. This is <a href="http://guides.rubyonrails.org/layouts_and_rendering.html#using-redirect-to">provided to our controller</a> from Rails. It redirects the user back to the homepage if they try just to submit the form without a term. The other line should look pretty familiar from <a href="/2018/03/19/riding-rails-part-03/">Part 3</a>. We’re just storing the results in a <code class="language-plaintext highlighter-rouge">@jobs</code> instance variable. Now we can use it in <code class="language-plaintext highlighter-rouge">app/views/search/index.html.erb</code>.</p>

<div class="language-erb highlighter-rouge"><div class="highlight"><pre class="highlight"><code><span class="nt">&lt;div</span> <span class="na">class=</span><span class="s">"container"</span><span class="nt">&gt;</span>
  <span class="nt">&lt;ul&gt;</span>
  <span class="cp">&lt;%</span> <span class="vi">@jobs</span><span class="p">.</span><span class="nf">each</span> <span class="k">do</span> <span class="o">|</span><span class="n">job</span><span class="o">|</span> <span class="cp">%&gt;</span>
    <span class="nt">&lt;li&gt;</span><span class="cp">&lt;%=</span> <span class="n">job</span><span class="p">.</span><span class="nf">title</span> <span class="cp">%&gt;</span><span class="nt">&lt;/li&gt;</span>
  <span class="cp">&lt;%</span> <span class="k">end</span> <span class="cp">%&gt;</span>
  <span class="nt">&lt;/ul&gt;</span>
<span class="nt">&lt;/div&gt;</span>
</code></pre></div></div>

<p>Hmm, that code is the same that we have on the homepage. Remember our <code class="language-plaintext highlighter-rouge">job</code> model is the same from the database or our GitHub Jobs parser. That’s not very DRY (don’t repeat yourself), let’s fix it.</p>

<h2 id="partials">Partials</h2>

<p>Let’s break out the code we have to render a <code class="language-plaintext highlighter-rouge">job</code>. There’s not much there yet, it’s just <code class="language-plaintext highlighter-rouge">li</code> with the <code class="language-plaintext highlighter-rouge">title</code> of the <code class="language-plaintext highlighter-rouge">job</code>. Create a new folder <code class="language-plaintext highlighter-rouge">jobs</code> under <code class="language-plaintext highlighter-rouge">views</code>, in that folder we’ll create a partial view. By convention <a href="http://guides.rubyonrails.org/layouts_and_rendering.html#using-partials">partials in Rails</a> start with an underscore. Thus your file should be called <code class="language-plaintext highlighter-rouge">_job.html.erb</code>. In that file, for now, just put in the code that renders a job:</p>

<div class="language-erb highlighter-rouge"><div class="highlight"><pre class="highlight"><code><span class="nt">&lt;li&gt;</span><span class="cp">&lt;%=</span> <span class="n">job</span><span class="p">.</span><span class="nf">title</span> <span class="cp">%&gt;</span><span class="nt">&lt;/li&gt;</span>
</code></pre></div></div>

<p>Now, here comes the “magic.” I <a href="/2010/04/27/ruby-beauty-rendering-a-rails-partial-for-a-collection/">wrote about this back in 2010</a>, but I didn’t mention this excellent shortcut we can use. Ready?</p>

<div class="language-erb highlighter-rouge"><div class="highlight"><pre class="highlight"><code><span class="nt">&lt;ul&gt;</span>
  <span class="cp">&lt;%=</span> <span class="n">render</span> <span class="vi">@jobs</span> <span class="cp">%&gt;</span>
<span class="nt">&lt;/ul&gt;</span>
</code></pre></div></div>

<p>That’s all we need. Rails is incredible! Because we have a <code class="language-plaintext highlighter-rouge">jobs</code> folder, with a <code class="language-plaintext highlighter-rouge">_job</code> partial and we have a <code class="language-plaintext highlighter-rouge">@job</code> collection, Rails looks for the <code class="language-plaintext highlighter-rouge">_job</code> partial and renders it. No need to specify anything else.</p>

<p>Now go ahead and change the code for the search page; it’s the same code as above.</p>

<h2 id="wrap-up">Wrap Up</h2>

<p>We have the basic functionally working. It’s nothing significant to look at, but it works.</p>

<p>For your weekly homework, go ahead and style up the <code class="language-plaintext highlighter-rouge">_job.html.erb</code> file. Just having the <code class="language-plaintext highlighter-rouge">title</code> shown isn’t very user-friendly. If you need docs on Bootstrap, <a href="https://getbootstrap.com/">head over to their site</a>. Feel free to further style the search form, the homepage, etc. If you want to use some of the JavaScript components in Bootstrap, you’ll need to follow the <a href="https://github.com/twbs/bootstrap-rubygem">instructions in their README</a>.</p>

<p>Next time, we’ll look at drilling down into a <code class="language-plaintext highlighter-rouge">job</code> so we can see a detailed view of the position. We also should be able to wrap up the series.</p>]]></content><author><name>Damien White</name></author><category term="ruby" /><category term="ruby-on-rails" /><category term="rails" /><category term="ruby" /><category term="rails" /><category term="riding-rails" /><category term="job_slayer" /><summary type="html"><![CDATA[Join us in creating a Ruby on Rails application from scratch that allows us to search for jobs. This is part 4 of the series.]]></summary><media:thumbnail xmlns:media="http://search.yahoo.com/mrss/" url="https://images.visoftinc.com/2018-03-26/railway-station.jpg" /><media:content medium="image" url="https://images.visoftinc.com/2018-03-26/railway-station.jpg" xmlns:media="http://search.yahoo.com/mrss/" /></entry><entry><title type="html">Riding Rails - Building a Web App (Part 03)</title><link href="https://blogs.visoftinc.com/2018/03/19/riding-rails-part-03/" rel="alternate" type="text/html" title="Riding Rails - Building a Web App (Part 03)" /><published>2018-03-19T00:00:00-04:00</published><updated>2018-03-19T00:00:00-04:00</updated><id>https://blogs.visoftinc.com/2018/03/19/riding-rails-part-03</id><content type="html" xml:base="https://blogs.visoftinc.com/2018/03/19/riding-rails-part-03/"><![CDATA[<p><img src="https://images.visoftinc.com/2018-03-19/high-speed-train.jpg" alt="High speed train" class="aligncenter" /></p>

<p>Welcome back to Riding Rails, this is Part 3. In this part, we’ll be working with GitHub Jobs and persisting the information in our database. We’ll see how far we get today. I think there will <em>at least</em> be four parts to this series. I’m coding this application live, and I’m trying to keep these parts from being too long.</p>

<p>If you’re just stumbling in, you probably missed <a href="/2018/03/05/riding-rails-part-01/">Part 1</a> and <a href="/2018/03/12/riding-rails-part-02/">Part 2</a>. This builds on the other two parts, so you’ll probably want to hop back and read those first.</p>

<h2 id="recap">Recap</h2>

<p>We left off <a href="/2018/03/12/riding-rails-part-02/">last time</a> learning about testing, fixtures, model validation and Guard for running our tests automatically.</p>

<p>Before we get started today, how did you go about solving the URL validation? There’s no real wrong answer. I guess if you skipped it that could be considered incorrect. Did you find the <a href="http://guides.rubyonrails.org/active_record_validations.html#format">format validator</a> and tried your hand at validation by regular expression? If you went this route, I hope you have a lot of tests. URL testing can be tricky. Hmm, if there were only other options. Did you happen to search the web for Rails URL validation? You may have stumbled on at least a couple of gems that solve this issue. The benefit of using a gem here would be that someone already did testing on it. Notice I didn’t say “maybe did testing,” because the Ruby community is awesome.</p>

<blockquote>
  <p>Yes, yes, I’m sure there are gems without tests/specs, but I can’t imagine them being very popular. In fact, read on.</p>
</blockquote>

<p>You also could have written a <a href="http://guides.rubyonrails.org/active_record_validations.html#performing-custom-validations">custom validator</a>. The would also require a lot of tests. My choice was to use the <a href="https://github.com/ralovets/valid_url">valid_url</a> gem as it states it has “The highest test coverage with more than a hundred different valid and invalid URL examples.” That’s cool, have a look at <a href="https://github.com/ralovets/valid_url/tree/master/spec">the specs</a>. Another option I quickly came across was <a href="https://github.com/perfectline/validates_url">validates_url</a>. It’s similar to valid_url, and I’m sure just as good.</p>

<h2 id="gem-or-no-gem">Gem or No Gem</h2>

<p>The first thing we’ll do today is look at utilizing the <a href="https://github.com/georgedrummond/github-jobs">github-jobs gem</a>. If you inspect the code for the gem, you’ll find that it’s straightforward. It merely queries GitHub Jobs and puts the results into an <a href="http://ruby-doc.org/stdlib-2.5.0/libdoc/ostruct/rdoc/OpenStruct.html">OpenStruct</a>. We need the results in the <code class="language-plaintext highlighter-rouge">job_slayer</code> <code class="language-plaintext highlighter-rouge">jobs</code> model, which we could fill pretty easily from an OpenStruct. After reviewing the specs that exist for the gem, it’s not worth using it, sadly. It won’t save us from testing at all because there are just a few specs in the gem. This is a good example of a non-popular one. I didn’t take the time back in <a href="/2018/03/05/riding-rails-part-01/">Part 1</a> to review the gem, and it’s specs. No worries though, we can pivot from the initial plan without issue.</p>

<h2 id="jump-right-in">Jump Right In</h2>

<p>Let’s get to work querying GitHub Jobs. We will test-drive this feature (remember TDD) and since we are using Guard, there is no need to run your tests manually.</p>

<blockquote>
  <p>Guard is still running, correct? If not, spin it up with the command <code class="language-plaintext highlighter-rouge">guard</code>. Make sure you are in your application’s root directory.</p>
</blockquote>

<p>Let’s walk through a test or two and then I’ll give you the requirements before moving on to the actual code so that you can get familiar with writing tests yourself. The first thing we have to do is create a test file. Create a directory (<code class="language-plaintext highlighter-rouge">parsers</code>) under <code class="language-plaintext highlighter-rouge">test</code> and a new file <code class="language-plaintext highlighter-rouge">github_jobs_test.rb</code>. Full path should be <code class="language-plaintext highlighter-rouge">test/parsers/github_jobs_test.rb</code>. We’ll add in the <code class="language-plaintext highlighter-rouge">GithubJobsTest</code> class and our first test. Note also the <code class="language-plaintext highlighter-rouge">require test_helper</code> at the top.</p>

<div class="language-ruby highlighter-rouge"><div class="highlight"><pre class="highlight"><code><span class="nb">require</span> <span class="s1">'test_helper'</span>

<span class="k">class</span> <span class="nc">GithubJobsTest</span> <span class="o">&lt;</span> <span class="no">ActiveSupport</span><span class="o">::</span><span class="no">TestCase</span>
  <span class="nb">test</span> <span class="s2">"should have a class method of import"</span> <span class="k">do</span>
    <span class="n">assert_respond_to</span> <span class="no">GithubJobs</span><span class="p">,</span> <span class="ss">:import</span>
  <span class="k">end</span>
<span class="k">end</span>
</code></pre></div></div>

<p>In this basic test, we’re asserting that our class <code class="language-plaintext highlighter-rouge">GithubJobs</code> has a method (responds to) called <code class="language-plaintext highlighter-rouge">import</code>. We need to be able to call <code class="language-plaintext highlighter-rouge">GithubJobs.import</code></p>

<blockquote>
  <p>You might be more familiar with the term static methods instead of class methods. Class methods in Ruby <a href="http://openmymind.net/2010/6/26/Learning-Ruby-Class-methods-are-not-Static-Methods/">are “close” to static methods</a> in say C#.</p>
</blockquote>

<p>We now need to add the class and class method of <code class="language-plaintext highlighter-rouge">import</code> to make this test pass. Here’s the full class (this is a new file/directory that you need to add, <code class="language-plaintext highlighter-rouge">app/parsers/github_jobs.rb</code>):</p>

<div class="language-ruby highlighter-rouge"><div class="highlight"><pre class="highlight"><code><span class="k">class</span> <span class="nc">GithubJobs</span>
  <span class="k">def</span> <span class="nc">self</span><span class="o">.</span><span class="nf">import</span>
  <span class="k">end</span>
<span class="k">end</span>
</code></pre></div></div>

<p>This is some new syntax here. By defining a method with <code class="language-plaintext highlighter-rouge">self</code> creates a class method. That is called like so: <code class="language-plaintext highlighter-rouge">GithubJobs.import</code>. There isn’t any reason to instantiate anything here since this is a “utility method.”</p>

<p>From <code class="language-plaintext highlighter-rouge">import</code> we want to get back an array of <code class="language-plaintext highlighter-rouge">job</code> models. But before we do, think about what we expect to get from not supplying any parameters to the method. Should we return all of GitHub Jobs’ jobs? It will limit the result to 50, so I guess it’s ok to do that, though I don’t see us using that feature. Perhaps we should require a parameter, something like a search term. Let’s do that and make sure the param is not empty. Add this to the <code class="language-plaintext highlighter-rouge">GitHubJobsTest</code></p>

<div class="language-ruby highlighter-rouge"><div class="highlight"><pre class="highlight"><code><span class="nb">test</span> <span class="s2">"should not work without the term param"</span> <span class="k">do</span>
  <span class="n">assert_raises</span><span class="p">(</span><span class="no">ArgumentError</span><span class="p">)</span> <span class="p">{</span> <span class="no">GithubJobs</span><span class="p">.</span><span class="nf">import</span> <span class="p">}</span>
<span class="k">end</span>
</code></pre></div></div>

<p>We’ll raise an error if the <code class="language-plaintext highlighter-rouge">import</code> method gets called without an argument. We’ll utilize Rails’ <code class="language-plaintext highlighter-rouge">blank?</code> <a href="http://guides.rubyonrails.org/active_support_core_extensions.html#blank-questionmark-and-present-questionmark">method</a>. The <code class="language-plaintext highlighter-rouge">blank?</code> method returns a boolean. In Ruby if a method returns a boolean, it typically is appended with a question mark. This isn’t a hard/fast rule; it’s at the option of the developer. But something to keep in mind for good practice as we’re developing.</p>

<div class="language-ruby highlighter-rouge"><div class="highlight"><pre class="highlight"><code><span class="k">def</span> <span class="nc">self</span><span class="o">.</span><span class="nf">import</span><span class="p">(</span><span class="n">term</span><span class="p">)</span>
  <span class="k">raise</span> <span class="no">ArgumentError</span><span class="p">,</span> <span class="s1">'You must supply a term'</span> <span class="k">if</span> <span class="n">term</span><span class="p">.</span><span class="nf">blank?</span>
<span class="k">end</span>
</code></pre></div></div>

<p>Ruby is beautiful and expressive, so instead of using the block form of <code class="language-plaintext highlighter-rouge">if</code> we can put it after a method. Oh, you don’t need parentheses to call a method, so <code class="language-plaintext highlighter-rouge">raise ArgumentError, 'You must supply a term'</code> can also be written as <code class="language-plaintext highlighter-rouge">raise(ArgumentError, 'You must supply a term')</code>. Just as with the question mark appended to a boolean, this is up to the developer.</p>

<h2 id="getting-results">Getting Results</h2>

<p>Now that we have our method set up, we’re going to start calling GitHub Jobs. This is a problem with testing. Imagine we write this test and it’s run 100 times, that’s 100 calls (for one test) to GitHub Jobs. We don’t want to do this to their service, so we need to think of a better option. We could mock the return from GitHub, but there is an easier way. Here is <a href="https://github.com/vcr/vcr">another gem</a> that we’ll use in our project. It’s called <code class="language-plaintext highlighter-rouge">vcr</code>. We also need the gem <code class="language-plaintext highlighter-rouge">webmock</code> which will intercept web calls for us.</p>

<p>You remember how to install/use a gem in our tests, right? Add them to the <code class="language-plaintext highlighter-rouge">group :development, :test</code> like so:</p>

<div class="language-ruby highlighter-rouge"><div class="highlight"><pre class="highlight"><code><span class="n">group</span> <span class="ss">:development</span><span class="p">,</span> <span class="ss">:test</span> <span class="k">do</span>
  <span class="o">...</span>
  <span class="n">gem</span> <span class="s1">'vcr'</span>
  <span class="n">gem</span> <span class="s1">'webmock'</span>
<span class="k">end</span>
</code></pre></div></div>

<p>Then run <code class="language-plaintext highlighter-rouge">bundle install</code>. Within the <code class="language-plaintext highlighter-rouge">test_helper.rb</code> file, add the following between <code class="language-plaintext highlighter-rouge">require 'rails/test_help'</code> and the class definition:</p>

<div class="language-ruby highlighter-rouge"><div class="highlight"><pre class="highlight"><code><span class="o">...</span>
<span class="nb">require</span> <span class="s1">'vcr'</span>

<span class="no">VCR</span><span class="p">.</span><span class="nf">configure</span> <span class="k">do</span> <span class="o">|</span><span class="n">config</span><span class="o">|</span>
  <span class="n">config</span><span class="p">.</span><span class="nf">cassette_library_dir</span> <span class="o">=</span> <span class="s2">"test/vcr_cassettes"</span>
  <span class="n">config</span><span class="p">.</span><span class="nf">hook_into</span> <span class="ss">:webmock</span>
<span class="k">end</span>
<span class="o">...</span>
</code></pre></div></div>

<blockquote>
  <p>Don’t put your cassettes directory under <code class="language-plaintext highlighter-rouge">test/fixtures</code>, as Rails will try to load them for each test and error.</p>
</blockquote>

<p>
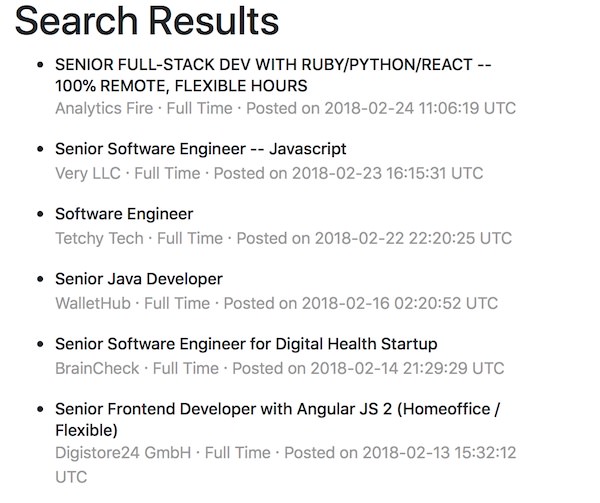
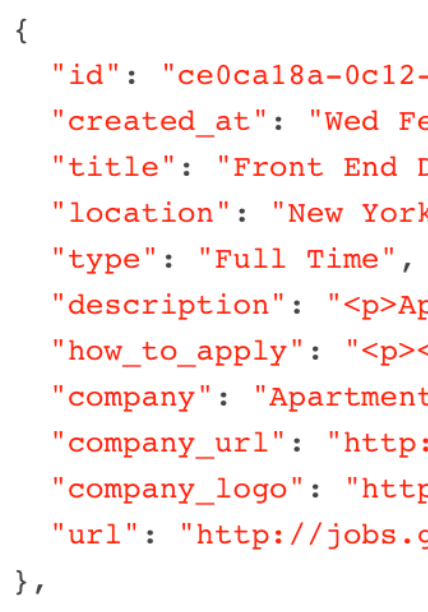
We have set up vcr, I’ll explain how it works later, now let’s use it in a test. We need to do one thing. First, we need to go out to GitHub Jobs’ site and find a term that has a couple of jobs available to test our method. Depending on when you do this, you will likely get different results from what’s listed here, but the concepts will all be the same. I searched for my favorite JavaScript framework, Ember.js, and that yielded just one job. I’ll use this for the example test.</p>

<p>The first thing to test is to make sure the method <code class="language-plaintext highlighter-rouge">import</code> returns an array.</p>

<div class="language-ruby highlighter-rouge"><div class="highlight"><pre class="highlight"><code><span class="nb">test</span> <span class="s2">"should return an array"</span> <span class="k">do</span>
  <span class="no">VCR</span><span class="p">.</span><span class="nf">use_cassette</span><span class="p">(</span><span class="s1">'search-ember'</span><span class="p">)</span> <span class="k">do</span>
    <span class="n">results</span> <span class="o">=</span> <span class="no">GithubJobs</span><span class="p">.</span><span class="nf">import</span> <span class="s1">'Ember.js'</span>
    <span class="n">assert_kind_of</span> <span class="no">Array</span><span class="p">,</span> <span class="n">results</span>
  <span class="k">end</span>
<span class="k">end</span>
</code></pre></div></div>

<p>We can satisfy this with just the following:</p>

<div class="language-ruby highlighter-rouge"><div class="highlight"><pre class="highlight"><code><span class="k">def</span> <span class="nc">self</span><span class="o">.</span><span class="nf">import</span><span class="p">(</span><span class="n">term</span><span class="p">)</span>
  <span class="k">raise</span> <span class="no">ArgumentError</span><span class="p">,</span> <span class="s1">'You must supply a term'</span> <span class="k">if</span> <span class="n">term</span><span class="p">.</span><span class="nf">blank?</span>
  <span class="p">[]</span>
<span class="k">end</span>
</code></pre></div></div>

<p>Tacky, huh? Oh, that probably looks weird if you are new to Ruby. That <code class="language-plaintext highlighter-rouge">[]</code> is an empty array, and because it’s the last line of the method, it’s returned automatically without you having to specify <code class="language-plaintext highlighter-rouge">return</code>. You can if you like, but other Rubyists may point and laugh at your code.</p>

<p>Anyway, that’s all we need for this test which now passes, let’s keep going. Add another test method as below and see if you can figure out how to make it pass on your own.</p>

<div class="language-ruby highlighter-rouge"><div class="highlight"><pre class="highlight"><code><span class="nb">test</span> <span class="s2">"should return an array of job models"</span> <span class="k">do</span>
  <span class="no">VCR</span><span class="p">.</span><span class="nf">use_cassette</span><span class="p">(</span><span class="s1">'search-ember'</span><span class="p">)</span> <span class="k">do</span>
    <span class="n">results</span> <span class="o">=</span> <span class="no">GithubJobs</span><span class="p">.</span><span class="nf">import</span> <span class="s1">'Ember.js'</span>
    <span class="n">assert_kind_of</span> <span class="no">Job</span><span class="p">,</span> <span class="n">results</span><span class="p">.</span><span class="nf">first</span>
  <span class="k">end</span>
<span class="k">end</span>
</code></pre></div></div>

<p>Did it pass? Fail? Are you confused? Did you change that last line in the <code class="language-plaintext highlighter-rouge">import</code> to be:</p>

<div class="language-ruby highlighter-rouge"><div class="highlight"><pre class="highlight"><code><span class="p">[</span><span class="no">Job</span><span class="p">.</span><span class="nf">new</span><span class="p">]</span>
</code></pre></div></div>

<p>Kudos! Obviously, we need more tests. Oh, you’ve probably noticed the <code class="language-plaintext highlighter-rouge">VCR.use_cassette('search-ember')</code> block in the past two tests. This is all we need to do to use VCR. What will happen is once we make a web call, it will record it and file it for us. The second run of the test will make the same request to a URL, but VCR will intercept it and give us back the recorded records. Pretty sweet, eh? This gives us a snapshot of results that we can test against, and it will be constant regardless of what happens at GitHub Jobs.</p>

<p>Now, let’s keep testing! We need to make sure each property of the <code class="language-plaintext highlighter-rouge">job</code> is filled in. So we’ll add a test for each property. Remember, one assertion per test (thank you, <a href="http://amzn.to/2Cx0VPC">Roy Osherove</a>). I’m not going to copy all the tests here, but I’ll give you one to get you started:</p>

<div class="language-ruby highlighter-rouge"><div class="highlight"><pre class="highlight"><code>  <span class="nb">test</span> <span class="s2">"should fill in the job model's title"</span> <span class="k">do</span>
    <span class="no">VCR</span><span class="p">.</span><span class="nf">use_cassette</span><span class="p">(</span><span class="s1">'search-ember'</span><span class="p">)</span> <span class="k">do</span>
      <span class="n">results</span> <span class="o">=</span> <span class="no">GithubJobs</span><span class="p">.</span><span class="nf">import</span> <span class="s1">'Ember.js'</span>
      <span class="n">assert_equal</span> <span class="n">results</span><span class="p">.</span><span class="nf">first</span><span class="p">.</span><span class="nf">title</span><span class="p">,</span> <span class="s1">'Javascript Application Engineer'</span>
    <span class="k">end</span>
  <span class="k">end</span>
</code></pre></div></div>

<p>At this point, we need to actually query GitHub Jobs to satisfy the test. This is going to be super simple thanks to Ruby’s <a href="https://ruby-doc.org/stdlib-2.5.0/libdoc/json/rdoc/JSON.html">built-in JSON parser</a>. We also are going to need the <code class="language-plaintext highlighter-rouge">OpenURI</code> library, which is part of Ruby, we just have to require it so Rails can tell which <code class="language-plaintext highlighter-rouge">open</code> we want (if you don’t do this, Rails will try to open the URL as a file, not what we want). Here is what <code class="language-plaintext highlighter-rouge">app/parsers/github_jobs.rb</code> should look like:</p>

<div class="language-ruby highlighter-rouge"><div class="highlight"><pre class="highlight"><code><span class="nb">require</span> <span class="s1">'open-uri'</span>

<span class="k">class</span> <span class="nc">GithubJobs</span>
  <span class="k">def</span> <span class="nc">self</span><span class="o">.</span><span class="nf">import</span><span class="p">(</span><span class="n">term</span><span class="p">)</span>
    <span class="k">raise</span> <span class="no">ArgumentError</span><span class="p">,</span> <span class="s1">'You must supply a term'</span> <span class="k">if</span> <span class="n">term</span><span class="p">.</span><span class="nf">blank?</span>

    <span class="n">params</span> <span class="o">=</span> <span class="s2">"description=</span><span class="si">#{</span><span class="no">URI</span><span class="p">.</span><span class="nf">encode</span><span class="p">(</span><span class="n">term</span><span class="p">)</span><span class="si">}</span><span class="s2">"</span>

    <span class="n">result</span> <span class="o">=</span> <span class="no">JSON</span><span class="p">.</span><span class="nf">parse</span><span class="p">(</span><span class="nb">open</span><span class="p">(</span><span class="s2">"https://jobs.github.com/positions.json?</span><span class="si">#{</span><span class="n">params</span><span class="si">}</span><span class="s2">"</span><span class="p">).</span><span class="nf">read</span><span class="p">)</span>
    <span class="n">result</span><span class="p">.</span><span class="nf">map</span> <span class="p">{</span> <span class="o">|</span><span class="n">job</span><span class="o">|</span> <span class="no">Job</span><span class="p">.</span><span class="nf">new</span><span class="p">(</span><span class="n">job</span><span class="p">)</span> <span class="p">}</span>
  <span class="k">end</span>
<span class="k">end</span>
</code></pre></div></div>

<p>This will give you three <code class="language-plaintext highlighter-rouge">UnknownAttributeError</code> errors, because the job hash contains keys that Rails doesn’t know about, like <code class="language-plaintext highlighter-rouge">url</code>. Also, it’s going to have a problem with both <code class="language-plaintext highlighter-rouge">id</code> and <code class="language-plaintext highlighter-rouge">created_at</code>, because those get handled automatically, and we don’t want GitHub’s data in those fields, we want our own. Finally, we also need to set the other attributes to custom values, such as <code class="language-plaintext highlighter-rouge">source</code> and <code class="language-plaintext highlighter-rouge">source_url</code>. Because of this, <code class="language-plaintext highlighter-rouge">Job.new</code> won’t work for us.</p>

<p>We’ll fix this with a class method on <code class="language-plaintext highlighter-rouge">job</code> called <code class="language-plaintext highlighter-rouge">build</code> that will build a <code class="language-plaintext highlighter-rouge">job</code> model for us.</p>

<blockquote>
  <p>You may be thinking “why are we creating a job this way and not using the constructor?” It’s because <a href="http://blog.dalethatcher.com/2008/03/rails-dont-override-initialize-on.html">overwriting <code class="language-plaintext highlighter-rouge">initialize</code> on ActiveRecord objects is a bad idea</a>.</p>
</blockquote>

<p>In <code class="language-plaintext highlighter-rouge">app/parsers/github_jobs.rb</code>, change the last line:</p>

<div class="language-ruby highlighter-rouge"><div class="highlight"><pre class="highlight"><code><span class="k">class</span> <span class="nc">GithubJobs</span>
  <span class="k">def</span> <span class="nc">self</span><span class="o">.</span><span class="nf">import</span><span class="p">(</span><span class="n">term</span><span class="p">)</span>
    <span class="o">...</span>
    <span class="n">result</span><span class="p">.</span><span class="nf">map</span> <span class="p">{</span> <span class="o">|</span><span class="n">job</span><span class="o">|</span> <span class="no">Job</span><span class="p">.</span><span class="nf">build</span><span class="p">(</span><span class="n">job</span><span class="p">)</span> <span class="p">}</span>
  <span class="k">end</span>
<span class="k">end</span>
</code></pre></div></div>

<p>Now create the class method on the <code class="language-plaintext highlighter-rouge">job</code> model:</p>

<div class="language-ruby highlighter-rouge"><div class="highlight"><pre class="highlight"><code><span class="k">class</span> <span class="nc">Job</span> <span class="o">&lt;</span> <span class="no">ApplicationRecord</span>
  <span class="o">...</span>

  <span class="k">def</span> <span class="nc">self</span><span class="o">.</span><span class="nf">build</span><span class="p">(</span><span class="n">attributes</span><span class="p">)</span>
    <span class="n">new</span> <span class="k">do</span> <span class="o">|</span><span class="n">j</span><span class="o">|</span>
      <span class="n">j</span><span class="p">.</span><span class="nf">title</span> <span class="o">=</span> <span class="n">attributes</span><span class="p">[</span><span class="s1">'title'</span><span class="p">]</span>
    <span class="k">end</span>
  <span class="k">end</span>
<span class="k">end</span>
</code></pre></div></div>

<blockquote>
  <p>Make sure you use strings for the hash keys here instead of symbols. This is because JSON gives us string keys/values. Generally, in Ruby, you use symbols for hash keys.</p>
</blockquote>

<p>Go ahead and add tests for each attribute of the <code class="language-plaintext highlighter-rouge">job</code> model, making sure it’s filled. Did you forget the names? Look back at <a href="http://localhost:4000/2018/03/05/riding-rails-part-01/#models">Part 1</a>. I’ll show you one more test:</p>

<div class="language-ruby highlighter-rouge"><div class="highlight"><pre class="highlight"><code><span class="nb">test</span> <span class="s2">"should fill in the job model's posted_at date"</span> <span class="k">do</span>
  <span class="no">VCR</span><span class="p">.</span><span class="nf">use_cassette</span><span class="p">(</span><span class="s1">'search-ember'</span><span class="p">)</span> <span class="k">do</span>
    <span class="n">results</span> <span class="o">=</span> <span class="no">GithubJobs</span><span class="p">.</span><span class="nf">import</span> <span class="s1">'Ember.js'</span>
    <span class="n">assert_equal</span> <span class="n">results</span><span class="p">.</span><span class="nf">first</span><span class="p">.</span><span class="nf">posted_at</span><span class="p">,</span> <span class="no">DateTime</span><span class="p">.</span><span class="nf">new</span><span class="p">(</span><span class="mi">2018</span><span class="p">,</span> <span class="mi">2</span><span class="p">,</span> <span class="mi">7</span><span class="p">,</span> <span class="mi">3</span><span class="p">,</span> <span class="mi">12</span><span class="p">,</span> <span class="mi">1</span><span class="p">)</span>
  <span class="k">end</span>
<span class="k">end</span>
</code></pre></div></div>

<blockquote>
  <p>Remember, my data is probably different from yours, so make sure you look at the JSON result for the first job that comes back. You can access the JSON from GitHub Jobs by tacking on a <code class="language-plaintext highlighter-rouge">.json</code> to the end of the URL.</p>
</blockquote>

<p>And the code to make it pass:</p>

<div class="language-ruby highlighter-rouge"><div class="highlight"><pre class="highlight"><code><span class="k">def</span> <span class="nc">self</span><span class="o">.</span><span class="nf">build</span><span class="p">(</span><span class="n">attributes</span><span class="p">)</span>
  <span class="n">new</span> <span class="k">do</span> <span class="o">|</span><span class="n">j</span><span class="o">|</span>
    <span class="n">j</span><span class="p">.</span><span class="nf">title</span> <span class="o">=</span> <span class="n">attributes</span><span class="p">[</span><span class="s1">'title'</span><span class="p">]</span>
    <span class="n">j</span><span class="p">.</span><span class="nf">posted_at</span> <span class="o">=</span> <span class="n">attributes</span><span class="p">[</span><span class="s1">'created_at'</span><span class="p">]</span>
  <span class="k">end</span>
<span class="k">end</span>
</code></pre></div></div>

<p>Continue writing a test and then mapping each attribute from the hash to our new <code class="language-plaintext highlighter-rouge">job</code> object. When you finish, you should have 24 total tests and assertions. I know it’s tempting to skip tests, but it’s important to ensure that all our attributes have values. In Guard, you can run all your tests by just hitting Return in the Terminal that’s running Guard. You can also type <code class="language-plaintext highlighter-rouge">all</code> at the prompt, but that’s what the Return key does.</p>

<h2 id="rails-console">Rails Console</h2>

<p>
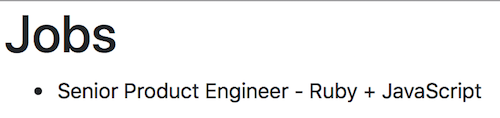
For our last topic today, let’s try out querying GitHub Jobs and saving the <code class="language-plaintext highlighter-rouge">job</code> model to the database. We don’t have time to build the interface as this tutorial is pretty long already. Instead, we’ll take a look at the Rails console. Open a new Terminal instance in the <code class="language-plaintext highlighter-rouge">job_slayer</code> directory and fire up the Rails console with the command <code class="language-plaintext highlighter-rouge">rails c</code> or <code class="language-plaintext highlighter-rouge">rails console</code>.</p>

<p>To start off, let’s try using the <code class="language-plaintext highlighter-rouge">GithubJobs.import</code> method, remember to give it a search term or you’ll get an <code class="language-plaintext highlighter-rouge">ArgumentError</code>. For example:</p>

<div class="language-bash highlighter-rouge"><div class="highlight"><pre class="highlight"><code>2.5.0 :002 <span class="o">&gt;</span> <span class="nb">jobs</span> <span class="o">=</span> GithubJobs.import <span class="s1">'javascript'</span>
 <span class="o">=&gt;</span> <span class="o">[</span><span class="c">#&lt;Job id: nil, title: "Senior Product Engineer"...</span>
</code></pre></div></div>

<p>Now, if you want to persist the array returned from our parser, all we need to do is loop over each job and call the method <code class="language-plaintext highlighter-rouge">save</code> on it, you can do it like so:</p>

<div class="language-ruby highlighter-rouge"><div class="highlight"><pre class="highlight"><code><span class="n">jobs</span><span class="p">.</span><span class="nf">each</span> <span class="p">{</span><span class="o">|</span><span class="n">job</span><span class="o">|</span> <span class="n">job</span><span class="p">.</span><span class="nf">save!</span><span class="p">}</span>
</code></pre></div></div>

<p>But with Ruby, we can shorten this code up:</p>

<div class="language-ruby highlighter-rouge"><div class="highlight"><pre class="highlight"><code><span class="n">jobs</span><span class="p">.</span><span class="nf">each</span><span class="p">(</span><span class="o">&amp;</span><span class="ss">:save!</span><span class="p">)</span>
</code></pre></div></div>

<p>This will iterate through the array and call <code class="language-plaintext highlighter-rouge">save!</code> on each <code class="language-plaintext highlighter-rouge">job</code>. Note that I’m using <code class="language-plaintext highlighter-rouge">save!</code> vs. just <code class="language-plaintext highlighter-rouge">save</code>. The one with the exclamation point will throw an exception if it fails, where <code class="language-plaintext highlighter-rouge">save</code> returns a boolean. When looping like this, it’s a good idea to use <code class="language-plaintext highlighter-rouge">save!</code></p>

<blockquote>
  <p>The exclamation point is another convention that Rubyists use to denote that something is either going to modify the object directly or could potentially throw an exception. Again, it’s up to the developer. This is just like the question mark for boolean operations, like <code class="language-plaintext highlighter-rouge">blank?</code>.</p>
</blockquote>

<p>To exit the Rails console, just type <code class="language-plaintext highlighter-rouge">exit</code> and hit Return.</p>

<h2 id="wrap-up">Wrap Up</h2>

<p>This tutorial went a little long today, but we learned valuable lessons. We discovered the <code class="language-plaintext highlighter-rouge">VCR</code> gem, which allows us to record our web interactions, and automatically play them back when we query again. We found that parsing JSON is a piece of cake with Ruby. We also saw how to test-drive a complete class using TDD.</p>

<p>In the next part of “Riding Rails,” we’ll put all this to work. We’ll work on a front-end for searching GitHub Jobs. This will entail routing, controllers, and views. Don’t worry though, it sounds like a lot, but it isn’t with Rails.</p>]]></content><author><name>Damien White</name></author><category term="ruby" /><category term="ruby-on-rails" /><category term="rails" /><category term="ruby" /><category term="rails" /><category term="riding-rails" /><category term="job_slayer" /><summary type="html"><![CDATA[Join us in creating a Ruby on Rails application from scratch that allows us to search for jobs. This is part 3 of the series.]]></summary><media:thumbnail xmlns:media="http://search.yahoo.com/mrss/" url="https://images.visoftinc.com/2018-03-19/high-speed-train.jpg" /><media:content medium="image" url="https://images.visoftinc.com/2018-03-19/high-speed-train.jpg" xmlns:media="http://search.yahoo.com/mrss/" /></entry><entry><title type="html">Riding Rails - Building a Web App (Part 02)</title><link href="https://blogs.visoftinc.com/2018/03/12/riding-rails-part-02/" rel="alternate" type="text/html" title="Riding Rails - Building a Web App (Part 02)" /><published>2018-03-12T00:00:00-04:00</published><updated>2018-03-12T00:00:00-04:00</updated><id>https://blogs.visoftinc.com/2018/03/12/riding-rails-part-02</id><content type="html" xml:base="https://blogs.visoftinc.com/2018/03/12/riding-rails-part-02/"><![CDATA[<p><img src="https://images.visoftinc.com/2018-03-12/old-locomotive.jpg" alt="Railroad tracks at sunset" class="aligncenter" /></p>

<p>Welcome back to Riding Rails, this is Part 2. In this installment, we’ll talk more about models and introduce testing. In case you missed it, check out <a href="/2018/03/05/riding-rails-part-01/">Part 1</a> as this builds on what we started.</p>

<p>We left off <a href="/2018/03/05/riding-rails-part-01/">last time</a> learning about migrations. We just scratched the surface with models and used the Rails model generator to create it and supporting files.</p>

<h2 id="testing-within-rails">Testing Within Rails</h2>

<p>Now that you know about migrations, we’ll get back to working with our model. We’re going to use test-driven development to work on our model, and because you’re a Ruby developer now, we test our code.</p>

<p>By default, Rails is set up for Test Driven Development (TDD), not the common alternative Behavior Driven Development (BDD). Tests in Rails inherit from <code class="language-plaintext highlighter-rouge">ActiveSupport::TestCase</code>, which in turn inherits from <code class="language-plaintext highlighter-rouge">Minitest::Test</code>. Minitest also has a <code class="language-plaintext highlighter-rouge">Minitest::Spec</code> option available, but to use BDD syntax like <code class="language-plaintext highlighter-rouge">describe</code> and <code class="language-plaintext highlighter-rouge">it</code> in Rails, we would have to install a gem. If we were going to do that, I would have installed RSpec (my preferred spec library) before generating the files. If we were using RSpec, then we would see <code class="language-plaintext highlighter-rouge">*_spec.rb</code> files instead of <code class="language-plaintext highlighter-rouge">*_test.rb</code> files. It’s not a big deal to install the gem, but I’m trying to keep extraneous installs to a minimum to avoid confusion. Thus we’ll use TDD. If you aren’t familiar with BDD, there are specs in place of tests. So I apologize in advance if I call something a “spec” instead of a “test!”</p>

<p>If we were using <code class="language-plaintext highlighter-rouge">Minitest::Test</code> directly, we would have to write tests with underscores for the method name like so:</p>

<div class="language-ruby highlighter-rouge"><div class="highlight"><pre class="highlight"><code><span class="k">def</span> <span class="nf">test_jobs_title_attribute</span>
<span class="err">…</span>
<span class="k">end</span>
</code></pre></div></div>

<p>With <code class="language-plaintext highlighter-rouge">ActiveSupport::TestCase</code> running on top of <code class="language-plaintext highlighter-rouge">Minitest::Test</code>, we can write the same test like this:</p>

<div class="language-ruby highlighter-rouge"><div class="highlight"><pre class="highlight"><code><span class="nb">test</span> <span class="s2">"jobs title attribute"</span>
<span class="err">…</span>
<span class="k">end</span>
</code></pre></div></div>

<p>The key takeaway is that with <code class="language-plaintext highlighter-rouge">ActiveSupport::TestCase</code> we can use the <code class="language-plaintext highlighter-rouge">test</code> method and pass it a string, rather than being forced to provide a Ruby “test class friendly” name. This will allow us to be more descriptive with our test case names.</p>

<h2 id="testing-models">Testing Models</h2>

<p>Open up <code class="language-plaintext highlighter-rouge">test/models/job_test.rb</code>, and let’s write our first test.</p>

<p>You’ll notice that in <code class="language-plaintext highlighter-rouge">job_test.rb</code> there is a class defined as we saw in the migration. There is also an <code class="language-plaintext highlighter-rouge">include</code> and some comments in the class. Go ahead and delete the comments (the lines that start with a <code class="language-plaintext highlighter-rouge">#</code>). That leaves us with the class definition and the include. We’ll use this included file (<code class="language-plaintext highlighter-rouge">test_helper.rb</code>) in all of our tests. So if we need to write any custom logic to be commonly shared across all of our tests, it can go in here.</p>

<p>Now let’s write our first failing test. We’re going to assert one requirement per test. This is something I <a href="/2009/09/30/book-review-manning-the-art-of-unit-testing/">learned long ago</a> by reading <a href="http://amzn.to/2Cx0VPC">“The Art of Unit Testing”</a> by <a href="http://osherove.com">Roy Osherove</a>. If you are not familiar with the concepts of writing unit tests, such as what “assertions” are and the important role they play in unit testing, I highly recommend reading that book. Let’s start with validations. We want to ensure that the <code class="language-plaintext highlighter-rouge">Job</code> object has a <code class="language-plaintext highlighter-rouge">title</code>, otherwise it should not be allowed to save. You’ll see in the test below that we create a new <code class="language-plaintext highlighter-rouge">Job</code> object without a title, and then tell the test method, using <code class="language-plaintext highlighter-rouge">assert_not</code>, that we expect the job to NOT be saved.</p>

<div class="language-ruby highlighter-rouge"><div class="highlight"><pre class="highlight"><code>  <span class="nb">test</span> <span class="s2">"should not save job without a title"</span> <span class="k">do</span>
    <span class="n">job</span> <span class="o">=</span> <span class="no">Job</span><span class="p">.</span><span class="nf">new</span><span class="p">(</span><span class="ss">title: </span><span class="kp">nil</span><span class="p">)</span>
    <span class="n">assert_not</span> <span class="n">job</span><span class="p">.</span><span class="nf">save</span>
  <span class="k">end</span>
</code></pre></div></div>

<p>Now that we have our test, let’s run it with the command <code class="language-plaintext highlighter-rouge">rails test</code>. You’ll see it fails as expected:</p>

<div class="language-bash highlighter-rouge"><div class="highlight"><pre class="highlight"><code>F

Failure:
JobTest#test_should_not_save_job_without_a_title <span class="o">[</span>../job_slayer/test/models/job_test.rb:6]:
Expected <span class="nb">true </span>to be nil or <span class="nb">false</span>
</code></pre></div></div>

<p>The <code class="language-plaintext highlighter-rouge">F</code> indicates a failure, and you can see the message <code class="language-plaintext highlighter-rouge">Expected true to be nil or false</code>. That’s not very specific. Let’s fix that by passing a message to the <code class="language-plaintext highlighter-rouge">assert_not</code> method:</p>

<div class="language-ruby highlighter-rouge"><div class="highlight"><pre class="highlight"><code>  <span class="nb">test</span> <span class="s2">"should not save job without a title"</span> <span class="k">do</span>
    <span class="n">job</span> <span class="o">=</span> <span class="no">Job</span><span class="p">.</span><span class="nf">new</span><span class="p">(</span><span class="ss">title: </span><span class="kp">nil</span><span class="p">)</span>
    <span class="n">assert_not</span> <span class="n">job</span><span class="p">.</span><span class="nf">save</span><span class="p">,</span> <span class="s1">'Saved the job without a title'</span>
  <span class="k">end</span>
</code></pre></div></div>

<p>Now, when you run the test again, we have a more meaningful failure message:</p>

<div class="language-bash highlighter-rouge"><div class="highlight"><pre class="highlight"><code>Failure:
..
Saved the job without a title
</code></pre></div></div>

<p>With the failing test, we’ll want to fix it by adding validations to the <code class="language-plaintext highlighter-rouge">Job</code> class. Open up <code class="language-plaintext highlighter-rouge">models/job.rb</code> and fix it by matching the class below:</p>

<div class="language-ruby highlighter-rouge"><div class="highlight"><pre class="highlight"><code><span class="k">class</span> <span class="nc">Job</span> <span class="o">&lt;</span> <span class="no">ApplicationRecord</span>
  <span class="n">validates</span> <span class="ss">:title</span><span class="p">,</span> <span class="ss">presence: </span><span class="kp">true</span>
<span class="k">end</span>
</code></pre></div></div>

<blockquote>
  <p>Are you surprised by the <code class="language-plaintext highlighter-rouge">Job</code> class? Where are our attributes <a href="http://localhost:4000/2018/03/05/riding-rails-part-01/#models">we defined in the last part</a>? The answer lies in <code class="language-plaintext highlighter-rouge">app/models/application_record.rb</code>, see how it inherits from <code class="language-plaintext highlighter-rouge">ActiveRecord::Base</code>? Well, ActiveRecord, Rails’ default ORM (object-relational mapping), does the mapping from the database for us. Seems almost magical, doesn’t it? Still curious? Read more about ActiveRecord <a href="http://guides.rubyonrails.org/active_record_basics.html">in the docs</a>.</p>
</blockquote>

<p>Re-run the test, and now it passes. Let’s do another! We want to make sure more fields are required. Let’s target the metadata that we are storing about a job. In your same test file, underneath the previous test we just made, add the new test code as shown here:</p>

<div class="language-ruby highlighter-rouge"><div class="highlight"><pre class="highlight"><code>  <span class="nb">test</span> <span class="s2">"should not save job without a source"</span> <span class="k">do</span>
    <span class="n">job</span> <span class="o">=</span> <span class="no">Job</span><span class="p">.</span><span class="nf">new</span><span class="p">(</span><span class="ss">source: </span><span class="kp">nil</span><span class="p">)</span>
    <span class="n">assert_not</span> <span class="n">job</span><span class="p">.</span><span class="nf">save</span><span class="p">,</span> <span class="s1">'Saved the job without a source'</span>
  <span class="k">end</span>
</code></pre></div></div>

<p>Now that you are familiar with the syntax from our first test, you should be able to see that this second test expects that the <code class="language-plaintext highlighter-rouge">source</code> attribute needs to have a value in order for the Job to save successfully. Since we are providing a null value to <code class="language-plaintext highlighter-rouge">source</code> this test should fail. Run the failing test using <code class="language-plaintext highlighter-rouge">rails test</code> and… wait… what? It passed?! Hmm, that’s not right. Do you see the problem? We are specifying <code class="language-plaintext highlighter-rouge">source: nil</code>, but the now required <code class="language-plaintext highlighter-rouge">title</code> isn’t set, so THAT is causing our Job to not save even though we haven’t added validations to the <code class="language-plaintext highlighter-rouge">source</code> attribute yet. I guess we can add the <code class="language-plaintext highlighter-rouge">title</code> with a value to the hash we are sending to <code class="language-plaintext highlighter-rouge">Job.new</code>, but that’s going to get old fast when we add more validation of attributes. “There must be a better way,” I can hear you exclaiming. You are right!</p>

<h2 id="fixtures">Fixtures</h2>

<p>There are a few ways to tackle this problem that we have. <a href="http://guides.rubyonrails.org/testing.html#the-low-down-on-fixtures">Rails provides us with Fixtures</a>, which is just a fancy word for “sample data.” We could use these Fixtures in our tests. We could also create a hash of all the attributes needed to create a model and change just the attributes we are interested in for each specification. A third option, which I personally use, is a gem called <a href="https://github.com/thoughtbot/factory_bot">FactoryBot</a> (previously known as FactoryGirl). That said, let’s use what we have instead of introducing another gem. Plus Factories vs. Fixtures is an another conversation entirely. Let’s go the Fixture route since Rails has already set it up for us. If you hop over into <code class="language-plaintext highlighter-rouge">test/fixtures/jobs.yml</code>, you’ll see some basic code that Rails created for us. Let’s use the attributes it provides to save typing. Change the file to look like this:</p>

<div class="language-yaml highlighter-rouge"><div class="highlight"><pre class="highlight"><code><span class="na">one</span><span class="pi">:</span>
  <span class="na">title</span><span class="pi">:</span> <span class="s">Senior Software Developer</span>
  <span class="na">posted_at</span><span class="pi">:</span> <span class="s">2018-02-20 13:01:47</span>
  <span class="na">location</span><span class="pi">:</span> <span class="s">Remote</span>
  <span class="na">type</span><span class="pi">:</span> <span class="s">Contract</span>
  <span class="na">description</span><span class="pi">:</span> <span class="s">MyText</span>
  <span class="na">how_to_apply: Apply here</span><span class="pi">:</span> <span class="s">https://visoftinc.com</span>
  <span class="na">company</span><span class="pi">:</span> <span class="s">Visoft, Inc.</span>
  <span class="na">company_url</span><span class="pi">:</span> <span class="s">https://visoftinc.com</span>
  <span class="na">company_logo</span><span class="pi">:</span> <span class="s">https://images.visoftinc.com/logos/visoftinc.png</span>
  <span class="na">source</span><span class="pi">:</span> <span class="s">https://jobs.github.com</span>
  <span class="na">source_url</span><span class="pi">:</span> <span class="s">https://jobs.github.com/positions/1234567890</span>
</code></pre></div></div>

<p>If you look at <code class="language-plaintext highlighter-rouge">test/test_helper.rb</code>, you’ll notice that it is already set up to load all of our fixtures before each test:</p>

<div class="language-ruby highlighter-rouge"><div class="highlight"><pre class="highlight"><code>  <span class="c1"># Setup all fixtures in test/fixtures/*.yml for all tests in alphabetical order.</span>
  <span class="n">fixtures</span> <span class="ss">:all</span>
</code></pre></div></div>

<p>With that in place, let’s change our two tests to the following:</p>

<div class="language-ruby highlighter-rouge"><div class="highlight"><pre class="highlight"><code><span class="k">class</span> <span class="nc">JobTest</span> <span class="o">&lt;</span> <span class="no">ActiveSupport</span><span class="o">::</span><span class="no">TestCase</span>
  <span class="nb">test</span> <span class="s2">"should not save job without a title"</span> <span class="k">do</span>
    <span class="n">job</span> <span class="o">=</span> <span class="n">jobs</span><span class="p">(</span><span class="ss">:one</span><span class="p">)</span>
    <span class="n">job</span><span class="p">.</span><span class="nf">title</span> <span class="o">=</span> <span class="kp">nil</span>
    <span class="n">assert_not</span> <span class="n">job</span><span class="p">.</span><span class="nf">save</span><span class="p">,</span> <span class="s1">'Saved the job without a title'</span>
  <span class="k">end</span>

  <span class="nb">test</span> <span class="s2">"should not save job without a source"</span> <span class="k">do</span>
    <span class="n">job</span> <span class="o">=</span> <span class="n">jobs</span><span class="p">(</span><span class="ss">:one</span><span class="p">)</span>
    <span class="n">job</span><span class="p">.</span><span class="nf">source</span> <span class="o">=</span> <span class="kp">nil</span>
    <span class="n">assert_not</span> <span class="n">job</span><span class="p">.</span><span class="nf">save</span><span class="p">,</span> <span class="s1">'Saved the job without a source'</span>
  <span class="k">end</span>
<span class="k">end</span>
</code></pre></div></div>

<p>As you can see, we are initially loading up our test data from the Fixture, and then nullifying the field that we want to test. Rerun the tests using the command <code class="language-plaintext highlighter-rouge">rails test</code>, and uh oh!</p>

<h2 id="an-error">An Error</h2>

<p>Since we’re going along with actual development, this could happen. Let’s take a closer look at the error:</p>

<div class="language-bash highlighter-rouge"><div class="highlight"><pre class="highlight"><code>E

Error:
JobTest#test_should_not_save_job_without_a_title:
ActiveRecord::SubclassNotFound: The single-table inheritance mechanism failed to locate the subclass:
<span class="s1">'Contract'</span><span class="nb">.</span> This error is raised because the column <span class="s1">'type'</span> is reserved <span class="k">for </span>storing the class <span class="k">in case</span> of
inheritance. Please rename this column <span class="k">if </span>you didn<span class="s1">'t intend it to be used for storing the inheritance class
or overwrite Job.inheritance_column to use another column for that information.
    test/models/job_test.rb:5:in `block in &lt;class:JobTest&gt;'</span>
</code></pre></div></div>

<p>It looks like we used a reserved word in ActiveRecord, <code class="language-plaintext highlighter-rouge">type</code> in our <code class="language-plaintext highlighter-rouge">job</code> model. Now, we could go and change this, but <code class="language-plaintext highlighter-rouge">job.type</code> sounds a lot better than <code class="language-plaintext highlighter-rouge">job.job_type</code> or something. ActiveRecord reserves the word <code class="language-plaintext highlighter-rouge">type</code> for doing <a href="http://api.rubyonrails.org/classes/ActiveRecord/Inheritance.html">single table inheritance (STI)</a>. We can change this, telling ActiveRecord that we’re not going to be using STI with our <code class="language-plaintext highlighter-rouge">job</code> model. Open the model file (<code class="language-plaintext highlighter-rouge">app/models/job.rb</code>) and inside the class add the following line:</p>

<div class="language-ruby highlighter-rouge"><div class="highlight"><pre class="highlight"><code><span class="nb">self</span><span class="p">.</span><span class="nf">inheritance_column</span> <span class="o">=</span> <span class="ss">:_type_disabled</span> <span class="c1"># disable STI</span>
</code></pre></div></div>

<p>Save, and re-run the tests. The error goes away, and we’re left with what we expected back when we started this second test, a failure. Let’s fix that the same as we did with the first test we wrote; you’re <code class="language-plaintext highlighter-rouge">job</code> model class should now look like this:</p>

<div class="language-ruby highlighter-rouge"><div class="highlight"><pre class="highlight"><code><span class="k">class</span> <span class="nc">Job</span> <span class="o">&lt;</span> <span class="no">ApplicationRecord</span>
  <span class="nb">self</span><span class="p">.</span><span class="nf">inheritance_column</span> <span class="o">=</span> <span class="ss">:_type_disabled</span> <span class="c1"># disable STI</span>
  <span class="n">validates</span> <span class="ss">:title</span><span class="p">,</span> <span class="ss">presence: </span><span class="kp">true</span>
  <span class="n">validates</span> <span class="ss">:source</span><span class="p">,</span> <span class="ss">presence: </span><span class="kp">true</span>
<span class="k">end</span>
</code></pre></div></div>

<p>Run the tests again (<code class="language-plaintext highlighter-rouge">rails test</code>) and voilà, success!</p>

<h2 id="other-validation-helpers">Other Validation Helpers</h2>

<p>Now that you know about the <code class="language-plaintext highlighter-rouge">presence</code> validator, we can add this to other attributes. But what about other types of validation in Rails? There are a <a href="http://guides.rubyonrails.org/active_record_validations.html#validation-helpers">ton of other built-in helpers</a> available. Let’s say we want to make sure that the <code class="language-plaintext highlighter-rouge">type</code> attribute must contain only certain values like “Full Time”, “Part Time”, and “Contract”. To add such a validation we can utilize the <a href="http://guides.rubyonrails.org/active_record_validations.html#inclusion">inclusion validator</a> which lets us specify a set of valid values for the attribute. Let’s test that out now. Remember we are using TDD so let’s write the test first. Add the following to your test file below the second test we just finished.</p>

<div class="language-ruby highlighter-rouge"><div class="highlight"><pre class="highlight"><code>  <span class="nb">test</span> <span class="s2">"should not save job without a valid type"</span> <span class="k">do</span>
    <span class="n">job</span> <span class="o">=</span> <span class="n">jobs</span><span class="p">(</span><span class="ss">:one</span><span class="p">)</span>
    <span class="n">job</span><span class="p">.</span><span class="nf">type</span> <span class="o">=</span> <span class="s1">'Seasonal'</span>
    <span class="n">assert_not</span> <span class="n">job</span><span class="p">.</span><span class="nf">save</span><span class="p">,</span> <span class="s1">'Saved the job without a vaild type'</span>
  <span class="k">end</span>
</code></pre></div></div>

<p>You know the drill by now, run the test making sure it fails. Now let’s fix it, add this to your <code class="language-plaintext highlighter-rouge">job</code> model:</p>

<div class="language-ruby highlighter-rouge"><div class="highlight"><pre class="highlight"><code>  <span class="n">validates</span> <span class="ss">:type</span><span class="p">,</span> <span class="ss">inclusion: </span><span class="p">{</span> <span class="ss">in: </span><span class="p">[</span><span class="s1">'Contract'</span><span class="p">,</span> <span class="s1">'Part Time'</span><span class="p">,</span> <span class="s1">'Full Time'</span><span class="p">]}</span>
</code></pre></div></div>

<p>Re-test, and it works!</p>

<h2 id="save-test-rinse-repeat">Save, Test, Rinse, Repeat</h2>

<p>We’ve repeated saving and running the tests a bunch of times now. You’re probably a bit annoyed having to repeat these steps over and over. The good news is that there is a better way. It involves installing a gem (well 2), but that’s a simple task in Rails thanks to Bundler. I thought about omitting this since it’s a separate install, but this isn’t new syntax that you need to learn or anything. It’s a merely an automated test runner. It will make your development process <strong>much</strong> better.</p>

<p>Open up your <code class="language-plaintext highlighter-rouge">Gemfile</code> and add we will add two gems in the <code class="language-plaintext highlighter-rouge">group :development, :test</code>, like so:</p>

<div class="language-ruby highlighter-rouge"><div class="highlight"><pre class="highlight"><code><span class="n">group</span> <span class="ss">:development</span><span class="p">,</span> <span class="ss">:test</span> <span class="k">do</span>
  <span class="o">...</span>
  <span class="n">gem</span> <span class="s1">'guard'</span>
  <span class="n">gem</span> <span class="s1">'guard-minitest'</span>
<span class="k">end</span>
</code></pre></div></div>

<p>Now, from a terminal window aimed at your project root, run the command below to install the two new gems we just added:</p>

<div class="language-bash highlighter-rouge"><div class="highlight"><pre class="highlight"><code>bundle <span class="nb">install</span>
</code></pre></div></div>

<p>Once that’s completed, initialize <code class="language-plaintext highlighter-rouge">guard-minitest</code> from the same terminal with this command:</p>

<div class="language-bash highlighter-rouge"><div class="highlight"><pre class="highlight"><code>guard init minitest
</code></pre></div></div>

<p>This creates a <code class="language-plaintext highlighter-rouge">Guardfile</code> telling <code class="language-plaintext highlighter-rouge">guard</code> what to run. Open the <code class="language-plaintext highlighter-rouge">Guardfile</code> in the root of your project and uncomment the section that starts with <code class="language-plaintext highlighter-rouge"># Rails 4</code>. Finally, where it says <code class="language-plaintext highlighter-rouge">guard :minitest do</code> change that to read <code class="language-plaintext highlighter-rouge">guard :minitest, spring: "bin/rails test" do</code>. If done correctly your <code class="language-plaintext highlighter-rouge">Guardfile</code> should look like this:</p>

<div class="language-ruby highlighter-rouge"><div class="highlight"><pre class="highlight"><code><span class="n">guard</span> <span class="ss">:minitest</span><span class="p">,</span> <span class="ss">spring: </span><span class="s2">"bin/rails test"</span> <span class="k">do</span>
  <span class="c1"># with Minitest::Unit</span>
  <span class="n">watch</span><span class="p">(</span><span class="sr">%r{^test/(.*)</span><span class="se">\/</span><span class="sr">?test_(.*)</span><span class="se">\.</span><span class="sr">rb$}</span><span class="p">)</span>
  <span class="n">watch</span><span class="p">(</span><span class="sr">%r{^lib/(.*/)?([^/]+)</span><span class="se">\.</span><span class="sr">rb$}</span><span class="p">)</span>     <span class="p">{</span> <span class="o">|</span><span class="n">m</span><span class="o">|</span> <span class="s2">"test/</span><span class="si">#{</span><span class="n">m</span><span class="p">[</span><span class="mi">1</span><span class="p">]</span><span class="si">}</span><span class="s2">test_</span><span class="si">#{</span><span class="n">m</span><span class="p">[</span><span class="mi">2</span><span class="p">]</span><span class="si">}</span><span class="s2">.rb"</span> <span class="p">}</span>
  <span class="n">watch</span><span class="p">(</span><span class="sr">%r{^test/test_helper</span><span class="se">\.</span><span class="sr">rb$}</span><span class="p">)</span>      <span class="p">{</span> <span class="s1">'test'</span> <span class="p">}</span>

  <span class="o">...</span>
  <span class="c1"># Rails 4</span>
  <span class="n">watch</span><span class="p">(</span><span class="sr">%r{^app/(.+)</span><span class="se">\.</span><span class="sr">rb$}</span><span class="p">)</span>                               <span class="p">{</span> <span class="o">|</span><span class="n">m</span><span class="o">|</span> <span class="s2">"test/</span><span class="si">#{</span><span class="n">m</span><span class="p">[</span><span class="mi">1</span><span class="p">]</span><span class="si">}</span><span class="s2">_test.rb"</span> <span class="p">}</span>
  <span class="n">watch</span><span class="p">(</span><span class="sr">%r{^app/controllers/application_controller</span><span class="se">\.</span><span class="sr">rb$}</span><span class="p">)</span> <span class="p">{</span> <span class="s1">'test/controllers'</span> <span class="p">}</span>
  <span class="n">watch</span><span class="p">(</span><span class="sr">%r{^app/controllers/(.+)_controller</span><span class="se">\.</span><span class="sr">rb$}</span><span class="p">)</span>        <span class="p">{</span> <span class="o">|</span><span class="n">m</span><span class="o">|</span> <span class="s2">"test/integration/</span><span class="si">#{</span><span class="n">m</span><span class="p">[</span><span class="mi">1</span><span class="p">]</span><span class="si">}</span><span class="s2">_test.rb"</span> <span class="p">}</span>
  <span class="n">watch</span><span class="p">(</span><span class="sr">%r{^app/views/(.+)_mailer/.+}</span><span class="p">)</span>                    <span class="p">{</span> <span class="o">|</span><span class="n">m</span><span class="o">|</span> <span class="s2">"test/mailers/</span><span class="si">#{</span><span class="n">m</span><span class="p">[</span><span class="mi">1</span><span class="p">]</span><span class="si">}</span><span class="s2">_mailer_test.rb"</span> <span class="p">}</span>
  <span class="n">watch</span><span class="p">(</span><span class="sr">%r{^lib/(.+)</span><span class="se">\.</span><span class="sr">rb$}</span><span class="p">)</span>                               <span class="p">{</span> <span class="o">|</span><span class="n">m</span><span class="o">|</span> <span class="s2">"test/lib/</span><span class="si">#{</span><span class="n">m</span><span class="p">[</span><span class="mi">1</span><span class="p">]</span><span class="si">}</span><span class="s2">_test.rb"</span> <span class="p">}</span>
  <span class="n">watch</span><span class="p">(</span><span class="sr">%r{^test/.+_test</span><span class="se">\.</span><span class="sr">rb$}</span><span class="p">)</span>
  <span class="n">watch</span><span class="p">(</span><span class="sr">%r{^test/test_helper</span><span class="se">\.</span><span class="sr">rb$}</span><span class="p">)</span> <span class="p">{</span> <span class="s1">'test'</span> <span class="p">}</span>

  <span class="o">...</span>
<span class="k">end</span>
</code></pre></div></div>

<p>Open up a new Terminal tab/window in the same application root folder. Then fire up guard by just typing <code class="language-plaintext highlighter-rouge">guard</code>. If it all worked correctly, you should see <code class="language-plaintext highlighter-rouge">3 runs, 3 assertions, 0 failures, 0 errors, 0 skips</code>. Every time we save from now on, <code class="language-plaintext highlighter-rouge">rails test</code> will be run for us. Much easier!</p>

<h2 id="trying-out-guard">Trying Out Guard</h2>

<p>Since this is the first time you’re using Guard, let’s make sure it’s working as expected. Add a new test inside <code class="language-plaintext highlighter-rouge">job_test.rb</code>. You are familiar with the process so go ahead and make sure that the <code class="language-plaintext highlighter-rouge">source_url</code> is provided, and here’s something new, make sure that it’s actually a URL. There are various ways to enforce that, and there isn’t a wrong way providing you really test it out. Save the test(s), and Guard will run it. Fix the failure and Guard will jump into action and rerun the test. Continuous feedback from Guard makes TDD/BDD very productive. When you’re done with testing the new requirements, you should have <em>at least</em> five total tests. Remember, one assertion/unit of work per test. I’ll leave it to you to decide how many tests you add depending on the solution you choose. Don’t shy away from any option, this is how we learn.</p>

<h2 id="homework">Homework</h2>

<p>In this post, we only validated a few of the attributes in our model. Look at what we have and where it can be improved. Even though users won’t be entering data into the database directly, remember the mantra of “garbage in, garbage out.” We don’t want just anything entered for say the <code class="language-plaintext highlighter-rouge">company_url</code>, do we? If you need a refresher, just have a look at Figure 2 under the <a href="/2018/03/05/riding-rails-part-01/#models">heading Models</a>. You could potentially require every attribute in our <code class="language-plaintext highlighter-rouge">job</code> model. However, this may limit what we’re able to store from other sources. However, if you plan to stick to just one source (GitHub Jobs), then that would probably be beneficial. Don’t forget to test out any validations that you add.</p>

<h2 id="wrap-up">Wrap Up</h2>

<p>In this second part of the tutorial, we saw how we could test-drive requirements with models. We learned that Rails comes with Fixtures, what they are, and how they can be used in our tests. After numerous times of saving and running the tests manually, we discovered that Guard is a fantastic tool that will give us constant, automated feedback.</p>

<p>Look out for part 3 of this series, in which we will discuss moving our application forward. With our <code class="language-plaintext highlighter-rouge">job</code> model in place, we’ll start using the model when we are querying GitHub Jobs and persisting everything to our database. I hope that you found the information here useful. If you have any questions, please leave a comment below or you can <a href="https://visoftinc.com#contact">contact us</a>.</p>]]></content><author><name>Damien White</name></author><category term="ruby" /><category term="ruby-on-rails" /><category term="rails" /><category term="ruby" /><category term="rails" /><category term="riding-rails" /><category term="job_slayer" /><summary type="html"><![CDATA[Join us in creating a Ruby on Rails application from scratch that allows us to search for jobs. This is part 2 of the series.]]></summary><media:thumbnail xmlns:media="http://search.yahoo.com/mrss/" url="https://images.visoftinc.com/2018-03-12/old-locomotive.jpg" /><media:content medium="image" url="https://images.visoftinc.com/2018-03-12/old-locomotive.jpg" xmlns:media="http://search.yahoo.com/mrss/" /></entry><entry><title type="html">Riding Rails - Building a Web App (Part 01)</title><link href="https://blogs.visoftinc.com/2018/03/05/riding-rails-part-01/" rel="alternate" type="text/html" title="Riding Rails - Building a Web App (Part 01)" /><published>2018-03-05T00:00:00-05:00</published><updated>2018-03-05T00:00:00-05:00</updated><id>https://blogs.visoftinc.com/2018/03/05/riding-rails-part-01</id><content type="html" xml:base="https://blogs.visoftinc.com/2018/03/05/riding-rails-part-01/"><![CDATA[<p><img src="https://images.visoftinc.com/2018-03-05/railroad-in-motion.jpg" alt="Railroad in motion" class="aligncenter" /></p>

<p>Now that you have <a href="/2018/02/19/setting-up-ruby-for-everyone/">Ruby</a> and <a href="/2018/02/26/starting-with-rails/">Rails</a> installed, let’s put Rails to work by creating a real application. In this post, we’ll build a job search application. We’ll utilize <a href="https://jobs.github.com/">GitHub Jobs</a> as our initial data source, but the idea behind this app is to aggregate different job APIs eventually.</p>

<p>If you’re a developer, the last thing I need to tell you about is data types and constructs. I find those topics to be not only dull, but a waste of time. Thank you, but I know about loops, conditions, etc. I’d rather see a project-based approach to teaching, and that’s what I plan to do in this series.</p>

<h2 id="the-plan">The Plan</h2>

<p>Before we venture into development, let’s take a moment and plan our approach. We know we’re going to utilize <a href="https://jobs.github.com/api">GitHub Jobs API</a> and that we’ll be using Rails as our framework. Now we absolutely can send and parse data ourselves, but I did a quick search on Web and found a <a href="https://github.com/georgedrummond/github-jobs">little Gem</a> that will do that for us. It hasn’t been updated since 2014. However, if we see it’s out-of-date, we can always fork it and make the modifications needed.</p>

<p>We should decide on what templating syntax we’d like to use. The default is ERB, but personally, I like <a href="http://slim-lang.com">Slim</a>. There is also <a href="http://haml.info">HAML</a>, but I find Slim to be nice and fast and the syntax is straightforward. For this application, I’m going to stick with ERB. This is the easiest since it’s what Rails uses out-of-the-box. That said, it’s cake to change to something else like Slim, it’s just adding a Gem to our Gemfile. Most importantly, I don’t want to introduce something new like Slim in this first tutorial.</p>

<p>Finally, let’s talk about testing. Personally, I practice BDD (behavior driven development) using <a href="http://rspec.info">RSpec</a> in my Rails projects. BDD is similar to TDD (test driven development). The difference is how you look at the problem. While TDD focuses on units of work, BDD focuses more on the bigger picture of how the application will be used. Rails is set up for testing from the start. One of the things I absolutely love about Rails is how the environments work. We’ll see this in action as we start development. Rails’ default test framework is <a href="https://github.com/seattlerb/minitest">minitest</a>. With minitest, we’re able to practice either TDD or BDD because the syntax adapts to whatever style we wish. Again, we’ll stick with the default test framework for ease of understanding.</p>

<h2 id="rails-new">Rails New</h2>

<p>Do you recall how to <a href="2018/02/26/starting-with-rails/#a-simple-app">create a new Rails application</a>? Navigate to a “Development” directory of your choosing, and we’ll create a new application called <code class="language-plaintext highlighter-rouge">job_slayer</code>.</p>

<div class="language-bash highlighter-rouge"><div class="highlight"><pre class="highlight"><code>rails new job_slayer
</code></pre></div></div>

<p>This will create a <code class="language-plaintext highlighter-rouge">job_slayer</code> directory with our new application. Simply change into it using the command: <code class="language-plaintext highlighter-rouge">cd job_slayer</code>. Once there, fire up your favorite text editor and open the directory. Take a look at the folder structure of the application; it should look similar to Figure 1.</p>

<figure>
  <img src="https://images.visoftinc.com/2018-03-05/figure01.png" alt="Result of our rails new command" class="w-30" />
  <figcaption>Figure1 - The results of our "rails new" command</figcaption>
</figure>

<p>This is the structure of all Rails applications. We’ll be spending a lot of time in the <code class="language-plaintext highlighter-rouge">app</code> and <code class="language-plaintext highlighter-rouge">test</code> folders in this tutorial.</p>

<p>The last thing, you use source control, right? Well, Rails actually initialized our application as a git repository automatically. We just need to add the files that Rails created for us and commit the changes.</p>

<div class="language-bash highlighter-rouge"><div class="highlight"><pre class="highlight"><code>git add <span class="nb">.</span>
git commit <span class="nt">-m</span> <span class="s2">"Initial commit"</span>
</code></pre></div></div>

<p>We’re in a good place. Let’s start writing some code!</p>

<h2 id="models">Models</h2>

<p>We’ll start by creating models for our application. Let’s think about this a little bit. What models are we going to develop? This app is called <code class="language-plaintext highlighter-rouge">job_slayer</code>, so we probably want a <code class="language-plaintext highlighter-rouge">job</code> model. We’ll use this to capture information about a job. Since our end goal is to make this a job aggregator, we need to standardize the different results from the various sources (remember, we’re just going to be targeting GitHub Jobs for this tutorial). We should also cache the jobs we receive locally, so we aren’t pinging the API each time. This way, we can have a list of jobs on our homepage that users can browse through.</p>

<p>We have to think about the attributes we want on our model. If you look at the <a href="https://jobs.github.com/api">GitHub API docs</a>, you’ll see some sample URLs and responses. I took a screenshot (Figure 2) of the fields that are provided to us.</p>

<figure>Í
  <img src="https://images.visoftinc.com/2018-03-05/figure02.png" alt="The fields returned from GitHub Jobs" class="w-30" />
  <figcaption>Figure 2 - Sample of the fields that are returned from GitHub Jobs</figcaption>
</figure>

<p>This is probably a good starting point for our <code class="language-plaintext highlighter-rouge">job</code> model. Of course, not all APIs are going to provide the same attributes, but we can always make changes to our model in the future.</p>

<p>We saw in the <a href="/2018/02/26/starting-with-rails/">last tutorial</a> how Rails comes with generators. You’ve seen the <code class="language-plaintext highlighter-rouge">scaffold</code> generator in action, and I promised no scaffolding for this application. That doesn’t mean there aren’t other generators that we can use. If you want to see all the things you can generate, run the command <code class="language-plaintext highlighter-rouge">rails g --help</code>. Since we need a model, we’ll utilize the model generator. This will create four files for us: the model, a database migration, a test, and a fixture file. You can see this from looking at the Rails generator docs (<code class="language-plaintext highlighter-rouge">rails g model --help</code>). The last thing that I’d like to mention is that if we provide the Rails model generator with the attributes we want, it will generate some code for us. You don’t need to provide attributes, but then you just get blank files for free. Notice that we aren’t specifying an attribute <code class="language-plaintext highlighter-rouge">id</code>, nor any <code class="language-plaintext highlighter-rouge">timestamps</code>. We’ll discuss this later. The list of attributes is pretty much identical to what we are receiving, with the addition of <code class="language-plaintext highlighter-rouge">posted_at</code>, <code class="language-plaintext highlighter-rouge">source</code>, and <code class="language-plaintext highlighter-rouge">source_url</code>. We’ll use these to store metadata about the job.</p>

<div class="language-bash highlighter-rouge"><div class="highlight"><pre class="highlight"><code>rails g model Job title posted_at:datetime location <span class="nb">type </span>description:text how_to_apply:text company company_url company_logo <span class="nb">source </span>source_url
</code></pre></div></div>

<p>Whew! That’s a long command because we have a fair amount of attributes that we want to store. Now let’s look at what was created and start working with this model.</p>

<blockquote>
  <p>What if you make a mistake with a generator command? Well, there is an “undo” that Rails provides, for our example, it’s merely <code class="language-plaintext highlighter-rouge">rails d model Job</code>. The <code class="language-plaintext highlighter-rouge">d</code> is a shortcut for the word <code class="language-plaintext highlighter-rouge">destroy</code>. Go ahead, give it a try before we make any modifications. Just remember to regenerate the model!</p>
</blockquote>

<p>Figure 3 shows the four files that were created.</p>

<figure>
  <img src="https://images.visoftinc.com/2018-03-05/figure03.png" alt="The generated files" />
  <figcaption>Figure 3 - The files generated by the model generator</figcaption>
</figure>

<p>You’ll notice the first item is the database migration. Let’s take a detour before continuing with our <code class="language-plaintext highlighter-rouge">job</code> model and discuss it.</p>

<h2 id="migrations">Migrations</h2>

<p>Let’s look closer at the database migration that was created for us. It can be found in the directory <code class="language-plaintext highlighter-rouge">db/migrate</code>. You’ll see one file in that directory with a timestamp, that is the migration that was created. The migration is Ruby code that creates a table called <code class="language-plaintext highlighter-rouge">jobs</code> with the attributes that we specified in the command. Let’s investigate this file a bit more. You can see a shortened example of the file below.</p>

<div class="language-ruby highlighter-rouge"><div class="highlight"><pre class="highlight"><code><span class="k">class</span> <span class="nc">CreateJobs</span> <span class="o">&lt;</span> <span class="no">ActiveRecord</span><span class="o">::</span><span class="no">Migration</span><span class="p">[</span><span class="mf">5.1</span><span class="p">]</span>
  <span class="k">def</span> <span class="nf">change</span>
    <span class="n">create_table</span> <span class="ss">:jobs</span> <span class="k">do</span> <span class="o">|</span><span class="n">t</span><span class="o">|</span>
      <span class="n">t</span><span class="p">.</span><span class="nf">string</span> <span class="ss">:title</span>
      <span class="n">t</span><span class="p">.</span><span class="nf">datetime</span> <span class="ss">:posted_at</span>
      <span class="o">...</span>
      <span class="n">t</span><span class="p">.</span><span class="nf">text</span> <span class="ss">:description</span>
      <span class="n">t</span><span class="p">.</span><span class="nf">text</span> <span class="ss">:how_to_apply</span>
      <span class="o">...</span>
      <span class="n">t</span><span class="p">.</span><span class="nf">timestamps</span>
    <span class="k">end</span>
  <span class="k">end</span>
<span class="k">end</span>
</code></pre></div></div>

<p>It’s all pretty straightforward. Everywhere we didn’t provide a specific type is created as a <code class="language-plaintext highlighter-rouge">string</code>, which is exactly what we wanted. For the attributes where we specified a type, the type is represented in the migration. Assuming this is the first time you’re seeing a migration, let’s talk about the oddities of the file. At the top, <code class="language-plaintext highlighter-rouge">class CreateJobs &lt; ActiveRecord::Migration[5.1]</code> This is how you define a class in Ruby. It inherits from <code class="language-plaintext highlighter-rouge">ActiveRecord::Migration[5.1]</code>. The <code class="language-plaintext highlighter-rouge">[5.1]</code> refers to the version of ActiveRecord (Rails’ ORM) created this file, and the double colons indicate that <code class="language-plaintext highlighter-rouge">ActiveRecord</code> is the “namespace” and that <code class="language-plaintext highlighter-rouge">Migration</code> is the class that we are inheriting for our new <code class="language-plaintext highlighter-rouge">CreateJobs</code> class.</p>

<p>This class has a single method, <code class="language-plaintext highlighter-rouge">change</code>. This same method gets called when we migrate and if we rollback the database. Everything from this point on is part of the DSL (domain specific language) that we use to modify the database. The <code class="language-plaintext highlighter-rouge">create_table :jobs do |t|</code> does what you’d expect, creates a table called <code class="language-plaintext highlighter-rouge">jobs</code>.</p>

<blockquote>
  <p>If you’re new to Ruby and you’re looking at that statement, the <code class="language-plaintext highlighter-rouge">:jobs</code>, specifically the colon, may be confusing. This is what’s known as a <a href="http://www.rubyfleebie.com/an-introduction-to-symbols/">Ruby symbol</a>. If you follow that link, you can find more information about symbols. The easiest way to understand them is to think of them as “constants.” Unlike a <code class="language-plaintext highlighter-rouge">string</code> they don’t store anything, they are just a name. If you’re still curious, there is plenty of <a href="https://gist.github.com/ryansobol/9b0b6995a7ae806cd008">information on symbols</a> out there.</p>
</blockquote>

<p>I feel that the Ruby code is pretty simple to understand, even if you aren’t a developer. The one oddity you’re probably wondering about is <code class="language-plaintext highlighter-rouge">t.timestamps</code>. No magic here, it’s just a little helper method that creates the <code class="language-plaintext highlighter-rouge">created_at</code> and <code class="language-plaintext highlighter-rouge">updated_at</code> columns. The cool thing about those columns’ names is that Rails will, by default, manage them for us. Now that is magical! To get the magic, all you need to do is name the columns correctly, and by using the <code class="language-plaintext highlighter-rouge">timestamps</code> method, it will do that for us.</p>

<p>You may be looking at this class and thinking that it’s pretty simple. There are no constraints of anything specified. If we wanted to, we could define things like defaults and indexes, but we’re not going to get into that level of complexity in this tutorial. Don’t worry though; we’ll handle things on the code side to prevent garbage data by way of validations.</p>

<blockquote>
  <p>Hmm, there’s still no <code class="language-plaintext highlighter-rouge">id</code> column specified, what’s going on? Well, <code class="language-plaintext highlighter-rouge">create_table</code> will automatically add the <code class="language-plaintext highlighter-rouge">id</code> column (unless you tell it not to). Honestly, without an <code class="language-plaintext highlighter-rouge">id</code> how would you identify and delete records easily?</p>
</blockquote>

<p>Now to migrate your database (which will create it automatically for us in SQLite), it’s a simple command:</p>

<div class="language-bash highlighter-rouge"><div class="highlight"><pre class="highlight"><code>rails db:migrate
</code></pre></div></div>

<p>If you’re using an older version of Rails, &lt; 5, then the command is similar, it’s <code class="language-plaintext highlighter-rouge">rake db:migrate</code> instead. Go ahead and migrate your database now.</p>

<h2 id="review">Review</h2>

<p>In the first part of this tutorial, we got our first look at models and migrations in Rails. We used the Rails model generator, and you saw there is no magic involved. Your mileage may vary using generators, and you may find you prefer to create files yourself instead. There’s no harm in that at all. In fact, I often do that exact thing when I’m developing. I invite you to explore the help files for the generators, as there are various customization options (<code class="language-plaintext highlighter-rouge">rails g model --help</code> for example). You can even customize the files generated with your own templates if you want. Finally, Rails has both the model and a migration generator (that command, you guessed it, <code class="language-plaintext highlighter-rouge">rails g migration</code>,). Personally, I find the migration generator to be the most useful as it gives me a starting point quickly.</p>

<p>In the next part of the tutorial, we’ll go back to working on the <code class="language-plaintext highlighter-rouge">job</code> model. We still have work to do there, as we need things like validations and tests. I hope you found this first part of “Riding Rails” to be helpful. As always, let us know what you think.</p>]]></content><author><name>Damien White</name></author><category term="ruby" /><category term="ruby-on-rails" /><category term="rails" /><category term="ruby" /><category term="rails" /><category term="riding-rails" /><category term="job_slayer" /><summary type="html"><![CDATA[Join us in creating a Ruby on Rails application from scratch that allows us to search for jobs.]]></summary><media:thumbnail xmlns:media="http://search.yahoo.com/mrss/" url="https://images.visoftinc.com/2018-03-05/railroad-in-motion.jpg" /><media:content medium="image" url="https://images.visoftinc.com/2018-03-05/railroad-in-motion.jpg" xmlns:media="http://search.yahoo.com/mrss/" /></entry><entry><title type="html">Starting With Rails</title><link href="https://blogs.visoftinc.com/2018/02/26/starting-with-rails/" rel="alternate" type="text/html" title="Starting With Rails" /><published>2018-02-26T00:00:00-05:00</published><updated>2018-02-26T00:00:00-05:00</updated><id>https://blogs.visoftinc.com/2018/02/26/starting-with-rails</id><content type="html" xml:base="https://blogs.visoftinc.com/2018/02/26/starting-with-rails/"><![CDATA[<p><img src="https://images.visoftinc.com/2018-02-26/programmer-writing-code.jpg" alt="Programmer Writing Code" class="aligncenter" /></p>

<p><a href="/2018/02/19/setting-up-ruby-for-everyone/">In my last post I walked you through installing Ruby</a> on your machine, be it a Mac, Windows, or Linux computer. If you remember, I planned to help my developer friend set up Rails on his machine. So with Ruby set up, you’re ready to install Rails. Let’s get started.</p>

<h2 id="windows-specifics">Windows Specifics</h2>

<p>Like last time, I’ll start with Windows. If you followed along last time, you might have used the <a href="http://railsinstaller.org/en">Rails Installer</a>. If you did, excellent, you can skip ahead to the next section. If you went the <a href="https://rubyinstaller.org">Ruby Installer</a> route, we’re going to need to install one thing before working with Rails. Out of the box, Rails uses <a href="http://sqlite.org/">SQLite</a> as it’s default data store. <a href="http://sqlite.org/">SQLite</a> is an easy to install, self-contained SQL database engine. It’s easy to use and supports up to 140 TB of data; Rails chose SQLite. Even if you decide to move to something else, like <a href="https://www.postgresql.org/">Postgres</a>, you might find yourself using SQLite in your local test environment. Once you use something that is <a href="https://www.postgresql.org/">Postgres</a> specific, you’ll then need to use it in all your environments, but that’s getting ahead of ourselves.</p>

<figure>
  <img src="https://images.visoftinc.com/logos/sqlite.png" alt="SQLite Logo" class="m-30" />
  <figcaption>SQLite Logo</figcaption>
</figure>

<p>Head over to the <a href="http://sqlite.org/download.html">SQLite Download Page</a>, and grab the precompiled binary for Windows. There is a 32-bit and 64-bit version of SQLite; I’d match the version to your version of Windows, which is most likely 64-bit. Unpack the zip archive to a folder in your PATH, such as the <code class="language-plaintext highlighter-rouge">C:\WINDOWS\system32</code> folder, or even the Ruby bin folder (typically <code class="language-plaintext highlighter-rouge">C:\Ruby\bin</code>). That’s all there is to it.</p>

<h2 id="rubygems">RubyGems</h2>

<p>Before we install Rails, I’d just like to talk a little about RubyGems. Gems (for short) are either written in Ruby or C, as I mentioned in the last post. When you issue a <code class="language-plaintext highlighter-rouge">gem install</code> command, by default, the gem will be installed as well as documentation for the gem. Honestly, this is just a waste of local space. To change the default behavior, tell it to skip documentation, run the following command:</p>

<div class="language-bash highlighter-rouge"><div class="highlight"><pre class="highlight"><code><span class="nb">echo</span> <span class="s1">'gem: --no-document'</span> <span class="o">&gt;&gt;</span> ~/.gemrc
</code></pre></div></div>

<p>That command will work on Mac and Linux, for Windows, where you don’t really have a “home directory,” the one-liner command for you is:</p>

<div class="language-bash highlighter-rouge"><div class="highlight"><pre class="highlight"><code><span class="o">(</span><span class="nb">echo install</span>: <span class="nt">--no-document</span> <span class="o">&amp;&amp;</span> <span class="nb">echo </span>update: <span class="nt">--no-document</span><span class="o">)</span> <span class="o">&gt;&gt;</span> c:<span class="se">\P</span>rogramData<span class="se">\g</span>emrc
</code></pre></div></div>

<blockquote>
  <p>Note that by installing it in <code class="language-plaintext highlighter-rouge">ProgramData</code> it applies to all users.</p>
</blockquote>

<p>With the <code class="language-plaintext highlighter-rouge">.gemrc</code> (or <code class="language-plaintext highlighter-rouge">gemrc</code> in Windows) in place, you can install any gem and know that it will <strong>skip</strong> installing documentation for every gem you install.</p>

<h2 id="installing-rails">Installing Rails</h2>

<p>This section is going to be very short. Rails is just a collection of gems.</p>

<figure>
  <img src="https://images.visoftinc.com/logos/rails.png" alt="Rails Logo" class="w-30" />
  <figcaption>Rails Logo</figcaption>
</figure>

<p>All we need to do is run the command to install the latest version of Rails:</p>

<div class="language-bash highlighter-rouge"><div class="highlight"><pre class="highlight"><code>gem <span class="nb">install </span>rails
</code></pre></div></div>

<p>That’s it! Gems are a snap to install.</p>

<h2 id="running-an-existing-rails-application">Running an Existing Rails Application</h2>

<p>Installing Rails is super easy, but what if you want to run an existing Rails application that you download from say GitHub. You don’t have to install Rails directly. As long as the project has a <code class="language-plaintext highlighter-rouge">Gemfile</code>, you can use a gem called <a href="http://bundler.io">Bundler</a>. The <code class="language-plaintext highlighter-rouge">Gemfile</code> in the root of the project specifies it’s dependencies, and in a Rails project you’re going to find an entry like <code class="language-plaintext highlighter-rouge">gem 'rails', '5.1.5'</code>. This line tells <a href="http://bundler.io">Bundler</a> to install Rails v5.1.5. Because of this, we don’t have to install Rails separately; we can just use <a href="http://bundler.io">Bundler</a>. But before we use Bundler, we need to install it, note we’ll only need to do this once:</p>

<div class="language-bash highlighter-rouge"><div class="highlight"><pre class="highlight"><code>gem <span class="nb">install </span>bundler
</code></pre></div></div>

<figure>
  <img src="https://images.visoftinc.com/logos/bundler.png" alt="Bundler Logo" class="w-20" />
  <figcaption>Bundler Logo</figcaption>
</figure>

<p>Now that we have <a href="http://bundler.io">Bundler</a>, we can navigate to the project’s root folder (where the <code class="language-plaintext highlighter-rouge">GemFile</code> is and run the simple command:</p>

<div class="language-bash highlighter-rouge"><div class="highlight"><pre class="highlight"><code>bundle <span class="nb">install</span>
</code></pre></div></div>

<p>Bundler will kick into action and install all the dependencies required by the <code class="language-plaintext highlighter-rouge">Gemfile</code>.</p>

<p>Want to work on different Rails project? Just <code class="language-plaintext highlighter-rouge">bundle install</code> in its root directory, that’s all there is to it.</p>

<h2 id="a-simple-app">A Simple “App”</h2>

<p>Congrats, you’ve reached the end of the tutorial. You now know how to install Rails, easy, isn’t it? We learned a little more about RubyGems and then discovered <a href="http://bundler.io">Bundler</a>.</p>

<p>If you want to test your Rails install out, we can create a little, super-simple application in just a few commands. Now, this is nowhere near a production app, but it will get you to verify everything works. I’m going to use the <code class="language-plaintext highlighter-rouge">scaffold</code> generator that Rails has to whip up something quickly, but you’ll see that the <code class="language-plaintext highlighter-rouge">scaffold</code> generator generates a lot of things we don’t want. With that said, open up a Terminal session and type the following:</p>

<div class="language-bash highlighter-rouge"><div class="highlight"><pre class="highlight"><code>rails new notepad
<span class="nb">cd </span>notepad
rails g scaffold note title content:text
rails db:migrate
rails s
</code></pre></div></div>

<p>These five commands will do the following:</p>

<ol>
  <li>Create a new application called notepad and run <code class="language-plaintext highlighter-rouge">bundle install </code>- <code class="language-plaintext highlighter-rouge">rails new notepad</code></li>
  <li>Change into the newly created notepad directory - <code class="language-plaintext highlighter-rouge">cd notepad</code></li>
  <li>Create scaffolding - <code class="language-plaintext highlighter-rouge">rails g scaffold note title content:text</code>
    <ol>
      <li>This will generate a database migration file</li>
      <li>A <code class="language-plaintext highlighter-rouge">Note</code> model with <code class="language-plaintext highlighter-rouge">title</code> as a <code class="language-plaintext highlighter-rouge">string</code> and <code class="language-plaintext highlighter-rouge">content</code> as a <code class="language-plaintext highlighter-rouge">text</code> field</li>
      <li>A <code class="language-plaintext highlighter-rouge">NotesController</code> which will have actions defined on it</li>
      <li>A <code class="language-plaintext highlighter-rouge">/notes</code> route that will handle <code class="language-plaintext highlighter-rouge">GET</code>, <code class="language-plaintext highlighter-rouge">POST</code>, <code class="language-plaintext highlighter-rouge">PUT/PATCH</code>, and <code class="language-plaintext highlighter-rouge">DELETE</code></li>
      <li>Tests for your model, route, controller</li>
      <li>A <code class="language-plaintext highlighter-rouge">NotesHelper</code></li>
      <li>Views for your controller actions, both ERB and JBuilder files</li>
      <li>A CoffeeScript file</li>
      <li>Finally two SCSS files, one for scaffolds and one specifically for notes.</li>
    </ol>
  </li>
  <li>Create the SQLite database and run the migration file - <code class="language-plaintext highlighter-rouge">rails db:migrate</code></li>
  <li>Finally, run the development server</li>
</ol>

<p>Now browse to <code class="language-plaintext highlighter-rouge">http://localhost:3000/notes</code>, and you’ll see you can add, update, create, and delete notes. A straightforward and simplistic app. Oh, by the way, the <code class="language-plaintext highlighter-rouge">rails g</code> command is a shortcut for <code class="language-plaintext highlighter-rouge">rails generate</code> and <code class="language-plaintext highlighter-rouge">rails s</code> is short for <code class="language-plaintext highlighter-rouge">rails server</code>. You can use either command, but I prefer less typing with the shortcuts. Below you can see the result in action.</p>

<video class="aligncenter" width="410" autoplay="" loop="">
  <source src="https://images.visoftinc.com/2018-02-26/rails new.webm" type="video/webm" />
  <source src="https://images.visoftinc.com/2018-02-26/rails new.mp4" type="video/mp4" />
  <source src="https://images.visoftinc.com/2018-02-26/rails new.ogv" type="video/ogg" />
  Your browser doesn't support HTML5 video tag.
</video>

<h2 id="wrap-up">Wrap Up</h2>

<p>I hope you enjoyed this post. We just scratched the surface of Rails, but we installed it and made sure it worked. We utilized the scaffold generator, and I’m sure you realized that the scaffolding generates a lot of files that we don’t need. We’ll see in another post other Rails generators so we can pick and choose what we want. As always, please let us know what you think, either leave a comment or <a href="https://visoftinc.com#contact">Contact Us</a>.</p>]]></content><author><name>Damien White</name></author><category term="ruby" /><category term="ruby-on-rails" /><category term="rails" /><category term="ruby" /><category term="rails" /><summary type="html"><![CDATA[We learned how to set up Ruby in the last post, in this one we'll see how to get started with Rails.]]></summary><media:thumbnail xmlns:media="http://search.yahoo.com/mrss/" url="https://images.visoftinc.com/2018-02-26/programmer-writing-code.jpg" /><media:content medium="image" url="https://images.visoftinc.com/2018-02-26/programmer-writing-code.jpg" xmlns:media="http://search.yahoo.com/mrss/" /></entry><entry><title type="html">Setting Up Ruby Everywhere</title><link href="https://blogs.visoftinc.com/2018/02/19/setting-up-ruby-everywhere/" rel="alternate" type="text/html" title="Setting Up Ruby Everywhere" /><published>2018-02-19T00:00:00-05:00</published><updated>2018-02-19T00:00:00-05:00</updated><id>https://blogs.visoftinc.com/2018/02/19/setting-up-ruby-everywhere</id><content type="html" xml:base="https://blogs.visoftinc.com/2018/02/19/setting-up-ruby-everywhere/"><![CDATA[<p><img src="https://images.visoftinc.com/2018-02-19/webdesign-project-desk.jpg" alt="Computer on desk" class="aligncenter" /></p>

<p>The other day I was working with another developer who primarily develops within the Microsoft space, such as .NET. My goal was to get him to try Rails, but the precursor to Rails is Ruby. Ruby isn’t hard to install at all, and some platforms, namely macOS and Linux, have excellent options available. This post is going to show you how to set up Ruby on your machine, regardless of your operating system.</p>

<h2 id="windows">Windows</h2>

<p>We’ll get Windows out of the way first. It is a cinch to install Ruby on Windows. There are two easy options available. First is the <a href="https://rubyinstaller.org">Ruby Installer</a>. You can just download their installer and be on your way with Ruby, easy peasy. As of this post, Ruby v2.5.0 is the latest version out.</p>

<p>Ok, you have Ruby installed on Windows. With <a href="https://rubyinstaller.org">Ruby Installer</a> though, there’s a slight catch. It has to do with RubyGems. Gems (for short) are packages you can use. An example of one would be like the <a href="https://github.com/visoft/ruby_odata">ruby_odata library</a> that I wrote. This gem allows you to work with an OData server using Ruby instead of complex web calls. Another gem, called <a href="https://github.com/sparklemotion/nokogiri">nokogiri</a> allows you to navigate XML documents with ease. This is where the “catch” exists. This particular gem is written in C, not Ruby. Nokogiri isn’t the only C-based gem, there are others, and you’re bound to hit one when installing gems. To install these on your system, they need to be compiled. Windows doesn’t ship with build tools that can do this, so you need to install what’s known as the <a href="https://rubyinstaller.org/add-ons/devkit.html">DevKit</a>. It looks like if you installed Ruby 2.4 or greater, you can install the DevKit with a command bundled with the <a href="https://rubyinstaller.org">Ruby Installer</a>.</p>

<p>Another option on Windows, that’s an all-inclusive installer (no need to install the DevKit separately) is the <a href="http://railsinstaller.org/en">Rails Installer</a>. As the name suggests, this will setup Rails for you as well, plus other tools like the DevKit. These installers are tied to specific versions of Ruby and Rails. As of this post, the newest <a href="http://railsinstaller.org/en">Rails Installer</a> is based on Ruby v2.3.3, not the latest version of Ruby (v2.5.0). Not the end of the world, but just be aware of your version.</p>

<figure>
  <img src="https://images.visoftinc.com/logos/railsinstaller.png" alt="Rails Installer Logo" />
  <figcaption>The Rails Installer Logo</figcaption>
</figure>

<p>If I had to choose on Windows, I’d go the <a href="http://railsinstaller.org/en">Rails Installer</a> route. I’ll talk about installing Rails in a different post, but if you want to use Rails out-of-the-box on Windows, you’re going to need things like <a href="https://www.sqlite.org/">SQLite</a>. This and other tools are included with the <a href="http://railsinstaller.org/en">Rails Installer</a>, so it will get you going quickly.</p>

<h2 id="macos">macOS</h2>

<p>MacOS has various options for installing Ruby, and in fact, most of these work on Linux too. First, let’s start with the Rails Installer. While I’d go with it for Windows, I wouldn’t choose the macOS versions. As of this post, the macOS options are pretty out of date. Besides, there are better options for installing Ruby on a Mac.</p>

<p>Let’s start with a precursor. If you’re on Mac, grab a copy of <a href="https://itunes.apple.com/us/app/xcode/id497799835?mt=12">Xcode</a>. It’s free in the Mac App Store. Why Xcode? Well, it comes with various command line tools that it will install the first time you run it. These tools make your Mac able to compile C-based gems. Now I know Xcode is large for just command line tools. Of course, there are other options. Another option that I just read is this:</p>

<blockquote>
  <p>“Apple now provides an official Command Line Tools for Xcode package that you can install without needing to install Xcode itself! You can install it with <code class="language-plaintext highlighter-rouge">xcode-select --install</code> on Mavericks and Yosemite or download it from Apple’s developer site (free registration required) and search for “Command Line Tools”
–<a href="https://github.com/kennethreitz/osx-gcc-installer">OSX GCC Installer</a></p>
</blockquote>

<figure>
  <img src="https://images.visoftinc.com/logos/xcode.png" alt="Xcode Logo" style="height: 256px;" />
  <figcaption>Xcode </figcaption>
</figure>

<p>Honestly, if you’re a software developer on macOS or OSX, you’re probably going to tinker with Mac or iOS development. If that’s the case, just grab <a href="https://itunes.apple.com/us/app/xcode/id497799835?mt=12">Xcode</a>. If not, try the command or download the tools from <a href="https://developer.apple.com">Apple’s Developer Site</a>.</p>

<p>Now that we have the appropriate tools, we can install Ruby and even compile Ruby from source if needed. I’d recommend a Ruby Version Manager. There are two big players in this space, <a href="https://rvm.io">RVM</a> or <a href="https://github.com/rbenv/rbenv">rbenv</a>. Personally, I like <a href="https://rvm.io">RVM</a> and haven’t tried <a href="https://github.com/rbenv/rbenv">rbenv</a> at all. <a href="https://github.com/rbenv/rbenv">Rbenv</a> can’t be installed alongside <a href="https://rvm.io">RVM</a>, so it’s hard to test both without getting rid of the other. You’ll find developers who swear by both, but I’m going to go with RVM for this guide. But before I start, check out <a href="https://github.com/rbenv/rbenv/wiki/Why-rbenv%3F">rbenv’s list of why you should choose it over RVM</a>. Know that whatever one you pick, you’ll be able to switch between versions of Ruby with ease.</p>

<p>Follow my guide for using <a href="#rvm">RVM below</a>, the process is the same on both systems. I’d recommend that you review the Linux steps below as I dig into some of the prerequites of RVM a little deeper.</p>

<h2 id="linux">Linux</h2>

<p>For Linux, we have most of the same choices as macOS, except for the Rails Installer (which again, I wouldn’t recommend on macOS due to its age (as of this post). On Linux, I’d recommend <a href="https://rvm.io">RVM</a> again, but <a href="https://github.com/rbenv/rbenv">rbenv</a> is available here as well. We’ll talk about <a href="#rvm">installing RVM</a> below, but here I will go over here is it’s requirements. Well, having just installed RVM on a Virtual Machine, I can tell you that RVM will prompt you for your password so it can install prerequisites for you. I’m assuming this requires sudo or root privileges. I had sudo rights on the VM, and I didn’t need to install the requirements manually. Pretty sweet, eh?</p>

<figure>
  <img src="https://images.visoftinc.com/logos/linux2.png" alt="Linux Tux" />
  <figcaption>Tux</figcaption>
</figure>

<p>Maybe you don’t like that RVM does that for you automatically, or maybe you don’t have root permissions. That feature of RVM is called <a href="hhttps://rvm.io/rvm/autolibs">autolibs</a>. You can disable these or pick and choose the scenarios you want RVM to handle. To do this during the install, before you install Ruby with RVM, type the command:</p>

<div class="language-bash highlighter-rouge"><div class="highlight"><pre class="highlight"><code>rvm requirements
</code></pre></div></div>

<p>This will show you what RVM needs to be able to install and you can install these packages yourself or have someone with root permissions do it for you. Note that this is only for installing versions of Ruby. <a href="https://rvm.io/rvm/prerequisites">RVM’s requirements for installation</a> are standard *nix tools, such as <code class="language-plaintext highlighter-rouge">curl</code>.</p>

<h2 id="rvm">RVM</h2>

<p>With the prerequisites out of the way, let’s do this!</p>

<figure>
  <img src="https://images.visoftinc.com/logos/rvm.png" alt="RVM Logo" />
  <figcaption>RVM Logo</figcaption>
</figure>

<p>To install RVM, just follow the commands on the <a href="https://rvm.io">homepage</a>. I’ll repeat them here, but know that the <a href="https://rvm.io">RVM</a> site has the most up-to-date information. Ok, here we go, just copy and paste these two commands into Terminal window:</p>

<div class="language-bash highlighter-rouge"><div class="highlight"><pre class="highlight"><code>gpg <span class="nt">--keyserver</span> hkp://keys.gnupg.net <span class="nt">--recv-keys</span> 409B6B1796C275462A1703113804BB82D39DC0E3 7D2BAF1CF37B13E2069D6956105BD0E739499BDB
</code></pre></div></div>

<p>Then:</p>

<div class="language-bash highlighter-rouge"><div class="highlight"><pre class="highlight"><code><span class="se">\c</span>url <span class="nt">-sSL</span> https://get.rvm.io | bash <span class="nt">-s</span> stable
</code></pre></div></div>

<p>Done.</p>

<p>Read the instructions at the end of the install (the 2nd command), the easiest thing to do is just restart Terminal, or you’re able to load RVM manually just for your current session. Once that’s done, it’s time to install a version of Ruby.</p>

<p>Now, installing any version of Ruby is just a Terminal command away, for example, to install the latest (as of this post) 2.5.0, you can use the following command:</p>

<div class="language-bash highlighter-rouge"><div class="highlight"><pre class="highlight"><code>rvm <span class="nb">install </span>2.5.0
</code></pre></div></div>

<p>Now, if you want to use 2.5.0, you can issue a command to RVM:</p>

<div class="language-bash highlighter-rouge"><div class="highlight"><pre class="highlight"><code>rvm use 2.5.0
</code></pre></div></div>

<p>Oh, what? Do you want that as your default version of Ruby? RVM has you covered:</p>

<div class="language-bash highlighter-rouge"><div class="highlight"><pre class="highlight"><code>rvm use 2.5.0 <span class="nt">--default</span>
</code></pre></div></div>

<p>Make sure you notice the two dashes before <code class="language-plaintext highlighter-rouge">default</code>.</p>

<p>That’s all there is to it. Now RVM comes with other tools that are available to us, but I’ll leave that for a future post.</p>

<h2 id="wrapping-up">Wrapping Up</h2>

<p>There you have it; Ruby is now installed on your machine. Look for more posts in the future where we’ll explore installing Rails and friends on our machine. Yes, <a href="/2010/04/06/installing-ruby-on-rails-on-windows/">I did write about installing Rails eight long years ago</a>, but that’s, obviously, a <em>little</em> out of date.</p>

<p>I hope you found this post helpful. If you have any problems installing Ruby, feel free to leave a comment below or <a href="https://visoftinc.com/#contact">contact us</a>.</p>]]></content><author><name>Damien White</name></author><category term="ruby" /><category term="how-to" /><category term="ruby" /><category term="installation" /><category term="rvm" /><summary type="html"><![CDATA[Learn how to install Ruby on Windows, macOS, and Linux.]]></summary><media:thumbnail xmlns:media="http://search.yahoo.com/mrss/" url="https://images.visoftinc.com/2018-02-19/webdesign-project-desk.jpg" /><media:content medium="image" url="https://images.visoftinc.com/2018-02-19/webdesign-project-desk.jpg" xmlns:media="http://search.yahoo.com/mrss/" /></entry></feed>