<?xml version="1.0" encoding="utf-8"?>
<feed xmlns="http://www.w3.org/2005/Atom">

  <title><![CDATA[CloudStacking.com]]></title>
  <link href="http://cloudstacking.com/atom.xml" rel="self"/>
  <link href="http://cloudstacking.com/"/>
  <updated>2013-02-18T14:32:56-05:00</updated>
  <id>http://cloudstacking.com/</id>
  <author>
    <name><![CDATA[Jonathan Desrocher]]></name>
    
  </author>
  <generator uri="http://octopress.org/">Octopress</generator>

  
  <entry>
    <title type="html"><![CDATA[Windows Product Activation For AWS EC2 Imported VMs]]></title>
    <link href="http://cloudstacking.com/posts/windows-product-activation-for-aws-ec2-imported-vms.html"/>
    <updated>2011-02-20T00:00:00-05:00</updated>
    <id>http://cloudstacking.com/posts/windows-product-activation-for-aws-ec2-imported-vms</id>
    <content type="html"><![CDATA[<h2>Introduction To Windows Activation</h2>

<p>Ever since Microsoft decided to tighten its grip on the way in which its software is provisioned, product activation became a part of every Windows administrators agenda.</p>

<p>Stepping up from Windows Server 2003 to Windows Server 2008, Microsoft has introduced two changes to the activation process (or in its official name: <a href="http://en.wikipedia.org/wiki/Windows_Product_Activation">Windows Product Activation</a>):</p>

<ol>
<li>Volume License customers are no longer exempt from performing activation; customers unwilling or unable to activate products online must use the newly introduced Key Management Service (more on KMS coming right up)</li>
<li>The Activation we knew from Windows XP/2003 in which the Windows is provided with a product key during installation which is later verified online (or by phone) is still available in Windows 2008 and has been labeled as Multiple Key Activation (MAK).
In addition to MAK, Microsoft introduced a new activation method in which Windows periodically checks-out a license from a centralized Key Management Service (KMS) which is good for only 180 days.
After the initial activation, Windows will contact the KMS server every 7 days to restart the 180 days countdown.</li>
</ol>


<p><strong>It is important to understand that both methods are designed to control (read:limit) the number of Windows activations performed by the customers based on the number of licenses purchased from Microsoft by requiring that each copy of Windows be activated for the particular hardware that its loaded onto.</strong></p>

<p>This means two things:</p>

<ol>
<li>Each new Windows installation must be activated &#8211; even if it on the same hardware configuration (click here for Microsofts definition of &#8220;hardware configuration&#8221;).</li>
<li><strong>When an existing copy of Windows is migrated between hardware configurations it must be re-activated.</strong></li>
</ol>


<!-- more -->


<h2>That&#8217;s hardly news, why does it suddenly relate to AWS?</h2>

<p>Traditionally, the only way to launch Windows Instances was from one of the AWS provided AMIs (or a user-created derivative thereof).
These AMIs were pre-configured to include a number of features such as paravirtualized drivers, the EC2 Configuration Service as well as numerous other configuration defaults which went largely unnoticed.</p>

<p>One such configuration was Windows Activation &#8211; does anyone recall ever activating or fiddling with the activation configuration of his EC2 Instance?
Every time we provisioned a new Instance, or <a href="posts/adding-resources-resizing-an-aws-ec2-instance.html">re&#8211;sized an existing one</a> the &#8211; Windows OS would just boot-up normally without ever as much as mentioning the need for any Activation.
This silent background configuration effectively crossed Windows Activation from the administrators to&#8211;do list when dealing with EC2 Instances.</p>

<p>With the recent introduction of the &#8220;VM import&#8221; feature that allows us to import an existing Virtual Machine &#8211; AWS has essentially opened the door for Windows instances that are 100% built and configured by customers from scratch (with the exception of drivers injected during the import process); and with this newfound freedom comes a wave of new problems and miss&#8211;configurations.</p>

<h3>Focusing On The Problem At Hand</h3>

<p>As previously mentioned, moving a copy of Windows from one hardware configuration to another will trigger Windows to require a new activation &#8211; and migrating from a VMware virtual machine to EC2 Instance definitely fits this bill.
Trying to activate Windows at this point will result in one of the following:</p>

<ul>
<li><strong>If using Multiple Activation Key:</strong> It is possible to re&#8211;activate this Windows copy online, but doing so will consume one activation from our online activations quota that is tracked by Microsoft (once that quota is reached &#8211; online activation will no longer be permitted).</li>
<li><strong>If using Key Management Services:</strong> Our new Instance will attempt to access the same internal activation server it had and will probably fail (unless connected via VPN).</li>
</ul>


<p><strong>It&#8217;s worth mentioning that in both cases we are attempting to Activate Windows using our existing Windows licenses; why should we consume our internal product licenses when the base Windows license is included in the EC2 hourly rate?</strong></p>

<h2>The Solution: AWS&#8217;s Key Management Services</h2>

<p>In order to address this exact problem (and make good on the proposition that the base Windows costs are covered in the EC2 hourly rate) &#8211; AWS is providing us with their own Key Management Services to simply offload the license management from EC2 customers.</p>

<p>In order to successfully activate our Instance using AWS&#8217;s KMS we need to perform the following actions from within our Instance:</p>

<ol>
<li>Synchronize the Instance&#8217;s Windows clock with that of the AWS KMS server.
The easiest way of achieving that is by configuring the Instance to synchronize against time.windows.com by going to the &#8220;Date and Time&#8221; settings from the control panel, select the &#8220;Internet Time tab&#8221; and set to synchronize with &#8220;time.windows.com&#8221;.
<strong>It&#8217;s important to click on the &#8220;Update Now&#8221; button in order to avoid error code <a href="http://support.microsoft.com/kb/938450">0xC004F06C</a> when attempting to activate.</strong></li>
<li>Configure our Instance to activate against one of AWS&#8217;s KMS servers from the table below by using the <a href="http://technet.microsoft.com/en-us/library/ff793433.aspx">slmgr.vbs tool</a>:

<blockquote><p>slmgr.vbs /skms <RELEVANT_KMS_ADDRESS_FROM_THE_TABLE_BELOW> <BR>
slmbr.vbs /ato</p></blockquote></li>
</ol>


<table border>
<tr>
<td>
US East (N.Virginia):
<td>
ec2-174-129-233-152.compute-1.amazonaws.com <br>
ec2-174-129-233-141.compute-1.amazonaws.com 
<tr>

<td>
US West (N.California):
<td>
ec2-204-236-129-123.us-west-1.compute.amazonaws.com <br>
ec2-204-236-129-122.us-west-1.compute.amazonaws.com
<tr>

<td>
EU (Ireland):
<td>
ec2-79-125-16-172.eu-west-1.compute.amazonaws.com <br>
ec2-79-125-16-108.eu-west-1.compute.amazonaws.com
<tr>

<td>
Asia Pacific (Singapore):
<td>
ec2-175-41-130-16.ap-southeast-1.compute.amazonaws.com <br>
ec2-175-41-130-20.ap-southeast-1.compute.amazonaws.com
</table>


<h2>Conclusion</h2>

<p>In this post we&#8217;ve discussed the potential for misconfiguration that can result from importing an Instance to AWS and continued to discuss in-depth the issue of Windows activation for EC2 Instances.</p>

<p>We&#8217;ve concluded with a step-by-step instructions on how to leverage AWS&#8217;s free activation service in order to offload any maintenance (and fee) that is associated with the base Windows licensing.</p>

<p>Happy Activations!</p>
]]></content>
  </entry>
  
  <entry>
    <title type="html"><![CDATA[Configuring EBS Instances to Terminate on Shutdown]]></title>
    <link href="http://cloudstacking.com/posts/configuring-ebs-instances-to-terminate-on-shutdown.html"/>
    <updated>2011-01-27T00:00:00-05:00</updated>
    <id>http://cloudstacking.com/posts/configuring-ebs-instances-to-terminate-on-shutdown</id>
    <content type="html"><![CDATA[<h2>Introduction and example</h2>

<p>EC2 Instances are booted either from the &#8220;Instance Store&#8221; (a process in which the AMI is copied from S3 onto an ephemeral boot device) or from EBS volumes (in which case the boot device is an EBS created from a snapshot of existing EBS volume serving as a template).</p>

<p>While the two types differ in many aspects, there is difference thing that really draws everyone attention: Instance Store Instances will Terminate upon shutdown (planned or unplanned) whereas EBS backed Instances have the ability to enter a Stopped state similarly to physical computers - when we turn it off it doesn&#8217;t disappear; it stays inactive until it is powered back on.</p>

<p>While the added persistency offered by EBS-backed volumes has many benefits - there are situations where the non-persistent nature of Instance Store Instances can be very convenient&#8230;</p>

<p>For example: in the past, I found myself provisioning individual all-in-a-box environments to various business partners for demo or development purposes.</p>

<p>In these scenarios I found it very convenient to instruct them to shut down the OS when done (or alternately rig the said Instance to shut itself down at a certain date) - thereby causing the Instance to Terminate; freeing any compute resources it was consuming and ending any charges it was incurring as such.</p>

<p>Note that this is not an airtight solution as we humans tend to forget Instances running and/or the Instance OS may fail to properly shut itself down but it is simple, readily available and best of all - does not require any kind of AWS account access or communication from the said Instance, completely containing the contents of the Instance for security purposes.</p>

<!-- more -->


<h2>So how can we set EBS backed Instances to auto-Terminate?</h2>

<p>EBS-backed Instances default to entering the Stopped state upon shutdown (after all, supporting this state is the primary reason why we EBS-backed Instances were conceived!), but that&#8217;s configurable using the AWS API and command line tools.</p>

<p>There are two methods of changing this behavior (read: attribute) of the instance, called <em>&#8220;Instance Initiated Shutdown Behavior&#8221;</em>.</p>

<h3>Method I: Configure during the initial creation of the Instance</h3>

<p>When we provision an EBS-backed Instances through the RunInstances we can supply the shutdown behavior argument and specify it to terminate upon shutdown like in the following example using the EC2 command line tools:</p>

<blockquote><p>ec2-run-instances ami-12345678 &#8211;instance-initiated-shutdown-behavior terminate</p></blockquote>

<h3>Method II: Modifying an existing Instance</h3>

<p>We can use the self-explanatory <a href="http://docs.amazonwebservices.com/AWSEC2/latest/APIReference/ApiReference-query-ModifyInstanceAttribute.html">ModifyInstanceAttribute</a> command on existing Instances</p>

<blockquote><p>ec2-modify-instance-attribute i-12345678 &#8211;instance-initiated-shutdown-behavior terminate</p></blockquote>

<h3>Reverting back to Stop upon shutdown</h3>

<p>Building on the previous method of modifying an existing Instance; we can also set the Instance to stop upon shutdown, thus reverting any previous setting to terminate.</p>

<p>Happy termination!</p>

<h4>Update March 24th, 2011:</h4>

<p>AWS now supports changing the shutdown behavior of the Instance through the web console - just right-click on your Instance and select the &#8220;Change Shutdown Behavior&#8221; option.</p>
]]></content>
  </entry>
  
  <entry>
    <title type="html"><![CDATA[Adding resources (resizing) an AWS EC2 Instance]]></title>
    <link href="http://cloudstacking.com/posts/adding-resources-resizing-an-aws-ec2-instance.html"/>
    <updated>2010-08-09T00:00:00-04:00</updated>
    <id>http://cloudstacking.com/posts/adding-resources-resizing-an-aws-ec2-instance</id>
    <content type="html"><![CDATA[<h2>There are a couple of ways of adding resources in the Cloud</h2>

<p>Cloud Computing, when exercised in all of it&#8217;s glory is about Services rather than Servers - this often facilitated by some form of task scheduling such as Message Queuing (<a href="introduction-to-amazon-simple-queue-service-sqs.html">click here to read my introduction to Amazon SQS and how to best leverage it for Cloud Computing</a>).</p>

<p>In this paradigm, adding resources to the Service (again, Servers are irrelevant) is dome simply by adding more servers to our Service&#8217;s pool, rather than adding resources to any server in particular.</p>

<p>But not every deployment is a textbook example of Cloud Computing - and that&#8217;s fine.
Sometimes we have to deal with a component that simply can&#8217;t be distributed between servers (often the case with database servers), and sometimes we are running workloads so light that it really makes more sense to throw more resources at our single server rather than face the complexities of re-architecting our application to scale between multiple servers.</p>

<h2>Not all Instances were created (launched) equal</h2>

<p>At it&#8217;s essence an Instance is an Amazon Machine Image (AMI) that has been deployed to a (virtual) machine and powered-up - hence the term <em>Instance</em>. It is a (running) <em>Instance</em> of an (Amazon Machine) <em>Image</em>.
Going back to the machine part of the equation, AWS offers <a href="http://aws.amazon.com/ec2/instance-types/">different Instance types</a> (read: sizes), each with a predefined amount of CPU, RAM and I/O (priority) resources.
Note that Instance types are either 32 or 64 bit - we&#8217;ll get back to this important detail in just a bit.</p>

<p>When we provision a new Instance, we either explicitly specify a type (read: size), or just default to small, which comes with 1.7 GB of memory and 1 EC2 Compute Unit.</p>

<!-- more -->


<h2>Cutting to the chase: Changing the Instance type (size)</h2>

<p>AWS gives us the option of changing the type of an already provisioned Instance by invoking the API call <em>ModifyInstanceAttribute</em> to change the <em>instanceType</em> value to either a larger or smaller, according to our discretion.</p>

<p>There are three limitations that we need to keep in mind:</p>

<ol>
<li>This action can only performed on Instances that are in the <em>stopped</em> state.</li>
<li>Derived from the previous: the Instance must be EBS-backed (since Instance Store Instances can&#8217;t stop - only terminate).</li>
<li>It is not permitted to switch between 32 and 64 bit Instance types due to AMI limitations.
For example: Small Instances can only grow to Medium while Extra Large Instances can only shrink to Large.</li>
</ol>


<p>This action can also be performed from the command-line via the <a href="http://developer.amazonwebservices.com/connect/entry.jspa?externalID=351">EC2 API Tools</a> (getting started with the tools isn&#8217;t as easy as I hope it would be. but <a href="http://paulstamatiou.com/how-to-getting-started-with-amazon-ec2">here is an excellent guide to get us started</a>).</p>

<p>Once the API tools are set-up, the syntax is very straightforward.
The following is a working example of taking an instance named i-12345678 and resizing it to Medium:</p>

<blockquote><p>ec2-modify-instance-attribute.cmd i-12345678 -t c1.medium</p></blockquote>

<p>Note that the <a href="http://aws.amazon.com/ec2/instance-types/">&#8220;Instance Types&#8221; page on the AWS website</a> contains the updated list of available Instance types, as well as their &#8220;API name&#8221; (the string that represents their size).</p>

<p>Happy resizing!</p>

<h3>Update March 24th, 2011:</h3>

<p>AWS now supports resizing the Instance through the web console - just right-click on your (stopped) Instance and select the &#8220;Change Instance Type&#8221; option.
Keep in mind that the all of the above limitations still apply.</p>
]]></content>
  </entry>
  
  <entry>
    <title type="html"><![CDATA[Running Hyper-V VMware or Xen on an AWS EC2 Instance?]]></title>
    <link href="http://cloudstacking.com/posts/running-hyper-v-vmware-or-xen-on-an-aws-ec2-instance.html"/>
    <updated>2010-06-30T00:00:00-04:00</updated>
    <id>http://cloudstacking.com/posts/running-hyper-v-vmware-or-xen-on-an-aws-ec2-instance</id>
    <content type="html"><![CDATA[<p>I commonly encounter the question whether an AWS instance can serve as a Virtualization host - be it Hyper-V, VMware or Xen.</p>

<p>And I can certainly understand the logic behind it - using Virtualization we could get so much more mileage out of our instances and theoretically drop the AWS costs even further down (more on that logic later).</p>

<p><strong>The short answer to that question is: No.
It is not possible to run any kind of Virtualization software inside an AWS Instance.</strong></p>

<h2>A word about Virtualization, and it&#8217;s prerequisites</h2>

<p>Before we jump into the full answer, let&#8217;s first have a quick refresher on Virtualization, Emulation and the difference between them.</p>

<p><em>Virtualization</em> is about taking an existing system architecture (like an Intel-based server) and enabling multiple instances of operating systems to run on it simultaneously while &#8220;playing nice&#8221; with each other.</p>

<p><em>Emulation</em>, on the other hand, is taking an existing system architecture (like the aforementioned Intel-based server) and pretending that it is something completely different - like a Power processor running a Mac or a shiny new iPad.</p>

<p>The thing to keep in mind is that Virtualization doesn&#8217;t enable you to run on the given hardware anything which you couldn&#8217;t just run natively.
In a nutshell: <strong>Virtualization is about running more of the same whereas Emulation is about running something else</strong>.</p>

<p>For further reading, please see <a href="http://blog.1530technologies.com/2006/08/virtual-machines-virtualization-vs-emulation.html">Link</a>, <a href="http://www.computerworld.com/s/article/338993/Emulation_or_Virtualization_">Link</a>.</p>

<!-- more -->


<h2>Peering under the hood of an AWS Instance</h2>

<p>Modern Virtualization engines are hardware-assisted - meaning that they are relying on hardware support of the CPU (in the form of <a href="http://en.wikipedia.org/wiki/Instruction_set">Instruction Sets</a>) to do some of the heavy lifting associated to avoid slowing down the execution by performing the processing in software.</p>

<p>In Intel and AMD processors these Instruction Sets are called VT and AMD-V accordingly and unsurprisingly - are required by <a href="http://www.microsoft.com/hyper-v-server/en/us/system-requirements.aspx">Hyper-V</a> , VMware and Xen.</p>

<p>
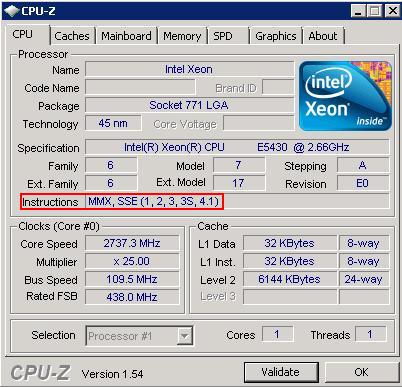
Armed with the knowledge of what to look for, Let&#8217;s review the available CPU Instruction Sets on a Windows Instance as displayed by the excellent tool CPU-Z:
<img src="http://cloudstacking.com/images/CPUID-sm2.jpg" alt="CPU-Z image" /></p>

<p>
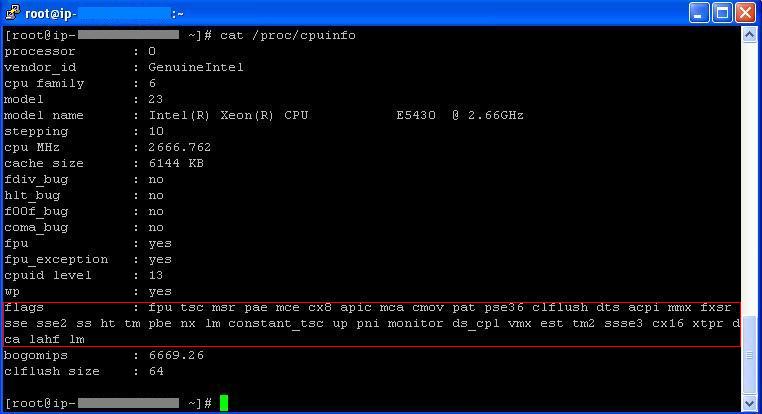
Likewise, Here are the CPU Instruction Sets in a Linux Instance:
<img src="http://cloudstacking.com/images/CPUINFO-cen.jpg" alt="CPUInfor image" /></p>

<h2>Conclusion</h2>

<p>As we&#8217;ve seen both in Windows and in Linux Instances, no Instruction Sets are available to the instance even though <a href="http://ark.intel.com/Product.aspx?id=33081&amp;code=Intel%C2%AE+Xeon%C2%AE+Processor+E5430+%2812M+Cache%2c+2.66+GHz%2c+1333+MHz+FSB%29">they are supported by the underlying processor (Intel E5430 in our case)</a>.</p>

<p>Although running a hypervisor inside another hypervisor (also known as <em>cascading</em>) <a href="http://www.petri.co.il/running-vmware-esx-and-esxi-in-workstation-on-your-desktop-pc.htm">is possible in different circumstances</a> and under strict limitations - I can certainly understand AWS for not allowing this feature due to security concerns (opening this kind of interaction between an Instance and the underlying Hypervisor can be dangerous) as well as operational (think about how adding another layer of IP multiplexing will effect the AWS network management).</p>

<p>Plus, from a service offering perspective: if customers want more machines they should just launch new ones and pay for them accordingly rather then stress their existing one to their limit and strain the AWS servers to the point of abuse.</p>

<p>Although we&#8217;ve established that Virtualization is generally not possible, Emulation is still a viable option (with all of it&#8217;s numerous drawbacks) - the only reason I can think of to run Emulation in AWS is to run applications that were written to non-Intel processors (such as Power).</p>

<p><a href="http://developer.amazonwebservices.com/connect/entry!default.jspa?categoryID=101&amp;externalID=592&amp;fromSearchPage=true">Here</a> is a guide on how to run QEMU in AWS.</p>

<h2>Final Thoughts</h2>

<p>I would like to ask why are we trying to enter the adventure of owning and operating Virtualization hypervisors (with all of the attached costs and labor) when we already have the ability to launch as many virtual machines as we want for &#8220;free&#8221; from AWS?</p>

<p>Sure, EC2 Instances cost money - but the <em>ability</em> to launch more and more machines is there right from the gate with no maintenance cost.</p>

<p>After all, having someone taking care of our server infrastructure (storage, servers, switches, hypervisors, etc.) for no up-front cost is the whole point of Cloud Computing? - turning down this &#8220;hypervisor outsourcing&#8221; may save a few cents, but pulls us back towards the business of operating our own server infrastructure and erodes the benefits we already receive from the Cloud.</p>
]]></content>
  </entry>
  
  <entry>
    <title type="html"><![CDATA[Using Puppet to configure new and existing servers in the Cloud]]></title>
    <link href="http://cloudstacking.com/posts/using-puppet-to-configure-new-and-existing-servers-in-the-cloud.html"/>
    <updated>2010-05-25T00:00:00-04:00</updated>
    <id>http://cloudstacking.com/posts/using-puppet-to-configure-new-and-existing-servers-in-the-cloud</id>
    <content type="html"><![CDATA[<h2>Introduction</h2>

<p>Cloud Computing grants us access to incredible amount of compute resources right at our fingertips - just hanging there, waiting to be tapped.
Nonetheless, it is often overlooked that while provisioning new servers is incredible easy the trick is to get them to do something actually <em>useful</em> (a virgin OS happily idling in the cloud only generates expenses - not business value or revenue).</p>

<p>In this post we&#8217;ll discuss the art and science of making the required configurations and customizations in order to bring our cloud-provisioned servers to a state where it is manifesting itself into business value.</p>

<!-- more -->


<h2>First, Let&#8217;s review our options</h2>

<p>Let&#8217;s start the discussion by outlining a simple scenario in which we set upon provisioning a new, fully-functioning web server in an existing environment.</p>

<p>To that end, we will typically need to perform the following steps:</p>

<ol>
<li>Install the web server on the base OS.</li>
<li>Install any required modules/frameworks (like Rails, .NET, mod-php etc.)</li>
<li>Import the web application itself, along with any required static content.</li>
<li>Import and configure any relevant server identifications such as hostname, public DNS name and X.509 certificates.</li>
<li>Configure the server to take it&#8217;s place in the application tiers by opening firewall ports, creating an ODBC connection to the database back-end and establish connection with relevant application servers.</li>
<li>Fire-up the server, insert it into the load-balancing scheme and validate it&#8217;s actually functioning properly.</li>
</ol>


<p>To fulfill these requirements, we could go down one of the following paths:</p>

<ol>
<li>Manually install and configure the required components (as done in many, if not most, IT shops do today).</li>
<li>Bundle all of the requirements into an Image (with physical servers this is often done via using <em>Symantec Ghost</em> or the equivalent) that our cloud provider will use to provision new machines.</li>
<li>Provision a vanilla OS image and as a part of it&#8217;s initialization fetch on-the-fly the desired components and perform the necessary customizations to bring it to production.</li>
</ol>


<h2>So which configuration method is best?</h2>

<p><em>Manually configuring</em> our servers is time consuming at best and error-prone at worse - making it by far the worse of the three.
The simple truth is that we humans are simply poor at performing repetitive tasks - and so much better off delegating it to the consistent and cheap computers we have at our disposal.</p>

<p><em>Imaging</em> is easy to set up (just manually customize once, and let the provider duplicate this configuration time and time again), but is limited in the sense that we need to create a separate Image for every different configuration - often resulting in a large number of nearly-identical images that all need to be manually maintained.</p>

<p>I strongly suggest implementing a <em>scripted installation</em> and configuration mechanism (we&#8217;ll discuss the actual implementation in just a bit) for software and components.
It may require more work up-front, but it offers ?such great benefits easily return that investment:</p>

<ol>
<li>First and foremost, unlike imaging: <em>We can apply the desired configurations to existing machines!</em>
A machine that has been around for a month is not <em>fundamentally</em> different than one that has been around for a minute as far as running scripts is concerned.</li>
<li>No need to create and maintain multiple images.
All of the customization is based on the same one baseline - think about having to patch and test only one baseline (also applies to configuration <em>removals</em>, such as uninstalling Apache Webserver).</li>
<li>Allows us to create new configurations literally on-the-spot (as they are made-to-order to begin with) - resulting in a much more dynamic and agile IT.</li>
<li>It is hardware agnostic (to a greater degree), so the same configuration could be reused on different types of virtual/physical machines.</li>
</ol>


<h2>Scripted configurations have been around for a while, why should we do things differently in the Cloud?</h2>

<p>First off, I strongly recommend scripted installations to manage all of your machines - be them physical, virtual or in the Cloud.</p>

<p>It&#8217;s the most efficient way to reign control on your IT infrastructure, and with some researches suggest that system configuration and installation tasks are consuming 60%-80% of IT departments&#8217; time (making it a very hard-hitting method of lowering operational costs).</p>

<p>True, we can insist on configuring Cloud machines the old-fashioned way (read: <em>the inefficient way</em>), but that won&#8217;t allow us to really leverage the elastic and dynamic nature of the Cloud infrastructure - resulting in nothing more than a glorified pay-by-the-hour hosting.</p>

<p><strong>Although in traditional environments we could get away with doing things inefficiently - the only way to fully leverage the rapidly provisioned Cloud resources and offer highly dynamic and scalable solutions is to rely heavily on a strong configuration and automation toolkit.</strong></p>

<h2>Puppet to the rescue</h2>

<h3>Puppet 101</h3>

<p>Puppet is an <a href="http://projects.puppetlabs.com/projects/puppet/">open source project</a>, backed by <a href="http://www.puppetlabs.com/">a commercial company</a> aimed at automatically configuring Linux (<a href="http://docs.puppetlabs.com/guides/platforms.html">and soon Windows!</a>) systems from a centralized location (providing all of the benefits I&#8217;ve mentioned in the previous section).</p>

<p>Puppet revolves around <em>resources</em> which represent various components of a system (such as a file or a process) and enables the administrator to define how does a particular resource be configured on a particular server (or group of similar servers such as <em>&#8220;all of the web servers&#8221;</em>.</p>

<p>For example, the following resource definition represents Apache webserver:</p>

<blockquote><p>service { &#8220;webserver&#8221;: <br>
<strong>require => Package[&#8220;httpd&#8221;],</strong> <br>
<strong>ensure => running,</strong> <br>
hasstatus => true, <br>
hasrestart => true, <br>
}</p></blockquote>

<p>The two lines highlighted in bold are the main piece of it: the first line ensures that the webserver package (&#8220;httpd&#8221; in RedHat or &#8220;apache2&#8221; in Debian) is installed on the system while the second line ensures that it is always running.</p>

<p>These various statements are handled by various <em>providers</em> - components of the system that provide configuration functionality such as the <em>package manager</em> and <em>service manager</em> in the above example.</p>

<p>We don&#8217;t dig any deeper into the implementation - but suffice to say that it leverages the existing distribution components, is completely configurable and allows for the addition of custom <em>providers</em> to further extend Puppet&#8217;s abilities.</p>

<h3>Deploying Puppet In The Cloud</h3>

<p>Puppet is a client/server framework with Puppet Agents running on every computer identifying themselves to an aptly named <em>Puppetmaster</em> server that centrally holds all of our configurations - for obvious reasons we&#8217;ll need to make Puppetmaster available to our Cloud machines.</p>

<p>Naturally, we probably don&#8217;t want all of our machines to have the same configuration - to this end I recommend using AWS&#8217;s user-data parameter when starting EC2 Instances to provide the name of the configuration we&#8217;d like Puppet to assign to this instance.</p>

<p>For example: if we want this instance to be a webserver then we could pass &#8220;webserver-ApplicationA&#8221; , or if we want a DB machine we could pass &#8220;mysql-ApplicationA&#8221; and have Puppet install and configure MySQL - <strong>The important benefit is that once the instance has been launched Puppet does all of the heavy lifting for us required to bring this Instance into full production use!</strong></p>

<p>For advanced users, I also recommend pairing Puppet with Subversion to enable rollback and auditing of configurations.</p>

<p>For EC2 users, there is also a freely available EC2 Puppet configuration recipe (enabling some nifty functionality such as having the instance map Elastic IP on boot) <a href="http://projects.puppetlabs.com/projects/puppet/wiki/Amazon_EC2_Recipe_Patterns">freely available at the Puppet website</a>.</p>

<h2>Conclusion</h2>

<p>The beauty of Cloud Computing is that we switch our focus from Servers to Services.
Obviously servers are still the building blocks of services, but instead of maintaining and configuring them one-by-one - we choose to couple Cloud computing with automation to alleviate the need to interact with individual machines and instead focus on the endgame: <em>Services</em>.</p>
]]></content>
  </entry>
  
  <entry>
    <title type="html"><![CDATA[Identifying EC2 Machine IP Ranges]]></title>
    <link href="http://cloudstacking.com/posts/identifying-ec2-machine-ip-ranges.html"/>
    <updated>2010-05-18T00:00:00-04:00</updated>
    <id>http://cloudstacking.com/posts/identifying-ec2-machine-ip-ranges</id>
    <content type="html"><![CDATA[<h2>Identifying EC2 Machine IP Ranges</h2>

<p>Now days, network-edge security is a well established practice - with firewalls providing IP based protection in every organization (and even in almost every home).</p>

<p>So it doesn&#8217;t surprise me that I get receive the following quite often from customers and peers: <strong>&#8220;What is the IP range of my EC2 machines?&#8221;</strong></p>

<!-- more -->


<h2>First, the origin of the question</h2>

<p>In an on-premise scenario, we usually know before-hand the IP range of the network we are attaching our machine to, and proceed therefrom to assign it an IP address either via DHCP or manually. (in the future, I&#8217;ll post why DHCP is so much better, even for servers).</p>

<p>In EC2, AWS provides us with an IP address via DHCP.
This mechanism works just fine - but doesn&#8217;t tell us what is the IP range of our machines (which could come in handy in case we are looking to group them together under the same firewall rule).</p>

<p>Also, in the AWS console, we can set firewall rules based on Security Group, but not with AWS as a whole.</p>

<h2>The answer: AWS is multi-tenant, so you don&#8217;t get a private IP range - next best thing is to the entire EC2 IP range.</h2>

<p>AWS really managed to hide this information <a href="http://developer.amazonwebservices.com/connect/ann.jspa?annID=676">in their discussion board</a>, but here it is (subject to future change), ordered by Region:</p>

<table border="1">
<tr align="center">
<td>
US East (N.Virginia)
<td>
US West (N.California)  
<td>
EU (Ireland)    
<td>
Asia Pacific (Singapore)
</tr>
<tr align="center">
<td>
<b>216.182.224.0/20</b><br>
(216.182.224.0 - 216.182.239.255)<br><br>

<b>72.44.32.0/19</b><br>
(72.44.32.0 - 72.44.63.255) <br><br>

<b>67.202.0.0/18</b><br>
(67.202.0.0 - 67.202.63.255) <br><br>

<b>75.101.128.0/17</b><br>
(75.101.128.0 - 75.101.255.255) <br><br>

<b>174.129.0.0/16</b><br>
(174.129.0.0 - 174.129.255.255) <br><br>

<b>204.236.192.0/18</b><br>
(204.236.192.0 - 204.236.255.255) <br><br>

<b>184.73.0.0/16</b><br>
(184.73.0.0 - 184.73.255.255) <br><br>

<b>184.72.128.0/17</b><br>
184.72.128.0 - 184.72.255.255) <br><br>
<td>
<b>204.236.128.0/18</b><br>
(216.236.128.0 - 216.236.191.255)<br><br>

<b>184.72.0.0/18</b><br>
(184.72.0.0 - 184.72.63.255)
<td>
<b>79.125.0.0/17</b><br>
(79.125.0.0 - 79.125.127.255)
<td>
<b>175.41.128.0/18</b><br>
(175.41.128.0 - 175.41.191.255)
</table>


<h2>A final word of caution</h2>

<p>Filtering network traffic by IP is a great first-line of defense, but by no means should it by your only!</p>

<p>Not only could an attack originate from the above EC2 IP range, and thus falsely &#8220;validated&#8221; by your firewall rule - even when properly configured it <a href="(http://en.wikipedia.org/wiki/Kevin_Mitnick">was already easily circumvented in the past</a> (and the knowledge is already out there on how to do it again, and again).</p>

<p>In order to further control the initialization of network traffic, I strongly advise you to use <a href="http://www.symantec.com/connect/articles/introduction-openssl-part-three-pki-public-key-infrastructure">SSL coupled with PKI</a> or consider limiting yourself to <a href="http://aws.amazon.com/vpc/">VPN</a> traffic.</p>
]]></content>
  </entry>
  
  <entry>
    <title type="html"><![CDATA[S3 URL Expiration]]></title>
    <link href="http://cloudstacking.com/posts/s3-url-expiration.html"/>
    <updated>2010-05-15T00:00:00-04:00</updated>
    <id>http://cloudstacking.com/posts/s3-url-expiration</id>
    <content type="html"><![CDATA[<h2>S3 URL sharing: simply available</h2>

<p>As <a href="http://aws.amazon.com/s3/">S3</a> is a web-based file share, rather than a locally attached block device such as a SCSI disk or thumb drive.
Because it is (only) accessible via HTTP, we can choose to <a href="http://www.codinghorror.com/blog/archives/000808.html">direct web clients directly to it, instead of serving it from our web server</a>, thereby offloading the load from the web servers and enjoying the built-in redundancy of S3.</p>

<p>The beauty of it is that it requires absolutely no change from either the web server or the client browser - just be sure to generate your HTML code with absolute paths to the relevant files in S3 and we are good to go:</p>

<blockquote><pre><code>&lt;img src="http://s3.amazonaws.com/MyBucket/MyPicture.jpeg"/&gt;
</code></pre></blockquote>

<h2>Simple has its own limitations</h2>

<p>The classic use-case for this feature is where we have a public website serving equally public multimedia content (such as pictures) for anonymous internet clients.</p>

<p>But what happens when we want to implement access-control and authenticate users in our application before we allow them direct access to the content stored on S3?</p>

<p>The bad news is that S3 supports setting <a href="http://docs.amazonwebservices.com/AmazonS3/latest/index.html?S3_ACLs.html">file permission ACLs</a>, but it only works with Amazon user accounts (the same ones used for AWS and the Amazon bookstore) - which isn&#8217;t really practical to control from inside our application and doesn&#8217;t integrate with any existing user database.</p>

<p>The solution is to use an S3 feature called URL Expiration.</p>

<!-- more -->


<h2>URL Expiration to the rescue</h2>

<p>S3 allows us to generate a unique URL alias to individual files on S3.
This URL can be set to automatically expire, say, after one minute from it&#8217;s generation.</p>

<p>And now if we mix together all of the ingredients: it is entirely possible to have a web application that authenticates a user for access to this particular image, an at that point generate a unique URL for that user, set to auto expire one hour later (just like the user session timeout in our web application) with the confidence that we are blocking out unauthenticated users as well as tightly controlling the distribution of these URL (as they auto-expire, users are forced to re-authenticate in order to access the same resources).</p>

<h2>Not bulletproof, but pretty close</h2>

<p>Some purists will point out that the generated unique URL does open a window of opportunity for a would-be attacker to brute-force his way into that resource, or for the legitimate user to pass-on the URL to a third party.</p>

<p>While these are valid concerns, the reality is that due to the very short lifespan of each URL makes brute-forcing statistically impossible, and as for passing along or intercepting/hijacking the URL from the user - this exposure is no greater than the widely used existing practice of using an <a href="http://en.wikipedia.org/wiki/Session_%28computer_science%29#HTTP_session_token">HTTP session token</a>.</p>

<h2>Conclusion</h2>

<p>Although S3 URL Expiration doesn&#8217;t bring any new functionality to the table, compared to the existing method of just serving the files directly from the web server - it still holds much value in reducing cost and administrative overhead while greatly improving the scalability and reliability of our generic HTTP application.</p>
]]></content>
  </entry>
  
  <entry>
    <title type="html"><![CDATA[Amazon SQS Gotchas]]></title>
    <link href="http://cloudstacking.com/posts/amazon-sqs-gotchas.html"/>
    <updated>2010-04-22T00:00:00-04:00</updated>
    <id>http://cloudstacking.com/posts/amazon-sqs-gotchas</id>
    <content type="html"><![CDATA[<h2>There&#8217;s nothing wrong with SQS, but nobody&#8217;s perfect either.</h2>

<p>In a previous post, I&#8217;ve covered the basics of Message Queuing, and Amazon&#8217;s implementation of it: <a href="http://aws.amazon.com/sqs/">SQS (Simple Queue Service)</a>.</p>

<p>Amazon has built SQS with three leading principles in mind: <em>Simplicity, Scalability</em> and <em>Redundancy</em>.</p>

<p>In order to achieve exactly that (and achieve they have), some concessions and unorthodox design decisions, creating a few gotchas that we need to keep in mind when working with SQS.</p>

<h2>Some technical background before we dive in</h2>

<p>In order to provide the so-called <em>unlimited</em> scalability for a given Queue (represented by the <em>unlimited</em> number of messages that could be placed in it) - the operation of the Queue service divided between a number of servers</p>

<p>This is done by grouping messages in the Queue <em>Blocks</em> composed of a certain number of messages which are dispersed, with each Block handled by a separate server.</p>

<p>This Note that in order to also achieve <em>Redundancy</em>, a given <em>Block</em> is actually duplicated to multiple servers in multiple AWS Availability Zones so that no single server failure will result in a loss of messages.</p>

<p>Anyone who has ever tried scaling software on a massive scale (and massive is really the word that comes into mind when thinking of AWS) knows that the #1 challenge and as such the bane of scalability is synchronization.</p>

<p>Having multiple servers/services/applications/pieces trying to coordinate and synchronize their actions by definition involves one component spending part of its time waiting for another (the more components, the greater the wait to work ratio) - and down goes the utilization.</p>

<p>That&#8217;s why AWS has bent some rules and made concessions as far as synchronization goes in order to enable the massive scalability of their offerings - SQS included (for example: you can have <em>unlimited</em> number of messages in a single SQS Queue).</p>

<p>But these amazing qualities come at a price - and below I will describe what exactly that price may be and how we can live with it.</p>

<!-- more -->


<h3>At least one delivery</h3>

<p>Every Message inserted in the queue is duplicated to multiple servers to ensure redundancy.
Let&#8217;s envision a scenario where a server holding a given messages fails, and before the server returned to normal operation a duplicate of the message was successfully received from an alternate server.</p>

<p>In a strictly synchronized environment, the returning server would identify that the message it holds has actually already been delivered and should now be deleted for consistency with the remainder of the servers operating the logical Queue.</p>

<p>However, as previously mentioned, SQS does not offer strict synchronization and thus the above scenario is likely to result in a re-delivery of the same duplicate message - hence the term <em>&#8220;At lest one delivery&#8221;</em>.</p>

<p>Usually this event is not overly problematic (especially as it very rarely occurs) - it&#8217;s just a possibility that needs to be considered and either properly handled by the logic of the receiving application (either by knowing there&#8217;s no harm in a duplicate receive or by placing an applicative fail-safe).</p>

<h3>Check, recheck and check again</h3>

<p>We&#8217;ve already established that a Queue is dispersed across multiple servers, so whenever a client performs an action against a Queue - the SQS mechanism redirects him to one of the actual servers operating the Queue.</p>

<p>Again, using simplicity as the enabler for scalability - this SQS load-balancing algorithm does not guarantee that a client request will be redirected to a server that actually contains messages.
It is entirely possible to be redirected to one empty server and getting a response of &#8220;no messages in Queue&#8221; while there are still messages in the Queue that are simply residing on a different server than the one which the client was just redirected to.</p>

<p>The easy (and only) fix to this behavior is to simply have the client re-check again and again the Queue, even if it reports it is empty - this way we ensure that the numerous queries will be load balanced across all of the servers operating the Queue and will eventually get to the waiting messages regardless of their current host server.</p>

<h3>Not FIFO</h3>

<p>Revisiting the SQS Block architecture and the imperfect load balancing algorithem fronting it - we run into another potential pitfall: contrary to their namesake SQS Queues are not <a href="http://en.wikipedia.org/wiki/FIFO">FIFO (First-In-First-Out)</a>.</p>

<p>It is entirely possible (and even quite common) that the AWS scalability mechanism which does the redirection of messages to servers to redirect subsequent messages which we will label as <em>Message A</em> and <em>Message B</em> to two separate physical servers (which we will also label as <em>Server A</em> and <em>Server B</em>).</p>

<p>Continuing our scenario, that same load balancing and scalability mechanism may redirect a client to receive messages first from Server B and then from Server A - resulting in the delivery of the messages in scrambled order.</p>

<p><strong>In plain english: there&#8217;s no gurantee that messages will be delivered in the same order in which they were sent - if that&#8217;s a problem then SQS is not a viable platform and other MQ platforms should be considered instead!</strong></p>

<h3>8K Message Size Limit</h3>

<p>A single message in SQS is limited to <strong>8K</strong> in size - plain and simple.</p>

<p>If there is a requirement to transfer more than that to the recipient we can do one of the two:</p>

<ol>
<li>Place the data that would otherwise have been sent as a message as a single file in some staging area (S3 is a great choice to this end) and just send the URL to the recipient (and still retain the actual benefits of properly dispersing the <em>responsibility</em> to process these files among the recipients).</li>
<li>Simply use a different Message Queueing mechanism (I&#8217;ve briefly discussed these in a previous article).</li>
</ol>


<h3>4 Days Message Retention</h3>

<p>Actually, this one is actually a feature - most MQ administrators would kill to have a SLA <em>guarantee</em> that unread messages will be retained in the Queue for 4 days before purged.</p>

<p>Keep in mind that the proper usage of SQS is as a pipeline, not an archive, and that under normal circumstances messages should never be left unread for so long (no queuing of messages in the beginning of the month pending end-of-month processing).</p>

<h2>Conclusion</h2>

<p>SQS is everything we&#8217;d expect it to be - being a product of AWS that has the word <em>Simple</em> in it&#8217;s name.</p>

<p>It&#8217;s readily available, simple to use, scalable and incredibly cheap (a bargain at $0.000001 per API call plus regular data charges which are waived if made from EC2 instances).</p>

<p>As discussed in a previous article, using Message Queuing is usually a good idea.
This is even more so when designing elastic systems and to that end SQS usually does the job well - just remember to steer away from potential pitfalls and everything will work like clockwork.</p>
]]></content>
  </entry>
  
  <entry>
    <title type="html"><![CDATA[Introduction to Amazon Simple Queue Service (SQS)]]></title>
    <link href="http://cloudstacking.com/posts/introduction-to-amazon-simple-queue-service-sqs.html"/>
    <updated>2010-03-31T00:00:00-04:00</updated>
    <id>http://cloudstacking.com/posts/introduction-to-amazon-simple-queue-service-sqs</id>
    <content type="html"><![CDATA[<h2>Introduction to Amazon Simple Queue Service (SQS)</h2>

<p>The beauty of electronic mail (or plain old snail mail for that matter) is that as the sender, you didn&#8217;t need to bother yourself with the the details of how your message reaches it&#8217;s destination.
After composing the message, all you need to do is just to hand it off to your trusted mailman who&#8217;s entire job is to handle the logistics and challenges of mail delivery for you.</p>

<p>This mechanism offers such level of abstraction, that you as a sender are not only not responsible for the actual delivery of the message - you don&#8217;t even need (or want) to know how it got to it&#8217;s destination (by plane, by truck, by carriage etc.).</p>

<p>Message Queuing (MQ) takes this same concept of relieving the sender from the responsibility of actually delivering the message to it&#8217;s destination by offloading it to a dedicated component that specializes in doing exactly that - reliably delivering messages to their destination.
It is also the technological cornerstone of SOA (<a href="http://en.wikipedia.org/wiki/Service-oriented_architecture">Service Oriented Architecture</a>), but that&#8217;s a story for another post.</p>

<h2>My applications already communicate just fine, what&#8217;s in it for me?</h2>

<p>TCP/IP Sockets are natively available in every programming language, and using them in applications is both common practice and common knowledge.</p>

<p>With both the technology and the know-how already in place - it is so very tempting to just use it.
After all, why bother to invest in bring something new into the mix (together with the associated overhead of skills and other costs) when we already have a viable way of doing business &#8220;for free&#8221;?</p>

<p>But, just like many other things in life - &#8220;free&#8221; often times comes with a hidden price tag:</p>

<ul>
<li>It places the burden of validating successful delivery (network-wise as well as logically in an application-specific manner) on the sending applications base code, requiring greater programmatic effort to successfully implement the program as a whole.</li>
<li>More code = more bugs. Plain and simple. <br> That&#8217;s not to say that an &#8220;off the shelf&#8221; middleware is bug-free, but leveraging existing and proven technologies is always safer and easier than writing and maintaining custom code produced in-house, period.</li>
<li>Sockets are opened between two computers: meaning that transferring a message to multiple recipients requires additional coding effort and more importantly - requires the sender to know where to send the message - a requirement that doesn&#8217;t always co-exists well with the dynamic nature of Cloud Computing.</li>
<li>Sockets are immediate - meaning that in order to pass on a given message the recipient must be ready and willing to receive it right now.<br>
If the recipient suddenly goes offline or simply unable to immediately process the messages (like an electronic trading system outside trade hours) it is the responsibility of the application to take necessary actions such as buffering the messages until the right time to process them.</li>
</ul>


<p>Message Queuing is designed to address all of the above and much more - it is a proven concept widely used in the <a href="http://blogs.computerworld.com/14637/linux_powers_worlds_fastest_stock_exchange">most demanding environments</a> and enjoys numerous implementations such as the stand-alone <a href="http://www-01.ibm.com/software/integration/wmq/">IBM Websphere MQ</a>, <a href="http://www.microsoft.com/windowsserver2003/technologies/msmq/default.mspx">Microsoft Message Queuing (MSMQ)</a> which is bundled with Windows Server, as well as open source implementations like <a href="http://activemq.apache.org/">Apache Active MQ</a>.</p>

<h2>So how does it work?</h2>

<p>Message Queuing revolves around the concept of Queue: a logical FIFO list of messages that share the same logical destination (such as incoming messages from clients to application X, or outgoing messages from application X to application Y).
In essence, the Queue&#8217;s logical function as a pipeline, enabling messages (read <em>information</em>) to freely and easily flow from one application to another.</p>

<p>Note that a Queue doesn&#8217;t explicitly specify servers, as it is a detached and independent entity from any single server - more on that in just a bit.</p>

<p>All we need to do from our application(s) is to invoke the Queue&#8217;s <em>&#8220;send&#8221;</em> method in the sending application (called <em>&#8220;Producer Application&#8221;</em> in SOA terminology) and similarly invoke the <em>&#8220;Receive&#8221;</em> method in the receiving application (again, in SOA terminology this application will be called <em>&#8220;Consumer Application&#8221;</em>) - and that&#8217;s literally all there is to it (application-wise).</p>

<p><img src="http://cloudstacking.com/images/Msmq.jpg" alt="Message Queuing Diagram" /></p>

<p>This two-step process in which one application&#8217;s send followed by other application&#8217;s receive has two very important properties:</p>

<ul>
<li>It is <strong>asynchronous</strong>: meaning that any period of time can pass between the send and the receive - in which time the message will exist inside of the queue, waiting for delivery.<br>
This is a very convenient and &#8220;free&#8221; way of implementing resiliency into our applications as messages aren&#8217;t lost when the receiver is down, only queued until the receiver finally does return to normal operation (think of messages in your mailbox while you are away for vacation or sick-leave).</li>
<li>It is also <strong>loosely coupled</strong>: meaning that the sender does have to be specifically address the messages to any particular recipient - instead they could be independently fetched by the receiver, or load balanced across multiple receivers (think of call-centers, where your call is placed in a queue and will be answered by the first representative who becomes available).</li>
</ul>


<p>Together, these two properties are well tailored to Cloud-Computing environments where there is a constantly shifting number of senders and receivers that using this method don&#8217;t need to actually know of each other - rather they just pivot around this one central Queue who handles both the load balancing and fault tolerance.</p>

<h2>So how does AWS do Message Queuing?</h2>

<p>Similarly to S3, SQS is an independent HTTP-based service happily living in the AWS cloud, not attached to any instance in particular.</p>

<p>True to it&#8217;s name SQS is very simple to set-up and use (at the expense of being feature-poor compared to other MQ implementations), and can be configured and used by any Internet connected computer (inside and outside of EC2).</p>

<p>Below is a working example, taken from the <a href="http://docs.amazonwebservices.com/AWSSimpleQueueService/latest/APIReference/">SQS API Reference</a> for sending a message to a Queue via invoking the following HTTP URL:</p>

<blockquote><p><strong>http://queue.amazonaws.com/123456789012/testQueue/</strong> <br>
?<strong>Action=SendMessage</strong> <br>
&amp;<strong>MessageBody=This+is+a+test+message</strong> <br>
&amp;Version=2009-02-01 <br>
&amp;SignatureMethod=HmacSHA256 <br>
&amp;Expires=2009-04-18T22%3A52%3A43PST <br>
&amp;AWSAccessKeyId=0GS7553JW74RRM612K02EXAMPLE <br>
&amp;SignatureVersion=2 <br>
&amp;Signature=Dqlp3Sd6ljTUA9Uf6SGtEExwUQEXAMPLE <br></p></blockquote>

<p>Similarly, in order to receive my message from from my queue will invoke the following HTTP URL:</p>

<blockquote><p><strong>http://queue.amazonaws.com/123456789012/testQueue/</strong> <br>
<strong>?Action=ReceiveMessage</strong> <br>
&amp;MaxNumberOfMessages=5 <br>
&amp;VisibilityTimeout=15 <br>
&amp;AttributeName=All; <br>
&amp;Version=2009-02-01 <br>
&amp;SignatureMethod=HmacSHA256 <br>
&amp;Expires=2009-04-18T22%3A52%3A43PST <br>
&amp;AWSAccessKeyId=0GS7553JW74RRM612K02EXAMPLE <br>
&amp;SignatureVersion=2 <br>
&amp;Signature=Dqlp3Sd6ljTUA9Uf6SGtEExwUQEXAMPLE</p></blockquote>

<p>And that&#8217;s all there is to it, no servers needed to support the Queue and no dedicated client needed needed to tap into it.</p>

<p>Simple.</p>

<h2>Conclusion and Further Reading.</h2>

<p>Message Queuing is a proven technological concept that is heavily leveraged both independently and as the foundation of larger concepts (such as SOA, or J2EE) to great success.
Oftentimes, Message Queuing is the perfect bridge in the gap between the need to keep applications simple (read: <em>&#8220;Single Minded&#8221;</em>) and yet sophisticated enough to keep track of what&#8217;s going on in highly dynamic Cloud-Computing environments.</p>

<p>Stay tuned, in future posts we will drill down the pros, and cons, of SQS.</p>
]]></content>
  </entry>
  
  <entry>
    <title type="html"><![CDATA[Configuring Explorer's Sendto shortcut to ThinApped Outlook]]></title>
    <link href="http://cloudstacking.com/posts/configuring-explorers-sendto-shortcut-to-thinapped-outlook.html"/>
    <updated>2010-02-07T00:00:00-05:00</updated>
    <id>http://cloudstacking.com/posts/configuring-explorers-sendto-shortcut-to-thinapped-outlook</id>
    <content type="html"><![CDATA[<h2>Introduction</h2>

<p>As the goal of Application Virtualization is to decouple the application from the underlying Operating System, we often find ourselves lacking this lost integration in unexpected places.
One issue I frequently face with customers is how to configure Windows Explorer&#8217;s Sendto shortcut (the one available when you right-click on a file) to actually work with a ThinApped copy of Microsoft Outlook.</p>

<h2>To thinreg or not to thinreg?</h2>

<p>ThinApp&#8217;s method of integrating itself into the OS is via a tool called thinreg.exe - but before we discuss why isn&#8217;t it suitable for this particular task we need to understand what it does do:
When we create a ThinApp package, we are essentially creating a self-contained application &#8220;bubble&#8221; which can have any number of &#8220;Entry Points&#8221; - these Entry Points usually represent the individual sub-components of the application that we want to expose to the user (and as they share the same bubble, they share files, registry and configuration with each other).</p>

<p>In the case of Microsoft Office, we typically want to create an Entry Point for each of the suite&#8217;s programs such as: Word, Outlook, Excel and Powerpoint - and the configuration of the Entry Points is captured by the ThinApp composer and placed into the package.ini file.</p>

<p>Let&#8217;s go over the output of the outlook.exe entry point as captured in a default Office installation, with the sections that interest us <strong>bolded</strong>:</p>

<blockquote><p>[Microsoft Office Outlook 2007.exe] <br>
Source=%ProgramFilesDir%\Microsoft Office\Office12\OUTLOOK.EXE <br>
Shortcut=Microsoft Office Enterprise 2007.dat <br>
Icon=%SystemRoot%\Installer{90120000-0030-0000-0000-0000000FF1CE}\outicon.exe <br>
FileTypes=.hol.ibc.ics.msg.oft.vcf.vcs <br>
Protocols=feed;feeds;mailto;Outlook.URL.feed;Outlook.URL.mailto;Outlook.URL.stssync;Outlook.URL.webcal;outlookfeed;outlookfeeds;stssync;webcal;webcals
ObjectTypes=DOCSITE.DocSiteControl.1;MailMsgAtt;Outlook.Application;Outlook.Application.12;Outlook.FileAttach;Outlook.MsgAttach;Outlook.OlkBusinessCardControl;Outlook.OlkBusinessCardControl.1;Outlook.OlkCategoryStrip;Outlook.OlkCategoryStrip.1;Outlook.OlkCheckBox;Outlook.OlkCheckBox.1;Outlook.OlkComboBox;Outlook.OlkComboBox.1;Outlook.OlkCommandButton;Outlook.OlkCommandButton.1;Outlook.OlkContactPhoto;Outlook.OlkContactPhoto.1;Outlook.OlkDateControl;Outlook.OlkDateControl.1;Outlook.OlkFrameHeader;Outlook.OlkFrameHeader.1;Outlook.OlkInfoBar;Outlook.OlkInfoBar.1;Outlook.OlkLabel;Outlook.OlkLabel.1;Outlook.OlkListBox;Outlook.OlkListBox.1;Outlook.OlkOptionButton;Outlook.OlkOptionButton.1;Outlook.OlkPageControl;Outlook.OlkPageControl.1;Outlook.OlkSenderPhoto;Outlook.OlkSenderPhoto.1;Outlook.OlkTextBox;Outlook.OlkTextBox.1;Outlook.OlkTimeControl;Outlook.OlkTimeControl.1;Outlook.OlkTimeZone;Outlook.OlkTimeZone.1;RECIP.RecipCtl.1 <br>
Shortcuts=%Programs%\Microsoft Office</p></blockquote>

<p>These parameters interest us because they define the specifics of how to register with the underlying physical OS. <br>
<a href="http://pubs.vmware.com/thinapp4/help/pkg_FileTypes.html#1036375">&#8220;FileTypes&#8221;</a> indicates what file suffixes will be associated with this Entry Point. <br>
<a href="http://pubs.vmware.com/thinapp4/help/pkg_Protocols.html#1036710">&#8220;Protocols&#8221;</a> is the association with Internet Explorer URL path suffixes (using http and https has become such a second nature to us, that we tend to forget that we can also browse to other types of addresses such using the same Explorer such as ftp). <br>
<a href="http://pubs.vmware.com/thinapp4/help/pkg_ObjectTypes.html#1048349">&#8220;ObjectTypes&#8221;</a> registers COM objects from ThinApp in the underlying COM Provider. <br>
<a href="http://pubs.vmware.com/thinapp4/help/pkg_Shortcuts.html#1028261">&#8220;Shortcuts&#8221;</a> is the list of the locations in which to place a shortcut to start the Entry Point (such as the user&#8217;s Desktop and Programs).</p>

<h2>So far so good, but what about the Sendto?</h2>

<p>As we&#8217;ve learned in the previous section, the functionality to enable Sendto context menu simply doesn&#8217;t exist in thinreg - but hope is not lost!
We can still manually (or via script) configure the host&#8217;s &#8220;Send to mail recipient&#8221; short cut so that instead of trying to locate a physical installation of a mail client - it will immediately launch our ThinApped Outlook instead.</p>

<p>First, we will need to locate and delete the existing Sendto link (aptly named &#8220;mail recipient.MAPIMail&#8221;), located under %userprofile%\sendto and create a new shortcut to the path shortcut invoking the following command:</p>

<h3>Outlook 2007:</h3>

<blockquote><p>&#8220;C:\Path to ThinApp\Outlook.exe&#8221; /c ipm.note /a</p></blockquote>

<h3>Outlook 2003:</h3>

<blockquote><p>&#8220;C:\Path to ThinApp\Outlook.exe&#8221; /c ipm.note</p></blockquote>

<h2>Enough talking - just hand over the answer!</h2>

<p>For the sake of practicality, below is a <strong>VBScript</strong> which will replace the original &#8220;mail recipient&#8221; with one invoking your ThinApped Outlook.
Just copy the text and <strong>paste it into a .vbs</strong> file and execute the script in the user&#8217;s behalf via <strong>logon script</strong>.</p>

<figure class='code'><div class="highlight"><table><tr><td class="gutter"><pre class="line-numbers"><span class='line-number'>1</span>
<span class='line-number'>2</span>
<span class='line-number'>3</span>
<span class='line-number'>4</span>
<span class='line-number'>5</span>
<span class='line-number'>6</span>
<span class='line-number'>7</span>
<span class='line-number'>8</span>
<span class='line-number'>9</span>
<span class='line-number'>10</span>
<span class='line-number'>11</span>
<span class='line-number'>12</span>
<span class='line-number'>13</span>
<span class='line-number'>14</span>
<span class='line-number'>15</span>
<span class='line-number'>16</span>
<span class='line-number'>17</span>
<span class='line-number'>18</span>
<span class='line-number'>19</span>
<span class='line-number'>20</span>
<span class='line-number'>21</span>
<span class='line-number'>22</span>
<span class='line-number'>23</span>
<span class='line-number'>24</span>
<span class='line-number'>25</span>
<span class='line-number'>26</span>
<span class='line-number'>27</span>
</pre></td><td class='code'><pre><code class=''><span class='line'>' First, we set the path for the ThinApped Outlook
</span><span class='line'>OutlookPath = "C:\ThinApp\Outlook 2007.exe /c ipm.note /a"
</span><span class='line'>
</span><span class='line'>' Don't forget to use these arguments for Outlook 2003
</span><span class='line'>'set OutlookPath = "C:\ThinApp\Outlook 2003.exe /c ipm.note"
</span><span class='line'>
</span><span class='line'>' Initialize the necessary objects
</span><span class='line'>set WshShell = WScript.CreateObject("WScript.Shell")
</span><span class='line'>Set objEnv = WshShell.Environment("Process")
</span><span class='line'>SendTo = objEnv("userprofile") & "\sendto"
</span><span class='line'>
</span><span class='line'>' Delete the original "mail recipient" as well as any previous "mail recipient" created by a previous run of this script
</span><span class='line'>Set filesys = CreateObject("Scripting.FileSystemObject")
</span><span class='line'>If filesys.FileExists(SendTo & "\Mail Recipient.MAPIMail") Then
</span><span class='line'> filesys.DeleteFile SendTo & "\Mail Recipient.MAPIMail"
</span><span class='line'>End If 
</span><span class='line'>
</span><span class='line'>If filesys.FileExists(SendTo & "\Mail Recipient.lnk") Then &lt;br>
</span><span class='line'> filesys.DeleteFile SendTo & "\Mail Recipient.lnk" &lt;br>
</span><span class='line'>End If 
</span><span class='line'>
</span><span class='line'>set oShortCutLink = WshShell.CreateShortcut(SendTo & "\Mail Recipient.lnk")
</span><span class='line'>oShortCutLink.TargetPath = OutlookPath
</span><span class='line'>oShortCutLink.WindowStyle = 1
</span><span class='line'>oShortCutLink.Hotkey = "CTRL+SHIFT+N"
</span><span class='line'>oShortCutLink.Description = "Send mail via ThinApped Outlook"
</span><span class='line'>oShortCutLink.Save</span></code></pre></td></tr></table></div></figure>

]]></content>
  </entry>
  
</feed>
