<?xml version="1.0" encoding="utf-8"?>
<feed xmlns="http://www.w3.org/2005/Atom">

  <title><![CDATA[Da Fish in Sea]]></title>
  <link href="http://www.dafishinsea.com/blog/atom.xml" rel="self"/>
  <link href="http://www.dafishinsea.com/blog/"/>
  <updated>2013-10-18T23:32:32-04:00</updated>
  <id>http://www.dafishinsea.com/blog/</id>
  <author>
    <name><![CDATA[David Wilhelm]]></name>
    
  </author>
  <generator uri="http://octopress.org/">Octopress</generator>

  
  <entry>
    <title type="html"><![CDATA[JavaScript Context Coloring for Vim]]></title>
    <link href="http://www.dafishinsea.com/blog/2013/10/17/javascript-context-coloring-for-vim/"/>
    <updated>2013-10-17T21:34:00-04:00</updated>
    <id>http://www.dafishinsea.com/blog/2013/10/17/javascript-context-coloring-for-vim</id>
    <content type="html"><![CDATA[<h3>What is Context Coloring?</h3>

<p>
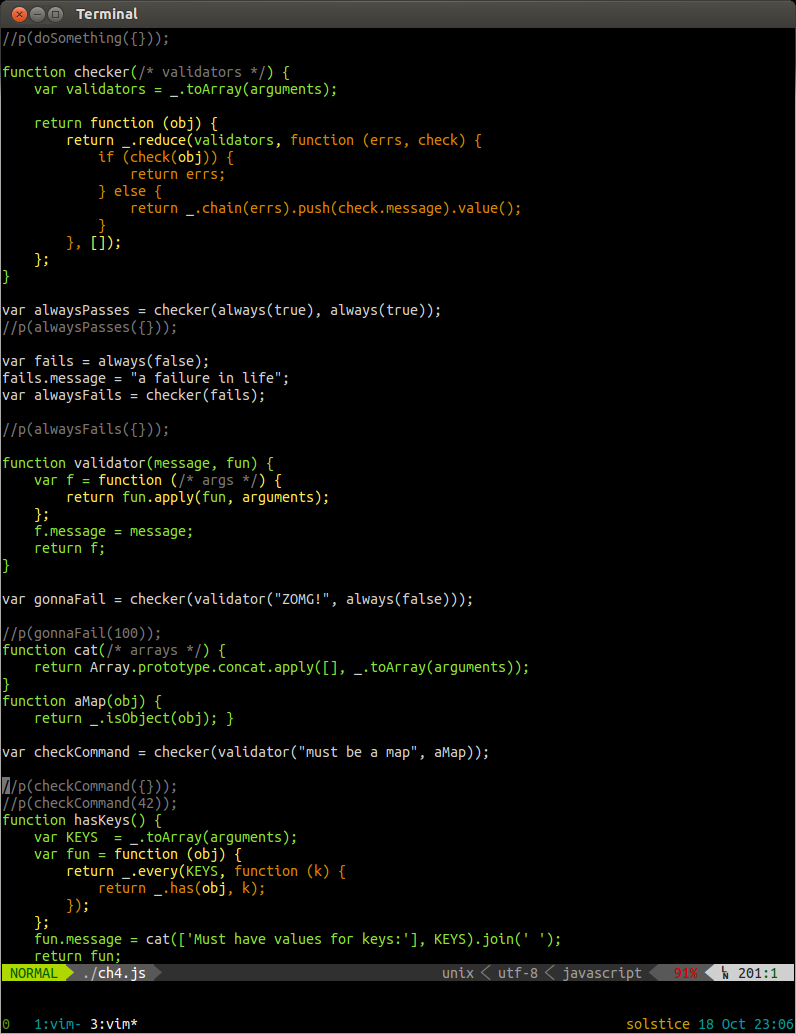
I made a plugin for the Vim text editor to highlight JavaScript code
according to its scope. This was inspired by an idea by Douglas
Crockford in his
<a href="http://www.youtube.com/watch?v=dkZFtimgAcM">presentation</a> at YUIConf
2012.  See from around the 16 minute mark onwards. I can&#8217;t really
claim to understand monads &#8211; apparently the curse is still in effect! &#8211;
but this idea for highlighting functions in JS struck me as a really
good idea, and something that I could do in Vim. Well, I finally got
around to doing it. This is what it looks like in action:</p>

<p><img src="http://dafishinsea.com/blog/images/ContextColoring.png" alt="JS Context Coloring" /></p>

<p>Notice how functions defined inside other functions are progressively
colored differently, making their scope clear. Also, closure variables
are colored according to scope they were defined in. I find that this can
 help make such code easier to read and understand. It is particularly
helpful when writing/reading code in a &#8216;functional&#8217; style. The example
code here is from a book I&#8217;m reading: <a href="http://shop.oreilly.com/product/0636920028857.do">Functional JavaScript</a>
by Michael Fogus.</p>

<h3>Other Editors/Implementations</h3>

<p>See this <a href="https://plus.google.com/113127438179392830442/posts/XjR4WmSDFAV">discussion on Google Plus</a>
for information on other implementations for other editors.</p>

<h3>Installation</h3>

<p>Check the README on the <a href="https://github.com/bigfish/vim-js-context-coloring">Github page</a></p>
]]></content>
  </entry>
  
  <entry>
    <title type="html"><![CDATA[Encapsulation in JavaScript]]></title>
    <link href="http://www.dafishinsea.com/blog/2012/02/23/encapsulation-in-javascript/"/>
    <updated>2012-02-23T19:58:00-05:00</updated>
    <id>http://www.dafishinsea.com/blog/2012/02/23/encapsulation-in-javascript</id>
    <content type="html"><![CDATA[<h3>Background</h3>

<p>One of the common misunderstandings about JavaScript is that it does not provide encapsulation,
 and therefore is not fully capable of Object Oriented Programming.
While EcmaScript 3 does not have syntax to specify which members of an
object are private or read-only, this is addressed in EcmaScript 5, with
the <a href="http://ejohn.org/blog/ecmascript-5-objects-and-properties/">new Object API</a>.
 However even without the new syntax, it is perfectly possible to achieve encapsulation in
JavaScript objects.</p>

<p>The key is understanding how scope works in JavaScript. The main thing
to keep in mind is that JavaScript is function scoped: variables are
visible anywhere within a function, including within functions which are
defined within that function. This is the property of &#8216;closure&#8217;.</p>

<p>The other important thing to understand is that JavaScript does not have
Classes, but rather constructor functions. So when you say,</p>

<figure class='code'><figcaption><span></span></figcaption><div class="highlight"><table><tr><td class="gutter"><pre class="line-numbers"><span class='line-number'>1</span>
</pre></td><td class='code'><pre><code class='javascript'><span class='line'><span class="kd">var</span> <span class="nx">dog</span> <span class="o">=</span> <span class="k">new</span> <span class="nx">Dog</span><span class="p">();</span>
</span></code></pre></td></tr></table></div></figure>


<p></p>

<p>What really happens is that the Dog constructor function gets called,
with &#8216;this&#8217; set to the prototype of the constructor. The prototype is
simply another object, which defaults to a plain old Object, but can be
specified in code, eg.</p>

<figure class='code'><figcaption><span></span></figcaption><div class="highlight"><table><tr><td class="gutter"><pre class="line-numbers"><span class='line-number'>1</span>
<span class='line-number'>2</span>
<span class='line-number'>3</span>
<span class='line-number'>4</span>
</pre></td><td class='code'><pre><code class='javascript'><span class='line'><span class="nx">Dog</span><span class="p">.</span><span class="nx">prototype</span> <span class="o">=</span> <span class="p">{</span>
</span><span class='line'>        <span class="nx">bark</span><span class="o">:</span> <span class="kd">function</span> <span class="p">()</span> <span class="p">{</span>
</span><span class='line'>    <span class="p">}</span>
</span><span class='line'><span class="p">}</span>
</span></code></pre></td></tr></table></div></figure>


<p>The effect of this is that the <code>dog</code> object will be able to use members
which exist in the prototype object, so <code>dog.bark()</code> will work.</p>

<h3>Encapsulating State</h3>

<p>So how do we get &#8216;private&#8217; members in objects? The trick is to use
the closure property of the constructor function itself, and define some
accessor methods within it:</p>

<figure class='code'><figcaption><span></span></figcaption><div class="highlight"><table><tr><td class="gutter"><pre class="line-numbers"><span class='line-number'>1</span>
<span class='line-number'>2</span>
<span class='line-number'>3</span>
<span class='line-number'>4</span>
<span class='line-number'>5</span>
<span class='line-number'>6</span>
</pre></td><td class='code'><pre><code class='javascript'><span class='line'><span class="kd">function</span> <span class="nx">Dog</span> <span class="p">(</span><span class="nx">name</span><span class="p">)</span> <span class="p">{</span>
</span><span class='line'>
</span><span class='line'>    <span class="k">this</span><span class="p">.</span><span class="nx">getName</span> <span class="o">=</span> <span class="kd">function</span> <span class="p">()</span> <span class="p">{</span>
</span><span class='line'>         <span class="k">return</span> <span class="nx">name</span><span class="p">;</span>
</span><span class='line'>    <span class="p">}</span>
</span><span class='line'><span class="p">}</span>
</span></code></pre></td></tr></table></div></figure>


<p>So now your dogs can be given a new name when they are created, but the
name cannot be directly accessed or changed from the outside.</p>

<figure class='code'><figcaption><span></span></figcaption><div class="highlight"><table><tr><td class="gutter"><pre class="line-numbers"><span class='line-number'>1</span>
<span class='line-number'>2</span>
<span class='line-number'>3</span>
</pre></td><td class='code'><pre><code class='javascript'><span class='line'><span class="kd">var</span> <span class="nx">fido</span> <span class="o">=</span> <span class="k">new</span> <span class="nx">Dog</span><span class="p">(</span><span class="s2">&quot;Fido&quot;</span><span class="p">);</span>
</span><span class='line'><span class="nx">console</span><span class="p">.</span><span class="nx">log</span><span class="p">(</span><span class="nx">fido</span><span class="p">.</span><span class="nx">getName</span><span class="p">());</span><span class="c1">//&quot;Fido&quot;</span>
</span><span class='line'><span class="nx">console</span><span class="p">.</span><span class="nx">log</span><span class="p">(</span><span class="nx">fido</span><span class="p">.</span><span class="nx">name</span><span class="p">);</span><span class="c1">//undefined</span>
</span></code></pre></td></tr></table></div></figure>


<p>If you want to make a private variables which are not arguments to the
constructor, you can do that by simply declaring them at the top of the
constructor function:</p>

<figure class='code'><figcaption><span></span></figcaption><div class="highlight"><table><tr><td class="gutter"><pre class="line-numbers"><span class='line-number'>1</span>
<span class='line-number'>2</span>
<span class='line-number'>3</span>
<span class='line-number'>4</span>
<span class='line-number'>5</span>
<span class='line-number'>6</span>
<span class='line-number'>7</span>
<span class='line-number'>8</span>
<span class='line-number'>9</span>
<span class='line-number'>10</span>
<span class='line-number'>11</span>
<span class='line-number'>12</span>
<span class='line-number'>13</span>
<span class='line-number'>14</span>
<span class='line-number'>15</span>
<span class='line-number'>16</span>
<span class='line-number'>17</span>
</pre></td><td class='code'><pre><code class='javascript'><span class='line'><span class="kd">function</span> <span class="nx">Dog</span> <span class="p">(</span><span class="nx">name</span><span class="p">)</span> <span class="p">{</span>
</span><span class='line'>
</span><span class='line'>    <span class="kd">var</span> <span class="nx">age</span> <span class="o">=</span> <span class="mi">0</span><span class="p">;</span>
</span><span class='line'>
</span><span class='line'>    <span class="k">this</span><span class="p">.</span><span class="nx">getName</span> <span class="o">=</span> <span class="kd">function</span> <span class="p">()</span> <span class="p">{</span>
</span><span class='line'>         <span class="k">return</span> <span class="nx">name</span><span class="p">;</span>
</span><span class='line'>    <span class="p">}</span>
</span><span class='line'>
</span><span class='line'>    <span class="k">this</span><span class="p">.</span><span class="nx">getAge</span> <span class="o">=</span> <span class="kd">function</span> <span class="p">()</span> <span class="p">{</span>
</span><span class='line'>         <span class="k">return</span> <span class="nx">age</span><span class="p">;</span>
</span><span class='line'>    <span class="p">}</span>
</span><span class='line'>
</span><span class='line'>    <span class="c1">//example of setter:</span>
</span><span class='line'>    <span class="k">this</span><span class="p">.</span><span class="nx">setAge</span> <span class="o">=</span> <span class="kd">function</span> <span class="p">(</span><span class="nx">newAge</span><span class="p">)</span> <span class="p">{</span>
</span><span class='line'>          <span class="nx">age</span> <span class="o">=</span> <span class="nx">newAge</span><span class="p">;</span>
</span><span class='line'>    <span class="p">}</span>
</span><span class='line'><span class="p">}</span>
</span></code></pre></td></tr></table></div></figure>


<p>So we could continue in this way, and declare <em>all</em> the methods of the
Dog inside the constructor function, and enjoy the benefits of having
encapsulated properties. That would work fine, but the
downside is that these functions are being re-created every time the
constructor is called. This is a waste of memory.. not sure how much of
an issue this is in reality unless you&#8217;re making thousands of them, but
it is something to avoid if possible.</p>

<h4>Preventing Memory Loss (What memory problem?)</h4>

<p>While it is not possible to completely avoid some duplicate functions,
the memory used can be mitigated as follows: if you make getters/setters for all
your properties that you want to be private, then you can define the
rest of the methods on the prototype to use the getters/setters. This
way the only duplicated functions are the getters/setters, which should
be very lightweight (couple lines each), and shouldn&#8217;t result in memory
issues, unless you&#8217;re making a particle system or something.</p>

<p>Here is an example of this:</p>

<figure class='code'><figcaption><span></span></figcaption><div class="highlight"><table><tr><td class="gutter"><pre class="line-numbers"><span class='line-number'>1</span>
<span class='line-number'>2</span>
<span class='line-number'>3</span>
<span class='line-number'>4</span>
<span class='line-number'>5</span>
</pre></td><td class='code'><pre><code class='javascript'><span class='line'><span class="c1">//...after previous code</span>
</span><span class='line'>
</span><span class='line'><span class="nx">Dog</span><span class="p">.</span><span class="nx">prototype</span><span class="p">.</span><span class="nx">getAgeInDogYears</span> <span class="p">()</span> <span class="p">{</span>
</span><span class='line'>    <span class="k">return</span> <span class="k">this</span><span class="p">.</span><span class="nx">getAge</span><span class="p">()</span> <span class="o">*</span> <span class="mi">7</span><span class="p">;</span>
</span><span class='line'><span class="p">}</span>
</span></code></pre></td></tr></table></div></figure>


<p>So this way you have the protection of encapsulated state, and avoid
duplicating all your methods in every instance, thanks to prototypal
inheritance. Now getters &amp; setters may be distateful to you, but it is
the best solution to this issue I can see, and it has the additional
benefit of adding a layer of abstraction to your code, so you could
change the way the state values are implemented, without changing a
bunch of references to properties throughout the class.</p>

<h3>Inheriting</h3>

<p>As always, for inheritance to work with non-empty constructors,
 it is important that you explicitly call the prototype&#8217;s constructor:</p>

<figure class='code'><figcaption><span></span></figcaption><div class="highlight"><table><tr><td class="gutter"><pre class="line-numbers"><span class='line-number'>1</span>
<span class='line-number'>2</span>
<span class='line-number'>3</span>
<span class='line-number'>4</span>
<span class='line-number'>5</span>
<span class='line-number'>6</span>
</pre></td><td class='code'><pre><code class='javascript'><span class='line'><span class="kd">function</span> <span class="nx">Daschund</span><span class="p">(</span><span class="nx">name</span><span class="p">)</span> <span class="p">{</span>
</span><span class='line'>    <span class="c1">//...</span>
</span><span class='line'>    <span class="nx">Dog</span><span class="p">.</span><span class="nx">call</span><span class="p">(</span><span class="k">this</span><span class="p">,</span> <span class="nx">name</span><span class="p">);</span>
</span><span class='line'><span class="p">}</span>
</span><span class='line'>
</span><span class='line'><span class="nx">Daschund</span><span class="p">.</span><span class="nx">prototype</span> <span class="o">=</span> <span class="k">new</span> <span class="nx">Dog</span><span class="p">();</span>
</span></code></pre></td></tr></table></div></figure>


<h3>The Behaviour Encapsulation Dilemma</h3>

<p>So we have private variables which can only be accessed by the
get/set functions we declared in the constructor. But what about private
functions? They too can be declared in the constructor function as inner
functions:</p>

<figure class='code'><figcaption><span></span></figcaption><div class="highlight"><table><tr><td class="gutter"><pre class="line-numbers"><span class='line-number'>1</span>
<span class='line-number'>2</span>
<span class='line-number'>3</span>
<span class='line-number'>4</span>
<span class='line-number'>5</span>
<span class='line-number'>6</span>
<span class='line-number'>7</span>
<span class='line-number'>8</span>
<span class='line-number'>9</span>
<span class='line-number'>10</span>
<span class='line-number'>11</span>
<span class='line-number'>12</span>
<span class='line-number'>13</span>
<span class='line-number'>14</span>
<span class='line-number'>15</span>
<span class='line-number'>16</span>
<span class='line-number'>17</span>
<span class='line-number'>18</span>
<span class='line-number'>19</span>
<span class='line-number'>20</span>
<span class='line-number'>21</span>
<span class='line-number'>22</span>
</pre></td><td class='code'><pre><code class='javascript'><span class='line'><span class="kd">function</span> <span class="nx">Dog</span> <span class="p">(</span><span class="nx">name</span><span class="p">)</span> <span class="p">{</span>
</span><span class='line'>
</span><span class='line'>    <span class="kd">var</span> <span class="nx">age</span> <span class="o">=</span> <span class="mi">0</span><span class="p">;</span>
</span><span class='line'>
</span><span class='line'>    <span class="c1">//private function</span>
</span><span class='line'>    <span class="kd">function</span> <span class="nx">scratch</span><span class="p">()</span> <span class="p">{</span>
</span><span class='line'>        <span class="nx">console</span><span class="p">.</span><span class="nx">log</span><span class="p">(</span><span class="s2">&quot;scratch&quot;</span><span class="p">);</span>
</span><span class='line'>    <span class="p">}</span>
</span><span class='line'>
</span><span class='line'>    <span class="k">this</span><span class="p">.</span><span class="nx">getName</span> <span class="o">=</span> <span class="kd">function</span> <span class="p">()</span> <span class="p">{</span>
</span><span class='line'>         <span class="k">return</span> <span class="nx">name</span><span class="p">;</span>
</span><span class='line'>    <span class="p">}</span>
</span><span class='line'>
</span><span class='line'>    <span class="k">this</span><span class="p">.</span><span class="nx">getAge</span> <span class="o">=</span> <span class="kd">function</span> <span class="p">()</span> <span class="p">{</span>
</span><span class='line'>         <span class="k">return</span> <span class="nx">age</span><span class="p">;</span>
</span><span class='line'>    <span class="p">}</span>
</span><span class='line'>
</span><span class='line'>    <span class="c1">//example of setter:</span>
</span><span class='line'>    <span class="k">this</span><span class="p">.</span><span class="nx">setAge</span> <span class="o">=</span> <span class="kd">function</span> <span class="p">(</span><span class="nx">newAge</span><span class="p">)</span> <span class="p">{</span>
</span><span class='line'>          <span class="nx">age</span> <span class="o">=</span> <span class="nx">newAge</span><span class="p">;</span>
</span><span class='line'>    <span class="p">}</span>
</span><span class='line'><span class="p">}</span>
</span></code></pre></td></tr></table></div></figure>


<p>The limitation here is that while such inner functions can be called by other
functions which are defined within the constructor, they cannot be called by prototype methods.
 You could put all methods which need to access the private methods also
inside your constructor, but then you&#8217;re back to the memory issue.</p>

<p>A way around this is to wrap the entire definition of the constructor
and prototype in a closure function, which contains the private methods.
This is basically the <a href="http://www.yuiblog.com/blog/2007/06/12/module-pattern/">module pattern</a>,
 and indeed if you are defining a constructor function inside a module,
 you can take advantage of the hiding effect of the module.</p>

<p>But there is an <a href="http://www.bit-101.com/blog/?p=3447">important gotcha</a> here:
these methods (and any other vars they access) are static: they are
shared between all instances created with the constructor function
contained within the same module. So you need to be aware of this.
 This is not a problem if you have static constants and &#8216;pure functions&#8217;
without side-effects encapsulated in your module. But it is potentially dangerous that one instance
could call a method which could affect other instances&#8230; a kind of state
contamination which is best avoided. Static and stateful just don&#8217;t go
well together.</p>

<p>There&#8217;s also the issue that the module pattern may be <a href="http://edspencer.net/2009/10/javascript-module-pattern-overused-dangerous-and-bloody-annoying.html">too effective in
preventing behaviour modification</a>,
 and <a href="http://snook.ca/archives/javascript/no-love-for-module-pattern">undermine the dynamic nature of the language</a>.</p>

<p>Perhaps perhaps private instance methods are not absolutely necessary, and may be detrimental.
 AFAIK <a href="http://en.wikipedia.org/wiki/Smalltalk">Smalltalk</a> does not have them either, and takes a
 similar approach to that outlined here, of encapsulating state
 by only exposing methods (strictly speaking, &#8216;messages&#8217;, in Smalltalk),
 not properties. And Smalltalk is the archetypal Object Oriented language.</p>

<p>To be honest, I&#8217;ve never really found myself feeling the need for all
this privacy, but I&#8217;m excited to have found a way to do it without
using a third party Class system for JavaScript.</p>
]]></content>
  </entry>
  
  <entry>
    <title type="html"><![CDATA[prevent carpal tunnel syndrome with LiveReload]]></title>
    <link href="http://www.dafishinsea.com/blog/2012/01/27/prevent-carpal-tunnel-syndrome-with-livereload/"/>
    <updated>2012-01-27T14:19:00-05:00</updated>
    <id>http://www.dafishinsea.com/blog/2012/01/27/prevent-carpal-tunnel-syndrome-with-livereload</id>
    <content type="html"><![CDATA[<p>If you are a web developer, you have most likely thought to yourself
occasionally, &#8220;I really wish I didn&#8217;t have to hit refresh a million times a day
to see my changes take effect&#8230;&#8221;. Well, finally there is an answer: <a href="http://livereload.com/">LiveReload</a>
comes to the rescue with a tool which automatically refreshes the browser
whenever some of the files used by it are changed.</p>

<p>The 2.0 version is a nice Mac App, which I am using at home, but I also tried out
<a href="https://github.com/mockko/livereload/">version 1.x</a> which is distributed as a RubyGem,
and it worked fine on Ubuntu&#8230; and it apparently works fine on Windows too
(after you have installed Ruby&#8230; see instructions on the GitHub readme).</p>

<p>After you have installed the app or gem, you can either embed a JavaScript on
your page, or <a href="http://help.livereload.com/kb/general-use/browser-extensions">install browser plugins</a>
. I opted for the plugin route, which adds a button to your browser chrome
allowing you to enable LiveReload for the current URL. Note that it is necessary
to restart the browser completely for it to work. This means on Firefox you will
need to restart twice: once to install the plugin, and again to get it working.
Another issue I saw with Firefox was that the button didn&#8217;t show up on the
addons toolbar, so I had to &#8216;customize&#8217; my toolbars and add the &#8216;LR&#8217; button
which was now available as an option.</p>

<p>The other thing you need to do is tell LiveReload which folders to watch for
changes. On the Mac App, you can use the Finder to select the folders, while
with the RubyGem you need to give the folders as command line arguments.. or
just type &#8216;livereload&#8217; in the folder you want to watch, if there is only one.</p>

<p>Another benefit of LiveReload is that you can hitch multiple browsers up at
once, to verify that your code behaves consistently across browsers. Great for
cross-browser testing while you work.</p>

<p>Furthermore, when you are writing specs or unit tests for your code, you can have
the tests running in another browser, and watch as they pass or fail, all
without leaving your editor.</p>

<p>Finally, the version 2 has options to auto-compile SASS, Less, CoffeeScript and
similar meta-languages which compile into HTML, CSS, or JavaScript. While the
Mac App is initially free to use (it is still beta, but I did not experience any
problems), I see that the update to the final 2.0 version will require some
payment. However, if you just want auto-refreshing on changes, without
pre-compilation, then you can continue to use the 1.0 version (or presumably the
Beta App ?).</p>

<p>In case you are wondering how LiveReload works, I took a gander at the
Javascript which the plugin embeds, and it uses WebSockets to receive
notifications from the livereload app, which starts up a socket server</p>

<p>I think LiveReload is going to make my experience as a web developer much less
annoying and more Zen-like :)</p>

<p>ps. I am not being paid by LiveReload to say any of this..
If you know of any other solutions to this perennial problem, I would certainly
be interested to hear of them!</p>
]]></content>
  </entry>
  
  <entry>
    <title type="html"><![CDATA[Vim for JavaScript]]></title>
    <link href="http://www.dafishinsea.com/blog/2012/01/23/vim-for-javascript/"/>
    <updated>2012-01-23T22:22:00-05:00</updated>
    <id>http://www.dafishinsea.com/blog/2012/01/23/vim-for-javascript</id>
    <content type="html"><![CDATA[<h3>Using Vim for JavaScript Development</h3>

<p>Here is how I do it &#8230;</p>

<h4>Plugin management</h4>

<p>I recommend using <a href="https://github.com/tpope/vim-pathogen">pathogen</a> to manage plugins, as then you can simply clone the
plugin repos into your .vim/bundle directory and you&#8217;re done. (and run &#8216;:Helptags&#8217; to install help).</p>

<p><img src="http://www.dafishinsea.com/images/default_syntax.png" alt="default javascript syntax" /></p>

<p>While this is not bad, I personally prefer <a href="http://www.vim.org/scripts/script.php?script_id=1491">another Javascript syntax definition file</a>,
 which provides a more complete set of keywords (eg. browser events such as &#8216;onmouseover&#8217;),
 and thus highlights them differently. To use it, download and copy it to</p>

<p>~/.vim/syntax/javascript.vim</p>

<p>Now when viewing the same .js file, you will notice a few differences:</p>

<p><img src="http://www.dafishinsea.com/images/zhao_yi_syntax.png" alt="better javascript syntax" /></p>

<h4>Folding</h4>

<p>Another feature which this syntax file adds is the ability to fold functions.
You can fold a function by positioning the cursor within it and typing &#8216;zc&#8217;.
Then it will collapse to a single blue line with the function definition
highlighted in it, and the number of lines contained within the fold. This can
be a handy way to defocus attention from functions you are not interested in. It
works in nested functions as well.</p>

<h4>Whitespace settings</h4>

<p>I generally want Javascript to have spaces instead of tabs, with 4 spaces for each
indent level. This can be achieved by adding the following content as the file
<code>.vim/after/ftplugin/javascript.vim</code></p>

<pre><code>" set whitespace for javascript to always use 4 spaces instead of tabs
setlocal expandtab
setlocal shiftwidth=4
setlocal shiftround
setlocal tabstop=4
</code></pre>

<h4>Indentation</h4>

<p>Vim&#8217;s default indent file for javascript merely sets the indentation to
cindent&#8230; this is not very effective. For best results, go get the
<a href="http://www.vim.org/scripts/script.php?script_id=3081">web-indent</a> plugin.</p>

<p>Then you can use the builtin indent commands (essentially &#8216;=&#8217; in command mode,
combined with a motion, eg. &#8216;gg=G&#8217; for the whole file, or just select some text
in visual mode and hit &#8216;=&#8217;).</p>
]]></content>
  </entry>
  
  <entry>
    <title type="html"><![CDATA[LIFE Forms - my JS10k entry is live!]]></title>
    <link href="http://www.dafishinsea.com/blog/2011/09/22/life-forms-my-js10k-entry-is-live/"/>
    <updated>2011-09-22T00:00:00-04:00</updated>
    <id>http://www.dafishinsea.com/blog/2011/09/22/life-forms-my-js10k-entry-is-live</id>
    <content type="html"><![CDATA[<p>I just managed to submit <a href="http://10k.aneventapart.com/Entry/667">my JS10K entry</a> in time, having spent a lot of time implementing compression hacks like converting the code and data into images using <a href="http://blog.learnboost.com/blog/introducing-node-canvas-server-side-html5-canvas-api/">node-canvas</a>. Turns out I may not have needed to worry about that as the competition now lets you submit a .zip file, and only considers the size of the .zip file, not the files within it. Somehow I missed that. Oh well. </p>


<p>Here is a link to one of my favorite lifeforms, the Frothing Puffer:</p>


<p></p>

<p><a href="http://10k.aneventapart.com/2/Uploads/667/#frothing puffer">
  <img src="http://dafishinsea.com/life/screenshots/life.png" alt="LIFE Forms" title="Frothing Puffer"></a></p>

<p>In order to meet the size restriction of the competition, I had to leave out some functionality that I developed earlier, such as thumbnails of the lifeforms. So here is <a href="http://dafishinsea.com/life/">the uncut version</a>, with thumbnails, and all of the lifeforms in it.</p>


<p>Actually, there are a couple of features in the competition version which are not in this version: The ability to link to a pattern using the URL, and also the ability to edit the seed pattern (albeit in text form). I have thoughts of making a version with a more visual editor, which would let you turn on cells by clicking on them, and perhaps save and share them with others. But I&#8217;m not sure if I&#8217;ll get around to it&#8230; life is short :P</p>


<p>I must give credit to the David Silver&#8217;s <a href="http://www.argentum.freeserve.co.uk/lex_home.htm">LIFE Lexicon</a>, where I obtained the seed patterns.  As always, <a href="https://github.com/bigfish/life">Da Code</a> is available on GitHub. Note that the competition version is in the JS10K branch.</p>

]]></content>
  </entry>
  
  <entry>
    <title type="html"><![CDATA[Setting up MongoDB on Mac OS X (Snow Leopard)]]></title>
    <link href="http://www.dafishinsea.com/blog/2011/09/13/setting-up-mongodb-on-mac-os-x-snow-leopard/"/>
    <updated>2011-09-13T00:00:00-04:00</updated>
    <id>http://www.dafishinsea.com/blog/2011/09/13/setting-up-mongodb-on-mac-os-x-snow-leopard</id>
    <content type="html"><![CDATA[<p>Just wanted to take note of how I did this, in case it helps anyone, or if I forget :)</p>


<h3>HomeBrew</h3>


<p>First I installed <a href="http://mxcl.github.com/homebrew/">Homebrew</a>, as I&#8217;m kind of sick of MacPorts and Fink (specifically how slow and out of date they tend to be). This was a matter of clicking on the &#8216;install homebrew today&#8217; button, which linked me to their github page&#8230; where I found the following instructions.</p>


<pre><code line_numbers="false">/usr/bin/ruby -e "$(curl -fsSL https://raw.github.com/gist/323731)"
</code></pre>


<p>So as it turns out this did not work, and instead I got an error message about ca certs. Fortunately it did mention that I should add the -k option to turn to turn off strict cert checking. so I did this instead:</p>


<pre><code line_numbers="false">/usr/bin/ruby -e "$(curl -fsSLk https://raw.github.com/gist/323731)"
</code></pre>


<p>And it worked.</p>


<h3>MongoDB</h3>


<p>So I went over to the <a href="http://www.mongodb.org/">MongoDB site</a> and specifically their <a href="http://www.mongodb.org/display/DOCS/Quickstart+OS+X">Quickstart OS X</a> page. Since I have homebrew now I did,</p>


<pre><code line_numbers="false">    brew update
    brew install mongodb
</code></pre>


<p>note that I did not need to use &#8216;sudo&#8217; before either of these commands, which is nice. After installing, it instucted me to issue the following commands:</p>


<pre><code line_numbers="false">    mkdir -p ~/Library/LaunchAgents
    cp /usr/local/Cellar/mongodb/2.0.0-x86_64/org.mongodb.mongod.plist ~/Library/LaunchAgents/
    launchctl load -w ~/Library/LaunchAgents/org.mongodb.mongod.plist
</code></pre>


<p>Which I dutifully did. Note that the &#8216;launchctl load &#8230;&#8217; command actually starts the &#8216;mongod&#8217; database daemon, so there&#8217;s no need to start it manually. Simply typing &#8216;mongo&#8217; starts the mongodb shell </p>


<pre><code line_numbers="false">    >: mongo
    MongoDB shell version: 2.0.0
    connecting to: test
</code></pre>


<p>Note that >: is my prompt, in case you&#8217;ve seen Lost you may get the joke :) Now I can create a &#8216;collection&#8217; by saving an item to one, like so:</p>


<pre><code line_numbers="false">    > db.foo.save({a:1})
</code></pre>


<p>And I can query all the items of &#8216;foo&#8217; like so:</p>


<pre><code line_numbers="false">    > db.foo.find()
    { "_id" : ObjectId("4e6ffd8928d02c8f55a09dbb"), "a" : 1 }
</code></pre>


<p>I&#8217;ve just got started with MongoDB, but I have to say it looks like it will be really nice to work with on personal projects. No more fussing around with database schemas! Yay!</p>


<p>Oh, yeah, to quit mongo, you just type:</p>


<pre><code line_numbers="false"> > quit()
</code></pre>

]]></content>
  </entry>
  
  <entry>
    <title type="html"><![CDATA[Hitting the JSConf Trail ... videos now online]]></title>
    <link href="http://www.dafishinsea.com/blog/2011/09/04/hitting-the-jsconf-trail-videos-now-online/"/>
    <updated>2011-09-04T00:00:00-04:00</updated>
    <id>http://www.dafishinsea.com/blog/2011/09/04/hitting-the-jsconf-trail-videos-now-online</id>
    <content type="html"><![CDATA[<p>I just found out that the videos from both the <a href="http://2011.jsconf.us/">JSConf 2011</a> and NodeConf conferences held earlier this year, are <a href="http://blip.tv/jsconf">available online</a>. </p>


<p>First off, the conference has an <a href="http://en.wikipedia.org/wiki/The_Oregon_Trail_(video_game)">Oregon Trail</a> theme, which I did not understand until I saw <a href="http://www.youtube.com/watch?v=KmrdWpXSnoo">this video</a> by author Sloane Crosley, which explains the game&#8217;s appeal delightfully.  (Skip to about the 2 minute mark for the actual reading)</p>


<p>Here are the ones I have checked out so far:</p>


<p><a href="http://blip.tv/jsconf/jsconf2011-david-flanagan-5449688">Bytes and Blobs (David Flanagan)</a> </p>


<p>A really good explanation of the new Binary APIs for Javascript. Nice to see the author of the great Rhino book in person (at least virtually.) Kind of amusing to hear all the talk of BLOBs (Binary Large OBjects). This opens up a number of interesting possibilities, such as getting access to files from the user&#8217;s filesystem (with their permission, after they have selected it) without uploading them. Also image processing, and even audio processing and generation. However, browser support is still incomplete&#8230; Let&#8217;s hope IE supports these APIs in it&#8217;s next version.</p>


<p></p>

<p><a href="http://blip.tv/jsconf/jsconf2011-rebecca-murphey-5478159">The Future of Javascript (Rebecca Murphey)</a></p>


<p>This is a call to action to ensure that Javascript evolves properly, to prevent some of the quagmires we currently experience as developers. In a nutshell, we need to agree on common standards and protocols to prevent duplication of effort. Some of this work is underway, eg CommonJS, promisesA. Also some interesting facts about the history of the automobile and the road system which we take for granted. </p>


<p><a href="http://blip.tv/jsconf/nodeconf-2011-peter-hallam-and-alex-russell-5510358">The Future of JS and You (Alex Russel and Peter Hallman)</a></p>


<p>A look behind the scenes of the <a href="http://code.google.com/p/traceur-compiler/">Traceur Javascript compiler</a>, which lets you write futuristic Harmony flavored Javascript, and generates present-day Javascript. This reminds me a bit of CoffeeScript, though here you&#8217;re still writing Javascript, albeit a version which does not yet exist. The suggestion is that you can invent your own Javascript.next features and hack the compiler to support them. If you&#8217;re interested in writing a compiler in Javascript, this would be a good place to start.</p>


<p><a href="http://blip.tv/jsconf/nodeconf-2011-james-halliday-5510213">&#8216;Freestyle RPC for Node&#8217; (James Halliday) </a>
An entertaining presentation on James&#8217;s <a href="https://github.com/substack/dnode">dnode</a> node module which allows seamless remoting between client and server code. perhaps not the most elucidating presentation (there is about 10min of random rapping towards the end) but DNode does indeed look awesome.</p>


<p>It seems like every single session from these conferences is available here. The only confusing thing is that the videos do not always have the same titles as the sessions at the conferences, so you may need to cross-reference with the <a href="http://2011.jsconf.us/#!/schedule">jsconf programme</a></p>


<p>Ah, I am so nostalgic for the old NodeJS logo :/</p>

]]></content>
  </entry>
  
  <entry>
    <title type="html"><![CDATA[Setting up BDD with Jasmine and ExtJS 4]]></title>
    <link href="http://www.dafishinsea.com/blog/2011/06/28/setting-up-bdd-with-jasmine-and-extjs-4/"/>
    <updated>2011-06-28T00:00:00-04:00</updated>
    <id>http://www.dafishinsea.com/blog/2011/06/28/setting-up-bdd-with-jasmine-and-extjs-4</id>
    <content type="html"><![CDATA[<p><a href="http://pivotal.github.com/jasmine/">Jasmine</a> is described on its site as a &#8216;behaviour driven development framework for testing your JavaScript code.&#8217; I thought I would give it a try, using it while developing a new game with my <a href="http://canvasteroids.com">Canvasteroids</a> framework.</p>


<p>First off, though, I should address the different terminology here: what is &#8216;behaviour driven development&#8217; anyways? Why isn&#8217;t it called a Unit Testing framework? To understand why, you should read <a href="http://techblog.daveastels.com/2005/07/05/a-new-look-at-test-driven-development/">this article</a> The idea that the names matter really rings true for me and it always seemed weird to me to try and test something which does not yet exist. Thinking of &#8216;specifications&#8217; rather than &#8216;tests&#8217; makes a lot more sense to me. Also, thinking about testing &#8216;units&#8217; of code is more likely to make your tests closely coupled to your implementation, leading to maintenance headaches and unnecessary, verbose tests.</p>


<p>Installing Jasmine is ridiculously easy: I just <a href="http://pivotal.github.com/jasmine/download.html">downloaded the standalone project</a>, and extracted it as the &#8216;specs&#8217; folder in the Canvasteroids project. Inside it is a SpecRunner.html file.. opening up this in a browser will run the dummy tests which are there by way of example. Then I removed them so that I could run my own specs. I also installed some <a href="http://www.vim.org/scripts/script.php?script_id=3249">Jasmine Snippets for Vim</a> to make writing specs even easier.</p>


<p>I created a new spec file called BreakoutSpec.js in the specs/ folder and added the following:</p>


<figure class='code'><figcaption><span></span></figcaption><div class="highlight"><table><tr><td class="gutter"><pre class="line-numbers"><span class='line-number'>1</span>
<span class='line-number'>2</span>
<span class='line-number'>3</span>
<span class='line-number'>4</span>
<span class='line-number'>5</span>
<span class='line-number'>6</span>
<span class='line-number'>7</span>
<span class='line-number'>8</span>
<span class='line-number'>9</span>
<span class='line-number'>10</span>
<span class='line-number'>11</span>
<span class='line-number'>12</span>
<span class='line-number'>13</span>
</pre></td><td class='code'><pre><code class='javascript'><span class='line'><span class="nx">describe</span><span class="p">(</span><span class="s2">&quot;Breakout Game Specs&quot;</span><span class="p">,</span> <span class="kd">function</span> <span class="p">()</span> <span class="p">{</span>
</span><span class='line'>
</span><span class='line'>    <span class="kd">var</span> <span class="nx">game</span><span class="p">;</span>
</span><span class='line'>
</span><span class='line'>    <span class="nx">beforeEach</span><span class="p">(</span><span class="kd">function</span> <span class="p">()</span> <span class="p">{</span>
</span><span class='line'>        <span class="nx">game</span> <span class="o">=</span> <span class="k">new</span> <span class="nx">breakout</span><span class="p">.</span><span class="nx">Breakout</span><span class="p">();</span>
</span><span class='line'>    <span class="p">});</span>
</span><span class='line'>
</span><span class='line'>    <span class="nx">it</span><span class="p">(</span><span class="s2">&quot;should exist&quot;</span><span class="p">,</span> <span class="kd">function</span> <span class="p">()</span> <span class="p">{</span>
</span><span class='line'>        <span class="nx">expect</span><span class="p">(</span><span class="nx">game</span><span class="p">).</span><span class="nx">toBeDefined</span><span class="p">();</span>
</span><span class='line'>    <span class="p">});</span>
</span><span class='line'>
</span><span class='line'><span class="p">});</span>
</span></code></pre></td></tr></table></div></figure>


<p>The describe() function defines a Suite of Specs. The function given to it as its second argument contains the specs themselves. Each spec is defined by an it() function call, which similarly takes a function as its second argument. The first argument to both describe() and it() is a descriptive string which will be shown in reports. Within the it() function there are calls to expect() which will check specific things to determine whether the Spec has been fulfilled. See the list of them <a href="https://github.com/pivotal/jasmine/wiki/Matchers">here</a>. In this case we are simply checking that the Breakout game instance was created successfully. Obviously, beforeEach() is run before each spec. We need to include the spec in the SpecRunner.html file, which now looks like this:</p>


<figure class='code'><figcaption><span></span></figcaption><div class="highlight"><table><tr><td class="gutter"><pre class="line-numbers"><span class='line-number'>1</span>
<span class='line-number'>2</span>
<span class='line-number'>3</span>
<span class='line-number'>4</span>
<span class='line-number'>5</span>
<span class='line-number'>6</span>
<span class='line-number'>7</span>
<span class='line-number'>8</span>
<span class='line-number'>9</span>
<span class='line-number'>10</span>
<span class='line-number'>11</span>
<span class='line-number'>12</span>
<span class='line-number'>13</span>
<span class='line-number'>14</span>
<span class='line-number'>15</span>
<span class='line-number'>16</span>
<span class='line-number'>17</span>
<span class='line-number'>18</span>
<span class='line-number'>19</span>
<span class='line-number'>20</span>
<span class='line-number'>21</span>
</pre></td><td class='code'><pre><code class='html'><span class='line'><span class="cp">&lt;!DOCTYPE html&gt;</span>
</span><span class='line'><span class="nt">&lt;html&gt;</span>
</span><span class='line'>    <span class="nt">&lt;head&gt;</span>
</span><span class='line'>        <span class="nt">&lt;title&gt;</span>Jasmine Test Runner<span class="nt">&lt;/title&gt;</span>
</span><span class='line'>        <span class="nt">&lt;link</span> <span class="na">rel=</span><span class="s">&quot;stylesheet&quot;</span> <span class="na">type=</span><span class="s">&quot;text/css&quot;</span> <span class="na">href=</span><span class="s">&quot;lib/jasmine-1.0.2/jasmine.css&quot;</span><span class="nt">&gt;</span>
</span><span class='line'>        <span class="nt">&lt;script </span><span class="na">type=</span><span class="s">&quot;text/javascript&quot;</span> <span class="na">src=</span><span class="s">&quot;lib/jasmine-1.0.2/jasmine.js&quot;</span><span class="nt">&gt;&lt;/script&gt;</span>
</span><span class='line'>        <span class="nt">&lt;script </span><span class="na">type=</span><span class="s">&quot;text/javascript&quot;</span> <span class="na">src=</span><span class="s">&quot;lib/jasmine-1.0.2/jasmine-html.js&quot;</span><span class="nt">&gt;&lt;/script&gt;</span>
</span><span class='line'>
</span><span class='line'>        <span class="c">&lt;!-- include spec files here... --&gt;</span>
</span><span class='line'>        <span class="nt">&lt;script </span><span class="na">type=</span><span class="s">&quot;text/javascript&quot;</span> <span class="na">src=</span><span class="s">&quot;spec/BreakoutSpec.js&quot;</span><span class="nt">&gt;&lt;/script&gt;</span>
</span><span class='line'>
</span><span class='line'>    <span class="nt">&lt;/head&gt;</span>
</span><span class='line'><span class="nt">&lt;body&gt;</span>
</span><span class='line'>
</span><span class='line'><span class="nt">&lt;script </span><span class="na">type=</span><span class="s">&quot;text/javascript&quot;</span><span class="nt">&gt;</span>
</span><span class='line'>        <span class="nx">jasmine</span><span class="p">.</span><span class="nx">getEnv</span><span class="p">().</span><span class="nx">addReporter</span><span class="p">(</span><span class="k">new</span> <span class="nx">jasmine</span><span class="p">.</span><span class="nx">TrivialReporter</span><span class="p">());</span>
</span><span class='line'>        <span class="nx">jasmine</span><span class="p">.</span><span class="nx">getEnv</span><span class="p">().</span><span class="nx">execute</span><span class="p">();</span>
</span><span class='line'><span class="nt">&lt;/script&gt;</span>
</span><span class='line'>
</span><span class='line'><span class="nt">&lt;/body&gt;</span>
</span><span class='line'><span class="nt">&lt;/html&gt;</span>
</span></code></pre></td></tr></table></div></figure>


<p>Refreshing the SpecRunner.html file, we see that this Spec fails. There are two failures, one which is the result of a run-time error while executing the spec (because the namespace &#8216;breakout&#8217; in &#8216;breakout.Breakout&#8217; is undefined, and because the expectation was not met (because &#8216;game&#8217; was not defined).</p>


<p>So, I made a new folder called &#8216;breakout&#8217; in the games folder, and copied the index.html file from Asteroids into it, renaming the reference to the Asteroids game class to be Breakout. I also created the new game class in a file alongside the index.html file, called Breakout.js, with the following Ext 4 class definition in it:</p>


<figure class='code'><figcaption><span></span></figcaption><div class="highlight"><table><tr><td class="gutter"><pre class="line-numbers"><span class='line-number'>1</span>
<span class='line-number'>2</span>
<span class='line-number'>3</span>
<span class='line-number'>4</span>
</pre></td><td class='code'><pre><code class='javascript'><span class='line'><span class="nx">Ext</span><span class="p">.</span><span class="nx">define</span><span class="p">(</span><span class="s1">&#39;breakout.Breakout&#39;</span><span class="p">,</span> <span class="p">{</span>
</span><span class='line'>    <span class="nx">constructor</span><span class="o">:</span> <span class="kd">function</span> <span class="p">()</span> <span class="p">{</span>
</span><span class='line'>    <span class="p">}</span>
</span><span class='line'><span class="p">});</span>
</span></code></pre></td></tr></table></div></figure>


<p>So we have a Breakout class now, but how do we load it in our test runner? Why not use the <a href="foundation post">Ext JS 4 Class loader</a>, just as we do in the game itself? This is what the updated SpecRunner looks like (we also need to load the ext-foundation.js file). </p>


<figure class='code'><figcaption><span></span></figcaption><div class="highlight"><table><tr><td class="gutter"><pre class="line-numbers"><span class='line-number'>1</span>
<span class='line-number'>2</span>
<span class='line-number'>3</span>
<span class='line-number'>4</span>
<span class='line-number'>5</span>
<span class='line-number'>6</span>
<span class='line-number'>7</span>
<span class='line-number'>8</span>
<span class='line-number'>9</span>
<span class='line-number'>10</span>
<span class='line-number'>11</span>
<span class='line-number'>12</span>
<span class='line-number'>13</span>
<span class='line-number'>14</span>
<span class='line-number'>15</span>
<span class='line-number'>16</span>
<span class='line-number'>17</span>
<span class='line-number'>18</span>
<span class='line-number'>19</span>
<span class='line-number'>20</span>
<span class='line-number'>21</span>
<span class='line-number'>22</span>
<span class='line-number'>23</span>
<span class='line-number'>24</span>
<span class='line-number'>25</span>
<span class='line-number'>26</span>
<span class='line-number'>27</span>
<span class='line-number'>28</span>
<span class='line-number'>29</span>
<span class='line-number'>30</span>
<span class='line-number'>31</span>
<span class='line-number'>32</span>
<span class='line-number'>33</span>
</pre></td><td class='code'><pre><code class='html'><span class='line'><span class="cp">&lt;!DOCTYPE html&gt;</span>
</span><span class='line'><span class="nt">&lt;html&gt;</span>
</span><span class='line'><span class="nt">&lt;head&gt;</span>
</span><span class='line'>    <span class="nt">&lt;title&gt;</span>Jasmine Test Runner<span class="nt">&lt;/title&gt;</span>
</span><span class='line'>    <span class="nt">&lt;link</span> <span class="na">rel=</span><span class="s">&quot;stylesheet&quot;</span> <span class="na">type=</span><span class="s">&quot;text/css&quot;</span> <span class="na">href=</span><span class="s">&quot;lib/jasmine-1.0.2/jasmine.css&quot;</span><span class="nt">&gt;</span>
</span><span class='line'>    <span class="nt">&lt;script </span><span class="na">type=</span><span class="s">&quot;text/javascript&quot;</span> <span class="na">src=</span><span class="s">&quot;lib/jasmine-1.0.2/jasmine.js&quot;</span><span class="nt">&gt;&lt;/script&gt;</span>
</span><span class='line'>    <span class="nt">&lt;script </span><span class="na">type=</span><span class="s">&quot;text/javascript&quot;</span> <span class="na">src=</span><span class="s">&quot;lib/jasmine-1.0.2/jasmine-html.js&quot;</span><span class="nt">&gt;&lt;/script&gt;</span>
</span><span class='line'>
</span><span class='line'>    <span class="c">&lt;!-- include Ext JS 4 Class framework --&gt;</span>
</span><span class='line'>    <span class="nt">&lt;script </span><span class="na">src=</span><span class="s">&quot;../lib/extjs/ext-foundation.js&quot;</span> <span class="na">type=</span><span class="s">&quot;text/javascript&quot;</span> <span class="na">charset=</span><span class="s">&quot;utf-8&quot;</span><span class="nt">&gt;&lt;/script&gt;</span>
</span><span class='line'>
</span><span class='line'>    <span class="c">&lt;!-- include spec files here... --&gt;</span>
</span><span class='line'>    <span class="nt">&lt;script </span><span class="na">type=</span><span class="s">&quot;text/javascript&quot;</span> <span class="na">src=</span><span class="s">&quot;spec/BreakoutSpec.js&quot;</span><span class="nt">&gt;&lt;/script&gt;</span>
</span><span class='line'>
</span><span class='line'><span class="nt">&lt;/head&gt;</span>
</span><span class='line'><span class="nt">&lt;body&gt;</span>
</span><span class='line'>
</span><span class='line'><span class="nt">&lt;script </span><span class="na">type=</span><span class="s">&quot;text/javascript&quot;</span><span class="nt">&gt;</span>
</span><span class='line'>    <span class="nx">Ext</span><span class="p">.</span><span class="nx">Loader</span><span class="p">.</span><span class="nx">setConfig</span><span class="p">({</span>
</span><span class='line'>        <span class="nx">paths</span><span class="o">:</span> <span class="p">{</span>
</span><span class='line'>            <span class="s1">&#39;breakout&#39;</span><span class="o">:</span> <span class="s1">&#39;../games/breakout&#39;</span>
</span><span class='line'>            <span class="p">},</span>
</span><span class='line'>            <span class="nx">enabled</span><span class="o">:</span> <span class="kc">true</span>
</span><span class='line'>        <span class="p">});</span>
</span><span class='line'>        <span class="nx">Ext</span><span class="p">.</span><span class="nx">require</span><span class="p">(</span><span class="s1">&#39;breakout.Breakout&#39;</span><span class="p">);</span>
</span><span class='line'>        <span class="nx">Ext</span><span class="p">.</span><span class="nx">onReady</span><span class="p">(</span><span class="kd">function</span> <span class="p">()</span> <span class="p">{</span>
</span><span class='line'>            <span class="nx">jasmine</span><span class="p">.</span><span class="nx">getEnv</span><span class="p">().</span><span class="nx">addReporter</span><span class="p">(</span><span class="k">new</span> <span class="nx">jasmine</span><span class="p">.</span><span class="nx">TrivialReporter</span><span class="p">());</span>
</span><span class='line'>            <span class="nx">jasmine</span><span class="p">.</span><span class="nx">getEnv</span><span class="p">().</span><span class="nx">execute</span><span class="p">();</span>
</span><span class='line'>        <span class="p">});</span>
</span><span class='line'><span class="nt">&lt;/script&gt;</span>
</span><span class='line'>
</span><span class='line'><span class="nt">&lt;/body&gt;</span>
</span><span class='line'><span class="nt">&lt;/html&gt;</span>
</span></code></pre></td></tr></table></div></figure>


<p>Note that we made the call to Ext.Loader.setConfig(), defining the required namespace &#8216;breakout&#8217; to be the relative path of the directory containing the class file. And we wrapped the Jasmine code in a call to Ext.onReady(), which will only execute when the classes required have been loaded. This is handy, because we will not have to worry about adding them to the SpecRunner, which can be a chore with other Javascript Testing frameworks I&#8217;ve used. We will however need to update the paths of the namespaces used by any classes in the application, so that any namespaces are correctly resolved. And when we run the SpecRunner again &#8230; we get the green light! The spec succeeded.</p>


<p>So I admit this is a trivial spec&#8230; but it should be enough to get you started with Jasmine and Ext JS4.</p>

]]></content>
  </entry>
  
  <entry>
    <title type="html"><![CDATA[Building on a solid foundation with Ext JS 4]]></title>
    <link href="http://www.dafishinsea.com/blog/2011/06/20/building-on-a-solid-foundation-with-ext-js-4/"/>
    <updated>2011-06-20T00:00:00-04:00</updated>
    <id>http://www.dafishinsea.com/blog/2011/06/20/building-on-a-solid-foundation-with-ext-js-4</id>
    <content type="html"><![CDATA[<p>I&#8217;ve been working with <a href="http://www.sencha.com/products/extjs/">Ext JS</a> a lot at work over the last year, and have grown to like it. Last year I went to the Sencha Conference in San Francisco, and was very impressed by the features of the upcoming release of <a href="http://www.sencha.com/products/extjs/whats-new-in-ext-js-4/">Ext JS 4</a>. One of the big changes is the new <a href="http://www.sencha.com/blog/countdown-to-ext-js-4-dynamic-loading-and-new-class-system">Class system</a>, which makes defining classes easy and also loads required classes dynamically when required. The build tools which Sencha (The company which makes Ext JS) provides make it easy to produce a single compressed .js file of your app for deployment. All in all it is a great framework.</p>

<p>Ext JS 4 is well modularized, and you can use as little or as much of it as you like. For the Canvasteroids game framework that I&#8217;m working on, I decided to use the &#8216;ext-foundation.js&#8217; file which is the essential core of the library, which defines the Class management system, as well as a useful collection of utility methods for the core Javascript types. However no changes are made to the native object prototypes, so there will not be complications when combining Ext 4 with other frameworks.</p>

<p>The Ext JS 4 class system lets you define a class as follows:</p>

<figure class='code'><figcaption><span></span></figcaption><div class="highlight"><table><tr><td class="gutter"><pre class="line-numbers"><span class='line-number'>1</span>
<span class='line-number'>2</span>
<span class='line-number'>3</span>
<span class='line-number'>4</span>
<span class='line-number'>5</span>
<span class='line-number'>6</span>
<span class='line-number'>7</span>
<span class='line-number'>8</span>
<span class='line-number'>9</span>
</pre></td><td class='code'><pre><code class='javascript'><span class='line'><span class="nx">Ext</span><span class="p">.</span><span class="nx">define</span><span class="p">(</span><span class="s1">&#39;some.Thing&#39;</span><span class="p">,</span> <span class="p">{</span>
</span><span class='line'>    <span class="nx">extend</span><span class="o">:</span> <span class="s1">&#39;some.ThingElse&#39;</span><span class="p">,</span>
</span><span class='line'>    <span class="nx">constructor</span><span class="o">:</span> <span class="kd">function</span> <span class="p">()</span> <span class="p">{</span>
</span><span class='line'>        <span class="k">this</span><span class="p">.</span><span class="nx">name</span> <span class="o">=</span> <span class="s2">&quot;Thing1&quot;</span><span class="p">;</span>
</span><span class='line'>    <span class="p">},</span>
</span><span class='line'>    <span class="nx">greet</span><span class="o">:</span> <span class="kd">function</span> <span class="p">()</span> <span class="p">{</span>
</span><span class='line'>        <span class="nx">alert</span><span class="p">(</span><span class="s2">&quot;o hai&quot;</span><span class="p">);</span>
</span><span class='line'>    <span class="p">}</span>
</span><span class='line'><span class="p">});</span>
</span></code></pre></td></tr></table></div></figure>


<p>Obviously, the &#8216;constructor&#8217; function is what becomes the class constructor. The &#8216;extend&#8217; property will cause this class to inherit the given class. Note also the use of namespaces, eg &#8216;foo.Bar&#8217; in the names of classes. In Ext JS 3 you had to explicitly declare all your namespaces, but in v4 this is handled automagically.</p>

<h3>Mix it up with Mixins</h3>


<p>Additionally, you can have &#8216;mixins&#8217; which add in methods (or properties) of the given class. This is very helpful as it enables another way of re-using code besides inheritance. This is how you declare mixins (an example from Canvasteroids):</p>

<figure class='code'><figcaption><span></span></figcaption><div class="highlight"><table><tr><td class="gutter"><pre class="line-numbers"><span class='line-number'>1</span>
<span class='line-number'>2</span>
<span class='line-number'>3</span>
<span class='line-number'>4</span>
<span class='line-number'>5</span>
<span class='line-number'>6</span>
<span class='line-number'>7</span>
<span class='line-number'>8</span>
<span class='line-number'>9</span>
<span class='line-number'>10</span>
<span class='line-number'>11</span>
<span class='line-number'>12</span>
<span class='line-number'>13</span>
<span class='line-number'>14</span>
<span class='line-number'>15</span>
<span class='line-number'>16</span>
<span class='line-number'>17</span>
</pre></td><td class='code'><pre><code class='javascript'><span class='line'><span class="nx">Ext</span><span class="p">.</span><span class="nx">define</span><span class="p">(</span><span class="s1">&#39;drawable.DrawableLine&#39;</span><span class="p">,</span> <span class="p">{</span>
</span><span class='line'>    <span class="nx">extend</span><span class="o">:</span> <span class="s1">&#39;geometry.Line&#39;</span><span class="p">,</span>
</span><span class='line'>    <span class="nx">mixins</span><span class="o">:</span> <span class="p">[</span><span class="s1">&#39;drawable.Drawable&#39;</span><span class="p">],</span>
</span><span class='line'>    <span class="nx">constructor</span><span class="o">:</span> <span class="kd">function</span> <span class="p">(</span><span class="nx">props</span><span class="p">)</span> <span class="p">{</span>
</span><span class='line'>        <span class="k">this</span><span class="p">.</span><span class="nx">callParent</span><span class="p">([</span><span class="nx">props</span><span class="p">]);</span>
</span><span class='line'>        <span class="c1">//this is a base drawable class -- set context (required property)</span>
</span><span class='line'>        <span class="k">this</span><span class="p">.</span><span class="nx">initDrawable</span><span class="p">(</span><span class="k">this</span><span class="p">.</span><span class="nx">context</span><span class="p">);</span>
</span><span class='line'>    <span class="p">},</span>
</span><span class='line'>    <span class="nx">draw</span><span class="o">:</span> <span class="kd">function</span> <span class="p">(</span><span class="nx">ctx</span><span class="p">)</span> <span class="p">{</span>
</span><span class='line'>        <span class="k">this</span><span class="p">.</span><span class="nx">beforeDraw</span><span class="p">(</span><span class="nx">ctx</span><span class="p">);</span>
</span><span class='line'>        <span class="k">this</span><span class="p">.</span><span class="nx">ctx</span><span class="p">.</span><span class="nx">beginPath</span><span class="p">();</span>
</span><span class='line'>        <span class="k">this</span><span class="p">.</span><span class="nx">ctx</span><span class="p">.</span><span class="nx">moveTo</span><span class="p">(</span><span class="k">this</span><span class="p">.</span><span class="nx">start</span><span class="p">.</span><span class="nx">x</span><span class="p">,</span> <span class="k">this</span><span class="p">.</span><span class="nx">start</span><span class="p">.</span><span class="nx">y</span><span class="p">);</span>
</span><span class='line'>        <span class="k">this</span><span class="p">.</span><span class="nx">ctx</span><span class="p">.</span><span class="nx">lineTo</span><span class="p">(</span><span class="k">this</span><span class="p">.</span><span class="nx">end</span><span class="p">.</span><span class="nx">x</span><span class="p">,</span> <span class="k">this</span><span class="p">.</span><span class="nx">end</span><span class="p">.</span><span class="nx">y</span><span class="p">);</span>
</span><span class='line'>        <span class="k">this</span><span class="p">.</span><span class="nx">ctx</span><span class="p">.</span><span class="nx">stroke</span><span class="p">();</span>
</span><span class='line'>        <span class="k">this</span><span class="p">.</span><span class="nx">afterDraw</span><span class="p">(</span><span class="nx">ctx</span><span class="p">);</span>
</span><span class='line'>    <span class="p">}</span>
</span><span class='line'><span class="p">});</span>
</span></code></pre></td></tr></table></div></figure>


<p>The initDrawable(), beforeDraw(), draw(), and afterDraw() methods all come from the Drawable mixin class (which is defined in the same was a regular class except it does not have a constructor). Drawing is a behaviour, and this is a good use case for using a Mixin. As with inheritance, you can override methods or properties from a Mixin class. In this case I overrode  the &#8216;draw&#8217; method with a custom implementation. In this way Mixins can act like Abstract Classes, but you are free to use more than one at a time.</p>

<h3>callParent() is super!</h3>


<p>Also note the call to callParent() : this is equivalent to super() in ActionScript.. it calls the same method from which it is called on the parent class. So in a constructor it will call the super-class&#8217;s constructor. Note that the arguments must be passed as an array.</p>

<h3>Getting Loaded with Ext.Loader</h3>


<p>If you&#8217;ve worked on a large scale Javascript application, you know it can become a pain to maintain a large number of script tags, and resolve dependencies. Every time you add a new class to the system, you have to add it to the list of scripts includes in your HTML page, and you have to figure out where in the list of includes it has to go in order to have all of its dependencies satisfied <em>and</em> to satisfy its dependents. This is usually done by trial and error and can be quite annoying. Ext.Loader to the rescue! Once properly configured, you will never need to add another script tag again! Here&#8217;s how to set up dynamic loading in your main HTML file:</p>

<figure class='code'><figcaption><span></span></figcaption><div class="highlight"><table><tr><td class="gutter"><pre class="line-numbers"><span class='line-number'>1</span>
<span class='line-number'>2</span>
</pre></td><td class='code'><pre><code class='html'><span class='line'><span class="nt">&lt;script </span><span class="na">src=</span><span class="s">&quot;../../lib/extjs/ext-foundation-debug.js&quot;</span> <span class="na">type=</span><span class="s">&quot;text/javascript&quot;</span><span class="nt">&gt;</span><span class="c">&lt;!--</span><span class="nx">mce</span><span class="o">:</span><span class="mi">0</span><span class="o">--&gt;</span><span class="nt">&lt;/script&gt;</span>
</span><span class='line'><span class="nt">&lt;script </span><span class="na">type=</span><span class="s">&quot;text/javascript&quot;</span><span class="nt">&gt;</span><span class="c">&lt;!--</span><span class="nx">mce</span><span class="o">:</span><span class="mi">1</span><span class="o">--&gt;</span><span class="nt">&lt;/script&gt;</span>
</span></code></pre></td></tr></table></div></figure>


<p>The &#8216;enabled:true&#8217; attribute of the object passed to Ext.Loader.setConfig() is what turns on the dynamic loading of classes. When this is turned on, Ext JS will dynamically add a &#8216;script&#8217; tag when it notices that it needs to load a class. By default, it will look for a file with the same name as the class (replacing &#8216;.&#8217; with &#8216;/&#8217;) relative to the HTML file. If you wish to use a different path you will need to add a mapping to the &#8216;paths&#8217; hash object. By default, the &#8216;Ext&#8217; namespace is mapped to the &#8216;src&#8217; directory of the library so it will load other classes from the framework if you are using them.</p>

<p>Then you load your main app using a call to Ext.require(). In this case I required the main Asteroids game class, which was in the same directory as the HTML file this code is in. The &#8216;Asteroids&#8217; class itself has multiple dependent classes, and the Loader will recursively parse them until they are all satisfied.For example the &#8216;canvasutils.Context2D&#8217; class will be resolved to &#8216;../../lib/canvasutils/Context2D.js&#8217;. NB: make sure you name your class correctly, or errors will occur in the loading process. In addition to any classes referenced in an &#8216;extends&#8217; or &#8216;mixins&#8217; definition, there is a &#8216;requires&#8217; property which can be used to explicitly declare a class&#8217;s dependencies. For example in the Asteroids class, I have defined the requires as follows:</p>

<figure class='code'><figcaption><span></span></figcaption><div class="highlight"><table><tr><td class="gutter"><pre class="line-numbers"><span class='line-number'>1</span>
<span class='line-number'>2</span>
<span class='line-number'>3</span>
<span class='line-number'>4</span>
<span class='line-number'>5</span>
<span class='line-number'>6</span>
<span class='line-number'>7</span>
</pre></td><td class='code'><pre><code class='javascript'><span class='line'><span class="nx">Ext</span><span class="p">.</span><span class="nx">define</span><span class="p">(</span><span class="s1">&#39;Asteroids&#39;</span><span class="p">,</span> <span class="p">{</span>
</span><span class='line'>    <span class="nx">extend</span><span class="o">:</span> <span class="s1">&#39;oop.InitProps&#39;</span><span class="p">,</span>
</span><span class='line'>    <span class="nx">requires</span><span class="o">:</span> <span class="p">[</span><span class="s1">&#39;eventbus.EventBus&#39;</span><span class="p">,</span> <span class="s1">&#39;controller.TouchPad&#39;</span><span class="p">,</span> <span class="s1">&#39;drawable.DrawableLine&#39;</span><span class="p">,</span>
</span><span class='line'>     <span class="s1">&#39;soundeffects.SoundEffects&#39;</span><span class="p">,</span> <span class="s1">&#39;sprites.Rock&#39;</span><span class="p">,</span> <span class="s1">&#39;sprites.Ship&#39;</span><span class="p">,</span> <span class="s1">&#39;sprites.ShipFragment&#39;</span><span class="p">,</span>
</span><span class='line'>     <span class="s1">&#39;sprites.Bullet&#39;</span><span class="p">,</span> <span class="s1">&#39;drawable.Layer&#39;</span><span class="p">,</span> <span class="s1">&#39;controller.Keyboard&#39;</span><span class="p">,</span> <span class="s1">&#39;ui.Button&#39;</span><span class="p">,</span> <span class="s1">&#39;ui.Text&#39;</span><span class="p">,</span>
</span><span class='line'>     <span class="s1">&#39;interactive.DraggableLayer&#39;</span><span class="p">],</span>
</span><span class='line'>    <span class="c1">//...</span>
</span></code></pre></td></tr></table></div></figure>


<p>When the Loader is enabled, Ext JS will wait until all the dependent classes have been loaded before executing Ext.onReady(). At this point you can simply instantiate the class normally with &#8216;new&#8217; as I have done. Alternatively, you can use Ext.create() with the class name as a string. This has the advantage that if for some reason the class was not loaded, the Loader will load the class <em>synchronously</em>. However, this is non-optimal for performance, and you will be warned in the console about this. Since I want to avoid this, and for ease of debugging, I tend to use the old fashioned form of instantiation with &#8216;new Xxx()&#8217;, and remember to add the class to the list of &#8216;requires&#8217;.</p>

<p>Note that the order of the classes in the &#8216;requires&#8217; array does not matter.</p>

<h3>Building a Deployment version</h3>


<p>While loading .js files dynamically is nice for debugging, it is not optimal for deployment, due to all the additional HTTP requests. It is recommended to combine all the required Javascript files into one, and compress it by removing comments, whitespace, etc. If you have used the Ext.Loader as I describe above, this will be very easy. First you will need to install the free Sencha tools from <a href="http://www.sencha.com/products/extjs/">here</a> (see the links for the different platforms tools near the bottom of the page). Then use a terminal to go to the same directory as you HTML file and type the following command:</p>

<figure class='code'><figcaption><span></span></figcaption><div class="highlight"><table><tr><td class="gutter"><pre class="line-numbers"><span class='line-number'>1</span>
</pre></td><td class='code'><pre><code class='javascript'><span class='line'><span class="nx">sencha</span> <span class="nx">create</span> <span class="nx">jsb</span> <span class="o">-</span><span class="nx">a</span> <span class="nx">index</span><span class="p">.</span><span class="nx">html</span> <span class="o">-</span><span class="nx">p</span> <span class="nx">app</span><span class="p">.</span><span class="nx">jsb3</span>
</span></code></pre></td></tr></table></div></figure>


<p>This will create a .jsb3 (JSBuilder, Sencha&#8217;s JavaScript compression tool) configuration file for the application. If that worked then do this:</p>

<figure class='code'><figcaption><span></span></figcaption><div class="highlight"><table><tr><td class="gutter"><pre class="line-numbers"><span class='line-number'>1</span>
</pre></td><td class='code'><pre><code class='javascript'><span class='line'><span class="nx">sencha</span> <span class="nx">build</span> <span class="o">-</span><span class="nx">p</span> <span class="nx">app</span><span class="p">.</span><span class="nx">jsb3</span> <span class="o">-</span><span class="nx">d</span> <span class="p">.</span>
</span></code></pre></td></tr></table></div></figure>


<p>And you should have a app-all.js file which will be the combined and compressed version of your app. You should create another HTML file for deployment which references this file, rather than the Ext.Loader config we used for develpoment. That&#8217;s it! Your Ext JS 4 app is ready to go.</p>

<p>This is a brief overview of the Class system, for more info see the excellent docs:</p>

<p><a href="http://docs.sencha.com/ext-js/4-0/#/guide/class_system">Class System docs</a></p>

<p><a href="http://docs.sencha.com/ext-js/4-0/#/guide/getting_started">Ext JS 4 Getting Started</a></p>
]]></content>
  </entry>
  
  <entry>
    <title type="html"><![CDATA[Updates to Asteroids]]></title>
    <link href="http://www.dafishinsea.com/blog/2011/06/18/updates-to-asteroids/"/>
    <updated>2011-06-18T00:00:00-04:00</updated>
    <id>http://www.dafishinsea.com/blog/2011/06/18/updates-to-asteroids</id>
    <content type="html"><![CDATA[<p>I was pleasantly shocked the other day to see a pull request in my GitHub account for the <a href="http://canvasteroids.com">Canvasteroids game framework</a> I recently created. There were the following features added to the <a href="http://canvasteroids.com/games/asteroids/asteroids.html">Asteroids</a> game:</p>

<ul>
    <li>score</li>
    <li>lives</li>
    <li>game over after 3 lives lost</li>
    <li>an animation when the rocket is being thrusted</li>
    <li>enhancements to the firing of bullets</li>
    <li>a new Text class for the framework (used to display the lives and score)</li>
</ul>


<p>Some kind folks from the <a href="http://chicoteam.wordpress.com/">Chico State Open Source Team</a> had picked my project to flex their programming skills. I was quite impressed with the quality of their contributions, and that they were able to dive into the project which I admit is not really documented at all.</p>

<p>This has inspired me to continue my efforts on Canvasteroids, as well as documenting it better, to enable further collaboration. I&#8217;ve since posted on my blog about one of the patterns I use in the framework: <a href="http://www.dafishinsea.com/blog/2011/06/16/stop-programming-in-javascript/">&#8216;State and Transition Oriented Programming&#8217;</a>. I&#8217;ve also started on a second game, which I will hopefully be launching soon.</p>
]]></content>
  </entry>
  
  <entry>
    <title type="html"><![CDATA[STOP Programming in Javascript]]></title>
    <link href="http://www.dafishinsea.com/blog/2011/06/16/stop-programming-in-javascript/"/>
    <updated>2011-06-16T00:00:00-04:00</updated>
    <id>http://www.dafishinsea.com/blog/2011/06/16/stop-programming-in-javascript</id>
    <content type="html"><![CDATA[<p>You may be wondering about the title of this post&#8230; well, it isn&#8217;t the advice my grandfather gave me but I never heeded :)
STOP is a reference to the concept of State and Transition Oriented Programming.  I found out about this concept from Troy Gardner at the 360Flex conference a couple of years ago. The <a href="http://tv.adobe.com/watch/360flex-conference/advanced-state-management-by-troy-gardner/">video of this presentation</a> is well worth watching.</p>

<p>To summarize, in case you&#8217;re not done watching it yet.. States are a very important aspect of programming interactive systems, but they are often neglected and as a result can lead to nasty bugs. By dealing with states carefully and consciously it becomes a lot easier to develop more complex systems. Troy developed a framework in ActionScript to provide readymade support for state management and transitions.</p>

<p>It would be possible to port the framework to JavaScript, but the basic idea is so simple that it does not require a framework to implement and benefit from using it. This post is my attempt to describe how to do that.</p>

<p>Usually, from what I&#8217;ve seen, states are defined as constants, or enums or something like that, and assigned to some global variable&#8230;</p>

<figure class='code'><figcaption><span></span></figcaption><div class="highlight"><table><tr><td class="gutter"><pre class="line-numbers"><span class='line-number'>1</span>
<span class='line-number'>2</span>
<span class='line-number'>3</span>
<span class='line-number'>4</span>
</pre></td><td class='code'><pre><code class='javascript'><span class='line'><span class="k">if</span> <span class="p">(</span><span class="nx">isHoliday</span><span class="p">)</span>
</span><span class='line'>    <span class="nx">STATE</span> <span class="o">=</span> <span class="s2">&quot;happy&quot;</span><span class="p">;</span>
</span><span class='line'><span class="k">else</span>
</span><span class='line'>    <span class="nx">STATE</span> <span class="o">=</span> <span class="s2">&quot;sad&quot;</span><span class="p">;</span>
</span></code></pre></td></tr></table></div></figure>


<p>Then later on, there will be forks in the code to do different things depending on the state:</p>

<figure class='code'><figcaption><span></span></figcaption><div class="highlight"><table><tr><td class="gutter"><pre class="line-numbers"><span class='line-number'>1</span>
<span class='line-number'>2</span>
<span class='line-number'>3</span>
<span class='line-number'>4</span>
</pre></td><td class='code'><pre><code class='javascript'><span class='line'><span class="k">if</span> <span class="p">(</span><span class="nx">STATE</span> <span class="o">===</span> <span class="s2">&quot;happy&quot;</span><span class="p">)</span>
</span><span class='line'>    <span class="nx">smile</span><span class="p">();</span>
</span><span class='line'><span class="k">else</span> <span class="k">if</span> <span class="p">(</span><span class="nx">STATE</span> <span class="o">===</span> <span class="s2">&quot;sad&quot;</span><span class="p">)</span>
</span><span class='line'>    <span class="nx">frown</span><span class="p">();</span>
</span></code></pre></td></tr></table></div></figure>


<p>While this works fine most of the time, you can quickly end up with a mess of duplciated conditional logic all over the place, as every time you need to do something, you have to check which State is active to decide if and how you&#8217;re going to do it.</p>

<p>It&#8217;s worth considering the difference between lowercase &#8216;state&#8217; and uppercase State. The former is simply the values of variables that your application contains. This is vague and generalized and not what I&#8217;m referring to here. The uppercase State refers to a global condition which usually corresponds to a phase of activity of the application.  For example a video player component might be &#8216;loading&#8217; or &#8216;playing&#8217; or &#8216;paused&#8217;. The State of the application fundamentally changes its behaviour, and how it will respond to events. Having said this, I&#8217;m not going to consistently capitalize &#8216;State&#8217;, but I&#8217;m always referring to the this more specific meaning of the word.</p>

<p>Events are things that happen in your application, whether it is user input or a result of processing or time passing.  A collision between two objects is an example of a typical event in a game for example. Depending on which State the application is in, events will be handled differently. When events occur, we can send &#8216;messages&#8217; or &#8216;signals&#8217; to the currently active State, which can decide how to respond.</p>

<p>The idea that I&#8217;ve borrowed/stolen from Troy Gardner is to implement States as functions. Since they are essentially global constants, they are capitalized. This also indicates their special significance, and differentiates them from reqular functions. Here is how the two states of a light switch might be implemented (if we visualize the switch as having two buttons, &#8216;off&#8217; and &#8216;on&#8217;):</p>

<figure class='code'><figcaption><span></span></figcaption><div class="highlight"><table><tr><td class="gutter"><pre class="line-numbers"><span class='line-number'>1</span>
<span class='line-number'>2</span>
<span class='line-number'>3</span>
<span class='line-number'>4</span>
<span class='line-number'>5</span>
<span class='line-number'>6</span>
<span class='line-number'>7</span>
<span class='line-number'>8</span>
<span class='line-number'>9</span>
<span class='line-number'>10</span>
<span class='line-number'>11</span>
<span class='line-number'>12</span>
<span class='line-number'>13</span>
<span class='line-number'>14</span>
<span class='line-number'>15</span>
<span class='line-number'>16</span>
<span class='line-number'>17</span>
<span class='line-number'>18</span>
<span class='line-number'>19</span>
<span class='line-number'>20</span>
<span class='line-number'>21</span>
<span class='line-number'>22</span>
<span class='line-number'>23</span>
</pre></td><td class='code'><pre><code class='javascript'><span class='line'><span class="kd">var</span> <span class="nx">state</span> <span class="o">=</span> <span class="nx">OFF</span><span class="p">;</span>
</span><span class='line'>
</span><span class='line'><span class="nx">offBtn</span><span class="p">.</span><span class="nx">onClick</span> <span class="o">=</span> <span class="kd">function</span> <span class="p">()</span> <span class="p">{</span>
</span><span class='line'>    <span class="nx">state</span><span class="p">(</span><span class="s2">&quot;turn_off&quot;</span><span class="p">);</span>
</span><span class='line'><span class="p">}</span>
</span><span class='line'>
</span><span class='line'><span class="nx">onBtn</span><span class="p">.</span><span class="nx">onClick</span> <span class="o">=</span> <span class="kd">function</span> <span class="p">()</span> <span class="p">{</span>
</span><span class='line'>    <span class="nx">state</span><span class="p">(</span><span class="s2">&quot;turn_on&quot;</span><span class="p">);</span>
</span><span class='line'><span class="p">}</span>
</span><span class='line'>
</span><span class='line'><span class="kd">function</span> <span class="nx">OFF</span><span class="p">(</span><span class="nx">msg</span><span class="p">)</span> <span class="p">{</span>
</span><span class='line'>    <span class="k">if</span><span class="p">(</span><span class="nx">msg</span> <span class="o">===</span> <span class="s2">&quot;turn_on&quot;</span><span class="p">)</span> <span class="p">{</span>
</span><span class='line'>        <span class="nx">turnLightOn</span><span class="p">();</span>
</span><span class='line'>        <span class="nx">state</span> <span class="o">=</span> <span class="nx">ON</span><span class="p">;</span>
</span><span class='line'>    <span class="p">}</span>
</span><span class='line'><span class="p">}</span>
</span><span class='line'>
</span><span class='line'><span class="kd">function</span> <span class="nx">ON</span><span class="p">(</span><span class="nx">msg</span><span class="p">)</span> <span class="p">{</span>
</span><span class='line'>    <span class="k">if</span><span class="p">(</span><span class="nx">msg</span> <span class="o">===</span> <span class="s2">&quot;turn_off&quot;</span><span class="p">)</span> <span class="p">{</span>
</span><span class='line'>        <span class="nx">turnLightOff</span><span class="p">();</span>
</span><span class='line'>        <span class="nx">state</span> <span class="o">=</span> <span class="nx">OFF</span><span class="p">;</span>
</span><span class='line'>    <span class="p">}</span>
</span><span class='line'><span class="p">}</span>
</span></code></pre></td></tr></table></div></figure>


<p>Notice how the event handlers did not have to know about the different States of the application, but simply sent a message to the currently active State function, which is dynamically assigned when the state is set.  Assigning the State function to the &#8216;state&#8217; variable effectively sets the State, and alters the behaviour of the system&#8230;  Note how the OFF State does not respond to the &#8216;turn_off&#8217; message, and the ON State does not respond to the &#8216;turn_on&#8217; message. There is no switching on the state value - rather the State function will handle the messages it is sent, ignoring any it is not interested in.</p>

<h3>Transitions</h3>


<p>It is often necessary to perform actions when changing from one State to another. But it can be easily done by using &#8216;enter&#8217; and &#8216;exit&#8217; messages which are passed to every State when they are made active or deactivated. The way to make this happen is to use a &#8216;changeState()&#8217; function to change from one state to another:</p>

<figure class='code'><figcaption><span></span></figcaption><div class="highlight"><table><tr><td class="gutter"><pre class="line-numbers"><span class='line-number'>1</span>
<span class='line-number'>2</span>
<span class='line-number'>3</span>
<span class='line-number'>4</span>
<span class='line-number'>5</span>
</pre></td><td class='code'><pre><code class='javascript'><span class='line'><span class="kd">function</span> <span class="nx">changeState</span><span class="p">(</span><span class="nx">newState</span><span class="p">)</span> <span class="p">{</span>
</span><span class='line'>    <span class="k">this</span><span class="p">.</span><span class="nx">state</span><span class="p">(</span><span class="s1">&#39;exit&#39;</span><span class="p">);</span>
</span><span class='line'>    <span class="k">this</span><span class="p">.</span><span class="nx">state</span> <span class="o">=</span> <span class="nx">newState</span><span class="p">;</span>
</span><span class='line'>    <span class="k">this</span><span class="p">.</span><span class="nx">state</span><span class="p">(</span><span class="s1">&#39;enter&#39;</span><span class="p">);</span>
</span><span class='line'><span class="p">}</span>
</span></code></pre></td></tr></table></div></figure>


<p>Then you can manage your transitions by listening for these messages in your State functions:</p>

<figure class='code'><figcaption><span></span></figcaption><div class="highlight"><table><tr><td class="gutter"><pre class="line-numbers"><span class='line-number'>1</span>
<span class='line-number'>2</span>
<span class='line-number'>3</span>
<span class='line-number'>4</span>
<span class='line-number'>5</span>
<span class='line-number'>6</span>
<span class='line-number'>7</span>
<span class='line-number'>8</span>
<span class='line-number'>9</span>
<span class='line-number'>10</span>
</pre></td><td class='code'><pre><code class='javascript'><span class='line'><span class="kd">function</span> <span class="nx">DAY</span><span class="p">(</span><span class="nx">msg</span><span class="p">)</span> <span class="p">{</span>
</span><span class='line'>    <span class="k">if</span> <span class="p">(</span><span class="nx">msg</span> <span class="o">===</span> <span class="s2">&quot;enter&quot;</span><span class="p">)</span> <span class="p">{</span>
</span><span class='line'>        <span class="nx">wakeUp</span><span class="p">();</span>
</span><span class='line'>    <span class="p">}</span> <span class="k">else</span> <span class="k">if</span><span class="p">(</span><span class="nx">msg</span> <span class="o">=</span> <span class="s2">&quot;exit&quot;</span><span class="p">)</span> <span class="p">{</span>
</span><span class='line'>        <span class="nx">turnLightsOn</span><span class="p">();</span>
</span><span class='line'>    <span class="p">}</span>
</span><span class='line'><span class="p">}</span>
</span><span class='line'>
</span><span class='line'><span class="nx">changeState</span><span class="p">(</span><span class="nx">DAY</span><span class="p">);</span>
</span><span class='line'><span class="nx">changeState</span><span class="p">(</span><span class="nx">NIGHT</span><span class="p">);</span><span class="c1">//lights get turned on</span>
</span></code></pre></td></tr></table></div></figure>


<h3>Hierarchical States</h3>


<p>If you want to nest States, eg. LUNCH within DAY, this can be done by passing on any unknown messages to the super-state:</p>

<figure class='code'><figcaption><span></span></figcaption><div class="highlight"><table><tr><td class="gutter"><pre class="line-numbers"><span class='line-number'>1</span>
<span class='line-number'>2</span>
<span class='line-number'>3</span>
<span class='line-number'>4</span>
<span class='line-number'>5</span>
<span class='line-number'>6</span>
<span class='line-number'>7</span>
</pre></td><td class='code'><pre><code class='javascript'><span class='line'><span class="kd">function</span> <span class="nx">LUNCH</span> <span class="p">(</span><span class="nx">msg</span><span class="p">)</span> <span class="p">{</span>
</span><span class='line'>    <span class="k">if</span><span class="p">(</span><span class="nx">msg</span> <span class="o">===</span> <span class="s2">&quot;eat&quot;</span><span class="p">)</span> <span class="p">{</span>
</span><span class='line'>        <span class="nx">eatLunch</span><span class="p">();</span>
</span><span class='line'>    <span class="p">}</span> <span class="k">else</span> <span class="p">{</span>
</span><span class='line'>        <span class="nx">DAY</span><span class="p">(</span><span class="nx">msg</span><span class="p">);</span><span class="c1">//eg &quot;check_email&quot; msg would be handled by DAY</span>
</span><span class='line'>    <span class="p">}</span>
</span><span class='line'><span class="p">}</span>
</span></code></pre></td></tr></table></div></figure>


<p>If you have events which need to be handled at any time, they can be put in a BASE state, and other states can pass on messages to it.  For example, if the user resizes the browser window, there could be a &#8216;resize&#8217; message which would be handled by the BASE State:</p>

<figure class='code'><figcaption><span></span></figcaption><div class="highlight"><table><tr><td class="gutter"><pre class="line-numbers"><span class='line-number'>1</span>
<span class='line-number'>2</span>
<span class='line-number'>3</span>
<span class='line-number'>4</span>
<span class='line-number'>5</span>
<span class='line-number'>6</span>
<span class='line-number'>7</span>
<span class='line-number'>8</span>
<span class='line-number'>9</span>
<span class='line-number'>10</span>
<span class='line-number'>11</span>
<span class='line-number'>12</span>
<span class='line-number'>13</span>
<span class='line-number'>14</span>
<span class='line-number'>15</span>
<span class='line-number'>16</span>
</pre></td><td class='code'><pre><code class='javascript'><span class='line'><span class="kd">function</span> <span class="nx">BASE</span> <span class="p">(</span><span class="nx">msg</span><span class="p">)</span> <span class="p">{</span>
</span><span class='line'>    <span class="k">if</span> <span class="p">(</span><span class="nx">msg</span> <span class="o">===</span> <span class="s2">&quot;resize&quot;</span><span class="p">)</span> <span class="p">{</span>
</span><span class='line'>        <span class="nx">resizeGame</span><span class="p">();</span>
</span><span class='line'>    <span class="p">}</span>
</span><span class='line'><span class="p">}</span>
</span><span class='line'>
</span><span class='line'><span class="kd">function</span> <span class="nx">PLAYING</span> <span class="p">(</span><span class="nx">msg</span><span class="p">)</span> <span class="p">{</span>
</span><span class='line'>
</span><span class='line'>    <span class="k">if</span> <span class="p">(</span><span class="nx">msg</span> <span class="o">===</span> <span class="s2">&quot;scored&quot;</span><span class="p">)</span> <span class="p">{</span>
</span><span class='line'>        <span class="nx">increaseScore</span><span class="p">();</span>
</span><span class='line'>    <span class="p">}</span>
</span><span class='line'>
</span><span class='line'>    <span class="c1">//always pass on messages to BASE</span>
</span><span class='line'>    <span class="nx">BASE</span><span class="p">(</span><span class="nx">msg</span><span class="p">);</span><span class="c1">//resize will be handled</span>
</span><span class='line'>
</span><span class='line'><span class="p">}</span>
</span></code></pre></td></tr></table></div></figure>


<p>As you can see by comparing these two examples, you have the option of passing all messages to the super-state, or only passing on unknown messages.</p>

<p>This method of handling events by sending messages to State functions is very flexible and dynamic, and makes adding new States easy. It adds some abstraction between events and the response to them, which reduces coupling within your application. It also reduces duplication and conditional branching, and I think it also makes the code easier to read, as behaviours are grouped by State and message, which should be self-descriptive.</p>

<p>Finally, STOP programming is not opposed in any way to OOP, but is orthogonal to it. I have found it to be particularly useful in developing games, which tend to have many different states with different behaviours.</p>

<p>For a more complex example of this pattern in action, see the <a href="https://github.com/bigfish/canvasteroids/blob/master/games/asteroids/Asteroids.js">Asteroids</a> game.</p>
]]></content>
  </entry>
  
  <entry>
    <title type="html"><![CDATA[A is for Asteroids]]></title>
    <link href="http://www.dafishinsea.com/blog/2011/05/13/a-is-for-asteroids/"/>
    <updated>2011-05-13T00:00:00-04:00</updated>
    <id>http://www.dafishinsea.com/blog/2011/05/13/a-is-for-asteroids</id>
    <content type="html"><![CDATA[<p>A while back I decided to have a go at making a Javascript + Canvas version of Asteroids. I was able to get a basic version of the game working in a weekend, but I wasn&#8217;t happy about the code being in one huge file, so I set about refactoring it using <a href="http://www.sencha.com/products/extjs/">ExtJS 4</a> for OO support (but not the whole library). This turned out to be quite addictive and after a while I had a small library of code on my hands. The initial title of the game was &#8216;CanvAsteroids&#8217;, but as I shifted to working on the supporting library I started to think of it as &#8216;CanvaSteroids&#8217; : Canvas on Steroids. And so I have named the library this awkward name  and renamed the game itself to just be Asteroids. The plan is to work my way through the alphabet, making a game for each letter. Next is Breakout. It&#8217;s good to have goals ;)</p>

<p>I want to write some more posts about some of the techniques I used to get the game working, especially the collision detection. I found a way to do this using the Canvas &#8216;isPointInPath&#8217; method, which seems to perform quite well. The game uses keyboard for controls (left-right arrows for turning, spacebar to fire) and I also added some mouse/touch control inspired by Seb Deslisle&#8217;s <a href="http://sebleedelisle.com/2011/04/multi-touch-game-controller-in-javascripthtml5-for-ipad/">JSTouchController</a>. I don&#8217;t think the game is really well suited to touch, but at least I learned how to handle the touch events. If anyone has an iPad I&#8217;d be interested to know how it works.. unfortunately I heard the performance of Canvas is not great on iOS. However I&#8217;m really not into targeting one platform, and I&#8217;d like the games to be playable on any desktop or mobile device which has a decent browser (ie supports Canvas). For the IE &lt; 9 users, I added <a href="http://code.google.com/chrome/chromeframe/">Chrome Frame</a>. For sound I used <a href="http://www.schillmania.com/projects/soundmanager2/doc/getstarted/#basic-inclusion">SoundManager2</a>. The actual sounds were recorded off my Atari 2600 during gameplay, and edited in Audacity.</p>

<p>Anyways, enough nerdy banter.. here&#8217;s the game (warning LOUD sound effects!).</p>

<p><a href="http://canvasteroids.com/games/asteroids/asteroids.html"><img style="border:none" src="http://canvasteroids.com/screenshots/asteroids.png" alt="Play Asteroids" /></a></p>

<p>I used GitHub&#8217;s nifty new pages feature (plus a domain) to host a site here:</p>

<p><a href="http://canvasteroids.com">canvasteroids.com</a></p>

<p>And for all your source-y needs, the <a href="http://github.com/bigfish/canvasteroids">Github repo</a></p>
]]></content>
  </entry>
  
  <entry>
    <title type="html"><![CDATA[Modular Javascript Development with RequireJS]]></title>
    <link href="http://www.dafishinsea.com/blog/2011/03/07/modular-javascript-development-with-requirejs/"/>
    <updated>2011-03-07T00:00:00-05:00</updated>
    <id>http://www.dafishinsea.com/blog/2011/03/07/modular-javascript-development-with-requirejs</id>
    <content type="html"><![CDATA[<p><a href="http://requirejs.org">RequireJS</a> is a micro-library focused on defining and loading Javascript &#8216;modules&#8217; so that they can easily be loaded in your own or other peoples projects.  Since Javascript has no compiler, the &lt;script&gt; tag has traditionally been the equivalent of the &#8216;import&#8217; statement in compiled languages. But it has been hard to combine multiple JS libraries which may end up clobbering each others prototypes, leading to mysterious bugs. The <a href="http://www.adequatelygood.com/2010/3/JavaScript-Module-Pattern-In-Depth">module pattern</a> is a well accepted pattern for preventing exposing global variables, although you still have a global variable for the module itself. With RequireJS you can reduce the number of globals even further, since modules are not assigned to global variables but are require() &#8216;d inside other modules.</p>

<p>Another benefit is performance.. loading scripts should be asynchonous for best usage of the network. Traditional &lt;script&gt; tags are synchronous and blocking, even if the code is not immediately required.  Other approaches to loading code use XHR &amp; eval() which makes debugging hard, and restrict to same origin (though there are workarounds). So RequireJS creates script tags dynamically, and appends them to the head of the document.</p>

<p>OK, how do you use it ? If you simply want to include an external script (whatever it may be), you can do this:</p>

<figure class='code'><figcaption><span></span></figcaption><div class="highlight"><table><tr><td class="gutter"><pre class="line-numbers"><span class='line-number'>1</span>
<span class='line-number'>2</span>
<span class='line-number'>3</span>
</pre></td><td class='code'><pre><code class='javascript'><span class='line'><span class="nx">require</span><span class="p">([</span><span class="s2">&quot;some/script.js&quot;</span><span class="p">],</span> <span class="kd">function</span> <span class="p">()</span> <span class="p">{</span>
</span><span class='line'>    <span class="c1">//do stuff once it is loaded</span>
</span><span class='line'><span class="p">});</span>
</span></code></pre></td></tr></table></div></figure>


<p>So what is going one here is that the first argument to &#8216;require()&#8217; is an array of dependencies, which are paths to Javascript files. The callback function is executed once the file has been loaded. Pretty simple. However the real power of RequireJS comes about when you also define your modules with a special define() function, which in turn declare their dependencies.. and so on, and so on, recursively. Usually, the Module Pattern is implemented with a closure function:</p>

<figure class='code'><figcaption><span></span></figcaption><div class="highlight"><table><tr><td class="gutter"><pre class="line-numbers"><span class='line-number'>1</span>
<span class='line-number'>2</span>
<span class='line-number'>3</span>
<span class='line-number'>4</span>
<span class='line-number'>5</span>
<span class='line-number'>6</span>
<span class='line-number'>7</span>
<span class='line-number'>8</span>
</pre></td><td class='code'><pre><code class='javascript'><span class='line'><span class="nx">MyModule</span> <span class="o">=</span> <span class="p">(</span><span class="kd">function</span> <span class="p">()</span> <span class="p">{</span>
</span><span class='line'>    <span class="kd">function</span> <span class="nx">boo</span><span class="p">()</span> <span class="p">{</span>
</span><span class='line'>        <span class="nx">alert</span><span class="p">(</span><span class="s2">&quot;boo!&quot;</span><span class="p">);</span>
</span><span class='line'>    <span class="p">}</span>
</span><span class='line'>    <span class="k">return</span> <span class="p">{</span>
</span><span class='line'>        <span class="nx">frighten</span><span class="o">:</span> <span class="nx">boo</span>
</span><span class='line'>    <span class="p">}</span>
</span><span class='line'><span class="p">})();</span>
</span></code></pre></td></tr></table></div></figure>


<p>With RequireJS you use the define() function instead of the anonymous closure:</p>

<figure class='code'><figcaption><span></span></figcaption><div class="highlight"><table><tr><td class="gutter"><pre class="line-numbers"><span class='line-number'>1</span>
<span class='line-number'>2</span>
<span class='line-number'>3</span>
<span class='line-number'>4</span>
<span class='line-number'>5</span>
<span class='line-number'>6</span>
<span class='line-number'>7</span>
<span class='line-number'>8</span>
<span class='line-number'>9</span>
<span class='line-number'>10</span>
</pre></td><td class='code'><pre><code class='javascript'><span class='line'><span class="nx">define</span><span class="p">([</span><span class="s1">&#39;dependency/first&#39;</span><span class="p">,</span> <span class="s1">&#39;deependency/second&#39;</span><span class="p">]</span> <span class="p">,</span> <span class="kd">function</span> <span class="p">(</span><span class="nx">d1</span><span class="p">,</span> <span class="nx">d2</span><span class="p">)</span> <span class="p">{</span>
</span><span class='line'>    <span class="c1">//when this gets called, the dependencies are loaded and available as d1, d2</span>
</span><span class='line'>    <span class="kd">function</span> <span class="nx">boo</span><span class="p">()</span> <span class="p">{</span>
</span><span class='line'>        <span class="nx">alert</span><span class="p">(</span><span class="s2">&quot;boo!&quot;</span><span class="p">);</span>
</span><span class='line'>    <span class="p">}</span>
</span><span class='line'>    <span class="c1">//you must return the module explicitly:</span>
</span><span class='line'>    <span class="k">return</span> <span class="p">{</span>
</span><span class='line'>        <span class="nx">frighten</span><span class="o">:</span> <span class="nx">boo</span>
</span><span class='line'>    <span class="p">}</span>
</span><span class='line'><span class="p">});</span>
</span></code></pre></td></tr></table></div></figure>


<p>If this was in a file called /scripts/scary.js, you could obtain an instance of the module as follows (in /index.html):</p>

<figure class='code'><figcaption><span></span></figcaption><div class="highlight"><table><tr><td class="gutter"><pre class="line-numbers"><span class='line-number'>1</span>
</pre></td><td class='code'><pre><code class='html'><span class='line'>  <span class="nt">&lt;script </span><span class="na">type=</span><span class="s">&quot;text/javascript&quot;</span><span class="nt">&gt;</span><span class="c">&lt;!--</span><span class="nx">mce</span><span class="o">:</span><span class="mi">0</span><span class="o">--&gt;</span><span class="nt">&lt;/script&gt;</span>
</span></code></pre></td></tr></table></div></figure>


<p>Notice that there is no .js on the end of the filename. RequireJS will see that and look for a define() function in the file to get the module with. Note that if you omit the .js on the path, the module <em>must</em> be defined using the define(). Another option, which avoids using any inline script in your HTML, is to use a &lt;script&gt; tag with require.js as the &#8216;src&#8217;, and give a data-main attribute to indicate the entry point of your app.</p>

<figure class='code'><figcaption><span></span></figcaption><div class="highlight"><table><tr><td class="gutter"><pre class="line-numbers"><span class='line-number'>1</span>
</pre></td><td class='code'><pre><code class='html'><span class='line'> <span class="nt">&lt;script </span><span class="na">src=</span><span class="s">&quot;scripts/require.js&quot;</span><span class="nt">&gt;</span><span class="c">&lt;!--</span><span class="nx">mce</span><span class="o">:</span><span class="mi">1</span><span class="o">--&gt;</span><span class="nt">&lt;/script&gt;</span>
</span></code></pre></td></tr></table></div></figure>


<p>This would work if we had a script called &#8216;main.js&#8217; in the scripts folder with something like this in it:</p>

<figure class='code'><figcaption><span></span></figcaption><div class="highlight"><table><tr><td class="gutter"><pre class="line-numbers"><span class='line-number'>1</span>
<span class='line-number'>2</span>
<span class='line-number'>3</span>
</pre></td><td class='code'><pre><code class='javascript'><span class='line'><span class="nx">define</span><span class="p">([</span><span class="s1">&#39;scary&#39;</span><span class="p">],</span> <span class="kd">function</span> <span class="p">(</span><span class="nx">scary</span><span class="p">))</span> <span class="p">{</span>
</span><span class='line'>    <span class="nx">scary</span><span class="p">.</span><span class="nx">boo</span><span class="p">();</span>
</span><span class='line'><span class="p">};</span>
</span></code></pre></td></tr></table></div></figure>


<p>Notice how the dependency is passed as an argument to the callback function. If there are more than one dependency, they will be passed as additional arguments, in the same order as the dependencies.</p>

<p>If you need to interact with the DOM, you should be aware that your dependencies may be loaded before the document itself is loaded, so you can use the require.ready() function which fires when the document is ready AND all dependencies have loaded&#8230;</p>

<figure class='code'><figcaption><span></span></figcaption><div class="highlight"><table><tr><td class="gutter"><pre class="line-numbers"><span class='line-number'>1</span>
<span class='line-number'>2</span>
<span class='line-number'>3</span>
<span class='line-number'>4</span>
<span class='line-number'>5</span>
<span class='line-number'>6</span>
<span class='line-number'>7</span>
</pre></td><td class='code'><pre><code class='javascript'><span class='line'><span class="nx">define</span><span class="p">([</span><span class="s1">&#39;scary&#39;</span><span class="p">],</span> <span class="kd">function</span> <span class="p">(</span><span class="nx">scary</span><span class="p">))</span> <span class="p">{</span>
</span><span class='line'>    <span class="nx">require</span><span class="p">.</span><span class="nx">ready</span><span class="p">(</span><span class="kd">function</span> <span class="p">()</span> <span class="p">{</span>
</span><span class='line'>        <span class="c1">//start app</span>
</span><span class='line'>        <span class="nx">scary</span><span class="p">.</span><span class="nx">boo</span><span class="p">();</span>
</span><span class='line'>        <span class="c1">//do DOM stuff...</span>
</span><span class='line'>    <span class="p">});</span>
</span><span class='line'><span class="p">};</span>
</span></code></pre></td></tr></table></div></figure>


<p>Note that the module name is relative to the directory containing the &#8216;data-main&#8217; module.  Also note, require.ready() uses window.onload for browsers (mostly IE) which do not support the DOMContentLoaded event. This may be slow if you have a lot of stuff on your page.</p>

<p>An example of more advanced usage is that an object literal can be passed in as the first argument to the require() function, to add some additional customization, eg, setting a baseURL, or some paths which will be expanded in the names of the dependencies.</p>

<h4>Advanced Usage: CommonJS Compatibility</h4>


<p><a href="http://wiki.commonjs.org/wiki/Packages/1.1">CommonJS</a> is a JS package standard, used by, eg. <a href="http://npmjs.org/">NPM</a> (Node Package Manager &#8211; see previous post). Therefore it is desirable that RequireJS would grok CommonJS packages. However, you need to specify some additional configuration in you package.json for this to work, eg.</p>

<figure class='code'><figcaption><span></span></figcaption><div class="highlight"><table><tr><td class="gutter"><pre class="line-numbers"><span class='line-number'>1</span>
<span class='line-number'>2</span>
</pre></td><td class='code'><pre><code class='javascript'><span class='line'><span class="nx">lib</span><span class="o">:</span> <span class="s1">&#39;some/dir&#39;</span><span class="p">,</span> <span class="c1">//the dir containing the modules, (default = lib)</span>
</span><span class='line'><span class="nx">main</span><span class="o">:</span> <span class="s1">&#39;script/app&#39;</span> <span class="c1">//the name of the module in the lib dir which will be used when someone require() &#39;s the packageName (default = lib/main))</span>
</span></code></pre></td></tr></table></div></figure>


<p>NB: for the package&#8217;s modules to be loaded they must be wrapped in a define () function as below .. this can be done manually or with a script (RequireJS provides some scripts for mass conversion).</p>

<figure class='code'><figcaption><span></span></figcaption><div class="highlight"><table><tr><td class="gutter"><pre class="line-numbers"><span class='line-number'>1</span>
<span class='line-number'>2</span>
<span class='line-number'>3</span>
<span class='line-number'>4</span>
<span class='line-number'>5</span>
</pre></td><td class='code'><pre><code class='javascript'><span class='line'><span class="nx">define</span><span class="p">(</span><span class="kd">function</span><span class="p">(</span><span class="nx">require</span><span class="p">,</span> <span class="nx">exports</span><span class="p">,</span> <span class="nx">module</span><span class="p">)</span> <span class="p">{</span>
</span><span class='line'>    <span class="nx">exports</span><span class="p">.</span><span class="nx">boo</span> <span class="o">=</span> <span class="kd">function</span> <span class="p">()</span> <span class="p">{</span>
</span><span class='line'>        <span class="nx">alert</span><span class="p">(</span><span class="s2">&quot;boo!&quot;</span><span class="p">);</span>
</span><span class='line'>    <span class="p">}</span>
</span><span class='line'><span class="p">});</span>
</span></code></pre></td></tr></table></div></figure>


<p>This must be exactly specified as above! (ie the parameters of the function must be &#8216;require&#8217;, &#8216;exports&#8217;, &#8216;module&#8217; in that order). This seems a bit weird &#8230; how do you declare dependencies, if you must stick to this exact function signature? Well, the answer is that there is some magic at work&#8230; RequireJS looks for any &#8216;require()&#8217; function calls in your module, and makes sure they are all loaded before the function is called! This is done because CommonJS has its own require() function, which is synchronous, so RequireJS essentially overrides it with its own asynchronous version. It is the &#8216;require&#8217; parameter which triggers this behaviour. But what about the &#8216;exports&#8217; and &#8216;module&#8217; parameters ? Well, the exports argument is what will be returned when require() is called for this module. It is not necessary to return anything from the define() function, the value of &#8216;exports&#8217; will be automatically returned. I&#8217;m not quite sure what the &#8216;module&#8217; argument is for, as I haven&#8217;t seen it used anywhere, so its probably best to leave it alone.. perhaps it just provides backwards compatibility with CommonJS syntax? In fact, it is possible to leave out the &#8216;exports&#8217; and &#8216;module&#8217; arguments <em>if</em> you return the module explicitly from the function given to define() .. exactly as in normal non-CommonJS usage. <a href="http://requirejs.org/docs/commonjs.html#exports">See here</a>.</p>

<h4>Optimization</h4>


<p>RequireJS provides an optimization tool, which uses <a href="https://github.com/mishoo/UglifyJS">UglifyJS</a> as its compressor.</p>

<p>TO use it, clone or download the <a href="http://github.com/jrburke/requirejs">RequireJS source code</a> as a sibling of your project and run the following command from the scripts (or lib, if in a CommonJS package) dir:</p>

<figure class='code'><figcaption><span></span></figcaption><div class="highlight"><table><tr><td class="gutter"><pre class="line-numbers"><span class='line-number'>1</span>
</pre></td><td class='code'><pre><code class='javascript'><span class='line'>   <span class="p">..</span><span class="o">/</span><span class="p">..</span><span class="o">/</span><span class="nx">requirejs</span><span class="o">/</span><span class="nx">build</span><span class="o">/</span><span class="nx">build</span><span class="p">.</span><span class="nx">sh</span> <span class="nx">name</span><span class="o">=</span><span class="nx">main</span> <span class="nx">out</span><span class="o">=</span><span class="nx">main</span><span class="o">-</span><span class="nx">built</span><span class="p">.</span><span class="nx">js</span> <span class="nx">baseUrl</span><span class="o">=</span><span class="p">.</span>
</span></code></pre></td></tr></table></div></figure>


<p>And you will have a compressed main-built.js file with all your dependencies in it, so they can be required with a single HTTP request. Eg., you could change the script tag above to:</p>

<figure class='code'><figcaption><span></span></figcaption><div class="highlight"><table><tr><td class="gutter"><pre class="line-numbers"><span class='line-number'>1</span>
</pre></td><td class='code'><pre><code class='html'><span class='line'>  <span class="nt">&lt;script </span><span class="na">src=</span><span class="s">&quot;scripts/require.js&quot;</span><span class="nt">&gt;</span><span class="c">&lt;!--</span><span class="nx">mce</span><span class="o">:</span><span class="mi">2</span><span class="o">--&gt;</span><span class="nt">&lt;/script&gt;</span>;
</span></code></pre></td></tr></table></div></figure>


<p>The RequireJS docs are excellent, and even nice to look at, so I recommend checking them out for more info, or if this becomes out of date&#8230;</p>

<h4>API Docs</h4>


<p><a href="http://requirejs.org/docs/api.html">http://requirejs.org/docs/api.html</a></p>
]]></content>
  </entry>
  
  <entry>
    <title type="html"><![CDATA[NodeJS and Friends]]></title>
    <link href="http://www.dafishinsea.com/blog/2011/03/01/188/"/>
    <updated>2011-03-01T00:00:00-05:00</updated>
    <id>http://www.dafishinsea.com/blog/2011/03/01/188</id>
    <content type="html"><![CDATA[<h3>Javascript Dev Tools: NodeJS, NPM, CommonJS, Teleport</h3>


<p>I&#8217;ve recently discovered some neat tools which help make Javascript development easier. Everyone is excited about HTML5, which Brendan Eich (the inventor of Javascript) describes as &#8216;The unicorn which craps skittles from its rear end&#8217;. The Javascript language awaits a much needed update with ES5 Harmony, but in the meantime it has access to some cool new APIs in the form of HTML5 features such as Canvas, Local Storage, etc.</p>

<p>But what about outside of the browser? There have been some attempts to use Javascript on the server, but they don&#8217;t seem to have gained much widespread adoption. Then came <a href="http://nodejs.org/">NodeJS</a>. If you haven&#8217;t heard about NodeJS I recommend you checkout <a href="http://www.yuiblog.com/blog/2010/05/20/video-dahl/">this video by Ryan Dahl</a>, the creator of NodeJS:</p>

<p>NodeJS is revolutionary in that it give Javascript access to the filesystem and network, with a performance oriented event-based approach that solves concurrency elegantly without the pain of multithreading. In itself this might only be interesting to hardcore server geeks, but NodeJS is being used as the infrastructure for a lot of other projects. Some of them are deployed by <a href="http://npmjs.org/">NPM</a>, the Node Package Manager, which (surprise!) is a package management system for NodeJS applications. So once you have installed NodeJS and NPM, you can easily install other libraries on the command line. And you can create your own projects, using the <a href="http://wiki.commonjs.org/wiki/Packages/1.1">CommonJS</a> package format. This is made easy by the &#8216;npm init&#8217; command, which creates a package.json configuration file for you automatically (I will give an example later).</p>

<p>But what if you&#8217;re more interested in client-side applications which run in a web-browser? No problem! <a href="http://jeditoolkit.com/teleport/#guide">Teleport</a> comes to the rescue. This is itself a NodeJS package which you can install using NPM. Now once you have created a basic NPM / Common JS app, you just include the teleport library as a dependency. Then you can write your Javascript just as you usually would for a web-app. To test the app in a browser you run &#8216;teleport activate&#8217; and Teleported will spawn a nodeJS webserver with your app running in it.</p>

<p>Once you have an awesome app ready, you can publish it to the NPM repository library with a single command (npm publish), so that other people can install it. No fussing about with web servers or downloading code. I&#8217;m really excited about the possibilities this creates for sharing client-server applications where the server is your own machine. Suddenly Javascript becomes a viable language for serious desktop applications with access to the filesystem and the network, as well as all the new HTML5 GUI goodness. Because the app runs on your own system, you can run it offline, and performance is going to be way better than over the internet.</p>

<p>In order to demonstrate just how easy this all is I will break it down for you, assuming you have nothing installed. Here we go:</p>

<p>Prerequisites:</p>

<ul>
    <li><a href="https://github.com/joyent/node/wiki/Installation">Install Node JS and NPM</a></li>
    <li>Install Teleport:</li>
</ul>


<pre><code>sudo npm install teleport
</code></pre>


<p>Create a NPM app (I called mine frappuccino) using the command line:</p>

<pre><code>mkdir frappucino
cd frappucino
npm init
</code></pre>


<p>At this point, you will go through a wizard to generate the package.conf file. It is just to provide metadata for your app, don&#8217;t worry too much about the answers, most of them are fine as they are. You can always edit it afterwards. For the &#8216;module entry point&#8217; question I left it as default, and for the &#8216;where do your modules live&#8217; I said &#8216;lib&#8217; (this is standard, but not default).  It actually guessed I was using a Git repo which I have in my home directory, which is not the repo I want to use, so I had to remove that reference afterwards. If you run it in a git repo, it will figure it out and use the info from that for the repository info. So if you want to do that, you should create the git repo first. After removing the incorrect repo info, my package.conf file looks like this:</p>

<figure class='code'><figcaption><span></span></figcaption><div class="highlight"><table><tr><td class="gutter"><pre class="line-numbers"><span class='line-number'>1</span>
<span class='line-number'>2</span>
<span class='line-number'>3</span>
<span class='line-number'>4</span>
<span class='line-number'>5</span>
<span class='line-number'>6</span>
<span class='line-number'>7</span>
<span class='line-number'>8</span>
<span class='line-number'>9</span>
<span class='line-number'>10</span>
<span class='line-number'>11</span>
<span class='line-number'>12</span>
<span class='line-number'>13</span>
<span class='line-number'>14</span>
<span class='line-number'>15</span>
</pre></td><td class='code'><pre><code class='javascript'><span class='line'><span class="p">{</span>
</span><span class='line'>    <span class="s2">&quot;name&quot;</span><span class="o">:</span> <span class="s2">&quot;frappucino&quot;</span><span class="p">,</span>
</span><span class='line'>    <span class="s2">&quot;description&quot;</span><span class="o">:</span> <span class="s2">&quot;Frothy App&quot;</span><span class="p">,</span>
</span><span class='line'>    <span class="s2">&quot;version&quot;</span><span class="o">:</span> <span class="s2">&quot;0.0.0&quot;</span><span class="p">,</span>
</span><span class='line'>    <span class="s2">&quot;author&quot;</span><span class="o">:</span> <span class="s2">&quot;David Wilhelm &quot;</span><span class="p">,</span>
</span><span class='line'>    <span class="s2">&quot;directories&quot;</span><span class="o">:</span> <span class="p">{</span>
</span><span class='line'>        <span class="s2">&quot;lib&quot;</span><span class="o">:</span> <span class="s2">&quot;lib&quot;</span>
</span><span class='line'>    <span class="p">},</span>
</span><span class='line'>    <span class="s2">&quot;engines&quot;</span><span class="o">:</span> <span class="p">{</span>
</span><span class='line'>        <span class="s2">&quot;node&quot;</span><span class="o">:</span> <span class="s2">&quot;*&quot;</span>
</span><span class='line'>    <span class="p">},</span>
</span><span class='line'>    <span class="s2">&quot;dependencies&quot;</span><span class="o">:</span> <span class="p">{</span>
</span><span class='line'>        <span class="s2">&quot;teleport&quot;</span><span class="o">:</span> <span class="s2">&quot;&amp;lt;=0.2.2&quot;</span>
</span><span class='line'>    <span class="p">}</span>
</span><span class='line'><span class="p">}</span>
</span></code></pre></td></tr></table></div></figure>


<p>The other change I made was to add the &#8220;dependencies&#8221; config, which will ensure that Teleport is installed as a dependency.
OK, there are now a couple of other files you need to create:</p>

<p>The index.html page. Mine looks like this:</p>

<figure class='code'><figcaption><span></span></figcaption><div class="highlight"><table><tr><td class="gutter"><pre class="line-numbers"><span class='line-number'>1</span>
<span class='line-number'>2</span>
</pre></td><td class='code'><pre><code class='html'><span class='line'><span class="nt">&lt;script </span><span class="na">src=</span><span class="s">&quot;support/teleport/teleport.js&quot;</span> <span class="na">type=</span><span class="s">&quot;text/javascript&quot;</span><span class="nt">&gt;&lt;/script&gt;</span>
</span><span class='line'><span class="nt">&lt;script </span><span class="na">type=</span><span class="s">&quot;text/javascript&quot;</span><span class="nt">&gt;&lt;/script&gt;</span>
</span></code></pre></td></tr></table></div></figure>


<p>Note the included teleport file (which npm will supply), and the application js file (which we will create next). Now create the /lib folder in the frappucino folder, and in it create a file called app.js. In it I have the following, as a test.</p>

<pre><code>alert("Frappucino is the best!");
</code></pre>


<p>Ok, now you should have the following file structure:</p>

<pre><code>frappucino/
    index.html
    package.json
    lib/
        app.js
</code></pre>


<p>Finally, to get npm to supply the dependencies, and register the app locally, type this within the &#8216;frappucino&#8217; directory:</p>

<pre><code>sudo npm link
</code></pre>


<p>I get some nice pink and green output with &#8216;npm ok&#8217; at the end to let me know it worked.</p>

<p>Now, to run the app, do:</p>

<pre><code>teleport activate
</code></pre>


<p>If all goes, well, it should say something like:</p>

<pre><code>Teleport is activated: http://localhost:4747/frappucino
</code></pre>


<p>Now you can open another terminal window and type:</p>

<pre><code>open http://localhost:4747/frappucino
</code></pre>


<p>And you will see your app in all its glory (or lack thereof, such as in this case.. just an alert window. But its a start :).</p>
]]></content>
  </entry>
  
  <entry>
    <title type="html"><![CDATA[My 10KApart Entry is Live !]]></title>
    <link href="http://www.dafishinsea.com/blog/2010/08/26/my-10kapart-entry-is-live/"/>
    <updated>2010-08-26T00:00:00-04:00</updated>
    <id>http://www.dafishinsea.com/blog/2010/08/26/my-10kapart-entry-is-live</id>
    <content type="html"><![CDATA[<p><a href="http://10k.aneventapart.com/entry/details/306">My entry</a> to the <a href="http://10k.aneventapart.com/">10KApart Javascript competition</a> is a lightweight version of the <a href="http://www.dafishinsea.com/turtle/explorer/">Turtle Graphics explorer</a> I&#8217;ve been working on. Aside from leaving out the the procedures browser, and doing some compression (I used <a href="http://developer.yahoo.com/yui/compressor/">YUICompressor</a>) I did not have to change the code, and I didn&#8217;t remove any of the turtle&#8217;s abilities. In fact there are a couple of new features, notably the showing of the turtle itself on screen.</p>

<p>So <a title="Turtle Shell" href="http://10k.aneventapart.com/entry/details/306">check it out</a>, and rate it ! It turns out that community voting is no longer considered for the Community Prize, but it will make me feel better :)
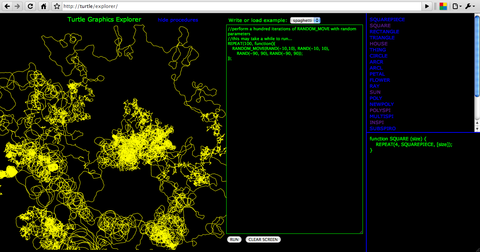
</p>

<p>I posted the source code on <a href="http://github.com/bigfish/turtle_shell">github</a> also.</p>
]]></content>
  </entry>
  
  <entry>
    <title type="html"><![CDATA[Turtle Graphics with Javascript and Canvas]]></title>
    <link href="http://www.dafishinsea.com/blog/2010/08/15/166/"/>
    <updated>2010-08-15T00:00:00-04:00</updated>
    <id>http://www.dafishinsea.com/blog/2010/08/15/166</id>
    <content type="html"><![CDATA[<script src="http://dafishinsea.com/turtle/js/turtle.js" type="text/javascript"></script>


<script src="http://dafishinsea.com/turtle/js/turtle_procedures.js" type="text/javascript"></script>


<p>One of my earliest experiences of computer programming was when my school acquired a computer lab, and we did some <a href="http://en.wikipedia.org/wiki/Turtle_graphics">Turtle Graphics</a> programming, probably in Logo. The school even had a robotic turtle which was used to draw lines on paper on the floor. I think one project we did was to draw the letters of the alphabet which made up the name of the school, or some other message. In any case I remember making the turtle go round drawing lines.</p>


<div>
    <canvas id="canvas2" width="400" height="400" style="float:left; margin-right: 10px">
     Your browser does not support canvas, please upgrade. 
    </canvas>
</div>


<script type="text/javascript">
turtle2 = new Turtle("canvas2", "#000000", "#00FF00", [TURTLE_PROCEDURES]);
turtle2.POLYSPI(1,50);
</script>


<p>Earlier this year I read <a href="">Mindstorms</a> by Seymour Papert, which describes how computers can be used by children to learn about Mathematics and programming, and how the Turtle Graphics system is a better system for exploratory learning than the Math is conventionally taught. One of the reasons for this is that the child is able to identify with the turtle, and solve problems by walking out the path of the turtle, and performing the instructions of the program. There is a fascinating description of how younger children were actually better at figuring out how to get the turtle to draw a circle by going forward a bit and turning a bit repeatedly, than were older children who had already learned more objective facts about circles, such as that they have a radius and a center. Even older children who had learned the algebraic formula for a circle were actually incapable of solving the problem. </p>


<p>Recently I discovered the Holy Grail of the field, the definitive <a href="http://mitpress.mit.edu/catalog/item/default.asp?ttype=2&amp;tid=7287">Turtle Graphics</a> by Andrea di Sessa and Harold Abelson, who also co-wrote the <a href="http://mitpress.mit.edu/sicp/full-text/book/book.html">Structure and Interpretation of Computer Programming</a>. I&#8217;ve only just read the first chapter, but I was inspired to try out implementing a Turtle Graphics environment in Javascript, using <a href="http://www.w3.org/TR/2dcontext/">Canvas</a> as a rendering surface. </p>


<br/>


<p>I started out typing my functions into the Javascript Console of Chrome, but I had a vision of a web-based interactive Turtle Graphics environment, where users could run their own code and see the results instantly.  So this weekend I hacked together the <a href="http://dafishinsea.com/turtle/explorer" >Turtle Graphics Explorer</a>. Its <em>not</em> going to work in any released version of IE (I&#8217;ll add Chrome Frame soon), but that will change when IE9 ships. A new version of Chrome, Safari, Firefox, or Opera should be fine, though I admit I&#8217;ve not tested thoroughly. Hopefully it is easy to understand.. load an example, or look at the procedures to see how they work. There is only very rudimentary error detection, so if it does not seem to be working, you may need to re-load a working example, hit &#8216;clear screen&#8217;, or just refresh the browser.</p></p>

<p>Here is a screenshoot of the application.. click on it to open it up, and start exploring ;)</p>


<p><a href="http://dafishinsea.com/turtle/explorer" ><img src="http://www.dafishinsea.com/images/turtle_explorer_med.png" alt="Turtle Graphics Explorer"/></a></p>


<p>All the code is available at the <a href="http://github.com/bigfish/turtle">GitHub project</a>.</p>

]]></content>
  </entry>
  
  <entry>
    <title type="html"><![CDATA[drawing in 3D]]></title>
    <link href="http://www.dafishinsea.com/blog/2010/03/13/drawing-in-3d/"/>
    <updated>2010-03-13T00:00:00-05:00</updated>
    <id>http://www.dafishinsea.com/blog/2010/03/13/drawing-in-3d</id>
    <content type="html"><![CDATA[<p>Last year Seb Lee-Delisle posted about how it would be nice to be able to <a href="http://sebleedelisle.com/2009/11/simple-flash-3d-drawing-api/">draw in 3D</a> with the same ease as you can draw in 2D, using the flash drawing API. It inspired me to try something similar, but with a different approach. I was looking into WebGL and OpenGL late last year, and though I got a bit bogged down with my lack of C knowledge, I found I liked the procedural API. The entire scene is actually redrawn every frame. This year I&#8217;ve also been thinking about the Turtle graphics system I once used in school, and how it works in a similar way (albeit in 2D). So I took a stab at creating a simple procedural 3D drawing API, along the lines of OpenGL and Logo. First the demo..</p>


<object classid="clsid:D27CDB6E-AE6D-11cf-96B8-444553540000" width="800" height="600" id="drawCubes">
    <param name="movie" value="http://www.dafishinsea.com/fishpond/src/com/dafishinsea/haxe/draw3d/DrawCubes.swf" />
    <param name="quality" value="high"/>
    <param name="bgcolor" value="#000000"/>
    <embed src="http://www.dafishinsea.com/fishpond/src/com/dafishinsea/haxe/draw3d/DrawCubes.swf" quality="high" bgcolor="#000000" width="800" height="600" type="application/x-shockwave-flash" pluginspage="http://www.macromedia.com/go/getflashplayer"></embed>
</object>


<p> <a href="http://www.adobe.com/go/getflashplayer">flash 10 </a>required </p>


<p>It is currently implemented as a base class which exposes the following methods:</p>


<pre><code lang="actionscript">    rotate(angleX, angleY, angleZ)
    draw(x,y,z)
    move(x,y,z)

    pushMatrix()
    popMatrix()
</code></pre>


<p>The x, y, z values here are relative to the current position. The current position (and rotation) is maintained by the modelViewMatrix. By calling  pushMatrix() you can save the current state and return to it later with popMatrix(). If you have subroutines, it is generally a good idea if they return the modelViewMatrix to the same state. For example in this example the drawSquare() method does this:</p>


<pre><code lang="actionscript">private function drawSquare()
{
    draw(100,0,0);
    rotate(0,0,90);
    draw(100,0,0);
    rotate(0,0,90);
    draw(100,0,0);
    rotate(0,0,90);
    draw(100,0,0);
    rotate(0,0,90);//return to starting orientation
}
</code></pre>


<p>So this simply draws 4 lines of length 100, rotating 90 degrees around the Z axis. The final rotation isn&#8217;t necessary for the drawing, but it ensures that the state is not changed after the routine is called. To draw a cube, we call the drawSquare routine while rotating and moving in 3D.</p>


<pre><code lang="actionscript">private function drawCube()
{
    //draw cube
    //back
    drawSquare();

    //left
    pushMatrix();
    rotate(0,90,0);
    drawSquare();
    popMatrix();

    //top
    pushMatrix();
    rotate(-90,0,0);
    drawSquare();
    popMatrix();

    //right
    pushMatrix();
    move(100,0,0);
    rotate(0,90,0);
    drawSquare();
    popMatrix();

    //bottom
    pushMatrix();
    move(0,100,0);
    rotate(-90,0,0);
    drawSquare();
    popMatrix();

    //front 
    pushMatrix();
    move(0,0,-100);
    drawSquare();
    popMatrix();

}
</code></pre>


<p>finally, to draw the cubes, we call the drawCube() routine inbetween calls to push/popMatrix() and any changes in position we wish to make.</p>


<pre><code lang="actionscript">    pushMatrix();
    drawCube();
    popMatrix();

    pushMatrix();
    move(150,0,0);
    drawCube();
    popMatrix();

    pushMatrix();
    move(-150,0,0);
    drawCube();
    popMatrix();
</code></pre>


<p>Once you get the hang of this approach, it is quite intuitive, and reduces the need for calculating a lot of 3D coordinates. This is done behind the scenes in the draw() method, which adds the real 3D coordinates to a list of vertices, which ultimately get projected to 2D coordinates. It&#8217;s easy to rotate the objects in the scene by calling rotate() before drawing the objects in the scene.</p>


<p>I&#8217;ve used <a href="http://haxe.org/">Haxe</a> here because of the faster compile time. There is also an earlier ActionScript version which I&#8217;ll link to below. </p>


<h3>Da Code</h3>


<p><a href="http://www.dafishinsea.com/fishpond/src/com/dafishinsea/haxe/draw3d/DrawCubes.hx">DrawCubes.hx</a></p>


<p><a href="http://www.dafishinsea.com/fishpond/src/com/dafishinsea/haxe/draw3d/Draw3D.hx">Draw3D.hx</a></p>


<p><a href="http://www.dafishinsea.com/fishpond/src/com/dafishinsea/experiments/MatrixStack.as">MatrixStack.as</a> (the AS3 prototype)</p>


<p><a href="http://github.com/bigfish/fishpond">GitHub</a></p>

]]></content>
  </entry>
  
  <entry>
    <title type="html"><![CDATA[A 3D heart for Valentine's Day]]></title>
    <link href="http://www.dafishinsea.com/blog/2010/02/14/a-3d-heart-for-valentines-day/"/>
    <updated>2010-02-14T00:00:00-05:00</updated>
    <id>http://www.dafishinsea.com/blog/2010/02/14/a-3d-heart-for-valentines-day</id>
    <content type="html"><![CDATA[<p>For Valentine&#8217;s Day I&#8217;ve dusted off an idea I initially submitted last year as part of the now defunct 25 Lines ActionScript contest. By tweaking the formula which generates the coordinates of the sphere, I was able to get something that more or less looked like a heart. I was able to get the heart modeled and lit within the 25 lines, but could not quite squeeze in the code to animate it. Now, without the limitation of 25 lines, I&#8217;ve done that, as well as optimize the performance using the normal map + PixelBender normal map shader that I used in my <a href="http://www.dafishinsea.com/blog/2009/11/09/lighting-a-3d-object-in-flash-pt-1/">normal map tutorial</a>. Here is the result - use the sliders to change the direction of the lighting. </p>


<object classid="clsid:D27CDB6E-AE6D-11cf-96B8-444553540000" width="800" height="600" id="heart">
    <param name="movie" value="http://www.dafishinsea.com/fishpond/src/com/dafishinsea/heart/Heart2.swf" />
    <param name="quality" value="high"/>
    <param name="bgcolor" value="#000000"/>
    <embed src="http://www.dafishinsea.com/fishpond/src/com/dafishinsea/heart/Heart2.swf" quality="high" bgcolor="#000000" width="800" height="600" type="application/x-shockwave-flash" pluginspage="http://www.macromedia.com/go/getflashplayer"></embed>
</object>


<p> <a href="http://www.adobe.com/go/getflashplayer">flash 10 </a>required </p>


<h3>How it Was Done</h3>


<p>The mechanics of this are essentially the same as the lighting of a sphere technique described in the normal map tutorial. However, since the shape of the heart is not the same as a sphere, I could not use the sphere formula to generate the normal map. So I just used the same formula to generate the normal map as I did to generate the geometry. For each point on the texture map, I determined the lat/lon of that point, and plugged it in to the formula to get its 3D position. I did the same for the pixel above and to the right. Since we now have three points, we have a triangle, and we can get the normal of the triangle by the cross-product of two of the sides (considered as vectors). This normal gets encoded as a color in the resulting normal map. This is a fairly intensive operation, but since it is only required once at the start, it doesn&#8217;t affect the running performance. I tried to optimize this process by using a PixelBender kernel to generate the normal map, but got some odd results, so returned to more familiar ActionScript territory. Using a shader to generate the normal map will become necessary if the geometry changes a lot.</p>


<p>I also refactored the code a lot so that it&#8217;s not all in one class. I&#8217;ve separated the model, shader and renderer into separate classes, and used a Scene to coordinate them. This is the beginnings of a primitive 3D engine, which I&#8217;ve dubbed DeepSee, so if that goes anywhere I may break it out as a separate project on GitHub.</p>


<h3>Da Code</h3>


<p>
<a href="http://www.dafishinsea.com/fishpond/src/com/dafishinsea/heart/Heart2.as">Heart2</a> <br/>
<a href="http://www.dafishinsea.com/fishpond/src/com/dafishinsea/deepsee/DeepScene.as">DeepScene</a> <br/>
<a href="http://www.dafishinsea.com/fishpond/src/com/dafishinsea/models/Heart.as">Heart.as</a> <br/>
<a href="http://www.dafishinsea.com/fishpond/src/com/dafishinsea/models/IModel.as">IModel.as</a> <br/>
<a href="http://www.dafishinsea.com/fishpond/src/com/dafishinsea/shaders/NormalMapShader.as">NormalMapShader</a> <br/>
<a href="http://www.dafishinsea.com/fishpond/src/com/dafishinsea/shaders/NormalMapShader.pbk">NormalMapShader.pbk</a></p>

]]></content>
  </entry>
  
  <entry>
    <title type="html"><![CDATA[Getting ctags to work with ActionScript and Haxe]]></title>
    <link href="http://www.dafishinsea.com/blog/2010/01/21/getting-ctags-to-work-with-actionscript-and-haxe/"/>
    <updated>2010-01-21T00:00:00-05:00</updated>
    <id>http://www.dafishinsea.com/blog/2010/01/21/getting-ctags-to-work-with-actionscript-and-haxe</id>
    <content type="html"><![CDATA[<p>If you are not a Vim user this post will probably not be of much interest or value&#8230; anyways, I just wanted to document this, for myself as well :)</p>


<p>Ctags, specifically <a href="http://ctags.sourceforge.net/">exuberant ctags</a> is a code-indexing system that creates files which summarize all the methods and properties in your classes. Its also the name of the command line utility that performs the indexing on source code and generates the tags files.</p>


<p>Ctags and Vim go hand in hand.. by specifying tags files to use in your .vimrc file, vim will be able to jump to the file where a class, method, or property is defined. Tags are also used for code-completion, and syntax highlighting. </p>


<p>Unfortunately ActionScript is not natively supported by ctags. Fortunately it is not hard to add support for it. I found out <a href="http://www.turdhead.com/2007/10/09/almost-perfect-actionscript-code-browsing-with-jedits-sidekick-panel/">here</a> how to do this for JEdit, but the process is much the same for Vim.</p>


<p></p>

<ol>
<li><p>Download Ctags source. I used <a href="http://prdownloads.sourceforge.net/ctags/ctags-5.8.tar.gz">ctags-5.8.tar.gz</a> which worked on my Ubuntu and Mac. I just put it in $HOME/ctags/ and extracted it with &#8216;tar zxvf ctags-5.8.tar.gz&#8217;</p></li>
<li><p>Ok , go into the source directory (ctags-5.8 or whatever your version is)</p></li>
<li><p>Add this <a href="https://github.com/bigfish/myvimfiles/raw/master/ctags/ctags-5.8/actionscript.c">actionscript.c</a> file into the source directory (you&#8217;ll need to Save As&#8230; actionscript.c, as github doesn&#8217;t seem to have a per-file download link). I found that the version linked the JEdit example did not work in Vim, so I modified the RegEx expressions in it so that they produced more standard tags.</p></li>
<li><p>In source.mak, add a line that says &#8220;actionscript.c &#34; under SOURCES and &#8220;actionscript.$(OBJEXT) &#34; under OBJECTS.</p></li>
<li><p>In parsers.h, we need to add the following line under #define PARSER_LIST:</p>

<pre><code line_numbers="false">ActionScriptParser, \ </code></pre>
<p>(an easy way to make these changes is just copy the line and edit the language name)</p></li>
<li><p>Build it. Do the usual</p>

<p>./configure
make</p></li>
</ol>


<p>You may need to do a &#8216;make clean&#8217; first to remove any previous builds.</p>


<ol>
<li>Try &#8216;./ctags &#8211;list-languages&#8217;, and actionscript one should show up. Then if looks good, go ahead with the final &#8216;sudo make install&#8217;. Thats it.</li>
</ol>


<p>Now for usage &#8230; to build a tags file for a AS3 project in a &#8216;src&#8217; folder, just do the following:</p>


<pre><code line_numbers="false">ctags -R -f tags path/to/src
</code></pre>


<p>Eg. I made a tags file for the Flex SDK:</p>


<pre><code line_numbers="false">ctags -R -f ${FLEX_HOME}/frameworks/projects/framework/src/tags ${FLEX_HOME}/frameworks/projects/framework/src
</code></pre>


<p>ctags may not be happy about generating a tags file over an existing file, so you may need to remove a previous one first. It may also warn about some null references in source code.. this doesn&#8217;t seem to matter.</p>


<p>Then I added the line </p>


<pre><code line_numbers="false">set tags+=$FLEX_HOME/frameworks/projects/framework/src/tags
</code></pre>


<p>to my .vimrc, and I can jump to any Flex SDK file by ctrl-] on the name of a class, method, or property. (ctrl-t jumps back). I can also recommend the <a href="http://vim-taglist.sourceforge.net/">taglist plugin</a>. This instantly makes tags for your current file and shows the symbols (organized by type) in a window split.</p>


<p>I also found that it was easy to add support for Haxe, by renaming a few things in the actionscript.c file and renaming it haxe.c (and making the other additions to sources.mak and parsers.h). You can probably figure it our yourself, or you can download the added and patched files here:</p>


<p><a href="http://www.dafishinsea.com/downloads/ctags_as3_haxe_patched_files.tar.gz">ctags_as3_haxe_patched_files.tar.gz</a> </p>

]]></content>
  </entry>
  
  <entry>
    <title type="html"><![CDATA[AR you Serious?]]></title>
    <link href="http://www.dafishinsea.com/blog/2010/01/16/ar-you-serious/"/>
    <updated>2010-01-16T00:00:00-05:00</updated>
    <id>http://www.dafishinsea.com/blog/2010/01/16/ar-you-serious</id>
    <content type="html"><![CDATA[<h2>Using Augmented Reality with native Flash 3D (ie. no 3D library)</h2>


<p><a href="http://en.wikipedia.org/wiki/Augmented_reality">Augmented Reality</a> (AR) was one of the big things to appear on the flash scene last year. AR has been around for a while, but it new in flash&#8230; The <a href="http://www.libspark.org/wiki/saqoosha/FLARToolKit/en">FLARToolkit</a>, is an ActionScript port (by Saqoosha, whom I got to see at FITC last year) of a Java AR library (NyARToolkit) IIRC, which was itself derived from the original C version (ARToolkit).</p>


<p>As an interesting aside: ARToolkit isn&#8217;t the only AR library implemented in C, though it was the first&#8230; there is also <a href="http://www.artag.net/">ARTag</a> which &#8220;uses more complex image processing and digital symbol processing to achieve a higher reliability and immunity to lighting&#8221;. For the limited processing power of Flash, ARToolkit was probably a good start, but perhaps some smart people may be able to enhance its recognition by improving the algorithms.</p>


<p>When I tried to use FLARToolkit, I&#8217;ll admit I had some trouble, as it seemed rather complex and not very well documented (at least not in English). But fortunately I found <a href="http://words.transmote.com/wp/flarmanager/">FLARManager</a> which makes setting up an AR project in Flash a lot simpler. It also provides some <a href="http://www.insideria.com/2009/07/flartoolkit-and-flarmanager.html">optimizations to the recognition process</a>. </p>


<p>However I feel it could be made still be simpler, and I&#8217;m working on that.. although the code still needs some refactoring, I have it basically working with a simple animated butterfly, which is simply a couple of bitmaps with Y rotations applied to them. The trick is to get the matrix that FLARManager gives you back when a marker is recognized, and apply that to your Sprite with 3D content. To use the app, you need to:</p>


<ol>
<li><p>make sure you have a webcam attached to your computer and turned on. Most macs have them built-in by default. Don&#8217;t use any other application which uses the camera at the same time or it won&#8217;t work&#8230; thus you can also only run one AR enabled website at a time.</p></li>
<li><p>print out a AR Marker ( see <a href="http://transmote.com/codeshare/FLARManager/deploy/FLARManager_v061/resources/flar/patterns/">here</a> ) &#8211; right click and download any of the .png files or the .pdf, if you want a whole bunch at once, and print on white paper. At a pinch, you can use a black rectangle drawn on paper, as I did in the video below.</p></li>
<li><p>Go <a href="http://www.dafishinsea.com/fishpond/src/com/dafishinsea/ar/ButtARfly.swf">here</a> for the AR Butterfly (but finish reading instructions first ;)</p></li>
<li><p>When the flash app starts, it will prompt you to allow access to the camera&#8230; click the &#8216;allow&#8217; button. Now I have found this settings thingy to be very glitchy (it can also be accessed by right clicking on a flash movie and selecting &#8216;Settings&#8230;&#8217;). On my MacBook, I found it took a long time for the dialog to go away after clicking the &#8216;allow button&#8217;. I&#8217;ve also noticed similar problems on Linux. If you&#8217;re having trouble with it you can enable the site permission to access the camera by going here:
<a href="http://www.macromedia.com/support/documentation/en/flashplayer/help/settings_manager06.html">flash player global settings</a>
Then you&#8217;ll need to find this site in the long list, select it, and click &#8216;always allow access&#8217; for the camera. That way you won&#8217;t be bothered by the buggy dialog anymore (at least on this site). </p></li>
<li><p>Once you can see the output of the camera in the app, make sure you have decent lighting, hold up the marker to the camera, and adjust position so that there is enough contrast, but also no glare, as FLARToolkit does not handle that very well. Also make sure nothing is in front of the marker, breaking the outlines, or it won&#8217;t detect (this is something that ARTag can apparently handle). You should also not move too fast, or have shaky hands&#8230; If you&#8217;re lucky, you&#8217;ll see something like this:</p></li>
</ol>


<object classid="clsid:D27CDB6E-AE6D-11cf-96B8-444553540000" width="640" height="480" id="buttARfly">
    <param name="movie" value="http://www.dafishinsea.com/videos/ButtARfly.swf" />
    <param name="quality" value="high"/>
    <param name="bgcolor" value="#000000"/>
    <embed src="http://www.dafishinsea.com/videos/ButtARfly.swf" quality="high" bgcolor="#000000" width="640" height="480" type="application/x-shockwave-flash" pluginspage="http://www.macromedia.com/go/getflashplayer"></embed>
</object>


<p> <a href="http://www.adobe.com/go/getflashplayer">flash 10 </a>required </p>


<p>I noticed that the z-sorting on the butterly wings is inverted in this video&#8230; will have to sort that out. I&#8217;ll post a link to the code later, once it is a bit more polished. I have several ideas for AR applications, which I&#8217;ll hopefully get a chance to work on soon&#8230;</p>

]]></content>
  </entry>
  
</feed>
