Jekyll2024-01-21T14:48:25-06:00https://benscheirman.com/feed.xmlBen ScheirmanBen is an experienced software engineer from Houston, TX. Currently focused on Swift, iOS, Ruby, and Rust.Unfuddling the SwiftUI Alignment Guide API2024-01-20T12:30:00-06:002024-01-20T12:30:00-06:00https://benscheirman.com/2024/01/swiftui-alignment-guideIn general I think Apple’s APIs are pretty good. However there are the occasional exceptions where my brain, for whatever reason, can’t seem to get a hold on the essence of the API design and results in me constantly looking up the docs. In UIKit, the UIAnimatedTransitioning and UIPresentationController APIs come to mind.
In SwiftUI, I’d say the most confusing (to me) is the alignment guide system.
I’m working on an update to one of my apps and I want to have a draggable bar (like a vertical slider) that can split into two when you tap on it.
This type of interface could be written like this:
struct DemoView: View {
  @State var isLinked = true

  var body: some View {
    HStack {
      BarView()
      if !isLinked {
        BarView()
      }
    }
    .onTapGesture {
      withAnimation {
        isLinked.toggle()
      }
    }
  }
}
Doing this doesn’t look great when you see the animation, however.
The reason for this is that the HStack has aligned the left bar in the center, and then when it re-renders with 2 bars it slides the bar to the new position. The right bar however was never in the view hierarchy before, so it just fades in to the new position.
In an attempt to fix this, I reached for the .alignmentGuide API, however no matter what I tried, modifying the HorizontalAlignment properties had no effect.
I have probably tried this exact thing a dozen times and am frustrated every time it doesn’t work, hence this post. It’s as much for future me as it is for you, dear reader.
How Alignment Guides work
Using the excellent SwiftUI Companion app (must buy if you work with SwiftUI in my opinion) I was able to generate a playground for visualizing how this works:
The alignmentGuide modifier takes the guide you want to modify (HorizontalAlignment or VerticalAlignment and then the closure lets you specify how you want to modify the view in relation to that.
So in the screenshot above, look at the middle bar. It’s .leading edge (of the parent VStack) is aligned with the .center of the yellow bar. Note that these are all horizontal guides in a vertical layout.
This seems confusing because it doesn’t look like the leading edge is there. But if you play with the toggles here you’ll see what is happening. The edges of the VStack are being pushed out because of the alignment guides. Without the last one enabled, it looks like this:
There are two key insights here.
the alignment guide passed to the .alignmentGuide(…) method refers to the container, not the view we’re modifying.
the alignment guides influence the layout of the cross dimension of the stack. So for a VStack you can control the horizontal alignment (but clearly the bars here are still stacked vertically). For an HStack you can control the vertical alignment.
So in my case I need a ZStack so I can have them vertically aligned and horizontally offset from each other in a way I can modify with the alignment guide.
Implementing the ZStack solution
Changing our HStack to a ZStack means that the items will be laid on top of one another, centered in both dimensions (by default). We can change the horizontal alignment of each depending on the value of the isLinked state property.
We also want to remove the if condition in our body because this will cause the 2nd bar to be inserted and removed from the hierarchy as we tap the button. We don’t want this because we want to be in control of the animation.
ZStack {
     BarView()
         .alignmentGuide(HorizontalAlignment.center) { d in
             d[isLinked ? .center : .trailing]
         }
     BarView()
         .alignmentGuide(HorizontalAlignment.center) { d in
             d[isLinked ? .center : .leading]
         }
 }
With this in place, our view is animating nicely.
My hope is that by writing this I will now remember this API, and hopefully you will too!
]]>Side Mirror 2.52023-03-06T19:39:00-06:002023-03-06T19:39:00-06:00https://benscheirman.com/2023/03/side-mirror-2-5Today I released a big new update for Side Mirror, my macOS app for presenters.
Before I dive into the new features, let me first try to explain what Side Mirror does.
This is truly the hardest part of developing this app. I have yet to find my good elevator pitch.
Side Mirror allows you to select any attached display on your Mac and run it in a window.
This can be useful for a number of reasons:
During live presentations, to avoid looking back at a projector screen. You can see it and monitor what the audience sees right on your Mac. This keeps your eyes front toward the audience. Your main screen can have presenter notes, snippets to copy & paste, files to drag, etc.
Using a cheap HDMI dummy adapter (like this one), you can get a virtual screen in macOS. Using Side Mirror, you can put this screen inside a window. There are 2 amazing reasons why this is powerful:
Presenting via Zoom. You can share your full “virtual” display and not have desktop icons or other windows visible to the audience.
Recording with Screenflow. Similar to above, but this time recording a full screen video without having to “prep” your desktop. Additionally this is a great way to have a dedicated, resolution-perfect display to record to simplify your workflow.
So that’s the core of Side Mirror.
In order to make using a display-in-a-window actually usable, there are a few key features
Teleporting your mouse clicks through the preview window and to where you actually clicked on the display (like magic 🪄)
Keyboard shortcut to bring your mouse back to the Side Mirror window, to help you avoid getting lost
Cursor preview hinting as your cursor moves to the external display, so you can easily tell if your mouse is on the display or on top of Side Mirror.
2.5 update features
So now that you (hopefully) understand what Side Mirror can do, here are the new features and fixes in 2.5.
✨New Resize option
Resize the Side Mirror window to match the target display resolution. You’re given 3 options to scale the Side Mirror window to match the target display. If it the main display can’t accommodate it, it does a best fit.
✨Snap Back Cursor
Enable this in preferences. This is a keyboard shortcut to have your mouse jump back to the Side Mirror window.
✨Cursor Hinting
Enable this in preferences. This will highlight the Side Mirror preview when your mouse moves to the target display. This can be useful as a guide to let you know which display your mouse is on. You can customize the color in preferences as well.
✨Remember last display
Side Mirror will now remember the last display used and automatically select it on subsequent launches, if it is available.
✨Keyboard Shortcuts
There’s now a keyboard shortcut to stop/start the preview
🐞Bug Fixes
Click-through is now disabled after you stop previewing
The preview will now be stopped if a display suddenly becomes unavailable
Displays that lack a title (or have an empty name) will now show “Untitled”
Fixed an issue that would cause the preview to suddenly stop
And one last thing, as I’m actually quite eager to start taking advantage of newer OS features, this will be the last release that supports macOS Catalina.
Available on the Mac App Store
You can find Side Mirror on the Mac App Store. I hope you enjoy it!
]]>Async/Await and the Future of Combine2021-06-09T13:31:30-05:002021-06-09T13:31:30-05:00https://benscheirman.com/2021/06/async-await-and-the-future-of-combineSwift 5.5 is here with Xcode 13 Beta and with it comes my favorite new addition to Swift: Async/Await.
But what does this mean for Combine?
Async/await is a high level, structured model for concurrency in Swift that allows you to write expressive async code in shockingly little ceremony.
A code sample is probably best for this, so consider this example where we want to fetch an image showing the current weather conditions for the user’s location.
To do this requires multiple steps:
First get the user’s location. If that gives an error, fail early.
Then use that to get the weather conditions
Look in that response to get an image URL for the current condition
The callback way
Using traditional callbacks we might have these methods:
getLocation { result in
    switch result {
    case .failed(let error):
       // do something with location error

    case .success(let location):
       getWeather(for: location) { result in
		    switch result {
    		case .failed(let error):
       		// do something with weather error

		    case .success(let conditions):
             // fetch image
				let imageTask = URLSession.shared.dataTask(with: conditions.imageURL) { (data, response, error) in
               // you get the idea
      	}
		}
	 }
}
Nested completion callbacks each with their own failure path is a giant pile of yuck. If we fail to call back with a failure from a previous step we might end up with an application that seems to get stuck (maybe showing a spinner forever). There’s nothing the compiler does here to help us. And if we have to ensure to call back any completion handler on a specific queue, there’s quite a lot of boilerplate which makes the above code even worse.
Of course, Combine makes this much nicer, but more on that in a minute.
Notice how these functions return actual values. They also indicate that they are async and they can throw errors.
There’s also lots of built-in SDK functions that have been adapted to be async, like URLSession.data(for:) .
Putting this all together:
let location = try await userLocation()
let conditions = try await weatherConditions(for: location)
let (imageData, response) = try await URLSession.shared.data(from: conditions.imageURL)
if (response as? HTTPURLResponse)?.statusCode == 200 {
    let image = UIImage(data: imageData)
} else {
    // failed
}
Notice now the code reads from top to bottom. When we get to the await keyword, our execution is suspended without blocking the thread, so the system is free to do other work.
There’s a lot of nuance here that I’m hand-waving over, but the key point is this is objectively better:
It’s much easier to write
It’s much easier to read
The compiler can enforce we handle all execution paths and errors
So this looks like the future, right? What about Combine?
What about Combine?
Back in iOS 13 we saw the release of Combine, Apple’s take on functional reactive programming. With Combine you can leverage Publishers that produces values over time, and then transform those values using Operators.
Combine provides a ton of power, but comes at a steep learning curve. This is what led me to create a full course on Combine. So you can imagine that many of us were wondering what would be added to Combine this year in light of all the async/await stuff we’ve seen in Swift Evolution over the past few months.
But searching the API diffs for anything Combine related yielded 0 results. Nothing.
Of course Apple will not tell us what the future plans are, but if we read the tea leaves a bit, it seems to me that this is pretty telling.
Combine’s strengths lie in the fact that it is modeled after streams of events or values. The assumption is that a Publisher can (and often does) emit multiple values before finishing. Many Publishers fire once and complete, but that is an implementation detail.
Contrast that with your typical completion callback or the async example above. Each of these produce a single value and return it.
So what does async/await do for multiple values?
Meet AsyncSequence
AsyncSequence is a new type that allows you to concurrently iterate over a series of async values. If you look at the API docs, it sure does have a lot of the same operations you’d find in a Combine pipeline:
map
filter
prefix
contains
reduce
flatMap
etc
I’ve yet to play around with AsyncSequence (at the time of writing this the session is not yet available), but it certainly appears that this is shaping up to be an eventual replacement for Combine.
The continuation types added in SE-0300 act as adaptors for synchronous code that signals completion by calling a delegate method or callback function. For code that instead yields multiple values over time, this proposal adds new types to support implementing an AsyncSequence interface.
The key point that this proposal suggests is to bridge the async/await continuation model - which currently assumes a single result or error - into working with multiple values over time.
So it certainly seems that Apple is creating an async model capable of potentially replacing Combine, at least for the majority of use cases.
Is Combine Going Away?
My previous stance was basically: “You should use Combine because it makes complex async code easier to write, reason about, and Apple will support it”.
I’m now second-guessing that statement somewhat.
Combine won’t go away (at least, not for a long while) but I think it’s use may be limited to the more Functional Reactive programming style and most of the async ergonomics we get from Swift 5.5 will be preferred by most developers. Things like back-pressure and demand management are important concepts for a fully reactive programming framework, but not every async pipeline needs that complexity.
Also, SwiftUI currently depends on Combine for reacting to state changes in your view models.
Maybe next year we will see some Publisher additions that adopt some of the async/await features to make working with Combine simpler. Or perhaps we’ll see AsyncStream take over the majority of these use-cases.
So should you avoid learning Combine? No! I think it’s extremely useful still, and will be more available than async/await since that currently requires macOS 12 / iOS 15. So for my projects that need to support older versions, I’ll still be leaning on Combine for my async needs.
And in the meantime, if you’d like to learn Combine, I’d love for you to check out my course.
]]>Combine for Mere Mortals2021-01-08T16:32:32-06:002021-01-08T16:32:32-06:00https://benscheirman.com/2021/01/combine-swiftI’m excited to announce that my Combine Swift Course is now complete and available for purchase.
Learning Combine has been extremely rewarding, but learning it can be daunting. I built this course because:
I love the idea of functional reactive programming, but on the surface I found it to be confusing
Despite reading books and following articles nothing seemed to click for me
So I decided to make the course I wish I had when I started out.
The course is aimed at making you more confident in writing complex asynchronous code that is easier to maintain and has less potential for bugs.
It has been a long road to get here, but I’m quite proud of the final result. I’d be thrilled if you checked it out!
The course is broken up into modules, each building up your knowledge of the Combine framework. Then later modules take that knowledge to solve real world problems.
Introduction & Theory
Combine Basics
Error Handling
Networking
Schedulers and Threading
More Publishers
App Architecture
Build a Complete Weather App with Combine
Advanced Combine
Testing Combine Publishers
Debugging Pipelines
The Back Story
Learning Combine was a challenge for me because reactive programming in general is such a mind shift. But after I started to get used to it something clicked. I started to find more areas where it would be useful. And I was able to simplify some parts of my code that was previously really complicated.
Last year I started planning out some Combine content and realized that it was much bigger than just a collection of screencasts. I came to the conclusion that this deserved its own complete course.
This was also an opportunity for me to try something new (one-time purchase course versus subscriptions).
Building a course takes an enourmous amount of work and I severely underestimated how much time it would actually take to write, record, edit, and publish the entire thing.
A custom course platform
Part of the reason that I underestimated it is that I wanted to build a course platform that was somewhat reusable for future courses I might want to do. There are lots of off the shelf platforms that offer this sort of thing, but I like to own the experience, and nothing works quite how I wanted it to.
The course platform is a custom Ruby on Rails web app, hosted on Digital Ocean. I can write more about this setup in a future post if you’re interested.
Course Levels
I decided to break down the course offerings into 3 packages:
The Standard course
This unlocks Modules 1-4 and gives you a solid fundamental overview of Combine
The Complete Course
This unlocks all 11 modules and allows you to download the videos for offline use.
Team Package
These come in groups of 5 seats and offers the complete course for your entire team.
What’s next?
While I have talked about this course on Twitter a bit over the course of the past few months, I’ve never really gone into Marketing Mode™. I’ll admit this is firmly outside of my comfort zone, but I also think that this course is worthy of a wide audience of iOS developers, and it’s going to be my goal to try to reach a bigger audience than just my Twitter followers.
On that note, I’d love if you shared this post with your colleagues!
]]>Managing Version Numbers with Fastlane2020-10-20T22:11:30-05:002020-10-20T22:11:30-05:00https://benscheirman.com/2020/10/managing-version-numbers-with-fastlaneIn this post I will describe how I use fastlane to manage my iOS and macOS version numbers for my releases.
There are many ways to deal with versioning, but I prefer to define them manually loosely following a semver model.
If you’re not familiar, that means:
Major versions for large/breaking changes
Minor version for new features
Patch for bug fixes
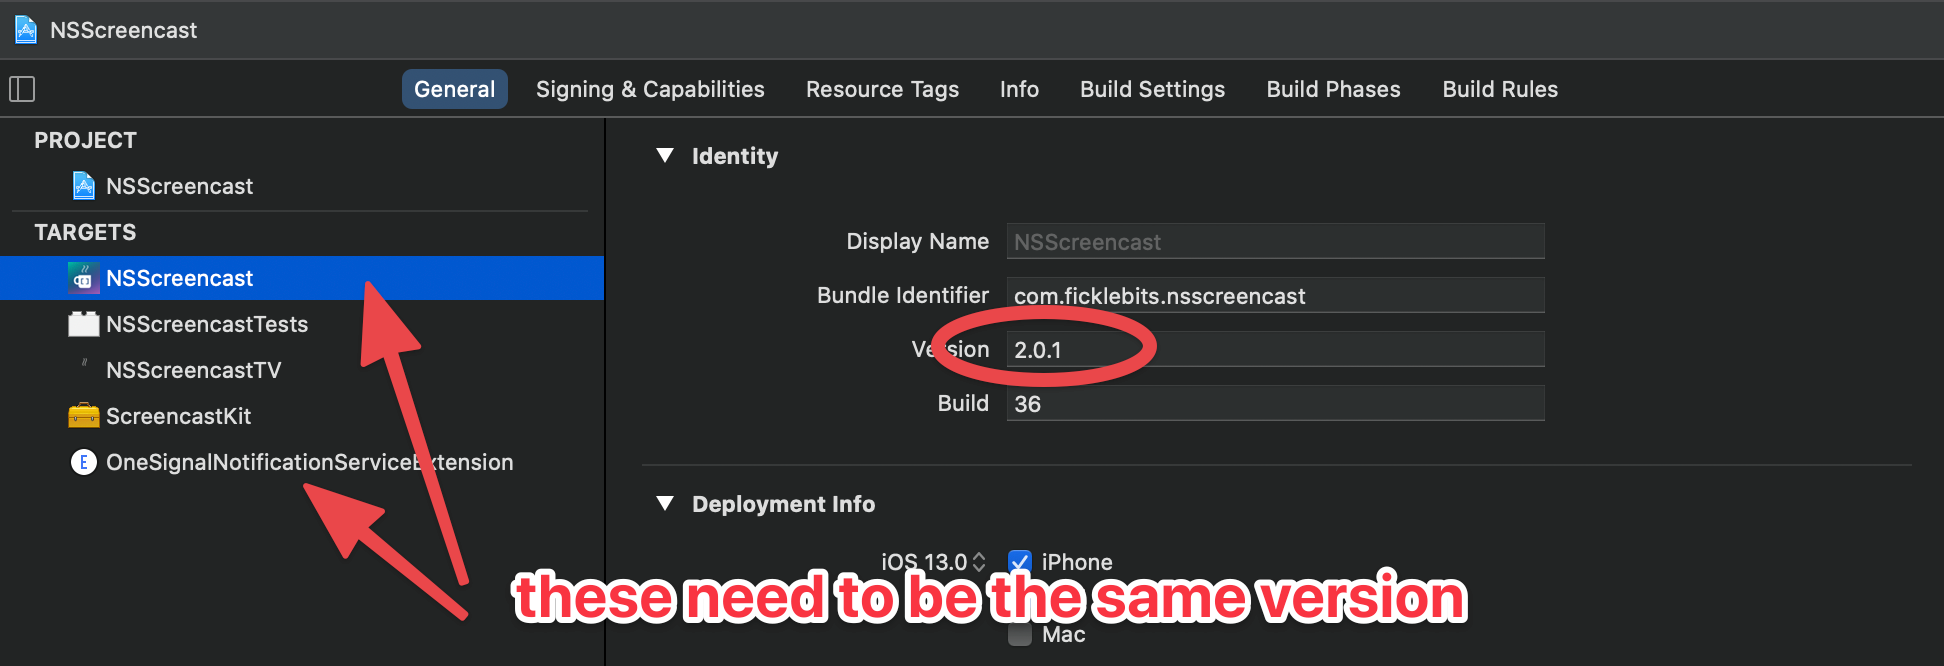
You can of course set a version number in Xcode, but this only works for one target at a time, and if you have any Extension targets (for things like Push Notifications) then they need to be set to the same version.
Setting a version number in Xcode is easy, but you need to keep it in sync with extensions.
Instead, I like to set it with fastlane when doing a release.
Bumping the Version Manually
If you just want to increment one of the version components you can do something like this:
%w{major minor patch}.each do |part|
  lane "bump_#{part}".to_sym do
    increment_version_number(bump_type: part)
  end
end
This is dynamically defining 3 new lanes that I can invoke from the CLI or from other lanes in my Fastfile:
bump_major
bump_minor
bump_patch
This leans on the builtin action to increment the version number from Fastlane.
To invoke this from the command line I can run:
bin/fastlane bump_patch
And I can do this once and be sure that both targets have the new version.
Prompting for the Version Number
Another approach I’ve taken is to prompt for the marketing version number when doing a release.
Again we’re leaning on builtin fastlane actions here, which make it easy:
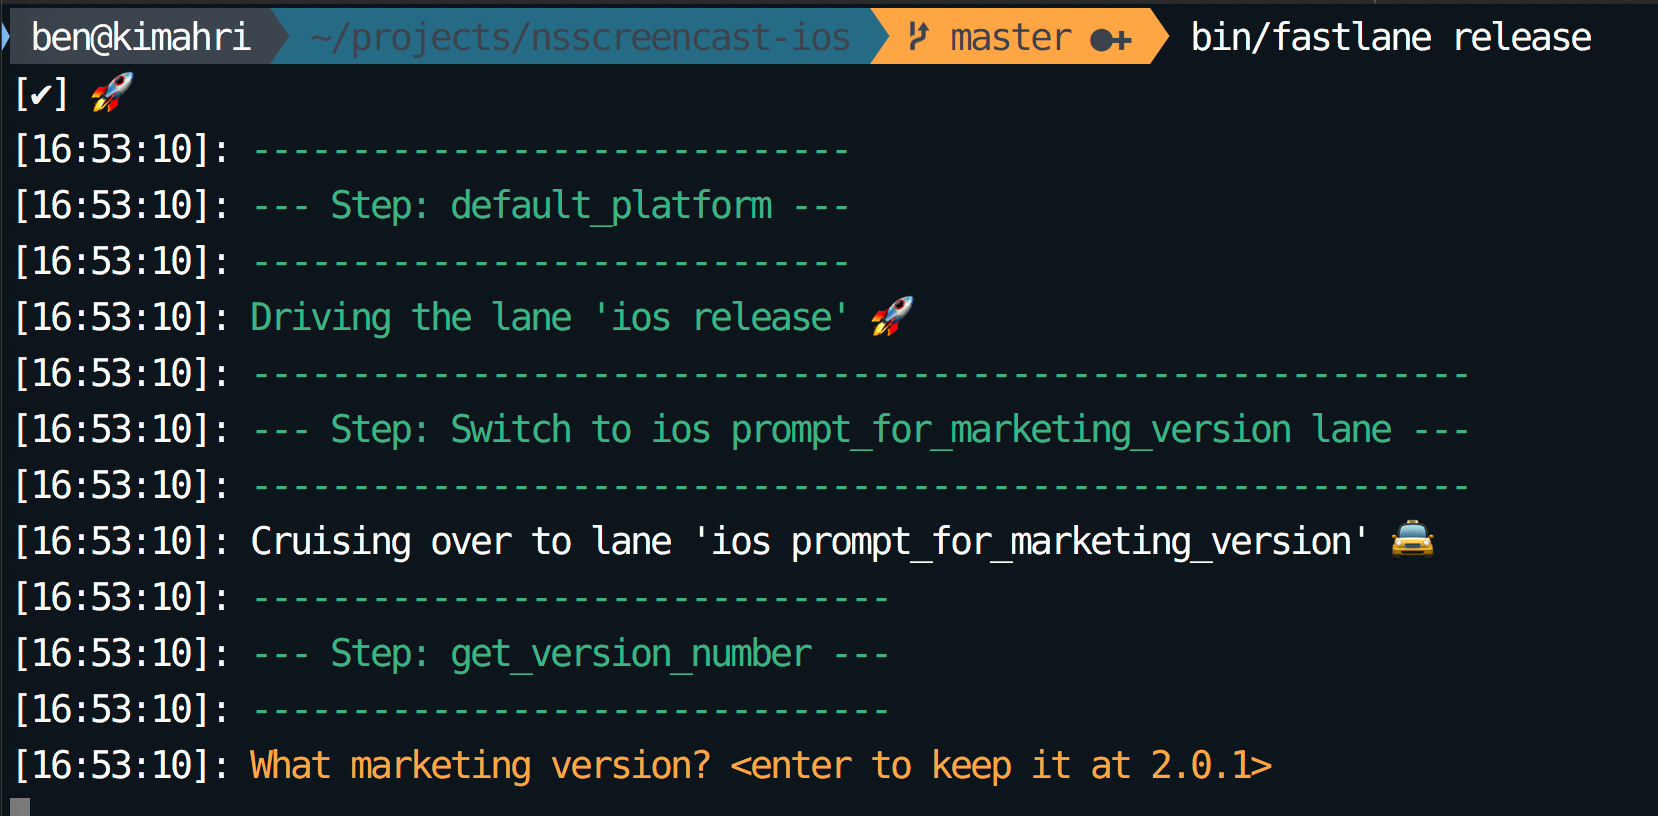
private_lane :prompt_for_marketing_version do |options|
  marketing_version = get_version_number
  new_version = UI.input("What marketing version? <enter to keep it at #{marketing_version}>")
  unless new_version.strip == ""
    increment_version_number(version_number: new_version)
    UI.message("Version number set to #{new_version}")
    marketing_version = new_version
  end
end
I’ll call this in my release lane:
Fastlane prompts for a version
I can press enter to skip it, or type a new number and it will set the target at that version.
Committing the Version Change and Tagging the Commit
After the release it is important to note only commit the version change, but tag the commit in Git so that you have a solid version history you can refer back to later.
if UI.confirm "Commit version bump and Tag this version?"
  commit_version_bump
  add_git_tag(tag: lane_context[SharedValues::VERSION_NUMBER])
  push_git_tags
end
If we say yes to the prompt, we’ll get a commit in the git history, then it will automatically tag the release with that version number we set earlier. Finally it will push the tags to the git remote (which is often forgotten).
This type of setup is especially important if multiple people are doing releases. You want to have a consistent strategy so that people don’t forget to tag (or forget to push them) and so that the tags all have the same naming consistency.
If a customer experiences an issue, you can always checkout the tag for that release and start building your fix from there.
]]>Exporting a Git History at a Specific Commit2020-10-16T13:52:45-05:002020-10-16T13:52:45-05:00https://benscheirman.com/2020/10/exporting-a-git-history-at-a-specific-commitI had a need today to take an existing git repo that has commits, and move the history as of one of those commits into a different git repo.
So my two requirements were:
Show the content as of <sha>
No .git repo or any ignored files in the export
It took a few minutes to find the right incantation so I thought I’d blog it here mostly for my future self. Maybe it will help someone else out there.
I should note that there are many ways to accomplish things in git, so if you have a better way I'm all ears!
We start by finding the sha that we want to export:
We can run git archive to get an archive of the repo in a given format. The available formats can be listed:
~/projects/repo $ git archive -l
tar
tgz
tar.gz
zip
I don’t need any compression, so tar will do, and this happens to be the default. If you want to specify a format you can do so with --format.
So we start by exporting into a tar file, whose filename is specified with the -o option:
~/projects/repo $ git archive -o git.tar 5b9242d
Now I have the tar file, I can go to the destination folder and untar it:
~/projects/other $ tar xvf ~/projects/repo/git.tar
x .gitignore
x .nova/
x .nova/Tasks/
x .nova/Tasks/Swift Build.json
x Package.resolved
x Package.swift
x README.md
x Sources/
x Sources/swift-encode/
x Sources/swift-encode/main.swift
x Tests/
x Tests/LinuxMain.swift
x Tests/swift-encodeTests/
x Tests/swift-encodeTests/XCTestManifests.swift
x Tests/swift-encodeTests/swift_encodeTests.swift
If there were files you didn’t want included in the destination folder, like the .nova folder for instance, you can specify that in the untar step:
~/projects/other $ tar xvf ~/projects/repo/git.tar --exclude .nova
And if we want to combine these commands into one we can avoid the intermediary tar file:
~/projects/repo $ git archive 5b9242d | tar x --exclude .nova --directory ~/projects/other
I’m sure I’ll need to look this up again, but handy to know!
]]>Sign-in with Apple Profile Information and Security2020-03-31T12:37:18-05:002020-03-31T12:37:18-05:00https://benscheirman.com/2020/03/sign-in-with-apple-profile-information-and-securitySign-in with Apple is a fantastically useful new feature in iOS 13 and macOS Catalina. I knew when it was announced that I would want to support it. I’m currently working on this for NSScreencast and things haven’t gone quite as smooth as I would have expected.
Update:
Thankfully, Apple changed the implementation at some point to include the email address in the signed id_token.
See down further for more details. Thanks to Sebastian Hubrich for correcting me on this.
For comparison, I already support Sign-in with Google (as required by some larger companies with team accounts). In this implementation I use the sorcery rubygem which supports several social logins (Google and a few dozen others), but does not currently support Sign-in with Apple (henceforth: “SIWA”).
I looked at providing support for it myself, however I couldn’t seem to follow the patterns that the rest of these plugins follow. The OAuth payload usually contains the requisite profile information, such as first name, last name, email address, etc. With SIWA, it doesn’t, and this presents a few challenges.
Profile Information Only Once
Apple provides the profile information to your application (or website) only once. The callback payload for a web app looks something like this:
The id_token is a signed JWT that contains information like:
Who issued this token?
Who is it for?
When does it expire?
What crypto algorithm can we use to validate it?
What is the cryptographic signature of the token to prove it hasn’t been tampered with or created by some other entity?
As you can see the id_token is an important part of this puzzle. If you aren’t familiar with JWTs yet, you will need to read up on them, as it is required knowledge for a SIWA implementation.
Alongside the token is a user object that contains profile information. We requested email address and full name, so those are provided here. In my case - and I suspect in many implementations - this user profile information is required to sign up for a new account.
So what happens if the user starts the sign in process and then cancels at the last step? What if your app encounters and error and the user has to retry? This user object will not be sent to you.
Apple only returns the user object the first time the user authorizes the app. Persist this information from your app; subsequent authorization requests won’t contain the user object.
This part is not only a nuisance, but a security concern that you will have to mitigate. More on the security aspect in a minute.
Most implementations will end up saving this profile information to later associate it with a successful sign in. And this produces a failure case you have to handle: What if you have no user hash above and also don’t have any saved profile information? The only recourse is to ask the user to navigate to the Apple ID account settings and remove your app from the list and try again. Ick.
In my case I have a Rails model to save this information in my database:
# Used to save user profile information from Sign-in w/ Apple
# We only get this information once, so if they abandon the sign-up
# process mid-way, we need to be able to retrieve it again if it is missing.
class AppleUserInfo < ApplicationRecord
end
This model has a sub column, which contains the Apple unique user id value, and a jsonb column for the user object above.
So now when a user signs up, I can provide a fallback user hash if the callback payload doesn’t contain one:
def callback(params)
  id_token = params.fetch(:id_token)

  parsed_token = verify(id_token) # decode and verify the authenticity of the JWT

  user_hash = params[:user] || AppleUserInfo.find_by!(sub: parsed_token[:sub]).user_hash

  # if we don't have a user hash here we have a problem and need to ask the user
  # to delete the app from their Apple ID account settings and try again :(

  # ...
end
So if I fall into that last case where I have no user hash saved and can’t fall back, we’re stuck and we can’t continue. So I have to ask the user to remove the app from their Apple ID account settings. This error message is awful, I know. And while it is a rare edge case it’s still technically possible to encounter.
If you have no profile information and you haven't saved any prior, you have to resort to ugly error messages like this one, prompting the user to delete their login and try again.
The user doesn’t have an account on your system, but iCloud thinks they do. So you have to go to Apple ID settings on your device and remove the app from there. Once they do that it will be like a fresh sign-in experience again.
Similar Experience on iOS
On iOS we have a similar experience, though the mechanics are different. Once a user taps a Sign-in with Apple button, you request authorization like this:
let provider = ASAuthorizationAppleIDProvider()
let request = provider.createRequest()
request.requestedScopes = [
    .fullName, .email
]

let authorizationController = ASAuthorizationController(authorizationRequests: [request])
authorizationController.delegate = self
authorizationController.presentationContextProvider = self
authorizationController.performRequests()
Here we request .fullName and .email scopes, so we expect this information to be present when we get the callback:
func authorizationController(controller: ASAuthorizationController, didCompleteWithAuthorization authorization: ASAuthorization) {

    if let appleIDCred = authorization.credential as? ASAuthorizationAppleIDCredential {

        let idToken = appleIDCred.identityToken
        let authCode = appleIDCred.authorizationCode

        let userId = appleIDCred.user // gives you Apple's unique id for this user. In the web callback id_token this is called 'sub'

        let fullName: PersonNameComponents? = appleIDCred.fullName
        let email: String? = appleIDCred.email

        // ...
    }
}
As you can see here, the credentials we get back from the Apple ID authorization callback include the idToken, as well as fullName and email, but these last two are both optional properties for the reasons mentioned above.
Update: The `idToken` here now includes the email address, so if that's all you need to sign up then you're good.
Just read it from the token instead of the credential object directly.
Your server will be decoding and verifying this token anyway, providing you with `email` and `email_verified`
keys in the payload section of the JWT.
So here we’re in the same boat. We need to save this information somewhere and then fall back to it if it wasn’t provided. In my case I chose the keychain:
KeychainHelper.save(KeychainKeys.userId, data: appleIDCred.user)

if let fullName = appleIDCred.fullName {
    if let givenName = fullName.givenName {
        KeychainHelper.save(KeychainKeys.firstName, data: givenName)
    }
    if let familyName = fullName.familyName {
        KeychainHelper.save(KeychainKeys.lastName, data: familyName)
    }
}

if let email = appleIDCred.email {
    KeychainHelper.save(KeychainKeys.email, data: email)
}
And then we follow a similar flow for falling back to this information when creating an account. Again, we can fall into a case where these don’t exist and have to ask the user to delete the login from their device’s Apple ID settings and try again.
The Security Problem
Update: This problem is now much less of an issue since `email` is part of the `idToken`. I'll leave the description here nonetheless since you still probably want to avoid automatically linking accounts unless you've verified the email address you have is actually theirs.
Earlier I mentioned that the fact that the user information is provided outside the idToken as a sibling node means that we can’t trust it. We can only trust the values embedded in the token, as those are signed with a signature that we can verify. Anything outside of that could be tampered with and your app’s server would not know.
What if an account already existed on your system with the provided email address? You might want to be friendly and allow the user to just link them up and use either credentials to log into the same a count.
Here’s an attack vector:
Mary has an account on your system. Her email address is mary@example.com and she logs in with a username and password.
Anitaknows that Mary has an account. She uses the mobile app and crafts a man-in-the-middle attack, intercepting the traffic coming from the mobile app to your server. Using her own Apple ID, she logs in to create an account. On the outgoing request, she modifies the above user hash to indicate a different email address, in this case mary@example.com.
If we were to allow linking up accounts based on the provided email address, we’d now have allowed Anita to steal Mary’s account.
If the profile information was provided in the JWT itself, Anita would be unable to do this, as modifying the JWT in any way would break the signature and the server would not trust it.
The answer to this situation is to not allow linking up based on email address alone, and demand instead that that user logs in with their password credentials first, then associate with an Apple ID later.
Summary
I originally wrote a TL;DR for this post and then realized the situation is nuanced and requires some explanation. While SIWA is not without it’s faults, the end-user experience is largely a positive one and supporting it is likely worth your time.
I recently released support for SIWA on NSScreencast.com and currently have around 50% of sign-ups using this over username & password. I find this to be quite encouraging, and would recommend you add support for your apps as well.
]]>Swift for Good2020-01-17T18:49:13-06:002020-01-17T18:49:13-06:00https://benscheirman.com/2020/01/swift-for-goodA few months ago Paul Hudson asked me if I would be interested in contributing to a new book. The idea of the book was this: many authors, each writing a chapter about Swift, with all proceeds going to charity. I quickly accepted and began writing.
This week, the book is a reality! The book is entitled Swift for Good and includes content from twenty different authors. All proceeds of the book benefit Black Girls Code, a charity devoted to proving to the world that girls of every color have the skills to become software engineers.
Swift for Good
My chapter covers writing a networking stack in Swift that uses TheMovieDB’s API as an example. In the chapter, we build out everything we need to get a robust, extensible networking layer in our project that allows us to write our requests like this:
MovieDB.api.send(request: .popularMovies({ result in
     switch result {
         case .success(let page):
             self.movies = page.results

         case .failure(let error):
             print("Error: \(error)")
     }
 }))
The chapter also goes into how we might leverage Request Adapters to provide things like authorization headers to every request or logging to get some insight into how our network requests are working. Along the way we leverage a number of Swift’s strengths such as Codable models, protocol extensions, enums, auto closures, and inline types.
I’m quite happy with how my chapter turned out. There’s also a load of excellent material from the other amazing authors in the book.
Thanks to Paul Hudson for putting this project (and the book, literally) together! Also thanks to the other 19 authors for donating their time and expertise to build a book for a good cause. I’m proud to have been a part of it!
]]>Modern AppKit File Permissions2019-10-23T23:38:19-05:002019-10-23T23:38:19-05:00https://benscheirman.com/2019/10/troubleshooting-appkit-file-permissionsSandboxing has been a fact of macOS development for quite some time now. With each release of macOS we see an increasing number of features and new security constraints that we must live with.
This is great for consumers, but (as with most things Security) can be a pain in the neck for developers.
I decided to start building a little utility app to stitch together some scripts that I use to publish NSScreencast. This is largely for my own education, and gives me an excuse to do more AppKit development.
My first task was to just list the episodes from a folder on my local machine in a tableview. The data for this would come from FileManager , so I could just list the contents of my directory, right? Right?
This code fails with an error indicating you don’t have permission to the folder.
A sandboxed macOS app doesn’t have access to the entire file system. Instead, apps have to be granted permission to read & write to specific folders.
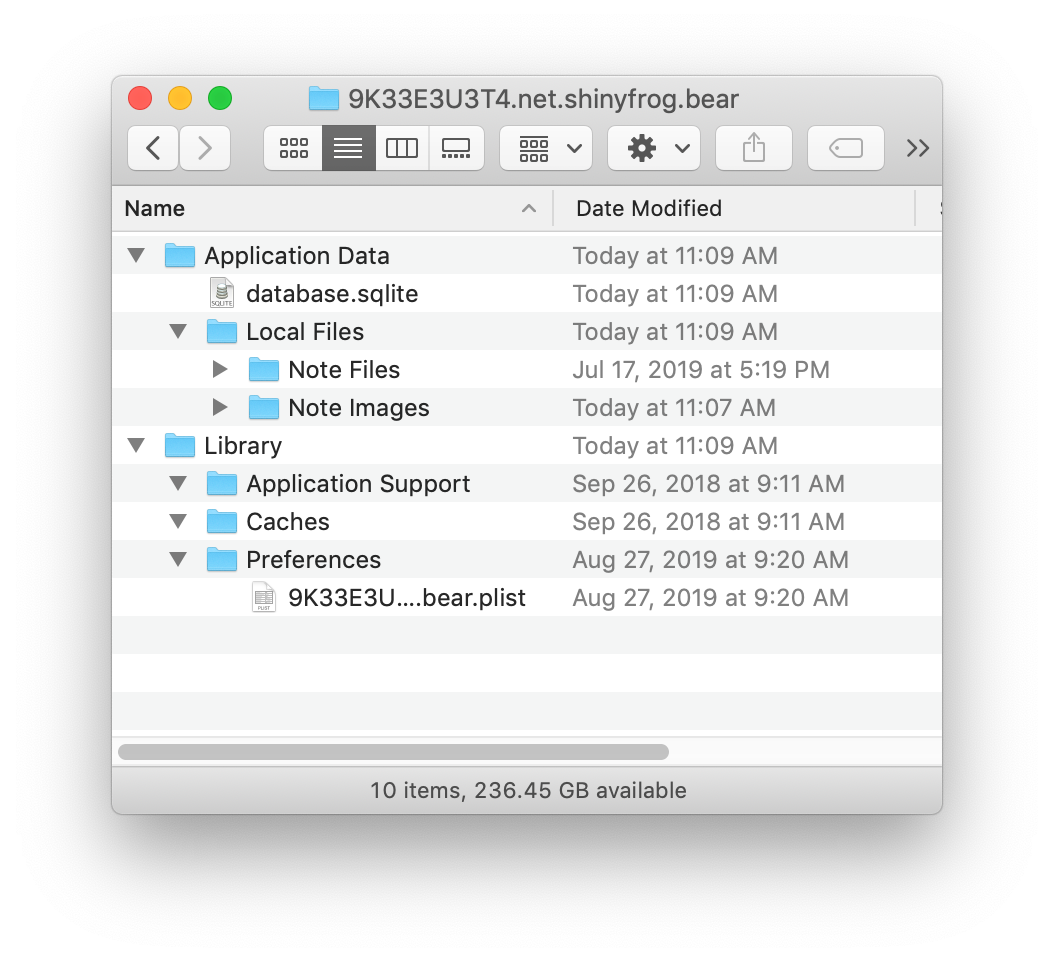
This isn’t true for your sandbox of course. Each app is given an isolated place to store data, documents, cache, and settings. But in this case I want to read files outside of my sandbox. For this I’ll need user permission.
This is an example of Bear's sandbox, the app I'm writing this post in.
So I need to somehow get access to a folder outside my sandbox.
Granting Permission to Access Folders
There is no API for saying “Please prompt the user to access this folder”. Instead, this is done in one of three ways:
Full Disk Access
Prompting the user to open a file/directory
Dragging & Dropping a folder onto the application
Of course you could also turn off Sandboxing altogether and not deal with this stuff. Doing so, however, means you would not be able to distribute your app on the Mac App Store. I personally don’t have this requirement, but I’m also stubborn and wanted to know how to do this stuff, so here we are.
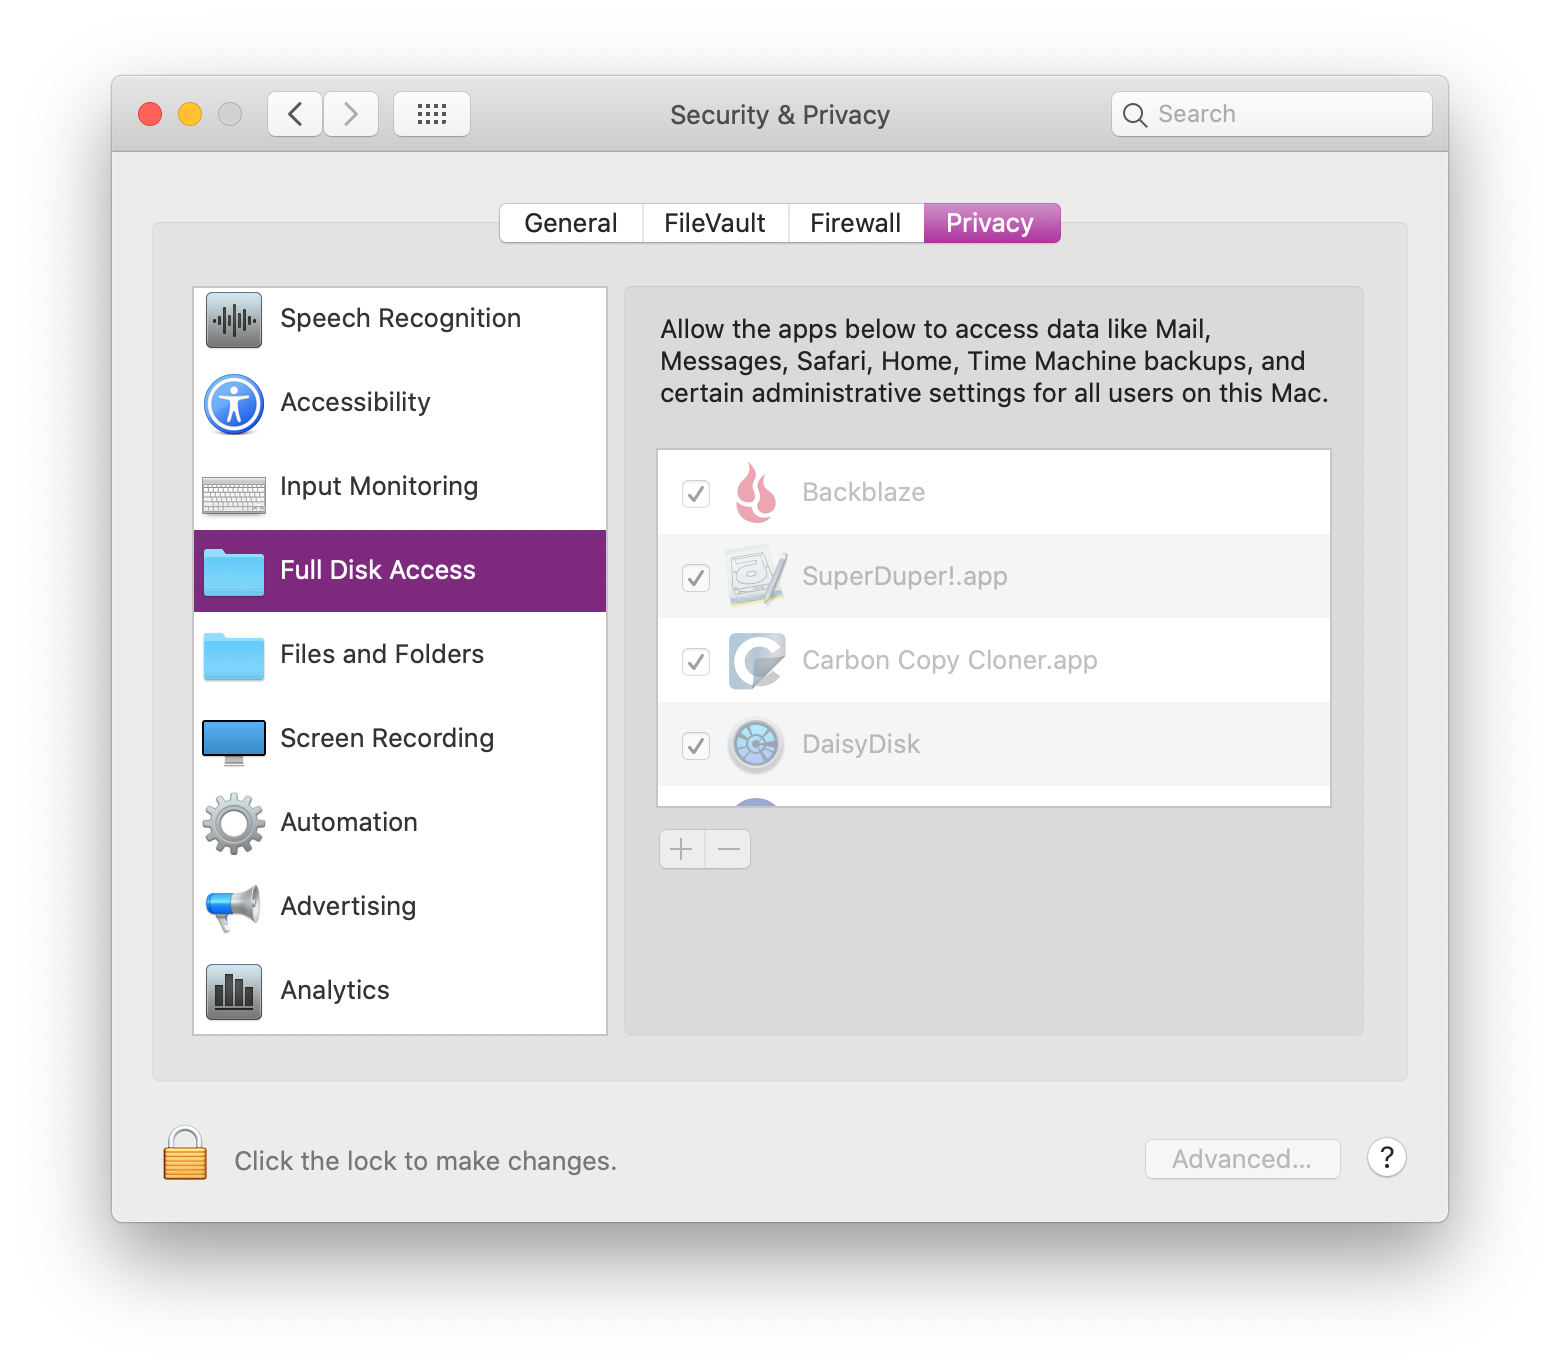
Full Disk Access
There is of course the option to use Full Disk Access, but this is a sledgehammer, and isn’t appropriate for most applications. If you do need Full Disk Access, this would require opening the Security preference pane, going into Full Disk Access, unlocking the UI, and dragging the app into this list.
Users will need assistance doing this, so I’ve noticed that many apps have their own way of prompting and instructing the user how to do this dance.
To top it off, the user has to quit the app and relaunch for the app to see these new permissions.
Fine Grained Permissions with NSOpenPanel
In our case we want permission to read (and write) to a single folder that is outside of our app’s sandbox. We’l need to enable this ability.
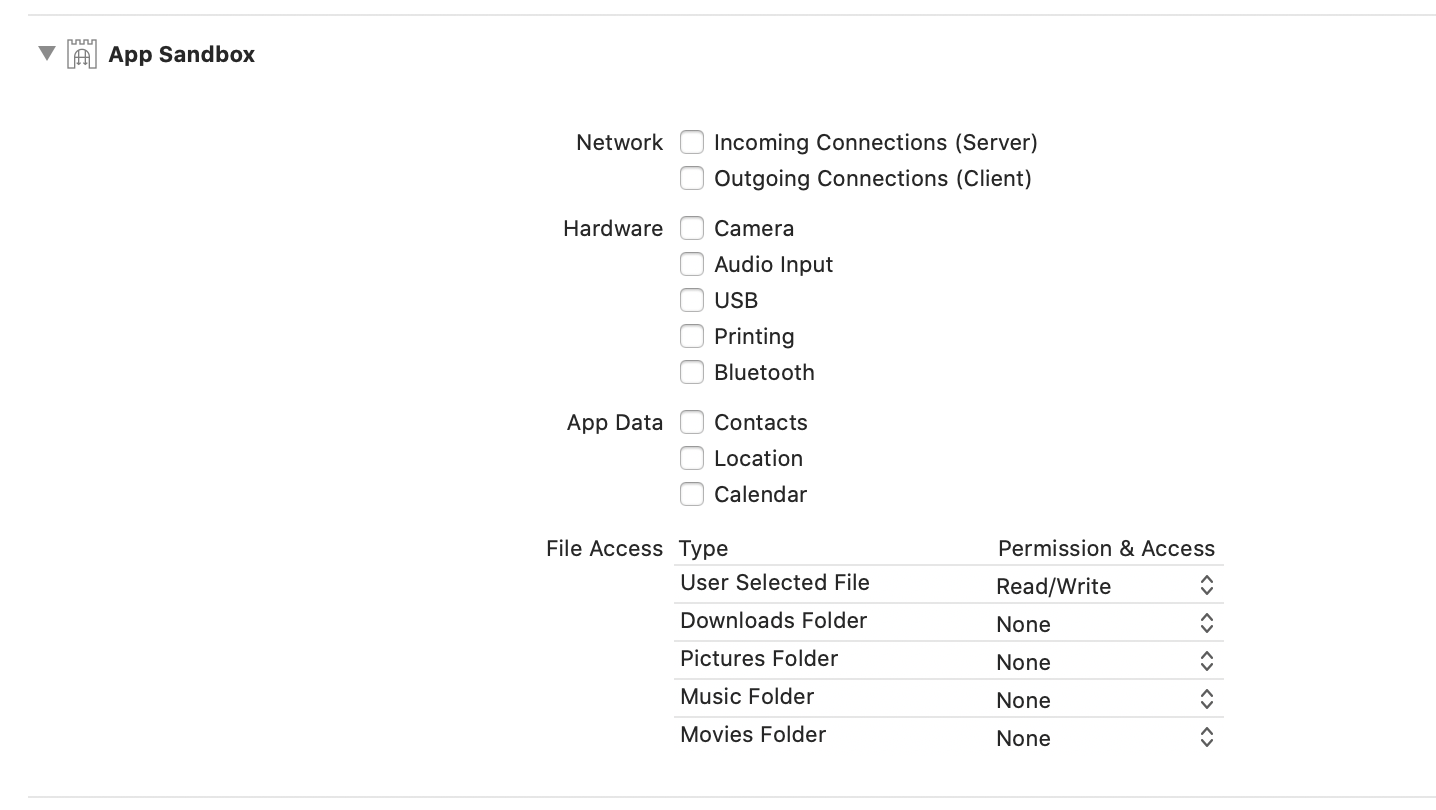
First, click on your project in the navigator on the left, then click “Signing & Capabilities”. Here you can manage a few common options when dealing with Sandboxing. Look for File Access - User Selected File and change this to Read/Write. This will give you a new entitlement in your entitlements file.
If you only wanted to write to one of the blessed locations listed above, then you don’t need to do this step, just set the appropriate permission level and you can access that folder.
For the User Selected File case, we have to show user intent. Here we’ll pop a panel to “open the directory”, which will signal to the OS this intent:
private func promptForWorkingDirectoryPermission() -> URL? {
    let openPanel = NSOpenPanel()
    openPanel.message = "Choose your directory"
    openPanel.prompt = "Choose"
    openPanel.allowedFileTypes = ["none"]
    openPanel.allowsOtherFileTypes = false
    openPanel.canChooseFiles = false
    openPanel.canChooseDirectories = true

    let response = openPanel.runModal()
    print(openPanel.urls) // this contains the chosen folder
    return openPanel.urls.first
}
If we use the URL instance that we get from the above function, we can pass this to FileManager to list the contents of the directory.
One caveat though: this access will expire when the user quits the app. Ugh.
Drag & Drop
Another way of signaling intent is to have the user drag & drop the folder to your app. To do this, you’ll have to go through the dance which will allow your app to accept a drag.
In my case I created a custom DragHandlingView and associated delegate to pass this information off to a controller:
protocol DragDelegate : class {
    func handleDrag(from view: DragHandlingView, dragInfo: NSDraggingInfo) -> Bool
}

class DragHandlingView: NSView {
    weak var delegate: DragDelegate?

    override func draggingEntered(_ sender: NSDraggingInfo) -> NSDragOperation {
        return .generic // this controls what the icon does ("copy", "move", "link", etc)
    }

    override func performDragOperation(_ sender: NSDraggingInfo) -> Bool {
        return delegate?.handleDrag(from: self, dragInfo: sender) ?? false
    }
}
Then in my controller, I request permission for the drag types I want to accept:
class WorkingDirectoryPromptViewController: NSViewController, DragDelegate {
    override func viewDidLoad() {
        super.viewDidLoad()
        registerForDragDrop()
    }

    private func registerForDragDrop() {
        (view as! DragHandlingView).delegate = self

        // we don't need file contents, just the location
        view.registerForDraggedTypes([.fileURL])
    }

    // ...
}
Then we can handle the drag:
Armed with these two methods, you now have a couple ways to be given a special URL that has access to the folder the user selects.
func handleDrag(from view: DragHandlingView, dragInfo: NSDraggingInfo) -> Bool {
    // the dragInfo contains a "pasteboard" with our data
    if let fileURL = NSURL(from: dragInfo.draggingPasteboard) as URL? {
        print("FILE: \(fileURL)")
        var isDir: ObjCBool = false
        _ = FileManager.default.fileExists(atPath: fileURL.path, isDirectory: &isDir)

        if !isDir.boolValue {
            let alert = NSAlert()
            alert.alertStyle = .warning
            alert.messageText = "Drag a folder instead."
            alert.runModal()
            return false
        } else {
            workingDirectoryChosen(fileURL)
        }
    }
    return true
}
Persistent Access to a Folder
By default the approaches above grant you access while the app remains open. When you quit the app, any folder access you had is lost.
To gain persistent access to a folder even on subsequent launches, we’ll have to take advantage of a system called Security-Scoped Bookmarks.
It is helpful to read the docs on this, as there is little information elsewhere on the web about this (hence this article).
To start we’ll need to add an entitlement to MyApp.entitlements:
I was informed by Jeff Johnson that this entitlement is no longer required, despite it still being listed in the docs. I filed a Feedback for this (FB7405463).
Next, after you’ve been granted permission to a folder using one of the methods above, we need to create a bookmark to that folder with a a special flag:
private func saveBookmarkData(for workDir: URL) {
    do {
        let bookmarkData = try workDir.bookmarkData(options: .withSecurityScope, includingResourceValuesForKeys: nil, relativeTo: nil)

        // save in UserDefaults
        Preferences.workingDirectoryBookmark = bookmarkData
    } catch {
        print("Failed to save bookmark data for \(workDir)", error)
    }
}
On a subsequent launch we can check for the existence of this data and try to load the URL back (preserving its permissions):
private func restoreFileAccess(with bookmarkData: Data) -> URL? {
    do {
        var isStale = false
        let url = try URL(resolvingBookmarkData: bookmarkData, options: .withSecurityScope, relativeTo: nil, bookmarkDataIsStale: &isStale)
        if isStale {
            // bookmarks could become stale as the OS changes
            print("Bookmark is stale, need to save a new one... ")
            saveBookmarkData(for: url)
        }
        return url
    } catch {
        print("Error resolving bookmark:", error)
        return nil
    }
}
With these approaches you should now have access to the folder even across app launches.
But there’s one more step! We have to tell the system when we want to use the “resource” and when we’re done.
Start / Stop Requesting Access
When we’re ready to read files, we’ll have to wrap this in a pair of calls to signal that we want to access the resource:
if !workingDir.startAccessingSecurityScopedResource() {
    print("startAccessingSecurityScopedResource returned false. This directory might not need it, or this URL might not be a security scoped URL, or maybe something's wrong?")
}

paths = try FileManager.default.contentsOfDirectory(at: workingDir, includingPropertiesForKeys: nil, options: .skipsHiddenFiles)
            .map {
                $0.relativePath.replacingOccurrences(of: workingDir.path, with: "")
            }
workingDir.stopAccessingSecurityScopedResource()
Here we call startAccessingSecurityScopedResource on the URL we’ve been given. This might return false under a few conditions:
The user really doesn’t have access to this
The URL isn’t a security scoped URL
This directory doesn’t need it (remember ~/Downloads, etc above?)
So we’re just logging this value and continuing anyway. We might still get an error when accessing the contentsOfDirectory and we’ll have to handle that by prompting for access again.
Some Gotchas
In working through this issue I ran into numerous gotchas.
Watch out for symlinks. My working directory is full of them, and I wanted to list contents of a nested folder that was actually a symlink, and this doesn’t work. You have to grant permissions to the real folder, which may involve additional prompts to grant all the permissions you need.
Watch out for folders that already have access. Even though we’re prompting for access, the user might select ~/Downloads or ~/Pictures or something. This will work fine, but you might run into confusion when startAccessingSecurityScopedResource returns false. In these cases we can just continue.
Watch out for Dropbox and other filesystem-bending plugins. Dropbox does some useful but unholy things to Finder and the file system in order to do its job. This might result in strange behavior when trying to access those files & folders.
]]>Xcode Environment Specific Configuration2018-10-02T15:50:15-05:002018-10-02T15:50:15-05:00https://benscheirman.com/2018/10/xcode-environment-specific-configurationAlmost every app you build with Xcode will need some sort of configuration. Whether it is API Keys for 3rd party SDKs, the URL of your API, feature toggles, or a logging level of verbosity, it’s a good idea to keep this configuration separate from your code.
The biggest reason you would want to do this is so that you can provide a different value depending on your build settings. For development builds, use a development API. For production, use the live API.
You might even want to isolate analytics between your beta distribution and your App Store distribution.
The way I approached this on the NSScreencast app is by using the Info.plist along with a custom configuration plist that I write a wrapper for.
It should be noted that the method described in this post does not imply any amount of secrecy whatsoever. If you need to hide keys and other sensitive data in your binary, take a look at
cocoapods-keys,
Arkana. I covered both of these in screencast form
here
and here.
Defining configuration per environment
In my projects I start by adding a Configuration group, along with a propertly list called config.plist.
config.plist from NSScreencast’s iOS app
In the plist there are three root keys:
Common - These will hold settings that apply no matter the environment
Local - These apply when running a specific scheme for local development
Production - This applies to any release build
Aside from Common you can name the environments whatever you like. You aren’t limited to these either, you can add as many as you need for your project.
How do I specify which environment to use?
The approach I’ve taken for this is to leverage Xcode build configurations along with the Info.plist. The reason is that the Info.plist is easy to read from your application and can contain substitutions based on build settings.
We’ll start by making an xcconfig file structure:
Configuration/Shared.xcconfig
Configuration/Debug.xcconfig
Configuration/Debug.LocalServer.xcconfig
Configuration/Release.xcconfig
You’ll want one of these for each build configuration you maintain. Here I’ve added a Shared.xcconfig in case there are any settings that would otherwise be duplicated in all of the config files.
You can also see that I have an extra one called Debug.LocalServer.xcconfig. This is because I added an extra build configuration for the sole purpose of changing configuration like this. My build configurations look like this:
Choosing the xcconfig files for each build configuration
What if I use CocoaPods? Doesn’t it already use xcconfig files?
Yep, you’ll have to take one extra step if you already have xcconfig files in use, which is true if you use CocoaPods.
Take note of the xcconfig file that is in use already, then simply include it in your own xcconfig file.
Here’s my Release.xcconfig:
#include "../Pods/Target Support Files/Pods-NSScreencast-Base-NSScreencast/Pods-NSScreencast-Base-NSScreencast.release.xcconfig"
#include "Shared.xcconfig"

ConfigEnvironment=Production
And here is my Debug.LocalServer.xcconfig:
#include "../Pods/Target Support Files/Pods-NSScreencast-Base-NSScreencast/Pods-NSScreencast-Base-NSScreencast.release.xcconfig"
#include "Shared.xcconfig"

ConfigEnvironment=LocalServer
All we are doing here is setting a build setting called ConfigEnvironment.
You can do loads of other things with these xcconfig files, including keeping interesting build settings under version control with comments. If you’re curious, take a look at the screencasts I did on the topic: xcconfig files (and part 2). Also worth mentioning is James Dempsey’s BuildSettingExtractor tool.
Now that we have a different build setting per environment, we need to make this available at runtime. Open the Info.plist.
We’re going to add one line here at the top level:
Adding ConfigEnvironment to Info.plist
This dynamic value gives us the missing piece to be able to determine the configuration at runtime.
You might be asking why we don’t just put all of our variables in the Info.plist. My answer is that this file already has a lot of uses, and is owned primarily by the operating system. I prefer isolating my configuration so that it easy to understand and change. There's also another benefit which I’ll get to at the end of this post.
Tying it all together
Now that we have our configuration values, and we know what environment we’re in, we need an easy way to refer to these values at runtime. For this, we’ll create a class called EnvironmentConfiguration:
final class EnvironmentConfiguration {
    private let config: NSDictionary

    init(dictionary: NSDictionary) {
        config = dictionary
    }

    convenience init() {
        let bundle = Bundle.main
        let configPath = bundle.path(forResource: "config", ofType: "plist")!
        let config = NSDictionary(contentsOfFile: configPath)!

        let dict = NSMutableDictionary()
        if let commonConfig = config["Common"] as? [AnyHashable: Any] {

            dict.addEntries(from: commonConfig)

        }
        if let environment = bundle.infoDictionary!["ConfigEnvironment"] as? String {
            if let environmentConfig = config[environment] as? [AnyHashable: Any] {
                dict.addEntries(from: environmentConfig)
            }
        }

        self.init(dictionary: dict)
    }
}
Note that the values in Commoncan be overridden by the environment specific values. This way you can provide defaults in the Common category, and then provide an override just in one environment if you need to.
This parses our plist, but doesn’t provide a way to read the values. This is where I add an extension and provide strongly-typed accessors for each key I want to by able to read:
Doing it this way means I can share the EnvironmentConfiguration.swift between projects, and then you just add an extension for the keys specific to your application.
Now, when I need a value from configuration, I can do this:
let config = EnvironmentConfiguration()
let apiClient = ApiClient(baseUrl: config.baseUrl)
What about Testing?
I’m glad you asked! With this structure it’s also trivial to initialize with your own in-memory dictionary instead of reading from the file. The only thing to worry about here is to avoid instantiating this configuration object from everywhere in your code. In fact, it may be beneficial to have your view controllers and other components depend on an abstraction:
protocol NSScreencastConfiguration {
    var baseApiUrl: String { get }
    var logLevel: String { get }
    var googleClientId: String { get }
    var oneSignalAppId: String { get }
    var appCenterKey: String { get }
}

extension EnvironmentConfiguration : NSScreencastConfiguration { }
With this in place, any component in your system that needs configuration should refer to the protocol instead of the concrete type.
class MyViewController : UIViewController {
    private let config: NSScreencastConfiguration

    init(config: NSScreencastConfiguration) {
        self.config = config
        super.init(nibName: nil, bundle: nil)
    }

    required init(coder: NSCoder) { fatalError() }

    override func viewDidLoad() {
        super.viewDidLoad()

        if config.logLevel == "verbose" {
            // log all the things!
        }
    }
}
Passing around dependencies like this is a difficult practice to get into (and adhere to). It adds friction, but it is a good idea to make your dependencies explicit.
What else can you do?
This post so far describes static configuration. This is configuration that you set at development time and never change. But what if you could modify these values… at runtime?
This requires adding some additional layers to the approach, but essentially is the same underlying idea: Your configuration is stored in a dictionary in memory, and you pass around the configuration object to components that need it.
This means it would be possible for you to build a sort of live debug screen in your debug and beta configurations, allowing you to tweak settings, target a different version of the API, or turn up log levels dynamically.
It would be like having a Quake Console for your app.
The Quake Console enabled debug info, cheats, and other abilities to players by pressing the backtick key.
Configuration is an important piece of most applications. By providing a flexible structure for providing configuration values, altering them based on environment, you can have a clean separation of code and configuration.
How do you handle configuration in your apps? I’d love to hear about alternative approaches to this concept. Hit me up on Twitter.