iPhone Land | ~iPhone Hackin' Style.
iOS Device [iPhone, iPad, iPod touch] Jailbreak Memo By RedFalcon
ja
-
SoftBank版 iPhone5s+R-SIM10で「IIJmio」を使ってみる
子供用に渡していたSoftBank版 iPhone5sをR-SIM10でSIMフリー化、MVNO「IIJmio」のSIMの格安プランを試してみることに。Step0:事前準備● R-SIM10の購入● IIJmioの申込と開通R-SIM10については、他より高いが交換保証のある以下を選択しました。【venture resource 06】r-sim10SIMロック解除アダプタamazon直送 iPhone5s/5c/6/6plus純正トレイ対応/ios8対応docomo格安si..
iPhone
RedFalcon
2016-03-06T17:24:05+09:00
Step0:事前準備 【venture resource 06】r-sim10SIMロック解除アダプタamazon直送 iPhone5s/5c/6/6plus純正トレイ対応/ios8対応docomo格安sim専用/日本語マニュアル付き/apn構成プロファイル付き/rsim10/r-sim10/ R-SIM10 IIJmio SIMカード ウェルカムパック (SMS) ナノSIM 【Amazon.co.jp 限定】 レポート環境 Step1:R-SIM10によるSIMフリー化 Step1:APN等各種設定 https://www.iijmio.jp/hdd/devices/config.jsp ※4G(LTE)をONにすると「圏外病」に陥る可能性が高まるので、そのリスクを避けたい方はOFFのままで。
]]>
-
TaiG1.2.0 for Win - iOS8.1.2 iPhone6Plus Jailbreak
OS 8.0-8.1.2 対応のUntethered Jailbreakツール『TaiG Jailbreak Tool』を使って、iPhone6Plus(iOS8.1.2)をJailbreakしてみました。TaiG Jailbreak Tool V1.2.0について(2014/12/13時点)★対応環境: Windows XP 以降, Mac OS X 未対応★対応機種:iPod touch, iPhone 4S/5/5c/5s/6/6Plus, iPad Mini 2/3,..
Cydia ・ 脱獄 /Jailbreak
RedFalcon
2014-12-13T19:09:10+09:00
TaiG Jailbreak Tool V1.2.0について(2014/12/13時点) レポート環境 Step0:事前準備 Step1:TaiG Jailbreak Toolのダウンロード TaiG公式サイト ● TaiG Jailbreak Tool V1.2.0 for Windows Step2:ダウンロードした『TaiG Jailbreak Tool』を起動 ステップ3 : Cydia初期設定 Step4:Jailbreak後にやるべきこと JailBreak後のセキュリティ対策~mobile terminalでパスワード変更 」を参考に設定して下さい。
-
TaiG1.2.0 for Win - iOS8.1.2 iPhone6Plus Jailbreak
OS 8.0-8.1.2 対応のUntethered Jailbreakツール『TaiG Jailbreak Tool』を使って、iPhone6Plus(iOS8.1.2)をJailbreakしてみました。TaiG Jailbreak Tool V1.2.0について(2014/12/13時点)★対応環境: Windows XP 以降, Mac OS X 未対応★対応機種:iPod touch, iPhone 4S/5/5c/5s/6/6Plus, iPad Mini 2/3,..
Cydia ・ 脱獄 /Jailbreak
RedFalcon
2014-12-13T19:08:32+09:00
TaiG Jailbreak Tool V1.2.0について(2014/12/13時点) レポート環境 Step0:事前準備 Step1:TaiG Jailbreak Toolのダウンロード TaiG公式サイト ● TaiG Jailbreak Tool V1.2.0 for Windows Step2:ダウンロードした『TaiG Jailbreak Tool』を起動 ステップ3 : Cydia初期設定 Step4:Jailbreak後にやるべきこと JailBreak後のセキュリティ対策~mobile terminalでパスワード変更 」を参考に設定して下さい。
-
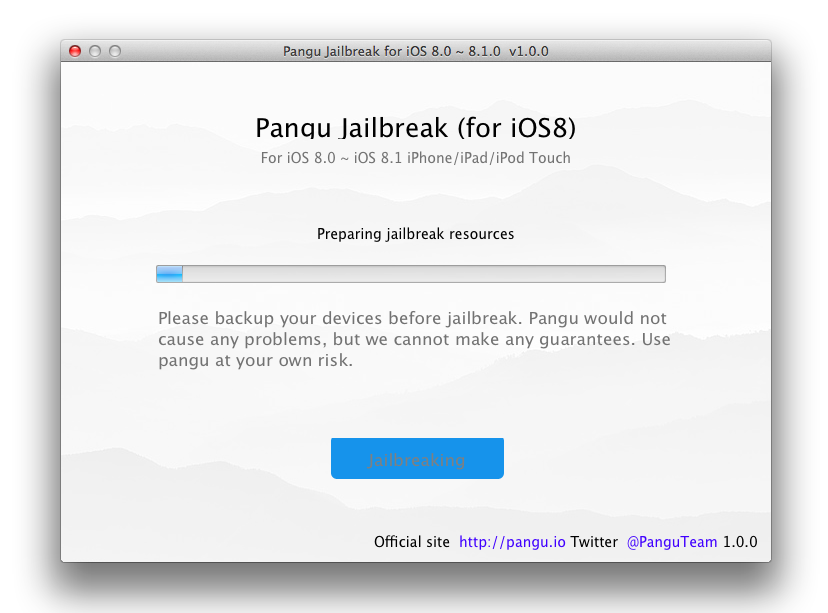
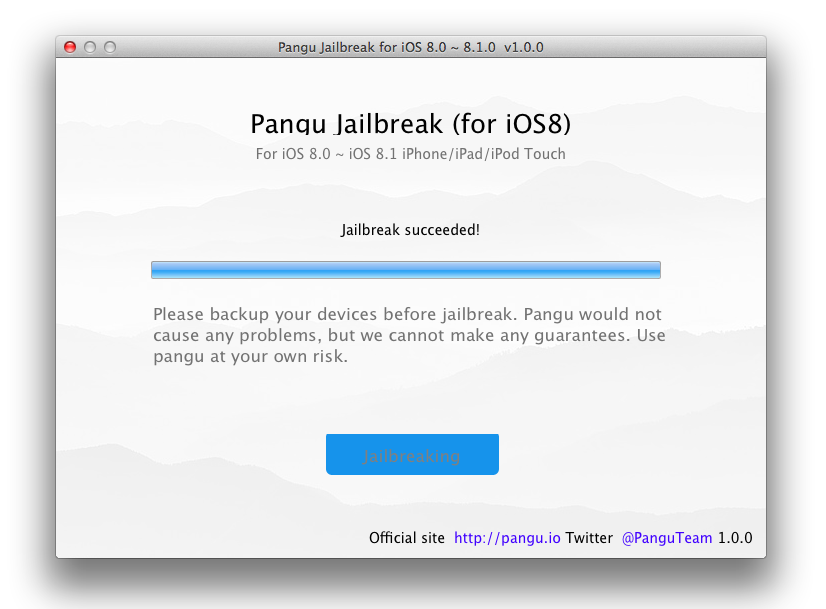
Pangu1.0.0 for Mac - iOS8.1 iPhone5s Jailbreak
OS 8.0-8.1.x 対応のUntethered Jailbreakツール『Pangu for iOS8』を使って、iPhone5S(iOS8.1 )をJailbreakしてみました。Pangu8について(2014/11/15時点)★対応環境: Windows XP 以降, Mac OS X 対応★対応機種:iPod touch, iPhone 4S/5/5c/5s/6/6Plus, iPad Mini 2/3, iPad/iPad Air/Air2★対応OS:iOS 8..
Cydia ・ 脱獄 /Jailbreak
RedFalcon
2014-11-15T14:36:37+09:00
Pangu8について(2014/11/15時点) レポート環境 Step0:事前準備 Step1:Pangu8のダウンロード Pangu公式サイト ● Pangu1.0.0 for Mac Step2:ダウンロードした『Pangu8.exe』を起動 ステップ3 : Pangu8初期設定 ステップ4 : Cydia初期設定 Step5:Jailbreak後にやるべきこと JailBreak後のセキュリティ対策~mobile terminalでパスワード変更 」を参考に設定して下さい。
-
【iOS8.1.2対応】Cydiaで追加したリポジトリ及びインストールしているJailbreak(脱獄)アプリ一覧
iOS8.1.2の環境で安定して使用できているJailbreak(脱獄)アプリの整理を兼ねて、自分用に備忘録としてまとめなおしました。下記アプリと同時にインストールされるアプリケーションは一覧リストに入れていないものもあります。(※アプリの価格は2014年12月13日現在のものですので実際の価格と異なる場合があります。Cydiaで最新の価格を確認下さい。)
Cydia ・ 脱獄 /Jailbreak
RedFalcon
2014-11-08T23:41:52+09:00
http://repo.alexzielenski.com/ ]http://kindadev.com/apt/ ]http://exile90software.com/cydia/beta/ ]http://hitoriblog.com/apt/ ]http://repo.rpdev.info/ ]http://ftp.sident.net/cydia-beta/ ]http://repo.tetherme.net/ ]http://weamdev.org/repo/ ]● セキュリティ対策 JailBreak後のセキュリティ対策~mobile terminalでパスワード変更 」を参考に設定して下さい。1) Alkaline [無料] 2) Apple File Conduit "2" [無料] 3) Barrel [$2.99] 4) betterFiveIconDock [無料] 5) BreakThrough [無料] 6) CCSettings for iOS8 [無料] 7) Cloaky [$1.50] 8) ForceGoodFit [無料] 9) iCleaner [無料] 10) iFile [$4.00] 11) LINE patch (ForceGoodFit Addon) [無料] 12) MobileTerminal (iOS7) [無料] 13) Nitrous [無料] 14) NoSlowAnimations [無料] 15) Priority Hub [無料] 16) Speed Intensifier [無料] 17) SwipeShiftCaret [無料] 18) TetherMe for iOS8+ [$4.99] 19) Virtual Home [$1.49] 20) Zeppelin [無料]
-
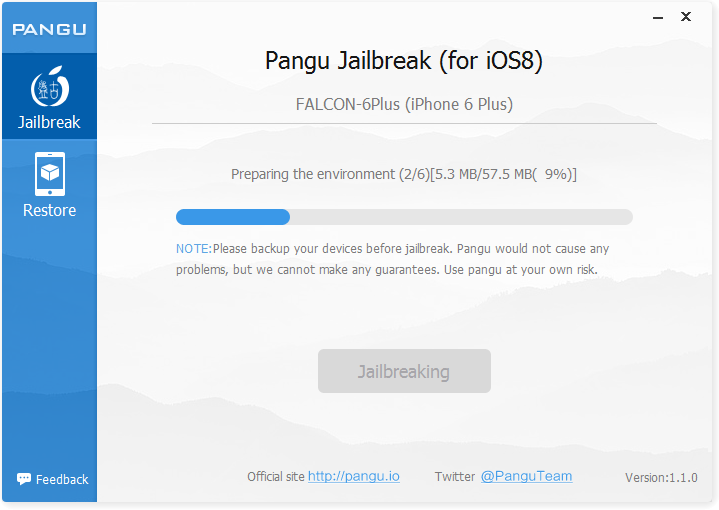
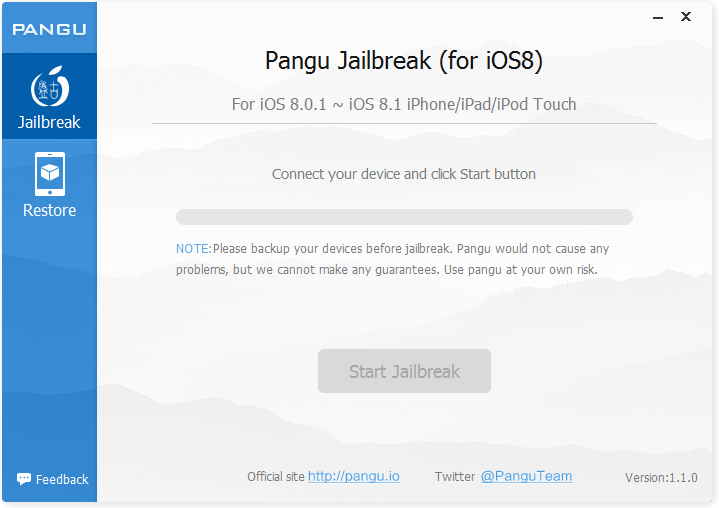
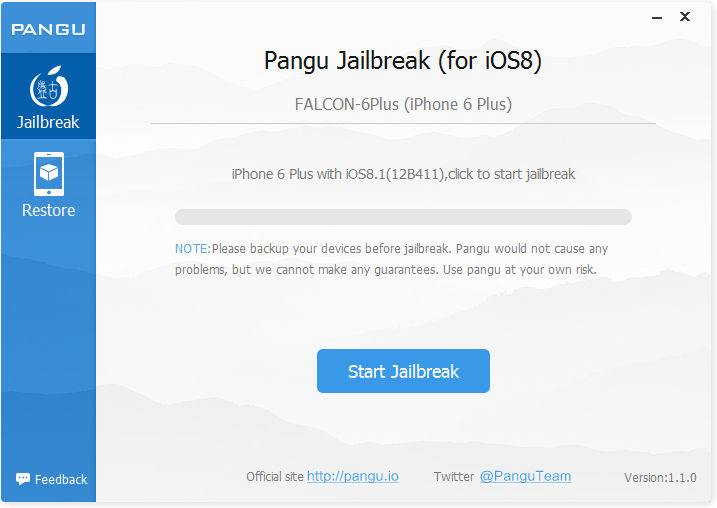
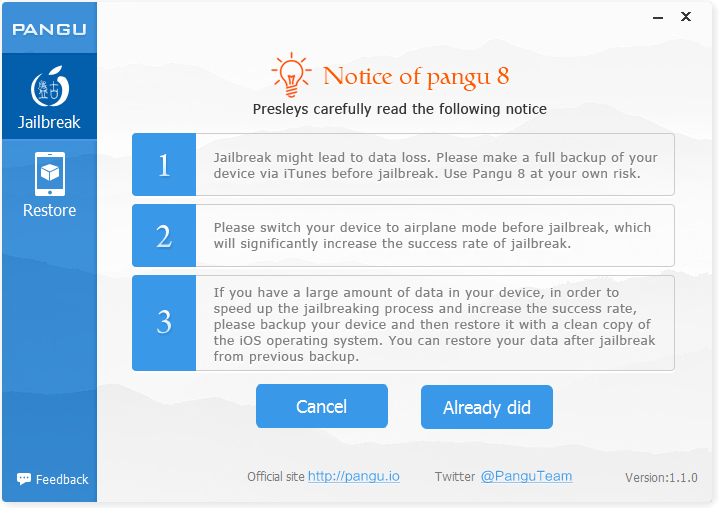
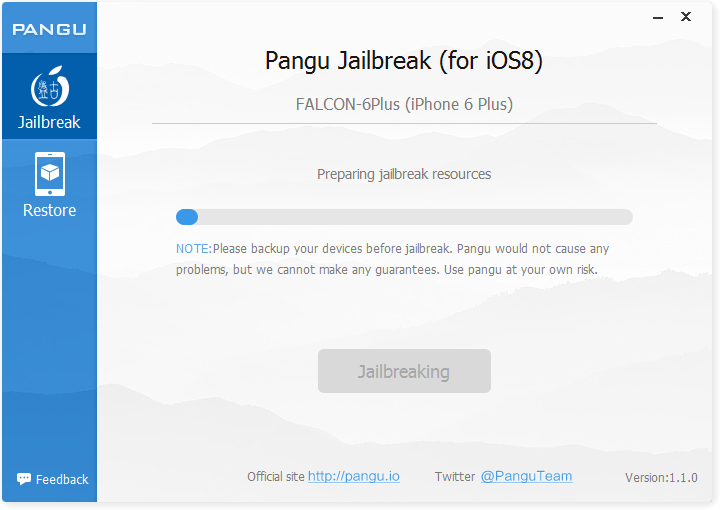
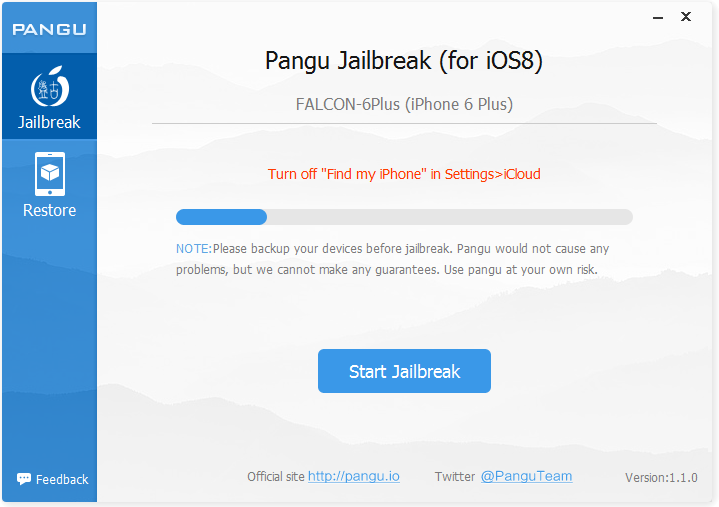
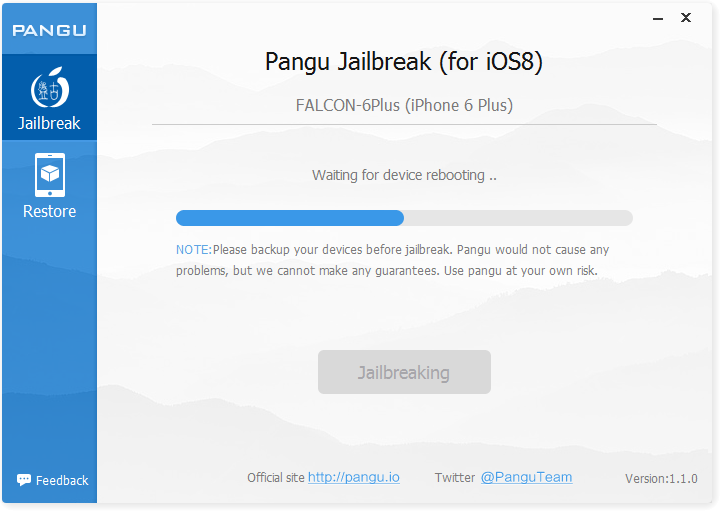
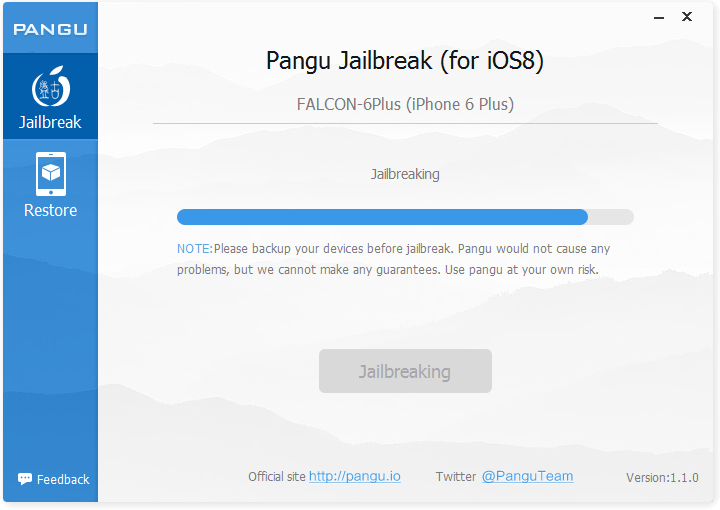
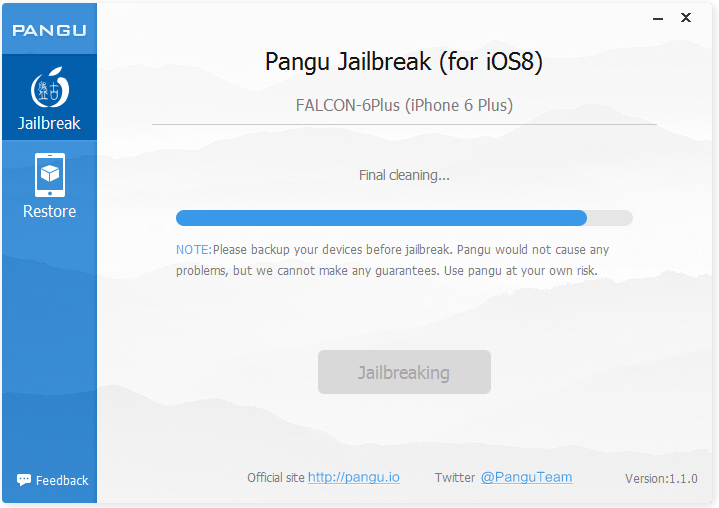
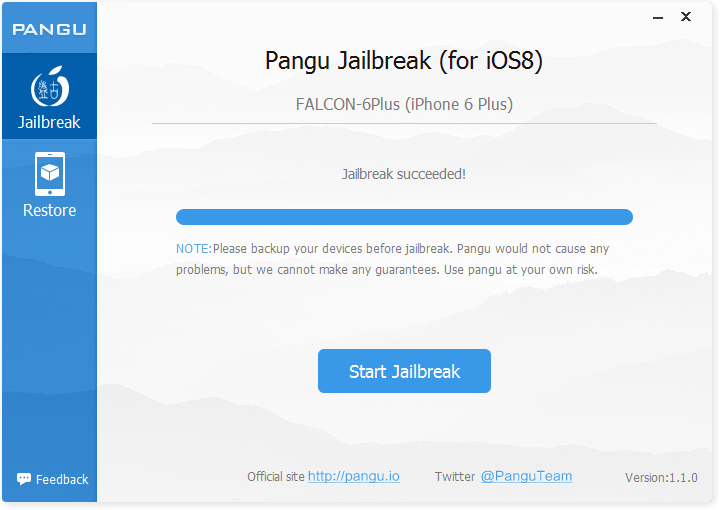
Pangu1.2.1 for Win - iOS8.1 iPhone6Plus Jailbreak
OS 8.0-8.1.x 対応のUntethered Jailbreakツール『Pangu for iOS8』を使って、iPhone6Plus(iOS8.1 )をJailbreakしてみました。Pangu8について(2014/11/15時点)★対応環境: Windows XP 以降, Mac OS X 対応★対応機種:iPod touch, iPhone 4S/5/5c/5s/6/6Plus, iPad Mini 2/3, iPad/iPad Air/Air2★対応OS:iO..
Cydia ・ 脱獄 /Jailbreak
RedFalcon
2014-11-02T15:55:20+09:00
Pangu8について(2014/11/15時点) レポート環境 Step0:事前準備 Step1:Pangu8のダウンロード Pangu公式サイト ● Pangu1.1.0 for Windows Step2:ダウンロードした『Pangu8.exe』を起動 ステップ3 : Pangu8初期設定 ステップ4 : Cydia初期設定 Step5:Jailbreak後にやるべきこと JailBreak後のセキュリティ対策~mobile terminalでパスワード変更 」を参考に設定して下さい。
-
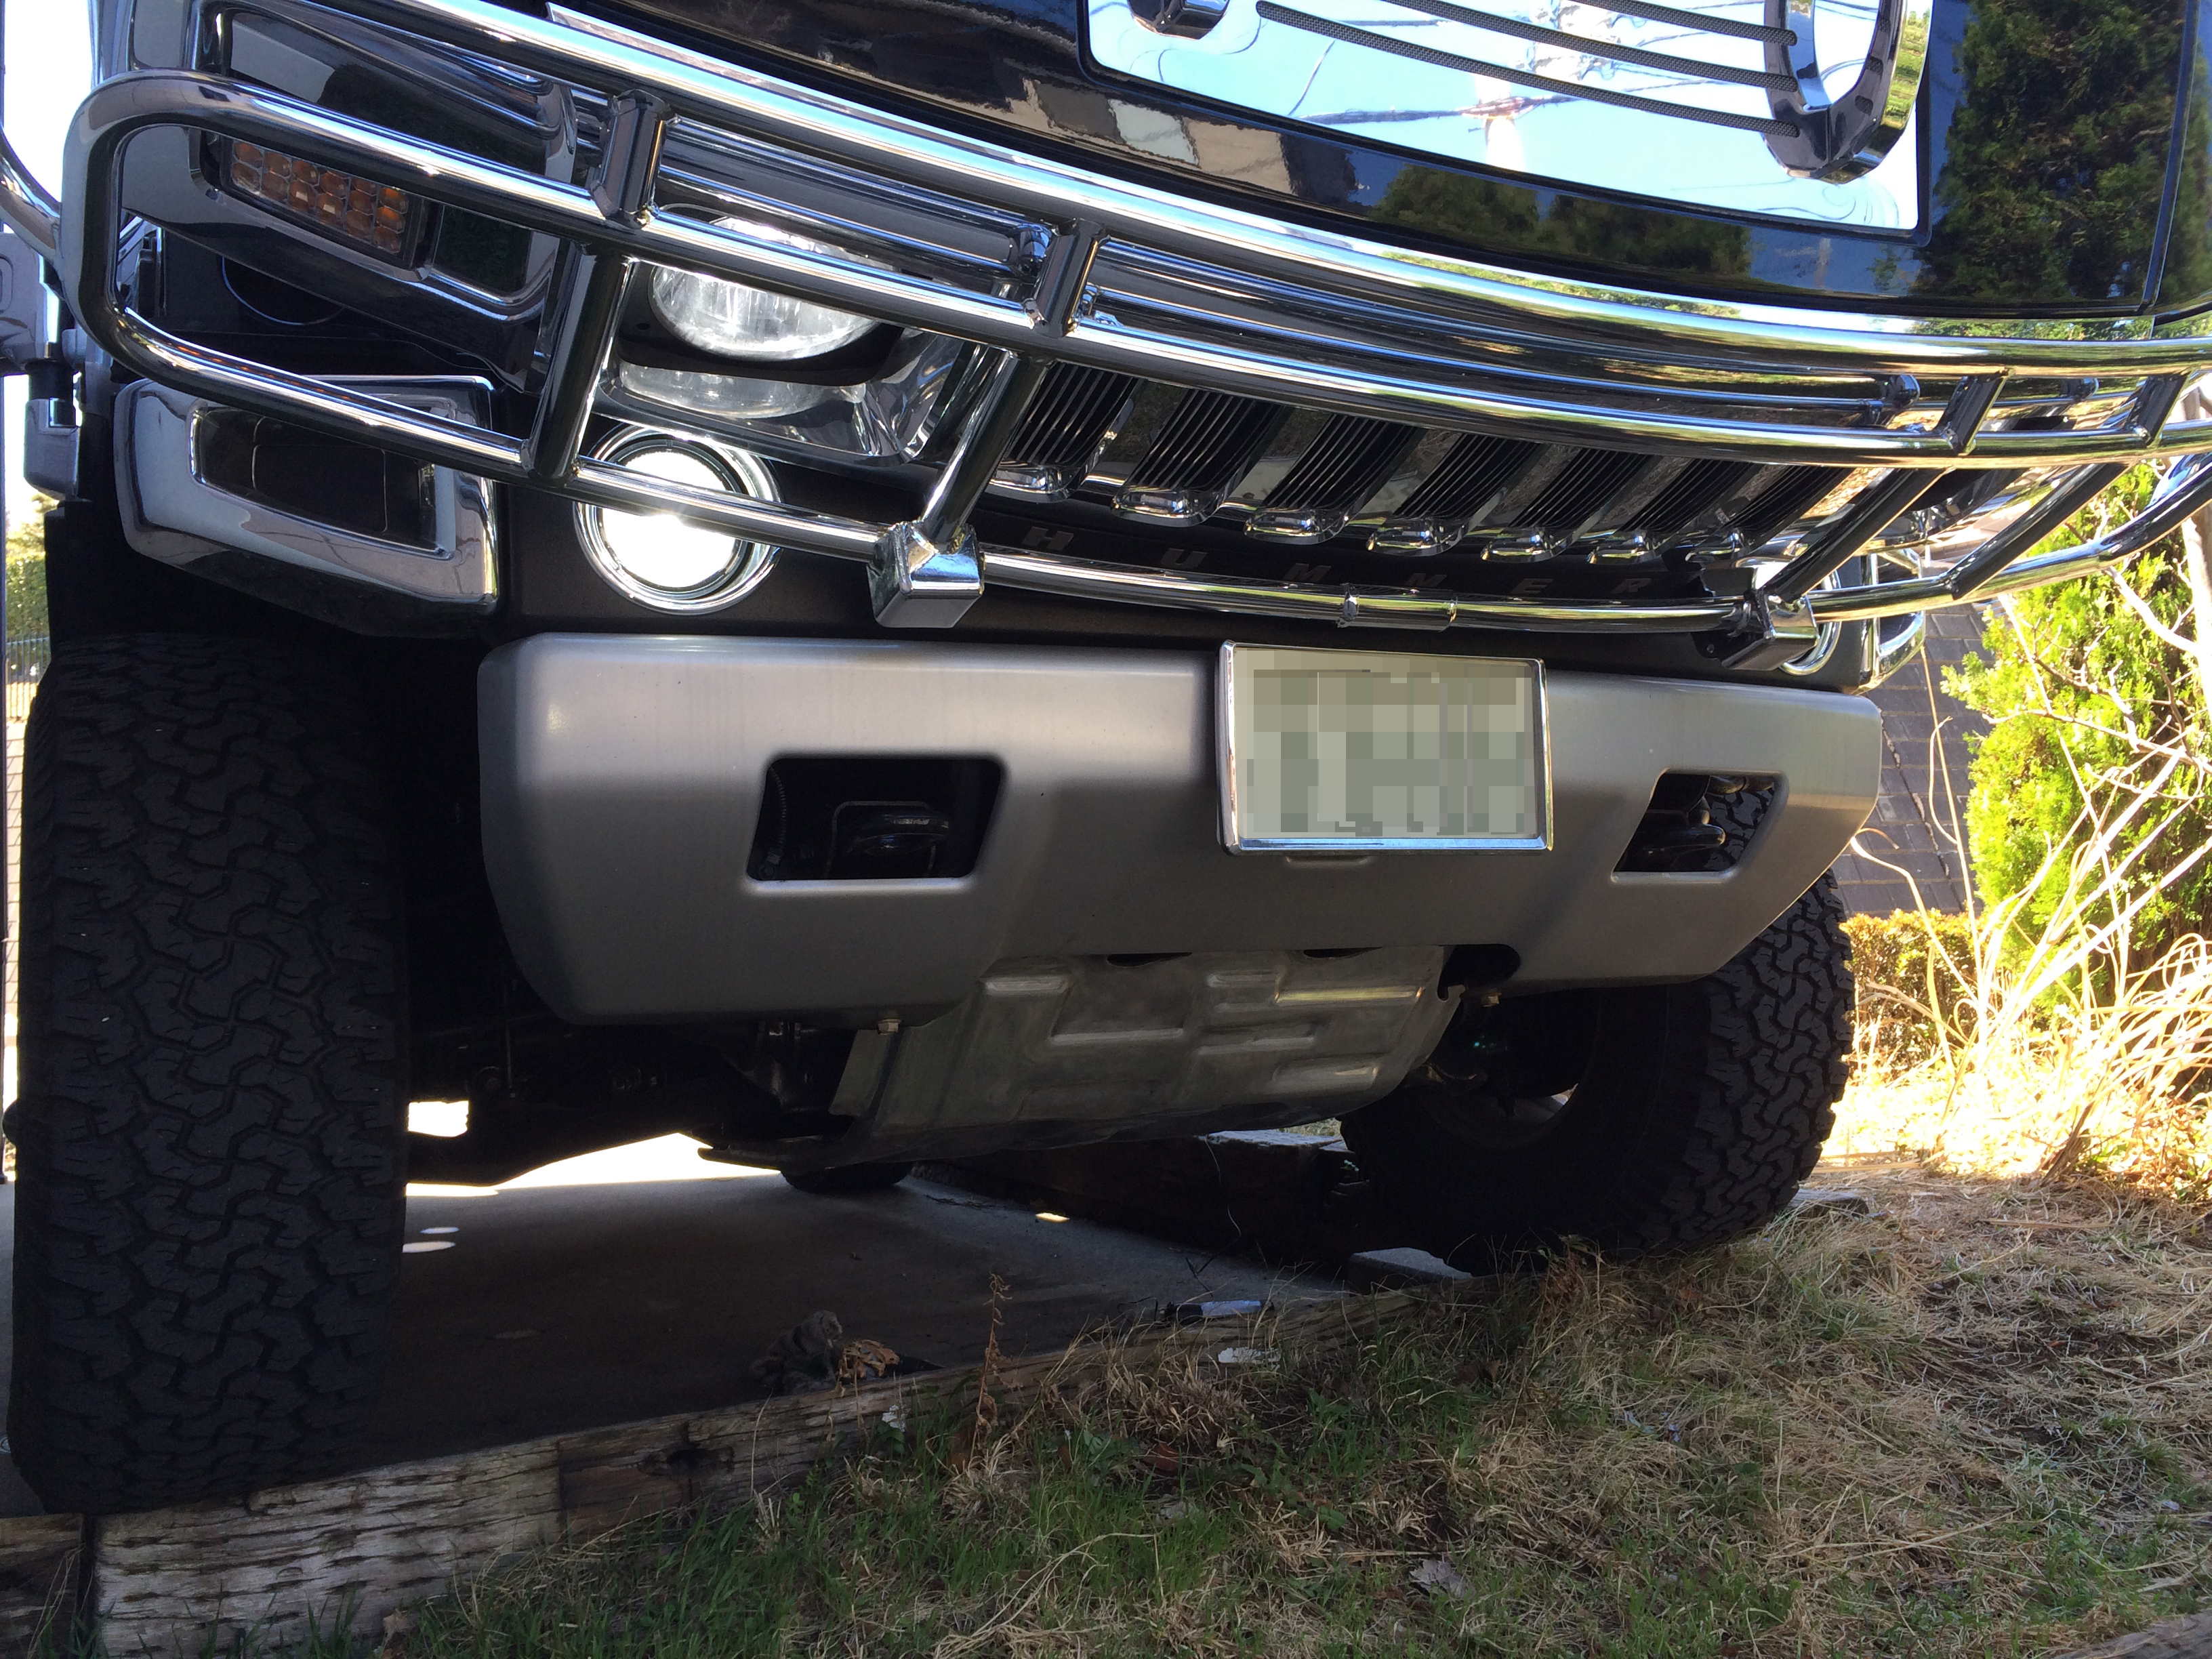
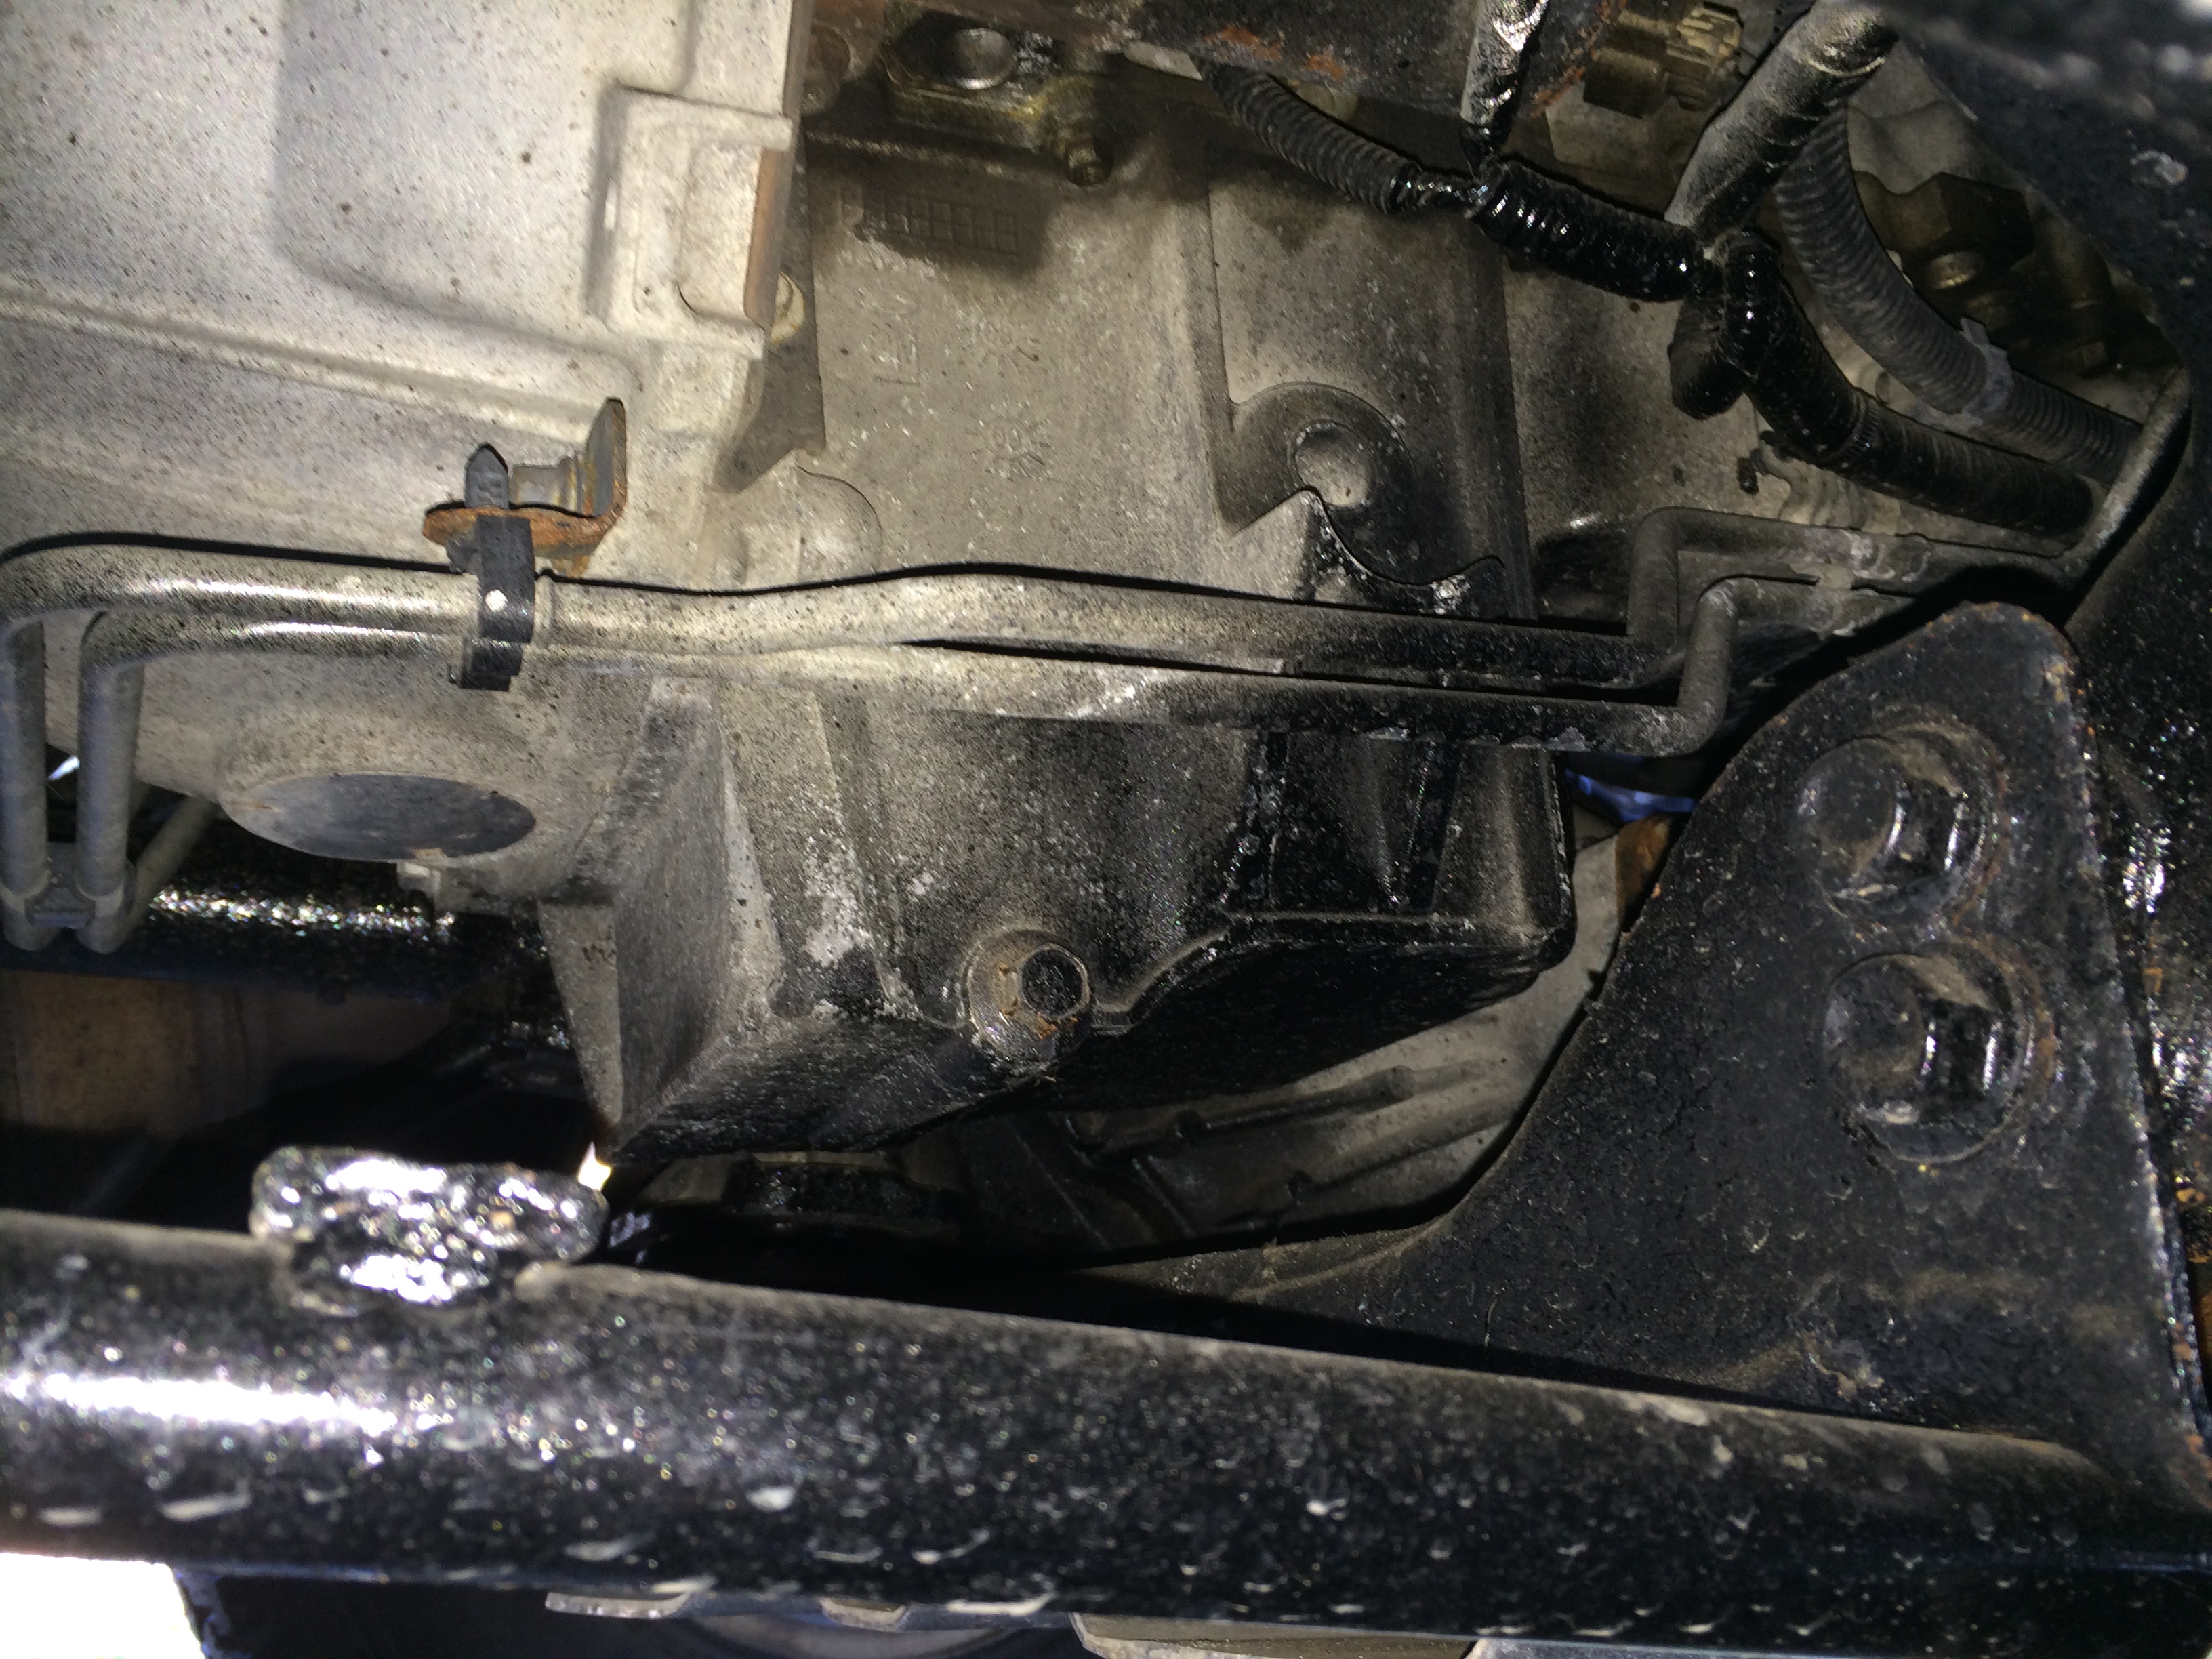
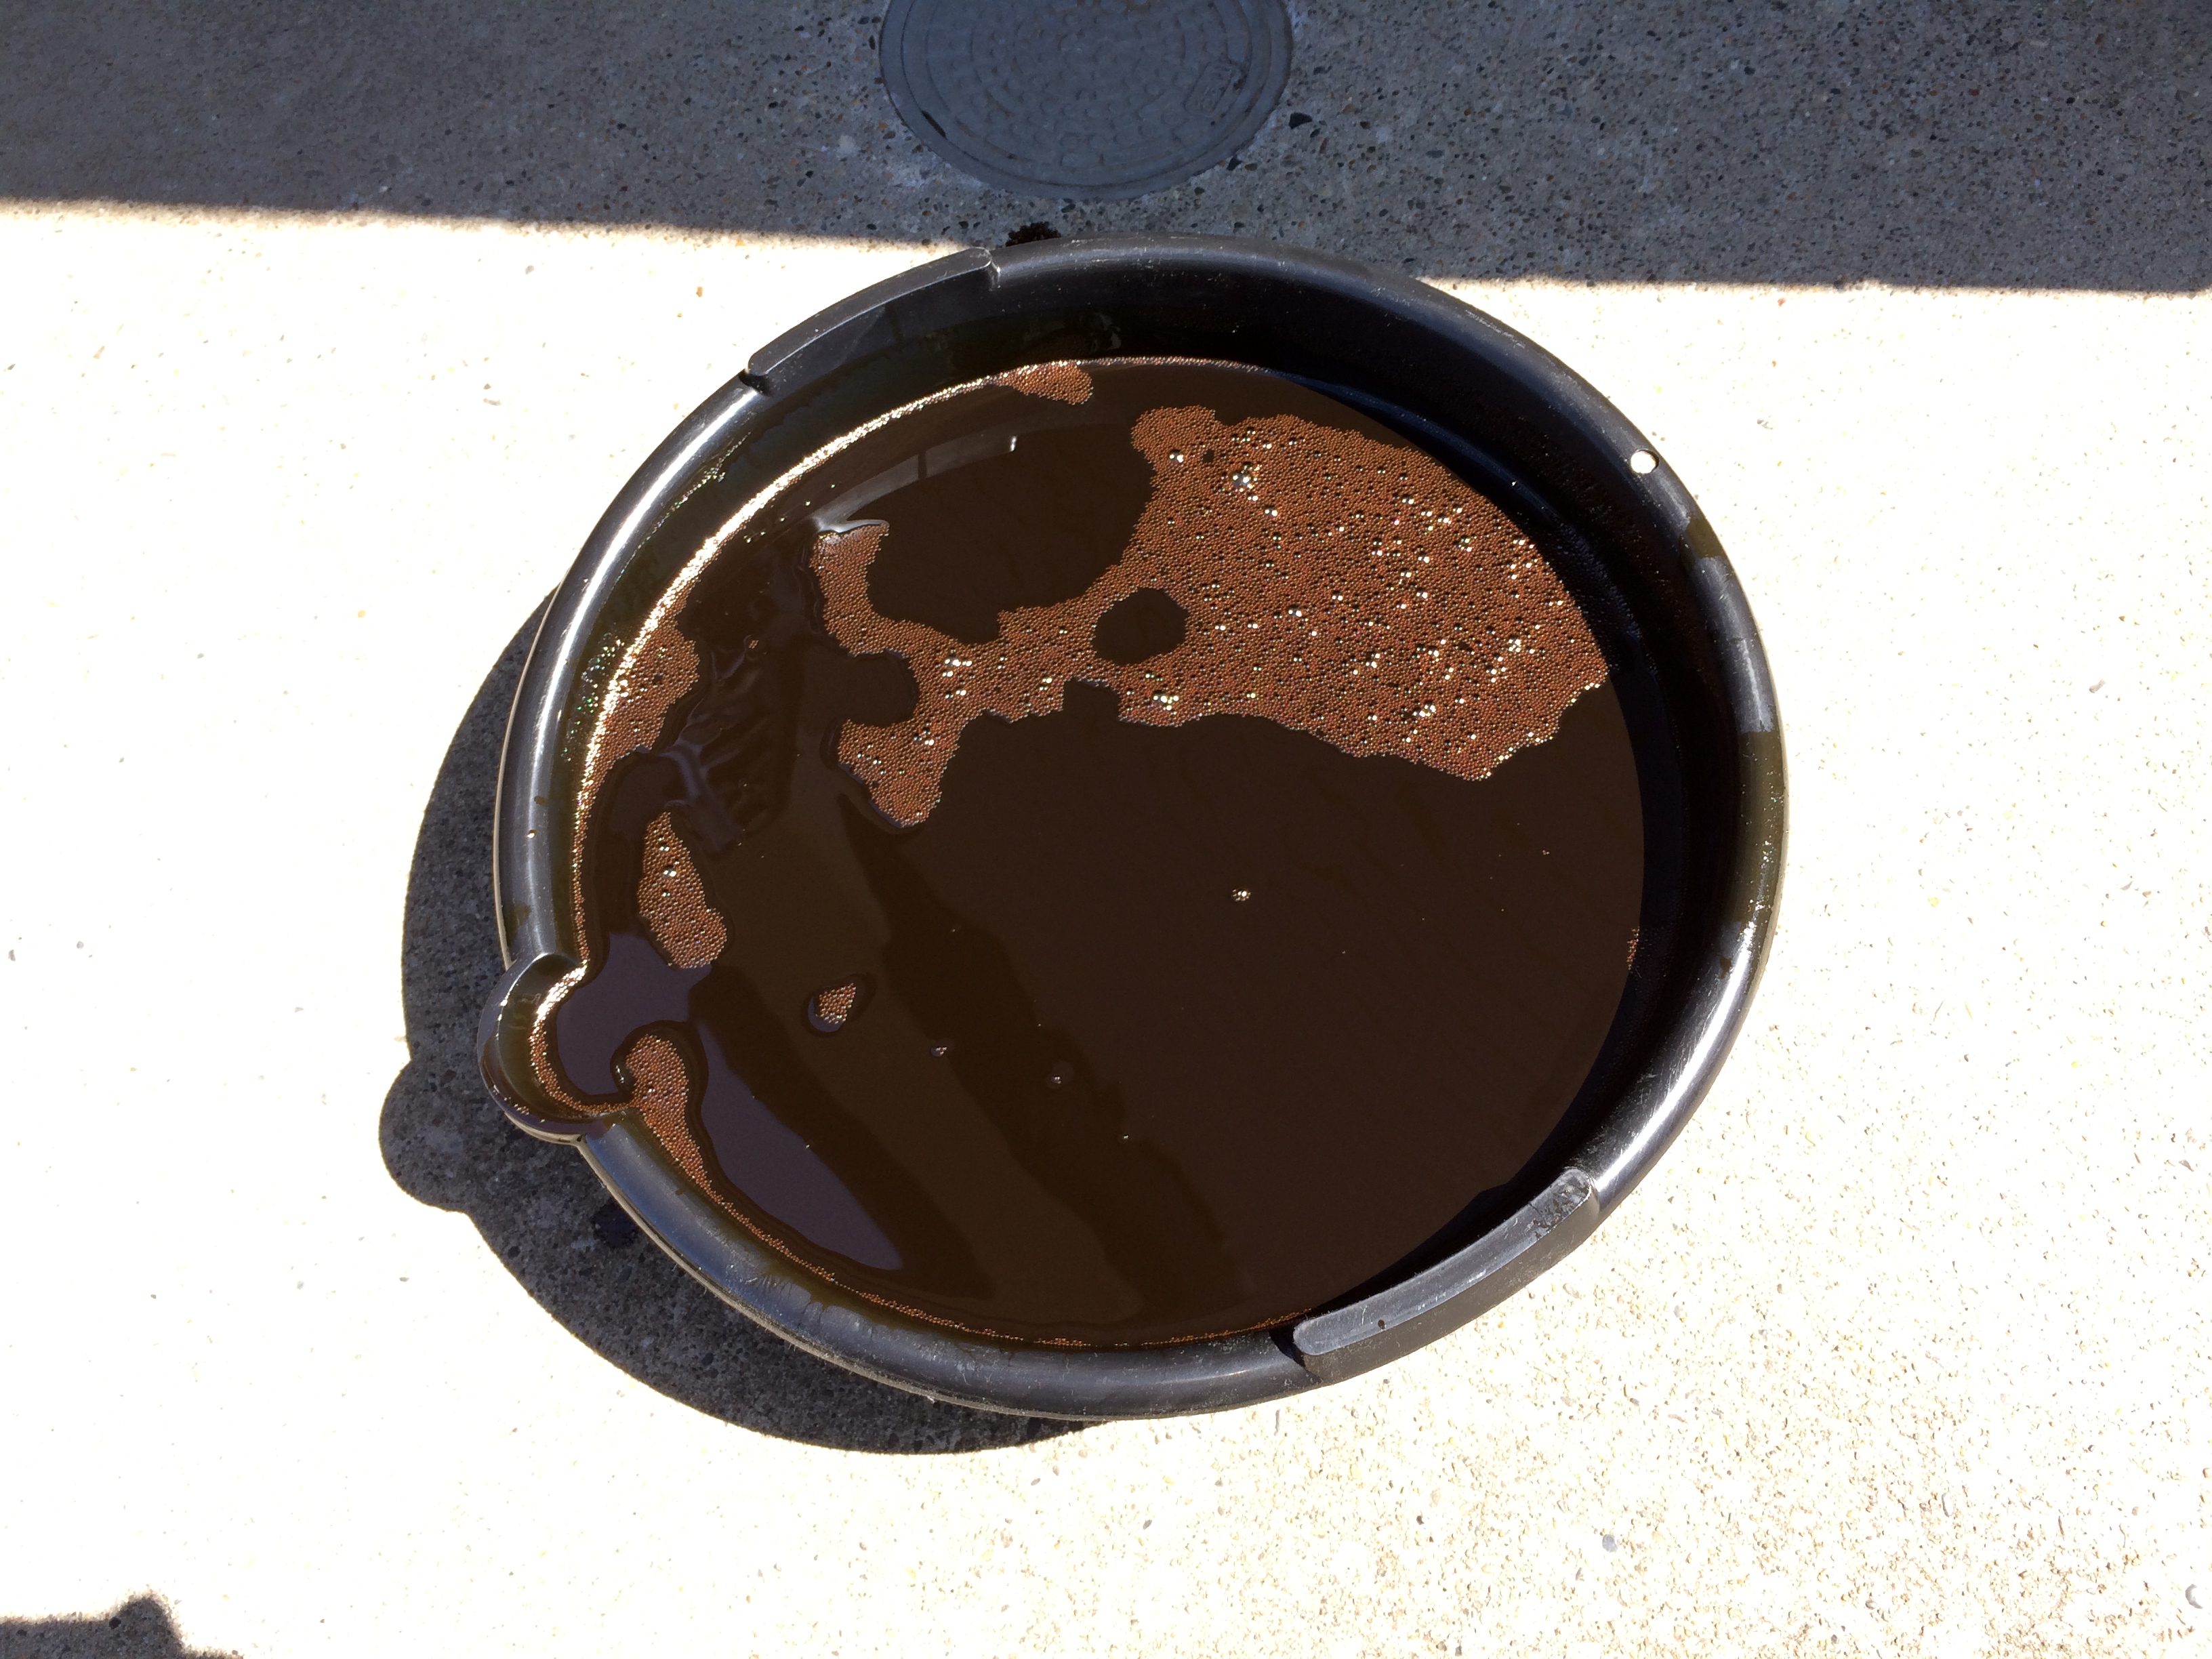
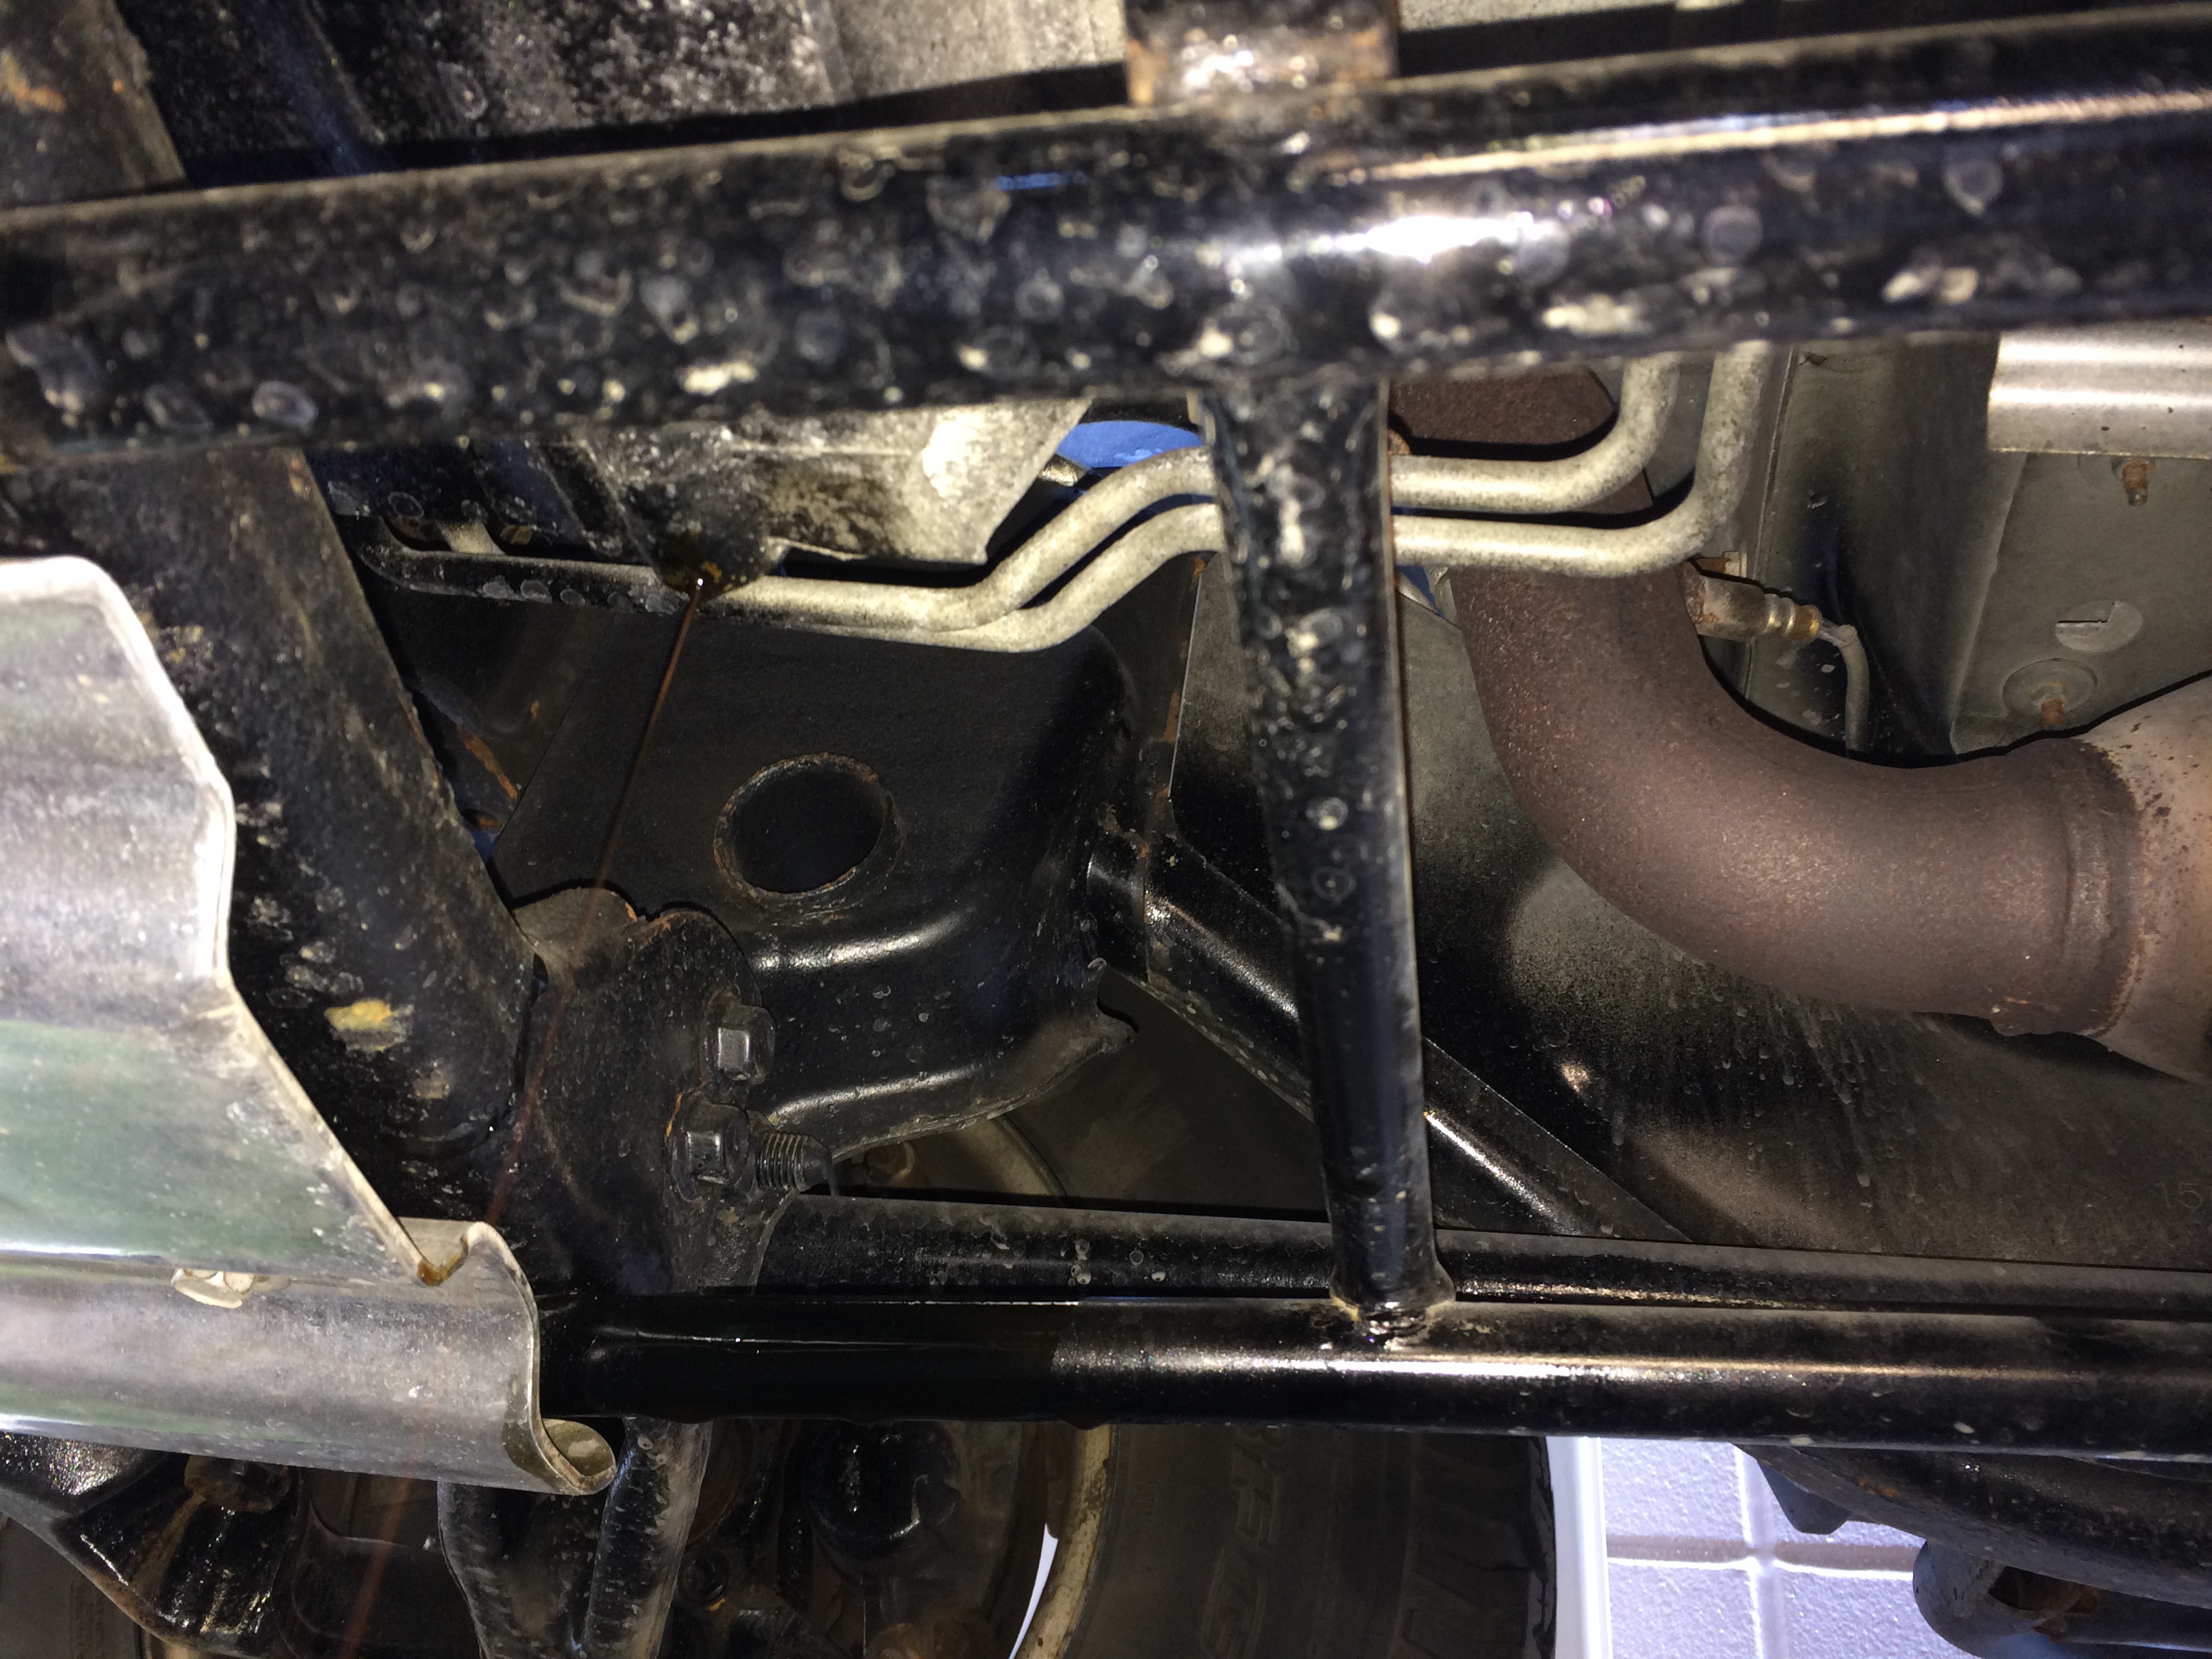
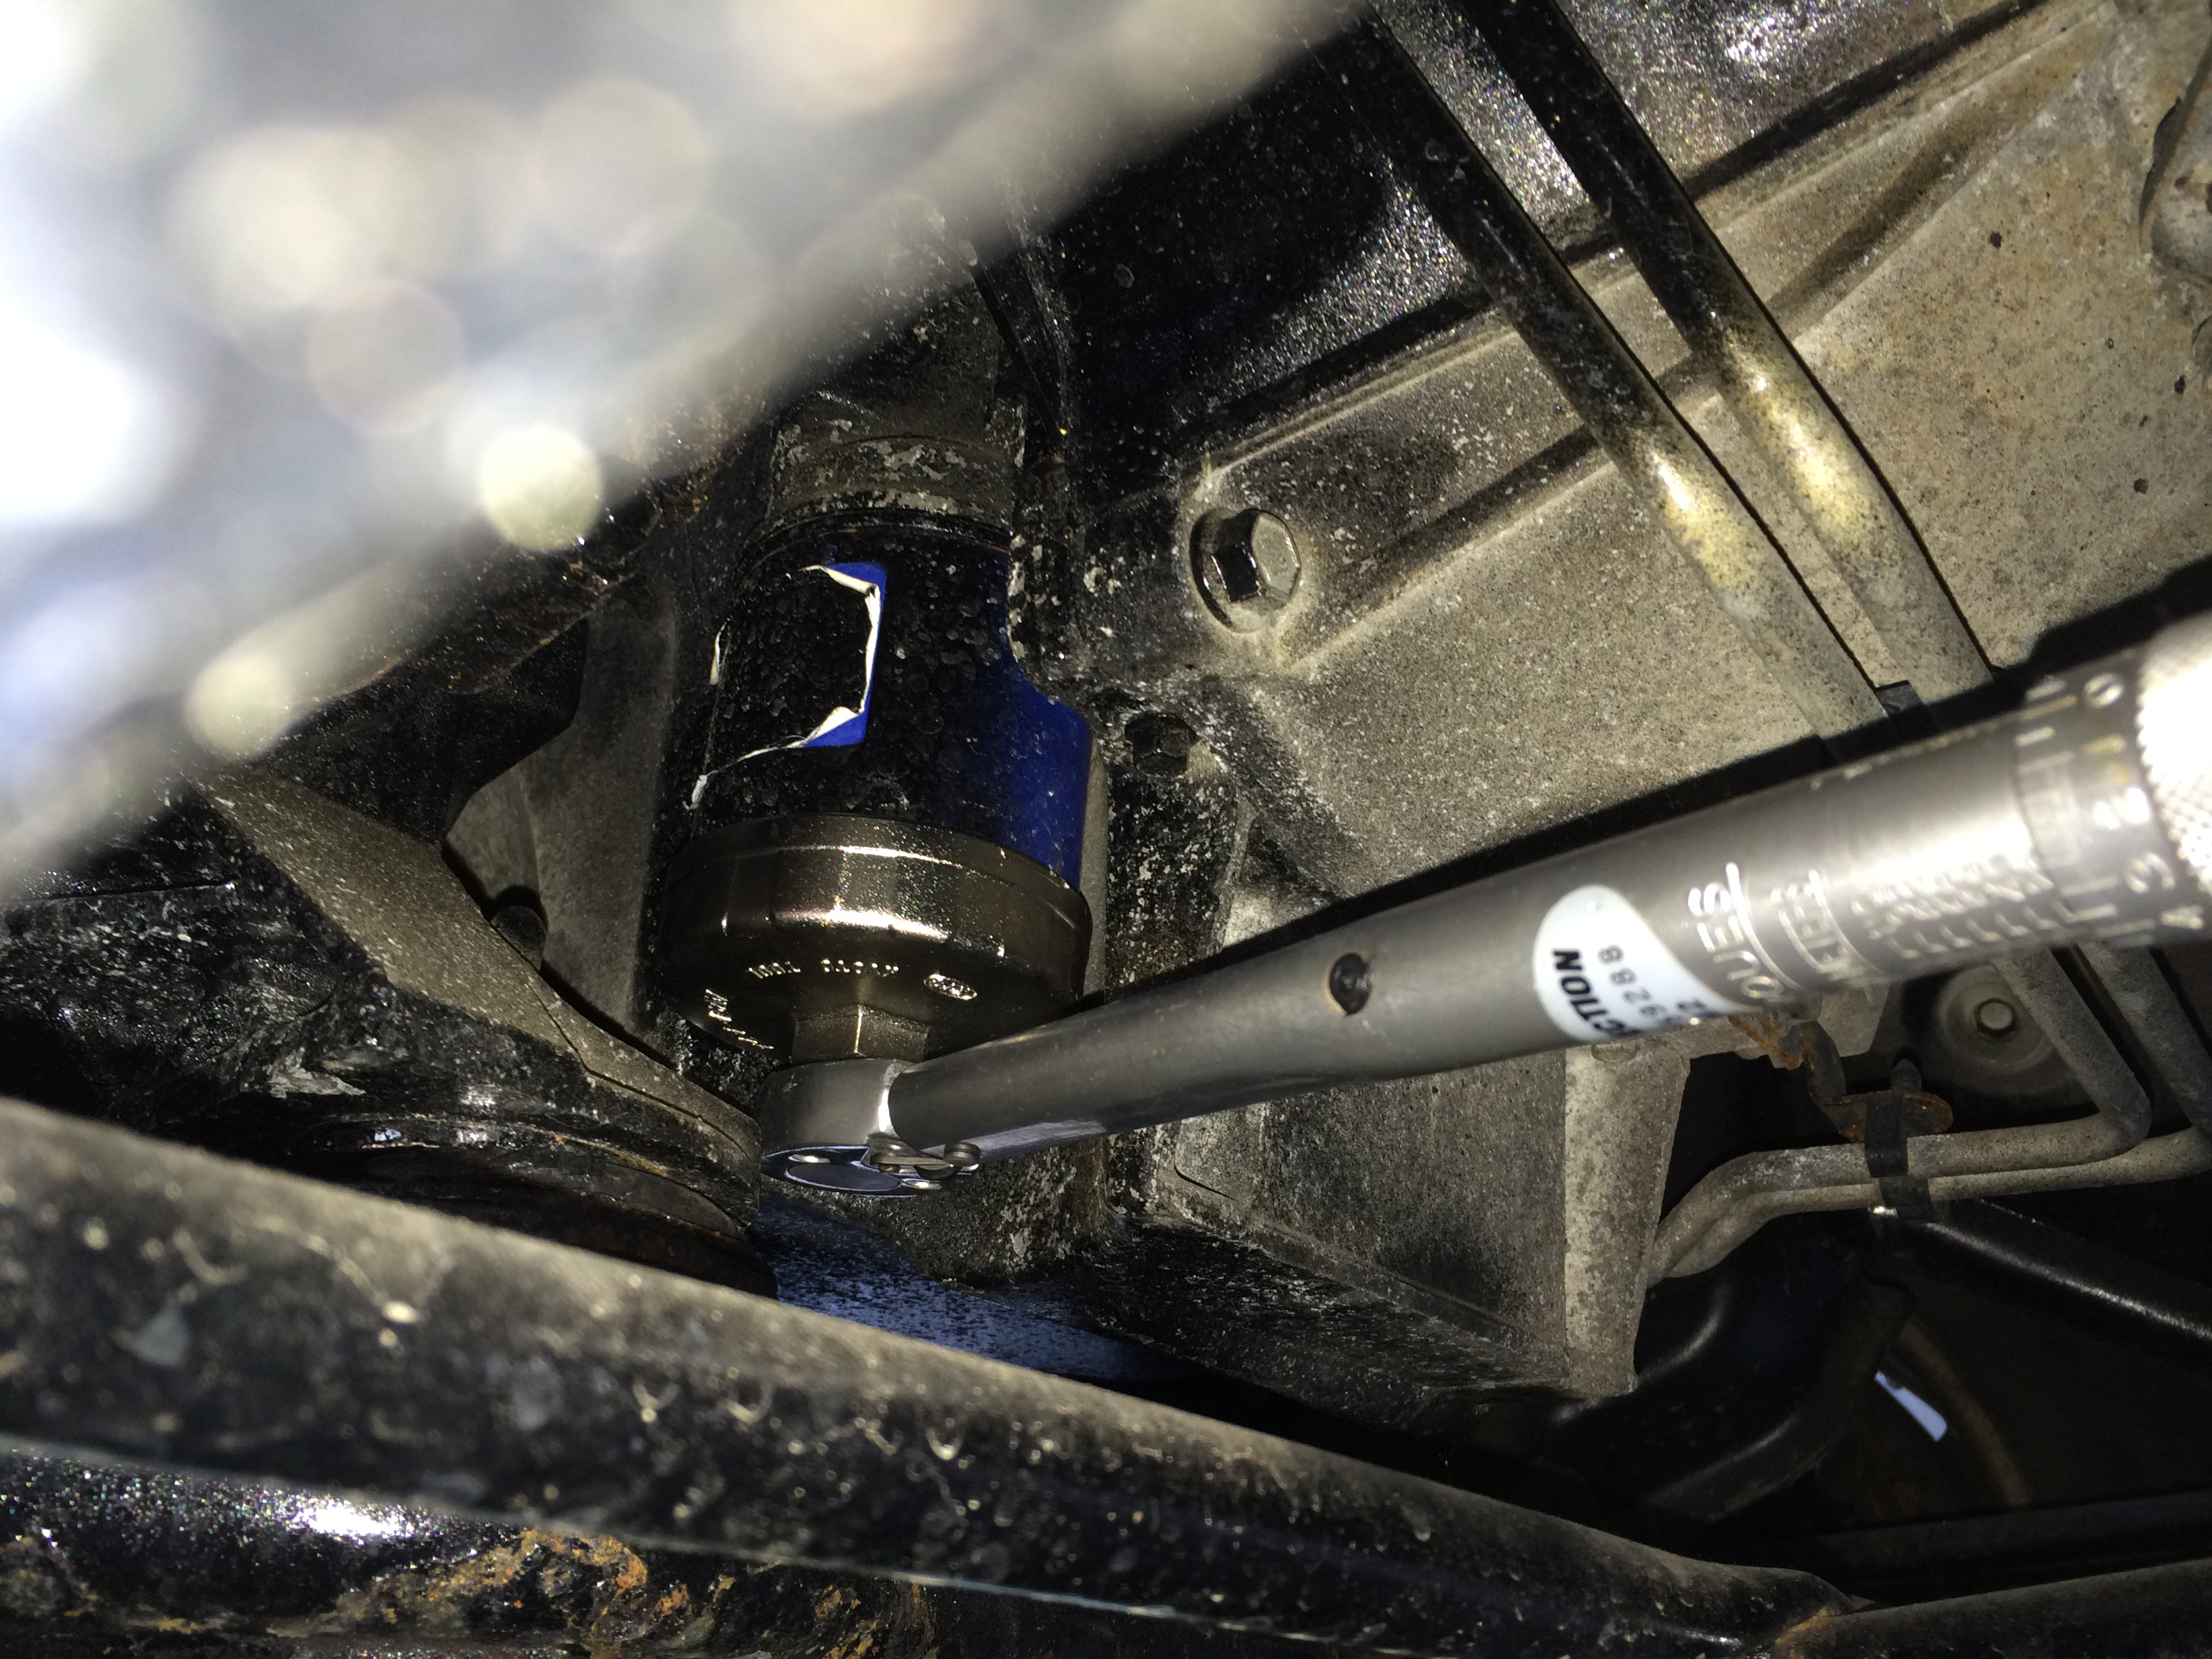
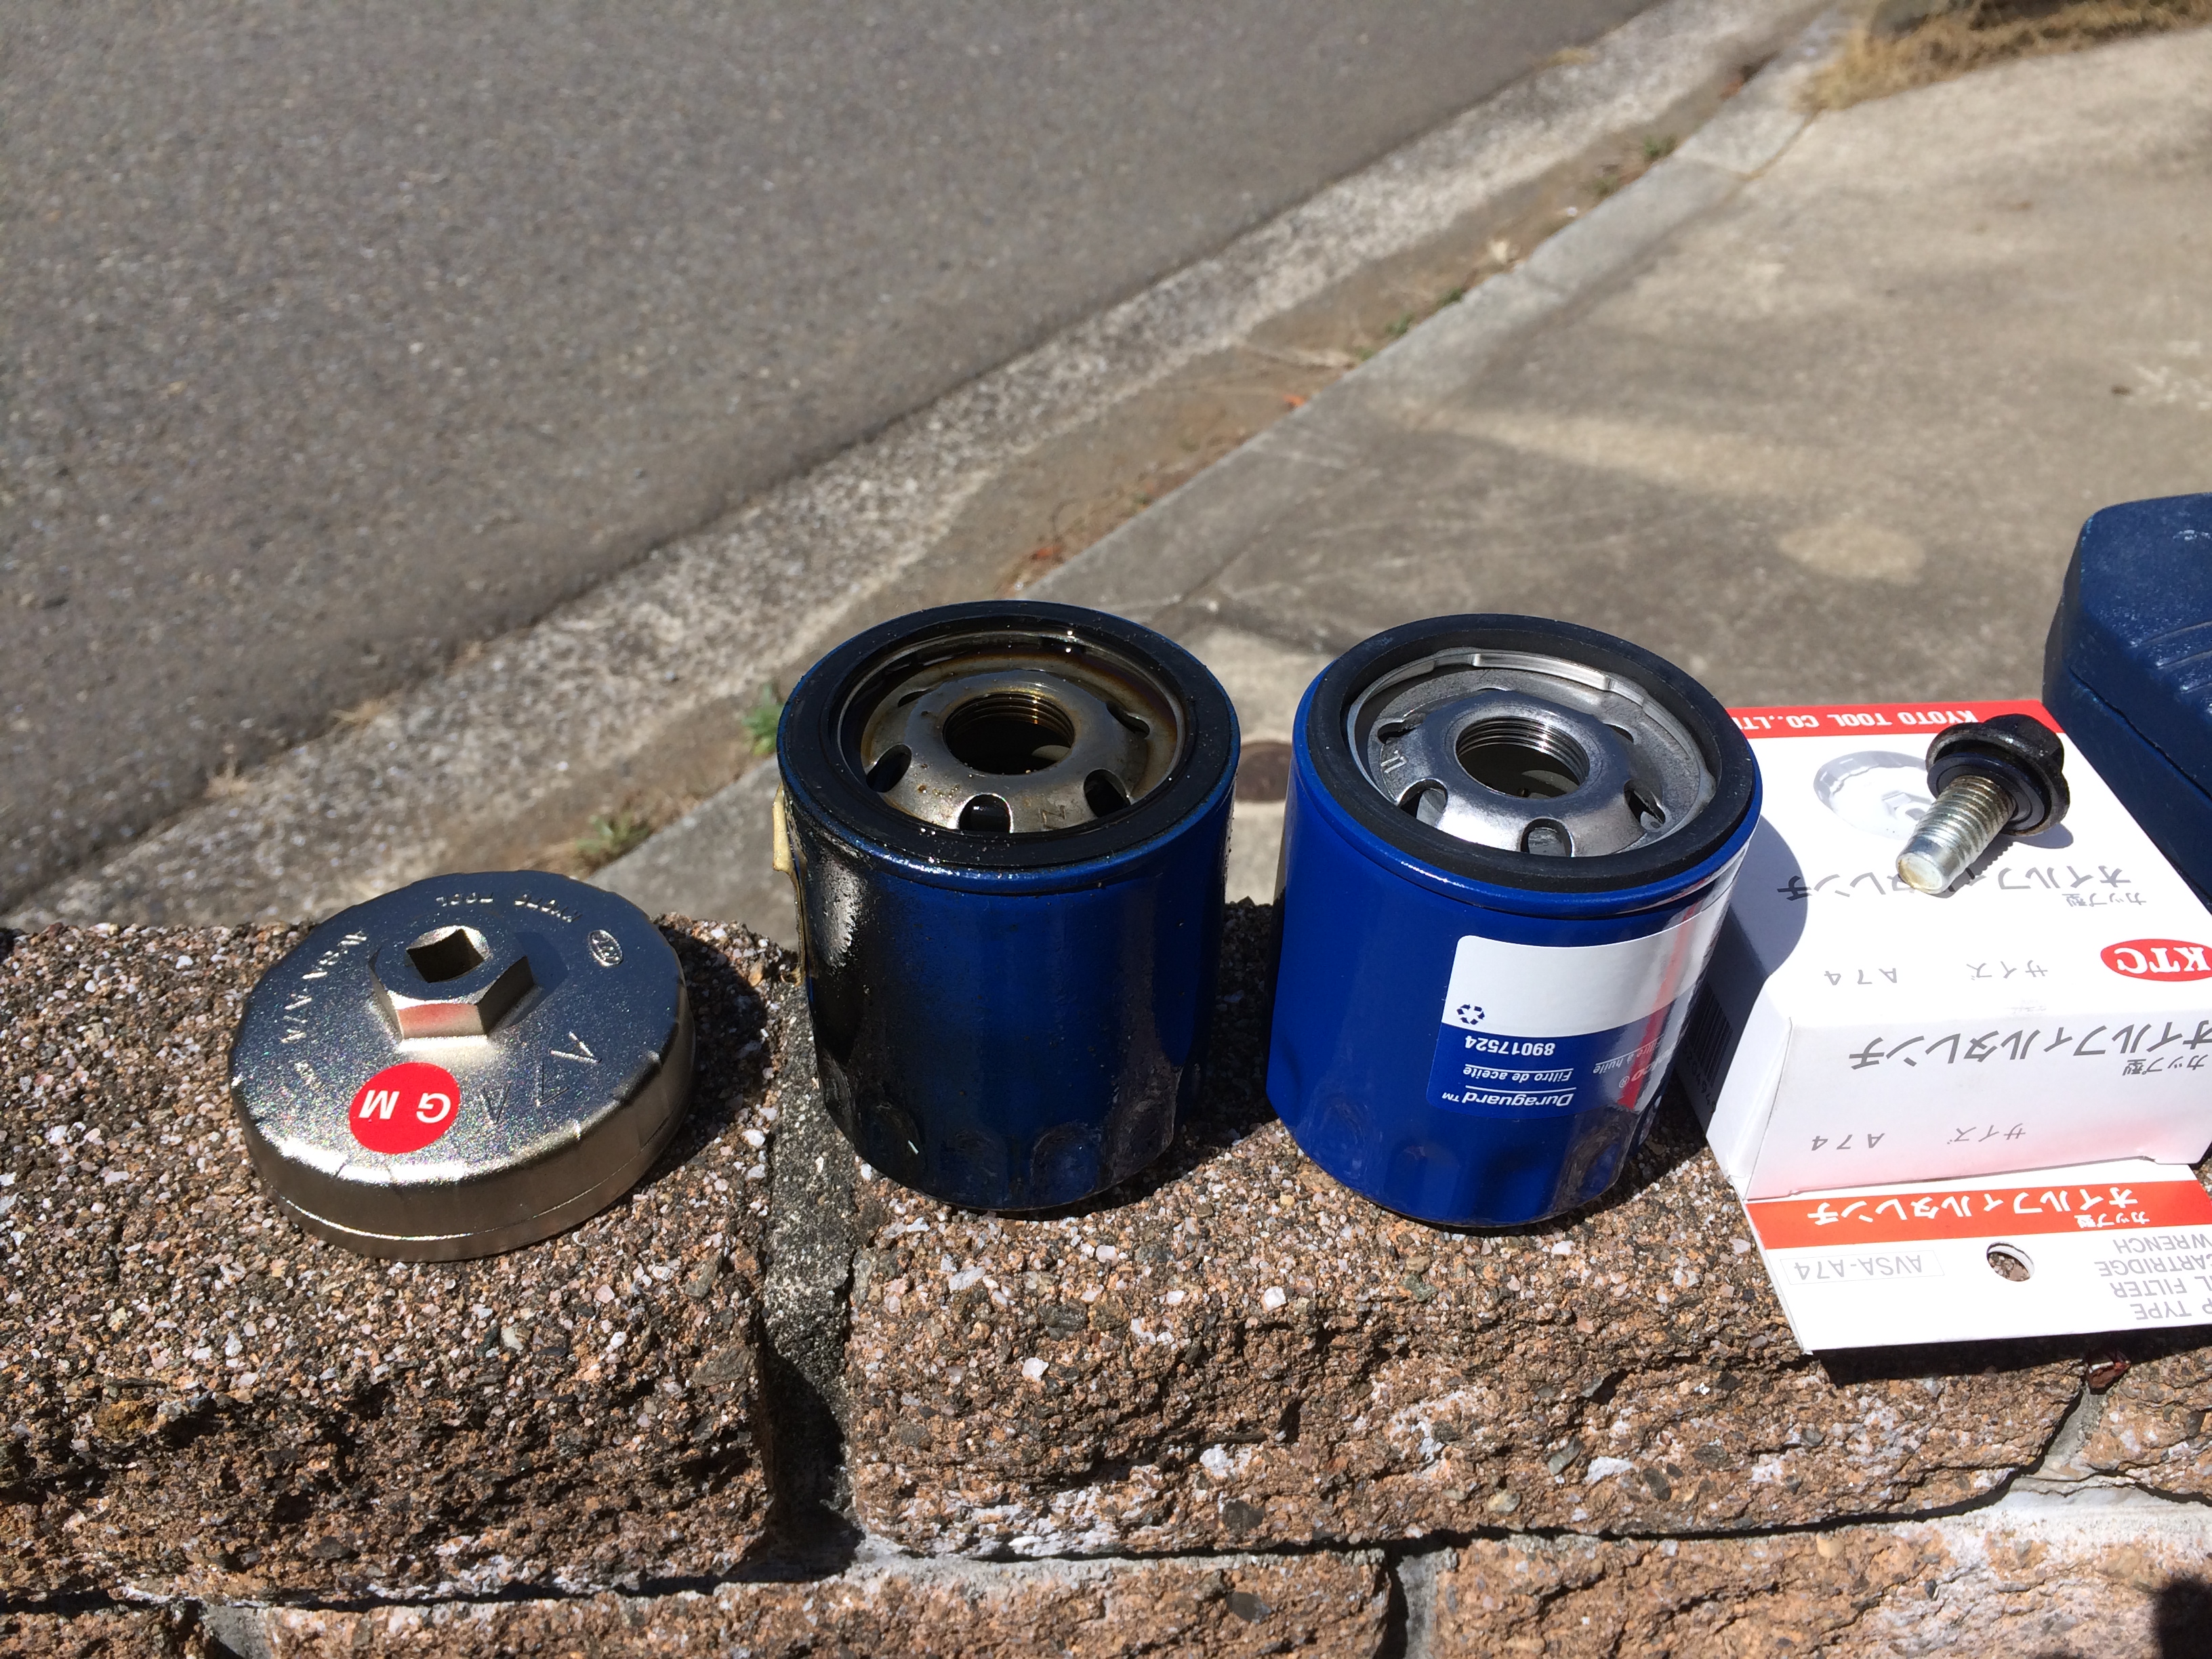
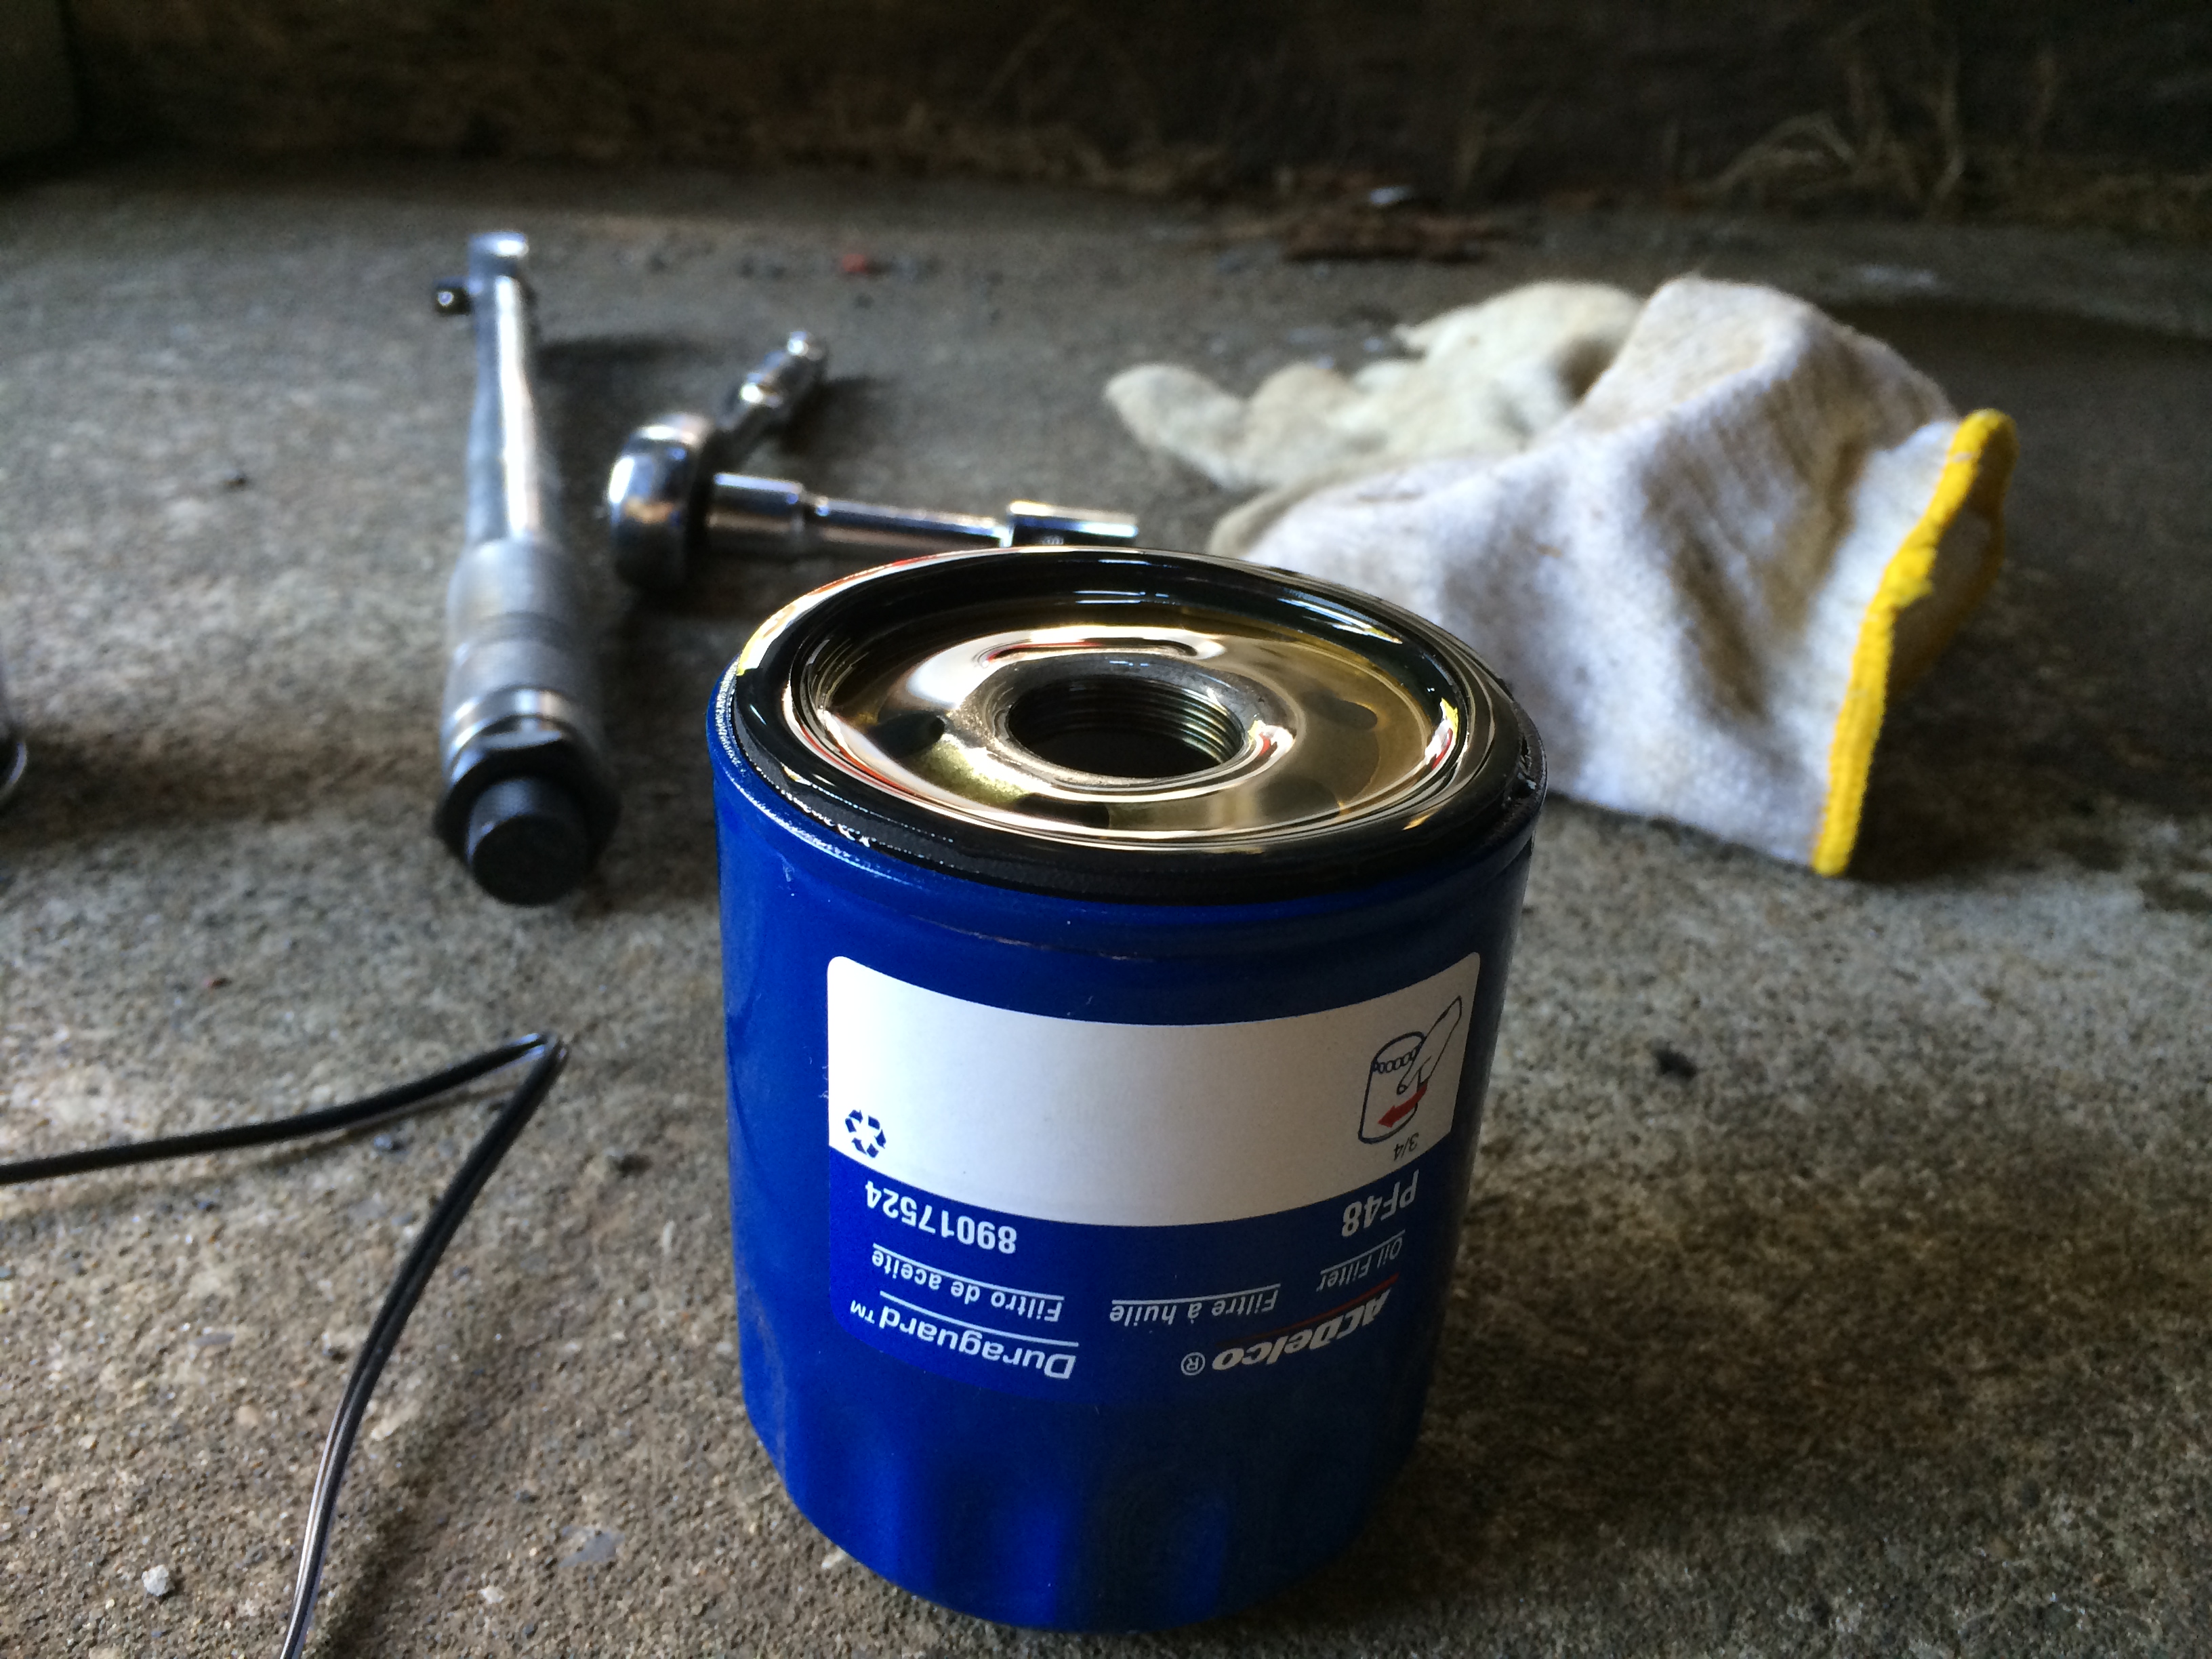
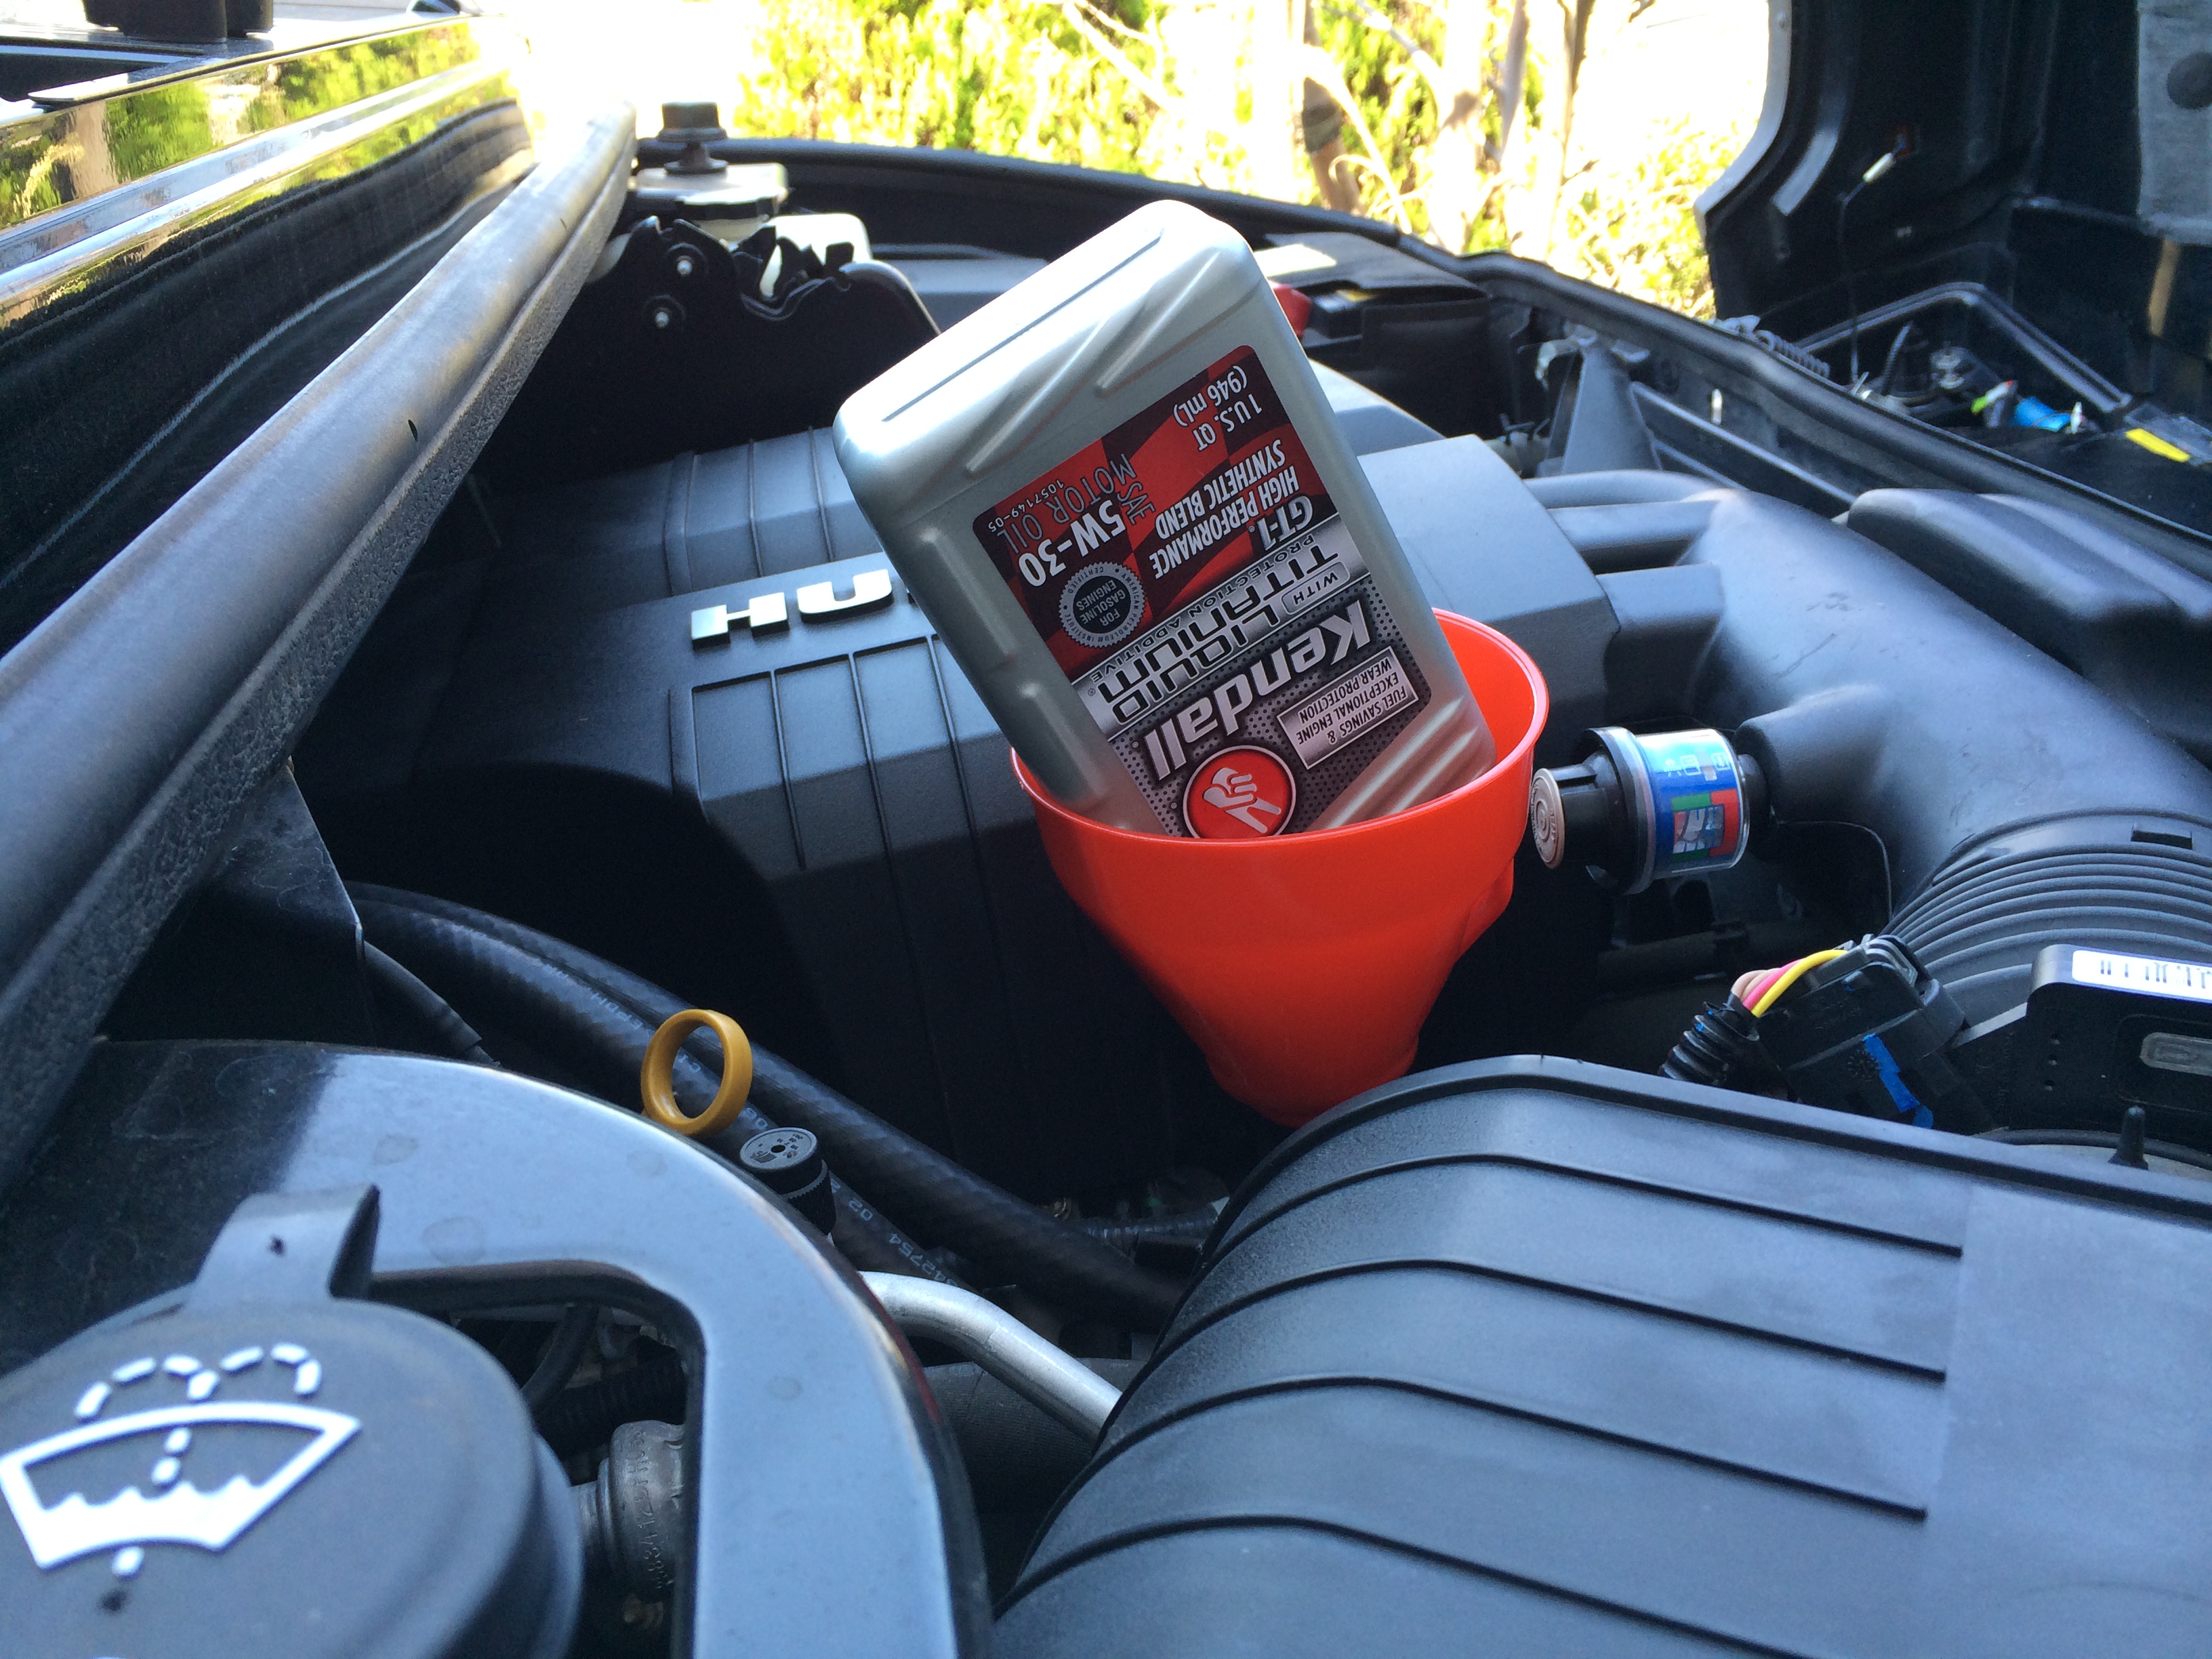
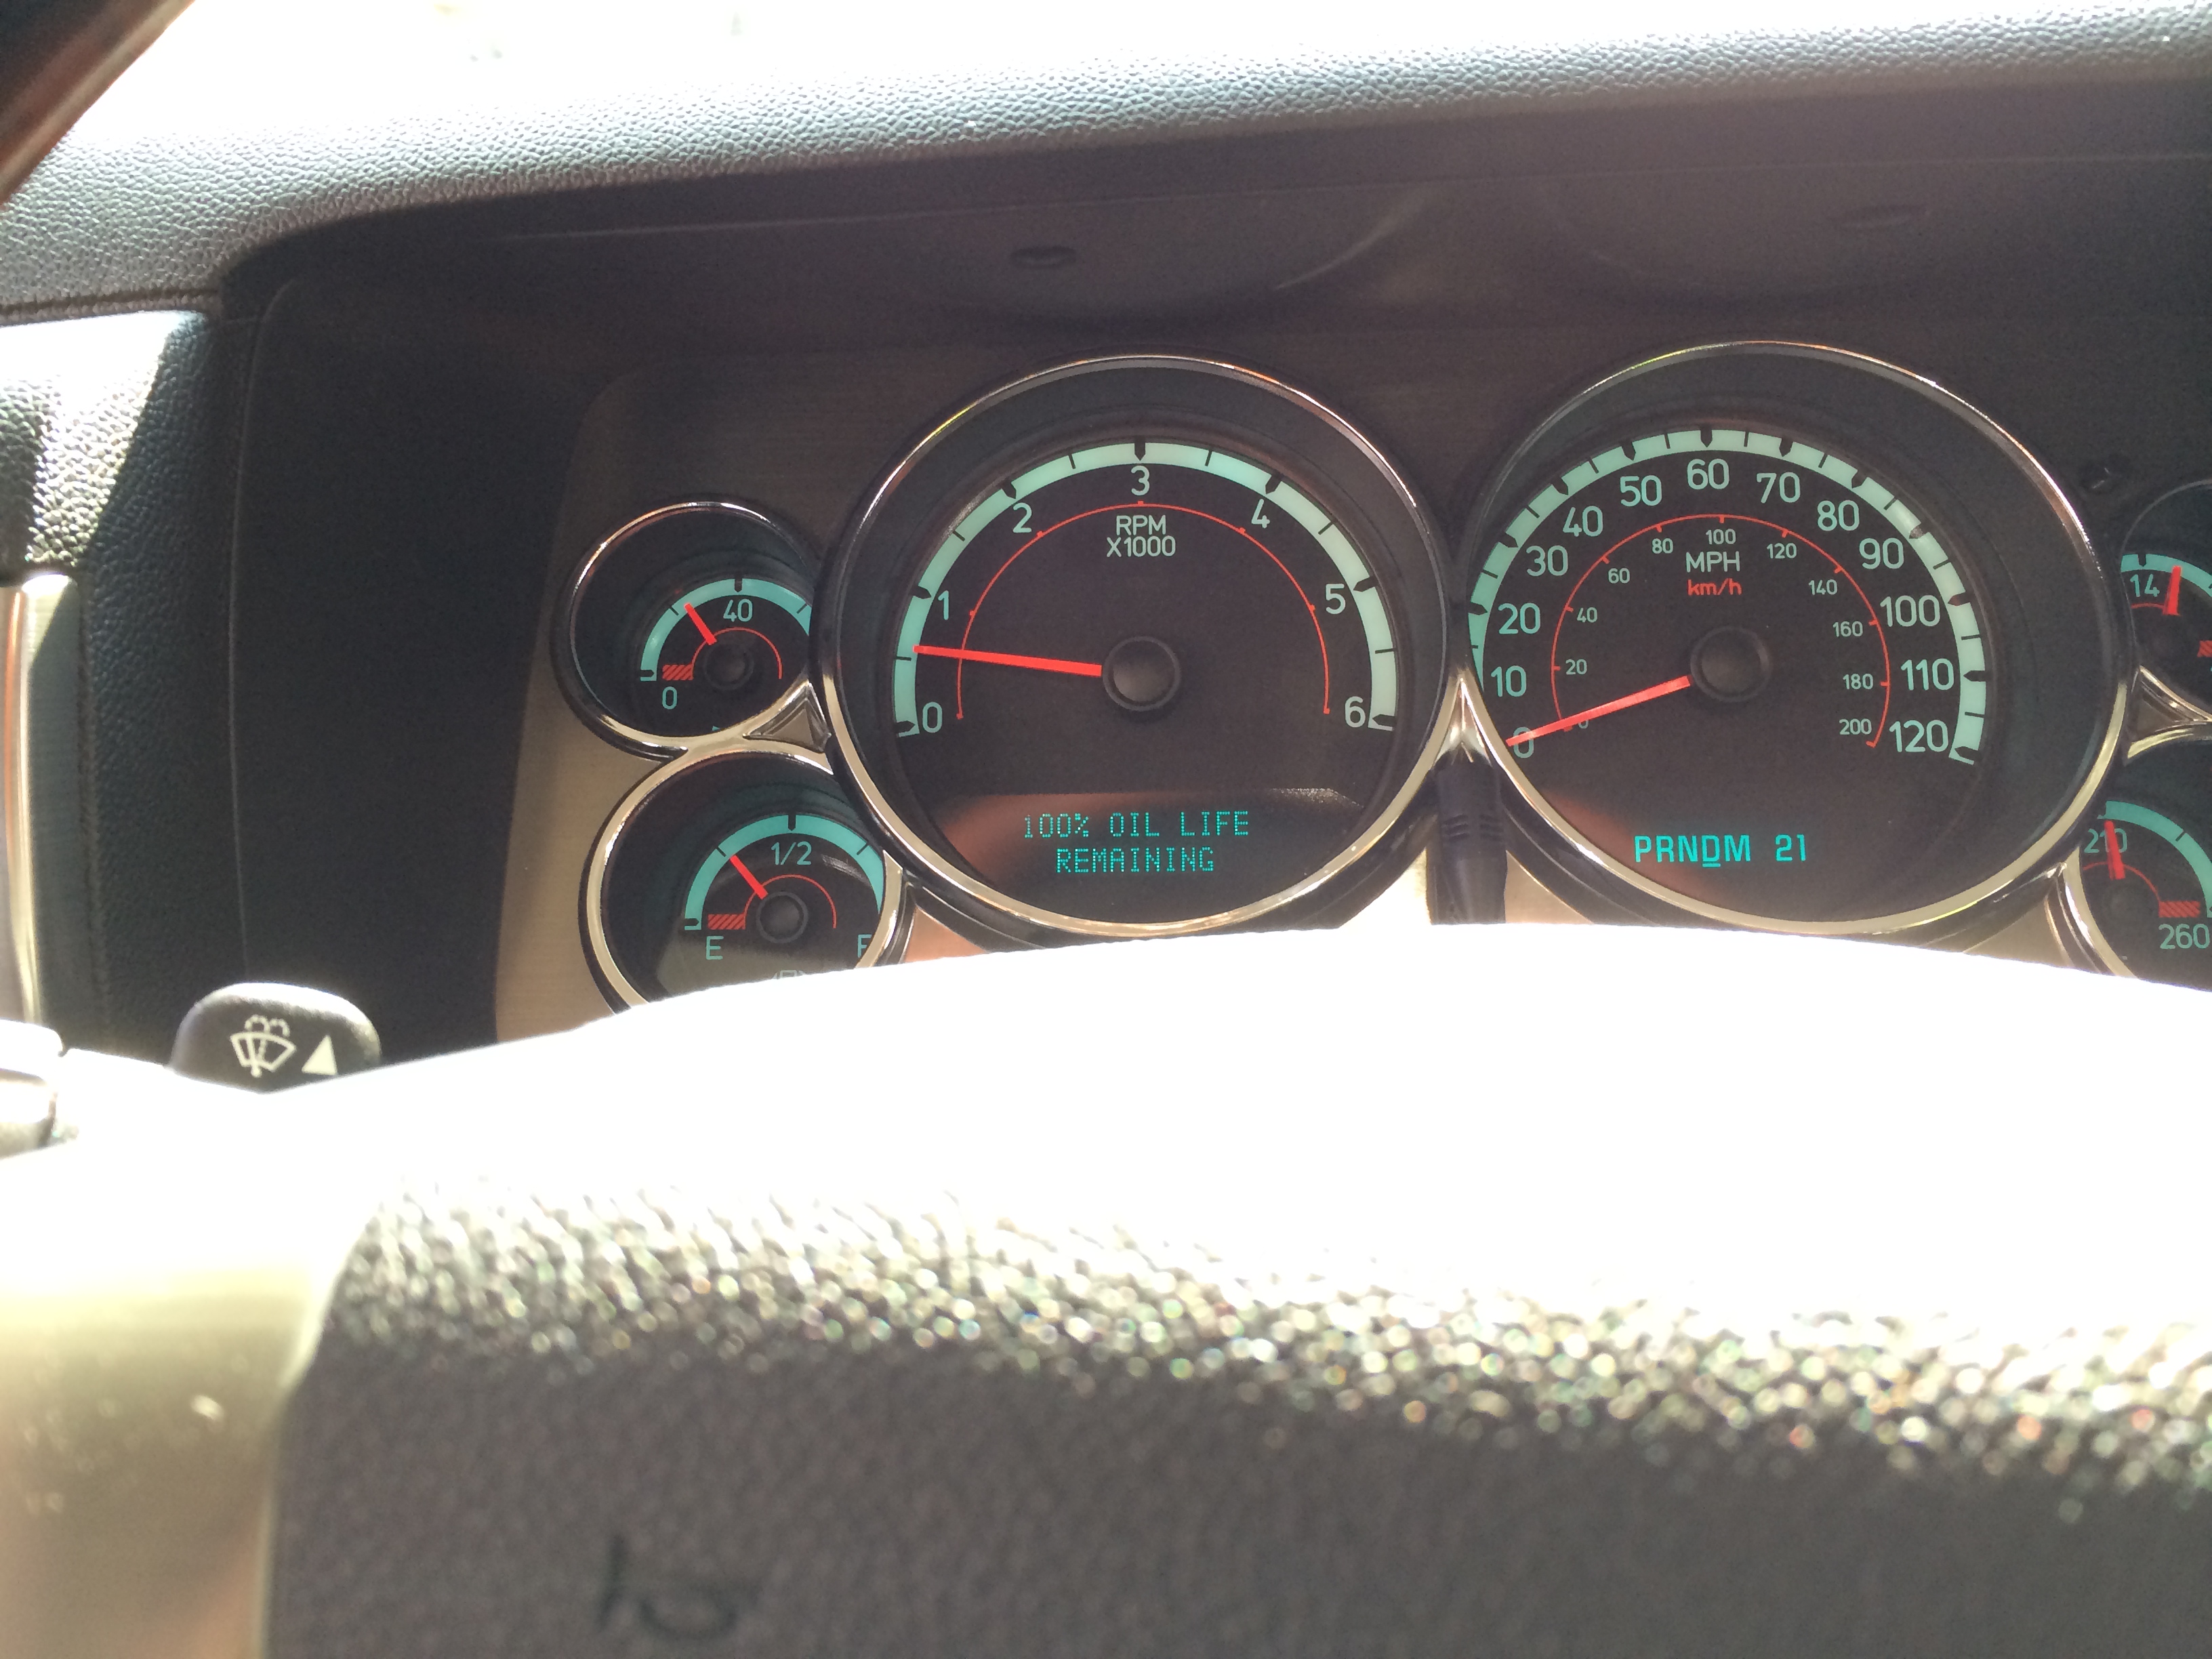
DIY 2008 HUMMER H2 エンジンオイル&フィルター交換
エンジンオイルライフが0%になり「A CHANGE ENGINE OIL SOON」の表示が出たので、エンジンオイルとオイルフィルターを交換。前回交換時から間が空いていたので、格安のエンジンオイルでの洗浄をひと手間入れ、Kendallのエンジンオイルに交換。<部品>1)ドレンパッキン2)オイルフィルター(ACDelco PF48)3)エンジンオイル(Kendall GT-1ハイパフォーマンス 5W-30)4)パーツクリーナードレンパッキンとオイルフィルターは、近所のヤナセで調..
HUMMER H2
RedFalcon
2014-03-23T19:16:42+09:00
オーナーズマニュアル (5-117)によるとフィルター交換時で5.7Lと記載されているので7本あれば充分。Kendall GT-1ハイパフォーマンス 5W-30 KTC オイルフィルタレンチ AVSA-A74
-
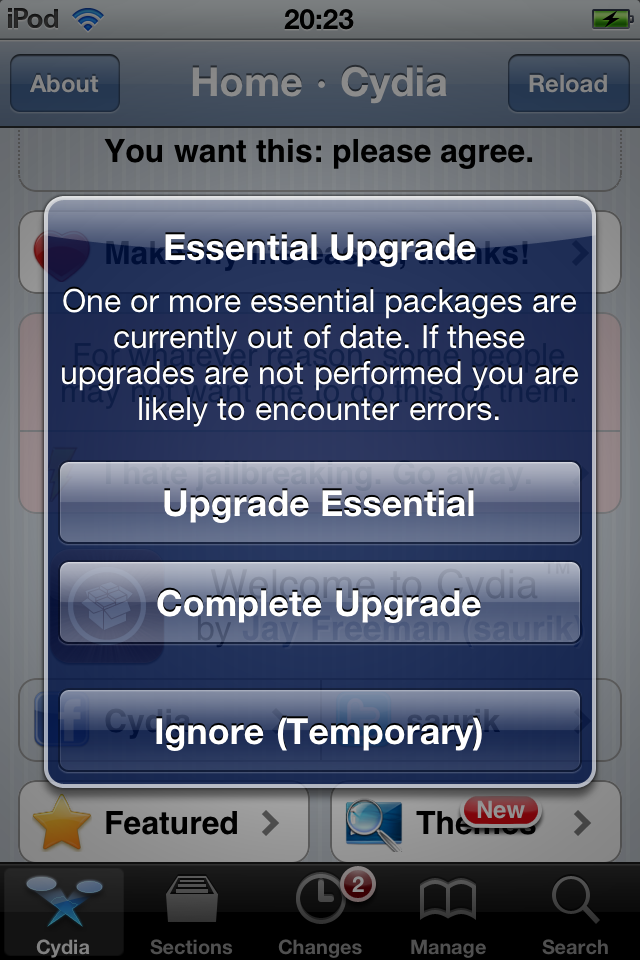
iOS7.0.4 Cydiaで "essential updates" におけるデフォルトアプリクラッシュ対処法
こちらの記事の文末でも取り上げていますが、Cydiaで "essential updates" を行うと、mail, safari, calculator, weatherなどの一部のデフォルトアプリが起動しなくなる事象が発生しているようです。どうもAppsyncに原因があるようなのですが、以下の対処法で解消する可能性がありますので共有しておきます。(当方の場合は、iOS6.1.3のiPhone4で「天気アプリ(weather.app)」がクラッシュしていたのですが、以下の対..
Cydia ・ 脱獄 /Jailbreak
RedFalcon
2014-01-04T21:43:28+09:00
こちらの記事 の文末でも取り上げていますが、Cydiaで "essential updates" を行うと、mail, safari, calculator, weatherなどの一部のデフォルトアプリが起動しなくなる事象が発生しているようです。どうもAppsyncに原因があるようなのですが、以下の対処法で解消する可能性がありますので共有しておきます。http://insanelyi.com/topic/15426-fix-some-stock-apps-wont-open-after-appsync-for-ios7-installed/
-
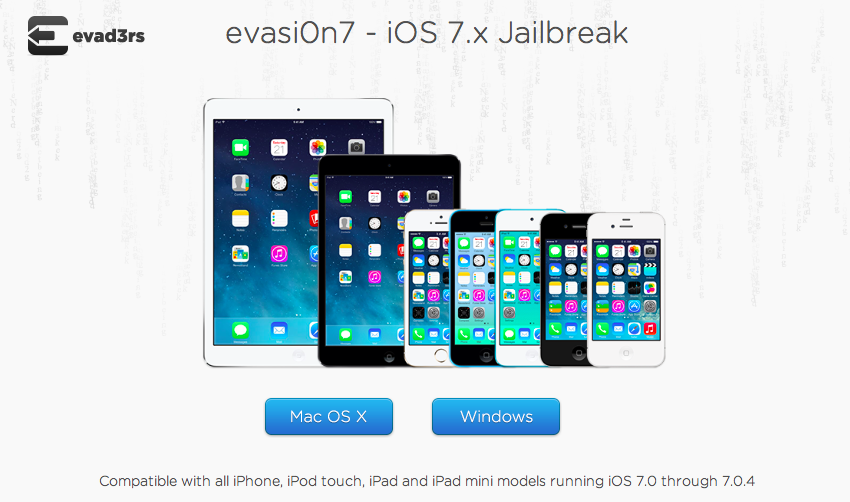
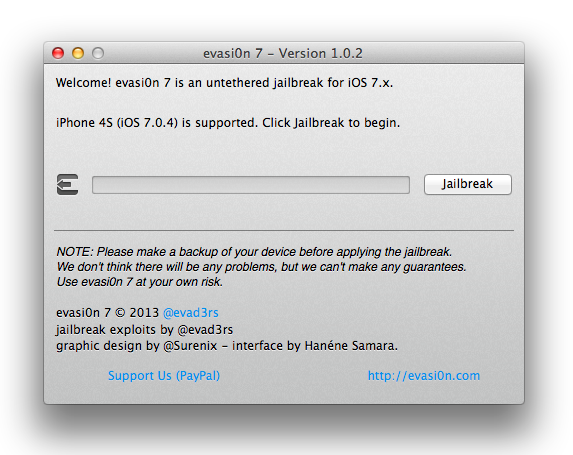
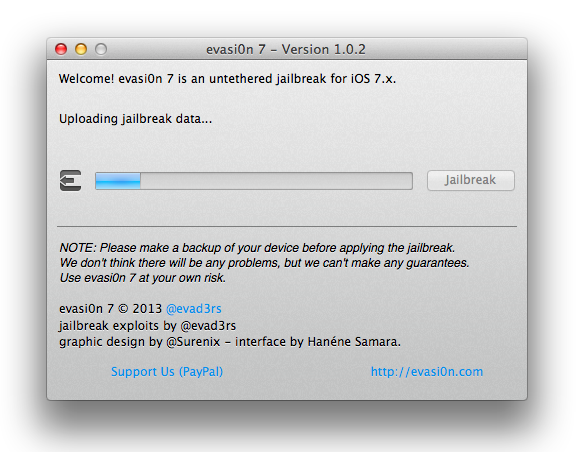
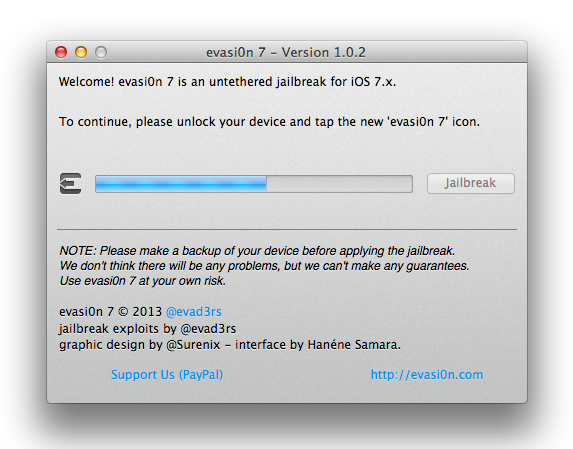
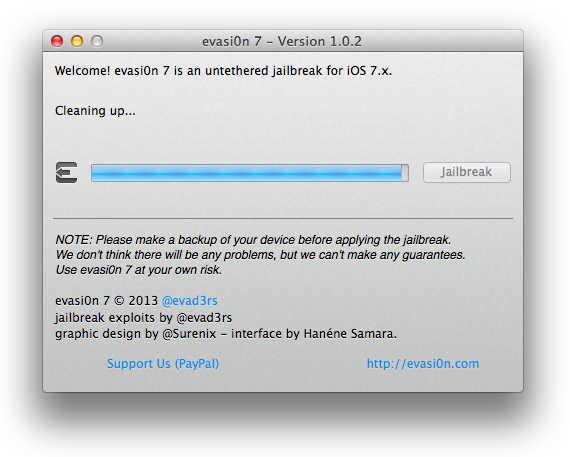
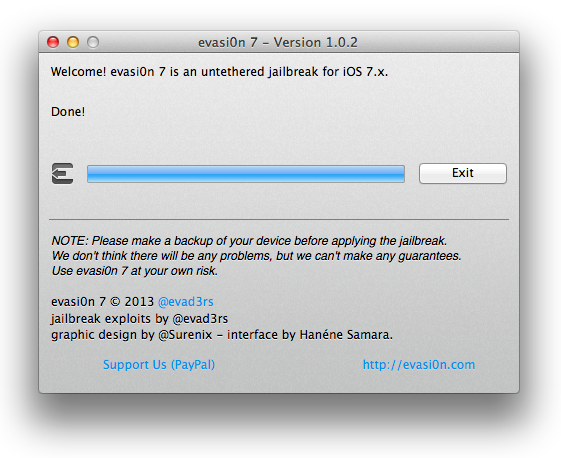
evasi0n7 for Mac - iOS7.0.4 Untethered Jailbreak
evasi0n7について(2014/1/2時点)★対応環境: Windows XP 以降, Mac OS X 10.6以降★対応機種:iPhone 4, iPhone 4S, iPhone 5, iPhone 5c, iPhone 5s, iPod touch 5G, iPad 2, iPad 3, iPad 4, iPad Air, iPad mini, iPad mini Retina★対応OS:iOS 7.0, 7.0.1, 7.0.2, iOS 7.0.3, iOS ..
Cydia ・ 脱獄 /Jailbreak
RedFalcon
2014-01-02T15:47:33+09:00
evasi0n7について(2014/1/2時点) レポート環境 Step0:事前準備 Step1:evasi0n7のダウンロード evasi0n.com ● evasi0n7 for Mac ● evasi0n7 for Windows Step2:ダウンロードした『evasi0n7.app』(Windows:evasi0n.exe)を起動 ステップ6 : Cydia初期設定 ●evasi0n7 を利用した iOS7.0.4 Untethered Jailbreak で、iFunboxによるルートディレクトリへのアクセスができなくなる。 1. Cydiaにて「afc2add」を検索http://blog.i-funbox.com/?p=1679 ●Cydiaで "essential updates" を行うと一部のデフォルトアプリ(mail, safari, calculator, weather)が起動しなくなる。 1. Open Cydia and navigate to the "Manage" section, then the "Packages" section. http://insanelyi.com/topic/15426-fix-some-stock-apps-wont-open-after-appsync-for-ios7-installed/
]]>
-
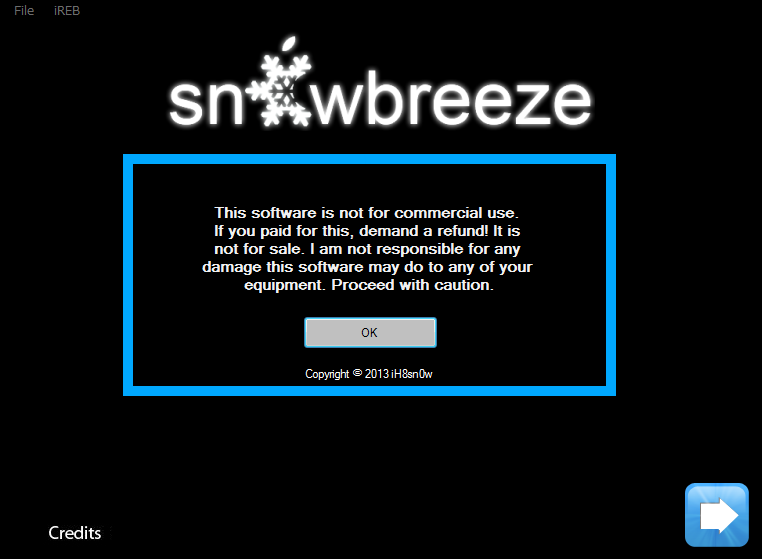
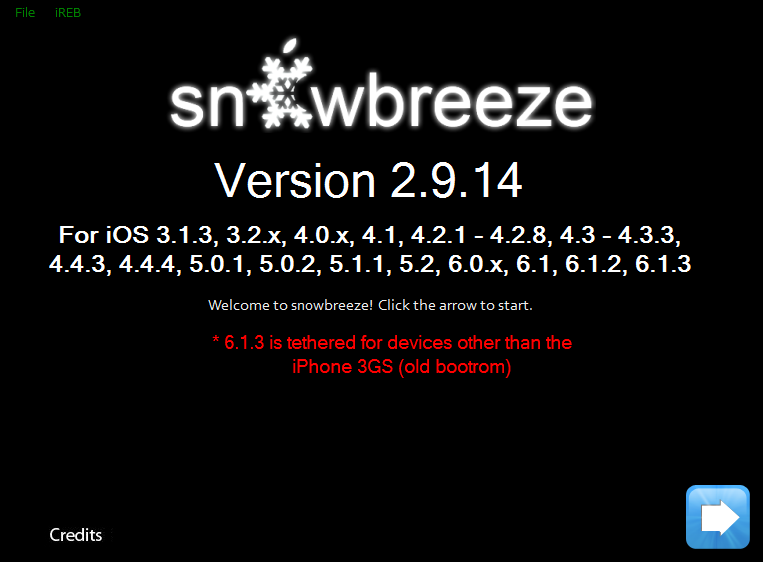
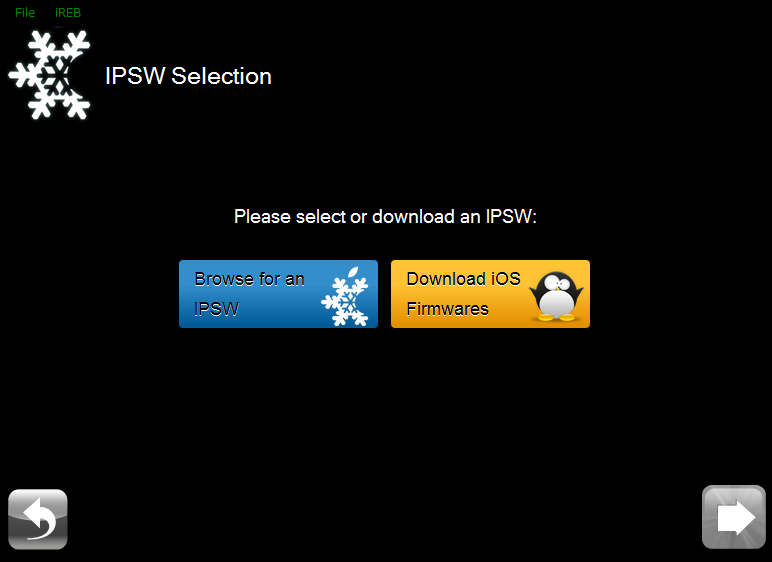
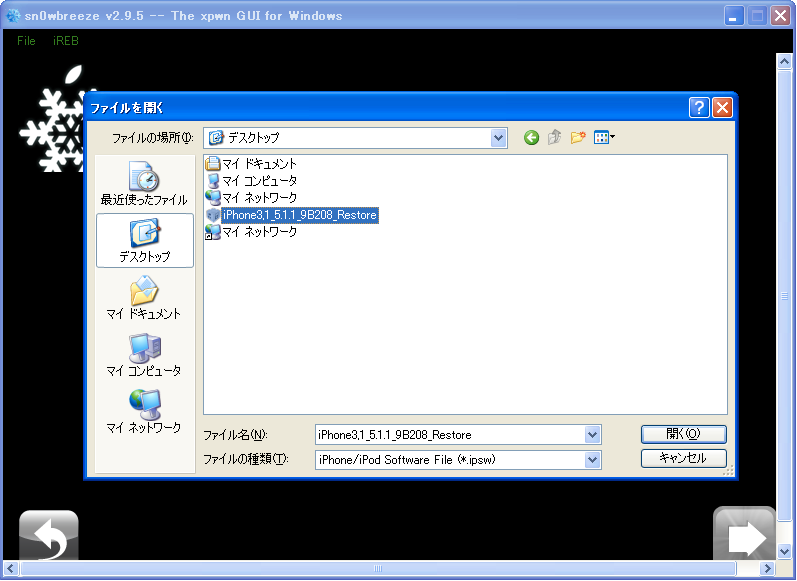
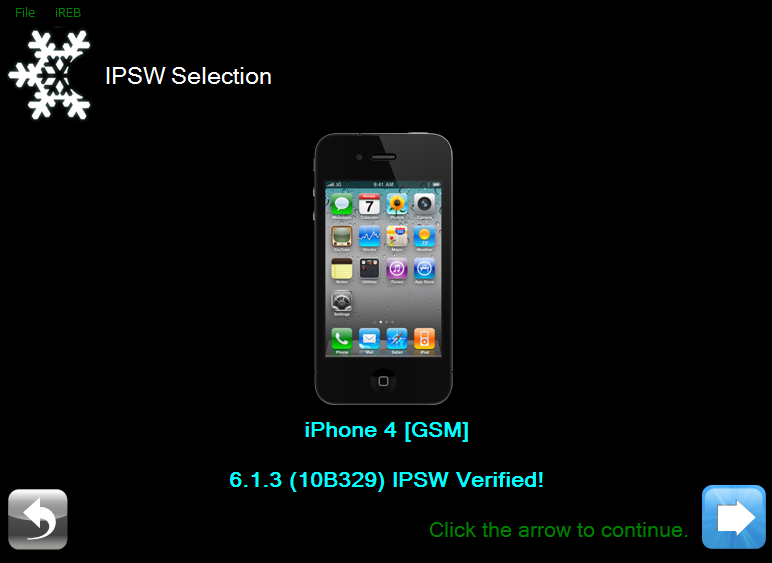
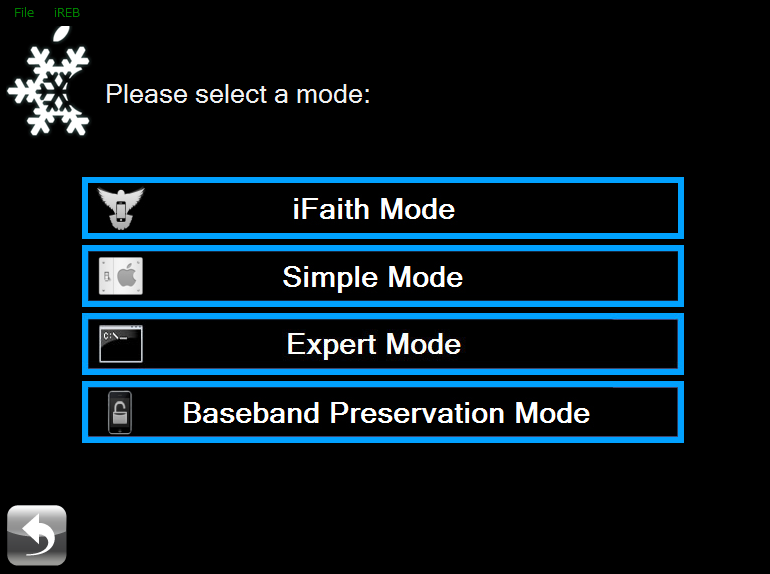
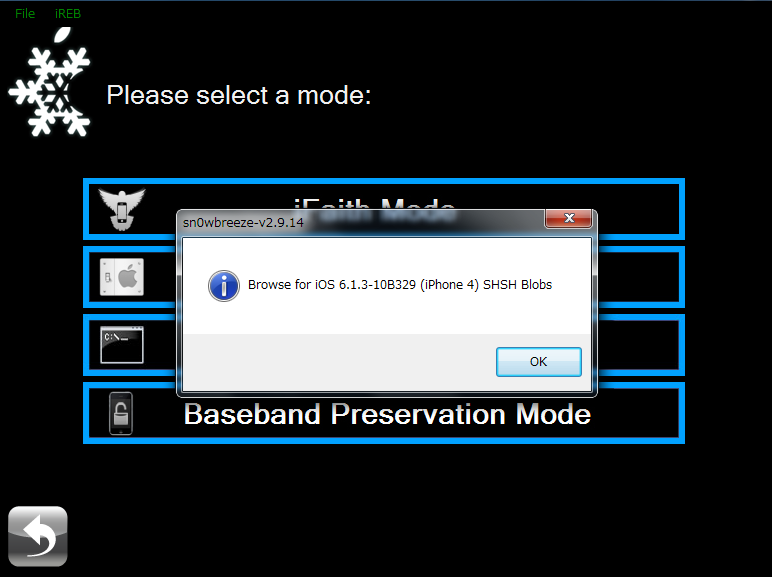
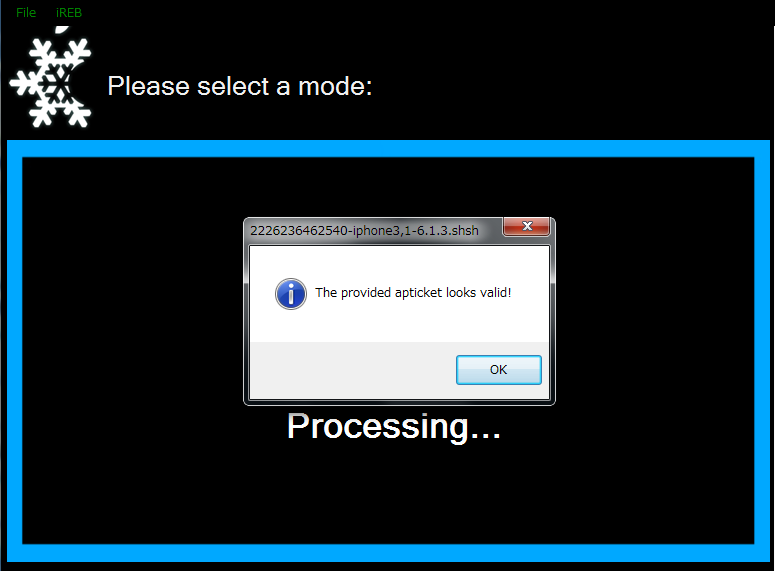
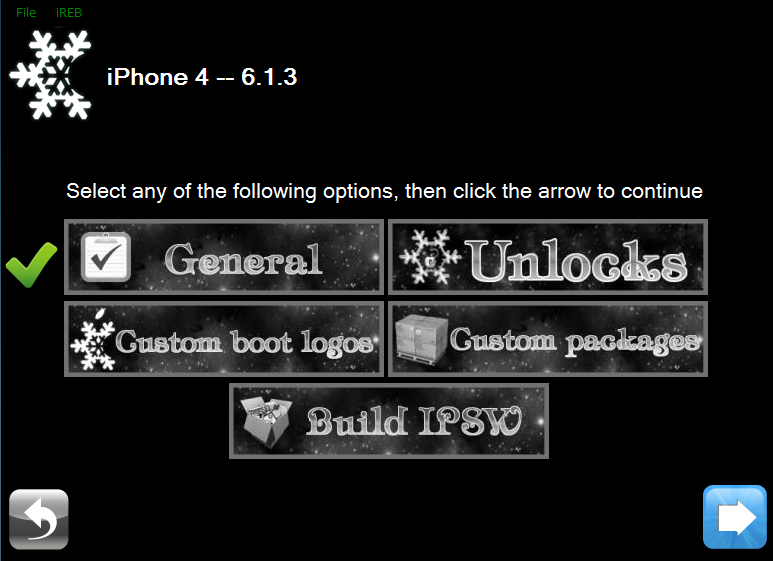
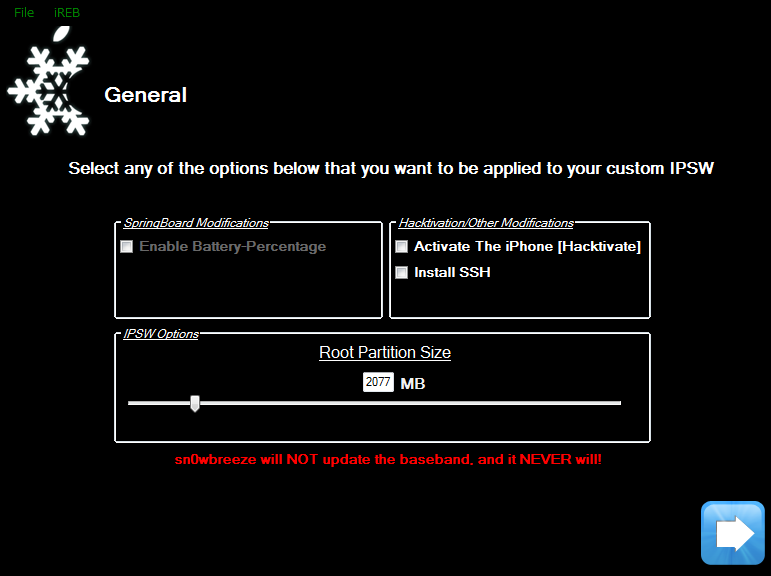
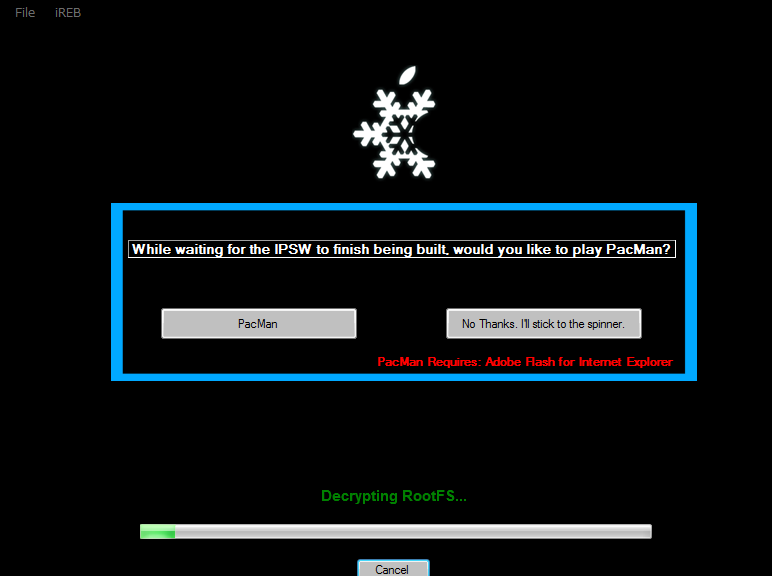
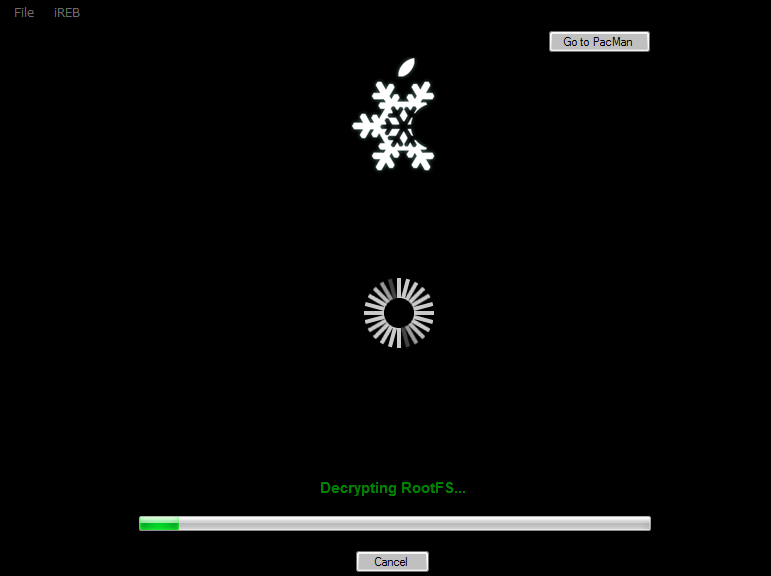
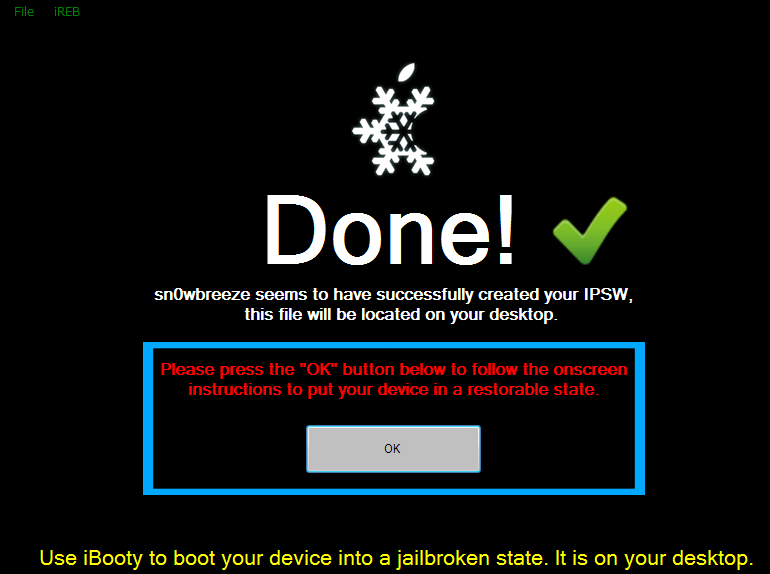
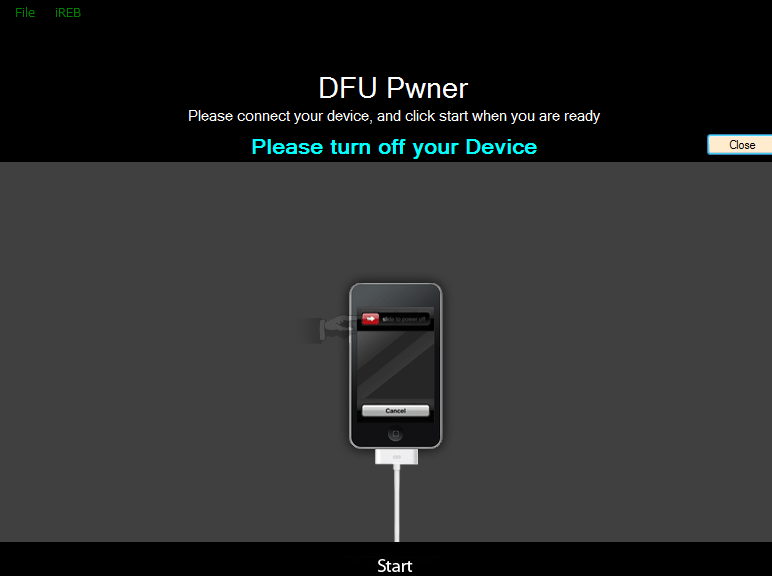
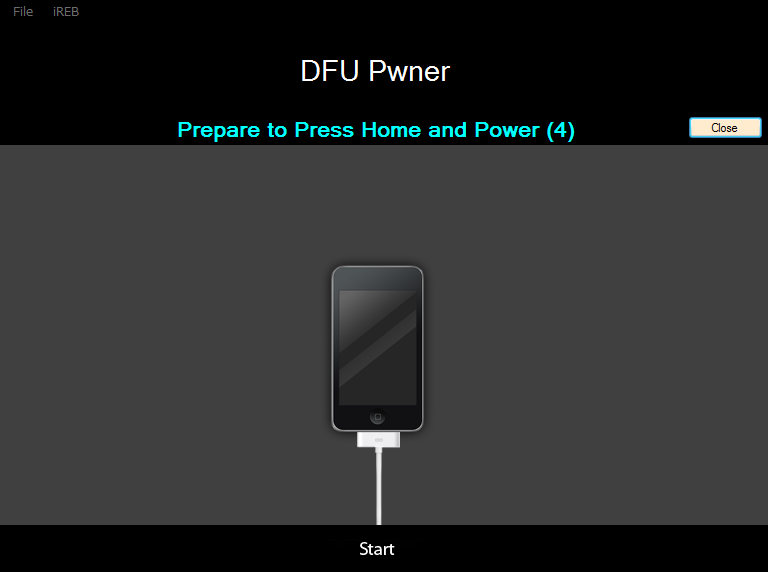
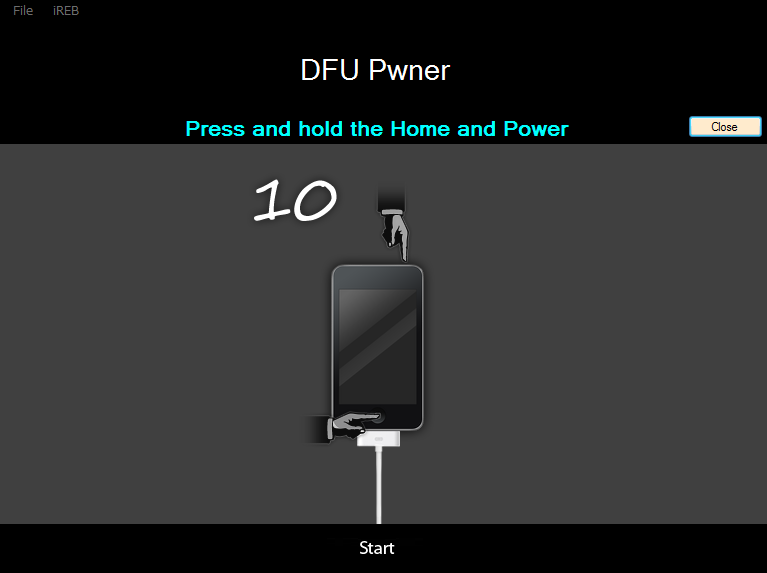
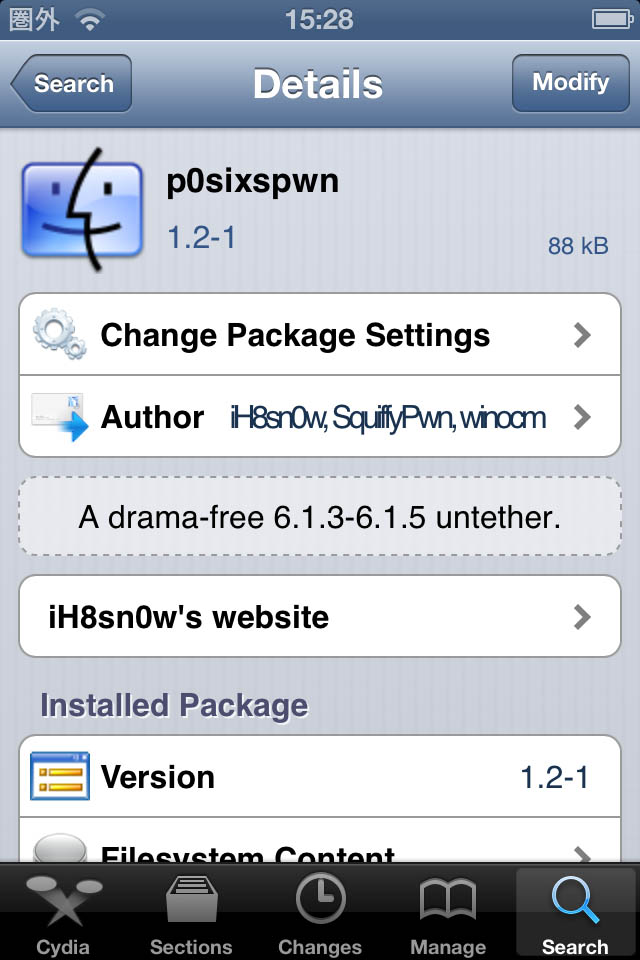
【A4ディバイス限定】sn0wbreeze 2.9.14 + p0sixspwn - iOS6.1.3のCFW(Baseband維持)を作成してUntethered Jailbreak
"iH8sn0w"からリリースされている"sn0wbreeze 2.9.14 for Win"を使用して、iOS6.1.3のカスタムファームウェアを作成しiPhone 4をTethered Jailbreak、その後p0sixspwnでUntethered Jailbreakしました。この方法であればBasebandを維持しての移行が可能になります。今回はiOS7対応のため、iTunesを11.1.3にアップグレードしている兼ね合いで、iTunesを11.0.5のままアップグ..
Cydia ・ 脱獄 /Jailbreak
RedFalcon
2014-01-01T20:12:51+09:00
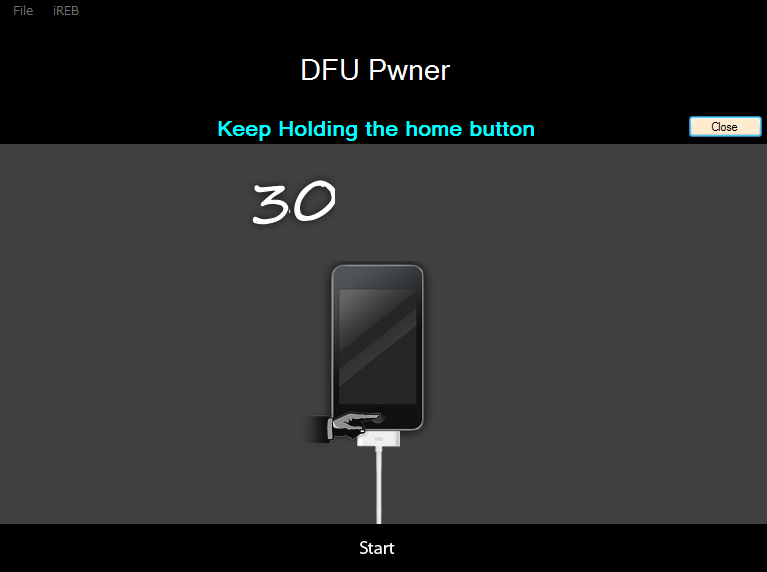
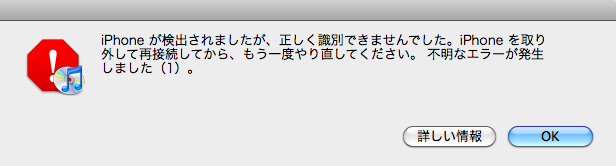
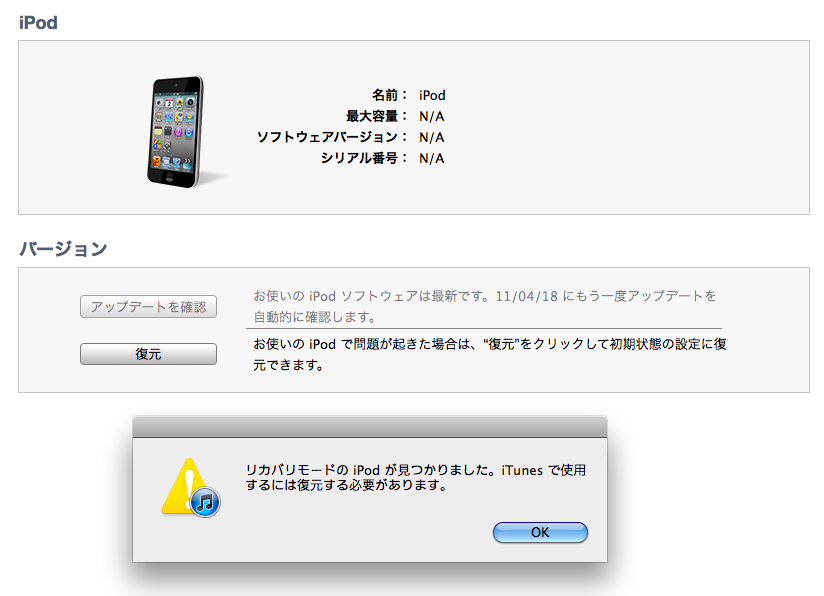
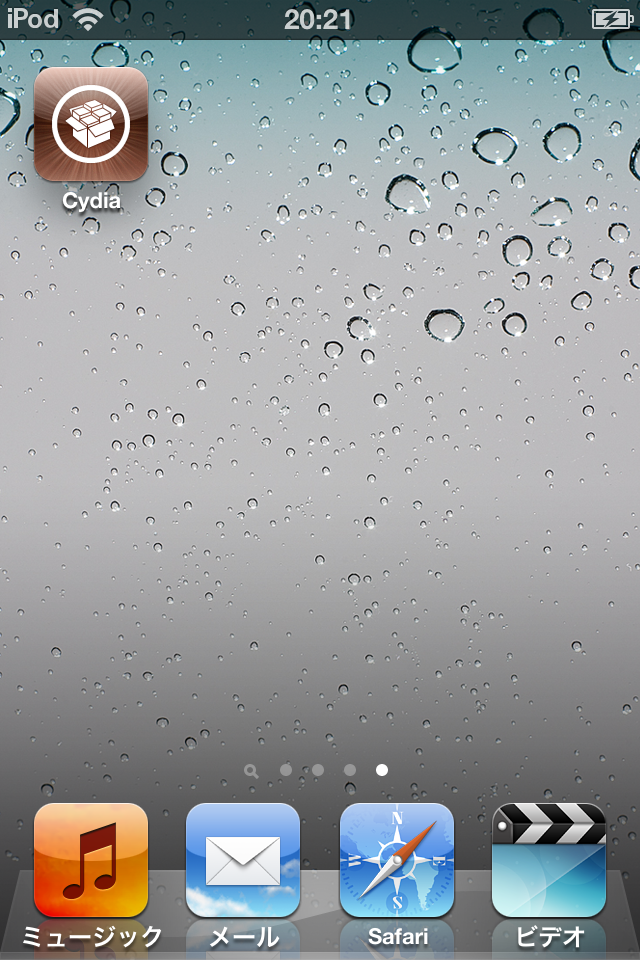
※iTunesを11.1.3はCFWからの復元でエラー11が発生するため、11.0.5にダウングレードする等の対策が必要。 sn0wbreeze 2.9.14について(2014/1/1時点) レポート環境 Step1:sn0wBreeze 2.9.14のダウンロード H8sn0w.com Step2:カスタムファームウェア作成 Step3 : DFUモード ステップ4 : iTunesで復元 ※スクリーンショットはMac版ですが、Windowsの場合も同様です。 ステップ5 : Cydia初期設定 ステップ6 :『p0sixspwn』のインストール
-
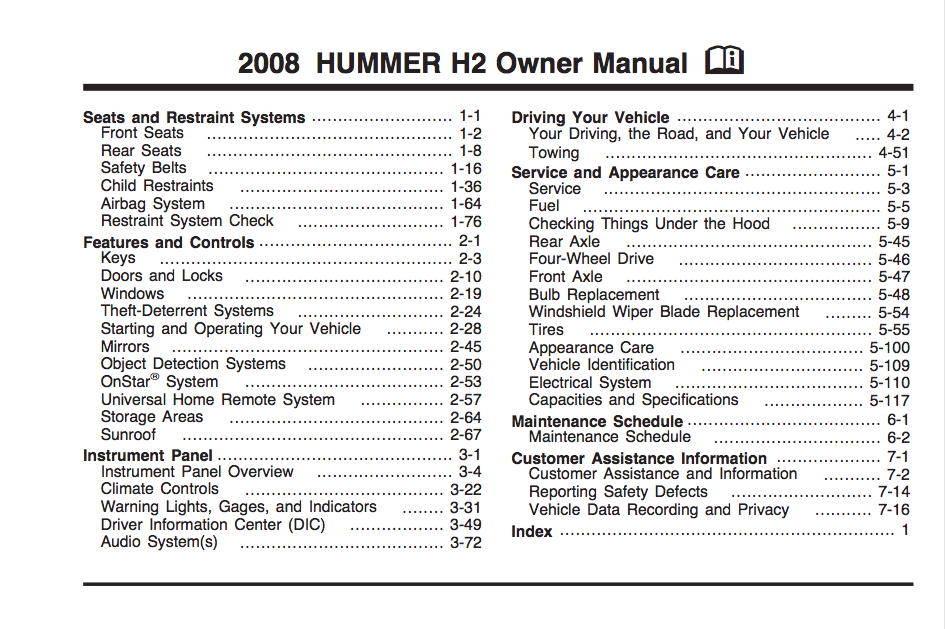
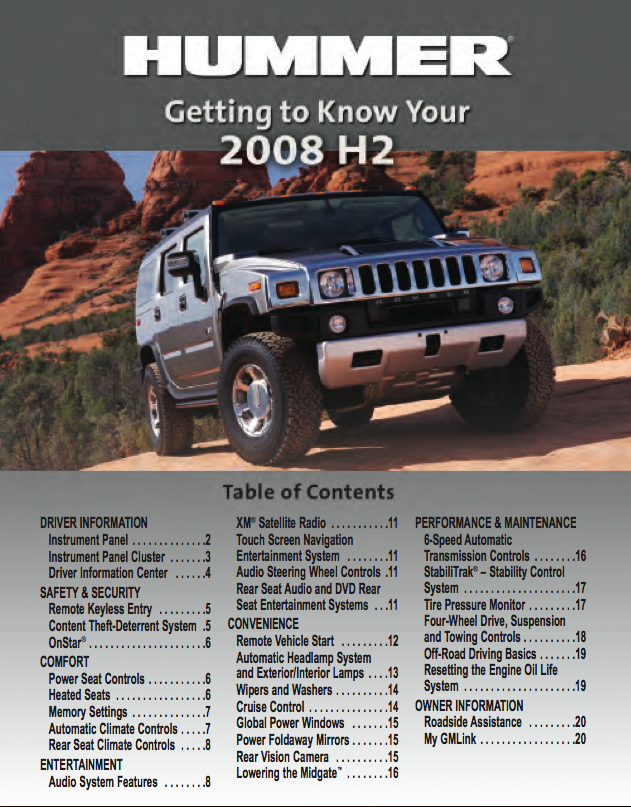
2008 HUMMER H2 マニュアル
自分用の備忘録HUMMER.com オーナーズマニュアル公式ダウンロードURL2008 HUMMER H2 ダイレクトリンク→2008 HUMMER H2 OWNERS MANUAL→2008 HUMMER H2 GET TO KNOW GUIDE2008 Hummer H2 specifications & performance data reviewTire size calculator
HUMMER H2
RedFalcon
2013-11-09T18:36:20+09:00
HUMMER.com オーナーズマニュアル公式ダウンロードURL 2008 HUMMER H2 ダイレクトリンク 2008 HUMMER H2 OWNERS MANUAL 2008 HUMMER H2 GET TO KNOW GUIDE 2008 Hummer H2 specifications & performance data review Tire size calculator
-
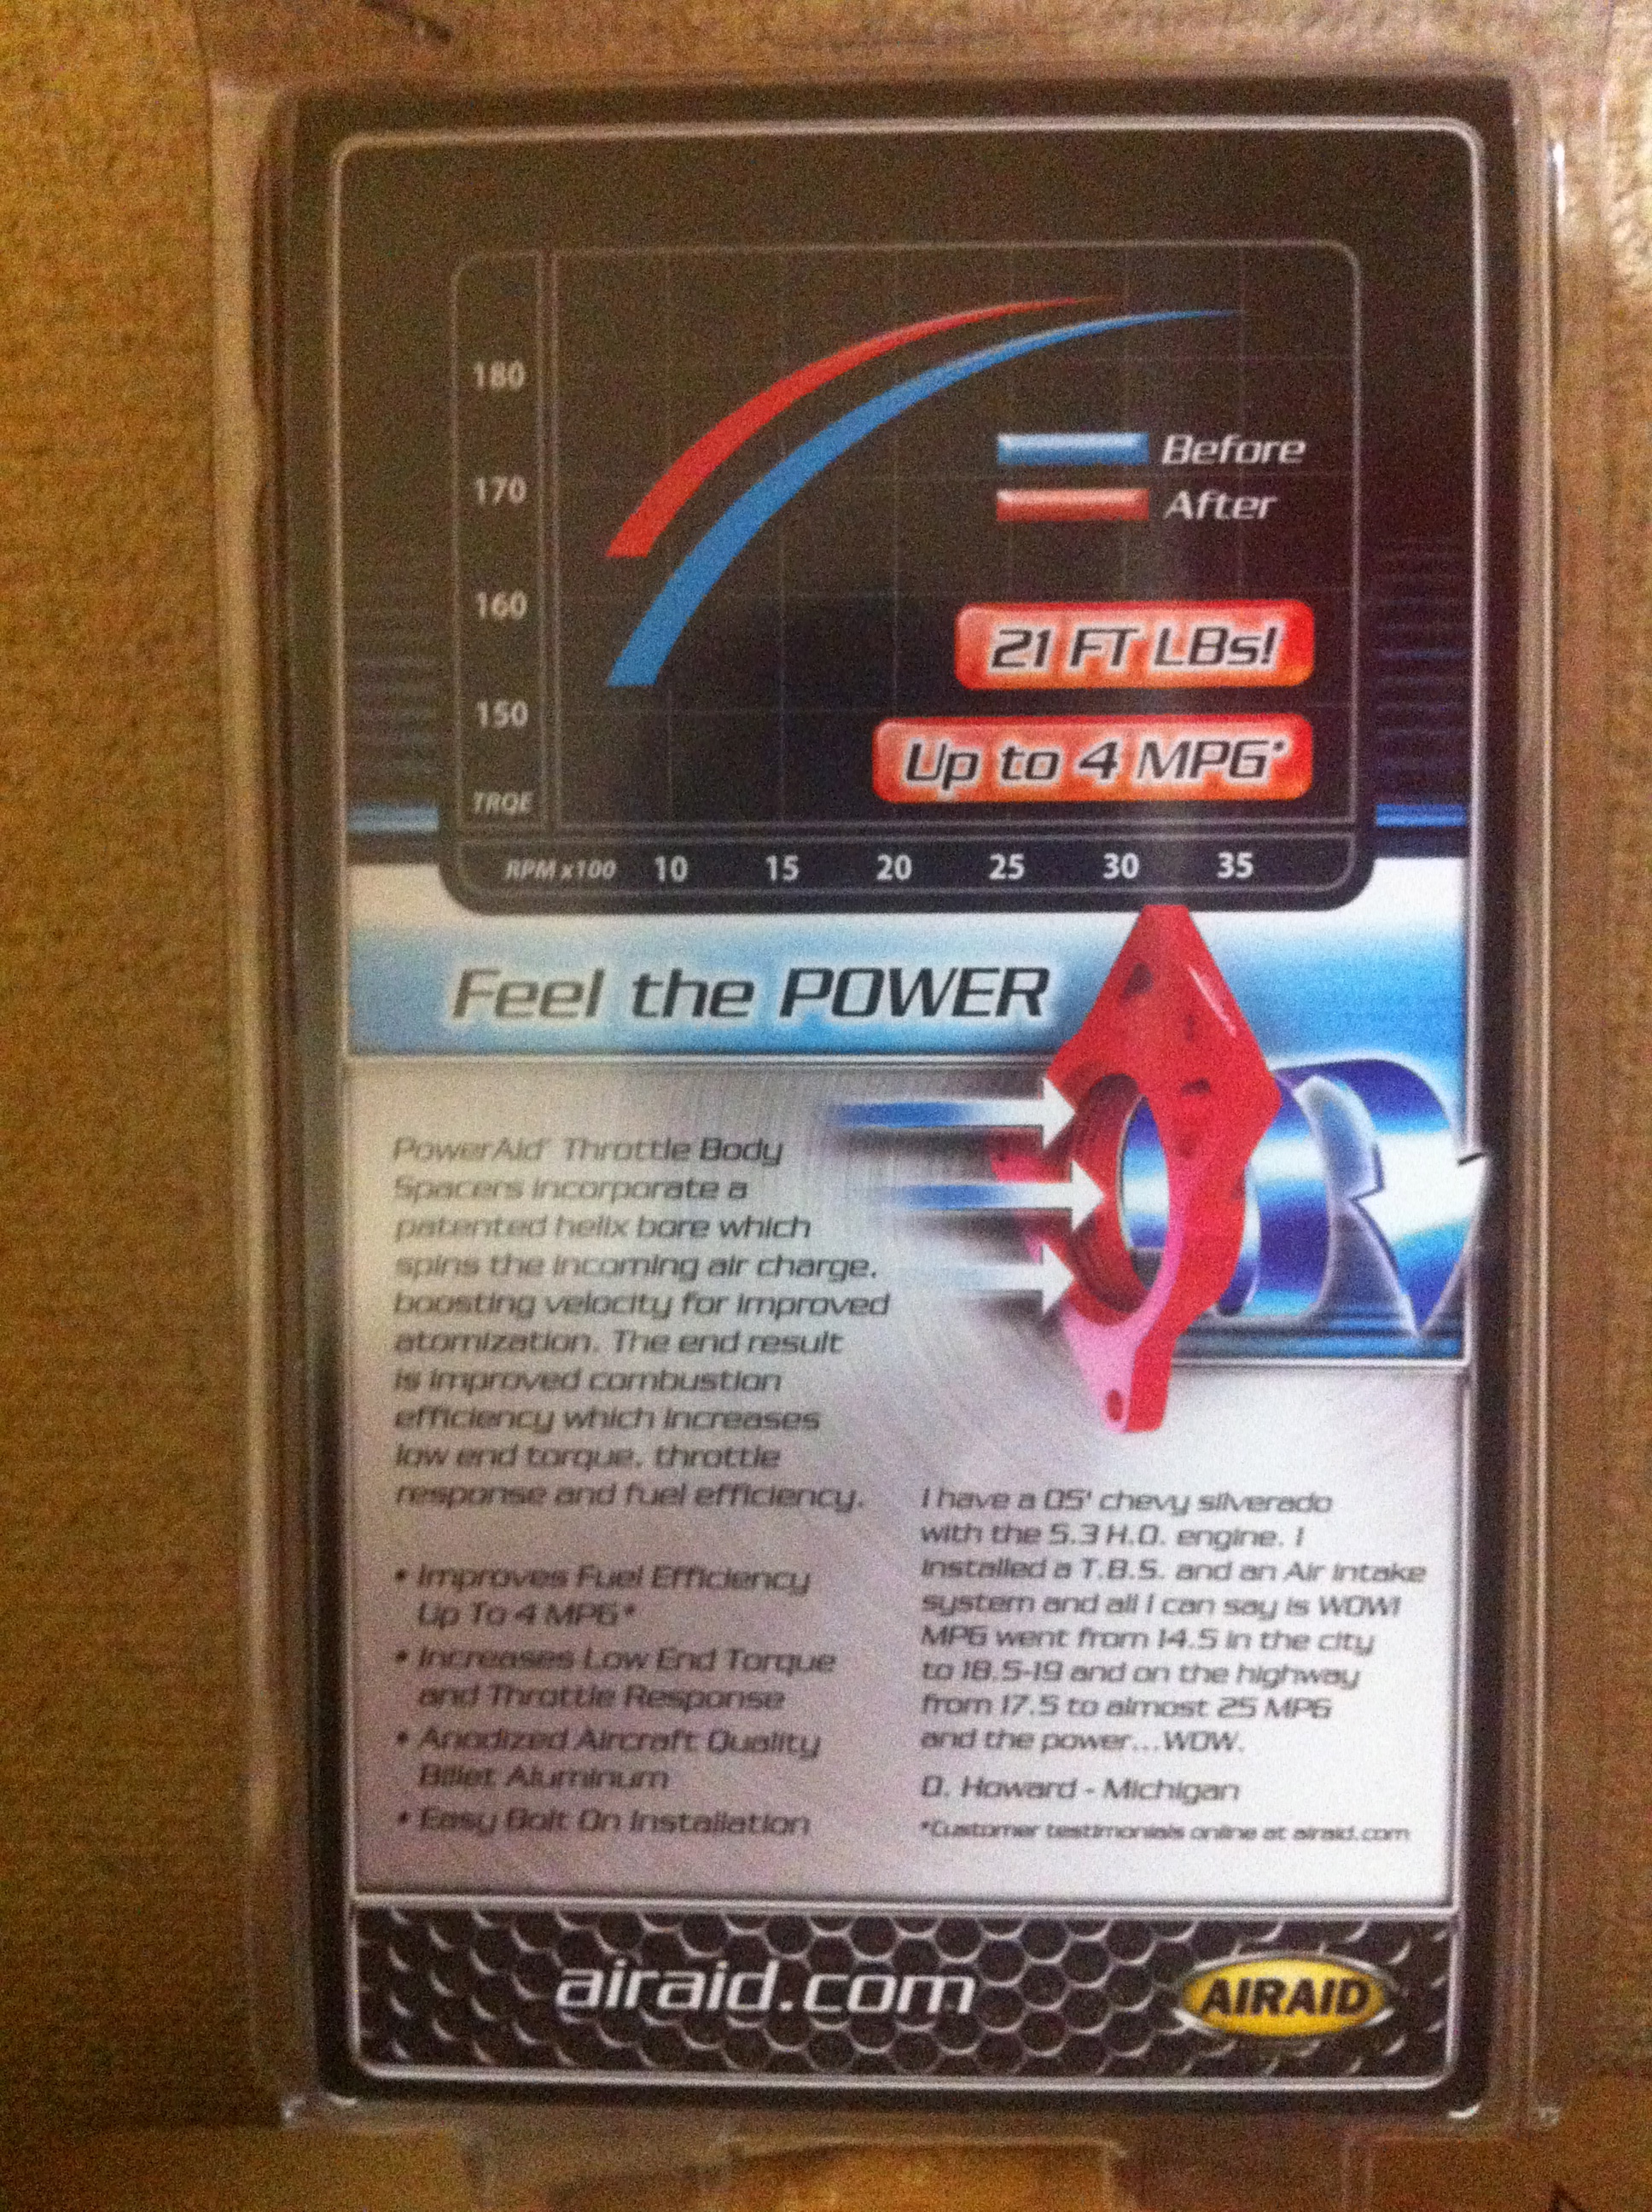
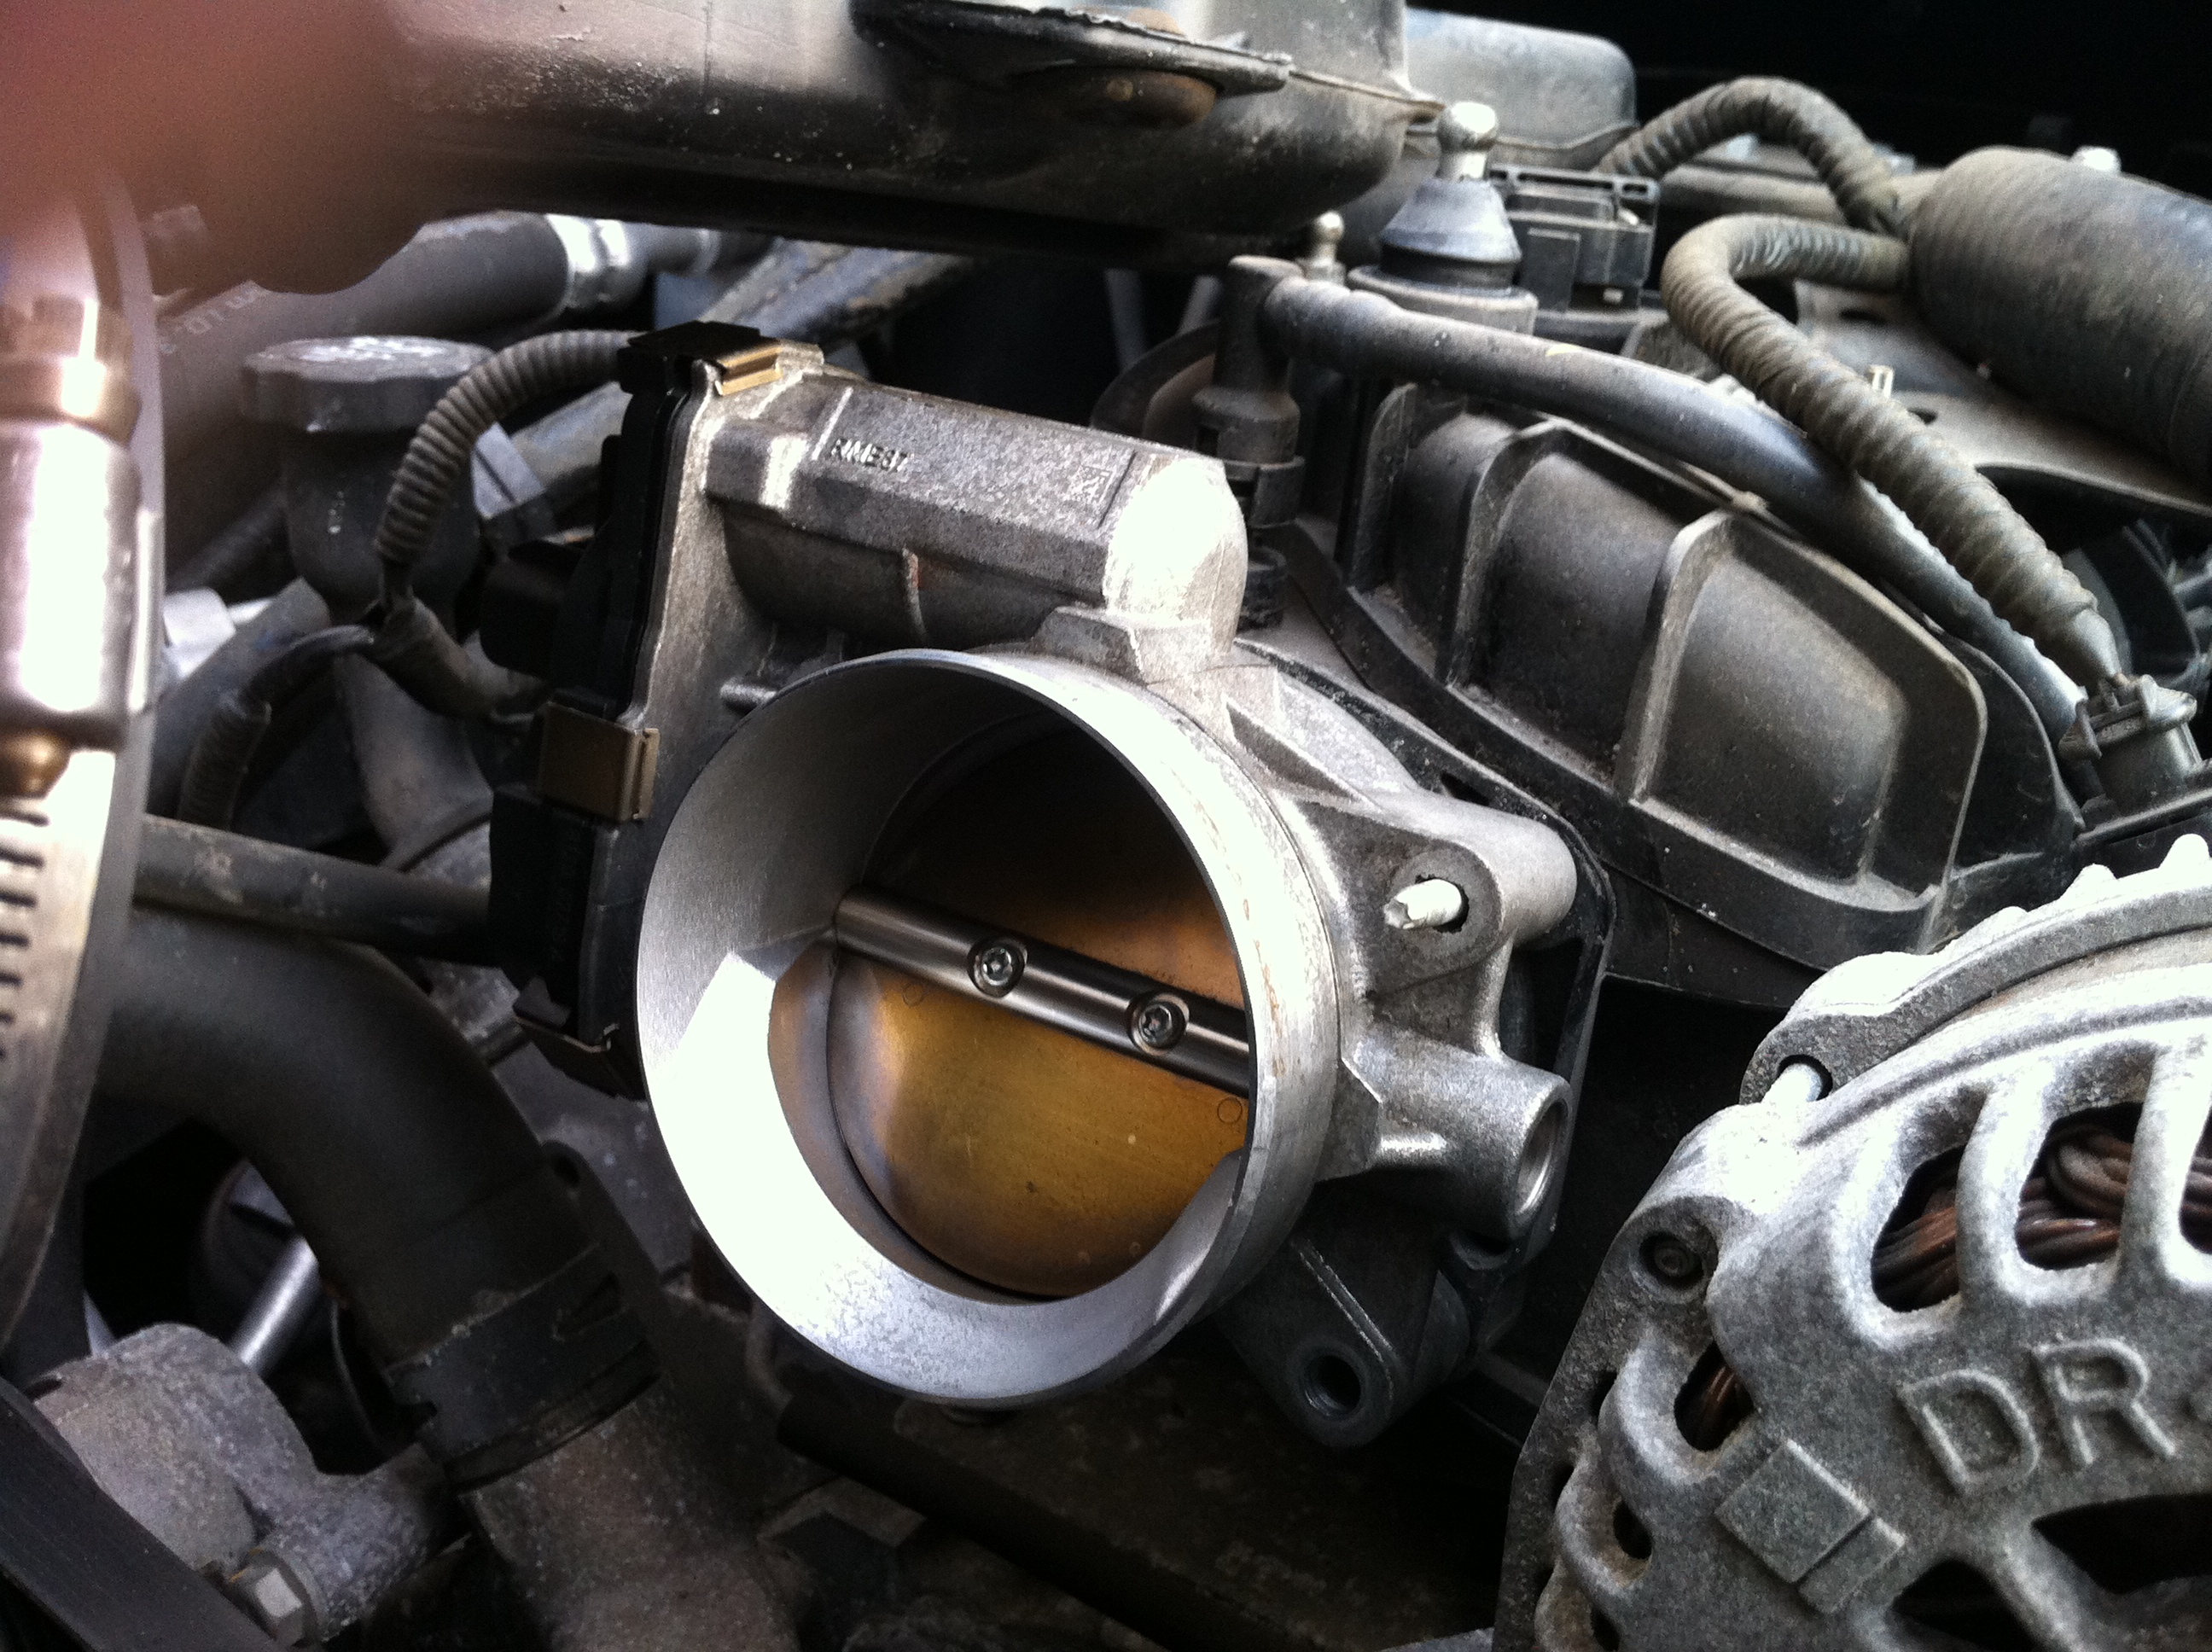
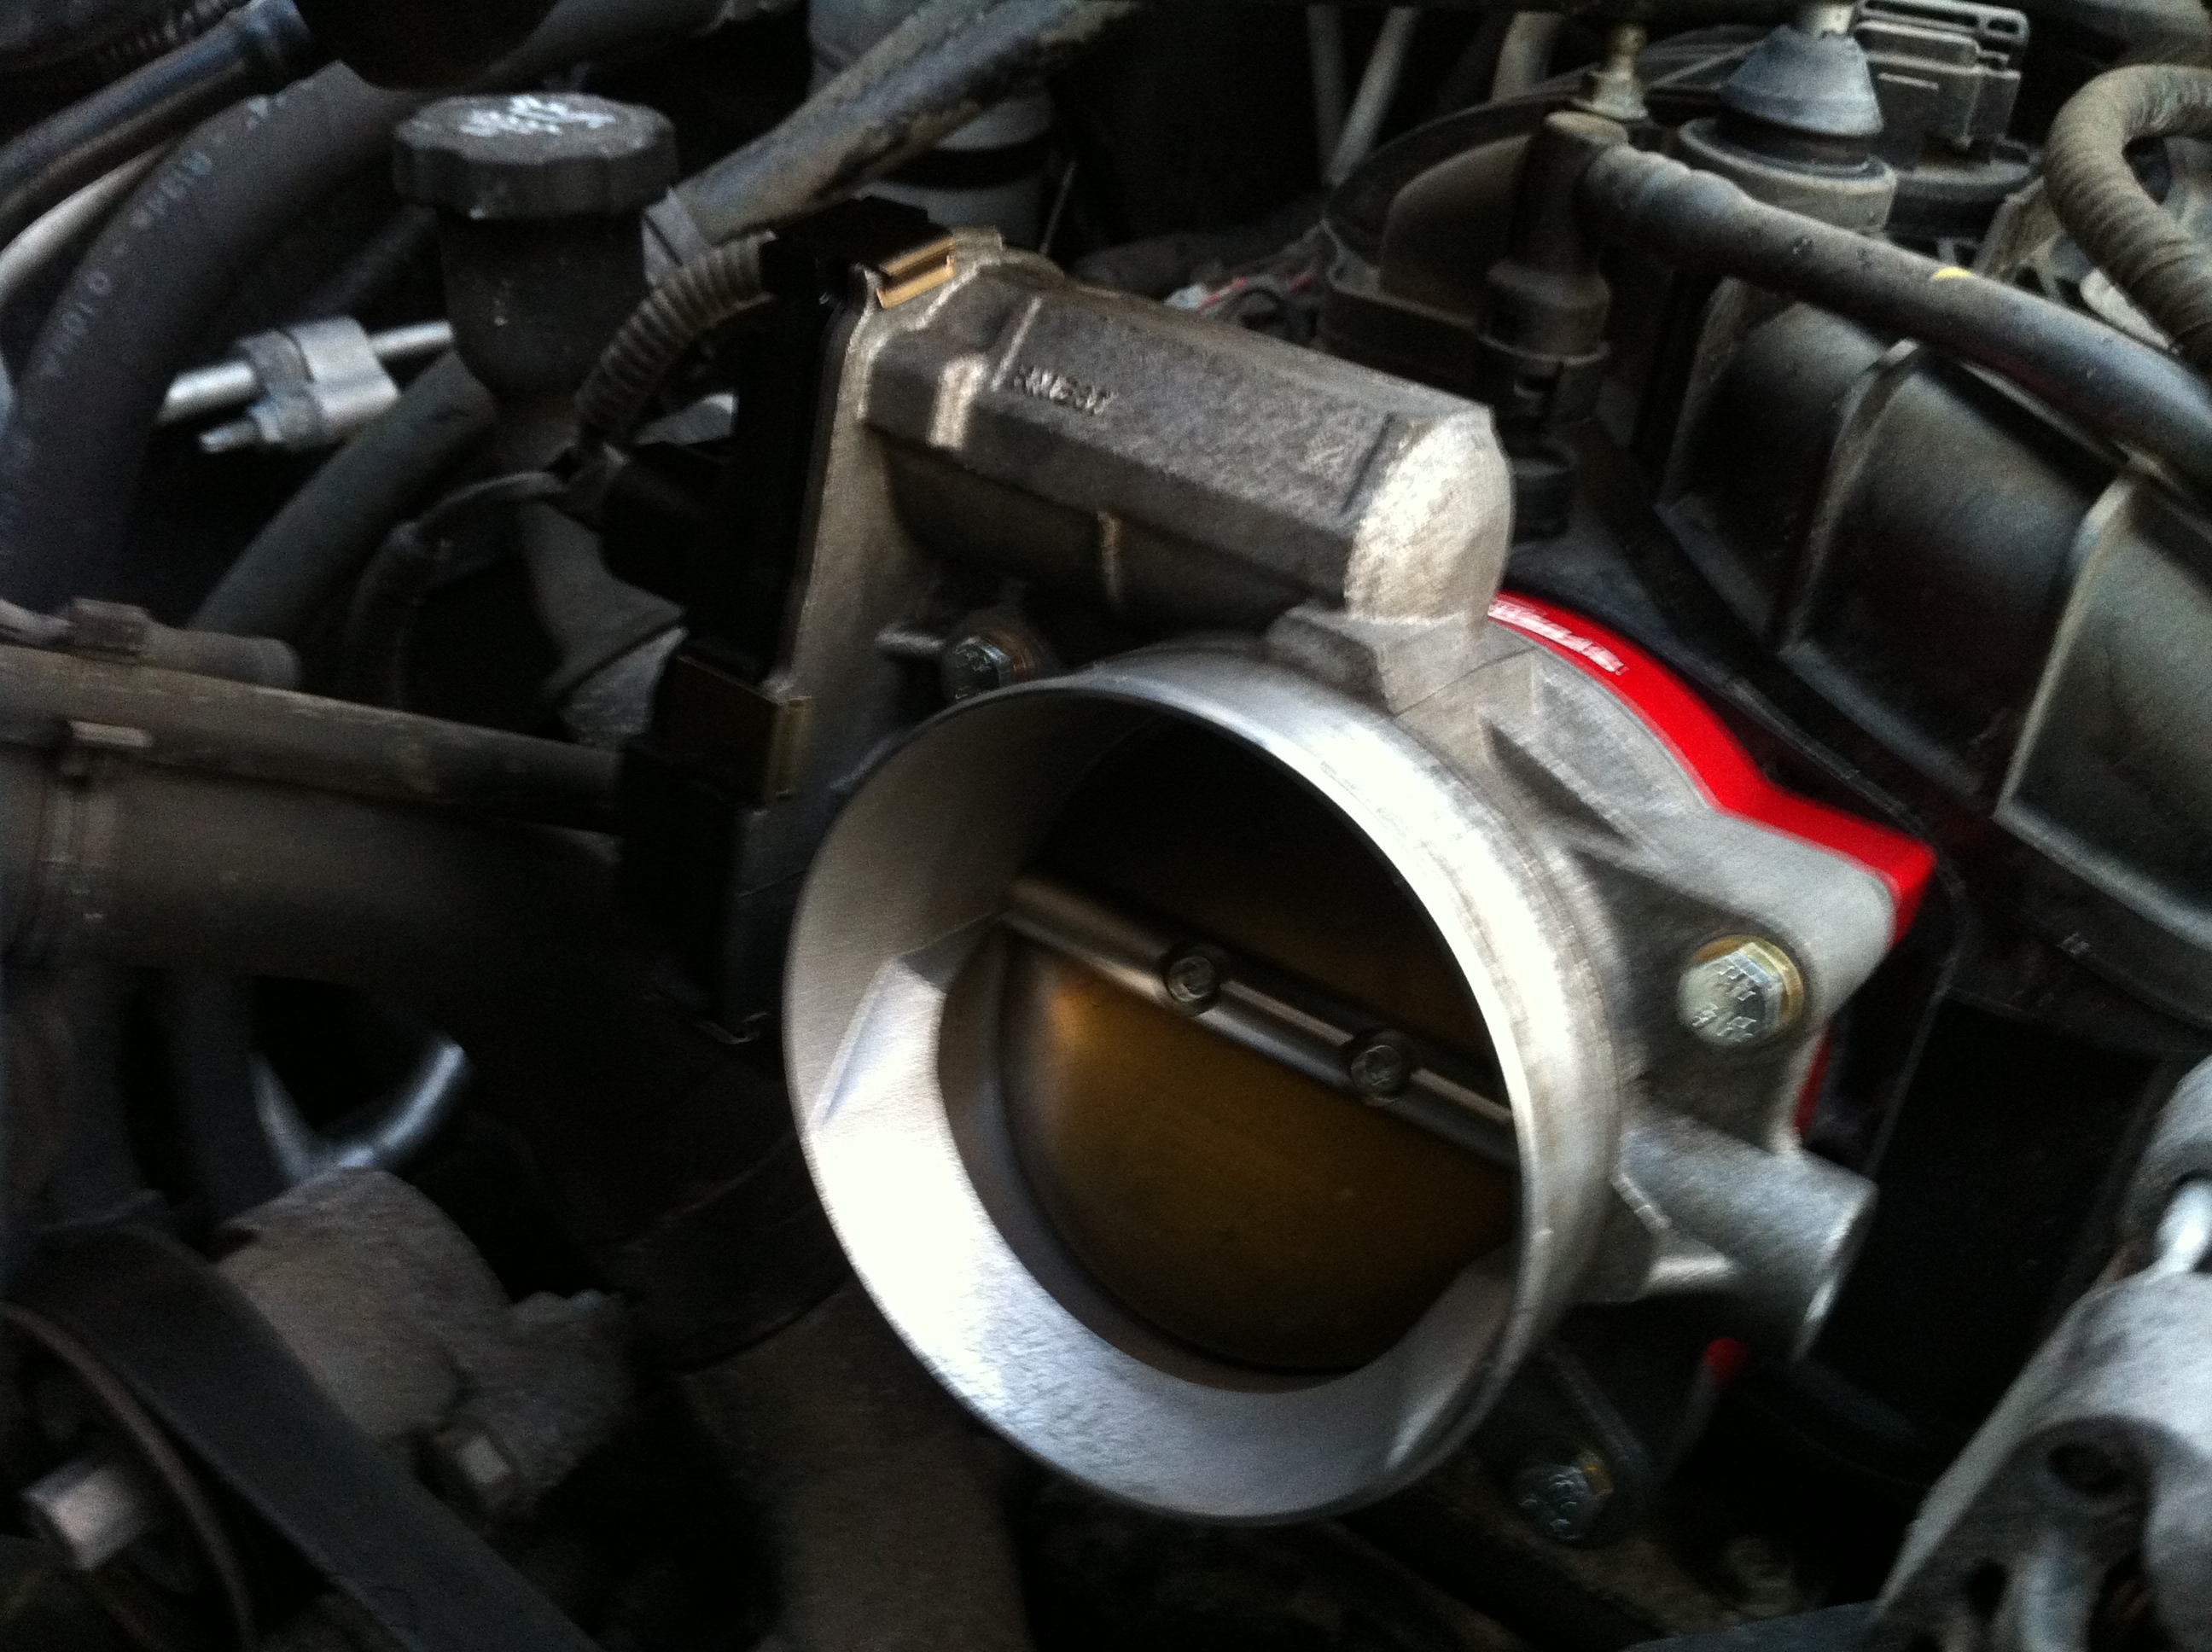
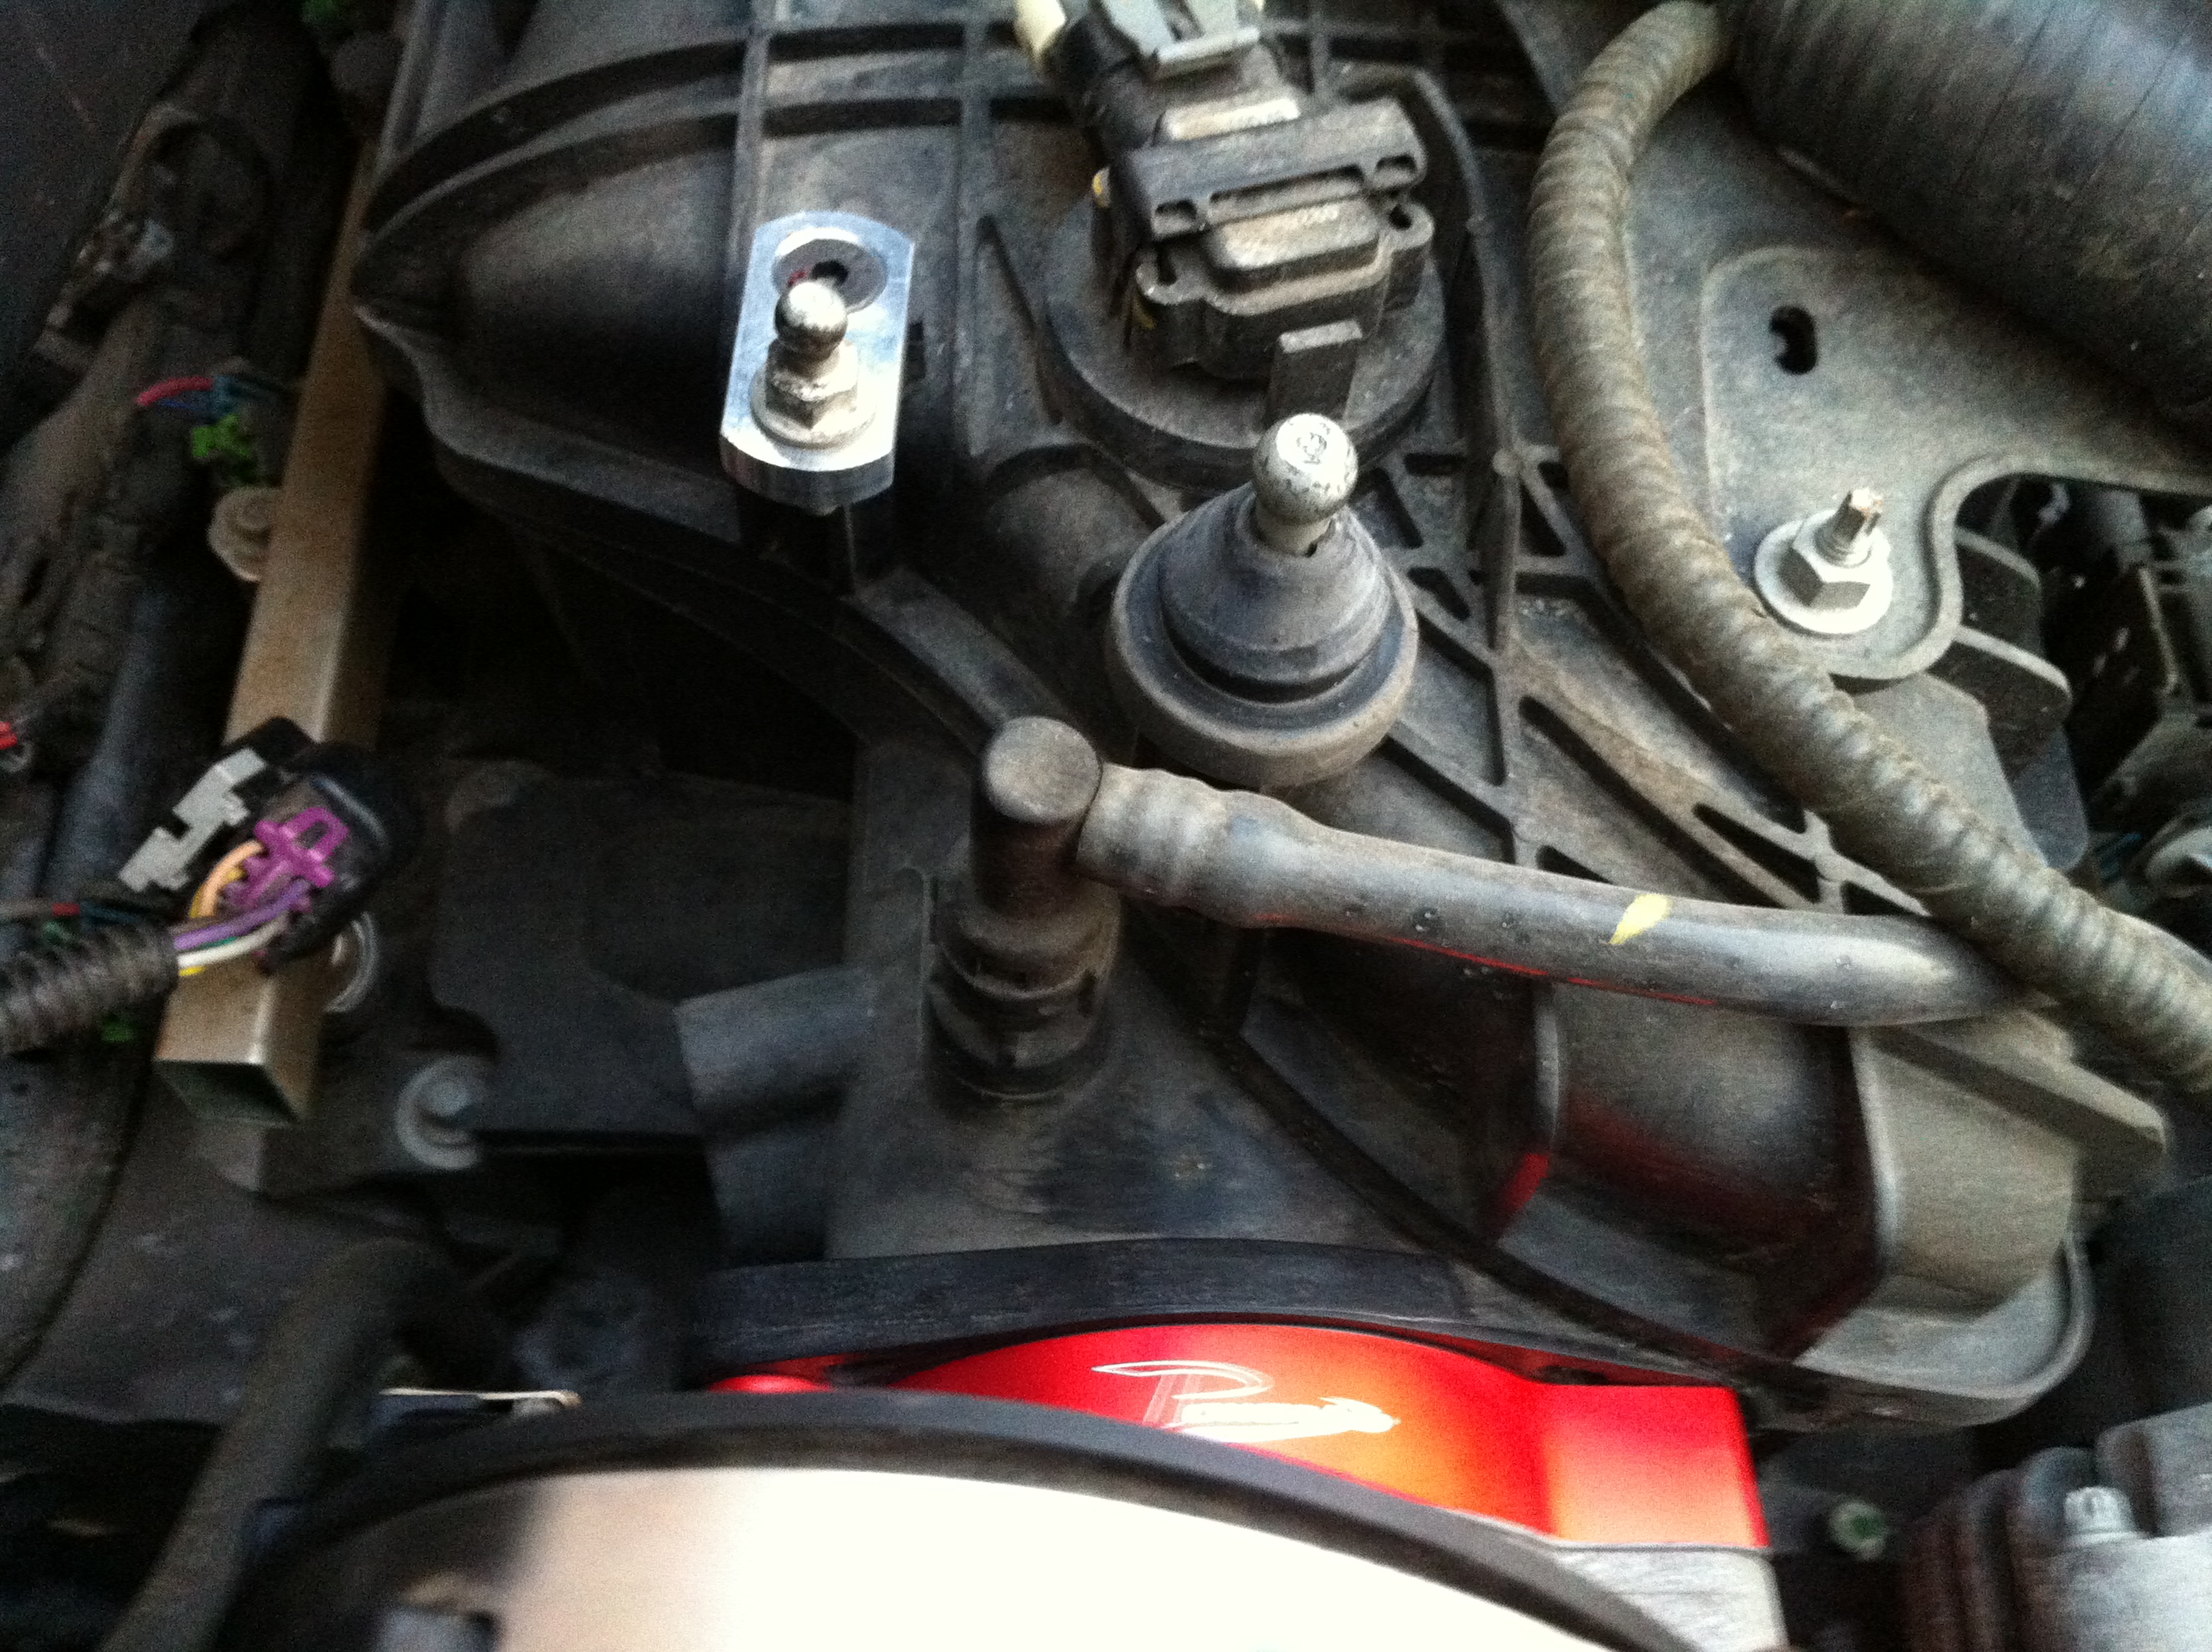
DIY 2008 HUMMER H2 Airaid スロットルボディスペーサー取付け
'08 HUMMER H2 に Airaid社のスロットルボディスペーサー(#200-606)を取付け。このパーツはインテークマニホールドとスロットルボディの間に装着するおよそ1インチのアルミ製スペーサーで、中低速域のトルクアップと燃費向上する!?らしい。。。パッケージ裏面の記載、内側に掘られた溝でトルネードを起こすって…ホンマかいな?と思いつつ、実際に体感できるという触れ込みも多いのでeBayで購入(日本での価格は2倍)。取付けは結構簡単です。http://www.aira..
HUMMER H2
RedFalcon
2013-08-04T23:29:15+09:00
http://www.airaid.com/InstallationPDF/200-606.pdf
-
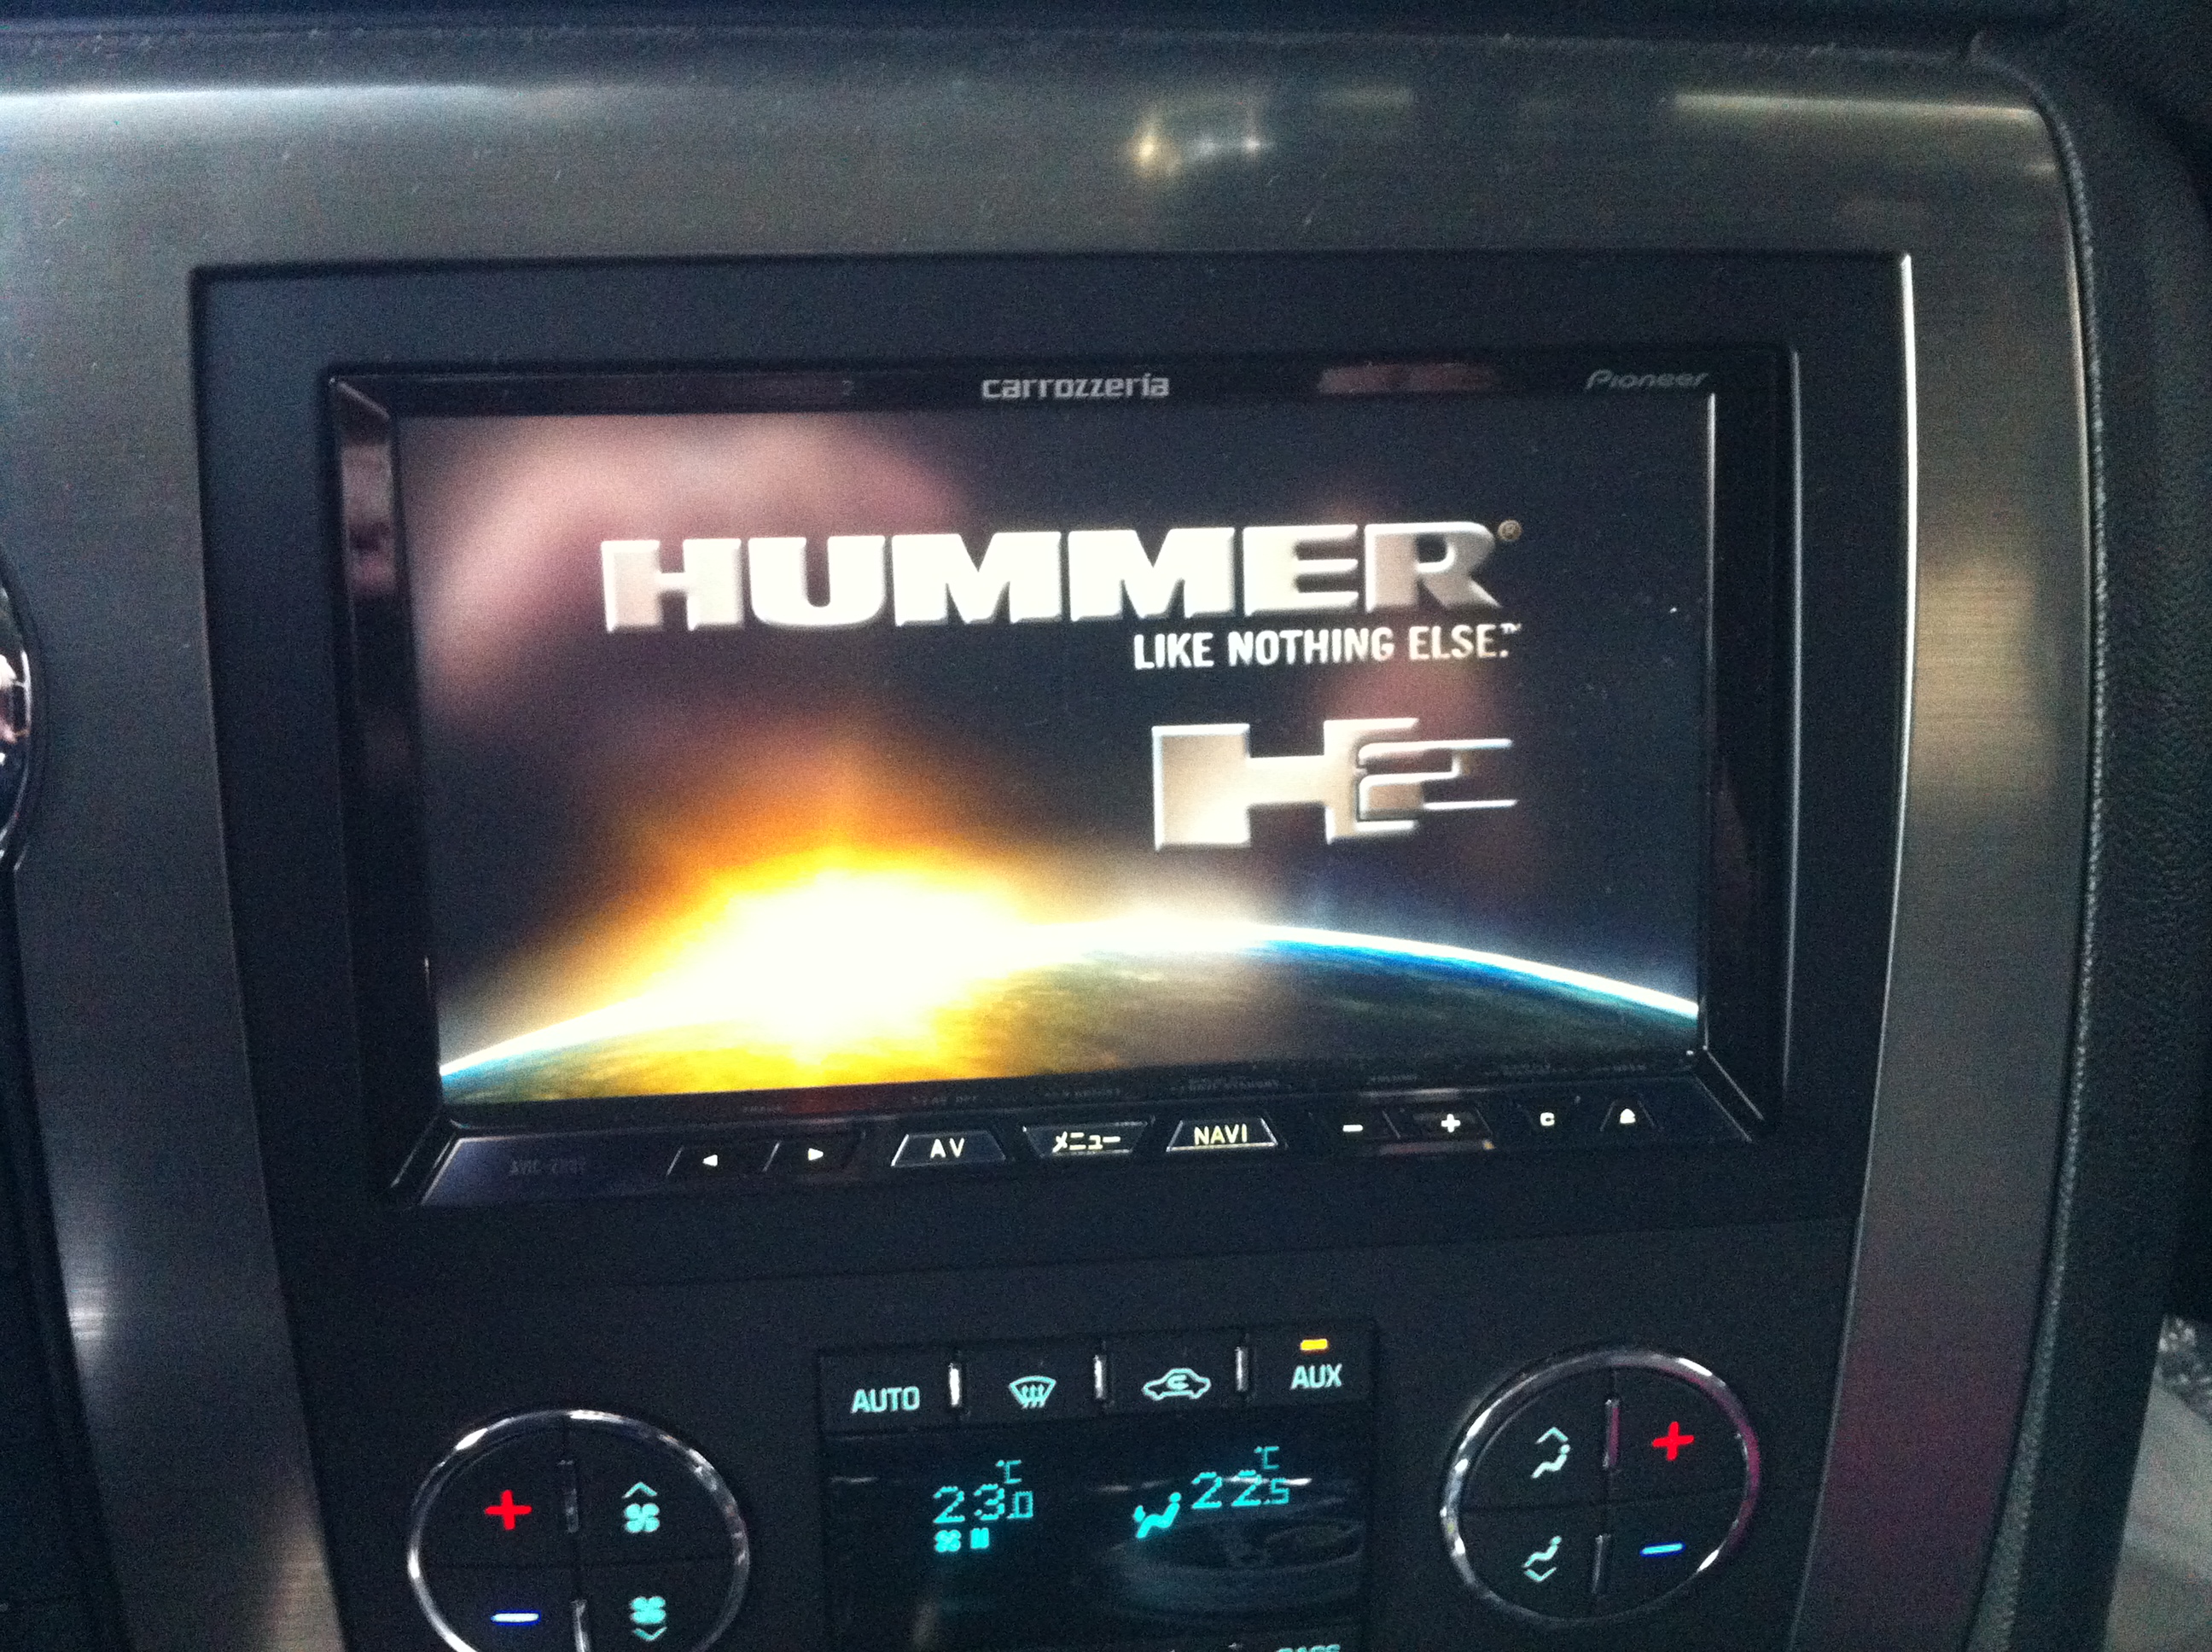
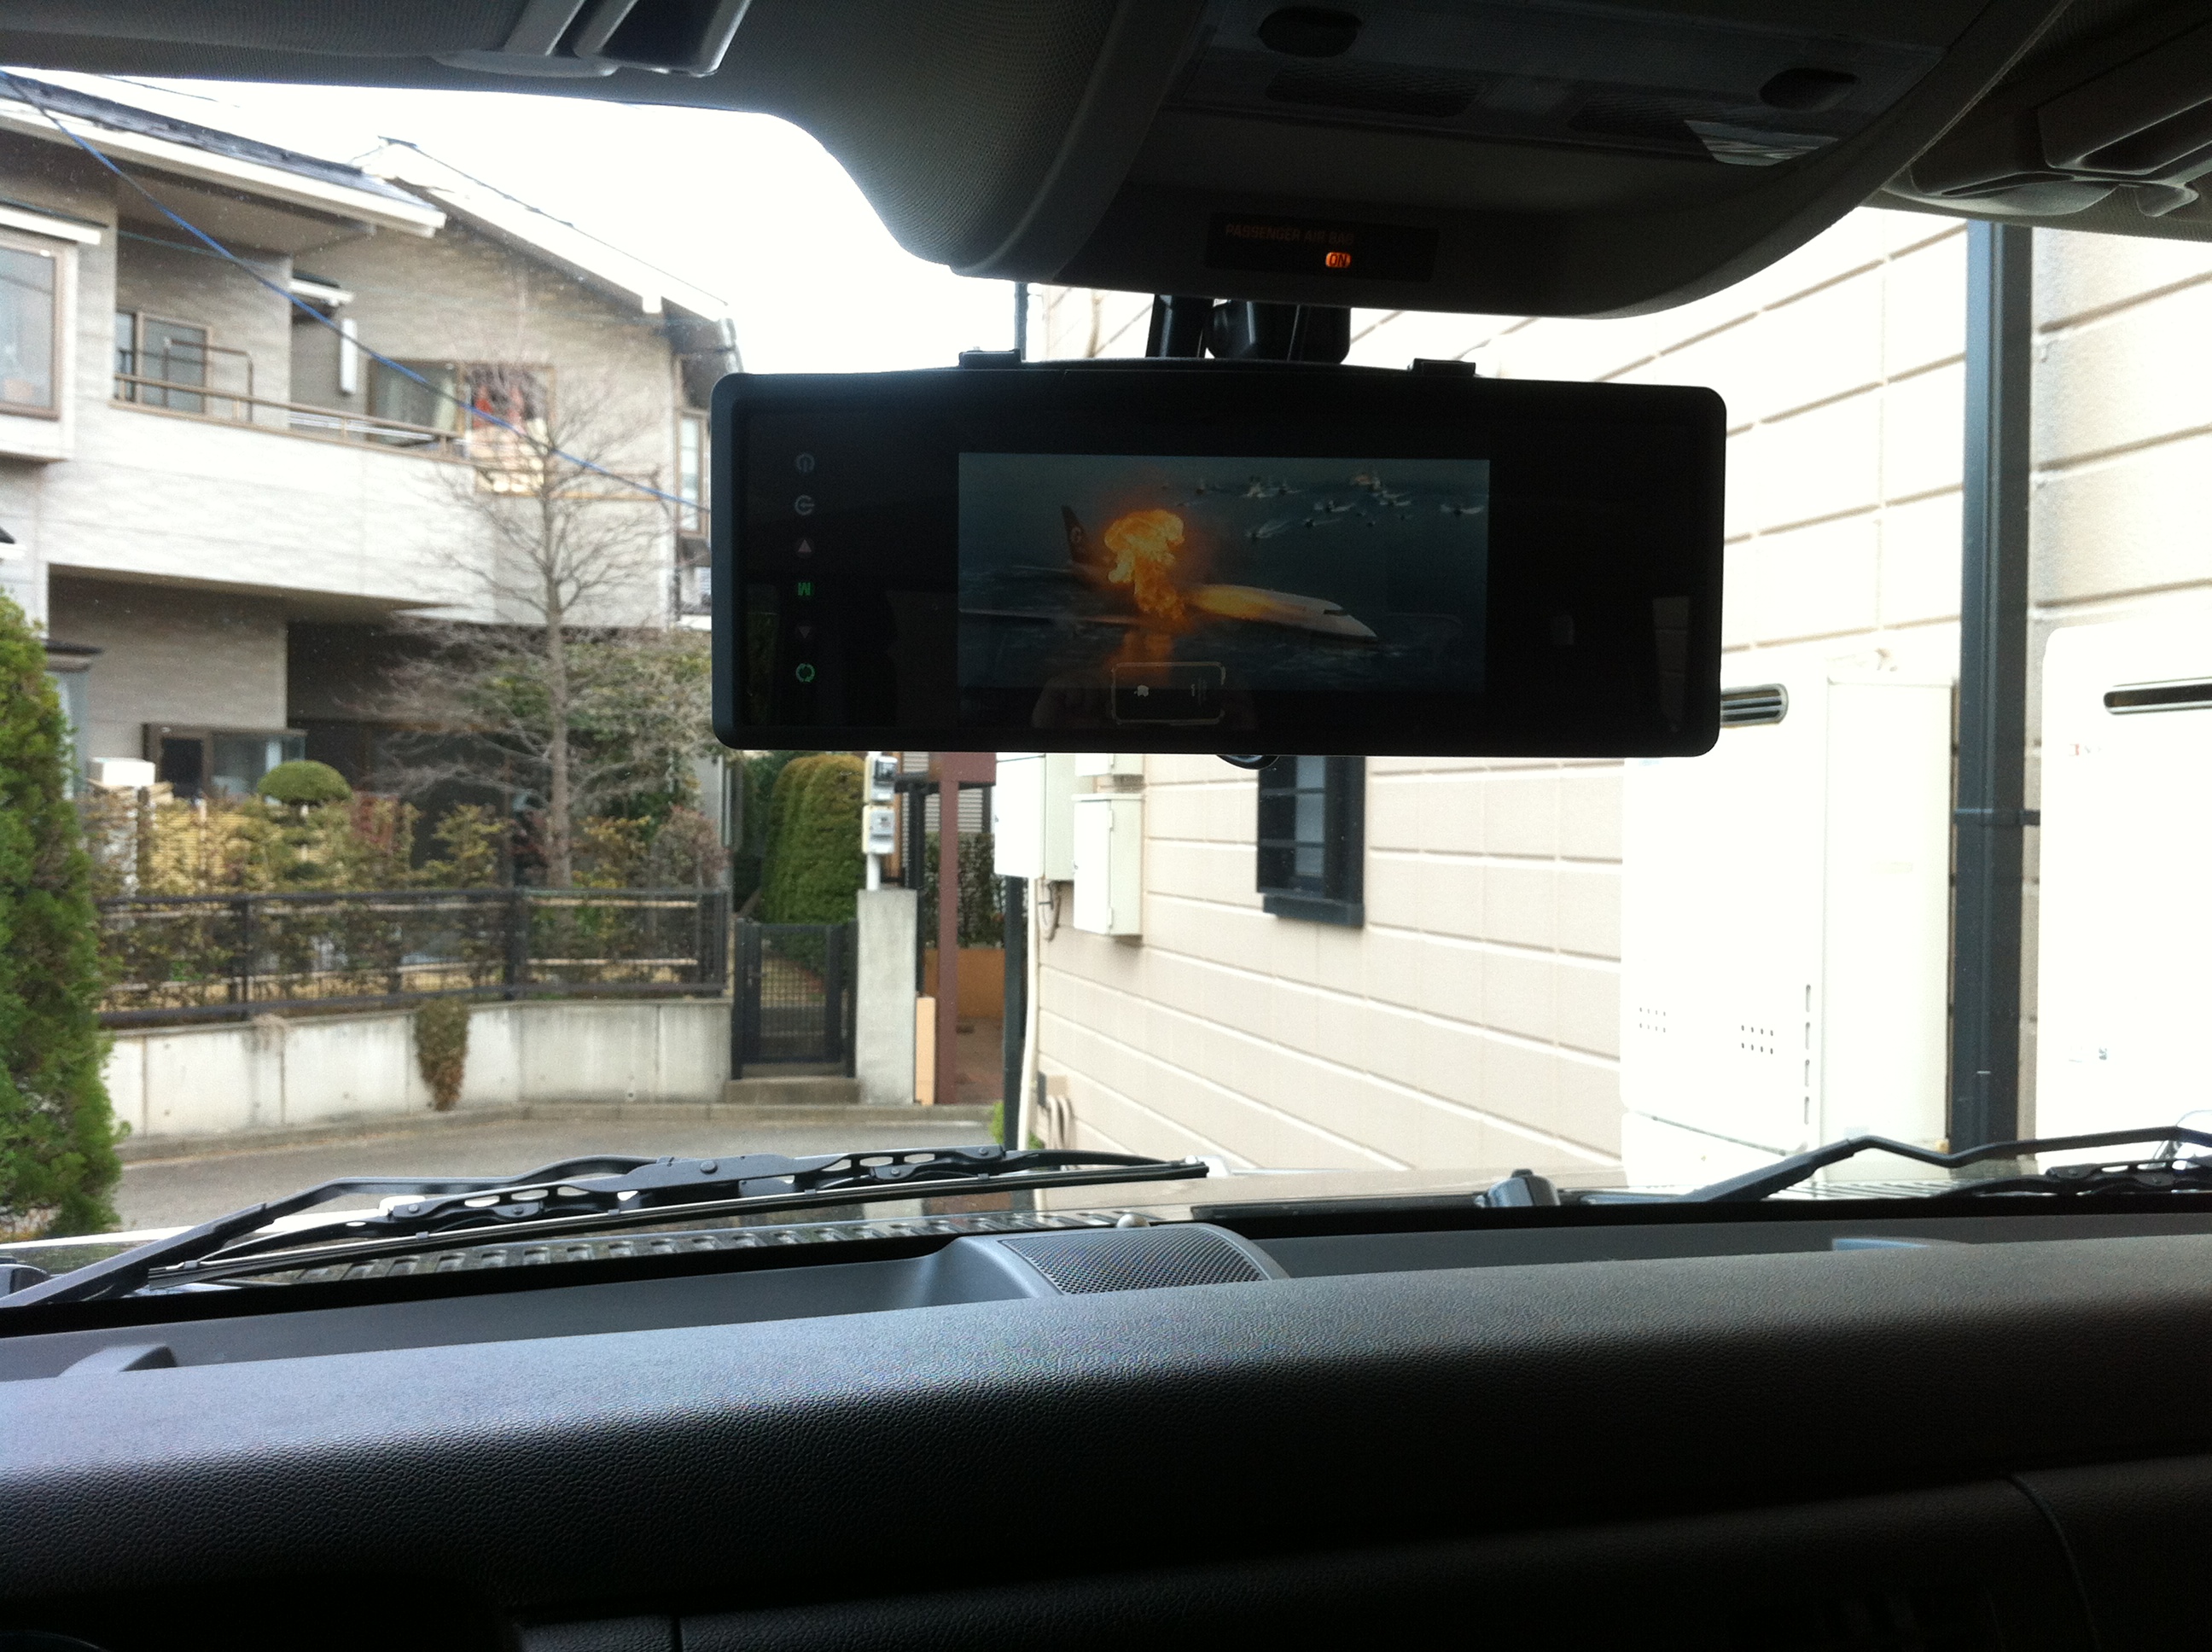
DIY 2008 HUMMER H2 サイバーナビ取付け
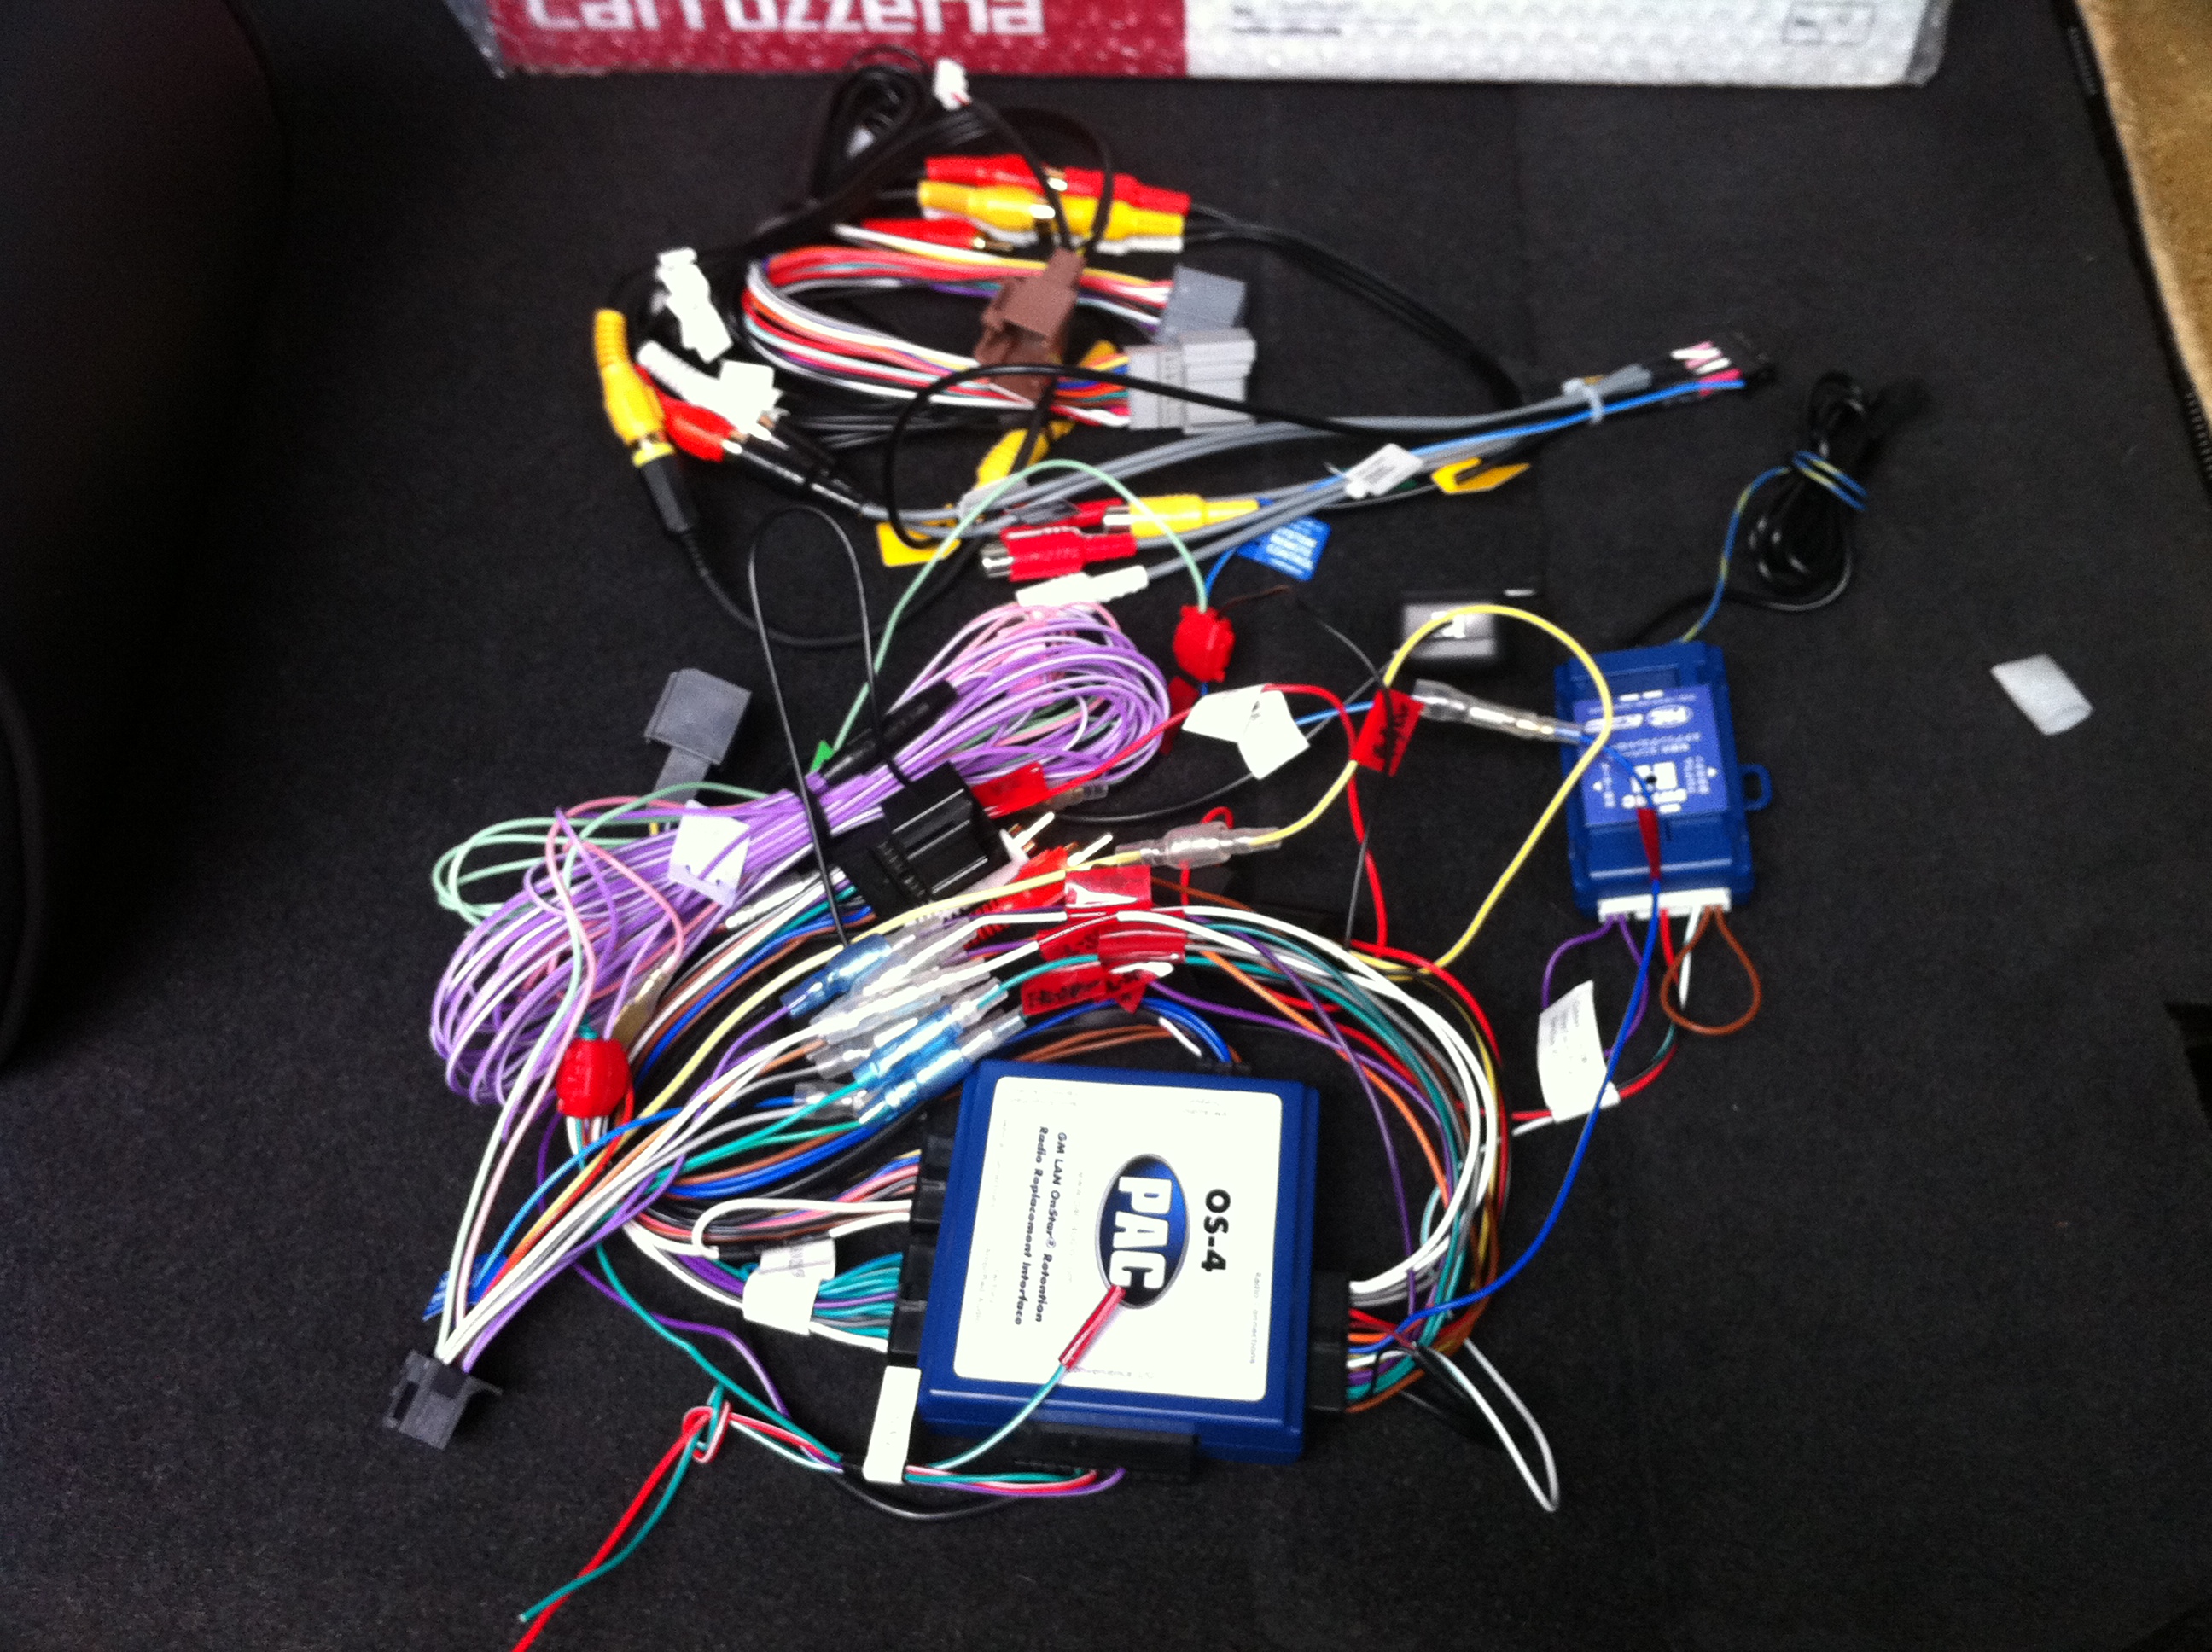
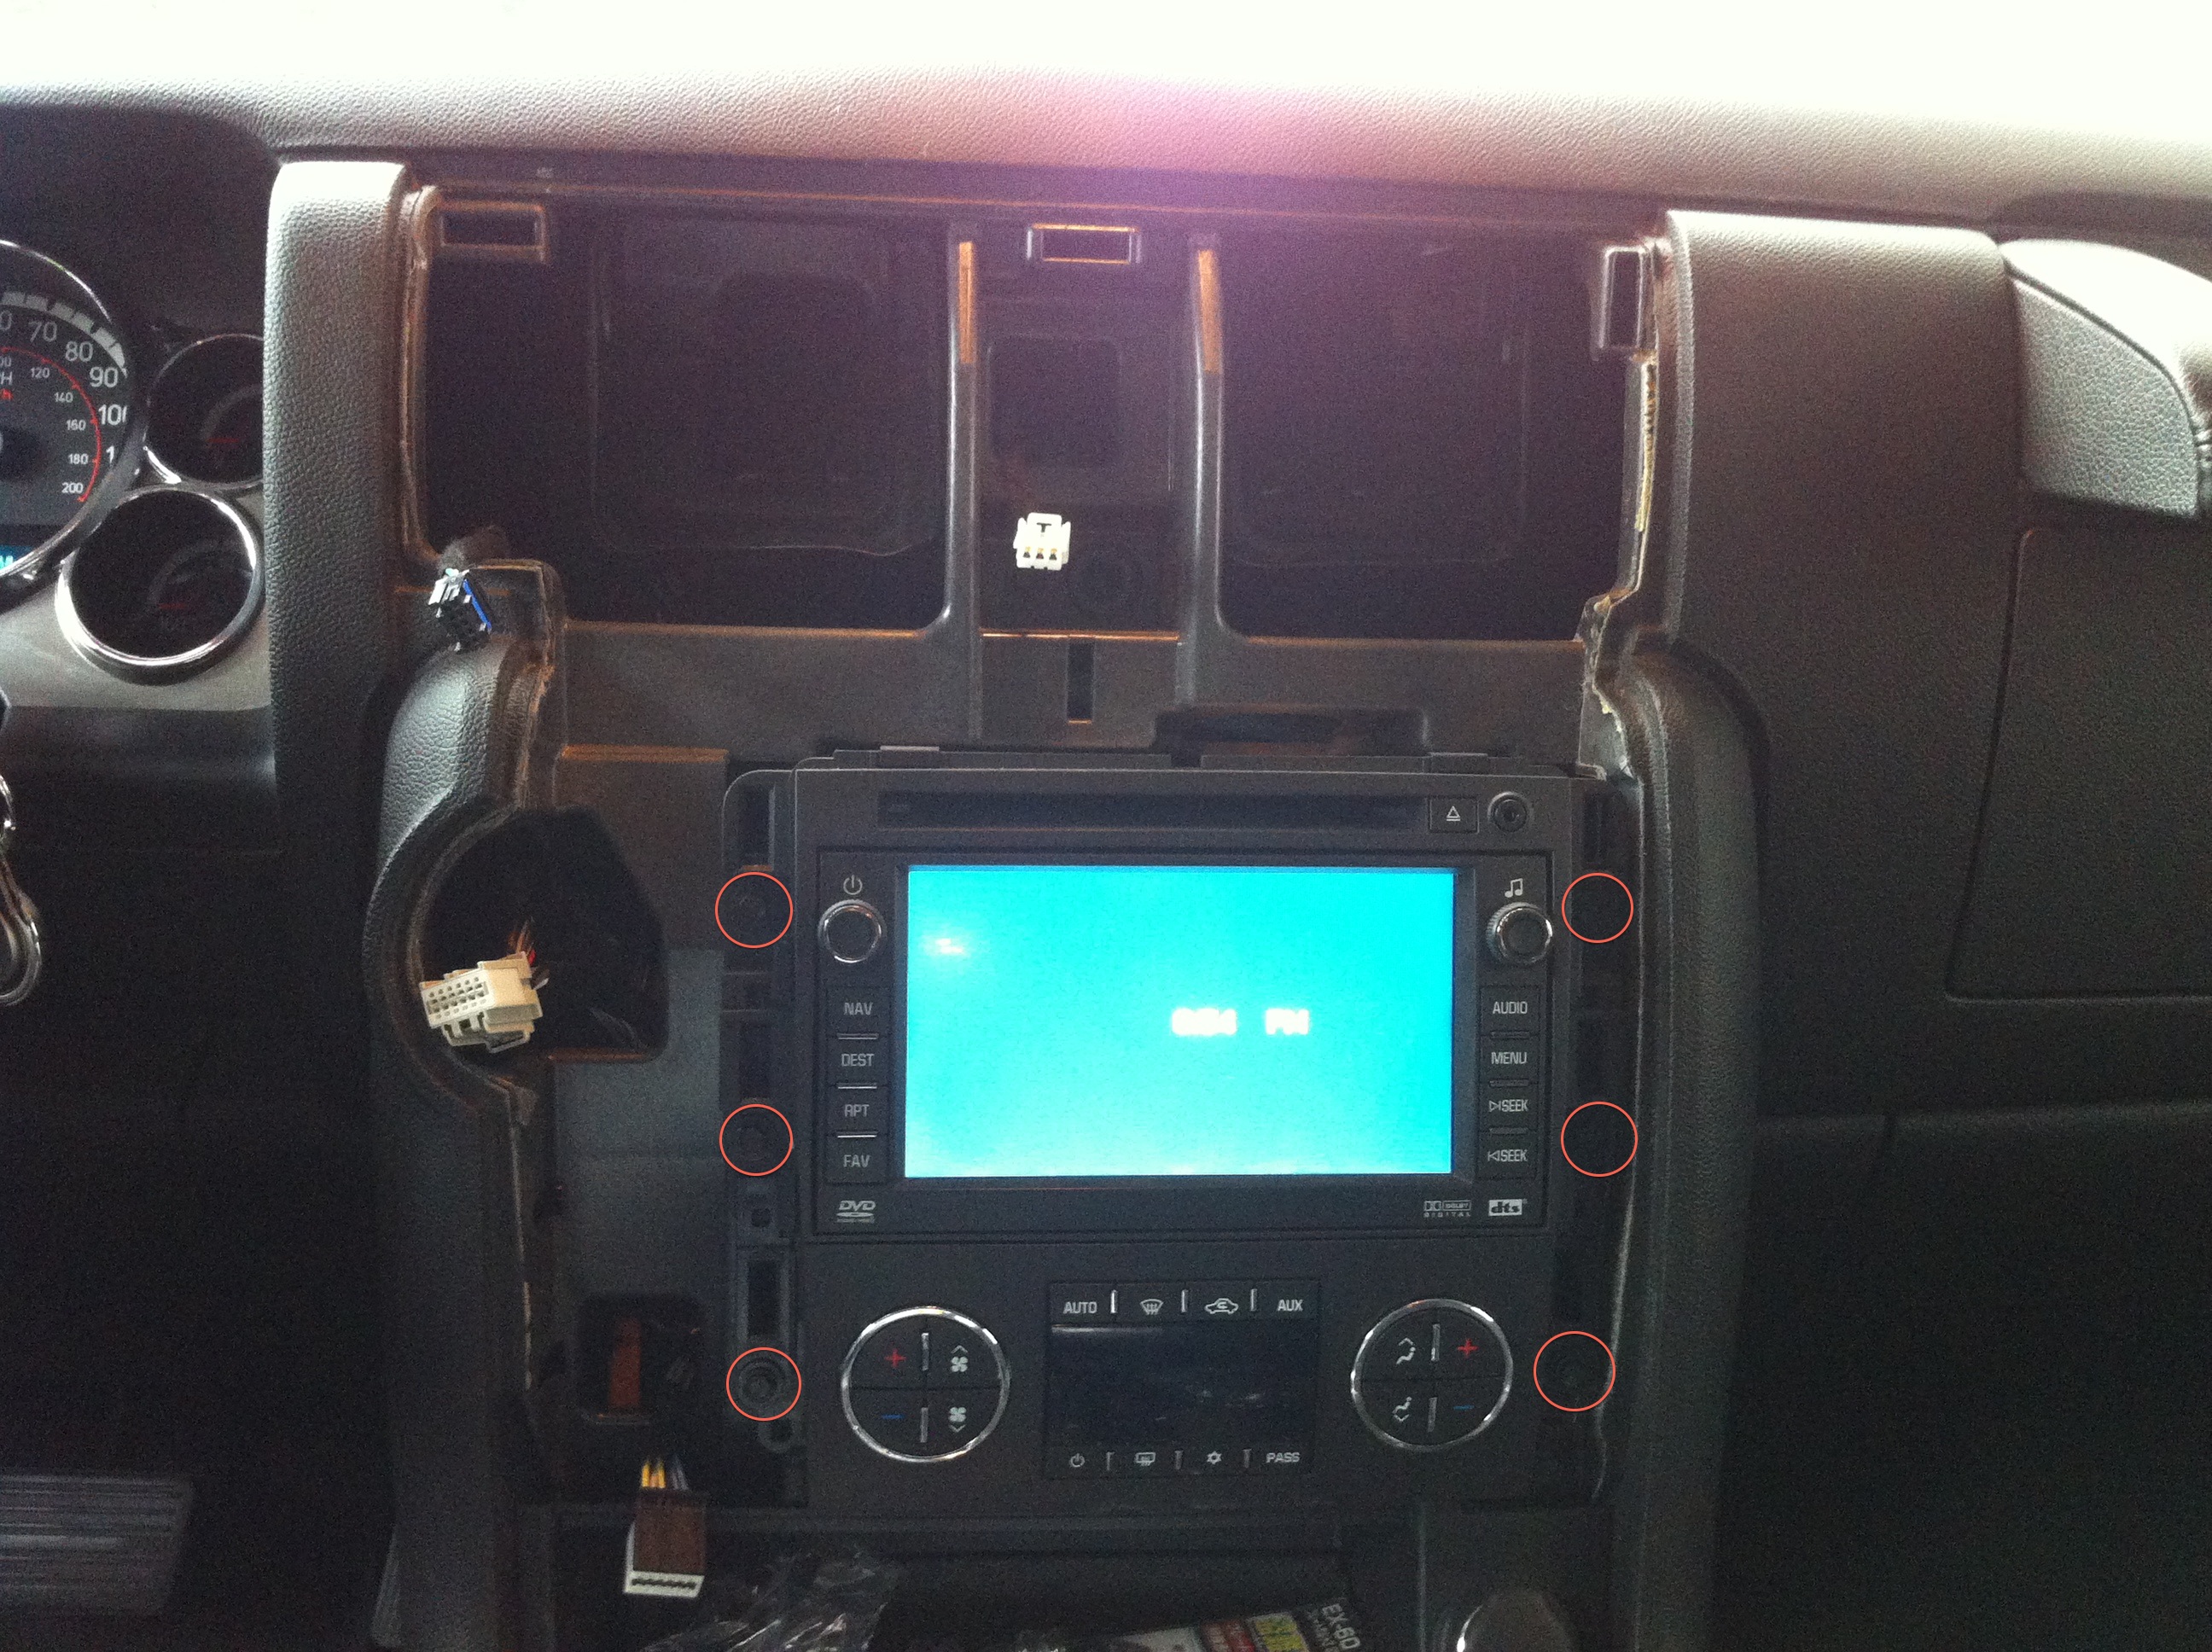
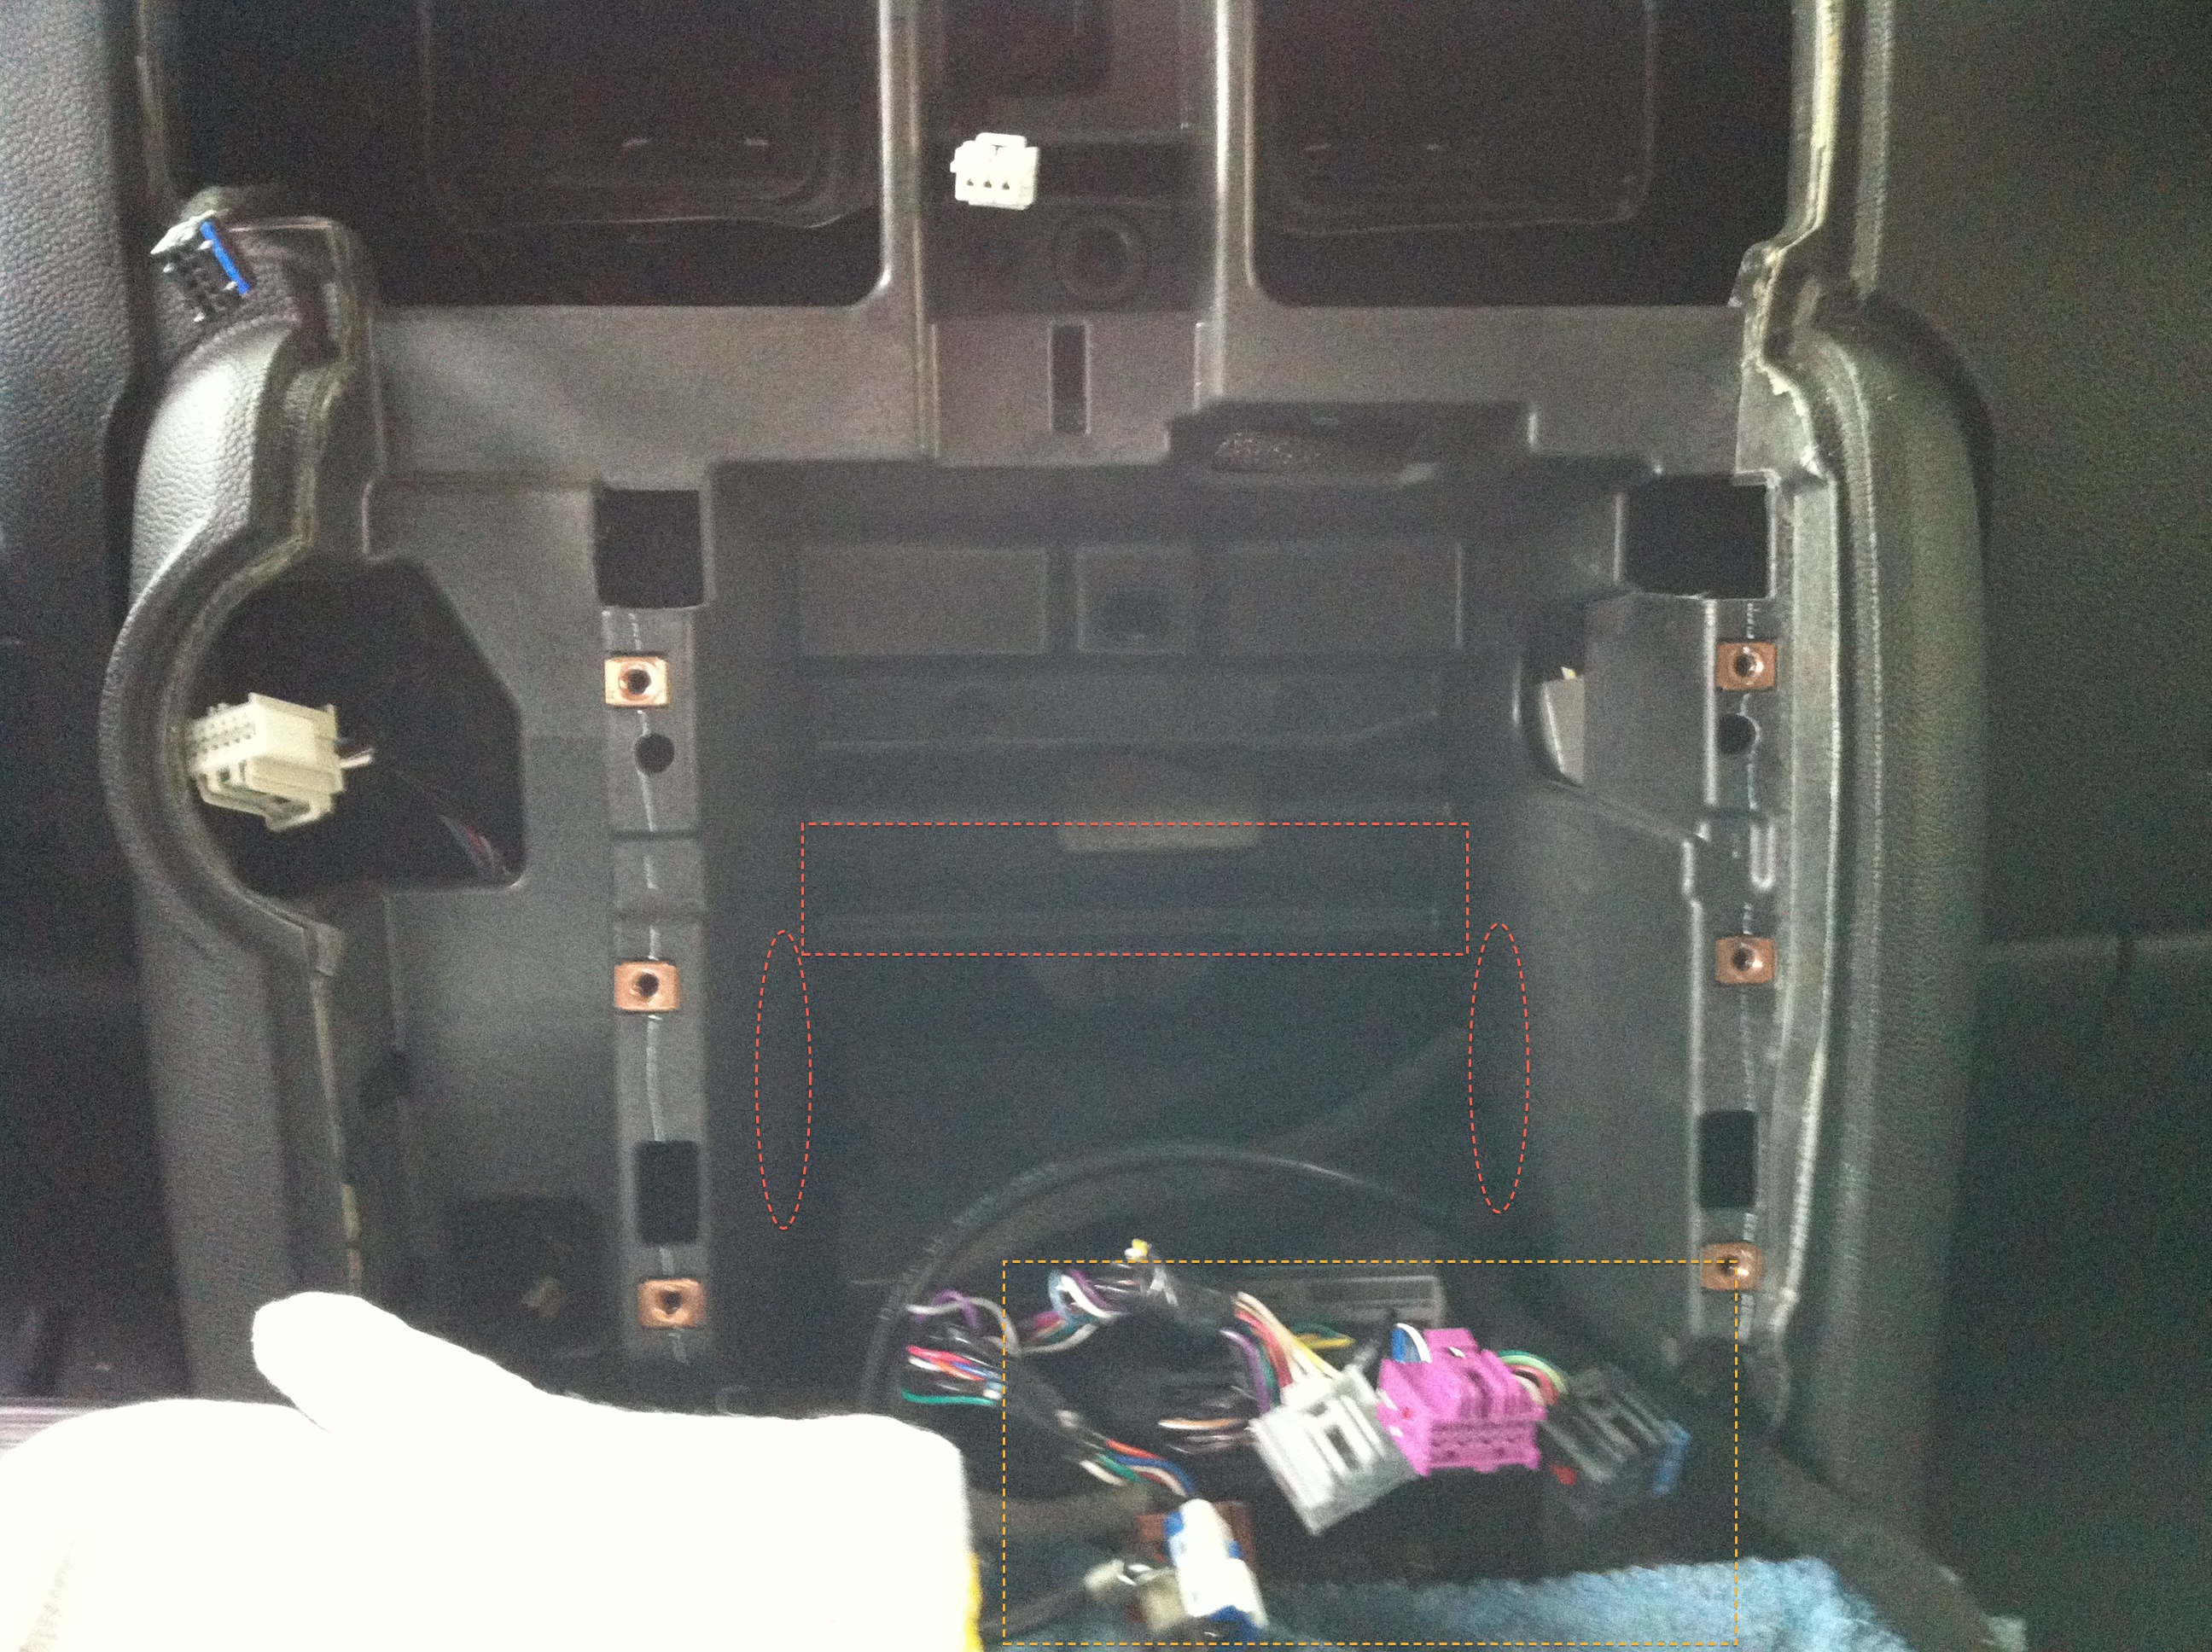
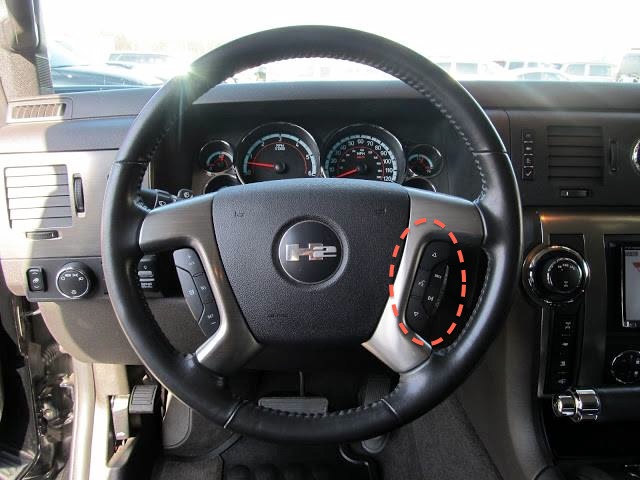
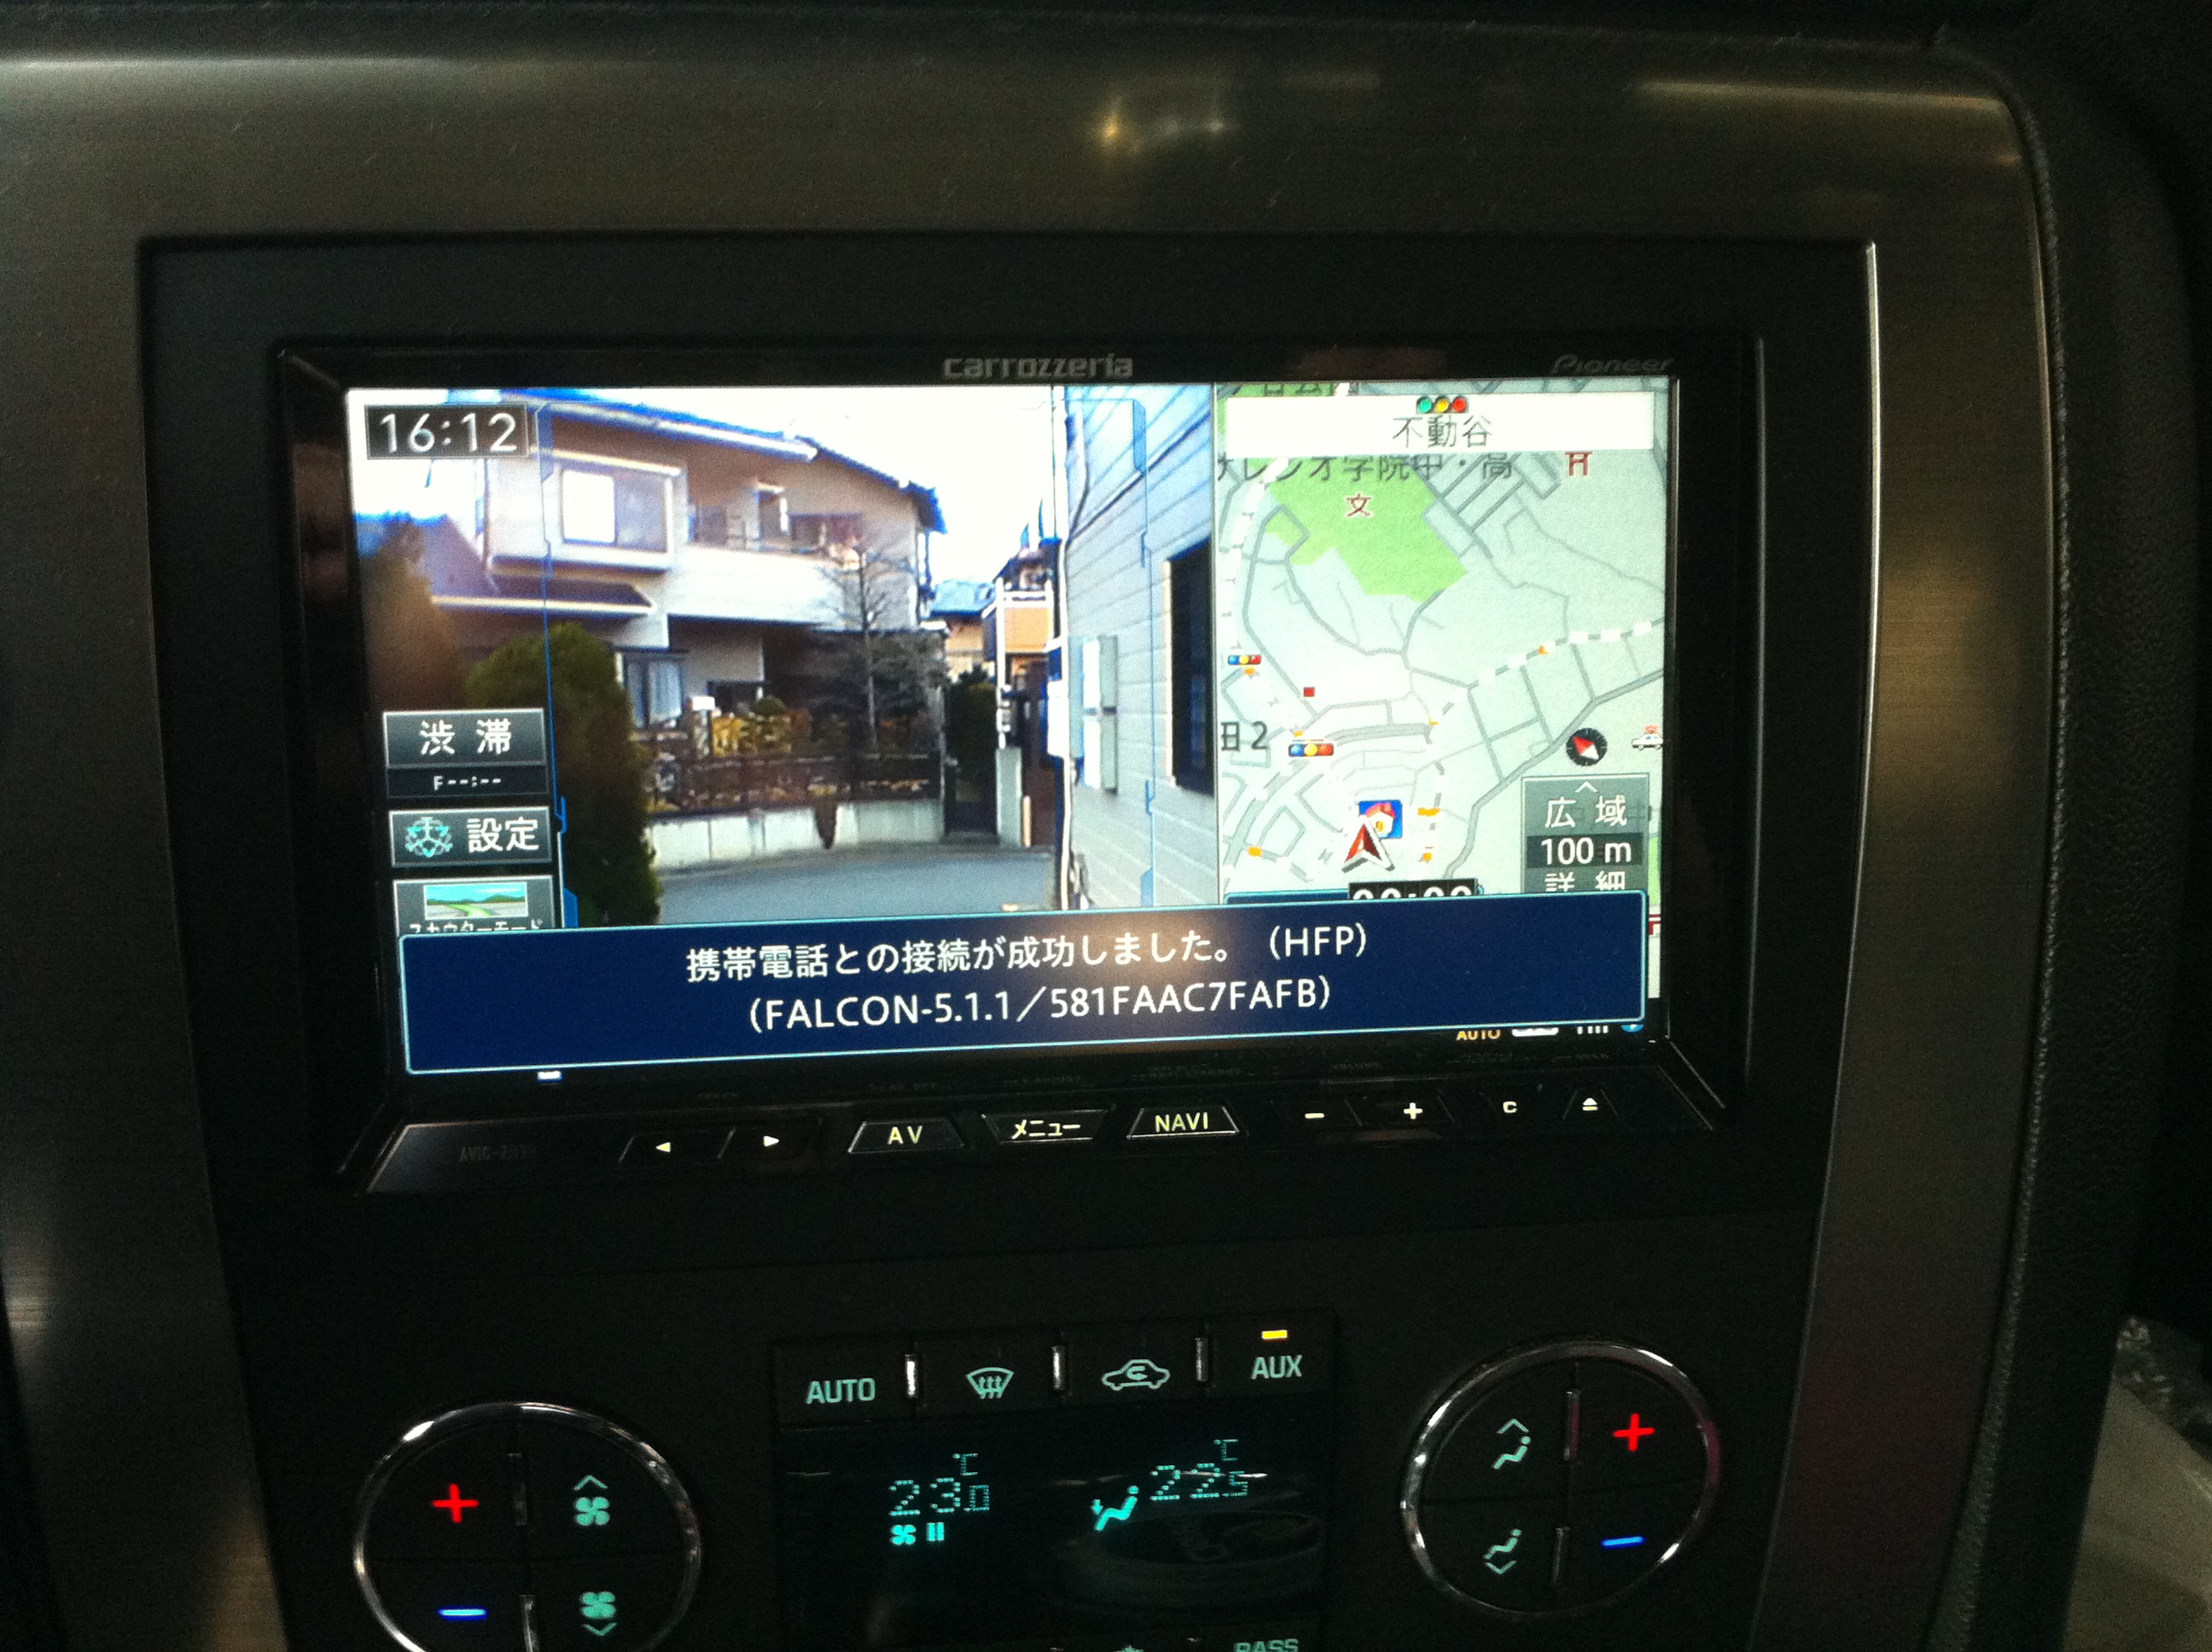
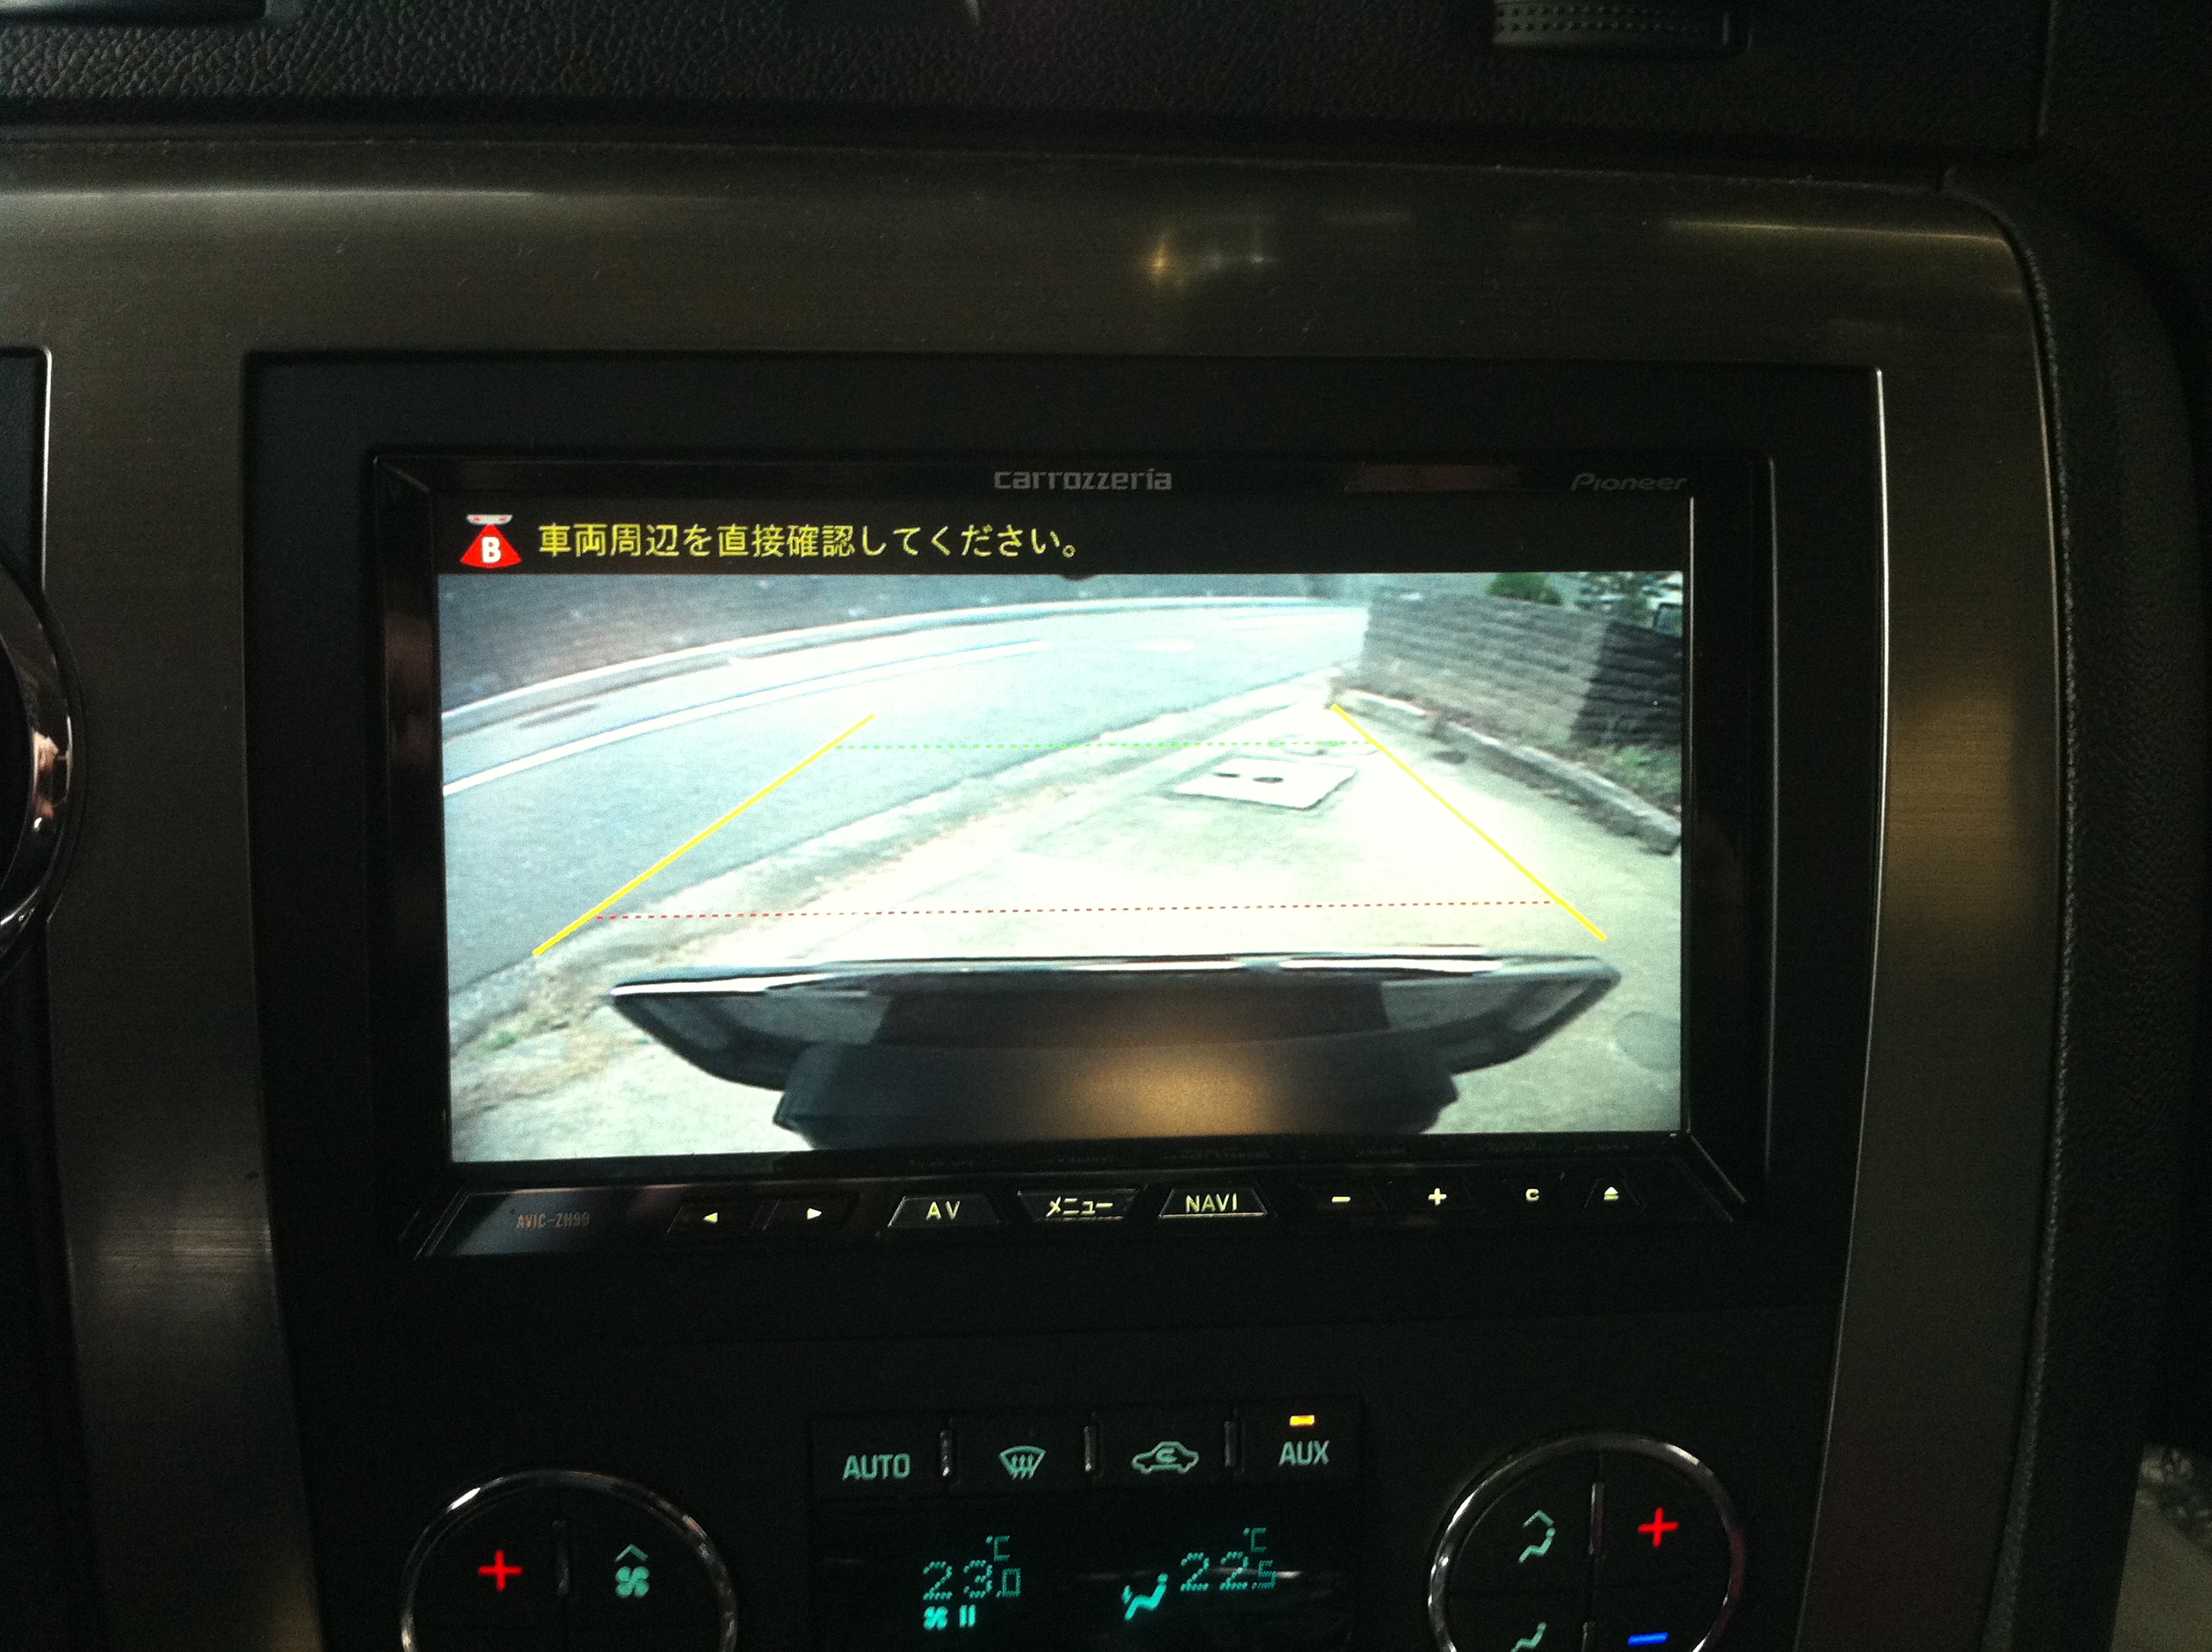
2008 HUMMER H2 US純正ナビ(BOSEプレミアムサウンドシステム)をカロッツェリアのサイバーナビAVIC-ZH99CSに換装。ポイントは、BOSEプレミアムサウンドシステム装備の機能を生かす事。(リアビューカメラ、後席フリップダウンモニタ、純正ステアリングコントロールスイッチなど)【必要なハーネス類】ハマーH2 オーディオ取り付けキット BOSE付き ’08y〜ステレオ インターフェイス ステアリングコントロール用 有線式 アルパイン カロツェリア専用ステレオ ..
HUMMER H2
RedFalcon
2013-08-04T12:59:40+09:00
ハマーH2 オーディオ取り付けキット BOSE付き ’08y〜 ステレオ インターフェイス ステアリングコントロール用 有線式 アルパイン カロツェリア専用 ステレオ フリップダウンハーネス carrozzeria(カロッツェリア) CD-VRM200 AV入力用変換ケーブル ※エアコンコントロールユニット下部にスペースがあるが、ハーネス類のボリュームが結構あるのでそのままでは収まりきらない。赤点線部分の樹脂カバーをリュータ等を使ってカットする。 ※メーカー設定は(7)カロッツェリアにセット、バージョンナンバーを2に設定 ※ARスカウターユニット及びETCユニットは助手席グローブBOX内に設置
-
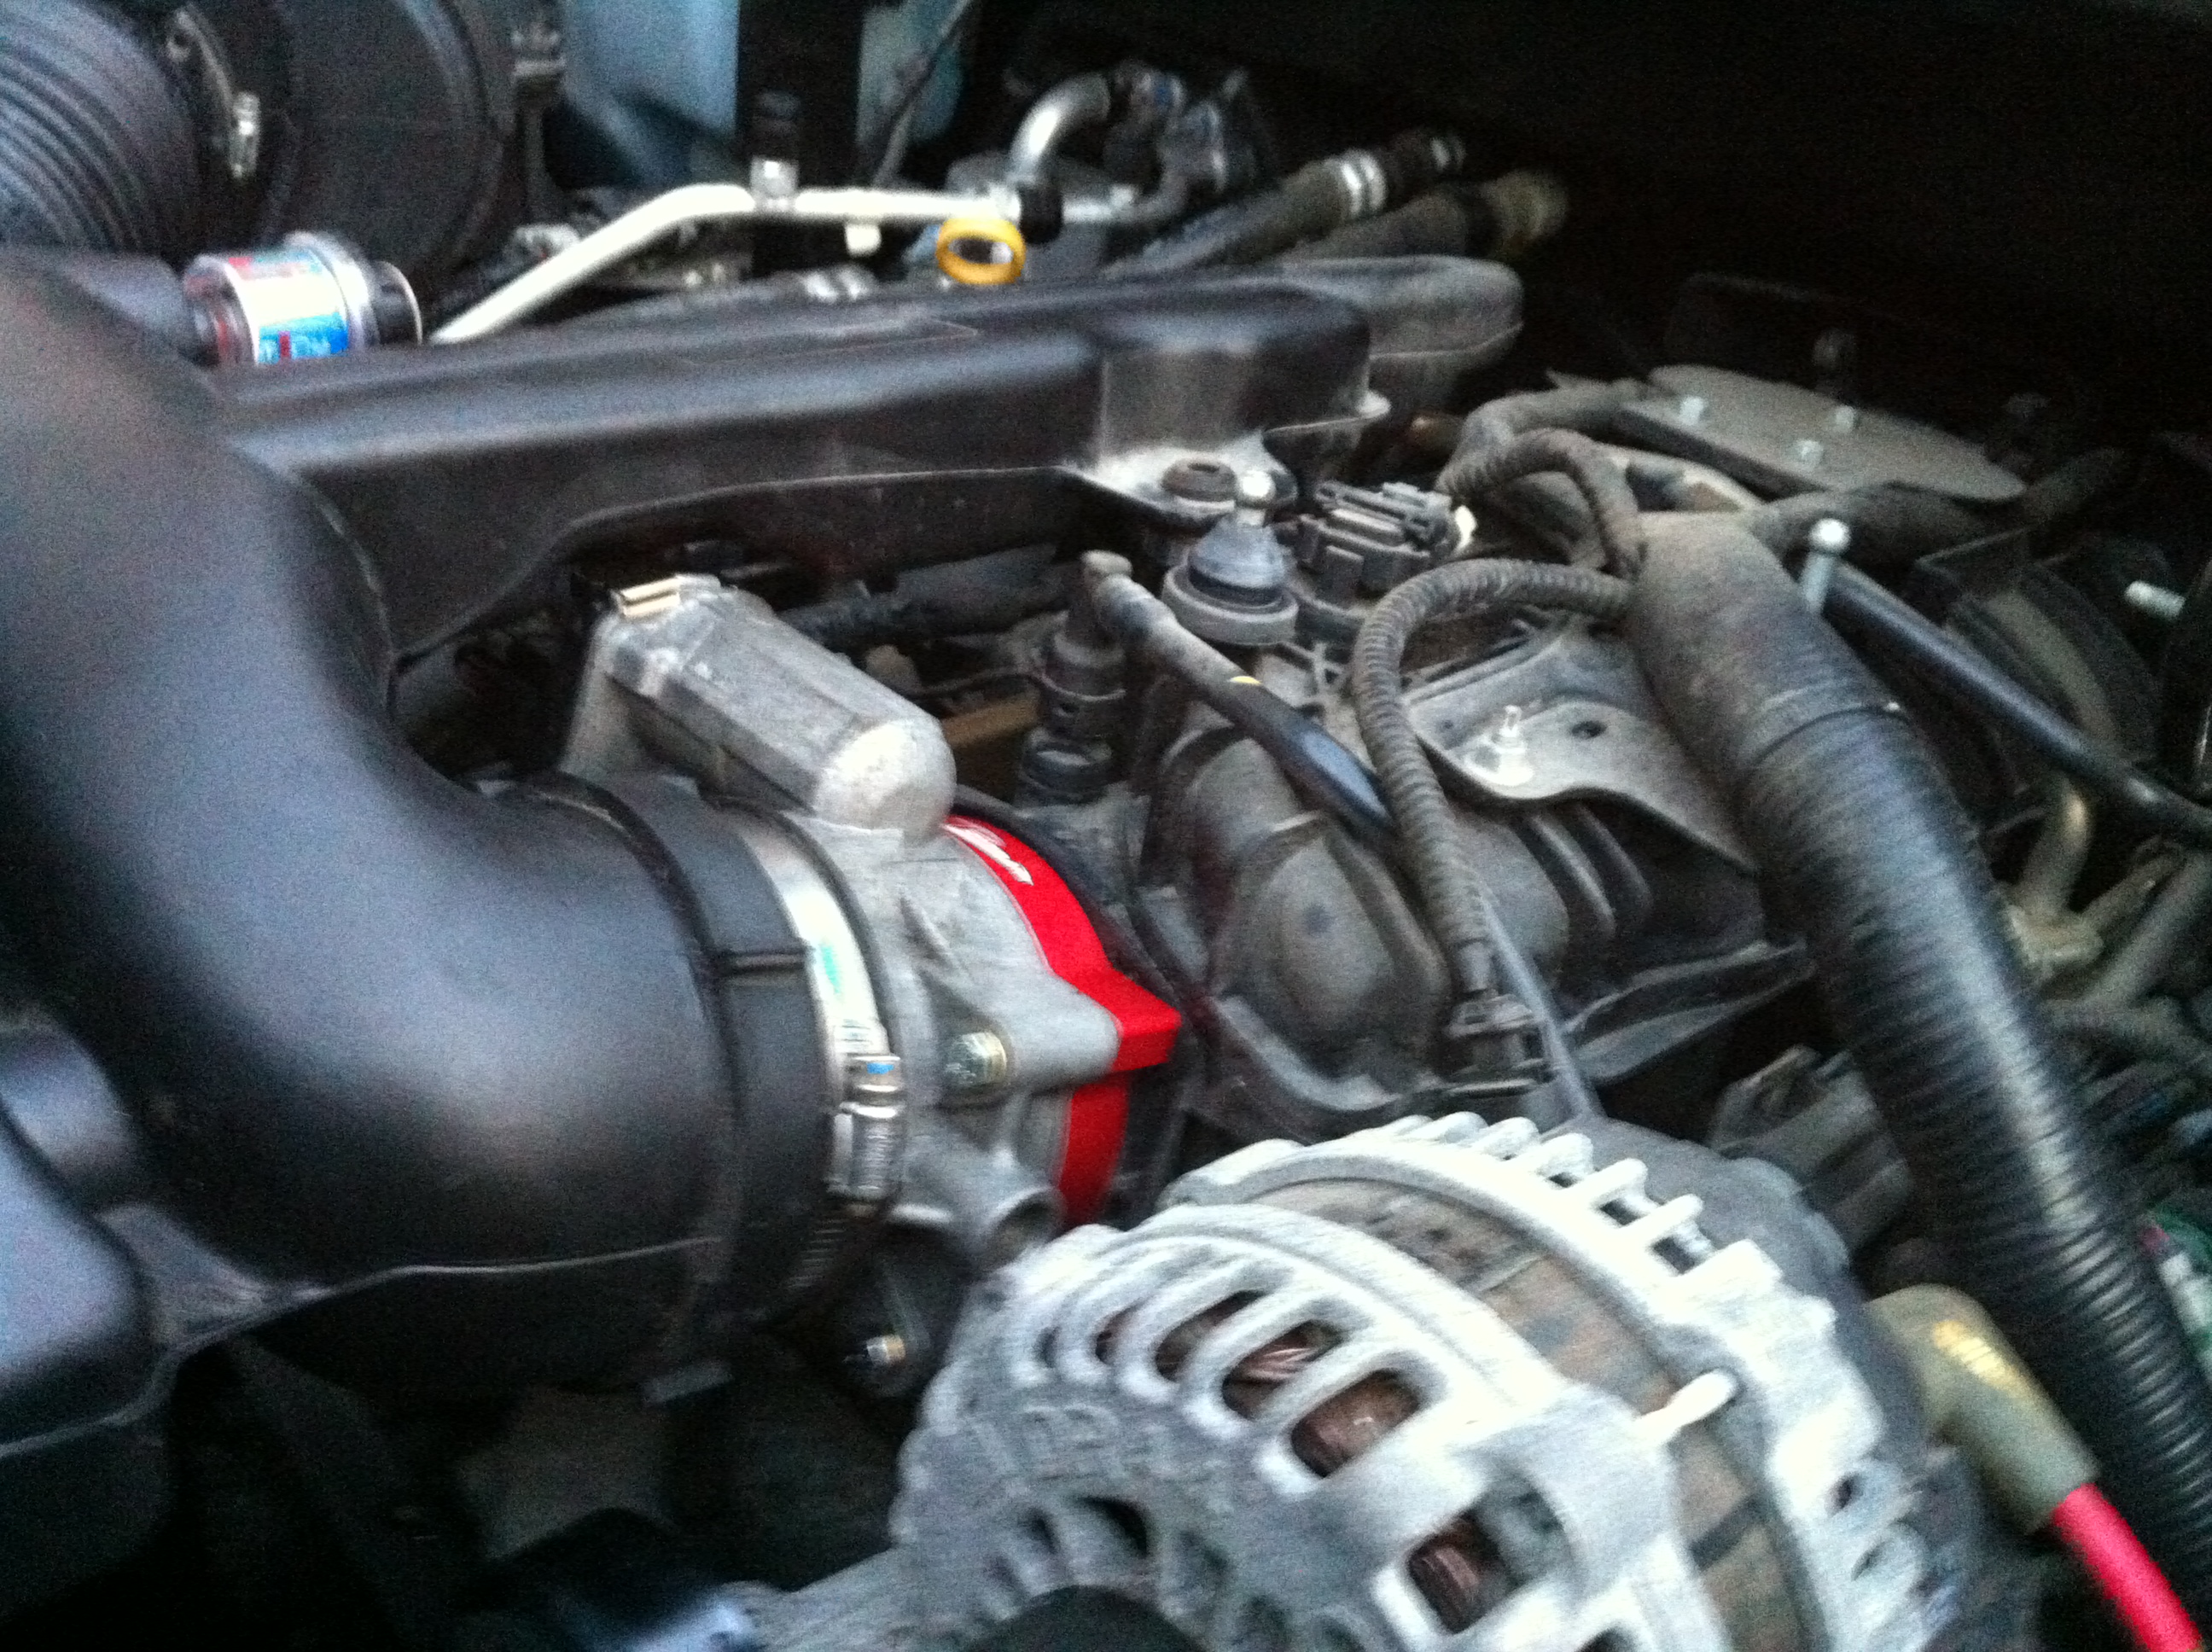
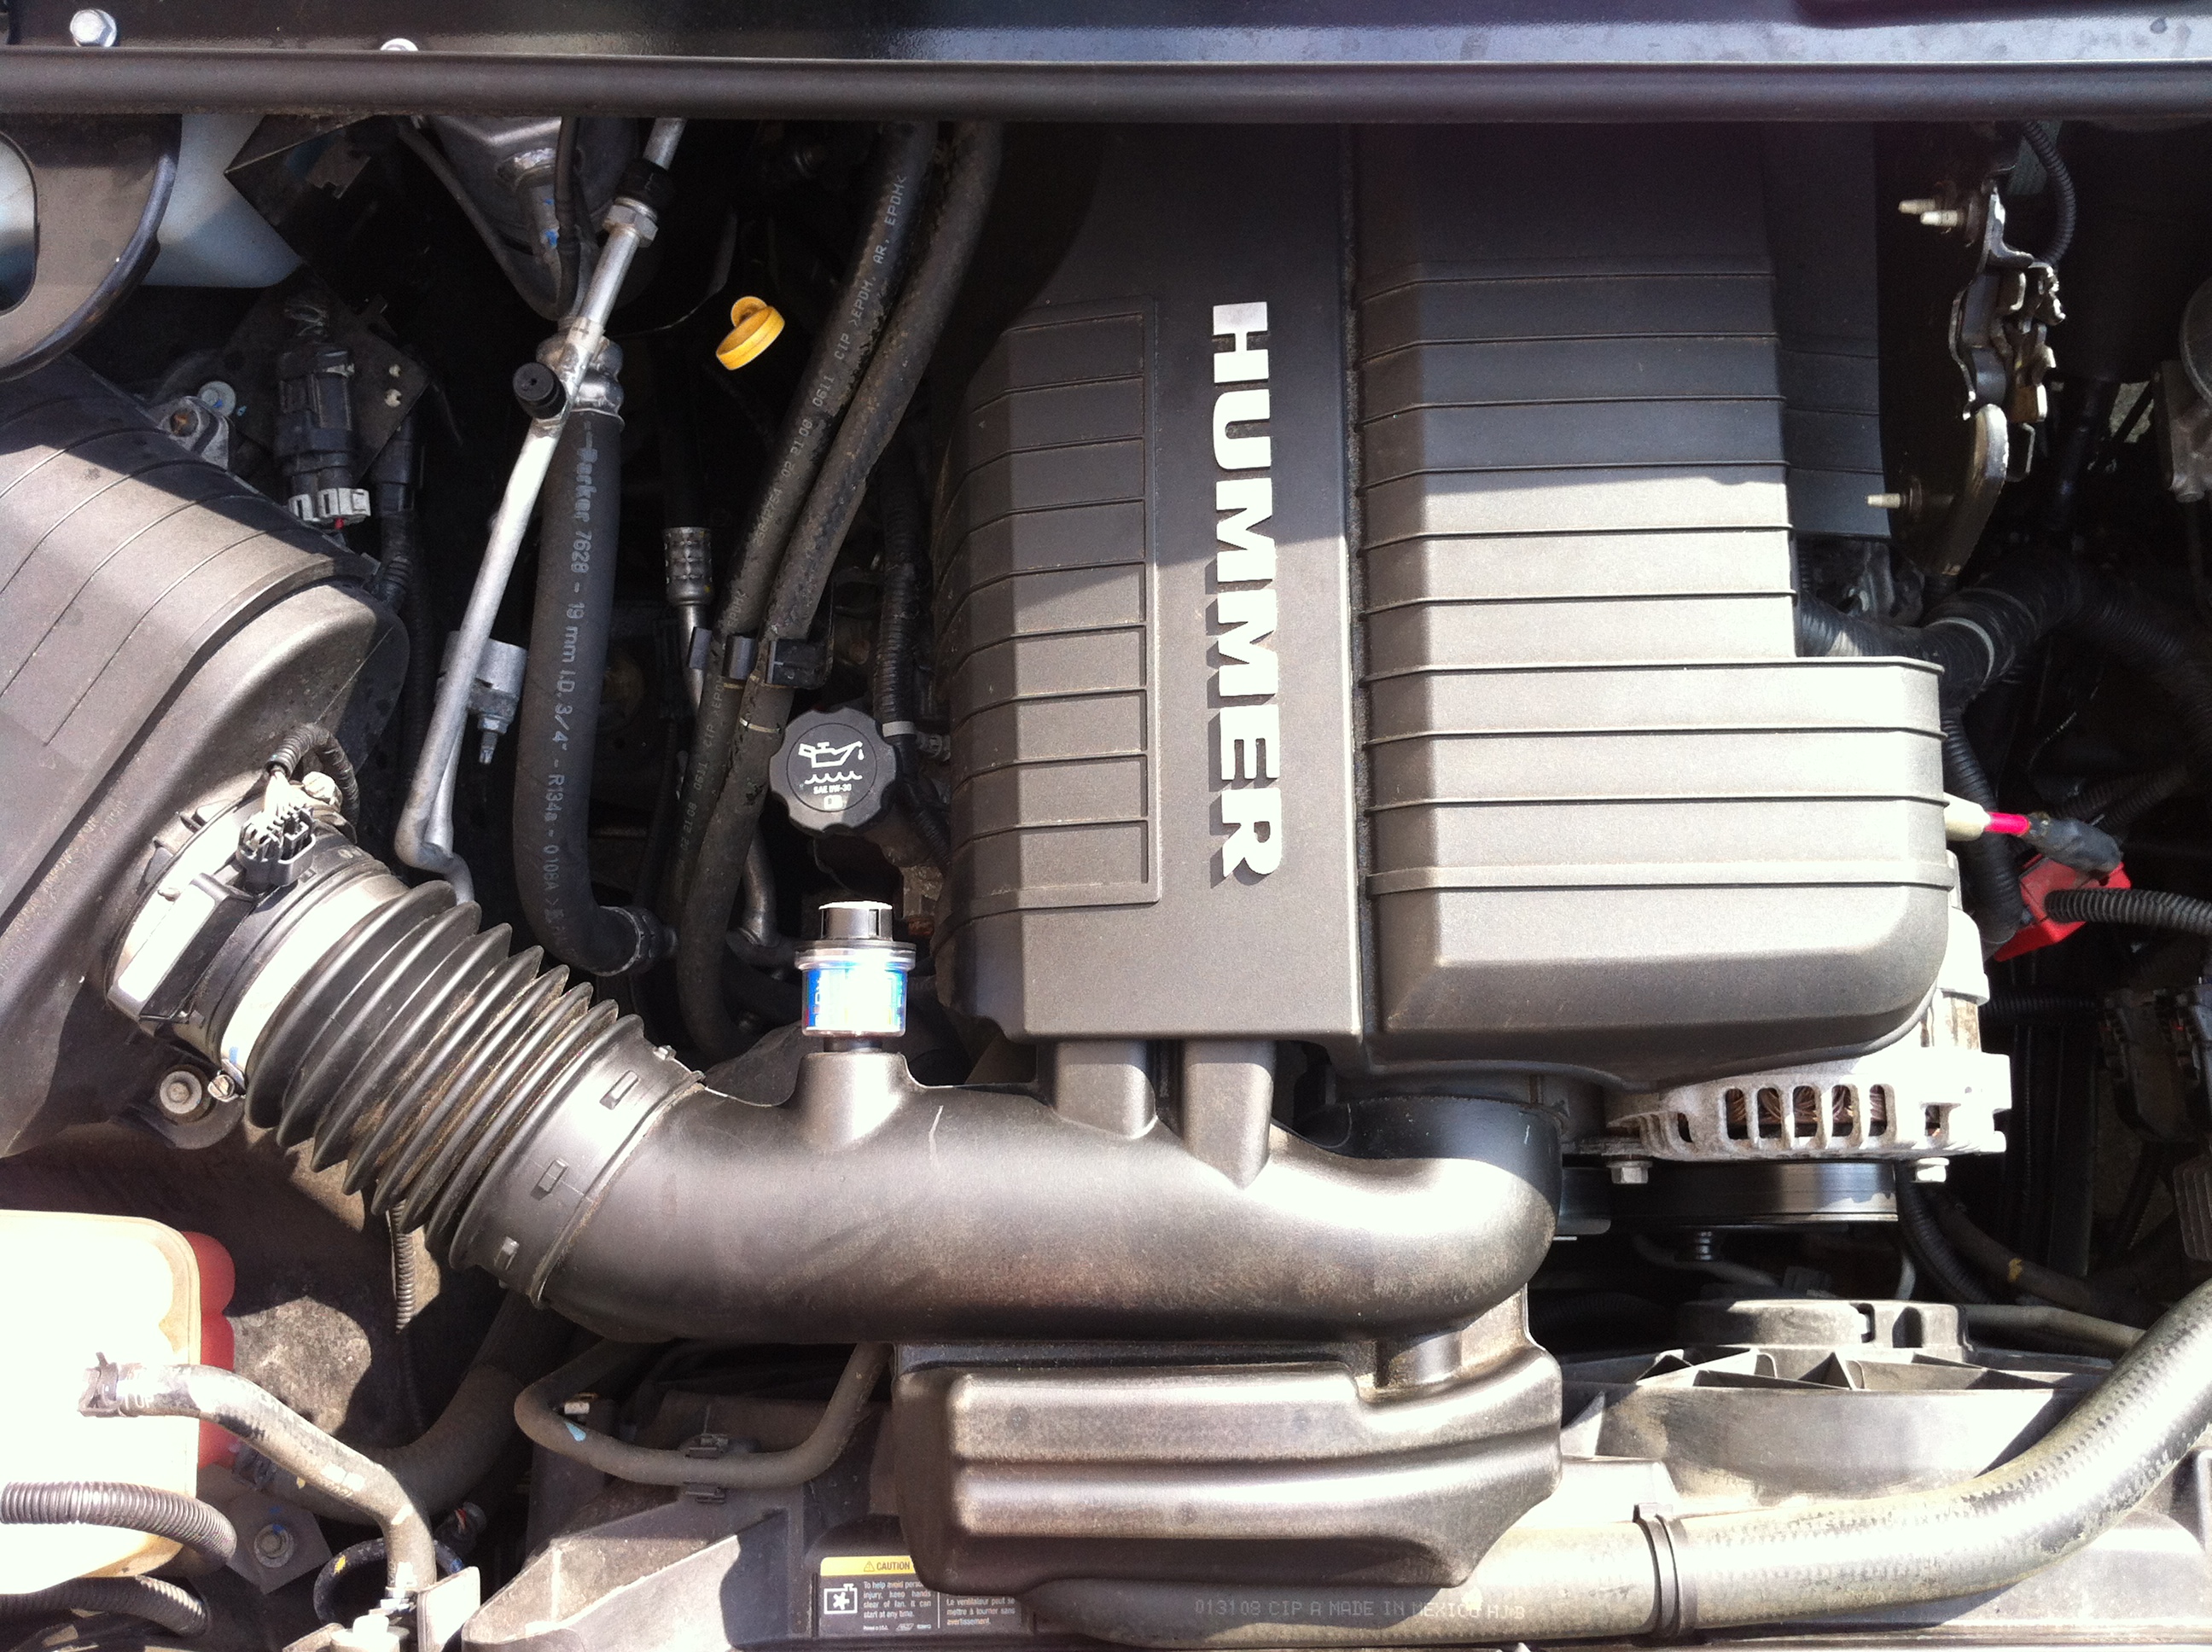
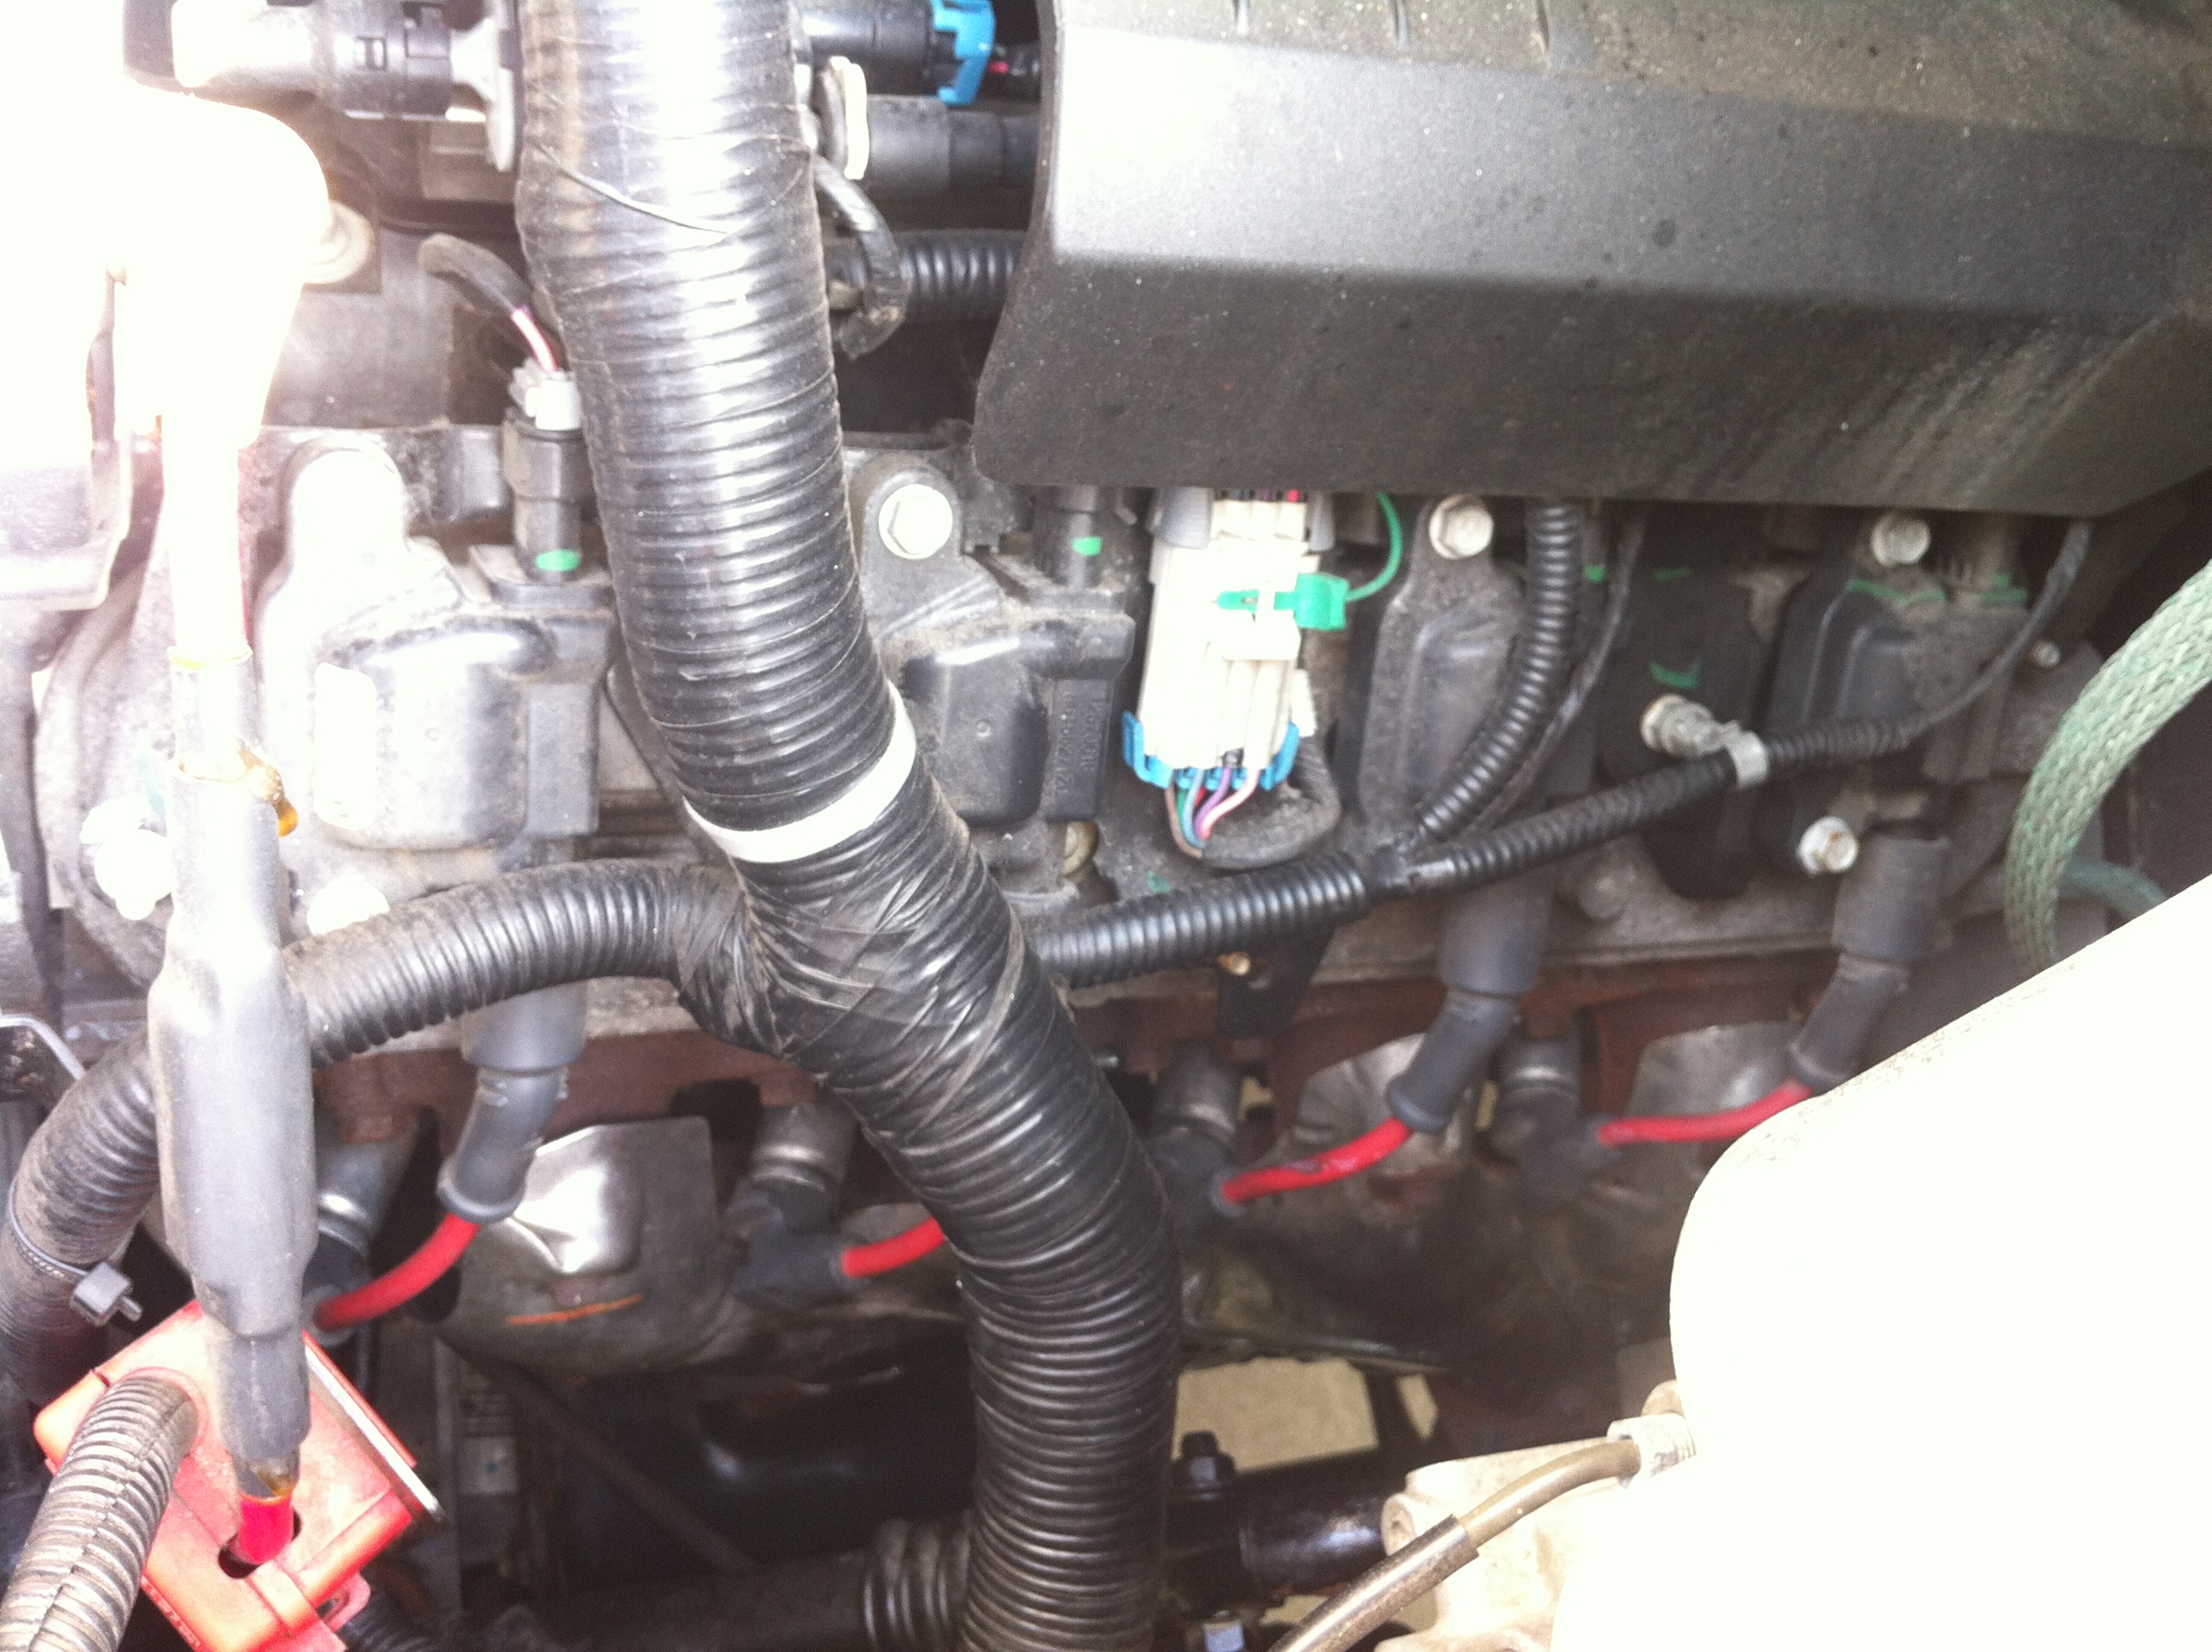
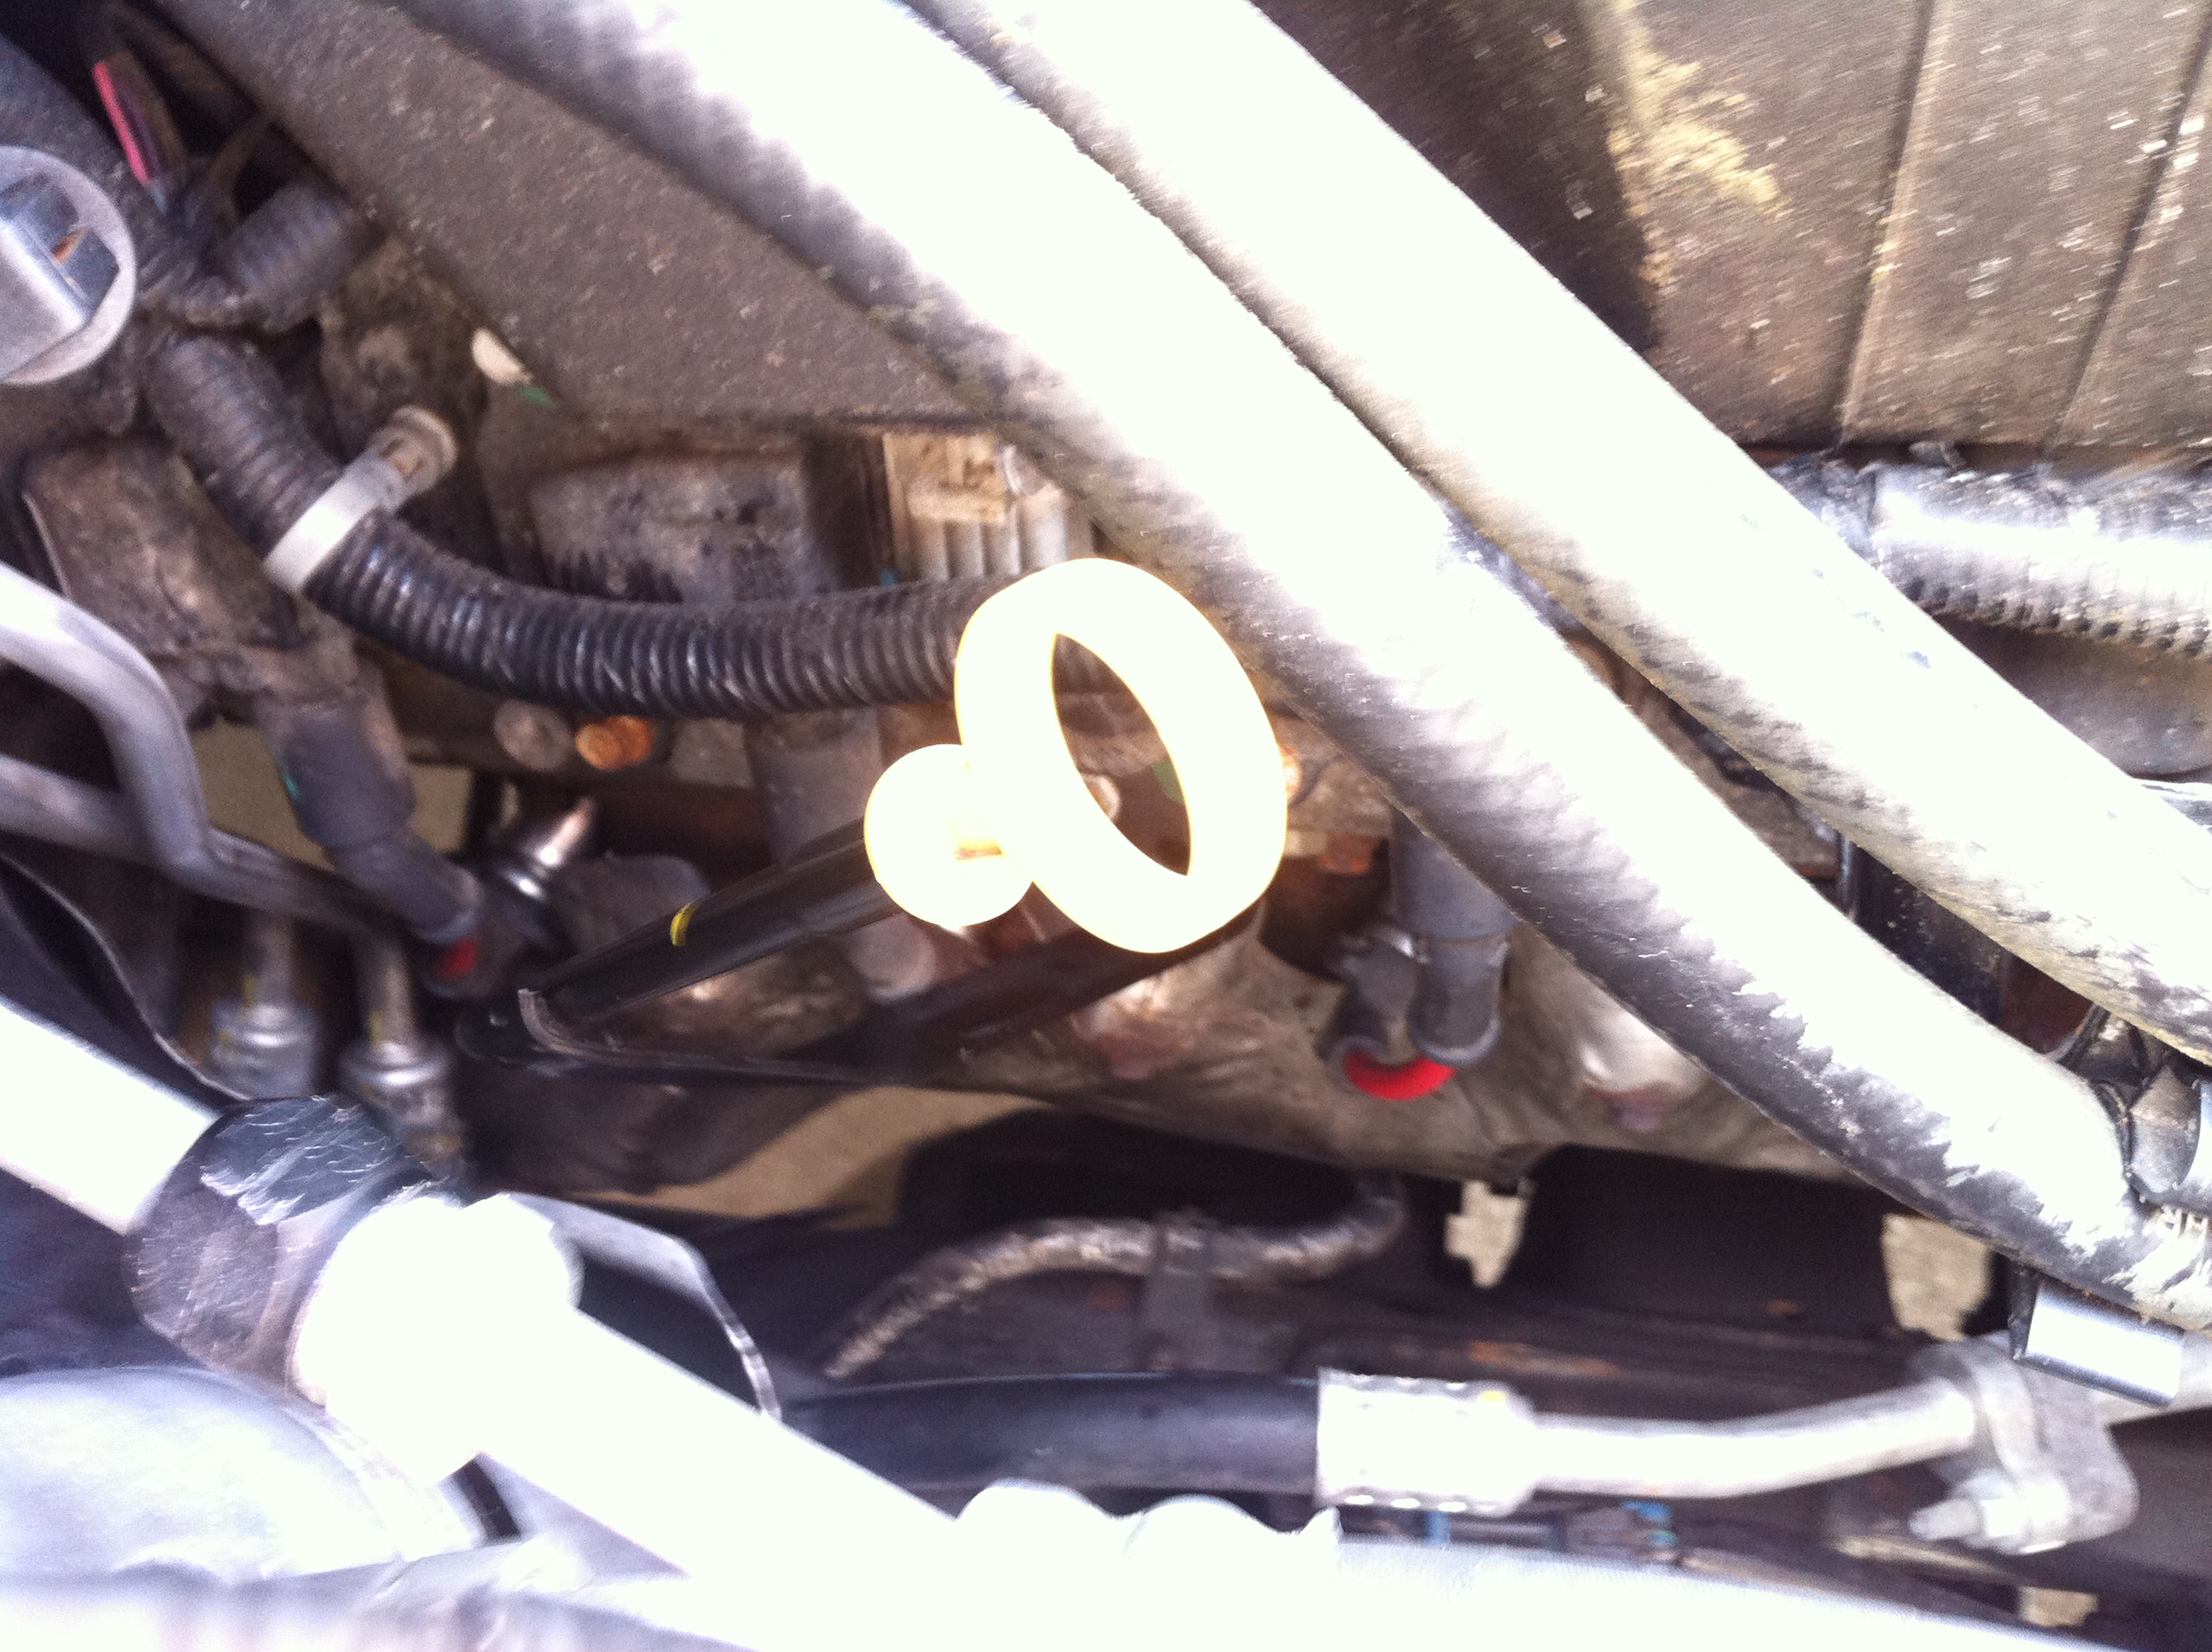
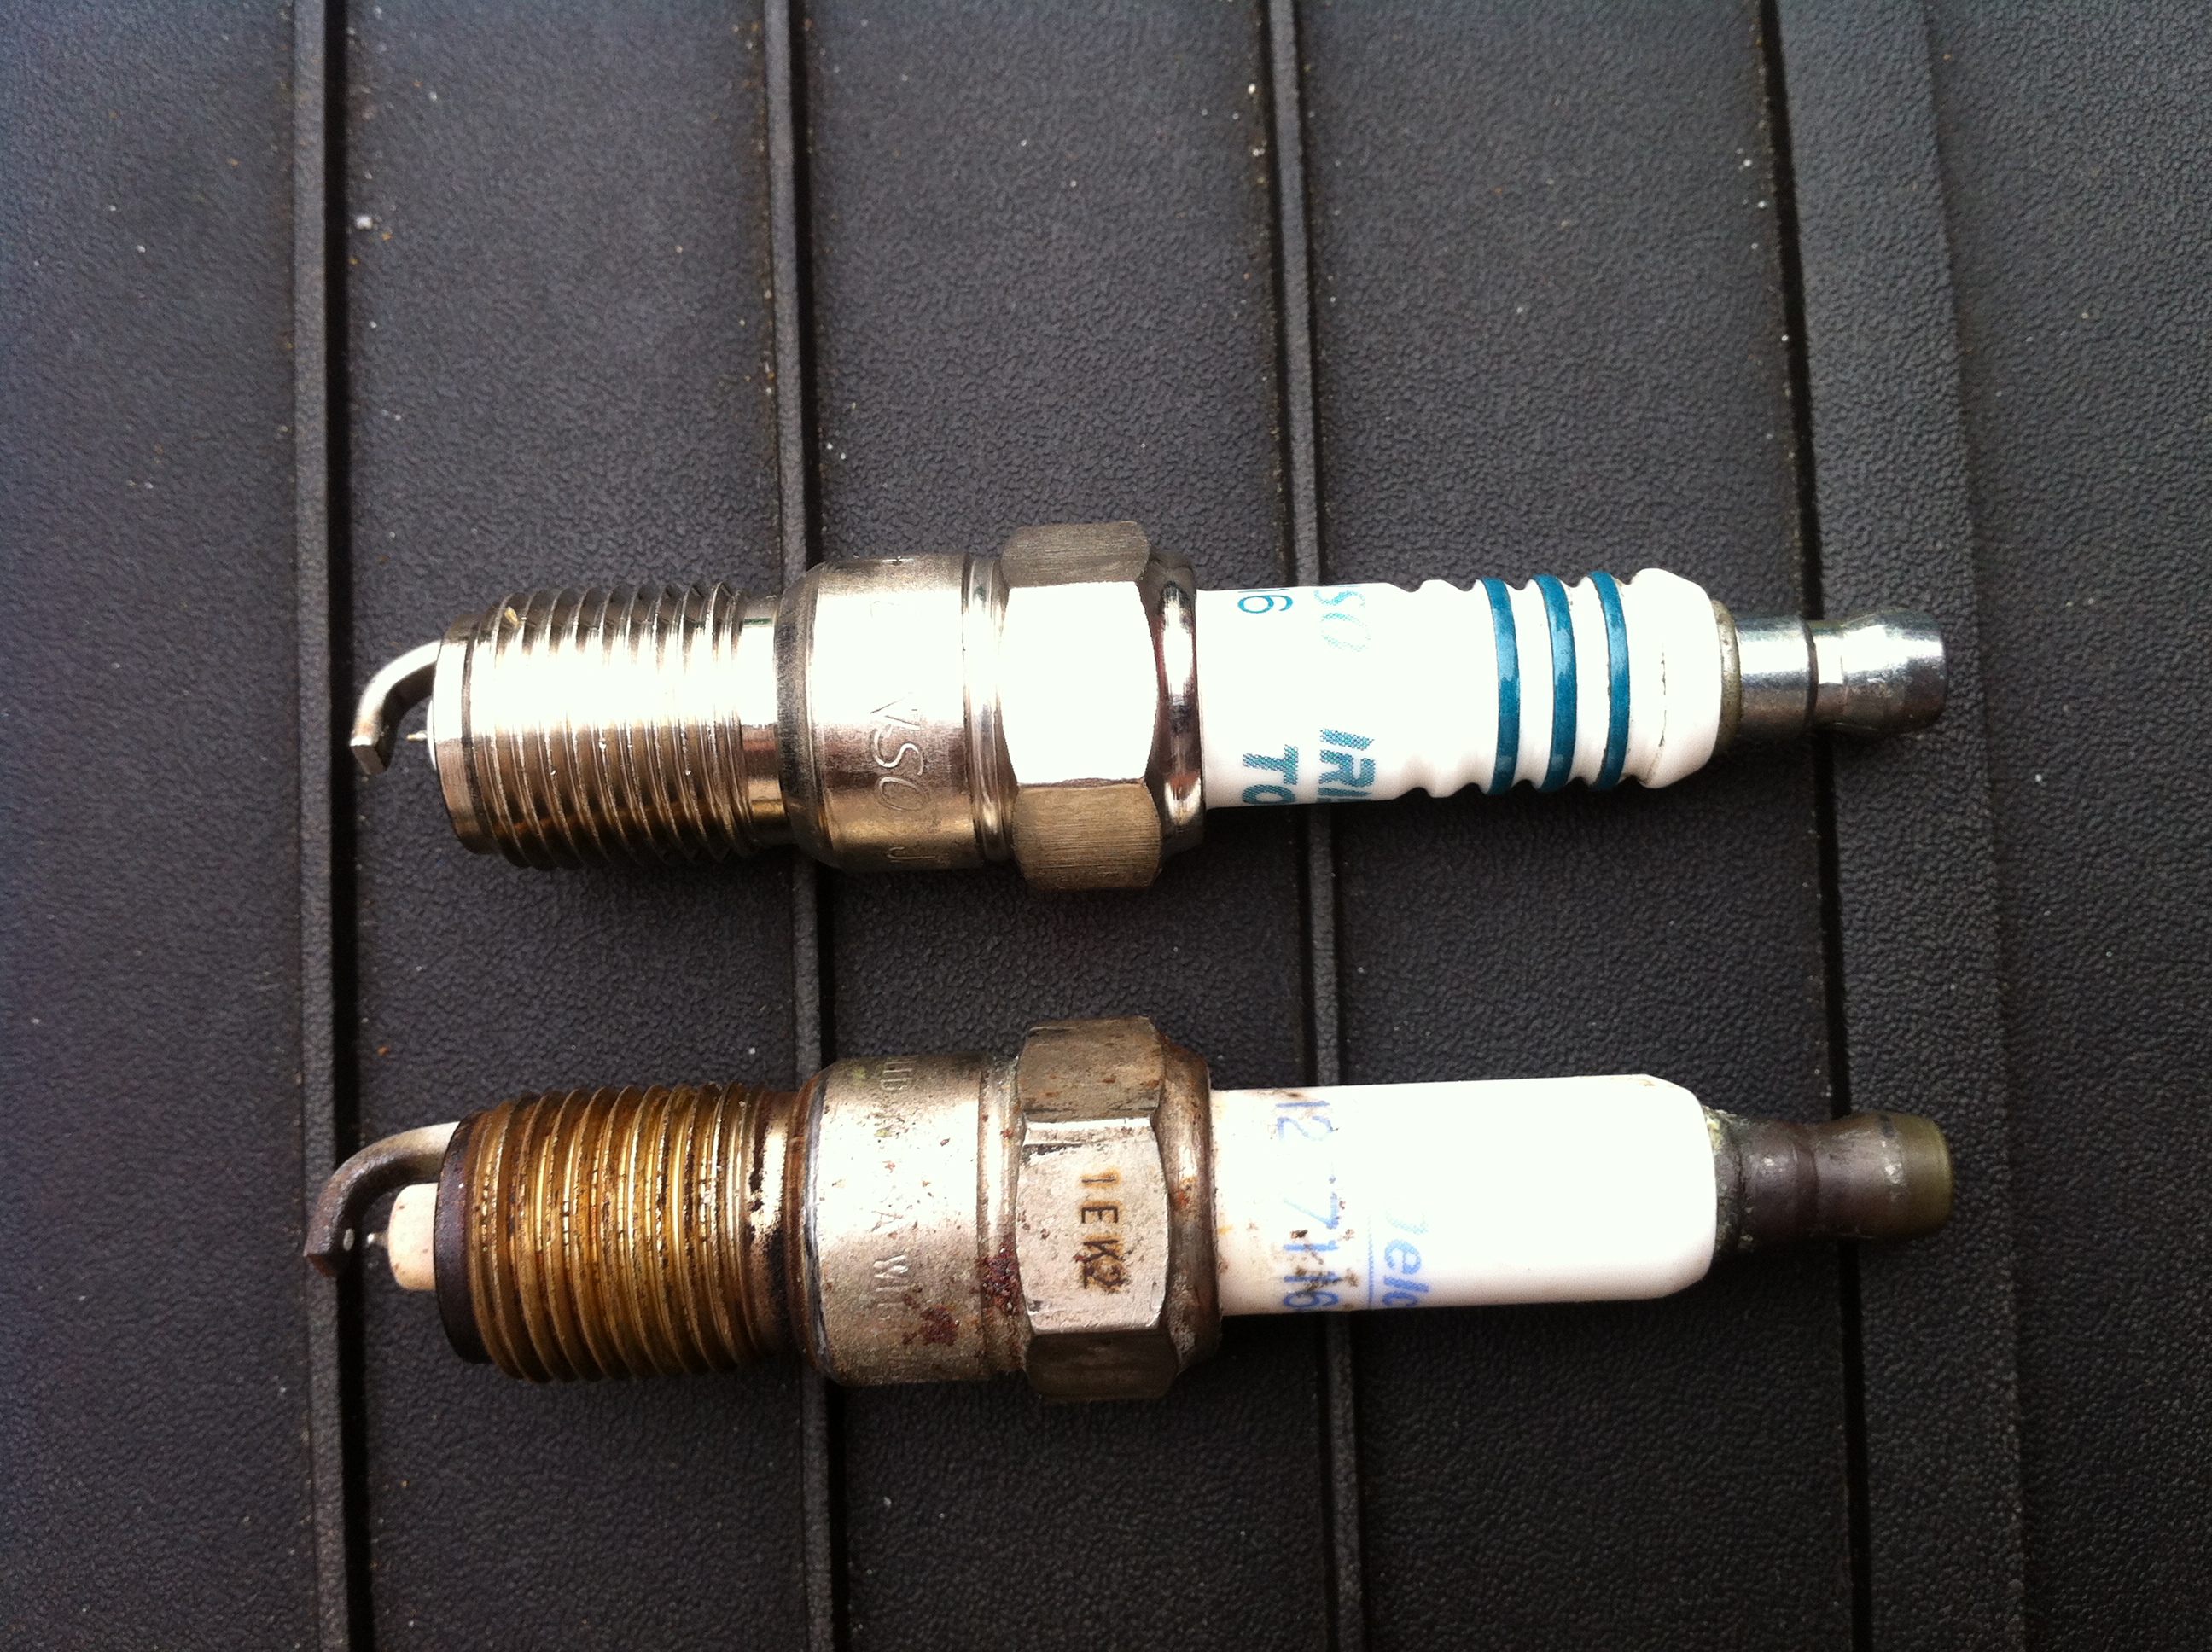
DIY 2008 HUMMER H2 プラグ交換
最近はあまりJailbreak関連のネタも無く、最近は趣味の車弄りに没頭していたので今回はそんなDIYを紹介。HUMMER H2の純正プラグ(AC DELCO製)は10万キロ交換不要なのだが、アクセルのレスポンスに若干のもたつきがあるので交換。プラグは、DENSO IRIDIUM TOUGH(デンソー イリジウム タフ)をセレクト。その他の対応プラグただ H2のエンジンルームは、こんな感じでプラグの場所はまるで谷底…。GMのプラグワイヤーは先端がスプリング形状になっていて、素..
HUMMER H2
RedFalcon
2013-07-15T20:12:47+09:00
-
iOS 6.1 Firmwares Direct Download Link
【iOS 6.1 Firmwares Direct Link】iOS 6.1 for iPhone 5・GSM:iPhone5,2_6.1_10B143_Restore.ipsw [link]・CDMA:iPhone5,1_6.1_10B143_Restore.ipsw [link]iOS 6.1 for iPhone 4S・iPhone4,1_6.1_10B142_Restore.ipsw [link]iOS 6.1 for iPhone 4・GSM:iPhone3,1_6..
iPhone
RedFalcon
2013-02-07T19:34:58+09:00
【iOS 6.1 Firmwares Direct Link】 iOS 6.1 for iPhone 5 [link] [link] iOS 6.1 for iPhone 4S [link] iOS 6.1 for iPhone 4 [link] [link] iOS 6.1 for iPhone 3GS [link] iOS 6.1 for iPad mini [link] [link] [link] iOS 6.1 for iPad 4 [link] [link] [link] iOS 6.1 for iPad 3 [link] [link] [link] iOS 6.1 for iPad 2 [link] [link] [link] [link] iOS 6.1 for iPod touch 4G [link] iOS 6.1 for iPod touch 5G [link]