https://www.clawhammersupply.com/blogs/moonshine-still-blog.atomClawhammer Supply - The Stillhouse Rambler Moonshine Whiskey Blog2026-07-16T14:42:20-04:00Clawhammer Supplyhttps://www.clawhammersupply.com/blogs/moonshine-still-blog/lavender-essential-oil-yields-using-professional-distillation-equipment2026-07-16T14:42:20-04:002026-07-17T11:36:36-04:00How Much Essential Oil Do you Get Using Professional Distillation Equipment?Kyle Brown
How much essential oil do you actually get from lavender? We spent 48 hours at Rabbit Mountain Lavender Farm in Boulder, Colorado, harvesting and steam distilling an entire crop on professional equipment to find out. The short answer is that you can expect 30-70 milliliters of oil and 1-2 quarts of hydrosol for every 7-8 pounds of steam distilled lavender. In other words, more than 6-7 ml per pound of lavender on average. However, this number can vary widely based on a number of factors we discuss below.
Lavender Variety Matters More Than Anything Else
If yield is your goal, variety selection matters more than any other single factor. True English lavender smells sweeter but produces less oil. Lavandin hybrids like Grosso are what commercial growers plant, because they can produce two to three times the oil. High-yield varieties like Grosso and Riverina Thomas will dramatically outproduce varieties like Miss Katherine or Buena Vista. On this harvest we distilled Miss Katherine, Phenomenal, Maillette, and Empress Purple.
When to Harvest Lavender for Essential Oil
Cut lavender when the first flowers on the stem are opening. That's when oil content peaks. If you rub a stem and your hands come away sticky and fragrant, that's the oil, and that's what we're after.
A trick we use at the farm: let the bees tell you. Bees only visit flowers that have opened, so when a plant is alive with bees, it's nature telling you it's full of oil. We typically look for 25% to 50% of the blooms to be open at harvest. Go too early and the plant hasn't produced enough oil yet. Go too late and production starts falling off.
A few more harvest rules that make a real difference:
Pick in the morning. Time of day affects oil content.
Keep some green on the plant. On older plants the woody growth can reach surprisingly high up the stem. Cut into the wood and you'll likely kill the plant.
Distill fresh. The faster the plant material goes from the field into the still, the more oil you keep.
One note on timing: in July, certain varieties will bloom a second time. The second flush is usually smaller than the first, and a mid-season harvest is a heavy pruning that can stress the plant, so we save the second cut for dried flowers rather than distillation.
Steam Distilling the Lavender
Steam distillation is how almost all real lavender essential oil is made, and the process is the same for peppermint, rosemary, eucalyptus, and pretty much any aromatic plant. We used our 240V essential oil steam distiller, a double-chamber system. The reason for two chambers is simple: water boils in one vessel and the plant material sits in the other. The plant never touches boiling water, so nothing scorches and nothing stews. Steam passes up through the lavender, ruptures the oil cells, and carries the oil out as vapor.
A few loading tips:
Don't pack the plant material too dense. Steam has to move through everything. A false bottom in the plant chamber lets steam rise evenly through the material with no cold pockets.
Load cold, pre-heat water to boiling temerature then hit it with full steam right away. This one is backed by research. Rather than letting the material slowly warm up, an immediate blast of full steam ruptures more oil cells and gives better extraction. It's also why a powerful heat source matters. We ran a 5,500 watt element on 240V with a digital touchscreen controller, which gets up to temperature extremely fast.
If you're distilling outside, set up a pop-up tent. Rain and distillation don't mix.
Once steam hits the condenser it turns back into liquid and drips out as two products at once: lavender essential oil, which floats, and lavender hydrosol underneath.
How Long to Run the Still
We ran each 8 gallon batch of lavender for about 25 to 30 minutes. With a powerful still, that's plenty of time to extract essentially all of the oil the plants are going to give. You can run longer to collect more hydrosol, and some farms do exactly that, but we've found that collecting more dilutes potency. Since our goal is oil, we stop at 25 to 30 minutes and load a fresh batch.
Don't Throw Out the Hydrosol
If you've never heard of hydrosol, it's the distilled plant water, and it carries the scent and water-soluble properties of the plant. People use it as a linen spray, a room spray, a skin toner, and in aromatherapy. It used to be considered a byproduct, but it isn't. You get quarts of it free with every run, and if you've ever priced lavender hydrosol, you know it isn't cheap. Save it.
Separating the Oil
The oil floats on top of the hydrosol, so separation is just a matter of draining from the bottom. We use a glass separator with a stopcock. The hydrosol drains off the bottom (ours runs through flex tubing at a trickle into a glass carboy), leaving pure oil behind. No pipettes, no skimming, and no water left in your oil. That last part matters, because water in the oil is what makes it go bad on the shelf.
Measure Every Batch
We strongly recommend weighing your plant material and measuring your oil production on every single batch. It's the only way to dial in your process. We use a baby scale for the plant material and a kitchen scale for the oil.
One catch on measuring: scales that display milliliters assume you're weighing water. Essential oil is less dense than water, so multiply the scale's reading by 1.13 to get the true volume. Same if your scale reads grams: grams times 1.13 gives you the actual milliliters of oil.
To make the record-keeping easy, we built a free lavender yield calculator and tracker. Enter the data points above and it automatically converts your results into fluid ounces of oil per pound of lavender, saves every batch, and includes a notes field for anything worth remembering ("harvested right after a thunderstorm," for example). That way you can compare runs and figure out what's actually moving your yield.
The Honest Answer
It takes a lot of plant to make a little oil. That's why real lavender oil costs what it costs. But every drop of this is pure, and we know exactly what's in it. If you're growing lavender at home and wondering what to do with your harvest, this is, in our opinion, the best answer there is. Everything works the same at garden scale. Same process, same steam, just a smaller pile of flowers.
And it's not just lavender. Rosemary, peppermint, lemon balm, pine: if it smells good growing, you can distill it.
]]>
https://www.clawhammersupply.com/blogs/moonshine-still-blog/how-to-steam-distill-rosemary-oil2024-03-27T18:04:54-04:002025-04-10T09:50:47-04:00How to Steam Distill Rosemary OilKyle Brown
Rosemary oil is having a moment. In addition to being a popular aromatherapy oil, it's also trending as a hair supplement. Due to its increased popularity the market has been flooded with new products - some of which are low quality knock-offs. One way to ensure that your oil is top quality is to make it yourself. That's exactly what brewing expert Ryan Hansen from Big Pop brewing recently did in a YouTube video on making essential oils. In this article we're going to break down Ryan's process and explain how to steam distill 100% pure organic rosemary oil at home.
Table of Contents
Rosemary Oil Uses
Growing Organic Rosemary
Harvesting
Steam Distilling
Separating Oil from Hydrosol
Rosemary Oil Uses
Rosemary has long been a popular aromatherapy oil. We cannot point to any studies that prove these claims, but it's said that rosemary oil promotes energy, focus, mental clarity, sense of well being and memory. More recently, and with scientific data to back up the claim, rosemary oil has become popular for improving hair health.
A study conducted in 2015, as well as a follow-up study in 2022, suggested that rosemary oil potentially has antioxidant, anti-inflammatory, antimicrobial, vasodilator, and or androgen blocking properties that increase hair growth. More research needs to be done to confirm the validity of these studies, but it looks promising.
Growing Organic Rosemary for Distilling
The quickest and easiest way to grow rosemary is to buy starts. Starts are seeds that have already been germinated and grown into small plants, ready for transplant into a garden or yard. You can find rosemary starts at most big box stores and farmers markets. Though, if you're looking for organic starts, the farmers market is probably going to be a more reliable source.
In the right conditions, rosemary plants can grow quite large. Some varieties will grow as high as 5 feet with a diameter of 4 feet. In terms of garden plants, that's huge! Though, if regularly pruned the won't get that big. Also, different varieties will take up less space. So, when selecting a varietal, make sure it will fit in the space you've allocated for growing.
To grow your rosemary organically, simply avoid applying any pesticides or herbicides to the plant. Honestly, rosemary is incredibly easy to grown an this will not be necessary for plan health anyway.
Though, consider that making a significant amount of rosemary oil will take quite a bit of plant material. A 3' tall by 4' wide plant will need to be trimmed nearly to the ground to fill an 8 gallon distiller for a single run, which will result in about 10ml of rosemary oil. Make sure you will have enough plant material to distill the amount of oil you desire.
Plant the rosemary starts in an area with well draining soil that gets full sun. Plan to water moderately if natural precipitation is not adequate. Also, consider that rosemary should overwinter well in climate zones 7 and above, but will have difficulty surviving outdoors in climate zones 6 and below. Aside from these requirements, rosemary is incredibly hardy and easy to grow. It requires very little care an attention relative to most garden other plants.
Harvesting Rosemary for Distilling
As far as seasonality goes, rosemary can be harvested at almost any point in the year. However, it's best to harvest during the spring and summer are probably ideal for plant health, as this is when the plant is actively growing and is able to regenerate most quickly. Some sources recommend to avoid harvesting while the plant is blooming while others say that this is when the concentration of oil is at its highest. Leave a comment below if you have an opinion on this.
In terms if the time of day, when harvesting rosemary for distillation purposes, it's ideal to harvest early in the morning after morning dew has evaporated. This is when the concentration of oil will be highest.
To gather the rosemary, it's best to avoid cutting the plant all the way down to the ground. Instead, aggressively prune the plant. For this reason, you may consider growing more rosemary than you think you may need for distilling.
Steam Distilling Rosemary Oil
To create 100% pure rosemary oil, we recommend steam distilling using only two ingredients: rosemary and water. This will ensure that the final product consists of two components - 100% pure rosemary oil and 100% pure rosemary hydrosol. It's possible to use alcohol as a solvent during the distillation process, but this will result in rosemary oil that has ethanol byproducts in and a rosemary alcohol tincture, as opposed to hydrosol.
The best way to steam distill is by using a two vessel distiller, which is exactly what Ryan did in this video:
One vessel contains water and is used to generate steam and the other is filled with plant material. Steam generated in the first vessel is piped into the bottom of the second vessel, which is filled with rosemary.
The As the steam moves up through he vessel, it breaks down the plant material and evaporates compounds within it, including rosemary oil. The vapor moves up through the column and eventually down through the condenser, which causes the vapor to turn back into a liquid. At this point it drips out of the still in the form of an emulsion (a mixture of two liquids that do not combine).
Separating Rosemary Oil from Hydrosol
After settling the components will separate into individual layers: rosemary oil and rosemary hydrosol. The oil will float on top of the water and will need to be separated. The easiest way to do this is by allowing the mixture to settle in a separatory funnel. This device allows for the hydrosol to be precisely drained out of the bottom, leaving only oil behind. The oil is then able to be drained into a separate container.
]]>
https://www.clawhammersupply.com/blogs/moonshine-still-blog/moonshine-mash-the-cracked-corn-method2023-11-03T11:33:12-04:002024-10-09T22:46:02-04:00Moonshine Mash - The Cracked Corn MethodKyle Brown
Because moonshine is steeped in tradition yet still dwells in the shadows due to the legal implications surrounding it, figuring out exactly how it's made can be somewhat of a challenge. One area where this is true is the process of making the mash. In this article we delve into the topic of using cracked corn to make moonshine mash and explain why it's not as simple as it sounds.
Cracked Corn
One of the primary ingredients in a classic moonshine mash is cracked corn—a type of feed corn that has been coarsely ground or broken to expose the starchy insides. However, cracked corn doesn't come ready to be mashed because its starches are not readily accessible for fermentation. They're locked up in a rock hard kernel. That's where the process of gelatinization comes in, transforming those kernels of insoluble starch into a structure that can be broken down by enzymes into fermentable sugar.
Gelatinization
Gelatinization is crucial. It involves heating the cracked corn to a specific temperature where the starches absorb water and swell, breaking down the complex molecules into simpler sugars needed for fermentation. To achieve this, the cracked corn must be heated and maintain that temperature for a decent amount of time.
Cracked Corn vs. Flaked Corn
Before reading on, we should make an important point. There is an alternative to cracked corn: flaked corn. Flaked corn is a bit more expensive but comes pre-gelatinized. This is very handy because it almost entirely eliminates the gelatinization process, saving a lot of headache and a lot of time.
The Cracked Corn Moonshine Mash Experiment
In our experiment, we followed the guidance of our friend Jesse from the YouTube channel "Still It," who has become something of a sage in the home distilling community. He recommends bringing your cracked corn to a boil and simmering it for at least an hour or more. The temperature (higher is better) and the time held at that temperature, dictates the effectiveness of the gelatinization process. We must warn you though, this process is fraught with perils.
Adding Enzymes
As corn absorbs water and breaks down, the concoction has a tenancy to become very thick. This is problematic because applying too much heat to very viscous liquid will cause scorching and ruin the entire process. To combat this, we did two things. First, we used 8 gallons of water for about 11.5 pounds of corn and this ratio worked pretty well. Second, we added some amylase enzymes to help break apart the starch as it started to thicken.
Boiling Cracked Corn
We boiled After the boil, we allowed our mixture to sit for several hours. This resting period is not just a pause in the action; it's a critical phase where the slow reduction in temperature further aids in breaking down the corn. It also ensures that when you introduce your additional grains—such as barley, wheat, and oats—the temperature is not too high to destroy the enzymes that are necessary for converting their starches into sugars.
Making a Cracked Corn Moonshine Mash
Our mash bill—a blend of grains that constitutes the recipe for our moonshine—was carefully selected. Barley was added for its high enzyme content, which aids in the conversion process. Wheat brought a smooth sweetness, and oats contributed a creamy texture to the final product. This combination was mashed together at 155 degrees Fahrenheit, allowing the enzymes from the barley to interact with the gelatinized corn and other grains to create fermentable sugars.
Fermentation
Cooling the mash is the next critical step before fermentation can begin. It's essential to cool the mixture to around 70°F (21°C) before adding the distiller's yeast. High temperatures can kill the yeast or stunt its activity, which would spell disaster for the alcohol production. However, distillers yeast is typically a bit more tolerant than brewers yeast and 80°F is fine, which is what we used as the starting point for our fermentation.
Distiller's yeast is a hardy strain that can withstand high temperatures, but more importantly, higher alcohol concentrations. As fermentation progresses the alcohol content of the "beer" being made increases. This will cause less alcohol tolerant yeasts to die or go dormant. However, distiller's yeast is typically able to create fermentation with alcohol by volume concentrations in the 10-20% range.
Conclusion
Throughout this process, Jesse's expertise was invaluable. His YouTube channel, "Still It," is a treasure trove of distillation wisdom, guiding both novices and seasoned shiners through the intricacies of crafting a quality spirit. We definitely recommend you check it out.
]]>
https://www.clawhammersupply.com/blogs/moonshine-still-blog/how-many-shots-in-a-fifth2023-08-14T11:39:16-04:002024-10-09T22:47:11-04:00How Many Shots in a Fifth?Alex Golick
Being able to pour the perfect shot or craft a delicious cocktail comes down to precise measurements. One of the most commonly used measurements is the "fifth," but what exactly does it mean? How many shots are in a fifth?
What is a Fifth?
A "fifth" in liquor terminology refers to a bottle that contains 750 milliliters of liquid. This measurement is equivalent to approximately 25.4 ounces.
The term "fifth" is a vestige of the past when liquor was measured in gallons, and a fifth was one-fifth of a gallon. Today, even though the metric system is the standard for liquor measurements, the term "fifth" remains in use, particularly in the United States.
How Many Shots Are in a Fifth?
A standard shot in the United States is generally considered to be 1.5 ounces. Therefore, if you divide the total number of ounces in a fifth (25.4 ounces) by the size of a standard shot (1.5 ounces), you get approximately 17 shots. However, this number can vary depending on the size of the shot glass and the pouring technique.
Shot Sizes Around the World
Shot sizes can vary significantly around the world. For instance, in the United Kingdom, a standard shot is 25ml, while in Japan, it's 30ml. These differences can affect the number of shots in a fifth. For example, a fifth would yield about 30 shots in the UK and around 25 shots in Japan.
Single Shot vs Double Shot
The difference between a single shot and a double shot is another important aspect to consider. A single shot in the United States is typically 1.5 ounces, while a double shot is usually 3 ounces. Therefore, a fifth would provide about 17 single shots or approximately 8.5 double shots.
How to Convert Shots to a Fifth
Converting the number of shots to a fifth is a simple mathematical calculation. If you know the size of your shot (in ounces), you can divide the total number of ounces in a fifth (25.4 ounces) by the size of your shot. For example, if your shot size is 1.5 ounces, you would calculate 25.4 ÷ 1.5 to find out how many shots are in a fifth.
How to Properly Measure a Fifth
Properly measuring a fifth is key to ensuring accurate pours and avoiding over-pouring. One method is to use a jigger, a bartending tool that measures liquor.
Most jiggers have two sides - one for measuring single shots (1.5 ounces) and one for double shots (3 ounces).
How Many Shots in a Fifth Could Get You Drunk?
The number of shots from a fifth that could lead to intoxication varies greatly depending on individual tolerance, body weight, and how quickly the shots are consumed. On average, it could take around 4 to 5 shots for a person to start feeling the effects of alcohol. Always remember to drink responsibly and know your limits.
Advice on How to Drink 1/5 Shots Responsibly
Drinking responsibly is crucial when consuming alcohol. This involves knowing your limits, drinking slowly, and staying hydrated. It's also important to never drink and drive. If you're hosting a party, consider providing non-alcoholic options for those who choose not to drink.
Frequently Asked Questions
How does the size of a shot glass affect the number of shots in a fifth?
The size of a shot glass significantly affects the number of shots in a fifth. Standard shot glasses in the United States hold 1.5 ounces of liquid. However, shot glasses vary in size, and larger shot glasses yield fewer shots from a fifth. Knowing the size of your shot glass is always a good idea when calculating the number of shots in a fifth.
Is there a difference in the number of shots in a fifth of different types of spirits, like vodka or whiskey?
No, the number of shots in a fifth is determined by the volume of the bottle, not the type of spirit. A fifth refers to a bottle that contains 750 milliliters of liquid, regardless of whether that liquid is vodka, whiskey, or any other type of spirit.
Is there a difference between a shot and a pour?
Yes, there’s a difference between a shot and a pour. A shot refers to a specific measure of liquor, typically served in a small shot glass. A pour, on the other hand, is a more general term and can refer to any amount of liquor poured into a glass. The size of a pour varies widely depending on the type of drink being made.
Final Thoughts
Understanding how many shots are in a fifth isn’t only a fascinating dive into the world of liquor measurements but also a practical guide for responsible drinking. Whether you're hosting a party, mixing cocktails, or simply enjoying a drink, knowing how many shots you can pour from a fifth can enhance your experience and ensure you're drinking responsibly.
Make sure to check Clawhammer Supply to take your understanding of spirits to the next level. We offer high-quality distilling equipment that lets you craft your own spirits at home. This hands-on experience allows you to have fun playing around with different recipes and gain a better appreciation for the art and science behind your favorite drinks
]]>
https://www.clawhammersupply.com/blogs/moonshine-still-blog/how-to-measure-alcohol-content2023-07-27T10:00:00-04:002024-04-30T15:20:11-04:00How to Measure Alcohol ContentKyle Brown
There are several ways to measure alcohol content in beer, wine, cider, mead and spirits. In this article I’m going to show you four. Specifically, I’m going to show you how to use a hydrometer, a refractometer, a digital hydrometer, and a digital refractometer. And as a bonus i’m going to show you how to use a new equipment combination by Anton Paar to calculate alcohol content with a single measurement. If you’ve ever calculated ABV before, you’ll likely understand that this is actually a pretty big deal.
I've brewed a lot of beer and a bit of cider, mead and wine too. I've even tried my hand at making high proof fuel alcohol. One thing i've learned along the way is that knowing how to properly measure alcohol can be very helpful. I've made my fair share of mistakes, but I always try to never make the same mistake twice. In this article i'll try to give you the benefit of my years of experience by sharing all of my best tips and tricks as well as pointing out potential pitfalls.
Specific Gravity and Alcohol Overview
But before we get started, I want to quickly give you some background information so this all makes sense. In brewing we use changes in the density of liquid to determine alcohol content. Professional brewers use a scale called "Plato Gravity" to determine the amount of dissolved solids in liquid. Homebrewers typically use "specific gravity," which is the ratio of the density of a substance relative to the density of a standard. When using specific gravity to measure alcohol by volume, brewers are comparing the density of sugar water to the density of pure water.
The density of pure water has what is known as a specific gravity of 1. If you dissolve sugar in that water you increase its density and the specific gravity reading will be higher. If you then ferment that sugar and turn it into alcohol you decrease the density and the specific gravity will drop. If you take gravity measurements before and after fermentation you can use that information to calculate alcohol by volume or ABV.
Tools For Measuring Alcohol Content
As far as measuring alcohol content goes, there are several tools that can be used to complete the job. The two primary tools are hydrometers and refractometers. Both are used to measure sugar content in an aqueous solution. Select the tool you're interested in for more information:
A Hydrometer is a scientific tool that we can use during brewing to determine how much alcohol was produced after a mash. It basically measures the density of liquid in relation to water.
A brewing hydrometer can be used to measure the specific gravity of high and medium gravity solutions. For example, you would use one of these to measure the starting and ending gravity of a wort or mash during the brew day and after fermentation.
A distilling hydrometer (also called a proofing hydrometer) is used to measure very low gravity solutions. For example you would use one of these to measure the proof of distilled spirits or the purity of fuel alcohol.
Commercial distillers making distilled spirits should own both a brewing hydrometer and a spirit or proofing hydrometer. A person or an entity making fuel alcohol would need both hydrometers as well. Commercial brewers or home brewers will only need a brewing hydrometer.
And to clarify, a brewing hydrometer cannot be used to measure the final proof of a distilled product and a spirit hydrometer cannot be used to measure the gravity of wort or finished beer. Read this article to learn more about the proper use of brewing hydrometers. And check this article for info on how a commercial distiller would use a proofing hydrometer.
What do Brewing Hydrometers Measure?
Hydrometers essentially measure the density of liquid. So, when brewing, the initial goal is to create a sugary solution that yeast will later eat and turn into alcohol. The more sugar that ends up in liquid, the more dense it will be. And the more dense the liquid is, the higher the brewing hydrometer will float in the liquid. This is the "original gravity" reading and it tells you the "potential alcohol" of a solution. I.e., using fermentation only (and not distilling), what is the maximum amount of alcohol you would expect to end up with after the yeast have done their thing. More on this below.
After fermentation is complete, you will use a hydrometer again to measure final gravity. As in, how good of the job did the yeast actually do? How much sugar did they eat and how much alcohol did they produce? The more sugar they ate and the more alcohol they produced, the lower the hydrometer will sit in the liquid. This is called the "final gravity" reading. Again, more on this below.
What do Distilling Hydrometers Measure?
Distilling or proofing hydrometers essentially do the same thing as brewing hydrometers. They tell the distiller how much alcohol is in a solution. However, the density of spirits and fuel alcohol is so low that a brewing hydrometer would sink right to the bottom. This is because alcohol is less dense than water. And much, much less dense than water with sugar in it.
So, distilling hydrometers are said to measure alcohol by volume or "proof." Fun fact "proof" is merely ABV multiplied by 2. For example, a 40% ABV solution of alcohol would be 80 proof.
How To Measure Alcohol Content With a Hydrometer
The process for measuring alcohol content using a hydrometer consists of the following steps:
An original gravity reading is taken to determine how much sugar there is in the mash. This reading is taken BEFORE fermentation, just before yeast is added to the mash and it is aerated. As we mentioned above, the original gravity (OG) reading measures the amount of sugar in a liquid and roughly indicates the percentage of alcohol that can be expected in the wash, assuming that everything goes well during fermentation.
To use the hydrometer, fill a test tube or a tall glass with the liquid that will be fermented and drop the hydrometer in. Make sure it is floating and not resting on the bottom of the container. Hydrometers have a scale printed in or on their surface. The location at which this scale intersects the water will correspond with the specific gravity of the liquid. Taking the measurement is as easy as floating the hydrometer in the liquid and reading the number on its side.
OG varies depending on the recipe being used. For example, an India Pale Lager beer that we recently brewed had an original gravity of 1.055. If we use a yeast that ferments all the way down to 0.10, which is a common stopping point for brewers yeast, the ABV we will end up with is 5.91%
Write down the OG in your brewing journal, as you will most likely forget what it was by the time it is done fermenting, especially if you have multiple batches fermenting at the same time. Keep in mind that this reading alone does not tell you the alcohol content of your wash. It only tells you the potential alcohol content. You must take another reading (final gravity) and compare it to OG to determine the actual alcohol percentage of your wash, which we explain in the next section.
To reiterate, take an OG reading by completing the following steps:
Use your beer sampler and fill your test jar almost to the top with liquid (you don't want any solids).
Gently drop the beer/wine hydrometer into the test jar- you want to spin the hydrometer so it spins freely and does not stick to the side walls. You will see that the hydrometer floats on the liquid.
Write down the number you see where the hydrometer intersects the liquid.
Final gravity measures liquid density, just like the original gravity reading does. However, if there weren't any hitches during the fermentation process, liquid density should be much lower because yeast ate all of the sugar (which increases density) and turned it into alcohol (lowering density). The difference between original and final gravity will tell you the alcohol percentage of the wash.
These steps assume your mash has been fermenting for at least a week and the activity in the airlock has slowed down significantly, if not stopped completely. If the airlock has not slowed down then wait a bit longer. Significant bubbling in the airlock means that the yeast is still working.
Use your beer sampler and fill your test jar almost to the top with liquid (you don't want any solids).
Gently drop the beer/wine hydrometer into the test jar- you want to spin the hydrometer so it spins freely and does not stick to the side walls. You will see that the hydrometer floats on the liquid.
Write down the number you see on the hydrometer- We are generally looking for a reading of around 1.010 or below. If the reading is above 1.010 let it sit for a few days and then take another reading, because the yeast might not be finished with their job yet. Keep taking samples over a few days until the reading does not change for 3 days in a row.
How To Read a Hydrometer- Temperature Correction
Most hydrometers are calibrated to be used at 60 degrees Fahrenheit. Check the instructions that came with it to be sure. If the liquid you are evaluating is above or below the calibration temp, you need to adjust for the actual reading. Again, this online calculator here offers help with the conversion
If for some reason you can't access the online calculator we linked above, you can always calculate ABV manually. You need both the OG and the FG, mentioned above, to determine alcohol by volume (ABV). The sample we took for this article was at 1.055 and the mash fermented down to 1.010. Here's a simple math equation to determine the ABV:
Subtract the Final Gravity from the Original Gravity
Multiply by the difference between FG and OG by 131.
For example, the pictures used in this article were from a thin mash batch (corn whiskey that was boosted with some extra sugar). The OG was 1.090 and the FG was 1.010. Here's how to determine the alcohol percentage of the wash:
1.055 minus 1.010 equals 0.045.
0.045 X 131.25 = 5.91
Our beer is 5.9% ABV
How to Use a Proofing Hydrometer
A proofing hydrometer works (mechanically) exactly the same way a brewing hydrometer does. However, you don't need to take a "starting gravity" reading. Simply drop a distilling hydrometer in high proof alcohol and read the number on the side. It tells you proof / ABV directly without any calculation. Though there are a couple of caveats. First, just like a brewing hydrometer, a distilling hydrometer is "temperature sensitive" so you may need to correct for temp. Also, it won't accurately measure the proof of alcohol that has had sugar added after distillation.
A refractometer is a device that measures the concentration of a variety of substances dissolved in water by measuring how light is refracted, or bent, as it passes through the liquid. In brewing, refractometers are used to determine sugar content in an aqueous solution.
How to Use a Refractometer
The next tool we’re going to look at is a refractometer. My best advice is that before you use one of these, you actually just throw it in a trash can and get another tool, because these things are absolute garbage. I know i’m going to take heat in the comment section but I bet a lot of the people commenting actually have no idea how inaccurate these things are.
Wort Correction
The first problem with them is that they’re not designed to easily and accurately measure maltose, which is the primary sugar in beer. To use a refractometer for beer you need to build in a wort correction factor to account for the maltose, which literally requires plugging readings from 10 different mashes into a spreadsheet then using that information to correct all future measurements. Also, even if you have the patience for that, turbidity and the color of beer will still skew refractometer measurements as well and as far as I know there is no way to correct for that.
Temperature Correction
Hydrometers are also temperature sensitive and you need to correct for that as well. Always read the literature included with your hydrometer to determine how to correct for temperature.
Alcohol Correction
But the final straw with traditional refractometers is that they’re only good for measuring unfermented wort. You cannot use them to accurately measure liquid with alcohol in it either. So they’re useless when it comes to taking a final gravity measurement without using yet another spreadsheet and correction factor. If you’ve been using refractometers without doing all of this stuff, congratulations, your numbers were all wrong.
How to Use a Refractometer Correctly
However, if you’re dead set on using one of these, here’s how it’s done correctly. First, calibrate the unit by placing a few drops of distilled water onto the slide and setting the scale to zero. Next place a few drops of beer wort onto the slide, make sure there aren’t any bubbles, and hold it up to a light source. A natural light source is best. It likely won't be correct. To make this right apply a temperature correction and then a wort correction. Take these readings again once the beer is done and apply the same corrections as well as an alcohol correction, which by the way, still isn’t going to be very accurate.
Our buddy Brian over at Short Circuited brewing actually took the time to correct his refractometer using all of the steps described above. If you really want to use it correctly, follow the steps he outlined in his video on the topic.
Ok, so let’s move on and talk about some of the newer, more high tech options. The first is the EasyDens digital hydrometer by Anton Paar.
The EasyDens measures brix, plato, and of course specific gravity as well as a bunch of other stuff. It’s accurate to .001 and is much easier to read than a standard hydrometer. Also, one of the really cool things about this is that it automatically corrects for temperature as long as your sample is in the ballpark of the calibration temp. And perhaps the best feature is that it only requires a tiny sample to get a reading, as opposed to an entire test tube. It’s a LOT more expensive than a glass hydrometer, but it’s a lot more convenient, it’s more accurate, and it’s much, much more convenient.
Setup is extremely easy. Just download the Brewmeister app for android or iphone, pop the EasyDens out of the box, hit power, and it connects automatically. Honestly, this is one of the easiest to connect and most reliable bluetooth devices i’ve ever owned.
To use it, take a small sample of wort, degas it with the syringe and run it through the unit. It’ll provide the temperature of the liquid and the temperature corrected specific gravity in a few seconds. To get the most accurate reading the temperature of the sample shoul be somewhere between 40 and 86 fahrenheit. If you want to use different units, just get into the settings on the app and navigate to what you want. You can also save the readings so you don’t even need to write anything down.
We’ve been using the first version of the EasyDens for years and this one is even better. It’s $400 bucks but if you’ve got the money, I highly recommend buying one. If not, I recommend adding this to your wishlist because it’s awesome.
The SmartRef digital refactometer, also made by Anton Paar, works like a standard refractometer, but unlike standard refractometers, it actually provides accurate numbers without the need for temperature and wort correction. That’s because the SmartRef has these calculations built into it. It can also measure the specific gravity of unfermented wort AND fermented wort because it has a correction factor built in for that as well. It’s also less expensive than the EasyDens.
To use it, download the brewmeister app, open the app, turn on the smart ref, and hit connect on your phone. Again, it connects automatically. Fill the cup to the line with wort and hit start. Note, this unit needs to be calibrated every now and again. To do so, fill it with distilled water, hit the little three dots in the upper righthand corner and choose the zero adjustment option.
At $269 dollars, the SmartRef is a bit cheaper than the EasyDens. It’s also very similar to the EasyDens but the EasyDens is a bit more accurate than the SmartRef. EasyDens also provides more measurement units.
Neither are cheap, but if this doesn’t bother you, i’d recommend the EasyDens. Also, if you’re a homebrew baller and money is no object when it comes to your hobbies, you might as well get both because if you do you’ll unlock a sweet feature that requires using the EasyDens and SmartRef simultaneously.
How to Calculate ABV with a Single Measurement
Using these units at the same time allows you to calculate the ABV of finished beer to within a half percent with no need for original gravity readings. That means you can just brew the beer and not take any readings and when it’s done you’ll still know the ABV.
Here’s a demo with some store bought beer. After grabbing a sample I’ll degas it with the syringe 4 or 5 times then fill both units and hit the “measure abv” button.
As you can see, it more or less nailed the ABV of this pumpkin beer. Again, it only provides readings to within a half percent so it rounds, but i'll take it because this feature is sweet and i've never seen anything like this before.
Final Recommendations
If you're on a budget, we'd recommend purchasing a brewing hydrometer for beer, wine, mead and cider. We'd also recommend a proofing hydrometer for measuring the ABV of spirits. They're not the easiest to read and they require a lot more liquid (relatively) to get a reading, but when temperature corrected they're fairly accurate and the price can't be beat.
We recommend staying away from refractometers unless you're going to take the time to make all of the necessary corrections to the readings. Also, be advised that using refractometers to take all readings, including the final gravity (with an alcohol correction) will likely produce the least accurate results.
For those not on a tight budget, the answer is easy: we highly recommend the EasyDens. The SmartRef is great as well, but it's slightly less accurate than the EasyDens. That said, if you've got the money, buy both (buying the combo actually saves a bit of money). Using the EasyDens and SmartRef together to calculate the ABV of finished beer is pretty awesome!
]]>
https://www.clawhammersupply.com/blogs/moonshine-still-blog/how-to-make-cbd-oil2023-07-17T11:31:03-04:002023-08-08T15:38:39-04:00How to Make CBD Oil At HomeBrett Nelson
Making CBD oil at home is a process that anyone can master. Not only is it cost-effective, but it also gives you complete control over the quality and concentration of the end product. This article guides you through the process, providing you with all the information you need on how to make CBD oil with steam distilling.
What is CBD Oil?
CBD oil is a product derived from the cannabis plant. It's rich in cannabidiol (CBD), a compound known for its potential therapeutic benefits. Unlike THC, another well-known compound in cannabis, CBD doesn't produce a "high" or psychoactive effect. Instead, it's often used for its potential to promote relaxation, reduce anxiety, and alleviate pain.
Benefits of Making CBD Oil at Home
Creating your own CBD oil at home has many advantages:
It's cost-effective.
You have complete control over the quality of the ingredients you use.
You can customize the concentration of CBD in your oil, allowing you to create a product that suits your specific needs and preferences.
Legal Status of CBD Oil
Before you start making CBD oil, check your local laws and regulations before starting the process. The legality of CBD varies by location, with some regions allowing its use and production, while others don’t.
What You Need to Make CBD Oil
To make CBD oil, you need the right ingredients and equipment.
Ingredients
High-CBD cannabis
Water
Equipment
Steam distillation kit (a boiling flask, a biomass flask for the cannabis, a condenser, and a collection flask for the distilled oil)
Choosing the Right CBD Strain
The type of cannabis strain you choose to make your CBD oil significantly impacts the oil's properties. Cannabis strains are typically classified as Indica, Sativa, or hybrid, each with unique characteristics:
Indica strains are known for their relaxing effects
Sativa strains are more energizing.
Hybrids offer a balance of both.
When choosing a strain, consider the THC and CBD content. Strains high in CBD and low in THC are typically the best choice for making CBD oil.
How to Make CBD Oil at Home: Step-by-Step
Making CBD oil is a simple process, but it involves several steps. These are:
1. Decarboxylate your canabbis
First, you need to decarboxylate your cannabis, which involves heating it to activate the CBD. To do it:
Grind the cannabis into small pieces
A food processor works well if a large amount of cannabis is being distilled.
Spread it evenly on baking sheets
Heat it in the oven at 250°F for 25 to 30 minutes.
This process enhances the potency of the oil, making it more effective.
2. Set Up the Steam Distillation System
Once your cannabis is decarboxylated, it's time to set up your steam distillation system:
Fill the boiler with water and the biomass kettle with your decarboxylated cannabis.
Connect the kettles according to the manufacturer's instructions, ensuring a tight seal to prevent steam from escaping.
3. Start the Steam Distillation Process
To start distilling your CBD oil:
Heat the water in the boiler until it turns into steam.
The steam passes through the biomass kettle, vaporizing the volatile compounds in the cannabis, including CBD. These vapors then travel into the condenser.
4. Condense the Vapor into Liquid
In the condenser, the cannabis vapors are cooled and condensed into a liquid. This liquid, which contains your CBD, then drips into a separatory funnel. This process can take a few hours, so patience is key. Remember, a slow and steady distillation process results in a more potent and pure CBD oil.
5. Collect and Store the CBD Oil
Once the distillation process is complete, you can collect your CBD oil from the collection flask:
Be sure to let the oil and hydrosol cool and settle before handling it.
Drain the hydrosol from the bottom of the separatory funnel. Then drain the oil into a different collection jar.
Store your CBD oil in a cool, dark place, ideally in a glass container with a tight-fitting lid to prevent exposure to air. Proper storage helps maintain the potency and effectiveness of your CBD oil.
How to Use CBD Oil
Using your homemade CBD oil is simple. You can take it orally by placing a few drops under your tongue, add it to food or drinks (such as CBD infused beer), or apply it topically to your skinas an essential oil.
Safety Precautions and Potential Side Effects
Safety is key when making CBD oil at home. Here are a few things to keep in mind:
Make sure that distillation and Cannabis and CBD are legal where you live.
The process of making CBD oil with steam distillation can produce strong odor, so always work in a well-ventilated area.
The equipment used in steam distillation can become very hot. Always handle with care to avoid burns.
Avoid direct contact with steam, since it can cause severe burns. Remember, you're working with potentially flammable materials, so caution is key. Use heat-resistant gloves and handle all glassware carefully to prevent breakage.
Frequently Asked Questions About Making CBD Oil
What kind of cannabis do I need to make CBD oil with steam distillation?
The type of cannabis you need depends on the desired potency and legal status in your area. High-CBD strains are typically the best choice for making CBD oil.
How much water do I need for the steam distillation process?
The amount of water you need depends on the size of your steam distillation system. As a general rule, you should fill your boiling flask about halfway with water. This allows enough space for the water to boil and produce steam without overflowing.
How long does it take to make CBD oil at home with steam distillation?
The process of making CBD oil at home with steam distillation can take a few hours. This includes the time to decarboxylate the cannabis (about 30 minutes to an hour), set up the steam distillation apparatus, and run the distillation process (another 2 to 3 hours).
Wrap Up
As you embark on your journey of making CBD oil at home, remember that patience and attention to detail are key. The process of steam distillation seems complex at first, but with practice, it becomes easier and more intuitive. Plus, the reward of having a homemade, high-quality CBD oil that's tailored to your specific needs is well worth the effort.
Whether you're a beginner or an experienced DIYer, at Clawhammer Supply we offer a wealth of information and steam distillation tools that can help you perfect your CBD oil-making process and dive into other DIY projects such as homemade brewing and essential oils.
]]>
https://www.clawhammersupply.com/blogs/moonshine-still-blog/how-to-make-peppermint-oil2023-07-07T14:37:48-04:002023-08-08T15:40:54-04:00How to Make Peppermint Oil at HomeBrett Nelson
If you’ve ever wondered how to make peppermint oil at home, we’ve got you covered. In this guide, we take you through the step-by-step process of making peppermint oil with steam distillation at home, including the tools and ingredients you need, and tips for ensuring the best results.
What is Peppermint Oil?
Peppermint oil is a concentrated substance extracted from the peppermint plant, a hybrid of watermint and spearmint. It carries a strong, fresh, minty aroma and is packed with beneficial compounds like menthol and menthone.
Benefits of Peppermint Oil
Peppermint oil soothes headaches, improves digestion, and boosts energy. Its antimicrobial properties make it a natural alternative for cleaning and personal care products.
Common Uses of Peppermint Oil
In addition to its health benefits, peppermint oil is also used in a variety of household applications. It's a popular ingredient in homemade cleaners and soaps, and it can even be used as a natural insect repellent.
The Benefits of Making Your Own Peppermint Oil
Making your own peppermint oil at home has several advantages:
It allows you to control the quality of the ingredients
It gives you the opportunity to customize the strength of the oil to suit your needs
It's a fun and rewarding project that can save you money in the long run.
Materials Needed to Make Peppermint Oil
To make peppermint oil, you need fresh peppermint leaves and a steam distillation setup.
List of Materials
Here’s what you need:
Fresh peppermint leaves
A steam distillation setup (which includes a heat source, distillation pot, condenser, and separator)
A dark-colored bottle
Where to Buy Materials
Most of these materials are available in your local grocery store or online. For the peppermint leaves, consider growing your own or purchasing from a local farmer's market to ensure freshness.
Peppermint is easy to grow in most climates. To harvest your own, plant seeds in nutrient-rich soil in a sunny spot, water regularly, and wait a few weeks for a plentiful harvest of leaves to make your own essential oil.
For the distillation setup, we offer a range of high-quality essential oil distillers specifically designed for home distillation of essential oils. Our products are user-friendly and come with detailed instructions, making them a great choice for both beginners and experienced distillers.
Choosing Quality Materials
The quality of your peppermint oil directly depends on the quality of your materials. Choose fresh, vibrant peppermint leaves and a high-quality steam distillation kit. Opt for organic materials to avoid any potential pesticide residue.
How To Make Peppermint Oil At Home
Now that you have your materials, it's time to start making your peppermint oil. The process involves a few key steps: preparing your peppermint leaves, distilling the oil, and then separating and storing the finished product.
Gather Your Ingredients
The first step in making peppermint oil involves harvesting the leaves. Pick them in the morning after the dew evaporates but before the sun gets too hot. This is when the leaves have the highest concentration of oils.
Prepare Your Peppermint Leaves
After harvesting your leaves, wash them. Distilling should leave behind impurities, but if the peppermint leaves you’re using are excessively dirty, consider giving them a rinse.
Mud Your Peppermint Leaves
Before adding your leaves to the oil, consider muddling or crushing them. If you’re distilling a very small batch, this will help to release a bit more oil from within the leaves, leading to a more potent final product. You can do this with a spoon, a mortar and pestle, or even your hands. If distilling large quantities of peppermint, this may not be feasible and is not necessary.
Distilling the Oil
Next, place the leaves in your distillation pot and follow the instructions for your specific steam distillation setup. The steam will carry the essential oils from the leaves to the condenser, where it cools and condenses into hydrosol and oil.
Separate and Store the Peppermint Oil
After the distillation process, you should have a mixture of hydrosol and oil:
Use a separatory funnel to separate the oil from the water.
Then, store the oil in your dark-colored bottle in a cool, dark place.
Tips and Tricks for Making the Best Peppermint Oil
Here are a few tips to keep in mind while making your peppermint oil at home with steam distillation:
Best Time to Harvest Peppermint
The best time to harvest peppermint is in the morning when the oils are most potent. Also, harvesting just before the plant flowers yields a stronger aroma and flavor.
How to Increase Oil Yield
To increase the yield of your peppermint oil, consider distilling a larger amount of leaves. Remember, the more leaves you distill, the more oil you get. However, do not over-pack the still. There needs to be some space for the steam to move through the plant material.
Ensuring Efficient Distillation
For efficient distillation, ensure that your distillation setup is properly assembled and that there’s a consistent heat source. The steam needs to be consistent, so consider using a digital controller with a high powered heating element.
Common Mistakes to Avoid
One common mistake is harvesting at inopportune times. Make sure the leaves are at peak freshness and not old or dried out.
Safety Precautions When Making and Using Peppermint Oil
While peppermint oil is a natural product, it's still important to use it safely. Here are a few things to keep in mind:
Safety During the Distilling Process
When making peppermint oil, handle all materials with care. Use a clean distillation setup. If a different type of plant material was previously distilled, consider washing it out with professional brewers wash to eliminate “competing” scents. Also, be cautious when handling the steam distillation setup as it can get very hot.
Safe Usage of Peppermint Oil
Peppermint oil is potent and should always be diluted before use. Never apply it directly to the skin without a carrier oil.
Also, keep in mind that peppermint oil can be irritating to some people, so always do a patch test before using it on larger areas of the body.
Potential Side Effects and How to Avoid Them
Some potential side effects of peppermint oil include skin irritation and allergic reactions.
To avoid these, always dilute the oil and do a patch test first. If you experience any adverse reactions, stop using it immediately.
Frequently Asked Questions About Making Peppermint Oil
How Long Does Homemade Peppermint Oil Last?
If you store it properly, homemade peppermint oil can last up to six months. Make sure to keep it in a cool, dark place and always use clean tools when handling the oil to prevent contamination.
How Do I Know When the Distillation Process is Complete?
The distillation process is complete when the steam no longer carries the scent of peppermint. This usually takes an hour or less, depending on the amount of leaves you're distilling and how powerful your heat source is.
Can I Use the Same Distillation Setup for Other Essential Oils?
Yes, you can use the same distillation setup to make other essential oils. Just make sure to clean all parts thoroughly between uses to avoid mixing scents.
Conclusion
Making peppermint oil at home isn’t only about the end product but also about the process. It's a chance to connect with nature, learn something new, and create a natural, versatile product that can be used in many ways.
If you're interested in DIY projects like this one, you might also enjoy exploring the world of home brewing. Clawhammer Supply offers a range of brewing equipment and steam distillation supplies that can help you take your DIY skills to the next level.
Whether you're interested in brewing beer, distilling spirits, or making your own essential oils, we have the tools and resources you need.
]]>
https://www.clawhammersupply.com/blogs/moonshine-still-blog/how-many-ounces-in-a-shot2023-05-12T18:54:56-04:002023-08-08T15:49:39-04:00How Many Ounces in a Shot? A Complete GuideAlex GolickIn the United States, a standard shot contains 1.5 fluid ounces of alcohol. This measurement is crucial for mixing cocktails, measuring spirits like moonshine, and keeping track of alcohol consumption. However, it's important to note that shot sizes can vary depending on the country and even the type of shot glass.
Shot Glass Sizes: A Quick Overview
Shot glasses come in a range of sizes, from small 1-ounce glasses to larger 2-ounce, 3-ounce (double shot), and beyond. While some shot glasses can hold up to 8 ounces, these novelty items should not be used to consume alcohol in such large quantities.
The standard measurement for a shot is 1.5 ounces, so regardless of the size of the shot glass, a 1.5-ounce pour can be used to create a standard shot.
Understanding Variations in Shot Glasses
Shot glasses can be found in a variety of designs, materials, and sizes. Here's some common types of shot glasses:
Tall shot glasses: These are taller than regular shot glasses and usually hold between 2 and 2.5 ounces of liquid.
Fluted shot glasses: These have a flared rim, making them easy to drink from. They also make your drink look a little fancier.
Themed shot glasses: These glasses come in all shapes and sizes, often featuring logos, images, or text related to a specific theme, event, or location.
Regardless of the shot glass' design, make sure to pour the correct amount of alcohol when measuring shots.
Measuring Your Shots: The Jigger
To measure your shots accurately, you need a jigger. This hourglass-shaped device is used by bartenders (both professional and amateur) to ensure precision when pouring alcohol into cocktails. A standard jigger has certain markings that measure the exact amount needed for each drink.
Some popular jigger brands include:
Barfly Japanese-Style Jigger
Cocktail Kingdom Leopold Jigger
MATCH Italian Pewter Jigger
OXO SteeL Double Jigger
Investing in a high-quality jigger lets you consistently create delicious cocktails and make sure you're drinking responsibly.
Popular Shot Recipes
If you're looking to expand your shot repertoire beyond basic whiskey or vodka, consider trying these popular shot recipes. Remember always to drink responsibly and be aware of the alcohol content of each shot.
Chuck Norris: A spicy combination of cherry liqueur, cinnamon schnapps, and Tabasco sauce
Lemon Drop: A refreshing mix of vodka, lemon juice, and sugar
Moonshine Pickleback: A crazy delicious drink made with moonshine, pickle juice, and hot sauce.
B-52: A visually impressive layered shot with Kahlúa, Baileys Irish Cream, and Grand Marnier
Washington Apple: A fruity blend of Crown Royal Whiskey, apple schnapps, and cranberry juice
Purple Gatorade: A sweet mix of vodka, Chambord, and lemon-lime soda
Grim Reaper: A potent combination of Jägermeister, Kahlúa, and Bacardi 151
International Shot Sizes: A Global Perspective
Shot sizes can vary dramatically from country to country. Here's a list of shot sizes in ounces (oz) and milliliters (ml) for several nations:
United States: 1.48 oz (43.77 ml)
Canada: 1.44 oz (42.58 ml)
United Kingdom: 0.84 oz (24.84 ml)
Australia: 1.01 oz (29.87 ml)
Germany: 0.67 oz (19.81 ml)
Denmark: 0.67 oz (19.81 ml)
Japan: 2.02 oz (59.74 ml)
Russia: 1.69 oz (49.98 ml)
Italy: 2.02 oz (59.74 ml)
Greece: 1.52 oz (44.95 ml)
It's important to be aware of these differences, especially when traveling or ordering drinks in a foreign country.
Shot Size Conversions
To better understand the relationship between ounces and milliliters, here are some shot size conversions:
1 shot: 44.36 ml
2 shots: 88.72 ml
3 shots: 133.08 ml
4 shots: 177.44 ml
Measuring Cocktails with Shot Glasses
Using shot glasses is a convenient and straightforward way to measure your cocktails at home. With a standard 1.5-ounce shot glass, you can easily approximate the correct amounts of alcohol and mixers needed for your drink. For more accurate measurements, look for a graduated shot glass with markings similar to a traditional measuring cup.
Double Shots and Other Shot Sizes
A double shot typically contains 3 ounces of alcohol in the United States. However, some places may only pour 2 ounces for a double shot. Be aware of your alcohol consumption and adjust your drinking accordingly.
Pony shots are smaller, containing just 1 ounce of alcohol. In contrast, shooters are larger versions of shot glasses and can hold greater amounts of liquid.
Final Thoughts
Regardless of the specific shot glass or measurement, a standard shot in the United States contains 1.5 ounces of alcohol. By understanding shot sizes, using proper measuring tools like a jigger, and experimenting with different recipes, you're sure to have a fun and responsible night of drinking.
Always remember to drink responsibly and know your limits. Cheers!
]]>
https://www.clawhammersupply.com/blogs/moonshine-still-blog/moonshine-recipes2023-05-12T18:53:29-04:002024-04-30T15:20:12-04:00Moonshine Recipes: A Flavorful Adventure AwaitsAlex Golick
Welcome to the world of moonshine recipes! If you're ready to explore new flavors, you've come to the right place. We've got fruity concoctions, dessert-inspired creations, and more. Dive into our easy-to-follow recipes and get ready to impress your taste buds.
For a comprehensive guide on making moonshine, take a look at our how to make moonshine article.
What is Moonshine?
First - what even is moonshine? Moonshine, often referred to as "white lightning" or "hooch," is a high-proof, unaged distilled spirit typically made from corn mash or sugar. Its roots can be traced back to the early American settlers who crafted their own homemade spirits to avoid taxes imposed on liquor production. Moonshine gained notoriety during the Prohibition era (1920-1933) in the US, as illegal distilleries sprouted up to meet the demand for alcohol. Today, moonshine has become a popular spirit for those seeking a unique, homemade touch to their libations.
Is Making Moonshine Illegal?
Is it legal to make moonshine at home? No, it's not legal to make moonshine at home. How about if you don't sell it? No, it's not legal to distill moonshine even if it’s not sold. What if you don't even give it away? Still nope! It's not legal to make moonshine in the United States even just for personal consumption. For more information, check out this article that answers the question of whether or not making moonshine is illegal.
For the record, I've named this article “Moonshine Recipes” for search optimization purposes only. It's an educational article and is not meant to be used to actually make your own moonshine. Most of these recipes are for cocktails and flavored drinks. We use (and recommend using) store bought moonshine to make them.
Different Moonshine Recipes
Now on to the recipes. We've gathered some fantastic moonshine recipes and mash guides from our distilling experts. Give them a go and share your moonshine-making experiences with us!
Apple moonshine mash: a refreshing, fruity spin on traditional moonshine. Gather apples, sugar, water, and cornmeal, then follow our step-by-step guide to whip up a delightful concoction.
If tropical vibes are your go-to, pineapple moonshine will hit the spot. Grab pineapple juice, sugar, and water, add distiller's yeast, and you're on your way to sippin' on this fruity delight.
Smooth as a summer breeze, watermelon moonshine is the stuff of dreams. Blend watermelon, strain, mix with sugar and water, and toss in some distiller's yeast. Ferment, distill, and let the good times roll.
Strawberry fields forever, or at least in a mason jar. Combine strawberries, sugar, water, and distiller's yeast to create this sweet, fruity sipper that'll knock your socks off.
Blackberry moonshine – a rich, berry-flavored libation to make your taste buds dance. Blend blackberries, sugar, and water, then add distiller's yeast and ferment. Distill, dilute, and savor the berry goodness.
Simplicity at its finest, sugar shine is a no-frills, versatile delight. Just mix sugar, water, and distiller's yeast, then ferment and distill to taste the magic.
Sweet, bold, and luscious, cherry moonshine is a surefire winner. Combine cherries, sugar, water, and distiller's yeast, then ferment, distill, and let the cherry explosion begin.
An exotic adventure in a glass, muskmelon moonshine offers a unique, aromatic experience. Blend muskmelon, sugar, and water, then mix with distiller's yeast. Ferment, distill, and enjoy the muskmelon marvel.
Irresistibly sweet, peach moonshine is a true delight. Combine peaches, sugar, water, and distiller's yeast. Ferment and distill to savor the delectable peach sensation.
Capture the essence of a classic dessert with apple pie moonshine. Mix apple juice, sugar, cinnamon, and distiller's yeast. Ferment, distill, and enjoy this warm, spiced delight.
Bringing fall flavors to life, pumpkin pie moonshine is a creamy, spiced concoction. Combine pumpkin puree, sugar, water, pumpkin pie spice, and distiller's yeast. Ferment, distill, and indulge in this delightful creation.
Tangy and savory, moonshine picklebacks offer a bold, salty flavor explosion. Mix moonshine, pickle juice, and spices. Refrigerate for 24 hours and enjoy this distinctive drink.
Well, there you have it, folks – a lineup of moonshine recipes that'll keep your stills busy and your spirits high. Remember to click on the linked moonshine type for detailed instructions, and enjoy the satisfaction of crafting your own homemade hooch. Also, make sure to check out our collection of moonshine stills. Happy distilling, y'all!
]]>
https://www.clawhammersupply.com/blogs/moonshine-still-blog/how-to-make-brandy2023-03-19T16:58:32-04:002024-10-09T22:48:38-04:00How to Make Brandy - Brandy RecipeKyle Brown
how to make brandy step by step using a homemade brandy recipe provided to us by Jesse Wilson, a master distiller in New Zealand.
]]>
Brandy is a distilled spirit made from a fruit mash or wine. Many different types of fruit are used to make brandy including grapes, apples, peaches, and more. However, unlike whiskey and bourbon, which are made from several types of grain, brandy is always made with a pure fruit mash. In this article we’ll explain how to make brandy, step by step.
Although we sell a wide range of stainless steel stills, we don’t have a license to make brandy, which is illegal to produce at home in the United States without federal and state permits. So to give you the best tutorial possible, we’ll be getting a bit of help from Jesse Wilson, a Master Distiller from the great country of New Zealand. It must also be noted that this article is for educational purposes only. Don’t try this unless you possess all of the required federal, state, and local permits.
What is Brandy?
Before we get started with how brandy is made, let’s clarify the definition. In other words, what is brandy? According to the United States is regulated by the United States Tax and Trade Bureau (TTB). Brandy is a spirit that is distilled “from the fermented juice, mash or wine of fruit or from its residue at less than 95% alcohol by volume (190 proof) having the taste, aroma and characteristics generally attributed to brandy and bottled at not less than 40% alcohol by volume (80 proof).”
The TTB defines what the spirit is, specifies how it needs to be produced and enforces these regulations. You can read all about brandy in chapter 4 of the Beverage Alcohol Manual (BAM), which defines the overall characteristics of brandy.
Ok, now that we know generally what it is and how it’s made, what is brandy made from? The primary ingredient used to make brandy is fermented grape juice, or wine. Where did brandy originate? It’s thought that brandy was first distilled in France. In fact, literature referencing Armagnac, a specific type of brandy produced in southern France, dates back to 1310! What are the most popular types of brandy? Rémy Martin, Hennessy, and Courvoisier are among the most popular types of brandy in the world. Can other types of fruit be used to make brandy? Yes, brandy can be made with any type of fruit. However, it’s made with anything other than grapes, the type of fruit is specified in the name. For example, brandy made from apples would be called “apple brandy.”
Speaking of apple brandy, check out this article if you’re interested in knowing how to make apple brandy. Oh, and here's how to make plum brandy. And last but not least, here's an article on how to make peach moonshine, which is basically peach brandy. If you're interested in other types of brandy, read on for a list of more...
Popular Types of Brandy
There are actually a lot of different types of brandy. Here are a few of the most popular.
Traditional Brandy
As we mentioned above, if the label says “brandy” with nothing written before or after, it’s a distilled spirit made from the juice of fermented grapes. It must be aged in oak barrels for 2 years.
Applejack or Apple Brandy
Applejack or apple brandy is a general style of brandy made using apples. The apples are first picked, then washed, crushed, and juiced. After juicing the liquid is treated to remove wild bacteria, which is almost always present on apple skin. Once treated the apple juice is fermented and then distilled.
Cognac
Cognac is a specific type of brandy produced only in the Cognac region of France. The TTB defers to French law regarding the requirements of Cognac. Cognac is twice distilled white wine made primarily with Ugni blanc grapes. The distillation must happen in copper stills and once distilled, the spirit must be aged in French oak barrels for at least two years.
Armagnac
Armagnac is a specific type of brandy produced in southwest France distilled from a blend of grapes including Baco, Colombard, Folle blanche and Ugni blanc. Armagnac is generally distilled in a column still. Armagnac is not required to be distilled twice like Cognac. This is probably due to the fact that column stills are more efficient and can produce a higher proof spirit during the first distillation run.
Calvados
Calvados is a specific type of apple brandy made by distilling dry, hard apple cider and aging it in oak barrels. As with many types of popular brandy, it’s made in France. And Like Cognac, Calvados is required to be distilled twice in a pot still.
Grappa
Grappa is an Italian brandy that is made by distilling fermented skins, pulp, seeds, and stems (pomace) leftover from the wine-making process. Italian grappa is generally distilled in traditional copper stills. Grappa is also generally aged in oak barrels to create a more smooth tasting, complex product.
Fruit Brandy
Other types of fruit brandy can literally be made from any type of fermented fruit juice. For example, cherry brandy, plum brandy, peach brandy, pear brandy, raspberry brandy, blackberry brandy, and apricot brandy are all viable types of fruit brandy.
Brandy Recipe - How To Make Brandy
We're going to focus on a recipe for traditional (grape) brandy in this article. And we've enlisted the help of our good friend and master distiller, Jesse Wilson, from the YouTube channel StillIt. Jesse was kind enough to provide us with this brandy recipe and he's also going to actually make it and distill it for us. He can do that legally since he lives in New Zealand. We're not so lucky here in the United States, where distilling alcohol at home is illegal, as we're still stuck in the dark ages, apparently.
Homemade Brandy Ingredients and Equipment
Again, making brandy at home is illegal in the US, but it's not in NZ, so if you live there, have at it. Jesse has informed us that the easiest way to make homemade brandy is to actually buy a homemade wine kit and start from there. To make things easier, here's an entire list of all of the equipment and ingredients one will need to make homemade brandy:
As you can see we've specified a still with a copper column and condenser. Copper removes sulfur compounds from distillate. This is important when making products for consumption. If live in NZ or you have a small-scale licensed distillery in the US, you'll want to use a still like the one we've specified. If you live in the US and are using plums from your orchard to make high proof fuel alcohol for farm equipment, you'll want to use something like our bubble plate still, which produces higher proof alcohol in a single run.
Brandy Recipe Steps
Use the fermenter and the wine making kit to mix plum wine juice.
Add yeast and ferment for 7-10 days.
Transfer to a still
Heat to at least 174F outdoors or in a well ventilated area
Discard the foreshots as these could contain methanol and are poisonous
Set the heads aside
Save the hearts for aging
Set the tails aside
Combine heads and tails for the next run
Add the hearts to a white oak container and age
After aging is complete, bottle.
Again, distilling alcohol for personal consumption is illegal in the United States. Clawhammer's distillation equipment is designed for legal uses only. Read our complete legal summary for more information on the legalities of distillation.
]]>
https://www.clawhammersupply.com/blogs/moonshine-still-blog/is-moonshine-illegal2023-03-14T15:48:25-04:002024-10-09T22:51:54-04:00Is Moonshine Illegal?Kyle BrownThe question is, is making moonshine illegal? The answer to this is somewhat complicated and unless the thought of digging ditches with chains around one's ankles is appealing, potential distillers better read on because in this article we're going to summarize whether or not moonshine is illegal.
]]>
The question is, is making moonshine illegal? The answer to this is somewhat complicated and unless the thought of digging ditches with chains around one's ankles is appealing, potential distillers better read on because in this article we're going to summarize whether or not moonshine is illegal.
The first thing you need to know is that there are federal and state laws that pertain to home distilling. Heck, in some cases there are even local laws. To avoid trouble with the federal, state, and local law enforcement agencies and officials, distillers need to comply with all laws; federal and state laws, as well as any local laws.
Spoiler alert, depending on where you live, it is generally not legal to make moonshine. So, maybe the best question isn't "is moonshine legal?" Perhaps a better question is, why is moonshine illegal? We'll discuss all this and more below.
When is Home Distilling Legal?
Federal law states that it is legal to own a still of any size. It doesn't matter if an individual has a 1 gallon still or a 100 gallon still. More specifically, it is legal to have a still for decoration, distilling water, distilling essential oils, etc. The still does not need to be registered with anyone and no permits are needed as long as it is being used for the aforementioned purposes.
A common misconception is that only stills 1 gallon and smaller are legal. This is not true. Actual law merely states that stills 1 gallon or less that are not being used to distill alcohol do not need a serial number (see more on this below).
We don’t claim to be lawyers, and our post on the legalities of distilling should NOT be taken as legal advice, however, we've done a lot of digging on this topic and feel that we have a pretty good handle on whether or not possessing a still and making moonshine is illegal.
UPDATE: there has been some debate in the comments regarding which types of stills are allowed according to federal law. Our interpretation is that the federal government does not require registration of stills that are not being used to produce distilled spirits. Here is our reasoning:
First, you must read the section USC Sec. 5179(a), a provision of Internal Revelue code. Pay careful attention to the wording and terminology used, particularly the exceptions made for different distillation use cases as well as the requirements for when a still is actually considered “set up.”
“§5179. Registration of stills (a) Requirements Every person having in his possession or custody, or under his control, any still or distilling apparatus set up, shall register such still or apparatus with the Secretary immediately on its being set up, by subscribing and filing with the Secretary a statement, in writing, setting forth the particular place where such still or distilling apparatus is set up, the kind of still and its capacity, the owner thereof, his place of residence, and the purpose for which said still or distilling apparatus has been or is intended to be used (except that stills or distilling apparatus not used or intended to be used for the distillation, redistillation, or recovery of distilled spirits are not required to be registered under this section).”
Note the exception: “stills or distilling apparatus not used or intended to be used for the distillation, redistillation, or recovery of distilled spirits are not required to be registered under this section.”
Additionally, and somewhat redundantly, a still is not considered “set up” until it meets this definition, as noted in part 29 of title 27 in the US Code of Federal Regulations:
“(b) When still is set up. A still will be regarded as set up and subject to registry when it is in position over a furnace, or connected with a boiler so that heat may be applied, irrespective of whether a condenser is in position.”
Additionally, here is the relevant bit of code that clarifies "offenses," i.e violations of the provision:
26 USC Sec. 5601 classifies the following as “an offense”:
“Any person who has in his possession or custody, or under his control, any still or distilling apparatus set up which is not registered, as required by section 5179(a)”
Our interpretation is that you are technically not required to register a still that is not being used for alcohol production AND even if it is, it does not need to be registered until it is “set up” according to the above mentioned definition.
Is Moonshine Illegal?
Regardless of whether you possess a still that can be legally, according to federal law, operated, be advised it is illegal to distill alcohol without having either a "distilled spirits permit" or a "federal fuel alcohol permit." It does not matter if the alcohol is for personal use only, not for sale, etc.
Federal Distilled Spirits & Federal Fuel Alcohol Permits
If a person wishes to legally distill alcohol, they have two options. The first option is to obtain a Federal Distilled Spirits Permit. This is the permit that industry giants like Jack Daniels and Makers Mark distilleries possess, which makes it legal for them to distill and distribute to the public. As one might imagine, this permit is very difficult to get.
In short, unless an individual is opening a distillery with the intention of selling their product in liquor stores, don't even bother looking into getting a distilled spirits permit; it's way too expensive and complicated for a home distiller to obtain. Instead pursue a fuel alcohol permit (which we'll describe next).
Option two is a Federal Fuel Alcohol Permit (link below). Be advised that the conditions of the permit only allow a distiller to use the alcohol they produce for fuel purposes, not for consumption.
Federal Fuel Alcohol Permit
Here's the link for the federal fuel alcohol permit: http://www.ttb.gov/forms/f511074.pdf For those that happen to build a copper still kit or purchase a stainless distiller from Clawhammer Supply, they'll write "Clawhammer Supply" in the manufacturer line and their order number for the serial number (e.g. "6601") on a sticker that is supplied with the equipment. List the type as a "pot still." The capacity is the size of boiler (i.e. 1 gallon, 5 gallon, 10 gallon, etc...). This will be the identifying information for the still.
Note, those not planning to use their still for alcohol do not need to get a permit or register the still with the federal government. Federal rules state that stills only need to be reported / registered if the Federal Alcohol and Tobacco Tax and Trade Bureau asks the manufacturer to do so (more on this below). However, for those who are going to use the equipment to distill alcohol, the use your order number (which is also your serial number) on all permit paperwork.
State Distillation Laws
State distilling law is different in every state. Some states have no laws on owning a still, but prohibit the distillation of alcohol (such as Colorado, which charges a small fine if one is caught doing so) while other states prohibit possession of a still unless it's for fuel alcohol (such as North Carolina, which requires a state fuel alcohol permit). Some states may prohibit possession of distillation equipment and distilling altogether. Google state laws to find the rules and regulations in your state. Also, make sure to comply with these rules and regulations.
Still Registration and Reporting
Federal Alcohol and Tobacco Tax and Trade Bureau regulations state that still manufacturers need to keep customer info. Additionally, these records may also be requested by the federal TTB and still manufacturers are required to submit them if asked.
How to Stay Out of Trouble
Federal law provides no exemptions for the production of distilled spirits for personal or family use. Under no circumstances should an individual ever distill or sell alcohol without a permit. If an individual chooses to distill alcohol, make sure to obtain all applicable fuel or spirit permits (listed above). Additionally, check state laws and make sure that owning and / or operating a still is permissible. Clawhammer distillation equipment is designed for legal uses only. Read our complete legal summary for more information on the legalities of distillation. And make sure to hire a legal professional to help you navigate the permitting process because this information on this website is not intended to be relied upon by anyone as the basis for any action or decision whatsoever.
]]>
https://www.clawhammersupply.com/blogs/moonshine-still-blog/how-to-make-bourbon2023-01-06T21:55:15-05:002024-04-29T15:35:52-04:00How to Make BourbonKyle Brown
In this guide, we'll show you how to make bourbon whiskey from start to finish. This will include step by step descriptions of recipe creation, grain milling, mashing, fermenting, distilling, and aging, blending, and bottling. To make sure we provide the most valuable and accurate information possible, we've enlisted the help of Jesse Wilson from the "Still It" YouTube channel. He’s a master distiller whose expertise is highly sought after by both home distillers and professional distillery owners.
It must also be noted that this article is for educational purposes only. While it is legal to make a bourbon mash in the United States, it is illegal to distill bourbon at home for personal consumption. In fact it's illegal to distill it for any reason without the proper federal, state and local permits. As it turns out, the “land of the free” ain’t so free after all. However, Jesse is from New Zealand where “freedom” is more than a cheap buzzword and home distilling is actually legal. So, we'll be making a mash in the U.S. and Jesse will head back NZ to distill it.
The Definition of Bourbon
Before we tell you how Bourbon is made, we should define “Bourbon.” In other words, what is Bourbon whiskey? The first thing you need to know is that all bourbon is whiskey, but not all whiskey is bourbon. Whiskey is a distilled alcoholic beverage that is made from any combination of cereal grains such as barley, rye, wheat and corn. A bourbon mash must composed primarily of corn (at least 51%). There are very specific distillation and bottling proof requirements. And Bourbon is aged in new, oak barrels. Additionally, it must contain no additives. All requirements are described in detail below.
But who decides what qualifies as "Bourbon?" The entity that dictates what is and is not Bourbon is the United States Tax and Trade Bureau (TTB). In fact, the TTB oversees all alcohol production in the United States, which includes defining and enforcing the rules and proper procedures for making spirits. Spirit class and type designation are discussed in chapter 4 of the Beverage Alcohol Manual, which defines the various types of bourbon whiskey and their requirements as follows.
*Note: the TTB spells “Whiskey” without an “e.” So, they spell it, “whisky.” However, it’s more commonly spelled with an “e” in the U.S.
Bourbon Whiskey Definition
So, what makes Bourbon, Bourbon? According to Chapter 4 of the TTB’s Beverage Alcohol Manual (BAM), bourbon is, “Whisky produced in the U.S. at not exceeding 80% alcohol by volume (160 proof) from a fermented mash of not less than 51 percent corn and stored at not more than 62.5% alcohol by volume (125 proof) in charred new oak containers.” Note, there is no minimum age requirement for standard bourbon. Additionally, chapter 7 of BAM states that no additional coloring, flavoring, or blending agents may be added unless the label is changed to reflect the additions. More on this below.
Straight Bourbon Whiskey Definition
According to the TTB, straight bourbon is, “Bourbon whisky stored in charred new oak containers for 2 years or more. ‘Straight Bourbon Whisky’ may include mixtures of two or more straight bourbon whiskies provided all of the whiskies are produced in the same state.” Straight bourbon also must meet the basic requirement for bourbon listed above, including having a grain bill that is at least 51% corn, produced at no more than 160 proof, and stored at not more than 125 proof in new oak barrels. The same additive rule mentioned above applies to straight bourbon whiskey as well.
Deceptive Labeling
Although these labeling requirements seem pretty cut and dry, there is a bit of gray area baked into the rules and the number of companies that take advantage of this is much more common than one would think. First, the TTB in fact does allow additives to both bourbon and straight bourbon, provided that the label is changed to reflect this. For example, chapter 7 of BAM specifically mentions that if “FD&C Yellow #5 is added to straight bourbon whisky….the product is now a distilled spirits specialty and must be labeled with a statement of composition such as ‘STRAIGHT BOURBON WHISKY WITH FD&C YELLOW #5 ADDED’"
So, the question is, how prevalent does this labeling need to be and how easy would it be to create a straight bourbon whiskey with additives that actually seemed like it was just, well, straight bourbon whiskey, without additives? The answer to that deceptive labeling of bourbon and other spirits is much easier than one would think. This problem is also a lot older than one would think!
Bottled in Bond Bourbon Definition
Spirit production was very loosely regulated in the early days of the Union. All manner of additives were included to “improve” the products. For example, tobacco was sometimes added to darken the color. Obviously this free-for-all scenario where any distillery could add whatever they wanted to recipes, barrels and bottles threatened to compromise the integrity of the entire industry. For this reason, the U.S. government intervened and created the “bottled in bond” program in 1897.
Bottled in bond is a tax incentive program for distilleries that produce spirits according to very specific requirements. Bottled in bond bourbon must be produced in a single season by a single distillery and distilled to be no stronger than 160 proof (80% alcohol by volume). It must then be aged in a new charred oak barrel at a federally bonded warehouse for at least 4 years. After that it must be bottled at 100 proof (50% alcohol by volume) under the supervision of a government official. Also, only water can be added to bourbon that has been bottled in bond (to adjust proof). Additives are prohibited.
As mentioned earlier, label discrepancies abound in the world of distilled spirits, but the bottled in bond program seems to be a bit more closely looked after these days. Spirits in this category tend to be more plainly labeled and are less likely to actually contain additives.
Kentucky Straight Bourbon Definition
The final bourbon definition we’ll discuss is Kentucky straight bourbon. This spirit essentially has the same requirements as straight bourbon whiskey, but it must be produced within the state of Kentucky. Also, in some cases a single bourbon may meet several of the definitions above at once. For example, Heaven Hill’s Bottled in Bond Kentucky Straight Bourbon Whiskey meets the requirements to be labeled “bottled in bond” and “Kentucky straight bourbon.”
Where is Bourbon made?
There is a lot of confusion about where Bourbon can be made. The spirit technically originated in Bourbon County, Kentucky. However, Bourbon can actually be made elsewhere. But where?
Regular Bourbon, Straight Bourbon, and Bottled in Bond Bourbon can only be made in the United States. Kentucky Bourbon and Kentucky Straight Bourbon can only be made in Kentucky.
Making Bourbon
First of all, is it legal to make bourbon mash at home? Yes, absolutely. It's the same process as making beer and the final ABV of a properly made bourbon mash will be similar to a strong beer. Is it legal to distill bourbon mash at home in the United States? Unfortunately, no. As we mentioned, we actually did make the this mash recipe but we relied on our friend Jesse, who lives in New Zealand, to distill it.
What better way to explain how bourbon is made than to actually make some and describe the process, which is what we’re going to do here. We start with raw grain and we end with bourbon in a glass. Our goal is to make a top shelf bourbon whiskey, akin to Heaven Hill or Pappy Van Winkle. Bourbon is actually made in a 5 step process:
Mashing is generally the term that is used to describe the “cooking” of the grain that will eventually be fermented and turned into alcohol and includes the following general steps:
Bourbon recipe creation
Gathering ingredients
Preparing equipment
Milling grain
Mashing, or converting grain starches into sugar
Bourbon Recipe Details and Ingredients
As mentioned above, bourbon is made from fermented grain and must be at least 51% corn, so corn will always be the primary ingredient in any bourbon. As we'll explain later, corn starch must be converted to sugar before fermentation can take place. Malted barley is generally used to facilitate this process and it's almost always included in the list of bourbon ingredients. The third ingredient is almost always rye or wheat. Rye will produce a more aggressive or "spicy" bourbon while wheat provides a more mellow drinking experience.
The recipe we've created below will result in a more refined, smoother bourbon. At the heart of our recipe is 14 pounds of corn. We've included 2.8 pounds of 6-row barley. And we've also included 3.25 pounds of malted wheat. And of course we’re going to need some water to cook all of these grains in as well so the recipe will also include 9.5 gallons of water. Yeast nutrient is optional, which we'll explain later. And yeast is required for fermentation.
Here are the ingredients for a 5 gallon bourbon mash:
9.5 gallons water
14 lbs. flaked corn
3.25 lbs. wheat malt
2.8 lbs. 6-row pilsner malt
Yeast nutrient
Distillers yeast
We've designed this recipe with three things in mind:
Style, flavor and aroma,
starting alcohol by volume, and
starch conversion potential (diastatic power).
Style, Flavor, and Aroma
We'll describe this in greater detail in just a moment, but our recipe is 51% corn, which satisfies the basic requirement of corn composition in a bourbon. It also contains wheat, which will produce a smoother and more mellow final product
Starting ABV
We'll dive into this in greater detail during the section on distillation, but what needs to be explained now is that this recipe is designed to produce a 10% ABV whiskey wash. Wash is the name for fermented mash. We could add a lot more grain now and probably double this number, but at the expense of quality. Since we're shooting for a top shelf drinking experience, we've capped the pre-distilled ABV to 10%
Diastatic Power (or Degrees Linter)
Starch conversion is quite a heady topic and we explain it in more detail during the section on mashing. The short of it is that enzymes contained within malted grains are used to convert grain starch into sugar during the mash. Because barley and wheat are the only malted ingredients we're using in this recipe, we need to make sure it contains enough enzymes to convert the starch in the corn.
The total capacity a particular malted grain has to convert starch into sugar is called its diastatic power. And the sum of the diastatic power given the total volume of grain used is called the total Lintner. To determine whether or not our malted barley and wheat contain enough enzymes for full starch conversion, we plugged our recipe details into a diastatic power calculator. According our math, this recipe should work out just fine.
Recipe Caveats
A couple of very significant caveats should be mentioned regarding the ingredients we’re using. First, we aren’t using sweet corn straight off a cob. We also aren’t standard dried corn. Regular ol’ dried corn is actually somewhat difficult to cook relative to other cereal grains. It must first be cracked or ground, if possible, and then cooked for 90 minutes or more at 185 Fahrenheit or longer. It absorbs a lot of water and can be kind of a pain to work with.
We’re what is referred to (in the United States) as “flaked maize.” This is a fancy word for corn that has been dried, has had the germ, oil, and much of the protein removed and is what is called “Pregelatinized.” This type of corn doesn’t need any sort of processing before mashing. I.e. it does not need to be milled. And it doesn’t need to be cooked either (beyond the standard mashing protocol).
The second caveat is that we aren’t just using raw barley, we’re using malted barley. Why? Long story short, malted barley contains enzymes that will convert all of the starch in the mash grain into sugar. Yeast will later convert the sugar into alcohol during the fermentation process. Raw barley doesn't contain the necessary enzymes to complete the conversion. More on this in the section on mashing.
The last point we need to make is that bourbon is probably most often made with corn, barley and rye. Rye tends to produce a more sharp and spicy flavor profile. Replacing the rye with wheat results in a lighter more mellow drinking experience, which is what we're after with this recipe. Also, there is no TTB labeling requirement for a wheat addition, but the recipe we've created here would colloquially be referred to as a wheated bourbon.
Brewing Equipment
We don’t have the luxury (or the burden) of owning and operating a commercial distillery, so to make this recipe we’ll need to scale it down to a manageable size. We’re using Clawhammer's 20 gallon brewing system and our still is just over 8 gallons, so we’ve scaled this recipe down so it produces just over 5 gallons of liquid for distillation.
Milling Bourbon Grain
For reasons that will become obvious in the next step, we need to crack open the grain to gain access to the insides of the kernel. We also need to increase the surface area of the grain itself. Running it through a grain mill cracking it in half, and breaking it into smaller pieces accomplishes this goal.
All grain needs to be milled before mashing. However, the thoroughness of milling that is required is contingent on the method of brewing is being used. Because we aren’t making a massive commercial sized batch we can use a brewing method that will make our lives easier. That said, we’ll be using what is called the brew in a bag (BIAB) method. BIAB consists of using a stainless steel mesh basket to hold grain during mashing. The gain basket is removed after mashing is complete allowing the entire mash process to be completed with a single kettle. This type of brewing typically tolerates finely crushed grains quite well. In fact, a finer crush will actually improve mash efficiency. Here is the bullet point for the recipe:
Double crush barley and wheat at .03 inches.
Milling flaked maize is optional
We’ll run our grain through a high quality grain mill set to about .03 inches wide, which roughly the thickness of a standard credit card. This is good information to remember because a handy trick to set the crush on a mill is to actually get out an old credit card and stuck it between the rollers of the mill. Push the mill rollers inward until they put slight pressure on the card, then tighten the set screws.
As stated, we actually ran our grain through the mill twice to grind it a bit more finely and improve the efficiency of the mash. Both times we collected the crushed grain in a food safe bucket, which also doubles as a cheap fermenter. As for the corn, because it is pregelatinized, we didn’t technically need to run it through the mill, but doing so probably would have increased mashed efficiency and also sped it up a bit.
One final note on milling is that if we were using standard feed corn, we would have wanted to run it through a mill.. Though we would caution against using a new mill for grinding something like feed corn. Corn is extremely hard and will dull mill rollers in short order.
After milling was complete we moved on to the mash.
Bourbon Mash Process
At this point we're ready to begin the actual mash. Obviously, bourbon is high proof alcohol. As we previously mentioned, the alcohol in bourbon is created by the fermentation of sugar by yeast. However, grain is primarily starch (not sugar). The process of mashing is actually what creates the sugar in a bourbon recipe.
To help explain the necessity of mashing, let's first look at the composition of a kernel of corn. Corn is about 75% starch, 10% protein, 5% oil, and the rest is fiber and water. Notice that sugar isn't listed here. Next, let's look at barley. The barley used for brewing is composed of about 80% starch, 10% protein, 10-15% water and 2-3% fatty acids. Notice again how there are no sugars listed. So, where does the sugar come from? It is created by using enzymes found in malted grain to convert the grain starch into sugar.
Buried within the genetic code of all seeds is an amazing function: the ability to convert starch into sugar. This process is activated by malting grain, which produces the enzymes needed for starch conversion. Once grain has been malted and the enzymes have been created, they can then be activated by creating conditions that allow them to begin breaking down starch molecules into sugar molecules. These conditions include moisture, heat, and proper pH. Here's and overview of the process with additional details below?
Bourbon Mash Steps
Fill kettle with 9.5 gallons of water
Heat water to 147 degrees F.
Gently pour grains into kettle while stirring
Wait 10 minutes and take a pH reading
Adjust pH so it is somewhere between 5.2 and 5.8
Allow to sit for 60 minutes while stirring intermittently
Complete a starch conversion iodine test
Complete a "mashout" at 170 F for 20 minutes
Mash Temperature
Many of the steps in the process of making bourbon can be tweaked in order to create slight variations in the final product. The mash is one of the steps that can be played with a bit.
Sacchrification is the technical name for the process of conversion of starch into sugar during the mash and it's actually completed by two different enzymes found in malted grain: alpha and beta amylase. Alpha amylase is most active at higher temperatures (150-160 F). Beta amylase is most active in the 140-150 F range. Alpha amylase converts starch into longer chain sugar, which can be difficult for yeast to break down. Beta amylase creates highly fermentable short chain sugars.
Because our ultimate goal is to make highly concentrated alcohol, we're looking to create more fermentable sugars than non-fermentable sugars. So we're going to be mashing at 147 degrees Fahrenheit to slightly boost the activity of beta amylase.
Mash Agitation
Commercial bourbon mashing equipment often contains a mixing paddle or rakes that stir water as grains are added and is also used to agitate the grain as it is mashing in order to increase starch conversion. We don't need something like that because we're using a small kettle and we're able to stir by and if we wish. We generally don't do this. Our standard practice is to use hoses and a pump to wort through the grain bed. However, we were being lazy on this particular day and didn't want to have to clean the hoses and pump later. So instead, we just stirred the grains occasionally with a large paddle.
Measuring and Adjusting Mash pH
One of the conditions needed for optimal starch to sugar conversion is proper pH. It's generally agreed upon that anywhere within the range of 5.2 to 5.8 is acceptable for mashing. Starting pH (after mashing in but before adjusting) will vary from batch to batch depending on the natural pH of the mash water, the amount of buffering agents present, and the amount and type of grain being used. Though typically, pH will need to be manually lowered when making bourbon mash because the grain used for distilling is only lightly kilned, which doesn't contribute as much to pH drop as more aggressively kilned, darker malts do.
To measure pH, wait 10 minutes after mashing in. Take a sample of wort from the top of the kettle and measure pH with a high quality pH meter. We wish we could recommend an inexpensive pH meter, but the cheap ones just never seem to work correctly. The only meter we can really vouch for is the MW102. It provides accurate readings, is very reliable, and can be easily re-calibrated.
If pH is low, add lactic acid, stir, and re-test after a few minutes. If pH is low, add calcium carbonate, stir, and re-test after a few minutes. Once pH is somewhere in the range of 5.2 - 5.8, move on. Note, if pH is out of range, the mash will likely still work just fine. Though maximum efficiency may not be achieved.
Mash Time
Mash time is almost always listed as 60 minutes. However, it may take more or less time depending on the type of grain being used. If a lot of cracked corn is being used in a mash, as opposed to flaked maize, mashing may take 90 minutes or longer. However, if flaked maize is used along with a fair amount of malted barley, or if enzymes are added, mashing could take 45 minutes or less. There are two ways to tell if a mash is done. The first method is to measure specific gravity and compare it to the recipe details, if a recipe is being followed. Once specific gravity equals or is higher than the recipe calls for, the mash is likely complete. The second method to measure mash "doneness" is to complete a starch conversion test, which is described below.
Starch Conversion Test
This isn't always necessary, and we rarely do it, but we conducted a starch conversion test to make sure the enzymes in our mash did their job and actually converted all of the starch into sugar. To complete a starch test we took a sample of wort from the kettle (clear liquid only, no solids), dripped it on a white plate, then added a drops of iodine. Tincture of iodine will work (from a pharmacy) will work. Five Star Chemical's Iodophor sanitizer will also work.
If the iodine immediately turns purple or black when dripped onto a sample of wort there is still starch present and conversion is not complete. If it stays orange or yellow, conversion is complete. Note, a very hot sample can give a false positive for starch, so let the sample cool for a minute or two before adding the iodine. Chunks of grain will also indicate a positive. Finally, if left to sit for long enough the iodine will eventually turn purple or black. Look for a change in the first 10 seconds or so.
Mash-out
After the conversion test indicated that our mash was done, we increased the mash temperature to 170 Fahrenheit and left it sit for 20 minutes to loosen the grains up a bit. Completing a mash-out will allow the extraction of more sugar and boost brew house efficiency by about a point.
Completing a mash-out will also flash pasteurize the mash as most naturally occurring bacteria will not be able to survive in this environment. This means that the flavor profile that resulting from this distilled wash will be more predictable, as wild yeast and bacteria will not have a chance grow. More on that later.
Also, consider adding yeast nutrient at this point. More information is provided in the next section.
Pulling the Grains
After mashing was complete we elevated the grain basket above the mash liquid by pulling it out and then suspending it on clips provided with Clawhammer's 20 gallon brewing system. Water soaked grains are extremely heavy and this task pulling such a heavy basket would normally necessitate the use of a brewing pully. However, because we had a few friends over we were easily able to lift the basket by hand. We left the basket in place over the kettle for 10 or 15 minutes then we pressed it to squeeze as much liquid out of the grains as possible.
Fermentation is the stage in bourbon production where the alcohol is created. Without yeast, the production of alcoholic beverages would be extremely difficult and they may not exist at all. There are several components to the fermentation process that are important to keep in mind: specific gravity, temperature, aeration, nutrients, pitching rate, and time.
Bourbon Fermentation Steps
Here is the specific procedure we followed for fermenting our Bourbon mash.
This step is optional, but it's certainly a good idea. Low ABV, all-barley mashes contain all of the nutrients necessary for maintaining yeast health and proper fermentation. However, as the relative percentage of corn increases and the ABV goes up, the need for yeast nutrient becomes more necessary. Because this recipe is designed to produce a roughly 10% ABV wash (wash is what mash is called after it's fermented), and corn made up more than half of the grain-bill, we added yeast nutrient.
If yeast nutrient is going to be added, it's a good idea to add it during the mash-out. This way if there is any wild yeast or bacteria present in the yeast nutrient, they will be zapped by the high temperature during the mash-out.
The wort must first be chilled to roughly 70 degrees Fahrenheit to kick off fermentation. Temperatures much lower than than this will cause fermentation to get off to a slow start or it won't happen at all. Temperatures significantly higher than this will cause yeast to be overly active and produce funky (potentially unwanted flavors) and could actually cause the yeast to die.
Chilling wort is generally accomplished by using an immersion chiller, a plate chiller, or a counter-flow chiller. Immersion chillers simply consist of of a coil, which is submerged in to the mash. A plate chiller is a small block with multiple parallel, but separate, plates. Cool water is circulated through one side of the plate chiller and mash is circulated through the other side. A counterflow chiller looks like an immersion chiller but works like a plate chiller. It consists of two pipes, one inner pipe and an external pipe that fits around the inner pipe like a jacket. Mash is circulated through the inner pipe and cool water is circulated through the outer pipe.
In order to determine the pre-distillation ABV as well as to have an idea of when fermentation is complete, we took a specific gravity reading should. This can be accomplished by floating a brewing hydrometer in the liquid. Note, brewing hydrometers are different from distilling hydrometers.
After taking our reading we transferred the liquid to a fermenter. For this type of thing we typically use food grade plastic buckets. They're cost effective, they're durable, and they get the job done.
Exposure to oxygen after fermentation is typically a bad thing but yeast need a bit of oxygen before fermentation begins. To aerate our wort we shook the fermentation buckets for 60 seconds each.
After aeration we pitched distillers yeast. It's always best to follow the directions on the package, but Jesse, our master distiller, eyeballed it. Watch our video on how to make bourbon for more information on this step.
Once the liquid was in the fermenter, we added an airlock and set the bucket aside in a cool, dark room and let it sit for a couple of weeks. At that point we took a specific gravity reading to determine the density of the liquid. We're looking for 1.010 or less. Ideally it will be near 1.000 or even below. At this point fermentation is complete and the liquid is ready for distillation.
If you live in New Zealand you can legally distill this Bourbon Mash. Check out Jesse's video on how to do that below. Also, we've summarized the detailed steps to distilling here as well.
The bourbon distillation process is comprised of several steps. Remember, distilling spirits at home is illegal in the United States. This information is for educational purposes only.
Bourbon Distillation Stripping Run Steps
Check final gravity
Prepare a pot still for distillation
Charge the still (add the wash to the still)
Ensure that the liquid completely covers the heating element at all times
Secure chilled water supply and drain hoses to condenser before heating still
Add an anti-foaming agent to the pot
Properly ventilate the distillation area at all times
Ensure there is no vapor leaking from the still for every run
Ensure that the still is not completely sealed for every use
Heat the wash and begin a stripping run
Always ensure that distillate is cool to the touch coming out of the still
Collect all distillate until the distillate being produced is 5-10% ABV or less
Complete 2 more stripping runs with the fresh, undistilled wash
Empty and rinse still
Bourbon Distillation Spirit Run Steps
Add liquid from all three stripping runs to the still;
Apply heat and begin a spirit run;
Discard at least the first 50 milliliters, as this could contain methanol;
Collect spirits in 450 milliliter container, this is the heads cut;
Begin collecting in smaller containers;
When harshness subsides, begin collecting the hearts cut;
Once the distillate tastes thin and watery, separate into the tails cut;
Jesse made quick work of this task. What we've technically made is regular ol' bourbon. Not straight bourbon and obviously not bourbon that has been bottled in bond. So, according to the definition of bourbon, the distilled spirit only needs to be in a new oak barrel for...well, a few seconds, we guess!
Add proofed down hearts to a new, charred, white oak barrel and age until the spirit is rich and complex, yet smooth.
This is another easy step. Because we didn't produce an entire warehouse full of barrels of the bourbon we made, no blending was required. So technically, what we would have made is single barrel bourbon. However, for to to be bourbon it should be at least 80 proof. Many say that 100 proof is ideal. Once the desired proof has been achieved, add to a bottle and cork or cap. Congratulations, you just learned how to make bourbon.
]]>
https://www.clawhammersupply.com/blogs/moonshine-still-blog/how-to-make-whiskey2022-12-07T13:30:00-05:002024-04-30T15:20:11-04:00Comprehensive Guide to Making Whiskey: Step-by-Step ProcessKyle BrownMore]]>
Some say that whiskey (also spelled whisky) is the most popular distilled spirit in the world. It's consumed across the globe and is made on every continent. But exactly how is whiskey made? In this article I'm going to explain how to make whiskey, step by step, with the help of a master distiller. I've also created a two part video series which can be found below.
Table of Contents
Before getting into how whiskey is made i'm going to provide a bit of helpful background information. This will include the following:
Whiskey is made all over the world and the definition varies from region to region. Though, according to the TTB, the legal definition of whiskey (whisky) in the United States is, "Spirits distilled from a fermented mash of grain at less than 95% alcohol by volume (190 proof) having the taste, aroma and characteristics generally attributed to whisky and bottled at not less than 40% alcohol by volume (80 proof)." Though, keep in mind that there are several different sub-types of whiskey. For example, Bourbon, Rye, Wheat, and Corn Whiskey each have their own definition. We'll clarify some of the differences below.
The answer to question of what is whiskey made of depends on the exact type of whiskey in mind. Single Malt Scotch Whisky (notice the omission of the "e" in "Scotch Whisky"), for example, is made with 100% malted barley contains no other types of grain. However, most other types of whiskey typically contain additional cereal grains. The three main ingredients most whiskies are water, malted barley, and yeast, but whiskey also typically contains corn, rye, wheat, oats, and more.
Water
Proportionally, water is the primary ingredient in whiskey. Tennessee Whiskey and Bourbon mash has been traditionally made with natural, limestone filtered water. This removes iron and adds calcium and other minerals, which is good for fermentation.
Barley
While malted barley is not always the primary grain used to make whiskey, it's almost always included in a whiskey mash. This is due to the fact that the malting process creates enzymes that convert the sugar in the barley and the rest of the grain into sugar during the mashing process.
Yeast
Yeast is another critical ingredient in whiskey. Yeast eat sugar during the fermentation process and produce alcohol. Without yeast, whiskey would not contain alcohol.
Corn, Wheat, Rye and Oats
Varying amounts of grains like corn, wheat, rye and oats are also often included in whiskey mash. The type and amount depends on the desired characteristics of the final product. For example, corn provides full bodied sweetness, wheat tends to make for a smoother and more mellow whiskey, and rye creates heat and spice.
When it comes to proofing and aging whiskey, there are several important benchmarks that must be observed.
Distillation Proof
For example, during the distillation process, proof never exceeds 160. Why? Because higher proof means less flavor, and unlike vodka, for example, whiskey is meant to be full bodied, aromatic, and flavorful.
Barrel Proof
Whiskey is also generally not barreled at no more than 125 proof (62.5% ABV). The upper limit on barrel proof was created with the final product in mind. Whiskey barreled at higher than 125 proof tends to be more robust than whiskey barreled at a lower proof, but more is not always better. Barreling whiskey at a very high proof can result in what some would consider a "harsh" final product.
Barrel Age
As far as aging goes, requirements vary quite a bit from spirit to spirit. In general, there is no minimum age requirement for "Whiskey." However, if aged for less than 4 years, the duration of aging must be specified on the bottle. Additionally, specific types of Whiskey, such as Straigh Whiskey and Bourbon have specific aging requirements. Straight Whiskey must be ages for a minimum of 2 years and Straight Bourbon Whiskey must be aged in a charred, new oak barrel for 2 years.
Bottle Proof
In the United States, whiskey is always bottled somewhere between 40% ABV (80 proof) and 80% ABV, (160 proof). This range is specified to ensure a consistent flavor, aroma, and strength for the style.
According to chapter 7 of the TTB's Alcohol Beverage Manual, food coloring and artificial flavoring can be added to whiskey. In fact, almost every type of American whiskey, with Bourbon being the only exception, allows for artificial flavoring and food coloring in amounts up to 2.5%. of the total volume. The only other type of whiskey made in the U.S. that cannot contain added color and flavoring is whiskey labeled as "straight." For example, "straight whiskey," and "straight rye whiskey" cannot contain such additives.
Although whisky was first produced in Ireland and Scotland, it also has an incredible history in America. In fact, in a letter sent from George Washington to John Hancock in August of 1777, the former suggested that the newly formed American Government set up public distilleries because importing whiskey from Europe had become nearly impossible due to attacks levied by the British Navy. Why was this so important? Well, because the soldiers needed it, of course.
In like manner, since our Imports of Spirit have become so precarious—nay impracticable on account of the Enemy’s Fleet, which infests our Whole Coast, I would beg leave to suggest the propriety of erecting public Distilleries in different States. The benefits arising from the moderate use of strong Liquor have been experienced in All Armies, and are not to be disputed.
George Washington would later open his own distillery at Mount Vernon, his private estate, located just 7 miles south of Washington DC.
In this article I discuss the definition of whiskey as well as the step by step processes one would take to make whiskey. Note, the legality of making whiskey at home is no different than the legality of making moonshine at home. Please note: this article is for educational purposes only. Don't try this at home.
There are a lot of different types of whiskeys. Bourbon is one of my favorites. But I also love Scotch and Irish whisky. Hell, I love Japanese whiskey too. Hmm, perhaps it's safe to say that I love all types of whiskey. That's why it was so difficult to decide upon a whiskey recipe for this project. Though, after a lot of deliberation I decided to make something closer to a Tennessee style whiskey.
Tennessee whiskey is made primarily with corn. Malted barley is added for starch conversion and body. And rye and wheat are also often added to either spice things up or mellow them out. The exact details of are recipe are as follows.
The type of water used for making whiskey can have a significant impact on the final product. In general, slightly elevated mash pH will produce a smoother, mellower tasting whiskey.
The grain used to make whiskey will actually lower the pH of water during a whiskey mash. To prevent this, calcium can be added, which is a buffering agent and neutralizes the pH drop. For this reason, whiskey made in and around Kentucky and Tennessee in the United States, home to a natural limestone aquifer, has historically been some of the best in the world. Limestone is primarily composed of calcium carbonate and works great for preventing pH drop.
This recipe calls for 9 gallons of water with a neutral pH and some limestone.
If you watched the video you likely noticed that there was an issue with the amount of water used for this recipe. The exact amount of water needed is going to be highly dependent on the type of corn used and the brewing equipment used to make the mash. I recommend starting with about 9 gallons of water and adding more until the mixture is fairly "loose" and soupy.
This style of whiskey is made using typical whiskey grains (corn, barley, and rye). The mash bill for Jack Daniel's, one of the most popular whiskies in the entire world, is made with 80% corn, 12% barley, and 8% rye.
Keep in mind that final product that comes out of a still is only going to taste as good as the ingredients that went in to begin with. Accordingly I'm using an "all-grain" mash bill in this whiskey recipe.
Making a whiskey mash involves crushing grain and then mixing it with hot water. The purpose of making a whiskey mash is to convert complex sugars into simple sugars that are more easily consumed yeast and turned into alcohol during the fermentation process.
Note, the ingredients above are portioned to allow for mashing to comfortably take place in a 20 gallon kettle and represent approximately 1/3 of the total ingredient amounts needed in order to make 15 full gallons of wash for a stripping run and a subsequent spirit run in an 8 gallon still.
You'll either need to make this mash recipe 3 times or you'll need to scale it up and brew it in a larger brewing system in order to use the 8 gallon still that was used for this process.
To make the mash, I'm doing something similar to how Jack Daniel's makes their mash. Howevever, Jack first gelatanizes the corn at 212F, they allow it to cool to 170F and add the rye, then they cool it all the way down to 148F and add their malted barley. Because I'm using flaked maize, which is pre-gelatinized, I don't need to cook the grains at 212.
There are quite a few ways to mash grains including fly sparging, batch sparging, step mashing, and the brew in a bag (or basket) method. This article will focus on the brew in a bag process as it is the easiest and requires the least amount of equipment.
The brew in a bag method is the easiest way to mash grains for an all grain mash. In this method, crushed grain is added to a mash strainer basket - the mash strainer bag acts as a filter which makes it very easy to remove the grains from the wort at the end of the mash.
After the mash is complete, the mash bag is simply lifted out of the mash tun, allowing the wort (the liquid after mashing) to drain back into the kettle. I used Clawhammer's 20 gallon brewing system to make the whiskey mash.
One final ingredient will be needed to make whiskey and it's arguably the most important:
Distillers yeast
Distillers yeast will eat the sugar in the mash and turn it into alcohol. It'll also produce a lot of flavor and aroma compounds. Because the alcohol by volume (ABV) of the mash is quite high (about 10%), it's imporant to use yeast that can handle that amount of alcohol without getting too stressed. That's why we recommend using distillers yeast. It's also important to cultivate the right environment for optimal fermentation.
To make sure fermentation goes off without a hitch, first make sure to clean and sanitize everything that the chilled wort will come in contact with (this does not include the brewing system). Cleaning and sanitizing all equipment is the best defense against getting an infection that will contaminate the mash. Using a cleaner such as PBW and a sanitizer such as star-san will decrease the likelihood of a contaminated batch of wash.
Beyond cleaning and sanitation, make sure to aerate the mash before adding yeast, as the yeast will need a bit of dissolved oxygen to produce additional healthy cells. The easiest way to do this is to shake the fermenter for about 2 minutes before adding the yeast. Also, store the fermenter somewhere with a stable temperature around 70 degrees Fahrenheit. You'll also want to keep it out of direct sunlight.
Here's the entire whiskey mash fermentation process:
As I mentioned above, this article is for educational purposes only. Making a mash at home is legal. But distilling alcohol is illegal without a federal, state, and local permits. Clawhammer's distillation equipment is designed for legal uses only. Please read our complete summary on the legalities of distillation for more information.
Here's a video that shows each step of the whiskey distillation process. The entire process is also detailed below, step by step.
Conduct a Stripping Run
Jesse conducted a "half stripping" run for this project. That means that some, but not all of the wash was quickly run through a pot still before being added to a column still for a final distillation.
Note, this procedure is slightly modified from Jesse's procedure in the video below, but matches the mash recipe above a bit better.
Here's how Jesse completed stripping distillation for his whiskey mash:
Place the still outdoors or in a well ventilated area.
Add 6.5 gallons of wash to the still along with an anti-foaming agent.
Install the still lid, column, cooling hoses, and drain hose.
Ensuring that liquid completely covers the heating element at all times, heat the still to at least 174F.
As the still is heating, check for vapor leaks.
Collect the stripping distillate in a sturdy container.
Always ensure that distillate is cool to the touch coming out of the still and that vapor is escaping leaking from the still output hose.
Collect all distillate until the distillate being produced is 5-10% ABV or less.
Complete 1 more stripping runs with the fresh, undistilled wash.
Empty and rinse still.
Conduct a Spirit Run
Following the same safety procedures listed above, Jesse did the following to complete his stripping run using a column still with a copper shotgun condenser.
Add the remaining wash as well as the liquid from both stripping runs to the still.
Apply heat and begin a spirit run;
Discard at least the first 75 milliliters, as this could contain methanol;
Collect spirits in individual 475 milliliter containers, labeling each one numerically as it is filled by the still.
Early numbered containers will contain heads.
The middle numbers will contain hearts.
Later containers will contain the tails.
Separate containers based on aroma and taste.
Charcoal Mellowing Whiskey (Optional)
Charcoal mellowing is what sets Tennessee whiskey apart from all other types of whiskey. Here are the steps that Jesse followed to charcoal mellow whiskey:
Chop maple hardwood into small pieces
Place the maple in a metal container with a small vent hole
Heat the container in a hot fire for several hours
Allow to cool.
Place maple charcoal in a column
Slowly drip whiskey into the charcoal bed
Allow the whiskey to drip through the bed of charcoal
Whiskey can be quickly aged in small batches using charred white oak. The process for aging whiskey is as follows:
Place whiskey in a small container.
Add charred white oak to the container.
Allow to sit for up to 6-8 months.
The time required to age will depend on a lot of factors. Most important is the ratio of the volume of liquid to the amount of wood added. Jesse recommends taste testing every few weeks to determine when it's ready. Again, he can do this because it's legal where he lives.
Whiskey is blended by tasting all of the whiskey in the various aging vessels and pairing the vessels that make the best aroma and flavor combinations.
Whiskey can often be bottled in empty store-bought bottles. If the bottle was originally corked, it can be re-corked using a corking tool.
Additional Whiskey Recipes
There are many different types of whiskey which are made all over the world. Here's a list of some of the more popular types of whiskey along with some information on how each is made:
Rye whiskey - Rye whiskey mash must be made predominantly with, you guessed it, rye. Here's a sample recipe for rye whiskey mash: 60% malted rye, 35% corn, and 5% malted barley. This is actually a very special recipe. According to historical distillery ledgers dating back to the lat 1700's, this is the recipe that George Washington used to produce the rye whiskey made at his estate.
Bourbon whiskey - Bourbon whiskey is predominantly corn with malted barley for starch to sugar conversion. It's then either rounded out with rye for a more lively drinking experience and spicy finish or with wheat to mellow things out. I prefer to keep things a bit more on the mellow side with Bourbon since it's already very robust given the amount of corn in the mash bill and the new white oak barrels that are used to age it. My preferred recipe is: 70% corn, 16 wheat, and 14% malted barley. Note, enzymes may need to be added to this recipe to achieve complete saccharification.
Scotch whisky -Scotch whiskey is made in Scottland, as one might imagine. The legal definition for Scotch sates that it must be, "...distilled at a distillery in Scotland from water and malted barley (to which only whole grains of other cereals may be added)." I take this to mean that Scotch is primarily malted barley and minimally "other cereals." My suggested malt bill would be 85% malted barley and 15% corn.
Tennessee whiskey - Although listed above, here is my preferred Tennessee whiskey recipe: 80% corn, 12% malted barley, 8% rye.
Wheat whiskey - Wheat whiskey is one of my favorites and a wheat whiskey recipe would look something like this: 51% wheat, 80% wheat, 15% malted barley, 15% corn.
Moonshine - Like Bourbon and Tennessee whiskey, moonshine is made predominantly using corn and malted barley. One of the moonshine recipes that I hear is more common is 82% corn and 18% malted barley.
]]>
https://www.clawhammersupply.com/blogs/moonshine-still-blog/lavender-farmhouse-with-charles-hoskinson2022-11-14T11:46:56-05:002024-11-15T16:12:38-05:00Lavender Farmhouse With Charles HoskinsonKyle Brown
We have a bit of a different brew day for this one. We teamed up with tech entrepreneur Charles Hoskinson, founder of IOHK and the ADA / Cardano cryptocurrency and blockchain platform. Why? Well, the record keeping aspect of blockchain technology could actually be used to improve the quality of beer, wine and spirits. We talk about that while brewing a Lavender Farmhouse beer made with Kveik yeast. Also, this is a bit of a weird recipe. Not a lot of beers are brewed with lavender. If you'd like to know what kind of food to pair this very unique beer with, check out our beer and food pairing guide.
Brew Day Video
Here's the entire Lavender Farmhouse recipe for the folks who would like to brew this recipe. Note, be very careful to not "over expose" the beer to the lavender flowers. It's very easy to overpower the beer with lavender which will make it taste like soap!
Ingredients
Water
7.86 gallons
Grain
7 lbs, 12 oz Pale Malt
1lb 12 oz Vienna Malt
1lb 11.5 oz Munich Malt
Hops, Etc.
3oz Huell Melon hops
2 oz Liberty hops
1 oz Willamette hops
0.25 oz dried lavender flowers
Yeast
1 package Voss Kveik yeast
Procedure
Mash
Mash for 45 minutes at 152 degrees
Boil
Boil for 30 minutes.
Add 1 oz of Huell Melon at beginning of boil
Add the rest of the hops with 10 minutes left in the boil.
Add the lavender flowers (to the hop silo) once heat is turned off.
Fermentation
Chill wort to 70F
Add 1 package of Voss Kveik yeast
Ferment for 1.5 weeks at room temperature
Aging
This beer will NOT be good right out of the fermenter. In our experience it will need at least a week or two to mature.
]]>
https://www.clawhammersupply.com/blogs/moonshine-still-blog/wild-water-ipa-beer-made-with-water-straight-from-a-waterfall2022-08-08T13:58:15-04:002024-11-15T16:13:27-05:00Wild Water IPAKyle Brown
It's often said that the difference between a great beer and an amazing beer lies in the chemistry of brewing water and how well it matches the style of the beer its being used to make.
That said, we brewed this Wild Water IPA with pristine water gathered from a North Carolina waterfall. We also foraged grains, hops, and yeast from the urban wilderness of Asheville, NC.
Fill your brew kettle with 7.61 gallons of water and heat it to 156F.
Mash
Finely crush the grain by double crushing or setting the gap size on your grain mill to be smaller. Once the water is at 152F, mash in and stir to ensure all the grains are wet. Mash for a total of 60 minutes.
Boil & Hops
After mashing for 60 minutes, pull the grain basket and hook it above the kettle. Adjust the heat on the controller to start a boil. Let the grains drain for at least 10 minutes. Once a boil is reached, add the following ingredients at the following times.
60 Minutes - 2.0 oz of Mt. Hood
30 Minutes - 1.0 oz of Mt. Hood
15 Minutes - 1.0 oz of Mt. Hood
0 Minutes - 1.0 oz of Mt. Hood
With 10 minutes left in the boil, hook up a plate chiller and run boiling wort through it. This will ensure that it is sanitized. At the end of the boil, chill the wort to yeast pitching temperature (68-73F). Make sure to grab a sample of wort before moving on in order to check the starting gravity to determine the ABV once fermentation has finished.
Yeast & Fermentation
Transfer chilled wort into a sanitized fermenter and pitch one pack of WLP008 East Coast Ale Yeast. Ferment between 68 - 73F for at least 10 days. Here's how to tell if fermentation has finished.
Tasting
Overall, this was a nice bitter IPA with a soft mouthfeel and a slightly sweet finish. This was a fun experiment and shows that as good beer starts with good water.
]]>
https://www.clawhammersupply.com/blogs/moonshine-still-blog/how-to-fix-bad-beer-removing-acetaldehyde-from-homebrew2022-06-20T13:18:32-04:002024-11-15T16:14:52-05:00How to Fix Bad Beer | Removing Acetaldehyde From HomebrewKyle BrownAcetaldehyde is a common off-flavor in beer that tastes like green apples. Needless to say, it’s not a desired flavor. We recently brewed a West Coast IPA that tasted sweet and tart, like a green apple, instead of bitter and dank. We knew Acetaldehyde was causing this, so we came up with a quick and easy strategy to remove this common off-flavor. Learn what causes Acetaldehyde and how to remove it from your beer below!
Full How-To Video
Watch us remove Acetaldehyde from a West Coast IPA in the video below.
How Is Acetaldehyde Caused?
Acetaldehyde is a natural byproduct of fermentation, but if fermentation finishes completely the yeast naturally cleans up this off-flavor. Acetaldehyde is caused when fermentation does not fully complete. Below are some reasons why this may happen.
Not pitching enough yeast
Not aerating your wort before fermentation
Racking the beer into a keg before fermentation is complete
Fermenting your beer at incorrect temperatures
We believe our West Coast IPA tasted like Acetaldehyde because we racked it into a keg too soon.
How to Remove Acetaldehyde From Beer
In order to remove this green apple flavor from our beer, we came up with the strategy of making a yeast starter and adding actively fermenting wort to the beer. This will kick off fermentation in our beer again and the yeast will clean up any acetaldehyde.
To learn how to make a yeast starter, read this article here or watch the video above. Please note that we did two things differently when making a yeast starter for this project. Instead of putting our scientific flask directly on a hot plate, we put it in a pot of boiling water. Putting a flask directly on a burner can stress the glass and cause it to break. We also did not use a foam stopper to cover the top of the flask. Instead, we used a small sanitized bowl and placed it upside down over the opening of the flask. A foam stopper or a sanitized bowl both work fine.
Once you’ve made your yeast starter, open up your beer that tastes like acetaldehyde and pitch the yeast starter into the beer. Seal the beer back up and let it ferment for 10 days.
Conclusion
Our strategy worked! Once we tasted our beer after 10 days, the apple flavor was gone! However, the hop flavor and aroma had almost completely disappeared. If you’re trying this strategy with an IPA like us, we recommend dry hopping for 2-3 days after fermentation has completed again.
]]>
https://www.clawhammersupply.com/blogs/moonshine-still-blog/how-to-make-amazing-non-alcoholic-beer2022-06-13T16:01:23-04:002024-11-15T16:15:38-05:00How to Make AMAZING Non Alcoholic BeerKyle Brown
There are a lot of different ways to make non alcoholic beer. But we think we accidentally stumbled on the absolute best way to make NA Beer. It involves what is called a Parti-Gyle mash, which is a process whereby beer is made using spent grains from a previous batch of beer. We've tried this a half dozen or so times now and every single batch has been absolutely delicious. It's also completely passable for normal beer. Here's how to make non alcoholic beer.
How to Make Non-Alcoholic Beer
You can use this process for any beer you brew. However, in order for this to qualify as non-alcoholic, we recommend that the ABV of your original beer be 5% or less.
Make a normal beer mash.
Transfer the spent grains to another kettle (or bucket) and rinse (sparge) them with 5.5 gallons of fresh water.
Boil for 60 minutes. At the beginning of the boil, add 1 oz of your favorite hops
Chill to 70F and pitch your favorite yeast.
Ferment completely under pressure in a keg (no airlock!) for at least 2 weeks
Cold crash, and put on tap.
If you'd rather watch a video about the process, here's a tutorial on making non alcoholic beer with moving pictures:
There are some caveats. First, this will result in beer that has a half percent of alcohol or less, which meets the definition of an NA beer. To stay under this benchmark, the starting gravity of the initial beer mash should be for a 5% ABV beer (or less). Anything more will result in final alcohol of the NA beer that exceeds a half a percent. Below are some recipes we've made that you can start with
Second, keep the hop additions to 5 ounces or less. Anything more will be overpowering. And you probably don't need an entire package of yeast either. Half will do.
N/A beer can be made a number of different ways. One of the better ways to do it is to just create a very small mash with a couple of pounds of grain. However, we prefer to make non-alcoholic beer how we've outlined above because spent grains are a waste product and are virtually "free." Cheers!
]]>
https://www.clawhammersupply.com/blogs/moonshine-still-blog/hoppy-lager-with-talus-hops2022-06-03T15:34:14-04:002024-11-15T16:15:24-05:00Hoppy Lager With Talus Hops - Homebrew RecipeKyle Brown
We invited Steve The Apartment Brewer and CH from Homebrew 4 Life over to brew a hoppy lager using Talus hops. We’ve never used these hops before, but we were pleasantly surprised when we tasted the finished beer. Read on to see how it turned out. All the recipe details are below.
This recipe is for a 5 gallon batch of beer and it’s tailored for our 10 gallon 120 volt brewing system. Watch us use it in the full brew day video below.
Fill your kettle with 7.3 gallons of water. Add .5 of a campden tablet to remove chlorine and chloramine. Set the temperature on your controller to 152 and start heating up the water.
Finely crush your grain by double crushing or setting the gap size in your mill to be very small. Once your water reaches 152F (66.6C), mash in. Hold the temperature of 152F (66.6C) and recirculate using the spray valve for one hour.
PH
Adjusting pH is optional, but just like water chemistry, doing this will lead to a better finished beer. Check your pH 5 - 10 minutes into your mash. Add lactic acid until the mash reaches a pH of 5.2 - 5.4. Be careful adding lactic acid, a little goes a long way.
Boil & Hops
After mashing for 60 minutes, pull your grain basket and hook it above your kettle. Let it drain for about 10 minutes before removing it. Increase the temperature on your controller or set it to 100% of power in order to start a boil. Once a boil is reached, follow this hop schedule. This recipe calls for a 60-minute boil.
10 Minutes - 1 oz of Talus
With 10 minutes left in the boil, hook up your plate chiller and run boiling wort through it. This will ensure that it is sanitized. At the end of the boil, chill the wort to 175F. Hold 175F for 20 minutes and add the following hops as a whirlpool addition.
Whirlpool at 175F for 20 minutes - 3 oz of Talus
After whirlpooling for 20 minutes, chill the wort. If you are fermenting this lager under pressure, chill the wort to room temperature. If you are traditionally fermenting it, chill the wort to 53 - 64F. We pressure fermented this lager. To learn more about traditionally fermenting lagers, read this article.
Yeast & Fermentation
Once the wort has reached room temperature, transfer it into a keg or another vessel that can be pressurized. We transferred this beer into a keg fermenter that we are in the process of developing right now, you can pre-order and learn more about it here. Before transferring, we installed a floating dip tube in our keg so we don’t have to transfer the beer once it’s done fermenting.
Once the wort is transferred, pitch 1 pack of Saflager S-189 and aerate the wort by shaking. Install a spunding valve to your pressure fermentation vessel and set it to 15 psi. Let it ferment at room temperature for at least 2 weeks. To learn more about pressure fermentation, watch this video below
Tasting
Our first impression upon tasting it was “tastes like the best day ever.” This lager was amazing. The hops did not give a traditional “orange” or “grapefruit” flavor to our beer, but rather a strong berry and strawberry flavor. It was unlike anything we had ever tasted before. You may have noticed that this recipe is a bit untraditional since it has no 60 minute hop addition, but all of us agreed that the beer was still very balanced. We liked the lack of bitterness. The pressure fermentation worked great as well because the beer was super clean tasting. Overall, give this beer a try if you’re looking for something that’s not as hoppy as an IPA, but still hoppy.
]]>
https://www.clawhammersupply.com/blogs/moonshine-still-blog/forbidden-rice-black-lager-homebrew-recipe2022-05-20T18:16:46-04:002024-11-15T16:11:23-05:00Forbidden Rice Black Lager Homebrew RecipeKyle Brown
We made the darkest and simultaneously lightest homebrew ever and it might just be a new beer style. It's a black lager that's super roasty but also super light in body. We achieved this vibe by using an absurd amount of black patent malt and a ton of black rice. This is a recipe for a 10 gallon batch of beer and it's tailored for our 20 gallon 240 volt brewing system. Here's the full recipe
Ingredients
15.24 gallons of city water treated with one campden tablet
12 pounds of 2 row pilsner malt
7 pounds of black rice
3 pounds of vienna malt
2 pounds of black patent malt
1 pound of crystal 60 malt
3 ounces of Rakau hops
2 packages of Saflager 34/70 yeast
Procedure
Fill the kettle with 5 gallons of water and add the rice. Boil for 60 minutes or until rice is fully cooked.
Once rice is cooked, add 10.25 gallons of water and heat (or cool) to 158F.
Add the remainder of the grains (make sure to finely crush) and mash for 60 minutes.
Elevate grains and allow to drain for 10 minutes.
Heat kettle to a boil.
Once boiling, add 1 ounce of Rakau hops and set a timer for 60 minutes.
Once the timer expires, cut the heat and add the remainder (2 ounces) of Rakau hops.
Chill to 70F, transfer to a fermenter and pitch 2 packages of Saflager 34/70.
We recommend pressure fermenting at room temperature for 14 days, cold crashing, and serving on tap at 40F.
]]>
https://www.clawhammersupply.com/blogs/moonshine-still-blog/brewing-the-tesla-gigabeer-german-pilsner-homebrew-recipe2022-05-12T13:59:19-04:002024-04-29T15:37:45-04:00Brewing the Tesla Gigabeer | German Pilsner Homebrew RecipeKyle Brown
We brewed the Tesla Gigabeer! During the Tesla Giga Berlin event in October 2021, Elon Musk announced that Tesla will be making what they call the Gigabeer (or Gigabier if you live in Germany). The Gigabeer will be contained in an unusual bottle that seems to be inspired by the Cybertruck. Since the beer was announced in Germany and it’s inspired by a truck, we thought the only appropriate style was a German Pilsner, which is a crushable & crisp light lager. For those that don’t live in the United States, there is an actual correlation between light lagers and trucks, here’s a real study that proved this.
This is a recipe for a 5 gallon batch of German Pilsner beer using Tettnang and Hallertau hops. This recipe is tailored for the Clawhammer Supply 120 volt brewing system. Watch us use it in the video below and follow along with this article for complete details.
Fill your brew kettle with 7.2 gallons of water and start heating it to 152F (66.6C).
Water Chemistry
Adjusting water chemistry for this beer is optional, but doing so will make the final flavor better. At the very least, add .5 of a campden tablet to remove chlorine and chloramine from your brewing water.
The following are our water chemistry targets in PPM. To learn more about adjusting your own water chemistry, check out this article.
Ca: 50.9
Mg: 11.5
Na: 13
SO4: 104.6
Cl: 59.5
HCO3: 106
These water chemistry targets make the sulfates higher than the chlorides. This will help “show off” the hops and make the finished beer slightly bitter.
Mash
Finely crush your grain by double crushing or setting the gap size in your mill to be very small. Once your water reaches 152F (66.6C), mash in. Hold the temperature of 152F (66.6C) and recirculate using the spray valve for one hour.
pH
Adjusting pH is optional, but just like water chemistry, doing this will lead to a better finished beer. Check your pH 5 - 10 minutes into your mash. Add lactic acid until the mash reaches a pH of 5.2 - 5.4. Be careful adding lactic acid, a little goes a long way.
Boil & Hops
After mashing for 60 minutes, pull your grain basket and hook it above your kettle. Let it drain for about 10 minutes before removing it. Increase the temperature on your controller or set it to 100% of power in order to start a boil. Once a boil is reached, follow this hop schedule. This recipe calls for a 60-minute boil.
60 Minutes - 2 oz of Tettnang
10 Minutes - .5 oz of Hallertau
0 Minutes (flameout) - .5 oz of Hallertau
With 10 minutes left in the boil, hook up your plate chiller and run boiling wort through it. This will ensure that it is sanitized. At the end of the boil, chill the wort to yeast pitching temperature. This temperature will vary depending on your method of fermentation (explained below). If you’re fermenting under pressure, chill the wort to room temperature. If you’re fermenting this lager traditionally, chill the wort to 50 - 55F (10 - 13C). If you cannot chill the wort to this low of a temp, just get it as close as possible and allow your fermentation fridge to cool it the rest of the way.
Fermentation Option #1 - Pressure Fermentation
Pressure fermentation allows you to ferment a lager much faster at room temperature. Traditionally, a lager is fermented cold and can take a month or more to make. We pressure fermented this beer in an oversized corny style keg that we’re in the process of making. You can pre-order it here. Before putting wort into our keg, we added a floating dip tube to it, which will save us time after fermentation.
Once our wort reached room temperature, we transferred it into our keg, pitched the yeast, and aerated by shaking the keg back and forth for 1 minute. Then, we attached a spunding valve to the keg that was set to hold a pressure of 15 PSI. In order to reach this pressure immediately, we connected a CO2 tank to our keg, added 15 PSI of CO2, and then disconnected the tank. This is optional, as the yeast will naturally create enough CO2 to add 15 PSI worth of pressure during fermentation.
After 2 weeks, we took a gravity reading. The beer reached a final gravity of 1.008, so it was definitely done. We then moved this beer into our kegerator to chill and carbonate it. Since we added a floating dip tube to our keg, we do not need to transfer the beer into another keg. The floating dip tube will pull beer from the top of the keg, instead of the bottom, which is where all the yeast settles to.
This beer turned out great! We’re sure Elon would be proud and we know that he definitely wouldn’t sue us because of all our hard work. With a light body, slightly hoppy flavor, and crisp finish, this beer is one of our most crushable yet. If you like this beer, we recommend you check out some similar recipes below.
]]>
https://www.clawhammersupply.com/blogs/moonshine-still-blog/cereal-milk-stout-making-beer-with-lucky-charms2022-03-31T15:10:16-04:002024-04-29T15:39:16-04:00Cereal Milk Stout - Making Beer With Lucky CharmsKyle Brown
Did you know that beer and cereal are actually made using the same primary ingredients!? In this homebrew beer recipe, we’re going to show you how to turn cereal into beer! The definition of the word cereal is, “Any plant of the grass family yielding an edible grain.” Plants in the grass family include barley, wheat, oats, rye, corn, and rice. All of these grains are primary ingredients in both breakfast cereal and beer. For this recipe, we’re adding Lucky Charms to a milk stout.
Lucky Charms (or your choice of an oat-based cereal) - 2 lbs
Hops
Magnum - .5 oz
East Kent Goldings - 1 oz
Yeast
WLP001 California Ale Yeast
Other
Whirlfloc Tablet
Lactose - 8 oz
Campden Tablet
Brew Day Instructions
Water
Fill your brew kettle with 7.7 gallons of water and heat it to 156F. Add .5 of a Campden tablet to remove chlorine.
Mash
Finely crush your grain by double crushing or setting the gap size on your grain mill to be smaller. You do not need to crush the Lucky Charms. Once your water is at 156F, mash in and stir to ensure all the grains are wet. When we mashed in, the Lucky Charms did not smell that good at all. Although the smell did dissipate later into the mash. Mash for a total of 60 minutes.
Boil & Hops
After mashing for 60 minutes, pull the grain basket and hook it above your kettle. Adjust the heat on the controller to start a boil. Let your grains drain for at least 10 minutes. Once a boil is reached, add the following ingredients at the following times.
60 Minutes - .5 oz of Magnum
10 Minutes
1 whirlfloc tablet
8 oz of lactose
1 oz of East Kent Goldings
With 10 minutes left in the boil, hook up your plate chiller and run boiling wort through it. This will ensure that it is sanitized. At the end of the boil, chill the wort to yeast pitching temperature (68-73F). Make sure to grab a sample of wort before moving on in order to check the starting gravity to determine the ABV once fermentation has finished.
Yeast & Fermentation
Transfer your chilled wort into a sanitized fermenter and pitch one pack of WLP001 California Ale Yeast. Ferment between 68 - 73F for at least 10 days. Here's how to tell if fermentation has finished.
Tasting
We joked with each other that this beer would be “the worst beer we ever brewed” and we thought we may be right because of how bad the mash smelled. However, not only was this beer not bad, it was pretty good too. Overall, this was a nice light stout with a creamy mouthfeel and a classic roasty, slightly sweet flavor. This was a fun experiment and shows that as long as you’re good with sanitation, it’s hard to mess up a beer.
]]>
https://www.clawhammersupply.com/blogs/moonshine-still-blog/advanced-brew-in-a-bag-biab-mashing-techniques2022-03-30T00:19:21-04:002024-10-09T22:57:59-04:00Advanced Brew In A bag (BIAB) Mashing TechniquesKyle Brown
In a separate article called How to Make a Beer Mash, we’ll discuss the actual steps involved in the mashing process. In this piece, we’ll dig into some general information that every intermediate to advanced brewer should know about mashing. We'll also talk about mashing techniques that every brew in a bag or BIAB brewer should know in order to successfully make high gravity beers in kettles that have limited space.
Why Mashing Temperature Matters
Getting your temperature right when it comes to the mashing process is critical for any advanced homebrewer. That’s because it affects the fermentability of the wort since it helps determine how effectively you are breaking down the bonds in the starches in your malt.
That’s because during the mash, you are activating two kinds of enzymes – beta- and alpha-amylase – which are most active at different temperatures.
Beta-amylase is more effective at producing fermentable sugars in the wort and is favored when the mash temperature is between 140 and 149 degree F.
Alpha-amylase, on the other hand, leaves larger and more complex sugars in the wort that are less fermentable. The optimal mashing temperature for alpha-amylase is between 155 and 158 degrees.
Although each of these enzymes has a temperature range where they are most active, each will be active to a lesser extent on the fringes of that range. Just because you mash at 155 degrees, it does not mean that beta-amylase is entirely inactive, it means that alpha is more active than beta.
Because of these differences, brewers have devised different mashing techniques as a way to leverage the strengths of these enzymes in the wort by controlling the temperature at which you mash.
Mash temperature is a major factor in creating a dry beer vs. a sweet beer. Lower mash temperature = drier beer; higher mash temperature = sweeter beer.
In general, you will get sweeter, fuller-bodied beers if you mash at higher temperatures (156 to 158 degrees F) and drier, less full beer styles if you mash at lower temperatures (148 to 150 degrees F).
Step Mashing
While many newcomers to all-grain brewing hone their skills with one-step or single-infusion mashing, more advanced brewers may employ multi-step mashing.
Using a stepped approach to your mash allows you to tweak your wort to get your desired result – whether that be dry or sweet, velvety or lightly astringent – it’s the complexity of the sugars in the wort that determine the mouthfeel of your beer.
Stepped mashing is also useful for breaking down proteins (protein rest) which can cause beer haze, and for favoring compounds such as ferulic acid that can be converted into desired flavors and aromas during fermentation.
The goal is to begin your mash at a lower temperature – something like 110-113 degrees F – and then resting there for 10 to 20 minutes, at which point proteolytic enzymes are most active. After this, ramp up the temperature to the desired mash temp (between 140 and 160). By doing this, you are giving both kinds of enzymes – beta- and alpha-amylase – optimal conditions to do their work. This is also called “multi-step resting” or “protein rest” and it’s a common brewing technique in old-school European breweries to help achieve more clarity in the beer. This mash regime of 140 / 155 degrees also produces a far more fermentable wort.
Decoction Mashing
Perfected by German lager brewers at a time before thermometers and when malt was less modified than today, decoction mashing involves removing a portion of the mash, bringing that portion to a boil, and adding it back to the main mash to raise the temperature to the next desired temperature step.
While a single decoction is viable, some brewers use double or even triple decoctions in making their beer.
Advocates of decoction mashing claim it leads to a richer malt character by increasing the Maillard reactions that occur when you bake a cake or sear a steak. A toasted grain character is achieved because as the mash is heated to boiling, some of the sugars that are exposed to extreme heat on the bottom of the decoction pot are caramelized. We actually used decoction mashing when brewing our Banana Bread Brown Ale.
Parti-Gyle Mash
While not often employed in modern brewing, this mashing technique was standard operating procedure in England for centuries. The idea was to create multiple batches of sweet wort from a single set of grains – draining off the wort each time before refilling, heating, resting, draining and restarting.
It’s a great way to make use of fermentable wort that the sparging process may continue to create. And the advantage is by separating the mash into separate batches, you can achieve the kind of gravity you’re looking for in a finished beer.
Each kettle’s worth of wort would then be boiled and hopped separately before ultimately being combined in various ways to create different beers. For example, if your first mash (or gyle) is for a strong ale or barley wine, you could then follow up with another beer style with a lower ABV, such as a mild or a bitter.
Of course, to make this work, you would need multiple sets of equipment and plenty of fermentation space.
Liquoring Back
In general, a thicker mash (a lower water-to-grain ratio) will result in a thicker, chewier beer. It’ll also increase the alcohol by volume (ABV) of the final product. Brewing software makes it very easy to fairly precisely hit this target. However, another way to do it is by “liquoring back.” To do this, a brewer will essentially make a beer stronger than it needs to be by holding back some of the water that was potentially going to be added. After the boil, specific gravity can be measured and additional water can be added to decrease the specific gravity to the exact level desired.
This is also an extremely useful tactic for making high gravity batches of beer in brew in a bag (BIAB) systems where the full volume of water and grain may not fit in a single kettle. To do this, add all of the grain and as much water as possible without overflowing the inner grain basket or bag, and add the rest of the water required after grains have been pulled. We do this often when making stronger beers such as our Russian Imperial Stout Homebrew Recipe.
Thanks for reading. Make sure to check out our brewing systems here. Also make sure to check out our articles on yeast and fermentation.]]>
https://www.clawhammersupply.com/blogs/moonshine-still-blog/yeast-the-mystery-ingredient-in-beer2022-03-28T21:01:04-04:002022-03-29T11:00:48-04:00Yeast, The Mystery Ingredient In BeerKyle Brown
Beer has long played a role in human civilizations. Some social archaeologists even believe beer was a primary driver in the switch from hunter-gatherer to agricultural society. But where does yeast come from and how does it work? We’ll tackle this and more, below.
Who Discovered Yeast?
It took a long time for us humans to realize what was helping us make our alcohol. For many eons, beer was thought to “spontaneously generate.” For many, it was considered a blessing from the gods. And, in truth, it was.
Even the pioneering Bavarian brewers overlooked yeast when, in 1516, they wrote down their strict set of laws called the Reinheitsgebot that declared that beer should only be made of water, barley, malt, and hops. Since no one could yet see them, yeast functioned like magic.
It wasn’t until the mid-nineteenth century that Louis Pasteur identified the divine force that converted wort into beer as a microorganism. Pasteur’s “discovery” of yeast had a lasting impact on brewing practices and beer flavor, and led brewers toward using pure strains of yeast to obtain repeatable flavor profiles.
How Many Types of Yeast Are There?
There are more than 1500 species of yeast. The type of yeast most commonly used to make beer is a single-cell organism called Saccharomyces Cerevisiae, which is technically classified as a fungus. And there are in fact thousands upon thousands of Saccharomyces Cerevisiae that have been cataloged and maintained by researchers and manufacturers such as White Labs and Wyeast. Different yeast strains have different characteristics – a “clean” beer like an American Blonde Ale will typically use a less expressive yeast strain than a Belgian farmhouse ale, or a German Hefeweizen.
Where Does Yeast Come From?
Yeast is everywhere in our environment. Malted grain is itself covered with wild yeast and bacteria, some of which can survive mashing temperatures. One reason that wort is boiled prior to fermentation is to kill any naturally occurring wild yeast or bacteria. After boiling, the wort is chilled to the optimum temperature for tempered yeast growth. This is typically somewhere between 50 and 70 degrees, depending on the type of yeast.
How Does Yeast Create Alcohol?
At a basic level, fermentation is the process where yeast converts sugars and other byproducts of the mashing process into alcohol, carbon dioxide, and other chemical compounds.
The life cycle of brewing yeast typically takes this arc:
Respiration: This is when the yeast is storing energy to reproduce.
Fermentation: The yeast now converts that energy into alcohol, carbon dioxide and flavors.
Sedimentation: When fermentation is complete, the yeasts go dormant.
To learn more about fermentation, we highly recommend this article on How to Ferment Beer. Also, don’t forget to check out our 10 gallon stainless steel brewing system.]]>
https://www.clawhammersupply.com/blogs/moonshine-still-blog/how-to-ferment-beer2022-03-27T14:47:14-04:002024-04-30T15:20:12-04:00How to Ferment BeerKyle Brown
Fermentation is a natural biological mechanism performed by microorganisms such as yeast. During the process of fermentation, yeast convert sugar into alcohol, carbon dioxide, and other chemical compounds. This process helps not only create but also determine the flavor of fermented food and beverages like bread and beer. That’s why learning to properly manage the fermentation process, which is really all about making yeast happy and productive, is a critical component to making great beer.
In this article, we’ll cover the basics of what happens during fermentation. We’ll also talk about creating the optimum conditions for fermentation in order to make great beer. We’ll cover advanced topics such as basic lager fermentation, pressure lager fermentation, quick lager fermentation, high gravity beers, and problems such as fixing a stuck fermentation in separate articles.
After mashing, boiling, and cooling liquid wort to a temperature of about 65-75 Fahrenheit, it’s time to “pitch” yeast and kick off fermentation. However, before that last step, the wort will be transferred to some kind of container suitable for this part of the process. In this case, the technical name of what is needed is called a fermenter, which could take the form of a plastic bucket, a glass or plastic container called a “carboy,” or perhaps some other similar device.
While glass has the advantage of being harder to scratch, and potentially easier to sanitize, it’s harder to clean (due to the small opening on top) than plastic, and it’s also heavier and slippery when wet – which can cause serious damage if a container, full or empty, is accidentally dropped. For this reason we recommend a high quality plastic fermenter or a stainless steel fermenter.
Whatever the container is made out of, it should be food-safe quality and it’s helpful if it has a handle. Bonus points if the container is transparent or see-through since that allows you to see how much beer you actually have while also doing a visual check on what’s happening with the fermentation process without having to take the lid off. Though, keep in mind, clear material must be either covered or placed in a dark room, as light will damage the precious cargo inside.
The fermenter will also need to have an airtight lid or closure as well as what’s called an “airlock,” which is a device that allows the carbon dioxide produced by the fermenting process to escape the container without exposing the beer to the outside environment. (Airlocks actually do allow air / oxygen into the vessel if the temperature drops and the beer contracts, so be careful about temp changes.)
Separate from the fermenter, sanitized hoses and a high quality siphon will be required to transfer your brew between the brew kettle and the fermenter. Finally, an additional, or a “secondary fermenter,” may come into play if a transfer is needed to allow the beer to condition for a longer period of time.
Additional “basic fermentation” equipment that one should buy includes:
A stick-on thermometer for the fermenter.
A hydrometer, which is simple rod-shaped device that measures the density of a liquid. This becomes useful after the beer has been fermenting about one to two weeks depending on the style of beer you are making and the fermentation process has begun to slow.
A “hydrometer test jar” which is a just a test tube for the hydrometer (you generally buy these separately).
And a “wine thief” or a turkey baster for taking a hydrometer sample.
How to Ferment Beer: The Complete Process
Chill the wort to 70 degrees Fahrenheit.
Using a hydrometer, take a “starting gravity” reading.
Siphon or pump the wort to a clean and sanitized fermenter (using a clean and sanitized siphon and hose).
Seal the fermenter and shake vigorously for 60 seconds. This should increase dissolved oxygen to about 8 parts per billion.
Open the fermenter again and add 1 - 2 packages of yeast (the exact amount depends on the yeast and the starting gravity).
Seal the fermenter once again.
Add a sanitized airlock, full of sanitizer solution.
Place the fermenter in a dark place with a stable temperature at or around 70 degrees Fahrenheit for ale yeast and 50 degrees Fahrenheit for lager yeast.
Wait 1 - 2 weeks for ales and 2 - 3 weeks for lagers.
Once finished, take a final gravity reading
Siphon (don’t pour) the finished beer into bottles or a keg. More on this in another article.
Assuming a starting gravity as measured and recorded, it can be compared to final gravity to determine the alcohol by volume (ABV) of the beer. It’s easiest to use an ABV calculator for this.
Optimum Fermentation Conditions
To achieve the best possible results from your fermentation, pay attention to a couple of key variables that will impact the process. We’ve discussed about some of these in a separate article on yeast, but they’re worth repeating here:
Healthy Yeast
One essential element in properly fermenting beer is using healthy yeast that has not aged past its expiration date. Healthy yeast will be more likely to create the flavor profile desired in a finished beer. Yeast typically comes in one of two forms: dried or in liquid form. Liquid yeasts only have a shelf life of a few months but have a greater range of availability. Dried yeast is more shelf stable, but the varieties are limited. In either case, make sure to check the expiration date before using!
Fermentation Pressure
Basic ale fermentation, which is what we're covering in this article, is conducted at ambient pressure. However, some beer styles and yeast types, such as hoppy lagers, benefit greatly from pressure fermentation.
Proper Pitch Rate
Pitching the proper number of yeast cells is also an integral part of a successful fermentation. Read the directions on the back of the yeast package. It will provide a limit for how much sugar one package of yeast can ferment. This depends on two factors - the total amount of beer being fermented and the starting gravity of the beer. For example, most packages of White Labs liquid yeast are able to ferment 5 gallons of beer at a starting gravity of 1.048 or less. If a larger batch is being fermented or the starting gravity exceeds that number, two or more packages will need to be used.
A secondary option to help yeast get to work faster is making a batch of “starter,” which is basically a mini batch of beer that is made a day or two ahead of the actual brew day. This allows yeast to multiply before being pitched into the actual fermenter. We’ve created a separate tutorial on how to make a yeast starter.
Sugar and Nutrients
Yeast consume sugar and create carbon dioxide alcohol and flavor compounds – but not all sugars are created equally. Almost all sugar is readily fermentable. However, something like Splenda and other low or zero calorie sugars can’t be used to make beer. Lactose also cannot be used to make beer, as it is non-fermentable. For this reason, lactose, or milk sugar, is actually used to sweeten beers such as “Milk Stouts” and “Milkshake IPAs.”
Yeast also needs essential nutrients like zinc and calcium to thrive, both of which come from malt. However, if a simple sugar like dextrose is used to make hard seltzer, yeast nutrient should be added. Again, follow the directions on the back of the package.
Oxygen
Another key variable in a successful fermentation is the level of oxygen that is dissolved in the wort. To an extent, the more oxygen present in the beer, the more yeasts will grow – which is why you aerate the chilled wort prior to adding yeast to it. However, there is a limit. For this reason, wort needs either vigorously shaken in the fermenter for a minute or two before yeast is added or an oxygenation stone should be used.
For some beer varieties like lagers and high-gravity ales, even more oxygen may be required to achieve the desired end result. This may require a taken of pure O2. But beware, according to internet lore, there is also a risk of over-oxygenating beer, so we don’t recommend using pure oxygen for normal ABV beers.
Fermentation Temperature
Controlling the temperature is a critical component of achieving a successful fermentation and high-quality finished beer. Read the manufacturer’s guidelines to know what temperature is best for a particular style of beer. Ale yeasts typically thrive at temperatures in the range of 64 to 70 degrees F (16 to 24 C) while lager yeasts like it cooler – between 48 and 58 degrees F.
Temperature control is one of the most common oversights made by new brewers. Temperatures that range too high or too low will result in off flavors in the beer, as it impacts the yeast’s appetite for feeding. For example, if fermentation temperature is too high, yeasts can die, leaving behind unpleasant chemicals such as fusel or “hot alcohol.” If it’s too low, yeast will begin to go dormant and flocculate, or sink to the bottom of your beer without finishing the job. This can result in a sweet, low ABV beer that also has a green apple taste as a result of acetaldehyde the yeast didn’t have a chance to “clean up” before going dormant.
To avoid these problems, place your fermenter in a place with a normalized temperature, and follow the manufacturer’s guidelines for the temperature range of your yeast. Also, consider brewing seasonally – if your apartment is hot in the summer, brew a saison; if it's cold in the winter, consider using a hybrid yeast like a Kolsch or California Common strain. Yeasts such as Kveik have a huge temperature range and actually perform better at higher temps.
Fermentation Time
Fermentation time is a variable that even experienced brewers overlook. The excitement associated with wrapping up a project and tasting the final product can cause even veteran brewers to end fermentation before it's actually finished. Many ales will finish in about 7-10 days, but to be absolutely certain, a final gravity should be taken to determine if the process is truly done. The appropriate final gravity number varies by yeast and by recipe, but most ales with an ABV in the 5% range will ferment down to 1.010. Additionally, even if the expected terminal gravity has been reached, off flavors and aromas may exist that the yeast could clean up if given additional time. Always smell and taste a sample of the beer before kegging or bottling.
As mentioned earlier in the article lager beer takes longer than ale to ferment. However, the process can be sped up with the quick lager process that we used for our India Pale Lager beer.
Constant Monitoring
When it comes to mastering a fermentation process, it’s also critical to pay attention to what’s happening at all stages of the brewing process, keeping on a keen eye on indicators like those listed above: temperature, gravity, PH, oxygen, and carbon dioxide. That’s why its also extremely helpful to keep a log of your activities and results as a way to spot problems early on before they get away from you – and your beer.
]]>
https://www.clawhammersupply.com/blogs/moonshine-still-blog/how-to-make-welchs-wine2022-03-25T11:32:40-04:002023-02-18T13:09:07-05:00How To Make Welch's WineKyle Brown
If you’re looking for an easy & cheap way to make alcohol at home, fermenting a bottle of store-bought Welch’s Grape Juice is a great idea. This may not be the tastiest way to make wine at home, but we bet if you’re reading this article you’re not too worried about that. Follow the steps below & watch our how-to video to learn how to make your very own Welch’s Wine.
Clawhammer Supply is supported by its audience. When you purchase through links on our site, we may earn an affiliate commission.
How to Make Welch’s Wine
Make a sanitizer solution with Star San
Place your yeast, airlock, and rubber stopper into the sanitizing solution
Open your yeast packet (if using scissors, sanitize) and pour yeast into Welch’s Grape Juice
Place the rubber stopper in the top of the grape juice bottle
Fill your airlock with Star San and place it into the rubber stopper
Let the grape juice ferment at room temperature for 2 weeks
Using a sanitized bottle wand and siphon hose, siphon the wine into another bottle (you’ll want to do this to leave behind the yeast that has settled to the bottom of the bottle)
Alternatively, you can pour your wine into another container, but this will cause the wine to splash and aerate. Aeration will make your wine not taste as good
The West Coast IPA is one of the most popular styles of craft beer, and for good reason! A West Coast IPA is more bitter than its East Coast counterpart and is characterized by dank, resiny flavors of citrus and pine. This West Coast IPA recipe is packed full of Columbus and Warrior hops and we brewed it with two of our favorite brewers, CH from Homebrew 4 Life and Justin from Jus’ Brewing. Watch us brew it in the video below or follow along with this recipe for a more detailed guide.
Fill your kettle with 7.5 Gallons of water. Adjust water chemistry to the following profile. Amounts are in parts per million
Calcium - 99
Magnesium - 18.2
Sodium - 8
Sulfate - 242.7
Chloride - 52.5
Alkalinity - 13
Water chemistry for West Coast IPAs is important because correct water chemistry will help your beer taste as bitter as it’s supposed to. The most important part of West Coast IPA water chemistry is the sulfate to chloride ratio as this ratio helps the beer taste more bitter. For West Coast IPAs, the ratio is 2:1ish, so more sulfates than chlorides. In an East Coast IPA, this would be flipped, resulting in a beer that tastes softer and less bitter.
Add .5 of a campden tablet. Heat water to 152F.
Mash
Finely crush your grain by double crushing or setting the gap size on your grain mill to be smaller. Once your water reaches 152F, mash in and stir to ensure all the grains are wet. Adjust pH 5-10 minutes into your mash. Collect a sample of your mash, test it’s pH, and add lactic acid until you reach a pH of 5.2-5.4. Mash for 60 minutes in total.
Boil & Hops
After a 60 minute mash, pull the grain basket and hook it above your kettle. Adjust the heat on the controller to start a boil. Let your grains drain for at least 10 minutes.
Once a boil is reached follow this hop schedule.
60 Minutes - 1 oz of Warrior / 1 oz of Columbus
With 5 - 10 minutes left in the boil, hook up your hoses, pump, and plate chiller and recirculate to sanitize. At the end of the boil, chill the wort to 200F and do the following hop addition.
10 Minute whirlpool at 200F - 1 oz of Columbus
After this whirlpool addition, chill your wort to yeast pitching temperature (68-73F). Make sure to grab a sample of wort before moving on in order to check starting gravity to determine ABV once fermentation has finished.
Yeast & Fermentation
Transfer your chilled wort into a sanitized fermenter and pitch one pack of WLP001 California Ale Yeast. Ferment between 68 - 73F for at least 10 days. Here's how to tell if fermentation has finished.
Dry Hops (Optional)
3 days before packaging, add 1 oz of Amarillo hops to your fermenter. Remove these before kegging or bottling.
Tasting
This turned out to be a classic West Coast IPA that has the perfect amount of booziness & bitterness. The aroma was nice & citrusy and the flavor was dank, piney & resiny. We named this beer 2NEWFRIENDS because we brewed it with our two new friends, CH from Homebrew 4 Life & Justin from Jus' Brewing. Be sure to check out their YouTube channels.
]]>
https://www.clawhammersupply.com/blogs/moonshine-still-blog/chocolate-strawberry-stout-homebrew-recipe2022-01-10T16:27:24-05:002024-04-29T15:39:16-04:00Chocolate Strawberry Stout Homebrew RecipeKyle Brown
While chocolate and strawberries might make you think of Valentine's day, this delicious stout is perfect for any time of year. It's a creamy dessert beer (that isn't too sweet) with notes of roasted cacao and a hint of strawberry. This one's so good we brought Rachael back to brew it up with us! Best served on a bearskin rug. Enjoy!
Fill your kettle with 8.16 gallons of water. Add a campden tablet to remove chlorine.
Mash
Finely crush your grain. Heat your water to 156F. This recipe calls for a 60 minute mash. Optional: Do a 10 minute mash out at 168F.
Hops
Once your mash is done, pull your grains, hook them above your kettle, and let them drain. While you’re waiting for your grains to drain, set your controller to 100% power to start a boil.
This recipe calls for a 60 minute boil. Add the following ingredients to the boil.
60 minutes - 1 oz Magnum Hops
15 minutes - Whirlfloc Tablet
Flameout - 8 oz Lactose / 4 oz Cacao Nibs
Yeast and Fermentation
Once you've added all your hops, chill your wort to 68F, transfer to a fermenter, and pitch one pack of Dry English Ale Yeast (WLP 007).
After the yeast, add 49 oz of strawberry puree to the fermenter. Ferment at 68F for 2 weeks. After 2 weeks, we recommend that you bottle or keg the beer and let it age for at least 30 days.
]]>
https://www.clawhammersupply.com/blogs/moonshine-still-blog/how-to-make-lavender-oil2022-01-04T16:59:18-05:002023-07-14T14:58:28-04:00How To Make Lavender OilKyle Brown
Lavender oil, a type of essential oil, can be extracted from lavender plants and is valued for its aromatherapy and medicinal uses. Purchasing lavender oil can be very expensive, however, making it at home is much cheaper and still provides a high quality 100% pure product. Steam distilling lavender oil at home is an easy, safe, & effective way to extract oil from your favorite plants.
Before we get started, it should be noted that we're going to be distilling lavender oil and hydrosol in this tutorial. However, this process can be used for a number of different herbs, including but not limited to; rose, citrus, bergamot, mint, peppermint, lemon, frankincense, Thieves, lemongrass, nettle, CBD, etc.
We're also going to be showing how to steam distill in this article. However, one could easily water distill by omitting the steam boiler and adding lavender and water directly to a single kettle and placing the column and condenser straight on top of that kettle. Water distilling is ideal for making some types of oil and hydrosol but not for others. Lavender oil is best extracted using steam distillation.
This article discusses how to make lavender oil using steam distillation. Watch us use it in the tutorial video below.
Step 1: Water
Fill the water boiler with water, this is the boiler that does not have the column and condenser. To ensure you have an adequate amount of water, use the sight glass tube. There just needs to be enough water to cover the heating element, but make sure to account for water loss during the distilling process.
Once water is in the boiler, ensure the two vessels are disconnected and then set the controller to 100% of power in order to start a boil. Research has shown to get a better yield of oil and hydrosol it is better to add hot steam directly to your lavender rather than waiting for the temperature of the steam to slowly build up over time. This is why the two vessels should be disconnected at this point.
Step 2: Gathering Lavender
Knowing when to harvest lavender plants can affect your essential oil yield. Harvest your lavender plants when the buds are just starting to open. It’s best to harvest the lavender in the morning just after the dew dries for max oil yield. Cut the lavender 2-inches above the woody growth, taking the entire stem with you when you harvest them. It’s recommended that you use a harvesting knife, however, a simple pair of hand pruning clippers will also work.
Pro Tip: The faster you get your lavender into the distiller the better. Once lavender is cut it begins to dry out and loses its potency.
Step 3: Load Lavender
Insert the false bottom into the base of the plant boiler, this will ensure that steam is evenly distributed throughout the lavender.
Start loading the plant boiler with lavender. Our 8-gallon boiler holds about 2 lavender shrubs worth of plant material, roughly 10lbs. Avoid packing the boiler too tight, otherwise steam will not reach all the material.
Once all the lavender is packed into the plant boiler, attach the column on top of the plant boiler and secure it with the butterfly clamp. Connect the two boilers once the water has started boiling.
Step 4: Turn on cooling water
After connecting the boilers turn the cooling water on for the condenser.
Step 5: Collect the Hydrosol & Lavender Oil
Once the two boilers are connected and cold water is flowing through the condenser column, the plant boiler will begin to heat up. At around 170°F the first drops of fluid will appear, this fluid is a mix of hydrosol and lavender oils.
Once the column thermometer reaches 202° a steady stream of fluid will begin to flow. Its recommended that you run the system from anywhere between 45m & 1 hour to get the most product out of your lavender.
Step 6: Separate Liquids
Because lavender oil has a lower density than hydrosol, it naturally rises to the top while hydrosol settles to the bottom. In order to encourage this natural separation, we collect all of the fluid in a separatory funnel using laboratory support stand. This device helps separate liquids of different densities and allows them to be collected without mixing the fluids.
Wait about 15-30 minutes after distilling ends for lavender oil & hydrosol to completely separate.
Step 7: Collecting & Storing
Using a separatory funnel, turn the knob at the base to start collecting hydrosol. Once all the hydrosol has been collected, turn the knob again to stop the flow of liquid. Using another collection vessel, turn the knob a final time and collect the lavender oil.
Essential oils are the most common desired products of distilling, however, hydrosol has recently gained popularity over the last few years as people have been using them as a cleaning additive and using them as natural household air fresheners.
The best place to store your lavender oil is in a cool, dry place such as a kitchen cabinet or a medicine cabinet. It's best to keep oils away from direct sunlight or any other direct heat and light sources.
Uses of Lavender Oil
Lavender oil is a versatile product with a myriad of uses. It's a favorite in aromatherapy for its calming and soothing properties, often used in diffusers or added to bathwater for a relaxing soak. In skincare, lavender oil is praised for its potential anti-inflammatory and antiseptic properties, which can help soothe minor burns and skin irritations. It's also commonly used in homemade cleaning products, providing a natural fragrance and cleaning power.
Benefits of Lavender Oil
The benefits of lavender oil extend beyond its pleasant aroma. It's often used in aromatherapy to promote relaxation and alleviate stress. Some studies suggest that it may help with sleep issues, anxiety, and even migraines. In skincare, lavender oil can potentially help soothe inflammation, fight acne-causing bacteria, and promote wound healing. However, remember to always dilute essential oils in a carrier oil before applying to the skin to avoid irritation.
Frequently Asked Questions
Can I use a different type of lavender for my oil?
Yes, there are many varieties of lavender, and while they may produce slightly different scents, most are suitable for oil distillation.
How long does homemade lavender oil last?
When stored properly, your homemade lavender oil can last up to a year. Always store it in a cool, dark place and keep the container tightly sealed.
Can I use lavender oil directly on my skin?
Essential oils are potent and should always be diluted in a carrier oil before applying to the skin. Test a small amount on your skin first to ensure you don't have an allergic reaction.
The Infusion Method
If you're looking for a simpler method to extract lavender oil, you might consider the infusion method. This involves steeping dried lavender buds in a carrier oil of your choice for several weeks. While this method may not yield as much oil as steam distillation, it's a simpler process that can be done with common household items.
Safety Precautions
When making and using lavender oil, it's important to remember a few safety precautions. Always use equipment as directed and be mindful of the heat when operating the distiller. When using your homemade lavender oil, remember to always dilute it in a carrier oil before applying to the skin. If you're pregnant, nursing, or have a medical condition, consult with a healthcare provider before using lavender oil.
]]>
https://www.clawhammersupply.com/blogs/moonshine-still-blog/how-to-make-hop-water2021-12-13T13:36:22-05:002024-04-29T15:39:16-04:00How to Make Hop Water - 5 Gallon BatchKyle Brown
Trying to figure out what to drink for dry January? Trying to find a non-alcohol drink to guzzle for sober October? Look no further. We present to you, hop water. It's a non alcohol (or low alcohol, depending on how you make it) drink that is super easy and inexpensive to make.
Check out our video here:
What is hop water?
Hop water is simply lightly hopped water that has been carbonated. A small amount of sugar and yeast may be used to carbonate the beverage. However, the primary ingredients are hops and water.
Hop Water Ingredients
5.25 gallons of water
A small amount of lemon juice or lactic acid (optional)
4-6 ounces of hops
Priming Sugar (optional)
Yeast (optional)
How is hop water made?
To make hop water, complete the following steps (our recipe is for 5 gallons):
Add 5.25 gallons of water to a kettle
Adjust pH (if you have a pH meter) using lactic acid or lemon juice to somewhere between 3.5 and 4.5
Bring to a boil for 10 minutes
Cool to 170 degrees
Add 4-6 ounces of hops and let steep for 20 minutes
How is hop water carbonated?
The next steps in the procedure depend on whether or not the hop water will be kegged or bottled. First we'll describe kegging hop water. After that we'll describe bottling hop water.
How is hop water kegged ?
After step 5 in the first section, transfer hop water to a keg and chill to 40F or less. Attach a CO2 tank to the keg and set pressure to 50psi. Gently shake for 3 to 4 minutes. Reduce pressure to 12psi and serve.
How is hop water bottled and carbonated?
After step 5 above, chill hop water to 70F and transfer into a bottling bucket. Once the hop water is transferred, add a pack of yeast to it. We used Lalbrew Kveik Ale Yeast. It's important to rehydrate the yeast before you add it to the bucket. To do this, add some hop water to a jar, sprinkle the yeast into the jar, and shake it up. Add this mixture to your bucket of hop water.
Next, prepare your bottles by first cleaning and sanitizing them. Next add enough priming sugar tablets for "high carbonation" and use a bottling bucket and bottling wand to fill each bottle, leaving about an inch of head room. Seal with sanitized caps using a capper. Do not refrigerate at this point. The bottles must remain at room temperature for 1-3 weeks to allow yeast to eat sugar and produce carbon dioxide. Once carbonated, chill to 40F and serve.
Is hop water non alcohol or low alcohol?
Hop water that has been kegged and carbonated using a CO2 tank is zero alcohol. Hop water that has been bottled and carbonated using priming sugar and yeast contains a small amount of alcohol.
]]>
https://www.clawhammersupply.com/blogs/moonshine-still-blog/dark-mexican-lager-homebrew-recipe2021-11-29T13:52:44-05:002023-01-08T10:44:11-05:00Negra Modelo (Dark Mexican Lager) | Homebrew RecipeKyle BrownThe Negra Modelo is an OG favorite, and for good reason. It's a balanced easy drinker with a rich flavor and a hint of bitterness. This is a great beer for beginners and experienced brewers alike. Check out our video below where Ross and Kyle walk you through the steps of the brew day with the usual shenanigans (but this one's different because there are chips and queso, and queso makes everything better). Brewed with Pilsner malt, Tettnang and Hallertau hops, and Mexican lager yeast. You can't go wrong with this one. Check out the recipe and tell us what you think in the comments.
Pinche cheve guey!
Full Brew Day Video
This recipe is for a 5 gallon batch and it is tailored for our 10 gallon 120 volt brewing system. Watch us use it in the video below.
Fill your kettle with 7.22 gallons of water. Add a campden tablet to remove chlorine.
Mash
Finely crush your grain. Heat your water to 156F. This recipe calls for a 60 minute mash.
Hops
Once your mash is done, pull your grains, hook them above your kettle, and let them drain. While you’re waiting for your grains to drain, set your controller to 100% power to start a boil.
This recipe calls for a 60 minute boil with one hop addition:
60 minute - 2 oz of Tettnang hops
60 minute - 1 oz of Hallertau hops
Yeast and Fermentation
Once you've added all your hops, chill your wort to 68F, transfer to a fermenter, and pitch one pack of Mexican Lager Yeast (White Labs #WLP940).
We fermented this at room temperature for one week. To learn more about pressure fermenting, subscribe to our YouTube channel and check out our recent video on pressure fermentation.
Tasting
This is an easy drinker but it still has a nice hint of bitterness. Knock a few of these back with some chips and queso and - like Ross says -you'll be "havin' a nice time". You can really pick up on the pilsner malt and the hop flavor is nice and subtle. It's like being whisked off to Mexico, and you don't even have to leave your house!
We highly recommend you try this one out. It's a pretty straightforward recipe, great for brewers who are just starting out. Let us know what you think, and be sure to check out our video here. Salud!


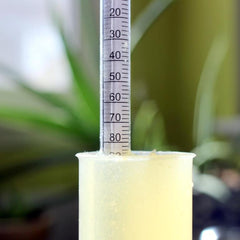


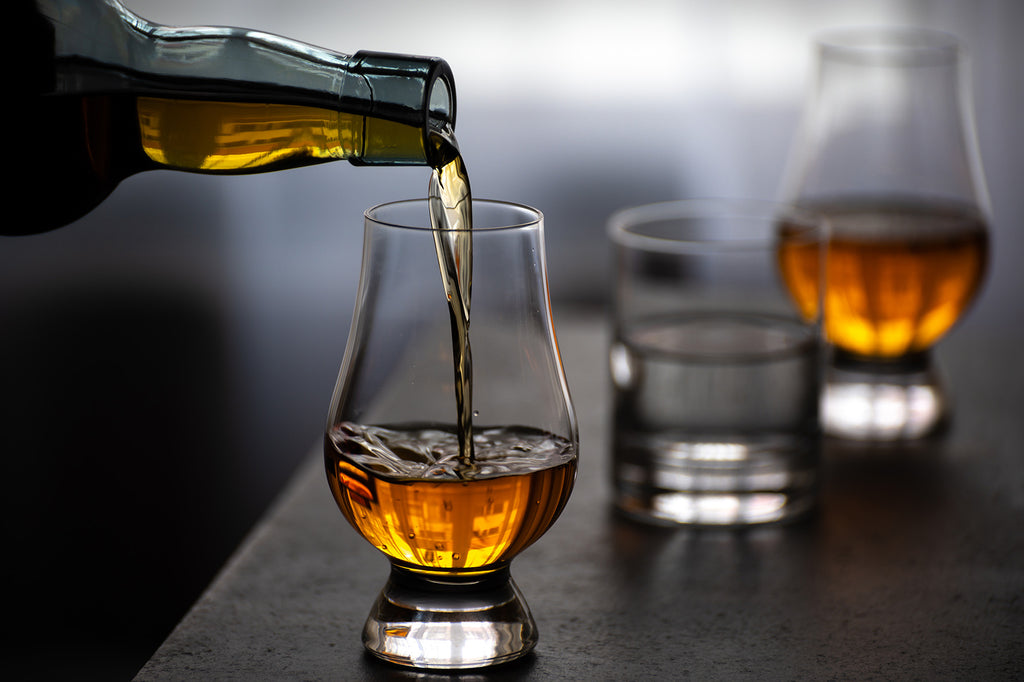
 The question is, is making moonshine illegal? The answer to this is somewhat complicated and unless the thought of digging ditches with chains around one's ankles is appealing, potential distillers better read on because in this article we're going to summarize whether or not moonshine is illegal.


 Acetaldehyde is a common off-flavor in beer that tastes like green apples. Needless to say, it’s not a desired flavor. We recently brewed a West Coast IPA that tasted sweet and tart, like a green apple, instead of bitter and dank. We knew Acetaldehyde was causing this, so we came up with a quick and easy strategy to remove this common off-flavor. Learn what causes Acetaldehyde and how to remove it from your beer below!


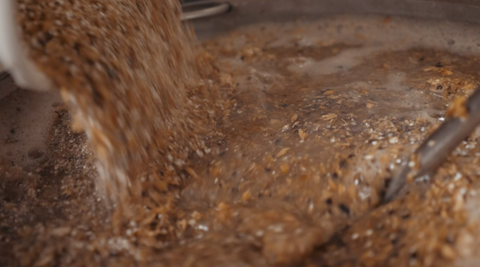


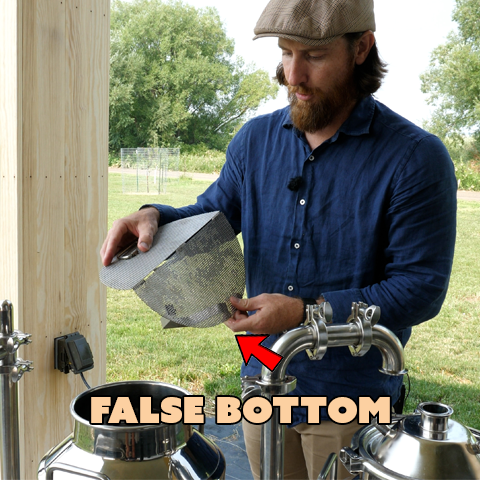
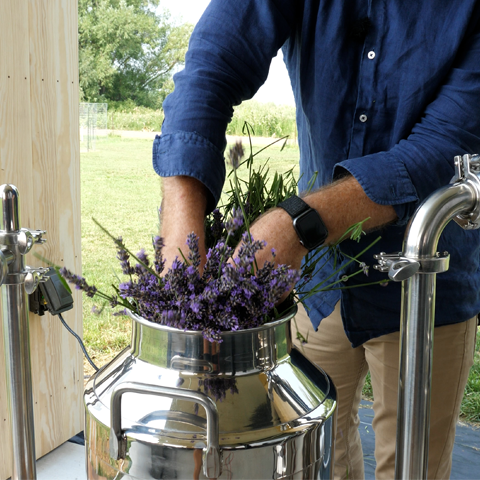


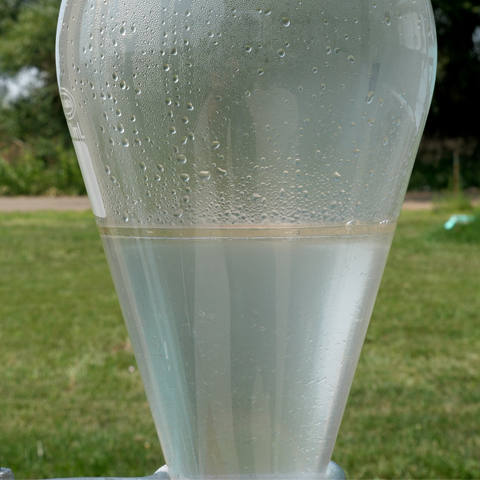

 The Negra Modelo is an OG favorite, and for good reason. It's a balanced easy drinker with a rich flavor and a hint of bitterness. This is a great beer for beginners and experienced brewers alike. Check out our video below where Ross and Kyle walk you through the steps of the brew day with the usual shenanigans (but this one's different because there are chips and queso, and queso makes everything better). Brewed with Pilsner malt, Tettnang and Hallertau hops, and Mexican lager yeast. You can't go wrong with this one. Check out the recipe and tell us what you think in the comments.


