CodeIgniter 3 + Tank Auth
Tank Auth is an authentication library for PHP-framework CodeIgniter. It’s based on DX Auth, althouth the code was seriously reworked.
Smarty templating engine integration for CodeIgniter 3.0+
Smarty templating engine integration for Codeigniter 3.0+ with inbuilt theming and asset management.
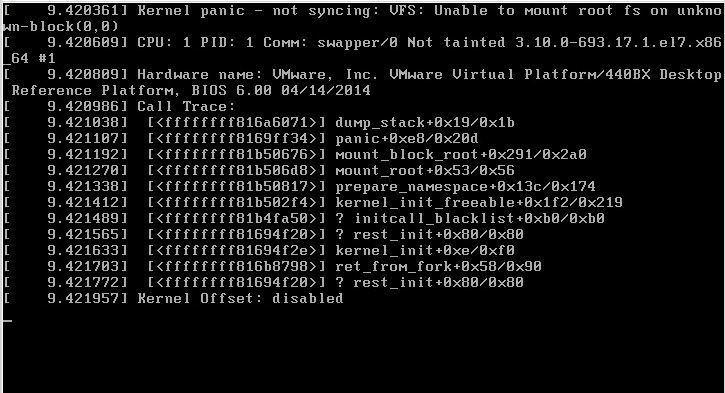
Linux: Centos Kernel panic – not syncing: VFS: Unable to mount root fs on unknown-block(0,0)
สั่ง reboot แล้วเครื่องเงียบหายไป พอไปดูที่ console พบข้อความแจ้ง Kernel panic – not syncing: VFS: Unable to mount root fs on unknown-block(0,0)
วิธีแก้ขั้นต้นก็ต้องหาทางบูทเครื่องให้ได้ก่อน โดยเลือก kernel เวอร์ชันเก่า ๆ ในระหว่างขั้นตอนการบูทเครื่อง
เมื่อลองค้นดูในอินเทอร์เน็ตก็มีหลายคนบอกว่าเป็นปัญหาที่ไฟล์ initramfs ใน /boot ที่มีปัญหาระหว่างการ upgrade kernel
วิธีแก้ที่ผมลองทำแล้วสำเร็จเลยคือสั่ง
# yum reinstall kernel
ตัวอย่างผลลัพธ์
Loaded plugins: fastestmirror, replace
Skipping the running kernel: kernel-3.10.0-514.26.2.el7.x86_64
Loading mirror speeds from cached hostfile
* base: mirror2.totbb.net
* epel: mirror2.totbb.net
* extras: mirror2.totbb.net
* ius: mirrors.tongji.edu.cn
* updates: mirror2.totbb.net
Resolving Dependencies
--> Running transaction check
---> Package kernel.x86_64 0:3.10.0-693.2.2.el7 will be installed
---> Package kernel.x86_64 0:3.10.0-693.5.2.el7 will be installed
---> Package kernel.x86_64 0:3.10.0-693.11.1.el7 will be installed
---> Package kernel.x86_64 0:3.10.0-693.11.6.el7 will be installed
---> Package kernel.x86_64 0:3.10.0-693.17.1.el7 will be installed
--> Finished Dependency Resolution

Dependencies Resolved

===========================================================================================================================
Package Arch Version Repository Size
===========================================================================================================================
Reinstalling:
kernel x86_64 3.10.0-693.2.2.el7 updates 43 M
kernel x86_64 3.10.0-693.5.2.el7 updates 43 M
kernel x86_64 3.10.0-693.11.1.el7 updates 43 M
kernel x86_64 3.10.0-693.11.6.el7 updates 43 M
kernel x86_64 3.10.0-693.17.1.el7 updates 43 M

Transaction Summary
===========================================================================================================================
Reinstall 5 Packages

Total size: 215 M
Total download size: 172 M
Installed size: 297 M
Is this ok [y/d/N]: y
Downloading packages:
Delta RPMs disabled because /usr/bin/applydeltarpm not installed.
(1/4): kernel-3.10.0-693.5.2.el7.x86_64.rpm | 43 MB 00:00:01
(2/4): kernel-3.10.0-693.2.2.el7.x86_64.rpm | 43 MB 00:00:01
(3/4): kernel-3.10.0-693.11.1.el7.x86_64.rpm | 43 MB 00:00:01
(4/4): kernel-3.10.0-693.11.6.el7.x86_64.rpm | 43 MB 00:00:01
---------------------------------------------------------------------------------------------------------------------------
Total 63 MB/s | 172 MB 00:00:02
Running transaction check
Running transaction test
Transaction test succeeded
Running transaction
Installing : kernel-3.10.0-693.2.2.el7.x86_64 1/5
Installing : kernel-3.10.0-693.11.6.el7.x86_64 2/5
Installing : kernel-3.10.0-693.11.1.el7.x86_64 3/5
Installing : kernel-3.10.0-693.17.1.el7.x86_64 4/5
Installing : kernel-3.10.0-693.5.2.el7.x86_64 5/5

Verifying : kernel-3.10.0-693.5.2.el7.x86_64 1/5
Verifying : kernel-3.10.0-693.17.1.el7.x86_64 2/5
Verifying : kernel-3.10.0-693.11.1.el7.x86_64 3/5
Verifying : kernel-3.10.0-693.11.6.el7.x86_64 4/5
Verifying : kernel-3.10.0-693.2.2.el7.x86_64 5/5

Installed:
kernel.x86_64 0:3.10.0-693.2.2.el7 kernel.x86_64 0:3.10.0-693.5.2.el7 kernel.x86_64 0:3.10.0-693.11.1.el7
kernel.x86_64 0:3.10.0-693.11.6.el7 kernel.x86_64 0:3.10.0-693.17.1.el7

Complete!
หายใจลึก ๆ แล้ว สั่ง reboot ถ้าบูทสำเร็จก็ยินดีด้วย 🙂
แต่ถ้าไม่สำเร็จ ลองทำตามขั้นตอนต่อไปนี้
1. Boot into a live same version of Centos. Choose the recovery options.
2. Go through all of the default prompts, then drop down to shell.
3. Type: chroot /mnt/sysimage
4. Type: cd /boot
5. Type: ls -l initramfs*
6. Look at the version numbers and determine the last version that was installed. Eg. initramfs-2.6.32-358.el6.x86_64.img
7. Type: dracut -f /boot/initramfs-2.6.32-358.el6.x86_64.img 2.6.32-358.el6.x86_64
This will rebuild the initramfs. On reboot your system should come back up.
DNS Zone file – TTL Value recommendations
TTL
- Infrastructure records (NS related): 1 – 2 days (86400 – 172800 seconds)
- Default $TTL: 1 hour – 1 day
- Minimum Zone TTL: 5 – 10 minutes
- Maximum Zone TTL: 1 – 2 days
SOA Refresh and Retry
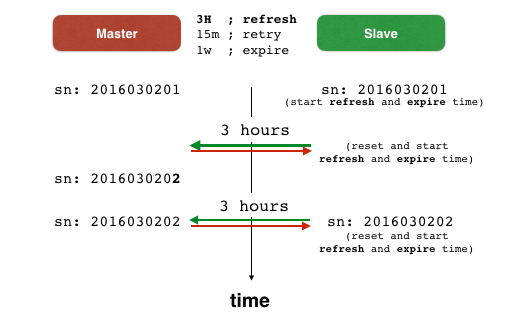
- SOA Refresh: 1 – 4 hours
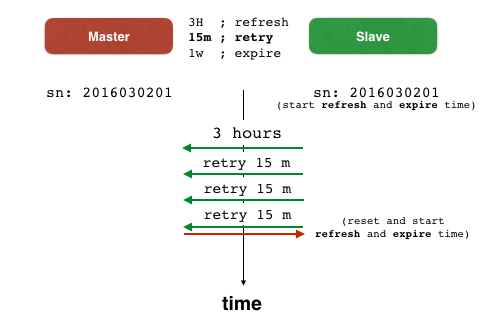
- SOA Retry: 15 – 60 minutes
SOA Expire
- SOA Expire: 1 – 3 weeks
SOA minimum
- SOA Minimum: 15 – 60 minutes
Source: https://securityblog.switch.ch/2014/02/06/zone-file-recommendations/
วิธีการตั้งค่าให้ Postfix เป็น mail server สำรอง
เราสามารถตั้งค่า Postfix ให้เป็น mail server สำรอง เพื่อรับอีเมลแทนในกรณีที่ mail server หลักเกิดปัญหา และเมื่อ mail server หลักสามารถใช้งานได้ mail server สำรองก็จะส่งอีเมลไปที่ mail server หลัก
สมมติว่าเรามี mail server หลักชื่อ mail.diary.in.th แล้วเราต้องการเพิ่ม mail server สำรองชื่อ mail2.diary.in.th เพื่อให้รับอีเมลชั่วคราวในระหว่างที่ mail.diary.in.th มีปัญหา
ขั้นแรกต้องเพิ่มค่า MX record ที่ zone file ให้มีค่า mail2.diary.in.th เป็น mail server ที่มีค่า priority มากกว่า mail.diary.in.th
diary.in.th    86400 IN MX 10 mail.diary.in.th.
diary.in.th    86400 IN MX 20 mail2.diary.in.th.
ก่อนบันทึกไฟล์ต้องเพิ่มค่า serial แล้วทำการ reload zone file
ขั้นตอนต่อไปต้องแก้ไขไฟล์ /etc/postfix/main.cf ที่เครื่อง mail server สำรอง (mail2.diary.in.th)
แก้ไขค่า smtpd_recipient_restrictions ให้มีค่า permit_mynetworks และ reject_unauth_destination เช่น
smtpd_recipient_restrictions = permit_sasl_authenticated, permit_mynetworks, reject_unauth_destination
แก้ไขค่า relay_domains โดยเพิ่มชื่อโดเมนของเรา เช่น
relay_domains = $mydestination, diary.in.th
แก้ไขค่า relay_recipient_maps ให้เป็นค่าว่าง ๆ เช่น
relay_recipient_maps =
การแก้ไขให้เป็นค่าว่าง ๆ ก็เพื่อความสะดวก ที่เราไม่ต้องเพิ่มอีเมลทุกอีเมลแต่ละอีเมลด้วยตัวเอง แต่หากต้องการเพิ่มอีเมลแต่ละอีเมลก็สามารถทำได้ เช่น
relay_recipient_maps = hash:/etc/postfix/relay_recipients
โดยในไฟล์ relay_recipients มีรายชื่ออีเมลเช่น
user1@diary.in.th    OK
user2@diary.in.th    OK
หลังจากนั้นใช้คำสั่ง
postmap /etc/postfix/relay_recipients
สิ่งที่ต้องระวังคือค่าเหล่านี้ต้องไม่มีชื่อโดเมน diary.in.th อยู่ด้วย
mydestination
virtual_alias_domains
virtual_mailbox_domains
หลังจากแก้ไขค่าต่าง ๆ แล้วให้ restart posfix โดยใช้คำสั่ง
# systemctl restart postfix
เราสามารถปรับแต่งค่าเพิ่มเติมเพื่อให้ mail server สำรองเก็บอีเมลไว้นานขึ้น โดยตั้งค่า maximal_queue_lifetime ให้นานขึ้น (ค่า default คือ 5 วัน)
maximal_queue_lifetime = 10d
อ่านข้อมูลเพิ่มเติมเกี่ยวกับ maximal_queue_lifetime ได้ที่ http://www.postfix.org/TUNING_README.html#hammer
อ้างอิงและข้อมูลเพิ่มเติมอื่น ๆ :
https://www.howtoforge.com/postfix_backup_mx
https://samhobbs.co.uk/2016/01/mx-backup-postfix-email-server
https://www.cyberciti.biz/faq/postfix-backup-mx-server-anti-spam/
CI Notice: Only variable references should be returned by reference
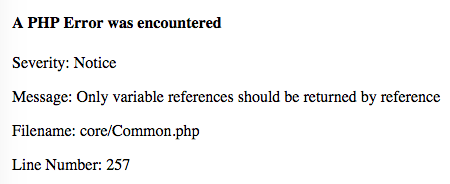
ให้แก้ไขไฟล์ Common.phop ในไดเรกทอรี system/core/ บรรทัดที่ 257 จาก
return $_config[0] =& $config;
ให้เป็น
$_config[0] =& $config;
return $_config[0];
อ้างอิง: https://ellislab.com/forums/viewthread/244510/#1066558
OSX 10.10 Yosemite + Apache 2.4 + AH01630: client denied by server configuration
แก้ไขค่า httpd.conf or httpd-vhosts.conf ด้วย “Require all denied”
<Directory />
AllowOverride none
Require all denied
</Directory>

<Directory /Volumes/Data/Data/USER/Sites/>
AllowOverride none
Require all granted
</Directory>
ที่มา: http://httpd.apache.org/docs/2.4/upgrading.html
Setting up PHP & MySQL on OS X Mavericks
With OS X 10.9 Mavericks, Apple chose to ship PHP 5.4.17. This is how to set it up from a clean install of Mavericks.
Note: If you don’t want to use the built-in PHP or want to use version 5.5, then these are some alternatives:
- PHP 5.3/5.4/5.5 for OS X 10.6/10.7/10.8/10.9 as binary package by Liip
- Zend Server (Free Edition)
- Homebrew has PHP.
Let’s go!
Read more: http://akrabat.com/computing/setting-up-php-mysql-on-os-x-mavericks/
Remove Duplicates from the “Open With” Right-Click Menu in Mac OS X

The “Open With” menu appears when any file in the Mac Finder is right-clicked (or control-clicked), and it is intended to provide a list of alternate apps that selected file can be opened with other than what is currently set as the default application.”
Remove Duplicates from the “Open With” Right-Click Menu in Mac OS X