soundtracks.tuneforums.com
//soundtracks.tuneforums.com/threads.php
<![CDATA[How to Make a Christmas Flash Gallery on Mac]]>
//soundtracks.tuneforums.com/thread_view.php?threadID=24055
Here's what you'll need:
1. Digital Photos for web flash photo gallery
2. Some back ground music
3. iFunia Magic Show for Mac - Click to Download Free Trial
Step 1: Add photos to the Christmas Flash photo gallery
Add the Christmas photos you want by holding down mouse and dragging it to the panel. You can add up to 500 photos that you want to use, type in caption and arrange the photos here. iFunia Magic Show for Mac supports a wide range of file formats for images.
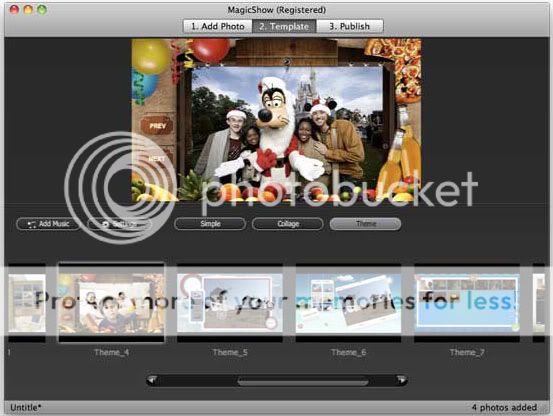
Step 2: Choose from a variety of Christmas Flash templates
Click on Template tab and choose the Christmas Flash template you like. All these Flash templates in the Christmas Flash photo gallery software are ready-for-use. Just choose one of the templates, do some simple settings, and proceed to publish your Christmas Flash photo gallery.
Step 3: Add the Christmas songs to the Flash photo gallery on Mac
If you want to add background music to your Christmas flash photo slideshow, just use the "Add music" built-in tool on the left side of the storyboard. You may check the option to control the background music looping or not.
Step 4: Preview and publish the Thanksgiving flash photo slideshow on Mac
Preview and if you are satisfied with your work, you can publish your flash photo gallery in swf, html or exe or screensaver formats, or you can mail the flash photo slideshow gallery to your friends directly as a gift.
]]>//soundtracks.tuneforums.com/thread_reply.php?threadID=2405512/09/2010 03:37 AM//soundtracks.tuneforums.com/thread_view.php?threadID=24055<![CDATA[How to Make a Christmas Flash Gallery on Mac]]>
//soundtracks.tuneforums.com/thread_view.php?threadID=24054
//soundtracks.tuneforums.com/thread_reply.php?threadID=2405412/09/2010 03:30 AM//soundtracks.tuneforums.com/thread_view.php?threadID=24054<![CDATA[Best HD Camcorder Editing Software with absolute no quality loss]]>
//soundtracks.tuneforums.com/thread_view.php?threadID=24053
editor with video restoration. You can adjust the brightness, contrast and saturation with the video editor. For long time recording with different light conditions, you can also cut the video clip to restore video accordingly.
Below is the quick step-by-step guide about adjusting video brightness, contrast and saturation with Aunsoft Final Mate for perfect movie creation.
Step 1. Import video files to Aunsoft Final Mate.
You can directly capture videos from camcorder connected to computer, or import .mts, .m2ts, .tod, .mod files from computer folder. To import videos from computer, just click the Import button. To capture videos from camcorder, just click the "Camcorder" button or follow the wizard to import camcorder videos.
Step 2. Restore video with brightness, contrast and saturation.
Click on one video clip on timeline, then click the first button on editing area, and you will face the Video Restoration window like below for adjusting brightness, contrast, and saturation. Drag and slide bar to the left or right, you can view the video restoration effect on the preview window.
Step 3. Export video.
Click the "Export" button and click the "Export into Device", "Export into Editor", or "Common Formats" to choose the output video format according to your usage. The output formats could be .wmv, .mp4, .mov, .3gp, .mpg, etc.
Since video restoration requires re-encoding, the "Lossless Output" option will not work. However, Aunsoft Final Mate, as the easy-to-use camcorder editing software, provides fast conversion speed, and will use NVIDIA video card with CUDA technology, or Intel CPU for acceleration if applicable.
Tips:
Under the Video Restoration window, there is checkbox for deinterlacing. You can deinterlace 1080i camcorder videos for playback on PC or portable devices.]]>//soundtracks.tuneforums.com/thread_reply.php?threadID=2405312/09/2010 02:27 AM//soundtracks.tuneforums.com/thread_view.php?threadID=24053<![CDATA[Best HD Camcorder Editing Software with absolute no quality loss]]>
//soundtracks.tuneforums.com/thread_view.php?threadID=24052
editor with video restoration. You can adjust the brightness, contrast and saturation with the video editor. For long time recording with different light conditions, you can also cut the video clip to restore video accordingly.
Below is the quick step-by-step guide about adjusting video brightness, contrast and saturation with Aunsoft Final Mate for perfect movie creation.
Step 1. Import video files to Aunsoft Final Mate.
You can directly capture videos from camcorder connected to computer, or import .mts, .m2ts, .tod, .mod files from computer folder. To import videos from computer, just click the Import button. To capture videos from camcorder, just click the "Camcorder" button or follow the wizard to import camcorder videos.
Step 2. Restore video with brightness, contrast and saturation.
Click on one video clip on timeline, then click the first button on editing area, and you will face the Video Restoration window like below for adjusting brightness, contrast, and saturation. Drag and slide bar to the left or right, you can view the video restoration effect on the preview window.
Step 3. Export video.
Click the "Export" button and click the "Export into Device", "Export into Editor", or "Common Formats" to choose the output video format according to your usage. The output formats could be .wmv, .mp4, .mov, .3gp, .mpg, etc.
Since video restoration requires re-encoding, the "Lossless Output" option will not work. However, Aunsoft Final Mate, as the easy-to-use camcorder editing software, provides fast conversion speed, and will use NVIDIA video card with CUDA technology, or Intel CPU for acceleration if applicable.
Tips:
Under the Video Restoration window, there is checkbox for deinterlacing. You can deinterlace 1080i camcorder videos for playback on PC or portable devices.]]>//soundtracks.tuneforums.com/thread_reply.php?threadID=2405212/09/2010 02:25 AM//soundtracks.tuneforums.com/thread_view.php?threadID=24052<![CDATA[HD Camcorder video editor,Replace Camcorder Audio with Desired Audio/Music/]]>
//soundtracks.tuneforums.com/thread_view.php?threadID=24051
HD camcorder video editor with simple audio adjustment like changing audio volume to louder sound and replacing new audio to cover the original recorded sound.
Here we focus on the audio replacement workflow to create movie with desired audio. Aunsoft Final Mate supports a lot of audio file formats, below is the audio file extensions you can browse for replacing audios.
Audio file formats: *.mp3, *.aac, *.ac3, *.wma, *.m4a, *.mp2, *.mpa, *.aac, *.wav, *.au, *mp2, *.ac3, *.flac *.ape, *.ogg, *.8svx, *.aiff *.aif *.caf *.dts *.smv *.tta *.voc *.goa.
If you have video file that includes your favorite song, you may also import the video file for replacing audio window, and Aunsoft Final Mate will help you extract audio from the video file and replace the original audio with new file.
Video file formats: *.mpg, *.mpg, *.mpeg, *.vob, *.mov, *.mp4, *.mkv, *.mwv, *.ts, *.tp, *.trp, *.avi, *.divx, *.3gp.
Below is the step-by-step guide to replace original camcorder audio with new audio file.
Step 1. Import camcorder videos to Aunsoft Final Mate.
You can import .mts, .m2ts, .tod, .mod files from camcorder and computer folder easily. For videos on computer folder, just click the "Import" button to browse the camcorder video files. For videos on camcorder, just connect the camcorder to computer via USB cable, choose the PC connection on camcorder LCD screen, and choose the Import option in the wizard to quickly load camcorder video files as movies.
Step 2. Replace camcorder audio.
Two kinds of audio replacing are available according to your needs.
- To replace audio for one video clip:
Just select a video clip on the timeline, and click the second button on editing area, and you will face the following window for adjusting audio. You may notice the video clip name one the window.
- To add one audio file for the entire movie:
If you have record a separate audio for the movie to play from beginning to the end, you can click the Adjust Movie Audio button, tick the check box for Replace Audio and browse the desired audio file from computer. The music will start from the movie beginning to the end.
Step 3. Choose output format.
Click the Export button and you can choose the preferred format according to your usage for portable device, advanced video editor or other formats like MKV, AVI. Aunsoft Final Mate as the HD camcorder video editor will start adjusting AVCHD audio with the additional song file for movie creation.
Tips:
1. The Loop option or adjusting audio works when the added audio is shorter than the video/movie length, and the music will be play continuously.
2. Aunsoft Final Mate will use the latest operation on the program. For example, if you replace movie audio to play throughout the movie, and then select one video on timeline to choose another file as additional audio, the operation of setting movie audio will be abandoned, and only the video clip you set will be replaced with the new audio.]]>//soundtracks.tuneforums.com/thread_reply.php?threadID=2405112/09/2010 02:25 AM//soundtracks.tuneforums.com/thread_view.php?threadID=24051<![CDATA[Lossless output for AVCHD/TOD/MOD,Merge Split AVCHD files into one AVCHD]]>
//soundtracks.tuneforums.com/thread_view.php?threadID=24050
Key features:
Directly capture videos from camcorder.
There is no need looking into the camcorder recording directory, as Aunsoft Final Mate includes one step loading camcorder video process. You will not get confused with the BDMV or AVCHD file structure.
Merge MTS/M2TS, MOD, TOD without re-enconding.
Get several short clips when recording an event? Aunsoft Final Mate will help you merge the MTS/M2TS sequences into a single file without conversion, making it easy to get the original HD quality.
Adjust video effects and settings.
You can easily change video brightness, contrast, saturation, deinterlace 1080i video, replace audio.
Export different formats.
You can choose common video formats like .wmv, .avi, .mp4, .mpg as output fomat to make the recorded videos compatible with your media players like iPad, HDTV, or editing software like Adobe Premiere Pro, Magix, Sony Vegas and so on.
Convert AVCHD, TOD, MOD to MP4 at faster speed with NVIDIA CUDA.
The new application will utilize NVIDIA CUDA for converting camcorder video at 5X faster speed. You can enjoy the
System requirement:
- Microsoft Windows XP (SP2 or later), Windows Vista, Windows 7
- 1.6MHz Intel/AMD Dual-core CPU or above. 2.6MHz Intel/AMD Dual-core CPU or above or CUDA-enabled graphics is recommended]]>//soundtracks.tuneforums.com/thread_reply.php?threadID=2405012/09/2010 02:25 AM//soundtracks.tuneforums.com/thread_view.php?threadID=24050<![CDATA[How to put various videos on iPad/iPod/iPhone/PSP??]]>
//soundtracks.tuneforums.com/thread_view.php?threadID=24047
iPod/iPhone: H.264 (up to 320*240, 768kbps, 30fps), MPEG-4 (up to 480*480, 2500kbps, 30fps).
Zune: WMV, MPEG-4, H.264(30fps).
Creative Zen: AVI.
Sansa: MPEG-4, MP4.
In order to put some unusual video on your portable devices you need a professional Video Converter 4Easysoft Total video converter can convert video between almost all video formats.
Input Video Formats: WMV, MP4, MOV, M4V, AVI, FLV, 3GP, 3G2, MPG, VOB, MPEG, MPG, ASF, MOD, MKV,RM,TOD, MPV, TS, HD videos, etc.
Output video formats:MP4, MOV, M4V, VOB, XviD, AVI, FLV, 3GP, 3G2, MPG, ASF, MKV, RM. H.264.MPEG-4, WMV, Super VCD(NTSC, PAL, SECAM), VCD(NTSC, PAL, SECAM) , DVD(NTSC, PAL, SECAM), HD video.
The following is about how to use video converter to convert almost any video formats to most portable devices supported video.
Step 0: Download and install 4Easysoft Total Video ConverterStep 1: Run it and click the ??Add File?? button to load your video.
Step 2: Select the output video format from the profile drop-download list.
The profile including video for almost any portable devices such as iPod, iPhone, Archos, iRiver, PSP, Zune. Creative Zen, Nokia Serials, Palm, and so on..
Big surprice:This converter can also support HD video and flash video as its input and output video, such as HD H.264, HD AVI, HD MPG, HD TS, HD WMV, etc.
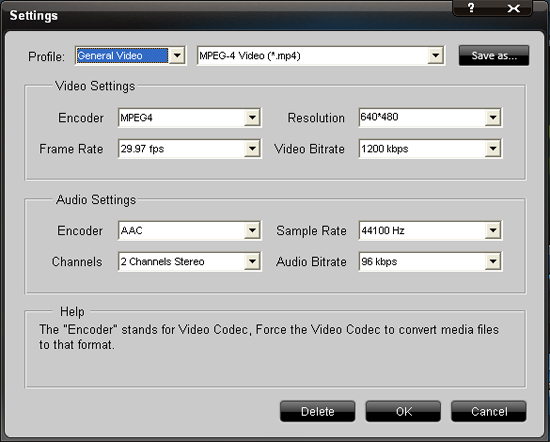
Or you can click ??setting?? button to customize output settings by setting Video Encoder, Resolution, Frame Rate, Video Bitrate, etc.
Step 3:Edit your video.
You can use the powerful editing function to edit your video.
Effect: You can use this function to optimize the video effect.
By clicking ??Effect?? button, you can set the video Brightness, Contrast, Saturation and check Deinterlacing which helps you to convert interlaced video to the progressive video.
Trim: You can use this function to cut any clip of your video.
Click the ??Trim?? and a dialogue-box pops up. You can drag the slide-bar to the position you want.
You can also set the Start time and the End time to trim your video.
Crop: You can remove the black edges around your movie video and customize the size of video play region as you wish. Click ??Crop?? to open the Trim window. Select a crop mode in the Crop Mode drop-down list and click OK to save the crop.
Preferences: By clicking the ??Preference?? button you can select the output destination, the Snapshot foler, the format of the snapshot image. You can also choose to shut down your computer or do nothing after your conversion. You can also select the CPU usage.
Merge: You can use this function to merge several videos into one.
Snapshot: You can use this function to capture your favorite image.
Step 4: Click the ??Start?? button to start your conversion and in a short while it will be finished.
Some related video editing tools:
Mod Converter:
It can convert Mod and Tod videos (made by some digital camcorder such JVC, Sony and so on) to any popular video formats such as AVI, WMV, RM, RMVB, MP3,etc. Besides professional conversion, they also have functions of Trim, Crop and Merge chapters into one file.
MKV Converter
]]>//soundtracks.tuneforums.com/thread_reply.php?threadID=2404712/09/2010 01:08 AM//soundtracks.tuneforums.com/thread_view.php?threadID=24047<![CDATA[Fast HD Camcorder Video Editor with Audio Replacement]]>
//soundtracks.tuneforums.com/thread_view.php?threadID=24048
HD camcorder video editor with simple audio adjustment like changing audio volume to louder sound and replacing new audio to cover the original recorded sound.
Here we focus on the audio replacement workflow to create movie with desired audio. Aunsoft Final Mate supports a lot of audio file formats, below is the audio file extensions you can browse for replacing audios.
Audio file formats: *.mp3, *.aac, *.ac3, *.wma, *.m4a, *.mp2, *.mpa, *.aac, *.wav, *.au, *mp2, *.ac3, *.flac *.ape, *.ogg, *.8svx, *.aiff *.aif *.caf *.dts *.smv *.tta *.voc *.goa.
If you have video file that includes your favorite song, you may also import the video file for replacing audio window, and Aunsoft Final Mate will help you extract audio from the video file and replace the original audio with new file.
Video file formats: *.mpg, *.mpg, *.mpeg, *.vob, *.mov, *.mp4, *.mkv, *.mwv, *.ts, *.tp, *.trp, *.avi, *.divx, *.3gp.
Below is the step-by-step guide to replace original camcorder audio with new audio file.
Step 1. Import camcorder videos to Aunsoft Final Mate.
You can import .mts, .m2ts, .tod, .mod files from camcorder and computer folder easily. For videos on computer folder, just click the "Import" button to browse the camcorder video files. For videos on camcorder, just connect the camcorder to computer via USB cable, choose the PC connection on camcorder LCD screen, and choose the Import option in the wizard to quickly load camcorder video files as movies.
Step 2. Replace camcorder audio.
Two kinds of audio replacing are available according to your needs.
- To replace audio for one video clip:
Just select a video clip on the timeline, and click the second button on editing area, and you will face the following window for adjusting audio. You may notice the video clip name one the window.
- To add one audio file for the entire movie:
If you have record a separate audio for the movie to play from beginning to the end, you can click the Adjust Movie Audio button, tick the check box for Replace Audio and browse the desired audio file from computer. The music will start from the movie beginning to the end.
Step 3. Choose output format.
Click the Export button and you can choose the preferred format according to your usage for portable device, advanced video editor or other formats like MKV, AVI. Aunsoft Final Mate as the HD camcorder video editor will start adjusting AVCHD audio with the additional song file for movie creation.
Tips:
1. The Loop option or adjusting audio works when the added audio is shorter than the video/movie length, and the music will be play continuously.
2. Aunsoft Final Mate will use the latest operation on the program. For example, if you replace movie audio to play throughout the movie, and then select one video on timeline to choose another file as additional audio, the operation of setting movie audio will be abandoned, and only the video clip you set will be replaced with the new audio.
Aunsoft Final Mate Key Features:
* Capture/Import/backup video files from camcorder to PC.
* Support AVCHD, MOD, TOD from JVC, Canon, Sony, Panasonic camcorder.
* Powerful media management function helps you organize, play, edit and convert videos.
* Split/trim unwanted parts of your video clips at the beginning, ending, or middle sections of your video on a timeline.
* Merge/join MTS, M2TS, or TOD without re-encoding or losing quality.
* Remove black borders of the movie and watch it in full screen with Crop.
* Increase volume up to 400% and replace audio in an existing movie.
* Playback recordings with inserted player and capture screenshots from videos.
* Video Restoration function helps to create stunning color and eye-catching works.
* Deinterlacing Filter helps remove interlacing artifacts/lines.
* Save/output resulting video in lossless format with no conversion.
* Export/convert HD recordings to other editors, media devices, or common formats.
* Optimize for NVIDIA? CUDATM and Intel to decode/encode files with unrivaled speed.]]>//soundtracks.tuneforums.com/thread_reply.php?threadID=2404812/09/2010 01:06 AM//soundtracks.tuneforums.com/thread_view.php?threadID=24048<![CDATA[HD Camcorder Editing Software with Video Restoration]]>
//soundtracks.tuneforums.com/thread_view.php?threadID=24049
editor with video restoration. You can adjust the brightness, contrast and saturation with the video editor. For long time recording with different light conditions, you can also cut the video clip to restore video accordingly.
Below is the quick step-by-step guide about adjusting video brightness, contrast and saturation with Aunsoft Final Mate for perfect movie creation.
Step 1. Import video files to Aunsoft Final Mate.
You can directly capture videos from camcorder connected to computer, or import .mts, .m2ts, .tod, .mod files from computer folder. To import videos from computer, just click the Import button. To capture videos from camcorder, just click the "Camcorder" button or follow the wizard to import camcorder videos.
Step 2. Restore video with brightness, contrast and saturation.
Click on one video clip on timeline, then click the first button on editing area, and you will face the Video Restoration window like below for adjusting brightness, contrast, and saturation. Drag and slide bar to the left or right, you can view the video restoration effect on the preview window.
Step 3. Export video.
Click the "Export" button and click the "Export into Device", "Export into Editor", or "Common Formats" to choose the output video format according to your usage. The output formats could be .wmv, .mp4, .mov, .3gp, .mpg, etc.
Since video restoration requires re-encoding, the "Lossless Output" option will not work. However, Aunsoft Final Mate, as the easy-to-use camcorder editing software, provides fast conversion speed, and will use NVIDIA video card with CUDA technology, or Intel CPU for acceleration if applicable.
Tips:
Under the Video Restoration window, there is checkbox for deinterlacing. You can deinterlace 1080i camcorder videos for playback on PC or portable devices.
Aunsoft Final Mate Key Features:
* Capture/Import/backup video files from camcorder to PC.
* Support AVCHD, MOD, TOD from JVC, Canon, Sony, Panasonic camcorder.
* Powerful media management function helps you organize, play, edit and convert videos.
* Split/trim unwanted parts of your video clips at the beginning, ending, or middle sections of your video on a timeline.
* Merge/join MTS, M2TS, or TOD without re-encoding or losing quality.
* Remove black borders of the movie and watch it in full screen with Crop.
* Increase volume up to 400% and replace audio in an existing movie.
* Playback recordings with inserted player and capture screenshots from videos.
* Video Restoration function helps to create stunning color and eye-catching works.
* Deinterlacing Filter helps remove interlacing artifacts/lines.
* Save/output resulting video in lossless format with no conversion.
* Export/convert HD recordings to other editors, media devices, or common formats.
* Optimize for NVIDIA? CUDATM and Intel to decode/encode files with unrivaled speed.]]>//soundtracks.tuneforums.com/thread_reply.php?threadID=2404912/09/2010 01:06 AM//soundtracks.tuneforums.com/thread_view.php?threadID=24049<![CDATA[Best Back up Movies Software help you Rip/Backup/Copy Blu-ray to M2TS]]>
//soundtracks.tuneforums.com/thread_view.php?threadID=24046
Back up Movies Software is a best tool for you to crack the Blu-ray copy-protections and copy Blu-ray to M2TS streams. Never miss this easy-to-use and powerful app if you are trying to back up Blu-ray Disc to M2TS files. Follow the quick guide below to decrypt and convert Blu-ray to M2TS clips.
Before we start make sure you have these tools:
PC or laptop (Windows XP/ Windows Vista/ Windows 7 only)
Source Blu-ray Disc (commercial copy-protected Blu-ray Disc)
BD drive (external or internal)
Pavtube Blu-ray Disc Ripper software click to download a free trial of Pavtube (Back up Movies Software)
Quick Guide: Ripping Blu-ray Disc to M2TS videos/ Converting Blu-ray to M2TS streams
Place in source Blu-ray Disc. In this guide I take a recently released Blu-ray Disc Toy Story 3 for example. Hook the BD drive to your PC or laptop and make sure your computer is connected with Internet.
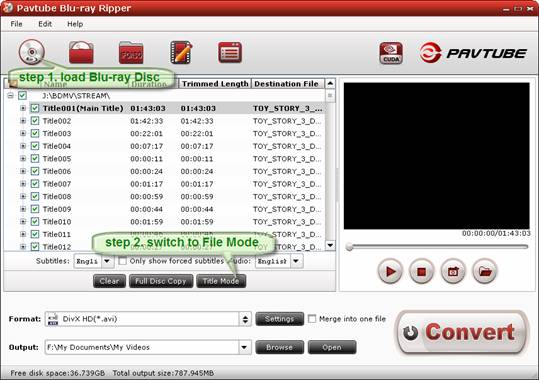
Step 1. Load Blu-ray Disc for copying Blu-ray to M2TS.
Run the trial of Pavtube Back up Movies Software, and it comes up with the main interface. Click the BD icon to decrypt/crack and load Blu-ray Disc Toy Story 3. The process takes a few seconds. When the Blu-ray Disc is loaded, it should be like this:
Step 2. Switch to ??File Mode?? to view the M2TS streams.
Click the ??Title Mode?? button to switch to ??File Mode??. When it changes to ??File Mode??, you will find M2TS streams are displayed in sequence. You can preview them too.
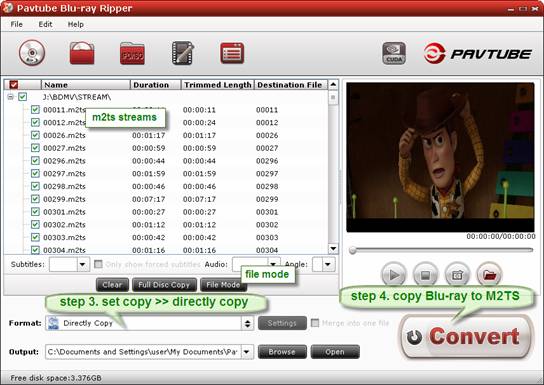
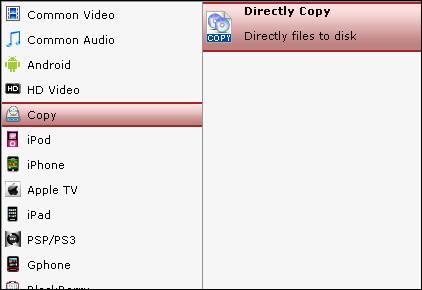
Step 3. Set export method for copying M2TS from Blu-ray Disc.
Click the ??Format?? bar, select ??Copy>>Directly Copy??.
Step 4. Start ripping Blu-ray to M2TS without quality loss.
Click ??Convert?? button to start copying M2TS streams from Blu-ray Disc. It usually takes 40min to an hour for ripping Blu-ray Disc to M2TS files.
Tip: make sure there??s enough space to save M2TS clips before you start ripping Blu-ray to M2TS. By default the output location is ??C\Documents and Settings\user\My Documents\Pavtube\blu-ray-ripper\?? and the software shows free space of the disk at the left bottom. If the Free disk space is less than 50GB, click ??Browse?? to set a different output location.
Why choose Pavtube Back up Movies Software:
It??s an all-in-one Blu-ray decrypter, converter and editor that provides multiple considerate Blu-ray backup solutions.
As Blu-ray decrypter, Pavtube Back up Movies Software is updated to support MKB v19, the latest BD copy-protecting method. This means the software decrypts up to the recent released movies like Toy Story 3, White Christmas, New Moon, Eclipse, Inception, etc
As a Blu-ray copy app, Pavtube Back up Movies Software provides you two copy solutions: copy the entire BDMV directory that contains all Blu-ray data, or copy Blu-ray to M2TS streams that are main movie.
As Blu-ray converter, Pavtube Back up Movies Software comes up with HD MP4, MKV, AVI, TS, MPG, MOV, M4V etc as well as preset for most popular devices: iPad, iPhone, PS3, iPod, Xbox, Motorola Droid X, HTC Evo 4G, etc. Now with CUDA support the ripping speed is improved to 3 times faster.
As Blu-ray editor, Pavtube Back up Movies Software allows you select desired subtitles, audio track, surround sound (AC3/AAC 5.1), add watermark, crop out unwanted frames, extract high-def audio, etc.
-------------------------------------------------
Playing DVD movies on Apple TV with AAC/AC3/DTS 5.1 surround sound or Stereo via Pavtube DVD to Apple TV Ripper for MacSolution for WMV playback issues with Popcorn Hour NMT Via Pavtube Video to Popcorn Hour ConverterHot News Introduce 4 Solutions for watching/playing/getting Blu-ray movie on Mac OS X
Sharing Top Blu-ray Ripping- improve Blu-ray converting speed with GPU accelerationBlur-ray Movie DVD to HTC Surround Converter for Mac-playing/putting/watching movies dvds to WP7 smartphonesPlaying/getting/putting/transfer Blu-ray Movie DVD Video to Droid X with Pavtube Droid X ConverterEnjoy/playing/watching Video Movies DVD to Samsung i9000 via Pavtube Samsung i9000 ConverterHot News Playing/Watching MKV/AVI/MP4/M2TS/Tivo Video files to Nokia N8/E7/C7 via Pavtube Video Movie to Nokia Converter for Mac
]]>//soundtracks.tuneforums.com/thread_reply.php?threadID=2404612/09/2010 12:50 AM//soundtracks.tuneforums.com/thread_view.php?threadID=24046
 Step 2: Choose from a variety of Christmas Flash templates
Click on Template tab and choose the Christmas Flash template you like. All these Flash templates in the Christmas Flash photo gallery software are ready-for-use. Just choose one of the templates, do some simple settings, and proceed to publish your Christmas Flash photo gallery.
Step 2: Choose from a variety of Christmas Flash templates
Click on Template tab and choose the Christmas Flash template you like. All these Flash templates in the Christmas Flash photo gallery software are ready-for-use. Just choose one of the templates, do some simple settings, and proceed to publish your Christmas Flash photo gallery.
 Step 3: Add the Christmas songs to the Flash photo gallery on Mac
If you want to add background music to your Christmas flash photo slideshow, just use the "Add music" built-in tool on the left side of the storyboard. You may check the option to control the background music looping or not.
Step 3: Add the Christmas songs to the Flash photo gallery on Mac
If you want to add background music to your Christmas flash photo slideshow, just use the "Add music" built-in tool on the left side of the storyboard. You may check the option to control the background music looping or not.
 Step 4: Preview and publish the Thanksgiving flash photo slideshow on Mac
Preview and if you are satisfied with your work, you can publish your flash photo gallery in swf, html or exe or screensaver formats, or you can mail the flash photo slideshow gallery to your friends directly as a gift.
Step 4: Preview and publish the Thanksgiving flash photo slideshow on Mac
Preview and if you are satisfied with your work, you can publish your flash photo gallery in swf, html or exe or screensaver formats, or you can mail the flash photo slideshow gallery to your friends directly as a gift.
 ]]>
]]> Step 3. Export video.
Click the "Export" button and click the "Export into Device", "Export into Editor", or "Common Formats" to choose the output video format according to your usage. The output formats could be .wmv, .mp4, .mov, .3gp, .mpg, etc.
Step 3. Export video.
Click the "Export" button and click the "Export into Device", "Export into Editor", or "Common Formats" to choose the output video format according to your usage. The output formats could be .wmv, .mp4, .mov, .3gp, .mpg, etc.
 Since video restoration requires re-encoding, the "Lossless Output" option will not work. However, Aunsoft Final Mate, as the easy-to-use camcorder editing software, provides fast conversion speed, and will use NVIDIA video card with CUDA technology, or Intel CPU for acceleration if applicable.
Tips:
Under the Video Restoration window, there is checkbox for deinterlacing. You can deinterlace 1080i camcorder videos for playback on PC or portable devices.]]>
Since video restoration requires re-encoding, the "Lossless Output" option will not work. However, Aunsoft Final Mate, as the easy-to-use camcorder editing software, provides fast conversion speed, and will use NVIDIA video card with CUDA technology, or Intel CPU for acceleration if applicable.
Tips:
Under the Video Restoration window, there is checkbox for deinterlacing. You can deinterlace 1080i camcorder videos for playback on PC or portable devices.]]> Step 3. Choose output format.
Click the Export button and you can choose the preferred format according to your usage for portable device, advanced video editor or other formats like MKV, AVI. Aunsoft Final Mate as the HD camcorder video editor will start adjusting AVCHD audio with the additional song file for movie creation.
Tips:
1. The Loop option or adjusting audio works when the added audio is shorter than the video/movie length, and the music will be play continuously.
2. Aunsoft Final Mate will use the latest operation on the program. For example, if you replace movie audio to play throughout the movie, and then select one video on timeline to choose another file as additional audio, the operation of setting movie audio will be abandoned, and only the video clip you set will be replaced with the new audio.]]>
Step 3. Choose output format.
Click the Export button and you can choose the preferred format according to your usage for portable device, advanced video editor or other formats like MKV, AVI. Aunsoft Final Mate as the HD camcorder video editor will start adjusting AVCHD audio with the additional song file for movie creation.
Tips:
1. The Loop option or adjusting audio works when the added audio is shorter than the video/movie length, and the music will be play continuously.
2. Aunsoft Final Mate will use the latest operation on the program. For example, if you replace movie audio to play throughout the movie, and then select one video on timeline to choose another file as additional audio, the operation of setting movie audio will be abandoned, and only the video clip you set will be replaced with the new audio.]]> System requirement:
- Microsoft Windows XP (SP2 or later), Windows Vista, Windows 7
- 1.6MHz Intel/AMD Dual-core CPU or above. 2.6MHz Intel/AMD Dual-core CPU or above or CUDA-enabled graphics is recommended]]>
System requirement:
- Microsoft Windows XP (SP2 or later), Windows Vista, Windows 7
- 1.6MHz Intel/AMD Dual-core CPU or above. 2.6MHz Intel/AMD Dual-core CPU or above or CUDA-enabled graphics is recommended]]> Or you can click ??setting?? button to customize output settings by setting Video Encoder, Resolution, Frame Rate, Video Bitrate, etc.
 Step 3:Edit your video.
You can use the powerful editing function to edit your video.
Effect: You can use this function to optimize the video effect.
By clicking ??Effect?? button, you can set the video Brightness, Contrast, Saturation and check Deinterlacing which helps you to convert interlaced video to the progressive video.
Step 3:Edit your video.
You can use the powerful editing function to edit your video.
Effect: You can use this function to optimize the video effect.
By clicking ??Effect?? button, you can set the video Brightness, Contrast, Saturation and check Deinterlacing which helps you to convert interlaced video to the progressive video.
 Trim: You can use this function to cut any clip of your video.
Click the ??Trim?? and a dialogue-box pops up. You can drag the slide-bar to the position you want.
You can also set the Start time and the End time to trim your video.
Trim: You can use this function to cut any clip of your video.
Click the ??Trim?? and a dialogue-box pops up. You can drag the slide-bar to the position you want.
You can also set the Start time and the End time to trim your video.
 Crop: You can remove the black edges around your movie video and customize the size of video play region as you wish. Click ??Crop?? to open the Trim window. Select a crop mode in the Crop Mode drop-down list and click OK to save the crop.
 Preferences: By clicking the ??Preference?? button you can select the output destination, the Snapshot foler, the format of the snapshot image. You can also choose to shut down your computer or do nothing after your conversion. You can also select the CPU usage.
 Merge: You can use this function to merge several videos into one.
Snapshot: You can use this function to capture your favorite image.
Step 4: Click the ??Start?? button to start your conversion and in a short while it will be finished.
Some related video editing tools:
Mod Converter:
It can convert Mod and Tod videos (made by some digital camcorder such JVC, Sony and so on) to any popular video formats such as AVI, WMV, RM, RMVB, MP3,etc. Besides professional conversion, they also have functions of Trim, Crop and Merge chapters into one file.
MKV Converter
]]>
Merge: You can use this function to merge several videos into one.
Snapshot: You can use this function to capture your favorite image.
Step 4: Click the ??Start?? button to start your conversion and in a short while it will be finished.
Some related video editing tools:
Mod Converter:
It can convert Mod and Tod videos (made by some digital camcorder such JVC, Sony and so on) to any popular video formats such as AVI, WMV, RM, RMVB, MP3,etc. Besides professional conversion, they also have functions of Trim, Crop and Merge chapters into one file.
MKV Converter
]]> Step 2. Switch to ??File Mode?? to view the M2TS streams.
Click the ??Title Mode?? button to switch to ??File Mode??. When it changes to ??File Mode??, you will find M2TS streams are displayed in sequence. You can preview them too.
Step 2. Switch to ??File Mode?? to view the M2TS streams.
Click the ??Title Mode?? button to switch to ??File Mode??. When it changes to ??File Mode??, you will find M2TS streams are displayed in sequence. You can preview them too.
 Step 3. Set export method for copying M2TS from Blu-ray Disc.
Click the ??Format?? bar, select ??Copy>>Directly Copy??.
Step 3. Set export method for copying M2TS from Blu-ray Disc.
Click the ??Format?? bar, select ??Copy>>Directly Copy??.
 Step 4. Start ripping Blu-ray to M2TS without quality loss.
Click ??Convert?? button to start copying M2TS streams from Blu-ray Disc. It usually takes 40min to an hour for ripping Blu-ray Disc to M2TS files.
Tip: make sure there??s enough space to save M2TS clips before you start ripping Blu-ray to M2TS. By default the output location is ??C\Documents and Settings\user\My Documents\Pavtube\blu-ray-ripper\?? and the software shows free space of the disk at the left bottom. If the Free disk space is less than 50GB, click ??Browse?? to set a different output location.
Why choose Pavtube Back up Movies Software:
It??s an all-in-one Blu-ray decrypter, converter and editor that provides multiple considerate Blu-ray backup solutions.
As Blu-ray decrypter, Pavtube Back up Movies Software is updated to support MKB v19, the latest BD copy-protecting method. This means the software decrypts up to the recent released movies like Toy Story 3, White Christmas, New Moon, Eclipse, Inception, etc
As a Blu-ray copy app, Pavtube Back up Movies Software provides you two copy solutions: copy the entire BDMV directory that contains all Blu-ray data, or copy Blu-ray to M2TS streams that are main movie.
As Blu-ray converter, Pavtube Back up Movies Software comes up with HD MP4, MKV, AVI, TS, MPG, MOV, M4V etc as well as preset for most popular devices: iPad, iPhone, PS3, iPod, Xbox, Motorola Droid X, HTC Evo 4G, etc. Now with CUDA support the ripping speed is improved to 3 times faster.
As Blu-ray editor, Pavtube Back up Movies Software allows you select desired subtitles, audio track, surround sound (AC3/AAC 5.1), add watermark, crop out unwanted frames, extract high-def audio, etc.
-------------------------------------------------
Playing DVD movies on Apple TV with AAC/AC3/DTS 5.1 surround sound or Stereo via Pavtube DVD to Apple TV Ripper for Mac
Solution for WMV playback issues with Popcorn Hour NMT Via Pavtube Video to Popcorn Hour Converter
Hot News Introduce 4 Solutions for watching/playing/getting Blu-ray movie on Mac OS X
Sharing Top Blu-ray Ripping- improve Blu-ray converting speed with GPU acceleration
Blur-ray Movie DVD to HTC Surround Converter for Mac-playing/putting/watching movies dvds to WP7 smartphones
Playing/getting/putting/transfer Blu-ray Movie DVD Video to Droid X with Pavtube Droid X Converter
Enjoy/playing/watching Video Movies DVD to Samsung i9000 via Pavtube Samsung i9000 Converter
Hot News Playing/Watching MKV/AVI/MP4/M2TS/Tivo Video files to Nokia N8/E7/C7 via Pavtube Video Movie to Nokia Converter for Mac
]]>
Step 4. Start ripping Blu-ray to M2TS without quality loss.
Click ??Convert?? button to start copying M2TS streams from Blu-ray Disc. It usually takes 40min to an hour for ripping Blu-ray Disc to M2TS files.
Tip: make sure there??s enough space to save M2TS clips before you start ripping Blu-ray to M2TS. By default the output location is ??C\Documents and Settings\user\My Documents\Pavtube\blu-ray-ripper\?? and the software shows free space of the disk at the left bottom. If the Free disk space is less than 50GB, click ??Browse?? to set a different output location.
Why choose Pavtube Back up Movies Software:
It??s an all-in-one Blu-ray decrypter, converter and editor that provides multiple considerate Blu-ray backup solutions.
As Blu-ray decrypter, Pavtube Back up Movies Software is updated to support MKB v19, the latest BD copy-protecting method. This means the software decrypts up to the recent released movies like Toy Story 3, White Christmas, New Moon, Eclipse, Inception, etc
As a Blu-ray copy app, Pavtube Back up Movies Software provides you two copy solutions: copy the entire BDMV directory that contains all Blu-ray data, or copy Blu-ray to M2TS streams that are main movie.
As Blu-ray converter, Pavtube Back up Movies Software comes up with HD MP4, MKV, AVI, TS, MPG, MOV, M4V etc as well as preset for most popular devices: iPad, iPhone, PS3, iPod, Xbox, Motorola Droid X, HTC Evo 4G, etc. Now with CUDA support the ripping speed is improved to 3 times faster.
As Blu-ray editor, Pavtube Back up Movies Software allows you select desired subtitles, audio track, surround sound (AC3/AAC 5.1), add watermark, crop out unwanted frames, extract high-def audio, etc.
-------------------------------------------------
Playing DVD movies on Apple TV with AAC/AC3/DTS 5.1 surround sound or Stereo via Pavtube DVD to Apple TV Ripper for Mac
Solution for WMV playback issues with Popcorn Hour NMT Via Pavtube Video to Popcorn Hour Converter
Hot News Introduce 4 Solutions for watching/playing/getting Blu-ray movie on Mac OS X
Sharing Top Blu-ray Ripping- improve Blu-ray converting speed with GPU acceleration
Blur-ray Movie DVD to HTC Surround Converter for Mac-playing/putting/watching movies dvds to WP7 smartphones
Playing/getting/putting/transfer Blu-ray Movie DVD Video to Droid X with Pavtube Droid X Converter
Enjoy/playing/watching Video Movies DVD to Samsung i9000 via Pavtube Samsung i9000 Converter
Hot News Playing/Watching MKV/AVI/MP4/M2TS/Tivo Video files to Nokia N8/E7/C7 via Pavtube Video Movie to Nokia Converter for Mac
]]>