Deploys
Whenever we deployed our code using capistrano (more great software!), it would restart Passenger on every webserver to ensure our code changes were picked up. In Passenger’s design, the first request to come in after starting actually spawns and ‘runs’ the rails app. Subsequent requests are very fast if using the smart or smart-lv2 spawn methods, but when it needed to be restarted, every request sent to the machine was backed up and waiting until the master Passenger process could fork workers to deal with them. Since our rails app is fairly large, it takes about 15-20 seconds for the app to fully load, and because of how Passenger does restarts we needed to wait for it before restarting Passenger on the next machine. This made our deploys really slow (and developers grumpy) since we needed to do rolling restarts with a large wait time between machines to account for the slow startup time, and to minimize impact to our users.
To keep the response times under control, we needed to wait 15 seconds on each machine for passenger to restart, before going on to the next webserver. With our 6 web machines, that took a minimum of 1.5 minutes just to restart the web processes, that time didn’t include all the other things that needed to happen while deploying (code checkout, asset packaging, etc). It took at least 5 minutes in total to deploy new code… Who’s keeping our deploy times under control? Passenger wasn’t. In came Unicorn to the rescue!
Passenger and Unicorn are very similar in that they both start a master process, and use fork(2) to spawn worker processes, drastically reducing time to spawn workers to handle requests. The difference between Unicorn and Passenger is that Unicorn is much simpler in design and uses a pre-fork model, it starts one instance of the rails app, and forks worker processes before accepting requests. This enables Unicorn to restart in the background while still accepting and responding to requests, the same way nginx works, allowing for zero-downtime deploys. Unicorn took us from 5 minute deploys, down to 1 minute. I’ll tell you how.
Unicorn uses accept(2) on a shared socket, which is the unix way of sharing a central queue. Now when we deploy, all we need to do is issue the master process a USR2 signal. A little ruby in before_fork, automates the killing of the old process:
1 2 3 4 5 6 7 8 9 10 | |
What happens:
- When code is changed, a USR2 signal is issued to the current running master Unicorn process.
- The running master Unicorn process with old code, tries to start the Unicorn binary again from scratch.
- If the re-execution of the master process is successful,
before_forktakes over and kills old master process. - If re-execution fails, the new master process won’t spawn, and will also not kill the old one running known good code.
- All connections are still actively served by old workers, until new ones spawn, and take over by issuing
accept(2)on the shared unix socket.
CPU Usage
The biggest difference was in CPU usage. With Passenger I used passenger_max_pool_size 10 and passenger_spawn_method smart-lv2, and I used worker_processes 10 for Unicorn. When I increased the load to both Unicorn and Passenger to 10 concurrent requests, Unicorn became the clear winner. Data colllected from Ganglia showed our CPU usage drop with Unicorn. With Passenger, we were barely able to handle our current load without adding more machines to the cluster, when we tried Unicorn we noticed as much as a 10% decrease in CPU usage.
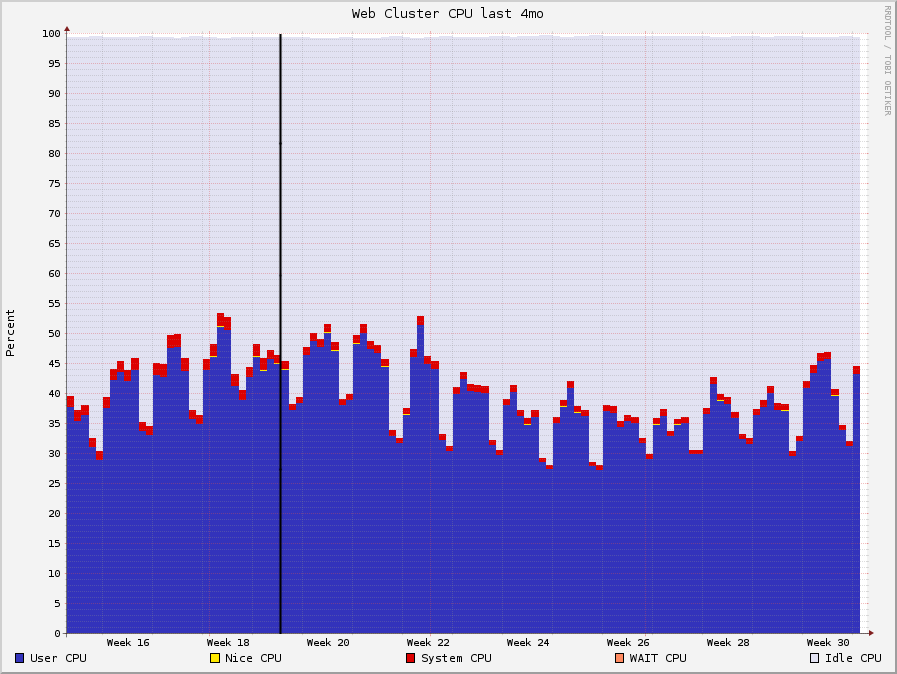
The CPU usage was curbed (peaks aren’t as thick), allowing us to gain a little bit of CPU headroom in following weeks before having to add more hardware.
Memory Usage
After running Unicorn and Passenger side by side in production, we found that Passenger utilized marginally less memory than Unicorn did, likely because of the dynamic spawning/killing that takes place, also somewhat explained the increased CPU usage with Passenger.
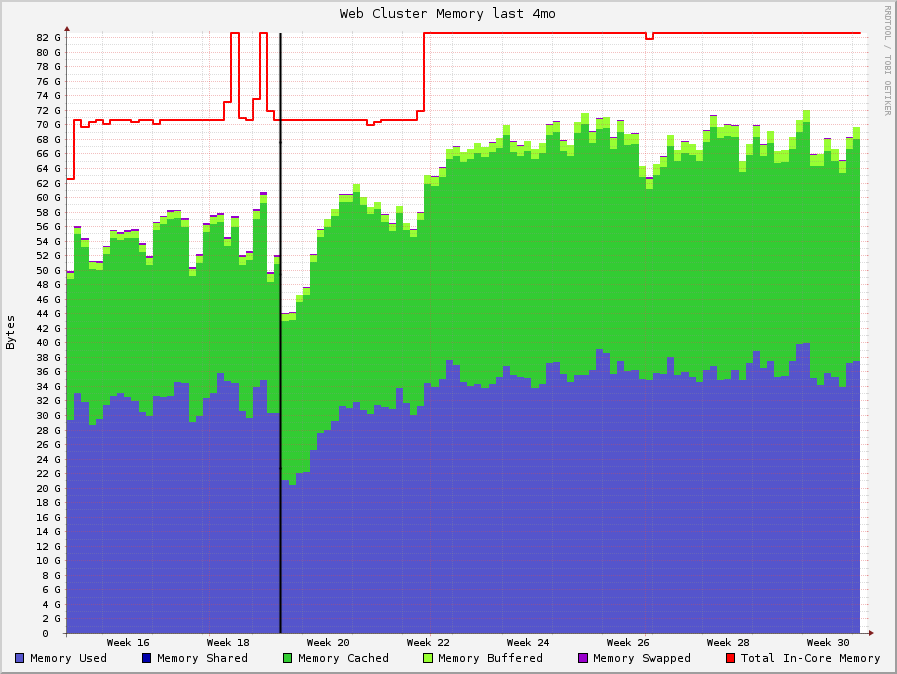
The graphs are drawn with rrdtool, and are therefore averaged out to make the graph smoother. The black line represents when we rolled out Unicorn across our entire web cluster. You can see on that the memory usage stayed about the same, but slightly beter on the Passenger side.
Response Times
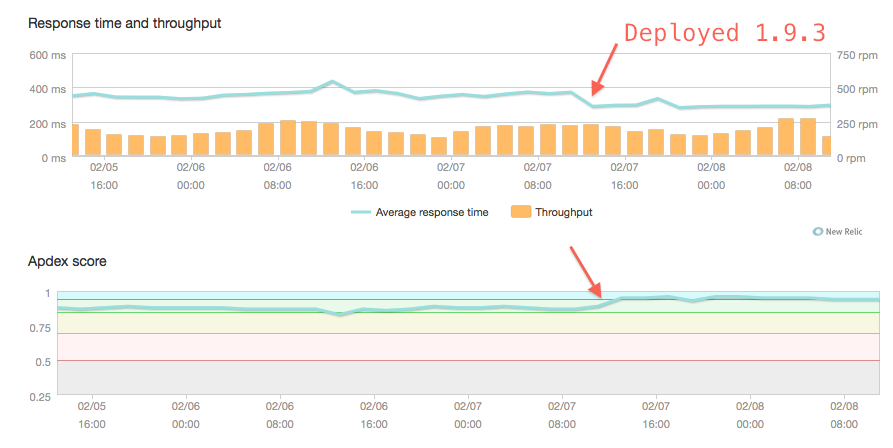
Unicorn had an added bonus of slightly quicker response times, especially as # of concurrent requests increased
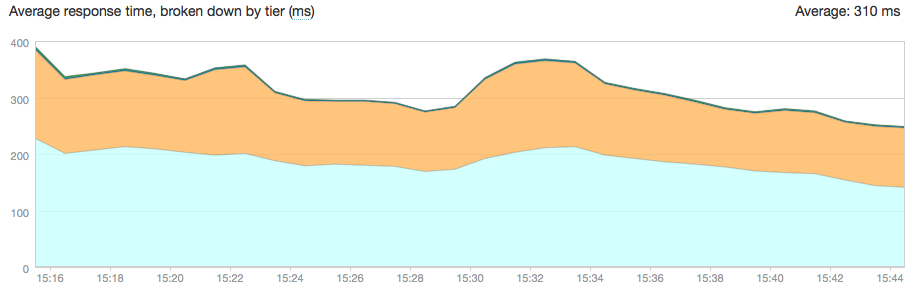
Response time going down during the Unicorn rollout.
We also noticed that during periods of high concurrent requests, Unicorn would be more reponsive than Passenger.
Conclusion
It took us 5 minute or more to change code on in our application… not exactly what you want when you’re trying to stay agile. We chose Unicorn because it performed more consistently across load levels, and allowed us to drastically cut down the time it takes us to deploy code across our growing infrastructure. Passenger is a wonderful ruby webserver, and because of it we were able to spend more engineering time on our application, rather than tweaking and fiddling with our webserver.
]]>